06-18, tccc handbook - reliable security information · tccc presents a system to manage combat...
TRANSCRIPT

FOR OFFICIAL USE ONLY
May 06No. 06-18
Tactics, Techniques, and Procedures
Center for Army Lessons Learned (CALL)Fort Leavenworth, KS 66027-1350
HANDBOOKHANDBOOK

Foreword
The original guidelines for Tactical Combat Casualty Care (TCCC) were published
in 1996. The Committee on Tactical Combat Casualty Care (CoTCCC) has updated
these guidelines several times and the most recent revisions will be published later
this year. The application of TCCC principles during combat has proven highly
effective and is a major reason combat deaths in Operation Iraqi Freedom (OIF) and
Operation Enduring Freedom (OEF) are lower than in any other conflict in the
history of the United States. It is imperative, then, that all military medical
personnel become familiar with the concepts and practices of TCCC.
This handbook is a one-stop, hip-pocket reference for all medical personnel, from
the combat medic to the provider, on the tactics, techniques, and procedures (TTP)
of TCCC. While this handbook’s contents are derived from the recommendations of
the CoTCCC and lessons learned in OIF/OEF, it should not be seen as a substitute
for the professional training and judgment of medical personnel. Rather, this
handbook is meant to serve as a quick reminder of the TTP of TCCC for medical
Soldiers in the field.
The primary mission of all military medical personnel in the field is to treat the
combat wounded and save lives. This task can be incredibly difficult due to the
complex medical needs of wounded Soldiers and the tactical situations in which
these injuries occur. The purpose of this handbook is to support medical Soldiers as
they strive to meet their most noble goal: to save lives and “conserve the fighting
strength.”
Steven MainsColonel, ArmorCenter for Army Lessons Learned

Tactical Combat Casualty Care Handbook
Table of Contents
Foreword
Chapter 1: Tactical Combat Casualty Care 1
Chapter 2: Tactical Combat Casualty Care Procedures 25
Appendix A: Triage Categories 51
Appendix B: Evacuation Categories 53
Appendix C: 9-Line Medical Evacuation 55
Appendix D: Combat Pill Pack 57
Appendix E: Improved First Aid Kit 59
Appendix F: Warrior Aid and Litter Combat Casualty Kit 61
Appendix G: Aid Bag Considerations 63
Appendix H: National Stock Numbers 65
Appendix I: References/Resources 67
Center for Army Lessons Learned
Director Colonel Steven Mains
Managing Editor Dr. Lon Seglie
CALL Analyst Major Andrew Doyle
Contributing AuthorDonald L. Parsons, PA-C,MPAS
Editor John Pennington
Graphic Artist Mark Osterholm
For Official Use Only i
TACTICAL COMBAT CASUALTY CARE HANDBOOK

The Secretary of the Army has determined that the publication of this periodical is
necessary in the transaction of the public business as required by law of the
Department. Use of funds for printing this publication has been approved by
Commander, U.S. Army Training and Doctrine Command, 1985, IAW AR 25-30.
Unless otherwise stated, whenever the masculine or feminine gender is used, both
are intended.
Note: Any publications referenced in this newsletter (other than the CALL
newsletters), such as ARs, FMs, and TMs, must be obtained through your pinpoint
distribution system.
This information was deemed of immediate value to forces engaged inthe Global War on Terrorism and should not be necessarily construedas approved Army policy or doctrine.
This information is furnished with the understanding that it is to beused for defense purposes only, that it is to be afforded essentially thesame degree of security protection as such information is afforded bythe United States, and that it is not to be revealed to another country orinternational organization without the written consent of the Center forArmy Lessons Learned.
ii For Official Use Only
CENTER FOR ARMY LESSONS LEARNED
Chapter 1
Tactical Combat Casualty Care
Section I: Introduction
Tactical Combat Casualty Care (TCCC) is the prehospital care rendered to a
casualty in a tactical, combat environment. The principles of TCCC are
fundamentally different from those of traditional civilian trauma care, where most
medical providers and medics train. These differences are based on both the unique
patterns and types of wounds that are suffered in combat and the tactical conditions
medical personnel face in combat. Unique combat wounds and tactical conditions
make it difficult to determine which intervention to perform at what time. Besides
addressing a casualty’s medical condition, responding medical personnel must also
address the tactical problems faced while providing casualty care in combat. A
medically correct intervention at the wrong time may lead to further casualties. Put
another way, “good medicine may be bad tactics,” which can get the rescuer and
casualty killed. To successfully navigate these issues, medical providers must have
skills and training oriented to combat trauma care, as opposed to civilian trauma
care. Unfortunately, many military medical providers and medics lack this
experience.
Casualties and wounds
On the battlefield, the prehospital period is the most important time to care for any
combat casualty. Up to 90 percent of combat deaths occur before a casualty reaches
a medical treatment facility. This highlights the primary importance of treating
battlefield casualties at the point of injury, prior to casualty evacuation
(CASEVAC) and arrival at a treatment facility.
Specifically, combat deaths result from:
• 31 percent: Penetrating head trauma.
• 25 percent: Surgically uncorrectable torso trauma.
• 10 percent: Potentially correctable surgical trauma.
• 9 percent: Exsanguination.
• 7 percent: Mutilating blast trauma.
• 5 percent: Tension pneumothorax (PTX).
• 1 percent: Airway obstruction/injury.
• 12 percent: Died of wounds (mainly infection and shock).
For Official Use Only 1
TACTICAL COMBAT CASUALTY CARE HANDBOOK

A significant percentage of these deaths (highlighted above in bold type) are
potentially avoidable with proper, timely intervention. Of these avoidable deaths,
the vast majority are due to exsanguination and airway or breathing difficulties,
conditions that can and should be addressed at the point of injury. It has been
estimated that of all preventable deaths, 90 percent of them can be avoided with the
simple application of a tourniquet for extremity hemorrhage, the rapid treatment of
a PTX, and the establishment of a stable airway.
On the battlefield, casualties will fall into three general categories:
• Casualties who will die, regardless of receiving any medical aid.
• Casualties who will live, regardless of receiving any medical aid.
• Casualties who will die if they do not receive timely and appropriatemedical aid.
TCCC addresses the third category of casualties, those who require the most
attention of the medical provider during combat.
TCCC versus advanced trauma life support (ATLS)
Trauma care training for military medical personnel traditionally has been based on
the principles of the civilian Emergency Medical Technicians Basic Course and
basic and advanced trauma life support. These principles, especially ATLS, provide
a standardized and very successful approach to the management of civilian trauma
patients in a hospital setting. However, some of these principles may not apply in
the civilian prehospital setting, let alone in a tactical, combat environment.
The prehospital phase of casualty care is the most critical phase of care for combat
casualties, accounting for up to 90 percent of combat deaths. Furthermore, combat
casualties can suffer from potentially devastating injuries not usually seen in the
civilian setting. Most casualties during combat are the result of penetrating injuries,
rather than the blunt trauma seen in the civilian setting. Combat casualties may also
suffer massive, complex trauma, such as traumatic limb amputation. In addition to
the medical differences between civilian and combat trauma, several other factors
affect casualty care in combat, including the following:
• Hostile fire may be present, preventing the treatment of the casualty.
• Medical equipment is limited to that carried by mission personnel.
• Tactical considerations may dictate that mission completion takeprecedence over casualty care.
• Time until CASEVAC is highly variable (from minutes to hours or days).
• CASEVAC may not be possible, based on the tactical situation.
2 For Official Use Only
CENTER FOR ARMY LESSONS LEARNED

TCCC goals
TCCC presents a system to manage combat casualties that considers the issues
discussed above. An important guiding principle of TCCC is performing the correct
intervention at the correct time in the continuum of field care. To this end, TCCC is
structured to meet three important goals:
• Treat the casualty.
• Prevent additional casualties.
• Complete the mission.
Stages of care
In thinking about the management of combat casualties, it is helpful to divide care
into three distinct phases, each with its own characteristics and limitations:
• Care under fire is the care rendered at the point of injury while both themedic and the casualty are under effective hostile fire. The risk ofadditional injuries from hostile fire at any moment is extremely high forboth the casualty and medic. Available medical equipment is limited tothat carried by the medic and the casualty.
• Tactical field care is the care rendered by the medic once he and thecasualty are no longer under effective hostile fire. It also applies tosituations in which an injury has occurred on a mission, but there hasbeen no hostile fire. Available medical equipment is still limited to thatcarried into the field by mission personnel. Time to evacuation may varyfrom minutes to hours.
• Combat CASEVAC care is the care rendered once the casualty has beenpicked up by an aircraft, vehicle, or boat. Additional medical personneland equipment that has been prestaged in these assets should be availableduring this phase of casualty management.
The following chapters and sections of this handbook will present a discussion of
each stage of TCCC, as well as instructions for the procedures TCCC requires.
For Official Use Only 3
TACTICAL COMBAT CASUALTY CARE HANDBOOK

Section II: Care under fire
Care under fire is the care rendered by the rescuer at the point of injury while he
and the casualty are still under effective hostile fire. The risk of additional injuries
at any moment is extremely high for both the casualty and the rescuer. The major
considerations during this phase of care are:
• Suppression of hostile fire.
• Moving the casualty to a safe position.
• Treatment of immediate life-threatening hemorrhage.
Casualty care during the care under fire phase is complicated by several tactical
factors. First, the medical equipment available for care is limited to that which is
carried by the individual Soldiers and the rescuers. Second, the unit’s personnel
will be engaged with hostile forces, and, especially in small-unit engagements, will
not be available to assist with casualty treatment and evacuation. Third, the tactical
situation prevents the medic or medical provider from performing a detailed
examination or definitive treatment of casualties. Furthermore, these situations
often occur during night operations, resulting in severe visual limitations while
treating the casualty.
Defensive actions
The best medicine on the battlefield is fire superiority. The rapid success of the
combat mission is the immediate priority and the best way to prevent the risk of
injury to other personnel or additional injuries to casualties. Medical personnel
carry small arms to defend themselves and casualties in the field. The additional
firepower from the medical personnel may be essential to obtaining fire superiority.
Initially, medical personnel may need to assist in returning fire before stopping to
care for the casualty. Additionally, casualties who have sustained
non-life-threatening injuries and are still able to participate in the fight must
continue to return fire as they are able.
As soon as the rescuer is directed or able, his first major objective is to keep the
casualty from sustaining additional injuries. Wounded Soldiers who are unable to
participate further in the engagement should lay flat and still if no ground cover is
available, or move as quickly as possible if nearby cover is available. If there is no
cover and the casualty is unable to move himself to find cover, he should remain
motionless on the ground so as not to draw additional fire. The medic may be able
to direct the injured Soldier to provide self-aid.
Airway management
Do not perform any immediate management of the airway during the care under fire
phase. Airway injuries typically play a minimal role in combat casualties,
4 For Official Use Only
CENTER FOR ARMY LESSONS LEARNED

comprising only 1 to 5 percent of casualties and are primarily from maxillofacial
injuries. The primary concern is to move the casualty to cover as quickly as
possible. The time, equipment, and positioning required to manage an impaired
airway expose the casualty and rescuer to increased risk. Rescuers should defer
airway management until the tactical field care phase, when the casualty and
rescuer are safe from hostile fire.
Hemorrhage control
The number one cause of preventable battlefield deaths is exsanguination from
extremity wounds. Therefore, the primary medical interventions during the care
under fire phase are directed toward stopping any life-threatening bleeding as
quickly as possible. Injuries to an artery or other major vessel can rapidly result in
hemorrhagic shock and exsanguination. A casualty may exsanguinate before
medical help arrives, so definitive control of life-threatening hemorrhage on the
battlefield cannot be overemphasized. In Vietnam, exsanguination from an
extremity wound was the cause of death in more than 2,500 casualties who had
sustained no other injury.
Extremity wounds: The rapid, temporary use of a tourniquet is therecommended management for all life-threatening extremity hemorrhage.Standard field dressings and direct pressure may not work reliably to controlextremity hemorrhage exsanguination. While traditional ATLS trainingdiscourages the use of tourniquets, they are appropriate in the tacticalcombat setting. The benefits of tourniquet use over other methods ofhemorrhage control include:
º Direct pressure and compression are difficult to perform andmaintain in combat settings and result in delays in getting therescuer and casualty to cover.
º Tourniquets can be applied by the casualty to himself, thuslimiting the rescuer exposure to hostile fire.
º There are few complications from tourniquet use. Ischemicdamage is rare if the tourniquet is in place for less than two hours.
During the care under fire phase, the casualty and rescuer remain in gravedanger from hostile fire while the tourniquet is being applied. Ignorenon-life-threatening hemorrhage until the tactical field care phase. Therescuer must make the decision regarding the relative risk of further injuryfrom applying the tourniquet versus the possibility of exsanguination.
Non-extremity wounds: As with extremity wounds, address onlylife-threatening, non-extremity hemorrhage during the care under fire phase.If the wound site is accessible, bleeding should be controlled with directpressure and/or a hemostatic device. One currently recommendedhemostatic device is the HemCon dressing, a proprietary bandageimpregnated with the hemostatic agent poly-N-acetyl glucosamine.
For Official Use Only 5
TACTICAL COMBAT CASUALTY CARE HANDBOOK

Another hemostatic device available is QuikClot, a proprietary hemostaticpowder by Z-Medica. QuikClot can be effective in controlling bleeding, butshould only be used for external bleeding, not in internal cavities(abdominal, thoracic, or cranial). Complications of its use include anexothermic reaction that can cause pain and collateral tissue damage. Inaddition, the powder format of this product can be very difficult toadminister properly on the battlefield, especially at night. Therefore,because of its safety and ease of use, the Committee on TCCC recommendsusing a hemostatic dressing, such as HemCon, as the first option for thecontrol of hemorrhage from sites not amenable to the use of a tourniquet.QuikClot may be considered after a hemostatic dressing is used.
Casualty transportation
Transportation of the casualty is often the most problematic aspect of TCCC. In thecare under fire phase, transportation is complicated by the limited equipment andpersonnel available and the risk of further injury due to hostile fire. Removing thecasualty from the field of fire as quickly as possible is the transportation priorityduring this phase of care. Do not attempt to save a casualty’s rucksack unless itcontains items that are critical to the mission. However, if at all possible, take thecasualty's weapons and ammunition. The enemy may use them against you.
Cervical spine immobilization: Although the civilian standard of care is toimmobilize the cervical spinal column prior to moving a patient withinjuries that might have resulted in damage to the spine, this practice isgenerally not appropriate in the combat setting. In Vietnam, studiesexamining the value of cervical spinal immobilization in penetrating neckinjuries found that only 1.4 percent of casualties with penetrating neckinjuries would have possibly benefited from immobilization of the cervicalspine. The time required to accomplish cervical spine immobilization wasfound to be 5.5 minutes, even when using experienced rescuers. In addition,the equipment needed for this procedure (long spine board) is generally notavailable at point of wounding. Therefore, the potential hazards of hostilefire to both the casualty and rescuer outweigh the potential benefit ofcervical spine immobilization.
However, for casualties with significant blunt trauma, cervical spineimmobilization is appropriate during the care under fire phase. Parachutinginjuries, fast-roping injuries, falls greater than 15 feet, and other types oftrauma resulting in neck pain or unconsciousness should be treated with spinalimmobilization, unless the danger of hostile fire constitutes a greater risk inthe judgment of the medic.
Transportation methods: Standard litters for patient evacuation may notbe available for movement of casualties in the care under fire phase.Consider using alternate methods of evacuation, such as Sked or Talon IIlitters, or dragging the casualty out of the field of fire by his web gear,poncho, or even a length of rope with a snap link. Additionally, consider theuse of obscurants, such as smoke or CS (irritating agent), to assist incasualty recovery. Vehicles can also be used as a screen during recoveryattempts. In Iraq, there have been several instances of tanks being used asscreens to facilitate CASEVAC.
6 For Official Use Only
CENTER FOR ARMY LESSONS LEARNED

Section III: Tactical field care
Tactical field care is the care rendered to the casualty once the casualty and rescuer
are no longer under effective hostile fire. This term also applies to situations in
which an injury has occurred on a mission, but there has been no hostile fire. This
phase of care is characterized by the following:
• The risk from hostile fire has been reduced, but still exists.
• The medical equipment available is still limited by what has been broughtinto the field by mission personnel.
• The time available for treatment is highly variable. Time prior toevacuation, or reengagement with hostile forces, can range from a fewminutes to many hours.
Medical care during this phase of care is directed toward more in-depth evaluation
and treatment of the casualty, focusing on those conditions not addressed during the
care under fire phase of treatment. While the casualty and rescuer are now in a
somewhat less hazardous situation, this is still not the setting for a true ATLS
evaluation and treatment. Evaluation and treatment is still dictated by the tactical
situation.
In some cases, tactical field care will consist of rapid treatment of wounds with the
expectation of a reengagement with hostile forces at any moment. The need to
avoid undertaking nonessential evaluation and treatment is critical in such cases.
Conversely, care may be rendered once the mission has reached an anticipated
evacuation point without pursuit and is awaiting CASEVAC. In these
circumstances, there may be ample time to render whatever care is feasible in the
field. However, as time to evacuation may vary greatly, medical providers and
medics must take care to partition supplies and equipment in the event of prolonged
evacuation wait times.
Cardiopulmonary resuscitation (CPR)
In casualties of blast or penetrating injury found to be without pulse, respiration, or
other signs of life, CPR on the battlefield will generally not be successful and
should not be attempted. Attempts to resuscitate trauma patients in arrest have been
found to be futile even in urban settings, where victims are in close proximity to
trauma centers. On the battlefield, the cost of performing CPR on casualties with
what are inevitably fatal injuries will result in additional lives lost as care is
withheld from casualties with less severe injuries. Also, these attempts expose
rescuers to additional hazards from hostile fire. Prior to the combat CASEVAC
phase, rescuers should consider CPR only in the cases of nontraumatic disorders
such as hypothermia, near drowning, or electrocution.
For Official Use Only 7
TACTICAL COMBAT CASUALTY CARE HANDBOOK

Altered mental status
Immediately disarm any casualty with an altered mental status, including secondary
weapons and explosive devices. An armed combatant with an altered mental status
is a significant risk to himself and those in his unit. The four main reasons for an
altered mental status are traumatic brain injury (TBI), pain, shock, and analgesic
medication (for example, morphine).
Airway management
In the tactical field care phase, direct initial management to the evaluation and
treatment of the casualty’s airway. Intervention should proceed from the least
invasive procedure to the most invasive. Do not attempt any airway intervention if
the casualty is conscious and breathing well on his own. Allow the casualty to
assume the most comfortable position that best protects his airway, to include
sitting upright.
Unconscious casualty without airway obstruction: If the casualty isunconscious, the most likely cause is either hemorrhagic shock or headtrauma. In either case, an adequate airway must be maintained. If theunconscious casualty does not exhibit signs of airway obstruction, theairway should first be opened with a chin-lift or jaw-thrust maneuver. As inthe care under fire phase, cervical spine immobilization is generally notrequired, except in the instance of significant blunt trauma.
If spontaneous respirations are present without respiratory distress, anadequate airway in the unconscious casualty is best maintained with anasopharyngeal airway (NPA). An NPA is preferred over an oropharyngealairway because it is better tolerated if the casualty regains consciousnessand is less likely to be dislodged during casualty transport. After insertingthe NPA, place the casualty in the recovery position (see Figure 1-1) tomaintain the open airway and prevent aspiration of blood, mucous, orvomitus.
8 For Official Use Only
CENTER FOR ARMY LESSONS LEARNED
Figure 1-1. Recovery position

Current or impending airway obstruction: For casualties with a currentor impending airway obstruction, the initial intervention is again to open theairway with either a chin-lift or jaw-thrust maneuver. This maneuver isfollowed by the insertion of an NPA. However, if an airway obstructiondevelops or persists despite the use of an NPA, a more definitive airway isrequired. In some casualties a more definitive airway may consist of asupraglottic device, such as a Combitube or King LT. These devices areeasily inserted and able to maintain an open airway better than a simpleNPA. However, often a surgical cricothyroidotomy may be indicated.
º Cricothyroidotomy: Significant airway obstruction in the combatsetting is likely the result of penetrating wounds of the face orneck, where blood or disrupted anatomy precludes goodvisualization of the vocal cords. This setting makes endotrachealintubation highly difficult, if not impossible. In these cases,surgical cricothyroidotomy is preferable over endotrachealintubation. This procedure has been reported safe and effective intrauma victims, and in the hands of a rescuer who does notintubate on a regular basis, it should be the next step when otherairway devices are not effective. Furthermore, cricothyroidotomycan be performed under local anesthesia with lidocaine in acasualty who is awake.
º Intubation: Endotracheal intubation is the preferred airwaytechnique in civilian trauma settings, but this procedure may beprohibitively difficult in the tactical environment. Many medicshave never intubated a live person; their experience is only withmannequins in a controlled environment and is infrequent at best.Standard endotracheal intubation technique requires the use oftactically compromising white light. Also, esophageal intubationsare more likely with the inexperienced intubator and much moredifficult to detect in the tactical environment. Finally, most airwayobstructions on the battlefield are the result of penetrating woundsof the head and neck, where cricothyroidotomy is the procedure ofchoice.
Breathing
The next aspect of casualty care in the tactical field care phase is the treatment of
any breathing problems, specifically the development of either an open PTX or a
tension PTX.
Penetrating chest wounds: Traumatic defects in the casualty’s chest wallmay result in an open PTX. All open chest wounds should be treated assuch. Cover the wound during expiration with an occlusive dressing, such aspetroleum gauze and a battle dressing or tape. The dressing may bethree-sided, but this is not necessary if the rescuer has the ability to performneedle chest decompression. The casualty should then be placed in a sittingposition and monitored for the development of a tension PTX, which shouldbe treated as described below.
Tension PTX: Assume any progressive, severe respiratory distress on thebattlefield resulting from unilateral penetrating chest trauma represents a
For Official Use Only 9
TACTICAL COMBAT CASUALTY CARE HANDBOOK

tension PTX. Do not rely on such typical signs as breath sounds, trachealshift, and hyperresonance on percussion for diagnosis in this setting,because these signs may not always be present. Even if these signs arepresent, they may be difficult to detect on the battlefield.
Treat tension PTXs in the tactical field care phase via decompression with a14-gauge needle catheter. A casualty with penetrating chest trauma willgenerally have some degree of hemothorax or PTX as a result of his primarywound. The additional trauma caused by a needle thoracostomy will notworsen his condition should he not have a tension PTX. Decompress thecasualty with a needle and catheter so that the catheter, with the needleremoved, can be taped in place to prevent recurrence of the tension PTX.The medic must monitor this casualty after the procedure to ensure thecatheter has not clotted or dislodged and that respiratory symptoms have notreturned. If respiratory symptomes have returned or the catheter is clotted ordislodged, flush the catheter or perform a second needle thoracostomyadjacent to the first. Chest tubes are not recommended during this phase ofcare as they are not needed for initial treatment of a tension PTX, are moretechnically difficult, time-consuming to perform, and more likely to result inadditional tissue damage and subsequent infection.
Hemorrhage control
In the tactical field care phase, hemorrhage control includes addressing any
significant bleeding sites not previously controlled and possibly removing any
earlier-placed tourniquets. When evaluating the casualty for bleeding sites, only
remove the absolute minimum of clothing needed to expose and treat injuries. Stop
significant extremity bleeding as quickly as possible, using a tourniquet without
hesitation if necessary. Otherwise, direct pressure, pressure dressings, or hemostatic
dressings (HemCon, QuikClot) should be used to control bleeding.
Tourniquets should remain in place until the casualty has been transported to the
evacuation point. Once the patient has been transported to the site where
CASEVAC is anticipated, reassess any tourniquets previously applied. If possible,
loosen the tourniquet and control bleeding with direct pressure or hemostatic
dressings. However, complete any required fluid resuscitation prior to tourniquet
discontinuation. It is not necessary to remove the tourniquet, only to loosen it. This
allows the tourniquet to be re-applied if the hemorrhage cannot be controlled by
other methods.
Vascular access
Obtain intravenous (IV) access at this point during the tactical field care phase.
While ATLS training teaches starting two large-bore (14- or 16-gauge) IV
catheters, the use of a single 18-gauge catheter is preferred in the tactical setting.
The 18-gauge catheter is adequate for rapid delivery of resuscitation fluids and
medication, is easier to insert, and conserves the supplies in a medic aid bag.
Medics should not start an IV on an extremity that may have a significant wound
proximal to the IV insertion site. Although larger catheters are necessary for the
10 For Official Use Only
CENTER FOR ARMY LESSONS LEARNED

delivery of blood products, these products will not routinely be administered until
the casualty has reached a treatment facility, at which point new IV access will be
obtained.
If the casualty requires fluid resuscitation and IV access cannot be obtained, sternal
intraosseous (IO) access is recommended. One possible IO fluid delivery system is
the First Access for Shock and Trauma (FAST1) System. Cutdowns are not
recommended in the tactical setting as they are time-consuming, technically
difficult, and require instruments that in all likelihood will not be available. Medics
will most likely not be trained, equipped, or authorized to perform cutdowns.
Fluid resuscitation
Fluid resuscitation during the tactical field care phase is significantly different than
in the civilian prehospital setting. During this phase of care, fluid resuscitation is
guided by several assumptions:
• The tactical situation may not allow time for thorough fluid resuscitation.Care may only consist of immediate CASEVAC while in extremis.
• Lack of hemorrhage control is the leading cause of preventable death onthe battlefield. Therefore, hemorrhage control is paramount and takespriority over fluid resuscitation, especially in a situation with limited timeand resources.
• Stethoscopes, blood pressure cuffs, and other equipment used in thehospital setting to monitor fluid status and shock are rarely available oruseful in a noisy and chaotic battlefield setting. In the tactical setting,assessing a casualty's mental status and peripheral pulses is adequate fordetermining the need for fluid resuscitation.
• The fluids available for casualty resuscitation are limited to those carriedby the combat medic. At most, a medic can be expected to carry six1,000-milliliter (ml) fluid bags or twelve 500-ml bags.
In light of these considerations, during the tactical field care phase only fluid
resuscitate those casualties exhibiting signs of shock or TBI. If the casualty has
only superficial wounds, IV fluid resuscitation is not necessary, but oral fluids
should be encouraged. In those casualties with significant wounds who are coherent
and without any obvious blood loss or signs of shock, blood loss likely has been
stopped. In these casualties, obtain IV access, hold IV fluids, and reevaluate the
casualty as frequently as possible.
Shock: Shock encountered in the combat setting will most likely behemorrhagic shock. Assume the casualty is in shock if he has an alteredmental status in the absence of head injury and/or has weak or absentperipheral pulses. Begin fluid resuscitation in these cases.
For Official Use Only 11
TACTICAL COMBAT CASUALTY CARE HANDBOOK

During the tactical field care phase, 6 percent Hetastarch (Hextend) is therecommended fluid for resuscitation. Hextend is preferred over crystalloidfluids because one 500-ml bag of Hextend is physiologically equivalent tothree 1,000-ml bags of lactated Ringers (LR), weighs 5.5 pounds less, andexpands intravascular fluid volume for at least eight hours.
º Initiate fluid resuscitation with a 500-ml Hextend IV bolus.
º Monitor the casualty, and, if after 30 minutes the casualty still hasno peripheral pulse or still has altered mentation, administer asecond 500-ml Hextend bolus.
º Do not administer more than 1,000 ml of Hextend. This isequivalent to six liters of LR.
If the casualty is still in shock after 1,000 ml of Hextend, the casualty isprobably still bleeding. Fluid resuscitation is unlikely to be effective untilthe hemorrhage is controlled. The casualty needs to be evacuated to surgicalcare as soon as possible. If rapid evacuation is not feasible, the medic mayneed to consider triaging medical supplies and focusing attention on moresalvageable casualties.
TBI: Head injuries are special situations. Hypotension and hypoxiaexacerbate secondary brain injury and are difficult to control in the initialphases of combat casualty care. If the casualty with TBI is unconscious andhas no peripheral pulse, he should be resuscitated to restore a palpable radialpulse and evacuated as soon as possible.
Hypothermia prevention
Combat casualties are at a high risk for hypothermia, which is defined as a whole
body temperature below 95ºF (35ºC). Hypothermia can occur regardless of the
ambient temperature. The blood loss typically associated with combat trauma
results in peripheral vasoconstriction, which contributes to the development of
hypothermia. In addition, the longer a casualty is exposed to the environment
during treatment and evacuation, especially in wet conditions, the more likely the
development of hypothermia. This is even more the case during rotary-wing
evacuation.
Hypothermia, acidosis, and coagulopathy constitute the “bloody vicious cycle” in
trauma patients. The association of hypothermic coagulopathy with high mortality
has been well described. Hypothermia causes the inhibition of coagulation proteins,
thus exacerbating the bleeding problem. The need to prevent hypothermia is
highlighted by the fact that up to 10 percent of combat casualties arrive at the Level
III treatment facility exhibiting some degree of hypothermia.
During the tactical field care phase, the rescuer must first minimize the casualty’s
exposure to the elements. If possible, keep all protective gear on the patient.
However, if at all possible, replace any wet clothing. Use any methods available to
keep the casualty warm, such as dry blankets, poncho liners, sleeping bags, etc.
12 For Official Use Only
CENTER FOR ARMY LESSONS LEARNED

Hypothermia Prevention and Management Kit (HPMK): One productnow available is the HPMK, which should be carried by all medics. HPMKconsists of a Ready-Heat blanket, which actively warms to 110-118ºF whenopened, a Blizzard Rescue Blanket, and a Thermolite HypothermiaPrevention System cap. When the casualty is ready for transport, place theReady-Heat blanket around his torso, the heat reflective cap on his head,and wrap him in the Blizzard Rescue Blanket.
Monitoring/further evaluation
During the tactical field care phase, monitor the casualty clinically and frequently
reassess him until evacuation. Pulse oximetry, at a minimum, should be included in the
medic aid bag and used as an adjunct to clinical monitoring. Keep in mind, though, that
pulse oximetry readings may be misleading in the settings of shock and hypothermia.
Carefully check the casualty for additional wounds. High-velocity projectiles from
assault rifles may tumble and take erratic courses in tissue, leading to exit sites
removed from the entry wound. Inspect and dress all wounds.
Pain control
All casualties in pain should be given analgesia. The type and route of medication
is dependent upon whether the casualty is conscious, still able to fight, and if IV
access has been obtained.
• Able to fight: If the casualty is conscious and still able to fight, give himoral pain medications that will not alter his level of consciousness. Therecommended medications are meloxicam (Mobic) 15 milligrams (mg)once daily, along with two 650 mg bi-layered Tylenol caplets. Thesemedications, along with an oral antibiotic, will make up the Combat PillPack, which all combatants should be instructed to take when they sustaina penetrating wound on the battlefield.
• Unable to fight: If the casualty is seriously injured, in pain, andotherwise unable to fight, he should be given narcotic medications.Medics must be trained in the use of naloxone (Narcan) and have itreadily available before administering any narcotics. Closely monitorthe casualty for any respiratory depression. Clearly and visibly documentthe use of any narcotics to avoid overdose and respiratory compromise.
º Without IV/IO access: Administer a 400-microgram transmucosalfentanyl citrate lozenge. This is placed in the casualty’s mouth andis absorbed through the oral mucosal. It is recommended to tape thelozenge to the casualty’s finger to prevent overdose. Reassess thecasualty in 15 minutes and repeat once if necessary.
º IV/IO access present: Administer an initial dose of 5 mgmorphine sulfate. This can be repeated every 10 minutes asneeded to control severe pain. Accompany morphine use with 25mg of promethazine IV/IO/intramuscular (IM) every four hours,for synergistic analgesia and nausea control.
For Official Use Only 13
TACTICAL COMBAT CASUALTY CARE HANDBOOK

Fractures
Splint all fractures as circumstances allow, ensuring that peripheral pulse, sensory,
and motor checks are performed both before and after splinting.
Infection control
Infection is an important cause of morbidity and mortality in battlefield wounds.
Assume all open wounds on the battlefield are infected and treat them with
antibiotics. Choose antibiotics that cover a broad spectrum of organisms, with the
specific medications based on available delivery route and any medication allergies
the casualty may have.
• Able to take oral medication: If the casualty can take oral medications,400 mg of gatifloxacin, taken once daily, is recommended. Thismedication should be part of the Combat Pill Pack and the casualtyshould take this as soon as he is injured and all life-threatening injurieshave been addressed.
• Unable to take oral medication: If the casualty is unable to take oralmedications because of shock, unconsciousness, or other reasons, IV orIM antibiotics should be given. Recommended antibiotics in this caseinclude cefotetan 2 grams (g) IV (over 3-5 minutes) or IM every 12hours; or ertapenem 1 g IV (over 30 minutes) or IM every 24 hours.
Communication
Combat is a frightening experience. Being wounded, especially seriously, can
generate tremendous anxiety and fear. Engaging a casualty with reassurance is
therapeutically beneficial. Communication is just as important in casualty care on
the battlefield as it is in the treatment facility. Ensure the care plan is explained to
the casualty.
Documentation
Document clinical assessments, treatment rendered, and changes in the casualty’s
status. Forward that information with the casualty to the next level of care. Utilize
DD Form 1380, Field Medical Card, for this. If this form is not available, use
three-inch white tape on the casualty’s chest and an indelible pen to document care.
14 For Official Use Only
CENTER FOR ARMY LESSONS LEARNED

Section IV: Combat CASEVAC care
Combat CASEVAC care is the care rendered once the casualty has been picked up
by an aircraft, vehicle, or boat for transportation to a higher echelon of care.
CASEVAC is the evacuation of combat casualties from the battlefield. In general,
combat CASEVAC care is a continuation of care rendered during the tactical field
care phase, with minor additions based on the following conditions:
• Additional medical personnel may accompany the evacuation asset.
• Additional medical equipment may be brought with the evacuation asset.
The arrival of additional medical personnel is important for several reasons:
• The medic may be one of the casualties or be dehydrated, hypothermic, orotherwise debilitated.
• There may be multiple casualties that exceed the medic’s capability tocare for simultaneously.
• The evacuation asset’s equipment will need to be prepared prior toCASEVAC.
• Additional medical personnel, such as physicians and other specialists,provide greater expertise.
The additional medical equipment brought by the evacuation asset serves several
purposes. Medical resupply may be accomplished during this phase of care. More
advanced medical equipment, such as blood products and other fluids, electronic
monitoring devices, and oxygen, may now be used to care for the casualty. This
equipment, and the possibly improved care environment of the evacuation asset, allows
more advanced casualty care with more skilled providers during the CASEVAC phase.
Airway management
Airway management during the CASEVAC phase follows the same principles as
during the tactical field care phase, with the use of positioning and a NPA as the
initial management options. However, the management of an impaired airway is
exceedingly difficulty during CASEVAC. It is now appropriate, if the equipment
and provider expertise is available, to obtain a definitive airway if required by the
casualty’s condition. Possible airway management options include:
• Cricothyroidotomy: As in the tactical field care phase,cricothyroidotomy is still an appropriate option when an NPA is noteffective. This is still the procedure of choice for penetrating wounds ofthe face or neck, where blood or disrupted anatomy precludes goodvisualization of the vocal cords.
For Official Use Only 15
TACTICAL COMBAT CASUALTY CARE HANDBOOK
• Intubation: The conditions of the CASEVAC phase now makeintubation a viable option. If the equipment is available and the careprovider has the appropriate expertise, several intubation methods arepossible. Blind intubation devices, such as the laryngeal mask airway,intubating laryngeal mask airway (ILMA), King LT, or the Combitube,are recommended options. These devices provide adequate ventilationwithout the need for illuminated laryngoscopy; have been used effectivelyin the prehospital setting; and, in the case of the ILMA and Combitube,protect the airway from aspiration. Additionally, if personnel haveadequate training, endotracheal intubation is now an option.
Breathing
During the CASEVAC phase, management of the casualty’s breathing is a
continuation of the interventions made during the tactical field care phase. Continue
to treat penetrating chest wounds with petroleum dressing and monitor for the
development of a tension PTX. Treat PTXs with needle decompression. At this
phase of care, though, it may now be possible to consider additional interventions.
• Chest tubes: For casualties with a tension PTX who show noimprovement with needle decompression, the provider should considerinserting a chest tube. A chest tube should also be considered forcasualties with PTX when a long evacuation time is anticipated, even ifthe initial needle decompression was successful.
• Oxygen: Oxygen may be brought by the evacuation asset and now beavailable. Most combat casualties do not require oxygen, but it should beused in seriously injured casualties, especially in the followingscircumstances:
º Low oxygen saturation by pulse oximetry.
º Injuries associated with impaired oxygenation.
º Unconscious casualties.
º Casualties with traumatic brain injuries.
º Casualties in shock.
º Casualties at altitude.
Fluid resuscitation
Several improvements in fluid resuscitation are possible in the CASEVAC phase.
Monitoring equipment brought by the evacuation asset may yield a better
understanding of a casualty’s fluid status and can direct resuscitation efforts.
Continue resuscitation in casualties with TBI to maintain a systolic blood pressure
of at least 90 millimeters (mm) mercury (Hg). If indicated and available, packed red
blood cells should be given to casualties suffering from blood loss. These blood
cells will restore oxygen-carrying capacity. Resuscitation for casualties in shock
16 For Official Use Only
CENTER FOR ARMY LESSONS LEARNED

can be continued with the use of Hextend (but not to exceed 1,000 ml per casualty)
or LR. Finally, LR can now be used to treat dehydration.
Hypothermia prevention
Hypothermia prevention becomes paramount during the CASEVAC phase,
especially if the casualty is evacuated in a helicopter. Continue to follow the
hypothermia prevention principles of the tactical field care phase: minimize the
casualty’s exposure to the elements, replace wet clothing, and use equipment such
as the HPMK. If the doors of the evacuation asset must be kept open, protect the
casualty from the wind. Also, if portable fluid-warming devices, such as the
Thermal Angel, are available, they should be used on all IV fluid sites.
Monitoring
The evacuation asset may contain additional patient-monitoring devices. Electronic
systems capable of monitoring blood pressure, heart rate, pulse oximetry, and
end-tidal carbon dioxide (CO2) may be available and should be used. This is
especially true in helicopter evacuation, which impairs or prevents the ability to
monitor the casualty clinically.
Pneumatic anti-shock garment (PASG)
PASG may be available during the CASEVAC phase and may be useful for
stabilizing pelvic fractures and helping to control pelvic and abdominal bleeding.
However, its application and extended use must be carefully monitored. This device
is contraindicated and should not be used in casualties with thoracic and brain
injuries.
Additional measures
All other aspects of care during the CASEVAC phase are identical to those during
the tactical field care phase. Hemorrhage must be controlled, using tourniquets as
necessary. However, tourniquets should be discontinued, if possible, once bleeding
is controlled by other means and the casualty has been resuscitated for hemorrhagic
shock. Maintain vascular access with at least one 18-gauge IV or an IO device, if
necessary. Provide analgesia and antibiotics as previously indicated during the
tactical field care phase. Continue to document all care and forward this
information with the casualty to the next level of care.
For Official Use Only 17
TACTICAL COMBAT CASUALTY CARE HANDBOOK

Section V: Management guidelines
Care under fire procedures
1. Take cover. Return fire as directed or required.
2. Direct and expect the casualty to continue to return fire if able.
3. Direct the casualty to move to cover/apply self-aid if able.
4. Try to keep the casualty from sustaining additional wounds.
5. Airway management is generally best deferred until the tactical field care phase.
6. Stop life-threatening external hemorrhage:
• Direct the casualty to control hemorrhage by self-aid if he is able.
• Use a tourniquet for hemorrhage that is anatomically amenable totourniquet application.
• For hemorrhage that cannot be controlled with a tourniquet, apply aHemCon dressing.
Tactical field care procedures
1. Immediately disarm any casualty with an altered mental status.
2. Airway management:
• Unconscious casualty without airway obstruction:
º Chin-lift or jaw-thrust maneuver.
º NPA.
º Place casualty in recovery position.
º Consider Combitube or King LT.
• Casualty with or impending airway obstruction:
º Chin-lift or jaw-thrust maneuver.
º NPA:
� Allow conscious casualty to assume any position that bestprotects the airway, including sitting up.
� Place unconscious casualty in recovery position.
º Surgical cricothyroidotomy if above measures fail.
18 For Official Use Only
CENTER FOR ARMY LESSONS LEARNED

3. Breathing:
• Treat penetrating chest wounds with a three-sided dressing.
• Consider tension PTX and perform needle decompression.
4. Bleeding:
• Assess for unrecognized hemorrhage and control bleeding.
• Assess for discontinuation of any tourniquets.
5. Access:
• Start an 18-gauge IV.
• If fluid resuscitation is needed and IV access is not obtainable, use sternalIO access.
6. Fluid resuscitation:
• Resuscitate only if in shock:
º Weak or absent peripheral pulses.
º Altered mental status.
• Hextend 500-ml IV bolus.
• Repeat once after 30 minutes if casualty is still in shock.
• No more than 1,000 ml of Hextend.
7. Prevent hypothermia:
• Minimize exposure.
• Replace wet clothing, if able.
• Apply Ready-Heat blanket to torso.
• Wrap in Blizzard Rescue Blanket.
• Put Thermolite Hypothermia Prevention System cap on casualty’s head,under helmet.
• Use any other method to retain heat if above gear is not available.
8. Monitor:
• Continue to monitor clinically.
• Initiate pulse oximetry monitoring.
For Official Use Only 19
TACTICAL COMBAT CASUALTY CARE HANDBOOK
9. Analgesia:
• Able to fight:
º Mobic 15 mg orally (PO), daily (qd).
º Tylenol 650 mg bi-layer caplet, 2 PO.
• Unable to fight:
º Naloxone should be available before administering opiates.
º Non-IV/IO access: Oral transmucosal fentanyl citrate400-microgram lozenge.
º IV/IO access:
� Morphine sulfate 5 mg IV/IO repeat every (q) 10 minutesas needed (PRN).
� Promethazine 25 mg IV/IO/IM.
10. Splint fractures.
11. Antibiotics (Recommended for all open wounds):
• PO: Gatifloxacin 400 mg PO qd.
• IV:
º Cefotetan 2 gm IV.
º Ertapenem 1 gm IV.
12. Communicate: Encourage, reassure, explain.
13. Document: Initiate documentation and forward with casualty.
20 For Official Use Only
CENTER FOR ARMY LESSONS LEARNED

Combat CASEVAC care
1. Airway management:
• Unconscious casualty without airway obstruction:
º Chin-lift or jaw-thrust maneuver.
º NPA.
º Place casualty in recovery position.
• Casualty with airway obstruction or impending airway obstruction:
º Chin-lift or jaw-thrust maneuver.
º NPA:
� Allow conscious casualty to assume any position that bestprotects the airway, to include sitting up.
� Place unconscious casualty in recovery position.
• If measures above are unsuccessful,
º Surgical cricothyroidotomy or
º Combitube, King LT or
º Endotracheal intubation.
2. Breathing:
• Treat penetrating chest wounds with a three-sided dressing.
• Consider tension PTX and perform needle decompression.
• Consider chest tube insertion if no improvement and/or long transportanticipated.
• Administer oxygen if:
º Low oxygen saturation by pulse oximetry.
º Injuries associated with impaired oxygenation.
º Unconscious patient.
º TBI patients (maintain oxygen saturation >90).
º Casualties in shock.
º Casualties at altitude.
For Official Use Only 21
TACTICAL COMBAT CASUALTY CARE HANDBOOK

3. Bleeding:
• Assess for unrecognized hemorrhage and control all sources of bleeding.
• Assess for discontinuation of tourniquets once bleeding is controlled byother means. Before releasing any tourniquet on a patient who has beenresuscitated for hemorrhagic shock, assure a positive response toresuscitation efforts (i.e., a peripheral pulse normal in character andnormal mentation if there is no TBI).
4. Access:
• Reassess need for IV access:
º If indicated, start an 18-gauge IV or saline lock.
º If resuscitation is required and IV access is not obtainable, usesternal intraosseous route.
5. Fluid resuscitation:
• Reassess for hemorrhagic shock: altered mental status (in the absence ofbrain injury) and/or abnormal vital signs.
• If not in shock:
º No IV fluids necessary.
º PO fluids permissible if conscious.
• If in shock:
º Hextend 500-ml IV bolus.
º Repeat Hextend 500-ml IV once after 30 minutes if still in shock.
º No more than 1,000 ml of Hextend.
• Continue resuscitation with packed red blood cells, Hextend, or LR asindicated.
• If a casualty with TBI is unconscious and has a weak or absent peripheralpulse, resuscitate as necessary to maintain a systolic blood pressure of 90mm Hg or above.
6. Prevention of hypothermia:
• Minimize casualty’s exposure to the elements. Keep protective gear on orwith the casualty if feasible.
• Continue Ready-Heat blanket, Blizzard Rescue Blanket and Thermolitecap.
22 For Official Use Only
CENTER FOR ARMY LESSONS LEARNED

• Apply additional interventions as needed.
• Utilize the Thermal Angel or other portable fluid warmer on all IV sites,if possible.
• Protect the casualty from wind if doors must be kept open.
7. Monitoring:
• Institute electronic monitoring of pulse oximetry and vital signs ifindicated.
8. Inspect and dress known wounds if not already done.
9. Check for additional wounds.
10. Analgesia as necessary.
• Able to fight:
º Mobic 15 mg PO qd.
º Tylenol, 650 mg bi-layer caplet, 2 PO q 8 hours.
• Unable to fight:
º Have naloxone readily available whenever administeringopiates.
º Does not otherwise require IV/IO access:
� Oral transmucosal fentanyl citrate 400-microgram lozenge.
º IV or IO access obtained:
� Morphine sulfate 5 mg IV/IO repeat q 10 min PRN.
� Promethazine 25 mg IV/IO/IM q 4 hours, for synergisticanalgesic effect and as a counter to potential nausea.
11. Reassess fractures and recheck pulses.
12. Antibiotics: recommended for all open combat wounds.
• If able to take PO:
º Gatifloxacin 400 mg PO qd.
• If unable to take PO (shock, unconscious, or penetrating torso injuries):
º Cefotetan 2 g IV or
º Ertapenem 1 gm IV.
For Official Use Only 23
TACTICAL COMBAT CASUALTY CARE HANDBOOK

13. PASG may be useful for stabilizing pelvic fractures and controlling pelvic and
abdominal bleeding. Its application and extended use must be carefully monitored.
It is contraindicated for casualties with thoracic and brain injuries.
14. Document clinical assessments, treatments rendered, and changes in casualty’s
status. Forward this info with the casualty to the next level of care.
24 For Official Use Only
CENTER FOR ARMY LESSONS LEARNED

Chapter 2
Tactical Combat Casualty Care Procedures
Section I: Airway management
Nasopharyngeal airway (NPA) insertion
(Necessary equipment: NPA, gloves, water-based lubricant.)
1. Place the casualty supine with the head in a neutral position.
Caution: Do not use the NPA if there is clear fluid (cerebrospinal fluid)coming from the ears or nose. This may indicate a skull fracture.
2. Select the appropriately sized airway using one of the following methods:
• Measure the airway from the casualty’s nostril to the earlobe.
• Measure the airway from the casualty’s nostril to the angle of the jaw.
Note: Choosing the proper length ensures appropriate diameter. Standard adult
sizes are 34, 32, 30, and 28 French (Fr).
3. Lubricate the tube with a water-based lubricant.
Caution: Do not use a petroleum-based or non-water-based lubricant. Thesesubstances can cause damage to the tissues lining the nasal cavity andpharynx, thus increasing the risk for infection.
4. Insert the NPA.
• Push the tip of the nose upward gently.
• Position the tube so that the bevel of the airway faces toward the septum.
• Insert the airway into the nostril and advance it until the flange restsagainst the nostril.
Caution: Never force the NPA into the casualty’s nostril. If resistance is met,pull the tube out and attempt to insert it in the other nostril. Most attemptsto insert the NPA should be in the right nostril. If unable to insert into theright nostril, try the left. If inserting in the left nostril the bevel will not beagainst the septum.
For Official Use Only 25
TACTICAL COMBAT CASUALTY CARE HANDBOOK

Surgical cricothyroidotomy
(Necessary equipment: Cutting instrument [for example, Scalpel # 10 or 15];
forceps or tracheal hook; povidone-iodine; endotracheal tube [ETT] 6-millimeter
[mm]; gloves; 4 x 4 gauze; tape; local anesthetic; and materials to inject.)
1. Hyperextend the casualty’s neck.
• Place the casualty in the supine position.
• Place a blanket or poncho rolled up under the casualty’s neck or betweenthe shoulder blades so the airway is straight.
Warning: Do not hyperextend the casualty’s neck if a cervical injury issuspected.
2. Put on gloves, if available.
3. Locate the cricothyroid membrane.
• Place a finger of the nondominant hand on the thyroid cartilage (Adam’sapple) and slide the finger down to the cricoid cartilage.
• Palpate for the “V” notch of the thyroid cartilage.
• Slide the index finger down into the depression between the thyroid andcricoid cartilage.
26 For Official Use Only
CENTER FOR ARMY LESSONS LEARNED
A - Cricoid CartilageB - Cricothyroid MembraneC - Incision SiteD - Thyroid CartilageA
B
C
D
Figure 2-1: Cricothyroid membrane anatomy
4. Prepare the incision site.
• Administer local anesthesia to the incision site if the casualty isconscious.
• Prep the skin over the membrane with povidone-iodine.
5. With a cutting instrument in the dominant hand, make a 1.5-inch vertical
incision through the skin over the cricothyroid membrane.
Caution: Do not cut the cricothyroid membrane with this incision.
6. Relocate the cricothyroid membrane by touch and sight.
7. Stabilize the larynx with one hand and make a 1/2-inch horizontal incision
through the elastic tissue of the cricothyroid membrane.
Note: A rush of air may be felt through the opening.
8. Dilate the opening with a hemostat, scalpel handle, or a hooked 18-gauge needle
that can grasp the cricoid cartilage and stabilize it.
9. Insert the ETT through the opening and toward the lungs. Only advance the ETT
2-3 inches into the trachea to prevent right mainstem bronchus intubation. Inflate
the cuff to stabilize the ETT.
10. Check for air exchange and tube placement.
• Air exchange: Listen and feel for air passage through the tube; look forbilateral chest rise and fall.
• Tube placement: Bilateral chest sounds/rise and fall of the chest confirmsproper tube placement.
º Unilateral breath sounds/rise and fall of chest indicate a right mainstem bronchus intubation: Withdraw the ETT 1-2 inches andreconfirm placement.
º Air from the casualty’s mouth indicates the tube is directedtoward the mouth. Remove the tube, reinsert, and recheck for airexchange and placement.
º Any other problem indicates the tube is not placed correctly.Remove the tube, reinsert, and recheck for air exchange.
For Official Use Only 27
TACTICAL COMBAT CASUALTY CARE HANDBOOK

11. Once the tube is correctly placed, begin rescue breathing, if necessary and
tactically appropriate.
• Connect the tube to a bag-valve-mask (BVM), and ventilate the casualtyat the rate of 20 breaths/minute (min).
• If BVM is not available, begin mouth-to-tube resuscitation at 20 breaths/min.
12. Apply a sterile dressing. Use either of the following methods:
• Make a V-shaped fold in a 4 x 4 gauze pad and place it under the edge ofthe ETT to prevent irritation to the casualty. Tape securely.
• Cut two 4 x 4 gauze pads halfway through and place on opposite sides ofthe tube. Tape securely.
Note: Cricothyroidotomy sets should be prepared prior to the mission. All essential
pieces of equipment should be prepared before deployment and packed into a
plastic zip-lock bag. Cut the ETT tube to just above the cuff inflation tube so that
the ETT is not protruding six inches out of the casualty’s neck.
Combitube insertion
(Necessary equipment: Combitube, 140-cubic centimeter [cc] syringe, 20-cc
syringe; gloves, stethoscope, BVM.)
1. Oxygenate the casualty, if available.
• Instruct an assistant to oxygenate the casualty using the BVM.
• Instruct the assistant to count aloud for 20 seconds while intubation isperformed.
• At the end of 20 seconds, the assistant should immediately resumeresuscitation if intubation is unsuccessful.
2. Prepare the Combitube.
• Inspect the tube for breaks or cracks.
• Attach the large syringe to the pharyngeal (proximal) cuff and inflate itwith 100 cc of air. Check for leaks and then deflate completely.
• Attach the small syringe to the tracheal (distal) cuff and inflate it with 15cc of air. Check for leaks and then deflate completely.
Note: These volumes are only true if using the 41 Fr size tube. If using the 37 Fr
tube, the inflation amounts are 85 cc and 12 cc, respectively.
Note: If a leak is present, replace the tube.
28 For Official Use Only
CENTER FOR ARMY LESSONS LEARNED

3. Put on gloves.
4. Kneel just above the casualty’s head, facing the casualty’s feet.
Note: If the casualty’s neck has been hyperextended to open the airway, return it to
a neutral position.
5. Insert the tube.
• Have the assistant give the casualty two breaths and start counting for 20seconds.
• Lift the jaw and tongue straight upward without hyperextending the neck.
• Pass the tube blindly, following the pharyngeal curvature until the teethare between the two black lines on the tube.
Caution: Do not force the tube at any time.
• Use the large syringe to inflate the pharyngeal cuff with 100 cc of air. Thedevice will seat itself in the posterior pharynx, behind the hard palate.
• Use the small syringe to inflate the distal cuff with 10 to 15 cc of air.
6. Ventilate the casualty and check tube placement.
• Attach the BVM device to the esophageal connector.
• Attempt to ventilate and listen for the presence of breath sounds in thelungs and absence of sounds from the epigastrium.
• If there is an absence of breath sounds and presence of sounds in theepigastrium, the tube is in the trachea.
• Attach the BVM to the tracheal connector and ventilate the casualty.
• Listen for the presence of breath sounds.
• Continue to ventilate the casualty every 3-5 seconds.
7. Remove the Combitube if the casualty regains consciousness or a gag reflex.
• Oxygenate the casualty with two slow breaths.
• Turn the casualty to one side.
• Deflate both cuffs.
• Withdraw the tube in one quick motion, following the curve of thepharynx.
• Immediately clear the casualty’s airway of any vomitus.
For Official Use Only 29
TACTICAL COMBAT CASUALTY CARE HANDBOOK

King LT insertion
(Necessary equipment: King LT, water-based lubricant, syringe.)
1. Prepare the casualty.
• Place the casualty’s head in the “sniffing” position.
• Preoxygenate the casualty, if equipment is available.
2. Prepare the King LT.
• Choose the appropriately sized tube.
• Test cuff inflation by injecting the proper volume of air into the cuff.Deflate the cuff prior to inserting the tube.
• Lubricate the tube with a water-based lubricant.
Caution: Do not use a petroleum-based or non-water-based lubricant. Thesesubstances can cause damage to the tissues lining the nasal cavity andpharynx, thus increasing the risk for infection.
3. Insert the King LT.
• Hold the tube in the dominant hand. With the nondominant hand, openthe casualty’s mouth and apply a chin lift.
• With the King LT rotated laterally 45 to 90 degrees, place the tip into themouth and advance the tube behind the base of the tongue.
Note: A lateral approach with the chin lift facilitates proper insertion. The tip must
remain midline as it enters the posterior pharynx.
• Rotate the tube to midline as the tip reaches the posterior pharynx.
• Advance the tube until the base of the connector is aligned with the teethor gums.
• Using either an attached pressure gauge or syringe, inflate the cuff to theminimum volume necessary to seal the airway.
4. Confirm proper placement of tube.
• Reference marks for the tube are at the proximal end of the tube andshould be aligned with the upper teeth.
• Confirm proper placement by listening for equal breath sounds duringventilation.
30 For Official Use Only
CENTER FOR ARMY LESSONS LEARNED

• While gently ventilating the casualty, gently withdraw the tube untilventilation is easy and free flowing, with minimal airway pressureneeded.
Note: Initially placing the tube deeper than required and then withdrawing slightly
increases the chance of proper insertion, helps ensure a patent airway, and
decreases the risk of airway obstruction if the casualty spontaneously ventilates.
5. Secure the tube with tape.
Size: 3 4 5
Connector Color: Yellow Red Purple
Casualty Size: 4 to 5 ft 5 to 6 ft > 6 ft
Cuff Volume: 45 to 60 ml 60 to 80 ml 70 to 90 ml
For Official Use Only 31
TACTICAL COMBAT CASUALTY CARE HANDBOOK

Section II: Breathing management
Penetrating chest wounds
(Necessary equipment: Field dressings or any airtight material [Asherman Chest
Seal, plastic wrap, tape].)
1. Expose the wound(s).
• Cut or unfasten the clothing that covers the wound.
• Disrupt the wound as little as possible.
Note: Do not remove clothing stuck to the wound.
2. Check for an exit wound.
• Feel and/or look at the casualty’s chest and back.
• Remove the casualty’s clothing, if necessary.
3. Seal the wound(s), usually covering the first wound encountered first.
Note: All penetrating chest wounds should be treated as if they are sucking chest
wounds.
Note: In an emergency, any airtight material can be used. It must be large enough
so it is not sucked into the chest cavity.
• Cut the dressing wrapper on one long and two short sides and remove thedressing.
• Apply the inner surface of the wrapper to the wound when the casualtyexhales.
• Ensure that the covering extends at least 2 inches beyond the edges of thewound.
• Seal by applying overlapping strips of tape to three sides of the plasticcovering to provide a flutter-type valve.
• Cover the exit wound in the same way, if applicable, but tape the woundon all four sides.
Note: Assess the effectiveness of the flutter valve when the casualty breathes.
When the casualty inhales, the plastic should be sucked against the wound,
preventing the entry of air. When the casualty exhales, trapped air should be able to
escape from the wound and out the open side of the dressing.
32 For Official Use Only
CENTER FOR ARMY LESSONS LEARNED

4. Dress the wound.
• Place the field first aid dressing over the seal and tie the ends directlyover the wound. This may negate the flutter-valve effect, so reevaluateand adjust the dressing to maintain the flutter-valve effect.
• Use padding material or another dressing for pressure and stability.
• Dress the exit wound in the same way, if applicable.
Caution: Ensure that the dressings are not tied so tightly that they interferewith the breathing process or the flutter-type valve.
5. Place the casualty on the injured side, sitting up.
6. Monitor the casualty.
• Monitor breathing and the wound seal.
• Assess the effectiveness of the flutter valve.
• Check vital signs.
• Observe for signs of shock.
Needle chest decompression
(Necessary equipment: Large-bore needle [10 to 14 gauge], at least 2.5 inches in
length, and tape.)
1. Locate the insertion site. Locate the second intercostal space (between the second
and third ribs) at the midclavicular line (approximately in line with the nipple) on
the affected side of the casualty’s chest.
2. Insert a large-bore (10- to 14-gauge) needle/catheter unit.
• Place the needle tip, bevel up, on the insertion site (second intercostalspace, midclavicular line).
• Lower the proximal end of the needle to permit the tip to enter the skinjust above the third rib margin.
• Firmly insert the needle into the skin over the third rib, until the pleurahas been penetrated, as evidenced by feeling a “pop” as the needle entersthe pleural space, and a hiss of air escaping from the chest.
Warning: Proper positioning of the needle is essential to avoid puncturingblood vessels and/or nerves.
For Official Use Only 33
TACTICAL COMBAT CASUALTY CARE HANDBOOK

Note: If you are using a catheter-over-needle, hold the needle still and push the
catheter into the plural space until resistance is felt. Withdraw the needle along the
angle of insertion while holding the catheter still.
3. Secure the catheter to the chest with tape, and monitor the casualty.
34 For Official Use Only
CENTER FOR ARMY LESSONS LEARNED
Figure 2-2: Needle chest compression, needle insertion site

Chest tube insertion
(Necessary equipment: Chest tube [16-35 Fr], gloves, one-way valve, scalpel
handle and blades [#10 and #15], Kelly forceps, large hemostat, povidone-iodine,
suture material, lidocaine with 1-percent epinephrine for injection, needle, and
syringe.)
1. Assess the casualty.
• If necessary, open the airway.
• Ensure adequate respiration and assist as necessary.
• Provide supplemental oxygen, if available.
• Connect the casualty to a pulse oximeter, if available.
• Initiate an intravenous (IV) line.
2. Prepare the casualty.
• Place the casualty in the supine position.
• Raise the arm on the affected side above the casualty’s head.
• Select the insertion site at the anterior axillary line over the fourth or fifthintercostal space.
• Clean the site with povidone-iodine solution.
• Put on sterile gloves.
• Drape the area.
• Liberally infiltrate the area with the 1-percent lidocaine solution.
3. Insert the tube.
• Make a 2- to 3-centimeter (cm) transverse incision over the selected siteand extend it down to the intercostal muscles.
Note: The skin incision should be 1 to 2 cm below the intercostal space through
which the tube will be placed.
• Insert the Kelly forceps through the intercostal muscles in the nextintercostal space above the skin incision.
• Puncture the parietal pleura with the tip of the forceps and slightlyenlarge the hole by opening the clamp 1.5 to 2 cm.
For Official Use Only 35
TACTICAL COMBAT CASUALTY CARE HANDBOOK

Caution: Avoid puncturing the lung. Always use the superior margin of therib to avoid the intercostal nerves and vessels.
• Immediately insert a gloved finger in the incision to clear any adhesions,clots, etc.
• Grasp the tip of the chest tube with Kelly forceps. Insert the tip of thetube into the incision as you withdraw your finger.
• Advance the tube until the last side hole is 2.5 to 5 cm inside the chestwall.
• Connect the end of the tube to a one-way drainage valve (e.g., Heimlichvalve).
• Secure the tube using the suture materials.
• Apply an occlusive dressing to the site.
• Radiograph the chest to confirm placement, if available.
4. Reassess the casualty.
• Check for bilateral breath sounds.
• Monitor and record vital signs every 15 minutes.
5. Document the procedure.
36 For Official Use Only
CENTER FOR ARMY LESSONS LEARNED
Figure 2-3: Chest tube insertion site
Section III: Hemorrhage control
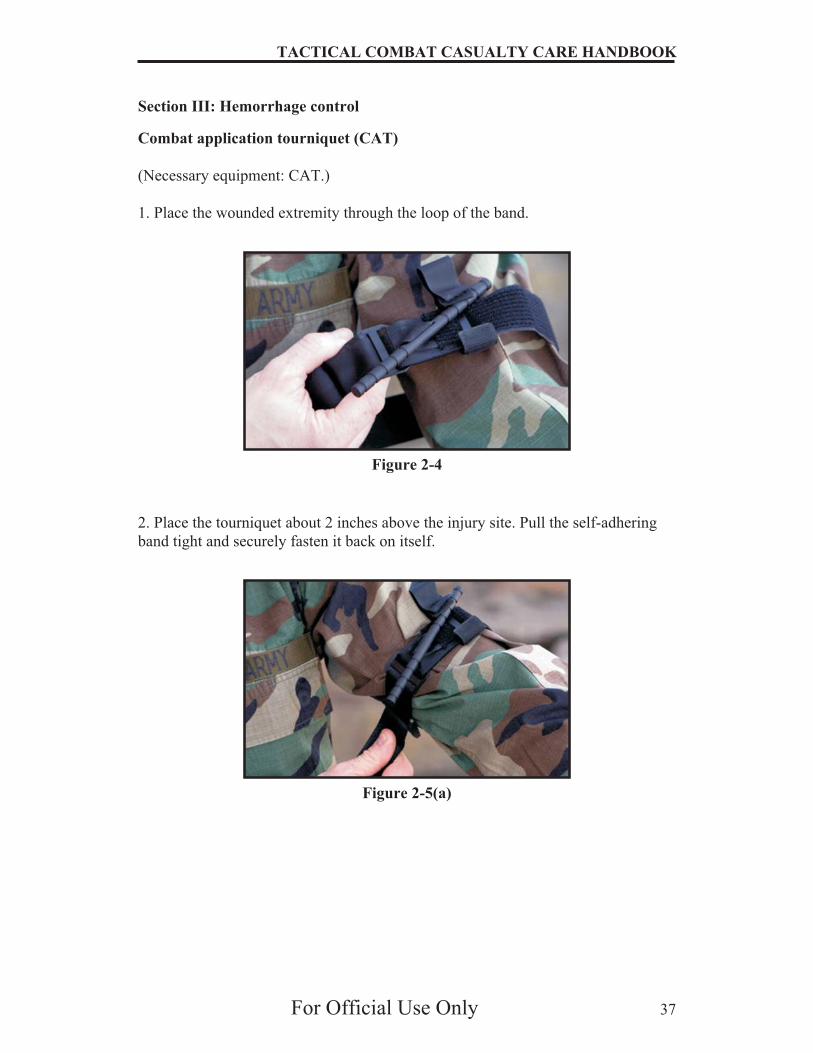
Combat application tourniquet (CAT)
(Necessary equipment: CAT.)
1. Place the wounded extremity through the loop of the band.
2. Place the tourniquet about 2 inches above the injury site. Pull the self-adhering
band tight and securely fasten it back on itself.
For Official Use Only 37
TACTICAL COMBAT CASUALTY CARE HANDBOOK
Figure 2-4
Figure 2-5(a)

3. Adhere it completely around the band until it reaches the clip.
4. Twist the windlass rod until the bleeding stops.
38 For Official Use Only
CENTER FOR ARMY LESSONS LEARNED
Figure 2-5(b)
Figure 2-6

5. Lock the windlass rod in place with the windlass clip.
6. Grasp the windlass strap, pull tight, and adhere it to the windlass clip.
Note: When applying the CAT to a lower extremity wound, the self-adhering band
must be routed through the friction-adapter buckle.
For Official Use Only 39
TACTICAL COMBAT CASUALTY CARE HANDBOOK
Figure 2-7
Figure 2-8

HemCon dressing
(Necessary equipment: HemCon dressing; bandage.)
Warning: HemCon should only be used for external wounds. Do not use ininternal cavities (abdominal, thoracic, cranial) or apply to the eyes. Bandageshould be presoftened when first issued.
1. Apply dressing with pressure to the wound for 1 to 2 minutes or until the
dressing adheres to the wound and bleeding stops.
2. Apply outer bandage to secure the dressing to the wound.
3. Remove the dressing within 48 hours.
QuikClot
(Necessary equipment: QuikClot.)
Warning: QuikClot should only be used for external wounds. Do not use ininternal cavities (abdominal, thoracic, cranial).
1. Blot away excess blood, water, and dirt from the wound.
2. Tear open the package, holding it away from your face and the casualty’s face.
Note: Avoid breathing the dust from QuikClot; it may irritate or burn the eyes,
nose, throat, or skin.
3. Apply contents of the bag directly to the wound. Only use enough QuikClot to
stop bleeding. Discard any unused product.
4. Apply direct, firm pressure to the wound for several minutes.
5. Wrap and tie the bandage to the wound to maintain pressure.
6. Evacuate the casualty as soon as possible. Send the empty package with the
casualty.
Note: When using hemostatic agents on extremity wounds it is best to use them in
conjunction with a tourniquet. Stop bleeding initially with tourniquet, clean and dry
the wound, and then apply the hemostatic agent. Allow the agent to set up for a
period of time and then attempt to remove tourniquet.
40 For Official Use Only
CENTER FOR ARMY LESSONS LEARNED
Section IV: Vascular access
Peripheral IV access
(Necessary equipment: IV tubing, IV fluids, 18-gauge IV needle/catheter,
constricting band, antiseptic wipes, gloves, tape, 2 x 2 gauze sponges.)
1. Select an appropriate access site on an extremity.
• Use the most distal, accessible vein possible.
• Avoid sites over joints.
• Avoid injured extremities.
• Avoid extremities with significant wounds proximal to IV insertion site.
2. Prepare the site.
• Apply the constriction band around the limb, about 2 inches above thesite of the puncture site.
• Clean the site with antiseptic solution.
3. Put on gloves.
4. Puncture the vein.
• Stabilize skin at the puncture site, pulling the skin downward until taut.
• Position the needle point, bevel up, parallel to the vein, 1/2 inch belowthe venipuncture site.
• Hold the needle at a 20- to 30-degree angle and insert it through the skin.
• Move the needle forward about 1/2 inch into the vein.
• Confirm the puncture by observing blood in the flash chamber.
Note: A faint give may be felt as the needle enters the vein.
5. Advance the catheter.
• Grasp the hub and advance the needle into the vein up to the hub.
Note: This prevents backflow of blood from the hub.
• While holding the hub, press lightly on the skin with the fingers of theother hand.
• Remove the needle from the catheter.
For Official Use Only 41
TACTICAL COMBAT CASUALTY CARE HANDBOOK

6. Connect the catheter to the IV infusion tubing and begin the infusion.
• If the casualty does not require IV fluids, attach a saline lock.
• Observe the site for infiltration of fluids into the tissues.
7. Secure the catheter and tubing to the skin and dress the site.
Intraosseous (IO) placement: First Access for Shock and Trauma (FAST1)system
(Necessary equipment: FAST1 device, infusion fluids.)
1. Prepare the site.
• Expose the sternum.
• Identify the sternal notch.
2. Place the target patch.
• Remove the top half of the backing (“Remove 1”) from the patch.
• Place index finger on the sternal notch, perpendicular to the skin.
• Align the locating notch in the target patch with the sternal notch.
• Verify that the target zone (circular hole) of the patch is directly over thecasualty’s midline, and press firmly on the patch to engage the adhesiveand secure the patch.
• Remove the remaining backing (“Remove 2”) and secure the patch tocasualty.
42 For Official Use Only
CENTER FOR ARMY LESSONS LEARNED
Figure 2-9: FAST1 target patch

3. Insert the introducer.
• Remove the cap from the introducer.
• Place the bone probe cluster needles in the target zone of the target patch.
• Hold the introducer perpendicular to the skin of the casualty.
• Pressing straight along the introducer axis, with hand and elbow in line,push with a firm, constant force until a release is heard and felt.
Warning: Avoid extreme force or twisting and jabbing motions.
• Expose the infusion tube by gently withdrawing the introducer. The styletsupports will fall away.
• Locate the orange sharps plug. Place it on a flat surface with the foamfacing up, and, keeping both hands behind the needles, push the boneprobe cluster into the foam. Reattach the sharps cap.
4. Connect the infusion tube.
• Connect the infusion tube to the right-angle female connector.
• Flush catheter with 1 milliliter (ml) of sterile IV solution.
• Attach the straight female connector to the source of fluids or drugs.
For Official Use Only 43
TACTICAL COMBAT CASUALTY CARE HANDBOOK
Figure 2-10: FAST1 introducer insertion

5. Secure the protector dome. Place the protector dome directly over the target
patch and press firmly to engage the Velcro fastening.
6. Attach the remover package to the casualty for transport.
Warning: The remover package must be transported with the casualty inorder to remove the FAST1 device later.
44 For Official Use Only
CENTER FOR ARMY LESSONS LEARNED
Figure 2-11: Connection of infusion tube
Figure 2-12: Completed FAST1 device with protector dome in place

IO device removal (FAST1)
(Necessary equipment: FAST1 remover package.)
1. Remove the dome.
Note: Hold the patch with one hand so it does not come away from the casualty
when the dome is removed.
2. Disconnect the tube.
3. Remove the infusion tube.
Warning: Do not pull on the infusion tube to remove it.
• Open the remover package.
• Remove the tubing protecting the remover tip.
• Insert the remover into the infusion tube while holding the tubeperpendicular to the casualty.
• Advance the remover and turn it clockwise until it stops.
• Press lightly on the target patch and pull the remover straight out todislodge the infusion tube. Hold the remover by the T-shaped knob. If theremover disengages from the tube without removing it, repeat theattempt.
4. Remove the target patch.
5. Dress the infusion site.
For Official Use Only 45
TACTICAL COMBAT CASUALTY CARE HANDBOOK
Figure 2-13: FAST1 remover

Section V: Hypothermia prevention
Care under fire phase
1. Get the casualty to safety.
2. Treat life-threatening hemorrhage.
3. Keep the casualty as clothed as possible.
Tactical field care phase
1. Stop bleeding and resuscitate appropriately. If warm fluids are available, use
them. They likely will not be available.
2. Remove any wet clothing and replace them with dry clothes, if possible.
3. Use the Hypothermia Prevention and Management Kit (HPMK):
• Place the Thermolite Hypothermia Prevention System cap on thecasualty’s head, underneath his helmet.
• Place the casualty on the Blizzard Rescue Blanket.
• Place the Ready-Heat blanket on the casualty’s torso and back. Once theingredients are exposed to the air, they instantly start to heat up to amaximum temperature of 104°F (40°C ) for 8 hours.
• Wrap the rescue blanket around the casualty.
Note: If you do not have an HPMK or a survival blanket of any kind, then find dry
blankets, poncho liners, space blankets, sleeping bags, body bags, or anything that
will retain heat and keep the casualty dry.
46 For Official Use Only
CENTER FOR ARMY LESSONS LEARNED
Figure 2-14: HPMK

Combat casualty evacuation care phase
1. The casualty should remain wrapped in the Ready-Heat blanket, Blizzard Rescue
Blanket, and hypothermia cap.
2. If these items were not available in the other phases of care, check with the
evacuation personnel to see if they have them or any other items that can be used to
prevent heat loss.
3. Wrap the casualty in dry blankets and, during helicopter transport, try to keep
wind from open doors from blowing over or under the casualty.
4. Use the Thermal Angel or other portable fluid warmer on all IV sites, if
available.
For Official Use Only 47
TACTICAL COMBAT CASUALTY CARE HANDBOOK

Section VI: Medication guidelines
Analgesia
Note: Pain medication should be given to any casualty in pain.
Oral analgesia
1. Give to any casualty still able to fight.
Note: These medications are included in the Combat Pill Pack: Meloxicam (Mobic)
15 milligrams (mg) and acetaminophen (Tylenol) 650 mg bi-layer caplet, x 2.
2. Oral transmucosal fentanyl citrate 400-microgram lozenge.
• Tape lozenge-on-a-stick to the casualty’s finger and place in thecasualty’s cheek.
• Reassess the casualty in 15 minutes.
• Add a second lozenge in the other cheek as necessary to control severepain.
• Monitor for respiratory depression.
3. Morphine sulfate
• Give morphine sulfate 5 mg IV or IO.
• Reassess in 10 minutes.
• Repeat dose every 10 minutes as necessary to control severe pain.
• Monitor for respiratory depression.
• Give promethazine 25 mg IV/IO/IM every 4 hours for synergisticanalgesic effect and as a counter to morphine-induced nausea.
4. Naloxone (Narcan)
• Have naloxone (Narcan) available before administering fentanyl ormorphine.
• Use immediately if casualty exhibits signs of respiratory depression.
48 For Official Use Only
CENTER FOR ARMY LESSONS LEARNED

Antibiotics
Note: Treat all casualties with open combat wounds with antibiotics.
Broad-spectrum antibiotics (for example, fluoroquinolones or cephalosporins)
should be used, depending on the casualty’s condition and allergies.
1. Oral antibiotics
Note: This medication is included in the Combat Pill Pack: Gatifloxacin 400 mg
once a day.
2. Non-oral antibiotics
• Cefotetan 2 grams (g) IV/IO (given with a slow push over 3-5 minutes) orIM every 12 hours.
• Ertapenem 1 g IV or IM every 24 hours.
For Official Use Only 49
TACTICAL COMBAT CASUALTY CARE HANDBOOK


Appendix A
Triage Categories
TriageCategory
Category Description Examples
Immediate This group includes thoseSoldiers requiringlifesaving surgery. Thesurgical procedures in thiscategory should not betime-consuming andshould concern only thosepatients with high chancesof survival.
Upper airway obstruction
Severe respiratory distress
Life-threatening bleeding
Tension pneumothorax
Hemothorax
Flail chest
Extensive 2nd- or 3rd-degree burns
Untreated poisoning (chemicalagent) and severe symptoms
Heat stroke
Decompensated shock
Rapidly deteriorating level ofconsciousness
Any other life-threateningcondition that is rapidlydeteriorating
Delayed This group includes thosewounded who are badly inneed of time-consumingsurgery, but whosegeneral condition permitsdelay in surgical treatmentwithout undulyendangering life.Sustaining treatment willbe required (e.g.,stabilizing intravenousfluids, splinting,administration ofantibiotics,catheterization, gastricdecompression, and reliefof pain).
Compensated shock
Fracture, dislocation, or injurycausing circulatory compromise
Severe bleeding, controlled by atourniquet or other means
Suspected compartment syndrome
Penetrating head, neck, chest,back, or abdominal injurieswithout airway or breathingcompromise or decompensatedshock
Uncomplicated immobilizedcervical spine injuries
Large, dirty, or crushed soft-tissueinjuries
Severe combat stress symptoms orpsychosis
For Official Use Only 51
TACTICAL COMBAT CASUALTY CARE HANDBOOK
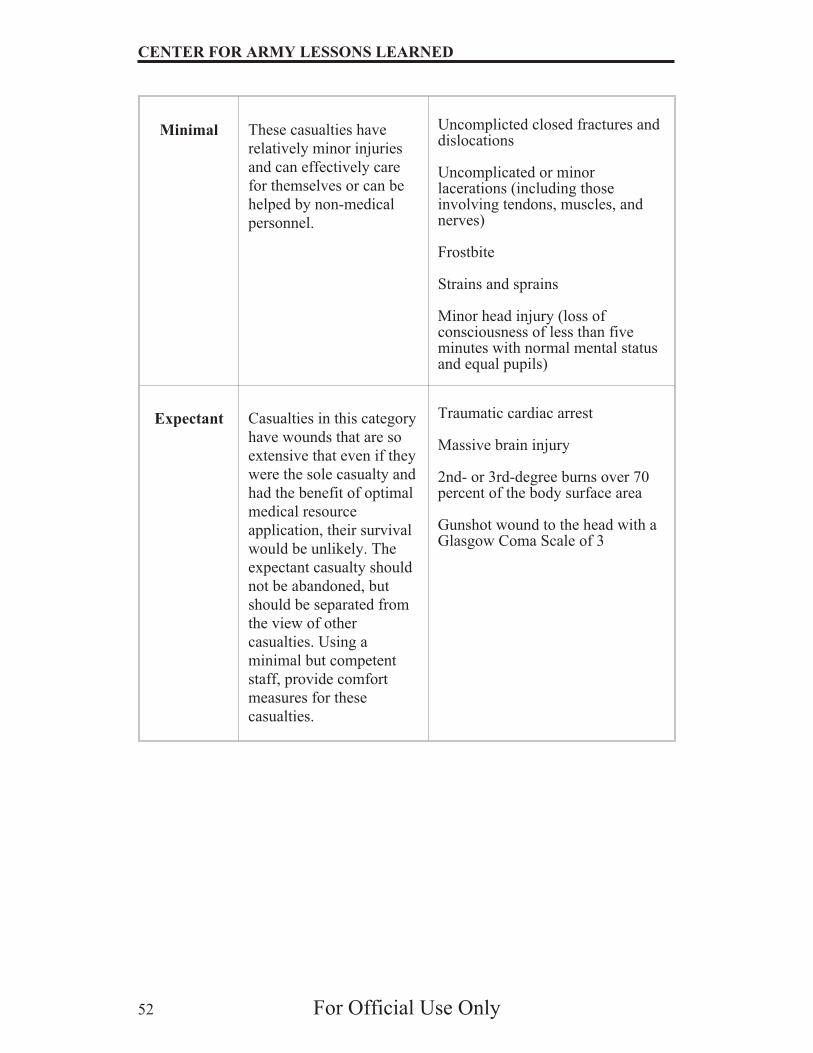
Minimal These casualties have
relatively minor injuries
and can effectively care
for themselves or can be
helped by non-medical
personnel.
Uncomplicted closed fractures anddislocations
Uncomplicated or minorlacerations (including thoseinvolving tendons, muscles, andnerves)
Frostbite
Strains and sprains
Minor head injury (loss ofconsciousness of less than fiveminutes with normal mental statusand equal pupils)
Expectant Casualties in this category
have wounds that are so
extensive that even if they
were the sole casualty and
had the benefit of optimal
medical resource
application, their survival
would be unlikely. The
expectant casualty should
not be abandoned, but
should be separated from
the view of other
casualties. Using a
minimal but competent
staff, provide comfort
measures for these
casualties.
Traumatic cardiac arrest
Massive brain injury
2nd- or 3rd-degree burns over 70percent of the body surface area
Gunshot wound to the head with aGlasgow Coma Scale of 3
52 For Official Use Only
CENTER FOR ARMY LESSONS LEARNED

Appendix B
Evacuation Categories
Evacuation Category Army Navy Marines Air Force
Urgent
(To save life, limb, oreyesight.)
Within 2
hours
Within 2
hours
Within 2
hours
As soon as
possible
Priority
(Medical condition coulddeteriorate.)
Within 4
hours
Within 4
hours
Within 4
hours
Within 24
hours
Routine
(Condition is not expected todeteriorate significantlywhile awaiting flight.)
Within 24
hours
Within 24
hours
Within 24
hours
Within 72
hours
Note: The categories of evacuation precedence are urgent, priority, and routine.
The evacuation time periods are flexible, mission-dependent, and vary greatly
among the services based upon the different types of evacuation assets that each
uses. The Army uses an “Urgent Surgical” subcategory to identify casualties that
may need immediate surgical intervention. The Army also uses a “Convenience”
category for personnel requiring medical evacuation for conditions that are not
expected to significantly change for an extended period of time (greater than 72
hours).
For Official Use Only 53
TACTICAL COMBAT CASUALTY CARE HANDBOOK

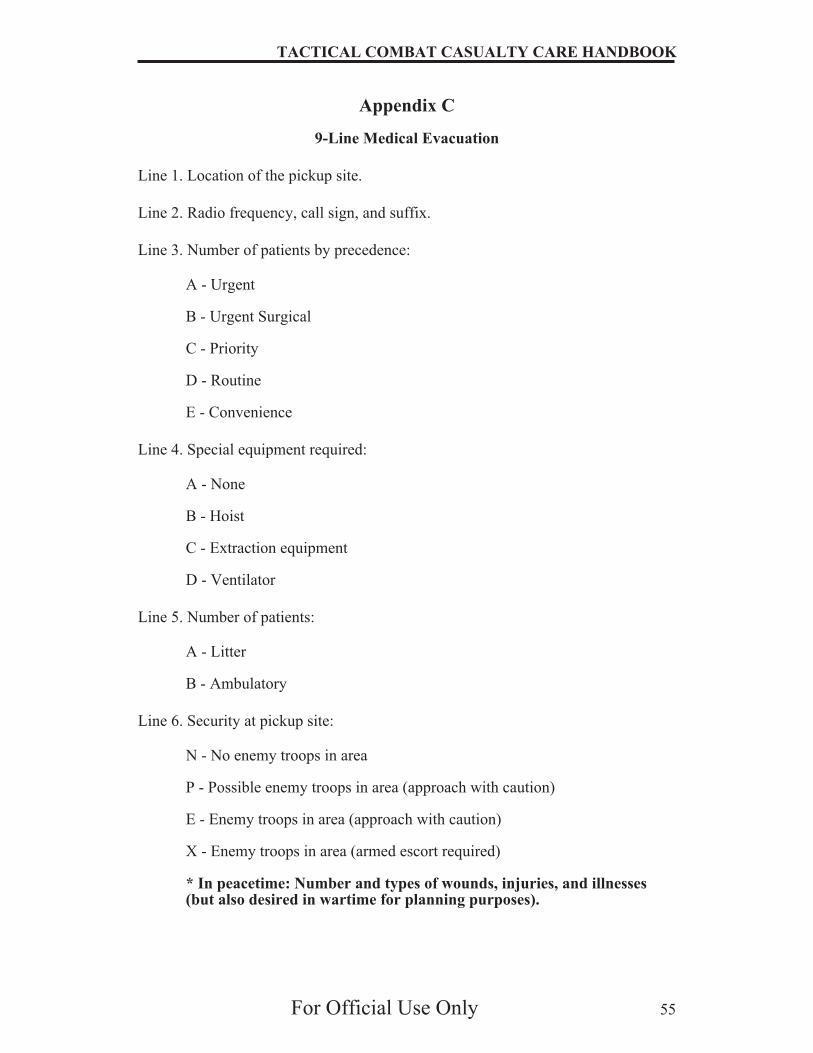
Appendix C
9-Line Medical Evacuation
Line 1. Location of the pickup site.
Line 2. Radio frequency, call sign, and suffix.
Line 3. Number of patients by precedence:
A - Urgent
B - Urgent Surgical
C - Priority
D - Routine
E - Convenience
Line 4. Special equipment required:
A - None
B - Hoist
C - Extraction equipment
D - Ventilator
Line 5. Number of patients:
A - Litter
B - Ambulatory
Line 6. Security at pickup site:
N - No enemy troops in area
P - Possible enemy troops in area (approach with caution)
E - Enemy troops in area (approach with caution)
X - Enemy troops in area (armed escort required)
* In peacetime: Number and types of wounds, injuries, and illnesses(but also desired in wartime for planning purposes).
For Official Use Only 55
TACTICAL COMBAT CASUALTY CARE HANDBOOK

Line 7. Method of marking pickup site:
A - Panels
B - Pyrotechnic signal
C - Smoke signal
D - None
E - Other
Line 8. Patient nationality and status:
A – U.S. military
B – U.S. civilian
C - Non-U.S. military
D - Non-U.S. civilian
E – Enemy prisoner of war
Line 9. Nuclear, Biological, and Chemical (NBC) contamination:
N - Nuclear
B - Biological
C - Chemical
* In peacetime: Terrain description of pickup site (but also desired inwartime as NBC contamination is rarely an issue).
56 For Official Use Only
CENTER FOR ARMY LESSONS LEARNED
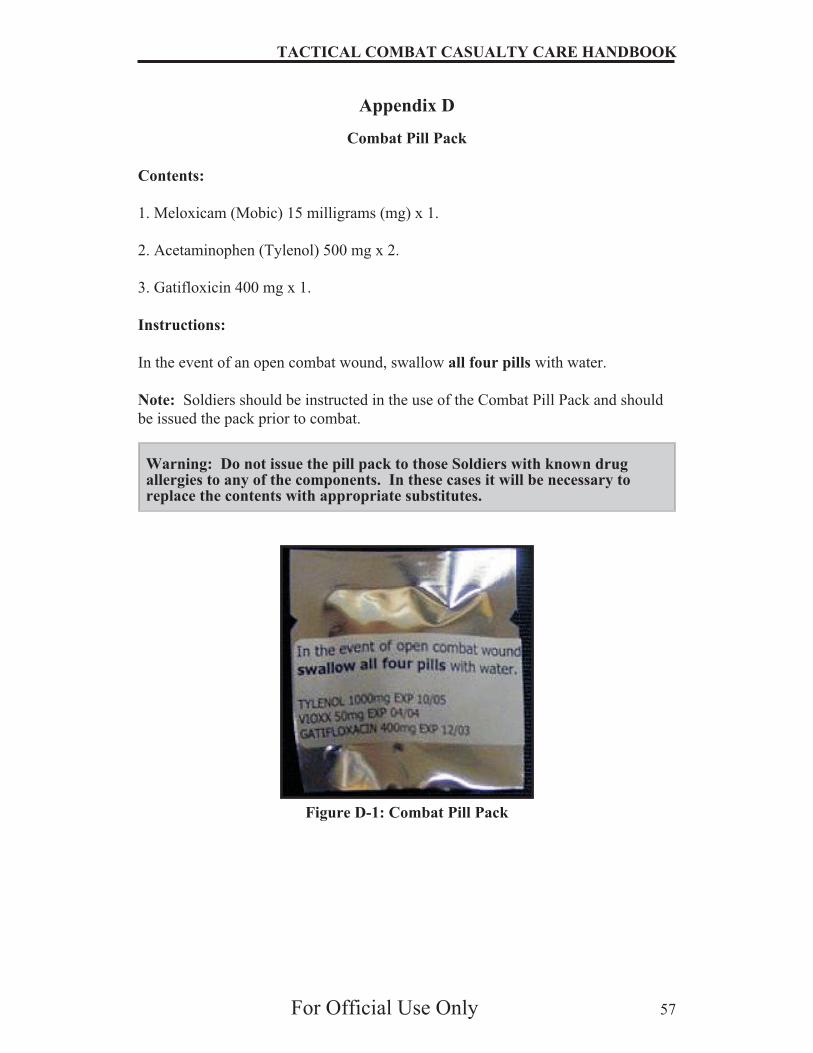
Appendix D
Combat Pill Pack
Contents:
1. Meloxicam (Mobic) 15 milligrams (mg) x 1.
2. Acetaminophen (Tylenol) 500 mg x 2.
3. Gatifloxicin 400 mg x 1.
Instructions:
In the event of an open combat wound, swallow all four pills with water.
Note: Soldiers should be instructed in the use of the Combat Pill Pack and should
be issued the pack prior to combat.
Warning: Do not issue the pill pack to those Soldiers with known drugallergies to any of the components. In these cases it will be necessary toreplace the contents with appropriate substitutes.
For Official Use Only 57
TACTICAL COMBAT CASUALTY CARE HANDBOOK
Figure D-1: Combat Pill Pack

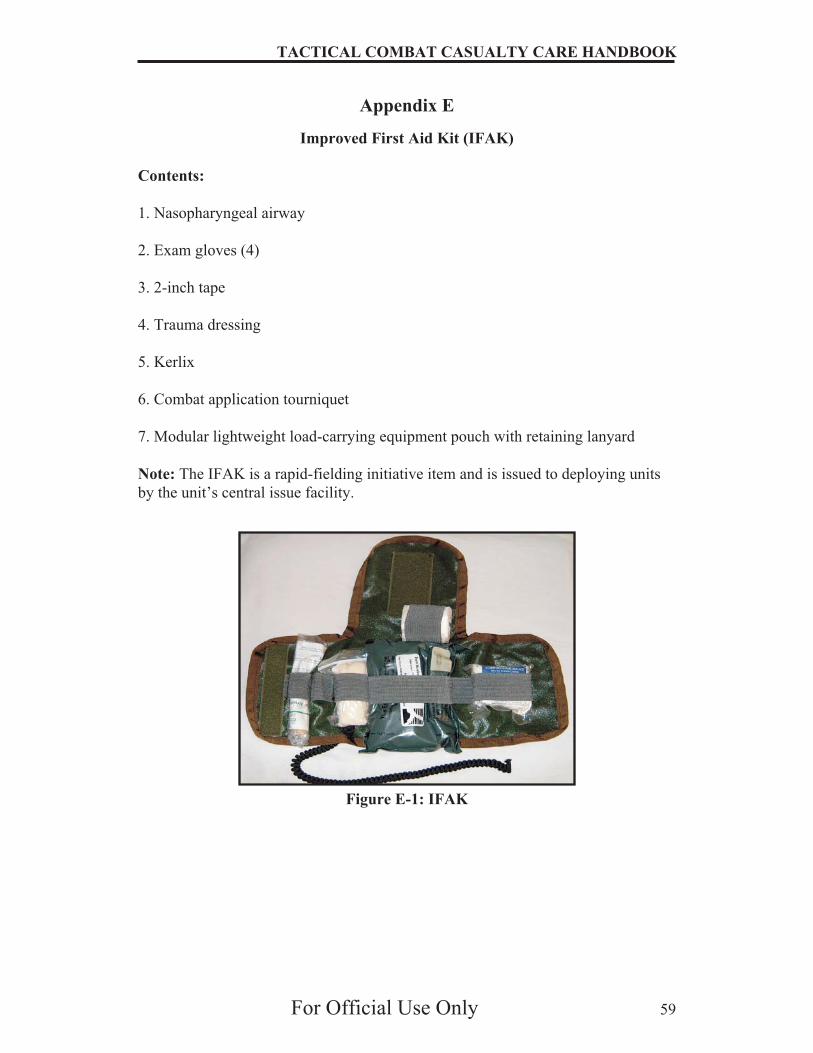
Appendix E
Improved First Aid Kit (IFAK)
Contents:
1. Nasopharyngeal airway
2. Exam gloves (4)
3. 2-inch tape
4. Trauma dressing
5. Kerlix
6. Combat application tourniquet
7. Modular lightweight load-carrying equipment pouch with retaining lanyard
Note: The IFAK is a rapid-fielding initiative item and is issued to deploying units
by the unit’s central issue facility.
For Official Use Only 59
TACTICAL COMBAT CASUALTY CARE HANDBOOK
Figure E-1: IFAK


Appendix F
Warrior Aid and Litter Combat Casualty Kit (WALK)
Contents:
1. 1 x bag (WALK)
2. 10 x gloves (Trauma, Nitrile, Black Talon [5 pair])
3. 2 x nasopharyngeal airway (28 Fr with lubricant)
4. 2 x gauze (Petrolatum 3” x 18”)
5. 2 x needle/catheter (14 gauge x 3.25”)
6. 2 x combat application tourniquet
7. 6 x trauma dressing
8. 4 x gauze (compressed, vacuum-sealed)
9. 1 x emergency trauma abdominal dressing
10. 2 x SAM II splint
11. 1 x shears (Trauma, 7.25”)
12. 2 x tape (surgical, adhesive 2”)
13. 1 x card (reference, combat casualty)
14. 2 x card (individual, combat casualty)
15. 1 x panel (recognition, orange)
16. 1 x litter (evacuation platform, Talon 90C)
17. 1 x Hypothermia Management and Prevention Kit
18. 4 x strap (tie down, universal litter)
Note: There should be a WALK on at least one vehicle per convoy.
For Official Use Only 61
TACTICAL COMBAT CASUALTY CARE HANDBOOK

62 For Official Use Only
CENTER FOR ARMY LESSONS LEARNED
Figure F-1: Warrior Aid and Litter Combat Casualty Kit

Appendix G
Aid Bag Considerations
There is no standard packing list for an aid bag. The contents of a medic’s or
provider’s aid bag are dependent upon:
• The skill level of the medic or provider.
• The type of mission.
• The length of mission.
In preparing an aid bag, the following categories and suggestions should be
considered:
• Airway supplies:
º Nasopharyngeal airways
º Combitube kits
º King LT kits
º Surgical cricothyroidotomy kit (if trained)
• Breathing supplies:
º Occlusive dressing
º Asherman Chest Seal
º 10- to 14-gauge, 2.5- to 3-inch needle catheter unit (chestdecompression)
º Chest tube supplies (if trained)
• Hemorrhage control:
º Emergency trauma dressings
º Kerlix
º Tourniquets
º Hemostatic devices (HemCon or QuikClot)
º Cravats
• Access devices:
º Intravenous (IV) infusion sets/kits
º IV fluids (Hextend)
º FAST1 sternal intraosseous device
For Official Use Only 63
TACTICAL COMBAT CASUALTY CARE HANDBOOK

• Fractures:
º SAM II splints
º Ace wraps
• Hypothermia prevention:
º Hypothermia Prevention and Management Kit
• Antibiotics:
º Gatifloxicin tablets, 400 milligrams
º Cefotetan, 2-gram injections
• Pain medication:
º Acetaminophen
º Mobic
º Morphine
º Transmucosal fentanyl citrate
º Promethazine
º Narcan
• Miscellaneous supplies:
º Large abdominal pads
º Tape, various sizes
º Gauze pads, various sizes
º Eye pads
º Cotton-tipped applicators
º Stethoscope
º Burn packs
º Water-based lubricant (for example, Surgilube)
º Exam gloves
º C-collar
º Needles and syringes, various sizes
º Chem lights
º Band-Aids
º Tongue depressors
64 For Official Use Only
CENTER FOR ARMY LESSONS LEARNED

Appendix H
National Stock Numbers
Equipment National Stock Number(NSN)
Airway Supplies
Nasopharyngeal airway
“Combitube, adult”
King LT:
Size 3
Size 4
Size 5
6515-00-300-2900
6515-01-307-7479
6515-01-515-0146
6515-01-515-0151
6515-01-515-0161
Breathing Supplies
Asherman Chest Seal 6510-01-408-1920
Hemorrhage Supplies
Combat application tourniquet
HemCon dressing
QuikClot
6515-01-521-7976
6510-01-502-6938
6510-01-499-9285
Vascular Access/Fluids
FAST1 Device
Hetastarch (Hextend)
6515-01-453-0960
6505-01-498-8636
Hypothermia Prevention
Hypothermia Management PreventionKit:
Ready-Heat blanket
Blizzard Rescue Blanket
Thermolite Cap
6515-01-532-8056
6532-01-525-4063
6532-01-524-6932
Thermal Angel 6515-01-242-6532
For Official Use Only 65
TACTICAL COMBAT CASUALTY CARE HANDBOOK

Miscellaneous Supplies
Sked litter
Talon IIC
Warrior Aid and Litter Combat Casualty Kit(WALK)
Improved First Aid Kit (IFAK)
Combat application tourniquet
Nasopharyngeal airway
Trauma dressing
4-inch Kerlix Roll
6530-01-260-1222
6530-01-452-1651
6545-01-532-4962
Kit is an issue item
6515-01-521-7976
6515-00-300-2900
6510-01-492-2275
6510-00-105-5807
66 For Official Use Only
CENTER FOR ARMY LESSONS LEARNED

Appendix I
References/Resources
Books:
Alexander, R.H. and H.J. Proctor. Advanced Trauma Life Support 1993 StudentManual. American College of Surgeons, 2003.
Bond, Casey (ed). Combat Medic Field Reference. Jones and Bartlett, 2005.
Burris, David G., Paul J. Dougherty, et al. (eds). Emergency War Surgery, ThirdUnited States Revision. Department of Defense, 2004.
McSwain, N. (ed.). Prehospital Trauma Life Support Manual, 5th edition. Mosby,2003.
Articles:
Butler, F. and K. O’Connor. “Antibiotics in Tactical Combat Casualty Care.”
Military Medicine. 2003; 168: 911-914.
Butler, F.K., J. Hagman, and E.G. Butler. “Tactical Combat Casualty Care in
Special Operations.” Military Medicine. 1996: 161 (Supp) 3-16.
Giebner, S. “Tactical Combat Casualty Care – 2003.” Journal of Special
Operations Medicine. 2003; 3(4): 47-55.
Training Manuals:
STP 8-91W15-SM-TG, Soldier’s Manual and Trainer’s Guide, MOS 91W, Health
Care Specialist, 10 October 2001.
Center for Army Lessons Learned (CALL) Resources:
CALL Newsletter 04-18, Medical Planning.
CALL Special Edition 05-8, Deploying Health Care Provider.
Online Resources:
U.S. Army Medical Department (AMEDD) Center and School Portal, Deployment
Relevant Training: https://www.cs.amedd.army.mil/deployment2.aspx.
AMEDD Lessons Learned: http://lessonslearned.amedd.army.mil.
Center for Army Lessons Learned: http://call.army.mil/.
For Official Use Only 67
TACTICAL COMBAT CASUALTY CARE HANDBOOK


CALL PUBLICATIONS INFORMATION PAGE
In an effort to make access to our information easier and faster, we have put all ofour publications, along with numerous other useful products, on our World WideWeb site. The CALL Web site is restricted to Department of Defense personnel.The URL is http://call2.army.mil.
If you have any comments, suggestions, or requests for information, you maycontact CALL by using the Web site "Request for Information or a CALL Product"or "Give Us Your Feedback" links at <http://call.army.mil>. We also encourageSoldiers and leaders to send in any tactics, techniques, and procedures (TTP) thathave been effective for them or their units. The TTP may be sent to us in draft formor fully formatted and ready to print. Our publications receive wide distributionthroughout the Army, and CALL would like to include your ideas. Your name willappear in the byline.
If your unit has identified lessons learned or tactics, techniques, and
procedures, please contact CALL using the following information:
Telephone: DSN 552-9569/9533; Commercial 913-684-9569/9533
Fax: DSN 552-4387; Commercial 913-684-4387
NIPR Email address: [email protected]
SIPR Email address: [email protected]
Message: CDRUSACAC FT LEAVENWORTH KS//ATZL-CTL/
Mailing Address: Center for Army Lessons Learned, ATTN: OCC, 10 MeadeAve., Bldg 50, Fort Leavenworth, KS 66027-1350.
If you would like copies of this manual or have a request for information
(RFI), please submit your request at NIPR: http://call.army.mil or SIPR:
http://call.army.smil.mil. Use the “Request Information or a CALL Product” link.
Please fill in all the information to include unit name and official military address.
Please include building number and street for military posts.
Additionally, we have developed a repository, the CALL Archives, that contains acollection of operational records (OPORDS and FRAGOS) from recent and pastmilitary operations. Much of the information in the CALL Archives ispassword-protected. You may obtain your own password by accessing our Web siteand visiting the CALL Archives page. Click on "Restricted Access" and "CALLArchives Access Request." After you have filled in the information and submittedthe request form, we will mail you a password. You may also request a passwordvia STU III telephone or a SIPRNET e-mail account.
For Official Use Only 69
TACTICAL COMBAT CASUALTY CARE HANDBOOK

CALL's products are produced at Fort Leavenworth, KS, and are not distributedthrough publication channels. Due to limited resources, CALL selectively providesits products for distribution to units, organizations, agencies, and individuals andrelies on them to disseminate initial distribution of each publication to theirsubordinates. Contact your appropriate higher element if your unit or office is notreceiving initial distribution of CALL publications.
Installation Distribution Centers TRADOC Schools
Corps, divisions, and brigades ROTC headquarters
Special forces groups and battalions Combat training centers
Ranger battalions Regional support commands
Staff adjutant generals
70 For Official Use Only
CENTER FOR ARMY LESSONS LEARNED

CALL PRODUCTS "ON-LINE"
Access information from CALL via the World Wide Web (www). CALL also
offers Web-based access to the CALL Archives. The CALL Home Page address is:
http://call.army.mil
CALL produces the following publications:
BCTP Bulletins, CTC Bulletins, Newsletters, and Trends Products: These
products are periodic publications that provide current lessons learned/TTP and
information from the training centers.
Special Editions: Special Editions are newsletters related to a specific operation or
exercise. Special Editions are normally available prior to a deployment and targeted
for only those units deploying to a particular theater or preparing to deploy to the
theater.
News From the Front: This product contains information and lessons on exercises,
real-world events, and subjects that inform and educate Soldiers and leaders. It
provides an opportunity for units and Soldiers to learn from each other by sharing
information and lessons. News From the Front can be accessed from the CALL
Web site.
Training Techniques: Accessed from the CALL products page, this online
publication focuses on articles that primarily provide tactics, techniques, and
procedures (TTP) at the brigade and below level of warfare.
Handbooks: Handbooks are "how to" manuals on specific subjects such as
rehearsals, inactivation, and convoy operations.
Initial Impressions Reports: Initial Impressions Reports are developed during and
immediately after a real-world operation and disseminated in the shortest time
possible for the follow-on units to use in educating personnel and supporting
training prior to deployment to a theater. Products that focus on training activities
may also be provided to support the follow-on unit.
Support CALL in the exchange of information by telling us about your successes
so they may be shared and become Army successes.
For Official Use Only 71
TACTICAL COMBAT CASUALTY CARE HANDBOOK

FOR OFFICIAL USE ONLY
10 Meade Avenue, Building 50
Fort Leavenworth, KS 66027-1350