0 >ÌÌ @n > - art of lock picking · page 6 how to pick a lock - step by step this is the...
TRANSCRIPT

HOW TO PICK A LOCK
A
STEP BY STEP
GUIDE TO SLAYING LOCKS
ARE YOU READY TO LEARN THEART OF LOCK PICKING?

How to Pick a LockA Step By Step Guide To Slaying Locks
Ready to learn how to pick a lock? Is that a yes? Good because this beginner’s guide to lock picking has helped thousandslearn the art of lock picking and it will help you too! I know intro’s can sometimes be more boring than watching a sloth eatplain chicken for 8 weeks straight so let’s get to the good stuff already!
Page 1
Lock picking is not rocket science and witha little knowledge and a decent set of lockpicking tools, you’ll learn how to pick a lockvery quickly, I promise. As you will come to see, locks areextremely stupid creatures that put uplittle defense against anyone trying tobypass them — with that, let us get started.
How to pick a lock - step by step
Introduction to Lock Picking .................................................. Page 2
How a Pin Tumbler Lock Works ........................................... Page 3
Flaws are Good: Manufacturing Tolerances ................... Page 6
Lock Picking Tools ..................................................................... Page 8
The Tension Wrench ................................................................ Page 9
Single Pin Picking ....................................................................... Page 12
Raking ............................................................................................ Page 14
Lock Picking Guide - Contents:
1.
2.
3.
4.
5.
6.
7.

Page 2
How to pick a lock - step by step
Introduction to Lock Picking
So what exactly is lock picking? Simply put, lock picking is a non-destructive way to open a lock without using the original key. This can be done through a variety of different ways, but all have the samegoal in mind — to mimic the key by using something other than the key. But in order to mimic a key, we must understand how a key works in a lock.This is done by first understanding how a lock itself works. There are many different types of locks utilized today, but all are based onfairly simple concepts — remember, locks are stupid creatures. For thepurpose of this guide, we will be focusing on the most basic and commonlyused lock, the pin tumbler lock.
The pin tumbler lock makes up about90% of locks used today and is whatyou will find on about every deadbolt,door lock, and padlock. They areextremely simple in their design andessentially 6,000-year-old technology. It is also often thought that learninghow to pick a lock requires some Zen-like focus. That you must sit quietly insome candlelit room for hours uponhours to find any success at the craft oflock picking.
But it is, in fact, quite the opposite. The basic concepts andtechniques of lock picking can be learned and applied easily withinminutes.

Page 3
How to pick a lock - step by step
How a Pin Tumbler WorksThe first step in learning how to pick locks is to understand how exactly thelock itself operates. Let’s start with the quick anatomy of a pin tumblerlock. These locks have six main components:
1. The Cylinder: The cylinder - orhousing - of the lock is essentially afixed outer shell that holds all thefunctional parts together.
2. The Plug: The plug is where we
insert the key and rotates freely
inside the shell when the key is
inserted. The plug has a series of
holes drilled down the center that
allows small pins to enter and exit.

Page 4
How to pick a lock - step by step
3. The Shear Line: The shear line is
the physical gap between the plug
and the housing. As we will see
later, the shear line plays one of the
most important roles in lock
picking.
4. Driver Pins: The driver pins arethe top set of pins and typically sithalfway between the housing andthe plug. Because of this, the plug isrestricted from rotating freely asany rotational force placed on theplug would result in binding thedriver pins. These pins are themeat and bones of the lock and arewhat keep the lock… well locked.
5. Key Pins: The key pins are
the bottom set of pins and do
exactly as the name suggests,
make contact with the key
when inserted. Each key pin is a
different length to match the
bitting — or cut — of the
appropriate key. We will see
the significance of this in a
moment.

Page 5
How to pick a lock - step by step
6. Springs: The springs do whatsprings do best, push stuff. Their
purpose in the lock is to force thedriver pins into the plug, thus
keeping the plug from freelyrotating.
When the key is placed into the cylinder, it pushes the key pins flushwith the shear line causing the driver pins to exit the plug. When the gap between the key pins and driver pins is exactly that ofthe shear line we can rotate the plug and disengage the lock.
Click On Image to Watch Animation

Page 6
How to pick a lock - step by step
This is the basis of pin and tumbler lock picking, to mimic the key bybumping every pin flush with the shear line and then rotating the plug. But why is it that we can do this in the first place and how is it that we cankeep every pin at the shear line without the constant pressure of a key?The answer is simply “flaws.”
Flaws Are Good: Manufacturing Tolerances
Nothing is perfect. Nothing can be produced without its flaws or somevariation from its ideal design. Everything is designed with a tolerance inmind. It is because of these flaws in production that we are able to manipulateand bypass locks. In the case of the tumbler lock, we have only but to lookat the plug. During the production of the plug, holes are drilled to hold the key pins.Ideally, these holes would all run down the true center-line of the plug andwould be in perfect alignment with each other hole. But again nothing isperfect. Each hole drilled has some variation from both the true center-lineand from each other hole. The quality of the lock greatly depends upon the quality and care that is putinto drilling these holes. Cheaper locks will generally have a greatervariation between holes than that of higher quality locks. In any case, this variation can be as slight as a thousandth of an inch,however, it’s because of this tiny distortion that we gain our ability to picklocks.

Page 7
How to pick a lock - step by step
Let's first look at a perfectly produced plug that would occur in a perfectworld. As we can see below, all the holes run perfectly down the centerlineof the plug!
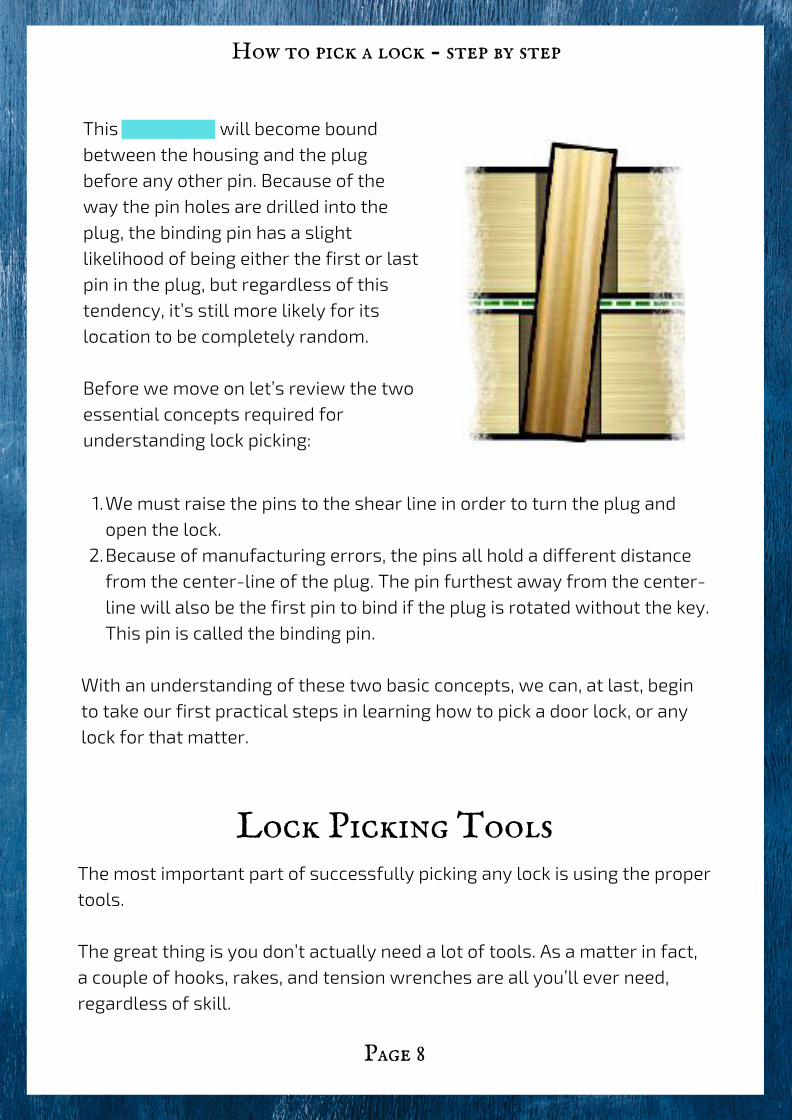
But in a real lock, all the pin holes vary in distance from the true center-lineof the plug, such as in this exaggerated example of a real lock plug.
There is an important term that lock pickers refer to as the “binding pin.”This pin is defined as the pin furthest from the plug’s true center-line. If youwere to attempt to rotate the plug without the key, the binding pin wouldbe the first in the line of pins to stop the plug from turning.
Page 8
How to pick a lock - step by step
This binding pin will become boundbetween the housing and the plugbefore any other pin. Because of theway the pin holes are drilled into theplug, the binding pin has a slightlikelihood of being either the first or lastpin in the plug, but regardless of thistendency, it’s still more likely for itslocation to be completely random. Before we move on let’s review the twoessential concepts required forunderstanding lock picking:
We must raise the pins to the shear line in order to turn the plug andopen the lock.Because of manufacturing errors, the pins all hold a different distancefrom the center-line of the plug. The pin furthest away from the center-line will also be the first pin to bind if the plug is rotated without the key.This pin is called the binding pin.
1.
2.
With an understanding of these two basic concepts, we can, at last, beginto take our first practical steps in learning how to pick a door lock, or anylock for that matter.
Lock Picking ToolsThe most important part of successfully picking any lock is using the propertools. The great thing is you don’t actually need a lot of tools. As a matter in fact,a couple of hooks, rakes, and tension wrenches are all you’ll ever need,regardless of skill.

Once you have your lock pick tools, it’s time to get down and dirty! ...that is after we cover how to use the tension wrench.
Page 9
How to pick a lock - step by step
My suggestion for a fantasticbeginner lock pick set is
the Peterson GSP Ghost LockPick Set because its pick
selection has a special focuson single pin picking and isgoing to allow you to pick amuch wider variety of lockswith a much wider variety of
techniques without everneeding to go out and buy any
other tools.
CHECK IT OUT
The Tension WrenchThe first order of business is learning how to properly use the tensionwrench. This little bent piece of metal is used to accomplish two things. Firstly, it acts similar to the key where it gives us the leverage we need toturn the plug. But more importantly, this tiny wrench is the tool that helpsus to keep the pins at the shear line as we pick them.

Page 10
How to pick a lock - step by step
Here is how it works. As we put slight tensionon the wrench, the binding pin will stop theplug from rotating. It’s here that we can now understand theimportance of the binding pin. As the pin beginsto bind, we push it up past the shear line withour pick and once up and out, the lock will turnever so slightly as the plug finds the nextbinding pin to stop on. But what also results is if you maintain thecorrect amount of tension on the wrench, thedriver pin will remain out of the plug and abovethe shear line while the key pin falls back intoits hole. While the plug only turns ever soslightly, it is enough for the driver pin to catchon the top of the plug and if the tension isreleased, the pin will fall back. So now that we know what we are trying toaccomplish inside the lock, let’s get down to it. Take your tension wrench and insert theshorter end into the lower part of the keyhole.
Click On Imageto Watch
Animation
While not always necessary, we sometimes need to determine in whichdirection the plug turns. To accomplish this apply pressure to thetension wrench clockwise and then counterclockwise. The plug should turnslightly both ways before it stops. As you rotate the plug both ways, focus on how the tension wrench feels asit stops. If it feels stiff and has little give, this is likely the wrong direction ofrotation. Whereas the right direction of rotation will feel mushy and give alittle more. Something else to keep in mind is some cheaper locks will openin whichever way you rotate the plug, such as the majority of padlocks.

Page 11
How to pick a lock - step by step
Once we are aware of which way the plug turns we can begin to put tensionon the wrench in that direction. The amount of tension we exert is key to successfully picking the lock. If weexert too much pressure the pins will bind below the shear line. If we don’tuse enough tension the pins will simply fall back into the plug.
Developing this feel for the tensionwrench is the primary skill involved in lockpicking. A general rule of thumb when using thetension wrench is to use one finger andstart with the slightest touch, increasingpressure as you find it necessary. As we apply slight tension on the plug, thebinding pin will begin to bind. The nextstep is to find this pin and push it abovethe shear line.
Once we are aware of which way the plug turns we can begin to put tensionon the wrench in that direction. The amount of tension we exert is key to successfully picking the lock. If weexert too much pressure the pins will bind below the shear line. If we don’tuse enough tension the pins will simply fall back into the plug.

So now that we know all this mumbo jumbo we can finally address the taskat hand, picking a lock. While there are multiple methods that one can useto pick a lock, we are first going to look at the method called single pinpicking — also known as SPP. In this method, we simply bump each individual pin up one at a time using ahook-type pick. While single pin picking is not the fastest nor easiest method, it is the bestin regards to learning how to pick a padlock or door lock as it gives us abetter understanding of exactly what is going on inside a lock. Obtainingthis understanding can be the difference between the mediocre and themaster. With that being said, let’s give it a shot.
Page 12
How to pick a lock - step by step
Single Pin Picking
1. The first thing we have to do is locate the binding pin. Insert your tension wrench and give it the necessary pressure to bind thefirst binding pin. You will need to keep tension on the plug during the entireprocess of picking the lock. Next, insert your pick into the top of the lock and, starting from either thefront or back, begin to cautiously probe each pin by lifting it up slightly. Asyou push each pin up, gauge how difficult it is to move. Most of the pins will be relatively easy to lift with the exception of thebinding pin. This pin will feel stiff and if you were to release the tension onthe plug it would once again feel like the rest of the pins.
2. Once we have found the first binding pin we need to raise itabove the shear line.
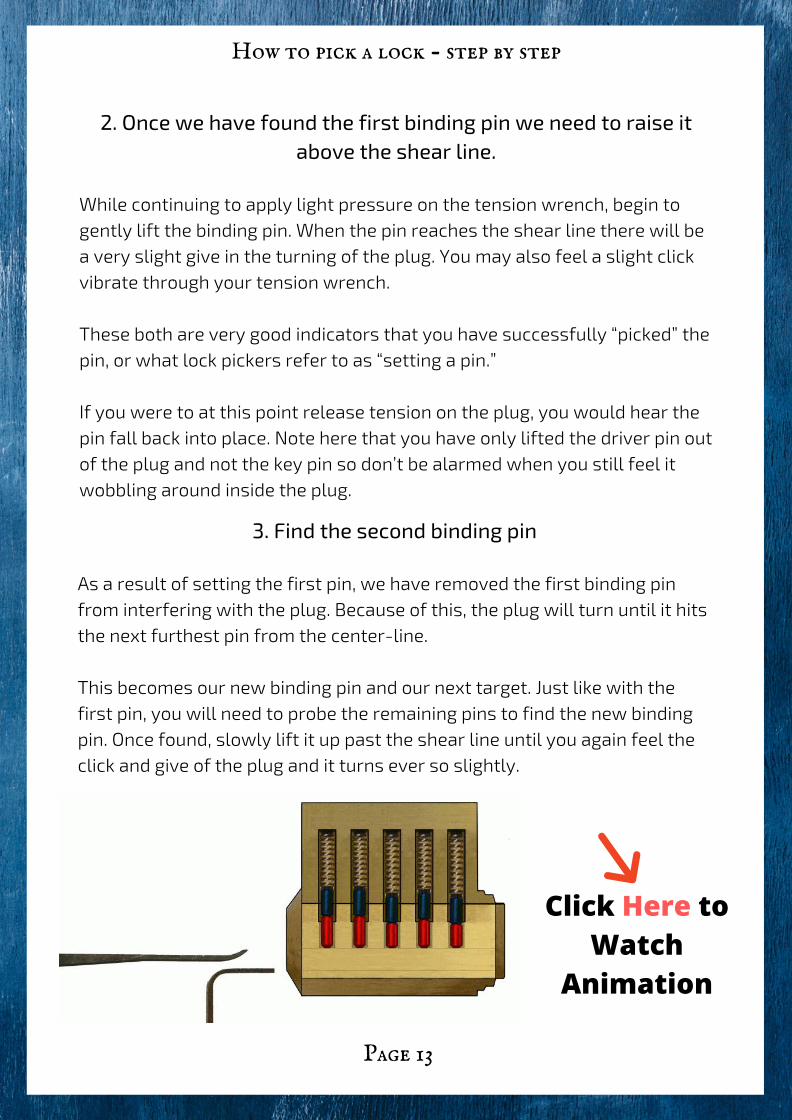
While continuing to apply light pressure on the tension wrench, begin togently lift the binding pin. When the pin reaches the shear line there will bea very slight give in the turning of the plug. You may also feel a slight clickvibrate through your tension wrench. These both are very good indicators that you have successfully “picked” thepin, or what lock pickers refer to as “setting a pin.” If you were to at this point release tension on the plug, you would hear thepin fall back into place. Note here that you have only lifted the driver pin outof the plug and not the key pin so don’t be alarmed when you still feel itwobbling around inside the plug.
3. Find the second binding pin As a result of setting the first pin, we have removed the first binding pinfrom interfering with the plug. Because of this, the plug will turn until it hitsthe next furthest pin from the center-line. This becomes our new binding pin and our next target. Just like with thefirst pin, you will need to probe the remaining pins to find the new bindingpin. Once found, slowly lift it up past the shear line until you again feel theclick and give of the plug and it turns ever so slightly.
Page 13
How to pick a lock - step by step
Click Here toWatch
Animation

4. Continue to apply pressure on the tension wrench, repeat thesame steps of locating the new binding pin and setting it.
Once all the pins are set, the plug will give and allow us to fully rotate it asif we had a key. That’s all there is to it! If by chance the pins either don’t set or keep falling, it is likely that you needto re-adjust the amount of pressure that you are applying to the tensionwrench. With some practice, you will develop a feel for exactly how muchpressure to exert throughout the entire process. Additionally, check out ourguide to honing your single pin picking skills.
Page 14
How to pick a lock - step by step
RakingOne of the easiest ways to pick a lock is called raking. Raking has currentlybecome the most common method for lock pickers as it’s quicker and theeasiest way to pick a lock. Raking is accomplished by inserting your pick into the back of the lock andquickly pulling it across the pins repeatedly with an upward force while atthe same time applying tension on the plug. This will cause the pins tobounce up above the shear line. While it works for most cylindrical tumbler locks, this method will struggleif the pins have any dramatic changes in size. An example of this would beas follows: one short pin – one long pin – one short pin – one long pin. While raking can be accomplished with just about any type of pick, it ismost commonly and more efficiently done with a rake-type of pick. Thesepicks commonly have a wavy edge but can also include picks such as thediamond or ball pick. Although there are many variations of each type of pick, a basic example ofeach can be seen on the next page.

Similar to single pin picking, the success we have in raking depends vastlyon the use of the tension wrench. Too much tension will cause the pins tobind below the shear line, while with too little tension the pins will againfall back into place. With that being rehashed, let’s get raking. Just as before insert the tension wrench into the bottom of the keyhole andapply slight tension to the plug. Now insert your pick into the back of thelock while applying upward pressure on the pins. Gently snap the pick out ina scrubbing sort of motion being sure to bump all the pins on your way out. Repeat this three or four times until all of the pins are set and the plugturns. If the lock does not unlock within five rakes, release the tension onthe plug and carefully listen for any set pins to drop.
Page 15
How to pick a lock - step by step
Click Here toWatch
Animation

If you do not hear any pins drop back into place this means you were eitherusing too much tension or not enough. Adjust the tension either lighter orheavier and try raking the lock again. Continue doing this until all the pinsset and the plug turns. With practice, you will gain a feel for the appropriate amount of tension toplace on the plug as you rake and will soon be able to open a lock withinyour first couple of attempts. If raking doesn’t seem to be working on aparticular lock, it can still be used to set several pins and you can finish offthe lock with the single pin picking method.
Page 16
How to pick a lock - step by step
Disclaimer:This Information is strictly to inform and not to be used in any malicious manner. Picklocks you own or have clear permission from the owner of that lock to pick. Know yourlocal laws and stay safe! Copyright:© 2018 Art of Lockpicking All rights reserved. No portion of this ebook may be reproduced in any form withoutpermission from the publisher, except as permitted by U.S. copyright law. Forpermissions contact: [email protected]
Visit Us At