xdrop manual droplet pcr (dpcr) manual_v1,1_oct-2019.pdfxdrop™ manual droplet pcr (dpcr) user...
TRANSCRIPT
Xdrop™ manual
Droplet PCR (dPCR) User manual v. 1.1 released 11 Oct. 2019

2
Table of Contents
Chapter 1: XdropTM at a Glance page 3
Targeted enrichment overview
Xdrop™ instrument overview
Required items for Xdrop™ dPCR
Suggested Samplix products
Equipment and reagents for Xdrop™ supplied by the user
Chapter 2: dPCR – General Considerations page 9
dPCR assay design
Target sequence
Primer design guidelines
DNA sample preparation
Primer optimization
Chapter 3: dPCR Setup page 12
Preparations for dPCR
Setup of dPCR reaction
Positive control dPCR reaction
Prepare dPCR cartridge
Collect generated droplets
Chapter 4: Single DNA Molecule Detection and Sorting of Droplets page 21
Requirements for flow cytometer analyzer and cell sorter
Notes to operator
Preparation of droplets for flow cytometry
Flow cytometry analysis of dPCR droplets
Set up flow cytometry with Cell sorter control droplets
Sorting of PCR positive dPCR droplets
Chapter 5: Evaluation of Targeted Enrichment page 27
Evaluate the enrichment of target DNA
Calculate fold enrichment of target DNA
Samplix ApS
Mileparken 28
DK – 2730 Herlev
www.samplix.com
Mail: [email protected]
For research use only, not for use in diagnostic procedures. Copyright 2019. Reproduction in any form,
either print or electronic, is prohibited without written permission of Samplix ApS
3
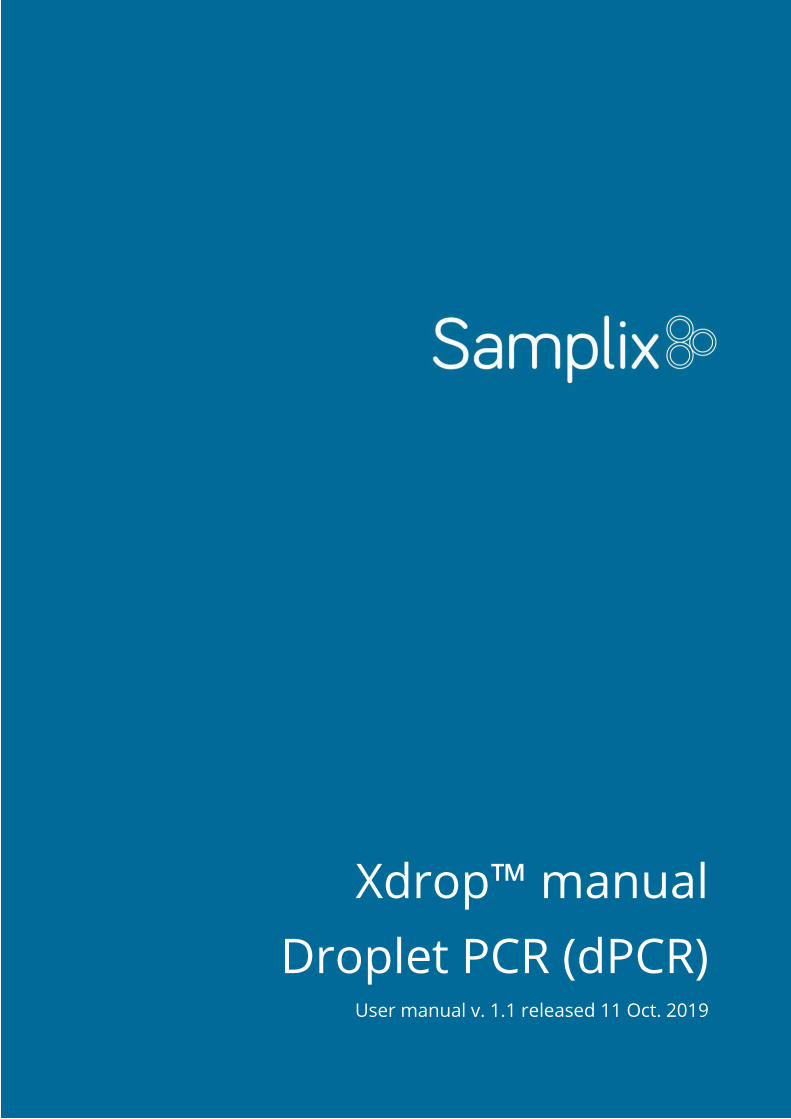
Chapter 1: Xdrop™ at a Glance
Targeted enrichment overview
Congratulations with your new Xdrop™ instrument, which we expect will facilitate groundbreaking research.
The Xdrop™ technology introduces a new approach for genomic analysis as the technology enables targeted
enrichment of genomic regions in droplets. The Xdrop™ technology offers sensitive and unbiased PCR-free
sample enrichment and general amplification prior to downstream analysis e.g. next generation sequencing.
Using the Xdrop™ instrument, cartridges, and reagents, sample DNA is partitioned into millions of picolitre
size highly stable droplets. The Xdrop™ droplet PCR (dPCR) droplets are suitable for standard PCR cycling,
flow cytometry analysis and sorting.
In the first step of enrichment, the sample is diluted and partitioned into millions of double emulsion droplets
using the Xdrop™ instrument and the advanced microfluidics dPCR cartridge. Droplets containing the target
DNA molecules are identified by a 120-160 bp targeted PCR specific to a sequence within or adjacent to the
region of interest. Positive droplets are identified by their fluorescence and physically separated from
negative droplets by use of a standard cell sorter. The result is an enrichment of long single molecules
comprising kilobases of DNA information.

4
For downstream universal amplification of the single molecules, Samplix has developed a proprietary
technology by which the high molecular weight DNA molecules are partitioned into thousands of droplets for
high fidelity multiple displacement amplification in droplets (dMDA).
The Xdrop™ enrichment and amplification technology are compatible with downstream molecular biology
techniques such as short- and long read sequencing.
Xdrop™ instrument overview
The Xdrop™ droplet generator is compatible with Samplix dPCR cartridges for production of dPCR droplets
and Samplix dMDA cartridges for the generation of droplets for amplification of DNA. When using dMDA
cartridges, always use the accompanying holder. The Xdrop™ instrument is used for generating both dPCR
and dMDA droplets.
The Xdrop™ instrument is composed of the following parts (see picture below):
• Drawer – holds the dPCR or dMDA cartridge.
• Touch screen – provides the means to control the droplet generator with gloved or un-
gloved hands.
• USB port on the back of the instrument – connects to a USB flash drive for troubleshooting, saving
log files, and for updating instrument firmware.
• Status LED –Purple when initializing and shutting down, Green when in standby, Blue
when operating and yellow-green when opening and closing the drawer.
• Air vents on the back of the instrument – for ventilation.
• A start button on the front of the instrument.
• A hardware switch on the back of the instrument.

5
Specifications
Width: 25 cm / 9,8 inches
Height: 25 cm / 9,8 inches
Length: 48 cm / 18,9 inches
Weight 17 kg / 37,5 lbs.
Voltage requirements: 110 V-240 V
Support
To find technical support, contact the technical support team at [email protected]
Warranty
The Xdrop™ instrument and associated accessories are covered by a standard Samplix ApS warranty.
Contact your local Samplix ApS office for the details of the warranty.
Safety
We strongly recommend that you follow the safety specifications listed in this section and throughout this
manual.
Xdrop™ is produced to comply with Safety Requirements for Electrical Equipment for Measurement,
Control, and Laboratory Use (UL 61010-1) and complies with EU (CISPR 11, class A, group 1, 150 kHz – 30
MHz) EMC.

6
Instrument safety warnings
The following warning labels refer directly to the safe use of the Xdrop™ instrument.
Icon Meaning
Warning about the risk of harm to body or equipment. Operating the
Xdrop™ before reading this manual can constitute a personal injury
hazard. Only qualified laboratory personnel should operate this
instrument.
Warning about the risk of harm to body or equipment from electrical
shock. Do not attempt to repair or remove the outer case of this
instrument, power supply, or other accessories. If you open these
instruments, you put yourself at risk for electrical shock and void
your warranty. All repairs must be done by an authorized repair
service.
Never remove the outer case of an Xdrop™ instrument. This may
cause you to receive an electrical shock.
Warning about the risk of harm to hands and fingers. Always keep
hands and fingers away from the instrument when the drawer is in
motion.
Intended use and intended users
The Xdrop™ instrument is intended for use by trained laboratory personnel in a clean laboratory environment
for DNA sample preparation from mixed DNA samples using droplet microfluidic technology.
Transportation and storage
Always transport the instrument in the original Samplix box. Before starting up the instrument, let it stay in
room temperature for at least 2 hours.
Maintenance and cleaning
If the instrument is shipped back to Samplix for maintenance, please make sure that the outer surfaces are
cleaned using a cloth and 70 % ethanol.
7
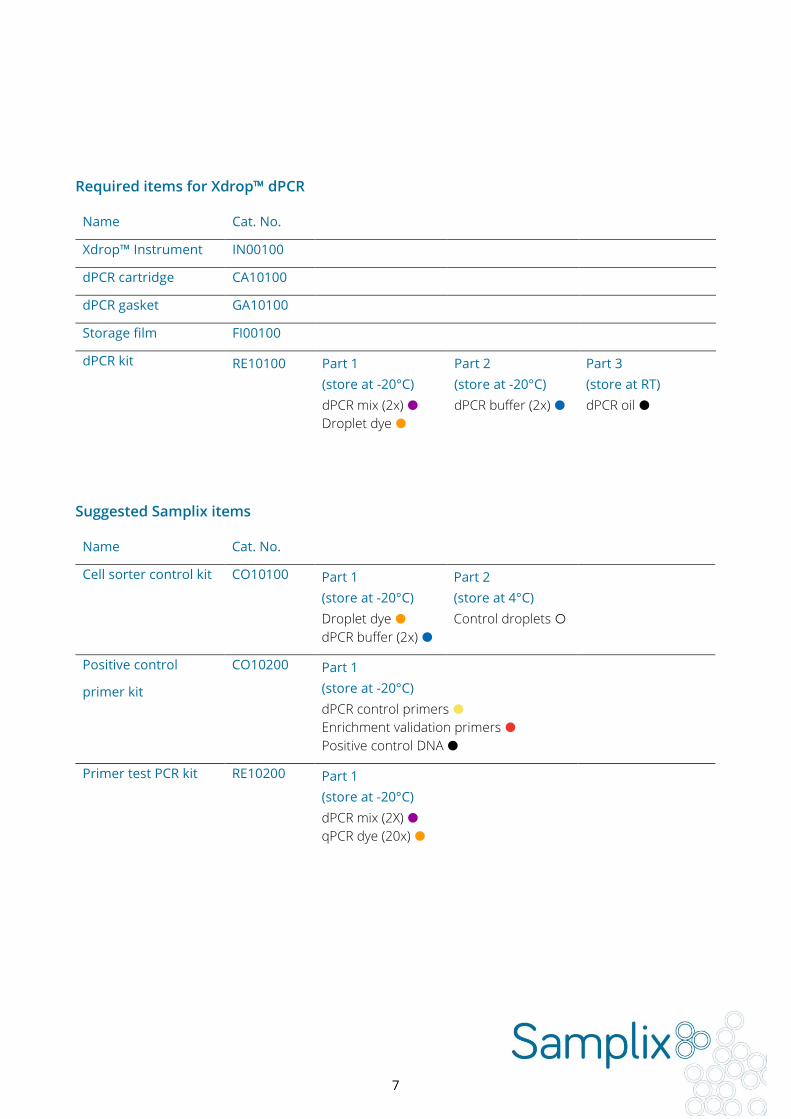
Required items for Xdrop™ dPCR
Name Cat. No.
Xdrop™ Instrument IN00100
dPCR cartridge CA10100
dPCR gasket GA10100
Storage film FI00100
dPCR kit RE10100 Part 1
(store at -20°C)
dPCR mix (2x) ●
Droplet dye ●
Part 2
(store at -20°C)
dPCR buffer (2x) ●
Part 3
(store at RT)
dPCR oil ●
Suggested Samplix items
Name Cat. No.
Cell sorter control kit CO10100 Part 1
(store at -20°C)
Droplet dye ●
dPCR buffer (2x) ●
Part 2
(store at 4°C)
Control droplets ○
Positive control
primer kit
CO10200
Part 1
(store at -20°C)
dPCR control primers ●
Enrichment validation primers ●
Positive control DNA ●
Primer test PCR kit RE10200 Part 1
(store at -20°C)
dPCR mix (2X) ●
qPCR dye (20x) ●
8
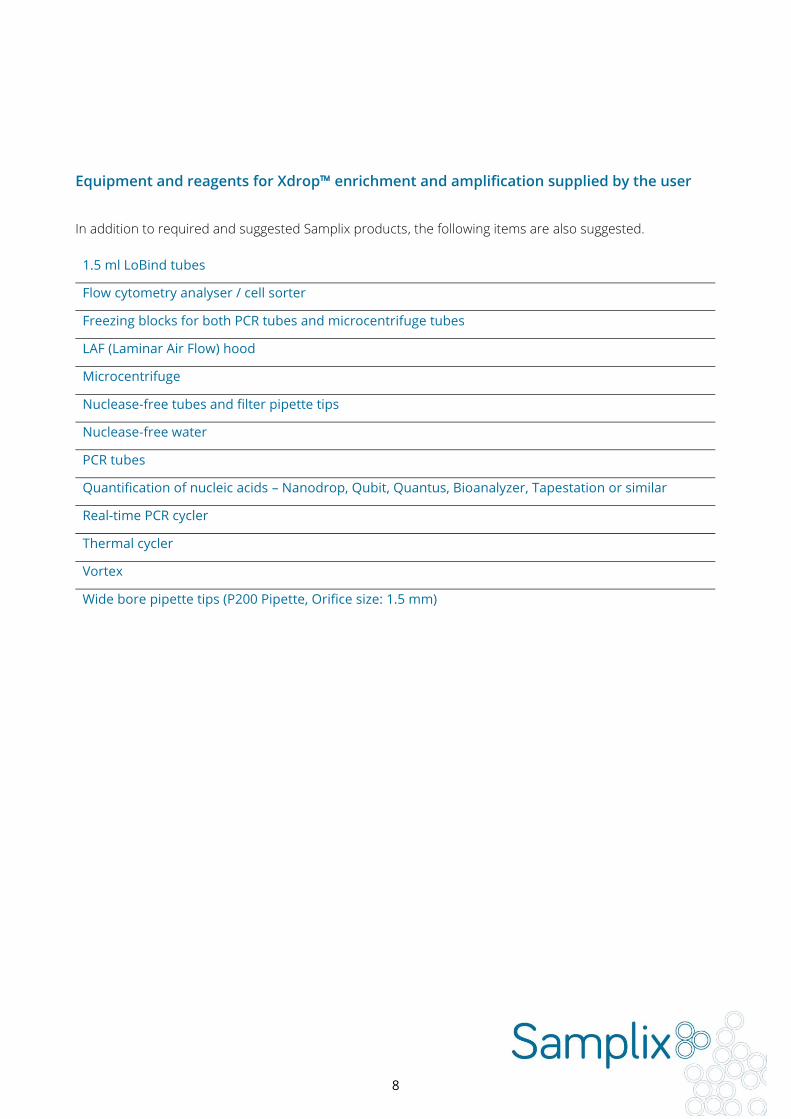
Equipment and reagents for Xdrop™ enrichment and amplification supplied by the user
In addition to required and suggested Samplix products, the following items are also suggested.
1.5 ml LoBind tubes
Flow cytometry analyser / cell sorter
Freezing blocks for both PCR tubes and microcentrifuge tubes
LAF (Laminar Air Flow) hood
Microcentrifuge
Nuclease-free tubes and filter pipette tips
Nuclease-free water
PCR tubes
Quantification of nucleic acids – Nanodrop, Qubit, Quantus, Bioanalyzer, Tapestation or similar
Real-time PCR cycler
Thermal cycler
Vortex
Wide bore pipette tips (P200 Pipette, Orifice size: 1.5 mm)

9
Chapter 2: droplet PCR – General
Considerations
dPCR assay design
The Xdrop™ technology requires a simple assay design with the following components:
• A high molecular weight DNA sample of high purity. Calculate the required amount of input DNA
needed based on the desired enrichment and desired amount of output DNA using the online
sample input calculation tool at samplix.com
• One droplet PCR (dPCR) primer pair for enrichment. Please see the design guidelines below and
use the online primer design tool at samplix.com.
• One quantitative PCR (qPCR) QC primer pair for validation of Xdrop™ DNA enrichment. Please see
the design guidelines below and use the online primer design tool at samplix.com.
Target sequence
The Xdrop™ technology allows targeted enrichment and amplification of a genomic region of interest without
the need for long-range PCR. The target DNA of interest can contain repeat regions, GC-rich regions or other
regions that are otherwise difficult to amplify. Specific primers amplifying a short fragment of optimally 140
bp is used for capturing the kilobase sized region of interest. The Xdrop™ technology compartmentalizes the
amplification reaction in small droplets and makes use of a highly processive DNA polymerase to enable
amplification of almost all regions of the genome.
The length of the enriched target DNA will depend on the length of the input DNA. Consider using high
molecular weight DNA as input with a DNA fragment size >30 kb and of high purity. Calculate the optimal
amount of input template DNA using the online sample input calculation tool at samplix.com
DNA sample preparation
When purifying the DNA sample, use a method that maintains the integrity of the DNA fragments while giving
pure DNA without contaminations. The Xdrop™ enrichment technology can be affected by contamination of
the DNA sample by RNA, proteins, carbohydrates, salt and phenol among others. Purify the DNA to the same
quality as required for long read sequencing.
Calculate the optimal amount of input template DNA using the online enrichment calculation tool at
samplix.com
10
Primer design guidelines
The Xdrop™ enrichment technology relies on carefully designed and highly specific PCR primer pairs. Two
sets of non-overlapping PCR primer pairs are required; one set of PCR primer pairs, called the dPCR set, is
responsible for creating a fluorescent signal used for target enrichment. The second set of PCR primers,
called the qPCR QC set, is used to validate the assay and quantify the number of target fragments in the pool
of enriched fragments.
Help for designing primers can be found in the online primer design tool at samplix.com
General design guidelines for dPCR primer pairs
• Amplicon length optimally 140 bp (between 120-160 bp)
• Melting temperature around 60°C.
• Avoid primer pairs with more than 2°C difference in melting temperature between forward and
reverse primer.
• Avoid placing primers in low complexity regions on the target.
• Primers need to be specific. Avoid primer pairs that amplify sequences not related to the target
sequence.
• Follow the general considerations for PCR primer pairs, avoid self-complementarity, stable
secondary structures, etc.
A qPCR QC primer pair required is for validation and calculation of the enrichment. Note: This primer pair
must be different from the enrichment dPCR primer pair and amplicons should not overlap.
General design guidelines for qPCR QC primer pairs for validation of enrichment
• Amplicon length between 80-120 base pairs.
• Melting temperature around 60°C.
• Avoid primer pairs with more than 2°C difference in melting temperature between the two primers.
• Place the amplicon within 2 kb of the droplet primer pair without overlapping the dPCR amplicon.
The risk of false-negative validation increases if the validation qPCR assay is placed further from the
dPCR assay.
• Follow the general considerations for PCR primer pairs, avoid self-complementarity, stable
secondary structures, etc.

11
Primer optimization
For every new target and prior to generating droplets, the dPCR enrichment primers must be optimized in
Samplix dPCR reagents preferably by qPCR using your sample DNA as a template. Include a negative control
with no template and at least three different concentrations of your template in the range of the amount of
input DNA for the dPCR assay suggested by the online sample calculation tool at samplix.com.
It is advised to run a melting curve analysis with the template DNA, dPCR primers designed and Samplix
reagents to check for the presence of alternative amplicons and primer-dimers. Consider running a
temperature gradient to determine the best annealing temperature.
Use the Samplix primer test PCR kit (Cat. No. RE10200) which includes Samplix dPCR mix (2X) ● and Samplix
qPCR dye ● to verify the primers and reaction efficiency.
To calculate the PCR efficiency, run a qPCR with a standard curve with at least three different amounts of
input DNA using the Samplix dPCR mix and your designed primer pairs (Fig. 2.1).
Calculate the PCR efficiency using the Ct values as input with the formula: (10^(-1/slope)-1) *100
Make sure that your designed primer pairs have an efficiency between 90-110 % and that the suggested
DNA input amount yields a Ct value below 30.
Fig. 2.1. Standard curve of the number of cycles versus fluorescent signal with three different amounts of
input DNA for calculation of PCR efficiency. To determine the PCR efficiency of the dPCR reaction, run a
qPCR reaction using Samplix primer test PCR kit (Cat. No. RE10200) and your designed primer pair with
increasing amounts of input DNA.

12
Chapter 3: dPCR Setup
Preparations for dPCR
Use the Samplix Primer test PCR kit (Cat. No. RE10200) to determine the optimal primer concentration and
annealing temperature for the dPCR reaction as described in the previous chapter (Chapter 2: dPCR –
General Considerations).
NOTE: Do not use any other reagents instead of Samplix dPCR kit (Cat. No. RE10100) for Xdrop™ dPCR droplet
production as this may compromise droplet production, droplet stability, and downstream enrichment.
Samplix provides a Positive control kit (Cat. No. CO10200) that contains DNA template and two primer pairs;
one for dPCR and one for validation qPCR after dMDA. See instructions next page.
Setup of dPCR reaction
1. Prepare the dPCR reaction mix following the table below.
2. Prepare mix for all reactions (40 μl reaction total per sample). Keep the reagents and the dPCR reaction
mix on ice.
3. Prepare dilutions of the correct amount of template DNA. Calculate the optimal amount of input template
DNA using the online sample calculation tool samplix.com
4. Add 2 μl of template DNA dilution to 38 μl dPCR reaction mix to get 40 μl/reaction total.
5. Allow the reaction mix to reach room temperature before loading on the dPCR cartridge followed by
immediate insertion of the dPCR cartridge on the Xdrop™ instrument.
dPCR reaction mix
(per sample) 1X
H2O (molecular grade) 16,4 μl
dPCR mix (2x) ● 20 μl
Primer Forward 10 µM 0,8 μl
Primer Reverse 10 µM 0,8 μl
Total mix 38 μl
Template DNA 2 μl

13
Optional: Positive control dPCR reaction (Cat. No. CO10200)
The Positive control kit (Cat. No. CO10200) is designed as a positive control assay to use together with the
dPCR kit (Cat. No. RE10100) and dMDA kit (Cat. No. 20100) for the full Xdrop™ workflow; dPCR droplet
production, sorting and enrichment.
• Set up dPCR reaction mix using dPCR control primers ● and Positive control DNA ● as described
below.
• Generate dPCR droplets in the Xdrop™ droplet generator as described from page 14.
• Run the produced dPCR droplets with the PCR programme described page 20 using an annealing
temperature of 60°C.
• Sort positive fluorescent dPCR droplets (see Chapter 4: Single DNA Molecule Detection and Sorting
of Droplets).
• Amplify sorted DNA material by dMDA, see XdropTM Manual Droplet MDA (dMDA).
• Validate enrichment using Enrichment validation primers ●
Set up the positive control dPCR reaction as detailed below
1. Prepare the positive control dPCR reaction mix after the table below using dPCR control primers ● and
Positive control DNA ●
2. Prepare mix for all reactions (40 μl/reaction total). Keep the reagents and the dPCR reaction mix on ice.
3. Use the dPCR control primers ● for the dPCR reaction mix.
4. The Positive control DNA ● is already at the correct concentration and should not be diluted further.
5. Allow the reaction mix to reach room temperature before loading on the dPCR cartridge followed by
immediate insertion of the dPCR cartridge on the Xdrop™ instrument.
Control dPCR reaction mix 1X
H2O (molecular grade) 16,4 μl
dPCR mix (2x) ● 20 μl
dPCR control primers (10 µM) ● 1,6 μl
Positive control DNA ● 2 μl
Total mix 40 μl
6. Prepare the dPCR cartridge as described for the general dPCR reaction
14
Prepare dPCR cartridge
1. Dilute the 2X dPCR buffer ● to 1X with molecular grade water. Note: Dilute an entire vial of dPCR
buffer. Precipitate potentially forming in the 2x buffer will dissolve when diluted to 1x. Make sure to
mix well by vortexing 10 seconds and inverting the tube >20 times. Use leftover 1x dPCR buffer for
sorting of droplets (chapter 4).
2. Unpack the cartridge from the plastic bag and place it on a clean flat surface in a LAF (Laminar Air
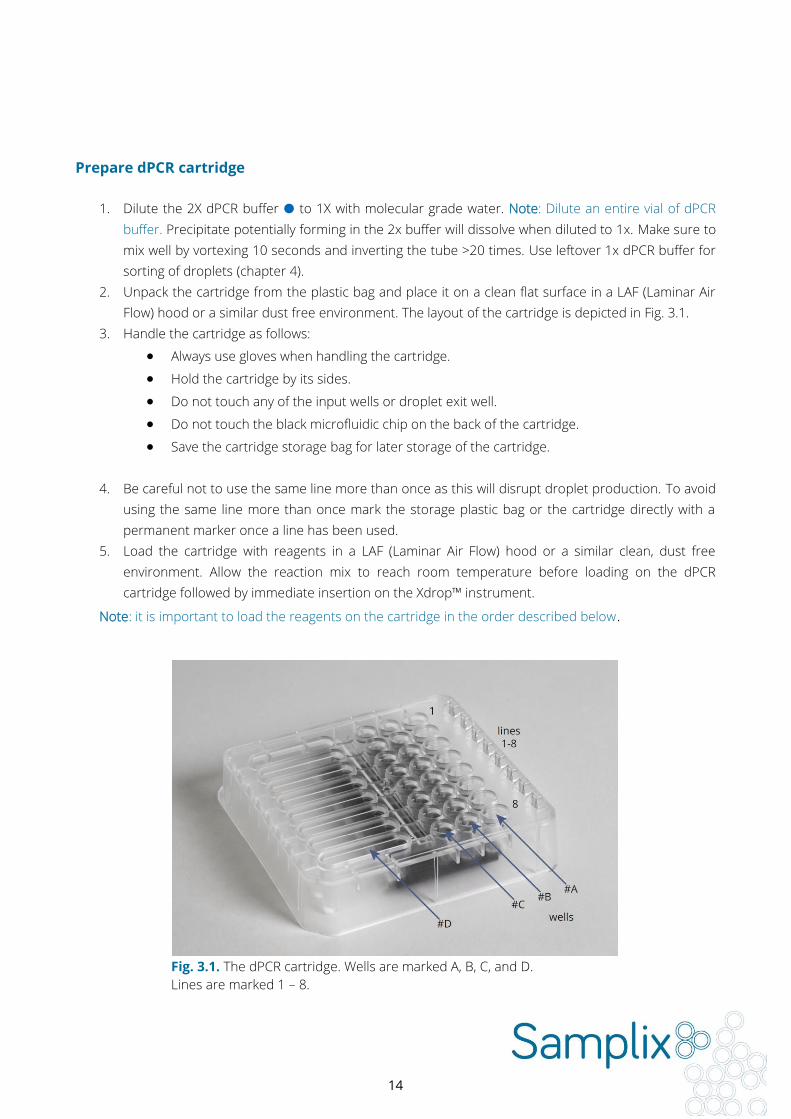
Flow) hood or a similar dust free environment. The layout of the cartridge is depicted in Fig. 3.1.
3. Handle the cartridge as follows:
• Always use gloves when handling the cartridge.
• Hold the cartridge by its sides.
• Do not touch any of the input wells or droplet exit well.
• Do not touch the black microfluidic chip on the back of the cartridge.
• Save the cartridge storage bag for later storage of the cartridge.
4. Be careful not to use the same line more than once as this will disrupt droplet production. To avoid
using the same line more than once mark the storage plastic bag or the cartridge directly with a
permanent marker once a line has been used.
5. Load the cartridge with reagents in a LAF (Laminar Air Flow) hood or a similar clean, dust free
environment. Allow the reaction mix to reach room temperature before loading on the dPCR
cartridge followed by immediate insertion on the Xdrop™ instrument.
Note: it is important to load the reagents on the cartridge in the order described below.
Fig. 3.1. The dPCR cartridge. Wells are marked A, B, C, and D.
Lines are marked 1 – 8.

15
Fig. 3.2. Loading of the dPCR cartridge. Left: Avoid introducing air bubbles by pipetting on the side of the
wells. Right: dPCR cartridge top view with wells marked.
6. Load 300 μl 1x dPCR buffer in the first well (#A). It is important to load the cartridge in the order
described here and avoid air bubbles by pipetting carefully on the side of the well (Fig. 3.2).
7. Load 40 μl 1x dPCR buffer to the shelf of the outlet well #D (Fig. 3.2).
8. Load 40 μl dPCR reaction mix including primers and sample DNA into well #C.
9. Load 100 μl dPCR oil ● into well #B.
10. Notice that the order of loading is: 300 μl 1x dPCR buffer in the well #A
40 μl 1x dPCR buffer to the shelf #D
40 μl 1x dPCR reaction mix in well #C
100 μl dPCR oil ● in well #B
11. Add a gasket to the top of the cartridge. Orient the gasket to the cartridge using the angled corner.
Attach to the pins first and then to the hooks (Fig. 3.3).

16
Fig. 3.3. Cover cartridge with the gasket by orienting it correctly (angled corner on the gasket
to angled corner on cartridge), then attach first the pins then pull gently to attach hooks.
Before powering up the instrument please make sure that the main power switch is in the “1” position. The
main switch is located at the back of the instrument. Power up the instrument by pushing the Start/Stop
button at the front. The instrument will start initializing and will shift to “Welcome screen”.
12. Push “open” on the instrument touch screen to eject the drawer (Fig. 3.4).
Fig. 3.4. The Xdrop™ instrument “welcome” screen, press “open” to eject the drawer.

17
13. When the “open” or “next” button has been pressed, the screen shifts to “Please place cartridge” and
“close”. Make sure that the cartridge is correctly positioned into the drawer (Fig. 3.5) as it may
otherwise cause damage to the instrument. Once the cartridge is correctly inserted, press “close” to
retract the drawer into the instrument.
Fig. 3.5. The Xdrop™ instrument with a correctly inserted dPCR cartridge. Be
very careful to place the cartridge correct as the instrument may otherwise
damage the cartridge.
14. Once the drawer is fully closed, press “next” on the touch screen.
15. The Xdrop™ instrument can operate with either dPCR or dMDA cartridges. Use the dPCR cartridge
with the “dPCR” option on the touch screen (Fig. 3.6.).

18
Fig. 3.6. The Xdrop™ instrument “Select cartridge” screen, select dPCR cartridge.
16. The lines to be processed are selected by pressing the corresponding numbers 1-8 on the screen.
When selected, buttons turn green (green = selected & blue = not selected) (Fig. 3.7).
Fig. 3.7. Selecting the lines to be used. Selected channels will be indicated by green
buttons (here: 2, 4, 6 and 8). Blue buttons indicate channels not yet selected.
17. Press “run”.
The instrument will now build up pressure. This process can take up to 4 minutes.

19
Once the desired pressures have been built up the message “Making your droplets” and the remaining run
time are displayed on the screen (Fig. 3.8). The Xdrop™ instrument will produce double emulsion dPCR
droplets in approximately 40 minutes.
Fig. 3.8. Touch screen image while producing droplets.
18. When droplet production has been completed, the screen will change to “Your droplets are ready”.
(Optional: To save the Log file from this production, insert a FAT formatted USB stick into the USB port at the
back of the instrument. 1-2 seconds after having inserted the USB, a “Save Log” button will appear on the
touch screen. Push the button and enter an appropriate name for your log file).
19. Press “Open” to eject the cartridge.
20. Remove the cartridge from the instrument and place it in a LAF bench.
21. Press “Close” to make the instrument retract the drawer back into its closed position.
22. Press “Finish” to return to the Welcome screen.
23. Shut down the instrument after a completed droplet production to avoid damage to the instrument.
If the instrument is not to be used for several hours, it should preferably be turned off. To turn the
instrument off, push the ON/OFF button at the front to power off the instrument to initiate the
automatic shutdown procedure.
20
Collect generated droplets
24. After finalized droplet production, confirm that dPCR droplets have been produced. dPCR droplets
will sink to the bottom of the collection well and form a white layer with a clear buffer phase on top.
25. If droplets are visible, collect droplets from the Exit-well (#D).
26. Optional: 200 μl dPCR-buffer (surplus in the dPCR-buffer well #A) can be used to “wash” residual
droplets from the shelf inside the exit well - where droplets are entering the well #D.
27. If any lanes are unused, the cartridge can be stored up to 2 weeks at room temperature. Discard the
single-use gasket and remove excess liquid in wells #A and #B before storage of the cartridge.
28. Seal the cartridge with Storage film (Cat. No. FI00100) and store protected from light and dust at
room temperature in the provided bag.
A total volume of droplets and buffer around 300-400 μl is expected to be collected after droplet production.
Note: Each gasket and production line are single-use and will not function properly if an attempt to re-use
already is carried out. Furthermore, attempting to reuse the gasket and cartridge lines will increase the risk
of cross-contamination of samples.
In the case re-use after prolonged storage of a cartridge with unused lanes is desired, the Samplix Storage
film (Cat. No. FI00100) should be applied to the cartridge. The Storage film should be placed so that all wells
(used and unused) are sealed. Moreover, it should be noted that the dPCR cartridge has a shelf-life of 2 weeks
after the packaging has been opened, provided that this period does not excide the expiry date indicated on
the product.
29. Dispense the droplets into four PCR-tube aliquots (of approximately 80-90 μl).
Note: dPCR droplets sediment rapidly during handling. To ensure equal distribution into the aliquots, be sure
to mix gently by pipetting up and down between each pipetting step.
21
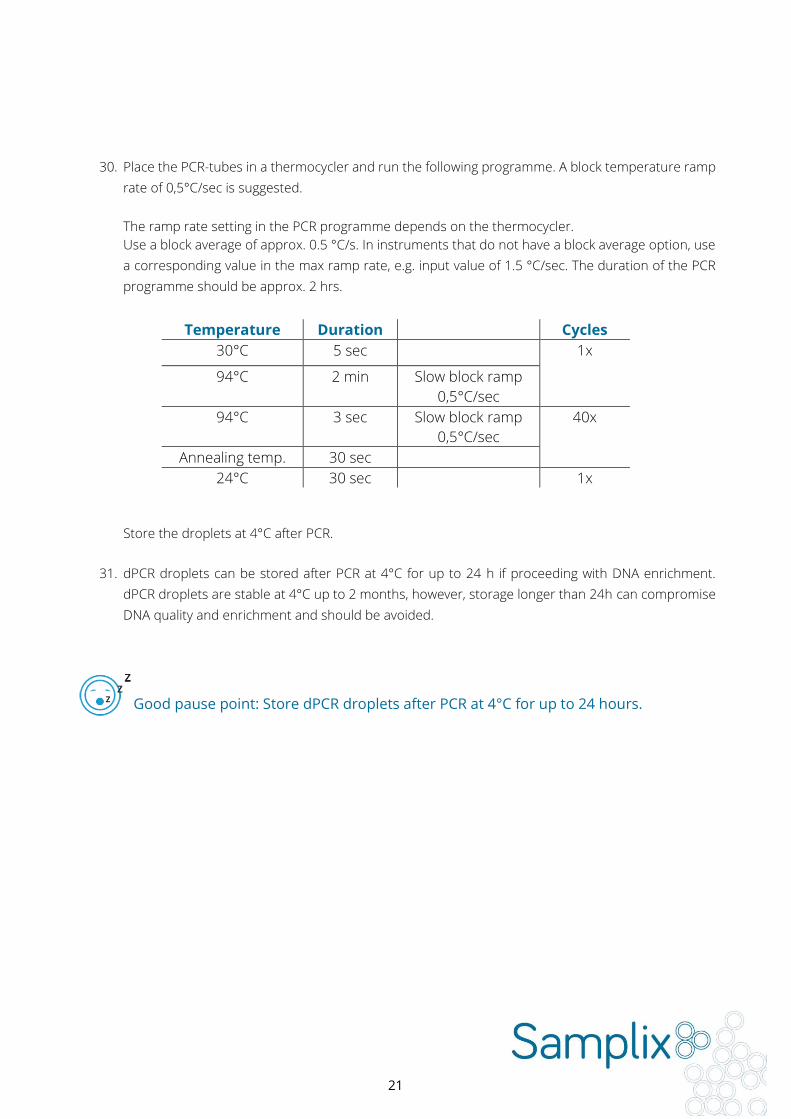
30. Place the PCR-tubes in a thermocycler and run the following programme. A block temperature ramp
rate of 0,5°C/sec is suggested.
The ramp rate setting in the PCR programme depends on the thermocycler.
Use a block average of approx. 0.5 °C/s. In instruments that do not have a block average option, use
a corresponding value in the max ramp rate, e.g. input value of 1.5 °C/sec. The duration of the PCR
programme should be approx. 2 hrs.
Temperature Duration Cycles
30°C 5 sec 1x
94°C 2 min Slow block ramp
0,5°C/sec
94°C 3 sec Slow block ramp
0,5°C/sec
40x
Annealing temp. 30 sec
24°C 30 sec 1x
Store the droplets at 4°C after PCR.
31. dPCR droplets can be stored after PCR at 4°C for up to 24 h if proceeding with DNA enrichment.
dPCR droplets are stable at 4°C up to 2 months, however, storage longer than 24h can compromise
DNA quality and enrichment and should be avoided.
Good pause point: Store dPCR droplets after PCR at 4°C for up to 24 hours.

22
Chapter 4: Single DNA Molecule
Detection and Sorting of Droplets
Requirements for flow cytometer analyzer and cell sorter
• A 488 nm (blue) laser. • Optical configuration detecting fluorophores excited at 488 nm such as FITC, GFP, and PE. • 100 μm nozzle tip/sorting chip minimum. • Sheath pressure at a maximum of 24 psi. • Sample line should be positioned at the bottom of the sample tube.
Notes to operator
• dPCR droplets are large, therefore the correct events are high in Forward Scatter (FSC) and Side
Scatter (SSC) (see fig. 4.1). • Smaller events and events with low SSC represent pure oil droplets and should be gated out. • dPCR droplets are stable and relatively heavy. It could take 5-10 min before the dPCR droplets reach
the point of interrogation and appear on the plot. • dPCR droplets do not clump together and a duplet discrimination plot is not required. • Positive fluorescent droplets are likely to be very rare (possibly less than 0,02% of total dPCR
droplets). Therefore, a positive population can be difficult to identify. Make sure the live plot of
fluorescence shows at least 100.000 events (see fig. 4.2) A histogram plot is not recommended.

23
Preparation of droplets for flow cytometry
1. Remove tubes with dPCR droplets from the PCR machine.
2. Make sure the 2x dPCR buffer ● is diluted with molecular grade water to 1x. Mix well by vortexing 10
seconds and inverting the tube at least 20 times.
3. Stain droplets with Droplet dye ● as follows:
• Prepare flow cytometry buffer by adding 1ml 1x dPCR buffer to a flow cytometry tube (tubes
depend on flow cytometer instrument).
• Spin down Droplet dye ● 1-2 minutes.
• Add 10 μl Droplet dye ● into the flow cytometry tube with dPCR buffer. Mix gently to dissolve the
dye in the dPCR-buffer.
• Remove supernatant from PCR tube leaving dPCR droplets undisturbed at the bottom.
• Use 200 μl buffer from flow cytometry tube to transfer all droplets from the PCR tubes to the
flow cytometry tube.
• Leave at room temperature protected from light for 5 min to stain droplets.
4. Add 15 μl of molecular grade H2O into the bottom of a 1,5 ml low binding collection tube and place
the collection tube in the appropriate holder for collection in the cell sorter instrument.
5. Load tube containing the dPCR droplets on the flow cytometer and start analysis or sorting.
24
Flow cytometry analysis of dPCR droplets
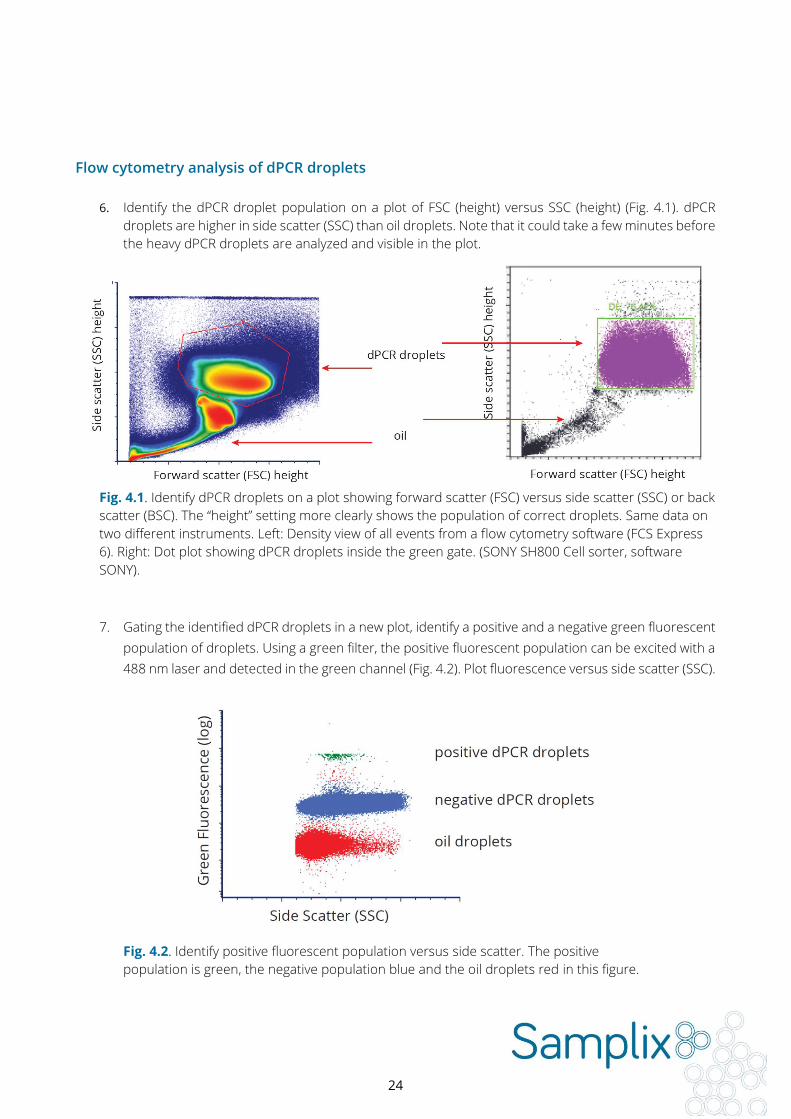
6. Identify the dPCR droplet population on a plot of FSC (height) versus SSC (height) (Fig. 4.1). dPCR
droplets are higher in side scatter (SSC) than oil droplets. Note that it could take a few minutes before
the heavy dPCR droplets are analyzed and visible in the plot.
Fig. 4.1. Identify dPCR droplets on a plot showing forward scatter (FSC) versus side scatter (SSC) or back
scatter (BSC). The “height” setting more clearly shows the population of correct droplets. Same data on
two different instruments. Left: Density view of all events from a flow cytometry software (FCS Express
6). Right: Dot plot showing dPCR droplets inside the green gate. (SONY SH800 Cell sorter, software
SONY).
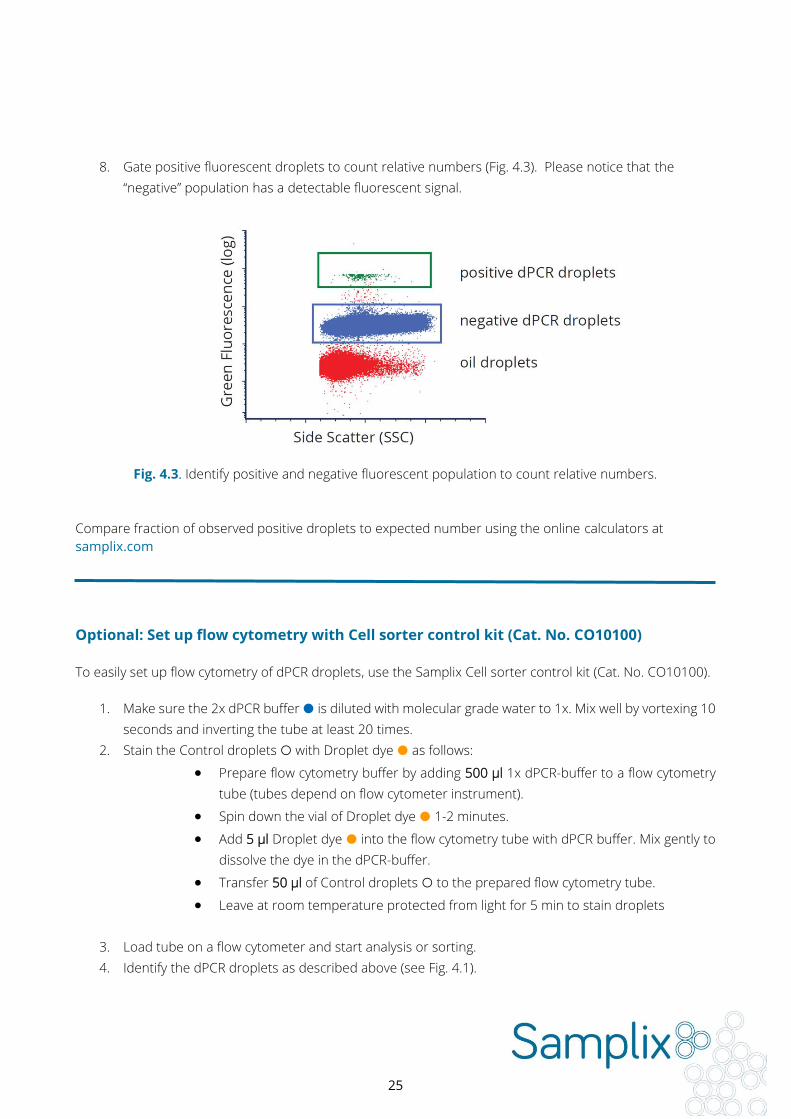
7. Gating the identified dPCR droplets in a new plot, identify a positive and a negative green fluorescent
population of droplets. Using a green filter, the positive fluorescent population can be excited with a
488 nm laser and detected in the green channel (Fig. 4.2). Plot fluorescence versus side scatter (SSC).
Fig. 4.2. Identify positive fluorescent population versus side scatter. The positive
population is green, the negative population blue and the oil droplets red in this figure.
25
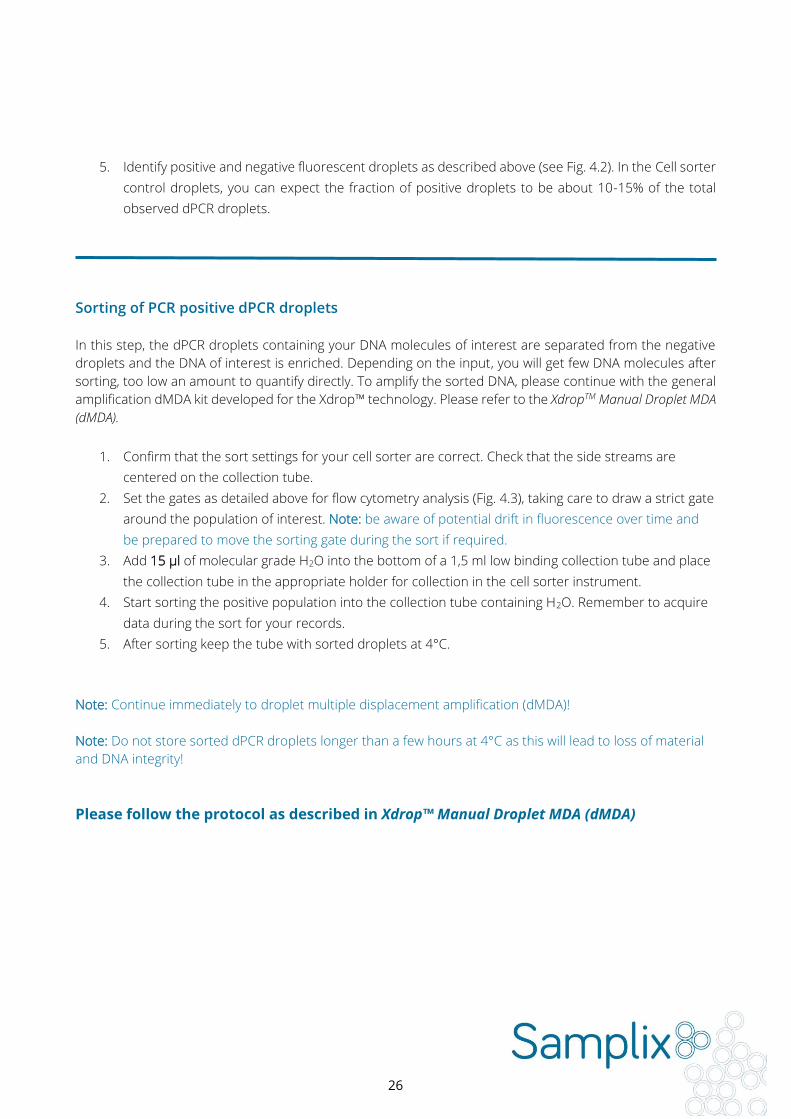
8. Gate positive fluorescent droplets to count relative numbers (Fig. 4.3). Please notice that the
“negative” population has a detectable fluorescent signal.
Fig. 4.3. Identify positive and negative fluorescent population to count relative numbers.
Compare fraction of observed positive droplets to expected number using the online calculators at
samplix.com
Optional: Set up flow cytometry with Cell sorter control kit (Cat. No. CO10100)
To easily set up flow cytometry of dPCR droplets, use the Samplix Cell sorter control kit (Cat. No. CO10100).
1. Make sure the 2x dPCR buffer ● is diluted with molecular grade water to 1x. Mix well by vortexing 10
seconds and inverting the tube at least 20 times.
2. Stain the Control droplets ○ with Droplet dye ● as follows:
• Prepare flow cytometry buffer by adding 500 μl 1x dPCR-buffer to a flow cytometry
tube (tubes depend on flow cytometer instrument).
• Spin down the vial of Droplet dye ● 1-2 minutes.
• Add 5 μl Droplet dye ● into the flow cytometry tube with dPCR buffer. Mix gently to
dissolve the dye in the dPCR-buffer.
• Transfer 50 μl of Control droplets ○ to the prepared flow cytometry tube.
• Leave at room temperature protected from light for 5 min to stain droplets
3. Load tube on a flow cytometer and start analysis or sorting.
4. Identify the dPCR droplets as described above (see Fig. 4.1).
26
5. Identify positive and negative fluorescent droplets as described above (see Fig. 4.2). In the Cell sorter
control droplets, you can expect the fraction of positive droplets to be about 10-15% of the total
observed dPCR droplets.
Sorting of PCR positive dPCR droplets
In this step, the dPCR droplets containing your DNA molecules of interest are separated from the negative
droplets and the DNA of interest is enriched. Depending on the input, you will get few DNA molecules after
sorting, too low an amount to quantify directly. To amplify the sorted DNA, please continue with the general
amplification dMDA kit developed for the Xdrop™ technology. Please refer to the XdropTM Manual Droplet MDA
(dMDA).
1. Confirm that the sort settings for your cell sorter are correct. Check that the side streams are
centered on the collection tube.
2. Set the gates as detailed above for flow cytometry analysis (Fig. 4.3), taking care to draw a strict gate
around the population of interest. Note: be aware of potential drift in fluorescence over time and
be prepared to move the sorting gate during the sort if required.
3. Add 15 μl of molecular grade H2O into the bottom of a 1,5 ml low binding collection tube and place
the collection tube in the appropriate holder for collection in the cell sorter instrument.
4. Start sorting the positive population into the collection tube containing H2O. Remember to acquire
data during the sort for your records.
5. After sorting keep the tube with sorted droplets at 4°C.
Note: Continue immediately to droplet multiple displacement amplification (dMDA)!
Note: Do not store sorted dPCR droplets longer than a few hours at 4°C as this will lead to loss of material
and DNA integrity!
Please follow the protocol as described in Xdrop™ Manual Droplet MDA (dMDA)

27
Chapter 5: Evaluation of Targeted
Enrichment
Evaluate the enrichment of target DNA
After quantification of total DNA (see XdropTM Manual Droplet MDA (dMDA)) continue with measurement of
target enrichment
An online tool for calculating the DNA enrichment is available at samplix.com
To determine fold enrichment of target DNA, perform a qPCR using the non-overlapping QC primers. See
“General primer design guidelines” or the online primer design tool at samplix.com. If a specific region of
DNA is required, place the validation primer pair on the opposite side of this region but with maximum 5 kb
distance from the dPCR primers. The enrichment will be highest in the region close to the dPCR amplicon.
To quantify the enrichment, perform a standard qPCR reaction using either the Samplix primer test PCR kit
(Cat. No. RE10200) or your own preferred qPCR reagents (Fig. 5.2).
Set up a qPCR for detection using the following DNA as a template
• dMDA amplified sorted positive population, 1:10 dilution (enriched sample, red curve below)
• dMDA H2O, 1:10 dilution (negative control)
• Suggested controls:
• dMDA sheath fluid from flow cytometer, 1:10 dilution (contamination control)
• dMDA 1 pg non-sorted input DNA, 1:10 dilution (positive control)
• Original sample input DNA in the same concentration as input in droplets (dark blue curve below).
Run a standard curve of original sample to calculate PCR efficiency (light blue curves).
• H2O (negative PCR control)

28
Fig. 5.2. Example of amplification curves for qPCR QC validation of enrichment. Curves
from left: Red: dMDA amplified sorted positive population. Light blue: 10x reference DNA.
Dark blue: 1x reference DNA. Light blue: 0,1x reference DNA.
Calculate fold enrichment of target DNA
Use the “Enrichment calculator” in the online tool (Fig. 5.3) to calculate the fold enrichment of target DNA
available at samplix.com
Fig. 5.3. From the Single genome calculators, choose the “Enrichment calculator” tool
shown on the right.

29
As input to the enrichment calculator (Fig. 5.4) use
• Genome size: Size of (host) genome in base pairs.
• PCR efficiency: Efficiency of PCR reaction in %. You can use the efficiency calculated when validating
primers designed (if same qPCR reagents have been used). Calculate the PCR efficiency using the Ct
values as input with the formula: (10^(-1/slope)-1) *100. If a % PCR efficiency has not been calculated,
use 100% as input.
• Targets per genome: Copy number of the target in host genome disregarding off-targets.
Fig. 5.4. Example of calculation using the online enrichment calculator tool.
See explanation in the text.
Control sample
• Ct value: Ct value from qPCR of 1x reference DNA (original sample input DNA).
• DNA concentration: Concentration of reference DNA in control/un-enriched stock solution.
Enriched sample
• Ct value: Ct value from qPCR using the product from dMDA reaction as input
• DNA concentration: Concentration of DNA in the enriched sample (i.e. the concentration of DNA
after the dMDA reaction) measured on Qubit, Bioanalyzer, FEMTO Pulse or similar
• Dilution factor: Factor of dilution of dMDA reaction in qPCR (1:10 fold dilution recommended).