“ will it blend? ” - diy planetariumdiyplanetarium.com/documents/blender-tutorial-1-willit...“...
TRANSCRIPT

“ WILL IT BLEND? ”
A DOMEHADS GUIDE TO GET CRACKING with 2.75

1. SETUP BLENDER FOR DOME WORK 1. Open Blender 2. Delete everything by pressing A (to select everything) and then X (to delete everything) 3. Press the SPACE BAR and type CAMERA then ENTER to add a camera 4. Set the RESOLUTION as follows:
5. Set the CAMERA TYPE as follows:

6. Open FILE > USER PREFERENCES and select the Add-ons tab a. Type PIE MENUS OFFICIAL and install the addon b. Type NETWORK RENDER and install the addon c. Type ADD CURVE SAPLING and install the addon
7. Click SAVE USER SETTINGS at the bottom of the popup window and close it 8. Press the SPACE BAR and type CUBE to add a cube to the scene 9. Move the camera away from the cube by dragging the RED-X and GREEN-Y handles 10. Set CYCLES as the render engine in the menu bar up top
11. Type FILE > SAVE STARTUP FILE (CTRL + U) to save these preferences. Doing so will start Blender with these settings every time it is opened.
YOU ARE READY TO START RENDERING FOR PLANETARIUMS WITH BLENDER!

2. LETS MODEL A MODEL 1. Open Blender 2. Remember that default scene we created? It should be ready to go 3. We’re going to make the hoverboard from Back To The Future 4. Scale the cube wider by pressing S + Y and dragging out 5. Flatten the cube by pressing S + Z and dragging down
6. Press Z > 6 to switch to wireframe mode 7. Press 7 to switch to top-down view 8. Add a cylinder (SPACE BAR type CYLINDER) and move it to the end of the cube like so:
9. LEFT CLICK the cube to select it 10. TAB > 6 to enter EDIT MODE 11. Make sure VERTEX SELECTION is selected
12. Press B for BOX SELECT and select the two vertices at the cylinder end 13. Press E to extrude the cube and drag to the right a little. 14. Press S + X to scale the extruded section to match the cylinder outline

15. Repeat until extruded around end of cylinder like so:
16. Press TAB > 4 to return to object mode
17. LEFT CLICK the CYLINDER to select it and then press X to delete it 18. DOUBLE CLICK the CUBE in the SCENE LIST and rename it to HOVERBOARD 19. LEFT CLICK the HOVERBOARD and press TAB > 6 to enter EDIT MODE 20. 7 for TOP VIEW and B to BOX SELECT the non-round end vertexes 21. E to extrude away from rounded end. 22. 3 for SIDE VIEW 23. Drag the extruded section upwards by grabbing the BLUE Z handle 24. With the extruded vertexes selected, press R to rotate to a more natural end bevel like so:
25. TAB > 4 to return to OBJECT MODE, Z > 2 to return to solid view

26. Press F12 or RENDER to view the progress
27. ZOMG. It’s DARK! 28. Add some light by enabling nodes here, and make it nice and bright:
29. See the difference?
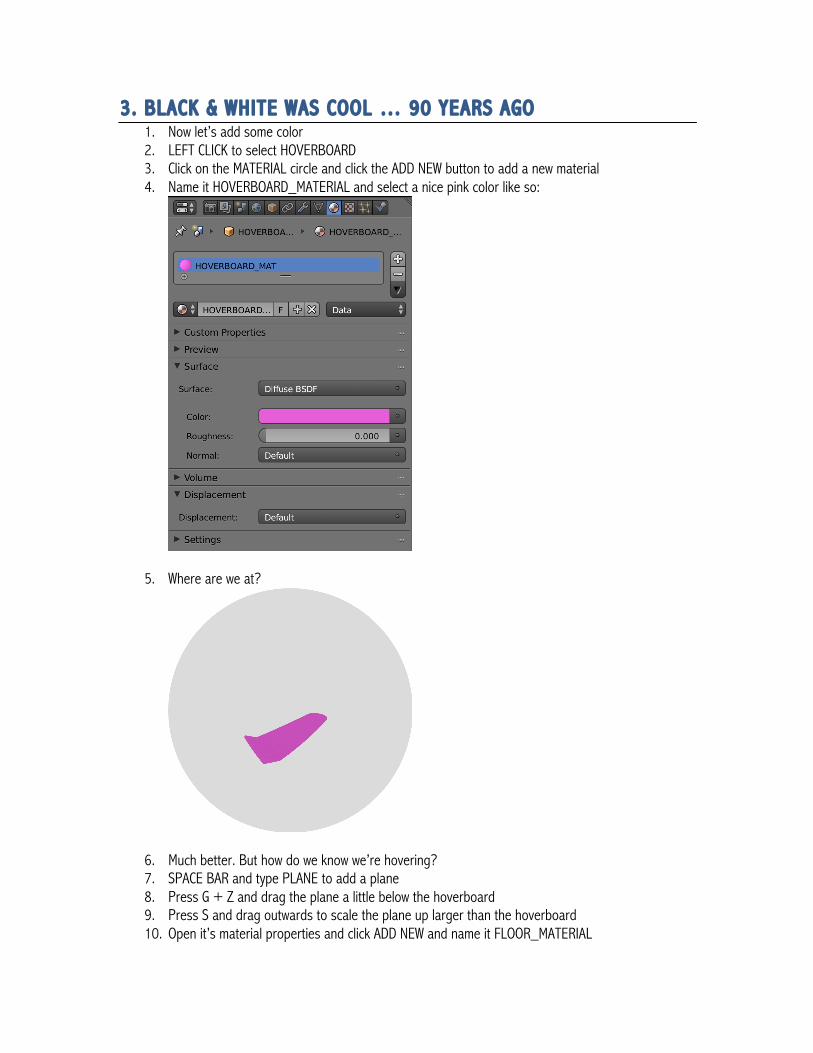
3. BLACK & WHITE WAS COOL … 90 YEARS AGO 1. Now let’s add some color 2. LEFT CLICK to select HOVERBOARD 3. Click on the MATERIAL circle and click the ADD NEW button to add a new material 4. Name it HOVERBOARD_MATERIAL and select a nice pink color like so:
5. Where are we at?
6. Much better. But how do we know we’re hovering? 7. SPACE BAR and type PLANE to add a plane 8. Press G + Z and drag the plane a little below the hoverboard 9. Press S and drag outwards to scale the plane up larger than the hoverboard 10. Open it’s material properties and click ADD NEW and name it FLOOR_MATERIAL

11. Split the 3D view by right clicking the edge of 3D view and select SPLIT AREA like so
12. Set the bottom pane as a NODE EDITOR like so:
13. Note that we see the material we created for the floor in the node editor

14. We’re going to make a fancy checkered pattern for the floor 15. In the node editor choose ADD > TEXTURE > CHECKER 16. Place it to the left of the nodes 17. LEFT CLICK the DIFFUSE BSDF shader and hit SHIFT + D to duplicate it 18. Click ADD SHADER > MIX SHADER 19. Choose a Blue and a Green color for each DIFFUSE BSDF shader respectively 20. Wire them up like so:
21. WHICH GIVES US:
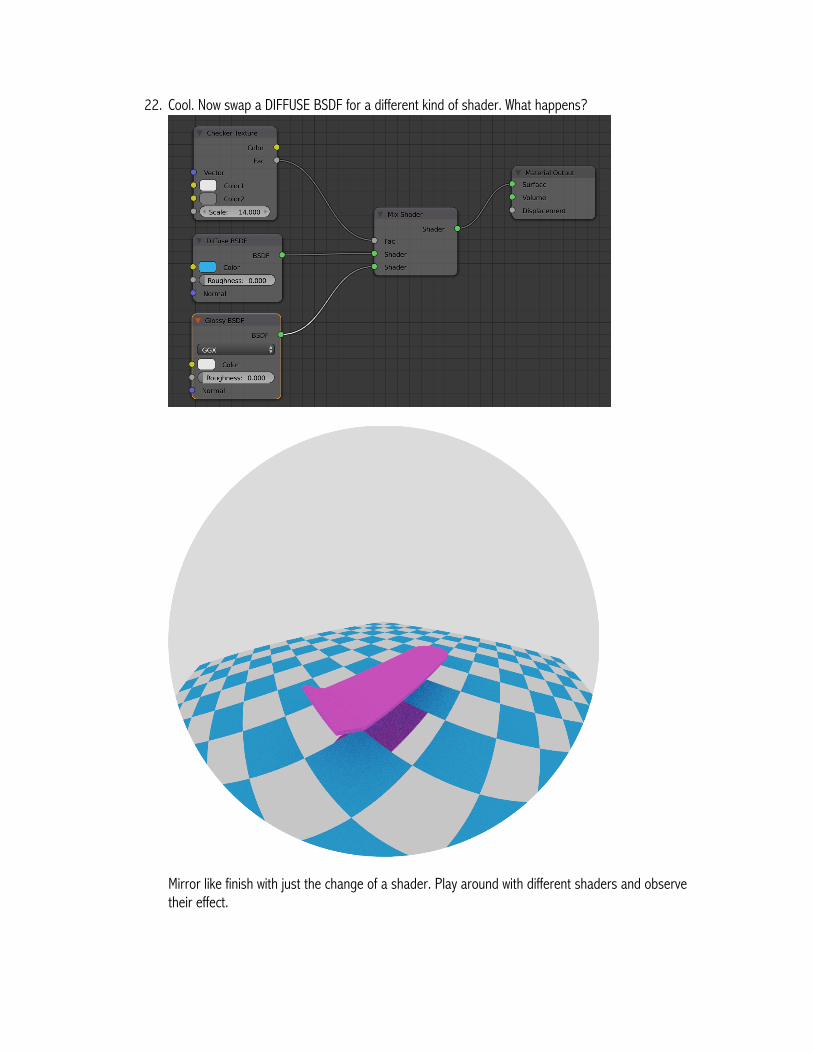
22. Cool. Now swap a DIFFUSE BSDF for a different kind of shader. What happens?
Mirror like finish with just the change of a shader. Play around with different shaders and observe their effect.

4. L IGHTS. CAMERA. ACTION! 1. Let’s make this hoverboard hover. 2. Left click it, and press I > ROT LOC SCALE 3. This inserts a keyframe at current playback position (0 frame) for it’s location, rotation, and scale 4. Enter 20 into the current frame marker, move the hoverboard up on the Z axis a bit and press
I > LOC ROT SCALE to insert another keyframe 5. Enter 40 into the current frame marker, lower the hoverboard, and press I > LOC ROT SCALE 6. Repeat every 20 frames until the hoverboard is animated up/down for a couple hundred frames 7. Press ALT + A to view the animation. The hoverboard will go up and down.
8. This works with the camera too. Try to add two keyframes – one at 0 and one at 200, so that the camera slowly moves away from the hoverboard.
9. Press ANIMATION to animate the frames. These can be stitched together at 30 fps to form a video.