midi driver script for blender 2.49b - manual - blend it! · 1 introduction 1.1 what is midi...
TRANSCRIPT

MIDI Driver script for Blender 2.49b - Manual
Paweª Adamowicz
([email protected], [email protected], user SirGagarin at BlenderArtist.org)
http://blendit.xaa.pl/
Created with LATEX on November 20, 2010
Contents
1 Introduction 2
1.1 What is MIDI Driver? . . . . . . . . . . . . . . . . . . . . . . . . . . . . . . . . . . . . 21.2 Script requirements . . . . . . . . . . . . . . . . . . . . . . . . . . . . . . . . . . . . . . 21.3 Requirements regarding the user . . . . . . . . . . . . . . . . . . . . . . . . . . . . . . 2
2 Before you start 2
2.1 MIDI Files . . . . . . . . . . . . . . . . . . . . . . . . . . . . . . . . . . . . . . . . . . 32.2 Definitions . . . . . . . . . . . . . . . . . . . . . . . . . . . . . . . . . . . . . . . . . . . 42.3 Input designation . . . . . . . . . . . . . . . . . . . . . . . . . . . . . . . . . . . . . . . 4
3 Manual 4
3.1 Initial preparations and script startup . . . . . . . . . . . . . . . . . . . . . . . . . . . 43.2 Loading MIDI file . . . . . . . . . . . . . . . . . . . . . . . . . . . . . . . . . . . . . . . 63.3 Sequence viewer . . . . . . . . . . . . . . . . . . . . . . . . . . . . . . . . . . . . . . . . 73.4 Note filter . . . . . . . . . . . . . . . . . . . . . . . . . . . . . . . . . . . . . . . . . . . 83.5 Animation entries . . . . . . . . . . . . . . . . . . . . . . . . . . . . . . . . . . . . . . . 9
3.5.1 Basic synchronisation . . . . . . . . . . . . . . . . . . . . . . . . . . . . . . . . 103.5.2 Additional options . . . . . . . . . . . . . . . . . . . . . . . . . . . . . . . . . . 11
3.6 Overlapping keys and ,,floating” animation . . . . . . . . . . . . . . . . . . . . . . . . 153.7 Other functions . . . . . . . . . . . . . . . . . . . . . . . . . . . . . . . . . . . . . . . . 18
4 Troubleshooting 20
5 Version history 20
6 License 21
1

1 Introduction
1.1 What is MIDI Driver?
MIDI Driver is a Python script for Blender 3D graphic suite. Its aim is to aid the animator in thecreation of the music-driven animations – the animations where each action is strictly dependant onthe accompanying sound from the soundtrack. Its working principles are very simple – the animatorhas to define the single action (like the character pressing a single piano key) and then relate it toa desired sound. The script does the rest: it will place the action in timeline each time the selectedsound occurs in the soundtrack. This way the animator can avoid time consuming process of matchingthe animation to the music.
The script use exclusively the MIDI files as the music data source. This is due to the fact, thatMIDI sequences provides easy to parse information about notes parameters, especially the start timeand duration of each note. Contrary to the wav or mp3 files, MIDIs do not require complex signalanalysis to retrieve notes timing. Moreover, obtained time data is precise.
MIDI Driver allows you to:
� load the MIDI file,
� select the notes for further processing, both manually or automatically,
� synchronise predefined IPOs or Actions with selected notes,
� enhance synchronised animation with additional options (hold, velocity-dependant scaling, pauseanimation)
� clean-up the synchronisation errors (overlapping or ”floating” animations (see sec. 3.6))
MIDI Driver will not create the source animation – there is no magic button ,,make this characterplay this instrument”. It is the animator who has to provide the animation of a single note occurrence.Furthermore, the script will not attach the MIDI music to your animation neither play the loadedMIDI file. To attach the sound to the animation, you have to do this while assembling your animation.
1.2 Script requirements
MIDI Driver version 0.7 and earlier has been initially designed for Blender 2.49b. It has been alreadytested that it will not run in any Blender from 2.5x branch due to the changes in the Python API.The script was not tested against Blender versions earlier than 2.49. If you suffer any problems withthe script under other Blender versions, make sure to give it a second chance in Blender 2.49b (http://www.blender.org/download/get-blender/). The MIDI Driver script does not use any externalPython libraries, so you may run it even if you do not have Python environment installed on yourmachine.
1.3 Requirements regarding the user
It is assumed that the reader is able to easily navigate in Blender, knows how to keyframe animationusing IPO and Actions and knows how to use IPO/Action editor (removing, adding and movingkeys, curves and Action channels). If any of these terms sounds unfamiliar to you, read the Blenderdocumentation and practise a bit – this way you will avoid any frustration if something goes wrongwhile trying out the script.
2 Before you start
This chapter is provided to get you familiar with the terminology used in this document. A shortintroduction to the MIDI file explains the meaning of the MIDI sequence data utilised in the script.Next, the most common terms regarding the work of the script are defined. Last is the keyboard andmouse designation system explained.
2

2.1 MIDI Files
MIDI or the Musical Instrument Digital Interface is a standard for the data exchange between electro-nic musical instruments like synthesisers and samplers. The part of the standard is the specificationof the MIDI File. Its aim is store the MIDI data for further use.
The most important property of the MIDI file is that it does not carry the sound itself (ie. thewaveform). It holds the prescription of how the electronic musical instrument has to recreate thesound: notes timing, instruments assignment, etc. You can compare MIDI file to a digital musicalnotation.
Each action of the musician is stored as an event in the MIDI File (key press, key release, instrumentchange). Events are grouped in one or more tracks. The differences of tracks layout within the file leadto the creation of the following types of Standard MIDI Files (called for short SMF):
SMF0 (Standard MIDI File type 0) – has only one track containing all MIDI data.
SMF1 – may have more than one track, the first track should be reserved for a control datacommon for all other tracks.
SMF2 – has one or more tracks, each containing MIDI data of a separate music piece. SMF2 isactually a playlist of one or more SMF0 files. This type is currently obsolete and very rare.
There is also a second classification of MIDI files, depending on the method of the time calculation.We distinguish two types:
Metrical time division – to calculate timing of a note, one has to incorporate the current tempovalue and the additional parameter specifying the length of a basic note (a quarternote) inprocessor ticks.
FPS time division – uses an absolute timing depending on the internal synthesiser clock. Thisform is used exclusively in direct data exchange between instruments.
MIDI Driver script converts events stored in the MIDI file to notes. Each note contains dataregarding a single sound in the sequence:
Channel identi�er – each note belongs to the one of the 16 available channels. The channel 10is reserved for the percussion. Notes pitch value is handled differently in this channel.
Programme (instrument) identi�er – this is a number, which identifies the programme – theinstrument by which the note is played.
Pitch – specifies how high is the note. The pitch range is 128 values, from C−2 to G8 (somemanufacturers confusingly give a range of C−1 to G9). The pitch of notes in the channel 10 hasa different meaning. It is an identifier of a piece of a drum set. Therefore, the note with a pitch 38will utter the sound of a snare drum in the channel 10 but will be a sound D1 in other channels.
Start time – is the distance from the beginning of the sequence, at which the note starts sounding.The script uses millisecond as the distance unit.
Stop time – is the distance from the beginning of the sequence, at which the note stops sounding.The script uses millisecond as the distance unit. To count the duration of the note one has tosubtract the start time from the stop time.
Velocity – is the measurement of the note expression – how hard (,,fast”) the key was pressed1.The range of this parameter is 0 to 127 and is mostly interpreted as the volume of the note.Thus, notes with velocity 0 are muted and those of velocity 127 are the loudest.
If you would like to learn more about the MIDI files, check the Somascape MIDI specification(http://www.somascape.org/midi/tech/mfile.html). It is much more lucid than the specs avail-able at the official MIDI Manufacturers Association page (http://www.midi.org/).
1Technically, there are two velocities for each note – one for the start and one for the end. Usually, the latter hasthe value 0 to mark the end of the note, so the velocity used by the script is actually the start velocity.
3

2.2 Definitions
During the reading of this document you may encounter the following terms:
Destination animation – An animation datablock (IPO or Action) created during the synchroni-sation from source animation. The destination animation is immediately linked to the specifieddestination datablock after the synchronisation. One can speak about destination IPO or desti-nation Actions.
Destination datablock – The datablock, to which the destination animation is linked.
Sequence (also MIDI sequence) – A collection of notes (see sec. 2.1) converted from the MIDIfile. The sequence also maintains the layout of the notes in the musical piece (notes are sortedin order of appearance).
Source animation – An animation datablock (IPO or Action) depicting an elementary actionrelated to a single note type (ex. character pressing G2 piano key, snare drum recoil after thehit). The keys from those animations are used to create the destination animation during thesynchronisation. In particular, one can speak about source IPO or source Action.
Source animation duration – A distance between the last and the first key from this animation.
Source animation leading key – A selected key from the source animation, that will be placedat the beginning of the note during the synchronisation. The position of other keys will becalculated with respect to this key. By default, the leading key is the first one from the sourceanimation. See sec. 3.5.2.
Synchronisation – A process in which the timing of the source animation keys is adjusted to thetiming of selected notes. Details of the course of the process are provided in sec. 3.5.1.
2.3 Input designation
When regarding the user input, following abbreviations are used:
Akey, Bkey, Ckey etc. – respective letter keys from the alphanumeric part of the keyboard.
F1, F2, F3 etc. – respective F keys at the top of the keyboard.
1key, 2key, 3key etc. – number keys from the alphanumeric part of the keyboard.
1num, 2num, 3num etc. – number keys from the number pad.
Alt, Ctrl, Shift, etc. – respective control keys, usually used in combinations like Alt+Akey.
LMB, MMB, RMB – left mouse button, middle mouse button, right mouse button. Also thestatement click X button stands for clicking interface component using LMB (for short as thisis the most frequent operation).
3 Manual
3.1 Initial preparations and script startup
To start the work with the script, download the midi_driver.py file from http://blendit.xaa.
pl/?p=middrv&l=eng. Next, go to the main Blender directory and place the script in the �Blender
Directory�\.blend\scripts folder. If there are any previous versions of this script, remove them.Start the Blender or restart it if it is already running.
You may consider setting up your workspace in the way presented in the fig. 1. The script hasquite a big interface and will require the whole height of the workspace.
4

Figure 1: Suggested layout of the Blender interface when working with the script.
Figure 2: Location of the script in the Scripts Window menu.
5

To turn on the script, go to the Scripts menu in the Scripts Window and select Scripts→Animation→MIDI Driver (fig. 2). If there is no such entry in the menu, try selecting Scripts→Update Menus or restartthe Blender.
After successful start-up, the script’s interface appears in the Scripts Window (fig. 3)
Figure 3: Layout of the script’s interface upon start-up.
3.2 Loading MIDI file
The topmost part of the script is the header (fig. 4). The only input available here is the Load button.Next to the button is the label with the path to the last successfully loaded MIDI file or sign ,,None”(upon start-up and after failed attempt to load the file). To load the file, click the Load MIDI button.
Figure 4: Script header with Load MIDI button.
The file chooser will be appended. Here you can browse for the MIDI file. Usually the MIDI files havemid, mi or midi extension. Still, some karaoke files (kar extension) may be also a correct MIDI file.The file choice is accepted by clicking Open MIDI �le button. To return without loading click Cancel(fig. 5)
If the MIDI file was correctly loaded, the path to the file will be written next to the Load button.Except that, the sequence from the MIDI file will be displayed in the sequence viewer (see sec. 3.3)and the menus in the note filter (see sec. 3.4) will be updated with the values from file.
Under some circumstances, an error may occur during the file loading. The following error messageswill appear afterwards:
File incorrect or does not exist – the file is damaged or has been deleted before the filechooser managed to refresh the file list.
File is not a MIDI - the chosen file does not contain a valid MIDI data.
6

Figure 5: Selecting the MIDI file with the file chooser.
Not supported MIDI SMF2 format – SMF2 files are obsolete (see sec. 2.1).
Not supported FPS timing – Exact rules of FPS time division (see sec. 2.1) are not preciseenough to correctly support it.
3.3 Sequence viewer
The center of the script’s interface is the sequence viewer (fig. 6). Its aim is to display the layout ofthe notes from the sequence loaded from the MIDI file. Each note is represented by a single stripe.The horizontal position of the stripe’s left edge marks the start of the note. The length of the stripeis proportional to the duration of the note. The vertical position of the note marks the pitch value.The stripes have different colours to distinguish the notes from different channels. Selected notes havea white outline.
Figure 6: Sequence viewer. Each note is represented by a colour stripe. The green, vertical line corre-sponds to the position of a frame pointer in IPO/Action Editor or at the timeline.
Due to the limited space, the display area is limited to the first 10 seconds of the sequence andfirst 3 octaves (36 note pitches). To navigate to the other parts of the sequence, hold the MMB withinthe display area and drag it around.
The notes can be manually selected in the sequence viewer. Clicking the note stripe with LMB willtoggle its selected/deselected status. Akey toggles select/deselect all notes. Ikey inverts selection: whenpressed, all selected notes become deselected, and previously deselected notes will be selected.
You can select more than one note with the box selection. To activate it, press Bkey. A crosshairwill appear. Click and hold LMB to specify the first corner of the selection box. Stretch the box andrelease the LMB to accept the second corner of the selection box. All notes, even partially included inthe box, will be selected.
When a single note is selected, information about its properties is displayed below the viewer. Todisplay this information without selecting the note, click its stripe with RMB.
7

The last feature of the sequence viewer is the green, vertical line pointer. Its position correspondsto the position of the frame pointer in the IPO/Action Editor or at the timeline. Ex. if the pointerin IPO Editor is placed at frame 75, the pointer in the sequence viewer will be placed at the thirdsecond (assuming the framerate is 25FPS). The pointer cannot be moved in the sequence viewer.
3.4 Note filter
The section right below the header of the script interface is the note filter (fig. 7). The controls hereallows the user to specify the rules of the automatic note selection. Notes can be selected according totheir assignment to channels, instruments, pitch values or their location in sequence. By default, all
Figure 7: Note filter. Each selection rule consists of a toggle button enabling the rule and an input toprovide the comparison value.
notes are selected. To select notes according to their properties, you have to enable one of the togglebuttons to activate the appropriate rule and input the sought value of the note property. There arefollowing rules available:
Channel – when this rule is enabled, notes, which channel number is equal to the one chosen onthe list, will be selected. Ex. enabling this rule and choosing channel 4 will make all notes fromchannel 4 selected (see fig. 10(a)).
Instr – when this rule is enabled, notes, which instrument identifier is equal to the one chosen onthe list, will be selected. Ex. enabling this rule and choosing 65:Alto Sax will make all notesplayed by alto saxophone selected (fig. 9(a)).
Note – when this rule is enabled, notes, which pitch value is equal to the one chosen on the list,will be selected. Ex. enabling this rule and choosing 67:G3 will make all notes with pitch valueG3 selected (fig. 9(b)). The pitch value list may contain the names of parts of drum set fromchannel 10. Those values will refer only to the notes from channel 10.
Range – when this rule is enabled, notes, that are even partially placed in the given time range,will be selected. You have to provide the start time of the range in the first input and the end ofthe time range in the second input after the rule toggle button. The time value must be providedin milliseconds (1000 milliseconds = 1 second). Ex. enabling this rule, and setting 2000 in thefirst and 4000 in the second input will select all notes that are even partially included between2nd and 4th second of the sequence (fig. 8(a)).
Order – when enabled, the rule introduces offset and increment of the selection. Offset (enteredin the first input) specifies how many notes from the beginning of the sequence will be skipped.Increment (second input) decides every which note is selected. Ex. enabling the rule and settingthe offset to 5 and increment to 3 will select every third note starting from the sixth one (firstfive skipped, see fig. 8(b)).
The values provided in the channel, instrument and note pitch selection lists are limited to the valuesthat are actually used in the sequence.
The selection rules can be combined, ie. more than one toggle can be enabled at a time (fig. 9).When combined, the channel, instrument and note pitch rules depends on each other:
If Channel and Instr are enabled, the instrument list is limited to the instruments from theselected channel.
8

(a) (b)
Figure 8: Example usage of the Range (a) and Order (b) selection rules.
If Channel and Note are enabled, the note pitch values list is limited to the pitch values of thenotes from the selected channel.
If Instr and Note are enabled, the note pitch values list is limited to the pitch values of the notesplayed by the selected instrument.
If Channel, Instr and Note are enabled, the note pitch values list is limited to the pitch values ofthe notes from the selected channel and played by the selected instrument.
(a) (b)
(c)
Figure 9: Example usage of the Instrument (a), Note (b) selection rules and the result of combiningthem (c).
The remaining two keys are used to control the availability of the notes. The Hide button will hideall notes that currently are not selected (fig. 10). Channel, instrument and note pitch selection listswill be limited to the values from remaining notes. Clicking Unhide buton retrieves visibility of allnotes.
3.5 Animation entries
The section at the bottom of the script interface holds nine animation entries (fig. 11). Each entryconsists of 10 controls to set the synchronisation parameters for one source animation. Therefore, upto nine animations can be synchronised with one set of selected notes. To perform the synchronisation,
9

(a) (b)
Figure 10: Using the Hide function. This feature may come handy when notes, which have to beselected manually, are obscured by notes from other channels.
at least one note has to be selected and at least one animation entry has to have both the destinationdatablock and source animation correctly specified. The meaning of each field and button in the singleanimation entry is explained in the following sections.
Figure 11: Script section with animation entries
3.5.1 Basic synchronisation
The basic synchronisation use the first three inputs of the animation entry. The first input allows youto choose the type of the source IPO and subsequently the type of the destination datablock (tab. 1).
Type designation Expected destination datablock type Expected source animation typeAR Armature/Object∗ ActionCA Camera/Object∗ Camera IPOLA Lamp/Object∗ Lamp IPOMA Material Material IPOOB Object Object IPOTE Texture Texture IPOWO World World IPO
∗ Depends on the state of the OB/Data button, see sec. 3.7.
Table 1: Type designation and subsequent requirements regarding the destination datablock and thesource animation type.
Next is the input to provide the name of the destination datablock. The datablock has to existand be of a correct type (an abbreviation of the expected type will be written in the input). If those
10

requirements are not fulfilled, an appropriate error message will be displayed.The third input is the place for the name of the source animation. The source animation has to
exist, be of correct type (fig. 12) and contain at least one key. Appropriate error message will bedisplayed if those requirements are violated. The source animation cannot be linked to the destinationdatablock (to prevent race condition). This condition is checked during the synchronisation so you willnot be prompted about this error upon the input but after starting the synchronisation. Animationentry with such error will not be processed.
Figure 12: The type of the IPO can be checked in the IPO Editor.
Figure 13 provides an example of a correct basic animation entry setup.
(a) (b)
Figure 13: An exemplary setup of the basic synchronisation. The destination datablock (here: Cube)and source animation (here: ObIpo) have to be previously created (a). Figure (b) shows the correctsettings of a single animation entry. The synchronisation is activated by pressing the Sync button (b).
The synchronisation utilises current framerate to calculate keys time location. Make sure to setthis parameter before performing any synchronisation and keep it constant afterwards (fig. 14)
To start the synchronisation, click the Sync button at the very bottom of the script interface.During the synchronisation, a copy of the source animation is created for each selected note. Thetime position and duration of each copy is adjusted in such manner, that its first key is locatedat the beginning of the related note, and the last key at this note’s end (fig. 15). The end of thesynchronisation will be signalised by a summarising message.
The destination animation has the name <type>MidiIpo<number> or MidiAction<number>, wheretype is the name of the source animation type (fig. 15(a)). The destination animations have the falseuser turned off (even Actions). Destination IPO curves have the interpolation and extend mode thesame as the respective source IPO curves.
The synchronisation does not affect the source animation, which is left untouched for a furtheruse.
If the destination datablock has an IPO or Action already linked, the new destination IPO orAction is mixed with it – new keys are inserted and old keys remain unless the overlapping conditionforces keys clipping (see sec. 3.6).
3.5.2 Additional options
The result of the basic synchronisation shown in the section 3.5.1 can be enhanced by using theadditional options available in each animation entry.
11

Figure 14: The framerate has to be set once before the first synchronisation. To set the current framerate go to the Buttons Window, Scene panel (F10), Render buttons, Format card.
(a)
(b)
Figure 15: The result of the synchronisation (a) and the course of the basic synchronisation leading tothis result (b). For each selected note, a copy of the source animation is created (1). Next, each copyis shifted, so that its first key is placed at the beginning of the respective note (2). Last, the durationof the copy is adjusted to meet the length of the related note (3).
12

Changing leading key The leading key is the source animation key, that will be placed at thebeginning of the notes, with other keys consequently shifted. By default, the leading key is the firstkey of the source animation. However, when animating ex. a drumstick hitting a drum, the drumstickwill actually touch the drum at the second or later key with preceding keys left to animate the run-up.To place such key at the beginning of the note, you have to specify this key as the leading key. Thiscan be done by providing its order number in the input next to the source animation name input.The numbering rule of the keys has been shown in the fig. 16. The difference between the default andcustom setting has been shown in the fig 17.
Figure 16: Keys numbering on the example of an IPO. Note, that keys located at the same timeposition bear the same order number.
(a)
(b)
Figure 17: The default setting with the first key as the leading key (a) and the user setting with thesecond key as the leading key (b). The green frame pointer is placed at the beginning of the first note.Those and further examples utilise the sequence and the source animation shown in the fig. 13.
Disabling scaling In some cases, you may want more uniform course of the animation, whereduration of each source animation copy related to selected notes is constant. To disable the durationscaling, disable the S button next to the leading key position input (fig. 18). Duration of each copy ofthe source animation will be now independent of notes length and equal to the duration of the source
13

animation. Be aware, that if the source animation is longer than a single note and space between itand it neighbours, clipping of the overlapping keys may occur (see sec. 3.6).
(a)
(b)
Figure 18: The default setting with scaling enabled (a) and disabled (b). In the latter case, all copiesof the source animation have an equal duration. Notice keys clipping where the notes are denser.
Holding leading key When animating ex. a piano play, a single piano key should stay depressedfor the whole duration of the respective note. This can be done by using the H toggle button (fig. 19).When enabled, all IPO curves, starting from the leading key, will be kept constant till the end of thenote. An extra key will be added in each curve at the end of the note.
Velocity influence The course of the destination animation can be varied by using the note velocity.To enable the velocity influence you have to provide the reference velocity in the input next to the Htoggle. The reference velocity is used to calculate the factor used to scale the level of keys. The factoris the current note velocity divided by the reference velocity. Ex. if the reference velocity is 60 andthe note velocity is 120, then the level of all keys related to this note will be scaled up 2 times (fig.20). The default reference velocity is 0, for which no level scaling occurs.
The level scaling is performed against the 0 level of the IPO curve (fig. 20(b)), thus the non-zerolevel of the leading key may be changed. In some cases you may want the leading key left constant(ex. when you want to vary the run-up and recoil of the drumstick, but leave the contact point eachtime the same). To accomplish this, enable the R button next to the reference velocity input. It willcause that the leading key level will be constant and levels of remaining keys will be scaled relativelyto the level of the leading key (fig. 20(c)).
Pause animation Pause animation is the animation performed during longer intervals between thenotes, ex. a character moving his hands away from the instrument if it will not be played for a while.To allow the insertion of the pause animation, you have to provide its name in the last input in theanimation entry. Such animation has to fulfil the same requirements as the source animation. Thecopies of pause animation will be placed in each interval longer than the duration of this animationand after the last selected note (fig. 21(b)). The interval is counted from the last key related to the
14

(a)
(b)
Figure 19: Default setting with hold option disabled (a) and enabled (b). In the latter case, theadditional key has been added to the IPO Curve to keep it constant for the whole duration of eachnote. Keys after the leading key are consequently shifted beyond the end of each note.
note preceding it to the first key related to the first note after the interval. The pause animation canbe stretched to the whole duration of the pause interval if the S button, next to the pause animationname input, is enabled (fig. 21(c)). The pause animation cannot be inserted without specifying thesource animation (there have to be keys related to the notes to determine the location of pauses).
3.6 Overlapping keys and ,,floating” animation
When synchronising the animation, two unwanted phenomenas may occur: overlapping of keys and,,floating” animation.
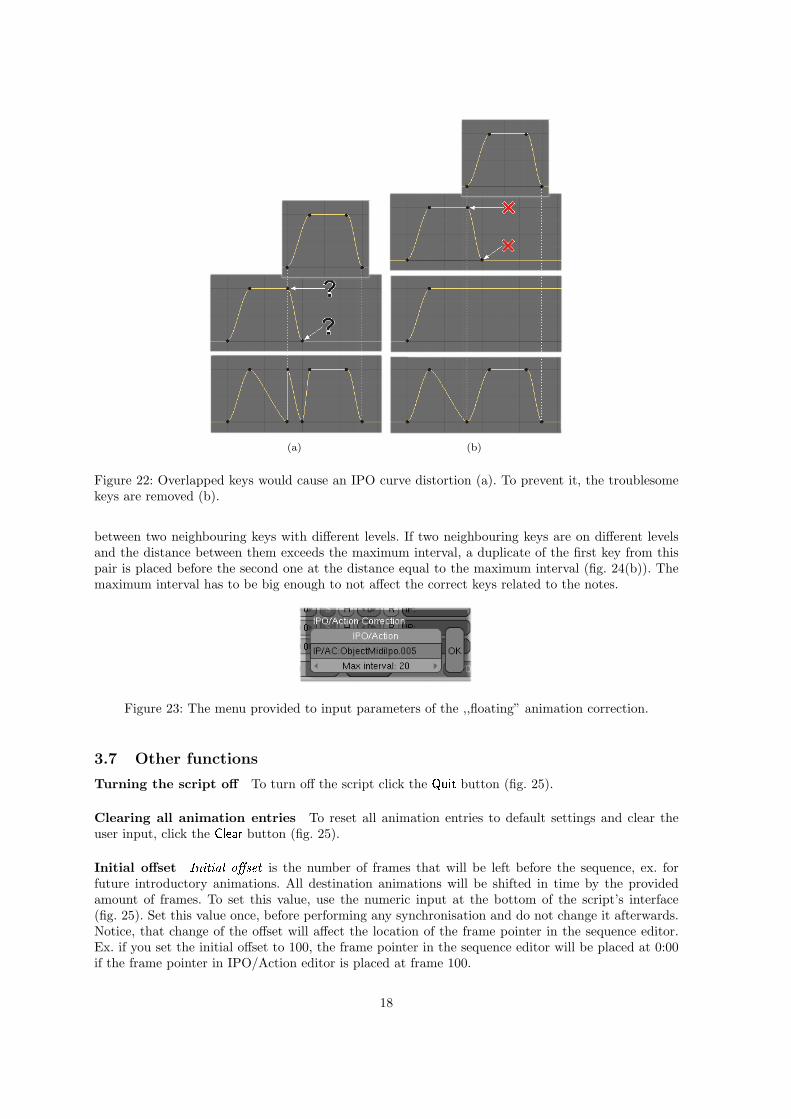
Overlapping of keys is any situation when keys are present in the IPO Curve in the place where thecopy of the source animation will be inserted (fig. 22(a)). This may happen when there are already keysin the destination animation: the new copy of source animation is overlapping the previously insertedone, the destination animation is reused etc. To prevent the distortion of the IPO curve, any existingkeys that would be overlapped by newly inserted source animation copy, are removed (fig. 22(b)).This is the mechanism that will be called in this document the keys clipping. The source animationsshould be designed to minimise the need of keys clipping. Keys clipping can be also reduced by usingdifferent settings (ex. leave scaling enabled for dense set of short notes).
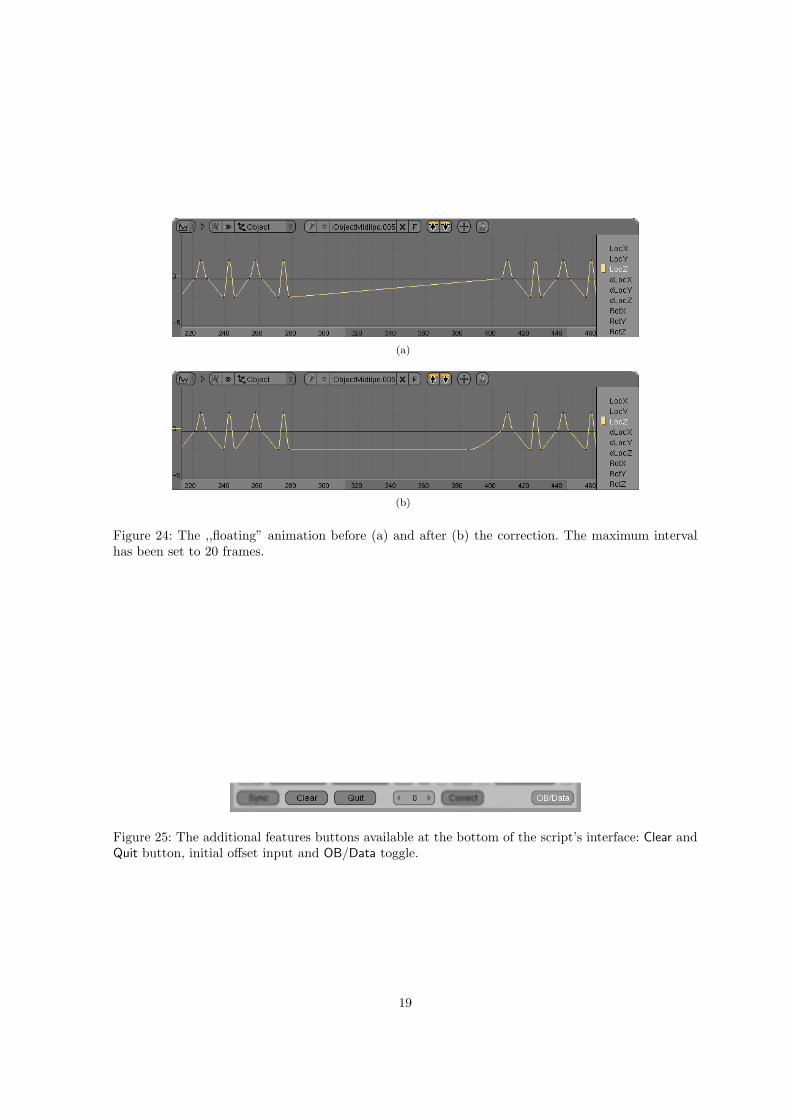
Floating animation occurs if in the IPO Curve there are two neighbouring but distanced keys ondifferent levels (fig. 24(a)). They are usually placed in the pause intervals and are caused by usingsource animation which first and last keys are on different levels (ie. it cannot be looped). Suchlocation of keys cause ex. a very slow movement of an object between two distant notes (the object is,,floating”).
The IPO or Action that contains such error can be fixed by using the correction function. The func-tion is available by clicking the Correct button, at the bottom of the script’s interface. A small windowwill appear (fig. 23). The user specifies here whether he will perform correction of IPO (IPO/Actionbutton enabled) or Action (IPO/Action button disabled), the name of the IPO/Action to correct andthe maximum interval value. Maximum interval is the maximum distance (counted in frames) allowed
15

(a)
(b)
(c)
Figure 20: The level scaling disabled (a), enabled with an absolute setting (b) and enabled witha relative setting (c). Notes velocities have been written out in (b) settings.
16

(a)
(b)
(c)
Figure 21: The IPO used as the pause animation (a) and its usage with pause scaling disabled (b) andenabled (c). A different part of the sequence is utilised in this example (see settings of (b)).
17
(a) (b)
Figure 22: Overlapped keys would cause an IPO curve distortion (a). To prevent it, the troublesomekeys are removed (b).
between two neighbouring keys with different levels. If two neighbouring keys are on different levelsand the distance between them exceeds the maximum interval, a duplicate of the first key from thispair is placed before the second one at the distance equal to the maximum interval (fig. 24(b)). Themaximum interval has to be big enough to not affect the correct keys related to the notes.
Figure 23: The menu provided to input parameters of the ,,floating” animation correction.
3.7 Other functions
Turning the script off To turn off the script click the Quit button (fig. 25).
Clearing all animation entries To reset all animation entries to default settings and clear theuser input, click the Clear button (fig. 25).
Initial offset Initial o�set is the number of frames that will be left before the sequence, ex. forfuture introductory animations. All destination animations will be shifted in time by the providedamount of frames. To set this value, use the numeric input at the bottom of the script’s interface(fig. 25). Set this value once, before performing any synchronisation and do not change it afterwards.Notice, that change of the offset will affect the location of the frame pointer in the sequence editor.Ex. if you set the initial offset to 100, the frame pointer in the sequence editor will be placed at 0:00if the frame pointer in IPO/Action editor is placed at frame 100.
18
(a)
(b)
Figure 24: The ,,floating” animation before (a) and after (b) the correction. The maximum intervalhas been set to 20 frames.
Figure 25: The additional features buttons available at the bottom of the script’s interface: Clear andQuit button, initial offset input and OB/Data toggle.
19

Object/Datablock naming mode When referring to the Armature, Camera or Lamp datablock,you may use the name of the datablock itself or the name of the object to which this datablock islinked. To switch between those two naming modes, use the OB/Data button (fig. 26).
(a)
(b) (c)
Figure 26: Any prop used in the scene consists of the object and a linked to it datablock (a). Thestate of the OB/Data toggle decides if you refer to the Armature, Camera or Lamp by its object name(b) or the name of the linked datablock (c).
4 Troubleshooting
It is more than sure, that the script contains some bugs. Some of them have been already spotted buttheir resolution is left till the next versions. The known bugs are:
Script does not save its current state, so when you undo something, all the settings (loadedsequence, selected notes, animation entries input) will be cleared. If you are not satisfied withthe result of the synchronisation, do not undo it, but unlink the destination animation from thedestination object and try again.
A number of MIDI files violates the data structures provided by the MIDI standard. They maycrash the script or make it mulfunction. If you happen to experience any problems when loadingMIDI file through the script, send me your *.blend file, MIDI file and the description of the lastsettings of the script.
The synchronisation of the Armature animation can give improper results. Particularly, if thesource Action contains any rotation of a bone and a velocity-dependant level scaling is en-abled (see sec. 3.5.2), the bones rotation may be incorrect. This is because Armatures utilisequaternions to evaluate rotations, and those cannot be linearly scaled by the script as any otherparameters. To walk around this problem, you may consider making the bone a child of anEmpty and synchronise the transformation of the Empty.
The script does not support the synchronisation of some types of IPO (ex. shape, curve, parti-cles). However, you may synchronise ex. the Object IPO for an Empty and use it as a driver forunsupported IPO.
5 Version history
Script versions:
20

March, 2010 0.1 – MIDI loader and note filter.
March, 2010 0.3 – First simple synchronisation routine, only for Object IPO type.
March, 2010 0.35 – Collision resolution mechanism added.
April, 2010 0.4 – Added synchronisation of Camera, Lamp, Material, Texture and World IPOs.
April, 2010 0.45 – Added scale and hold options, added possibility to change leading key.
April, 2010. 0.47 – Collision resolution mechanism updated (correction of ,,floating” animations).
April, 2010 0.5 – Synchronisation of Actions added.
April, 2010 0.55 – Added pause IPO insertion.
April, 2010 0.57 – Added velocity-specific vertical scaling.
April, 2010 0.6 – Added sequence viewer with selection routines.
May, 2010 0.65 – Major fixes and cleanup.
June, 2010 – Started work on branch 1.* for Blender 2.5.
August, 2010 0.7 – First release version for Blender 2.49b.
November, 2010 0.72 – Bug fixes for Mac Blender (script downgrade to Python 2.3)
Manual versions:
June, 2010 – Manual for MIDI Driver v.0.65.
August, 2010 – Rewritten manual for MIDI Driver v.0.7, first published version.
November, 2010 –
6 License
Copyright © 2010 Pawe l Adamowicz ([email protected], [email protected] )
The MIDI Driver script for Blender 2.49b is free software: you can redistribute it and/or modify itunder the terms of the GNU General Public License as published by the Free Software Foundation,version 3 of the License.
This script is distributed in the hope that it will be useful, but WITHOUT ANY WARRANTY;without even the implied warranty of MERCHANTABILITY or FITNESS FOR A PARTICULARPURPOSE. See the GNU General Public License for more details.
You should have received a copy of the GNU General Public License along with this program. If not,see http://www.gnu.org/licenses/.
Contents of this manual are under Creative Commons Attribution-NoDerivs 3.0 Unported License.See http://creativecommons.org/licenses/by-nd/3.0/ for further details.
21