инструкция-для-кофемашин-servomat-vending...
DESCRIPTION
xs machineTRANSCRIPT

cino xs speedmix H5 Operating manual 3rd edition 12/2003 Software version FXSHD 12A onwards / 23.09.2003

Operating manual XS Speedmix H5 Version FXSHD 12A onwards
© servomat steigler 1 29.12.2003

Version FXSHD 12A onwards XS Speedmix H3 Operating manual
29.12.2003 2 © servomat steigler
AAAA RRRR TTTT
A wide variety of Recipe Technical coffee specialities step program quality control Hot drink systems without The high quality of drinks produced Our electronic FlashCard- Cappuccino are today almost with the A.R.T. system can be memory guards A+R. The unthinkable. First of all the achieved only with the aid of finely service agent can adjust the feed for site and taste of wide variety tuned step production program. some more/less water/product depending of coffee specialities cheer up Coffee, topping/whitener, chocolate upon the customer’s requirement. the hearts of the consumers and and fine filtered hot water are He however does not have any access to thus revs up the turnover. step by step transformed into R – recipe step production. In the A.R.T. system you can creamy drinks. find the following range : Each speciality of coffee has its Cappuccino independent step-by-step Conclusion: Cappuccino Extra production. The A.R.T. program guarantees MoccaCino a consistent quality of drinks, the Café Au lait level of which is simply determined Espresso by the quality of products used.

Operating manual XS Speedmix H5 Version FXSHD 12A onwards
© servomat steigler 3 29.12.2003
This operating manual is meant for the following machine
Identification label of your machine
This manual is an integral part of the machine and must always be available in the vicinity of the machine for reference, till such time as the machine gets
disposed off
If the manual gets misplaced or damaged, for reordering you must provide the identification data given on the rating plate of the machine to the manufacturer.
Version FXSHD 12A onwards XS Speedmix H3 Operating manual
29.12.2003 4 © servomat steigler
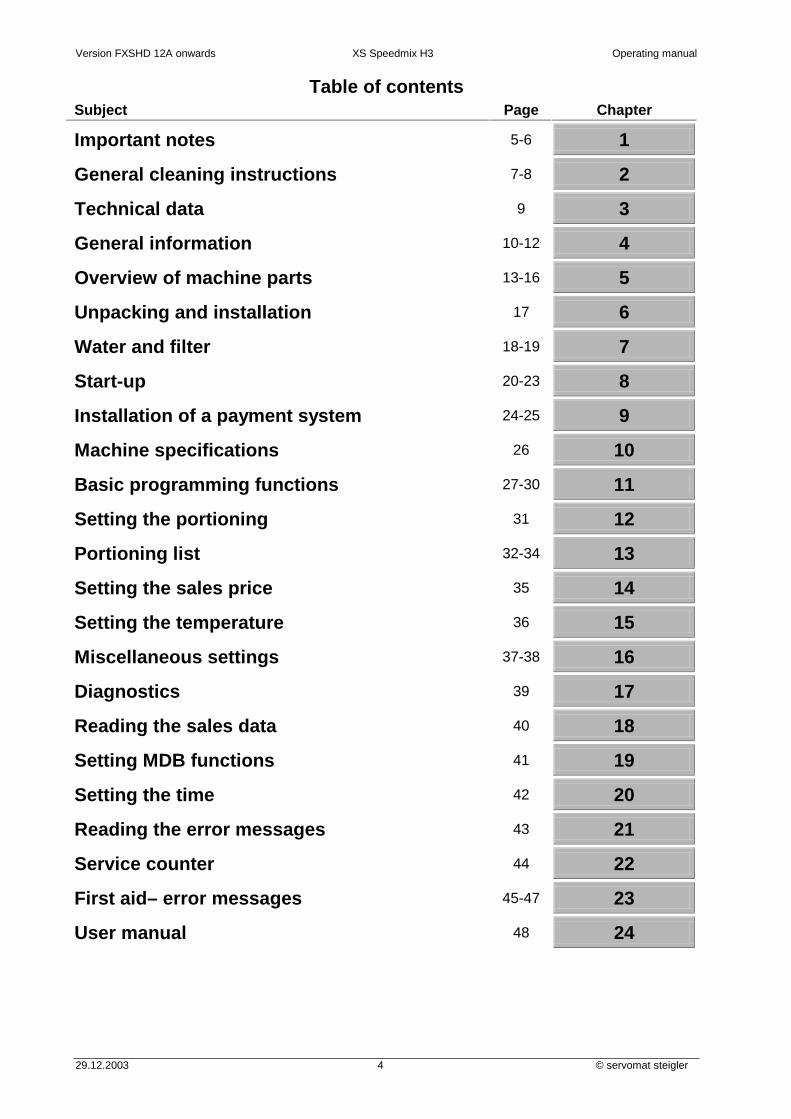
Table of contents Subject Page Chapter
Important notes 5-6 1
General cleaning instructions 7-8 2
Technical data 9 3
General information 10-12 4
Overview of machine parts 13-16 5
Unpacking and installation 17 6
Water and filter 18-19 7
Start-up 20-23 8
Installation of a payment system 24-25 9
Machine specifications 26 10
Basic programming functions 27-30 11
Setting the portioning 31 12
Portioning list 32-34 13
Setting the sales price 35 14
Setting the temperature 36 15
Miscellaneous settings 37-38 16
Diagnostics 39 17
Reading the sales data 40 18
Setting MDB functions 41 19
Setting the time 42 20
Reading the error messages 43 21
Service counter 44 22
First aid– error messages 45-47 23
User manual 48 24

Operating manual XS Speedmix H5 Version FXSHD 12A onwards
© servomat steigler 5 29.12.2003
11.. IImmppoorrttaanntt nnootteess 1.1
Details concerning the quality
o The quality of the machine is intended only for production with coffee, cocoa, tee or other such drinks the machine is meant for.
o The typical application is as vending machine for customers, guests and employees.
o The installation, filling-up and cleaning must be done according to the specifications given in this manual, by our technical partner’s staff properly trained by servomat steigler.
o For changing the quality of coffee, or the product quality, a readjustment by servomat’s technical partner is a necessary prerequisite.
o The machine must be installed in a dry, closed room free of any external environmental effects (e.g. strong vibration).
o The size and capacity, and the associated filling-up/cleaning and servicing costs of model XS E are intended for up to 50 portions per day, maximum 36000 portions in 24 months.
o If the machine is filled up and cleaned by untrained staff an extensive induction by technical partner of servomat is absolutely necessary.
o The manufacturer will not bear any liability for damage caused by acts of vandalism or improper handling (e.g. manipulation attempts with coins, tokens, cashless means of payment .
o Wear parts are those parts which undergo a natural wear and tear or have a normally limited serviceable life. These parts can fail during the statutory period of limitation applicable for claims, i.e. 24 months. However, in legal terms this is not to be seen as a defect. Following parts are covered here: O-rings/lighting devices/V-rings/grinding disk/mixing motors/ valves and water heating elements in case of calcification.
o The use of water softners/ filters, such as BRITA-water filter is strongly recommended at installation sites where water hardness is more than 9° degree according to German standards. Considerable functions of our coffee machine are directly linked to the water conveying parts, such as valves, boiler, heating elements.
o Regular servicing must be done according to the enclosed checklist (minimum twice a year, however, after every 5000 portions). During servicing wear parts must replaced according to the enclosed list in order to ensure overall functioning.
o The guidelines for cleaning and hygiene given this manual must be followed in order to ensure flawless functioning of our machine.
Beimerstetten, den 01.01.2002 Text contents are protected by copyright.
Version FXSHD 12A onwards XS Speedmix H3 Operating manual
29.12.2003 6 © servomat steigler
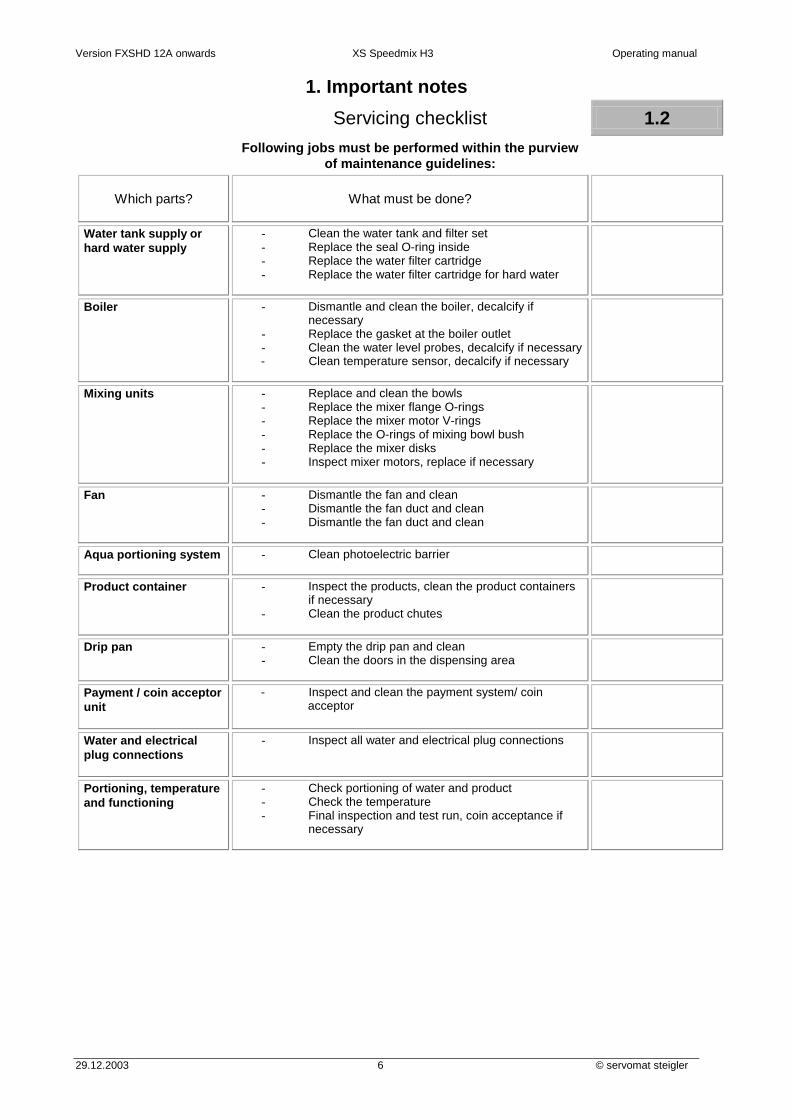
1. Important notes Servicing checklist 1.2 Following jobs must be performed within the purview
of maintenance guidelines:
Which parts?
What must be done?
Water tank supply or hard water supply
- Clean the water tank and filter set - Replace the seal O-ring inside - Replace the water filter cartridge - Replace the water filter cartridge for hard water
Boiler
- Dismantle and clean the boiler, decalcify if necessary
- Replace the gasket at the boiler outlet - Clean the water level probes, decalcify if necessary
- Clean temperature sensor, decalcify if necessary
Mixing units
- Replace and clean the bowls - Replace the mixer flange O-rings - Replace the mixer motor V-rings - Replace the O-rings of mixing bowl bush - Replace the mixer disks - Inspect mixer motors, replace if necessary
Fan - Dismantle the fan and clean - Dismantle the fan duct and clean - Dismantle the fan duct and clean
Aqua portioning system - Clean photoelectric barrier
Product container - Inspect the products, clean the product containers if necessary
- Clean the product chutes
Drip pan
- Empty the drip pan and clean - Clean the doors in the dispensing area
Payment / coin acceptor unit
- Inspect and clean the payment system/ coin acceptor
Water and electrical plug connections
- Inspect all water and electrical plug connections
Portioning, temperature and functioning
- Check portioning of water and product - Check the temperature - Final inspection and test run, coin acceptance if
necessary

Operating manual XS Speedmix H5 Version FXSHD 12A onwards
© servomat steigler 7 29.12.2003
2. Cleaning instructions 2.1 General cleaning instructions
! For this, we
recommend our ready for use HACCP cleaning agent
This cleaning instruction is an extension of the user instructions given on inner surface of the machine cover. The cleaning instructions constitute instructions for daily, weekly and monthly cleaning. Please follow the cleaning instructions. This would ensure more hygiene and lesser malfunctions.
2.2 Daily cleaning
1. Fill up the products: First of all check the level of all existing products in the machine. Close the red shut-off flap of the product container in advance. Now fill in the product given on the product container. After this again open the red shut-off flap of the product container.
2. Carry out the rinsing program: Press the program button on the inner side of the machine door. A program menu is shown on the display. Press key 4 where 4 = RINSING. Now place a large vessel under the outlet. For the mixing bowl 1 press key 1. Now rinse this mixing bowl thoroughly in multiple rinsing cycles. After that press keys 2, 3 and so on. Press individual keys multiple times until around 3 litre of hot water has been used for rinsing. After that press the program key to re-enter the sales mode.
3. Clean the water drip pan: With the door open, remove the drip pan as follows: lightly press downwards and pull out. Remove the grid from the drip pan and clean both parts under warm running water. After that again set the drip pan properly in place.
4. Clean the doors in the product dispensing area: Clean the doors in the product dispensing area from inside as well as outside. Here you could find deposits caused by splashing of the product. Use a damp sponge or cloth to clean these parts.
2.3 Weekly cleaning
Cleaning steps described under sections 1 to 4 are included here.
5. Clean the mixing bowls: Turn the red locking clamp to left. Now you can pull out the mixing bowl. Take out the mixing bowls completely with pipe and discharge angle. Clean these parts using the rinsing solution meant for the purpose. Again dry up the parts carefully.
! Product chutes get clogged if they are
wet.
6. Clean the product chutes: Press the product chute lightly against the product container and turn it to the left in the anticlockwise direction. Clean these product chutes using the rinsing solution meant for the purpose. Again dry up these products properly before reinstallation.
7. Clean the water storage tanks: Lift the water storage tank (blue) slightly using the handle, and pull out. Clean the water storage tank by rubbing off the deposits under warm running water. Remove lime deposits with mild vinegar. Afterwards rinse the water tank several times. If you are using a filter set in the water tank clean it the same way.
Version FXSHD 12A onwards XS Speedmix H3 Operating manual
29.12.2003 8 © servomat steigler
2. Cleaning instructions Monthly cleaning 2.4 Steps for the daily and weekly cleaning described under section
1 to 7 are included here.
8. Clean the product container: First of all close the red shut-off flaps on the product containers. Take out the product containers by lifting these slightly at the front and then pulling them out. Pour out the remaining product. Remove the product chutes from the product containers. Put the product containers and chutes in a rinsing solution meant for them. Wipe the product containers clean with the help of a sponge. Dry out the product containers properly. Preferably leave them to dry out overnight and install them again next day and fill in.
9. Clean fan duct: When you have taken out the product containers and the mixing bowls, you can pull out the plastic drawer above the mixing bowls and below the product containers. This is meant to be the suction channel for water vapour suction. Here it is possible that the product also gets sucked along. Clean the fan duct using the rinsing solution meant for the purpose and dry it up properly before reinstallation.
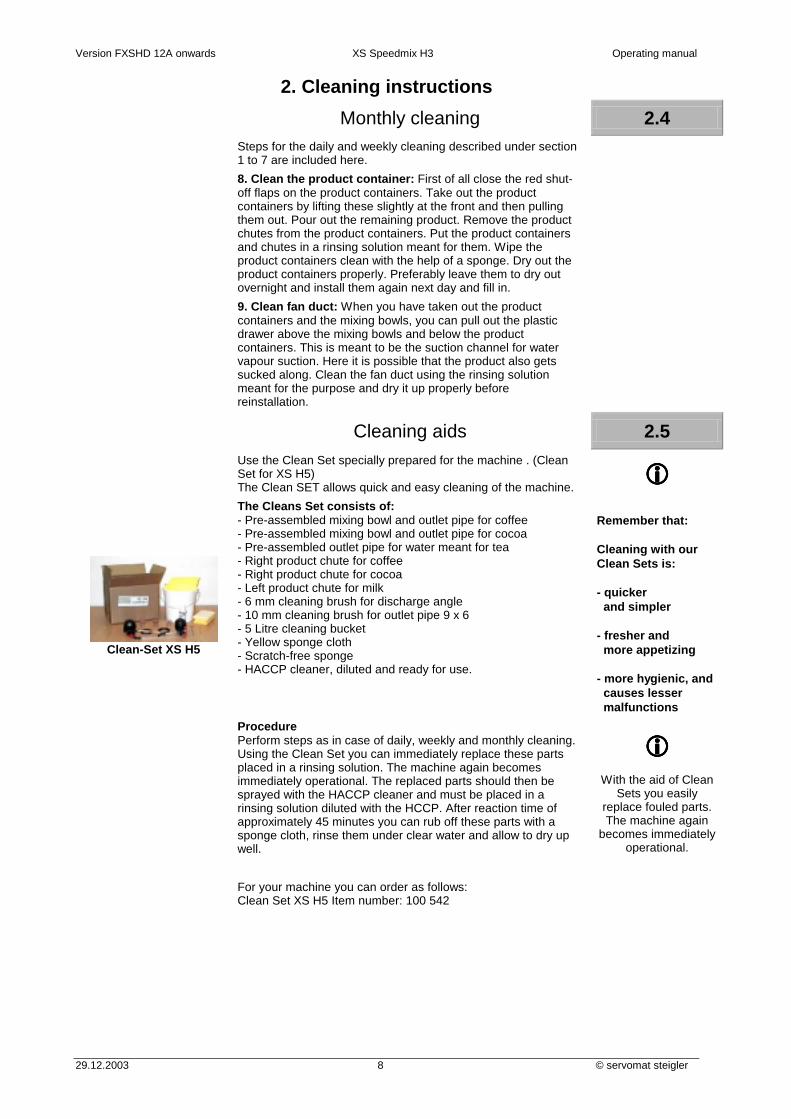
Cleaning aids 2.5 Use the Clean Set specially prepared for the machine . (Clean
Set for XS H5) The Clean SET allows quick and easy cleaning of the machine.
!!!!
Clean-Set XS H5
The Cleans Set consists of: - Pre-assembled mixing bowl and outlet pipe for coffee - Pre-assembled mixing bowl and outlet pipe for cocoa - Pre-assembled outlet pipe for water meant for tea - Right product chute for coffee - Right product chute for cocoa - Left product chute for milk - 6 mm cleaning brush for discharge angle - 10 mm cleaning brush for outlet pipe 9 x 6 - 5 Litre cleaning bucket - Yellow sponge cloth - Scratch-free sponge - HACCP cleaner, diluted and ready for use.
Remember that: Cleaning with our Clean Sets is: - quicker and simpler - fresher and more appetizing - more hygienic, and causes lesser malfunctions
Procedure Perform steps as in case of daily, weekly and monthly cleaning. Using the Clean Set you can immediately replace these parts placed in a rinsing solution. The machine again becomes immediately operational. The replaced parts should then be sprayed with the HACCP cleaner and must be placed in a rinsing solution diluted with the HCCP. After reaction time of approximately 45 minutes you can rub off these parts with a sponge cloth, rinse them under clear water and allow to dry up well.
!!!! With the aid of Clean
Sets you easily replace fouled parts. The machine again
becomes immediately operational.
For your machine you can order as follows: Clean Set XS H5 Item number: 100 542

Operating manual XS Speedmix H5 Version FXSHD 12A onwards
© servomat steigler 9 29.12.2003
3. Technical data 3.1 Technical data sheet
Dimensions Height (with closed cover) Width (with closed doors) Depth (with closed doors)
520 mm 390 mm 450 mm
Weight
Empty Full
44 Kg 52 Kg
Electrical values Voltage supply Max. power consumption Consumption with approx. 50 cups per day (130 ml)
230 Volt 50 Hz 16 A 1350 Watt 1,7 Kw/h
Transformer Primary 230 V (black) Secondary 24 V (blue) 90VA – 100VA 8,5 V (red) 10VA
230 Volt 50 Hz 24 Volt 8,5 Volt
Aqua portioning system
Voltage supply
24 V DC
Boiler Heating element power Capacity Heating –up time
1300 W 4 Litre approx. 10 minutes
Temperature control
Electronic PTC sensor
Product motor Voltage supply Running speed
24 V DC 85 Upm
Mixer motor Voltage supply Running speed adjustable from
24 V DC 2400 Upm to 16000 Upm
Valves Voltage supply at inlet valve
24 V DC
Hard water supply (optional)
Water pressure Water supply
1 – 8 Bar 3 / 8“ or 3 / 4“ external
Door lighting Fluorescent lamps - length 300 mm - diameter 16 mm 220 V / 8 Watt
Miscellaneous GSM useful via external modem FLASH CARD programming with PC-Software Signal lamp for production run
Coffee container (small) Coffee capacity for approx. 0,4 kg
Sugar container (small) Sugar capacity for approx. 1,0 kg
Cocoa container (Wide) Cocoa capacity for approx. 2,1 kg
Milk container (Small) Topping capacity for approx. 0,8 kg
Individual container (Small) Individual capacity for approx. 1,0 kg
Version FXSHD 12A onwards XS Speedmix H3 Operating manual
29.12.2003 10 © servomat steigler
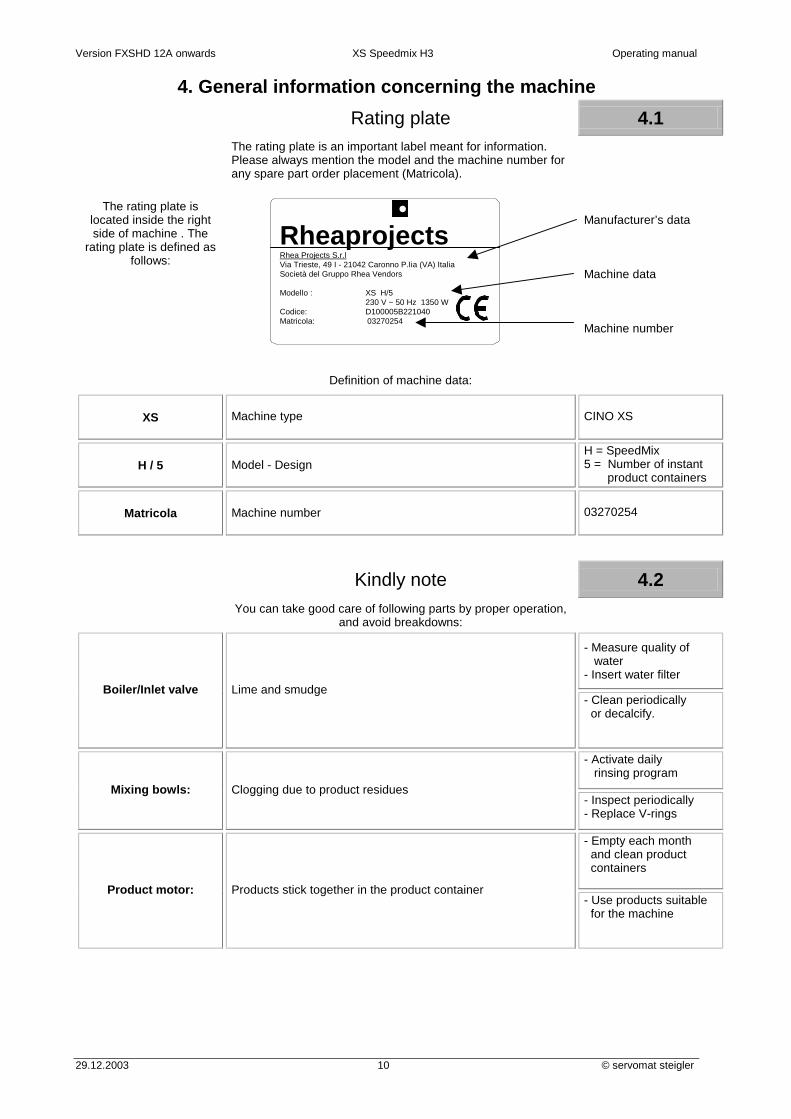
4. General information concerning the machine Rating plate 4.1 The rating plate is an important label meant for information.
Please always mention the model and the machine number for any spare part order placement (Matricola).
The rating plate is located inside the right side of machine . The
rating plate is defined as follows:
Manufacturer’s data Machine data Machine number
Definition of machine data:
XS
Machine type
CINO XS
H / 5
Model - Design
H = SpeedMix 5 = Number of instant product containers
Matricola
Machine number
03270254
Kindly note 4.2 You can take good care of following parts by proper operation,
and avoid breakdowns:
- Measure quality of water - Insert water filter
Boiler/Inlet valve Lime and smudge - Clean periodically or decalcify.
- Activate daily rinsing program
Mixing bowls: Clogging due to product residues - Inspect periodically - Replace V-rings
- Empty each month and clean product containers
Product motor: Products stick together in the product container - Use products suitable for the machine
Rheaprojects Rhea Projects S.r.l Via Trieste, 49 I - 21042 Caronno P.Iia (VA) Italia Società del Gruppo Rhea Vendors Modello : XS H/5 230 V ~ 50 Hz 1350 W Codice: D100005B221040 Matricola: 03270254
Operating manual XS Speedmix H5 Version FXSHD 12A onwards
© servomat steigler 11 29.12.2003
4. General information concerning the machine 4.3 Safety notes
! This machine is manufactured keeping in mind the safety aspects. Nevertheless, independent installation and operation of the machine may only be entrusted to those persons who have completed 18 years of age. Only a person, who is qualified to handle such equipment on account of his training and experience, and familiar with the relevant safety and accident prevention regulations, and thus in a position to identify and avert danger, is suitable for the job.
Before start-up this operating manual must be read in its entirety
in order to ensure safe start-up and a flawless
operation. Caution: Pull out the mains plug
before all maintenance jobs!
! The machine was manufactured in compliance with the following European safety regulations:
- EN 60 335 - 1
” Safety of electrical household appliances and similar products”.
4.4 Warning notes
• - Caution: there are hot parts on this machine. The temperature can be more than 90°C at specific locations on the machine.
• - Never operate the machine with a defective power supply. • - Never immerse the machine in water.
• - Before cleaning the machine without the cleaning program
always ensure that the mains plug is pulled out. • - Never allow children to work on the machine unsupervised
4.5 Safety devices
! Door contact switch • Manually connected safety thermostat for the boiler • Time controlled protection for the heating system • Electronic monitoring system of the temperature regulator • Time controlled protection for the refilling of water • Flashing light during product dispensation

Version FXSHD 12A onwards XS Speedmix H3 Operating manual
29.12.2003 12 © servomat steigler
4. General information concerning the machine Features of the machine 4.6
The machine is delivered with a water tank function. This water tank involves a Tank in Tank filter set with a water filter cartridge. To increase the water capacity, on one hand there is Aqua module with 19 litre water tank and on the other a hard water kit SpeedMix. We recommend that a water filter be installed for the hard water . (See section Water and Filter)
The machine is normally delivered without the payment system. For this there is an option for coin unit kit NRI G13. For cashless payment systems the machine is prepared for the Executive and MDB protocols.
Accessories 4.7
A wide range of accessories and special parts are available to derive additional benefits from the machine: The installation kits are delivered along with the installation instructions that must be followed to ensure the safety of the machine.
!
• XS coin unit KIT G13
• XS-Multicontainer
• Flash-Card
• FlashCard interface box
• Software editor for Flash Card
• XS front panel (various designs)
• XS accessories (cups, pots, spoons, tablets, Sugar candy, cup warmer)
• XS SpeedMix basic spare parts set (all necessary parts)
• XS SpeedMix CLEAN-SET
• XS cash card kit
• XS AQUA module
Operating manual XS Speedmix H5 Version FXSHD 12A onwards
© servomat steigler 13 29.12.2003
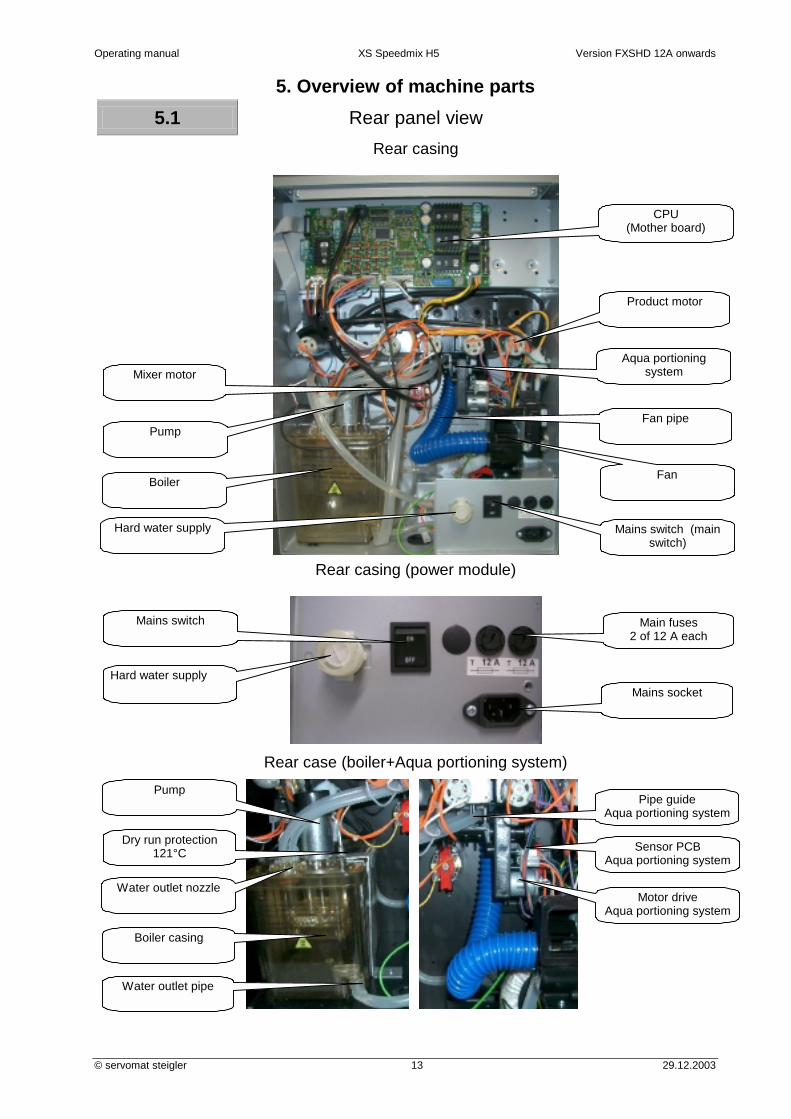
5. Overview of machine parts 5.1 Rear panel view
Rear casing
Rear casing (power module)
Rear case (boiler+Aqua portioning system)
Main fuses 2 of 12 A each
Hard water supply
Mains switch
Mains socket
CPU (Mother board)
Aqua portioning system Mixer motor
Fan
Mains switch (main switch)
Product motor
Fan pipe Pump
Boiler
Pipe guide Aqua portioning system
Water outlet pipe
Water outlet nozzle
Boiler casing
Dry run protection 121°C
Pump
Sensor PCB Aqua portioning system
Motor drive Aqua portioning system
Hard water supply

Version FXSHD 12A onwards XS Speedmix H3 Operating manual
29.12.2003 14 © servomat steigler
5. Overview of machine parts Front view 5.2 Outer casing
Inner casing
Inner casing (doors)
Product container
Door contact switch
Mixing bowl
Drip pan
Product chute
Flat strip cable
Mixing bowl
Display
Screen for the installation of coin kit
Keyboard for selection and programming
Drip grid
Panel
Door lock
Drip pan
Casing cover
Program key
Lock
Flat strip cable Lock operating lever
Lighting box cover
Light signal
Product output
Coin slot
Cover for product nameplates
Flashing light
Outlet clamp Outlet pipes

Operating manual XS Speedmix H5 Version FXSHD 12A onwards
© servomat steigler 15 29.12.2003
5. Overview of machine parts 5.3 Inside view
Inner door lighting
Flashing light on inner and outer doors
Boiler connections
Flash mode during drink dispensation
Blue LED
3 pole connection
Transparent glass
Knob for program key
Starter socket
Choke
Fluorescent lamp
Connection for flashing light
Starter
Pump
Heating connections
Water inlet nozzle
STB 88°C
Dry run protection 121°C
Water outlet nozzle
Temperature sensor
Transparent glass
Water level probe long Water level probe
short
Version FXSHD 12A onwards XS Speedmix H3 Operating manual
29.12.2003 16 © servomat steigler
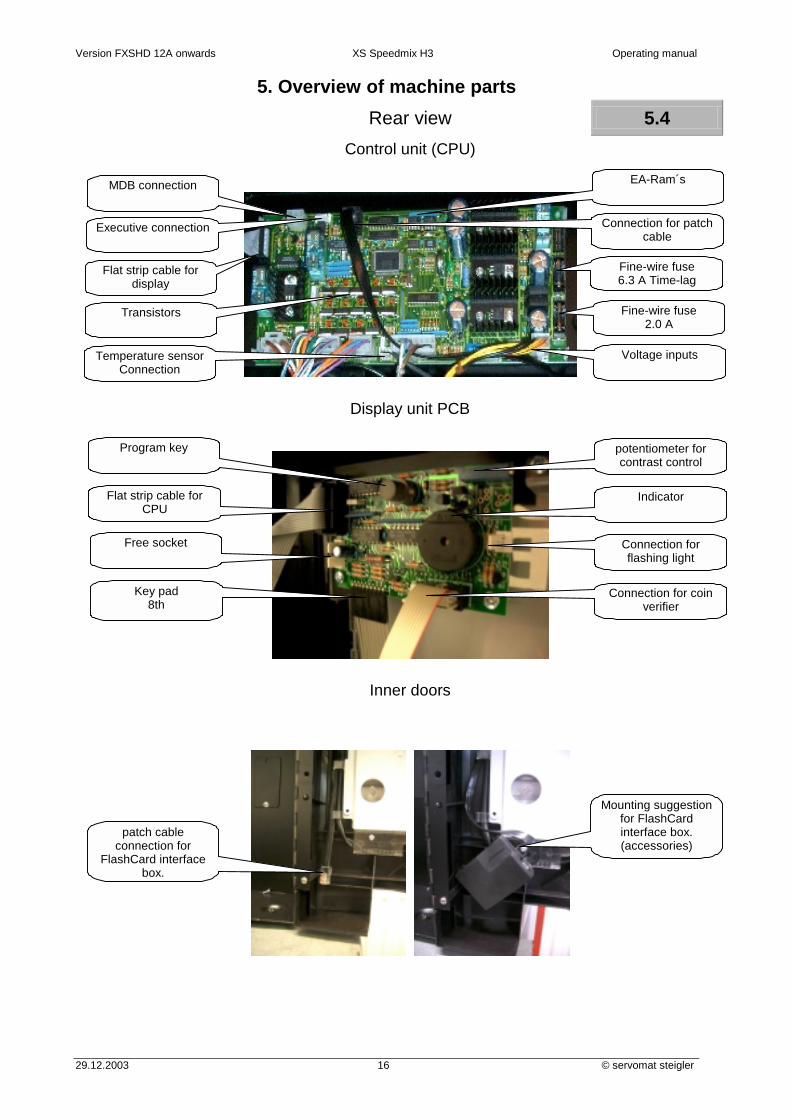
5. Overview of machine parts Rear view 5.4 Control unit (CPU)
Display unit PCB
Inner doors
Flat strip cable for CPU
Free socket
Key pad 8th
potentiometer for contrast control
Indicator
Connection for flashing light
Connection for coin verifier
EA-Ram´s
Fine-wire fuse 6.3 A Time-lag
Fine-wire fuse 2.0 A
Voltage inputs
Executive connection
MDB connection
Transistors
Program key
Mounting suggestion for FlashCard interface box. (accessories)
patch cable connection for
FlashCard interface box.
Flat strip cable for display
Temperature sensor Connection
Connection for patch cable

Operating manual XS Speedmix H5 Version FXSHD 12A onwards
© servomat steigler 17 29.12.2003
6. Unpacking and installation 6.1 Instructions for installation
! Flawless operation of the machine is guaranteed in closed rooms with a room temperature not less 5°C. The machine should not be used in rooms where there is splash water.
Caution: As some products are sensitive to heat and humidity, malfunctions are possible during machine operation if the room temperature exceeds 30°C or the air humidity rises above 80%.
If such conditions prevail, the parts which come in direct contact with the products must be cleaned daily.
6.2 Selection of installation site
! While selecting the place of installation please bear in mind that easy access must be ensured for operating, servicing and loading the machine.
6.3 Installation
•••• After carefully removing the packing check whether the machine is in a flawless condition. Check whether all parts of the machine are installed properly.
aaaa
•••• The machine keys are tied firmly to the drip pan
aaaa
•••• While selecting the place of installation ensure that a flat, vibration-free base is available and there is sufficient place for operation aaaa
•••• The machine must be installed with proper vertical and horizontal alignment so that the door closes flawlessly.
aaaa
•••• The machine must neither be exposed to frost and humidity, nor to the direct solar radiations
aaaa
•••• Basically a minimum distance of 10 cm must be maintained between the wall and the rear panel of the machine. aaaa
•••• The machine comes with a mains cable having a shockproof plug. A 220V A.C. shockproof socket with16A fuse is required.
aaaa

Version FXSHD 12A onwards XS Speedmix H3 Operating manual
29.12.2003 18 © servomat steigler
7. Water and filter
Quality of water 7.1
The German Coffee Association e.V. has compiled the following basics for the optimisation of safety and quality .
Among other things, following criteria form a prerequisite for highly aromatic coffee content (naturally by using high-grade roasted coffee):
• Water fresh in taste = oxygenous • ph – value of 6.5 – 7.5 • Total hardness between 7 – 12° hardness (dH) according to German standards • Carbonate hardness between 3 – 4° kH
!
Water filter 7.2
* Aforementioned materials are food grade. By impregnating the active charcoal with silver growth of bacteria is restrained.
Our water filter systems perform twofold work: 1. The activated charcoal removes substances that cause smell and spoil taste, e.g. chorine and chloride compounds as well as their residues 2. The ion exchanger * reduces, among other things, lime deposits (Carbonate hardness) and specific heavy metals which could appear depending upon the place of installation.
!
Espresso systems function at specially high temperature and high water pressure. Therefore, our mobile machines with tank systems are normally fitted with tank filter.
Conclusion: More aroma, less lime deposit, reduced servicing and operating costs, minimum downtime.
Capacity of a filter cartridge BC 06
Procedure for the replacement of Aqua-Aroma filter cartridge: 1. Unscrew filter cartridge 2. Put in the new filter cartridge and tighten easily 3. Check the filter system for leaky places.
Carbonate hardness
Capacity Number of cups / tumblers *
Carbonate hardness in
degrees
In litres 130 ml 150 ml
6° kH 700 5300 4600 8° kH 520 4000 3400
10° kH 420 3200 2800 12° kH 350 2600 2300 14° kH 300 2300 2000 16° kH 260 2000 1700 18° kH 240 1800 1600
* Capacity data does not include any rinsing and cleaning cycles
Instructions for the installation of Aqua-Aroma filter cartridge: Recommended maximum usage period 6 months or refer to table Capacity.
For placing a repeat order:
1 piece of BRITA connection head Article no. 799 051 for 06 BC 1 piece of BRITA AquaQuell filter 06 BC Article no. 799 052
!

Operating manual XS Speedmix H5 Version FXSHD 12A onwards
© servomat steigler 19 29.12.2003
7. Water and filter 7.3 Cleaning the boiler
The boiler is the most important element in the water cycle of the machine. Therefore, protect the water system from dust and calcification. Carry out periodic maintenance and servicing work, even at the time of water filter installation. The most important parts are given below:
1. Clean the boiler outlets 2. Remove the outlets by turning them in the clockwise direction.
3. Pull out the complete outlet module from the boiler.
4. Now again turn the outlet nozzle and its spout in the clockwise direction.
5. Separate the parts. 6. Remove the large V-ring. Replace it if necessary.
7. Put the outlet spout and the outlet casing in a cleaner or a decalcification agent. Clean the outlet nozzles. Here residues of dust and lime can lead to severe water fluctuations.
8. Clean the short water level probe, the temperature sensor as well as the long water level probe. Please do not use any emery paper or wire brush. Put the parts without connections in container with cleaner or decalcification agent.
9. In the suction casing check the fastening screw of the impeller for tightness. 10. Inspect the V-ring on the pump axis. It should not be too tight. It is only meant to be a splash protection.
11. If you want to decalcify the complete boiler, first remove the dry run protection. Hold the top part in the boiler housing. After this rinse the parts properly.
1. 2. 3.
4. 5. 6.
7. 8.
9. 10 11
Version FXSHD 12A onwards XS Speedmix H3 Operating manual
29.12.2003 20 © servomat steigler
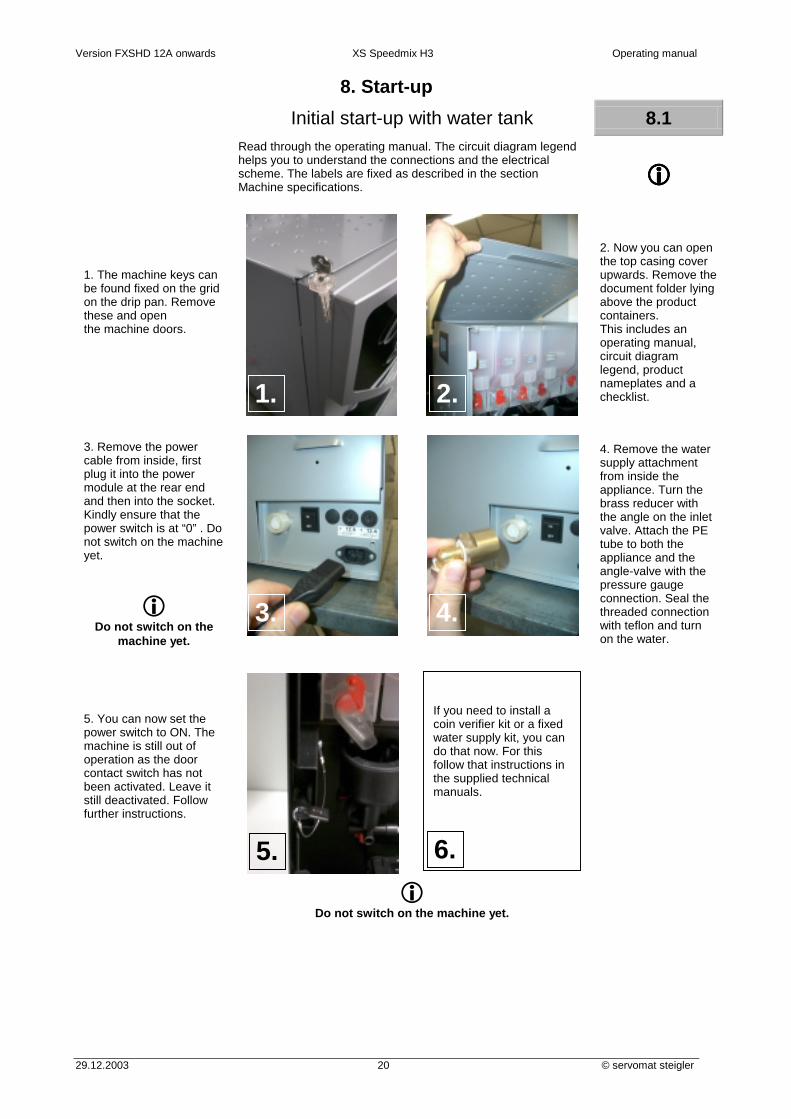
8. Start-up Initial start-up with water tank 8.1
Read through the operating manual. The circuit diagram legend helps you to understand the connections and the electrical scheme. The labels are fixed as described in the section Machine specifications.
!!!!
1. The machine keys can be found fixed on the grid on the drip pan. Remove these and open the machine doors.
2. Now you can open the top casing cover upwards. Remove the document folder lying above the product containers. This includes an operating manual, circuit diagram legend, product nameplates and a checklist.
3. Remove the power cable from inside, first plug it into the power module at the rear end and then into the socket. Kindly ensure that the power switch is at “0” . Do not switch on the machine yet.
!
Do not switch on the machine yet.
4. Remove the water supply attachment from inside the appliance. Turn the brass reducer with the angle on the inlet valve. Attach the PE tube to both the appliance and the angle-valve with the pressure gauge connection. Seal the threaded connection with teflon and turn on the water.
5. You can now set the power switch to ON. The machine is still out of operation as the door contact switch has not been activated. Leave it still deactivated. Follow further instructions.
! Do not switch on the machine yet.
If you need to install a coin verifier kit or a fixed water supply kit, you can do that now. For this follow that instructions in the supplied technical manuals.
3. 4.
1. 2.
5. 6.
Operating manual XS Speedmix H5 Version FXSHD 12A onwards
© servomat steigler 21 29.12.2003
88.. SSttaarrtt--uupp 8.2 Tip for the first thorough cleaning
Before filling up the products ensure that the product containers are clean. There could be packaging dust. If this is so proceed as follows: (Pictures of the product container are similar)
!!!!
Remove all product containers from the machine
Remove the cover
Remove the product chute
Remove the clamp for the portioning spiral
Remove the product portioning spiral
Remove the stirring wheel
Loosen the torque mixing bowls.
Remove the mixing bowls
Remove the product outlet pipes
Remove the mixer disks
!!!! While assembling bear in mind that the product
chutes are different. Cocoa has a dark red
product chute.

Version FXSHD 12A onwards XS Speedmix H3 Operating manual
29.12.2003 22 © servomat steigler
88.. SSttaarrtt--uupp Filling up the product 8.3
!!!! Now fill up the products mentioned on the product containers. First of all close the red shut-off flaps on the product containers. Open the red shut-off flaps again after fill-up. (Pictures of the product container are similar)
Red shut-off flap opened
Red shut-off flap closed
! Now begin the automatic rinsing of the machine so that the product, that trickled into the mixing bowls, is rinsed away. To prevent clogging follow this procedure each time the machine is filled up.
For this proceed as follows:
Switching on the machine 8.4
Take the door contact key and turning it
anticlockwise insert it into the door contact
switch.
The machine starts. The display shows the software version of the machine in the first 3 seconds.
After this the display shows: “Please wait”. During this period
the machine checks whether everything is ok.
After this the machine goes automatically into water fill-up phase. Check the connections for tightness.
During fill-up phase it is possible that the machine indicates malfunction. Fill up the water tank once again and then press button 1.
After the fill-up phase the machine goes into heat-up phase. The set value is 85° C. The machine is ready for operation once this value is reached.
The display then alternately shows: and:
switching on ..... please wait
refilling water wait
OFF 6 A NO WATER
rheavendors XS
place your cup
FILL IN WATER RESET SEL 1
wait temperature
XS H3 std. F.C. FXSHD 12A 23-09-03

Operating manual XS Speedmix H5 Version FXSHD 12A onwards
© servomat steigler 23 29.12.2003
88.. SSttaarrtt--uupp 8.5 Cleaning with the rinsing program
Press the programming button on the inner side of the door. The display alternately shows: Press selection button 4 on the keyboard. The display shows: From the keyboard with selection buttons 1, 2 and 3, you can now clean the mixing bowls 1, 2 and tea water pipe associated with them in short cycles.
Now for the mixing bowl 1 press button 1. The display shows: “cleaning 1”. The mixing bowl is now cleaned in a short rinsing cycle. Press buttons 1, 2 and 3 multiple times one after another to clean out the mixing bowls and the tea water pipe. Clean out with approx. 3 litre water. During this procedure place a large vessel under the outlet.
Our TIP: We would like to emphasize that this cleaning must done daily.
!
2=DATI 4=CLEAN 5=MAINT.
cleaning 1
cleaning 2
cleaning 3
1=PROGR 3=FREE
cleaning sel 1 – 2 – 3

Version FXSHD 12A onwards XS Speedmix H3 Operating manual
29.12.2003 24 © servomat steigler
99.. IInnssttaallllaattiioonn ooff aa ppaayymmeenntt ssyysstteemm Installation of a NRI G13 coin acceptor KIT 9.1 Zum Einbau eines Münzprüfer-KIT gehen Sie wie folgt vor: The kit consists of: 1 Coin acceptor unit NRI G13 1 Coin acceptor unit clamp 1 Coin slot 1 Lockable cash counter 4 Screws 1 short cash counter bolt 1 long cash counter bolt
1. Remove coin slot 2. From inside push the coin slot outwards at the centre. 3. Remove the coin slot
4. Remove the flat strip cable from the clamp. 5. Now you can see the fixing points. 6. Now take the clamp and position it on the fixing points.
7. Now fix the clamp with two bolts at the top and at the bottom. 8. Now position the coin slot from outside and fix this with 2 screws.
9. To insert the coin acceptor unit, now you must remove the lighting box. Loosen the 5 screws. 10. Now remove the lighting box and while doing so disconnect the cable for the flashing light on the display.
1. 2. 3.
4. 5. 6.
7. 8.
9. 10

Operating manual XS Speedmix H5 Version FXSHD 12A onwards
© servomat steigler 25 29.12.2003
99.. IInnssttaallllaattiioonn ooff aa ppaayymmeenntt ssyysstteemm 9.1 Installation of a NRI G13 coin acceptor KIT
To install a coin acceptor kit, proceed as follows:
11. Remove the lighting box carefully pushing it downwards. There are still some cables on it that you do not need to pull out. 12. Now plug the flat strip cable of the coin acceptor unit into the display unit.
13. Put the lighting box back in position. Again plug in the cable for the flashing light. Pay attention to the cable routing. Now install the cup clamps. Short end up, long end down. 14. Now plug the other end of the flat strip cable into the coin collector unit.
15. Push the count collector unit laterally from the right side into the clamp till the clamping lever locks in place. 16. Now suspend the cash counter from the clamps. 17. Test whether the coin return key is functioning.
To test the coin acceptance you must first enter the prices in the program. Coin acceptance is not possible without setting the prices. For further details kindly refer to the technical documentation supplied along with the kit.
!!!!
11 12
13 14
15 16 17

Version FXSHD 12A onwards XS Speedmix H3 Operating manual
29.12.2003 26 © servomat steigler
1100.. MMaacchhiinnee ssppeecciiffiiccaattiioonnss Arrangement of product containers 10.1
Kindly ensure that the containers do not get mixed up. Put the containers back in the correct place. Take care that the product chutes are fitted on the correct container.
!
Product details:
Product 1 Coffee
- narrow portioning spiral - Portioning motor 85 rpm
Product 2 Sugar
- narrow portioning spiral - Portioning motor 85 rpm
Product 3 Topping
- narrow portioning spiral - Portioning motor 85 rpm
Product 4 Cocoa
- wide portioning spiral - Portioning motor 85 rpm
Product 6 Individual
- wide portioning spiral - Portioning motor 85 rpm
In program mode the components are named as follows: Product1 = Coffee Product2 = Sugar Product3 = Topping Product4 = Cocoa Product6 = Individual Water1 = Coffee water Water2 = Milk water Water3 = Individual water Mixer1 = Coffee mixer Mixer2 = Milk mixer Mixer3 = Individual mixer
Options 10.2
The options are fixed. The labels are enclosed in the machine documents. You have the option to select between configurations 00, 01 and 02. Also see section 13.2 Portioning list.
!
Take care that the labels and the product containers are installed properly.
Configuration Std 00 Configuration Std 01 Configuration Std 02
Preselection Sugar
Cappuccino
Latte Macchiato
MoccaCino
Black Coffee
Chocolate
Café au Lait
Individual
1
2
3
4
5
6
7
8
Preselection Sugar
Cappuccino
Latte Macchiato
MoccaCino
Black Coffee
Chocolate
Café au Lait
Individual
1
2
3
4
5
6
7
8
Preselection Sugar
Cappuccino
Latte Macchiato
MoccaCino
Black Coffee
Chocolate
Café au Lait
Individual
1
2
3
4
5
6
7
8
Sugar
Topping
Cocoa
Mixer 1 Water 1
Mixer 2 Water 2
Mixer 3 Water 3
Product 2 Product 3 Product 4
Coffee
Individual
Product 1 Product 6
Coffee

Operating manual XS Speedmix H5 Version FXSHD 12A onwards
© servomat steigler 27 29.12.2003
1111.. BBaassiicc pprrooggrraammmmiinngg ffuunnccttiioonnss 11.1 Flash Card controls
! No EPROM is installed in this control system. Updates are done via a “FLASH CARD“. The Flash Card controls have an internal Flash memory.
FlashCard
The Flash Card is a storage medium with a 1 MB memory chip. TIP If you program a Flash Card, you must fix a label on it so that there is no room for confusion.
Article number: ELT0030068
FlashCard Interface
The Flash Card interface is an optional accessory.
Article number: SCH0004500
FlashCard Interfacebox
With the box you have the option to keep the Flash Card interface box mobile. But you also have the option of fixing the interface on the door.
Article number: 0020040238
FlashCard Editor
With the aid of the Flash Card editor you can transfer your data from the machine to the PC and administer, or you can even download software updates from our internet site and transfer them on to the Flash Card. In addition to this, sales data can be transferred from the machine to the Flash Card and using the editor it can be converted into an Excel file.
We have put together a SET for you. The FlasH Card SET consists of: 1 x Software Editor RHEAction 1 x Flash Card Reader 2 x Flash Card 1 MB
Article number: 500008
SLOT
for FLASH-CARD RJ45 interface for
connection with the CPU
Memory chip Label for inscription

Version FXSHD 12A onwards XS Speedmix H3 Operating manual
29.12.2003 28 © servomat steigler
1111.. BBaassiicc pprrooggrraammmmiinngg ffuunnccttiioonnss
What do I use the Flash Card for? 11.2
You can use the Flash Card for multiple functions:
You can program new software updates with a Flash Card on the machine.
You can save your set data on a FLASH CARD on the machine and program another machine.
You can save you set data on a FLASH CARD on the machine and save them on the PC.
With the editor you can configure your Flash Card as sales card and read the sales data from the machine. With the editor you can save this data into an Excel file and have a look at it.
How do I carry out an update? 11.3 For this you need a Flash Card with the associated data and a Flash Card interface box. !!!!
1. Open the doors.
2. Insert the Flash Card in the SLOT meant for it the Flash Card interface box.
A prerequisite for an update is that the master and configuration files of the relevant machine type must be available on the FLASH CARD 3. Switch on the machine from the door contact key.
The file contents are displayed.
4. The display shows: PROGRAM MASTER“.
5. After 15 sec. appears the following flashing message: “PROGRAM DATA EA ROM“.
6. After 15 sec. appears the following message: “PROGRAMMING CORRECT”
7. Switch off the machine from the door contact and remove Flash Card.
9. Restore power to the system. Check the parameters prices, temperature and fan operating time.
Saving the machine data 11.4 For this you need a Flash Card with the associated data and
a Flash Card interface box. !!!!
1. While the machine is in operating state insert the Flash Card into the SLOT meant for it on the Flash Card interface box.
2. Press the programming button twice in succession. The display shows:
3. After a few seconds the display shows:
Prerequisite for downloading is that the configuration file for the respective machine be available on the FLASH CARD.
4. The download is now over. Remove Flash Card and switch the machine off and on.
Programming master
Programming OK
Programming EAROM data
Rheavendors Group B 1C
Programming - - - - - - RHEA FLASH - - - - - -
Programming OK

Operating manual XS Speedmix H5 Version FXSHD 12A onwards
© servomat steigler 29 29.12.2003
1111.. BBaassiicc pprrooggrraammmmiinngg ffuunnccttiioonnss
11.5 General functions On pressing the programming key on the display PCB on the
inner side of the door you reach the machine program. See picture:
!
On pressing the programming key following information alternately appears on the display:
Using the selection key you can now select the desired program item. The program points are defined as follows:
!!!!
1=PROGRAMMING On pressing button –1- you reach the programming module by entering codes 6 – 7 – 8.
2=COUNTER
On pressing button –2- you reach the sales counter. Here you can read the sales data. The counters are automatically shown in continuation. - Total selections - Partial - Total money - N Tests - Total selection 1 - Total selection 2 - Total selection 3 - Total selection 4 - Total selection 5 - Total selection 6 - Total selection 7 - Total selection 8
!!!! For ending the counter status query, press
programming key. 3=FREE SALE
On pressing button -3- you reach the free sale. You can again exit the free sale by pressing the programming key.
4=RINSING
On pressing button -4- you reach the rinsing program. Using buttons 1 –2 – 3 you can specifically start the cleaning program for the mixing unit and the pipes. You can exit the cleaning program by pressing the programming button.
5=SERVICE COUNTER On pressing button 5 you reach the service counter. In this regard read section 22.1. On pressing the programming key you go back to the sales mode.
11.6 Selection keys in the programming mode
1=PROG 3=FREE
Program key
2=DATI 4=CLEAN 5=MAINT.
1
2
3
4
5
6
7
8
Product 1
Product 2
Product 3
Product 4
Product 5
Product 6
Product 7
Product 8
Forward query and Run through all menu items one after another
Forward run through all options within menu items selected with
select button 1
Backward run through all options within menu items selected with
select button 1
Moving up of the shown parameter value
Moving down the shown parameter value
Portioning button for product verification
(not for water)
Backward query and Run through all menu items one after another

Version FXSHD 12A onwards XS Speedmix H3 Operating manual
29.12.2003 30 © servomat steigler
1111.. BBaassiicc pprrooggrraammmmiinngg ffuunnccttiioonnss
Tabular program overview 11.7
On pressing the programming key and then entering the code you get into programming mode. Using the selection buttons – 1 - and – 2 – you can go to the individual menus.
!
Selection button 1 Selection button 2 see chapter no.
Programming button 1 For set points see section 13.2 Portioning list 12.1 ...... till Programming button 8 For set points see section 13.2 Portioning list 12.1 Prices Setting the sales price 14.2 Coin Value of coin A to coin F (only pulse generator) 14.3 Temperature Temperature boiler 15.1 Miscellaneous Machine code A
Machine code B Message number Coin mech type Free Fan time Beep time Decimals number Language free not active free free Standard data Standard data load
16.1 16.1 16.2 16.3 16.4 16.5 16.6 16.7 16.8 16.9
Diagnostics Display temperature Voltage Pump throughput
17.1 17.2 17.3
Sales data Total selections Partial Total money N tests Total selection 1 to total selection 8
18.1 18.2 18.3 18.4 18.5
MDB Ejection tubes 4 – 5 – 7 – 8 Habil. escrow max. credit max. rest Type sell Token value Coin rest a0 to Coin rest p0 Coin no rest a0 to coin no rest p0 Tubes MDB
19.1 19.1 19.1 19.1 19.1 19.1 19.1 19.1 19.1
Programming clock Switching on Switching off Cleaning Hour Day Month Year
20.2 20.3 20.4 20.5 20.6 20.7 20.8
Registration out of service
No. 1 to no. 20 21.1
Programming maintenance
Counter filter H2O free free
22.1
Operating manual XS Speedmix H5 Version FXSHD 12A onwards
© servomat steigler 31 29.12.2003
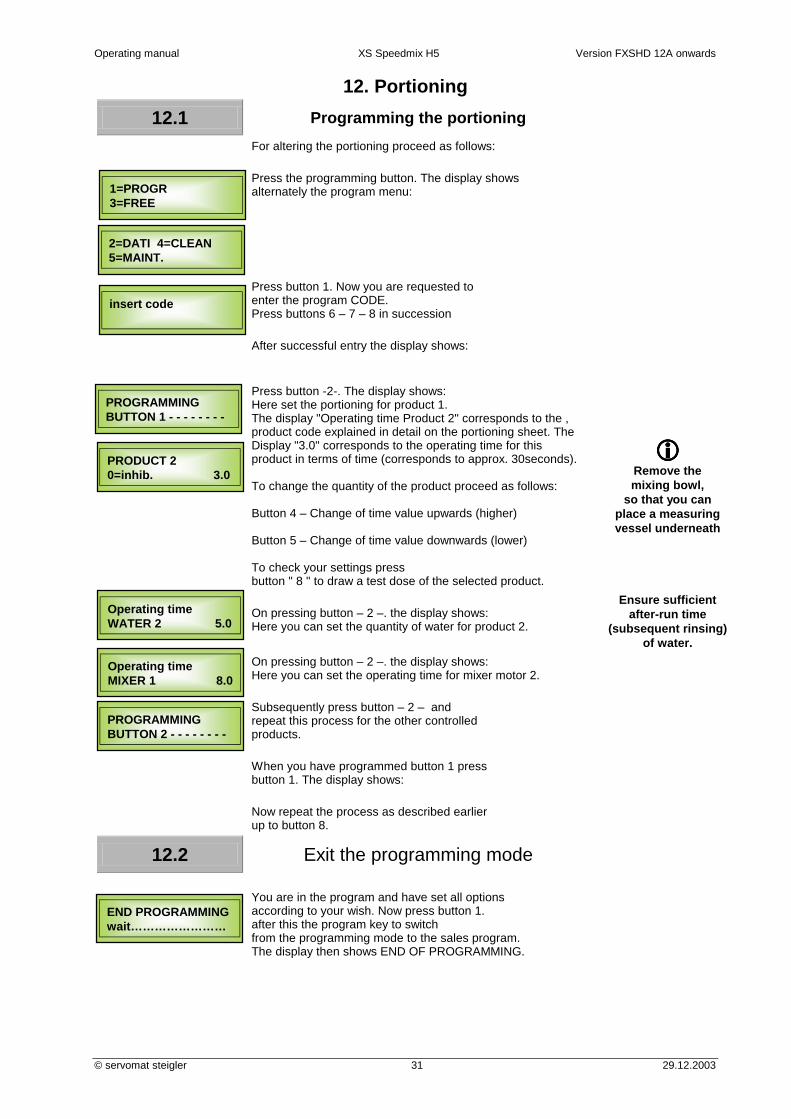
12. Portioning
12.1 Programming the portioning For altering the portioning proceed as follows:
Press the programming button. The display shows alternately the program menu:
Press button 1. Now you are requested to enter the program CODE. Press buttons 6 – 7 – 8 in succession
After successful entry the display shows:
Press button -2-. The display shows: Here set the portioning for product 1. The display "Operating time Product 2" corresponds to the , product code explained in detail on the portioning sheet. The Display "3.0" corresponds to the operating time for this product in terms of time (corresponds to approx. 30seconds). To change the quantity of the product proceed as follows: Button 4 – Change of time value upwards (higher) Button 5 – Change of time value downwards (lower) To check your settings press button " 8 " to draw a test dose of the selected product.
!!!! Remove the mixing bowl,
so that you can place a measuring vessel underneath
On pressing button – 2 –. the display shows: Here you can set the quantity of water for product 2.
Ensure sufficient after-run time
(subsequent rinsing) of water.
On pressing button – 2 –. the display shows: Here you can set the operating time for mixer motor 2.
Subsequently press button – 2 – and repeat this process for the other controlled products.
When you have programmed button 1 press button 1. The display shows:
Now repeat the process as described earlier up to button 8.
12.2 Exit the programming mode
You are in the program and have set all options according to your wish. Now press button 1. after this the program key to switch from the programming mode to the sales program. The display then shows END OF PROGRAMMING.
1=PROGR 3=FREE
PROGRAMMING BUTTON 1 - - - - - - - -
PRODUCT 2 0=inhib. 3.0
Operating time WATER 2 5.0
Operating time MIXER 1 8.0
PROGRAMMING BUTTON 2 - - - - - - - -
END PROGRAMMING wait……………………
2=DATI 4=CLEAN 5=MAINT.
insert code

Version FXSHD 12A onwards XS Speedmix H3 Operating manual
29.12.2003 32 © servomat steigler
1133.. PPoorrttiioonniinngg lliisstt
Explanation on portioning list 13.1
For each key you have the option to change the portioning of the time of the product motor, mixer motor and valve required and controlled for the purpose.
!!!! You can use button 4
and 5 to change this value
Button functioning: Here you can activate or deactivate the selected button. Normally the button is always functioning. Button inhibited: You have the option to deactivate the individual butons. With this option no drink is dispensed in the sales mode.
!!!! You can use button 4
and 5 to change this value
Programming partial: Programming partial means: Only those parameters that have a function are visible. Programming total: Programming total means: All functions, even those that do not have a function, are visible. What can you do with programming partial or total?: With programming partial option, if you set a parameter to “0” and then exit programming, this parameter is not visible when the “programming partial” option is selected the next time. You can again access the parameter by selecting the programming total option for this key. Now again enter a value for this parameter. Again set the programming partial option to see whether this value is visible.
Mixer speed: You have the option to influence the speed of the mixer motors. Standard setting of the mixer motor speed can be found in the portioning list. Setting options from 00 to 05. Mixer speed … 00: The mixer limiting is deactivated, which means that the motor is running on full power. Explanation regarding the setting of the mixer speed: The voltage supply is reduced, which means that the motor runs slower. Thus the speed is reduced. The given speeds are based on measurements without load.
Setting 00 01 02 03 04 05 Voltage Volt DC 24 V 21 V 18 V 15 V 12 V 9 V
Speed rpm 16000 13500 11000 8000 5800 3200
!!!! These are approximate
values. These are approximate values.
FUNCTIONING
Programming: PARTIAL
Programming: TOTAL
MIXER speed 1 00

Operating manual XS Speedmix H5 Version FXSHD 12A onwards
© servomat steigler 33 29.12.2003
13. Portioning list 13.2 Portioning list XS H / 3
Standard data 00 Standard data 01 Standard data 02
Volume of water q 130 ccm Volume of water q 150 ccm Volume of water q 180 ccm
Product 4 = Topping Product 4 = Topping Product 4 = Topping Software version: FXSHD 12A–23.09.03
Time Gram / ml Time Gram / ml Time Gram/ ml
BUTTON 1 Preselection Sugar Preselection Sugar Preselection Sugar BUTTON Functioning/ Inhibited Functioning Functioning Functioning Quantity extra sugar 1,0 1,0 1,0
BUTTON 2 CAPPUCCINO CAPPUCCINO CAPPUCCINO BUTTON Functioning/ Inhibited Functioning Functioning Functioning Programming Partial / Total Partial Partial Partial PRODUCT 1 1,6 1,9 g 1,7 2,0 g 1,8 2,3 g PRODUCT 2 1,5 6,0 g 1,6 6,4 g 1,7 6,9 g PRODUCT 3 2,0 6,0 g 2,2 6,3 g 2,4 7,0 g WATER 1 TIME 4,0 4,0 4,0 MIXER 1 6,0 6,0 6,0 MIXER SPEED 1 00 00 00 WATER 2 TIME 4,0 5,0 5,0 MIXER 2 6,0 7,0 7,0 MIXER SPEED 2 00 00 00
BUTTON 3 LATTE MACCHIATO LATTE MACCHIATO LATTE MACCHIATO BUTTON Functioning/ Inhibited Functioning Functioning Functioning Programming Partial / Total Partial Partial Partial PRODUCT 1 1,9 2,3 g 2,0 2,4 g 2,0 2,4 g PRODUCT 2 1,7 6,9 g PRODUCT 3 5,0 5,5 5,5 WATER 1 TIME 1,5 1,5 2,5 MIXER 1 4,0 4,0 5,0 MIXER SPEED 1 00 00 00 WATER 2 TIME 6,0 7,0 5,5 MIXER 2 5,0 6,0 5,0 MIXER SPEED 2 00 00 00
BUTTON 4 MOCCACINO MOCCACINO MOCCACINO BUTTON Functioning/ Inhibited Functioning Functioning Functioning Programming Partial / Total Partial Partial Partial PRODUCT 1 2,0 2,4 g 2,1 2,6 g 2,2 2,9 g PRODUCT 3 2,0 6,0 g 2,2 6,3 g 2,3 6,5 g PRODUCT 4 1,2 8,0 g 1,3 8,4 g 1,5 9,0 g WATER 1 TIME 3,5 3,5 4,0 MIXER 1 5,5 5,5 6,0 MIXER SPEED 1 00 00 00 WATER 2 TIME 4,0 5,0 6,0 MIXER 2 6,0 7,0 8,0 MIXER SPEED 2 00 00 00

Version FXSHD 12A onwards XS Speedmix H3 Operating manual
29.12.2003 34 © servomat steigler
1133.. PPoorrttiioonniinngg lliisstt Portioning list XS H / 3 13.2
Standard data 00 Standard data 01 Standard data 02
Volume of water q 130 ccm Volume of water q 150 ccm Volume of water q 180 ccm
Product 4 = Topping Product 4 = Topping Product 4 = Topping Software version: FXSHD 12A–23.09.03
Time Gram / ml Time Gram / ml Time Gram/ ml
BUTTON 5 BLACK COFFEE BLACK COFFEE BLACK COFFEE BUTTON Functioning/ Inhibited Functioning Functioning Functioning Programming Partial / Total Partial Partial Partial PRODUCT 1 1,5 1,8 g 1,6 2,0 g 1,7 2,3 g PRODUCT 2 1,5 6,0 g 1,6 6,4 g 1,7 6,9 g WATER 1 TIME 9,0 10,0 12,0 MIXER 1 5,0 5,0 6,0 MIXER SPEED 1 00 00 00
BUTTON 6 CHOCOLATE CHOCOLATE CHOCOLATE BUTTON Functioning/ Inhibited Functioning Functioning Functioning Programming Partial / Total Partial Partial Partial PRODUCT 4 3,2 22,0 g 3,3 23,0 g 3,5 26,0 g WATER 2 TIME 7,0 8,0 10,0 MIXER 2 9,0 10,0 12,0 MIXER SPEED 2 00 00 00
BUTTON 7 CAFE AU LAIT CAFE AU LAIT CAFE AU LAIT BUTTON Functioning/ Inhibited Functioning Functioning Functioning Programming Partial / Total Partial Partial Partial PRODUCT 1 1,8 2,2 g 1,9 2,3 g 2,0 2,5 g PRODUCT 2 1,5 6,0 g 1,6 6,4 g 1,7 6,9 g PRODUCT 3 2,3 6,5 g 2,4 6,7 g 2,5 7,0 g WATER 1 TIME 3,5 4,0 5,0 MIXER 1 5,5 6,0 7,0 MIXER SPEED 1 00 00 00 WATER 2 TIME 4,0 5,0 5,0 MIXER 2 6,0 7,0 7,0 MIXER SPEED 2 00 00 00
BUTTON 8 HOT WATER HOT WATER HOT WATER BUTTON Functioning/ Inhibited Functioning Functioning Functioning Programming Partial / Total Partial Partial Partial PRODUCT 6 4,0 4,4 5,0 WATER 3 TIME 9,0 10,0 12,0 MIXER 3 11,0 12,0 14,0 MIXER SPEED 3 00 00 00
IMPORTANT NOTE: In this portioning list all menu items, which can be changed, are listed. In programming mode REDUCED, even those parameters that cannot be changed but have a function, are also visible. These parameters are fixed for the product recipe. In programming mode OPEN all parameters are visible. For each key programming you have over 40 set points available to you. Which means that with 8 selection keys you have over 240 parameters that can be taken into account for programming a machine. To make the programming clearer to you we have integrated the program item Programming REDUCED. In the standard data 00 / 01 / 02 we have provided you the standard values which are suitable for most of the products.

Operating manual XS Speedmix H5 Version FXSHD 12A onwards
© servomat steigler 35 29.12.2003
1144.. SSeett ssaalleess pprriiccee 14.1
Price allocation
The machine allows 8 price allocations which are assigned permanently to 8 selection keys. You can sell at 8 different prices.
Price 1 - Button 1
Price 2 - Button 2 Price 3 - Button 3 Price 4 - Button 4
Price 5 - Button 5 Price 6 - Button 6 Price 7 - Button 7 Price 8 - Button 8
14.2 Set sales price
In programming using button 1select the list “Programming prices”. The display shows:
Now, press buttton -2-. The display shows:
The sales price must be adjusted according to the smallest coin value used in the coin acceptor unit.
With button – 4 – and – 5 – you can set your desired sales price.
Press button 2 after you have set price 1. The display shows:
Price setting “0” implies free sales. If a coin acceptor unit is connected no coin collection takes place
Repeat the procedure as described earlier up to Price 8.
14.3 Fix the value of the coins
In programming using button 1select the list “Programming coins”. The display shows:
This function is supported only in connection with the pulse generators.
Now, press button -2-. The display shows:
The basic setting for the coin set is programmed as follows: Coin A = 0.05 € Coin B = 0.10 € Coin C = 0.20 € Coin D = 0.50 € Coin E = 1.00 € Coin F = 1,00 € (desired value of the token) On pressing button 4 and 5 you can increase or decrease the value of the coin.
PROGRAMMING PRICES - - - - - - - - - - -
PRICE 1 0.00
PRICE 2 0.00
PROGRAMMING COINS - - - - - - - - - - -
COIN A 0.05
Version FXSHD 12A onwards XS Speedmix H3 Operating manual
29.12.2003 36 © servomat steigler
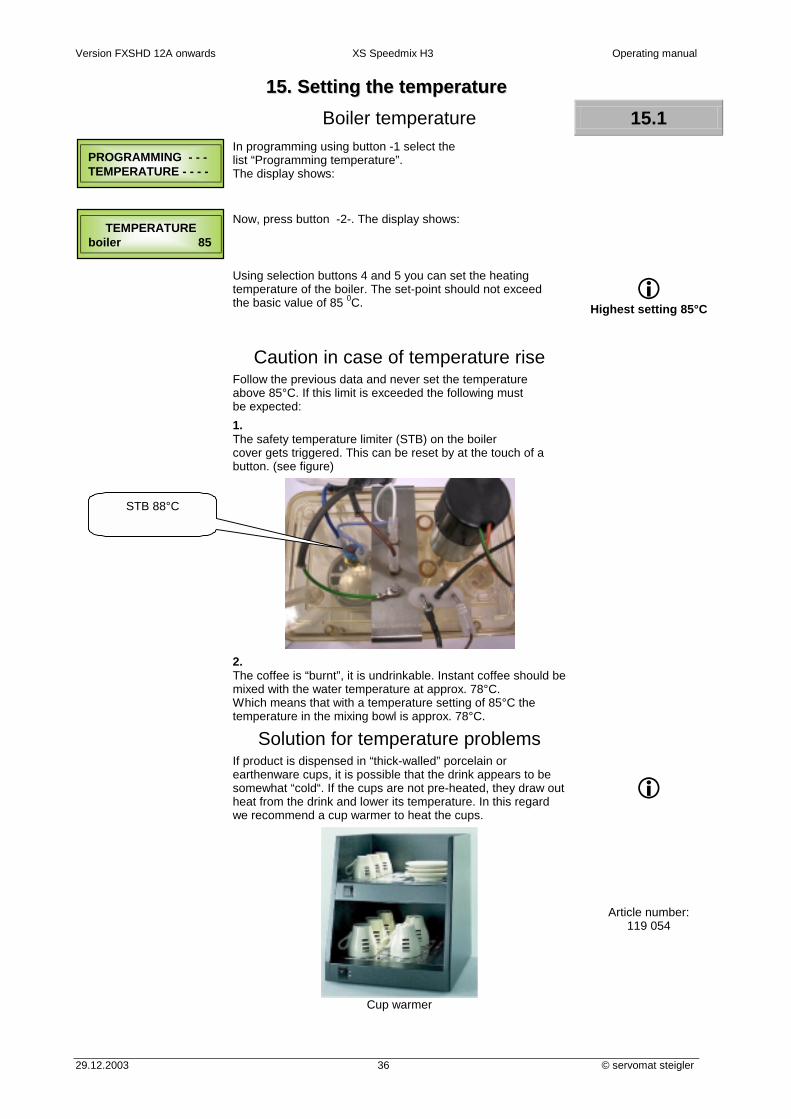
1155.. SSeettttiinngg tthhee tteemmppeerraattuurree
Boiler temperature 15.1 In programming using button -1 select the
list “Programming temperature”. The display shows:
Now, press button -2-. The display shows:
Using selection buttons 4 and 5 you can set the heating temperature of the boiler. The set-point should not exceed the basic value of 85 0C.
! Highest setting 85°C
Caution in case of temperature rise
Follow the previous data and never set the temperature above 85°C. If this limit is exceeded the following must be expected:
1. The safety temperature limiter (STB) on the boiler cover gets triggered. This can be reset by at the touch of a button. (see figure)
2. The coffee is “burnt”, it is undrinkable. Instant coffee should be mixed with the water temperature at approx. 78°C. Which means that with a temperature setting of 85°C the temperature in the mixing bowl is approx. 78°C.
Solution for temperature problems
If product is dispensed in “thick-walled” porcelain or earthenware cups, it is possible that the drink appears to be somewhat “cold“. If the cups are not pre-heated, they draw out heat from the drink and lower its temperature. In this regard we recommend a cup warmer to heat the cups.
!
Cup warmer
Article number: 119 054
PROGRAMMING - - - TEMPERATURE - - - -
TEMPERATURE boiler 85
STB 88°C

Operating manual XS Speedmix H5 Version FXSHD 12A onwards
© servomat steigler 37 29.12.2003
1166.. MMiisscceellllaanneeoouuss sseettttiinnggss 16.1
Machine number
In programming select key –1- select the list “Miscellaneous programming”. The display shows:
Press key –2-. The display shows: Here you can enter the machine number.
If a second machine is connected to the XS, you can give an additional machine number.
16.2 Information
You have the option to select from multiple fonts in the display.
Now, press button -2-. The display shows:
With button – 4 – and – 5 – you can set your desired display information.
0 = rheavendors XS - place your cup 1 = take a relax moment - place your cup 2 = enjoy a break time - place your cup 3 = Freely programmable 4 = enjoy a break time - place your cup 5 = rheavendors at your service - place your cup 6 = insert coins - place your cup
! Setting “3” can be freely programmed with the Flash Card
editor.
7 = message 7 - place your cup
16.3 Payment system
Press button –2-. The display shows:
With button – 4 – and – 5 – you can set your desired payment system.
Payment system Par. Sing. Vend.
Pulse generator (e.g. G13) for single sale
Par. Mult. Vend. Pulse generator (e.g. G13) for multiple sales
Executive Coin changer, cashless (e.g. cash card)
! Exec. Price Hold for price setting via the payment system. (coin changer)
MDB Coin changer, cashless (e.g. cash card)
Take care that your payment system is set correctly. In case of incorrect setting the display shows:
message number 0
rheavendors XS
place your cup
PROGRAMMING MISCELLANEOUS - -
machine code A 00
machine code B 00
coin-mech type PAR. SING. VEND.
SERVICE OFF 2
Version FXSHD 12A onwards XS Speedmix H3 Operating manual
29.12.2003 38 © servomat steigler
1166.. MMiisscceellllaanneeoouuss sseettttiinnggss
Fan after-run time 16.4
Press button –2-. The display shows: Here you can set the after-run time of the fan, how long should the fan run after the product has been selected. Standard setting here is 5 Min.
Time signal 16.5
Press button –2-. The display shows: Determine the length of the signal tone from the electronic controls of the CPU on selection of products and/ or confirmation of coin acceptance.
Decimal position 16.6
Press button –2-. The display shows: Setting of the decimal point according to German and/or European coin value (x . xx). Setting = 2
Language 16.7
Press button –2-. The display shows: Setting the language for the menu. By pressing buttons 4 and/or 5 you can select between 3 different languages.
Standard data 16.8 Press button –2-. The display shows:
Here you can specify which standard values you wish to access. 00 = Standard data for 130 ccm with topping 01 = Standard data for 150 ccm with topping 02 = Standard data for 180 ccm with topping Set the value with buttons 4 and 5. Bear in mind the following point to so ensure that the values are accepted.
! While updating with a
Flash Card automatically the
values from standard data 00 are loaded.
Load standard data 16.9 Here you can now load your predefined standard data. Keep
button 4 pressed till “SAVING OVER” appears on the display. Now the new standard values are written into the memory.
Standard data 4=load
fan time min. 0
beep time 3
decimals number 2
SPRACHE: DEUTSCH
LANGUAGE: ENGLISH
LINGUA: ITALIANA
Standard data 0-1-2 00

Operating manual XS Speedmix H5 Version FXSHD 12A onwards
© servomat steigler 39 29.12.2003
17. Diagnosis program 17.1 Display temperature
! These options are important and useful tools for the service engineer.
Now, press button -2-. The display shows:
1 = permanent temperature display on the display 0 = no temperature display on the display
After the test again deactivate this display so that the other display information can be shown.
17.2 Voltage Now, press button -2-. The display shows: Here you can read the output voltage from the transformer.
17.3 Pump throughput Now, press button -2-. The display shows:
! 0 = slow 1 = medium 2 = medium-fast 3 = fast
With this option you can regulate the throughput of the pump for the general settings (quantity of water). With buttons –4- and –5- you can select between 0, 1, 2, 3. Standard setting here is “1” Between the individual steps there is a performance differential of approx.5% per step. (max. power differential 15%)
HABIL. DISPLAY TEMPERA. 1=YES 0
VOLTAGE volt: 24,8
tuning pump 0 – 3 0
Version FXSHD 12A onwards XS Speedmix H3 Operating manual
29.12.2003 40 © servomat steigler
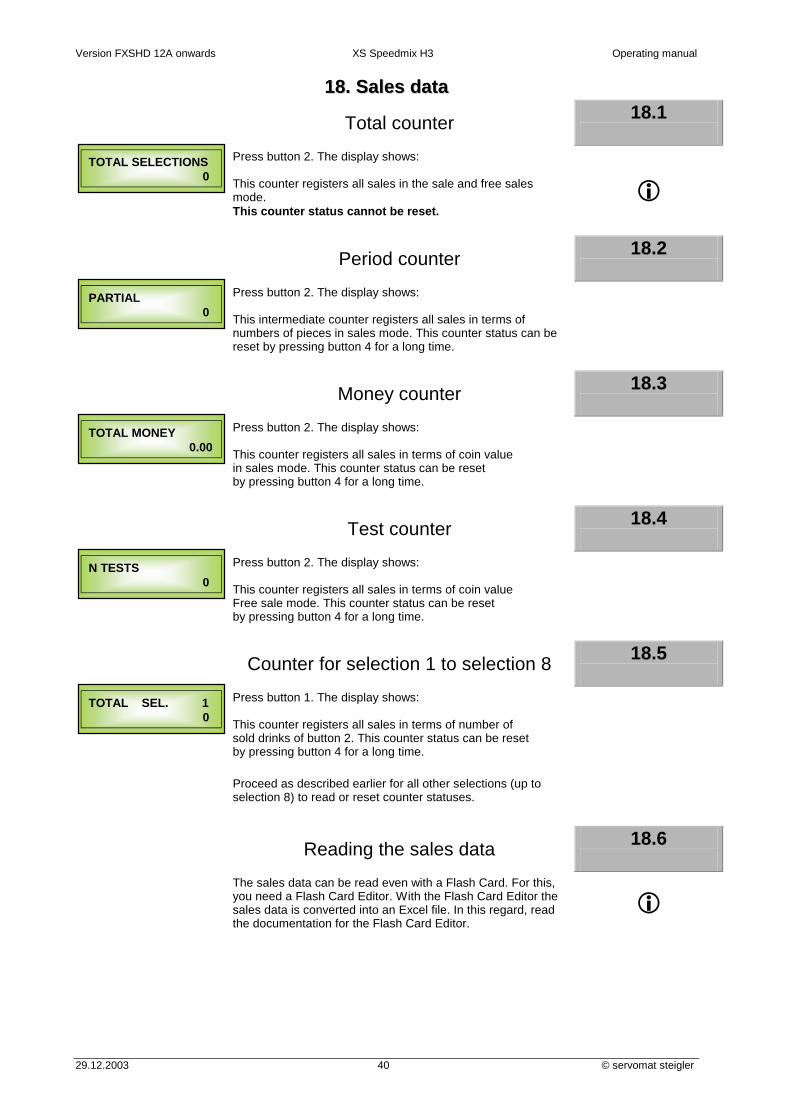
1188.. SSaalleess ddaattaa
Total counter 18.1
Press button 2. The display shows: This counter registers all sales in the sale and free sales mode. This counter status cannot be reset.
!
Period counter 18.2
Press button 2. The display shows: This intermediate counter registers all sales in terms of numbers of pieces in sales mode. This counter status can be reset by pressing button 4 for a long time.
Money counter 18.3
Press button 2. The display shows: This counter registers all sales in terms of coin value in sales mode. This counter status can be reset by pressing button 4 for a long time.
Test counter 18.4
Press button 2. The display shows: This counter registers all sales in terms of coin value Free sale mode. This counter status can be reset by pressing button 4 for a long time.
Counter for selection 1 to selection 8 18.5
Press button 1. The display shows: This counter registers all sales in terms of number of sold drinks of button 2. This counter status can be reset by pressing button 4 for a long time.
Proceed as described earlier for all other selections (up to selection 8) to read or reset counter statuses.
Reading the sales data 18.6
The sales data can be read even with a Flash Card. For this, you need a Flash Card Editor. With the Flash Card Editor the sales data is converted into an Excel file. In this regard, read the documentation for the Flash Card Editor.
!
TOTAL SELECTIONS 0
PARTIAL 0
TOTAL MONEY 0.00
N TESTS 0
TOTAL SEL. 1 0

Operating manual XS Speedmix H5 Version FXSHD 12A onwards
© servomat steigler 41 29.12.2003
1199.. MMDDBB sseettttiinnggss
19.1 MDB Parameter
Change the MDB settings according to the following table. Use button 2 to move in the CODE area and with buttons 4 and 5 change the values.
CODE Explanation Set standard value Coin key 4 – 5 – 7 – 8
Channel payment by pressing the button 4 – 5 – 7 – 8 (4 = 0,50 €, 5 = 0,20 €, 7 = 0,10 €, 8 = 0,05 €)
EE 0 = Ready for change 1 = Purchase obligation 1
C MAX CREDIT Maximum credit in Cent 0 = infinite 500 = Value in Cent = 5 €
0
R MAX remaining cash Maximum remaining cash in Cent 0 = infinite 500 = Value in Cent = 5 €
0
SS 0 = Single sale (Singlesale) 1 = Multiple sale (Multisale) 0
Token Value or free sale impulse of the token Free sale impulse is = 0. Message on the display: Free sale Value of the token which is programmed in the coin acceptor unit e.g. 100 = 1 €. Message on the display: 1.00
0
CIN
Blocking the individual coin channels
A B C D E F G H I J K L M N O P 0 0 0 0 0 0 0 0 0 0 0 0 0 0 0 0
0 = Active 1 = Blocked
All coins are activated 0-0-0-0-0-0-0-0-0-0-0-0-0-0-0-0
CH
Receipt group with display “put in counted cash“ BLOCK EURO (€)
A B C D E F G H I J K L M N O P 5 10 20 50 100 200 - - - - - - - - - - 0 0 0 0 1 1 0 0 0 0 0 0 0 0 0 0
0 = Active 1 = Blocked
Kindly note that: While using a token, activate the corresponding channel. (TK)
MDB channel capacity Total contents in the channels Value in EURO
! These settings are required only for coin changer.
PROGRAMMING MDB
Version FXSHD 12A onwards XS Speedmix H3 Operating manual
29.12.2003 42 © servomat steigler
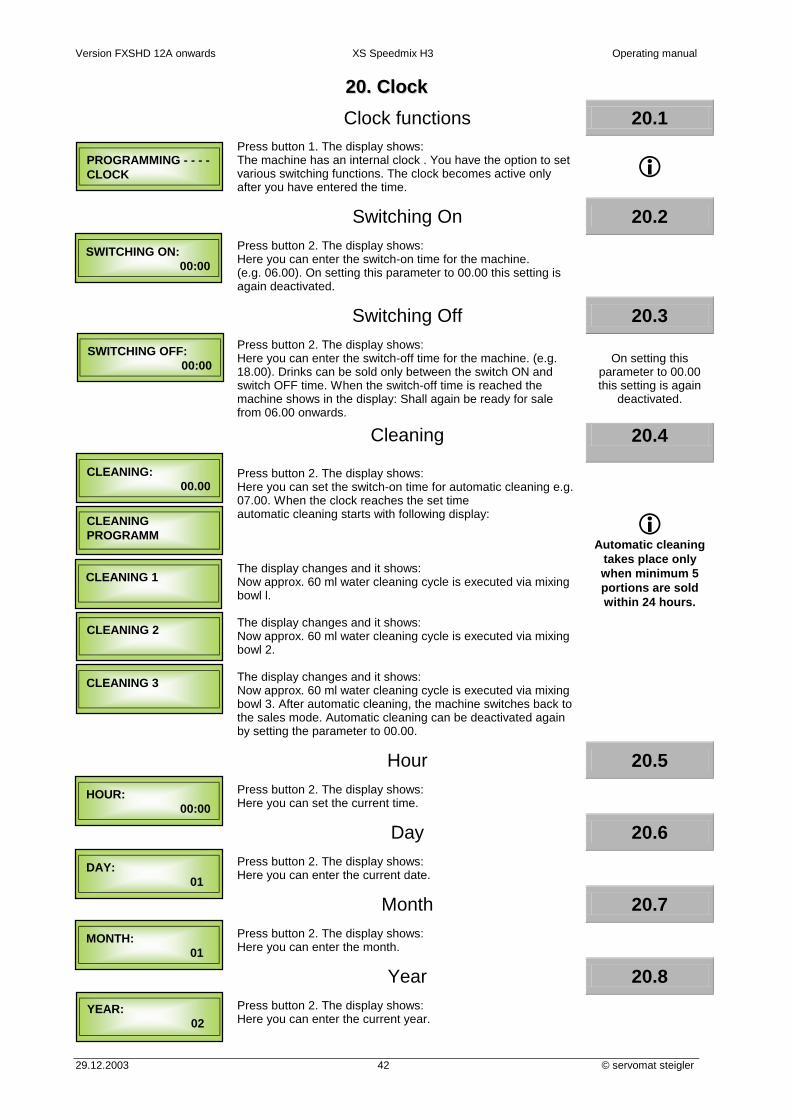
2200.. CClloocckk Clock functions 20.1 Press button 1. The display shows:
The machine has an internal clock . You have the option to set various switching functions. The clock becomes active only after you have entered the time.
!
Switching On 20.2 Press button 2. The display shows:
Here you can enter the switch-on time for the machine. (e.g. 06.00). On setting this parameter to 00.00 this setting is again deactivated.
Switching Off 20.3 Press button 2. The display shows:
Here you can enter the switch-off time for the machine. (e.g. 18.00). Drinks can be sold only between the switch ON and switch OFF time. When the switch-off time is reached the machine shows in the display: Shall again be ready for sale from 06.00 onwards.
On setting this parameter to 00.00 this setting is again
deactivated. Cleaning 20.4
Press button 2. The display shows: Here you can set the switch-on time for automatic cleaning e.g. 07.00. When the clock reaches the set time automatic cleaning starts with following display: The display changes and it shows: Now approx. 60 ml water cleaning cycle is executed via mixing bowl l. The display changes and it shows: Now approx. 60 ml water cleaning cycle is executed via mixing bowl 2. The display changes and it shows: Now approx. 60 ml water cleaning cycle is executed via mixing bowl 3. After automatic cleaning, the machine switches back to the sales mode. Automatic cleaning can be deactivated again by setting the parameter to 00.00.
!
Automatic cleaning takes place only when minimum 5 portions are sold within 24 hours.
Hour 20.5 Press button 2. The display shows:
Here you can set the current time.
Day 20.6 Press button 2. The display shows:
Here you can enter the current date.
Month 20.7 Press button 2. The display shows:
Here you can enter the month.
Year 20.8 Press button 2. The display shows:
Here you can enter the current year.
CLEANING: 00.00
CLEANING PROGRAMM
CLEANING 1
CLEANING 2
CLEANING 3
YEAR: 02
HOUR: 00:00
DAY: 01
MONTH: 01
PROGRAMMING - - - - CLOCK
SWITCHING ON: 00:00
SWITCHING OFF: 00:00
Operating manual XS Speedmix H5 Version FXSHD 12A onwards
© servomat steigler 43 29.12.2003
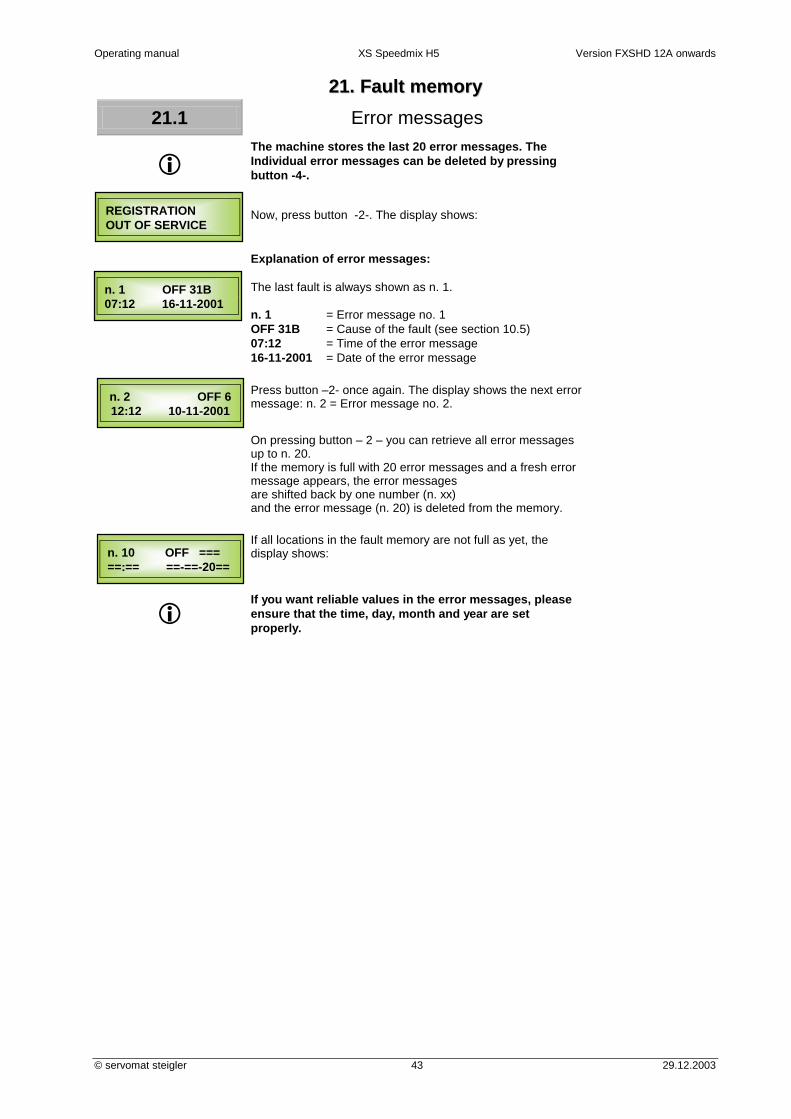
2211.. FFaauulltt mmeemmoorryy 21.1 Error messages
! The machine stores the last 20 error messages. The Individual error messages can be deleted by pressing button -4-.
Now, press button -2-. The display shows:
Explanation of error messages: The last fault is always shown as n. 1. n. 1 = Error message no. 1 OFF 31B = Cause of the fault (see section 10.5) 07:12 = Time of the error message 16-11-2001 = Date of the error message
Press button –2- once again. The display shows the next error message: n. 2 = Error message no. 2.
On pressing button – 2 – you can retrieve all error messages up to n. 20. If the memory is full with 20 error messages and a fresh error message appears, the error messages are shifted back by one number (n. xx) and the error message (n. 20) is deleted from the memory.
If all locations in the fault memory are not full as yet, the display shows:
! If you want reliable values in the error messages, please ensure that the time, day, month and year are set properly.
REGISTRATION OUT OF SERVICE
n. 1 OFF 31B 07:12 16-11-2001
n. 2 OFF 6 12:12 10-11-2001
n. 10 OFF === ==:== ==-==-20==
Version FXSHD 12A onwards XS Speedmix H3 Operating manual
29.12.2003 44 © servomat steigler
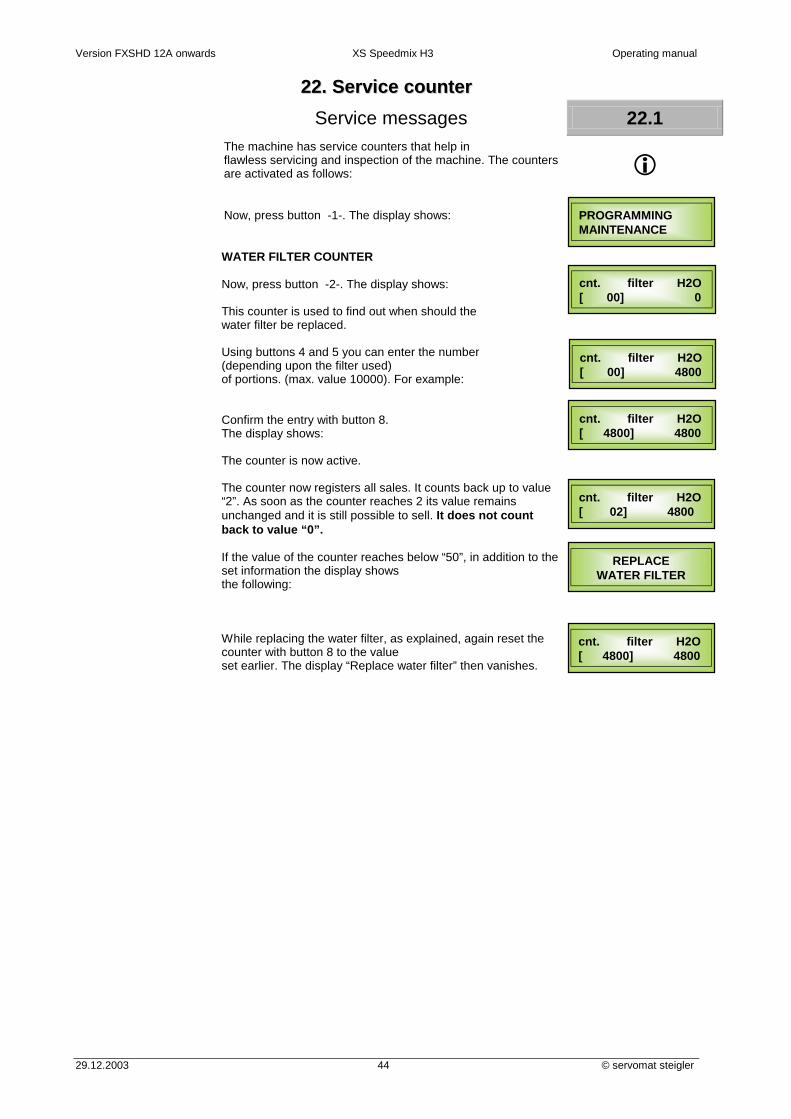
2222.. SSeerrvviiccee ccoouunntteerr Service messages 22.1
The machine has service counters that help in flawless servicing and inspection of the machine. The counters are activated as follows: !
Now, press button -1-. The display shows:
WATER FILTER COUNTER Now, press button -2-. The display shows: This counter is used to find out when should the water filter be replaced. Using buttons 4 and 5 you can enter the number (depending upon the filter used) of portions. (max. value 10000). For example: Confirm the entry with button 8. The display shows: The counter is now active. The counter now registers all sales. It counts back up to value “2”. As soon as the counter reaches 2 its value remains unchanged and it is still possible to sell. It does not count back to value “0”. If the value of the counter reaches below “50”, in addition to the set information the display shows the following: While replacing the water filter, as explained, again reset the counter with button 8 to the value set earlier. The display “Replace water filter” then vanishes.
PROGRAMMING MAINTENANCE
cnt. filter H2O [ 00] 0
cnt. filter H2O [ 00] 4800
cnt. filter H2O [ 4800] 4800
REPLACE WATER FILTER
cnt. filter H2O [ 02] 4800
cnt. filter H2O [ 4800] 4800

Operating manual XS Speedmix H5 Version FXSHD 12A onwards
© servomat steigler 45 29.12.2003
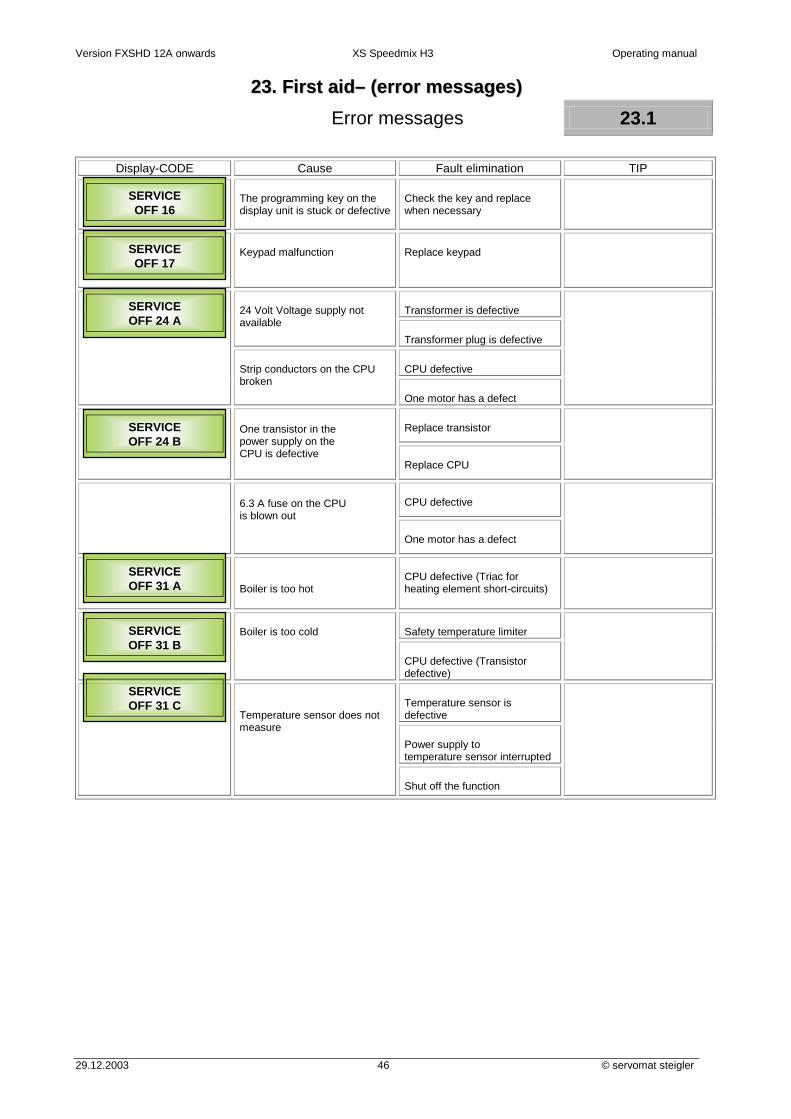
2233.. FFiirrsstt aaiidd–– ((eerrrroorr mmeessssaaggeess)) 23.1 Error messages
With the aid of electronic controls the machine controls a large number of functions and in case of specific faults adjusts the sale automatically . The display then shows: as message: e.g.: OFF (Code). To delete the fault display the machine must be switched off and switched on.
!
Display CODE Cause Fault elimination TIP
Incorrect payment system Defective adapter cable Power breakdown in data cable from coin unit to CPU
Payment system malfunction
Coin unit defective
The right EAROM memory on the CPU is defective.
Replace memory
The left EAROM memory on the CPU is defective.
Replace memory
Water tank empty
no water
Inadequate water supply (inlet valve is defective)
Pull out overflow pipe at the inlet valve, allow collected water to drain out from the pipe
Check boiler for leakage
Water loss in the boiler, although no sales took place.
Inspect pipe joints
Load standard data
Fault in EAROM memory
Replace EAROMS memory
Aqua portioning system motor
Fault in the aqua portioning system
Aqua portioning system PCB
Probe not ok (possible calcification) Plug on the probe is loose
Boiler level control not ok
Tumbler door motor not ok
SERVICE OFF 2
SERVICE OFF 10
SERVICE OFF 14
SERVICE OFF 12
SERVICE OFF 5B
SERVICE OFF 5A
SERVICE OFF 6A
SERVICE OFF 6B
Version FXSHD 12A onwards XS Speedmix H3 Operating manual
29.12.2003 46 © servomat steigler
2233.. FFiirrsstt aaiidd–– ((eerrrroorr mmeessssaaggeess)) Error messages 23.1
Display-CODE Cause Fault elimination TIP
The programming key on the display unit is stuck or defective
Check the key and replace when necessary
Keypad malfunction
Replace keypad Transformer is defective
24 Volt Voltage supply not available
Transformer plug is defective CPU defective
Strip conductors on the CPU broken
One motor has a defect
Replace transistor
One transistor in the power supply on the CPU is defective
Replace CPU
CPU defective
6.3 A fuse on the CPU is blown out
One motor has a defect
Boiler is too hot
CPU defective (Triac for heating element short-circuits) Safety temperature limiter
Boiler is too cold
CPU defective (Transistor defective)
Temperature sensor is defective Power supply to temperature sensor interrupted
Temperature sensor does not measure
Shut off the function
SERVICE OFF 16
SERVICE OFF 17
SERVICE OFF 31 A
SERVICE OFF 31 B
SERVICE OFF 31 C
SERVICE OFF 24 B
SERVICE OFF 24 A

Operating manual XS Speedmix H5 Version FXSHD 12A onwards
© servomat steigler 47 29.12.2003
2233.. FFiirrsstt aaiidd–– ((eerrrroorr mmeessssaaggeess))
23.2 Causes of malfunctions without error messages
For the malfunctions described here no error messages are displayed on the display unit.
! Fault Possible cause Solution
Power supply had broken down
Check input voltage and restore when necessary
The machine is out of operation, no part gets any power
One of the main fuses is blown out Replace fuse
The fuse for 8.5 Volt on the CPU is defective Replace fuse
The machine is out of operation, nothing can be seen on the display unit but a few parts continue to get power
The display unit is not properly connected to the CPU Check plug connection
The machine is on, however, neither product nor water is being dispensed
One of the 24 Volt fuses is defective. Transformer output voltage
Replace fuse
Product containers are not put in place properly
Put the product container properly in place Replace product motor
Product motor is defective CPU is defective
The machine is on, there is water but no product being dispensed
Plug connection is loose Check cable connection

Version FXSHD 12A onwards XS Speedmix H3 Operating manual
29.12.2003 48 © servomat steigler
2244.. UUsseerr mmaannuuaall Cleaning instructions 24.1

Operating manual XS Speedmix H5 Version FXSHD 12A onwards
© servomat steigler 49 29.12.2003

Version FXSHD 12A onwards XS Speedmix H3 Operating manual
29.12.2003 50 © servomat steigler
89179 Beimerstetten, Robert Bosch Str. 3
Ihr Service und Beratungspartner