zxpseries8 ug en
TRANSCRIPT

8/10/2019 Zxpseries8 Ug En
http://slidepdf.com/reader/full/zxpseries8-ug-en 1/226
P1045430-002
Zebra® ZXP Series 8™
Card Printer
User’s Manual

8/10/2019 Zxpseries8 Ug En
http://slidepdf.com/reader/full/zxpseries8-ug-en 2/226
P1045430-002 Rev. B
Copyright Notice
© 2013 ZIH Corp.
This document contains information proprietary to Zebra Technologies Corporation. This document and theinformation contained within is Copyrighted by Zebra Technologies Corporation and may not be duplicated infull or in part by any person without written approval from Zebra.
While every effort has been made to keep the information contained within current and accurate as of the date of publication, no guarantee is given that the document is error-free or that it is accurate with regard to anyspecification. Zebra Technologies Corporation reserves the right to make changes, for the purpose of product
improvement, at any time.
Trademarks
ZXP Series 8 is a trademark and Zebra is a registered trademark of Zebra Technologies Corporation. Windowsis a registered trademark of Microsoft Corporation in the United States and other countries. All othertrademarks or registered trademarks are marks of their respective holders.
Product Disposal
Product Disposal Information • Do not dispose of this product in unsorted municipal
waste. This product is recyclable, and should be recycled according to your local
standards. For more information, please see our web site at:
http://www.zebra.com/environment
8/10/2019 Zxpseries8 Ug En
http://slidepdf.com/reader/full/zxpseries8-ug-en 3/226
P1045430-002 Zebra ZXP Series 8 Card Printer User’s Manual iii
Contents
1 • Introduction . . . . . . . . . . . . . . . . . . . . . . . . . . . . . . . . . . . . . . . . . . . . . . . 1
Description . . . . . . . . . . . . . . . . . . . . . . . . . . . . . . . . . . . . . . . . . . . . . . . . . . . . 1
Printer Components . . . . . . . . . . . . . . . . . . . . . . . . . . . . . . . . . . . . . . . . . . . . . 2
Laminator Components. . . . . . . . . . . . . . . . . . . . . . . . . . . . . . . . . . . . . . . . . . . 3
Controls, Connectors, and Indicators . . . . . . . . . . . . . . . . . . . . . . . . . . . . . . . . 4
Icons . . . . . . . . . . . . . . . . . . . . . . . . . . . . . . . . . . . . . . . . . . . . . . . . . . . . . . . . . 5
Zebra Supplies . . . . . . . . . . . . . . . . . . . . . . . . . . . . . . . . . . . . . . . . . . . . . . . . . 5
2 • Installation and Setup . . . . . . . . . . . . . . . . . . . . . . . . . . . . . . . . . . . . . . . 7
General Information. . . . . . . . . . . . . . . . . . . . . . . . . . . . . . . . . . . . . . . . . . . . . . 7Unpacking the Printer . . . . . . . . . . . . . . . . . . . . . . . . . . . . . . . . . . . . . . . . . . . . 8
Installing the Card Hoppers. . . . . . . . . . . . . . . . . . . . . . . . . . . . . . . . . . . . . . . 12
Loading Cards. . . . . . . . . . . . . . . . . . . . . . . . . . . . . . . . . . . . . . . . . . . . . . . . . 13
Opening the Printer Door . . . . . . . . . . . . . . . . . . . . . . . . . . . . . . . . . . . . . . . . 14
Installing the Cleaning Cartridge . . . . . . . . . . . . . . . . . . . . . . . . . . . . . . . . . . . 15
Installing the Cleaning Roller. . . . . . . . . . . . . . . . . . . . . . . . . . . . . . . . . . . . . . 16
Loading the Transfer Film . . . . . . . . . . . . . . . . . . . . . . . . . . . . . . . . . . . . . . . . 17
Loading a Print Ribbon . . . . . . . . . . . . . . . . . . . . . . . . . . . . . . . . . . . . . . . . . . 19
Loading the Laminate . . . . . . . . . . . . . . . . . . . . . . . . . . . . . . . . . . . . . . . . . . . 21
Connecting Power. . . . . . . . . . . . . . . . . . . . . . . . . . . . . . . . . . . . . . . . . . . . . . 33
Connecting the Printer to your Computer . . . . . . . . . . . . . . . . . . . . . . . . . . . . 34
Installing the Windows Printer Driver . . . . . . . . . . . . . . . . . . . . . . . . . . . . . . . 36
3 • Operation . . . . . . . . . . . . . . . . . . . . . . . . . . . . . . . . . . . . . . . . . . . . . . . . 49
Introduction . . . . . . . . . . . . . . . . . . . . . . . . . . . . . . . . . . . . . . . . . . . . . . . . . . . 49
Card Type Selection . . . . . . . . . . . . . . . . . . . . . . . . . . . . . . . . . . . . . . . . . . . . 50
Printing a Test Card. . . . . . . . . . . . . . . . . . . . . . . . . . . . . . . . . . . . . . . . . . . . . 51
Manual Card Feed. . . . . . . . . . . . . . . . . . . . . . . . . . . . . . . . . . . . . . . . . . . . . . 52
Operator Control Panel (OCP) . . . . . . . . . . . . . . . . . . . . . . . . . . . . . . . . . . . . 54
Ethernet Indicators -- Detail. . . . . . . . . . . . . . . . . . . . . . . . . . . . . . . . . . . . . . . 64
8/10/2019 Zxpseries8 Ug En
http://slidepdf.com/reader/full/zxpseries8-ug-en 4/226
iv Zebra ZXP Series 8 Card Printer User’s Manual P1045430-002
: Contents
4 • Printer Settings and Adjustments . . . . . . . . . . . . . . . . . . . . . . . . . . . . 65
Introduction . . . . . . . . . . . . . . . . . . . . . . . . . . . . . . . . . . . . . . . . . . . . . . . . . . . 65
Printer Properties . . . . . . . . . . . . . . . . . . . . . . . . . . . . . . . . . . . . . . . . . . . . . . 66
Printing Preferences . . . . . . . . . . . . . . . . . . . . . . . . . . . . . . . . . . . . . . . . . . . . 78
5 • ZXP Series Toolbox. . . . . . . . . . . . . . . . . . . . . . . . . . . . . . . . . . . . . . . 101
Introduction . . . . . . . . . . . . . . . . . . . . . . . . . . . . . . . . . . . . . . . . . . . . . . . . . . 101ZXP Series Toolbox Access . . . . . . . . . . . . . . . . . . . . . . . . . . . . . . . . . . . . . 102
Information . . . . . . . . . . . . . . . . . . . . . . . . . . . . . . . . . . . . . . . . . . . . . . . . . . 103
Configuration. . . . . . . . . . . . . . . . . . . . . . . . . . . . . . . . . . . . . . . . . . . . . . . . . 109
Cleaning . . . . . . . . . . . . . . . . . . . . . . . . . . . . . . . . . . . . . . . . . . . . . . . . . . . . 118
Print Test Card. . . . . . . . . . . . . . . . . . . . . . . . . . . . . . . . . . . . . . . . . . . . . . . . 122
Technology . . . . . . . . . . . . . . . . . . . . . . . . . . . . . . . . . . . . . . . . . . . . . . . . . . 123
Advanced Security . . . . . . . . . . . . . . . . . . . . . . . . . . . . . . . . . . . . . . . . . . . . 127
Print Viewer. . . . . . . . . . . . . . . . . . . . . . . . . . . . . . . . . . . . . . . . . . . . . . . . . . 130
6 • Cleaning . . . . . . . . . . . . . . . . . . . . . . . . . . . . . . . . . . . . . . . . . . . . . . . . 131
Cleaning the Printer. . . . . . . . . . . . . . . . . . . . . . . . . . . . . . . . . . . . . . . . . . . . 131
Cleaning the Laminator . . . . . . . . . . . . . . . . . . . . . . . . . . . . . . . . . . . . . . . . . 135
Cleaning the Printhead . . . . . . . . . . . . . . . . . . . . . . . . . . . . . . . . . . . . . . . . . 140Card Cleaning Cartridge . . . . . . . . . . . . . . . . . . . . . . . . . . . . . . . . . . . . . . . . 141
Cleaning Roller . . . . . . . . . . . . . . . . . . . . . . . . . . . . . . . . . . . . . . . . . . . . . . . 141
7 • Troubleshooting . . . . . . . . . . . . . . . . . . . . . . . . . . . . . . . . . . . . . . . . . 143
OCP Error Messages . . . . . . . . . . . . . . . . . . . . . . . . . . . . . . . . . . . . . . . . . . 144
OCP Test Card Images . . . . . . . . . . . . . . . . . . . . . . . . . . . . . . . . . . . . . . . . . 151
Test Card Descriptions . . . . . . . . . . . . . . . . . . . . . . . . . . . . . . . . . . . . . . . . . 152
Ethernet Issues . . . . . . . . . . . . . . . . . . . . . . . . . . . . . . . . . . . . . . . . . . . . . . . 153
8 • Technical Speci fications . . . . . . . . . . . . . . . . . . . . . . . . . . . . . . . . . . 155
Standard Features. . . . . . . . . . . . . . . . . . . . . . . . . . . . . . . . . . . . . . . . . . . . . 155
Specifications . . . . . . . . . . . . . . . . . . . . . . . . . . . . . . . . . . . . . . . . . . . . . . . . 156
Declarations of Conformity . . . . . . . . . . . . . . . . . . . . . . . . . . . . . . . . . . . . . . 159
8.02.11b/g Wireless Compliance Information . . . . . . . . . . . . . . . . . . . . . . . . 161
A • Printer Conf igurations . . . . . . . . . . . . . . . . . . . . . . . . . . . . . . . . . . . . 165
B • Setting Custom Card Specif ications . . . . . . . . . . . . . . . . . . . . . . . . 167
C • Network Operations . . . . . . . . . . . . . . . . . . . . . . . . . . . . . . . . . . . . . . 191
D • Wireless Network Operations . . . . . . . . . . . . . . . . . . . . . . . . . . . . . . 199
E • Magnetic Card Encoder . . . . . . . . . . . . . . . . . . . . . . . . . . . . . . . . . . . 201
F • Smart Card Options . . . . . . . . . . . . . . . . . . . . . . . . . . . . . . . . . . . . . . 207
G • Packing the Printer for Shipment . . . . . . . . . . . . . . . . . . . . . . . . . . . 213
I • Worldwide Support . . . . . . . . . . . . . . . . . . . . . . . . . . . . . . . . . . . . . . . 219

8/10/2019 Zxpseries8 Ug En
http://slidepdf.com/reader/full/zxpseries8-ug-en 5/226
P1045430-002 Zebra ZXP Series 8 Card Printer User’s Manual 1
1Introduction
Description
This manual contains installation, operation, and maintenance information for the Zebra ZXPSeries 8 Card Printers manufactured by Zebra Technologies Corporation.
Zebra ZXP Series 8 Card Printers use reverse transfer printing technology to create photo-quality and over-the-edge images on plastic identification cards. Zebra’s reverse transfer
printers provide fast throughput and a range of encoding options for a variety of marketsand applications.
This manual describes single-sided and dual-sided ZXP Series 8 Card Printers anddual-sided ZXP Series 8 Card Printers with either a single-sided or dual-sided Laminator.
The single-sided Laminator lays down and seals a laminating film on the top surface of the printed card for added security; the dual-sided Laminator lays down and seals laminating filmon both the top and bottom surfaces of the printed card.
References to “the laminator” in this document apply to either the single-sided or the dual-sided Laminator.

8/10/2019 Zxpseries8 Ug En
http://slidepdf.com/reader/full/zxpseries8-ug-en 6/226
2 Zebra ZXP Series 8 Card Printer User’s Manual P1045430-002
1: Introduction
Printer Components
Printer Components
The following figure shows components of the Printer. If the Laminator is present, see page 3 for details.
Input Hopper
Operator Control
Panel (OCP)
Card Cleaning
Cartridge
Card CleaningRoller
Printhead
Print Ribbon Supply
behind card cleaning roller
Print Ribbon Take-Up
Transfer Film
Supply
Transfer Film
Take-Up
Single Card
Feed Slot
Printer Door (shown open)
Reject Bin
underneath input feed tray
Mag Encoder (optional)
behind idler cover
Transfer Station Card Slot
Smart Card (optional)
under this cover

8/10/2019 Zxpseries8 Ug En
http://slidepdf.com/reader/full/zxpseries8-ug-en 7/226
1: Introduction
Laminator Components
P1045430-002 Zebra ZXP Series 8 Card Printer User’s Manual 3
Laminator Components
The following figure shows components of the Laminator.
Heater
Upper Laminate Cassette
(single-sided and dual-sided laminators)
Lower Laminate Cassette
(dual-sided laminator only)
Lower Laminate Cassette Latch
(dual-sided laminator only)
Upper Laminate Cassette Latch
(single-sided and dual-sided laminators)
Output
Hopper
Manual Advance Tool
Enclosure
Lock
(optional)
8/10/2019 Zxpseries8 Ug En
http://slidepdf.com/reader/full/zxpseries8-ug-en 8/226
4 Zebra ZXP Series 8 Card Printer User’s Manual P1045430-002
1: Introduction
Controls, Connectors, and Indicators
Controls, Connectors, and Indicators
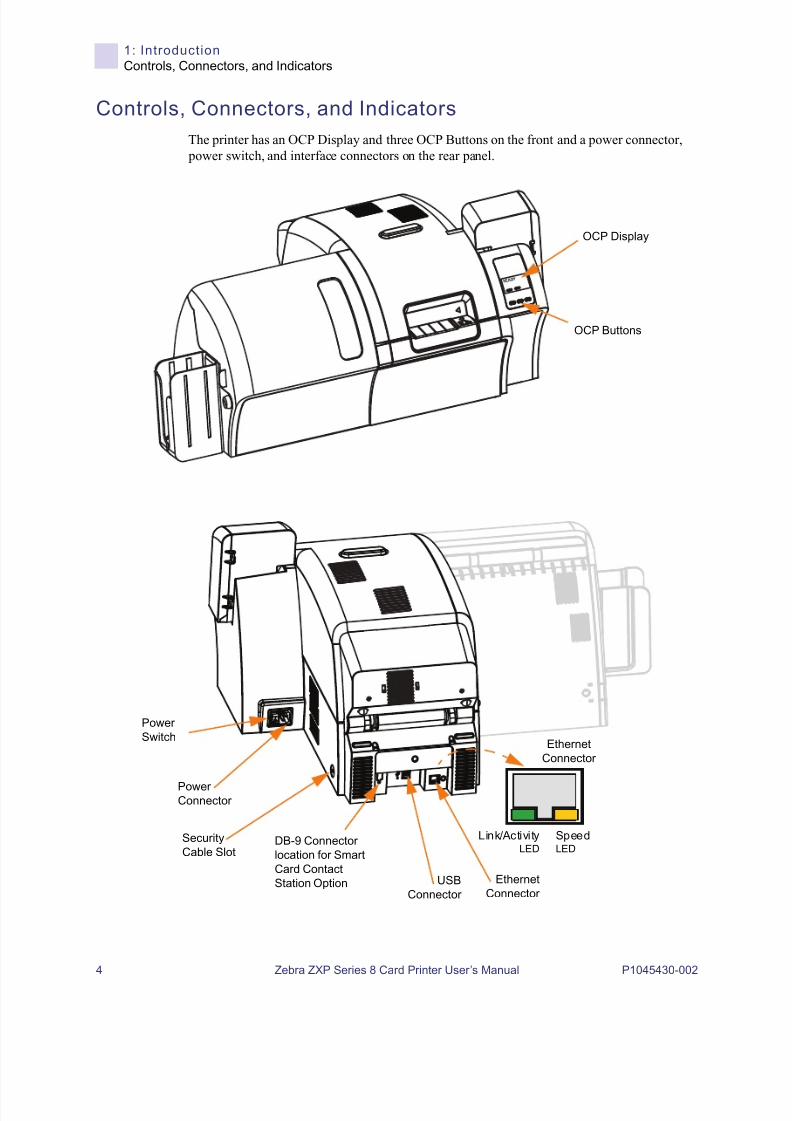
The printer has an OCP Display and three OCP Buttons on the front and a power connector, power switch, and interface connectors on the rear panel.
OCP Display
OCP Buttons
Power
Switch
PowerConnector
Ethernet
Connector USB
Connector
DB-9 Connector
location for Smart
Card Contact
Station Option
Security
Cable Slot
Ethernet
Connector
Link/Activity SpeedLED LED

8/10/2019 Zxpseries8 Ug En
http://slidepdf.com/reader/full/zxpseries8-ug-en 9/226
1: Introduction
Icons
P1045430-002 Zebra ZXP Series 8 Card Printer User’s Manual 5
Icons
Throughout this manual, different icons highlight important information, as follows:
Zebra Supplies
Genuine Zebra supplies meet stringent quality standards and are recommended for optimal
printing quality and proper printer performance. The ZXP Series 8 printer is designed to workonly with Zebra True Colours® i Series™ Ribbons, Zebra True Colours i Series Transfer Film,and Zebra True Secure™ i Series Laminates; see www.zebra.com/supplies for details.
Note • Indicates information that emphasizes or supplements important points of themain text.
Important • Advises you of information that is essential to complete a task, or points out theimportance of specific information in the text.
Provides an example or scenario to demonstrate or clarify a section of text.
Electrostatic Discharge Caution • Warns you of the potential for electrostaticdischarge.
Electric Shock Caution • Warns you of a potential electric shock situation.
Hot Surface • Warns you of a situation where excessive heat could cause a burn.
Caution • Advises you that failure to take or avoid a specific action could result in
physical harm to you, or could result in physical damage to the hardware.

8/10/2019 Zxpseries8 Ug En
http://slidepdf.com/reader/full/zxpseries8-ug-en 10/226
6 Zebra ZXP Series 8 Card Printer User’s Manual P1045430-002

8/10/2019 Zxpseries8 Ug En
http://slidepdf.com/reader/full/zxpseries8-ug-en 11/226
P1045430-002 Zebra ZXP Series 8 Card Printer User’s Manual 7
2Installation and Setup
General Information
This section will guide you through the installation and setup of your Card Printer. Thisconsists of the following procedures, which should be performed in the order presented.
• Unpacking the Printer . . . . . . . . . . . . . . . . . . . . . . . . . . . . . . . . . . . . . . . . . . . 8
• Installing the Card Hoppers . . . . . . . . . . . . . . . . . . . . . . . . . . . . . . . . . . . . . 12
• Loading Cards . . . . . . . . . . . . . . . . . . . . . . . . . . . . . . . . . . . . . . . . . . . . . . . 13
• Opening the Printer Door . . . . . . . . . . . . . . . . . . . . . . . . . . . . . . . . . . . . . . . 14
• Installing the Cleaning Cartridge . . . . . . . . . . . . . . . . . . . . . . . . . . . . . . . . . 15• Installing the Cleaning Roller . . . . . . . . . . . . . . . . . . . . . . . . . . . . . . . . . . . 16
• Loading the Transfer Film . . . . . . . . . . . . . . . . . . . . . . . . . . . . . . . . . . . . . . 17
• Loading a Print Ribbon . . . . . . . . . . . . . . . . . . . . . . . . . . . . . . . . . . . . . . . . 19
• Loading the Laminate. . . . . . . . . . . . . . . . . . . . . . . . . . . . . . . . . . . . . . . . . . 21
• Connecting Power . . . . . . . . . . . . . . . . . . . . . . . . . . . . . . . . . . . . . . . . . . . . 33
• Connecting the Printer to your Computer . . . . . . . . . . . . . . . . . . . . . . . . . . 34
• Installing the Windows Printer Driver . . . . . . . . . . . . . . . . . . . . . . . . . . . . . 36
The procedure to be followed for Packing the Printer for Shipment is given at the end ofthis section.

8/10/2019 Zxpseries8 Ug En
http://slidepdf.com/reader/full/zxpseries8-ug-en 12/226
8 Zebra ZXP Series 8 Card Printer User’s Manual P1045430-002
2: Installation and Setup
Unpacking the Printer
Unpacking the Printer
Printer wi thout a Laminator
Step 1. Inspect the shipping container to ensure that no damage has occurred during
shipment. If any damage is apparent, file a claim with the shipper.
Step 2. Open the shipping container.
Step 3. Remove the packing material and accessories from around the top of the Printer.
Step 4. Make sure the following items are included with your Printer:
If any items are missing, please contact your dealer. To reorder, refer to Appendix I ofthis manual.
Important • Save all the packing material and the shipping carton in case the Printer needs to be moved or shipped. If the original material is lost or damaged, a replacement Shipping Kitcan be ordered from Zebra.
Quick Start Guide CD-ROM with InstallWizard Cleaning Cartridge
Cleaning Roller USB Cable Power Cable
Cleaning Kit Input Hopper Output Hopper
USB

8/10/2019 Zxpseries8 Ug En
http://slidepdf.com/reader/full/zxpseries8-ug-en 13/226
2: Installation and Setup
Unpacking the Printer
P1045430-002 Zebra ZXP Series 8 Card Printer User’s Manual 9
Step 5.Lift the Printer out of the carton by holding it with both hands.
Step 6. Place the Printer in a location that meets the following requirements:
• A reasonably dust- and dirt-free environment.
• Flat surface at least 27 in (686 mm) x 28 in (711 mm) that can support theweight of the Printer; additional space preferred. Allow a 4-inch clearance,minimum, on all sides.
• Vertical clearance at least 32 in (813 mm).
• Temperature within the range of 59° to 95°F (15° to 35°C).
• Relative Humidity 20 to 80% inclusive, non-condensing.
• AC power accessible.
Step 7. Remove the protective plastic bag from the Printer.
Caution • The Printer weighs approximately 27.5 lbs (12.5 kg).

8/10/2019 Zxpseries8 Ug En
http://slidepdf.com/reader/full/zxpseries8-ug-en 14/226
10 Zebra ZXP Series 8 Card Printer User’s Manual P1045430-002
2: Installation and Setup
Unpacking the Printer
Printer with a Laminator
Step 1. Inspect the shipping container to ensure that no damage has occurred duringshipment. If any damage is apparent, file a claim with the shipper.
Step 2. Open the shipping container.
Step 3. Remove the packing material and accessories from around the top of the Printer.
Step 4. Make sure the following items are included with the Printer:
If any items are missing, please contact your dealer. To reorder, refer to Appendix I ofthis manual.
Important • Save all the packing material and the shipping carton in case the Printer needs to be moved or shipped. If the original material is lost or damaged, a replacement Shipping Kitcan be ordered from Zebra.
Quick Start Guide CD-ROM with InstallWizard Cleaning Cartridge
Cleaning Roller USB Cable Power Cable
Laminate Cassette(s) Input Hopper Output Hopper
USB
Single-
and
Dual-
sided
Dual-
sided
only

8/10/2019 Zxpseries8 Ug En
http://slidepdf.com/reader/full/zxpseries8-ug-en 15/226
2: Installation and Setup
Unpacking the Printer
P1045430-002 Zebra ZXP Series 8 Card Printer User’s Manual 11
Step 5. With two people holding the carrying strap (colored blue, green, and red for clarity),carefully lift the Printer out of the recess in the lower foam insert.
Step 6. Place the Printer in a location that meets the following requirements:
• A reasonably dust- and dirt-free environment.
• Flat surface at least 38 in (965 mm) wide x 28 in (711 mm) deep that cansupport the weight of the Printer; additional space preferred. Allow a 4-inchclearance, minimum, on all sides.
• Vertical clearance at least 32 in (813 mm).
• Temperature within the range of 59° to 95°F (15° to 35°C).
• Relative Humidity 20 to 80% inclusive, non-condensing.
• AC power accessible.
Remove the protective plastic bag from the Printer.
Caution • The Printer weighs approximately 44 lbs (20 kg); use two people to lift it out of
the shipping carton.

8/10/2019 Zxpseries8 Ug En
http://slidepdf.com/reader/full/zxpseries8-ug-en 16/226
12 Zebra ZXP Series 8 Card Printer User’s Manual P1045430-002
2: Installation and Setup
Installing the Card Hoppers
Installing the Card Hoppers
Input Hopper
The Input Hopper is positioned on the right side of the Printer and holds the cards to be printed.
Step 1. Install the Input Hopper by sliding the hopper into the receptacle on the right sideof the Printer.
Step 2. Ensure that the Input Hopper locks securely in place.
Output Hopper
The Output Hopper is positioned on the left side of the Printer (or the left side of the Laminatorif the printer includes a Laminator as shown above) and receives the printed cards.
Step 1. Install the Output Hopper by inserting the four tabs on the right side of the hopperinto the four slots on the left side of the Printer or Laminator.
Step 2. Ensure that the Output Hopper locks securely in place.
Output
Hopper
Input
Hopper
8/10/2019 Zxpseries8 Ug En
http://slidepdf.com/reader/full/zxpseries8-ug-en 17/226
2: Installation and Setup
Loading Cards
P1045430-002 Zebra ZXP Series 8 Card Printer User’s Manual 13
Loading Cards
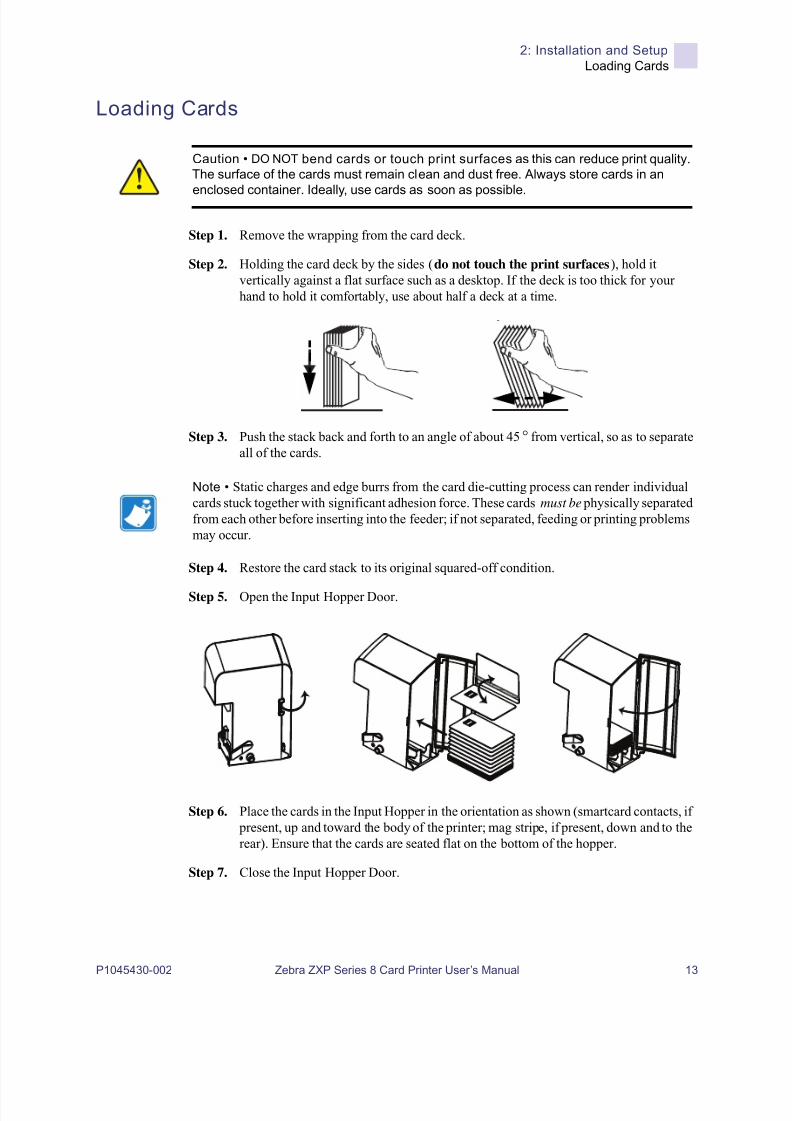
Step 1. Remove the wrapping from the card deck.
Step 2. Holding the card deck by the sides (do not touch the print surfaces), hold itvertically against a flat surface such as a desktop. If the deck is too thick for yourhand to hold it comfortably, use about half a deck at a time.
Step 3. Push the stack back and forth to an angle of about 45° from vertical, so as to separateall of the cards.
Step 4. Restore the card stack to its original squared-off condition.
Step 5. Open the Input Hopper Door.
Step 6. Place the cards in the Input Hopper in the orientation as shown (smartcard contacts, if present, up and toward the body of the printer; mag stripe, if present, down and to therear). Ensure that the cards are seated flat on the bottom of the hopper.
Step 7. Close the Input Hopper Door.
Caution • DO NOT bend cards or touch print surfaces as this can reduce print quality.
The surface of the cards must remain clean and dust free. Always store cards in an
enclosed container. Ideally, use cards as soon as possible.
Note • Static charges and edge burrs from the card die-cutting process can render individualcards stuck together with significant adhesion force. These cards must be physically separatedfrom each other before inserting into the feeder; if not separated, feeding or printing problemsmay occur.

8/10/2019 Zxpseries8 Ug En
http://slidepdf.com/reader/full/zxpseries8-ug-en 18/226
14 Zebra ZXP Series 8 Card Printer User’s Manual P1045430-002
2: Installation and Setup
Opening the Printer Door
Opening the Printer Door
Step 1. Press the Door Release button on the top of the Printer.
Step 2. Observe that the Door releases and pops up approximately half an inch.
Step 3. Grasp the Door at the bottom front.
Step 4. Lift the Door to its upright position. It will remain in that position.

8/10/2019 Zxpseries8 Ug En
http://slidepdf.com/reader/full/zxpseries8-ug-en 19/226
2: Installation and Setup
Installing the Cleaning Cartridge
P1045430-002 Zebra ZXP Series 8 Card Printer User’s Manual 15
Installing the Cleaning Cartridge
The Cleaning Cartridge cleans the cards entering the Printer from the Input Hopper. TheCleaning Cartridge consists of a Cartridge Frame and an Adhesive Roller, which are
packed together.
Step 1. Remove the Cartridge Frame and the Adhesive Roller from their packaging.
Step 2. Insert the Adhesive Roller into the Cartridge Frame. To avoid contamination, alwayshold the frame and the roller by the ends.
Step 3. Peel the protective wrapper from the Adhesive Roller.
Step 4. Open the Printer Door by pressing the Door Release button on the top of the Printer.
Step 5. Locate the area where the Cleaning Cartridge will be installed (adjacent to the InputHopper); circled below.
Step 6.Hold the Cleaning Cartridge by the extended handle.
Step 7. With the cartridge at about a 30° angle (pointing downward), insert the lip of thecartridge into the slot, until the cartridge seats against the back wall.
Step 8. Press the front of the cartridge down until it seats all the way down and latches withan audible click.
Step 9. Close the Printer’s Door.

8/10/2019 Zxpseries8 Ug En
http://slidepdf.com/reader/full/zxpseries8-ug-en 20/226
16 Zebra ZXP Series 8 Card Printer User’s Manual P1045430-002
2: Installation and Setup
Installing the Cleaning Roller
Installing the Cleaning Roller
The Cleaning Roller cleans the cards entering the Printer from either the Input Hopper or theSingle-Feed Input.
Step 1. Remove the Cleaning Roller from its packaging. To avoid contamination, always
hold the roller by the ends.
Step 2. Peel the protective wrapper from the Cleaning Roller.
Step 3. Open the Printer Door by pressing the Door Release button on the top of the Printer.
Step 4. Locate the area where the Cleaning Roller will be installed; circled below.
Step 5. Hold the Cleaning Roller by the ends.
Step 6. Position the ends of the Cleaning Roller in the slots.
Step 7. Push down until the roller fully seats and latches.
Step 8. Close the Printer’s Door.

8/10/2019 Zxpseries8 Ug En
http://slidepdf.com/reader/full/zxpseries8-ug-en 21/226
2: Installation and Setup
Loading the Transfer Film
P1045430-002 Zebra ZXP Series 8 Card Printer User’s Manual 17
Loading the Transfer Film
The ZXP Series 8 Card Printer is designed to work only with Zebra True Colours® i Series™ Transfer Film for near photographic print resolution and over-the-edge printing.
Step 1. Locate the transfer film supply spindles and the transfer film take-up spindles. Note
that the Flanges and Spindles are color coded (white-to-white, green-to-green).
Supply Spool
GREEN
Take-up Spool
WHITE
Take-up Spindle
GRAY
Supply Spindle
GRAY
Take-up Spindle
WHITE
Supply Spindle
GREEN
Flange
Flange

8/10/2019 Zxpseries8 Ug En
http://slidepdf.com/reader/full/zxpseries8-ug-en 22/226
18 Zebra ZXP Series 8 Card Printer User’s Manual P1045430-002
2: Installation and Setup
Loading the Transfer Film
Step 2. Unroll about 1 foot (30 cm) from the full roll of transfer film on the supply spool; andwind it, 2 wraps, onto the empty take-up spool.
Step 3. Load transfer film supply spool onto the supply spindles, green flange side to
the left.
Step 4. Load the empty take-up spool onto the take-up spindles, white flange side tothe right.
Step 5. Make sure the spring-loaded spindles on the right seat into the spools.
Step 6. Make sure the transfer film comes off the bottom of the supply spool and feeds to the bottom of the take-up spool.
Step 7. The figure below shows the proper installation of the transfer film.

8/10/2019 Zxpseries8 Ug En
http://slidepdf.com/reader/full/zxpseries8-ug-en 23/226
2: Installation and Setup
Loading a Print Ribbon
P1045430-002 Zebra ZXP Series 8 Card Printer User’s Manual 19
Loading a Print Ribbon
The ZXP Series 8 Card Printer is designed to work only with Zebra True Colours® i Series™ Ribbons in order to achieve rich, vibrant, image production over the full-color spectrum.
Step 1. Locate the print ribbon supply spindles and the print ribbon take-up spindles. Note
that the Flanges and Spindles are color coded (blue-to-blue, purple-to-purple).
Supply Spool
PURPLE
Take-up Spool
BLUETake-up Spindle
GRAY
Supply Spindle
PURPLE
Take-up Spindle
BLUE
Supply Spindle
GRAY
Flange
Flange

8/10/2019 Zxpseries8 Ug En
http://slidepdf.com/reader/full/zxpseries8-ug-en 24/226
20 Zebra ZXP Series 8 Card Printer User’s Manual P1045430-002
2: Installation and Setup
Loading a Print Ribbon
Step 2. Load the print ribbon supply spool onto the supply spindles, purple flange side to
the left.
Step 3. Load the empty take-up spool onto the take-up spindle, blue flange side to the right.
Step 4. Make sure the spring-loaded spindles on the left seat into the spools.
Step 5. Make sure the print ribbon comes off the bottom of the supply spool and feeds to the bottom of the take-up spool.
Step 6. The figure below shows the proper installation of the print ribbon.
8/10/2019 Zxpseries8 Ug En
http://slidepdf.com/reader/full/zxpseries8-ug-en 25/226
2: Installation and Setup
Loading the Laminate
P1045430-002 Zebra ZXP Series 8 Card Printer User’s Manual 21
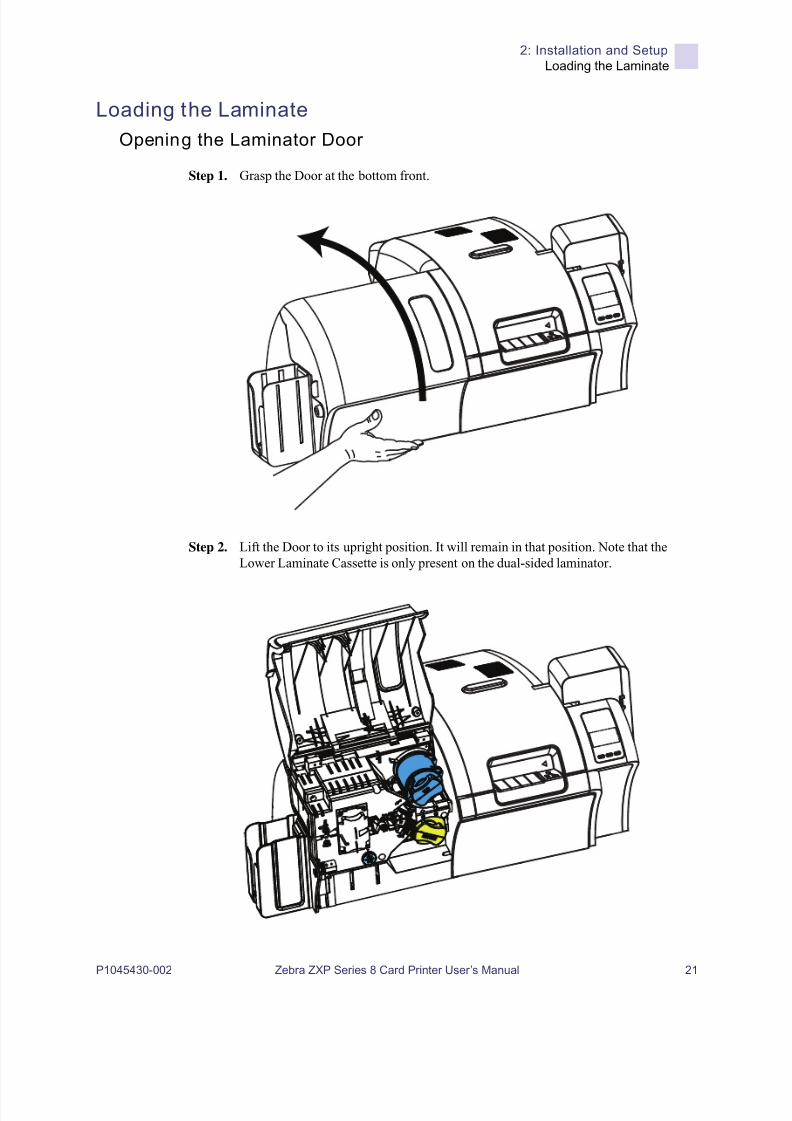
Loading the Laminate
Opening the Laminator Door
Step 1. Grasp the Door at the bottom front.
Step 2. Lift the Door to its upright position. It will remain in that position. Note that theLower Laminate Cassette is only present on the dual-sided laminator.

8/10/2019 Zxpseries8 Ug En
http://slidepdf.com/reader/full/zxpseries8-ug-en 26/226
22 Zebra ZXP Series 8 Card Printer User’s Manual P1045430-002
2: Installation and Setup
Loading the Laminate
Removing the Laminate Cassette(s)
Step 1. Rotate the locking lever maximum in the direction indicated in the figure below.
Step 2. Rotate the cassette to the mechanical stop in the direction indicated below.
8/10/2019 Zxpseries8 Ug En
http://slidepdf.com/reader/full/zxpseries8-ug-en 27/226
2: Installation and Setup
Loading the Laminate
P1045430-002 Zebra ZXP Series 8 Card Printer User’s Manual 23
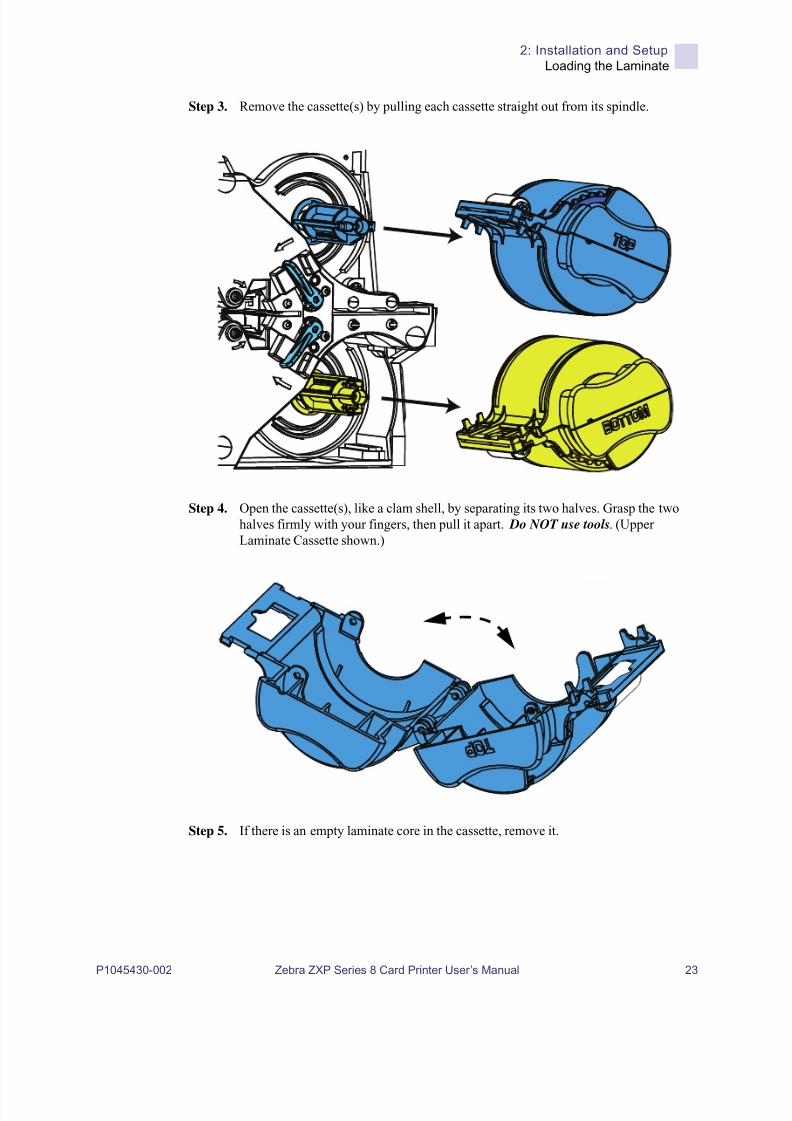
Step 3. Remove the cassette(s) by pulling each cassette straight out from its spindle.
Step 4. Open the cassette(s), like a clam shell, by separating its two halves. Grasp the twohalves firmly with your fingers, then pull it apart. Do NOT use tools. (UpperLaminate Cassette shown.)
Step 5. If there is an empty laminate core in the cassette, remove it.

8/10/2019 Zxpseries8 Ug En
http://slidepdf.com/reader/full/zxpseries8-ug-en 28/226
24 Zebra ZXP Series 8 Card Printer User’s Manual P1045430-002
2: Installation and Setup
Loading the Laminate
Loading the Laminate Cassette(s)
Step 1. Remove a new roll of laminate from its packaging. There are two different laminaterolls, one for the Upper Cassette (Blue) and one for the Lower Cassette (Yellow).
Step 2. Place the roll of laminate in the Upper Laminate Cassette (present on both thesingle-sided laminator and dual-sided laminator). Note the orientation of the laminatespool with respect to the laminate cassette as shown in the figure below.
Step 3. Pull out an inch or two of laminate past the lip of the cassette.
Step 4. Close the cassette by firmly pressing the “clamshell” together. You will hear a clickand feel a detent when the halves of the cassette seat together.
Step 5. Remove a second new roll of laminate from its packaging (for dual-sidedlaminator only).
Step 6. Place the roll of laminate in the Lower Laminate Cassette (present on the dual-sided laminator only). Note the orientation of the laminate spool with respect to thelaminate cassette as shown in the figure below.
Important • The geared flange on the laminate spool is removable, but do not remove it. If itdoes come off, snap it back onto the end of the spool.

8/10/2019 Zxpseries8 Ug En
http://slidepdf.com/reader/full/zxpseries8-ug-en 29/226
2: Installation and Setup
Loading the Laminate
P1045430-002 Zebra ZXP Series 8 Card Printer User’s Manual 25
Step 7. Pull out an inch or two of laminate past the lip of the cassette.
Step 8. Close the cassette by firmly pressing the “clamshell” together. You will hear a clickand feel a detent when the halves of the cassette seat together.
Step 9. Cut the laminate square (as close to perpendicular as possible) with scissors. Hold the
scissors in one hand. Hold the cassette with the other hand. Press the laminate firmlyagainst the white roller thereby keeping the laminate from moving while cutting.

8/10/2019 Zxpseries8 Ug En
http://slidepdf.com/reader/full/zxpseries8-ug-en 30/226
26 Zebra ZXP Series 8 Card Printer User’s Manual P1045430-002
2: Installation and Setup
Loading the Laminate
Step 10. Rotate the core to adjust the laminate overhang. Stop when the end of the laminate is just beyond the lip of the cassette, as shown below.
Important • Check for laminate overhang any time the locking lever is pressed or thecassette is removed.
0 - 0.5 mm
0 - 1/32"
0 - 0.5 mm
0 - 1/32"

8/10/2019 Zxpseries8 Ug En
http://slidepdf.com/reader/full/zxpseries8-ug-en 31/226
2: Installation and Setup
Loading the Laminate
P1045430-002 Zebra ZXP Series 8 Card Printer User’s Manual 27
Installing the Laminate Cassette(s)
Step 1. Slide the cassette onto the spindle.
Step 2. Ensure the cassette is fully seated on the spindle. Gently press the cassette until it isflush against the laminator frame.

8/10/2019 Zxpseries8 Ug En
http://slidepdf.com/reader/full/zxpseries8-ug-en 32/226
28 Zebra ZXP Series 8 Card Printer User’s Manual P1045430-002
2: Installation and Setup
Loading the Laminate
Step 3. Rotate each cassette (in the direction indicated in the figure below) until it stops.
Step 4. Observe the locking lever snap into place.

8/10/2019 Zxpseries8 Ug En
http://slidepdf.com/reader/full/zxpseries8-ug-en 33/226
2: Installation and Setup
Loading the Laminate
P1045430-002 Zebra ZXP Series 8 Card Printer User’s Manual 29
Laminating Contact Smart Cards
The laminate for the top surface of a contact smart card has a repeating pattern of an index holeand a rectangular cutout to expose the card’s electrical contacts.
Step 1. Remove the Upper Laminate Cassette; see Page 22.
Step 2. Open the cassette, and remove the laminate if present.
Step 3. Load the smart card laminate into the cassette; see Page 24.
Step 4. Cut the laminate, splitting the index hole as shown.
electrical contacts
index hole
rectangular cutout
Cut the laminate, splitting the
index hole

8/10/2019 Zxpseries8 Ug En
http://slidepdf.com/reader/full/zxpseries8-ug-en 34/226
30 Zebra ZXP Series 8 Card Printer User’s Manual P1045430-002
2: Installation and Setup
Loading the Laminate
Step 5. Rotate the core to adjust the laminate overhang. Stop when the end of the laminate(not the edge of the index hole) is even with the edge of the lips of the cassette.
Step 6. Install the cassette.
8/10/2019 Zxpseries8 Ug En
http://slidepdf.com/reader/full/zxpseries8-ug-en 35/226
2: Installation and Setup
Loading the Laminate
P1045430-002 Zebra ZXP Series 8 Card Printer User’s Manual 31
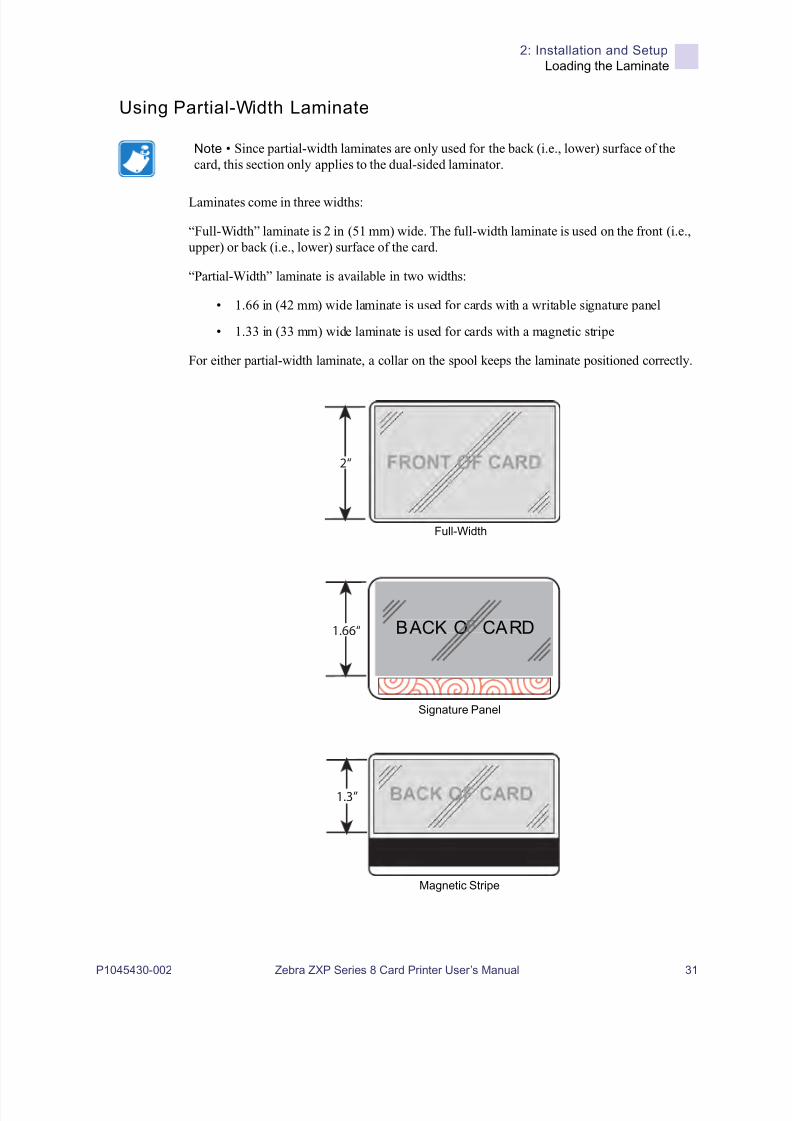
Using Partial-Width Laminate
Laminates come in three widths:
“Full-Width” laminate is 2 in (51 mm) wide. The full-width laminate is used on the front (i.e.,upper) or back (i.e., lower) surface of the card.
“Partial-Width” laminate is available in two widths:
• 1.66 in (42 mm) wide laminate is used for cards with a writable signature panel
• 1.33 in (33 mm) wide laminate is used for cards with a magnetic stripe
For either partial-width laminate, a collar on the spool keeps the laminate positioned correctly.
Note • Since partial-width laminates are only used for the back (i.e., lower) surface of thecard, this section only applies to the dual-sided laminator.
2“
1.3”
BACK OF CARDBACK O CARD1.66“
Full-Width
Signature Panel
Magnetic Stripe

8/10/2019 Zxpseries8 Ug En
http://slidepdf.com/reader/full/zxpseries8-ug-en 36/226
32 Zebra ZXP Series 8 Card Printer User’s Manual P1045430-002
2: Installation and Setup
Loading the Laminate
Step 1. Remove the Lower Laminate Cassette; see Page 22.
Step 2. Open the cassette, and remove the laminate if present.
Step 3. Load the partial-width laminate into the cassette. Note that the collar on the laminatespool is on the end opposite the geared flange.
Step 4. Trim the partial-width laminate.
Step 5. Rotate the core to adjust the laminate overhang. Stop when the end of the laminate iseven with the edge of the lips of the cassette.
Step 6. Install the cassette; see Page 27.
Collar
8/10/2019 Zxpseries8 Ug En
http://slidepdf.com/reader/full/zxpseries8-ug-en 37/226
2: Installation and Setup
Connecting Power
P1045430-002 Zebra ZXP Series 8 Card Printer User’s Manual 33
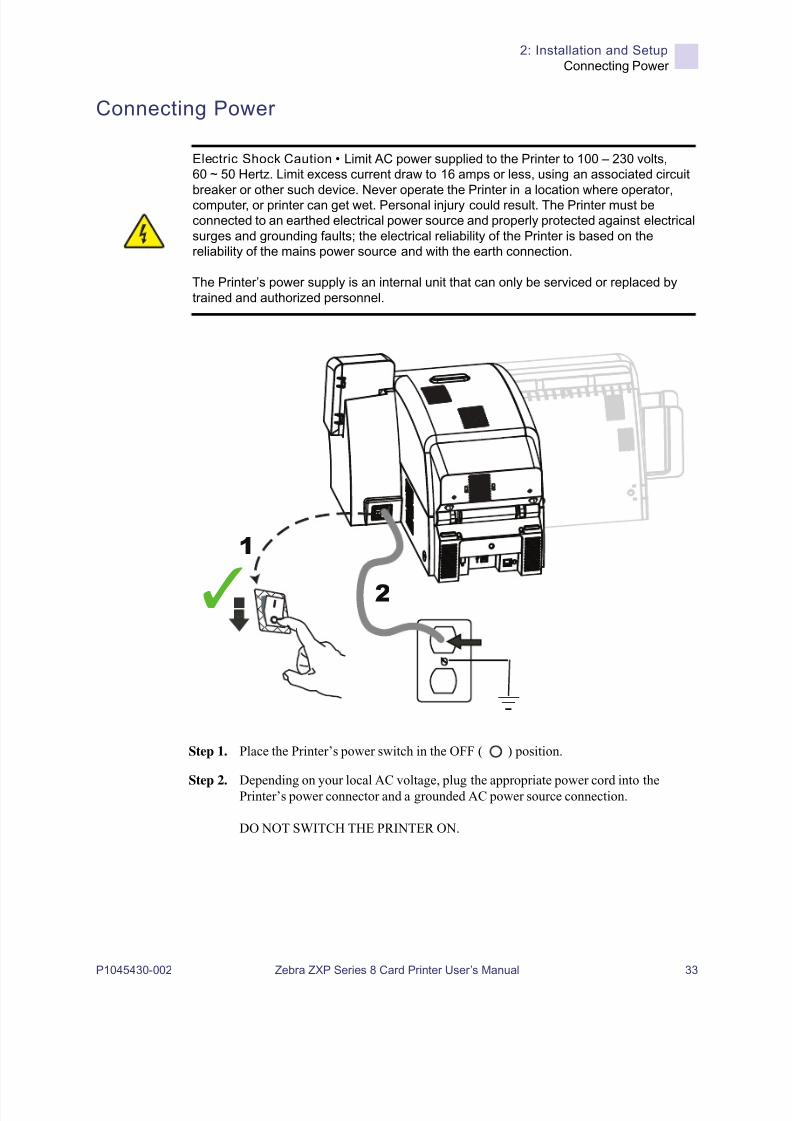
Connecting Power
Step 1. Place the Printer’s power switch in the OFF ( ) position.
Step 2. Depending on your local AC voltage, plug the appropriate power cord into thePrinter’s power connector and a grounded AC power source connection.
DO NOT SWITCH THE PRINTER ON.
Electric Shock Caution • Limit AC power supplied to the Printer to 100 – 230 volts,
60 ~ 50 Hertz. Limit excess current draw to 16 amps or less, using an associated circuit
breaker or other such device. Never operate the Printer in a location where operator,computer, or printer can get wet. Personal injury could result. The Printer must be
connected to an earthed electrical power source and properly protected against electrical
surges and grounding faults; the electrical reliability of the Printer is based on the
reliability of the mains power source and with the earth connection.
The Printer’s power supply is an internal unit that can only be serviced or replaced by
trained and authorized personnel.
✓
1
2
8/10/2019 Zxpseries8 Ug En
http://slidepdf.com/reader/full/zxpseries8-ug-en 38/226
34 Zebra ZXP Series 8 Card Printer User’s Manual P1045430-002
2: Installation and Setup
Connecting the Printer to your Computer
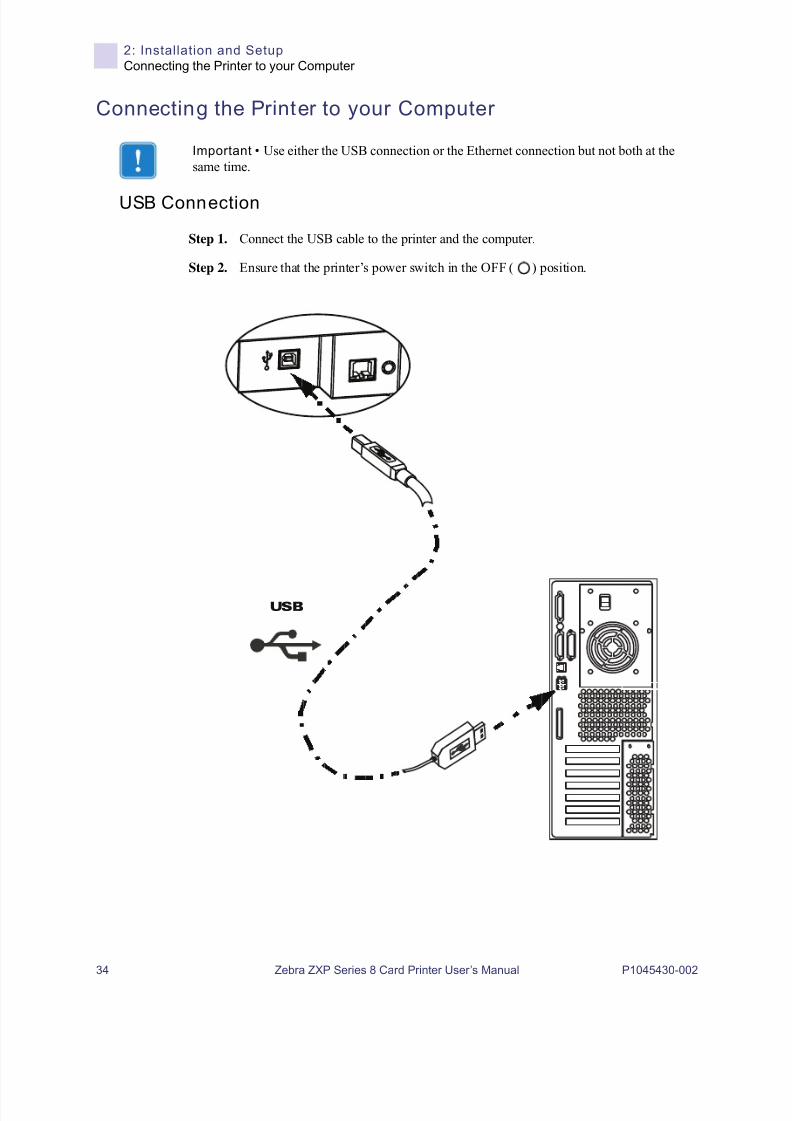
Connecting the Printer to your Computer
USB Connection
Step 1. Connect the USB cable to the printer and the computer.
Step 2. Ensure that the printer’s power switch in the OFF ( ) position.
Important • Use either the USB connection or the Ethernet connection but not both at thesame time.
USB
8/10/2019 Zxpseries8 Ug En
http://slidepdf.com/reader/full/zxpseries8-ug-en 39/226
2: Installation and Setup
Connecting the Printer to your Computer
P1045430-002 Zebra ZXP Series 8 Card Printer User’s Manual 35
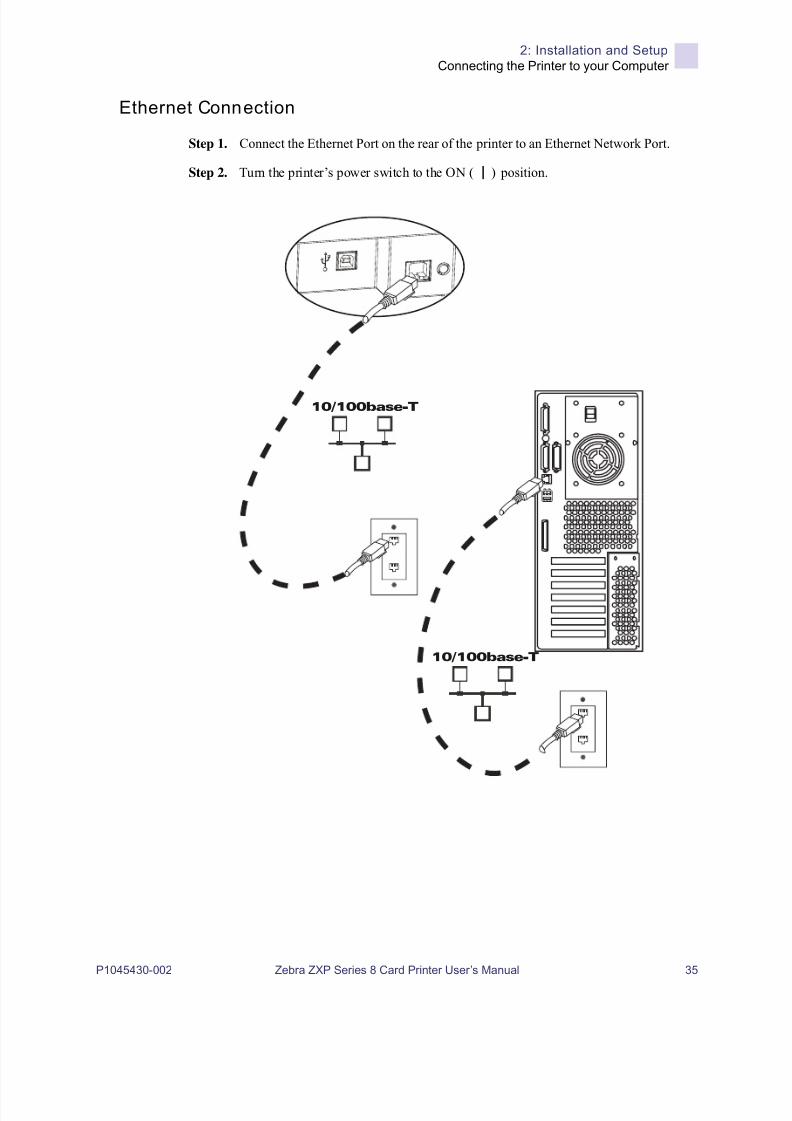
Ethernet Connection
Step 1. Connect the Ethernet Port on the rear of the printer to an Ethernet Network Port.
Step 2. Turn the printer’s power switch to the ON ( ) position.
10/100base-T
10/100base-T
8/10/2019 Zxpseries8 Ug En
http://slidepdf.com/reader/full/zxpseries8-ug-en 40/226
36 Zebra ZXP Series 8 Card Printer User’s Manual P1045430-002
2: Installation and Setup
Installing the Windows Printer Driver
Installing the Windows Printer Driver
Installing the USB Printer Driver
Step 1. If not already done, connect power to the printer. Turn power OFF (O).
Step 2. Connect the USB port on the rear of the printer to the computer’s USB port.
Step 3. Ensure that the Printer’s power switch is in the OFF (O) position.
Step 4. Insert the User Documentation and Drivers CD into the CD drive of the hostcomputer. The Main Menu will open.
Step 5. From the Main Menu, click Install Zebra Printer Driver.
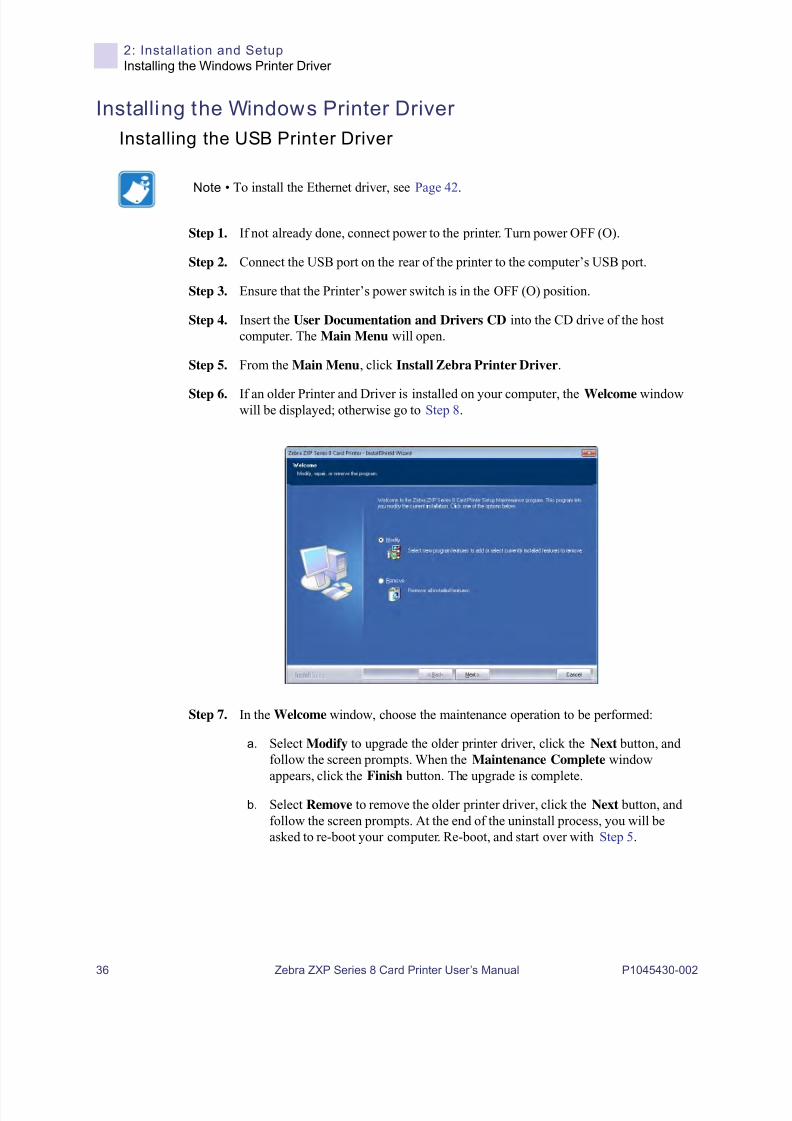
Step 6. If an older Printer and Driver is installed on your computer, the Welcome windowwill be displayed; otherwise go to Step 8.
Step 7. In the Welcome window, choose the maintenance operation to be performed:
a. Select Modify to upgrade the older printer driver, click the Next button, andfollow the screen prompts. When the Maintenance Complete windowappears, click the Finish button. The upgrade is complete.
b. Select Remove to remove the older printer driver, click the Next button, andfollow the screen prompts. At the end of the uninstall process, you will beasked to re-boot your computer. Re-boot, and start over with Step 5.
Note • To install the Ethernet driver, see Page 42.

8/10/2019 Zxpseries8 Ug En
http://slidepdf.com/reader/full/zxpseries8-ug-en 41/226
2: Installation and Setup
Installing the Windows Printer Driver
P1045430-002 Zebra ZXP Series 8 Card Printer User’s Manual 37
Step 8. The InstallShield Wizard window will open. To proceed with the installation, clickthe Next button.
Step 9. Select Install USB printer drivers, and click the Next button.
Step 10. Ensure that the Printer’s power switch in the OFF ( ) position; and then click theOK button.

8/10/2019 Zxpseries8 Ug En
http://slidepdf.com/reader/full/zxpseries8-ug-en 42/226
38 Zebra ZXP Series 8 Card Printer User’s Manual P1045430-002
2: Installation and Setup
Installing the Windows Printer Driver
Step 11. This will bring up the License Agreement window. To proceed with the installation,select the I accept the terms of the license agreement option , and then click theNext button.
Step 12. This will bring up the Customer Information window. Enter User Name andCompany Name; and then click the Next button.

8/10/2019 Zxpseries8 Ug En
http://slidepdf.com/reader/full/zxpseries8-ug-en 43/226
2: Installation and Setup
Installing the Windows Printer Driver
P1045430-002 Zebra ZXP Series 8 Card Printer User’s Manual 39
Step 13. This will bring up the Choose Destination Location window.
• To accept the default destination location where setup will install the files, clickthe Next button.
- or -
• Select a folder where setup will install the files, and click the Next button.
Step 14. This will bring up the Ready to Install the Program window. To continue, click theInstall button.
8/10/2019 Zxpseries8 Ug En
http://slidepdf.com/reader/full/zxpseries8-ug-en 44/226
40 Zebra ZXP Series 8 Card Printer User’s Manual P1045430-002
2: Installation and Setup
Installing the Windows Printer Driver
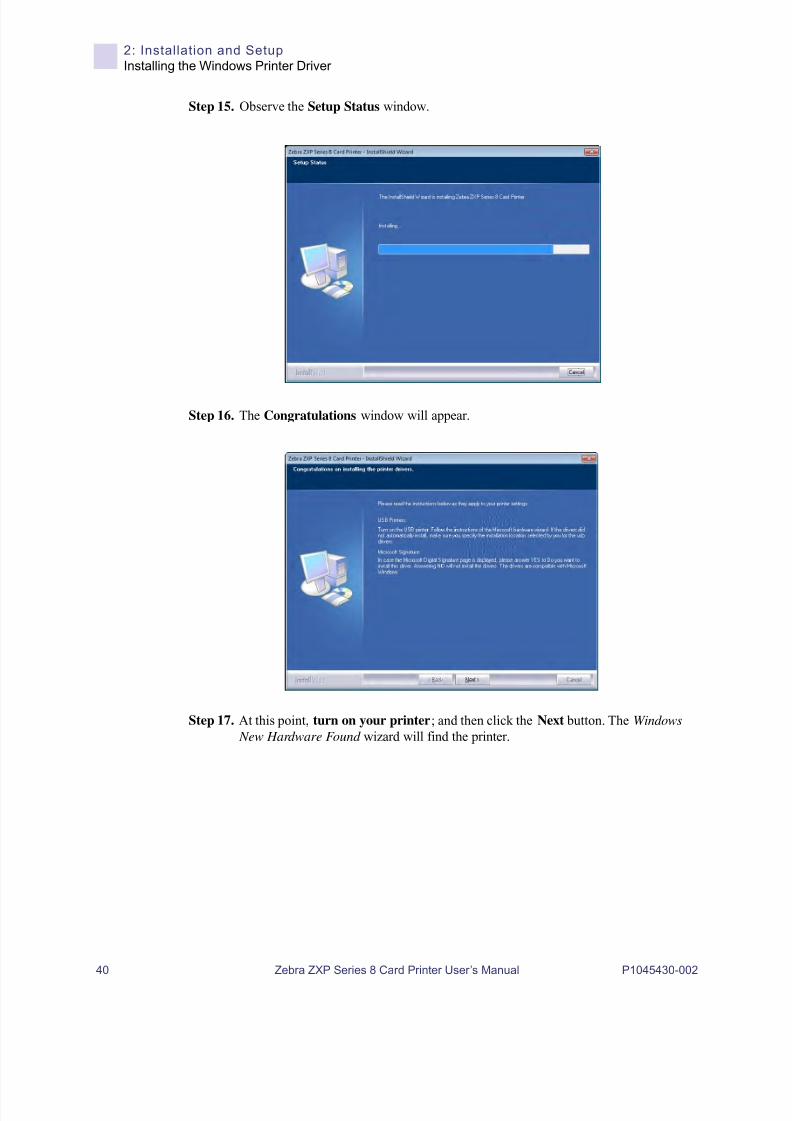
Step 15. Observe the Setup Status window.
Step 16. The Congratulations window will appear.
Step 17. At this point, turn on your printer; and then click the Next button. The Windows
New Hardware Found wizard will find the printer.

8/10/2019 Zxpseries8 Ug En
http://slidepdf.com/reader/full/zxpseries8-ug-en 45/226
2: Installation and Setup
Installing the Windows Printer Driver
P1045430-002 Zebra ZXP Series 8 Card Printer User’s Manual 41
Step 18. When the InstallShield Wizard Complete window appears, select the Yes, I want to
restart my computer now radio button; and click the Finish button.
Step 19. This completes USB driver installation.
Step 20. To use the Printer, you would select it just like you would any other printerconnected to a Windows system.
Note • You may need to change the card setup (card type, orientation, etc.), encoding, and/or black panel settings via the Printer Driver; Printing Preferences on page 78.
8/10/2019 Zxpseries8 Ug En
http://slidepdf.com/reader/full/zxpseries8-ug-en 46/226
42 Zebra ZXP Series 8 Card Printer User’s Manual P1045430-002
2: Installation and Setup
Installing the Windows Printer Driver
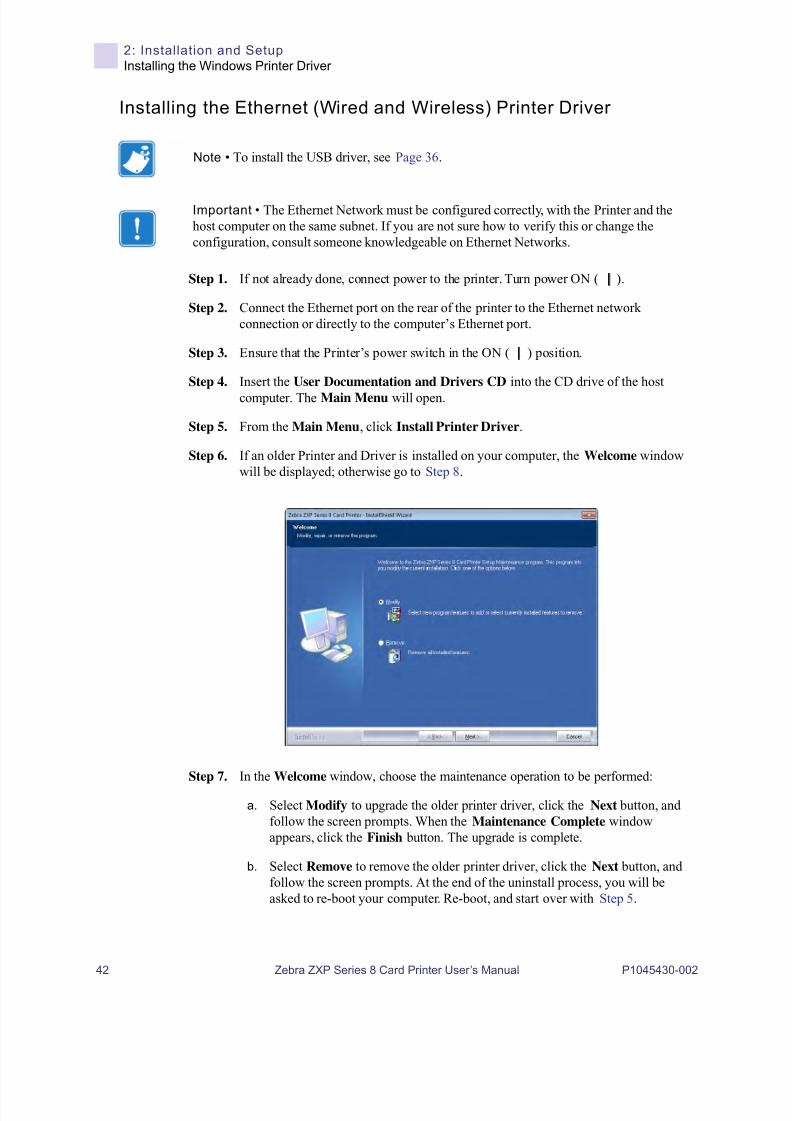
Installing the Ethernet (Wired and Wireless) Printer Driver
Step 1. If not already done, connect power to the printer. Turn power ON ( ).
Step 2. Connect the Ethernet port on the rear of the printer to the Ethernet networkconnection or directly to the computer’s Ethernet port.
Step 3. Ensure that the Printer’s power switch in the ON ( ) position.
Step 4. Insert the User Documentation and Drivers CD into the CD drive of the host
computer. The Main Menu will open.
Step 5. From the Main Menu, click Install Printer Driver.
Step 6. If an older Printer and Driver is installed on your computer, the Welcome windowwill be displayed; otherwise go to Step 8.
Step 7. In the Welcome window, choose the maintenance operation to be performed:
a. Select Modify to upgrade the older printer driver, click the Next button, andfollow the screen prompts. When the Maintenance Complete windowappears, click the Finish button. The upgrade is complete.
b. Select Remove to remove the older printer driver, click the Next button, andfollow the screen prompts. At the end of the uninstall process, you will beasked to re-boot your computer. Re-boot, and start over with Step 5.
Note • To install the USB driver, see Page 36.
Important • The Ethernet Network must be configured correctly, with the Printer and thehost computer on the same subnet. If you are not sure how to verify this or change theconfiguration, consult someone knowledgeable on Ethernet Networks.
8/10/2019 Zxpseries8 Ug En
http://slidepdf.com/reader/full/zxpseries8-ug-en 47/226
2: Installation and Setup
Installing the Windows Printer Driver
P1045430-002 Zebra ZXP Series 8 Card Printer User’s Manual 43
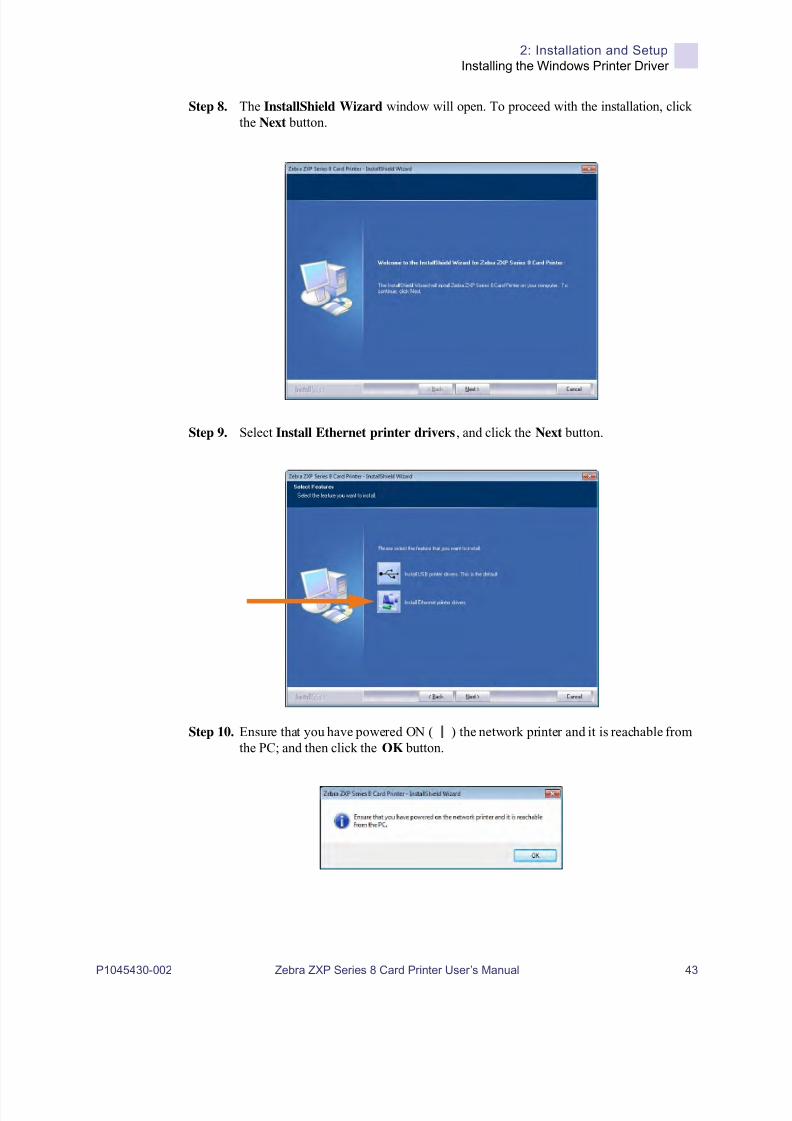
Step 8. The InstallShield Wizard window will open. To proceed with the installation, clickthe Next button.
Step 9. Select Install Ethernet printer drivers, and click the Next button.
Step 10. Ensure that you have powered ON ( ) the network printer and it is reachable fromthe PC; and then click the OK button.

8/10/2019 Zxpseries8 Ug En
http://slidepdf.com/reader/full/zxpseries8-ug-en 48/226
44 Zebra ZXP Series 8 Card Printer User’s Manual P1045430-002
2: Installation and Setup
Installing the Windows Printer Driver
Step 11. This will bring up the License Agreement window. To proceed with the installation,select the I accept the terms of the license agreement option , and then click theNext button.
Step 12. This will bring up the Customer Information window. Enter your name and thename of the company for which you work; and then click the Next button.

8/10/2019 Zxpseries8 Ug En
http://slidepdf.com/reader/full/zxpseries8-ug-en 49/226
2: Installation and Setup
Installing the Windows Printer Driver
P1045430-002 Zebra ZXP Series 8 Card Printer User’s Manual 45
Step 13. Identify the printer:
• Setup will search for the Ethernet printers in the network and display theavailable printers. Select the desired printer, and then click the Next button.
- or -
• Enter the Printer IP Address directly (example circled below), and click theNext button.
Step 14. Enter the location of the printer, and add any applicable comments; and then click theNext button.
8/10/2019 Zxpseries8 Ug En
http://slidepdf.com/reader/full/zxpseries8-ug-en 50/226
46 Zebra ZXP Series 8 Card Printer User’s Manual P1045430-002
2: Installation and Setup
Installing the Windows Printer Driver
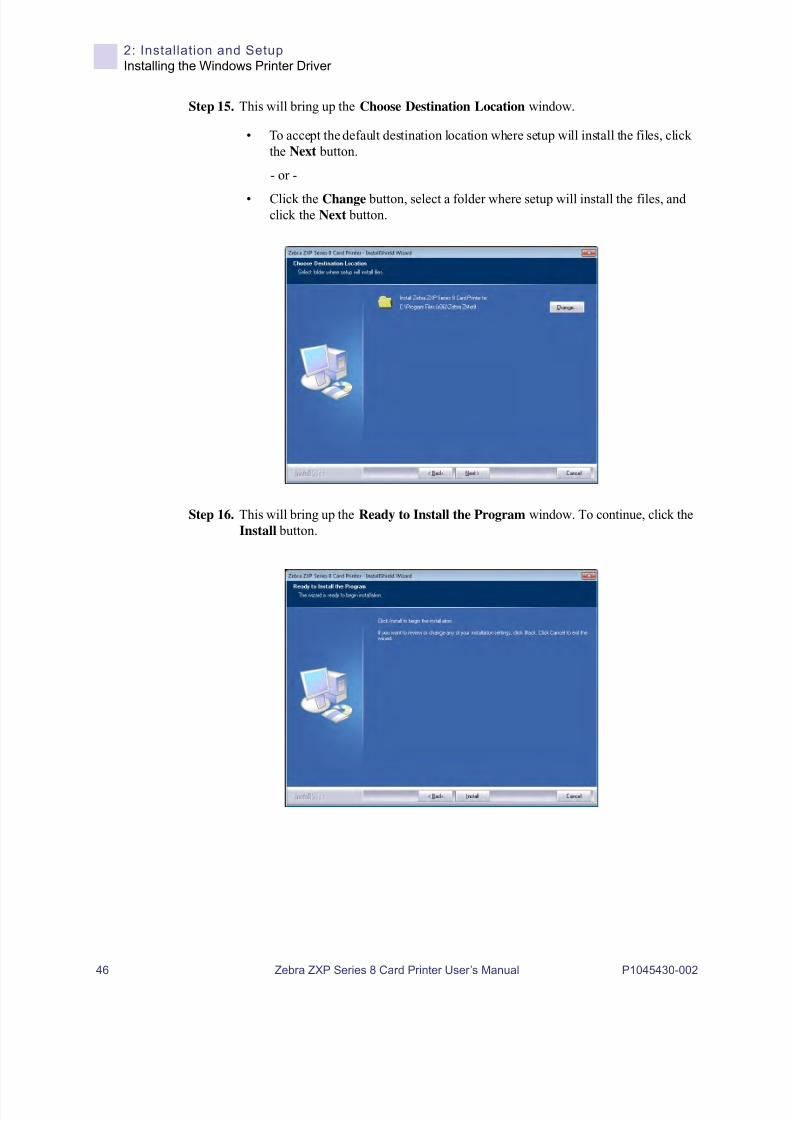
Step 15. This will bring up the Choose Destination Location window.
• To accept the default destination location where setup will install the files, clickthe Next button.
- or -
• Click the Change button, select a folder where setup will install the files, andclick the Next button.
Step 16. This will bring up the Ready to Install the Program window. To continue, click theInstall button.

8/10/2019 Zxpseries8 Ug En
http://slidepdf.com/reader/full/zxpseries8-ug-en 51/226
2: Installation and Setup
Installing the Windows Printer Driver
P1045430-002 Zebra ZXP Series 8 Card Printer User’s Manual 47
Step 17. Observe the Setup Status window.
Step 18. When the InstallShield Wizard Complete window appears, click the Finish button.
Step 19. This completes Ethernet driver installation.
Step 20. To use the Printer, you would select it just like you would any other printerconnected to the Ethernet.
Note • You may need to change the card setup (card type, orientation, etc.), encoding, and/or black panel settings via the Printer Driver; Printing Preferences on page 78.
8/10/2019 Zxpseries8 Ug En
http://slidepdf.com/reader/full/zxpseries8-ug-en 52/226
48 Zebra ZXP Series 8 Card Printer User’s Manual P1045430-002
8/10/2019 Zxpseries8 Ug En
http://slidepdf.com/reader/full/zxpseries8-ug-en 53/226
P1045430-002 Zebra ZXP Series 8 Card Printer User’s Manual 49
3Operation
Introduction
Printing with the Card Printer is similar to printing with any other printer in a Windowsenvironment.
• The Printer Driver Software is installed on your computer (see Section 2).
• The Printer is connected to the power source and the computer (see Section 2).
• The Printer is selected by either the Operating System or the appropriate applicationsoftware program.
• Printer Properties are set (the factory default values will be appropriate for manyapplications).
• Set the Card Type.
• Print a Test Card.
• Card printing is directed by the appropriate application software program.

8/10/2019 Zxpseries8 Ug En
http://slidepdf.com/reader/full/zxpseries8-ug-en 54/226
50 Zebra ZXP Series 8 Card Printer User’s Manual P1045430-002
3: Operation
Card Type Selection
Card Type Selection
The Card Setup tab allows you to specify the card type in use. Based on your selection, the printer automatically adjusts various printer properties for optimum print quality.
1. To access the Card Setup Tab, select Start > Devices and Printers. Right click on the Zebra ZXP Series 8 Card Printer listing; and select Printing Preferences > Card Setup.
2. Make the appropriate Card Type selection from the dropdown menu (circled above).
3. Click on the Apply button, and then click on the OK button.
If your card type is not listed in the drop-down menu, select Custom; and fill out the CardSpecifications pop-up screen; see Card Setup Tab on page 79 and Appendix B for details.For help setting the custom card specifications for your card type, contact the Zebra Card
Testing Service at:
Phone: 866-569-9086 (Toll Free)Email: [email protected]

8/10/2019 Zxpseries8 Ug En
http://slidepdf.com/reader/full/zxpseries8-ug-en 55/226
3: Operation
Printing a Test Card
P1045430-002 Zebra ZXP Series 8 Card Printer User’s Manual 51
Printing a Test Card
To print a test card:
1. Select Start > Devices and Printers. Right click on the Zebra ZXP Series 8 Card Printer
listing; and select Printing Preferences > Card Setup.
2. Click on the Test Print button (circled above) to print the test card; see sample test below. The printer may need to warm up to operating temperature before printing.
Test Card - Front Test Card - Back

8/10/2019 Zxpseries8 Ug En
http://slidepdf.com/reader/full/zxpseries8-ug-en 56/226
52 Zebra ZXP Series 8 Card Printer User’s Manual P1045430-002
3: Operation
Manual Card Feed
Manual Card Feed
A Manual Feed Slot is available for feeding single cards. Note that this option works withcards in the Input Hopper.
Access the Card Setup Tab: Select Start > Devices and Printers. Right click on the Zebra ZXP Series 8 Card Printer listing; and select Printing Preferences > Card Setup.
1. From the Card source dropdown menu, select Single card feed slot (circled above).
2. Click on the Apply button, and then click on the OK button.
3. For demonstration purposes, click on the Test Print button. Note that the Printer mayneed to warm up to operating temperature before printing.

8/10/2019 Zxpseries8 Ug En
http://slidepdf.com/reader/full/zxpseries8-ug-en 57/226
3: Operation
Manual Card Feed
P1045430-002 Zebra ZXP Series 8 Card Printer User’s Manual 53
4. Insert a single card into the slot in the correct orientation. Do not feed more than one cardat a time.
5. The printer will feed in the card and start printing.
6. Once the printing job is complete, the card is ejected from the printer into theOutput Hopper.
Caution • DO NOT bend cards or touch print surfaces as this can reduce print quality.
The surface of the cards must remain clean and dust free. Always store cards in an
enclosed container. Ideally, use cards as soon as possible.
X ✔
✔

8/10/2019 Zxpseries8 Ug En
http://slidepdf.com/reader/full/zxpseries8-ug-en 58/226
54 Zebra ZXP Series 8 Card Printer User’s Manual P1045430-002
3: Operation
Operator Control Panel (OCP)
Operator Control Panel (OCP)
The printer is equipped with an OCP Display and three OCP Buttons which give access to the printer menus.
• Press the MENU button, to access the Main Menu.
• Press the INFO button, to access and view the Printer Settings Menu.
• Press the CANCEL button, to cancel the current print job in the printer.
Messages
Your printer is equipped with an OCP Display to provide printer status information. Thereadout is controlled by three OCP Buttons directly below the OCP Display. The messagesdisplayed fall into three categories:
• Operational, see Page 55.
• Warning, see Page 56.
• Error, see Page 56.
ZXP Series 8
INFO CANCELMENU
Message
Button Functions
Buttons
READY

8/10/2019 Zxpseries8 Ug En
http://slidepdf.com/reader/full/zxpseries8-ug-en 59/226
3: Operation
Operator Control Panel (OCP)
P1045430-002 Zebra ZXP Series 8 Card Printer User’s Manual 55
Operational
Operational Messages are displayed during the Printer’s normal operation.
MESSAGE DESCRIPTION
ALARM An error message needs to be cleared before normal operations
can resume.
CANCELING The Cancel button was pressed, and the current operation is
being terminated.
CONFIG DATA Configuration data is being transferred from the computer to
the printer.
CONTACT OPERATION Contact Smart Card is being encoded; i.e., the card is in position
and data is being transferred.
CONTACTLESS OPERATION Contactless Smart Card is being encoded; i.e., the card is in
position and data is being transferred.
COOLING Ready to accept a print job, rollers cooling; e.g., when switching
from 2-sided printing to 1-sided printing.
COOLING
PRINT JOB WAITING
Print job received, cooling rollers to temperature.
COOLING
PRINTHEAD TEMPERATURE
Cooling printhead to temperature.
COOLING
WAITING TO LAMINATE
Ready to accept a print job, laminator cooling; e.g., when
switching from 2-sided laminating to 1-sided laminating.
DIAGNOSTIC Diagnostic testing in progress.
JOB DATA Data is being transferred from the computer to the printer.
LAMINATING Print job received, laminating in process.
MAG OPERATION A Magnetic Stripe Card is being encoded; i.e., card is in position
and data is being transferred.
MANUALLY INSERT CARDFROM FRONT
Waiting for manual card feed (this function is set via the CardSetup Tab on page 79).
OFFLINE Status toggled (offline/online) via the OCP Advanced
Settings Menu.
PRINTING Print job received, printing in process.
READY Ready and at temperature.
STANDBY Printer is in “sleep” mode; i.e., power save mode.
WAIT
INITIALIZING
Performing a self test on startup.
WARMING Ready to accept a print job, rollers heating; e.g., at startup or
when switching from 1-sided printing to 2-sided printing.
WARMING
PRINT JOB WAITING
Print job received, warming rollers to temperature.
WARMING
WAITING TO LAMINATE
Ready to accept a print job, laminator warming; e.g., when
switching from 1-sided laminating to 2-sided laminating.
WARMING
PRINTHEAD TEMPERATURE
Warming printhead to temperature.
WARNING Indicates that additional OCP instructions need to be performed;
e.g., PRINT RIBBON LOW, etc.
8/10/2019 Zxpseries8 Ug En
http://slidepdf.com/reader/full/zxpseries8-ug-en 60/226
56 Zebra ZXP Series 8 Card Printer User’s Manual P1045430-002
3: Operation
Operator Control Panel (OCP)
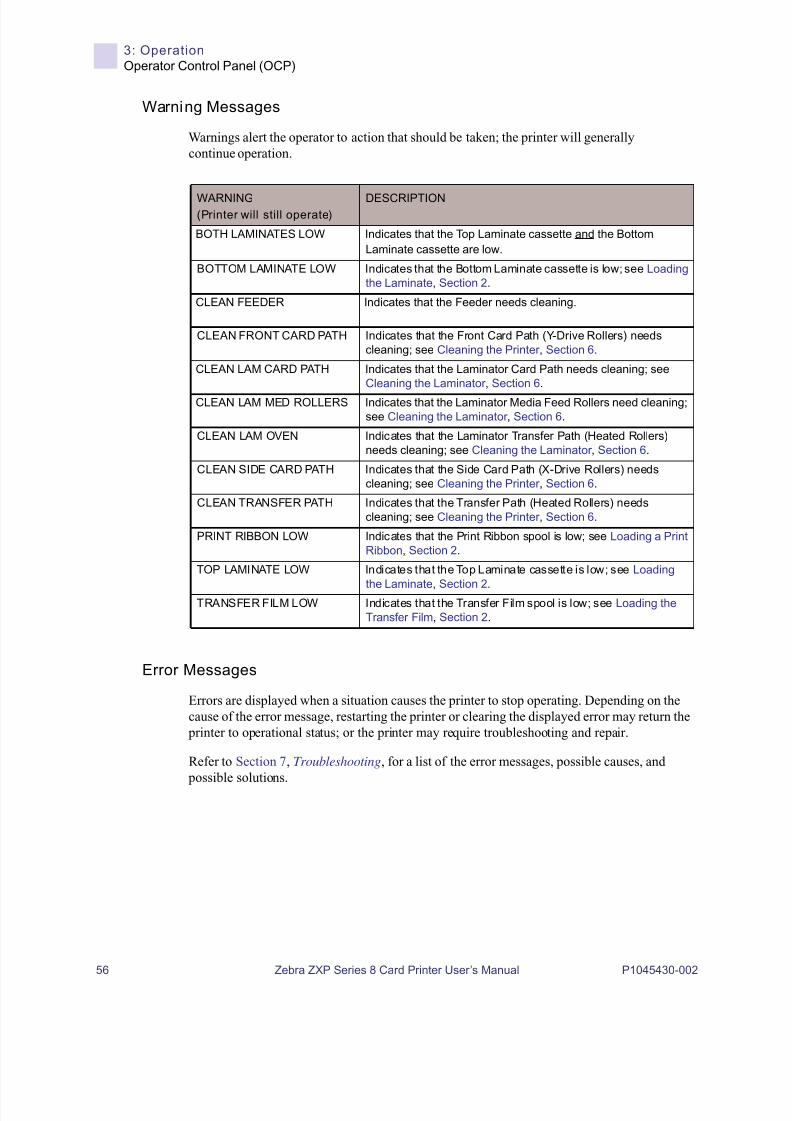
Warning Messages
Warnings alert the operator to action that should be taken; the printer will generallycontinue operation.
Error Messages
Errors are displayed when a situation causes the printer to stop operating. Depending on thecause of the error message, restarting the printer or clearing the displayed error may return the
printer to operational status; or the printer may require troubleshooting and repair.
Refer to Section 7, Troubleshooting, for a list of the error messages, possible causes, and possible solutions.
WARNING
(Printer will still operate)
DESCRIPTION
BOTH LAMINATES LOW Indicates that the Top Laminate cassette and the Bottom
Laminate cassette are low.
BOTTOM LAMINATE LOW Indicates that the Bottom Laminate cassette is low; see Loading
the Laminate, Section 2.
CLEAN FEEDER Indicates that the Feeder needs cleaning.
CLEAN FRONT CARD PATH Indicates that the Front Card Path (Y-Drive Rollers) needs
cleaning; see Cleaning the Printer , Section 6.
CLEAN LAM CARD PATH Indicates that the Laminator Card Path needs cleaning; see
Cleaning the Laminator , Section 6.
CLEAN LAM MED ROLLERS Indicates that the Laminator Media Feed Rollers need cleaning;
see Cleaning the Laminator , Section 6.
CLEAN LAM OVEN Indicates that the Laminator Transfer Path (Heated Rollers)
needs cleaning; see Cleaning the Laminator , Section 6.
CLEAN SIDE CARD PATH Indicates that the Side Card Path (X-Drive Rollers) needs
cleaning; see Cleaning the Printer , Section 6.
CLEAN TRANSFER PATH Indicates that the Transfer Path (Heated Rollers) needs
cleaning; see Cleaning the Printer , Section 6.
PRINT RIBBON LOW Indicates that the Print Ribbon spool is low; see Loading a Print
Ribbon, Section 2.
TOP LAMINATE LOW Indicates that the Top Laminate cassette is low; see Loading
the Laminate, Section 2.TRANSFER FILM LOW Indicates that the Transfer Film spool is low; see Loading the
Transfer Film, Section 2.

8/10/2019 Zxpseries8 Ug En
http://slidepdf.com/reader/full/zxpseries8-ug-en 61/226
3: Operation
Operator Control Panel (OCP)
P1045430-002 Zebra ZXP Series 8 Card Printer User’s Manual 57
Printer Menu Information
Info Menu
• Press the PREV button to move up the menu list
• Press the NEXT button to move down the menu list
• Press the EXIT button to return to the Operating Mode Display
PRINTER INFO
NETWORK INFO
RIBBON INFO
FILM INFO
PRINTHEAD USAGE
CONFIGURATION INFO
TEMPERATURE INFO
Displays MCB FW Ver, HCB FW Ver, MAB FW Ver, MSN (Machine Serial Number),and PH S/N (Printhead Serial Number).
Displays DHCP, IP, Mask, GW, and MAC.
Displays Type, # Images, and % Remaining.
Displays Type, # Images, and % Remaining.
Displays Card Count and Printhead Lines.
Displays RAM, Single or Dual Sided, and Options Installed: Mag, Encoder, Laminator.
Displays Settings: Top and Bottom temperature; and Current Temperature: Top and Bottom.
INFO Button(Operating Mode Display)
LAMINATOR INFO * Displays LCB, MAB, LSN, Top instal led (yes/no) , Bottom instal led (yes/no) .
TOP LAMINATE INFO * Displays P/N, Type, # Images, and % Remaining.
BTM LAMINATE INFO * Displays Type, # Images, and % Remaining.
LAM TEMPERATURE INFO * Displays Settings: Top and Bottom temperature; and Current: Top and Bottom temperature.
LAMINATOR ODOMETER * Displays Unit on (# days), Top on (# days), Bottom on (# days), # Laminated, # Processed.
WIRELESS INFO
WIRELESS STATISTICS
Displays Settings: SSID, Channel Noise Floor, WEP, DHCP, IP, Mask, GW, and MAC. Only appliesto Printers with the Wireless option installed.
Displays RX Bytes, Discards, TX Bytes, Discards, Errors; TX Success, TX Retry, RX Success,RX Duplicate, and RTS Success. Only applies to Printers with the Wireless option installed.
Info Menu
PREV NEXT EXIT
Displays Card Count.REJECT BIN
CAL LUT INFO Displays Look-Up Table info for LUT1 and LUT2.
* Only applies to Printers with a Laminator.

8/10/2019 Zxpseries8 Ug En
http://slidepdf.com/reader/full/zxpseries8-ug-en 62/226
58 Zebra ZXP Series 8 Card Printer User’s Manual P1045430-002
3: Operation
Operator Control Panel (OCP)
Main Menu
Main Menu
MENU Button(Operating Mode Display)
RETURN
PRINT TEST CARDS
NETWORK SETTINGS
ADVANCED SETTINGS
See Print Test Cards Menu on page 59.
Network Settings Menu on page 60.
See Advanced Settings Menu on page 61.
UP DOWN SELECT
• Press the UP button to move up the menu list
• Press the DOWN button to move down the menu list
• Press the SELECT button to select the item from the list
WIRELESS SETTINGS See Wireless Settings Menu on page 63.

8/10/2019 Zxpseries8 Ug En
http://slidepdf.com/reader/full/zxpseries8-ug-en 63/226
3: Operation
Operator Control Panel (OCP)
P1045430-002 Zebra ZXP Series 8 Card Printer User’s Manual 59
Print Test Cards Menu
Print Test Cards Menu
UP DOWN SELECT
Main Menu
RETURN
Sets the number of Test Cards to be printed (1, 5, 10, ..., 100)
Selects single-sided or double-sided card printing
Selects the type of card; e.g., Custom, PVC, PET, PETG, etc.
COUNT
SIDES
CARD TYPE
MID GRAY
GRID ON GRAY
MAG ENCODE ONLY 5
Selects Test Card to be printed; see OCP Test Card Images on page 151.
• Press the UP button to move up the menu list
• Press the DOWN button to move down the menu list
• Press the SELECT button to select the item from the list

8/10/2019 Zxpseries8 Ug En
http://slidepdf.com/reader/full/zxpseries8-ug-en 64/226
60 Zebra ZXP Series 8 Card Printer User’s Manual P1045430-002
3: Operation
Operator Control Panel (OCP)
Network Settings Menu
Network Settings Menu
UP DOWN SELECT
Main Menu
RETURN WITHOUT SAVE
Enable or disable the DHCP Mode.
Change the IP Address.
Change the Subnet Mask.
SAVE SETTINGS
DHCP MODE
SET IP ADDRESS
SET SUBNET MASK
SET DEFAULT GATEWAY Change the GW (Gateway).
• Press the UP button to move up the menu list
• Press the DOWN button to move down the menu list
• Press the SELECT button to select the item from the list

8/10/2019 Zxpseries8 Ug En
http://slidepdf.com/reader/full/zxpseries8-ug-en 65/226
3: Operation
Operator Control Panel (OCP)
P1045430-002 Zebra ZXP Series 8 Card Printer User’s Manual 61
Advanced Settings Menu
Advanced Settings Menu
UP DOWN SELECT
Main Menu
RETURN
Displays current language, sets language option (English, French,Spanish, German, Brazilian Portuguese, or Italian)
Deletes all pending print jobs in the printer
Toggles printer Online / Offline
Sets sleep timer function value
Adjusts the OCP display contrast
SELECT LANGUAGE
FLUSH PRINT QUEUE
PRINTER ONLINE
CLEAN PRINTER
SET SLEEP TIMER
SET SCREEN CONTRAST
• Press the UP button to move up the menu list
• Press the DOWN button to move down the menu list
• Press the SELECT button to select the item from the list
See Clean Printer Menu on page 62
Resets the reject bin count to zeroCLEAR REJECT BIN
Sets the warmup delay (0 - 15 minutes)SET WARMUP DELAY

8/10/2019 Zxpseries8 Ug En
http://slidepdf.com/reader/full/zxpseries8-ug-en 66/226
62 Zebra ZXP Series 8 Card Printer User’s Manual P1045430-002
3: Operation
Operator Control Panel (OCP)
Clean Printer Menu
Clean Printer Menu
Advanced Settings Menu
RETURN
CLEAN SIDE CARD PATH
CLEAN FRONT CARD PATH
CLEAN HEATER ROLLERS
UP DOWN SELECT
• Press the UP button to move up the menu list
• Press the DOWN button to move down the menu list
• Press the SELECT button to select the item from the list
Refer to Section 6, Cleaning, for detailed cleaning instructions
Use the X Roller Cleaning Card , and step through the cleaning process
Use the Y Roller Cleaning Card , and step through the cleaning process
Use the Hot Roller Cleaning Card , and step through the cleaning process
CLEAN LAM CARD PATH * Use the Laminator Cleaning Card, and step through the cleaning process
CLEAN MED LAM ROLLERS *
Use the Laminator Hot Roller Cleaning Card (with adhesive), and stepthrough the cleaning process
Use the Cleaning Swab, and step through the cleaning process
CLEAN LAM OVEN *
* Only applies to Printers with a Laminator.

8/10/2019 Zxpseries8 Ug En
http://slidepdf.com/reader/full/zxpseries8-ug-en 67/226
3: Operation
Operator Control Panel (OCP)
P1045430-002 Zebra ZXP Series 8 Card Printer User’s Manual 63
Wireless Settings Menu
To configure the printer for wireless printing, refer to the Zebra ZXP Series 8 Card PrinterWireless Reference Manual, P/N P1035089-001 or Zebra ZXP Series 8 Card Printer Service
Manual, P/N 1013376.
Network Settings Menu
UP DOWN SELECT
Main Menu
RETURN WITHOUT SAVE
Enable or disable the Radio.
Connect your wireless printer to a wireless network via theWireless Setup Wizard.
Enable or disable the DHCP.
SAVE SETTINGS
RADIO CONTROL
SETUP WIZARD
DHCP MODE
SET IP ADDRESS
Set the Defaults.
• Press the UP button to move up the menu list• Press the DOWN button to move down the menu list
• Press the SELECT button to select the item from the list
Set the IP Address.
Set the Subnet Mask.SET SUBNET MASK
SET DEFAULT GATEWAY
SET DEFAULTS
Set the default Gateway (GW).

8/10/2019 Zxpseries8 Ug En
http://slidepdf.com/reader/full/zxpseries8-ug-en 68/226
64 Zebra ZXP Series 8 Card Printer User’s Manual P1045430-002
3: Operation
Ethernet Indicators -- Detail
Ethernet Indicators -- Detail
Link/Activity Indicator (Green)
Speed Indicator (Orange)
Ethernet
Connector
Link/Activity SpeedLED LED
Off No link (disconnected)
On Network link has been established
Blinking Network activity has been detected
Off No link (disconnected)
1 Blink The LED blinks once (one blink, pause, one blink, etc.) when a
10Base link has been established.
2 Blinks The LED blinks twice (two blinks, pause, two blinks, etc.) when
a 100Base link has been established.

8/10/2019 Zxpseries8 Ug En
http://slidepdf.com/reader/full/zxpseries8-ug-en 69/226
P1045430-002 Zebra ZXP Series 8 Card Printer User’s Manual 65
4Printer Settings and
Adjustments
Introduction
This section describes settings and adjustments that can be made to your Windows ZXPSeries 8 Printer Driver. This consists of two major topics:
• Printer Properties . . . . . . . . . . . . . . . . . . . . . . . . . . . . . . . . . . . . . . . . . . . . . . . 66
• Printing Preferences. . . . . . . . . . . . . . . . . . . . . . . . . . . . . . . . . . . . . . . . . . . . . 78

8/10/2019 Zxpseries8 Ug En
http://slidepdf.com/reader/full/zxpseries8-ug-en 70/226
66 Zebra ZXP Series 8 Card Printer User’s Manual P1045430-002
4: Printer Sett ings and Adjustments
Printer Properties
Printer Properties
Printer Properties can be used to view the printer firmware/driver/hardware configuration andinstalled media, to access advanced settings via the ZXP Toolbox, and to set features such assecurity, ports, and color management.
To access the Card Printer Properties, select Start > Devices and Printers. Right click on the Zebra ZXP Series 8 Card Printer listing, then select Properties.
• General Tab. . . . . . . . . . . . . . . . . . . . . . . . . . . . . . . . . . . . . . . . . . . . . . . . . . . .67
• Sharing Tab. . . . . . . . . . . . . . . . . . . . . . . . . . . . . . . . . . . . . . . . . . . . . . . . . . . .68
• Ports Tab . . . . . . . . . . . . . . . . . . . . . . . . . . . . . . . . . . . . . . . . . . . . . . . . . . . . . .69
• Advanced Tab . . . . . . . . . . . . . . . . . . . . . . . . . . . . . . . . . . . . . . . . . . . . . . . . . .70
• Color Management Tab . . . . . . . . . . . . . . . . . . . . . . . . . . . . . . . . . . . . . . . . . .71
• Security Tab . . . . . . . . . . . . . . . . . . . . . . . . . . . . . . . . . . . . . . . . . . . . . . . . . . .75
• Device Information Tab . . . . . . . . . . . . . . . . . . . . . . . . . . . . . . . . . . . . . . . . . .76
The OK button applies and saves the settings.
The Cancel button exits Printing Properties. Changes made are abandoned.
The Apply button applies, but does not save, the settings.
The Help button enables you to view a corresponding page of help information.

8/10/2019 Zxpseries8 Ug En
http://slidepdf.com/reader/full/zxpseries8-ug-en 71/226
4: Printer Settings and Adjustments
Printer Properties
P1045430-002 Zebra ZXP Series 8 Card Printer User’s Manual 67
General Tab
The General tab shows the selected printer and lists the features of the printer.
To access the General tab, select Start > Devices and Printers. Right click on the Zebra ZXP
Series 8 Card Printer listing. Select Properties > General.
• Location - Lets you specify where the printer is located.
• Comment - Lets you specify general information about the printer, such as the typeof print device and who is responsible for it. Once set, these fields can be displayed
by applications.
• Model - Specifies the name of the printer driver installed.
- Features - Specifies whether various options are available on the printer.
The Printing Preferences button takes you to Printing Preferences used to set selected
configuration parameters; see Printing Preferences on page 78.
The Print Test Page button sends the standard Windows test page to the printer.
8/10/2019 Zxpseries8 Ug En
http://slidepdf.com/reader/full/zxpseries8-ug-en 72/226
68 Zebra ZXP Series 8 Card Printer User’s Manual P1045430-002
4: Printer Sett ings and Adjustments
Printer Properties
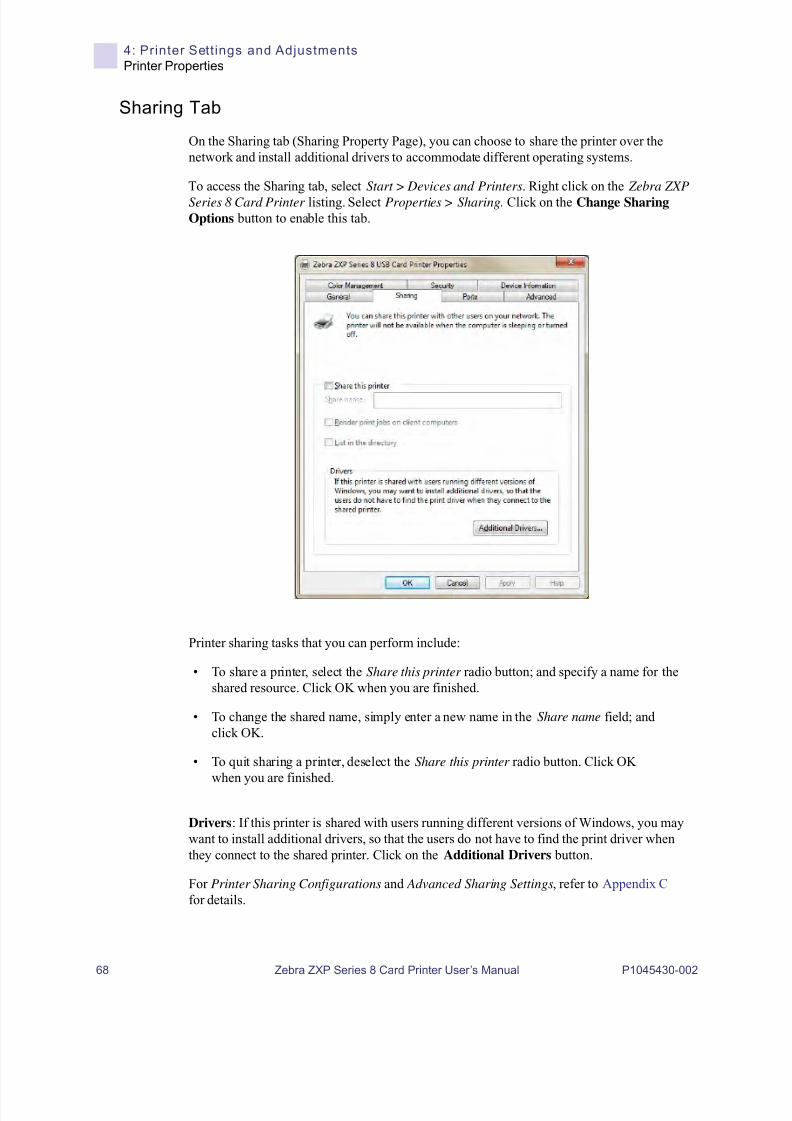
Sharing Tab
On the Sharing tab (Sharing Property Page), you can choose to share the printer over thenetwork and install additional drivers to accommodate different operating systems.
To access the Sharing tab, select Start > Devices and Printers. Right click on the Zebra ZXP
Series 8 Card Printer listing. Select Properties > Sharing. Click on the Change Sharing
Options button to enable this tab.
Printer sharing tasks that you can perform include:
• To share a printer, select the Share this printer radio button; and specify a name for theshared resource. Click OK when you are finished.
• To change the shared name, simply enter a new name in the Share name field; andclick OK.
• To quit sharing a printer, deselect the Share this printer radio button. Click OKwhen you are finished.
Drivers: If this printer is shared with users running different versions of Windows, you maywant to install additional drivers, so that the users do not have to find the print driver whenthey connect to the shared printer. Click on the Additional Drivers button.
For Printer Sharing Configurations and Advanced Sharing Settings, refer to Appendix C for details.
8/10/2019 Zxpseries8 Ug En
http://slidepdf.com/reader/full/zxpseries8-ug-en 73/226
4: Printer Settings and Adjustments
Printer Properties
P1045430-002 Zebra ZXP Series 8 Card Printer User’s Manual 69
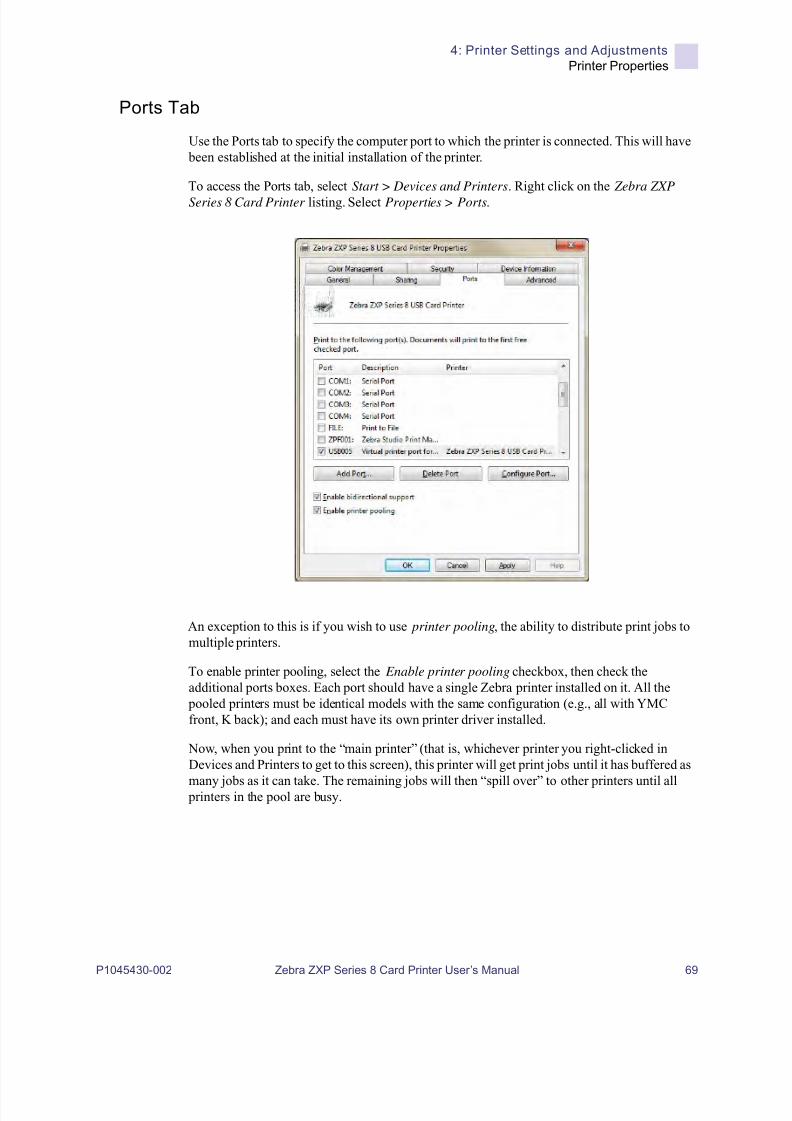
Ports Tab
Use the Ports tab to specify the computer port to which the printer is connected. This will have been established at the initial installation of the printer.
To access the Ports tab, select Start > Devices and Printers. Right click on the Zebra ZXP
Series 8 Card Printer listing. Select Properties > Ports.
An exception to this is if you wish to use printer pooling, the ability to distribute print jobs tomultiple printers.
To enable printer pooling, select the Enable printer pooling checkbox, then check theadditional ports boxes. Each port should have a single Zebra printer installed on it. All the
pooled printers must be identical models with the same configuration (e.g., all with YMCfront, K back); and each must have its own printer driver installed.
Now, when you print to the “main printer” (that is, whichever printer you right-clicked inDevices and Printers to get to this screen), this printer will get print jobs until it has buffered as
many jobs as it can take. The remaining jobs will then “spill over” to other printers until all printers in the pool are busy.
8/10/2019 Zxpseries8 Ug En
http://slidepdf.com/reader/full/zxpseries8-ug-en 74/226
70 Zebra ZXP Series 8 Card Printer User’s Manual P1045430-002
4: Printer Sett ings and Adjustments
Printer Properties
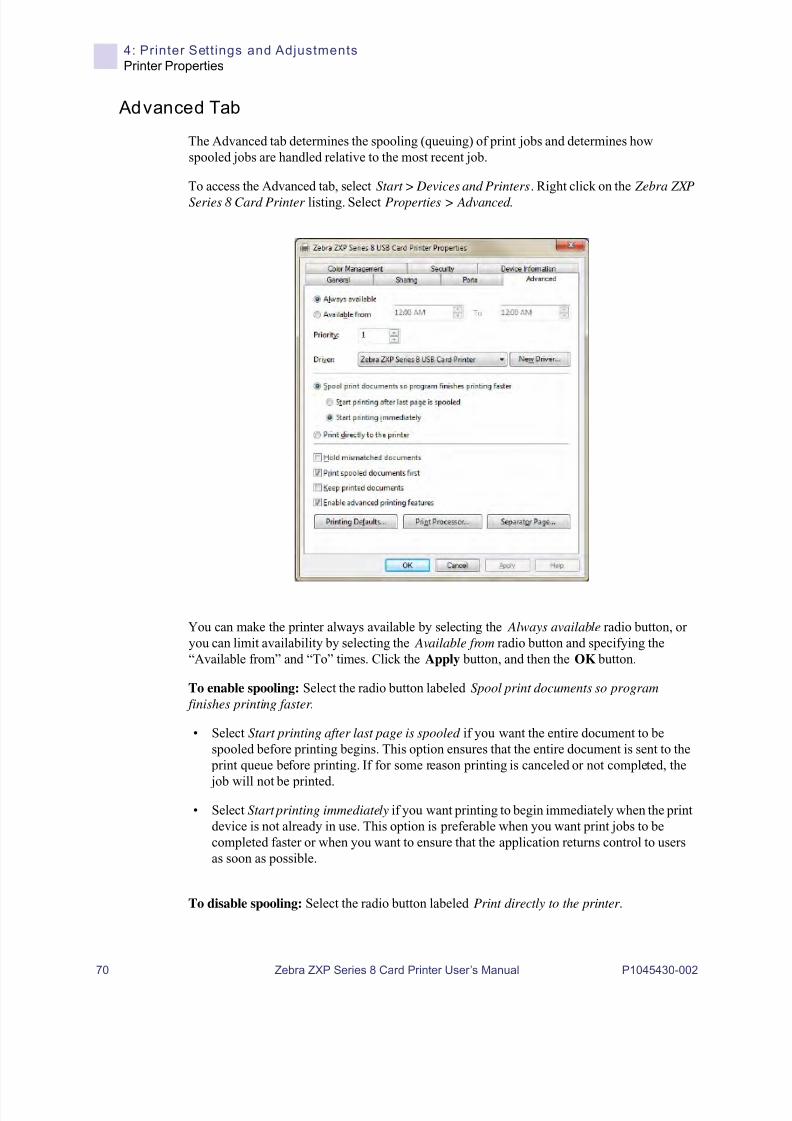
Advanced Tab
The Advanced tab determines the spooling (queuing) of print jobs and determines howspooled jobs are handled relative to the most recent job.
To access the Advanced tab, select Start > Devices and Printers. Right click on the Zebra ZXP
Series 8 Card Printer listing. Select Properties > Advanced.
You can make the printer always available by selecting the Always available radio button, oryou can limit availability by selecting the Available from radio button and specifying the“Available from” and “To” times. Click the Apply button, and then the OK button.
To enable spooling: Select the radio button labeled Spool print documents so program
finishes printing faster .
• Select Start printing after last page is spooled if you want the entire document to bespooled before printing begins. This option ensures that the entire document is sent to the
print queue before printing. If for some reason printing is canceled or not completed, the
job will not be printed.
• Select Start printing immediately if you want printing to begin immediately when the printdevice is not already in use. This option is preferable when you want print jobs to becompleted faster or when you want to ensure that the application returns control to usersas soon as possible.
To disable spooling: Select the radio button labeled Print directly to the printer .
8/10/2019 Zxpseries8 Ug En
http://slidepdf.com/reader/full/zxpseries8-ug-en 75/226
4: Printer Settings and Adjustments
Printer Properties
P1045430-002 Zebra ZXP Series 8 Card Printer User’s Manual 71
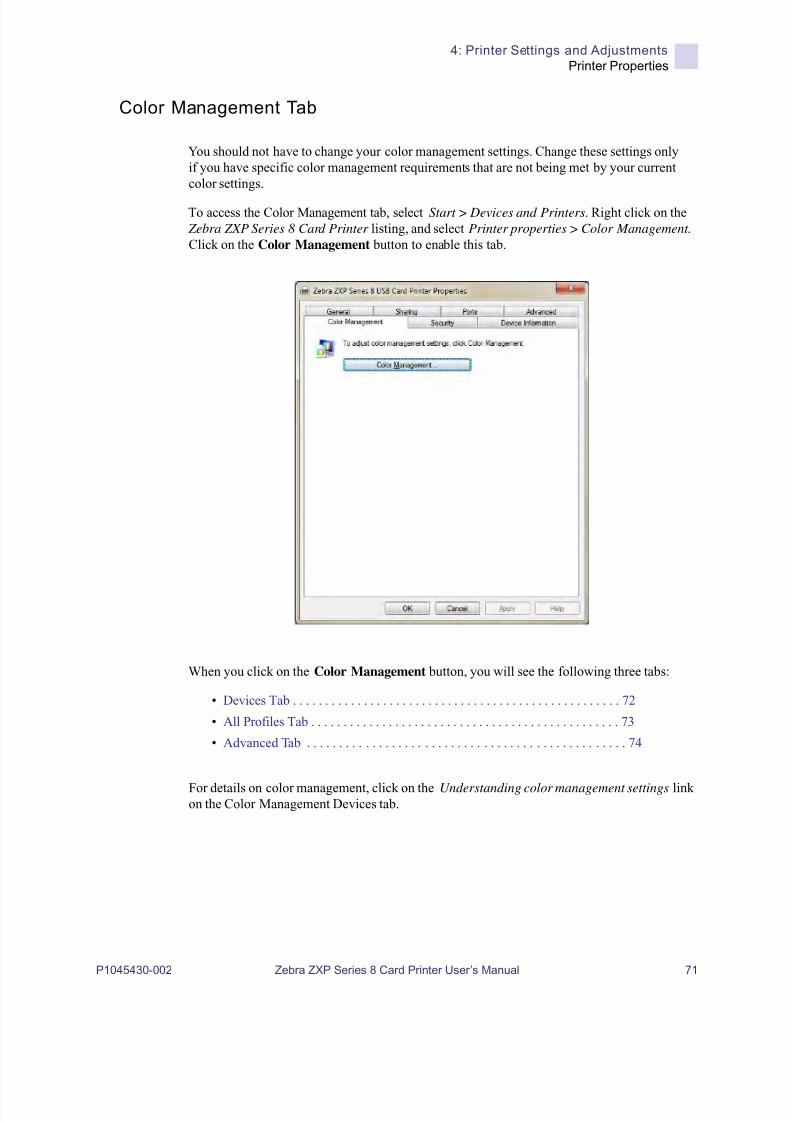
Color Management Tab
You should not have to change your color management settings. Change these settings onlyif you have specific color management requirements that are not being met by your currentcolor settings.
To access the Color Management tab, select Start > Devices and Printers. Right click on the Zebra ZXP Series 8 Card Printer listing, and select Printer properties > Color Management.
Click on the Color Management button to enable this tab.
When you click on the Color Management button, you will see the following three tabs:
• Devices Tab . . . . . . . . . . . . . . . . . . . . . . . . . . . . . . . . . . . . . . . . . . . . . . . . . . . 72
• All Profiles Tab . . . . . . . . . . . . . . . . . . . . . . . . . . . . . . . . . . . . . . . . . . . . . . . . 73
• Advanced Tab . . . . . . . . . . . . . . . . . . . . . . . . . . . . . . . . . . . . . . . . . . . . . . . . . 74
For details on color management, click on the Understanding color management settings linkon the Color Management Devices tab.

8/10/2019 Zxpseries8 Ug En
http://slidepdf.com/reader/full/zxpseries8-ug-en 76/226
72 Zebra ZXP Series 8 Card Printer User’s Manual P1045430-002
4: Printer Sett ings and Adjustments
Printer Properties
Devices Tab
Use the Devices tab to select your printer and to view, add, and select profiles and behaviors touse with your printer.
The Use my settings for this device checkbox must be selected to enable the following button functions:
• The Add button allows you to add additional profiles to the color profile list.
• The Remove button allows you to remove profiles from the color profile list.
The Set As Default button allows you to set the selected profile as the default profile.
For details on color management, click on the Understanding color management settings
link (arrow above).

8/10/2019 Zxpseries8 Ug En
http://slidepdf.com/reader/full/zxpseries8-ug-en 77/226
4: Printer Settings and Adjustments
Printer Properties
P1045430-002 Zebra ZXP Series 8 Card Printer User’s Manual 73
Al l Prof iles Tab
Use the All Profiles tab to view and manage the profiles that are in your system. Note thatcolor profiles are usually added automatically during the installation of new devices.
If you need to install a new profile, follow these steps:
Step 1. Click on the Add button.
Step 2. Observe the Install Profile browse window.
Step 3. Locate the desired color profile.
Step 4. Click on the Add button (in the Install Profile browse window).

8/10/2019 Zxpseries8 Ug En
http://slidepdf.com/reader/full/zxpseries8-ug-en 78/226
74 Zebra ZXP Series 8 Card Printer User’s Manual P1045430-002
4: Printer Sett ings and Adjustments
Printer Properties
Advanced Tab
Use the Advanced tab to check your Windows Color System Defaults settings, verify ICCRendering to WCS Gamut Mapping, and calibrate your display (Display Calibration).
This tab allows you to configure advanced color management settings to ensure accurate
display and printing of color information.
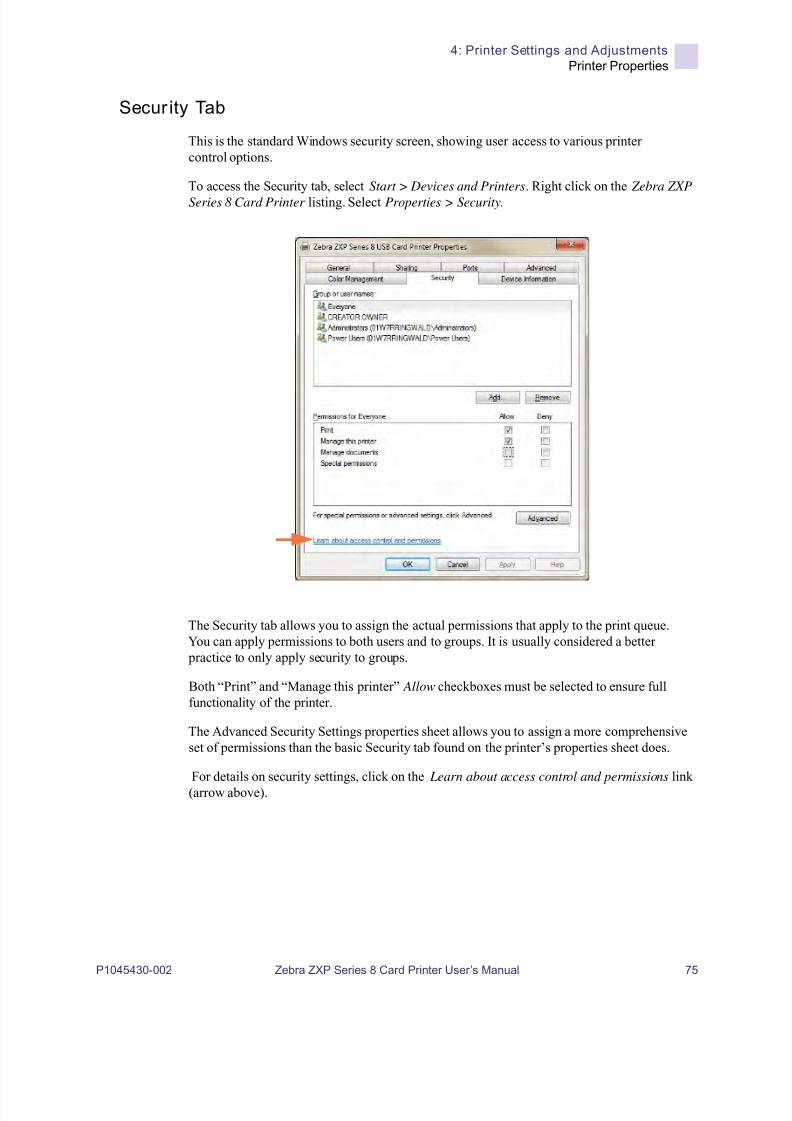
8/10/2019 Zxpseries8 Ug En
http://slidepdf.com/reader/full/zxpseries8-ug-en 79/226
4: Printer Settings and Adjustments
Printer Properties
P1045430-002 Zebra ZXP Series 8 Card Printer User’s Manual 75
Secur ity Tab
This is the standard Windows security screen, showing user access to various printercontrol options.
To access the Security tab, select Start > Devices and Printers. Right click on the Zebra ZXP
Series 8 Card Printer listing. Select Properties > Security.
The Security tab allows you to assign the actual permissions that apply to the print queue.You can apply permissions to both users and to groups. It is usually considered a better practice to only apply security to groups.
Both “Print” and “Manage this printer” Allow checkboxes must be selected to ensure fullfunctionality of the printer.
The Advanced Security Settings properties sheet allows you to assign a more comprehensiveset of permissions than the basic Security tab found on the printer’s properties sheet does.
For details on security settings, click on the Learn about access control and permissions link(arrow above).

8/10/2019 Zxpseries8 Ug En
http://slidepdf.com/reader/full/zxpseries8-ug-en 80/226
76 Zebra ZXP Series 8 Card Printer User’s Manual P1045430-002
4: Printer Sett ings and Adjustments
Printer Properties
Device Information Tab
The Device Information tab provides device information, security status, and printer usage.Access to Media Info and ZXP ToolBox is included.
To access the Device Settings tab, select Start > Devices and Printers. Right click on the Zebra ZXP Series 8 Card Printer listing. Select Properties > Device Information.
• The Media Info button takes you to the Media Info screen; see next page.
• The ZXP Toolbox button takes you to the ZXP Toolbox which provides advancedconfiguration capabilities and tools to manage the operation of your printer; seeSection 5 for details.
Note that the ZXP Toolbox is a separate application that works independently from the printer driver.

8/10/2019 Zxpseries8 Ug En
http://slidepdf.com/reader/full/zxpseries8-ug-en 81/226
4: Printer Settings and Adjustments
Printer Properties
P1045430-002 Zebra ZXP Series 8 Card Printer User’s Manual 77
Media Info
The Media Info screen shows ribbon status, transfer film status, top laminate status, and bottom laminate status.
- Ribbon: Shows the ribbon type installed and the number of images remaining.
- Transfer film: Shows the transfer film type installed and the number of imagesremaining.
- Top laminate: Shows the top laminate type and the number of images remaining.
- Bottom laminate: Shows the bottom laminate type and the number of imagesremaining.

8/10/2019 Zxpseries8 Ug En
http://slidepdf.com/reader/full/zxpseries8-ug-en 82/226
78 Zebra ZXP Series 8 Card Printer User’s Manual P1045430-002
4: Printer Sett ings and Adjustments
Printing Preferences
Printing Preferences
To access the Card Printer Printing Preferences, select Start > Devices and Printers. Rightclick on the Zebra ZXP Series 8 Card Printer listing; and select Printing Preferences.
• Card Setup Tab. . . . . . . . . . . . . . . . . . . . . . . . . . . . . . . . . . . . . . . . . . . . . . . . . 79
• Encoding Tab . . . . . . . . . . . . . . . . . . . . . . . . . . . . . . . . . . . . . . . . . . . . . . . . . . 95
• Black Panel (K) Optimization Tab. . . . . . . . . . . . . . . . . . . . . . . . . . . . . . . . . . 96
• Color (YMC) Optimization Tab. . . . . . . . . . . . . . . . . . . . . . . . . . . . . . . . . . . . 99
• About Tab. . . . . . . . . . . . . . . . . . . . . . . . . . . . . . . . . . . . . . . . . . . . . . . . . . . . 100
The Restore Defaults button restores the tab’s default setting values.
The OK button saves any changes that have been made and closes the page.The Cancel button cancels any changes that have been made and closes the page.
The Apply button applies your settings.
The Help button will enable you to view a corresponding page of help information.
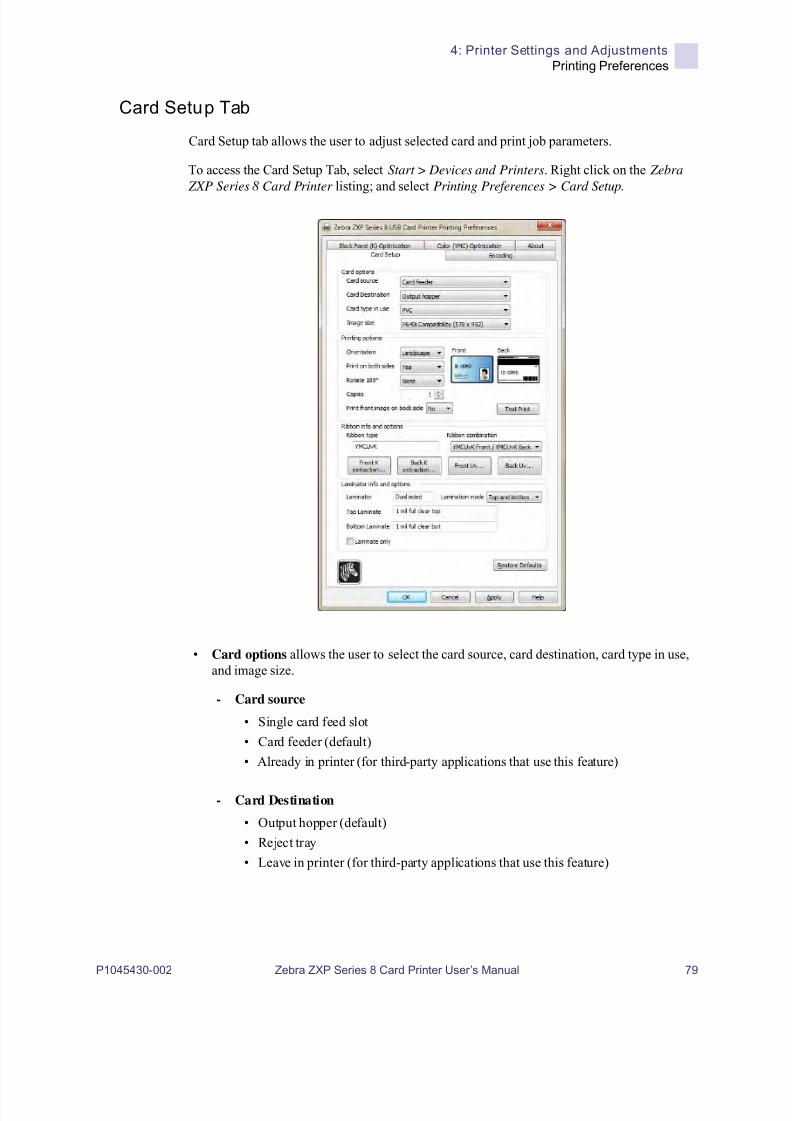
8/10/2019 Zxpseries8 Ug En
http://slidepdf.com/reader/full/zxpseries8-ug-en 83/226
4: Printer Settings and Adjustments
Printing Preferences
P1045430-002 Zebra ZXP Series 8 Card Printer User’s Manual 79
Card Setup Tab
Card Setup tab allows the user to adjust selected card and print job parameters.
To access the Card Setup Tab, select Start > Devices and Printers. Right click on the Zebra
ZXP Series 8 Card Printer listing; and select Printing Preferences > Card Setup.
• Card options allows the user to select the card source, card destination, card type in use,and image size.
- Card source
• Single card feed slot
• Card feeder (default)
• Already in printer (for third-party applications that use this feature)
- Card Destination
• Output hopper (default)
• Reject tray
• Leave in printer (for third-party applications that use this feature)

8/10/2019 Zxpseries8 Ug En
http://slidepdf.com/reader/full/zxpseries8-ug-en 84/226
80 Zebra ZXP Series 8 Card Printer User’s Manual P1045430-002
4: Printer Sett ings and Adjustments
Printing Preferences
- Card type in use allows the user to specify the type of card being used. Based on theselection, the printer automatically adjusts the transfer roller temperature and inputand output transfer speed for optimum print quality.
If none of the provided card types matches the actual user card type, or you are unableto achieve desired results using any of the provided card types, then you may specify
your own parameters using the Custom 1 (arrow below) and Custom 2 selections; seeAppendix B, Setting Custom Card Specifications, for details.
For help setting the specifications for your card type, contact the Zebra Card
Testing Service at:
Phone: 866-569-9086 (Toll Free)Email: [email protected]
Note that the you can rename Custom 1 and Custom 2 and then save the renamedcard type for future use. The card name must be less than 21 characters (printableASCII characters only). This change is persistent; i.e., on hardware host reboot or printer initialization, the card type list will always display the user-defined name.Also, any driver or firmware update will not overwrite user-defined Custom 1 orCustom 2 card settings.
• In the case of multiple hosts to one printer, all driver hosts will see the new cardtype list with the customer-specific name change(s).
• In the case of multiple printers the user will be responsible for editing andmanaging consistent custom card name(s) across multiple printers.
- Image size is either Edge to edge (648 x 1024) or CR-80 Standard (578 x 952). Notethat the printing size is specified in pixels.
8/10/2019 Zxpseries8 Ug En
http://slidepdf.com/reader/full/zxpseries8-ug-en 85/226
4: Printer Settings and Adjustments
Printing Preferences
P1045430-002 Zebra ZXP Series 8 Card Printer User’s Manual 81
• Printing options allows the user to select the card orientation (portrait or landscape), to print on both sides of the card, to rotate the card 180 degrees, and to specify the number ofcopies to print. If you modify any of these settings, click the Apply button before printinga test card. The Test Print button prints a test card; see Printing a Test Card on page 51.
• Ribbon info and options:
- Ribbon type shows the type of ribbon (color or monochrome) installed in the printer.
- Ribbon combination allows you to select the combination of panels to be printed oneach side.
- Depending on the ribbon type installed, the Front and Back buttons let you setoptions for:
• Black Panel Options . . . . . . . . . . . . . . . . . . . . . . . . . . . . . . . . . . . . . . 82
• Uv Panel Option . . . . . . . . . . . . . . . . . . . . . . . . . . . . . . . . . . . . . . . . . 88
• Inhibit Option . . . . . . . . . . . . . . . . . . . . . . . . . . . . . . . . . . . . . . . . . . . 93
• Laminator info and options shows the user if the Laminator option is installed (and if sowhether it is Single or Dual sided), whether Top Laminate and/or Bottom Laminate isinstalled (and if so what type it is), and allows the user to change the Lamination modeon a per-job basis.
The Lamination modes are as follows:
- Default: Operates as configured. Card Destination must be set to Output Hopper.
- Top: Set if both the top and bottom laminates are installed, and you only want tolaminate the top.
- Bottom: Set if both the top and bottom laminates are installed, and you only want to
laminate the bottom.
- Top and Bottom: Set if both the top and bottom laminates are to be used.
- Pass-through: Allows a card to pass through the laminator without having laminateapplied. Note that the laminate must be removed from the laminator for this optionto work.
- Any: Set if the laminate, currently installed in the printer (top only, bottom only, topand bottom, or none), is to be used.
- Laminate only can be used to laminate pre-printed cards. This is a special-purposefunction that is enabled when the Lamination mode is set to Top, Bottom, or Top and
bottom and the Card destination is set to Output hopper. When this option is selected,the card is passed from the input hopper, through the printer without being printed, tothe laminator for lamination, then to the output hopper.
If the laminate installed does not match the Lamination mode, then a Lamination ModeMismatch error will occur. To resolve the error, either the laminate will need to beinstalled/removed; or the Lamination mode will need to be changed.

8/10/2019 Zxpseries8 Ug En
http://slidepdf.com/reader/full/zxpseries8-ug-en 86/226
82 Zebra ZXP Series 8 Card Printer User’s Manual P1045430-002
4: Printer Sett ings and Adjustments
Printing Preferences
Black Panel Options
The Black Panel Options pop-up window allows you to manage and configure the use of theBlack Panel (K panel) when the selected Ribbon Combination shows the K panel on the sameside as the Y, M, and C panels (e.g. YMCK Front / K Back).
To access the Advanced Black Panel Options pop-up window, select Start > Devices andPrinters. Right click on the Zebra ZXP Series 8 Card Printer listing, and select Printing
preferences > Card Setup.
From the Card Setup tab, select a Ribbon Combination that has YMC and K all on the sameside. The Front K Extraction… and/or Back K Extraction... buttons will become active. Pressthe appropriate button to open up the pop-up window. The figure below shows settings for thefront side of the card; settings for the back side of the card are identical.
To extract black areas from color images (use the K panel instead of the Y, M, and C panels),several selections must be made:
• Select black panel extraction type:
- Disable black extraction does not use the K panel for any part of the image. Thisselection will have the effect of rendering all black images as YMC composite.
- Print YMC composite and K black uses both the K panel and the Y, M, and C panels to print the portions of the image that are identified as black. This selection willresult in a dark, black image; but the edges will be smooth (due to YMC printed underthe K), not the sharp edges typically desired for a barcode.
- Print all black data uses only the K panel to print the portions of the image that areidentified as being black. Note that the areas that are identified as black are based onthe threshold selections made in the black level area in the black extraction from colorimages area; see Page 84.
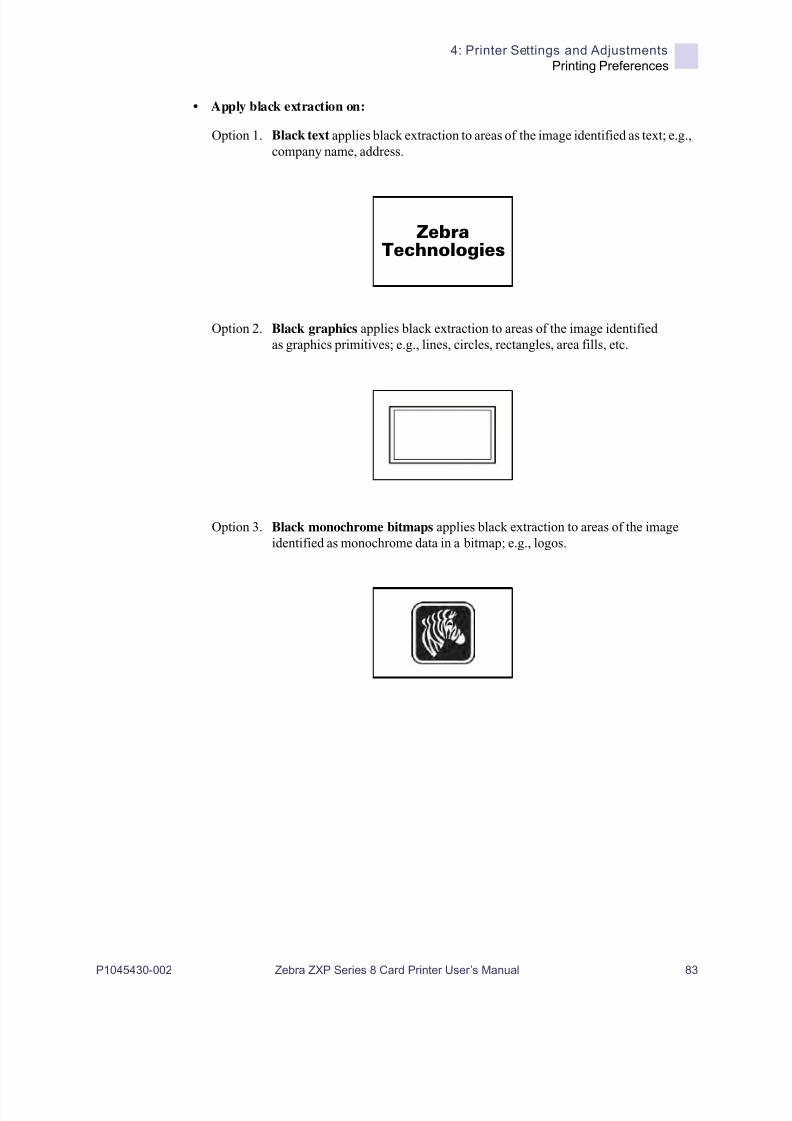
8/10/2019 Zxpseries8 Ug En
http://slidepdf.com/reader/full/zxpseries8-ug-en 87/226
4: Printer Settings and Adjustments
Printing Preferences
P1045430-002 Zebra ZXP Series 8 Card Printer User’s Manual 83
• Apply black extraction on:
Option 1. Black text applies black extraction to areas of the image identified as text; e.g.,company name, address.
Option 2. Black graphics applies black extraction to areas of the image identifiedas graphics primitives; e.g., lines, circles, rectangles, area fills, etc.
Option 3. Black monochrome bitmaps applies black extraction to areas of the imageidentified as monochrome data in a bitmap; e.g., logos.
ZebraTechnologies
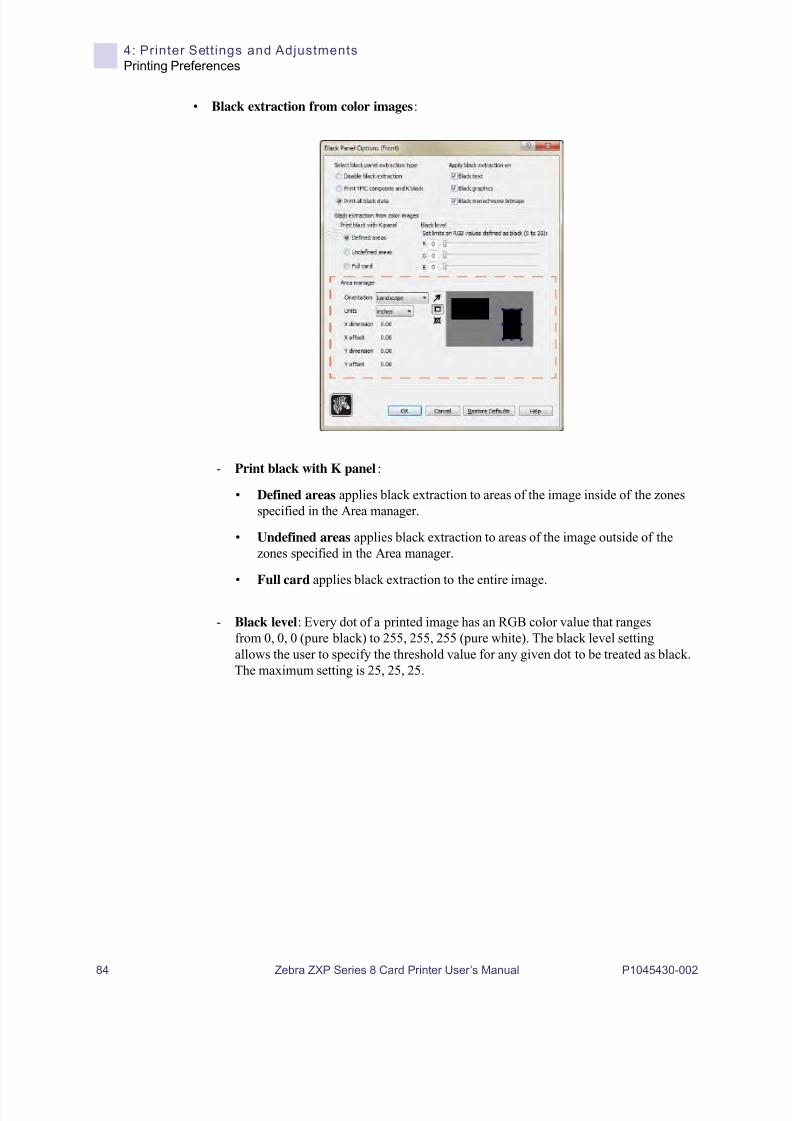
8/10/2019 Zxpseries8 Ug En
http://slidepdf.com/reader/full/zxpseries8-ug-en 88/226
84 Zebra ZXP Series 8 Card Printer User’s Manual P1045430-002
4: Printer Sett ings and Adjustments
Printing Preferences
• Black extraction from color images:
- Print black with K panel:
• Defined areas applies black extraction to areas of the image inside of the zonesspecified in the Area manager.
• Undefined areas applies black extraction to areas of the image outside of thezones specified in the Area manager.
• Full card applies black extraction to the entire image.
- Black level: Every dot of a printed image has an RGB color value that rangesfrom 0, 0, 0 (pure black) to 255, 255, 255 (pure white). The black level settingallows the user to specify the threshold value for any given dot to be treated as black.The maximum setting is 25, 25, 25.

8/10/2019 Zxpseries8 Ug En
http://slidepdf.com/reader/full/zxpseries8-ug-en 89/226
4: Printer Settings and Adjustments
Printing Preferences
P1045430-002 Zebra ZXP Series 8 Card Printer User’s Manual 85
Area manager:
This option is enabled when either the Defined areas (extract inside the zone) or theUndefined areas (extract outside the zone) radio button is selected.
• Orientation: The Orientation selection sets the image orientation to eitherPortrait or Landscape.
• Units: The Units selection sets the units to either inches or mm (millimeters). TheX-dimension, X-offset, Y-dimension, and Y-offset reflect these units.
To create a zone: Select the rectangle icon , click on an area of the image to establishthe first corner of the zone, drag the cursor until the zone is the desired size and shape,then release the mouse button. Note that multiple zones can be defined.
To select, move, or resize a zone: Select the arrow icon , click on a zone to select it,then drag it to move it, or drag on the edges to resize it.
To delete a zone: Select the rectangle icon with an "X" through it , then click on thezone that you want to delete.

8/10/2019 Zxpseries8 Ug En
http://slidepdf.com/reader/full/zxpseries8-ug-en 90/226
86 Zebra ZXP Series 8 Card Printer User’s Manual P1045430-002
4: Printer Sett ings and Adjustments
Printing Preferences
Reasons and Behavior for Black Panel Extraction
This section covers special handling of black data specified on the “Black Panel (K)” taband applies only to surfaces of the card on which both YMC (color) and K (black) are to
be printed.
To print black during the print process, equal amounts of process colors Y, M, and C (printerribbon panels) are delivered, with maximum intensity, to create a near-black image.
• However, this “composite” image appears as a dark shade of gray and not machinereadable. For example, a visually-black barcode printed with Y, M and C will not bedetectable by most barcode readers and is not a true Visible Black color.
• The remedy for this is to “extract the black.” In other words, print the same text, graphics,or barcode, using the K (black) panel, on top of the YMC barcode. (You can also choose to
print only in K, omitting YMC from that region.)
Depending on the application used to design the card layout, different elements of the cardimage may be identified in different ways to the printer driver. The printer driver needs torecognize four types of basic elements:
1. Black text
2. Black (monochrome) graphics -- lines, circles, rectangles, and area fills
3. Black monochrome bitmap images
These elements may not always be sent to the driver as expected. For example, a barcode may
be sent as black text, a series of black area fills, or a black monochrome bitmap. Results willdepend on the application used to create the card design. Another variable, again controlled bythe card design application, is the precedence (stacking order) of the various element types inthe event that one or more of them overlap.

8/10/2019 Zxpseries8 Ug En
http://slidepdf.com/reader/full/zxpseries8-ug-en 91/226
4: Printer Settings and Adjustments
Printing Preferences
P1045430-002 Zebra ZXP Series 8 Card Printer User’s Manual 87
If the printer is set up to print both YMC and K on the same side, text, lines and pixels, areafills and monochrome bitmaps, if (and only if) designated black by the application, can bedirected to the K panel. For this to happen, the graphic type in question has to be selected onthe “Black Panel (K)” tab. For text, lines and pixels, area fills and monochrome bitmaps thedesignation “black” is set at RGB values of 0,0,0. This threshold can be adjusted up to25,25.25, with the Black level slider adjustment. Near-black doesn’t qualify.
In the Black Panel (K) tab, the “element selection” portion is straightforward – simplydesignate any or all of the four graphic types to be printed in K, either K alone, or over process
black (YMC).
In the Black Panel (K) tab, the “element selection” portion is straightforward – simplydesignate any or all of the four graphic types to be printed in K, either K alone, or over process
black (YMC).
Black extraction is quite different. It applies only to the fourth graphic type – the color bitmapimage.To perform black extraction, the driver generates a K image by looking for blackfeatures (pixels) in the color bitmap, that is, instances where all three YMC values are at, or
close to, the maximum (full intensity). Each such true-black or near-black instance generates acorresponding cluster of black pixels in the extracted image, which will be printed with theK (black) panel either on top of the YMC image, or replacing it entirely – your choice.
A problem that can arise when K is extracted from an entire card image is over-emphasis ofevery black cluster; e.g., dark hair in a portrait photo or scenic background. K overprinting insuch areas can be displeasing. To deal with this, set up exclusion zones within which noextraction is performed. Six such areas are provided for on each side of the card,independently. In the default state, all areas are null (0,0 offsets, and zero size).
There is a choice of black extraction within the defined areas or outside the defined areas; seePrint black with K panel: 84 for details.

8/10/2019 Zxpseries8 Ug En
http://slidepdf.com/reader/full/zxpseries8-ug-en 92/226
88 Zebra ZXP Series 8 Card Printer User’s Manual P1045430-002
4: Printer Sett ings and Adjustments
Printing Preferences
Uv Panel Option
A Uv Panel is used to print invisible images (text or graphics) that will glow in the visiblespectrum when exposed to a Uv Light. The Uv Panel pop-up window allows you to manageand configure printing with a Uv Panel. This window is only available when using Uv ribbons(e.g., YMCUvK).
To access the Uv Panel pop-up window, select Start > Devices and Printers. Right click on the Zebra ZXP Series 8 Card Printer listing, and select Printing Preferences > Card Setup.
Select Ribbon info ... > Front Uv ... or Back Uv ...
• Select the Uv type:
- Disable Uv . . . . . . . . . . . . . . . . . . . . . . . . . . . . . . . . . . . . . . . . . . . . . . . . . . . . 90
- Bitmap based Uv Print . . . . . . . . . . . . . . . . . . . . . . . . . . . . . . . . . . . . . . . . . . 90
- Uv image area extraction . . . . . . . . . . . . . . . . . . . . . . . . . . . . . . . . . . . . . . . . . 91
• Uv printing options:
- Rotate 180o rotates the bitmap image 180o.
- Double pass prints the Uv image on a second transfer film panel and applies it to thecard, over the first transferred image. This option increases the visibility of the Uv
image but uses twice the transfer film.- Grayscale prints the bitmap image as a grayscale image, which is composed of
shades of gray, varying from black to white.
- Halftone prints the bitmap image as a halftone image, which simulates continuoustone imagery through the use of dots, varying either in size or in spacing.
Security ID automatically prints a unique text value in fixed locations on a card using theUV panel; see Page 92 for details.

8/10/2019 Zxpseries8 Ug En
http://slidepdf.com/reader/full/zxpseries8-ug-en 93/226
4: Printer Settings and Adjustments
Printing Preferences
P1045430-002 Zebra ZXP Series 8 Card Printer User’s Manual 89
• Uv image extraction: This section is enabled when Uv image area extraction is selectedfrom the Select the Uv type dropdown menu. Options include Defined areas, Undefinedareas, Full card, and Extract Uv from current image.
• Bitmap-based Uv Print: This section is enabled when Bitmap based Uv Print is selectedfrom the Select the Uv type dropdown menu. To locate the bitmap (1-bit monochrome
bitmap), click on the Browse button to bring up a dialog for choosing the file.
• Area manager: This section is enabled when Uv image area extraction is selected fromthe Select the Uv type dropdown menu.
- TheOrientation
selection sets the image orientation to either Portrait or Landscape.- The Units selection sets the units to either inches or mm (millimeters). The X
dimension, X offset, Y dimension, and Y offset reflect these units.
To create a zone: Select the rectangle icon , click on an area of the image to establishthe first corner of the zone, drag the cursor until the zone is the desired size and shape,then release the mouse button. Note that multiple zones can be defined.
To select, move, or resize a zone: Select the arrow icon , click on a zone to select it,then drag it to move it or drag on the edges to resize it.
To delete a zone: Select the rectangle icon with an “X” through it , then click on the
zone that you want to delete.

8/10/2019 Zxpseries8 Ug En
http://slidepdf.com/reader/full/zxpseries8-ug-en 94/226
90 Zebra ZXP Series 8 Card Printer User’s Manual P1045430-002
4: Printer Sett ings and Adjustments
Printing Preferences
Disable Uv
Disable Uv is the default. Uv printing is disabled when this option is selected.
Bitmap based Uv PrintBitmap based Uv Print allows you to import a bitmap image to print on the Uv panel; e.g.,import a security seal.
1. Select Bitmap based Uv Print form the Select the Uv type dropdown menu.
2. Click on the Browse button (circled above) to bring up a dialog box for choosingthe file.
3. Locate and select the file (a specific .bmp file on local drive).
4. Select Uv printing options (Rotate 180, Double Pass, Grayscale, or Haftone),as required.
5. Click on the OK button.
6. The Driver applies this .bmp as full Uv print on all print jobs sent to printer.
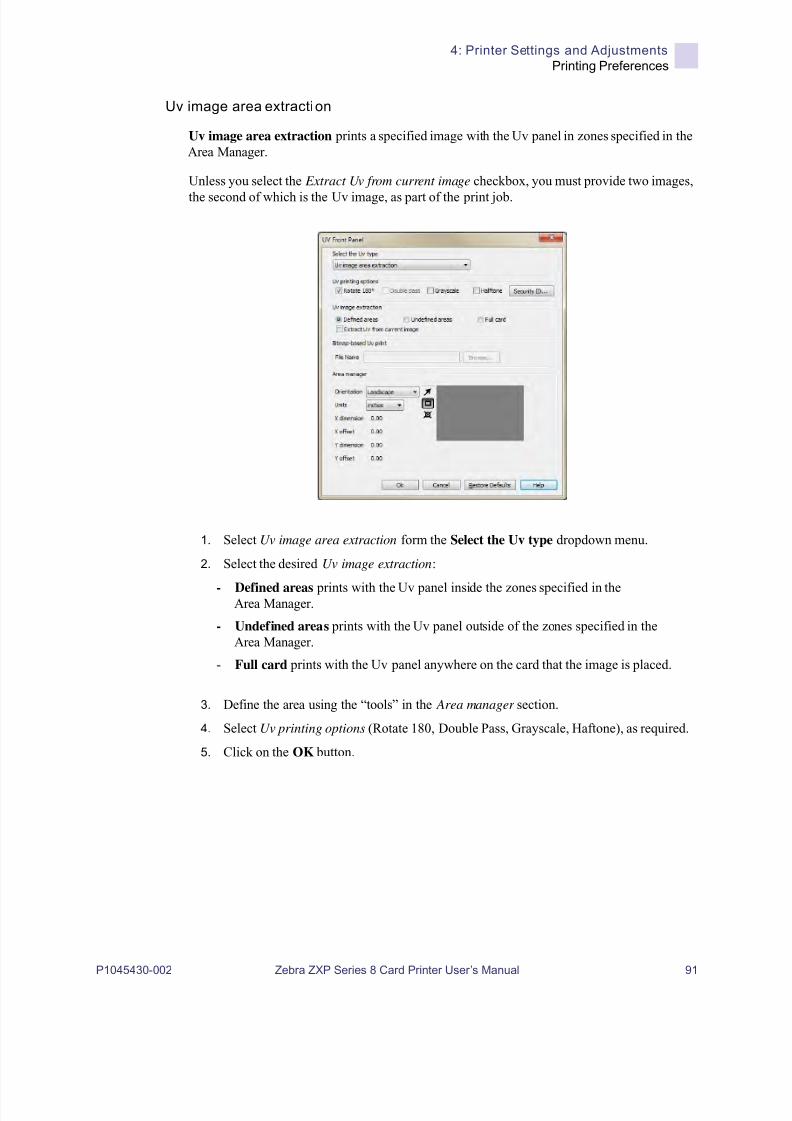
8/10/2019 Zxpseries8 Ug En
http://slidepdf.com/reader/full/zxpseries8-ug-en 95/226
4: Printer Settings and Adjustments
Printing Preferences
P1045430-002 Zebra ZXP Series 8 Card Printer User’s Manual 91
Uv image area extraction
Uv image area extraction prints a specified image with the Uv panel in zones specified in theArea Manager.
Unless you select the Extract Uv from current image checkbox, you must provide two images,
the second of which is the Uv image, as part of the print job.
1. Select Uv image area extraction form the Select the Uv type dropdown menu.
2. Select the desired Uv image extraction:
- Defined areas prints with the Uv panel inside the zones specified in theArea Manager.
- Undefined areas prints with the Uv panel outside of the zones specified in theArea Manager.
- Full card prints with the Uv panel anywhere on the card that the image is placed.
3. Define the area using the “tools” in the Area manager section.
4. Select Uv printing options (Rotate 180, Double Pass, Grayscale, Haftone), as required.
5. Click on the OK button.

8/10/2019 Zxpseries8 Ug En
http://slidepdf.com/reader/full/zxpseries8-ug-en 96/226
92 Zebra ZXP Series 8 Card Printer User’s Manual P1045430-002
4: Printer Sett ings and Adjustments
Printing Preferences
Security ID
The Security ID option automatically prints a unique text value in a fixed location on a cardusing the UV panel.
1. Click on the Security ID button (circled above) to activate this option.
2. Observe the UV Panel popup.
3. Select the Enable security ID auto print checkbox.
4. Specify the Text location. Select the location from four pre-defined areas of a card(upper left, upper right, lower left, lower right).
5. Specify the Text category (MAC address, Printer serial number, or Custom text). If
Custom text is specified, enter the text in the Custom text field, 32 characters maximum.6. To enable the Inverted text option, select the Inverted text checkbox.
7. Click on the OK button.
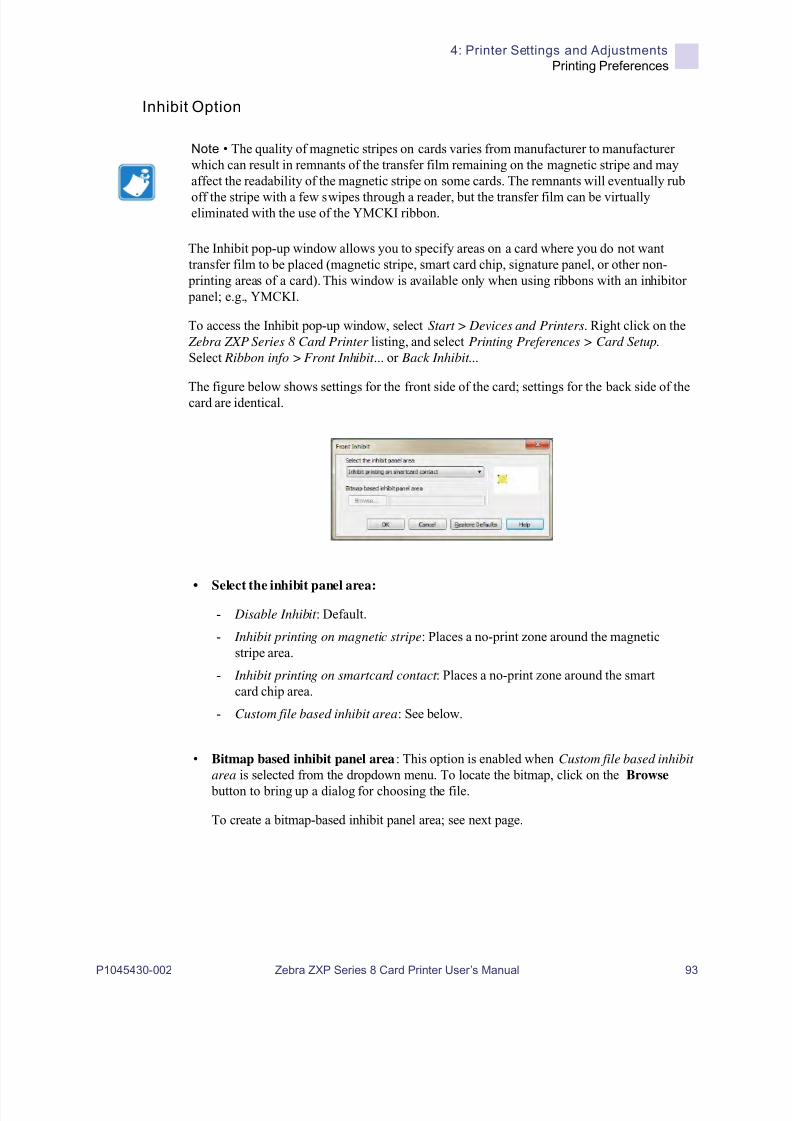
8/10/2019 Zxpseries8 Ug En
http://slidepdf.com/reader/full/zxpseries8-ug-en 97/226
4: Printer Settings and Adjustments
Printing Preferences
P1045430-002 Zebra ZXP Series 8 Card Printer User’s Manual 93
Inhibit Option
The Inhibit pop-up window allows you to specify areas on a card where you do not wanttransfer film to be placed (magnetic stripe, smart card chip, signature panel, or other non-
printing areas of a card). This window is available only when using ribbons with an inhibitor panel; e.g., YMCKI.
To access the Inhibit pop-up window, select Start > Devices and Printers. Right click on the Zebra ZXP Series 8 Card Printer listing, and select Printing Preferences > Card Setup.
Select Ribbon info > Front Inhibit ... or Back Inhibit ...
The figure below shows settings for the front side of the card; settings for the back side of thecard are identical.
• Select the inhibit panel area:
- Disable Inhibit : Default.
- Inhibit printing on magnetic stripe: Places a no-print zone around the magneticstripe area.
- Inhibit printing on smartcard contact : Places a no-print zone around the smartcard chip area.
- Custom file based inhibit area: See below.
• Bitmap based inhibit panel area: This option is enabled when Custom file based inhibit
area is selected from the dropdown menu. To locate the bitmap, click on the Browse button to bring up a dialog for choosing the file.
To create a bitmap-based inhibit panel area; see next page.
Note • The quality of magnetic stripes on cards varies from manufacturer to manufacturerwhich can result in remnants of the transfer film remaining on the magnetic stripe and mayaffect the readability of the magnetic stripe on some cards. The remnants will eventually rub
off the stripe with a few swipes through a reader, but the transfer film can be virtuallyeliminated with the use of the YMCKI ribbon.

8/10/2019 Zxpseries8 Ug En
http://slidepdf.com/reader/full/zxpseries8-ug-en 98/226
94 Zebra ZXP Series 8 Card Printer User’s Manual P1045430-002
4: Printer Sett ings and Adjustments
Printing Preferences
To create a bitmap-based inhibi t panel area:
Step 1. Open a new image file in a drawing program; e.g., Microsoft Paint.
Step 2. In the Paint menu, select Properties.
Step 3. Under Units, click the unit of measurement you want to use for the width andheight; e.g. inches.
Step 4. Type the measurements of the card in Width and Height; e.g., 3.370” by 2.125”.
Step 5. Under Colors, select the Black and White radio button.
Step 6. Click the OK button.
Step 7. With the drawing tool, draw and fill with black the area on the card where you do not
want transfer film to be placed; in the example below, the signature panel.
Step 8. Save the image file as a 1-bit monochrome bitmap; e.g., < filename >.bmp.
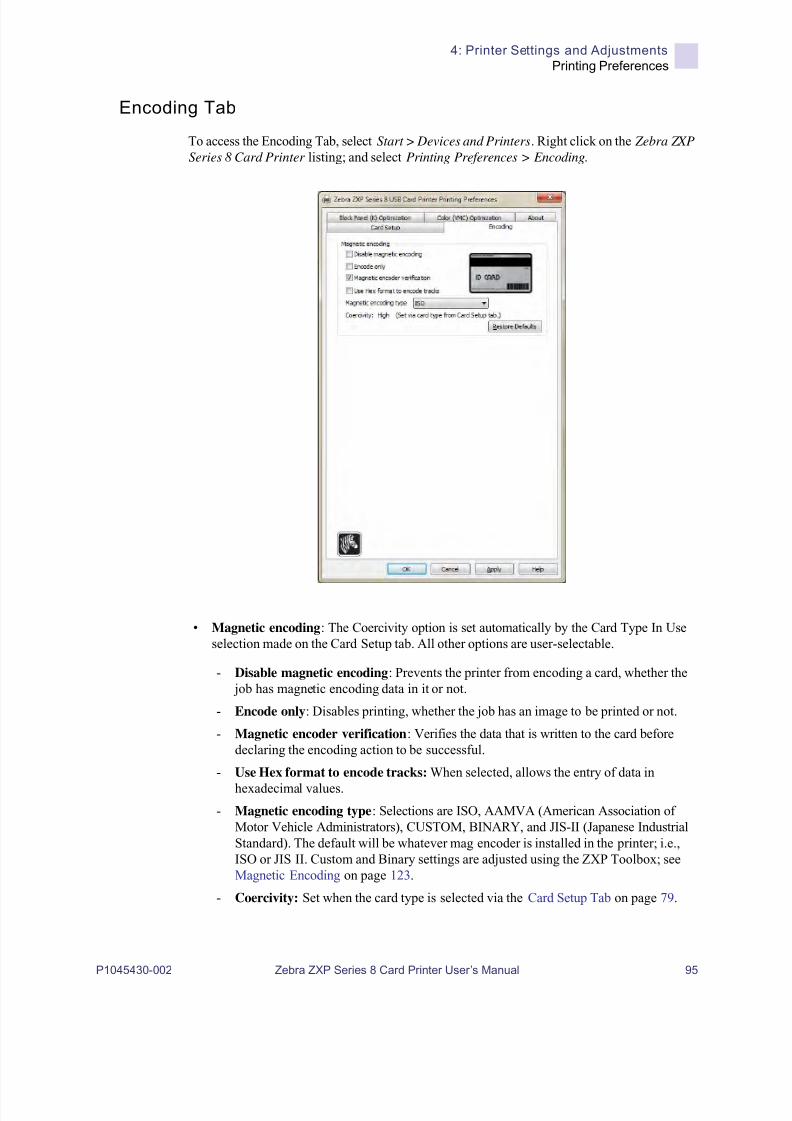
8/10/2019 Zxpseries8 Ug En
http://slidepdf.com/reader/full/zxpseries8-ug-en 99/226
4: Printer Settings and Adjustments
Printing Preferences
P1045430-002 Zebra ZXP Series 8 Card Printer User’s Manual 95
Encoding Tab
To access the Encoding Tab, select Start > Devices and Printers. Right click on the Zebra ZXP
Series 8 Card Printer listing; and select Printing Preferences > Encoding.
• Magnetic encoding: The Coercivity option is set automatically by the Card Type In Useselection made on the Card Setup tab. All other options are user-selectable.
- Disable magnetic encoding: Prevents the printer from encoding a card, whether the job has magnetic encoding data in it or not.
- Encode only: Disables printing, whether the job has an image to be printed or not.
- Magnetic encoder verification: Verifies the data that is written to the card beforedeclaring the encoding action to be successful.
- Use Hex format to encode tracks: When selected, allows the entry of data in
hexadecimal values.
- Magnetic encoding type: Selections are ISO, AAMVA (American Association ofMotor Vehicle Administrators), CUSTOM, BINARY, and JIS-II (Japanese IndustrialStandard). The default will be whatever mag encoder is installed in the printer; i.e.,ISO or JIS II. Custom and Binary settings are adjusted using the ZXP Toolbox; seeMagnetic Encoding on page 123.
- Coercivity: Set when the card type is selected via the Card Setup Tab on page 79.

8/10/2019 Zxpseries8 Ug En
http://slidepdf.com/reader/full/zxpseries8-ug-en 100/226
96 Zebra ZXP Series 8 Card Printer User’s Manual P1045430-002
4: Printer Sett ings and Adjustments
Printing Preferences
Black Panel (K) Optimization Tab
The Black Panel (K) Optimization tab displays available options to optimize black panel
printing for the type of image being printed.
To access the Black Panel (K) Optimization Tab, select Start > Devices and Printers. Right
click on the Zebra ZXP Series 8 Card Printer listing; and select Printing Preferences > Black Panel (K) Optimization.
There is a separate optimization for the front and back side of the card.
• Optimize for: There is a separate optimization for Text, Barcode, Pictures, and Mixed forthe front and back side of the card.
• K panel destruction: Renders the used K-panel unreadable.
• Monochrome conversions: This section is used to control multi-tone printing when usingone color ribbon. The available options are Dither error diffusion (default), Dither 6x6halftoning, Dither 8x8 halftoning, Dither pure black on white, and Send as grayscale;see next page for details.
• Front and Back Preheat: This function controls the intensity of the black panel image.The higher the value, the darker the image and vice versa. Values range from -50 to 50,default = 0.

8/10/2019 Zxpseries8 Ug En
http://slidepdf.com/reader/full/zxpseries8-ug-en 101/226
4: Printer Settings and Adjustments
Printing Preferences
P1045430-002 Zebra ZXP Series 8 Card Printer User’s Manual 97
Monochrome Conversion
The monochrome panels in the ribbon can only print binary (pure on or off) images.Monochrome conversion is used to convert continuous tone 8-bit-per-pixel RGB or grayimage content into binary1-bit-per-pixel content.
• Color Image
The sample image to the right is the original color image usedto make the following monochrome conversions.
• Dither error diffusion (default)
Error diffusion is used primarily where you have a full color(RGB image with 8 bits per pixel) or full gray (single color butstill 8 bits per pixel) that you need to print with binary printing(can only print full-on or full-off; i.e., 1 bit per pixel).Typically preferred over halftoning for most images.
• Dither 6x6 halftoning and Dither 8x8 halftoning
To simulate gray in graphics, halftones are printed. Halftonesare arrays of dots arranged in a grid (e.g., 6x6 or 8x8) torepresent each image pixel as a shade of gray. For dark gray,more grid dots are black. For light gray, more grid dots arewhite As the grid size goes up so does the number of possibleoutput levels, 6x6 cell has 36 possible output levels while 8x8has 64. But as cell size increases, there is a correspondingdecrease in resolution.
• Dither pure black on white
This is the simplest method for converting from 8 bits per pixel
to 1 bit per pixel.
For example, the input pixel can be a value from 0 to 255. Ifthe threshold is 128, any pixel over 128 becomes full on (1);and any pixel that is less than 128 becomes full off (0). Thismode works best for text, barcodes, line art, logos --everything except continuous-tone pictures.
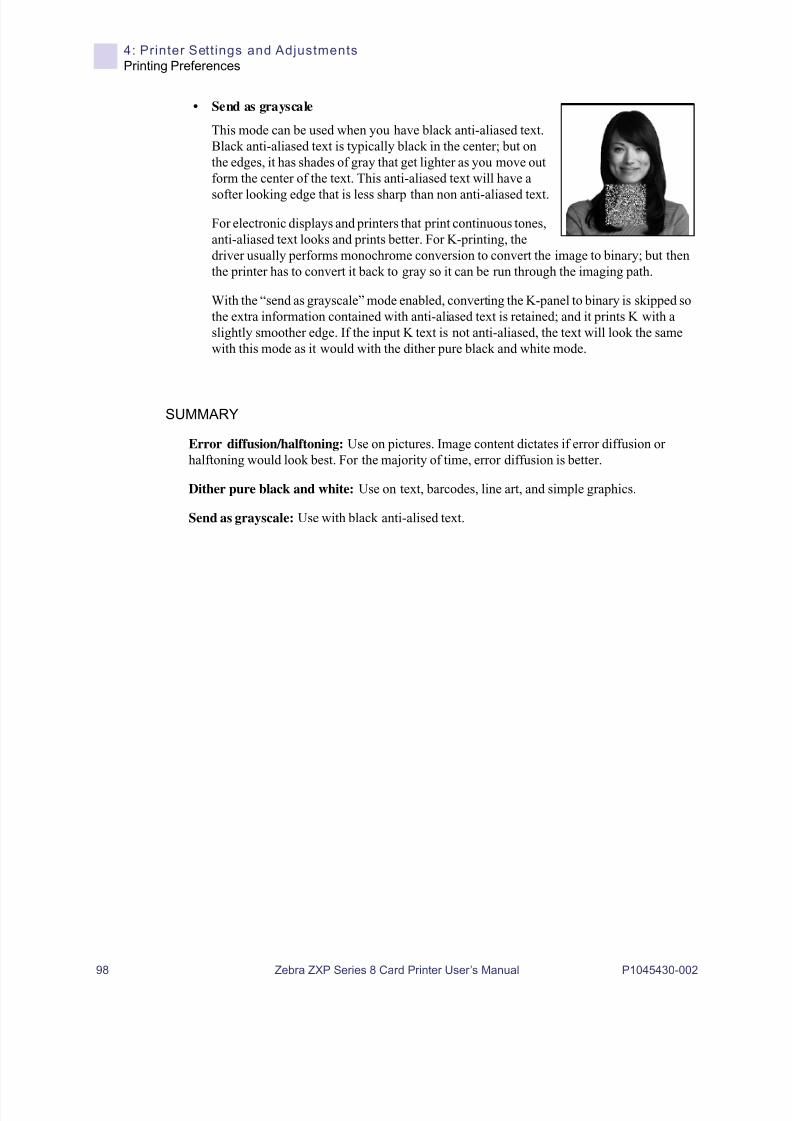
8/10/2019 Zxpseries8 Ug En
http://slidepdf.com/reader/full/zxpseries8-ug-en 102/226
98 Zebra ZXP Series 8 Card Printer User’s Manual P1045430-002
4: Printer Sett ings and Adjustments
Printing Preferences
• Send as grayscale
This mode can be used when you have black anti-aliased text.Black anti-aliased text is typically black in the center; but onthe edges, it has shades of gray that get lighter as you move outform the center of the text. This anti-aliased text will have a
softer looking edge that is less sharp than non anti-aliased text.
For electronic displays and printers that print continuous tones,anti-aliased text looks and prints better. For K-printing, thedriver usually performs monochrome conversion to convert the image to binary; but thenthe printer has to convert it back to gray so it can be run through the imaging path.
With the “send as grayscale” mode enabled, converting the K-panel to binary is skipped sothe extra information contained with anti-aliased text is retained; and it prints K with aslightly smoother edge. If the input K text is not anti-aliased, the text will look the samewith this mode as it would with the dither pure black and white mode.
SUMMARY
Error diffusion/halftoning: Use on pictures. Image content dictates if error diffusion orhalftoning would look best. For the majority of time, error diffusion is better.
Dither pure black and white: Use on text, barcodes, line art, and simple graphics.
Send as grayscale: Use with black anti-alised text.

8/10/2019 Zxpseries8 Ug En
http://slidepdf.com/reader/full/zxpseries8-ug-en 103/226
4: Printer Settings and Adjustments
Printing Preferences
P1045430-002 Zebra ZXP Series 8 Card Printer User’s Manual 99
Color (YMC) Optimization Tab
To access the Color (YMC) Optimization Tab, select Start > Devices and Printers. Rightclick on the Zebra ZXP Series 8 Card Printer listing, and select Printing preferences >
Color (YMC) Optimization.
These color adjustments modify only how the pictures print . These adjustments do notaffect the image files. (That type of adjustment would be made in an image processingapplication program.)
• Full color printing: Adjustments (-25 to +25 range) include Brightness, Contrast,Gamma, Saturation, Red, Green, and Blue. Adjustments are reflected in the preview.
• Sharpening filter: Options are None, Low, Normal (default), and High. By default, theimage file is automatically sharpened; i.e., edges are enhanced within the image. Ifsharpening has already been done, this function can be turned off (None). The Low and
High options are available if additional sharpening adjustment is required. Adjustmentsare not reflected in the preview.
• Preheat: Adjustment ranges from -50 to 50, default = 0. Increasing the preheat valueaffects the entire image and will darken up edges of fonts, fine lines, and color edges thatare against a white or very near white background. In some cases, increasing the preheatvalue too much can cause the white or near white images to print with as light color cast.Increasing the preheat might also improve color-to-color mis-registration that may occurfor certain images.

8/10/2019 Zxpseries8 Ug En
http://slidepdf.com/reader/full/zxpseries8-ug-en 104/226
100 Zebra ZXP Series 8 Card Printer User’s Manual P1045430-002
4: Printer Sett ings and Adjustments
Printing Preferences
About Tab
The About Tab shows the copyright and the driver version for the Zebra ZXP Series 8
Card Printer .
To access the About Tab, select Start > Devices and Printers. Right click on the Zebra ZXP
Series 8 Card Printer listing; and select Printing Preferences > About .

8/10/2019 Zxpseries8 Ug En
http://slidepdf.com/reader/full/zxpseries8-ug-en 105/226
P1045430-002 Zebra ZXP Series 8 Card Printer User’s Manual 101
5ZXP Series Toolbox
Introduction
The ZXP Series Toolbox provides advanced configuration capabilities and tools to manage theoperation of your printer. Note that the ZXP Series Toolbox is a separate application thatworks independently from the printer driver.
Important • Use of the ZXP Series Toolbox is intended only for advanced users andsystem administrators.
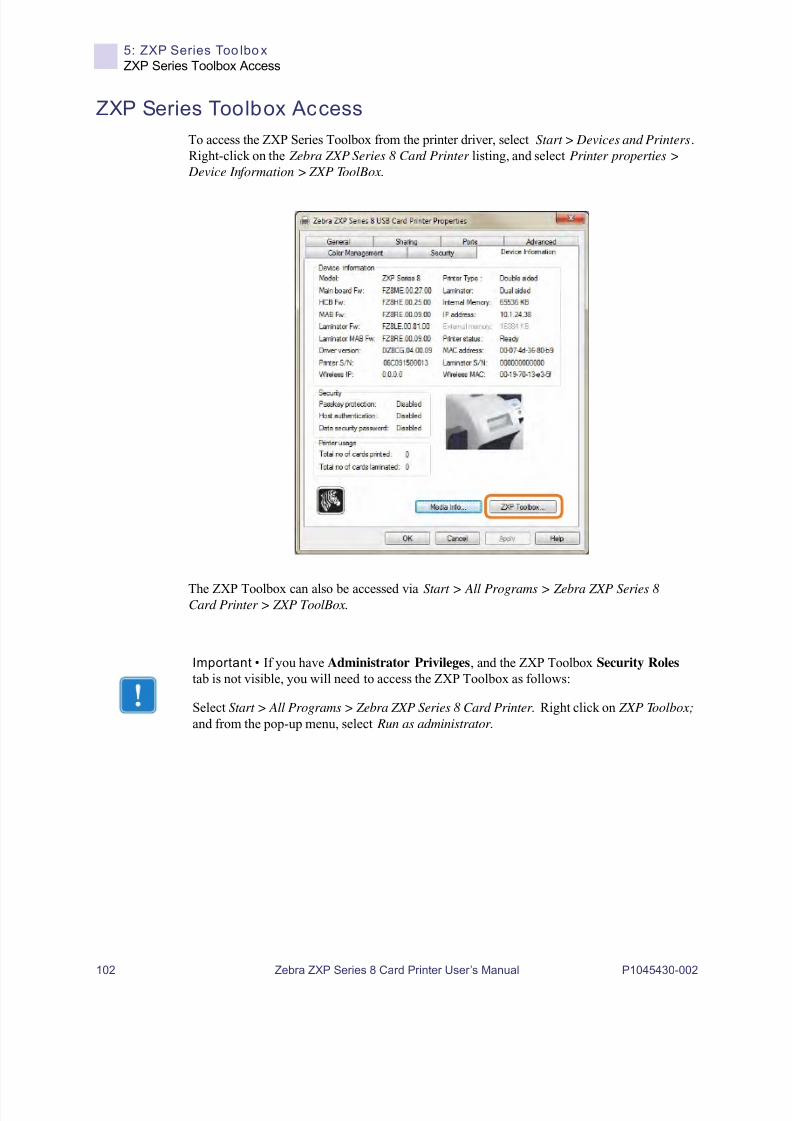
8/10/2019 Zxpseries8 Ug En
http://slidepdf.com/reader/full/zxpseries8-ug-en 106/226
102 Zebra ZXP Series 8 Card Printer User’s Manual P1045430-002
5: ZXP Series Too lbo x
ZXP Series Toolbox Access
ZXP Series Toolbox Access
To access the ZXP Series Toolbox from the printer driver, select Start > Devices and Printers.Right-click on the Zebra ZXP Series 8 Card Printer listing, and select Printer properties >
Device Information > ZXP ToolBox.
The ZXP Toolbox can also be accessed via Start > All Programs > Zebra ZXP Series 8Card Printer > ZXP ToolBox.
Important • If you have Administrator Privileges, and the ZXP Toolbox Security Roles tab is not visible, you will need to access the ZXP Toolbox as follows:
Select Start > All Programs > Zebra ZXP Series 8 Card Printer. Right click on ZXP Toolbox;
and from the pop-up menu, select Run as administrator.

8/10/2019 Zxpseries8 Ug En
http://slidepdf.com/reader/full/zxpseries8-ug-en 107/226
5: ZXP Series Toolbox
Information
P1045430-002 Zebra ZXP Series 8 Card Printer User’s Manual 103
Information
Printer
This information cannot be edited or changed by the user; however, this information may be
useful for Zebra trained and certified personnel in diagnosing or evaluating printer status.
• Firmware and Driver lists the versions (Firmware, HCB, MAB, Laminator, LaminatorMAB, and Driver).
• Other shows the Interface, the Transfer type, and the Card type in use, RAM, Printerserial number, and Laminator serial number.
• Options shows the options installed -- Magnetic encoding, Contact smartcard, Contactlesssmartcard, and Laminator type.
• Status displays Warnings, Faults, and Status; Input and Output speeds (single anddouble); Top and Bottom transfer temperatures.
• OCP shows the Language displayed in the Operator Control Panel and the LCD contrastlevel selected.
• Odometer shows the number of Cards printed and the number of Printhead lines printed.

8/10/2019 Zxpseries8 Ug En
http://slidepdf.com/reader/full/zxpseries8-ug-en 108/226
104 Zebra ZXP Series 8 Card Printer User’s Manual P1045430-002
5: ZXP Series Too lbo x
Information
Printer Sensors
These characteristics cannot be edited or changed by the user; however, this information may be useful for Zebra trained and certified personnel in diagnosing or evaluating printersensors status.
• Sensor States details the state of each printer sensor.
• Sensor Values details the value of each printer sensor.
• Ribbon Take-up Motor lists various electrical characteristics of the motor.

8/10/2019 Zxpseries8 Ug En
http://slidepdf.com/reader/full/zxpseries8-ug-en 109/226
5: ZXP Series Toolbox
Information
P1045430-002 Zebra ZXP Series 8 Card Printer User’s Manual 105
Media
This screen displays ribbon, transfer film, and laminate details. This data is automatically readand updated from the installed media in the printer.
• Ribbon Details include Type, Description, Initial size, and Images remaining.
• Transfer Film Details include Type, Description, Initial size, Images remaining.
• Top Laminate Details include Type, Description, Initial size, Images remaining.
• Bottom Laminate Details include Type, Description, Initial size, Images remaining.
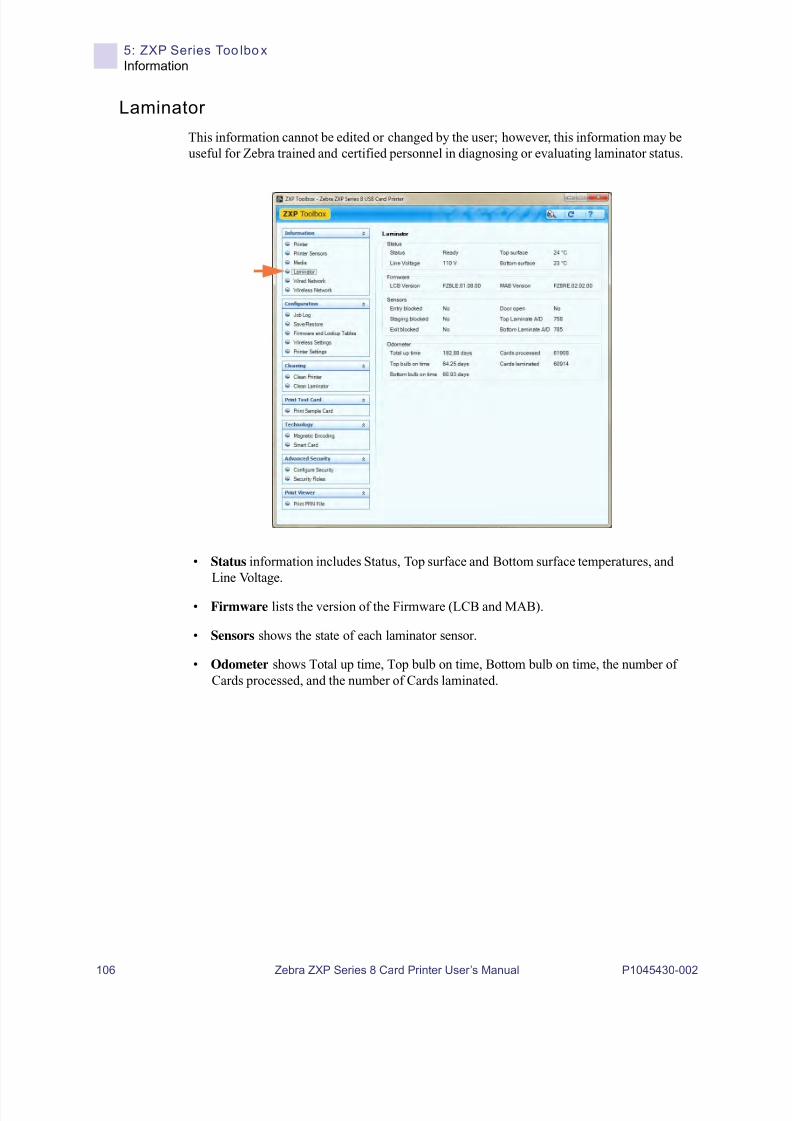
8/10/2019 Zxpseries8 Ug En
http://slidepdf.com/reader/full/zxpseries8-ug-en 110/226
106 Zebra ZXP Series 8 Card Printer User’s Manual P1045430-002
5: ZXP Series Too lbo x
Information
Laminator
This information cannot be edited or changed by the user; however, this information may beuseful for Zebra trained and certified personnel in diagnosing or evaluating laminator status.
• Status information includes Status, Top surface and Bottom surface temperatures, andLine Voltage.
• Firmware lists the version of the Firmware (LCB and MAB).
• Sensors shows the state of each laminator sensor.
• Odometer shows Total up time, Top bulb on time, Bottom bulb on time, the number ofCards processed, and the number of Cards laminated.

8/10/2019 Zxpseries8 Ug En
http://slidepdf.com/reader/full/zxpseries8-ug-en 111/226
5: ZXP Series Toolbox
Information
P1045430-002 Zebra ZXP Series 8 Card Printer User’s Manual 107
Wired Network
This information cannot be edited or changed by the user; however, this information may beuseful for network administrators in diagnosing or evaluating wired network status.
• Network Configuration
- IP address (Internet Protocol) - Each computer that connects to a network or theInternet, must have a unique address. IP address numbers are in the form x.x.x.x; e.g.,169.254.100.2. Most networks use DHCP or AutoIP to dynamically assign IPaddresses; however, a device can be manually assigned a static IP address.
- Gateway - A dedicated device (router or computer) that connects two differentnetworks. For example, a computer on an Ethernet network may act as a gateway
between the network and the Internet.
- Subnet mask - A number that identifies the IP addresses that belong to a subnet.
- MAC address (Media Access Control) - A hardware address that uniquelyidentifies each device on a network. You can usually find the MAC address printed
on the device.

8/10/2019 Zxpseries8 Ug En
http://slidepdf.com/reader/full/zxpseries8-ug-en 112/226
108 Zebra ZXP Series 8 Card Printer User’s Manual P1045430-002
5: ZXP Series Too lbo x
Information
Wireless Network
This information cannot be edited or changed by the user; however, this information may beuseful for network administrators in diagnosing or evaluating wireless network status.
For details on the functionality of this screen, refer to the Wireless Reference Manual,
P/N P1035089-001.
The Save button saves your wireless settings as XML files. The XML files are stored in thefollowing default location: C:\ProgramData\ZXP Series 8\Config.

8/10/2019 Zxpseries8 Ug En
http://slidepdf.com/reader/full/zxpseries8-ug-en 113/226
5: ZXP Series Toolbox
Configuration
P1045430-002 Zebra ZXP Series 8 Card Printer User’s Manual 109
Configuration
Job Log
The Job Log is a utility that builds a text file with separators. The only data that is logged iswhat is selected from the list in the contents area. The data set can be uploaded at any time to acentral archive, thus providing a means for security officers to validate a card by comparing itwith tamper-proof real data.
• Enable logging - If this box is checked, the logging feature is enabled.
• Log File Definition - Choose one of the following options:
- If the “Create new log file each day” box is unchecked, the data is saved to a log fileof your choice (Filename).
- If the box is checked, the data is saved to log file with the day’s date; e.g., ZXPLog_2013_4_15.
- In addition to the Filename, you may wish to enter a special field Separator Character.The default field Separator Character is “ |”.
Note • Access to this feature is controlled via Advanced Security > Security Roles.

8/10/2019 Zxpseries8 Ug En
http://slidepdf.com/reader/full/zxpseries8-ug-en 114/226
110 Zebra ZXP Series 8 Card Printer User’s Manual P1045430-002
5: ZXP Series Too lbo x
Configuration
• Log File Contents - The Log File Contents group selects the data to be logged in the fileyou specified above. The data will be logged in the order displayed on the screen, eachfield being separated by the character specified in the Logfile Definition, Separator.
Log File Contents selections include:
- Time: Logs the time a which the card was sent to the printer in the HH:MM:SSformat. The 24-hour clock is used, so 13:00:00 = 1:00 pm, and 05:00:00 = 5:00 am.
- Date: Logs the date the card was sent to the printer in the MM/DD/YYYY format.
- Printer serial number: Logs the serial number of the printer that printed the card.
- Static text: Adds the text in the text box (16 characters maximum) to the record.
- IP address: Logs the IP address of the PC that sent the card to the printer.
- Magnetic Track 1, 2, 3 Data: Logs the data sent to the printer to be encoded onthe card’s magnetic stripe.
- EIN data from Mag Track 2: Logs the EIN (Embedded Inventory Number) pre-encoded on Track 2.
- Application will send data with “~L=xxx” TextOut: Allows third-partyapplications to send data to be logged in much the same way as they would sendmagnetic data.
- Spooler job number: Logs the number which the card print job was assigned in theWindows print spooler.
- User name: Logs the name of the person who is logged onto the computer sendingthe print job.
- ZML Job ID: Logs the UUID; or, in a Windows environment, the GUID.
The Save Job Log Settings button saves the Job Log settings.
The Save Printer Log Files button creates the following XML Log Files:
- GetLogCleanHistory.xml
- GetLogErrors.xml
- GetLogEventHistory.xml
- GetLogServiceHistory.xml

8/10/2019 Zxpseries8 Ug En
http://slidepdf.com/reader/full/zxpseries8-ug-en 115/226
5: ZXP Series Toolbox
Configuration
P1045430-002 Zebra ZXP Series 8 Card Printer User’s Manual 111
Save/Restore
When you set up a printer, you can save the printer and driver configuration settings; then, ifyou need to you restore the printer, you can use the saved configuration settings to ensureconfiguration consistency.
• The Save buttons save the Driver Settings and/or Printer Settings in an XML file format.
1. Click the Save button, and observe the browser window.
2. Enter the <filename>, and click the Save button
3. The Printer and Driver configuration settings will be stored as P_<filename> andD_<filename> respectively.
• The Restore buttons restore the Driver Settings and/or Printer Settings saved in the XML
file format above.
1. Click the Restore button, and observe the list of files in the browser window.
2. Select the desired file, and click the Open button.
3. The configuration settings will be restored and displayed.
Note • Access to this feature is controlled via Advanced Security > Security Roles.
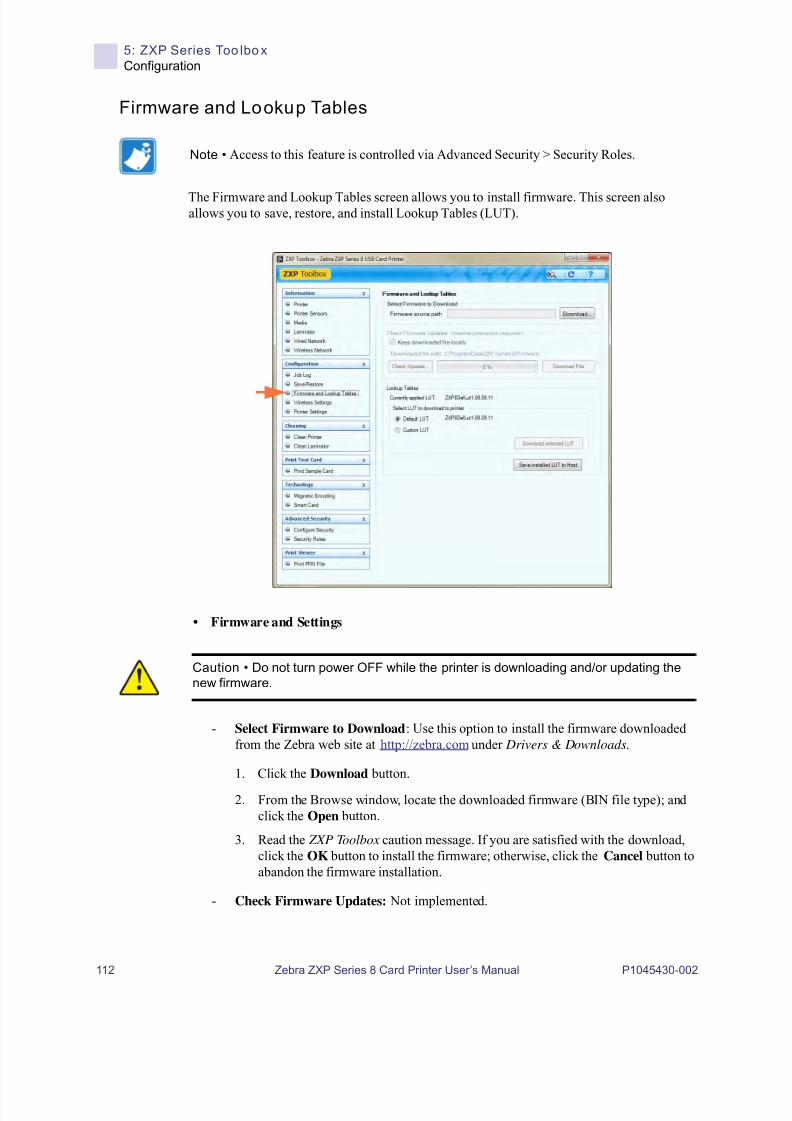
8/10/2019 Zxpseries8 Ug En
http://slidepdf.com/reader/full/zxpseries8-ug-en 116/226
112 Zebra ZXP Series 8 Card Printer User’s Manual P1045430-002
5: ZXP Series Too lbo x
Configuration
Firmware and Lookup Tables
The Firmware and Lookup Tables screen allows you to install firmware. This screen alsoallows you to save, restore, and install Lookup Tables (LUT).
• Firmware and Settings
- Select Firmware to Download: Use this option to install the firmware downloadedfrom the Zebra web site at http://zebra.com under Drivers & Downloads.
1. Click the Download button.
2. From the Browse window, locate the downloaded firmware (BIN file type); andclick the Open button.
3. Read the ZXP Toolbox caution message. If you are satisfied with the download,click the OK button to install the firmware; otherwise, click the Cancel button toabandon the firmware installation.
- Check Firmware Updates: Not implemented.
Note • Access to this feature is controlled via Advanced Security > Security Roles.
Caution • Do not turn power OFF while the printer is downloading and/or updating the
new firmware.
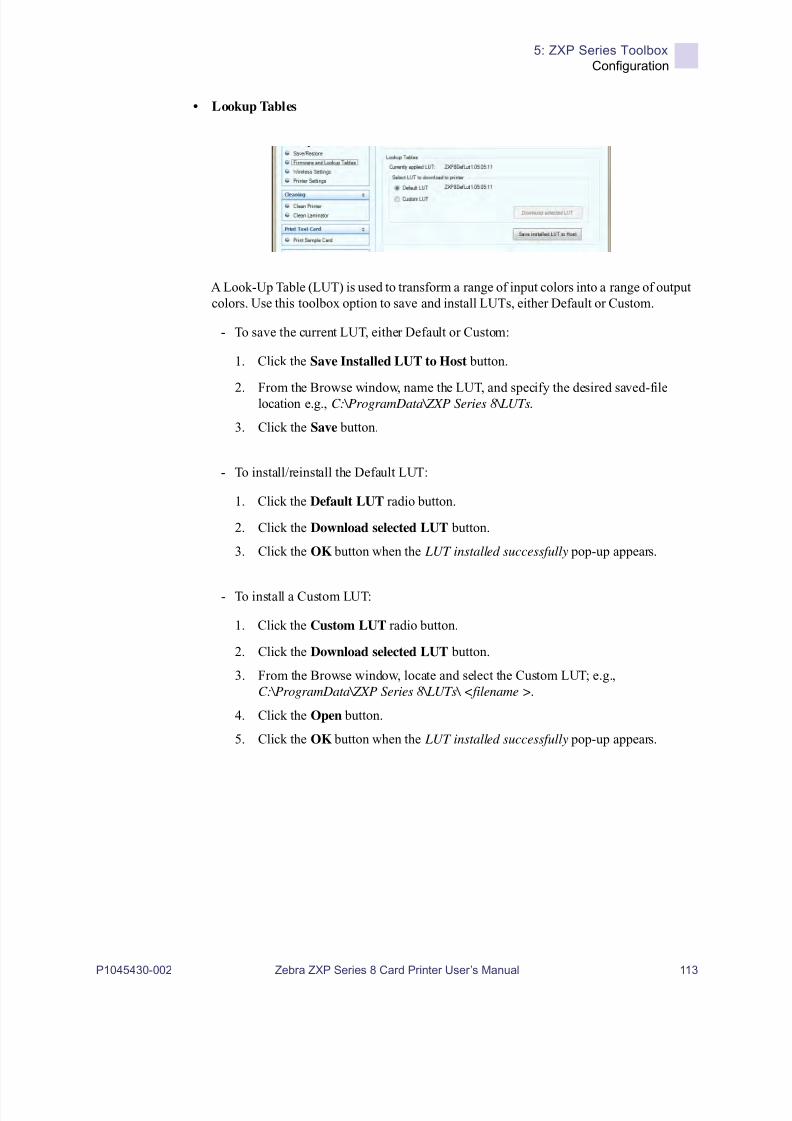
8/10/2019 Zxpseries8 Ug En
http://slidepdf.com/reader/full/zxpseries8-ug-en 117/226
5: ZXP Series Toolbox
Configuration
P1045430-002 Zebra ZXP Series 8 Card Printer User’s Manual 113
• Lookup Tables
A Look-Up Table (LUT) is used to transform a range of input colors into a range of outputcolors. Use this toolbox option to save and install LUTs, either Default or Custom.
- To save the current LUT, either Default or Custom:
1. Click the Save Installed LUT to Host button.
2. From the Browse window, name the LUT, and specify the desired saved-filelocation e.g., C:\ProgramData\ZXP Series 8\LUTs.
3. Click the Save button.
- To install/reinstall the Default LUT:
1. Click the Default LUT radio button.
2. Click the Download selected LUT button.
3. Click the OK button when the LUT installed successfully pop-up appears.
- To install a Custom LUT:
1. Click the Custom LUT radio button.
2. Click the Download selected LUT button.
3. From the Browse window, locate and select the Custom LUT; e.g.,C:\ProgramData\ZXP Series 8\LUTs\ <filename >.
4. Click the Open button.
5. Click the OK button when the LUT installed successfully pop-up appears.

8/10/2019 Zxpseries8 Ug En
http://slidepdf.com/reader/full/zxpseries8-ug-en 118/226
114 Zebra ZXP Series 8 Card Printer User’s Manual P1045430-002
5: ZXP Series Too lbo x
Configuration
Wireless Settings
The Wireless Settings screen allows you to connect a printer to a wireless network, or changethe printer or network settings after you have installed the printer.
For details on the functionality of this screen, refer to the Wireless Reference Manual,
P/N P1035089-001.
There are two approaches that can be used to configure the printer's wireless settings:
• If all the necessary information is known (SSID, BSSID, Channel, Security, Encryptionand Key), enter these parameters directly into the Wireless Configuration.
• The alternate approach is to request that the printer scan for wireless access points andselect one. This automatically fills in most of the Wireless Configuration parameters.
Note • Access to this feature is controlled via Advanced Security > Security Roles.

8/10/2019 Zxpseries8 Ug En
http://slidepdf.com/reader/full/zxpseries8-ug-en 119/226
5: ZXP Series Toolbox
Configuration
P1045430-002 Zebra ZXP Series 8 Card Printer User’s Manual 115
Printer Settings
The Printer Settings screen allows you to change the Operator Control Panel (OCP) settings,set the network configuration parameters, make print performance settings, adjust the printoffset, and change the printhead serial number and resistance.
• OCP: This section allows you to change the Language displayed in the Operator ControlPanel (English, French, Spanish, German, Portuguese, or Italian) and adjust the LCDContrast level selected (the level ranges from 20 to 50).
• Wired Network Configuration: This section allows you to change the various networkconfiguration parameters (DHCP, SNMP, IP address, Gateway, Subnet mask, andMAC address).
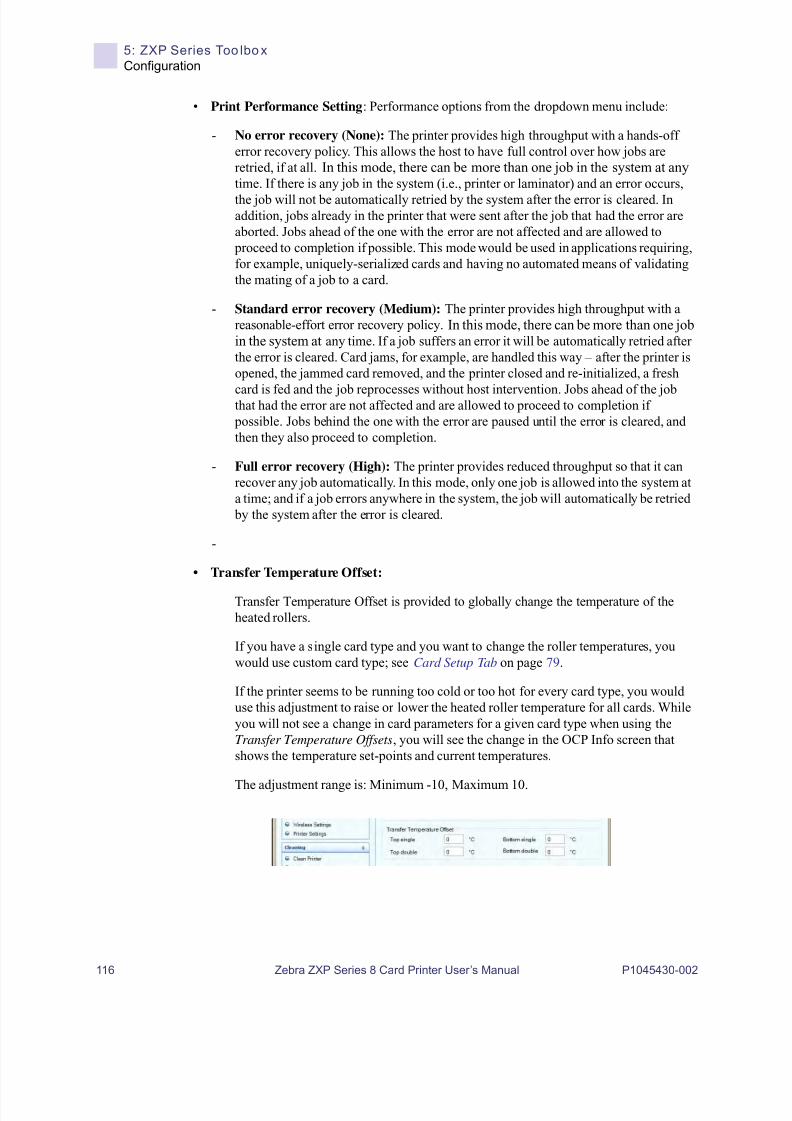
8/10/2019 Zxpseries8 Ug En
http://slidepdf.com/reader/full/zxpseries8-ug-en 120/226
116 Zebra ZXP Series 8 Card Printer User’s Manual P1045430-002
5: ZXP Series Too lbo x
Configuration
• Print Performance Setting: Performance options from the dropdown menu include:
- No error recovery (None): The printer provides high throughput with a hands-offerror recovery policy. This allows the host to have full control over how jobs areretried, if at all. In this mode, there can be more than one job in the system at anytime. If there is any job in the system (i.e., printer or laminator) and an error occurs,
the job will not be automatically retried by the system after the error is cleared. Inaddition, jobs already in the printer that were sent after the job that had the error areaborted. Jobs ahead of the one with the error are not affected and are allowed to
proceed to completion if possible. This mode would be used in applications requiring,for example, uniquely-serialized cards and having no automated means of validatingthe mating of a job to a card.
- Standard error recovery (Medium): The printer provides high throughput with areasonable-effort error recovery policy. In this mode, there can be more than one jobin the system at any time. If a job suffers an error it will be automatically retried afterthe error is cleared. Card jams, for example, are handled this way – after the printer isopened, the jammed card removed, and the printer closed and re-initialized, a fresh
card is fed and the job reprocesses without host intervention. Jobs ahead of the jobthat had the error are not affected and are allowed to proceed to completion if possible. Jobs behind the one with the error are paused until the error is cleared, andthen they also proceed to completion.
- Full error recovery (High): The printer provides reduced throughput so that it canrecover any job automatically. In this mode, only one job is allowed into the system ata time; and if a job errors anywhere in the system, the job will automatically be retried
by the system after the error is cleared.
-
• Transfer Temperature Offset:
Transfer Temperature Offset is provided to globally change the temperature of theheated rollers.
If you have a single card type and you want to change the roller temperatures, youwould use custom card type; see Card Setup Tab on page 79.
If the printer seems to be running too cold or too hot for every card type, you woulduse this adjustment to raise or lower the heated roller temperature for all cards. Whileyou will not see a change in card parameters for a given card type when using theTransfer Temperature Offsets, you will see the change in the OCP Info screen thatshows the temperature set-points and current temperatures.
The adjustment range is: Minimum -10, Maximum 10.
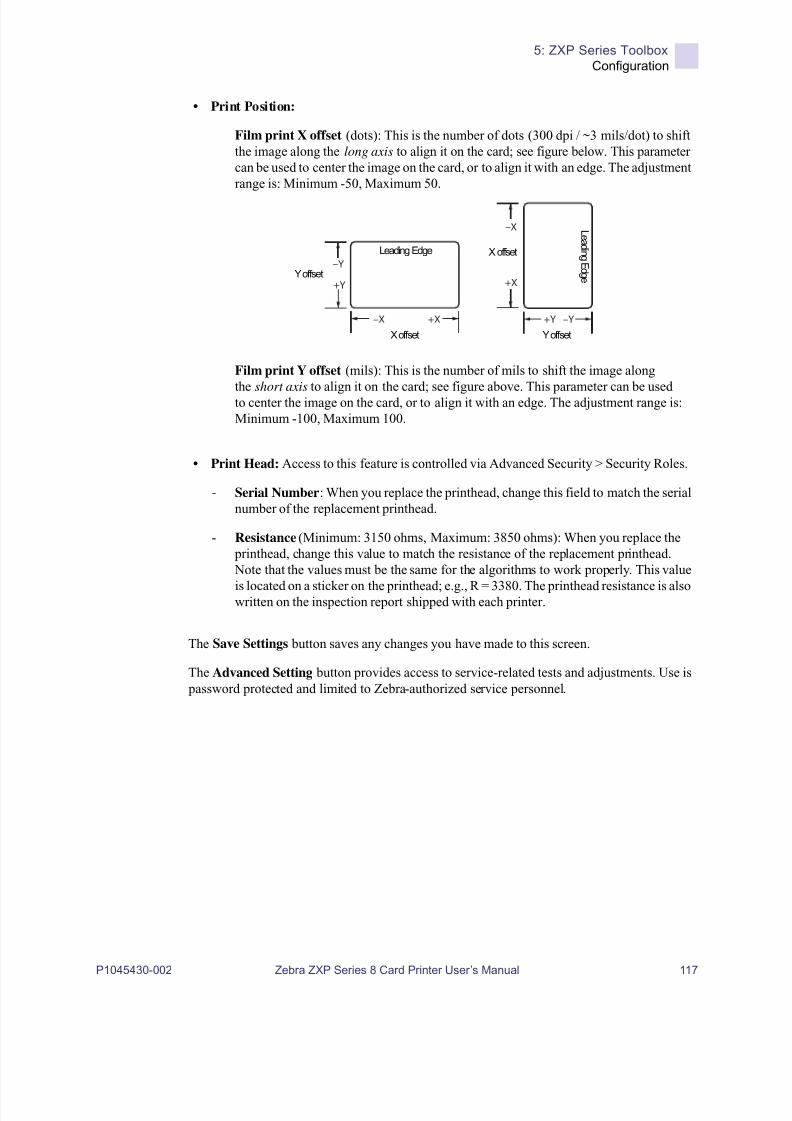
8/10/2019 Zxpseries8 Ug En
http://slidepdf.com/reader/full/zxpseries8-ug-en 121/226
5: ZXP Series Toolbox
Configuration
P1045430-002 Zebra ZXP Series 8 Card Printer User’s Manual 117
• Print Position:
Film print X offset (dots): This is the number of dots (300 dpi / ~3 mils/dot) to shiftthe image along the long axis to align it on the card; see figure below. This parametercan be used to center the image on the card, or to align it with an edge. The adjustmentrange is: Minimum -50, Maximum 50.
Film print Y offset (mils): This is the number of mils to shift the image along
the short axis to align it on the card; see figure above. This parameter can be usedto center the image on the card, or to align it with an edge. The adjustment range is:Minimum -100, Maximum 100.
• Print Head: Access to this feature is controlled via Advanced Security > Security Roles.
- Serial Number: When you replace the printhead, change this field to match the serialnumber of the replacement printhead.
- Resistance (Minimum: 3150 ohms, Maximum: 3850 ohms): When you replace the printhead, change this value to match the resistance of the replacement printhead. Note that the values must be the same for the algorithms to work properly. This value
is located on a sticker on the printhead; e.g., R = 3380. The printhead resistance is alsowritten on the inspection report shipped with each printer.
The Save Settings button saves any changes you have made to this screen.
The Advanced Setting button provides access to service-related tests and adjustments. Use is password protected and limited to Zebra-authorized service personnel.
+X–X
+X
–X
–Y
+Y
–Y+Y
X offset Y offset
X offset
Y offset
Leading Edge
L e a d i n gE d g e

8/10/2019 Zxpseries8 Ug En
http://slidepdf.com/reader/full/zxpseries8-ug-en 122/226
118 Zebra ZXP Series 8 Card Printer User’s Manual P1045430-002
5: ZXP Series Too lbo x
Cleaning
Cleaning
Clean Printer
The Clean Printer screen gives you the option to clean the printer via the Toolbox; refer to
Section 6, for cleaning via the OCP.
• Side Card Path
When you click the Clean button, instructions will appear in the following sequence:
1. Remove the card hopper, and click the Next button.
2. Insert X Roller Cleaning Card in the side slot where the card hopper was located,and click the Clean button.
3. Wait until the cleaning process completes. The card will be ejected through theside slot.
4. Flip the cleaning card. Insert the card through the side slot. Click the Clean button.
5. Wait until the cleaning process completes. The card will be ejected through theside slot.
6. Observe the message, Side card path cleaning has been completed successfully.
7. Replace the card hopper, and click the Close button to conclude the side card pathcleaning process.

8/10/2019 Zxpseries8 Ug En
http://slidepdf.com/reader/full/zxpseries8-ug-en 123/226
5: ZXP Series Toolbox
Cleaning
P1045430-002 Zebra ZXP Series 8 Card Printer User’s Manual 119
• Front Card Path
When you Click the Clean button, instructions will appear in the following sequence:
1. Insert a Y Roller Cleaning Card in the front feed slot, and click the Clean button.
2. Wait until the cleaning process completes. The card will eject through the frontfeed slot.
3. Flip the cleaning card. Insert the card through front feed slot, and click theClean button.
4. Wait until the cleaning process completes. The card will eject through the frontfeed slot.
5. Observe the message, Front card path cleaning has been completed successfully.
6. Click the Close button to conclude the front card path cleaning process.
• Heater Rollers
When you Click the Clean button, instructions will appear in the following sequence:
1. Open the printer cover, remove the transfer film, and close the cover. Then, click theNext button.
2. Wait until the transfer temperature falls below 70o C.
3. Remove the backing from the Hot Roller Cleaning Card. Insert the card in the frontfeed slot, and click the Clean button.
4. Wait until the cleaning process is completed. The card will be ejected through thefront feed slot.
5. Flip the cleaning card. Insert card in the front feed slot, and click the Clean button.
6. Wait until cleaning process is completed. The card will be ejected through the frontfeed slot.
7. Remove the cleaning card. Open the printer cover, and install the transfer film. Closethe printer cover, and click the Close button to complete the cleaning cycle.

8/10/2019 Zxpseries8 Ug En
http://slidepdf.com/reader/full/zxpseries8-ug-en 124/226
120 Zebra ZXP Series 8 Card Printer User’s Manual P1045430-002
5: ZXP Series Too lbo x
Cleaning
Clean Laminator
The Clean Laminator screen gives you the option to clean the laminator via the Toolbox; referto Section 6, for cleaning via the OCP.
• Laminator Card Path (see Cleaning: Laminator on page 135).
When you click the Clean button, instructions will appear in the following sequence:
1. Wait until the transfer temperature falls below 60oC.
2. Open the laminator cover, remove the laminates (top and bottom cassettes), and closethe cover; then, click on the OK button.
3. Remove the card hopper, and click on the OK button.
4. Insert the Laminator Cleaning Card in the side slot where the card hopper was located.Click on the OK button after inserting the cleaning card.
5. Wait until the cleaning process completes. The card will eject through the side slot.
6. Observe the message, Laminator cleaning has been completed successfully.
7. Open the laminator cover, install the laminates, and close the cover.
8. Click the Close button to conclude the card transport roller cleaning process.

8/10/2019 Zxpseries8 Ug En
http://slidepdf.com/reader/full/zxpseries8-ug-en 125/226
5: ZXP Series Toolbox
Cleaning
P1045430-002 Zebra ZXP Series 8 Card Printer User’s Manual 121
• Laminator Rollers (see Cleaning: Laminator Media Feed Rollers on page 136).
1. Open the laminator cover, remove both laminates, prepare an alcohol swab, and clickthe Next button.
2. Click the Top button, and clean the top feed roller (with the alcohol swab) until it
stops turning.3. Click the Bottom button, and clean the bottom feed roller (with the alcohol swab)
until it stops turning.
4. When completed, install both laminates; and click the Close button to conclude thelaminator rollers cleaning process.
• Laminator Oven (see Cleaning: Heater Assembly Rollers on page 138).
1. Wait until the transfer temperature falls below 60oC.
2. Open the laminator cover, remove the oven assembly, and click the Next button.
3. Clean both rollers with the adhesive card, and click the Next button when completed.
4. Install the oven assembly, and click the Close button to conclude laminator ovencleaning process.

8/10/2019 Zxpseries8 Ug En
http://slidepdf.com/reader/full/zxpseries8-ug-en 126/226
122 Zebra ZXP Series 8 Card Printer User’s Manual P1045430-002
5: ZXP Series Too lbo x
Print Test Card
Print Test Card
Print Sample Card
1. View the Test Card Library. Use the scrollbar to view all the selections. Note that
the sample cards in the Test Card Library are .bmp images stored in the followingdefault location: C:\ProgramData\ZXP Series 8\Library.
- or -Click on the Add button, then browse to and select an image of your own to add to theTest Card Library.
2. Set the front side:
a. Select (click on) a “front side” card from the Test Card Library.
b. Click the Set As Front button.
c. View the selected card in the Preview. Note that to remove the selected card fromthe Preview, click the Set As Front button.
d. To change your selection, repeat Steps Step a through Step c.
3. Set the back side: same as Step Step 2, except click the Set As Back button.
4. When satisfied with your selection, click the Print Sample Card button to print thesample card.
The Printing Preferences button takes you to the Printer Preferences, Card Setup Tab.
The Print Configuration Test Card button provides printer configuration data on a card.
The Reprint Last Card button sends a command to the printer to print the last card.

8/10/2019 Zxpseries8 Ug En
http://slidepdf.com/reader/full/zxpseries8-ug-en 127/226
5: ZXP Series Toolbox
Technology
P1045430-002 Zebra ZXP Series 8 Card Printer User’s Manual 123
Technology
Magnetic Encoding
The Magnetic Encoding screen allows the user to test various magnetic encoding options. Formore information on magnetic encoding, refer to Appendix E.
• Settings
Before using this screen, set the following magnetic encoding properties:
1. Select the card type; see Card Setup Tab on page 79.
2. Select the magnetic encoding type; see Encoding Tab on page 95. Encoding typessupported are ISO, AAMVA, CUSTOM, BINARY, and JIS-II.
The screen above will reflect the choices made in Step 1 and Step 2.
Note • Access to this feature is controlled via Advanced Security > Security Roles.

8/10/2019 Zxpseries8 Ug En
http://slidepdf.com/reader/full/zxpseries8-ug-en 128/226
124 Zebra ZXP Series 8 Card Printer User’s Manual P1045430-002
5: ZXP Series Too lbo x
Technology
• Encode/Read Data
Coercivity: Select either High or Low.
Track selection:
- Read: Click the checkboxes to select Track 1, Track 2, and/or Track 3; select the
desired ISO format (ISO1, ISO2, or ISO3) for each track from the associated ISOdropdown menus; click the Read button, and validate the data read.
- Encode: Click the checkboxes to select Track 1, Track 2, and/or Track 3; select thedesired ISO format (ISO1, ISO2, or ISO3) for each track from the associated ISOdropdown menus; enter the data to be written; and click the Encode button.
- Get EIN: Click on the Get EIN button to read the EIN encoded on the magneticstripe. The EIN is read and displayed.
The Printing Preferences button takes you to Printing Preferences used to set selectedconfiguration parameters; see Printing Preferences on page 78.
The Restore Defaults button restores the magnetic encoding default values.
The Apply button saves the magnetic encoding values.

8/10/2019 Zxpseries8 Ug En
http://slidepdf.com/reader/full/zxpseries8-ug-en 129/226
5: ZXP Series Toolbox
Technology
P1045430-002 Zebra ZXP Series 8 Card Printer User’s Manual 125
Smart Card
The Smart Card screen allows the user to test various smart card encoding options. For moreinformation on smart card encoding, refer to Appendix F.
• Card Readers:
- Select the card reader from the drop-down menu.
- Card Option: Select either Contact or Contactless.
• Card Types:
- Select the card type from the drop-down menu.
- Place a card in the feeder, and click Feed Card button.

8/10/2019 Zxpseries8 Ug En
http://slidepdf.com/reader/full/zxpseries8-ug-en 130/226
126 Zebra ZXP Series 8 Card Printer User’s Manual P1045430-002
5: ZXP Series Too lbo x
Technology
• Card Types (continued):
- Input Data: Includes address, length, input, and PIN.
• Writing Data: Set the address, set the length, enter data in Input field, and clickthe Write button.
• Reading Data: After writing data (above), click the Read button. “Readsuccessful” and the value read from the smart card will be displayed in theMessages section.
• Click the Set PIN button to set the security code for the card.
• Click the Write Raw Data button to write “raw data” to a card.
The Get ATR button returns the ATR (Answer To Reset) result from the card reader.This is useful to identifying the type of smart card inserted into the printer.
The Eject Card button ejects the card.
- Click the Messages checkbox to show the output in hex format.
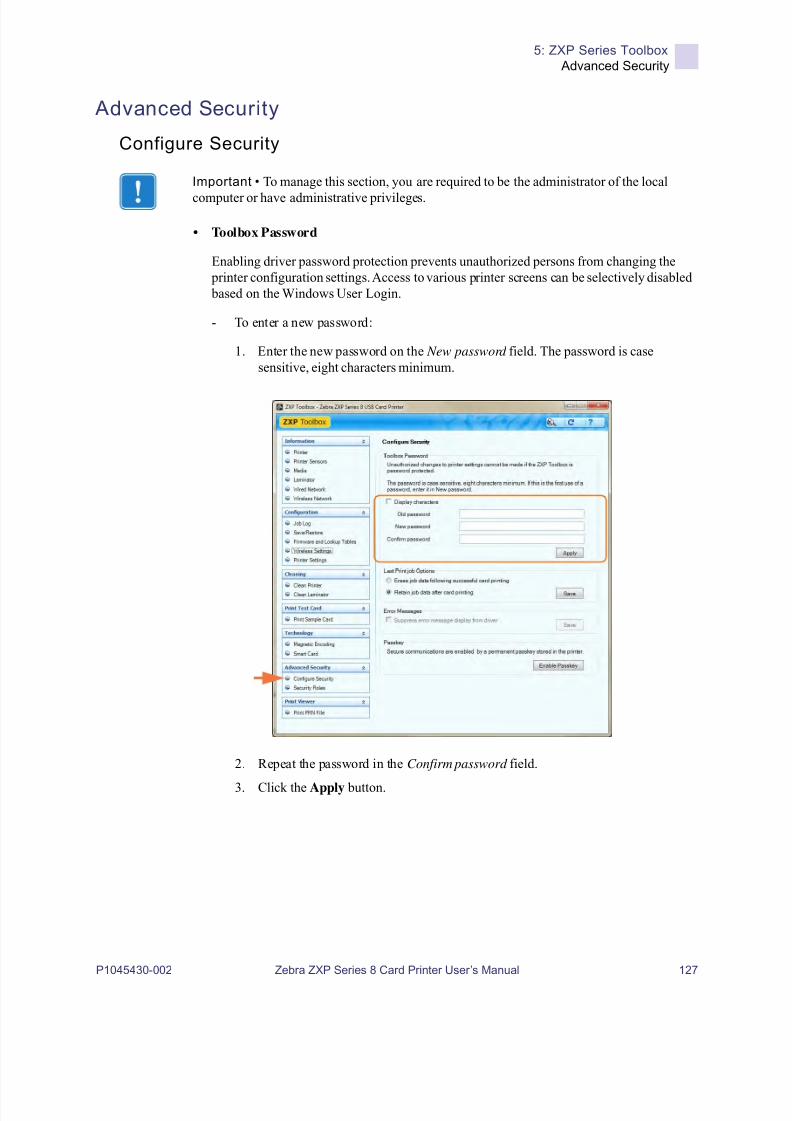
8/10/2019 Zxpseries8 Ug En
http://slidepdf.com/reader/full/zxpseries8-ug-en 131/226
5: ZXP Series Toolbox
Advanced Security
P1045430-002 Zebra ZXP Series 8 Card Printer User’s Manual 127
Advanced Security
Configure Security
• Toolbox Password
Enabling driver password protection prevents unauthorized persons from changing the printer configuration settings. Access to various printer screens can be selectively disabled based on the Windows User Login.
- To enter a new password:
1. Enter the new password on the New password field. The password is casesensitive, eight characters minimum.
2. Repeat the password in the Confirm password field.
3. Click the Apply button.
Important • To manage this section, you are required to be the administrator of the local
computer or have administrative privileges.

8/10/2019 Zxpseries8 Ug En
http://slidepdf.com/reader/full/zxpseries8-ug-en 132/226
128 Zebra ZXP Series 8 Card Printer User’s Manual P1045430-002
5: ZXP Series Too lbo x
Advanced Security
• Toolbox Password (continued)
- To change the Password:
1. Enter your password in the Old password field.
2. Enter the new password in the New password and the Confirm password fields.3. Click the Apply button.
- To deactivate password protection:
1. Enter your password in the Old password field.
2. Leave the New password and the Confirm password fields blank.
3. Click the Apply button.
• Last Print Job Options
- The Erase job data following successful card printing option erases the print job aftersuccessful card printing.
- The Retain job data after card printing option allows the print job to remain inmemory for multiple prints via the OCP.
The Save button saves the selection.
• Error Messages
Select the checkbox to suppress error message display from the driver.
• Passkey
The Enable Passkey button provides access to advanced security settings; i.e., HostAuthentication, Data Encryption, and Printer Lock Key.

8/10/2019 Zxpseries8 Ug En
http://slidepdf.com/reader/full/zxpseries8-ug-en 133/226
5: ZXP Series Toolbox
Advanced Security
P1045430-002 Zebra ZXP Series 8 Card Printer User’s Manual 129
Securi ty Roles
Use this section used to establish security roles; i.e., grant and restrict access to various ZXPSeries Toolbox screens. The list of users in the drop-down menu (e.g., Guest, HelpAssistant,Local User, localfix, etc.) is derived from the list of users o the system.
• To set security access roles:
1. Select a user from the drop-down menu.
2. Use the arrow buttons (>, >>, <, and <<) to make specific ZXP Toolbox Featuresavailable to or restrict specific features from the selected user.
3. When satisfied with the selection, click the Save button.
At the next login, the user will only see or have access to the features previously granted.
Important • To manage this section, you are required to be the administrator of the localcomputer or have administrative privileges.
Important • If you have Administrator Privileges, and the ZXP Toolbox Security Roles tab is not visible, you will need to access the ZXP Toolbox as follows:
Select Start > All Programs > Zebra ZXP Series 8 Card Printer. Right click on ZXP Toolbox;
and from the pop-up menu, select Run as administrator.

8/10/2019 Zxpseries8 Ug En
http://slidepdf.com/reader/full/zxpseries8-ug-en 134/226
130 Zebra ZXP Series 8 Card Printer User’s Manual P1045430-002
5: ZXP Series Too lbo x
Print Viewer
Print Viewer
When you print a PRN file, you print directly to the printer, bypassing computer applicationsand associated printer drivers. This utility can be used to ensure that your printer is working
properly by isolating it from driver-related and communication-related issues.
Print PRN file
• To send a PRN file to the printer:
1. Click the Browse button.
2. From the Browse window, locate and select a PRN file.
3. Click the Open button.
4. View the PRN file.
5. If satisfied with the selection, click the Print button.
Successfully printing the PRN file indicates that the printer and data communications to the printer are set up and configured properly.

8/10/2019 Zxpseries8 Ug En
http://slidepdf.com/reader/full/zxpseries8-ug-en 135/226
P1045430-002 Zebra ZXP Series 8 Card Printer User’s Manual 131
6Cleaning
Cleaning the Printer
Clean your Printer using the Cleaning Cards provided. The regular use of these cards willclean and maintain important parts of your printer that cannot be reached, including thePrinthead, Transport Rollers, and optional Magnetic Encoder Station.
Printer usage (total number of cards printed and total number of cards laminated) can be foundon the printer’s Properties, Device Information tab. To access the Device Information tab,select Start > Devices and Printers. Then right-click on the Zebra ZXP Series 8 Card Printer
listing, and select Properties > Device Information.
When to Clean
• X-Roller and Y-Roller cleaning should occur every 5,000 cards.
• Heated Roller cleaning should occur every 20,000 cards. Note that a Heated RollerCleaning Card is not supplied with the printer; order Zebra Cleaning Card KitP/N 105999-801.
Caution • PROTECT YOUR FACTORY WARRANTY!
The recommended maintenance procedures must be performed to maintain the factory
warranty. Other than the recommended cleaning procedures described in this manual,
allow only Zebra authorized technicians to service the Printer.
NEVER loosen, tighten, adjust, or bend, etc., a part or cable inside the printer.
NEVER use a high-pressure air compressor to remove particles from the printer.

8/10/2019 Zxpseries8 Ug En
http://slidepdf.com/reader/full/zxpseries8-ug-en 136/226
132 Zebra ZXP Series 8 Card Printer User’s Manual P1045430-002
6: Cleaning
Cleaning the Printer
Cleaning the Rollers
Step 1. To initiate the cleaning process.
a. Press the MENU button on the Operator Control Panel (OCP). The OCP willdisplay the Main Menu.
b. Scroll through the Main Menu, and select Advanced Settings. The OCP willdisplay the Advanced Settings Menu.
c. Scroll through the Advanced Settings Menu, and select Clean Printer. The OCPwill display the Clean Printer Menu.
Step 2. To clean the X-Drive Rollers.
a. Select Clean Side Card Path to run the X-Roller Cleaning Routine.
b. Use the X-Roller Cleaning Card.
c. Follow the OCP instructions.
d. When complete, the OCP will return to the Clean Printer Menu.
Note • Do not use previously used cleaning cards.

8/10/2019 Zxpseries8 Ug En
http://slidepdf.com/reader/full/zxpseries8-ug-en 137/226
6: Cleaning
Cleaning the Printer
P1045430-002 Zebra ZXP Series 8 Card Printer User’s Manual 133
Step 3. To clean the Y-Drive Rollers.
a. Select Clean Front Card Path to run the Y-Roller Cleaning Routine.
b. Use the Y-Roller Cleaning Card.
c. Follow the OCP instructions.
d. When complete, the OCP will return to the Clean Printer Menu.
Step 4. To clean the Heated Rollers.
a. Select Clean Transfer Path to run the Heated Roller Cleaning Routine.
b. Use the Hot Roller Cleaning Card.
c. Follow the OCP instructions.
d. When complete, the OCP will return to the Clean Printer Menu.
e. Then use the Hot Roller Cleaning Card to clean the Platen; see Page 134.
Exit the Printer Menus by selecting RETURN at each menu level (Clean Printer Menu,Advanced Settings Menu, and Main Menu).
NOTE • To avoid a long wait while the Heated Rollers cool to 70oC, perform cleaning
before the rollers heat; i.e., when first turned on and the rollers are still cold.

8/10/2019 Zxpseries8 Ug En
http://slidepdf.com/reader/full/zxpseries8-ug-en 138/226
134 Zebra ZXP Series 8 Card Printer User’s Manual P1045430-002
6: Cleaning
Cleaning the Printer
Cleaning the Platen
Step 1. Open the printer Door.
Step 2. Remove the Transfer Film.
Step 3. Manually run the Hot Roller Cleaning Card over the Platen.
Step 4. Re-install the Transfer Film.
Step 5. Close the printer Door.
Platen

8/10/2019 Zxpseries8 Ug En
http://slidepdf.com/reader/full/zxpseries8-ug-en 139/226
6: Cleaning
Cleaning the Laminator
P1045430-002 Zebra ZXP Series 8 Card Printer User’s Manual 135
Cleaning the Laminator
Initiate the cleaning process:
Step 1. Press the MENU button on the Operator Control Panel (OCP). The OCP willdisplay the Main Menu.
Step 2. Scroll through the Main Menu, and select Advanced Settings. The OCP willdisplay the Advanced Settings Menu.
Step 3.Scroll through the Advanced Settings Menu, and select Clean Printer. The OCPwill display the Clean Printer Menu.
Cleaning: Laminator
The default cleaning interval is once every 5000 cards.
Step 1. Select Clean Lam Card Path to run the Laminator Cleaning Routine.
Step 2. Use the Laminator Cleaning Card in the Laminator Cleaning Kit.
Step 3. Follow the OCP instructions.
Step 4. When complete, the OCP will return to the Clean Printer Menu.
Note • To order a Laminator Cleaning Kit, see the Media List on the User Documentation
and Drivers CD supplied with this printer.
NOTE • To avoid a long wait while the Card Transport Rollers cool to 60oC, perform
cleaning before the rollers heat; i.e., when first turned on and the rollers are still cold.
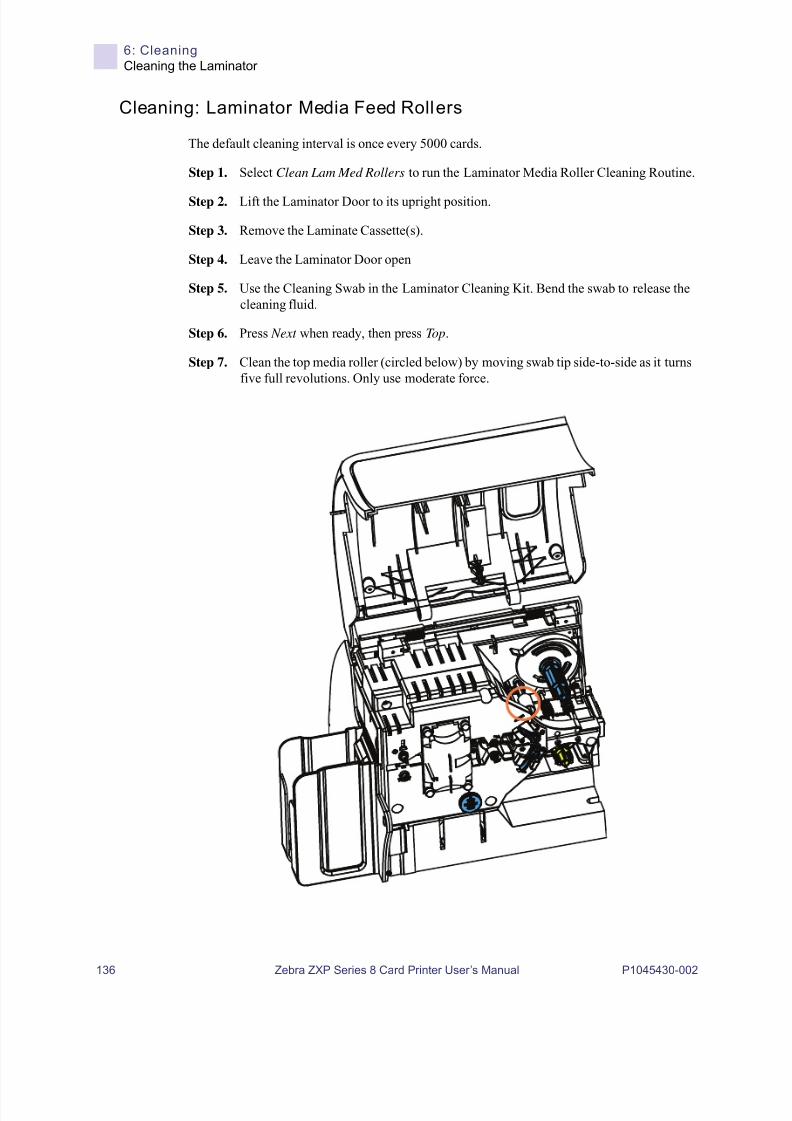
8/10/2019 Zxpseries8 Ug En
http://slidepdf.com/reader/full/zxpseries8-ug-en 140/226
136 Zebra ZXP Series 8 Card Printer User’s Manual P1045430-002
6: Cleaning
Cleaning the Laminator
Cleaning: Laminator Media Feed Rollers
The default cleaning interval is once every 5000 cards.
Step 1. Select Clean Lam Med Rollers to run the Laminator Media Roller Cleaning Routine.
Step 2. Lift the Laminator Door to its upright position.
Step 3. Remove the Laminate Cassette(s).
Step 4. Leave the Laminator Door open
Step 5. Use the Cleaning Swab in the Laminator Cleaning Kit. Bend the swab to release thecleaning fluid.
Step 6. Press Next when ready, then press Top.
Step 7. Clean the top media roller (circled below) by moving swab tip side-to-side as it turnsfive full revolutions. Only use moderate force.
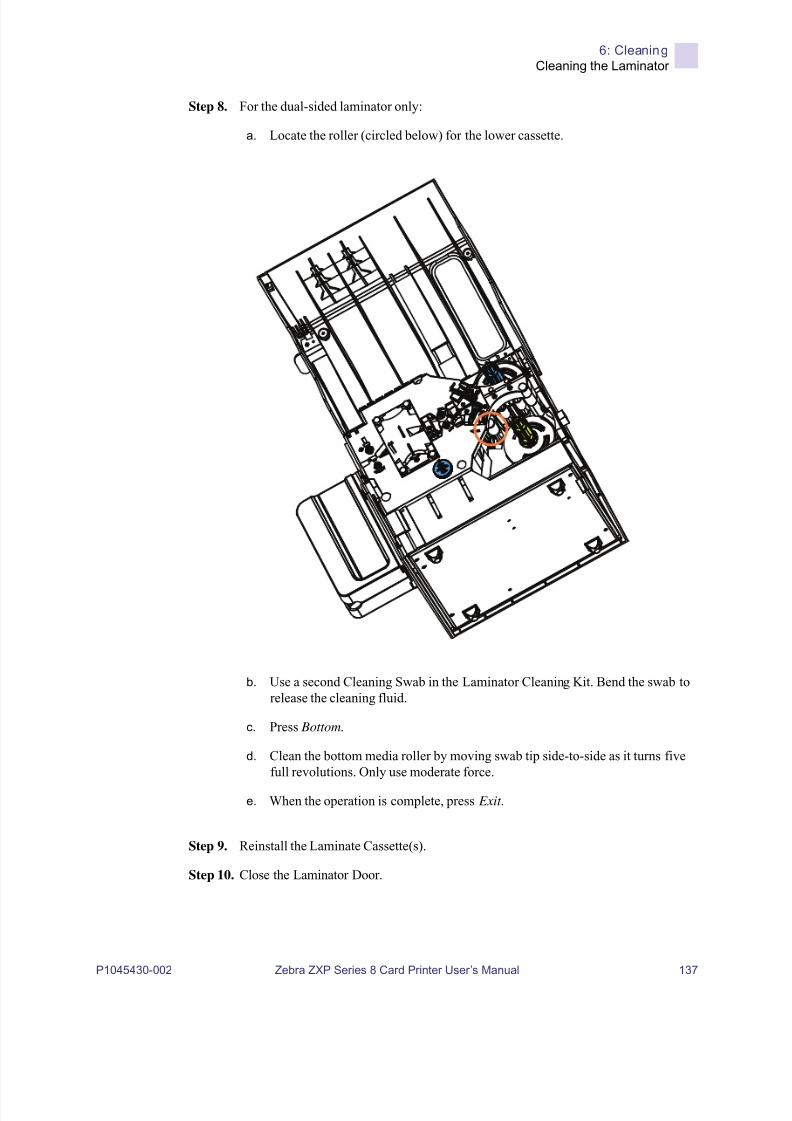
8/10/2019 Zxpseries8 Ug En
http://slidepdf.com/reader/full/zxpseries8-ug-en 141/226
6: Cleaning
Cleaning the Laminator
P1045430-002 Zebra ZXP Series 8 Card Printer User’s Manual 137
Step 8. For the dual-sided laminator only:
a. Locate the roller (circled below) for the lower cassette.
b. Use a second Cleaning Swab in the Laminator Cleaning Kit. Bend the swab torelease the cleaning fluid.
c. Press Bottom.
d. Clean the bottom media roller by moving swab tip side-to-side as it turns fivefull revolutions. Only use moderate force.
e. When the operation is complete, press Exit .
Step 9. Reinstall the Laminate Cassette(s).
Step 10. Close the Laminator Door.

8/10/2019 Zxpseries8 Ug En
http://slidepdf.com/reader/full/zxpseries8-ug-en 142/226
138 Zebra ZXP Series 8 Card Printer User’s Manual P1045430-002
6: Cleaning
Cleaning the Laminator
Cleaning: Heater Assembly Rollers
The default cleaning interval is once every 20,000 cards.
Step 1. Select Clean Lam Oven to run the Laminator Oven Cleaning Routine.
Step 2. Observe the OCP, and wait until the laminator temperature goes below 60o.
Step 3. Lift the Laminator Door to its upright position.
Step 4. Remove the four thumb screws (circled below) holding the Heater Assemblyin place.
Step 5. Slide the Heater Assembly out of the Laminator (arrow above).
Step 6. Use the Laminator Hot Roller Cleaning Card (with adhesive) in the LaminatorCleaning Kit.
Step 7. Prepare the card for use.
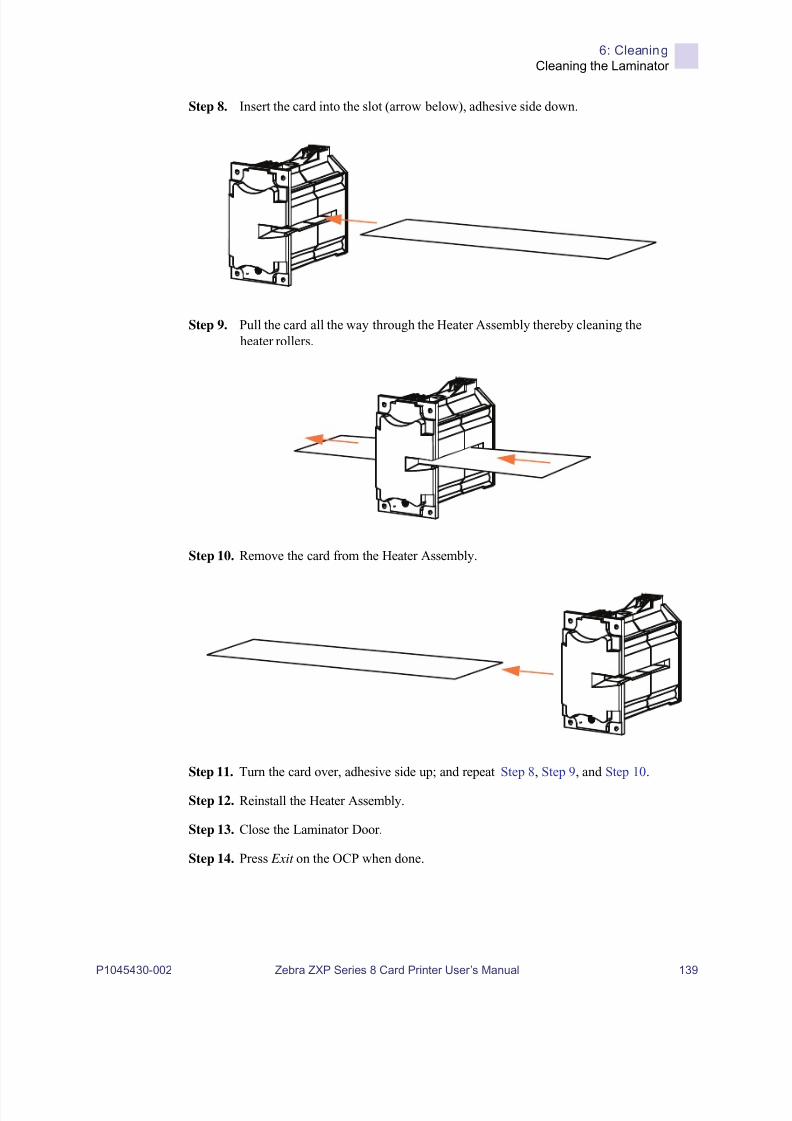
8/10/2019 Zxpseries8 Ug En
http://slidepdf.com/reader/full/zxpseries8-ug-en 143/226
6: Cleaning
Cleaning the Laminator
P1045430-002 Zebra ZXP Series 8 Card Printer User’s Manual 139
Step 8. Insert the card into the slot (arrow below), adhesive side down.
Step 9. Pull the card all the way through the Heater Assembly thereby cleaning theheater rollers.
Step 10. Remove the card from the Heater Assembly.
Step 11. Turn the card over, adhesive side up; and repeat Step 8, Step 9, and Step 10.
Step 12. Reinstall the Heater Assembly.
Step 13. Close the Laminator Door.
Step 14. Press Exit on the OCP when done.
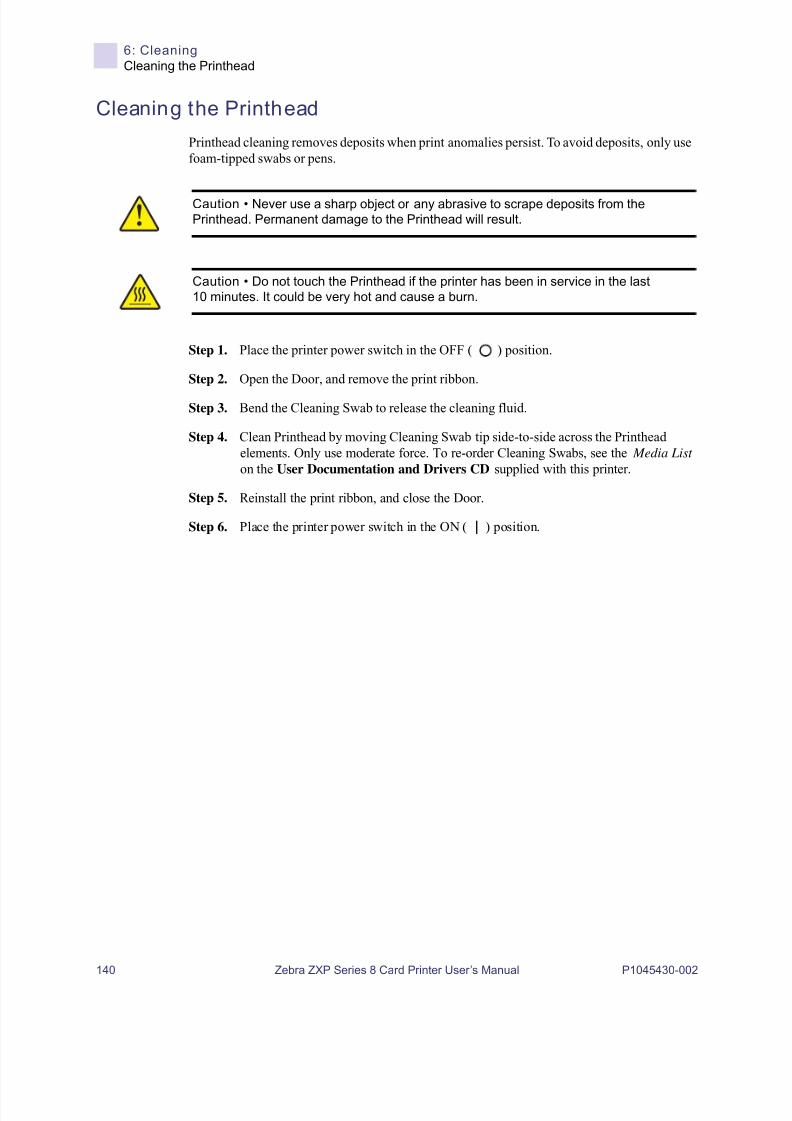
8/10/2019 Zxpseries8 Ug En
http://slidepdf.com/reader/full/zxpseries8-ug-en 144/226
140 Zebra ZXP Series 8 Card Printer User’s Manual P1045430-002
6: Cleaning
Cleaning the Printhead
Cleaning the Printhead
Printhead cleaning removes deposits when print anomalies persist. To avoid deposits, only usefoam-tipped swabs or pens.
Step 1. Place the printer power switch in the OFF ( ) position.
Step 2. Open the Door, and remove the print ribbon.
Step 3. Bend the Cleaning Swab to release the cleaning fluid.
Step 4. Clean Printhead by moving Cleaning Swab tip side-to-side across the Printheadelements. Only use moderate force. To re-order Cleaning Swabs, see the Media List on the User Documentation and Drivers CD supplied with this printer.
Step 5. Reinstall the print ribbon, and close the Door.
Step 6. Place the printer power switch in the ON ( ) position.
Caution • Never use a sharp object or any abrasive to scrape deposits from the
Printhead. Permanent damage to the Printhead will result.
Caution • Do not touch the Printhead if the printer has been in service in the last
10 minutes. It could be very hot and cause a burn.

8/10/2019 Zxpseries8 Ug En
http://slidepdf.com/reader/full/zxpseries8-ug-en 145/226
6: Cleaning
Card Cleaning Cartridge
P1045430-002 Zebra ZXP Series 8 Card Printer User’s Manual 141
Card Cleaning Cartr idge
The Card Cleaning Cartridge cleans the cards entering the printer through the card feeder. Toensure print quality, the card cleaning roller requires periodic replacement. New card cleaningrollers are included with each print ribbon or may be purchased separately. (To reorder, refer to
the Media List on the User Documentation and Drivers CD supplied with this printer.)
Installation of the Card Cleaning Cartridge is described in Section 2 and is not repeated indetail here.
Cleaning Roller
The Card Cleaning Roller cleans the cards entering and exiting the Transfer Station. To ensure
print quality, the card cleaning roller requires periodic replacement. A new card cleaning rolleris included with each print ribbon or may be purchased separately. (To reorder, refer to theMedia List on the User Documentation and Drivers CD supplied with this printer.)
Installation of the Card Cleaning Roller is described in Section 2 and is not repeated indetail here
Note • Before replacing the Card Cleaning Cartridge or its adhesive roller, clean the Printerusing the Cleaning Cards as described earlier in this chapter.

8/10/2019 Zxpseries8 Ug En
http://slidepdf.com/reader/full/zxpseries8-ug-en 146/226
142 Zebra ZXP Series 8 Card Printer User’s Manual P1045430-002

8/10/2019 Zxpseries8 Ug En
http://slidepdf.com/reader/full/zxpseries8-ug-en 147/226
P1045430-002 Zebra ZXP Series 8 Card Printer User’s Manual 143
The table on the next page offers causes and solutions to symptoms related to improperoperation. Check the table when experiencing any loss of operation or print quality.
Use the following figure of a Printer with a Laminator in conjunction with the table to helplocate the possible cause and effect a solution.
Input Hopper
Operator ControlPanel (OCP)
Transfer Station
Single Card
Feed Slot
Card Cleaning
Cartridge
Printhead
Card Cleaning Roller
Heater
Output Hopper
Lower Laminate Cassette
(dual-sided laminator only)
Upper Laminate Cassette
(single-sided and dual-sided
laminators)
7Troubleshooting

8/10/2019 Zxpseries8 Ug En
http://slidepdf.com/reader/full/zxpseries8-ug-en 148/226
144 Zebra ZXP Series 8 Card Printer User’s Manual P1045430-002
7: Troubleshooting
OCP Error Messages
OCP Error Messages
CODE MESSAGE POSSIBLE CAUSE POSSIBLE SOLUTION
1 SYSTEM NOT READY A problem was detected during printer
start-up.
Power cycle the printer, and retry.
2 - 4 SYSTEM ERROR Internal logic error. Power cycle the printer, and retry.
5 FW UPGRADE ERROR Firmware upgrade incompatibil ity. Verify the version, and retry install ing the
firmware.
6 DIAGNOSTIC ERROR Error encountered in Diagnostic Mode. Power cycle the printer, and retry.
7 FW UPGRADE ERROR Firmware upgrade failed. Verify the version, and retry installing the
firmware.
8 CRITICAL ERROR
SHUTTING DOWN
Major malfunction encountered. Contact Zebra Technical Support.
3001 PRINTER OFFLINE Status toggled (offline/onl ine) via the OCP
Advanced Settings Menu.
Change status to online via the OCP
Advanced Settings Menu.
4001 OUT OF CARDS • The Feeder Cartridge is empty.
• Card is stuck in Feeder Cartridge.
a. Load cards in the Feeder Cartridge.
b. Re-seat the Feeder Cartridge.
4002 INVALID CARD TYPE Encoding error. a. Ensure that you are using the correct
card type.
b. In the Encoding tab of the driver
Printing Preferences, check that the
settings are correct for the cards you
are using.
c. Ensure that the data conforms to
ISO Specifications.
d. Retry writing and reading.
4003 CARD JAM Card is jammed in the Printer Clear the card path.
4010 OUT OF FILM The transfer film has run out. Load new roll of transfer film.
4011 INVALID FILM Transfer film does not match the printer. a. Verify the part number of the transfer
film is correct on OCP.
b. Power cycle the printer.
4012 FILM JAM The transfer film is jammed. a. Check the transfer film.
b. Reinstall the transfer film.
c. Repair the break in the transfer film
and reinstall.
4013 FILM MOTION ERROR Transfer film not correctly responding to
motion commands.
a. Check the transfer film.
b. Reinstall the transfer film.
c. Power cycle the printer.
4014 CARD FEED ERROR Card is jammed in Feeder Cartridge. a. Clear card jam in Feeder Cartridge,
and re-seat Feeder Cartridge.
b. Ensure that cards are not stuck
together and that they are the correct
thickness (10 to 50 mil).4015 CARD NOT INSERTED Card was not fed into the Single Card
Feed Slot within 30-second period.
Retry and feed card into the Single Card
Feed Slot, or cancel the operation.
4016 OUT OF CARDS • The Feeder Cartridge is empty.
• Card is stuck in Feeder Cartridge.
a. Load cards in the Feeder Cartridge.
b. Re-seat the Feeder Cartridge.
4017 INVALID FILM Transfer film does not match the printer. a. Verify the part number of the transfer
film is correct on OCP.
b. Power cycle the printer.
5001 OUT OF RIBBON Print ribbon has run out. Load a new roll of print ribbon.

8/10/2019 Zxpseries8 Ug En
http://slidepdf.com/reader/full/zxpseries8-ug-en 149/226
7: Troubleshooting
OCP Error Messages
P1045430-002 Zebra ZXP Series 8 Card Printer User’s Manual 145
5002 INVALID RIBBON Print ribbon does not match the printer. Verify the part number of the print ribbon
is correct on OCP.
5003 RIBBON JAM Print ribbon is jammed. a. Check the print ribbon.
b. Reinstall the print ribbon.
c. Repair the break in the print ribbon
and reinstall.
5004 RIBBON MOTION ERROR Print ribbon not correctly responding to
motion commands.
a. Check the print ribbon.
b. Reinstall the print ribbon.
c. Repair the break in the print ribbon
and reinstall.
5005 RIBBON ADC ERROR Possible hardware issue. Contact Zebra Technical Support.
5006 RIBBON BEMF ERROR Problem with the Back EMF (BEMF) of the
ribbon motors.
Contact Zebra Technical Support.
5007 RIB COLOR DETECT ERR Print ribbon is not installed correctly. Reinstall the print ribbon.
5008 INVALID RIBBON Print ribbon does not match the printer. a. Verify that the part number of the
print ribbon is correct on OCP.
b. Power cycle the printer, and retry.
6001 - 6008 GENERAL MEMORY ERROR There is a problem when accessing
general memory.
Power cycle the printer, and retry.
6009 FLASH ERASE ERROR There is a problem when accessing
flash memory.
Power cycle the printer, and retry.
6010 FLASH ERASE VERIF ERR There is a problem when accessing
flash memory.
Power cycle the printer, and retry.
6011 FLASH PROGRAM ERROR There is a problem when accessing
flash memory.
Power cycle the printer, and retry.
6012 FLASH PROG VERIFY ERR There is a problem when accessing
flash memory.
Power cycle the printer, and retry.
6013 INVALID FW SRECORD There is a problem when accessing
flash memory.
Power cycle the printer, and retry.
6015 - 6025 GENERAL MEMORY ERROR There is a problem when accessing
general memory.
Power cycle the printer, and retry.
7001 CARD FEED ERROR Card is jammed in Feeder Cartridge. a. Clear the card jam in the Feeder
Cartridge, and re-seat the Feeder
Cartridge.
b. Ensure that cards are not stuck
together and that they are the correct
thickness (10 to 50 mil).
7002 CARD CLEAN ERROR Faulty Card Cleaning Roller (if an error
occurs during single card feed) or Card
Cleaning Cartridge (if cards fed from
Feeder Cartridge).
Replace the Card Cleaning Roller or
Card Cleaning Cartridge (rollers), as
appropriate.
7003 PRINTHEAD CABLE ERROR Printhead cable loose or disconnected. Check printhead cable connection,
reconnect if loose or disconnected.
7004 CARD EJECT ERROR Card from previous job is stuck in the exit
area.
Remove the card from the exit area.
7005 PRINTHEAD TOO HOT Printhead temperature out of proper range
(HOT).
Contact Zebra Technical Support.
7006 PRINTHEAD TOO COLD Printhead temperature out of proper range
(COLD).
Contact Zebra Technical Support.
7008 COVER OPEN This warning will be displayed if the cover
protecting the Printer Module is opened.
This warning will be cleared when the
printer cover is closed.
7010 PRINTHEAD MOTION ERR Printhead did not move to proper position
during initialization.
Power cycle the printer, and retry.
CODE MESSAGE POSSIBLE CAUSE POSSIBLE SOLUTION

8/10/2019 Zxpseries8 Ug En
http://slidepdf.com/reader/full/zxpseries8-ug-en 150/226
146 Zebra ZXP Series 8 Card Printer User’s Manual P1045430-002
7: Troubleshooting
OCP Error Messages
7011 ROLLERS OVER TEMP Heated Rollers (used to transfer the
image from the transfer film to the Card)
are too hot for proper operation.
Turn off power, and contact Zebra
Technical Support.
7012 ROLLERS UNDER TEMP Heated Rollers (used to transfer the
image from transfer film to Card) are not
hot enough for proper operation.
Turn off power, and contact Zebra
Technical Support.
7013 MOTOR VOLTAGE ERROR Incorrect voltage detected at one or
several motors in the unit.
Power cycle the printer, and retry.
7014 SCRIPT PROCESSING
ERROR
Internal logic error. Power cycle the printer, and retry.
7015 MAG MOTION ERROR Printhead did not move to proper position
during initialization.
Power cycle the printer, and retry.
7016 TRANSFER ERROR
7017 REJECT ERROR A problem during the reject process. Contact Zebra Technical Support.
7018 SMARTCARD ERROR • Encoding error.
• Faulty card.
a. Ensure that you are using the correct
card type.
b. Check that the cards are loaded in
the correct orientation.
c. Ensure that the data conforms to ISO
Specifications.
d. Retry writing and reading.
7019 SCRIPT CONTENT ERROR Internal logic error. Power cycle the printer, and retry.
7020 SCRIPT SEND ERROR Internal logic error. Power cycle the printer, and retry.
7034 REJECT BIN FULL
REMOVE CARDS
The Reject Bin is full. Remove the cards from the bin, and
reset the reject bin card count to 0 via
the OCP (Main Menu > Advanced
Settings > Clear Reject Bin).
7036 - 7039 PRINT CARD JAM Card is jammed in Printer Module. Clear the card path.
9001 MAG READ ERROR • Encoding error.• Defective magnetic stripe.
a. Ensure that you are using the correctcard type.
b. Check that the cards are loaded with
the magnetic stripe in the correct
orientation.
c. Ensure that the cards are set-up
correctly in the printer driver
(coercivity setting).
d. Ensure that the data conforms to
ISO Specifications.
e. Retry reading.
9002 MAG WRITE ERROR • Encoding error.
• Defective magnetic stripe.
a. Ensure that you are using the correct
card type.
b. Check that the cards are loaded with
the magnetic stripe in the correctorientation.
c. Ensure that the cards are set-up
correctly in the printer driver
(coercivity setting).
d. Ensure that the data conforms to
ISO Specifications.
e. Retry writing.
CODE MESSAGE POSSIBLE CAUSE POSSIBLE SOLUTION

8/10/2019 Zxpseries8 Ug En
http://slidepdf.com/reader/full/zxpseries8-ug-en 151/226
7: Troubleshooting
OCP Error Messages
P1045430-002 Zebra ZXP Series 8 Card Printer User’s Manual 147
9004 NO MAG STRIPE Magnetic stripe not detected. a. Ensure that you are using the correct
card type.
b. Check that the cards are loaded with
the magnetic stripe in the correct
orientation.
10001 CONTACT READ ERROR • Faulty card.• Incorrect card orientation.
• Incorrect Mode or Protocol setting.
• Faulty reader.
• Try another card.• Try another card (check orientation).
• Correct the Mode or Protocol setting.
• Contact Zebra Technical Support.
10002 CONTACT WRITE ERROR • Faulty card.
• Incorrect card orientation.
• Incorrect Mode or Protocol setting.
• Faulty writer.
• Try another card.
• Try another card (check orientation).
• Correct the Mode or Protocol setting.
• Contact Zebra Technical Support.
11001 CONTACTLESS READ
ERROR
• Faulty card.
• Incorrect Mode or Protocol setting.
• Faulty reader.
• Try another card.
• Correct the Mode or Protocol setting.
• Contact Zebra Technical Support.
11002 CONTACTLESS WRITE
ERROR
• Faulty card.
• Incorrect Mode or Protocol setting.
• Faulty writer.
• Try another card.
• Correct the Mode or Protocol setting.
• Contact Zebra Technical Support.
14001 MISSING HCB The Halogen Controller Board (HCB) ismissing.
Contact Zebra Technical Support.
14002 HCB BULB ERROR The Halogen Controller Board (HCB) is
unable to pulse the upper and lower
heaters to bring the upper and lower
rollers to the proper temperature.
Contact Zebra Technical Support.
14003 HCB SENSOR ERROR The Halogen Controller Board (HCB) is
unable to detect temperature of the upper
or lower rollers.
Contact Zebra Technical Support.
14004 HCB FIRMWARE MISSING The Halogen Controller Board (HCB)
firmware is missing.
Contact Zebra Technical Support.
15001 MISSING MAB An error occurred when reading the RFID
Tag by the MAB (Media Authentication
Board).
a. Check print ribbon orientation.
b. Verify part number of the print ribbon.
c. Power cycle the printer, and retry.
15002 MAB FIRMWARE MISSING MAB (Media Authentication Board)Firmware is missing.
Install the firmware.
17001 LAMINATOR MISSING Laminator data cable loose or
disconnected.
Contact Zebra Technical Support.
17002 LAMINATOR FAILED
INITIALIZATION
Laminator was detected by the printer, but
was unable to communicate to it.
Contact Zebra Technical Support.
17003 LAMINATOR UNKNOWN
ERROR
An unknown error has occurred – this is
an indication of a FW problem and should
not occur.
Press RETRY on the OCP.
17004 MISSING LAMINATOR MAB An error occurred when reading the RFID
Tag by trying to communicate to the
Laminator MAB (Media Authentication
Board).
a. Check laminate orientation.
b. Power cycle the printer, and retry.
17005 TOP LAMINATE FEED FAIL • Top laminate cartridge is not installed
properly.• Cartridge is not removed when that
side of the card is not being laminated.
• A mis-cut piece of laminate (rare) is
obscuring the media sensor.
• Remove, reposition, and re-install the
top laminate cartridge.• Remove the top laminate cartridge.
• Remove the mis-cut piece of
laminate.
17006 BOTTOM LAMINATE FEED
FAIL
• Bottom laminate cartridge is not
installed properly.
• Cartridge is not removed when that
side of the card is not being laminated.
• Remove, reposition, and re-install the
bottom laminate cartridge.
• Remove the bottom laminate
cartridge.
CODE MESSAGE POSSIBLE CAUSE POSSIBLE SOLUTION
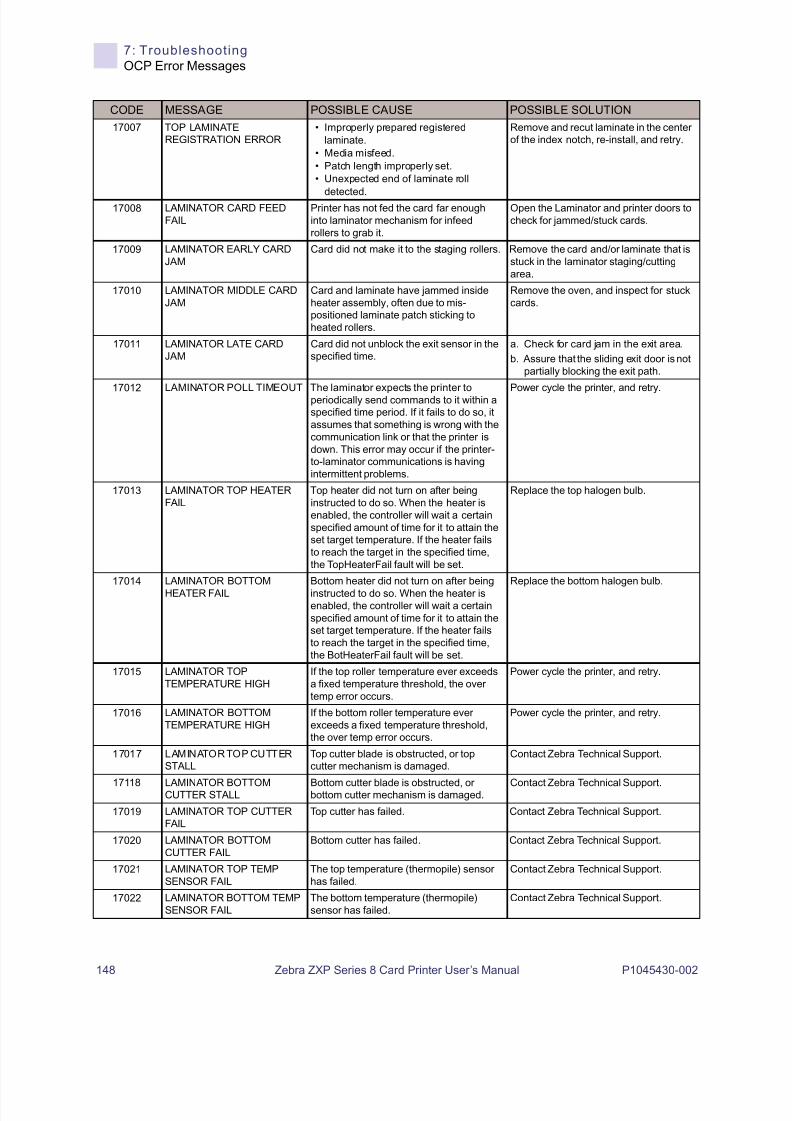
8/10/2019 Zxpseries8 Ug En
http://slidepdf.com/reader/full/zxpseries8-ug-en 152/226
148 Zebra ZXP Series 8 Card Printer User’s Manual P1045430-002
7: Troubleshooting
OCP Error Messages
17007 TOP LAMINATE
REGISTRATION ERROR
• Improperly prepared registered
laminate.
• Media misfeed.
• Patch length improperly set.
• Unexpected end of laminate roll
detected.
Remove and recut laminate in the center
of the index notch, re-install, and retry.
17008 LAMINATOR CARD FEED
FAIL
Printer has not fed the card far enough
into laminator mechanism for infeed
rollers to grab it.
Open the Laminator and printer doors to
check for jammed/stuck cards.
17009 LAMINATOR EARLY CARD
JAM
Card did not make it to the staging rollers. Remove the card and/or laminate that is
stuck in the laminator staging/cutting
area.
17010 LAMINATOR MIDDLE CARD
JAM
Card and laminate have jammed inside
heater assembly, often due to mis-
positioned laminate patch sticking to
heated rollers.
Remove the oven, and inspect for stuck
cards.
17011 LAMINATOR LATE CARD
JAM
Card did not unblock the exit sensor in the
specified time.
a. Check for card jam in the exit area.
b. Assure that the sliding exit door is not
partially blocking the exit path.
17012 LAMINATOR POLL TIMEOUT The laminator expects the printer toperiodically send commands to it within a
specified time period. If it fails to do so, it
assumes that something is wrong with the
communication link or that the printer is
down. This error may occur if the printer-
to-laminator communications is having
intermittent problems.
Power cycle the printer, and retry.
17013 LAMINATOR TOP HEATER
FAIL
Top heater did not turn on after being
instructed to do so. When the heater is
enabled, the controller will wait a certain
specified amount of time for it to attain the
set target temperature. If the heater fails
to reach the target in the specified time,
the TopHeaterFail fault will be set.
Replace the top halogen bulb.
17014 LAMINATOR BOTTOM
HEATER FAIL
Bottom heater did not turn on after being
instructed to do so. When the heater is
enabled, the controller will wait a certain
specified amount of time for it to attain the
set target temperature. If the heater fails
to reach the target in the specified time,
the BotHeaterFail fault will be set.
Replace the bottom halogen bulb.
17015 LAMINATOR TOP
TEMPERATURE HIGH
If the top roller temperature ever exceeds
a fixed temperature threshold, the over
temp error occurs.
Power cycle the printer, and retry.
17016 LAMINATOR BOTTOM
TEMPERATURE HIGH
If the bottom roller temperature ever
exceeds a fixed temperature threshold,
the over temp error occurs.
Power cycle the printer, and retry.
17017 LAMINATOR TOP CUTTER
STALL
Top cutter blade is obstructed, or top
cutter mechanism is damaged.
Contact Zebra Technical Support.
17118 LAMINATOR BOTTOMCUTTER STALL
Bottom cutter blade is obstructed, orbottom cutter mechanism is damaged.
Contact Zebra Technical Support.
17019 LAMINATOR TOP CUTTER
FAIL
Top cutter has failed. Contact Zebra Technical Support.
17020 LAMINATOR BOTTOM
CUTTER FAIL
Bottom cutter has failed. Contact Zebra Technical Support.
17021 LAMINATOR TOP TEMP
SENSOR FAIL
The top temperature (thermopile) sensor
has failed.
Contact Zebra Technical Support.
17022 LAMINATOR BOTTOM TEMP
SENSOR FAIL
The bottom temperature (thermopile)
sensor has failed.
Contact Zebra Technical Support.
CODE MESSAGE POSSIBLE CAUSE POSSIBLE SOLUTION

8/10/2019 Zxpseries8 Ug En
http://slidepdf.com/reader/full/zxpseries8-ug-en 153/226
7: Troubleshooting
OCP Error Messages
P1045430-002 Zebra ZXP Series 8 Card Printer User’s Manual 149
17023 LAMINATOR FAN FAIL This should only happen if one or both
cooling fans fail or the cooling vents near
the heated roller assembly are blocked or
the fan(s) have failed.
Check for blocked vents.
17024 LAMINATOR EEPROM
DEFAULT
The parameters stored in EEPROM have
been reset to their default values. This willnot normally happen, but could be seen
with certain FW upgrades when new
parameters have been added by
Engineering. It could also indicate a
problem with the Laminator’s EEPROM.
a. Press RETRY on the OCP when this
error occurs.b. Power cycle the printer, and retry.
17025 LAMINATOR TOP
TEMPERATURE LOW
If the top roller temperature does not
reach a fixed temperature threshold, the
under temp error occurs.
Power cycle the printer, and retry.
17026 TOP AND BOTTOM
LAMINATES OUT
The top and bottom laminates have
run out.
Load new rolls of laminate.
17027 TOP LAMINATE OUT The top laminate has run out. Load new roll of laminate.
17028 BOTTOM LAMINATE OUT The bottom laminate has run out. Load new roll of laminate.
17029 INVALID TOP LAMINATE Laminate does not match the type allowed
in the laminator or top and/or bottom has
been swapped.
a. Verify that the top and bottom
laminate cassettes are installed in the
correct locations.
b. Verify the part number of the laminate
is correct on OCP.
c. Power cycle the printer, and retry.
17030 INVALID BOTTOM
LAMINATE
Laminate does not match the type allowed
in the laminator or top and/or bottom has
been swapped.
a. Verify that the top and bottom
laminate cassettes are installed in the
correct locations.
b. Verify the part number of the laminate
is correct on OCP.
c. Power cycle the printer, and retry.
17031 BOTTOM LAMINATE
REGISTRATION ERROR
• Improperly prepared registered
laminate.
• Media misfeed.
• Patch length improperly set.• Unexpected end of laminate roll
detected.
Remove and recut laminate in the center
of the index notch, re-install, and retry.
17038 LAMINATOR COVER OPEN This warning will be displayed if the cover
protecting the laminator is opened.
This warning will be cleared when the
laminator cover is closed.
17040 LAMINATOR INITIALIZING This warning will be displayed after the
laminator door is closed and laminate
spools are re-read/detected.
No action needed
17041 LAMINATOR FIRMWARE
MISSING
LCB (Laminator Controller Board)
Firmware is missing.
Install the firmware.
17042 LAMINATOR MAB
FIRMWARE MISSING
Laminator MAB (Media Authentication
Board) Firmware is missing.
Install the firmware.
18001 ETHERNET COMM ERROR Ethernet communication problem. a. Disconnect and reconnect the
network cable.
b. Power cycle the printer, and retry.
19001 WIFI COMM ERROR Wireless Ethernet communication
problem.
a. Power cycle the printer.
b. Re-run the set-up wizard to
re-establish the wireless settings.
c. Contact Zebra Technical Support.
19002 WIFI ACCESS POINT
MISSING
Access point, specified by printer wireless
settings, not found during initial printer
scan after power up.
Verify access point, specified by the
printer wireless settings, is properly
connected to the network and turned on.
CODE MESSAGE POSSIBLE CAUSE POSSIBLE SOLUTION

8/10/2019 Zxpseries8 Ug En
http://slidepdf.com/reader/full/zxpseries8-ug-en 154/226
150 Zebra ZXP Series 8 Card Printer User’s Manual P1045430-002
7: Troubleshooting
OCP Error Messages
19003 WIFI LINK LOST • Connection to the access point
was lost.
• Poor signal quality or low signal
strength.
• Interference.
• Access point power has been lost.
a. Verify access point is properly
connected to the network and
powered ON.
b. Put the printer antenna in a similar
orientation than access point’s
antenna, and re-run the set-up wizardto re-establish the wireless settings.
19004 WIFI INCOMPATIBLE
NETWORK
• Printer, after power up, found the
access point specified by the wireless
settings, but found the access point
settings incompatible.
• Access point configuration has been
modified.
Re-run the set-up wizard to establish the
new wireless settings.
19005 WIFI ASSOCIATION FAILED • During association with an access
point, the association failed.
• Poor signal quality.
• Low signal strength.
Put the printer antenna in a similar
orientation as the access point’s
antenna, and re-run the set-up wizard to
re-establish the wireless settings.
19006 WIFI CONNECTION FAILED • They key handshake following the
association failed.
• WEP Key or WPA passphrase is
incorrect.
Ensure that you have the correct
key/passphrase, then re-run the set-up
wizard to establish new wireless
settings.
CODE MESSAGE POSSIBLE CAUSE POSSIBLE SOLUTION

8/10/2019 Zxpseries8 Ug En
http://slidepdf.com/reader/full/zxpseries8-ug-en 155/226
7: Troubleshooting
OCP Test Card Images
P1045430-002 Zebra ZXP Series 8 Card Printer User’s Manual 151
OCP Test Card Images
See Test Card descriptions on the following page.
MID GRAY GRID ON GRAY CYAN STRIPES
2 PIXEL GRID DARK CYAN MAX GRAY
OFFSET DOTS SMEAR MIN MAGENTA
MID MAGENTA MID CYAN MID YELLOW
MOTION & REGISTRATION GRADIENT BOXES MONOCHROME ONLY
DENSITY SETUP GRID ON GRAY 2 MAG ENCODE ONLY 1 - 5
Encode Only
No Image

8/10/2019 Zxpseries8 Ug En
http://slidepdf.com/reader/full/zxpseries8-ug-en 156/226
152 Zebra ZXP Series 8 Card Printer User’s Manual P1045430-002
7: Troubleshooting
Test Card Descriptions
Test Card Descr ipt ions
Image Title Description Print artifacts to look for with this image
MID GRAY Flat uniform gray Motion artifacts, banding, platen defects, transfer
artifacts, dirt, overall density level
GRID ON GRAY Solid black on top, gray grid
underneath
Colored ribbon wrinkles in the black area, or clear/white
transfer film wrinkles in the gray area
CYAN STRIPES Horizontal stripes next to
lighter vertical stripe
Non-uniformity or horizontal banding within cyan box on
right of card
2 PIXEL GRID 2 pixel wide grid lines on
white
Mis-registration between color planes
DARK CYAN Maximum cyan only density
image
Motion artifacts, transfer artifacts, scratches, dirt
MAX GRAY Maximum CMY (black)
density image
Wrinkles, snapping noise during printing, ribbon /
transfer-film tears or breaks, flash, card positioning
OFFSET DOTS Individual C, M, & Y dots
spaced at regular intervals
Motion artifacts on specific color planes,
mis-registration
SMEAR Gray with full density YMCK
blocks near top
Color smear artifacts
MIN MAGENTA Flat uniform low-density
magenta
Motion artifacts, banding, platen defects, density level,
uniformity, bead position
MID MAGENTA Flat uniform mid-density
magenta
Motion artifacts, banding, platen defects, density level,
uniformity
MID CYAN Flat uniform mid-density cyan Motion artifacts, banding, platen defects, density level,
uniformity
MID YELLOW Flat uniform mid-density
yellow
Motion artifacts, banding, platen defects, density level,
uniformity
MOTION &
REGISTRATION
Uniform cyan with registration
marks on sides
Banding, mis-registrations, motion artifacts
GRADIENT BOXES 3 sets of light-to-dark
grayscale ramps
Used to create color calibration look-up table
MONOCHROME
ONLY
Barcode and text Edge contrast, pattern damage, non-uniformity
DENSITY SETUP Used to measure mid and
max densities
Density level of mid-gray and black
GRID ON GRAY 2 Less stressful version of the
grid-on-gray target
Colored ribbon wrinkles in the black area, or clear/white
transfer film wrinkles in the gray area
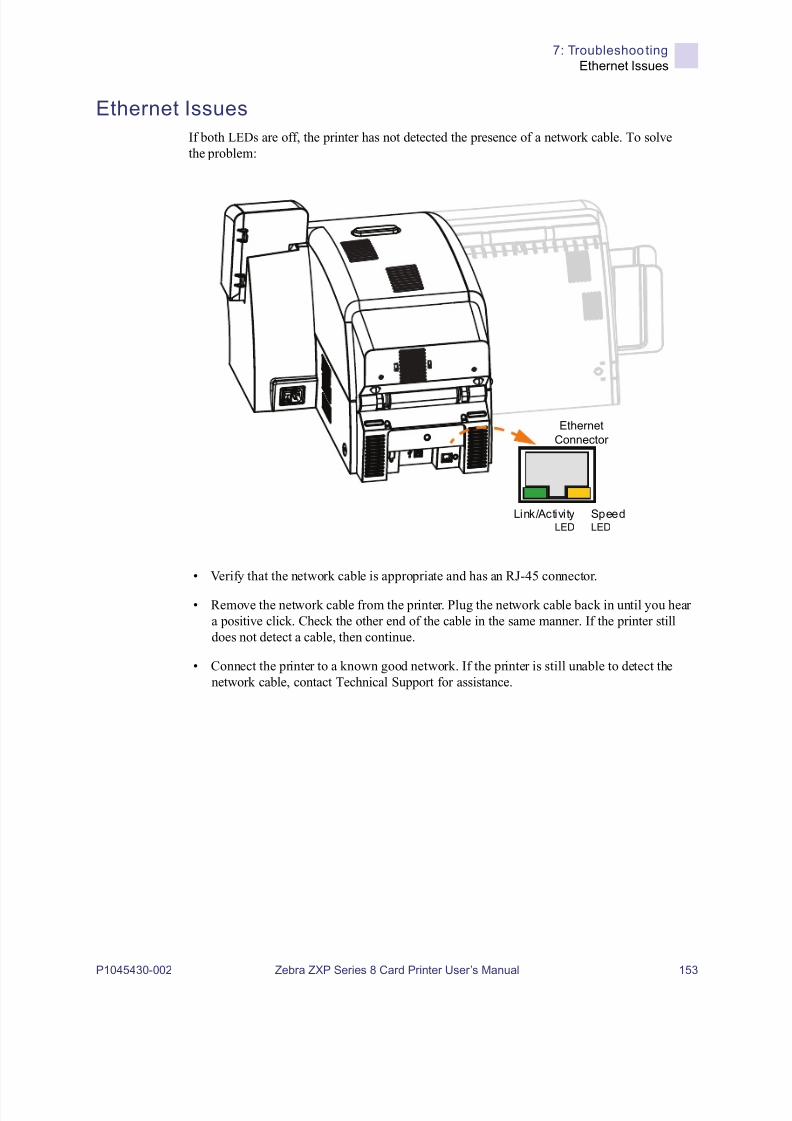
8/10/2019 Zxpseries8 Ug En
http://slidepdf.com/reader/full/zxpseries8-ug-en 157/226
7: Troubleshooting
Ethernet Issues
P1045430-002 Zebra ZXP Series 8 Card Printer User’s Manual 153
Ethernet Issues
If both LEDs are off, the printer has not detected the presence of a network cable. To solvethe problem:
• Verify that the network cable is appropriate and has an RJ-45 connector.
• Remove the network cable from the printer. Plug the network cable back in until you heara positive click. Check the other end of the cable in the same manner. If the printer stilldoes not detect a cable, then continue.
• Connect the printer to a known good network. If the printer is still unable to detect thenetwork cable, contact Technical Support for assistance.
Ethernet
Connector
Link/Activity SpeedLED LED

8/10/2019 Zxpseries8 Ug En
http://slidepdf.com/reader/full/zxpseries8-ug-en 158/226
154 Zebra ZXP Series 8 Card Printer User’s Manual P1045430-002

8/10/2019 Zxpseries8 Ug En
http://slidepdf.com/reader/full/zxpseries8-ug-en 159/226
P1045430-002 Zebra ZXP Series 8 Card Printer User’s Manual 155
8Technical Specifications
Standard Features• Thermal transfer and dye diffusion to transfer film
• Full color or monochrome reverse transfer printing
• Single-sided and dual-sided printing
• Maximum print speed (batch mode; i.e., the same image repeatedly)
• Single-sided (Front Only)YMC 190 cphYMCK 160 cph
• Dual-sided (Front and Back)
YMCK (YMC Front, K Back) 170 cphYMCKK (YMCK Front, K Back) 150 cph
• Photo quality image
• Over-the-edge printing on standard CR80 media
• Microsoft Windows Certified drivers
• Single-card feed capability
• 150 card capacity feeder (30 mil)
• 15 card reject hopper (30 mil)
• 100 card output hopper (30 mil)
• i Series™ intelligent media technology• Auto calibration of media
• 21-character soft menu LCD text operator display
• 304 dpi (12.0 dots/mm) print resolution
• 64MB memory standard
• 2-year unlimited warranty on printer, lifetime limited warranty on printhead withGenuine Zebra Supplies
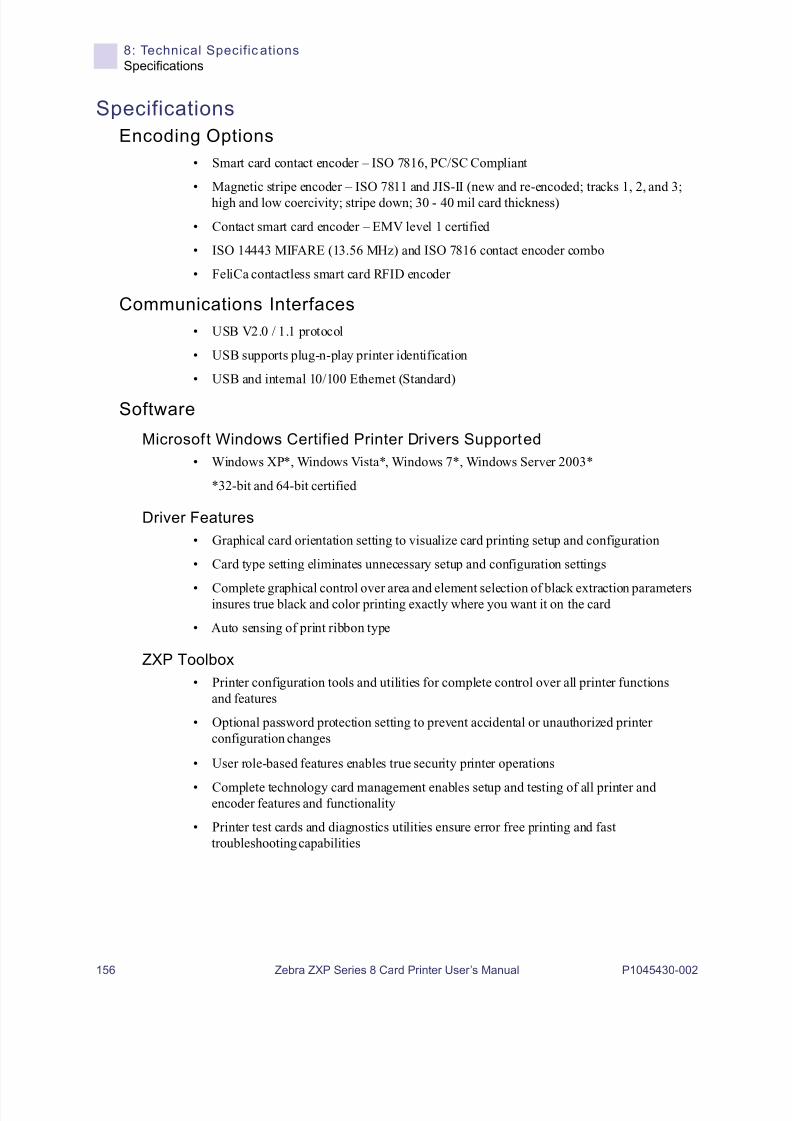
8/10/2019 Zxpseries8 Ug En
http://slidepdf.com/reader/full/zxpseries8-ug-en 160/226
156 Zebra ZXP Series 8 Card Printer User’s Manual P1045430-002
8: Technical Specific ations
Specifications
Specifications
Encoding Options
• Smart card contact encoder – ISO 7816, PC/SC Compliant
• Magnetic stripe encoder – ISO 7811 and JIS-II (new and re-encoded; tracks 1, 2, and 3;high and low coercivity; stripe down; 30 - 40 mil card thickness)
• Contact smart card encoder – EMV level 1 certified
• ISO 14443 MIFARE (13.56 MHz) and ISO 7816 contact encoder combo
• FeliCa contactless smart card RFID encoder
Communications Interfaces
• USB V2.0 / 1.1 protocol
• USB supports plug-n-play printer identification
• USB and internal 10/100 Ethernet (Standard)
Software
Microsof t Windows Certified Printer Drivers Supported
• Windows XP*, Windows Vista*, Windows 7*, Windows Server 2003*
*32-bit and 64-bit certified
Driver Features
• Graphical card orientation setting to visualize card printing setup and configuration
• Card type setting eliminates unnecessary setup and configuration settings
• Complete graphical control over area and element selection of black extraction parametersinsures true black and color printing exactly where you want it on the card
• Auto sensing of print ribbon type
ZXP Toolbox
• Printer configuration tools and utilities for complete control over all printer functionsand features
• Optional password protection setting to prevent accidental or unauthorized printerconfiguration changes
• User role-based features enables true security printer operations
• Complete technology card management enables setup and testing of all printer andencoder features and functionality
• Printer test cards and diagnostics utilities ensure error free printing and fasttroubleshooting capabilities

8/10/2019 Zxpseries8 Ug En
http://slidepdf.com/reader/full/zxpseries8-ug-en 161/226
8: Technical Specifications
Specifications
P1045430-002 Zebra ZXP Series 8 Card Printer User’s Manual 157
Card Compatibility
• Card Thickness: 30 – 40 mil
• Card Size: ISO 7810 format, Type ID-1, CR-80
• Card Material: ABS; PVC, Composite; TESLIN, Composite; PET; PETG;
Polycarbonate; PVC
Agency Approvals
Zebra ZXP Series 8 Card Printer complies with following applicable directives and standardsfor the ITE: Residential, Commercial & Light Industry environments
• For US/Canada/Mexico/Australia&NZ
• FCC Class A, cfr47, Part 15 Subpart B
• Part15 Subpart C
• Canadian STD RSS-210
• NOM-ETL (Mexico)• IEC 60950-1:2005/A1:2009
EN 60950-1:2006/A11:2009/A12:2011/A1:2010/AC:2011UL 60950-1:2007 R12.11CAN/CSA-C22.2 N0.60950-1-07/A1:2011
• EN60950: EN60950-1 Safety Standard (TUV & NRTL)
• C-Tick (Australia)
• For Europe:
• Applicable Directives and Supporting Standards:
2004/108/EC EMC Directive, CISPR22:2009, EN 55022:2010,Class A CISPR24:2010, EN 55024:2010EN 61000-3-2:2006/A2:2009, EN 61000-3-3:20082006/95/EC LVD Directive, EN60950-1, CB Scheme
• WLAN Enabled
Applicable Directives and Supporting Standards:
99/5/EC R&TTE Directive, EN 301 489-17 V1.2.1,EN 300 328 V1.7.1
• RFID Enabled
Applicable Directives and Supporting Standards:
99/5/EC R&TTE Directive, EN 301 489-3 V1.4.1,EN 300 220-2 V2.1.2

8/10/2019 Zxpseries8 Ug En
http://slidepdf.com/reader/full/zxpseries8-ug-en 162/226
158 Zebra ZXP Series 8 Card Printer User’s Manual P1045430-002
8: Technical Specific ations
Specifications
Electrical
• Single-phase AC power
• Auto-switching Power Supply
• 90V~264V AC RMS and 47-63 HZ (50-60 Hz nominal)
• Power Consumption, Printer only:
Idle 100 W
Printing 150 W
Initializing / Warm-up 300 W
Sleep 20 W
• Power Consumption, Printer + Laminator:
Idle 160 W
Printing 340 W
Initializing / Warm-up 570 W
Sleep 20 W
Physical• Printer only
Height (with card hoppers) 13.2" (334 mm)
Width (with card hoppers) 18.75" (476 mm)
Depth 20.4" (519 mm)
Weight (printer only) 27.5 lbs (12.5 kg)
• Printer with Laminator
Height (with card hoppers) 13.2" (334 mm)
Width (with card hoppers) 30.75" (781 mm)
Depth 20.4" (519 mm)
Weight 44 lbs (20 kg
Environmental• Operating Temperature 59º to 95ºF (15º to 35ºC)
• Storage Temperature 23º to 131ºF (-5º to 55ºC)• Operating Humidity 20% to 80% non-condensing
• Storage Humidity 10% to 90% non-condensing
• Shipping Temperature -40º to 140ºF (-40º to 60ºC)
• Shipping Humidity 10 to 90% non-condensing
Note • Osprey printer setup temperature for composite card top @ 175C & bottom @ 180C,then laminator setup for both sides lamination @ 140C. Power with 120VAC 60HZ.
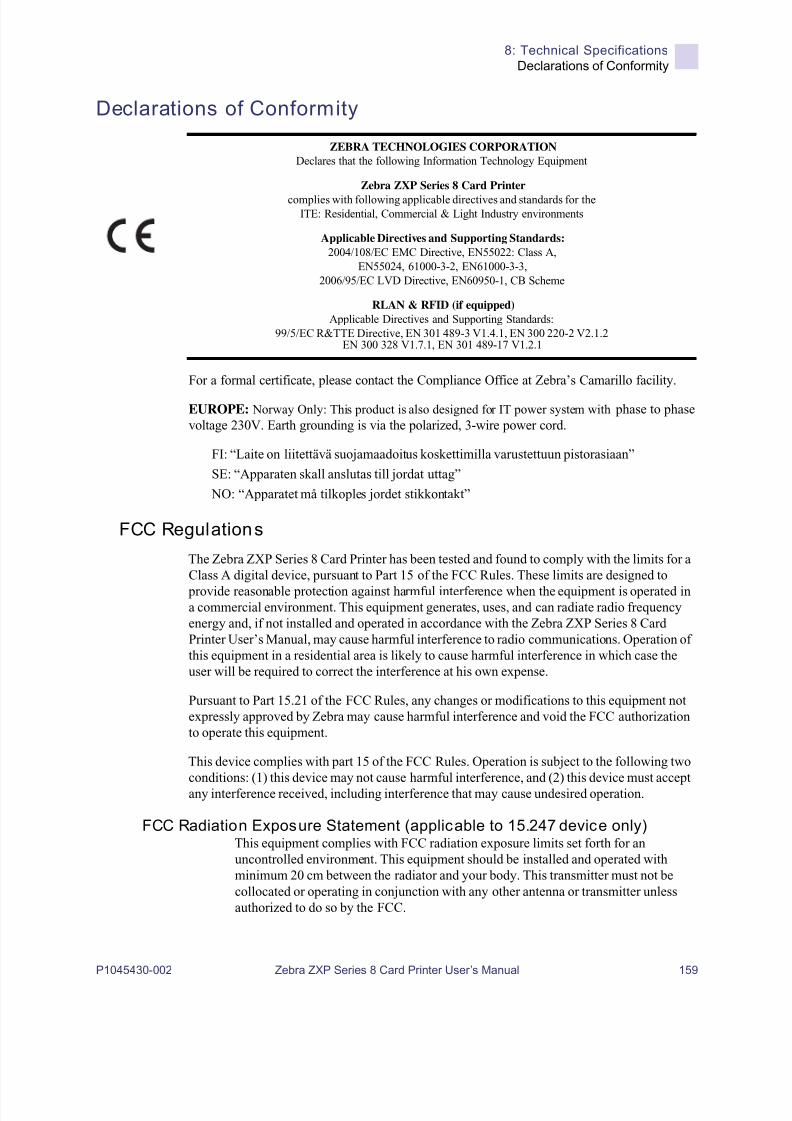
8/10/2019 Zxpseries8 Ug En
http://slidepdf.com/reader/full/zxpseries8-ug-en 163/226
8: Technical Specifications
Declarations of Conformity
P1045430-002 Zebra ZXP Series 8 Card Printer User’s Manual 159
Declarations of Conformity
For a formal certificate, please contact the Compliance Office at Zebra’s Camarillo facility.
EUROPE: Norway Only: This product is also designed for IT power system with phase to phasevoltage 230V. Earth grounding is via the polarized, 3-wire power cord.
FI: “Laite on liitettävä suojamaadoitus koskettimilla varustettuun pistorasiaan”
SE: “Apparaten skall anslutas till jordat uttag”
NO: “Apparatet må tilkoples jordet stikkontakt”
FCC Regulations
The Zebra ZXP Series 8 Card Printer has been tested and found to comply with the limits for aClass A digital device, pursuant to Part 15 of the FCC Rules. These limits are designed to
provide reasonable protection against harmful interference when the equipment is operated ina commercial environment. This equipment generates, uses, and can radiate radio frequencyenergy and, if not installed and operated in accordance with the Zebra ZXP Series 8 CardPrinter User’s Manual, may cause harmful interference to radio communications. Operation ofthis equipment in a residential area is likely to cause harmful interference in which case theuser will be required to correct the interference at his own expense.
Pursuant to Part 15.21 of the FCC Rules, any changes or modifications to this equipment notexpressly approved by Zebra may cause harmful interference and void the FCC authorizationto operate this equipment.
This device complies with part 15 of the FCC Rules. Operation is subject to the following twoconditions: (1) this device may not cause harmful interference, and (2) this device must acceptany interference received, including interference that may cause undesired operation.
FCC Radiation Exposure Statement (applicable to 15.247 device only)This equipment complies with FCC radiation exposure limits set forth for anuncontrolled environment. This equipment should be installed and operated withminimum 20 cm between the radiator and your body. This transmitter must not becollocated or operating in conjunction with any other antenna or transmitter unlessauthorized to do so by the FCC.
ZEBRA TECHNOLOGIES CORPORATION
Declares that the following Information Technology Equipment
Zebra ZXP Series 8 Card Printer
complies with following applicable directives and standards for theITE: Residential, Commercial & Light Industry environments
Applicable Directives and Supporting Standards:
2004/108/EC EMC Directive, EN55022: Class A,EN55024, 61000-3-2, EN61000-3-3,
2006/95/EC LVD Directive, EN60950-1, CB Scheme
RLAN & RFID (if equipped)
Applicable Directives and Supporting Standards:99/5/EC R&TTE Directive, EN 301 489-3 V1.4.1, EN 300 220-2 V2.1.2
EN 300 328 V1.7.1, EN 301 489-17 V1.2.1

8/10/2019 Zxpseries8 Ug En
http://slidepdf.com/reader/full/zxpseries8-ug-en 164/226
160 Zebra ZXP Series 8 Card Printer User’s Manual P1045430-002
8: Technical Specific ations
Declarations of Conformity
Industry Canada Notice
This device complies with Industry Canada ICES-003 class A requirements.Cet équipement est conforme à l 'ICES-003 classe A de la Norme Industrielle Canadienne.
This device complies with Industry Canada licence-exempt RSS standard(s). Operation is
subject to the following two conditions: (1) this device may not cause interference, and |(2) this device must accept any interference, including interference that may causeundesired operation of the device.
Japanese Notification
Chinese Notification

8/10/2019 Zxpseries8 Ug En
http://slidepdf.com/reader/full/zxpseries8-ug-en 165/226
8: Technical Specifications
8.02.11b/g Wireless Compliance Information
P1045430-002 Zebra ZXP Series 8 Card Printer User’s Manual 161
8.02.11b/g Wireless Compliance InformationThis information applies to printers that have the 8.02.11b/g wireless option installed.
Proprietary StatementsFCC Compliance Statement
This device complies with part 15 of the FCC Rules. Operation is subject to the following two conditions: (1) This device may not
cause harmful interference, and (2) this device must accept any interference received, including interference that may cause
undesired operation.
Note: This equipment has been tested and found to comply with the limits for a Class A digital device, pursuant to part 15 of the
FCC Rules. These limits are designed to provide reasonable protection against harmful interference when the equipment is
operated in a commercial environment. This equipment generates, uses, and can radiate radio frequency energy and, if not
installed and used in accordance with the instruction manual, may cause harmful interference to radio communications.
Operation of this equipment in a residential area is likely to cause harmful interference in which case the user will be required to
correct the interference at his own expense.
Modifications not expressly approved by the manufacturer could void the user's authority to operate the equipment under FCC
rules.
WARNING: Exposure to Radio Frequency radiation. To conform to FCC RF exposure requirements this device shall be used in
accordance with the operating conditions and instructions listed in this manual.
NOTE: This unit was tested with shielded cables on the peripheral devices. Shielded cables must be used with the unit to insure
compliance. Changes or modifications to this unit not expressly approved by Zebra Technologies Corporation could void the
user's authority to operate this equipment.
Canadian Compliance Statement
This Class A digital apparatus complies with Canadian ICES-003.
Cet appareil numérique de la classe A est conforme á la norme NMB-003 du Canada.
"IC:" before the equipment certification number signifies that the Industry Canada technical specifications were met. It does not
guarantee that the certified product will operate to the user's satisfaction. This device complies with Industry Canada license-
exempt RSS standard(s). Operation
is subject to the following two conditions: (1) this device may not cause interference, and (2) this device must accept any
interference, including
interference that may cause undesired operation of the device.
NCC (Taiwan) Complianc e Statement
“
”
" According to "Administrative Regulations on Low Power Radio Waves Radiated Devices" Without permission granted by the
DGT, any company, enterprise, or user is not allowed to change frequency, enhance transmitting power or alter original
characteristic as well as performance to a approved low power radio-frequency devices. The low power radio-frequency devices
shall not influence aircraft security and interfere legal communications; If found, the user shall cease operating immediately until
no interference is achieved. The said legal communications means radio communications is operated in compliance with the
Telecommunications Act.
The low power radio-frequency devices must be susceptible with the interference from legal communications or ISM radio wave
radiated devices."
Japan: Ministry of Internal Affairs and Communications (MIC) Certification
(MIC)
MIC
RFID No. FC-10003
WIFI 208WWW110007 208GZ110008
Contain FCC ID & IC Numbers
1. Zebra WIFI Radio 802.11b/g
FCC ID : I28-W2WLAN11G
IC ID : 3798B-W2WLAN11G

8/10/2019 Zxpseries8 Ug En
http://slidepdf.com/reader/full/zxpseries8-ug-en 166/226
162 Zebra ZXP Series 8 Card Printer User’s Manual P1045430-002
8: Technical Specific ations
8.02.11b/g Wireless Compliance Information
Radio Regulatory InformationEuropean Regulatory Information for th is Radio
This device is intended for use in all EU and EFTA member states.
Europe – EU Declaration of Conform ity
This device complies with the essential requirements of the R&TTE Directive 1999/5/EC. The following test methods
have been applied in order to prove presumption of compliance with the R&TTE Directive 1999/5/EC:
App licable Di rect ives and Suppo rt ing Standards :
2004/108/EC EMC Directive, EN55022 Class A, EN55024
EN61000-3-2, EN61000-3-3
2006/95/EC LVD Directive, EN60950-1, CB Scheme
RLAN & RFID (if equipped)
App lic able Di rect ives and Suppo rt ing Standards :
99/5/EC R&TTE Directive, EN 301 489-3, EN 300 330-2
EN 301 489-17, EN 300 328
EMC requirements for s pread-spectrum radio equipment.
This device is a 2.4 GHz wireless LAN transceiver, intended for indoor home and office use in all EU and EFTA member
states.
WLAN Module Using 802.11b/g Radio
Other than conditions specified elsewhere in this manual, only one of the radio options can be installed in the printer at one time
and the antenna used for these transmitters must not be co-located or must not operate in conjunction with any other antenna.
European Regulatory Infor mation for these Radios
Note: -Member states in the EU with restrictive use for this device are crossed out! This device is also authorized for use in all
EFTA member states (CH, IS, LI, NO)
The use of this frequency band in France is subject to restrictions. You may only use channels 10 and 11 (2457 and 2462 MHz)
on French territory, except in those French departments as listed in the table below where channels 1-13 (2412-2472 MHz) may
be used. For more information, see:
http://www.anfr.fr/ and/or http://www.art-telecom.fr .
AT BE CY CZ DK
EE FI FR DE GR
HU IE IT LV LT
LU MT NL PL PT
SK SI ES SE GB
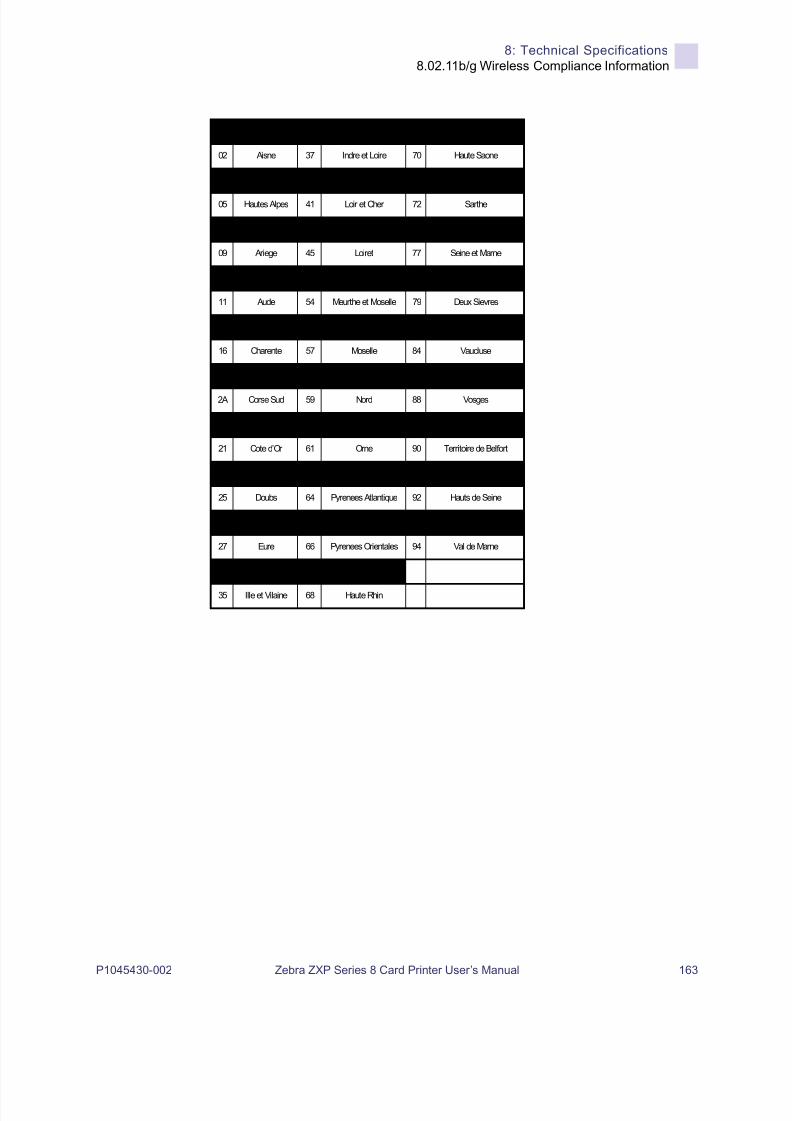
8/10/2019 Zxpseries8 Ug En
http://slidepdf.com/reader/full/zxpseries8-ug-en 167/226
8: Technical Specifications
8.02.11b/g Wireless Compliance Information
P1045430-002 Zebra ZXP Series 8 Card Printer User’s Manual 163
01 Ain 36 Indre 69 Rhone
02 Aisne 37 Indre et Loire 70 Haute Saone
03 Allier 39 Jura 71 Saone et Loire
05 Hautes Alpes 41 Loir et Cher 72 Sarthe
08 Ardennes 42 Loire 75 Paris
09 Ariege 45 Loiret 77 Seine et Marne
10 Aube 50 Manche 78 Yvelines
11 Aude 54 Meurthe et Moselle 79 Deux Sievres
12 Aveyron 55 Meuse 82 Tarn et Garonne
16 Charente 57 Moselle 84 Vaucluse
19 Correze 58 Nievre 86 Vienne
2A Corse Sud 59 Nord 88 Vosges
2B Haute Corse 60 Oise 89 Yonne
21 Cote d’Or 61 Orne 90 Territoire de Belfort
24 Dordogne 63 Puy de Dome 91 Essonne
25 Doubs 64 Pyrenees Atlantique 92 Hauts de Seine
26 Drome 65 Hautes Pyrenees 93 Seine St Denis
27 Eure 66 Pyrenees Orientales 94 Val de Marne
32 Gers 67 Bas Rhin
35 Ille et Vilaine 68 Haute Rhin

8/10/2019 Zxpseries8 Ug En
http://slidepdf.com/reader/full/zxpseries8-ug-en 168/226
164 Zebra ZXP Series 8 Card Printer User’s Manual P1045430-002

8/10/2019 Zxpseries8 Ug En
http://slidepdf.com/reader/full/zxpseries8-ug-en 169/226
P1045430-002 Zebra ZXP Series 8 Card Printer User’s Manual 165
APPENDIX A
Printer Configurations
IntroductionThe Part Number of a particular printer is shown on a label affixed to the bottom of the printer;that Part Number identifies the specific configuration for that printer.
The chart on the following page shows the configurations that are available.

8/10/2019 Zxpseries8 Ug En
http://slidepdf.com/reader/full/zxpseries8-ug-en 170/226
166 Zebra ZXP Series 8 Card Printer User’s Manual P1045430-002
A: Pr inter Configurat ions
Part Numbers
PART NUMBER DESCRIPTION
Z 8 _ Base Unit
_ _ 1
_ _ 2
_ _ 3
_ _ 4
-
-
-
-
_ _ _ _ _ _ _ _ _ _ _ _
_ _ _ _ _ _ _ _ _ _ _ _
_ _ _ _ _ _ _ _ _ _ _ _
_ _ _ _ _ _ _ _ _ _ _ _
Single-sided printing
Dual-sided printing
Dual-sided printing with single-sided lamination
Dual-sided printing with dual-sided lamination
_ _ _
_ _ _
_ _ _
_ _ _
-
-
-
-
0 _ _ _ _ _ _ _ _ _ _ _
A _ _ _ _ _ _ _ _ _ _ _
E _ _ _ _ _ _ _ _ _ _ _
F _ _ _ _ _ _ _ _ _ _ _
Smart Card Options
None
Contact Encoder + Contactless MIFARE
Contact Station
Contact Encoder + Contactless FeliCa
_ _ _
_ _ _ _ _ _
-
--
_ 0 _ _ _ _ _ _ _ _ _ _
_ M _ _ _ _ _ _ _ _ _ _ _ J _ _ _ _ _ _ _ _ _ _
Mag Encoders
None
ISO HiCo/LoCo Mag S/W Selectable
JIS II Compliant Mag
_ _ _
_ _ _
-
-
_ _ 0 _ _ _ _ _ _ _ _ _
_ _ A _ _ _ _ _ _ _ _ _
Security Options
None
Enclosure Lock
_ _ _
_ _ _
_ _ _
_ _ _
-
-
-
-
_ _ _ C _ _ _ _ 0 0 _ _
_ _ _ W _ _ _ _ E M _ _
_ _ _ W _ _ _ _ J P _ _
_ _ _ W _ _ _ _ U S _ _
Interface
USB + 10/100 Ethernet
USB + 10/100 Ethernet + Wireless LAN -- EMEA
USB + 10/100 Ethernet + Wireless LAN -- Japan
USB + 10/100 Ethernet + Wireless LAN -- United States
_ _ _
_ _ _
-
-
_ _ _ _ 0 _ _ _ _ _ _ _
_ _ _ _ D _ _ _ _ _ _ _
Software/KitNone
Media Starter Kit (includes: 1 YMCK ribbon kit,
1 roll of InTM, 200 PVC cards)
_ _ _ - _ _ _ _ _ 0 0 0 _ _ _ _
Miscellaneous
None
_ _ _
_ _ _
_ _ _
_ _ _
_ _ _
_ _ _ _ _ _
_ _ _
_ _ _
_ _ _
_ _ _
-
-
-
-
-
--
-
-
-
-
_ _ _ _ _ _ _ _ 0 0 _ _
_ _ _ _ _ _ _ _ A P _ _
_ _ _ _ _ _ _ _ A U _ _
_ _ _ _ _ _ _ _ B R _ _
_ _ _ _ _ _ _ _ C N _ _
_ _ _ _ _ _ _ _ E M _ _ _ _ _ _ _ _ _ _ J P _ _
_ _ _ _ _ _ _ _ P H _ _
_ _ _ _ _ _ _ _ T H _ _
_ _ _ _ _ _ _ _ T W _ _
_ _ _ _ _ _ _ _ U S _ _
Country Code
None
Asia/Pacific
Australia
Brazil
China
EMEA (Europe/Middle East/Africa)
Japan
Philippines
Thailand
Taiwan
United States
_ _ _ - _ _ _ _ _ _ _ _ _ _ 0 0Custom Code
Reserved for future options

8/10/2019 Zxpseries8 Ug En
http://slidepdf.com/reader/full/zxpseries8-ug-en 171/226
P1045430-002 Zebra ZXP Series 8 Card Printer User’s Manual 167
Appendix B
Setting Custom Card
Specifications
B.1 Introduction
This document is to be used for setting the specifications for cards not listed in the Card type
in use dropdown menu; arrow below. Setting the specifications for a non-listed card type is athree-step process that uses the Card Setup Tab.
If you need help setting the specifications for your card type, contact the Zebra Card
Testing Service at:
Phone: 1-866-569-9086 (Toll Free)Email: [email protected]
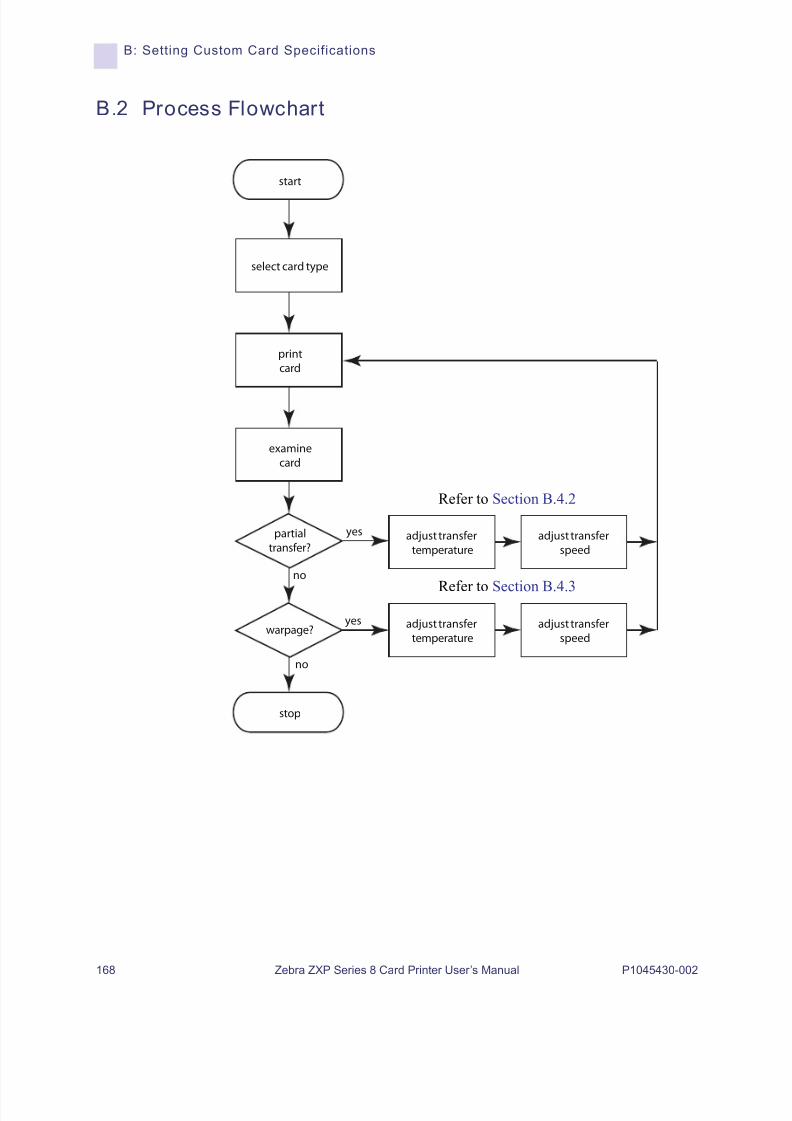
8/10/2019 Zxpseries8 Ug En
http://slidepdf.com/reader/full/zxpseries8-ug-en 172/226
168 Zebra ZXP Series 8 Card Printer User’s Manual P1045430-002
B: Setting Custom Card Specifications
B.2 Process Flowchart
partial
transfer?
examine
card
card
start
stop
no
no
yes
yes
adjust transfer
temperature
adjust transfer
speed
adjust transfer
temperature
adjust transfer
speed
select card type
warpage?
Refer to Section B.4.2
Refer to Section B.4.3

8/10/2019 Zxpseries8 Ug En
http://slidepdf.com/reader/full/zxpseries8-ug-en 173/226
B: Setting Custom Card Specifications
P1045430-002 Zebra ZXP Series 8 Card Printer User’s Manual 169
B.3 3-Step Process
Step 1: Select the Card Type
From the Card type in use dropdown menu, select Custom 1 or Custom 2; and click OK. Notethat Custom 1 or Custom 2 have adjustable transfer temperature and transfer speed tables; theother card types do not.
Note • To access the Card Setup Tab, select Start > Devices and Printers. Right click on the Zebra ZXP Series 8 Card Printer listing; and select Printing Preferences > Card Setup.

8/10/2019 Zxpseries8 Ug En
http://slidepdf.com/reader/full/zxpseries8-ug-en 174/226
170 Zebra ZXP Series 8 Card Printer User’s Manual P1045430-002
B: Setting Custom Card Specifications
Step 2: Make adjustments
After selecting Custom 1 or Custom 2, the Card Specifications window will appear. Make therecommended transfer temperature and/or transfer speed adjustment (Section B.4), andclick the OK button.
The Card Specifications window will close.
Note • Before making any adjustments, print and examine a test card (Step 3:). The qualityof the test card will determine whether or not to continue the process.

8/10/2019 Zxpseries8 Ug En
http://slidepdf.com/reader/full/zxpseries8-ug-en 175/226
B: Setting Custom Card Specifications
P1045430-002 Zebra ZXP Series 8 Card Printer User’s Manual 171
Step 3: Print and examine Test Card
From the Card Setup tab, print (click on the Test Print button circled below) and examine atest card.
The quality of the test card will determine whether or not to continue the process.

8/10/2019 Zxpseries8 Ug En
http://slidepdf.com/reader/full/zxpseries8-ug-en 176/226
172 Zebra ZXP Series 8 Card Printer User’s Manual P1045430-002
B: Setting Custom Card Specifications
B.4 Adjustments
Topics addressed in this section include:
B.4.1 Adjustment Overv iew . . . . . . . . . . . . . . . . . . . . . . . . . . . . 173
B.4.2 Partial Transfer . . . . . . . . . . . . . . . . . . . . . . . . . . . . . . . . . 175
Front of card. . . . . . . . . . . . . . . . . . . . . . . . . . . . . . . . . . . . . 175
Back of card . . . . . . . . . . . . . . . . . . . . . . . . . . . . . . . . . . . . . 178
B.4.3 Warpage . . . . . . . . . . . . . . . . . . . . . . . . . . . . . . . . . . . . . . 181
Edges curled down . . . . . . . . . . . . . . . . . . . . . . . . . . . . . . . 181
Edges curled up . . . . . . . . . . . . . . . . . . . . . . . . . . . . . . . . . 184
Irregular Warpage . . . . . . . . . . . . . . . . . . . . . . . . . . . . . . . . 187

8/10/2019 Zxpseries8 Ug En
http://slidepdf.com/reader/full/zxpseries8-ug-en 177/226
B: Setting Custom Card Specifications
P1045430-002 Zebra ZXP Series 8 Card Printer User’s Manual 173
B.4.1 Adjustment Overview
When making adjustments, be aware that interdependencies exist between parameters; e.g., parameter changes which reduce warp could induce partial transfer.
There are four basic parameters to control, and these parameters differ for single-sided printing
and dual-sided printing for each card type:
• Input transfer speed (speed in)
• Output transfer speed (speed out)
• Front transfer temperature (upper roller temperature)
• Back transfer temperature (lower roller temperature)
Speeds are in inches per second (ips), and temperatures are in degrees Celsius (C).
It is very helpful to think about theenergy
being put into the card as opposed to justtemperature. Speed parameters are the “big knobs” for adjusting energy, while temperature parameters are the “fine tuning knobs.” Slowing down only 0.1 ips has almost twice theenergy-increasing effect as raising the temperature 5oC. In terms of energy:
• Far too little energy = no transfer at all
• Not enough energy = partial transfer
• Too much energy = card warp
• Far too much energy = card jams caused by severe warp
With respect to speeds, going slower in can help guarantee good transfer, while going fasterout can prevent the already-transferred card from remaining hot long enough to soften,weaken, warp, and possibly even jam. Usually, the most reliable and stable speed settingsrange between 1.2 ips and 2.6 ips, with lower generally being better for most card types.
With respect to temperatures, a top temperature which is slightly higher than thecorresponding bottom temperature normally works well for dual-sided transfer. For single-sided transfer, there will be significantly lower temperatures for the back side of the card toavoid accidental transfer. In general, a lower temperature difference between the front and
back sides will induce fewer warming/cooling cycles in the printer.

8/10/2019 Zxpseries8 Ug En
http://slidepdf.com/reader/full/zxpseries8-ug-en 178/226
174 Zebra ZXP Series 8 Card Printer User’s Manual P1045430-002
B: Setting Custom Card Specifications
To compensate for interdependency issues, try adjusting the parameters in the following order:
Step 1. Start by correcting any partial transfer issues by using the procedure outlined inSection B.4.2.
Step 2. Then attempt to improve warpage by using the procedure outlined in Section B.4.3.
Start with acceptable settings from Step 1. While adjusting parameters, ensure that thetransfer quality remains acceptable. Do not continue reducing temperatures orincreasing speeds if the transfer quality becomes unacceptable.
Additional considerations and information:
The thermal conductivity of the card fundamentally influences retransfer performance. Cardcharacteristics affecting retransfer include:
• Single-layer vs. multi-layer construction (homogeneous vs. composite materials) –for homogeneous cards, warp is often lowest when equal energy is put into each sideof the card, while such is not usually true for non-homogeneous cards made of a mix
of metals and plastics due to the widely different thermal properties of the materials,
• Surface finish – glossy vs. matte,
• Whether the card has a magnetic stripe – more prone to warp, especially low-coercivity (LoCo) cards identifiable by a brown stripe instead of the common high-coercivity black stripe, and
• Whether the card is a smart card – often containing asymmetrically-distributed,thermally conductive, dissimilar components which can make warp reductionmore challenging.
Even cards sold as ‘typical’ PVC may not all be similar in terms of retransfer behavior, giventheir exact binders, fillers, pigmentations, and other materials ratios. While many competitiveretransfer printers tend to disavow PVC because it can be difficult to use in their retransfer
printers, a prime ZXP Series 8 advantage is the ability to successfully retransfer to economicalPVC cards.

8/10/2019 Zxpseries8 Ug En
http://slidepdf.com/reader/full/zxpseries8-ug-en 179/226
B: Setting Custom Card Specifications
P1045430-002 Zebra ZXP Series 8 Card Printer User’s Manual 175
B.4.2 Partial Transfer
Front of card
Partial transfer is usually caused by lack of energy being transferred to the card, i.e. thetemperatures are too low or the speeds are too fast.
Step 1. Increase Front Transfer Temperature:
a. From the Card Specifications window, make a note of the default front transfertemperature settings; see Section B.3.
b. Increase the appropriate (single or double side) front transfer temperature by 5.
c. Click on the OK button.
d. Print a test card; see Section B.3.
e. Examine the test card.
• If there is noticeable improvement, continue increasing the front transfertemperature by 5, printing a test card, and examining the resulting card. Stopwhen the problem is corrected or there is no more improvement. If the
problem is corrected, no more adjustment is required; otherwise go to Step 2.
• If there is no noticeable improvement, return the temperature to its defaultsetting; and go to Step 2.
Light or missing transfer on
the sides
Spotty transfer anywhere on
the card
Light transfer on entire card

8/10/2019 Zxpseries8 Ug En
http://slidepdf.com/reader/full/zxpseries8-ug-en 180/226
176 Zebra ZXP Series 8 Card Printer User’s Manual P1045430-002
B: Setting Custom Card Specifications
Step 2. Decrease Transfer Input Speed
a. From the Card Specifications window, make a note of the default transfer inputspeed settings.
b. Decrease the appropriate (single or double) transfer input speed by 0.1.
c. Click on the OK button.
d. Print a test card.
e. Examine the test card.
• If there is noticeable improvement, continue decreasing the transfer inputspeed by 0.1, printing a test card, and examining the resulting card. Stopwhen the problem is corrected or there is no more improvement. If the
problem is corrected, no more adjustment is required; otherwise go to Step .
• If there is no noticeable improvement, return the speed to its default setting;and go to Step .

8/10/2019 Zxpseries8 Ug En
http://slidepdf.com/reader/full/zxpseries8-ug-en 181/226
B: Setting Custom Card Specifications
P1045430-002 Zebra ZXP Series 8 Card Printer User’s Manual 177
Step 3. Decrease Transfer Output Speed
a. From the Card Specifications window, make a note of the default transfer outputspeed settings.
b. Decrease the appropriate (single or double) transfer output speed by 0.1.
c. Click on the OK button.
d. Print a test card.
e. Examine the test card.
• If there is noticeable improvement, continue decreasing the transfer outputspeed by 0.1, printing a test card, and examining the resulting card. Stopwhen the problem is corrected or there is no more improvement. If the
problem is corrected, no more adjustment is required. If the problem persists,contact Zebra Technical Support.
• If there is no noticeable improvement, return the transfer output speed to itsdefault setting; and contact Zebra Technical Support.

8/10/2019 Zxpseries8 Ug En
http://slidepdf.com/reader/full/zxpseries8-ug-en 182/226
178 Zebra ZXP Series 8 Card Printer User’s Manual P1045430-002
B: Setting Custom Card Specifications
Back of card
Partial transfer is usually caused by lack of energy being transferred to the card, i.e. thetemperatures are too low or the speeds are too fast.
Step 1. Increase Back Transfer Temperature:
a. From the Card Specifications window, make a note of the default back transfertemperature settings; see Section B.3.
b. Increase the appropriate (single or double side) back transfer temperature by 5.
c. Click on the OK button.
d. Print a test card; see Section B.3.
e. Examine the test card.
• If there is noticeable improvement, continue increasing the back transfertemperature by 5, printing a test card, and examining the resulting card. Stopwhen the problem is corrected or there is no more improvement. If the
problem is corrected, no more adjustment is required; otherwise go to Step 2.
• If there is no noticeable improvement, return the temperature to its default
setting; and go to Step 2.

8/10/2019 Zxpseries8 Ug En
http://slidepdf.com/reader/full/zxpseries8-ug-en 183/226
B: Setting Custom Card Specifications
P1045430-002 Zebra ZXP Series 8 Card Printer User’s Manual 179
Step 2. Decrease Transfer Input Speed
a. From the Card Specifications window, make a note of the default transfer inputspeed settings.
b. Decrease the appropriate (single or double) transfer input speed by 0.1.
c. Click on the OK button.
d. Print a test card.
e. Examine the test card.
• If there is noticeable improvement, continue decreasing the transfer inputspeed by 0.1, printing a test card, and examining the resulting card. Stopwhen the problem is corrected or there is no more improvement. If the
problem is corrected, no more adjustment is required; otherwise go to Step 3.
• If there is no noticeable improvement, return the speed to its default setting;and go to Step 3.

8/10/2019 Zxpseries8 Ug En
http://slidepdf.com/reader/full/zxpseries8-ug-en 184/226
180 Zebra ZXP Series 8 Card Printer User’s Manual P1045430-002
B: Setting Custom Card Specifications
Step 3. Decrease Transfer Output Speed
a. From the Card Specifications window, make a note of the default transfer outputspeed settings.
b. Decrease the appropriate (single or double) transfer output speed by 0.1.
c. Click on the OK button.
d. Print a test card.
e. Examine the test card.
• If there is noticeable improvement, continue decreasing the transfer outputspeed by 0.1, printing a test card, and examining the resulting card. Stopwhen the problem is corrected or there is no more improvement. If the
problem is corrected, no more adjustment is required. If the problem persists,contact Zebra Technical Support.
• If there is no noticeable improvement, return the transfer output speed to itsdefault setting; and contact Zebra Technical Support.

8/10/2019 Zxpseries8 Ug En
http://slidepdf.com/reader/full/zxpseries8-ug-en 185/226
B: Setting Custom Card Specifications
P1045430-002 Zebra ZXP Series 8 Card Printer User’s Manual 181
B.4.3 Warpage
Edges curled down
Warpage is usually caused by too much energy being transferred to the card; i.e., thetemperatures are too hot or the speeds are too slow.
Step 1. Decrease Back Transfer Temperature:
a. Go to the Card Specifications window; see Section B.3.
b. Make a note of the default back transfer temperature settings.
c. Decrease the appropriate (single or double side) back transfer temperature by 5.
d. Click on the OK button.
e. Print a test card; see Section B.3.
f. Examine the test card.
• If there is noticeable improvement, continue decreasing the back transfertemperature by 5, printing a test card, and examining the resulting card. Stop
when the problem is corrected or there is no more improvement. If the problem is corrected, no more adjustment is required; otherwise go to Step 2.
• If there is no noticeable improvement, return the temperature to its defaultsetting; and go to Step 2.
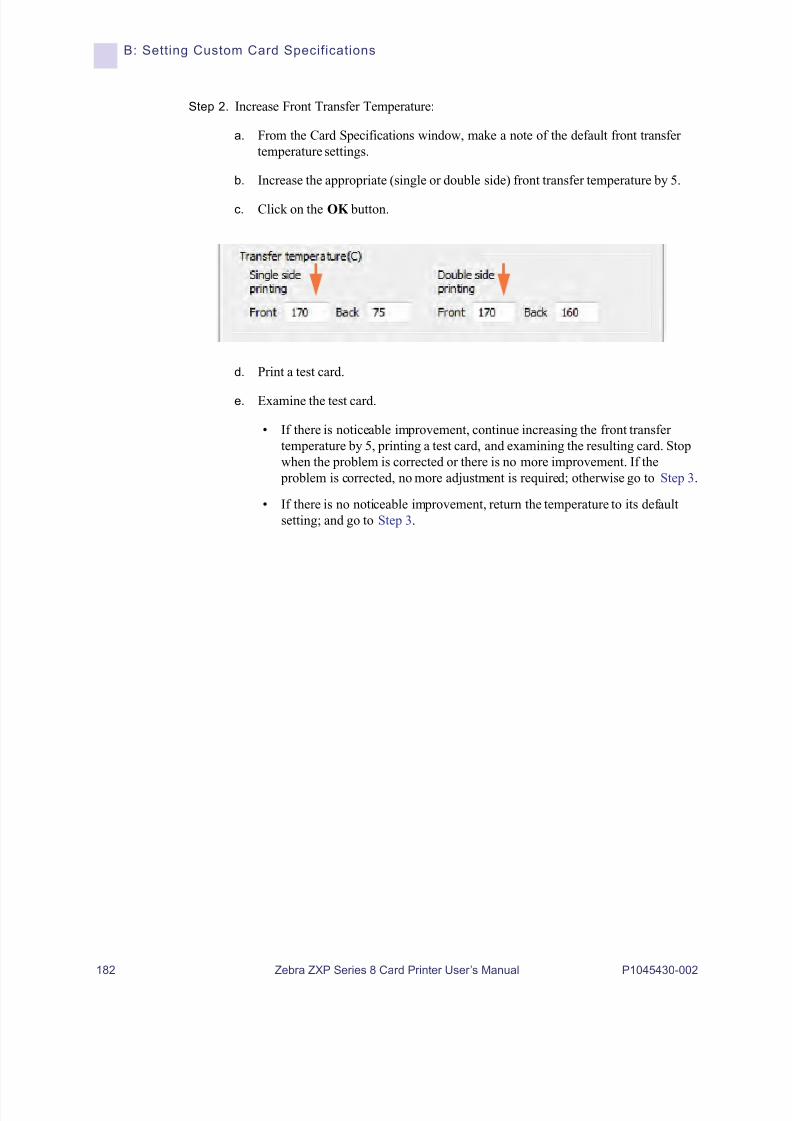
8/10/2019 Zxpseries8 Ug En
http://slidepdf.com/reader/full/zxpseries8-ug-en 186/226
182 Zebra ZXP Series 8 Card Printer User’s Manual P1045430-002
B: Setting Custom Card Specifications
Step 2. Increase Front Transfer Temperature:
a. From the Card Specifications window, make a note of the default front transfertemperature settings.
b. Increase the appropriate (single or double side) front transfer temperature by 5.
c. Click on the OK button.
d. Print a test card.
e. Examine the test card.
• If there is noticeable improvement, continue increasing the front transfertemperature by 5, printing a test card, and examining the resulting card. Stopwhen the problem is corrected or there is no more improvement. If the
problem is corrected, no more adjustment is required; otherwise go to Step 3.
• If there is no noticeable improvement, return the temperature to its defaultsetting; and go to Step 3.
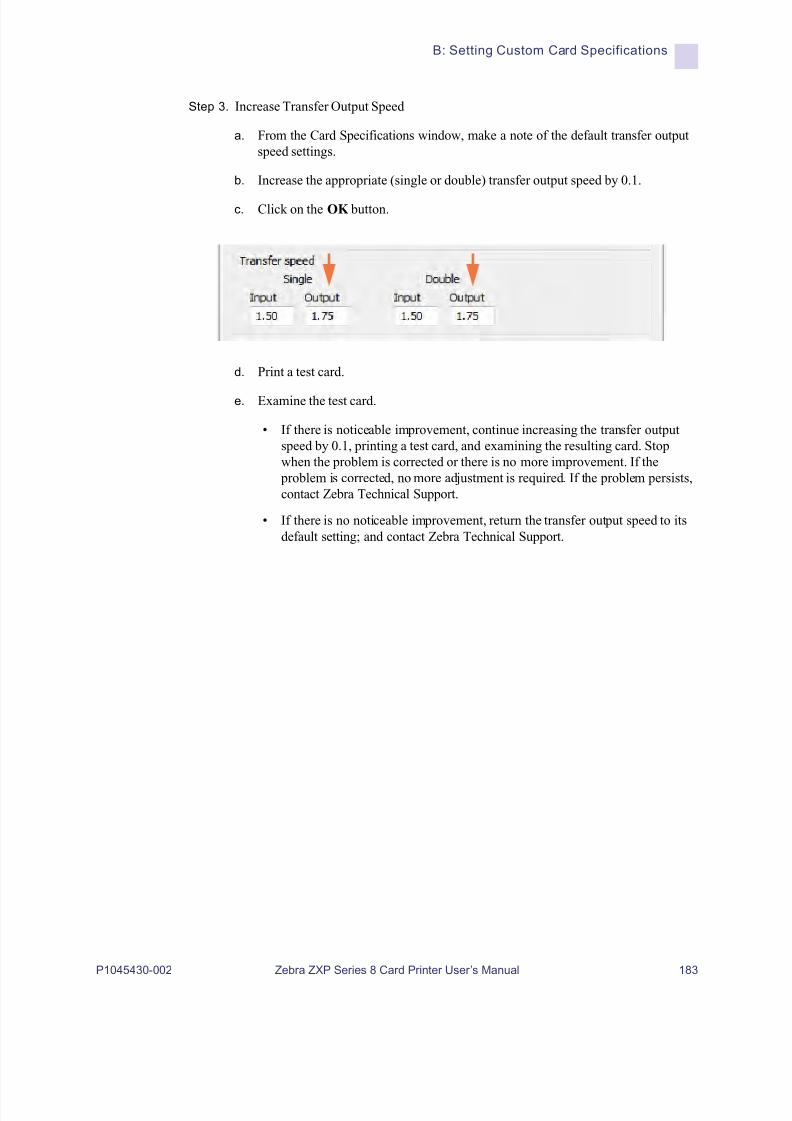
8/10/2019 Zxpseries8 Ug En
http://slidepdf.com/reader/full/zxpseries8-ug-en 187/226
B: Setting Custom Card Specifications
P1045430-002 Zebra ZXP Series 8 Card Printer User’s Manual 183
Step 3. Increase Transfer Output Speed
a. From the Card Specifications window, make a note of the default transfer outputspeed settings.
b. Increase the appropriate (single or double) transfer output speed by 0.1.
c. Click on the OK button.
d. Print a test card.
e. Examine the test card.
• If there is noticeable improvement, continue increasing the transfer outputspeed by 0.1, printing a test card, and examining the resulting card. Stopwhen the problem is corrected or there is no more improvement. If the
problem is corrected, no more adjustment is required. If the problem persists,contact Zebra Technical Support.
• If there is no noticeable improvement, return the transfer output speed to itsdefault setting; and contact Zebra Technical Support.

8/10/2019 Zxpseries8 Ug En
http://slidepdf.com/reader/full/zxpseries8-ug-en 188/226
184 Zebra ZXP Series 8 Card Printer User’s Manual P1045430-002
B: Setting Custom Card Specifications
Edges curled up
Warpage is usually caused by too much energy being transferred to the card, i.e. thetemperatures are too hot or the speeds are too slow.
Step 1.Decrease Front Transfer Temperature:a. Go to the Card Specifications window; see Section B.3.
b. Make a note of the default front transfer temperature settings.
c. Decrease the appropriate (single or double side) front transfer temperature by 5.
d. Click on the OK button.
e. Print a test card; see Section B.3.
f. Examine the test card.
• If there is noticeable improvement, continue decreasing the front transfertemperature by 5, printing a test card, and examining the resulting card. Stopwhen the problem is corrected or there is no more improvement. If the
problem is corrected, no more adjustment is required; otherwise go to Step 2.
• If there is no noticeable improvement, return the temperature to its defaultsetting; and go to Step 2.

8/10/2019 Zxpseries8 Ug En
http://slidepdf.com/reader/full/zxpseries8-ug-en 189/226
B: Setting Custom Card Specifications
P1045430-002 Zebra ZXP Series 8 Card Printer User’s Manual 185
Step 2. Increase Back Transfer Temperature:
a. From the Card Specifications window, make a note of the default back transfertemperature settings.
b. Increase the appropriate (single or double side) back transfer temperature by 5.
c. Click on the OK button.
d. Print a test card.
e. Examine the test card.
• If there is noticeable improvement, continue increasing the back transfertemperature by 5, printing a test card, and examining the resulting card. Stopwhen the problem is corrected or there is no more improvement. If the
problem is corrected, no more adjustment is required; otherwise go to Step 3.
• If there is no noticeable improvement, return the temperature to its defaultsetting; and go to Step 3.

8/10/2019 Zxpseries8 Ug En
http://slidepdf.com/reader/full/zxpseries8-ug-en 190/226
186 Zebra ZXP Series 8 Card Printer User’s Manual P1045430-002
B: Setting Custom Card Specifications
Step 3. Increase Transfer Output Speed
a. From the Card Specifications window, make a note of the default transfer outputspeed settings.
b. Increase the appropriate (single or double) transfer output speed by 0.1.
c. Click on the OK button.
d. Print a test card.
e. Examine the test card.
• If there is noticeable improvement, continue increasing the transfer outputspeed by 0.1, printing a test card, and examining the resulting card. Stopwhen the problem is corrected or there is no more improvement. If the
problem is corrected, no more adjustment is required. If the problem persists,contact Zebra Technical Support.
• If there is no noticeable improvement, return the transfer output speed to itsdefault setting; and contact Zebra Technical Support.

8/10/2019 Zxpseries8 Ug En
http://slidepdf.com/reader/full/zxpseries8-ug-en 191/226
B: Setting Custom Card Specifications
P1045430-002 Zebra ZXP Series 8 Card Printer User’s Manual 187
Irregular Warpage
Warpage is usually caused by too much energy being transferred to the card, i.e. thetemperatures are too hot or the speeds are too slow.
Step 1. Decrease Front Transfer Temperature:
a. Go to the Card Specifications window; see Section B.3.
b. Make a note of the default front transfer temperature settings.
c. Decrease the appropriate (single or double side) front transfer temperature by 5.
d. Click on the OK button.
e. Print a test card; see Section B.3.
f. Examine the test card.
• If there is noticeable improvement, continue decreasing the front transfer
temperature by 5, printing a test card, and examining the resulting card. Stopwhen the problem is corrected or there is no more improvement. If the problem is corrected, no more adjustment is required; otherwise go to Step 2.
• If there is no noticeable improvement, return the temperature to its defaultsetting; and go to Step 2.
Note • Irregular warpage is more common with Smart Cards.

8/10/2019 Zxpseries8 Ug En
http://slidepdf.com/reader/full/zxpseries8-ug-en 192/226
188 Zebra ZXP Series 8 Card Printer User’s Manual P1045430-002
B: Setting Custom Card Specifications
Step 2. Decrease Back Transfer Temperature:
a. Go to the Card Specifications window.
b. Make a note of the default back transfer temperature settings.
c. Decrease the appropriate (single or double side) back transfer temperature by 5.
d. Click on the OK button.
e. Print a test card.
f. Examine the test card.
• If there is noticeable improvement, continue decreasing the back transfertemperature by 5, printing a test card, and examining the resulting card. Stopwhen the problem is corrected or there is no more improvement. If the
problem is corrected, no more adjustment is required; otherwise go to Step 3.
• If there is no noticeable improvement, return the temperature to its defaultsetting; and go to Step 3.

8/10/2019 Zxpseries8 Ug En
http://slidepdf.com/reader/full/zxpseries8-ug-en 193/226
B: Setting Custom Card Specifications
P1045430-002 Zebra ZXP Series 8 Card Printer User’s Manual 189
Step 3. Increase Transfer Output Speed
a. From the Card Specifications window, make a note of the default transfer outputspeed settings.
b. Increase the appropriate (single or double) transfer output speed by 0.1.
c. Click on the OK button.
d. Print a test card.
e. Examine the test card.
• If there is noticeable improvement, continue increasing the transfer outputspeed by 0.1, printing a test card, and examining the resulting card. Stopwhen the problem is corrected or there is no more improvement. If the
problem is corrected, no more adjustment is required; otherwise go to Step 4.
• If there is no noticeable improvement, return the transfer output speed to itsdefault setting; and go to Step 4.
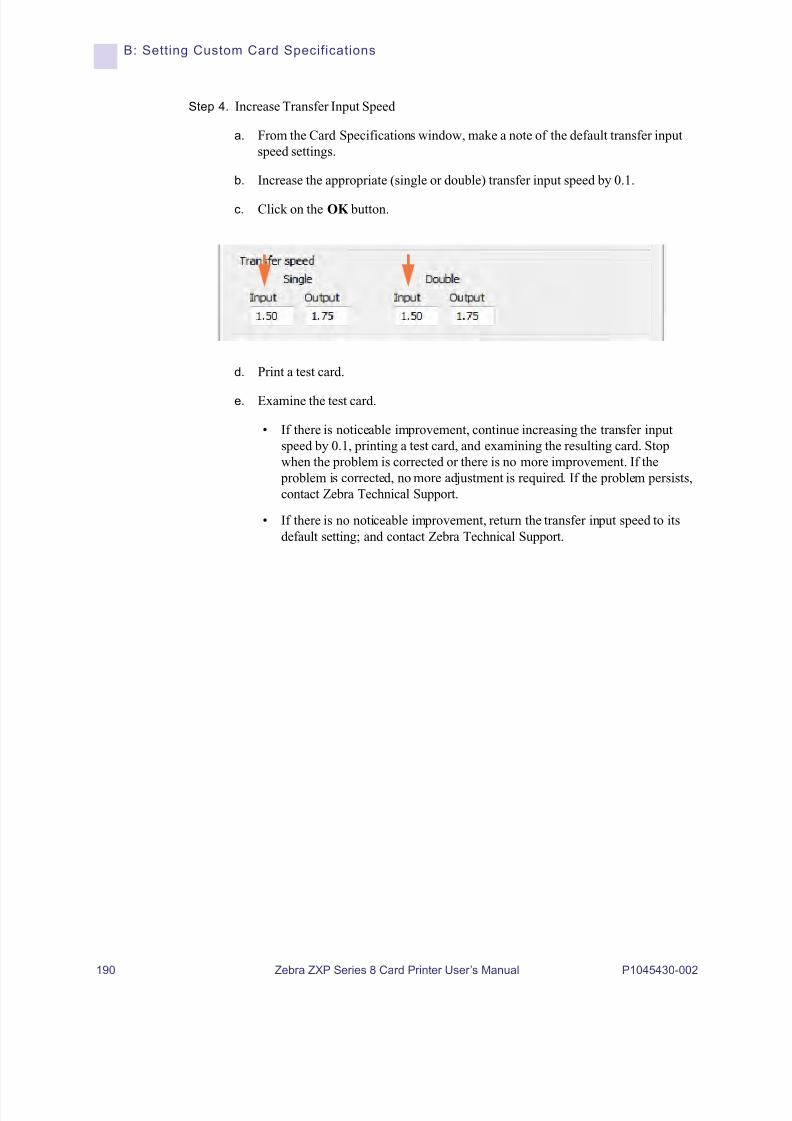
8/10/2019 Zxpseries8 Ug En
http://slidepdf.com/reader/full/zxpseries8-ug-en 194/226
190 Zebra ZXP Series 8 Card Printer User’s Manual P1045430-002
B: Setting Custom Card Specifications
Step 4. Increase Transfer Input Speed
a. From the Card Specifications window, make a note of the default transfer inputspeed settings.
b. Increase the appropriate (single or double) transfer input speed by 0.1.
c. Click on the OK button.
d. Print a test card.
e. Examine the test card.
• If there is noticeable improvement, continue increasing the transfer inputspeed by 0.1, printing a test card, and examining the resulting card. Stopwhen the problem is corrected or there is no more improvement. If the
problem is corrected, no more adjustment is required. If the problem persists,contact Zebra Technical Support.
• If there is no noticeable improvement, return the transfer input speed to itsdefault setting; and contact Zebra Technical Support.

8/10/2019 Zxpseries8 Ug En
http://slidepdf.com/reader/full/zxpseries8-ug-en 195/226
P1045430-002 Zebra ZXP Series 8 Card Printer User’s Manual 191
Appendix C
Network Operations
This section covers:
Adding a Network Printer . . . . . . . . . . . . . . . . . . . . . . . . . . . . . . . . . . . . . . 192
Printer Pooling . . . . . . . . . . . . . . . . . . . . . . . . . . . . . . . . . . . . . . . . . . . . . . . 196
Printer Sharing . . . . . . . . . . . . . . . . . . . . . . . . . . . . . . . . . . . . . . . . . . . . . . . 198

8/10/2019 Zxpseries8 Ug En
http://slidepdf.com/reader/full/zxpseries8-ug-en 196/226
192 Zebra ZXP Series 8 Card Printer User’s Manual P1045430-002
C: Networ k Operations
Adding a Network Printer
Use this procedure if you have already installed an ethernet printer on your system (referto Section 2), and you want to install a second ethernet printer on the network via theMicrosoft Add Printer Wizard.
Step 1. Click on the Start button, then select Devices and Printers.
Step 2. Observe the Devices and Printers window.
Step 3. Click on the Add a printer option in the Taskbar (arrow above).
Step 4. Observe the What type of printer do you want to install window.
Step 5. Select Add a local printer (arrow above), and click the Next button.

8/10/2019 Zxpseries8 Ug En
http://slidepdf.com/reader/full/zxpseries8-ug-en 197/226
C: Network Operations
P1045430-002 Zebra ZXP Series 8 Card Printer User’s Manual 193
Step 6. Observe the Choose a printer port window.
Step 7. Select the Create a new port radio button (1st arrow above).
Step 8. From the dropdown menu, select Standard TCP/IP Port (2nd arrow above).
Step 9. Click on the Next button.
Step 10. Observe the Type a printer hostname or IP address window.
Step 11. Enter the IP address of your printer in the Hostname or IP address text box (circledabove). Note that the Port name will automatically be filled in when you enter theIP Address. Do not change the Port Name.
Step 12. Ensure that the Query the printer ... checkbox is selected (arrow above).
Step 13. Click on the Next button.

8/10/2019 Zxpseries8 Ug En
http://slidepdf.com/reader/full/zxpseries8-ug-en 198/226
194 Zebra ZXP Series 8 Card Printer User’s Manual P1045430-002
C: Networ k Operations
Step 14. Observe the Install the printer driver window.
Step 15. Select the Manufacturer and the Printer (arrows above).
Step 16. Click on the Next button.
Step 17. Observe the Which version of the driver do you want to use window.
Step 18. Select the Use the driver that is currently installed radio button (arrow above).
Step 19. Click the Next button.
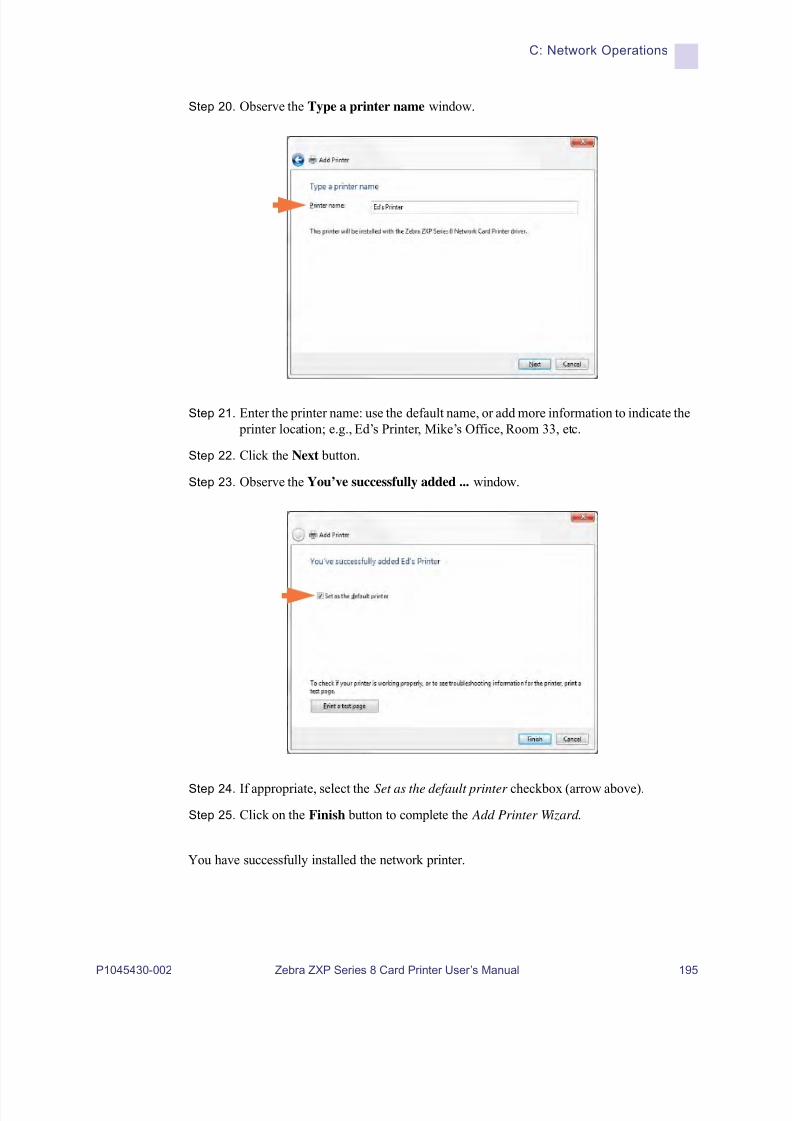
8/10/2019 Zxpseries8 Ug En
http://slidepdf.com/reader/full/zxpseries8-ug-en 199/226
C: Network Operations
P1045430-002 Zebra ZXP Series 8 Card Printer User’s Manual 195
Step 20. Observe the Type a printer name window.
Step 21. Enter the printer name: use the default name, or add more information to indicate the printer location; e.g., Ed’s Printer, Mike’s Office, Room 33, etc.
Step 22. Click the Next button.
Step 23. Observe the You’ve successfully added ... window.
Step 24. If appropriate, select the Set as the default printer checkbox (arrow above).
Step 25. Click on the Finish button to complete the Add Printer Wizard .
You have successfully installed the network printer.
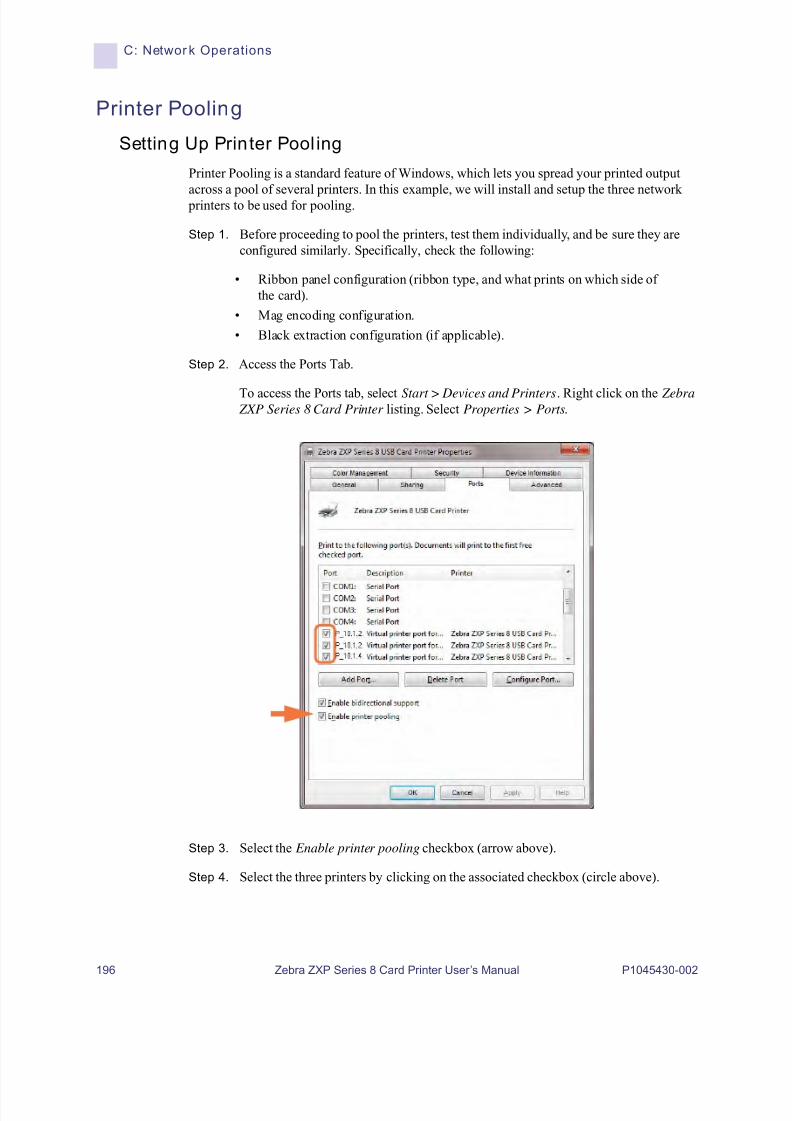
8/10/2019 Zxpseries8 Ug En
http://slidepdf.com/reader/full/zxpseries8-ug-en 200/226
196 Zebra ZXP Series 8 Card Printer User’s Manual P1045430-002
C: Networ k Operations
Printer Pooling
Setting Up Printer Pool ing
Printer Pooling is a standard feature of Windows, which lets you spread your printed output
across a pool of several printers. In this example, we will install and setup the three network printers to be used for pooling.
Step 1. Before proceeding to pool the printers, test them individually, and be sure they areconfigured similarly. Specifically, check the following:
• Ribbon panel configuration (ribbon type, and what prints on which side ofthe card).
• Mag encoding configuration.
• Black extraction configuration (if applicable).
Step 2. Access the Ports Tab.
To access the Ports tab, select Start > Devices and Printers. Right click on the Zebra ZXP Series 8 Card Printer listing. Select Properties > Ports.
Step 3. Select the Enable printer pooling checkbox (arrow above).
Step 4. Select the three printers by clicking on the associated checkbox (circle above).

8/10/2019 Zxpseries8 Ug En
http://slidepdf.com/reader/full/zxpseries8-ug-en 201/226
C: Network Operations
P1045430-002 Zebra ZXP Series 8 Card Printer User’s Manual 197
Using the Printer Pool
When the first printer has taken as many jobs as it can handle (that being two jobs - one to be printed immediately, the other waiting), the following jobs “spill over” to the second printer,and then to the third printer.
Note that if you are only printing two jobs, they would both go to the first printer. Pooling isa spill-over methodology. It does not balance printer usage.
Once the pool has been set up, maintenance and configuration changes should be donethrough the menus for each individual printer, not through the pool (which can produceundesirable results).
Note • Send print jobs to the printer pool, not to an individual printer.
Important • The effect of any maintenance and/or changes can (and should) be tested by
sending print jobs separately to each printer, not to the pool.

8/10/2019 Zxpseries8 Ug En
http://slidepdf.com/reader/full/zxpseries8-ug-en 202/226
198 Zebra ZXP Series 8 Card Printer User’s Manual P1045430-002
C: Networ k Operations
Printer Sharing
In the printer sharing configurations, the following Microsoft Windows host and clientcombinations will be supported in USB and network (Ethernet) connectivity. Note that PrinterPooling Sharing is not supported.
Supported WindowsDriversMicrosoft OS
One-to-One One-to-Many Many-to-One Many-to-Many PrinterPooling
1 Printer -1 Host
One Host -Many Printers
Multiple Hosts(Drivers) -1 Printer
Multiple Hosts(Drivers) -Many Printers
Windows 8 32-bit Yes Yes Yes Yes Yes
Windows 8 64-bit Yes Yes Yes Yes Yes
Win Server 2012 1 Yes Yes Yes Yes Yes
Server 2008 64-bit Yes Yes Yes Yes Yes
Server 2008 32-bit Yes Yes Yes Yes Yes
Server 2003 Yes Yes Yes Yes Yes
Windows 7 64-bit Yes Yes Yes Yes Yes
Windows 7 32-bit Yes Yes Yes Yes Yes
Vista 64-bit 2 Yes No No No No
Vista 32-bit 2 Yes No No No No
Windows XP Yes Yes Yes Yes Yes
1 No support for Windows Server 2012 Virtual Datacenter, Support for Standard, Essentials, and Foundation editions.
2 Need to qualify Service Pack support

8/10/2019 Zxpseries8 Ug En
http://slidepdf.com/reader/full/zxpseries8-ug-en 203/226
P1045430-002 Zebra ZXP Series 8 Card Printer User’s Manual 199
Appendix D
Wireless Network
Operations
Introduction
This Appendix provides information about installing and connecting a Zebra ZXP Series 8Card Printer (with the Wireless Option) to a wireless network.
8/10/2019 Zxpseries8 Ug En
http://slidepdf.com/reader/full/zxpseries8-ug-en 204/226
200 Zebra ZXP Series 8 Card Printer User’s Manual P1045430-002
D: Wireless Network Operations
Installing the Printer
A printer with the wireless option ships with the wireless radio pre-installed in the printer. Anantenna is shipped in the box with the printer. The antenna must be connected to the rear of the
printer before using the wireless interface. Lightly push the antenna onto the printer antennaconnector, and rotate the knurled antenna connector until finger tight.
The antenna orientation is important to maximize the wireless signal strength. Inspect theaccess point antenna(s), and try to put the printer antenna in a similar orientation. Afterconnecting the printer to the wireless network, the antenna orientation can be adjusted tomaximize signal strength.
As the distance between the printer and the access point increases, the signal strength
decreases. If there are intervening walls, unpredictable signal strength attenuation will occur.Decreasing signal strength results in automatic data rate reduction. At the longest distance,network traffic can become very slow.
Printer location is important to ensure that adequate signal strength is achieved. Followthese suggestions:
• Position the printer as close to the access point that it will connect to as possible.
• If possible, orient the printer such that there is a clear line of sight between the printerantenna and the access point antenna.
• Locate the printer such that there are no intervening walls in the line of sight between
the antennas.
• Do not put the printer in a cabinet, especially not a metal one.
• Do not locate large metal objects close to the printer antenna.
• Do not locate the printer close to devices that emit RF radiation in the 2.4 GHz range; suchdevices might include: microwave ovens, cordless phones, wireless surveillance cameras,
baby monitors, wireless video transmitter and Bluetooth devices, etc.
Configuring the Printer
To configure the printer for wireless printing, refer to the Zebra ZXP Series 8 Card PrinterWireless Reference Manual, P/N P1035089 or Service Manual, P/N 1013376.
Caution • Only use the antenna that is shipped with the printer to ensure regulatorycompliance for the transmit power.

8/10/2019 Zxpseries8 Ug En
http://slidepdf.com/reader/full/zxpseries8-ug-en 205/226
P1045430-002 Zebra ZXP Series 8 Card Printer User’s Manual 201
Appendix E
Magnetic Card Encoder
Introduction
This Appendix includes operation and maintenance requirements for Printers with the optionalmagnetic card stripe encoder.
The magnetic encoder can be set for either high or low coercivity, which must match the cards being used. Use the printer driver to change the encoder setting.
Mag Encoder (optional)
behind the idler roller
assembly door

8/10/2019 Zxpseries8 Ug En
http://slidepdf.com/reader/full/zxpseries8-ug-en 206/226
202 Zebra ZXP Series 8 Card Printer User’s Manual P1045430-002
E: Magnetic Card Encoder
Driver Setting
The Card Setup tab allows the user to specify the Magnetic Encoder Card Type in use.Based on your selection, the printer automatically adjusts various printer properties foroptimum performance.
The Encoding tab allows the user to set various magnetic encoding options.
To access the Card Setup Tab or the Encoding Tab, select Start > Devices and Printers. Rightclick on the Zebra ZXP Series 8 Card Printer listing; and select the desired tab.
Use a YMCKI or YMCKKI ribbon. This will allow you to select an inhibit panel area fornon-printing areas of your card , in this case, the mag stripe); see Inhibit Option on page 93 for details.
Before doing any magnetic encoding, set the following encoding properties:
1. Select the card type (arrow above); see Card Setup Tab on page 79.
2. Select the magnetic encoding type (circled above); see Encoding Tab on page 95.Encoding types supported are ISO, AAMVA, CUSTOM, BINARY, and JIS-II.
3. Click the Apply button.
4. Click the OK button.

8/10/2019 Zxpseries8 Ug En
http://slidepdf.com/reader/full/zxpseries8-ug-en 207/226
E: Magnetic Card Encoder
P1045430-002 Zebra ZXP Series 8 Card Printer User’s Manual 203
Media Loading Orientation
Place the cards in the Input Hopper in the correct orientation as shown (with the magneticstripe down and facing to the rear). Ensure that the cards are seated properly the hopper.
Magnetic Encoder Cleaning
The Magnetic Encoder is cleaned as part of the printer cleaning process; see Section 6. If thefrequency of encoding errors increases, the head may need additional cleaning. To clean, onlyuse foam-tipped swabs.
1. Open the Door.
2. Open the idler roller assembly door.
3. Bend the Cleaning Swab to release the cleaning fluid.
4. Clean the Magnetic Encoder by moving Cleaning Swab tip side-to-side across thehead elements. To re-order Cleaning Swabs, see the Media List on the User
Documentation and Drivers CD supplied with this printer.
5. Close the idler roller assembly door.
6. Close the Door.
Note • ONLY USE cards that comply with ISO 7810 and 7811 standards for magnetic stripecards. The magnetic stripe must be flush to the surface of the card to work properly.
Never use cards which have taped-on magnetic stripes.
Caution • Never use a sharp object or any abrasive to scrape deposits from the Magnetic
Encoder. Permanent damage to the Magnetic Head will result.
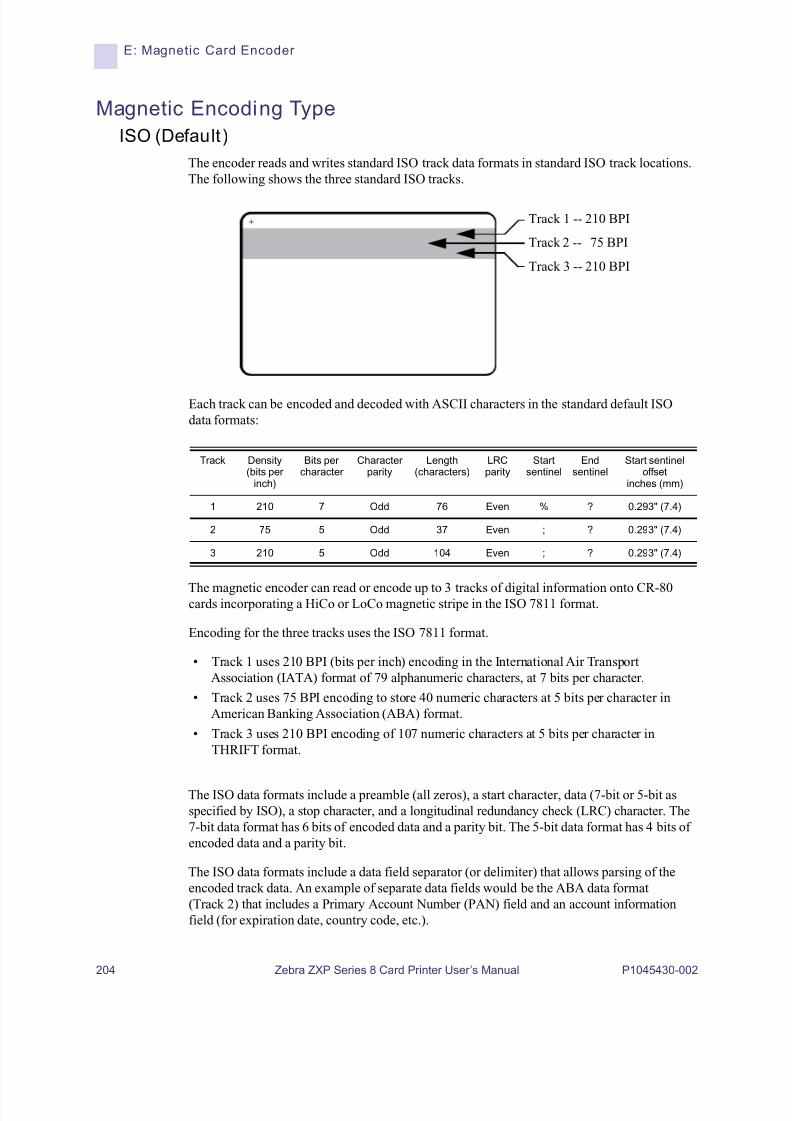
8/10/2019 Zxpseries8 Ug En
http://slidepdf.com/reader/full/zxpseries8-ug-en 208/226
204 Zebra ZXP Series 8 Card Printer User’s Manual P1045430-002
E: Magnetic Card Encoder
Magnetic Encoding Type
ISO (Default)
The encoder reads and writes standard ISO track data formats in standard ISO track locations.The following shows the three standard ISO tracks.
Each track can be encoded and decoded with ASCII characters in the standard default ISOdata formats:
The magnetic encoder can read or encode up to 3 tracks of digital information onto CR-80cards incorporating a HiCo or LoCo magnetic stripe in the ISO 7811 format.
Encoding for the three tracks uses the ISO 7811 format.
• Track 1 uses 210 BPI (bits per inch) encoding in the International Air TransportAssociation (IATA) format of 79 alphanumeric characters, at 7 bits per character.
• Track 2 uses 75 BPI encoding to store 40 numeric characters at 5 bits per character inAmerican Banking Association (ABA) format.
• Track 3 uses 210 BPI encoding of 107 numeric characters at 5 bits per character inTHRIFT format.
The ISO data formats include a preamble (all zeros), a start character, data (7-bit or 5-bit asspecified by ISO), a stop character, and a longitudinal redundancy check (LRC) character. The7-bit data format has 6 bits of encoded data and a parity bit. The 5-bit data format has 4 bits ofencoded data and a parity bit.
The ISO data formats include a data field separator (or delimiter) that allows parsing of theencoded track data. An example of separate data fields would be the ABA data format(Track 2) that includes a Primary Account Number (PAN) field and an account informationfield (for expiration date, country code, etc.).
Track Density(bits per
inch)
Bits percharacter
Characterparity
Length(characters)
LRCparity
Startsentinel
Endsentinel
Start sentineloffset
inches (mm)
1 210 7 Odd 76 Even % ? 0.293" (7.4)
2 75 5 Odd 37 Even ; ? 0.293" (7.4)
3 210 5 Odd 104 Even ; ? 0.293" (7.4)
Track 1 -- 210 BPI
Track 2 -- 75 BPI
Track 3 -- 210 BPI

8/10/2019 Zxpseries8 Ug En
http://slidepdf.com/reader/full/zxpseries8-ug-en 209/226
E: Magnetic Card Encoder
P1045430-002 Zebra ZXP Series 8 Card Printer User’s Manual 205
AAMVA
The data stored on magnetic stripes on American driver's licenses is specified by the AmericanAssociation of Motor Vehicle Administrators (AAMVA).
Alpha-numeric characters on Tracks 1 and 3, numerals only on Track 2.
CUSTOM
If a custom format is desired, the ISO standard format may be used as a starting point. The
standard format can then be modified by assigning different values to any or all of the density,character, and sentinel attributes. (If any of these attributes is missing, its correspondingvalue in the standard ISO format will be substituted.)
BINARY
The binary option allows the user to specify directly the value for each bit on the mag stripe.
In this “direct binary” mode, it is the host’s responsibility to fully populate the magnetic stripe;i.e., the hex data provided by the host must include the leading zeroes, start sentinel, data, endsentinel, LRC, and trailing zeroes. Note that the magnetic stripe is encoded from the right-hand end as viewed from the “stripe” side, with the stripe uppermost. The least significant bitof the data is encoded first.
A sufficient number of leading zeroes should be prepended to offset the start sentinel byapproximately 0.3" (7.5 mm) from the right-hand end, as in the ISO format. Care should betaken to ensure that the payload data does not exceed the capacity of the tracks at theirspecified recording densities. (In the binary mode, out-of-range data is not recorded, and noerror condition will result.)
A CR-80 size card has a nominal capacity of 252 bits per track at 75 BPI, and 708 bits at210 BPI. These capacities equate approximately to 31 hex bytes (248 binary bits) and 88 hex
bytes respectively.
JIS-II
JIS II data format is the Japanese Industrial Standard for magnetic stripe encoding. JIS-II dataformat is used to encode a single track on a standard ISO magnetic stripe card.
The JIS II Data Format uses a 7-bit, 128-character set; i.e., the 7-bit ASCII Table with someentries representing Japanese characters. The JIS II track is wide, covering ISO Tracks 1and 2.
Encoding is 210 bpi, character size is 8, parity is even, the start sentinel is %, the start sentineloffset (x0.001”) is 197, and the end sentinel is ?.
Track Density(bits per
inch)
Bits percharacter
Characterparity
Length(characters)
LRCparity
Startsentinel
Endsentinel
Start sentineloffset
inches (mm)
1 210 7 Odd 79 Even % ? 0.293" (7.4)
2 75 5 Odd 37 Even ; ? 0.293" (7.4)
3 210 7 Odd 79 Even % ? 0.293" (7.4)
8/10/2019 Zxpseries8 Ug En
http://slidepdf.com/reader/full/zxpseries8-ug-en 210/226
206 Zebra ZXP Series 8 Card Printer User’s Manual P1045430-002
E: Magnetic Card Encoder
Encoder Macro Commands
With ZXP Series 8 printers, we provide support for pass-through mag encoding commands.
The application developer or user can use a preamble or Macro to indicate to the driver thatthe data following the Preamble or Macro is to be mag encoded.
The user can have encoding and printing data on the same card, and the driver will filter outthe encoding data from the printing data. The user does not have to know job control syntax orZMotif commands to send mag encoding commands to the printer.
Supported Macro commands are:
1. C01<Track1 Data>C02<Track2 Data>C03<Track3 Data>
2. ${1<Track1 data>}$${2<Track2 data>}$${3<Track3 data>}$
3. ~1=<Track1 data>~2=<Track2 data>~3=<Track3 data>

8/10/2019 Zxpseries8 Ug En
http://slidepdf.com/reader/full/zxpseries8-ug-en 211/226
P1045430-002 Zebra ZXP Series 8 Card Printer User’s Manual 207
APPENDIX F
Smart Card Options
Introduction
This Appendix contains information on the additional operations of a Printer equipped withone or more of the available Smart Card options.
Smart Cards can have a built-in microcomputer and/or memory to store fingerprints, voicerecognition patterns, medical records, and other such data. All other printer operations remainthe same as the standard models.
Smart Card Encoder
(optional)

8/10/2019 Zxpseries8 Ug En
http://slidepdf.com/reader/full/zxpseries8-ug-en 212/226
208 Zebra ZXP Series 8 Card Printer User’s Manual P1045430-002
F: Smart Card Option s
Encoding and Reading Smart Cards
Encoding data onto Smart Cards and reading the data previously encoded on them is totallyunder control of the application software; no operator action is required.
Driver Setting
The Card Setup tab allows the user to specify the Smart Card Type in use. Based on yourselection, the printer automatically adjusts various printer properties for optimum
printer performance.
To access the Card Setup Tab, select Start > Devices and Printers. Right click on the Zebra
ZXP Series 8 Card Printer listing; and select Printing Preferences > Card Setup.
Before doing any smartcard encoding, set the following encoding properties:
1. From the dropdown menu, select the card type (arrow above); see Card Setup Tab on page 79.
2. Click the Apply button.
3. Click the OK button.

8/10/2019 Zxpseries8 Ug En
http://slidepdf.com/reader/full/zxpseries8-ug-en 213/226
F: Smart Card Options
P1045430-002 Zebra ZXP Series 8 Card Printer User’s Manual 209
Contact Smart Cards
Contact Smart Cards have a pad of contacts on the surface of the card that connect to thecircuitry embedded into the card.
The printer responds to commands that position the card at the contact location, where the
printer connects to the contacts on the Smart Card. Data to be encoded onto the Smart Card,and data read from the Smart Card, can interface via a connector on the printer’s rear panel(Contact Station), or encoding/decoding can be performed by logic on the printer’s MainPCBA (Contact Encoder ).
All other printer operations remain the same.
Media Loading Orientation for Contact Smart Cards
Place the cards in the Input Hopper in the correct orientation as shown (with the gold-platedSmart Card contacts at the top surface of the card and facing to the left). Ensure that the cardsare seated properly the hopper.
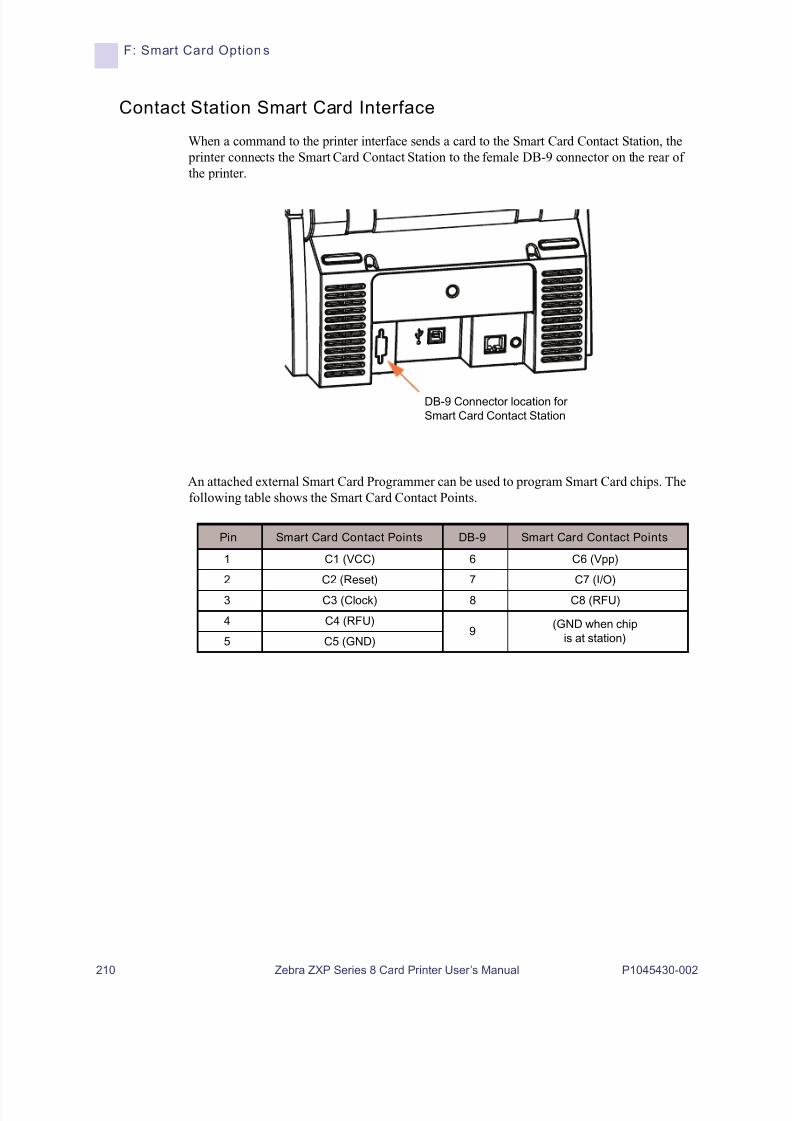
8/10/2019 Zxpseries8 Ug En
http://slidepdf.com/reader/full/zxpseries8-ug-en 214/226
210 Zebra ZXP Series 8 Card Printer User’s Manual P1045430-002
F: Smart Card Option s
Contact Station Smart Card Interface
When a command to the printer interface sends a card to the Smart Card Contact Station, the printer connects the Smart Card Contact Station to the female DB-9 connector on the rear ofthe printer.
An attached external Smart Card Programmer can be used to program Smart Card chips. Thefollowing table shows the Smart Card Contact Points.
Pin Smart Card Contact Points DB-9 Smart Card Contact Points
1 C1 (VCC) 6 C6 (Vpp)
2 C2 (Reset) 7 C7 (I/O)
3 C3 (Clock) 8 C8 (RFU)
4 C4 (RFU)9
(GND when chip
is at station)5 C5 (GND)
DB-9 Connector location for
Smart Card Contact Station
8/10/2019 Zxpseries8 Ug En
http://slidepdf.com/reader/full/zxpseries8-ug-en 215/226
F: Smart Card Options
P1045430-002 Zebra ZXP Series 8 Card Printer User’s Manual 211
Contactless Smart Cards
Rather than using a contact pad, Contactless Smart Cards use various short-range radiotechnologies to “connect” to the printer. The printer moves the card to an antenna locationon the card path, and the encoding or decoding occurs. All other printer operations remainthe same.
Media Loading Orientation for Contactless Smart Cards
For Contactless Smart Cards, orientation is not a consideration.
Printing on Contactless Smart Cards
With reverse transfer printing technology, there are no restrictions when designing material to be printed on Contactless Smart Cards.

8/10/2019 Zxpseries8 Ug En
http://slidepdf.com/reader/full/zxpseries8-ug-en 216/226
212 Zebra ZXP Series 8 Card Printer User’s Manual P1045430-002

8/10/2019 Zxpseries8 Ug En
http://slidepdf.com/reader/full/zxpseries8-ug-en 217/226
P1045430-002 Zebra ZXP Series 8 Card Printer User’s Manual 213
Appendix G
Packing the Printer for
Shipment
Introduction
If the printer is to be shipped, it is important to use the original packing and shippingmaterial to prevent damage to the Printer.
If the original material is lost, a replacement Shipping Kit can be ordered from Zebra;see the Spare Part Kits listing in the Service Manual or check the Partner Zone onhttp://zebra.com
Procedure
Step 1. Remove any cards from the Input and Output Hoppers.
Step 2. If the printer still has power applied and is turned on and is still connected to thehost computer, set the printer’s power switch (on the back of the printer) to theOFF ( ) position; and disconnect the interface and power cables to the printer.
Step 3. Open the printer Door.
Step 4. Remove the Print Ribbon and Transfer Film. (If you wish to save the print ribbon andfilm for future use, you may want to put them in a plastic bag for storage.)
Step 5. Remove the Card Cleaning Cartridge and Card Cleaning Roller, and place them inthe foam insert.
Step 6. Close the printer Door.
Note • The specifics of the shipment and the printer’s condition may influence which of thefollowing steps are followed; common sense should prevail.

8/10/2019 Zxpseries8 Ug En
http://slidepdf.com/reader/full/zxpseries8-ug-en 218/226
214 Zebra ZXP Series 8 Card Printer User’s Manual P1045430-002
G: Packing th e Print er for Shipment
Step 7. Remove the Input and Output Hopper, and place them in the foam insert.
Step 8. Place the Printer in its protective plastic bag.
Step 9. Place the lower foam insert in the Shipping Carton.
Step 10. Use both hands to carefully place the Printer into the recess in the lower foam insert.
Step 11. Place the upper foam insert onto the Printer, and gently press it down so it makes asnug fit on the Printer -- the top of the upper foam insert should be even with theupper edge of the Shipping Carton.
Step 12. Close the Shipping Carton.
Step 13. Tape the Shipping Carton securely.
Note • In the figure below, the printer and accessories are shown in the bottom foam insert,out of the shipping carton for clarity.
Card Cleaning
Roller
Card Cleaning
Cartridge
Input Hopper
Output Hopper

8/10/2019 Zxpseries8 Ug En
http://slidepdf.com/reader/full/zxpseries8-ug-en 219/226
P1045430-002 Zebra ZXP Series 8 Card Printer User’s Manual 215
Appendix H
Packing the Printer with
Laminator for Shipment
Introduction
If the printer is to be shipped, it is important to use the original packing and shippingmaterial to prevent damage to the Printer.
If the original material is lost, a replacement Shipping Kit can be ordered from Zebra; seethe Spare Part Kits listing in the Service Manual, or check the Partner Zone atwww.zebra.com.
Procedure
Step 1. Remove any cards from the Input and Output Hoppers.
Step 2. If the unit still has power applied and is turned on and is still connected to thehost computer, set the unit’s power switch (on the back of the printer part of the unit)
to the OFF ( ) position; and disconnect the interface and power cables.
Step 3. Open the printer door, and remove the print ribbon and transfer film. If you wish tosave the print ribbon and transfer film for future use, we suggest you place them insealable plastic bags for storage so they do not dry out or get dirty.
Step 4. Remove the cleaning cartridge and cleaning roller, and place them in the cutouts inthe lower foam insert.
Note • The specifics of the shipment and the printer’s condition may influence which of thefollowing steps are followed; common sense should prevail.

8/10/2019 Zxpseries8 Ug En
http://slidepdf.com/reader/full/zxpseries8-ug-en 220/226
216 Zebra ZXP Series 8 Card Printer User’s Manual P1045430-002
H:
Step 5. Close the printer door.
Step 6. Open the laminator door.
Step 7. Remove the laminate cassette(s). You can leave unused laminate in the cassette(s).
Step 8. Close the laminator door.
Step 9. Place the lower foam insert in the carton.
Step 10. Remove the input hopper and and the output hopper, and set them in the cutouts ofthe lower foam insert. Tape the hoppers securely in place.
Step 11. Place the unit in its protective plastic bag.
Step 12. Attach the carrying strap around the unit in the following order:
a. Place loop #1 around the rear of the unit.
b. Place loop #2 around the laminator side of the unit.
c. Place loop #3 around the Card Input and OCP Assembly on the printer side ofthe unit.
Note • In the following two illustrations, the protective plastic bag has been omitted forclarity. Note that the strap loops have been colored (blue, green, and red) for clarity.
12
3

8/10/2019 Zxpseries8 Ug En
http://slidepdf.com/reader/full/zxpseries8-ug-en 221/226
H:
P1045430-002 Zebra ZXP Series 8 Card Printer User’s Manual 217
Step 13. With two people holding the carrying strap, carefully lift and place the unit into therecess in the lower foam insert.
Step 14. Place the two corner blocks on top of the right front and left front corners of thelower foam insert.
Step 15. Place the upper foam insert onto the unit, and gently press it down so it makes a snugfit on the unit -- the top of the upper foam insert should be even with the upper edgeof the carton.
Step 16. Place the laminate cassette(s) in the cutout(s) of the upper foam insert. The interfaceand power cables can be placed next to a rib in the upper foam insert.
Step 17. Close the shipping carton, and tape it securely.
Caution • The Printer weighs approximately 44 lbs (20 kg); use two people to lower it
into the shipping carton.

8/10/2019 Zxpseries8 Ug En
http://slidepdf.com/reader/full/zxpseries8-ug-en 222/226
218 Zebra ZXP Series 8 Card Printer User’s Manual P1045430-002

8/10/2019 Zxpseries8 Ug En
http://slidepdf.com/reader/full/zxpseries8-ug-en 223/226
P1045430-002 Zebra ZXP Series 8 Card Printer User’s Manual 219
APPENDIX I
Worldwide Support
For Technical Support or Repair Services, contact the appropriate facility listed below.
North America and Latin America - Technical Support
T: +1 877 ASK ZEBRA (877 275 9327)+1 847 913 2259
North America and Latin America - Repair Services
Before returning any equipment to Zebra Technologies Corporation for in-warranty or out-of-warranty repair, contact Repair Services for a Repair Order (RO) number. Mark the RO numberclearly on the outside of the box. Ship the equipment, freight prepaid, to the address listed below:
Zebra Technologies Repair Services333 Corporate Woods ParkwayVernon Hills, IL 60061
webform: www.zebra.com/repair T: +1 877 ASK ZEBRA (877 275 9327)E: [email protected]

8/10/2019 Zxpseries8 Ug En
http://slidepdf.com/reader/full/zxpseries8-ug-en 224/226
220 Zebra ZXP Series 8 Card Printer User’s Manual P1045430-002
I: Worldwide Support
Europe, Middle East, and Afr ica - Technical Support
For further assistance, contact:
Zebra Technologies Card Printer SolutionsDukes MeadowMillboard Road, Bourne End
Buckinghamshire SL8 5XF, UK
T: +44 (0) 1628 556 025F: +44 (0) 1628 556 001E: [email protected]
Language Phone Email
Arabic +971 (0)46058220 [email protected]
Dutch +31 (0)33 450 50 48 [email protected]
English (UK) +44 (0)1628 556 225 [email protected]
(Sweden) +46 (0)8 594 709 88 [email protected]
(South Africa)+27 (0)11 201 7712 /0860 393272
French +33 (0) 1 53 48 12 74 [email protected]
German +49 (0) 2159 676 870 [email protected]
Hebrew +97 236 498 140 [email protected]
Italian +39 0 2 575 06388 [email protected]
Polish +48 223 801 980 [email protected]
Russian +7 495 739 5993 [email protected]
Spanish +34 (0) 917 992 896 [email protected]
Turkish +90 212 314 1010 [email protected]

8/10/2019 Zxpseries8 Ug En
http://slidepdf.com/reader/full/zxpseries8-ug-en 225/226
I: Worldwide Support
P1045430-002 Zebra ZXP Series 8 Card Printer User’s Manual 221
Europe, Middle East, and Africa - Repair Services
Before returning any equipment to Zebra Technologies Corporation for in-warranty or out-of-warranty repair, contact your supplier for a Return Materials Authorization (RMA) number, orcontact one ot the following repair centers for support and instructions:
For further assistance, contact:
For assistance anywhere in the EMEA, contact After Sales Customer Services at:
T: + 44 (0) 177 2 69 3069E: [email protected]
Type of repair and location Phone Email
Depot Repair in Germany,Austria, Switzerland
+49 (0) 2159 676 870 [email protected]
Depot Repair in France +33 (0) 1 53 48 12 74 [email protected]
Depot and On-Site Repair inUK and Ireland
+44 (0) 1628 556 225 [email protected]
Depot Repair in South Africa +27 (0) 11 201 7777 -
Depot Repair in Middle East +971 (0) 46058220 [email protected]

8/10/2019 Zxpseries8 Ug En
http://slidepdf.com/reader/full/zxpseries8-ug-en 226/226
I: Worldwide Support
As ia Paci fic - Technical Support
Zebra Technologies Asia Pacific Pte. Ltd.120 Robinson Road #06-01 Parakou BuildingSingapore 068913
T: +65 6858 0722F: +65 6885 0838E: [email protected]
Asia Paci fic Repair Services