zxa5 series loudspeaker owner’s manual series owners... · zxa5 series loudspeaker owner’s...
TRANSCRIPT

Electro-Voice ZxA5 Owner’s Manual
ZxA5 SeriesLoudspeaker
Owner’s Manual
ZxA5-60ZxA5-90

Electro-Voice ZxA5 Owner’s Manual1
Important Safety Instructions
1. Read these instructions. 2. Keep these instructions. 3. Heed all warnings.4. Follow all instructions.5. Do not use this apparatus near water. 6. Clean only with a dry cloth.7. Do not block any ventilation openings. Install in accordance with the manufacturers instructions.8. Do not install near any heat sources such as radiators, heat registers, stoves, or other apparatus (including amplifiers) that produce heat.9. Do not defeat the safety purpose of the polarized or grounding-type plug. A polarized plug has two blades with one wider than the other. A grounding type plug has two blades and a third grounding prong. The wide blade or the third prong are provided for your safety. If the provided plug does not fit into your outlet, consult an electrician for replacement of the obsolete outlet.10. Protect the power cord from being walked on or pinched particularly at plugs, convenience receptacles, and the point where they exit from the apparatus.11. Only use attachments/accessories specified by the manufacturer.12. Unplug this apparatus during lightning storms or when unused for long periods of time. 13. Refer all servicing to qualified service personnel. Servicing is required when the apparatus has been damaged in any way, such as power-supply cord or plug is damaged, liquid has been spilled or objects have fallen into the apparatus, the apparatus has been exposed to rain or moisture, does not operate normally, or has been dropped14. To completely disconnect AC power from this apparatus, the power supply cord must be unplugged.15. Do not expose this apparatus to dripping or splashing and ensure that no objects filled with liquids, such as vases, are placed on this apparatus.16. The AC plug of the power supply cord shall remain readily operable. Caution: Do not exceed the marked rating of the AC Output. Example: If each additional unit is rated 3A, a maximum of 3 units can be connected for a total of 9A.
The lightning flash with arrowhead symbol, within an equilateral triangle is intended to alert the user to the presence of uninsu-lated “dangerous voltage” within the product’s enclosure that may be of sufficient magnitude to constitute a risk of electric shock to persons.
The exclamation point within an equilateral triangle is intended to alert the user to the presence of important operating and maintenance (servicing) instructions in the literature accompa-nying the appliance.
The asterisk within an equilateral triangle is intended to inform the user to necessary installation or removal instructions re-garding equipment or hardware use relating to the system.
Management of WEEE (waste electrical and electronic equipment) (applicable in Member States of the European Union and other European countries with individual national policies on the management of WEEE) The symbol on the product or on its packaging indicates that this product may not be treated as regular household waste, but has to be disposed through returning it at an Electro-Voice dealer.
WARNING: TO REDUCE THE RISK OF FIRE OR ELECTRIC SHOCK, DO NOT EXPOSE THIS APPLIANCE TO RAIN OR MOISTURE.
AVIS: RISQUE DE CHOC ELECTRIQUE. NE PAS OUVRIR.
WARNING: CONNECT ONLY TO MAINS SOCKET WITH PRO-TECTIVE EARTHING CONNECTION.
CAUTIONRISK OF ELECTRIC SHOCK
DO NOT OPEN
CAUTION: These servicing instructions are for use by qualified personnel only. To reduce the risk of electric shock, do not perform any servicing other than that contained in the Operating Instructions unless you are qualified to do so. Refer all servicing to qualified service personnel.
1. Security regulations as stated in the EN 60065 (VDE 0860 / IEC 65) and the CSA E65 - 94 have to be obeyed whenservicing the appliance.2. Use of a AC separator transformer is mandatory during maintenance while the appliance is opened, needs to beoperated and is connected to the AC.3. Switch off the power before retrofitting any extensions, changing the AC voltage or the output voltage.4. The minimum distance between parts carrying AC voltage and any accessible metal piece (metal enclosure),respectively between the AC poles has to be 3 mm and needs to be minded at all times.The minimum distance between parts carrying AC voltage and any switches or breakers that are not connectedto the AC (secondary parts) has to be 6 mm and needs to be minded at all times.5. Replacing special components that are marked in the circuit diagram using the security symbol (Note) is only permissiblewhen using original parts.6. Altering the circuitry without prior consent or advice is not legitimate.7. Any work security regulations that are applicable at the location where the appliance is being serviced have to be strictlyobeyed. This applies also to any regulations about the work place itself.8. All instructions concerning the handling of MOS - circuits have to be observed.
Important Service Instructions

Electro-Voice ZxA5 Owner’s Manual
ZxA5 Series Owner’s Manual
Table of Contents
Thank you for choosing the Electro-Voice ZxA5 series loudspeaker system. This system is the culmination
of EV’s experience in transducer design. Please take time to consult this manual so that you can under-
stand all the features built into your EV system and fully utilize all its performance capabilities.
Important Safety Instructions ...........................................................................................................................................1
Important Service Instructions .........................................................................................................................................1
ZxA5 Series Owner’s Manual ..........................................................................................................................................2
Safety First ..........................................................................................................................................................................3
Description ..........................................................................................................................................................................4
System Features - ZxA5 ....................................................................................................................................................4
System Coverage - ZxA5 ..................................................................................................................................................4
System Setup - ZxA5 .........................................................................................................................................................5
ZxA5 Amplifier .....................................................................................................................................................................5
Suspending ZxA5 Speaker Systems .............................................................................................................................7
ZxA5 Stage Monitor Positions ...................................................................................................................................... 12
Specifications ................................................................................................................................................................... 13
Dimensions ........................................................................................................................................................................ 14
Block Diagram .................................................................................................................................................................. 14
Frequency Response, Beamwidth, and Directivity ................................................................................................... 15
ZxA5 Rigging/Accessory Reference Table ................................................................................................................ 16
FCC Information ............................................................................................................................................................... 16
Painting ZxA5 Speaker Systems .................................................................................................................................. 17
Notes .................................................................................................................................................................................. 18
2

Electro-Voice ZxA5 Owner’s Manual
Safety First
When setting up, installing and using the Electro-Voice ZxA5 speaker system, there are a number of pre-cautions that you should follow: · When Electro-Voice ZxA5 speakers are used for portable applications in which they will be positioned directly on the floor, make sure that the floor or stage is solid and secure.
· Electro-Voice ZxA5 speakers include 1-3/8 inch stand mounts to allow mounting on tripod stands.Make sure to: · Check the specifications of the speaker stand to be certain it is capable of supporting the weight of the speaker.
· Check that the speaker stand is placed on a flat, stable surface and be sure to fully extend the legs of the stand. Do not try to make the stand “taller” and compromise its structural integrity.
· Route cables and position the stand so that performers, production crew and audience members will not trip over the stand or cables and pull the speaker system over. Secure cables with wire ties or tape whenever possible.
· Do not attempt to suspend more than one speaker on a stand designed for a single speaker· Unless you are confident that you can safely handle lifting the weight of the speaker onto the stand, ask another person to help you place it.
· If you intend to hang or fly the ZxA5 system, only do so safely with the correct hardware and accessories.
WARNING: Suspending any object is potentially dangerous and should only be attempted by individuals who have a thorough knowledge of the techniques and regulations of rigging ob-jects overhead. Electro-Voice strongly recommends that ZxA5 speakers be suspended taking into account all current national, federal, state and local regulations. It is the responsibility of the installer to ensure that ZxA5 speakers are safely installed in accordance with all such regula-tions. If ZxA5 speakers are suspended, Electro-Voice strongly recommends that the system be inspected at least once a year. If any sign of weakness or damage is detected, remedial action should be taken immediately. There are data sheets for each Electro-Voice Suspension and Ar-ray Kit that should also be consulted prior to suspending speakers.
· Electro-Voice does not recommend use of ZxA5 speakers outdoors without protection from rain or in high moisture environments.
· Electro-Voice ZxA5 loudspeakers are easily capable of generating sound pressure levels suffi-cient to cause permanent hearing damage to anyone within normal coverage distance. Caution should be taken to avoid prolonged exposure to sound pressure levels exceeding 90 dB.
Note: This is a Class A product. In a domestic environment this product may cause radio interferences in which case the user may be required to take adequate measures.
3

Electro-Voice ZxA5 Owner’s Manual
Description
System Features - ZxA5
System Coverage - ZxA5
The Electro-Voice ZxA5 is one of the best-sounding powered 15” two-way composite loudspeakers available today, designed to provide performance that rivals much larger systems!
Most powered loudspeakers are designed with simple operation in mind, making it quick and easy to achieve good audio qual-ity. Many products on the market - including EV - deliver this level of functionality with moderate output power amplifiers. However, a product that truly sets EV apart from the pack is the ZxA5, a very high powered loudspeaker that provides maxi-mum performance. This performance and power requires more skill than is required to operate a less demanding, lower-perfor-mance loudspeaker. To provide maximum performance with LF punch and high SPL, the ZxA5 does NOT have a separate pro-tection limiter for the woofer, but the woofer amplifier does have a clip limiter. It is possible to overdrive the ZxA5 hard enough and long enough for the woofer to fail.
When the ZxA5 is driven to amplifier clip the sound quality decreases; at this point the drive level should be turned down.
Electro-Voice appreciates our loyal ZxA5 users and would like to obtain the best sonic results with long term reliability. For ap-plications requiring heavy low-frequencies, we recommend using a suitable subwoofer with the ZXA5 operating in high pass mode (see page 6). Installations that require the ZxA5 to run near clip regularly may consider an outboard limiter.
· Integrated Amplifier with 1000W LF, 250W HF· Selectable 100 Hz High Pass· XLR and 1/4” TRS Input Connector· XLR Output Connector· PowerCon Connector with Slave Through· DVX3150 15” LF Transducer with Forced Air Cooling· ND2 2” Voice Coil, 1” Exit Neodymium Compression Driver· Two Models: 60° x 60° or 90° x 50° Coverage Patterns· High Sensitivity, 133 dB Maximum SPL· Adjustable Monitor Angle (45° or 55°)· 3 Anchor Plates for Single Stud Fitings and 10 Integral Suspension Points· Full Line of Accessories
Coverage Patterns and ApplicationsZxA5-60 60° x 60° coverage for long-throw and cluster applicationsZxA5-90 90° x 50° for wider coverage or shorter distances
Figure 1a:3D EASE Directivity Balloon, ZxA5-60, 60° x 60° Coverage
Figure 1b:3D EASE Directivity Balloon, ZxA5-90, 90° x 50° Coverage
4
Electro-Voice ZxA5 Owner’s Manual
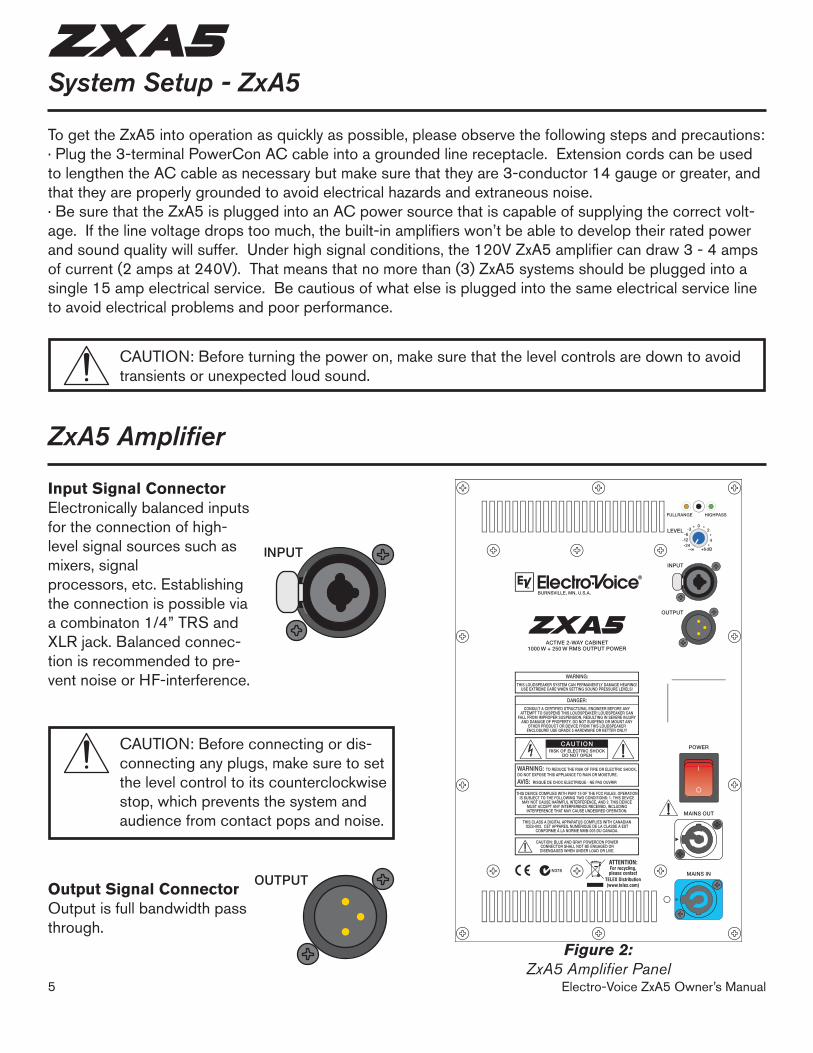
System Setup - ZxA5
To get the ZxA5 into operation as quickly as possible, please observe the following steps and precautions: · Plug the 3-terminal PowerCon AC cable into a grounded line receptacle. Extension cords can be used to lengthen the AC cable as necessary but make sure that they are 3-conductor 14 gauge or greater, and that they are properly grounded to avoid electrical hazards and extraneous noise.· Be sure that the ZxA5 is plugged into an AC power source that is capable of supplying the correct volt-age. If the line voltage drops too much, the built-in amplifiers won’t be able to develop their rated power and sound quality will suffer. Under high signal conditions, the 120V ZxA5 amplifier can draw 3 - 4 amps of current (2 amps at 240V). That means that no more than (3) ZxA5 systems should be plugged into a single 15 amp electrical service. Be cautious of what else is plugged into the same electrical service line to avoid electrical problems and poor performance.
ZxA5 Amplifier
Input Signal ConnectorElectronically balanced inputs for the connection of high-level signal sources such as mixers, signalprocessors, etc. Establishing the connection is possible via a combinaton 1/4” TRS and XLR jack. Balanced connec-tion is recommended to pre-vent noise or HF-interference.
Output Signal ConnectorOutput is full bandwidth pass through.
CAUTION: Before turning the power on, make sure that the level controls are down to avoid transients or unexpected loud sound.
CAUTION: Before connecting or dis-connecting any plugs, make sure to set the level control to its counterclockwise stop, which prevents the system and audience from contact pops and noise.
Figure 2:ZxA5 Amplifier Panel
5

Electro-Voice ZxA5 Owner’s Manual
ZxA5 Amplifier (cont’)
Crossover Mode SwitchSelects between 40 Hz highpass filter for Fullrange use, and 100 Hz highpass filter for use with a sub-woofer. It is not recommended that you use a ZxA5 in Fullrange mode with subwoofers.
LevelThis control sets the output level of the ZxA5 in a range between -∞dB and +6dB. The internal power amplifier provides a nominal input sensitivity of +6dBu.
Power SwitchAC switch for switching the ZxA5’s power ON or OFF. The switch lights after turning the power ON. If the switch is not lit upon turning the power on, make sure that the AC cord is correctly connected. If the AC cord is correctly connected and the AC switch does not light upon power-on, please contact your local dealer.
Mains InAC connection is established via a PowerCon con-nector. A 15’ (5m) long AC cord with PowerCon plug is supplied.
Mains OutThe PowerCon AC out socket allows the connection of additional ZxA5 Systems.To prevent AC network overload, connecting more than (3) ZxA5 Systems to a single AC outlet (10A - 16A) is not recommended.
CAUTION: Blue and grey PowerCon power connector shall not be engaged or disengaged when under load or live.
CAUTION: This appliance has no user-serviceable parts inside. Leave any servicing and maintenance to qualified service technicians only.
6

Electro-Voice ZxA5 Owner’s Manual
Suspending ZxA5 Speaker Systems
ZxA5 enclosures have 5 steel anchor points internally mounted on the top, bottom, and rear. Single stud fittings can be attached to these anchor plates and used as suspension points. Each of these anchor plates also has a M8 thread to accept rated forged M8 shoulder eyebolts. In addition to these points there are five additional M8 threaded points; two on the handle side, and three on the rear. These points can be used for suspending ZxA5s vertically, horizontally, individually, in clusters, or to attach to EV mount-ing brackets. Working load limits for the ZxA5 and fittings are shown in Figure 3.
Figure 3:Working Load-Limit Rating of
ZxA5 Speaker System
Prior to each use, inspect the grid assembly or suspen-sion point(s) and associated hardware for any cracks, deformations, broken welds, corrosion, missing or damaged components which could reduce the grid assembly or suspension point(s) strength. Replace any damaged hardware. Never exceed the limitations or maximum recommended load intended for grid assem-bly design or suspension point(s). As an added safety measure, it is suggested that the user install a second suspension point back to the grid (or building structural supports). This redundant safety point should have as little slack as possible (less than one inch is preferable).
ZxA5 M8 Suspension PointsMetric (M8) inserts are equipped on the top and bottom of the enclosure, around the handle, and on the back of the enclosure for a total of 10 points. The inserts can be used to attach forged eyebolts or rigging brackets.
Figure 4a:ZxA5 M8 Suspension Points
(Top, Handle, Rear)
Figure 4b:ZxA5 M8 Suspension Points
(Bottom)
(2) M8 Suspension Points(Single-Stud Anchor Plate
Removal Required)
(2) M8 Suspension Points(Decal Removal Required)
(2) M8 Suspension Points(Single-Stud Anchor Plate/Decal Removal Required)
(2) M8 Suspension Points(Removal of Handle Bolts
Required)
7
The shaft length of the eyebolts cannot exceed
20mm on bottom M8 suspension points
Prior to each use, inspect the loudspeaker enclosures for any cracks, deformations, missing or damaged components, which could reduce enclosure strength. Inspect the bracket assembly on the enclosures for any cracks, deformations, missing or loose screws which could reduce the flying hardware strength. Replace any loudspeaker systems that are damaged or missing hardware. Never exceed the limitations or maximum recommended load for the ZxA5 systems.
(2) M8 Suspension Points(Decal Removal Required)

Electro-Voice ZxA5 Owner’s Manual 8
Suspending ZxA5 Speaker Systems (cont’)
Suspending the ZxA5 using optional Electro-Voice Single-Stud Rigging KitsThe ZxA5 is shipped with three single-stud anchor plates for rigging with single-stud rigging. There are two more locations on the bottom to mount single-stud anchor plates for flying the ZxA5 upside-down or horizontally. All of these locations can facilitate M8 Eyebolts if desired as well.
Figure 5:Suspending the ZxA5 Using Included
Single-Stud Anchor PlatesKit Used (Left View) -
SSK-1 Single-Stud Rigging Kit (x1)Kits Used (Right View) -
SSK-1 Single-Stud Rigging Kit (x2)EBK-3 Forged M8 Eyebolt Kit (x1)*
Figure 6:Suspending the ZxA5 Upside-Down Using Included Single-Stud Anchor Plates and
Single-Stud Rigging KitKits Used -
RK-Z Single-Stud Anchor Plate Kit (x1)SSK-1 Single-Stud Rigging Kit (x1)
Step 1: Remove Decals Step 2: Attach Single-Stud Anchor Plates Removed from the Top of the
Enclosure or Optional RK-Z Kit (Shown) or Eyebolts (Not Shown
*EBK-3 on Bottom of Top Enclosure (Not Shown, See Figure 3b)

Electro-Voice ZxA5 Owner’s Manual
Suspending ZxA5 Speaker Systems (cont’)
Horizontal Suspension of the ZxA5The ZxA5 is capable of being suspended horizontally from the side (handle) or downward from the rear with the use of M8 Eyebolts.
Figure 9:Suspending the ZxA5 Horizontally from Handle
Using Optional Forged Eyebolt KitKit Used - EBK-3 Forged M8 Eyebolt Kit (x1)
Figure 8:Assembling Eyebolts to Handle
for Horizontal SuspensionKit Used - EBK-3 Forged
M8 Eyebolt Kit (x1)
Step 1: Remove Handle Bolts Step 2: Attach Eyebolts
9
Figure 7:Suspending the ZxA5 Downward from Rear
Using Optional Forged Eyebolt Kit*Kit Used - EBK-3 Forged M8 Eyebolt Kit (x1)
*Note - When suspending from the rear M8 suspension points, it is recommended that the (2) left M8 suspension points are used on the rear of the enclosure for best weight distribution
in relation to the enclosure’s center of gravity.

Electro-Voice ZxA5 Owner’s Manual 10
Suspending ZxA5 Speaker Systems (cont’)
Arraying and Suspending the ZxA5 using optional Electro-Voice Mounting or Array BracketsFigures 11 and 12 show several applications using EV mounting and array brackets. Carefully follow the instructions in this manual & the user manual packaged with EV brackets, and always use safe rigging practices when suspending ZxA5.
Figure 10:Assembling the HA-5 Adapter for use with VSA-1 Strong-Arm Mount and TCA-1 Truss Clamp Adapter
Kits Used -HA-5 Handle Adaptor (x1)
VSA-1 Strong-Arm Mount (x1)TCA-1 Truss-Clamp Adaptor (x1)
Figure 11:Suspending the ZxA5 Vertically from Handle Using Optional Handle Adapter and Strong-Arm Mount
Kit Used -HA-5 Handle Adapter Kit (x1)VSA-1 Strong-Arm Mount (x1)
TCA-1 Truss Clamp Adapter (x1)
*Note - Please consult TMK Series User Instructions for additional information
Step 1: Remove Handle Boltsand Handle
Step 2: Attach HA-5 and Handle Bolts Step 3: Attach VSA-1 and TCA-1
Attach TCA-1 to Truss
HA-5 Handle Mount VSA-1 Strong-Arm
TCA-1 TrussClamp Adapter

Electro-Voice ZxA5 Owner’s Manual11
Suspending ZxA5 Speaker Systems (cont’)
NOTE: Do not exceed work-
ing load limit for individual rigging points when ar-raying the ZxA5.
See Figure 3, Page 7
Kits Used - CB5 Array Bracket Kit (x2)* SSK-1 Single-Stud Rigging Kit (x2)EBK-3 Forged M8 Eyebolt Kit (x1)
Figure 12:Arraying and Suspending the ZxA5
Kits Used - CB5 Array Bracket Kit (x4)* EBK-3 Forged M8 Eyebolt Kit (x1)
Kits Used - CB5 Array Bracket Kit (x1)* SSK-1 Single-Stud Rigging Kit (x1)
Kits Used - CB5 Array Bracket Kit (x2)*
Kits Used - MB5 Wall/Ceiling Mounting Bracket (Wall Configuration)
Kits Used - MB5 Wall/Ceiling Mounting Bracket (Ceiling Configuration)
*Note - CB5 Array Kits can be used for 60° or 90° Splay Angles
Electro-Voice ZxA5 Owner’s Manual 12
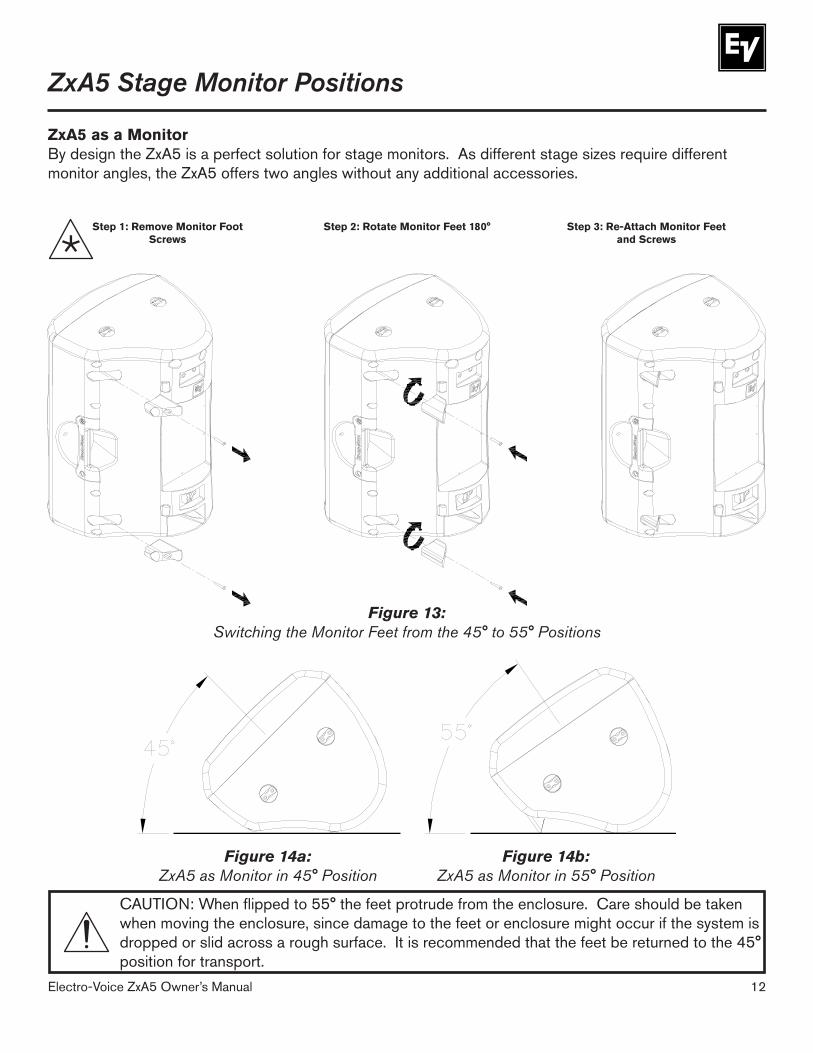
ZxA5 Stage Monitor Positions
ZxA5 as a MonitorBy design the ZxA5 is a perfect solution for stage monitors. As different stage sizes require different monitor angles, the ZxA5 offers two angles without any additional accessories.
CAUTION: When flipped to 55° the feet protrude from the enclosure. Care should be taken when moving the enclosure, since damage to the feet or enclosure might occur if the system is dropped or slid across a rough surface. It is recommended that the feet be returned to the 45° position for transport.
Figure 13:Switching the Monitor Feet from the 45° to 55° Positions
Figure 14a:ZxA5 as Monitor in 45° Position
Figure 14b:ZxA5 as Monitor in 55° Position
Step 1: Remove Monitor FootScrews
Step 2: Rotate Monitor Feet 180° Step 3: Re-Attach Monitor Feetand Screws
Electro-Voice ZxA5 Owner’s Manual
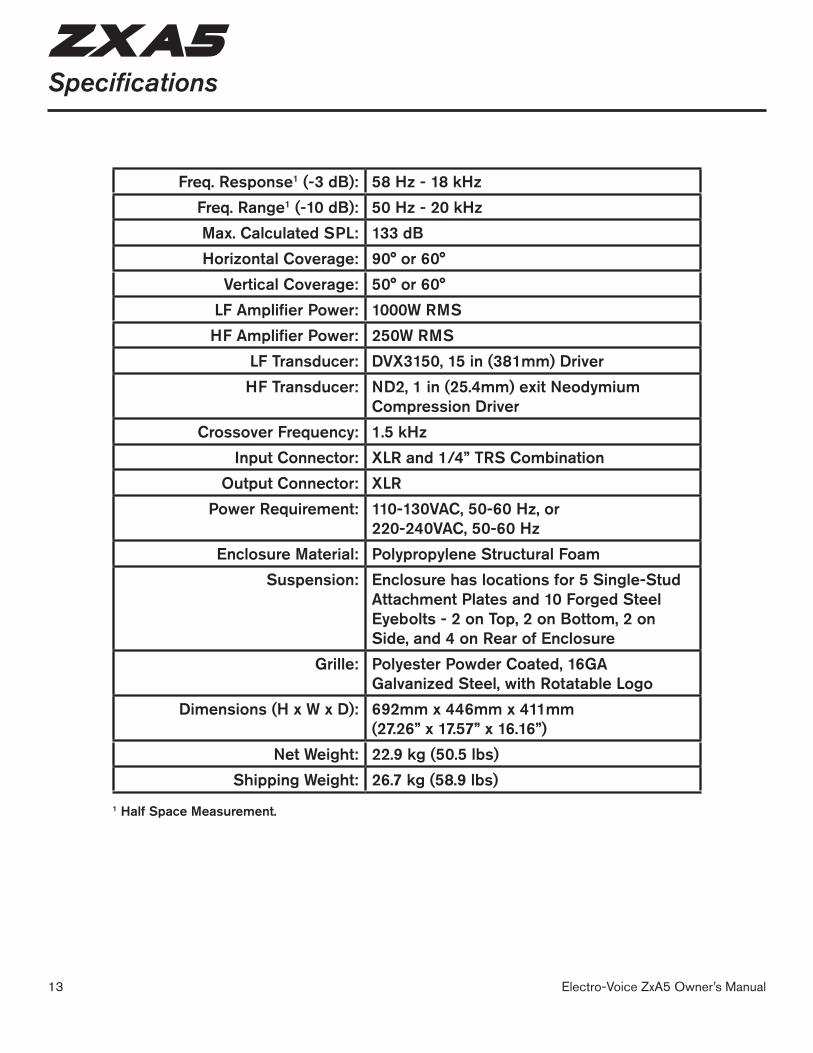
Specifications
1 Half Space Measurement.
Freq. Response1 (-3 dB): 58 Hz - 18 kHzFreq. Range1 (-10 dB): 50 Hz - 20 kHzMax. Calculated SPL: 133 dBHorizontal Coverage: 90° or 60°
Vertical Coverage: 50° or 60°LF Amplifier Power: 1000W RMSHF Amplifier Power: 250W RMS
LF Transducer: DVX3150, 15 in (381mm) DriverHF Transducer: ND2, 1 in (25.4mm) exit Neodymium
Compression DriverCrossover Frequency: 1.5 kHz
Input Connector: XLR and 1/4” TRS CombinationOutput Connector: XLR
Power Requirement: 110-130VAC, 50-60 Hz, or220-240VAC, 50-60 Hz
Enclosure Material: Polypropylene Structural FoamSuspension: Enclosure has locations for 5 Single-Stud
Attachment Plates and 10 Forged Steel Eyebolts - 2 on Top, 2 on Bottom, 2 on Side, and 4 on Rear of Enclosure
Grille: Polyester Powder Coated, 16GAGalvanized Steel, with Rotatable Logo
Dimensions (H x W x D): 692mm x 446mm x 411mm(27.26” x 17.57” x 16.16”)
Net Weight: 22.9 kg (50.5 lbs)Shipping Weight: 26.7 kg (58.9 lbs)
13
Electro-Voice ZxA5 Owner’s Manual 14
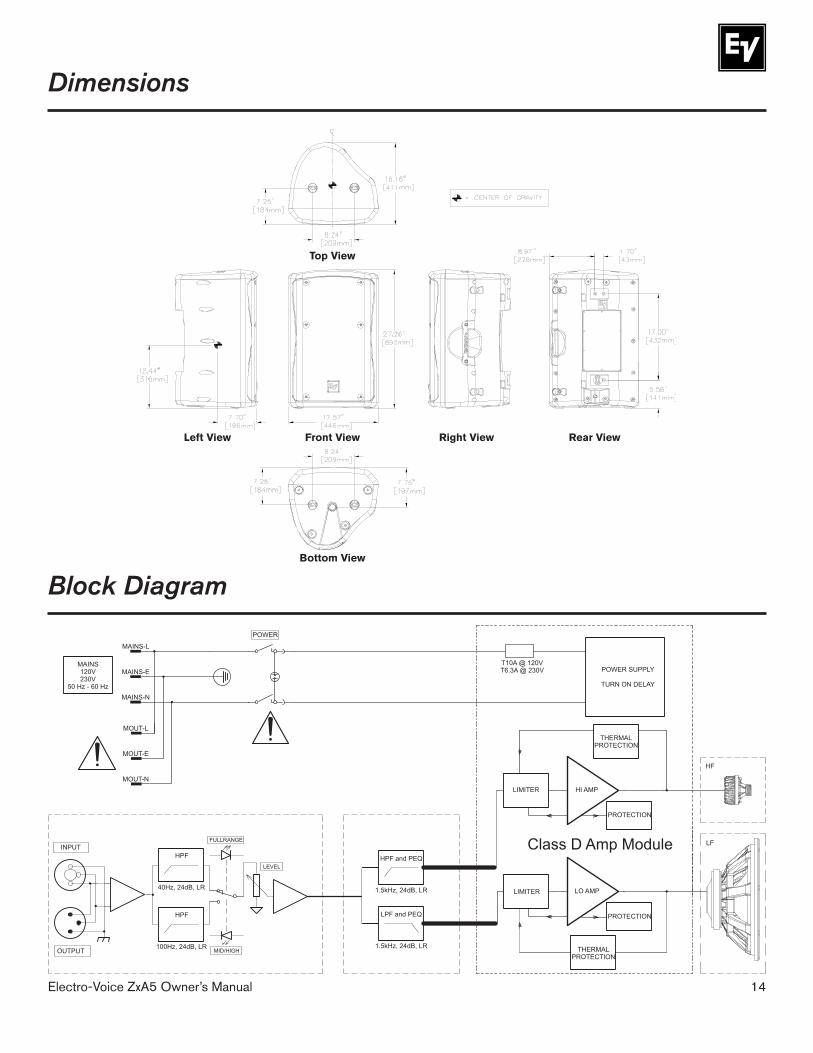
Dimensions
Block Diagram
Front View
Top View
Bottom View
Left View Right View Rear View

Electro-Voice ZxA5 Owner’s Manual
20 50 100 1000 10000 2000070
80
90
100
110
Frequency (Hz)
Sens
itivi
ty (d
B)
Full Range Mode, Full SpaceHigh Pass Mode, Full Space
20 50 100 1000 10000 2000070
80
90
100
110
Frequency (Hz)
Sens
itivi
ty (d
B)
Full Range Mode, Full SpaceHigh Pass Mode, Full Space
Frequency Response, Beamwidth, and Directivity
ZxA5-90 SeriesFrequency Response
Beamwidth
Directivity
ZxA5-60 SeriesFrequency Response
Beamwidth
Directivity
15

Electro-Voice ZxA5 Owner’s Manual 16
ZxA5 Models and Accessories Reference Table
System Model Coverage Finish Voltage WeatherResistant
Part No.
ZxA5-90B (120V) 90° x 50° Black 120V No 301859-001
ZxA5-90W (120V) 90° x 50° White 120V No 301859-002
ZxA5-60B (120V) 60° x 60° Black 120V No 301859-003
ZxA5-60W (120V) 60° x 60° White 120V No 301859-004
ZxA5-90B (230V) 90° x 50° Black 230V No 301859-005
ZxA5-90W (230V) 90° x 50° White 230V No 301859-006
ZxA5-60B (230V) 60° x 60° Black 230V No 301859-007
ZxA5-60W (230V) 60° x 60° White 230V No 301859-008
Accessory Model Description Part No.
CB5-B Array Bracket Kit, Black Finish 301625-001
CB5-W Array Bracket Kit, White Finish 301625-002
MB5-B Wall/Ceiling Mounting Bracket Kit, Black Finish 301626-001
MB5-W Wall/Ceiling Mounting Bracket Kit, White Finish 301626-002
SSK-1 Single-Stud Rigging Kit (Set of 3) 301633-000
EBK-3 Forged M8 Eyebolt Kit (Set of 3) 301634-000
RK-Z Single-Stud Anchor Plate Kit (Set of 3) 301812-000
TCA-1 Truss Clamp Adapter ACC000012-001
VSA-1 Vertical Strong-Arm Mount ACC000007-001
HA-5 Handle Mount Adapter 301811-001
HDC-5 Heavy-Duty Stackable Cover, Black 301813-001
FCC Information
FCC Information (USA)1. IMPORTANT: Do not modify this unit! Changes or modifications not expressly approved by the manu-facturer could void the user’s authority, granted by the FCC, to operate the equipment.
2. NOTE: This equipment has been tested and found to comply with the limits for a Class Adigital device, pursuant to Part 15 of the FCC Rules. These limits are designed to providereasonable protection against harmful interference in a residential installation. Thisequipment generates, uses and can radiate radio frequency energy and, if not installed andused in accordance with the instructions, may cause harmful interference to radiocommunications. However, there is no guarantee that interference will not occur in aparticular installation. If this equipment does cause harmful interference to radio ortelevision reception, which can be determined by turning the equipment off and on, the useris encouraged to try to correct the interference by one or more of the following measures: •Reorientorrelocatethereceivingantenna. •Increasetheseparationbetweentheequipmentandreceiver. •Connecttheequipmentintoanoutletonacircuitdifferentfromthattowhichthereceiveris connected. •Consultthedealeroranexperiencedradio/TVtechnicianforhelp.
Electro-Voice ZxA5 Owner’s Manual
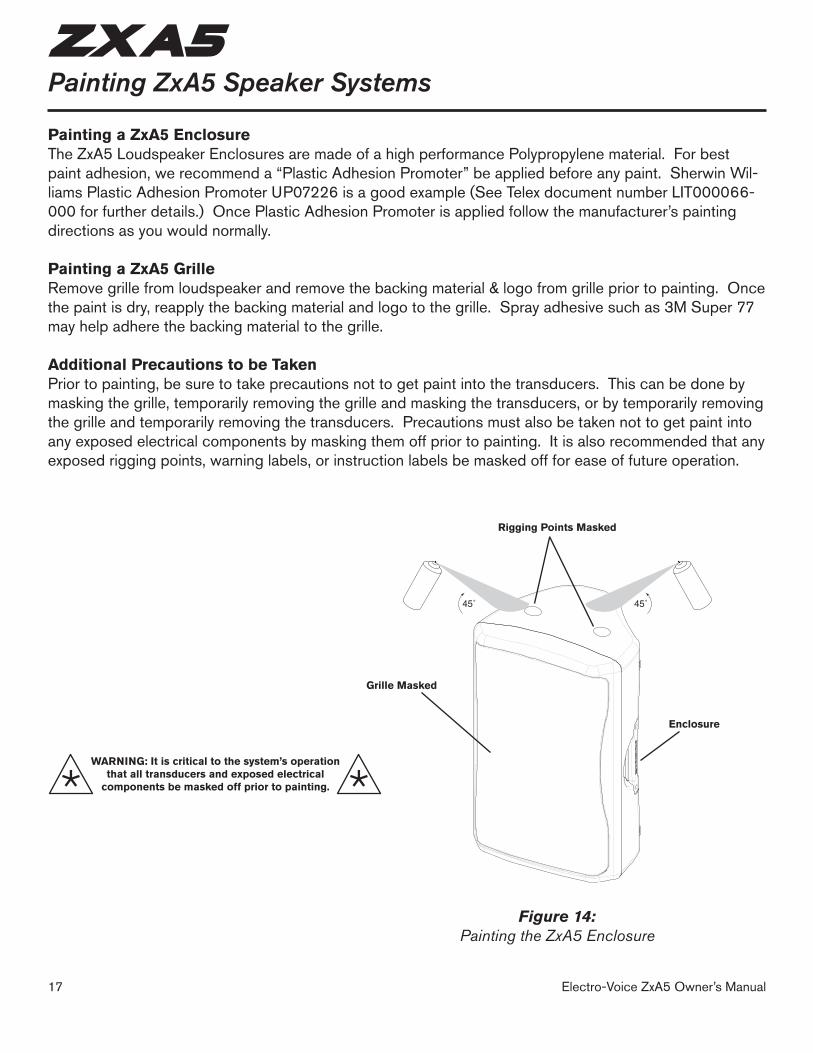
Painting ZxA5 Speaker Systems
Painting a ZxA5 EnclosureThe ZxA5 Loudspeaker Enclosures are made of a high performance Polypropylene material. For best paint adhesion, we recommend a “Plastic Adhesion Promoter” be applied before any paint. Sherwin Wil-liams Plastic Adhesion Promoter UP07226 is a good example (See Telex document number LIT000066-000 for further details.) Once Plastic Adhesion Promoter is applied follow the manufacturer’s painting directions as you would normally.
Painting a ZxA5 GrilleRemove grille from loudspeaker and remove the backing material & logo from grille prior to painting. Once the paint is dry, reapply the backing material and logo to the grille. Spray adhesive such as 3M Super 77 may help adhere the backing material to the grille.
Additional Precautions to be TakenPrior to painting, be sure to take precautions not to get paint into the transducers. This can be done by masking the grille, temporarily removing the grille and masking the transducers, or by temporarily removing the grille and temporarily removing the transducers. Precautions must also be taken not to get paint into any exposed electrical components by masking them off prior to painting. It is also recommended that any exposed rigging points, warning labels, or instruction labels be masked off for ease of future operation.
Figure 14:Painting the ZxA5 Enclosure
Rigging Points Masked
Enclosure
Grille Masked
WARNING: It is critical to the system’s operationthat all transducers and exposed electrical
components be masked off prior to painting.
17

Electro-Voice ZxA5 Owner’s Manual 18
Notes

Electro-Voice ZxA5 Owner’s Manual
12000 Portland Avenue South, Burnsville, MN 55337Phone: 952/884-4051, Fax: 952/884-0043
www.electrovoice.com© Bosch Communications Systems 01/2011Part Number 38110444 Rev C
U.S.A. and Canada only. For customer orders, contact Customer Service at:800/392-3497 Fax: 800/955-6831
Europe, Africa, and Middle East only. For customer orders, contact Customer Service at:+ 49 9421-706 0 Fax: + 49 9421-706 265
Other Internatonal locations. For customer orders, Contact Customer Service at:+ 1 952 884-4051 Fax: + 1 952 887-9212
For warranty repair or service information, contact the Service Repair department at:800/685-2606
For technical assistance, contact Technical Support at: 866/78AUDIO
Specifications subject to change without notice.
Electro-Voice