zte blade max 3 quick start guide - · pdf filezte corporation expressly disclaims any...
TRANSCRIPT


1
LEGAL INFORMATION
Copyright © 2017 ZTE CORPORATION.
All rights reserved. No part of this publication may be quoted, reproduced, translated or used in any form or by any means, electronic or mechanical, including photocopying and microfilm, without the prior written permission of ZTE Corporation.
Notice This guide is published by ZTE Corporation. We reserve the right to make modifications on print errors or update specifications without prior notice. Every effort has been made in the preparation of this guide to ensure accuracy of the contents, but all statements, information, and recommendations in this guide do not constitute a warranty of any kind, expressed or implied.
We offer self-service for our smart terminal device users. Please visit the ZTE official website (at www.zteusa.com) for more information on self-service and supported product models. Information on the website takes precedence.
Disclaimer 4G LTE is not available in all areas. See uscellular.com/4G for complete coverage details. 4G LTE service provided through King Street Wireless, a partner of U.S. Cellular. LTE is a trademark of ETSI.
ZTE Corporation expressly disclaims any liability for faults and damages caused by unauthorized modifications of the software.
Images and screenshots used in this guide may differ from the actual product. Content in this guide may differ from the actual product or software.
Trademarks ZTE and the ZTE logos are trademarks of ZTE Corporation.
Google and Android are trademarks of Google, Inc.

2
The Bluetooth® trademark and logos are owned by the Bluetooth SIG, Inc. and any use of such trademarks by ZTE Corporation is under license.
microSDXC Logo is a trademark of SD-3C, LLC.
Qualcomm® Snapdragon™ processors are products of Qualcomm Technologies, Inc.
Qualcomm and Snapdragon are trademarks of Qualcomm Incorporated, registered in the United States and other countries. Used with permission.
Manufactured under license from Dolby Laboratories. Dolby, Dolby Audio, and the double-D symbol are trademarks of Dolby Laboratories.
Other trademarks and trade names are the property of their respective owners.
WARNING: This product contains a chemical known to the State of California to cause cancer, birth defects or other reproductive harm.
For accessories, please visit http://www.zteusa.com.
Version No. : R1.0
Edition Time : January 21, 2017
Manual No. : 079584508905
3
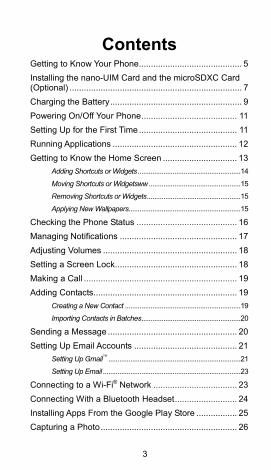
Contents Getting to Know Your Phone ........................................... 5 Installing the nano-UIM Card and the microSDXC Card (Optional) ........................................................................ 7 Charging the Battery ....................................................... 9 Powering On/Off Your Phone ........................................ 11 Setting Up for the First Time ......................................... 11 Running Applications .................................................... 12 Getting to Know the Home Screen ............................... 13
Adding Shortcuts or Widgets ........................................................ 14 Moving Shortcuts or Widgetsww .................................................. 15 Removing Shortcuts or Widgets ................................................... 15 Applying New Wallpapers............................................................. 15
Checking the Phone Status .......................................... 16 Managing Notifications ................................................. 17 Adjusting Volumes ........................................................ 18 Setting a Screen Lock ................................................... 18 Making a Call ................................................................ 19 Adding Contacts............................................................ 19
Creating a New Contact ............................................................... 19 Importing Contacts in Batches ...................................................... 20
Sending a Message ...................................................... 20 Setting Up Email Accounts ........................................... 21
Setting Up Gmail™ ........................................................................ 21 Setting Up Email ........................................................................... 23
Connecting to a Wi-Fi® Network ................................... 23 Connecting With a Bluetooth Headset .......................... 24 Installing Apps From the Google Play Store ................. 25 Capturing a Photo ......................................................... 26

4
Recording a Video ........................................................ 28 Playing Music ................................................................ 29 Connecting to PC .......................................................... 30 Browsing the Internet .................................................... 31
Opening a Web Page .................................................................. 31 Customizing the Browser ............................................................. 32
Extending Battery Life ................................................... 32

5
Getting to Know Your Phone
Earpiece Proximity & light
sensor
Back key
Home key
Touch screen
Front camera
Recent apps key
nano-UIM/
microSDXC
card tray
Auxiliary
microphone
Main
microphone

6
WARNING!
This device comes with integrated battery. Do not open the back cover. It may cause unexpected damage to your phone.
Volume key
Speaker
Charging/USB
Type-C jack
Headset jack
Dual-lens cameraDual-flash
Power key
Fingerprint
sensor
7
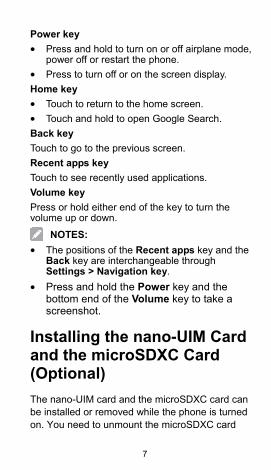
Power key
• Press and hold to turn on or off airplane mode, power off or restart the phone.
• Press to turn off or on the screen display.
Home key
• Touch to return to the home screen.
• Touch and hold to open Google Search.
Back key
Touch to go to the previous screen.
Recent apps key
Touch to see recently used applications.
Volume key
Press or hold either end of the key to turn the volume up or down.
NOTES:
• The positions of the Recent apps key and the Back key are interchangeable through Settings > Navigation key.
• Press and hold the Power key and the bottom end of the Volume key to take a screenshot.
Installing the nano-UIM Card and the microSDXC Card (Optional)
The nano-UIM card and the microSDXC card can be installed or removed while the phone is turned on. You need to unmount the microSDXC card

8
before removing it.
WARNING! To avoid damage to the phone, do not use any non-standard nano-UIM card cut from a UIM card. You can get a standard nano-UIM card from your service provider.
1. Insert the tip of the tray eject tool into the hole next to the card tray.
2. Pull out the card tray and place the
nano-UIM/microSDXC card (not included) on the tray with the gold-colored contacts facing down. Carefully slide the tray back into place.

9
Charging the Battery Your phone’s battery should have enough power for the phone to turn on, find a signal, and make a few calls. You should fully charge the battery as soon as possible.
WARNING! Use only ZTE-approved chargers and USB Type-C cables. The use of unapproved accessories could damage your phone or cause the battery to explode.
WARNING! Do not remove the back cover. The battery is not removable. Removal may cause fire or explosion.
1. Connect the adapter to the charging/USB Type-C jack.
microSDXC card
nano-UIM card

10
2. Connect the charger to a standard AC power outlet.
3. Disconnect the charger when the battery is fully charged.
NOTE:
If the battery is extremely low, you may be unable to power on the phone even when it is being charged. In this case, try again after charging the phone for at least 20 minutes. Contact the customer service if you still cannot power on the phone after prolonged charging.

11
Powering On/Off Your Phone Make sure the battery is charged before powering on.
• Press and hold the Power key to turn on your phone.
• To power off, press and hold the Power key and touch Power off.
NOTE: If the screen freezes or takes too long to respond, you can press and hold the Power key for about 10 seconds to restart the phone.
Setting Up for the First Time
When you first power on your phone after you purchase it or reset it to factory settings, you need to do some settings before using it.
1. Touch the language field to select the language.
2. Touch .
3. Follow the prompts to Select Wi-Fi, type your Name, set screen lock to protect your phone, and check Google services.

12
Running Applications
1. Touch the Home key if the current screen is not the home screen.
2. Touch to check the applications.

13
3. To run an application on your phone, slide up or down on the screen to find the application you needed, and then touch the application icon.
Getting to Know the Home Screen The home screen is the starting point for your phone’s applications, functions, and menus. You can customize your home screen by adding shortcuts, folders, widgets, and more.
NOTE:
Your home screen extends beyond the initial screen, providing more space for shortcuts, widgets, and folders. Simply swipe left or right to

14
see the extended home screens.
Adding Shortcuts or Widgets 1. Touch the Home key > .
- or -
To add widgets, touch and hold an empty area of the home screen and select Widgets.
2. Slide left or right to browse the available applications or widgets.
3. Touch and hold a widget or an application icon and drag it to a home screen panel. If necessary, drag the shortcut to the left or right to select other home screen panels.
Home screen
Folder
Status bar
Shortcut
Primary shortcuts

15
Moving Shortcuts or Widgets 1. Touch and hold a shortcut or widget on the
home screen.
2. Drag it to the place you need.
Removing Shortcuts or Widgets 1. Touch and hold a shortcut or widget on the
home screen.
2. Drag it to (Remove) to remove it.
NOTE:
When there are more than three home screen panels, empty panels are automatically deleted.
Applying New Wallpapers You can set the wallpaper for the home screen and lock screen.
1. Touch and hold an empty place on the home screen and then touch Wallpapers.
2. Slide left or right on the wallpaper panel to select a wallpaper, or touch GALLERY or LIVE WALL PAPER to choose the image or animation you want to use as the wallpaper. Some cropping may be needed for picture and photo images.
NOTE:
In addition, you can touch the Home key > > Settings > Display > Wallpaper to pick an image from Gallery, Photos or Wallpapers, or an animation from Live Wallpapers.

16
Checking the Phone Status The status bar at the top of the screen displays phone and service status with various icons on the right side. Below are some of the icons and their meanings.
3G connected 4G connected
No signal Signal strength
Silent mode Airplane mode
Vibration mode Bluetooth on
Priority mode Connected to a Wi-Fi® network
Battery low Wi-Fi in use
Battery full Speaker on
/ Battery charging
Phone microphone off
Alarm set GPS on
Do not disturb
mode on
(Alarms only or
Priority only)
Do not disturb
mode on (Total
silence)

17
Wi-Fi hotspot
Managing Notifications The status bar at the top of the screen provides notification alerts with different icons on the left side. Below are some of the icons and their meanings.
The notifications depend on the apps installed and you can touch and drag the status bar down to see more information.
New SMS Upcoming event
New MMS
New Wi-Fi network detected
New message(s)from the Email app
Downloading data
/
New message(s)from the Gmail app
Sending data
Missed call Updates available
Call in progress USB connected
/
Song playing Wired headset connected

18
Adjusting Volumes 1. Touch the Home key > > Settings >
Sound & notifications.
2. Drag the sliders below Media volume, Alarm volume, Ring volume, and Notification volume to adjust the volume for each type of audio.
NOTE: You can adjust the volume levels any time by pressing the Volume up key or Volume down key. Then touch and drag a volume slider.
Setting a Screen Lock You can protect your phone by creating a screen lock. When enabled, you need to touch and hold the screen, draw a pattern, or enter a numeric PIN or password to unlock the phone’s screen and keys.
1. Touch the Home key > > Settings > Security > Screen lock.
2. Touch None, Long press, Pattern, PIN or Password.
Touch None to disable the screen lock feature.
Touch Long press to enable unlock with a ‘touch and hold’ gesture. You can unlock the screen by touching and holding on the blank area of the screen.
Touch Pattern to create a pattern that you

19
must draw to unlock the screen.
Touch PIN or Password to set a numeric PIN or a password you must enter to unlock your screen.
Making a Call 1. Touch the Home key > .
2. Touch and enter the phone number or the contact name with the dialpad. The phone will display matching information from your contact list.
3. Touch the matching contact to call the contact
or touch to call the number.
Adding Contacts
Creating a New Contact 1. Touch the Home key > and touch the
CONTACTS tab.
2. Touch to add a new contact.
3. If you have multiple accounts associated with your phone, touch the field above Name and select an account.
4. Enter the contact name, phone numbers, email addresses, and other information.
5. Touch to save the contact.

20
Importing Contacts in Batches 1. Touch the Home key > .
2. Touch > Import/Export > Import from storage.
3. Select an account in which to save the contacts.
4. If prompted, choose to import one, multiple, or all vCard files.
5. If prompted, touch OK.
Sending a Message
1. Touch the Home key > > .
2. Enter the recipient(s) and message text. If you want to send a multimedia message, touch to add attachments.
3. Touch or > Send.

21
Setting Up Email Accounts
Setting Up Gmail™ You can use the Gmail app to add your Gmail accounts and other personal email accounts like Yahoo, Hotmail and AOL Mail.
1. Touch the Home key > > Gmail.
NOTE:
If another Gmail account is already set up,
touch the Home key > > > Accounts
and select Google, Personal (IMAP), or
Personal (POP3).
Select recipients
Add MMS attachments
Enter recipient numbers
Enter message text

22
2. Touch Learn more to read or skip the instructions for the first time use, and then touch Add an email address.
3. Select Google or Personal (IMAP/POP) and touch OK.
4. For Gmail account, touch Enter your email to sign in to your existing Google Account, or touch Or create a new account to create one; for other email accounts, enter the email address and password.
5. Follow the instructions on the screen to set up the account.

23
Setting Up Email You can use the Email app to add email accounts including Microsoft Exchange ActiveSync, Gmail, Hotmail, Yahoo, etc.
1. Touch the Home key > > Email.
2. Select an email server and enter the email address and password.
3. Touch NEXT and follow the onscreen instructions.
Connecting to a Wi-Fi® Network 1. Touch the Home key > > > Wi-Fi.

24
2. Touch the Wi-Fi switch if Wi-Fi is off. Your phone automatically searches for Wi-Fi networks in range and displays their names and security settings. It also connects to previously linked networks when they are in range.
3. Touch a network name to connect to it.
4. If the network is secured, enter a password or other credentials (ask your network administrator for details) and touch CONNECT.
Connecting With a Bluetooth Headset 1. Turn on the Bluetooth headset and switch it to
pairing mode. Refer to the headset’s user guide for more information.
2. Touch the Home key > > >
Bluetooth.
3. Touch the Bluetooth switch if it is off. When
Bluetooth is on, the icon appears in the
status bar.
NOTE:
Your phone automatically scans for and displays the IDs of all available Bluetooth
devices in range. You could touch > Refresh if you want to scan again.

25
4. Touch the ID of the headset, or any other device you want to pair with your phone. Enter a passcode if prompted.
5. If necessary, touch the ID of the paired headset to connect with it.
NOTE:
Touch the ID again and then touch OK to end the
connection.
Installing Apps From the Google Play Store Before you begin, make sure that you have signed in to your Google Account.
NOTE:
The content you can access in the Play Store depends on your region and your service provider.
1. Touch the Home key > > Play Store.
The first time you launch Play Store, accept the Google Play Terms of Service.
2. Find the apps you need either by category or by touching .
3. Touch the app to see detailed description.
4. Touch INSTALL (free apps) or the price (paid apps). If the app is not free, you need to sign in to your Google Wallet™ account and select a payment method.

26
CAUTION:
Once installed, some apps can access many functions or a significant amount of your personal data. The Play Store will show you what the app can access. Touch ACCEPT to proceed.
5. Wait for the app to be downloaded and installed automatically. Payment needs to be authorized before paid apps start downloading.
The app is successfully installed when the icon appears in the status bar. You can find the new app after touching the Home key > .
Capturing a Photo 1. Touch the Home key > > .
2. Aim the camera at the subject and make any necessary adjustment. Photo mode is used by default.
NOTE:
You can pinch or spread on the screen to zoom in or zoom out before taking pictures.

27
WARNING!
Keep a safe distance when using the flash. Do not point the flash toward people or animals’ eyes.
3. Touch the area where you want the camera to focus, or leave the camera to autofocus on the center of the image.
NOTE:
When you touch the screen to focus, the
exposure bar appears beside the focus point.
You can drag up or down to adjust the
View photos and videos
Special effect Camera shutter
High-Dynamic Range mode
Time delay
Front/back camera
Flash mode
Camera/video settings
Close the window
Dual camera mode
More camera modes Video mode
Photo mode

28
exposure.
4. Lightly touch .
NOTE:
When you use the front camera, you can also
touch to enable smile detection.
Recording a Video 1. Touch the Home key > > > VIDEO.
2. Aim the camera at the subject. You can touch any area on the screen that you want the camcorder to focus on before and during recording.
NOTE:
You can spread or pinch on the screen to zoom in or out before and during recording.
3. Touch to start recording and touch to stop.

29
NOTE:
While the recording is in progress, you can touch
to save the frame as a separate photo.
Playing Music 1. Touch the Home key > > .
2. Touch All Songs and find the song you want to play.
-or-
Touch an icon to view your music library organized by All Songs, Artists, Playlists, Albums, Folders, or Favorites that you have added as favorites.
You can also slide up and down to browse the songs under the Recently Played bar.
3. Touch the song to play it. Touch the bar at the bottom to open the playback screen.

30
NOTE:
Swipe left or right in the Album artwork and lyrics area to see the whole lyrics or the current playlist.
Connecting to PC
You can connect your phone to a computer with a USB cable and transfer music, pictures, and other files in either direction. Your phone stores these files in the phone storage or on a removable microSDXC card.
1. Connect your phone to the PC with a USB cable.
2. Open the notification panel and touch .
Return to the music library
Album artwork/ lyrics area
Track information
Toggle
repeat mode
Playback control
Shuffle
Add to the Favorites
Access additional options
Track name, artist, and
album information
Progress bar
Current playlist
Dolby Audio

31
3. Choose one of the following options:
Charge only: Charge your phone via USB.
Install driver: Install the driver needed for connecting your phone to your PC.
Media device (MTP): Transfer media files on Windows® or Mac®.
NOTE: For Windows XP, please install the drivers and Media Player 11 (or later version) when you use Media device (MTP) for the first time.
Camera (PTP): Transfer photos using camera software.
To disconnect the device from the computer, simply unplug the USB cable when you’re finished.
NOTE:
To make your phone connect to the computer automatically using the selected connection type, check Don’t ask me again.
Browsing the Internet
Opening a Web Page Touch the Home key > Chrome or use other web browsers to view web pages or search for information on the Internet.
The browser also opens when you touch a web link - for example, in an email or a text message.
1. Touch the address field at the top and enter

32
the URL of the web page or the words you want to search for.
NOTE:
You can touch the microphone icon to search by voice.
2. Touch on the keyboard to open the web page.
Customizing the Browser Touch the Home key > Chrome > > Settings to customize the settings for the browser.
Extending Battery Life There are several things you can do to make your battery last longer.
• Turn on Wi-Fi®, Bluetooth®, GPS, mobile data, and auto-sync only when you need to.
• Lower the screen brightness.
• Use Bluetooth® tethering or USB tethering (when you have a cable) instead of mobile hotspot to share your phone’s data service.
• Touch the Home key > > Settings > Sound & notification > Other sounds and uncheck Vibrate on touch.

33

34