z/osmf labs: sdsf - share · sdsf overview page - introduction list of views of jobs & checks...
TRANSCRIPT

© 2015 BM Corporation
z/OSMF Labs: SDSF
estimated time to complete: 30-45 minutes

© Copyright IBM Corporation 2015
Abstract
z/OS Management Facility (z/OSMF) provides a web-based graphical interface for
system programmers on z/OS. Attendees of this hands-on lab can try the z/OSMF
SDSF task to see how it can help them monitor and control jobs and health checks.
This session will be useful to systems programmers and their managers who will be
using, or are considering using, z/OSMF.
The z/OSMF SDSF task was introduced in z/OSMF V2.1 with PTF UI15294.

© Copyright IBM Corporation 2015
Session objective
Gain experience with some basic function of z/OSMF SDSF
You will perform these tasks:
1. SDSF Settings
2. Select the SDSF task
3. Set common filters
4. View jobs
5. Configure a table
6. Switch views
7. Edit and resubmit JCL
8. Modify a property of a job
9. View the User Session Log
10. System command
11. Purge a job's output
12. Export a table
13. Browse a health check

Session objectives
Hints and Tips
• You can get assistance by clicking the Help links – there is
always one near the top on the right side
• The closer that you follow the instructions, the easier it will be
to assist you if you go astray
• Please note: Do NOT use the Browser BACK button to go
to the prior screen!!!
• What you see may not exactly match the handout, as the
workload varies
© Copyright IBM Corporation 2015

Introduction to z/OSMF SDSF
You can use the SDSF task of z/OSMF to:
• See key summary information about your sysplex
• Work with objects such as jobs and checks for IBM z/OS
Health Checker
• Issue system commands.
z/OSMF SDSF:
• Communicates with z/OS System Display and Search Facility
(SDSF)
• Is protected by z/OS SDSF security (SAF and ISFPRMxx)
• Shows data for the sysplex, or the JESplex for views showing
JES data.
© Copyright IBM Corporation 2015

© Copyright IBM Corporation 2015
Login to z/OSMF
1. Launch the Mozilla Firefox browser
• If the browser asks to add an exception for the certificate, do so.
2. Point the browser to this URL:
https://mvs1.centers.ihost.com/zosmf/
• Ignore and close the warning message
• IZUG809W Unsupported Web browser version or level found…
3. Login with SHARE user ID and password provided by the lab
instructor
• Each workstation has been assigned a unique z/OS user ID
• SHARAnn, or SHARBnn, or SHARCnn where nn is 01-30
• Password to be provided

Before using the SDSF task the first time, you must
specify SDSF settings
- Under z/OSMF Settings
z/OSMF SDSF Settings
© Copyright IBM Corporation 2015

Task 1. SDSF Settings – Perform thse steps
1a. Expand z/OSMF
Settings and select
the SDSF Settings
task
© Copyright IBM Corporation 2015
1b. Supply or verify the
logon settings as shown.
Logon proc: share
Account: shr
Region: 100000
1c. Click Save. There
is no confirmation
message. Go on to
the next page.
If you didn’t change
any values, just go on
to the next page.

Task 1. SDSF Settings
1d. Click the X to
close the SDSF
Settings tab
© Copyright IBM Corporation 2015

Task 2. Select the SDSF Task
2a. Expand Jobs
and Resources,
then select SDSF
New task
© Copyright IBM Corporation 2015

Task 2. Select the SDSF Task
A pop-up shows
the progress of
starting the
SDSF task
© Copyright IBM Corporation 2015

Task 2. Select the SDSF Task
2b. Click the control
on the divider to let the
SDSF task use the
whole browser window
© Copyright IBM Corporation 2015
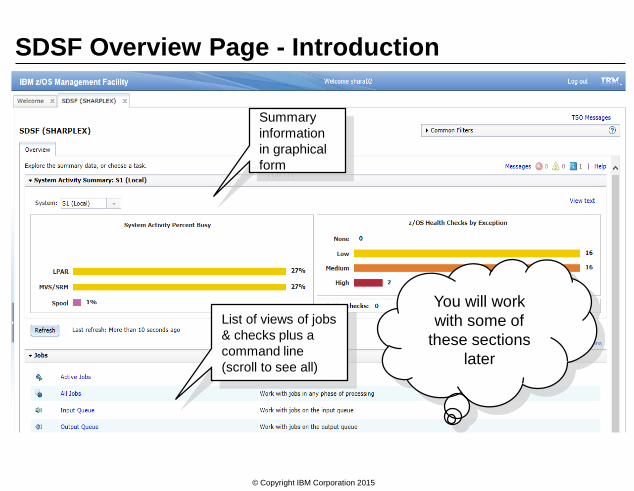
SDSF Overview Page - Introduction
List of views of jobs
& checks plus a
command line
(scroll to see all)
Summary
information
in graphical
form
You will work
with some of
these sections
later
© Copyright IBM Corporation 2015

Collapse
and expand
sections –
click or
Explore the Overview Page
Choose text
or icon
views.
Scroll to see
more…
© Copyright IBM Corporation 2015

Task 3. Set Common Filters
For the lab, a set of jobs have been submitted to populate the SDSF views.
The jobs were submitted with user ID SHARA00.
To explore the SDSF function, you will periodically be asked to change filters
between that user ID and the user ID you are using.
New task
© Copyright IBM Corporation 2015

Task 3. Set Common Filters
3a. Click the arrow to
expand Common Filters
© Copyright IBM Corporation 2015

Task 3. Set Common Filters
3b. Type new values:
Job name: *
Owner: shara00
3c. Click More to see
additional filters
© Copyright IBM Corporation 2015
*

Task 3. Set Common Filters
3d. Ensure that the values for
System and Destination are *
3e. Click Apply. You might also
want to click the arrow to
collapse the section again. There
is no confirmation for Apply. Go
on to the next page.
© Copyright IBM Corporation 2015

Task 4. View Jobs
4a. Click All Jobs to
see jobs in any phase
New task
© Copyright IBM Corporation 2015

Task 4. View Jobs – Elements
Summary information of
jobs grouped by return
code in graphical form
Collapsible list of
properties of a job
Scrollable table
of jobs

Task 5. Configure a Table – Add Max-RC column
New task
© Copyright IBM Corporation 2015
5a. Click View to display a menu
5b. Click Configure Columns

Task 5. Configure a Table – Add Max-RC column
5c. Scroll to
find Max-RC
Dialog shows available columns
on the left and columns in the
table on the right
© Copyright IBM Corporation 2015

Task 5. Configure a Table – Add Max-RC column
5d. Click Max-RC
5e. Click Add
© Copyright IBM Corporation 2015
Use this later if you
change your mind!

Task 5. Configure a Table – Add Max-RC column
5f. Click Up twice, to move
Max-RC before Prty
5g. Click OK
© Copyright IBM Corporation 2015

Task 5. Configure a Table – Sort
5h. Click JOBNAME
to sort using that
column
Max-RC is now in the table
© Copyright IBM Corporation 2015

Task 5. Configure a Table – Sort
© Copyright IBM Corporation 2015
Job names are
now sorted

Task 6. Switch to another view
New task
© Copyright IBM Corporation 2015
6a. Click the Overiew tab

Task 6. Switch to another view
6b. Click Input Queue
© Copyright IBM Corporation 2015

Task 6. Switch to another view
Each view has
its own tab
© Copyright IBM Corporation 2015
The view includes
a graphic
summary, table,
and properties.

Task 7. Edit and resubmit JCL
For this
exercise, start
by returning to
the All Jobs view
New task
© Copyright IBM Corporation 2015
7a. Click the
All Jobs tab

Task 7. Edit and resubmit JCL
© Copyright IBM Corporation 2015
7b. Scroll the table to find
the job we want to use,
SAMPJOB

Task 7. Edit and resubmit JCL
Hover the mouse pointer
on the job name for a tip
© Copyright IBM Corporation 2015
7c. Click the SAMPJOB job name. If there is
more than one SAMPJOB, pick either one.
This job has
a JCL error

Task 7. Edit and resubmit JCL
Tabs for job data sets, browse and
edit JCL
Table of job data setsProperties for a
selected data set
© Copyright IBM Corporation 2015

Task 7. Edit and resubmit JCL
© Copyright IBM Corporation 2015
7d. Click the Browse All tab to
browse job data sets

Task 7. Edit and resubmit JCL
Tabs for job data sets, browse and
edit JCL
Table of job data setsProperties for a
selected data set
JCL error
All of the job’s data sets are
shown in a scrollable,
searchable window
Find field
© Copyright IBM Corporation 2015

Task 7. Edit and resubmit JCL
© Copyright IBM Corporation 2015
7e. Click the Edit JCL tab

Task 7. Edit and resubmit JCL
7f. Change DDD to DD to
correct the JCL error
JCL for the Job, in an edit window
7g. Click Submit
© Copyright IBM Corporation 2015

Task 7. Edit and resubmit JCL
7h. Click Close
TSO messages are
displayed in a pop-up
© Copyright IBM Corporation 2015

Task 7. Edit and resubmit JCL
7i. Click the All Jobs tab (to
see the job you just submitted)
© Copyright IBM Corporation 2015

Task 7. Edit and resubmit JCL
Because you submitted
the job, you need to
change the Owner filter
to your ID. Note that
your ID is on the title
bar
© Copyright IBM Corporation 2015
7i. Expand Common
Filters, change Owner
to your user ID, then
click Apply

Task 7. Edit and resubmit JCL
Better result!
The view is refreshed
with jobs that you own
© Copyright IBM Corporation 2015
Here’s SAMPJOB
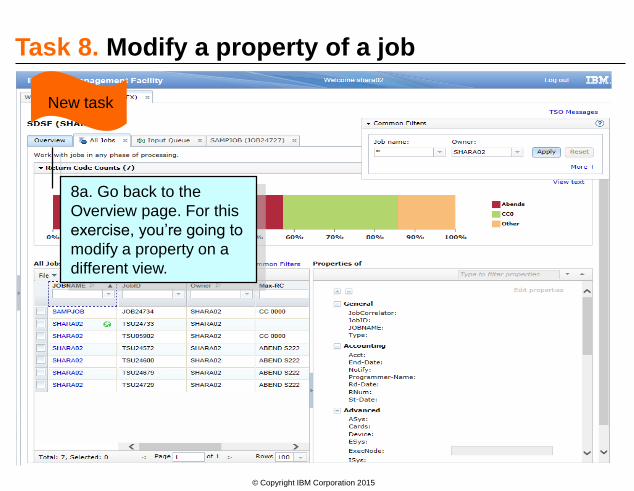
Task 8. Modify a property of a job
New task
© Copyright IBM Corporation 2015
8a. Go back to the
Overview page. For this
exercise, you’re going to
modify a property on a
different view.

Task 8. Modify a property of a job
8b. Click Held Output Queue
© Copyright IBM Corporation 2015

Task 8. Modify a property of a job
Graphic summary, table
and properties
© Copyright IBM Corporation 2015
8c. Click the checkbox for
SAMPJOB to select the job

Task 8. Modify a property of a job
Properties for the job
are now shown
You can collapse the
whole properties section
by clicking here
© Copyright IBM Corporation 2015
Properties are in groups, which
you can expand and collapse

Task 8. Modify a property of a job
© Copyright IBM Corporation 2015
8d. Click Edit properties

Task 8. Modify a property of a job
Properties are now editable
© Copyright IBM Corporation 2015
8e. Scroll down to the Prty
property, or type Prty in the
Filter field at the top of the
Properties section

Task 8. Modify a property of a job
8f. Type a new value, 145,
in the Prty field
© Copyright IBM Corporation 2015

Task 8. Modify a property of a job
8h. Click Apply
© Copyright IBM Corporation 2015
8g. If the Apply button is not
visible, scroll (using the
outermost scroll bar)

Task 8. Modify a property of a job
© Copyright IBM Corporation 2015
Prty value has changed

Task 9. View the user session log
New task
© Copyright IBM Corporation 2015
9a. Return to the Overview page

Task 9. View the user session log
9b. Click User Session Log.
(You may need to scroll to see
the link.)
© Copyright IBM Corporation 2015

Task 9. View the user session log
Log for your session
JES2 command that was generated
when you changed the Prty value
Messages issued in response
© Copyright IBM Corporation 2015

Task 10. System command
10a. Type d a
This page includes a
command line for system
commands. (So does the
Overview page.)
10b. If a list of commands
appears beneath the
command line, click the
entry for d a
New task
© Copyright IBM Corporation 2015

Task 10. System command
10c. Click the Help with command syntax link
© Copyright IBM Corporation 2015

Task 10. System command
List of topics to help you
complete the command
that you typed. Clicking
any link under Command
shows the syntax diagram.
The help opens
in a new
browser
window. You
may need to
bring it to the
top.
© Copyright IBM Corporation 2015

Task 11. Purge a job’s output
11a. Return to the SDSF
window and click the
Held Output Queue tab
New task
© Copyright IBM Corporation 2015
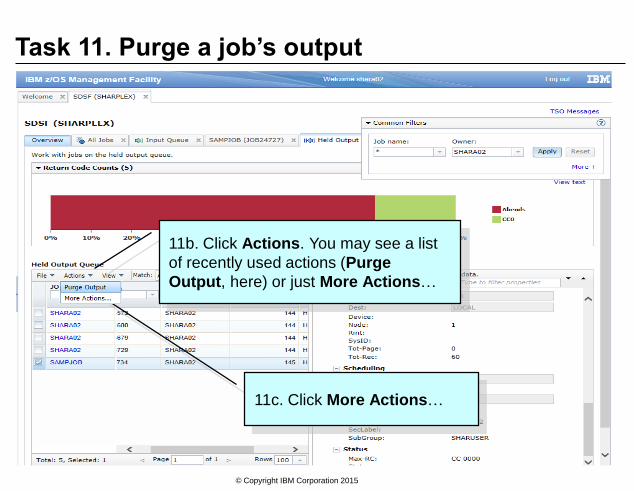
Task 11. Purge a job’s output
11c. Click More Actions…
© Copyright IBM Corporation 2015
11b. Click Actions. You may see a list
of recently used actions (Purge
Output, here) or just More Actions…

Task 11. Purge a job’s output
You can list all actions, or
just those in a category
11d. Click Purge Output
11e. Click OK
© Copyright IBM Corporation 2015

Task 11. Purge a job’s output
11f. Click OK to confirm
© Copyright IBM Corporation 2015

Task 11. Purge a job’s output
SAMPJOB has been purged
© Copyright IBM Corporation 2015

Task 12. Export a table
For this exercise,
we’ll use a different
table, but you can
export any table
New task
© Copyright IBM Corporation 2015
12a. Click Overview

Task 12. Export a table
12b. Click Active Jobs
© Copyright IBM Corporation 2015

Task 12. Export a table
The Active Jobs view includes
a graphic summary, table and
properties
© Copyright IBM Corporation 2015
12c. Change the Owner to *
and click Apply (to get more
table data)

Task 12. Export a table
12d. Click View, and expand to see
Export Table Data > All Data
12e. Click All Data
© Copyright IBM Corporation 2015
Table now has all active jobs
12d. Click File, and expand to see
Export All Data
12e. Click Export All Data

Task 12. Export a table
12f. Your workstation for
this lab may not have Excel
or other spreadsheet
software, but the next page
in the presentation shows
an example. This lab also
shows an example of a file
opened with Notepad. If
you’re comfortable doing so
and want to see your file,
you can click Save File, use
the resulting dialog to save
the file, and then open it
with the program of your
choice.
Otherwise, click Cancel
and go on to the next page.
You can save the
comma-separated
variable (CSV) file or
open it with
spreadsheet software
© Copyright IBM Corporation 2015

Task 12. Export a table - Example
Here is an example of a
file opened in Excel
© Copyright IBM Corporation 2015

Task 12. Export a table - Example
Here is an example of a
file opened in Notepad
© Copyright IBM Corporation 2015

Task 13. Browse a health check
New task
© Copyright IBM Corporation 2015
13a. Click Overview to
return to the Overview page

Task 13. Browse a health check
13b. Click z/OS Health Checks
© Copyright IBM Corporation 2015

Task 13. Browse a health check
© Copyright IBM Corporation 2015
Like the others, this view
includes a graphic
summary, table and
properties

Task 13. Browse a health check
© Copyright IBM Corporation 2015
13c. Click a check name

Task 13. Browse a health check
Tabs for different views of the check
There is currently no history
for this check
© Copyright IBM Corporation 2015
13d. Click the
Browse Check tab

Task 13. Browse a health check
Browse window for the check’s
output. Searchable and scrollable.
Find field
© Copyright IBM Corporation 2015

Want to try more?
• Filters in the table For quick filtering, type a value in
the input field under the title.
These filters take effect after the
common filters. Try combining
common and table filters.
• Find in Browse
Type a value in the Find
field, then press Enter
To limit your search,
click Find options
© Copyright IBM Corporation 2015
For complex filtering, use
View > Filter > Custom Filters

© Copyright IBM Corporation 2015
Want to try more? View the SYSLOG.
• To view the SYSLOG, you can browse the SYSLOG job from the All
Jobs View, or *MASTER* from the Active Jobs view.

End of this lab
Thank you!
For more information, see:
• z/OSMF website:
http://ibm.com/systems/z/os/zos/zosmf
• z/OSMF in the z/OS information center:
http://pic.dhe.ibm.com/infocenter/zos/v2r1/topic/com.ibm.zos.v2r1.izu/izu.htm
© Copyright IBM Corporation 2015