z/os pki services - ibm redbooks · redbooks front cover z/os pki services quick set-up for...
TRANSCRIPT

Redbooks
Front cover
z/OS PKI ServicesQuick Set-up for Multiple CAs
Keith Winnard
Wai Choi
Martina vondem Bussche


International Technical Support Organization
z/OS PKI Services: Quick Set-up for Multiple CAs
October 2016
SG24-8337-00

© Copyright International Business Machines Corporation 2016. All rights reserved.Note to U.S. Government Users Restricted Rights -- Use, duplication or disclosure restricted by GSA ADP ScheduleContract with IBM Corp.
First Edition (October 2016)
This edition applies to Version 2, Release 2 of IBM z/OS(product number 5650-ZOS).
Note: Before using this information and the product it supports, read the information in “Notices” on page v.

Contents
Notices . . . . . . . . . . . . . . . . . . . . . . . . . . . . . . . . . . . . . . . . . . . . . . . . . . . . . . . . . . . . . . . . . .vTrademarks . . . . . . . . . . . . . . . . . . . . . . . . . . . . . . . . . . . . . . . . . . . . . . . . . . . . . . . . . . . . . . vi
IBM Redbooks promotions . . . . . . . . . . . . . . . . . . . . . . . . . . . . . . . . . . . . . . . . . . . . . . . . . vii
Preface . . . . . . . . . . . . . . . . . . . . . . . . . . . . . . . . . . . . . . . . . . . . . . . . . . . . . . . . . . . . . . . . . ixAuthors. . . . . . . . . . . . . . . . . . . . . . . . . . . . . . . . . . . . . . . . . . . . . . . . . . . . . . . . . . . . . . . . . . ixNow you can become a published author, too! . . . . . . . . . . . . . . . . . . . . . . . . . . . . . . . . . . . ixComments welcome. . . . . . . . . . . . . . . . . . . . . . . . . . . . . . . . . . . . . . . . . . . . . . . . . . . . . . . . .xStay connected to IBM Redbooks . . . . . . . . . . . . . . . . . . . . . . . . . . . . . . . . . . . . . . . . . . . . . .x
Chapter 1. Welcome to PKI Services on z/OS . . . . . . . . . . . . . . . . . . . . . . . . . . . . . . . . . 11.1 Introduction . . . . . . . . . . . . . . . . . . . . . . . . . . . . . . . . . . . . . . . . . . . . . . . . . . . . . . . . . . . 2
1.1.1 Pre-requisite reading. . . . . . . . . . . . . . . . . . . . . . . . . . . . . . . . . . . . . . . . . . . . . . . . 21.1.2 Basic scenario components . . . . . . . . . . . . . . . . . . . . . . . . . . . . . . . . . . . . . . . . . . 3
1.2 Scenario build . . . . . . . . . . . . . . . . . . . . . . . . . . . . . . . . . . . . . . . . . . . . . . . . . . . . . . . . . 31.2.1 Building the scenario. . . . . . . . . . . . . . . . . . . . . . . . . . . . . . . . . . . . . . . . . . . . . . . . 4
Chapter 2. Setting up the Root CA environment . . . . . . . . . . . . . . . . . . . . . . . . . . . . . . . . 52.1 Setting up PKI services rootca environment . . . . . . . . . . . . . . . . . . . . . . . . . . . . . . . . . . 6
2.1.1 Defining VSAM data sets . . . . . . . . . . . . . . . . . . . . . . . . . . . . . . . . . . . . . . . . . . . . 62.1.2 Installing the HTTP Server - Powered by Apache. . . . . . . . . . . . . . . . . . . . . . . . . 132.1.3 Using the set up script to create certificates and key rings. . . . . . . . . . . . . . . . . . 142.1.4 Configuring the PKI Services UNIX files . . . . . . . . . . . . . . . . . . . . . . . . . . . . . . . . 202.1.5 Customizing PKISERVD started task . . . . . . . . . . . . . . . . . . . . . . . . . . . . . . . . . . 252.1.6 Configuring the HTTP server for PKI services . . . . . . . . . . . . . . . . . . . . . . . . . . . 262.1.7 Setting up the LDAP server . . . . . . . . . . . . . . . . . . . . . . . . . . . . . . . . . . . . . . . . . 312.1.8 Preparing ROOTCA for use . . . . . . . . . . . . . . . . . . . . . . . . . . . . . . . . . . . . . . . . . 342.1.9 Enabling ROOTCA for use from the browser . . . . . . . . . . . . . . . . . . . . . . . . . . . . 35
Chapter 3. Setting up SUBCA1 and SUBCA2 under ROOTCA . . . . . . . . . . . . . . . . . . . 373.1 SUBCA1 set up . . . . . . . . . . . . . . . . . . . . . . . . . . . . . . . . . . . . . . . . . . . . . . . . . . . . . . . 38
3.1.1 Creating SUBCA1 certificate request . . . . . . . . . . . . . . . . . . . . . . . . . . . . . . . . . . 383.1.2 Requesting the SUBCA1 certificate to be signed by ROOTCA . . . . . . . . . . . . . . 393.1.3 Retrieving SUBCA1 certificate . . . . . . . . . . . . . . . . . . . . . . . . . . . . . . . . . . . . . . . 433.1.4 Adding the SUBCA1 certificate to RACF . . . . . . . . . . . . . . . . . . . . . . . . . . . . . . . 453.1.5 Creating and customizing the UNIX files for SUBCA1 . . . . . . . . . . . . . . . . . . . . . 473.1.6 Creating the VSAM data sets for SUBCA1 . . . . . . . . . . . . . . . . . . . . . . . . . . . . . . 493.1.7 Creating certificate, key ring, and authorization for SUBCA1 . . . . . . . . . . . . . . . . 493.1.8 Starting SUBCA1 . . . . . . . . . . . . . . . . . . . . . . . . . . . . . . . . . . . . . . . . . . . . . . . . . 50
3.2 SUBCA2 set up . . . . . . . . . . . . . . . . . . . . . . . . . . . . . . . . . . . . . . . . . . . . . . . . . . . . . . . 53
Related publications . . . . . . . . . . . . . . . . . . . . . . . . . . . . . . . . . . . . . . . . . . . . . . . . . . . . . 55IBM Redbooks . . . . . . . . . . . . . . . . . . . . . . . . . . . . . . . . . . . . . . . . . . . . . . . . . . . . . . . . . . . 55Other publications . . . . . . . . . . . . . . . . . . . . . . . . . . . . . . . . . . . . . . . . . . . . . . . . . . . . . . . . 55Help from IBM . . . . . . . . . . . . . . . . . . . . . . . . . . . . . . . . . . . . . . . . . . . . . . . . . . . . . . . . . . . 55
© Copyright IBM Corp. 2016. All rights reserved. iii

iv z/OS PKI Services: Quick Set-up for Multiple CAs
Notices
This information was developed for products and services offered in the US. This material might be available from IBM in other languages. However, you may be required to own a copy of the product or product version in that language in order to access it.
IBM may not offer the products, services, or features discussed in this document in other countries. Consult your local IBM representative for information on the products and services currently available in your area. Any reference to an IBM product, program, or service is not intended to state or imply that only that IBM product, program, or service may be used. Any functionally equivalent product, program, or service that does not infringe any IBM intellectual property right may be used instead. However, it is the user’s responsibility to evaluate and verify the operation of any non-IBM product, program, or service.
IBM may have patents or pending patent applications covering subject matter described in this document. The furnishing of this document does not grant you any license to these patents. You can send license inquiries, in writing, to:IBM Director of Licensing, IBM Corporation, North Castle Drive, MD-NC119, Armonk, NY 10504-1785, US
INTERNATIONAL BUSINESS MACHINES CORPORATION PROVIDES THIS PUBLICATION “AS IS” WITHOUT WARRANTY OF ANY KIND, EITHER EXPRESS OR IMPLIED, INCLUDING, BUT NOT LIMITED TO, THE IMPLIED WARRANTIES OF NON-INFRINGEMENT, MERCHANTABILITY OR FITNESS FOR A PARTICULAR PURPOSE. Some jurisdictions do not allow disclaimer of express or implied warranties in certain transactions, therefore, this statement may not apply to you.
This information could include technical inaccuracies or typographical errors. Changes are periodically made to the information herein; these changes will be incorporated in new editions of the publication. IBM may make improvements and/or changes in the product(s) and/or the program(s) described in this publication at any time without notice.
Any references in this information to non-IBM websites are provided for convenience only and do not in any manner serve as an endorsement of those websites. The materials at those websites are not part of the materials for this IBM product and use of those websites is at your own risk.
IBM may use or distribute any of the information you provide in any way it believes appropriate without incurring any obligation to you.
The performance data and client examples cited are presented for illustrative purposes only. Actual performance results may vary depending on specific configurations and operating conditions.
Information concerning non-IBM products was obtained from the suppliers of those products, their published announcements or other publicly available sources. IBM has not tested those products and cannot confirm the accuracy of performance, compatibility or any other claims related to non-IBM products. Questions on the capabilities of non-IBM products should be addressed to the suppliers of those products.
Statements regarding IBM’s future direction or intent are subject to change or withdrawal without notice, and represent goals and objectives only.
This information contains examples of data and reports used in daily business operations. To illustrate them as completely as possible, the examples include the names of individuals, companies, brands, and products. All of these names are fictitious and any similarity to actual people or business enterprises is entirely coincidental.
COPYRIGHT LICENSE:
This information contains sample application programs in source language, which illustrate programming techniques on various operating platforms. You may copy, modify, and distribute these sample programs in any form without payment to IBM, for the purposes of developing, using, marketing or distributing application programs conforming to the application programming interface for the operating platform for which the sample programs are written. These examples have not been thoroughly tested under all conditions. IBM, therefore, cannot guarantee or imply reliability, serviceability, or function of these programs. The sample programs are provided “AS IS”, without warranty of any kind. IBM shall not be liable for any damages arising out of your use of the sample programs.
© Copyright IBM Corp. 2016. All rights reserved. v

Trademarks
IBM, the IBM logo, and ibm.com are trademarks or registered trademarks of International Business Machines Corporation, registered in many jurisdictions worldwide. Other product and service names might be trademarks of IBM or other companies. A current list of IBM trademarks is available on the web at “Copyright and trademark information” at http://www.ibm.com/legal/copytrade.shtml
The following terms are trademarks or registered trademarks of International Business Machines Corporation, and might also be trademarks or registered trademarks in other countries.
DB2®IBM®RACF®
Redbooks®Redbooks (logo) ®System z®
Tivoli®z/OS®
The following terms are trademarks of other companies:
UNIX is a registered trademark of The Open Group in the United States and other countries.
Other company, product, or service names may be trademarks or service marks of others.
vi z/OS PKI Services: Quick Set-up for Multiple CAs

IBM REDBOOKS PROMOTIONS
Find and read thousands of IBM Redbooks publications
Search, bookmark, save and organize favorites
Get personalized notifications of new content
Link to the latest Redbooks blogs and videos
DownloadNow
Get the latest version of the Redbooks Mobile App
iOS
Android
Place a Sponsorship Promotion in an IBM Redbooks publication, featuring your business or solution with a link to your web site.
Qualified IBM Business Partners may place a full page promotion in the most popular Redbooks publications. Imagine the power of being seen by users who download millions of Redbooks publications each year!
®
®
Promote your business in an IBM Redbooks publication
ibm.com/RedbooksAbout Redbooks Business Partner Programs
IBM Redbooks promotions

THIS PAGE INTENTIONALLY LEFT BLANK

Preface
If you are new to Public Key Infrastructure (PKI), this IBM® Redbooks® publication helps you install, tailor, and configure PKI Services on IBM z/OS®. The intention is to show you a simplified set-up in which the ITSO labs were created. You can choose a similar set-up for your site in a controlled test environment where you can gain skills and experience in PKI Services on z/OS, and then move on to plan and implement it across your site.
This IBM Redbooks publication is written at the z/OS Version 2 Release 2 level.
Authors
This book was produced by a team of specialists from around the world working at the International Technical Support Organization, Poughkeepsie Center.
Keith Winnard is the z/OS Project Leader at the International Technical Support Organization, Poughkeepsie Center. He writes extensively and is keen to engage with customers to understand what they want from IBM Redbooks Publications. Before joining the ITSO in 2014, Keith worked for clients and Business Partners in the UK and Europe in various technical and account management roles. He is experienced with blending and integrating new technologies into the traditional landscape of mainframes.
Wai Choi is a Senior Software Engineer for IBM in Poughkeepsie. She works on digital certificate support in IBM RACF®, PKI services, and Kerberos. Wai actively participates in conferences and forums about digital certificates and related topics. She is a Certified Information Systems Security Professional (CISSP).
Martina vondem Bussche is an IT Security Architect at the Client Center in the IBM Research & Development lab in Germany. She is certified ISACA Information Security Manager (CISM) and Information Systems Auditor (CISA). Having started her career at IBM as a Systems Engineer, that is, in technical pre-sales for Mainframe hardware and continued in technical pre-sales for IBM System z® software security products, she has a strong Mainframe background. Now, she is focusing on overall Mainframe security topics and projects.
Thanks to Bob Haimowitz (DSG, Poughkeepsie Center) for setting up and maintaining the systems, and providing valuable advice, guidance, and assistance throughout the creation of this IBM Redbooks publication.
Now you can become a published author, too!
Here’s an opportunity to spotlight your skills, grow your career, and become a published author—all at the same time! Join an ITSO residency project and help write a book in your area of expertise, while honing your experience using leading-edge technologies. Your efforts will help to increase product acceptance and customer satisfaction, as you expand your network of technical contacts and relationships. Residencies run from two to six weeks in length, and you can participate either in person or as a remote resident working from your home base.
© Copyright IBM Corp. 2016. All rights reserved. ix

Find out more about the residency program, browse the residency index, and apply online at:
ibm.com/redbooks/residencies.html
Comments welcome
Your comments are important to us!
We want our books to be as helpful as possible. Send us your comments about this book or other IBM Redbooks publications in one of the following ways:
� Use the online Contact us review Redbooks form found at:
ibm.com/redbooks
� Send your comments in an email to:
� Mail your comments to:
IBM Corporation, International Technical Support OrganizationDept. HYTD Mail Station P0992455 South RoadPoughkeepsie, NY 12601-5400
Stay connected to IBM Redbooks
� Find us on Facebook:
http://www.facebook.com/IBMRedbooks
� Follow us on Twitter:
http://twitter.com/ibmredbooks
� Look for us on LinkedIn:
http://www.linkedin.com/groups?home=&gid=2130806
� Explore new Redbooks publications, residencies, and workshops with the IBM Redbooks weekly newsletter:
https://www.redbooks.ibm.com/Redbooks.nsf/subscribe?OpenForm
� Stay current on recent Redbooks publications with RSS Feeds:
http://www.redbooks.ibm.com/rss.html
x z/OS PKI Services: Quick Set-up for Multiple CAs

Chapter 1. Welcome to PKI Services on z/OS
In this chapter, you are introduced to this IBM Redbooks publication and provided with suggestions for prerequisite reading. An overview of the scenario that was used to create a controlled environment also is shown.
The IBM HTTP Server - Powered by Apache is referred to as HTTP server throughout this document.
This chapter includes the following topics:
� 1.1, “Introduction” on page 2� 1.2, “Scenario build” on page 3
1
© Copyright IBM Corp. 2016. All rights reserved. 1

1.1 Introduction
This IBM Redbooks publication describes how to quickly set up z/OS PKI Services and have the servers running so that you can try the certificate creation, management, and administration functions. We recommend that you use the set up in your test system first. You must configure more options in the production system.
The steps that were used to set up a scenario in our controlled environment are described. Examples of the use of the PKI Services on z/OS also are provided.
1.1.1 Pre-requisite reading
If you are new to digital certificates, it is suggested that you read the IBM Redbooks publication that is shown in Figure 1-1, which is available at this website:
http://www.redbooks.ibm.com/abstracts/sg248336.html
Figure 1-1 Prerequisite reading
For more information about PKI Services on z/OS, see the following publications:
� Cryptographic Series PKI Services Guide and Reference, SA23-2286� IBM HTTP Server - powered by Apache, SC27-8417� IBM Tivoli® Directory Server Administration and Use for z/OS, SC23-6788
Topics covered:• Digital Certificates Overview
• What is a digital certificate?• Why would you use a digital certificate?
• Introducing Certificate Authorities (CA)• Intermediate CAs
• The digital certificate lifecycle• Digital certificate management and
administration• Introducing PKI Services on z/OS
• Requesting and approving certificates• Generating certificates for use across
the enterprise• Email notifications
2 z/OS PKI Services: Quick Set-up for Multiple CAs

1.1.2 Basic scenario components
The implementation that we set up is shown in Figure 1-2.
Figure 1-2 Three instances of PKI Services
ROOTCA is an instance with a self-signed certificate. It issues the server certificate for the HTTP server. After the ROOTCA instance is set up with the HTTP server, it is used to issue CA certificates for SUBCA1 and SUBCA2.
ROOTCA can be put offline after it issues the intermediate CAs. All of the certificates are then issued by SUBCA1 or SUBCA2, according to your needs. For example, you can assign SUBCA1 to issue certificates for internal use and SUBCA2 to issue certificates for your business partners.
1.2 Scenario build
The environment is built by producing the following entities:
� PKI CA certificates that are owned by CERTAUTH: 'ROOTCA PKI CA', 'SUBCA1 PKI CA', 'SUBCA2 PKI CA'
� IDs for the servers:
– PKI daemon ID: PKISRVD– HTTP server ID: WEBSRV– LDAP server ID: GLDSRV
� PKI key rings:
– PKISRVD/CAring.ROOTCA, contains ROOTCA PKI CA
– PKISRVD/CAring.SUBCA1, contains ROOTCA PKI CA, SUBCA1 PKI CA, and SUBCA1 RA
– PKISRVD/CAring.SUBCA2, contains ROOTCA PKI CA, SUBCA2 PKI CA, and SUBCA2 PKI RA
� One HTTP server for all domains:
– HTTP server certificate that is owned by WEBSRV with label 'SSL Cert'.
– HTTP key ring: WEBSRV/SSLring contains ROOTCA PKI CA, SSL Cert, SUBCA1 PKI CA, and SUBCA2 PKI CA.
� Start procedures in SYS1.PROCLIB:
– HTTP server - SYS1.PROCLIB(IHSSRVER): s ihssrver
– LDAP server - SYS1.PROCLIB(GLDSRV): s gldsrv
PKI ServicesRoot Certificate Authority
ROOTCA
PKI ServicesIntermediate Certificate Authority
SUBCA1
PKI ServicesIntermediate Certificate Authority
SUBCA2
Chapter 1. Welcome to PKI Services on z/OS 3
– PKI server - SYS1.PROCLIB(PKISERVD):
• S pkiservd,jobname=rootca,dir='/etc/pkiserv/rootca'• S pkiservd,jobname=subca1,dir='/etc/pkiserv/subca1'• S pkiservd,jobname=subca2,dir='/etc/pkiserv/subca2'
1.2.1 Building the scenario
The environment was built at the z/OS Version 2 Release 2 level.
The following directories are needed for the configuration files:
� /etc/pkiserv/rootca� /etc/pkiserv/subca1� /etc/pkiserv/subca2
The following directories are needed to store the CRL files if CRL Distribution point is to be created by using the HTTP protocol :
� /var/pkiserv/rootca� /var/pkiserv/subca1� /var/pkiserv/subca2
The following products are needed to build the scenario:
� An HTTP server to manage requests through a web server.
� An LDAP for posting certificates and Certificate Revocation List (CRL).
� Sendmail (optional) for sending email notifications to certificate requesters and administrators.
� VSAM data sets to store the object store and issue certificate lists.
Although the ROOTCA, SUBCA1, and SUBCA2 share the HTTP server and LDAP server, the configuration files and VSAM data set store is unique to each CA.
For more information about building and configuring the ROOTCA PKI instance, HTTP server, the LDAP server, and some configuration work for SUBCA1 and SUBCA2, see Chapter 2, “Setting up the Root CA environment” on page 5.
For more information about building and configuring the SUBCA1 and SUBCA2 intermediate CAs, see Chapter 3, “Setting up SUBCA1 and SUBCA2 under ROOTCA” on page 37. (The configuration work is for each unique instance only.)
Note: The z/OS level is V2.2 and HTTP Server - powered by Apache is used.
4 z/OS PKI Services: Quick Set-up for Multiple CAs

Chapter 2. Setting up the Root CA environment
In this chapter, the process that is used to build the PKI Services environment for the ROOTCA is described.
2
© Copyright IBM Corp. 2016. All rights reserved. 5

2.1 Setting up PKI services rootca environment
Samples for setting up an environment are provided in this book as part of the installation process. Each sample is identified throughout the course of the book as and when it is needed.
We suggest that you set up a partitioned data set into which the samples can be copied and then, modify them as suggested or to meet your installation standards. For this book, the data set PKI.QUICK.SETUP is allocated. This data set is referred to as the SETUP data set throughout this paper.
The samples are copied under the same member name and modified where necessary to suit the controlled environment.
2.1.1 Defining VSAM data sets
The VSAM data sets include the PKISRVD prefix. The data sets that include the object store (OST) qualifier are related to object store, which is used to store certificate requests. The data sets that include the issued certificate list (ICL) qualifier are related to the issued certificates list, which is used to store issued certificates.
VSAM data set configuration for ROOTCAThe root CA VSAM data sets are shown in Figure 2-1.
Figure 2-1 Rootca VSAM data sets
Note: Ensure that you read all the comments in the SAMPLIB members and complete the appropriate tasks.
PKISRVD.ROOTCA.VSAM.ICL PKISRVD.ROOTCA.VSAM.ICL.DA PKISRVD.ROOTCA.VSAM.ICL.IX PKISRVD.ROOTCA.VSAM.ICL.REQAIX PKISRVD.ROOTCA.VSAM.ICL.REQAIX.DA PKISRVD.ROOTCA.VSAM.ICL.REQAIX.IX PKISRVD.ROOTCA.VSAM.ICL.REQUESTR PKISRVD.ROOTCA.VSAM.ICL.STATAIX PKISRVD.ROOTCA.VSAM.ICL.STATAIX.DA PKISRVD.ROOTCA.VSAM.ICL.STATAIX.IX PKISRVD.ROOTCA.VSAM.ICL.STATUS
PKISRVD.ROOTCA.VSAM.OST PKISRVD.ROOTCA.VSAM.OST.AIX PKISRVD.ROOTCA.VSAM.OST.AIX.DA PKISRVD.ROOTCA.VSAM.OST.AIX.IX PKISRVD.ROOTCA.VSAM.OST.DA PKISRVD.ROOTCA.VSAM.OST.IX PKISRVD.ROOTCA.VSAM.OST.PATH PKISRVD.ROOTCA.VSAM.OST.REQAIX PKISRVD.ROOTCA.VSAM.OST.REQAIX.DA PKISRVD.ROOTCA.VSAM.OST.REQAIX.IX PKISRVD.ROOTCA.VSAM.OST.REQUESTR PKISRVD.ROOTCA.VSAM.OST.STATAIX PKISRVD.ROOTCA.VSAM.OST.STATAIX.DA PKISRVD.ROOTCA.VSAM.OST.STATAIX.IX PKISRVD.ROOTCA.VSAM.OST.STATUS
6 z/OS PKI Services: Quick Set-up for Multiple CAs

Defining the ROOTCA VSAM data setsCopy member SYS1.SAMPLIB(IKYCVSAM) into your set up data set. Change the volume and the data set names. In our system, we change ‘vvvvvv’ to BH6ST5, and qualify the VSAM data set names with ROOTCA, as shown in Figure 2-1 on page 6.
The job features several steps that include the following commands:
� DELCLUST: Deletes clusters, paths, and alternative indexes, as shown in Figure 2-2.
Figure 2-2 Step DELCLUST output
DELETE - PKISRVD.ROOTCA.VSAM.OST - CLUSTER - PURGE - ERASE IDC3012I ENTRY PKISRVD.ROOTCA.VSAM.OST NOT FOUND IDC3009I ** VSAM CATALOG RETURN CODE IS 8 - REASON CODE IS IGG0CLA3-42 IDC0551I ** ENTRY PKISRVD.ROOTCA.VSAM.OST NOT DELETED IDC0001I FUNCTION COMPLETED, HIGHEST CONDITION CODE WAS 8 DELETE - PKISRVD.ROOTCA.VSAM.ICL - CLUSTER - PURGE - ERASE IDC3012I ENTRY PKISRVD.ROOTCA.VSAM.ICL NOT FOUND IDC3009I ** VSAM CATALOG RETURN CODE IS 8 - REASON CODE IS IGG0CLA3-42 IDC0551I ** ENTRY PKISRVD.ROOTCA.VSAM.ICL NOT DELETED IDC0001I FUNCTION COMPLETED, HIGHEST CONDITION CODE WAS 8 IF MAXCC LT 9 THEN SET MAXCC = 0
Chapter 2. Setting up the Root CA environment 7

� DEFKSDS: Defines two VSAM clusters, as shown in Figure 2-3.
Figure 2-3 Step DEFKSDS output
IDCAMS SYSTEM SERVICES DEFINE CLUSTER - (NAME(PKISRVD.ROOTCA.VSAM.OST) - VOL(BH6ST5) - RECSZ(1024 32756) - INDEXED - NOREUSE - KEYS(4 0) - SHR(2) - CYL(3,1) - LOG(NONE) - OWNER(PKISRVD) ) - DATA - (NAME(PKISRVD.ROOTCA.VSAM.OST.DA) - CISZ(4096) - SPANNED) - INDEX - (NAME(PKISRVD.ROOTCA.VSAM.OST.IX)) IDC0508I DATA ALLOCATION STATUS FOR VOLUME BH6ST5 IS 0 IDC0509I INDEX ALLOCATION STATUS FOR VOLUME BH6ST5 IS 0 IDC0001I FUNCTION COMPLETED, HIGHEST CONDITION CODE WAS 0
DEFINE CLUSTER - (NAME(PKISRVD.ROOTCA.VSAM.ICL) - VOL(BH6ST5) - RECSZ(1024 32756) - INDEXED - NOREUSE - KEYS(4 0) - SHR(2) - CYL(3,1) - LOG(NONE) - OWNER(PKISRVD) ) - DATA - (NAME(PKISRVD.ROOTCA.VSAM.ICL.DA) - CISZ(4096) - SPANNED) - INDEX - (NAME(PKISRVD.ROOTCA.VSAM.ICL.IX)) IDC0508I DATA ALLOCATION STATUS FOR VOLUME BH6ST5 IS 0 IDC0509I INDEX ALLOCATION STATUS FOR VOLUME BH6ST5 IS 0 IDC0001I FUNCTION COMPLETED, HIGHEST CONDITION CODE WAS 0 IDCAMS SYSTEM SERVICES IDC0002I IDCAMS PROCESSING COMPLETE. MAXIMUM CONDITION CODE WAS 0
8 z/OS PKI Services: Quick Set-up for Multiple CAs

� MKZEROS: Uses IEBGENER to write a record of all binary zeros to a temporary file, as shown in Figure 2-4.
Figure 2-4 Step MKZEROS output
� REPROKSD: Writes the temporary file into both VSAM dat sets, as shown in Figure 2-5.
Figure 2-5 Step REPROKSD output
DATA SET UTILITY - GENERATE GENERATE MAXFLDS=4,MAXLITS=80 RECORD FIELD=(20,X'0000000000000000000000000000000000000000',,1), FIELD=(20,X'0000000000000000000000000000000000000000',,21), FIELD=(20,X'0000000000000000000000000000000000000000',,41), FIELD=(20,X'0000000000000000000000000000000000000000',,61) PROCESSING ENDED AT EOD
IDCAMS SYSTEM SERVICES REPRO INFILE(SYSDATA) - OUTDATASET(PKISRVD.ROOTCA.VSAM.OST) IDC0005I NUMBER OF RECORDS PROCESSED WAS 1 IDC0001I FUNCTION COMPLETED, HIGHEST CONDITION CODE WAS 0 REPRO INFILE(SYSDATA) - OUTDATASET(PKISRVD.ROOTCA.VSAM.ICL) IDC0005I NUMBER OF RECORDS PROCESSED WAS 1 IDC0001I FUNCTION COMPLETED, HIGHEST CONDITION CODE WAS 0 IDC0002I IDCAMS PROCESSING COMPLETE. MAXIMUM CONDITION CODE WAS 0
Chapter 2. Setting up the Root CA environment 9

� DEFALTDX: Defines ALTERNATE INDEX and PATH, as shown in Figure 2-6 and Figure 2-7 on page 11.
Figure 2-6 Step DEFALTDX output
IDCAMS SYSTEM SERVICES DEFINE ALTERNATEINDEX - (NAME(PKISRVD.ROOTCA.VSAM.OST.AIX) - RELATE(PKISRVD.ROOTCA.VSAM.OST)- VOL(BH6ST5) - TRK(5,1) - KEYS(24 44) ) - DATA - (NAME(PKISRVD.ROOTCA.VSAM.OST.AIX.DA)) - INDEX - (NAME(PKISRVD.ROOTCA.VSAM.OST.AIX.IX)) IDC0508I DATA ALLOCATION STATUS FOR VOLUME BH6ST5 IS 0 IDC0509I INDEX ALLOCATION STATUS FOR VOLUME BH6ST5 IS 0 IDC0001I FUNCTION COMPLETED, HIGHEST CONDITION CODE WAS 0 DEFINE PATH - (NAME(PKISRVD.ROOTCA.VSAM.OST.PATH) - PATHENTRY(PKISRVD.ROOTCA.VSAM.OST.AIX)) IDC0001I FUNCTION COMPLETED, HIGHEST CONDITION CODE WAS 0 DEFINE ALTERNATEINDEX - (NAME(PKISRVD.ROOTCA.VSAM.OST.STATAIX) - RELATE(PKISRVD.ROOTCA.VSAM.OST)- VOL(BH6ST5) - TRK(5,1) - KEYS(40 4) ) - DATA - (NAME(PKISRVD.ROOTCA.VSAM.OST.STATAIX.DA)) - INDEX - (NAME(PKISRVD.ROOTCA.VSAM.OST.STATAIX.IX)) IDC0508I DATA ALLOCATION STATUS FOR VOLUME BH6ST5 IS 0 IDC0509I INDEX ALLOCATION STATUS FOR VOLUME BH6ST5 IS 0 IDC0001I FUNCTION COMPLETED, HIGHEST CONDITION CODE WAS 0 DEFINE PATH - (NAME(PKISRVD.ROOTCA.VSAM.OST.STATUS) - PATHENTRY(PKISRVD.ROOTCA.VSAM.OST.STATAIX)) IDC0001I FUNCTION COMPLETED, HIGHEST CONDITION CODE WAS 0
10 z/OS PKI Services: Quick Set-up for Multiple CAs

Figure 2-7 Step DEFALTDX output (continued)
DEFINE ALTERNATEINDEX - (NAME(PKISRVD.ROOTCA.VSAM.ICL.STATAIX) - RELATE(PKISRVD.ROOTCA.VSAM.ICL)- VOL(BH6ST5) - TRK(5,1) - KEYS(40 4) ) - DATA - (NAME(PKISRVD.ROOTCA.VSAM.ICL.STATAIX.DA)) - INDEX - (NAME(PKISRVD.ROOTCA.VSAM.ICL.STATAIX.IX)) IDC0508I DATA ALLOCATION STATUS FOR VOLUME BH6ST5 IS 0 IDC0509I INDEX ALLOCATION STATUS FOR VOLUME BH6ST5 IS 0 IDC0001I FUNCTION COMPLETED, HIGHEST CONDITION CODE WAS 0 DEFINE PATH - (NAME(PKISRVD.ROOTCA.VSAM.ICL.STATUS) - PATHENTRY(PKISRVD.ROOTCA.VSAM.ICL.STATAIX)) IDC0001I FUNCTION COMPLETED, HIGHEST CONDITION CODE WAS 0 DEFINE ALTERNATEINDEX - (NAME(PKISRVD.ROOTCA.VSAM.OST.REQAIX) - RELATE(PKISRVD.ROOTCA.VSAM.OST)- VOL(BH6ST5) - TRK(5,1) - KEYS(32 12) ) - DATA - (NAME(PKISRVD.ROOTCA.VSAM.OST.REQAIX.DA)) - INDEX - (NAME(PKISRVD.ROOTCA.VSAM.OST.REQAIX.IX)) IDC0508I DATA ALLOCATION STATUS FOR VOLUME BH6ST5 IS 0 IDC0509I INDEX ALLOCATION STATUS FOR VOLUME BH6ST5 IS 0 IDC0001I FUNCTION COMPLETED, HIGHEST CONDITION CODE WAS 0 DEFINE PATH - (NAME(PKISRVD.ROOTCA.VSAM.OST.REQUESTR) - PATHENTRY(PKISRVD.ROOTCA.VSAM.OST.REQAIX)) IDC0001I FUNCTION COMPLETED, HIGHEST CONDITION CODE WAS 0 DEFINE ALTERNATEINDEX - IDCAMS SYSTEM SERVICES (NAME(PKISRVD.ROOTCA.VSAM.ICL.REQAIX) - RELATE(PKISRVD.ROOTCA.VSAM.ICL)- VOL(BH6ST5) - TRK(5,1) - KEYS(32 12) ) - DATA - (NAME(PKISRVD.ROOTCA.VSAM.ICL.REQAIX.DA)) - INDEX - (NAME(PKISRVD.ROOTCA.VSAM.ICL.REQAIX.IX)) IDC0508I DATA ALLOCATION STATUS FOR VOLUME BH6ST5 IS 0 IDC0509I INDEX ALLOCATION STATUS FOR VOLUME BH6ST5 IS 0 IDC0001I FUNCTION COMPLETED, HIGHEST CONDITION CODE WAS 0 DEFINE PATH - (NAME(PKISRVD.ROOTCA.VSAM.ICL.REQUESTR) - PATHENTRY(PKISRVD.ROOTCA.VSAM.ICL.REQAIX)) IDC0001I FUNCTION COMPLETED, HIGHEST CONDITION CODE WAS 0
Chapter 2. Setting up the Root CA environment 11

� BLDINDEX: Builds the alternative indexes, as shown in Figure 2-8.
Figure 2-8 Step BLDINDEX output
� PRTCLUST: Prints the VSAM data set record, as shown in Figure 2-9.
Figure 2-9 Step PRTCLUST output
BLDINDEX INDATASET(PKISRVD.ROOTCA.VSAM.OST) - OUTDATASET(PKISRVD.ROOTCA.VSAM.OST.AIX) IDC0652I PKISRVD.ROOTCA.VSAM.OST.AIX SUCCESSFULLY BUILT IDC0001I FUNCTION COMPLETED, HIGHEST CONDITION CODE WAS 0 BLDINDEX INDATASET(PKISRVD.ROOTCA.VSAM.OST) - OUTDATASET(PKISRVD.ROOTCA.VSAM.OST.STATAIX) IDC0652I PKISRVD.ROOTCA.VSAM.OST.STATAIX SUCCESSFULLY BUILT IDC0001I FUNCTION COMPLETED, HIGHEST CONDITION CODE WAS 0 BLDINDEX INDATASET(PKISRVD.ROOTCA.VSAM.ICL) - OUTDATASET(PKISRVD.ROOTCA.VSAM.ICL.STATAIX) IDC0652I PKISRVD.ROOTCA.VSAM.ICL.STATAIX SUCCESSFULLY BUILT IDC0001I FUNCTION COMPLETED, HIGHEST CONDITION CODE WAS 0 BLDINDEX INDATASET(PKISRVD.ROOTCA.VSAM.OST) - OUTDATASET(PKISRVD.ROOTCA.VSAM.OST.REQAIX) IDC0652I PKISRVD.ROOTCA.VSAM.OST.REQAIX SUCCESSFULLY BUILT IDC0001I FUNCTION COMPLETED, HIGHEST CONDITION CODE WAS 0 BLDINDEX INDATASET(PKISRVD.ROOTCA.VSAM.ICL) - OUTDATASET(PKISRVD.ROOTCA.VSAM.ICL.REQAIX) IDC0652I PKISRVD.ROOTCA.VSAM.ICL.REQAIX SUCCESSFULLY BUILT IDC0001I FUNCTION COMPLETED, HIGHEST CONDITION CODE WAS 0
PRINT - INDATASET(PKISRVD.ROOTCA.VSAM.OST) CHAR IDCAMS SYSTEM SERVICES LISTING OF DATA SET -PKISRVD.ROOTCA.VSAM.OST KEY OF RECORD - .... ..................................................................IDC0005I NUMBER OF RECORDS PROCESSED WAS 1 IDC0001I FUNCTION COMPLETED, HIGHEST CONDITION CODE WAS 0 IDCAMS SYSTEM SERVICES PRINT - INDATASET(PKISRVD.ROOTCA.VSAM.ICL) CHAR IDCAMS SYSTEM SERVICES LISTING OF DATA SET -PKISRVD.ROOTCA.VSAM.ICL KEY OF RECORD - .... ..................................................................IDC0005I NUMBER OF RECORDS PROCESSED WAS 1 IDC0001I FUNCTION COMPLETED, HIGHEST CONDITION CODE WAS 0 IDCAMS SYSTEM SERVICES IDC0002I IDCAMS PROCESSING COMPLETE. MAXIMUM CONDITION CODE WAS 0
12 z/OS PKI Services: Quick Set-up for Multiple CAs

The captions in the step list show the SYSPRINT output from IKYCVSAM job. The VSAM object store and ICL set up is completed for ROOTCA.
2.1.2 Installing the HTTP Server - Powered by Apache
Installation processComplete the following steps to set up the HTTP server in the environment:
1. Change the directory to /etc.
2. Create a directory that is named websrv1.
3. Change the permissions for the websrv1 directory.
4. Change the directory to /usr/lpp/ihsa_zos/bin.
5. Install the HTTP server into wersrv1 directory by using port 80.
6. It is possible that you created websrv1 with your ID, which makes you the owner. Change the owner of webrsrv1 conf and logs directories and their contents to websrv. The websrv user was set up as a user on our system.
Example 2-1 Display home directory of user websrv
tso lu websrv noracf omvs
USER=WEBSRV
OMVS INFORMATION ---------------- UID= 0000000345 HOME= /etc/websrv1 PROGRAM= /bin/sh CPUTIMEMAX= NONE ASSIZEMAX= NONE FILEPROCMAX= NONE PROCUSERMAX= NONE THREADSMAX= NONE MMAPAREAMAX= NONE ***
Note: For more information, see the “Installing and configuring IBM HTTP Server on the z/OS V2R2 system” section of Chapter 2 in IBM HTTP Server - Powered by Apache SC27-8417.
Note: The websrv user ID should exist. Define this user if it was not yet created. Ensure that the home directory of websrv points to /etc/websrv1, as shown in Example 2-1.
Chapter 2. Setting up the Root CA environment 13

The commands that are used in the installation process are shown in Figure 2-10.
Figure 2-10 Commands to install the HTTP server into websrv1 directory
VerificationRun the verification commands that are shown in Figure 2-11 to confirm that the installation was successful.
Figure 2-11 Verifying the installation
The base installation into websrv1 is now complete.
2.1.3 Using the set up script to create certificates and key rings
In this section, we describe using the set up script to create certificates and key rings for the PKI instance and web server and set up authorization in RACF.
The IKYSETUP REXX procedure creates the certificate, private key, and keyring that are needed for the ROOTCA certificate authority.
IKYSETUP functionsThe IKYSETUP REXX performs the following steps:
1. Creates users and groups. 2. Allows administrators to access PKI VSAM databases.3. Creates the CA certificate.
cd /etc
mkdir websrv1
chmod 770 websrv1
cd /usr/lpp/ihsa_zos/bin
install_ihs /etc/websrv1 80KWRES01:/usr/lpp/ihsa_zos/bin: >install_ihs /etc/websrv1 80 Copying install directory and creating symlinks... Updating install paths... cmd: /usr/lpp/ihsa_zos/bin/postinst -i /etc/websrv1 -t install -v PORT=80 -v SERVERNAME=WTSC76.ITSO.IBM.COM
cd /etc/websrv1
chown -R websrv conf
chown -R websrv logs
KWRES01:/SYSTEM/etc/websrv1/bin: >apachectl -v Server version: IBM_HTTP_Server/9.0.0.0-PI54808 (Unix) Server built: Jan 20 2016 17:19:40 KWRES01:/SYSTEM/etc/websrv1/bin: >apachectl configtest Syntax OK
14 z/OS PKI Services: Quick Set-up for Multiple CAs

4. Backs up the CA certificate.5. Marks the CA certificate as HIGHTRUST. 6. Saves the CA certificate to a data set.7. Creates the RA certificate.8. Backs up RA certificate.9. Creates the PKI Services keyring.10.Creates the Web server SSL certificate and keyring. 11.Saves the web server’s root CA certificate to a data set for OPUT.12.Gives PKISRVD access to BPX.SERVER. 13.Allows the PKI Services daemon to act as a CA.14.Allows the Web server to access its keyring. 15.Allows the Web server to switch identity to PKISERV.16.Allows the PKI Services daemon to use ICSF. 17.Creates the STARTED class profile for the daemon.18.Allows PKISERV to request certificate functions. 19.Creates the profile to protect PKI Admin functions.
Copy the SYS1.SAMPLIB(IKYSETUP) member into the SETUP data set. Modify the REXX procedure to reflect our environment.
Set up the Distinguished Name (DN) of our certificate authority that is defined in Figure 2-12 on page 16. The suffix of this DN must match the suffix that is set up for the LDAP directory (suffix value from the ds.profile file set up in step 2 of “Setting up the LDAP server” on page 31).
Chapter 2. Setting up the Root CA environment 15

The first area to change in the IKYSETUP REXX relates to the CA content. Figure 2-12 shows the REXX procedures before and after the changes. Our changes are marked in bold.
Figure 2-12 CA content changes to IKYSETUP
Before the changesca_domain = "" /* @L4A*/ if LENGTH(ca_domain) > 8 then /* @L4A*/ ca_domain_trunc = LEFT(ca_domain,8) /* @L4A*/else /* @L4A*/ ca_domain_trunc = ca_domain /* @L4A*/ OrgUnit = STRIP(ca_domain "Human Resources Certificate Authority") /* @L4A*/ca_dn= "OU('"||OrgUnit||"')", "O('Your Company')", "C('Your Country 2 Letter Abbreviation')" /* @L4C*/ ca_label = STRIP(ca_domain "Local PKI CA") /* Label for CA certificate with the CA Domain name
After the changesca_domain = "ROOTCA" /* @L4A*/ if LENGTH(ca_domain) > 8 then /* @L4A*/ ca_domain_trunc = LEFT(ca_domain,8) /* @L4A*/else /* @L4A*/ ca_domain_trunc = ca_domain /* @L4A*/ OrgUnit = STRIP(ca_domain "IBM PKI RedBooks") /* @L4A*/ca_dn= "OU('"||OrgUnit||"')", "O('IBM')", "C('US')" /* @L4C*/ ca_label = STRIP(ca_domain "ROOTCA PKI CA") /* Label for CA certificate with the CA Domain name
16 z/OS PKI Services: Quick Set-up for Multiple CAs

The next change refers to the Registration Authority (RA). Figure 2-13 shows the before and after values.
Figure 2-13 RA changes
The Web server DN was also changed. The before and after values are shown in Figure 2-14.
Figure 2-14 Web dn changes
The sample web server protection directives that are supplied by PKI use SSLring for the web server’s SAF key ring. The value that is shown in Figure 2-15 is not changed. If the value is changed, the KeyFile directive in the samples/vhost443.conf and samples/vhost1443.conf files must be modified when the web server is configured.
Figure 2-15 SSLring for web server’s SAF keyring
Running the IKYSETUP REXX procedureBefore the IKYSETUP REXX procedure is run, the REXX procedure is reviewed to confirm that it performed as expected by using the RUN(NO) option. By using this option, we can see which commands and values are generated without running the commands. Enter the following command:
EX 'PKI.QUICK.SETUP(IKYSETUP)' 'RUN(NO)'
The IKYSETUP REXX writes to a log data set KWRES01.ROOTCA.IKYSETUP.LOG. Examine the contents to ensure that the generated commands are satisfactory. Enter the following command to run the REXX procedure:
EX 'PKI.QUICK.SETUP(IKYSETUP)' 'RUN(YES)'
Before the changesra_label = STRIP(ca_domain "Local PKI RA") /*Label for RA Certificate @01C*/After the changesra_label = STRIP(ca_domain “PKI RA") /*Label for RA Certificate @01C*/
Before the changesweb_dn=, "CN('www.YourCompany.com')", "O('Your Company')", "L('Your City')", "SP('Your Full State or Province Name')", "C('Your Country 2 Letter Abbreviation')"
After the changesweb_dn=, "CN('wtsc76.itso.ibm.com')", "O('IBM')", "L('Poughkeepsie')", "SP('New York')", "C('US')"
web_ring = "SSLring" /* SAF keyring for web server */
Chapter 2. Setting up the Root CA environment 17

During execution (with the NO or YES value set), IKYSETUP displays the prompt that is shown in Figure 2-16. A memorable passphrase is required, which is needed if the key must be restored. Enter the passphrase, press Enter, and the processing continues.
Figure 2-16 IKYSETUP REXX passphrase prompt
The KWRES01.ROOTCA.IKYSETUP.LOG data set shows all of the generated RACF commands and their results. Near the end of the data set, a section is included that provides information that is needed for the PKI Services UNIX set up, as shown in Figure 2-17 on page 19. This information is used to customize the PKI Services UNIX files. The line that is indicated in bold requires an action.
Creating the CA certificate ... RACDCERT GENCERT CERTAUTH SUBJECTSDN(OU('ROOTCA IBM PKI RedBooks') O('IBM') C('US')) WITHLABEL('ROOTCA PKI CA') NOTAFTER(DATE(2036/08/15)) SIZE(2048) Enter a passphrase to protect the key. You will need this value later if you need to restore the key. Attention, the value will be displayed in the screen:
18 z/OS PKI Services: Quick Set-up for Multiple CAs

Figure 2-17 UNIX configuration information
------------------------------------------------- Information needed for PKI Services UNIX set up: ------------------------------------------------- The daemon user ID is: PKISRVD The VSAM high-level qualifier is: PKISRVD This is needed for the [ObjectStore] section in pkiserv.conf The PKI Services' DER encoded certificate is in data set: 'PKISRVD.ROOTCA.CACERT.DERBIN' The webserver's DER encoded root CA certificate is in data set: 'PKISRVD.ROOTCA.WEBROOT.DERBIN' This must be OPUT to /var/pkiserv/cacert.der with the BINARY option The fully qualified PKI Services' SAF keyring is: PKISRVD/CAring.ROOTCA This is needed for the [SAF] section in pkiserv.conf The label of the PKI Services' RA certificate is: ROOTCA PKI RA This is needed for the [SAF] section in pkiserv.conf The PKI Services CA DN is: OU=ROOTCA IBM PKI RedBooks,O=IBM,C=US The suffix must match the LDAP suffix in slapd.conf The PKI Services RA DN is: CN=Registration Authority,OU=ROOTCA IBM PKI RedBooks,O=IBM,C=US The suffix must match the LDAP suffix in slapd.conf The recommended location for the pkiserv.conf and pkiserv.tmpl is: /etc/pkiserv/ROOTCA Set the following environment variables in pkiserv.envars: _PKISERV_CA_DOMAIN=ROOTCA _PKISERV_CONFIG_PATH=/etc/pkiserv/ROOTCA Set the following environment variable in your virtual host files: _PKISERV_CONFIG_PATH_ROOTCA =/etc/pkiserv/ROOTCA The webserver's SAF keyring is: SSLring This is needed for the KeyFile directive in virtual host files The Webserver's DN is: CN=wtsc76.itso.ibm.com,O=IBM,L=Poughkeepsie,ST=New York,C=US The left most RDN must be the webserver's fully qualified domain name
Chapter 2. Setting up the Root CA environment 19

The ROOTCA certificate is saved in the PKISRVD.ROOTCA.WEBROOT.DERBIN data set. The certificate is copied into the UNIX file directory /var/pkiserv for the web page user to download the CA certificate.
OPUT or the following command can be used:
cp “//’PKISRVD.ROOTCA.WEBROOT.DERBIN' " /var/pkiserv/cacert.der
Configuring the PKI Services UNIX aspectsThe sample files are under the sample directory where PKI Services is installed. In our system, the directory is /usr/lpp/pkiserv/samples. Each file’s role is listed in Table 2-1.
Table 2-1 UNIX PKI Services sample files
The form data sets must be configured only if you intend to use them.
2.1.4 Configuring the PKI Services UNIX files
This section describes copying and customizing the supplied UNIX PKI Services files into a directory for our rootca.
Copying the sample filesCreate a UNIX rootca directory by issuing the following command:
mkdir /etc/pkiserv/rootca
Note: The /var/pkiserv directory is specified in the HTTP server configuration.
Data set Description
pkiserv.conf The configuration file that contains various settings and values.
pkiserv.envars The environmental variables file.
pkiserv.tmpl The certificate templates file that is used with REXX CGI executable files. Itcontains HTML-style code that builds the web pages that are underlying certificate requests.
expiringmsg.form The form for an email that is sent to a user when a certificate is going to expire.
pendingmsg.form The form for an email that is sent to an administrator when requests are pending approval.
pendingmsg2.form The form is your company sends an email notification to an administrator about requests that are approved with modifications.
readymsg.form The form for an email that is sent to a user when the PKI Services administrator approves a certificate request and the certificate is ready for retrieval.
rejectmsg.form The form for an email that is sent to a user when the PKI Servicesadministrator rejects a certificate request.
renewcertmsg.form The form for an email that is sent to a user when PKI Services automatically renews an expiring certificate.
recoverymsg.form The form for an email that is sent to a user who requested that PKI Services recover a certificate for which PKI Services generated the key pair.
20 z/OS PKI Services: Quick Set-up for Multiple CAs

Copy the supplied PKI Services data sets by issuing the following commands:
� cp -p /usr/lpp/pkiserv/samples/pkiserv.conf /etc/pkiserv/rootca� cp -p /usr/lpp/pkiserv/samples/pkiserv.tmpl /etc/pkiserv/rootca� cp -p /usr/lpp/pkiserv/samples/pkiserv.envars /etc/pkiserv/rootca� cp -p /usr/lpp/pkiserv/samples/*.form /etc/pkiserv/rootca
Customizing pkiserv.confChange the directory to the rootca and open the data set for edit by issuing the following command:
cd /etc/pkiserv/rootca
edit pkiserv.conf
Customize the VSAM data set names to those names that were defined with job IKYCVSAM by issuing the following command:
C VSAM ROOTCA.VSAM all
The update is shown in Figure 2-18.
Figure 2-18 Updated pkiserv.conf VSAM specification
# Data set name of the VSAM request (object store) base CLUSTER # ObjectDSN='pkisrvd.ROOTCA.VSAM.ost' # Data set name of the VSAM object store PATH for the transaction ID # (TID) alternate index. # ObjectTidDSN='pkisrvd.ROOTCA.VSAM.ost.path' # Data set name of the VSAM object store PATH for the status alternate # index # ObjectStatusDSN='pkisrvd.ROOTCA.VSAM.ost.status' # Data set name of the VSAM object store PATH for the requestor # alternate index # ObjectRequestorDSN='pkisrvd.ROOTCA.VSAM.ost.requestr' # Data set name of the VSAM issued certificate list (ICL) base CLUSTER # ICLDSN='pkisrvd.ROOTCA.VSAM.icl' # Data set name of the VSAM ICL PATH for the status alternate index # ICLStatusDSN='pkisrvd.ROOTCA.VSAM.icl.status' # Data set name of the VSAM ICL PATH for the requestor alternate index # ICLRequestorDSN='pkisrvd.ROOTCA.VSAM.icl.requestr'
Chapter 2. Setting up the Root CA environment 21

Change the location of where the messages (the .form data sets that were copied) are to be found by issuing the following command:
C /etc/pkiserv/ /etc/pkiserv/rootca all
The results are shown in Figure 2-19.
Figure 2-19 Changed message locations
The CA Keyring, CA Token, and RA label were changed by issuing the following commands:
c CAring CAring.ROOTCA
c pkisrvd.PKIToken pkisrvd.rootca.PKIToken
c 'Local PKI RA' 'ROOTCA PKI RA'
The updates are shown in Figure 2-20 on page 23.
# full pathname or data set name containing the 'your certificate is # ready to be retrieved' message form. Defaults to no message issued ReadyMessageForm=/etc/pkiserv/rootca/readymsg.form # full pathname or data set name containing the 'your certificate # request has been rejected' message form. Defaults to no message issued RejectMessageForm=/etc/pkiserv/rootca/rejectmsg.form # full pathname or data set name containing the 'your certificate is # about to expire' message form. Defaults to no message issued ExpiringMessageForm=/etc/pkiserv/rootca/expiringmsg.form # full pathname or data set name containing the request(s) pending for # approval message form. Defaults to no notification sent. AdminNotifyForm=/etc/pkiserv/rootca/pendingmsg.form # full pathname or data set name containing the request(s) approved # with modifications message form. Defaults to no notification sent. AdminNotifyModForm=/etc/pkiserv/rootca/pendingmsg2.form
# full pathname or data set name containing the renewed certificate # message form for automatic certificate renewal. # If absent, automatic certificate renewal is disabled. RenewCertForm=/etc/pkiserv/rootca/renewcertmsg.form # full pathname or data set name containing information on # the list of certificates that match the criteria specified # to recover key generated certificates. # If absent, recovery query results will not be sent. RecoverForm=/etc/pkiserv/rootca/recoverymsg.form
22 z/OS PKI Services: Quick Set-up for Multiple CAs
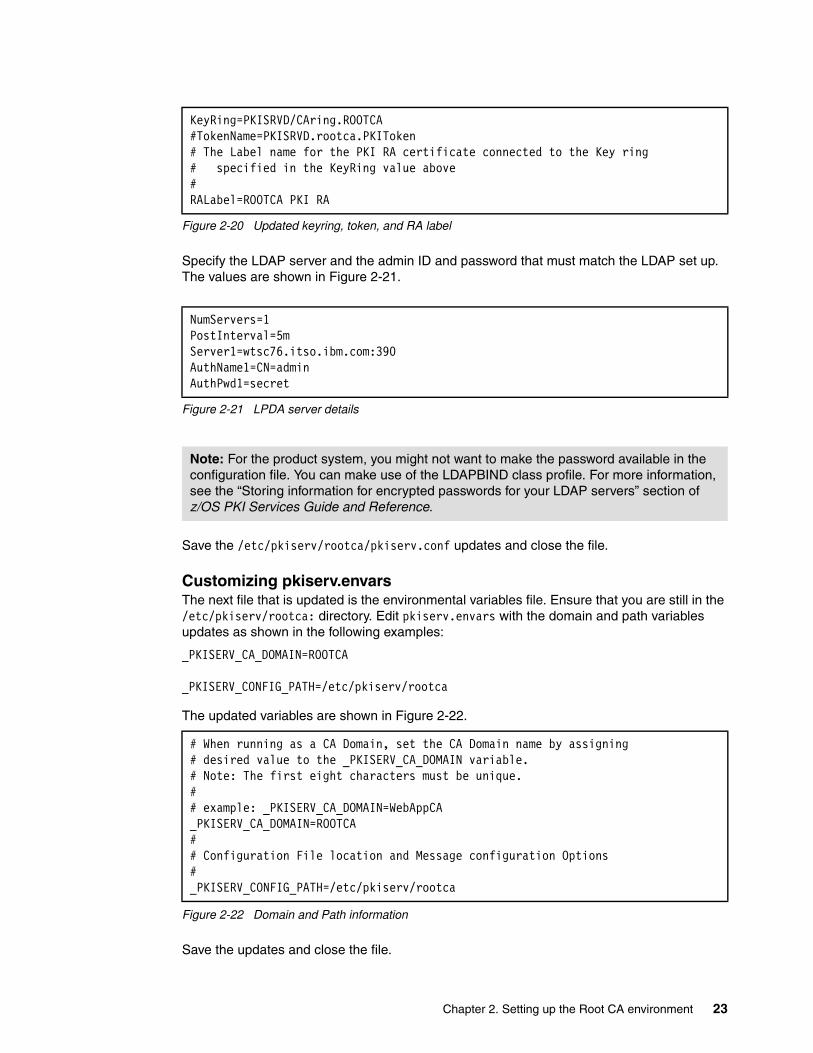
Figure 2-20 Updated keyring, token, and RA label
Specify the LDAP server and the admin ID and password that must match the LDAP set up. The values are shown in Figure 2-21.
Figure 2-21 LPDA server details
Save the /etc/pkiserv/rootca/pkiserv.conf updates and close the file.
Customizing pkiserv.envarsThe next file that is updated is the environmental variables file. Ensure that you are still in the /etc/pkiserv/rootca: directory. Edit pkiserv.envars with the domain and path variables updates as shown in the following examples:
_PKISERV_CA_DOMAIN=ROOTCA
_PKISERV_CONFIG_PATH=/etc/pkiserv/rootca
The updated variables are shown in Figure 2-22.
Figure 2-22 Domain and Path information
Save the updates and close the file.
KeyRing=PKISRVD/CAring.ROOTCA #TokenName=PKISRVD.rootca.PKIToken # The Label name for the PKI RA certificate connected to the Key ring # specified in the KeyRing value above # RALabel=ROOTCA PKI RA
NumServers=1 PostInterval=5m Server1=wtsc76.itso.ibm.com:390 AuthName1=CN=admin AuthPwd1=secret
Note: For the product system, you might not want to make the password available in the configuration file. You can make use of the LDAPBIND class profile. For more information, see the “Storing information for encrypted passwords for your LDAP servers” section of z/OS PKI Services Guide and Reference.
# When running as a CA Domain, set the CA Domain name by assigning# desired value to the _PKISERV_CA_DOMAIN variable. # Note: The first eight characters must be unique. # # example: _PKISERV_CA_DOMAIN=WebAppCA _PKISERV_CA_DOMAIN=ROOTCA # # Configuration File location and Message configuration Options # _PKISERV_CONFIG_PATH=/etc/pkiserv/rootca
Chapter 2. Setting up the Root CA environment 23

Customizing pkiserv.tmplEdit the sample pkiserv.tmpl file and make the following changes:
� <APPLICATION NAME=PKISERV>
is changed to
<APPLICATION NAME=ADMROOTCA>
� <FORM name=admform METHOD=GET ACTION="/PKIServ/ssl-cgi/auth/admmain.rexx ">
is changed to
<FORM name=admform METHOD=GET ACTION="/Rootca/ssl-cgi/auth/admmain.rexx ">
� <APPLICATION NAME=CUSTOMERS>
is changed to
<APPLICATION NAME=ROOTCA>
Then, change all occurrences of “Customers” to “Rootca”.
Review the pkiserv.tmpl file to learn more about the web application.
Customizing notification formsAll of the form files must be updated next to customize the messages. Use the following list command to identify the form files to be changed.
ls *.form
The response to the command is shown in Figure 2-23.
Figure 2-23 List of .form files
Edit all the *.form files to customize the domain information. Figure 2-24 on page 25 shows the updated expiringmsg.form with the updated values. The other forms should be similar. Use the following commands to customize the domain information:
c dime-o-cert 'IBM RB ROOTCA' all
c www.dimeocert.com wtsc76.itso.ibm.com all
c Customers Rootca
KWRES01:/SYSTEM/etc/pkiserv/rootca: >ls *.form expiringmsg.form pendingmsg2.form recoverymsg.form renewcertmsg.form pendingmsg.form readymsg.form rejectmsg.form
24 z/OS PKI Services: Quick Set-up for Multiple CAs

Figure 2-24 Updated expiration message
The web pages and web application are now updated to identify it as the ROOTCA application.
2.1.5 Customizing PKISERVD started task
The started task JCL was updated to reflect the rootca environment by completing the following tasks:
1. Copy the start procedure from SYS1.IBM.PROCLIB(PKISERVD) to SYS1.PROCLIB(PKISERVD).
2. Edit DIR='/etc/pkiserv/rootca'.
From:IBM RB ROOTCA PKI Subject:Certificate Expiration Attention - Please do not reply to this message as it was automatically sent by a service machine. Dear %%requestor%%, Thank you for choosing IBM RB ROOTCA PKI. The certificate you requested forsubject %%dn%% expires at %%notafter%% local time. If you want to renew your certificate, please visit: http://www.dimeocert.com wtsc76.itso.ibm.com/Rootca/public-cgi/camain.rexxIf this is a browser certificate, you must use the same workstation and browser that you used when you requested the original certificate. If this is a servercertificate, you will have to submit a PKCS#10 certificate request.
Chapter 2. Setting up the Root CA environment 25

The updated procedure is shown in Figure 2-25.
Figure 2-25 PKI Services Daemon started task JCL
2.1.6 Configuring the HTTP server for PKI services
This section describes how the HTTP Server - powered by Apache was configured for PKI services.
In section “Installing the HTTP Server - Powered by Apache” on page 13, the process that is used to install the http server is described. The following configuration files are updated to include the PKI Services. PKI Services provides sample virtual host files for non-SSL requests, SSL requests, and SSL requests with client authentication on different ports:
� httpd.conf: This file is the main HTTP server configuration file.
� Virtual host files:
– vhost80.conf: This file is virtual host file for non-SLL requests.
– vhost443.conf: This file is the virtual host file for SSL requests with server authenticating.
– vhost143.conf: This file is the virtual host file for SSL requests with client authentication.
//********************************************************************* //* * //* Licensed Materials - Property of IBM * //* 5650-ZOS * //* Copyright IBM Corp. 2001, 2013 * //* Status=HKY7790 * //* * //********************************************************************* //********************************************************************* //* * //* Procedure for starting the PKI Services Daemon * //* * //********************************************************************* //PKISERVD PROC REGSIZE=256M, X// OUTCLASS='A', X// TZ='EST5EDT', X// FN='pkiserv.envars', X// DIR='/etc/pkiserv/rootca', X// STDO='1>DD:STDOUT', X// STDE='2>DD:STDERR' //*-------------------------------------------------------------------- //GO EXEC PGM=IKYPKID,REGION=®SIZE,TIME=1440, // PARM=('ENVAR("_CEE_ENVFILE=&DIR/&FN","TZ=&TZ") / &STDO &STDE') //STDOUT DD SYSOUT=&OUTCLASS //STDERR DD SYSOUT=&OUTCLASS //SYSOUT DD SYSOUT=&OUTCLASS //CEEDUMP DD SYSOUT=&OUTCLASS
Note: For more information, see Chapter 7 of Cryptographic Services PKI Services Guide and Reference SA23-2286.
26 z/OS PKI Services: Quick Set-up for Multiple CAs

These files are used by the IP-based virtual hosting feature of the IBM HTTP Server. IP-based virtual hosting is a method to apply different directives that are based on the IP address and port on which a request is received.
Customizing httpd.conf, vhost80.conf, vhost443.conf, and vhost1443.conf files
The installation process put the httpd.conf file in /etc/websrv1/conf. The following commands were issued:
cd /etc/websrv1/conf
oedit httpd.conf
Updating httpd.confComplete the following steps:
1. Find and uncomment the four load modules as shown in Figure 2-26. Although shown together, they are in separate parts of the configuration file.
Figure 2-26 Four load modules to uncomment
2. Add the Addtype directives for PKI Services, as shown in Figure 2-27.
Figure 2-27 Addtype directives for PKI Services
3. Add include statements to point to the virtual host files, as shown in Figure 2-28.
Figure 2-28 include the virtual host files
Updating vhost filesCopy the vhost files into the /etc/websrv1/conf directory by issuing the following command:
cp /usr/lpp/pkiserv/samples/vhost*.conf /etc/websrv1/conf
LoadModule alias_module modules/mod_alias.so LoadModule rewrite_module modules/mod_rewrite.so LoadModule authnz_saf_module modules/mod_authnz_saf.so LoadModule ibm_ssl_module modules/mod_ibm_ssl.so
# # AddType allows you to add to or override the MIME configuration# file mime.types for specific file types. # #The following four types are for PKI Services AddType application/x-x509-user-cert .cer AddType application/x-x509-ca-cert .der AddType application/octet-stream .msi AddType application/pkix-crl .crl
Include conf/vhost80.conf Include conf/vhost443.conf Include conf/vhost1443.conf
Chapter 2. Setting up the Root CA environment 27

Add the following statements for each file as described in the figures’ caption:
� Change the <application-root> to the system installation directory. The directory is /usr/lpp/pkiserv in our system.
� SetEnv statements that are shown in Figure 2-29
� RewriteRule statements that are shown in Figure 2-30 and Figure 2-31 on page 29
� AliasMatch statements that are shown in Figure 2-33 on page 29
� ScriptAlias statements that are shown in Figure 2-34 on page 30
� LocationMatch statements that are shown in Figure 2-35 on page 30
Figure 2-29 SETENV statements for vhost80, vhost443, vhost1443
Figure 2-30 RewriteRule statements for vhost80
Note: If you are not using the default ports 80 and 443, you must include the port number in the URL.
Note: If your AliasMatch does not point to /var/pkiserv, you must add a corresponding DirectoryMatch section as with the section for /var/pkiserv.
Note: We are setting up for all the 3 PKI instances, including ROOOTCA, SUBCA1, and SUBCA2 (not the ROOTCA only).
SetEnv _PKISERV_CONFIG_PATH_ROOTCA "/etc/pkiserv/rootca" SetEnv _PKISERV_CONFIG_PATH_ADMROOTCA "/etc/pkiserv/rootca" SetEnv _PKISERV_CONFIG_PATH_SUBCA1 "/etc/pkiserv/subca1" SetEnv _PKISERV_CONFIG_PATH_ADMSUBCA1 "/etc/pkiserv/subca1" SetEnv _PKISERV_CONFIG_PATH_SUBCA2 "/etc/pkiserv/subca2" SetEnv _PKISERV_CONFIG_PATH_ADMSUBCA2 "/etc/pkiserv/subca2"
RewriteRule ^/(AdmRootca|Rootca)/ssl-cgi/(.*) https://wtsc76.itso.ibm.com/$1/ssl-cgi-bin/$2 [R,NE]RewriteRule ^/(AdmSubca1|Subca1)/ssl-cgi/(.*) https://wtsc76.itso.ibm.com/$1/ssl-cgi-bin/$2 [R,NE]RewriteRule ^/(AdmSubca2|Subca2)/ssl-cgi/(.*) https://wtsc76.itso.ibm.com/$1/ssl-cgi-bin/$2 [R,NE]RewriteRule ^/(AdmRootca|Rootca)/clientauth-cgi/(.*) https://wtsc76.itso.ibm.com:1443/$1/clientauth-cgi-bin/$2 [R,NE]RewriteRule ^/(AdmSubca1|Subca1)/clientauth-cgi/(.*) https://wtsc76.itso.ibm.com:1443/$1/clientauth-cgi-bin/$2 [R,NE]RewriteRule ^/(AdmSubca1|Subca2)/clientauth-cgi/(.*)https://wtsc76.itso.ibm.com:1443/$1/clientauth-cgi-bin/$2 [R,NE]
28 z/OS PKI Services: Quick Set-up for Multiple CAs

Figure 2-31 RewriteRule statements for vhost443
Figure 2-32 RewriteRule statements for vhost1443
vhost80The AliasMatch statements are for the CRL, as shown in Figure 2-33.
Figure 2-33 AliasMatch to be added to vhost80 only
RewriteRule ^/(AdmRootca|Rootca)/public-cgi/(.*) http://wtsc76.itso.ibm.com/$1/public-cgi/$2 [R,NE,L] RewriteRule ^/(AdmSubca1|Subca1)/public-cgi/(.*) http://wtsc76.itso.ibm.com/$1/public-cgi/$2 [R,NE,L] RewriteRule ^/(AdmSubca2|Subca2)/public-cgi/(.*) http://wtsc76.itso.ibm.com/$1/public-cgi/$2 [R,NE,L] RewriteRule ^/(AdmRootca|Rootca)/ssl-cgi/(.*)https://wtsc76.itso.ibm.com/$1/ssl-cgi-bin/$2 [R,NE]RewriteRule ^/(AdmSubca1|Subca1)/ssl-cgi/(.*)https://wtsc76.itso.ibm.com/$1/ssl-cgi-bin/$2 [R,NE]RewriteRule ^/(AdmSubca2|Subca2)/ssl-cgi/(.*)https://wtsc76.itso.ibm.com/$1/ssl-cgi-bin/$2 [R,NE]RewriteRule ^/(AdmRootca|Rootca)/clientauth-cgi/(.*)https://wtsc76.itso.ibm.com:1443/$1/clientauth-cgi-bin/$2 [R,NE,L]RewriteRule ^/(AdmSubca1|Subca1)/clientauth-cgi/(.*)https://wtsc76.itso.ibm.com:1443/$1/clientauth-cgi-bin/$2 [R,NE,L]RewriteRule ^/(AdmSubca1|Subca2)/clientauth-cgi/(.*)https://wtsc76.itso.ibm.com:1443/$1/clientauth-cgi-bin/$2 [R,NE,L]
RewriteRule ^/(AdmRootca|Rootca)/public-cgi/(.*) http://wtsc76.itso.ibm.com/$1/public-cgi/$2 [R,NE,L]RewriteRule ^/(AdmSubca1|Subca1)/public-cgi/(.*) http://wtsc76.itso.ibm.com/$1/public-cgi/$2 [R,NE,L]RewriteRule ^/(AdmSubca2|Subca2)/public-cgi/(.*) http://wtsc76.itso.ibm.com/$1/public-cgi/$2 [R,NE,L]RewriteRule ^/(AdmRootca|Rootca)/ssl-cgi/(.*) https://wtsc76.itso.ibm.com/$1/ssl-cgi-bin/$2 [R,NE,L]RewriteRule ^/(AdmSubca1|Subca1)/ssl-cgi/(.*) https://wtsc76.itso.ibm.com/$1/ssl-cgi-bin/$2 [R,NE,L]RewriteRule ^/(AdmSubca2|Subca2)/ssl-cgi/(.*) https://wtsc76.itso.ibm.com/$1/ssl-cgi-bin/$2 [R,NE,L]
AliasMatch /rootca/crls/(.*) /var/pkiserv/rootca/$1 AliasMatch /subca1/crls/(.*) /var/pkiserv/subca1/$1 AliasMatch /subca2/crls/(.*) /var/pkiserv/subca2/$1
Chapter 2. Setting up the Root CA environment 29

Figure 2-34 ScriptAliasMatch statements
LocationMatch statements are added for vhost443 and vhost1443 only, as shown in Figure 2-35.
Figure 2-35 LocationMatch statements for vhost443 and vhost1443
vhost80:ScriptAliasMatch /(AdmRootca|AdmSubca1|AdmSubca2)/public-cgi/(.*) /usr/lpp/pkiserv/PKIServ/public-cgi/$2ScriptAliasMatch /(Rootca|Subca1|Subca2)/public-cgi/(.*) /usr/lpp/pkiserv/PKIServ/public-cgi/$2vhost443:ScriptAliasMatch ^/(AdmRootca|Rootca)/(public-cgi|ssl-cgi-bin)/(.*) "/usr/lpp/pkiserv/PKIServ/$2/$3"ScriptAliasMatch ^/(AdmSubca1|Subca1)/(public-cgi|ssl-cgi-bin)/(.*) "/usr/lpp/pkiserv/PKIServ/$2/$3"ScriptAliasMatch ^/(AdmSubca2|Subca2)/(public-cgi|ssl-cgi-bin)/(.*) "/usr/lpp/pkiserv/PKIServ/$2/$3"vhost1443:ScriptAliasMatch ̂ /(AdmRootca|Rootca)/(clientauth-cgi|clientauth-cgi-bin)/(.*) "/usr/lpp/pkiserv/PKIServ/clientauth-cgi-bin/$3"ScriptAliasMatch ̂ /(AdmSubca1|Subca1)/(clientauth-cgi|clientauth-cgi-bin)/(.*) "/usr/lpp/pkiserv/PKIServ/clientauth-cgi-bin/$3"ScriptAliasMatch ̂ /(AdmSubca2|Subca2)/(clientauth-cgi|clientauth-cgi-bin)/(.*) "/usr/lpp/pkiserv/PKIServ/clientauth-cgi-bin/$3"
vhost443:<LocationMatch "^/(AdmRootca|Rootca)/ssl-cgi-bin(/(auth|surrogateauth) )?/cagetcert.rexx"> Charsetoptions TranslateAllMimeTypes </LocationMatch> <LocationMatch "^/(AdmSubca1|Subca1)/ssl-cgi-bin(/(auth|surrogateauth) )?/cagetcert.rexx"> Charsetoptions TranslateAllMimeTypes </LocationMatch> <LocationMatch "^/(AdmSubca2|Subca2)/ssl-cgi-bin(/(auth|surrogateauth) )?/cagetcert.rexx"> Charsetoptions TranslateAllMimeTypes </LocationMatch>vhost1443:<LocationMatch "^/(AdmRootca|Rootca)/clientauth-cgi-bin/auth/pkicmp"> CharsetOptions NoTranslateRequestBodies </LocationMatch> <LocationMatch "^/(AdmSubca1|Subca1)/clientauth-cgi-bin/auth/pkicmp"> CharsetOptions NoTranslateRequestBodies </LocationMatch> <LocationMatch "^/(AdmSubca2|Subca2)/clientauth-cgi-bin/auth/pkicmp"> CharsetOptions NoTranslateRequestBodies</LocationMatch>
30 z/OS PKI Services: Quick Set-up for Multiple CAs
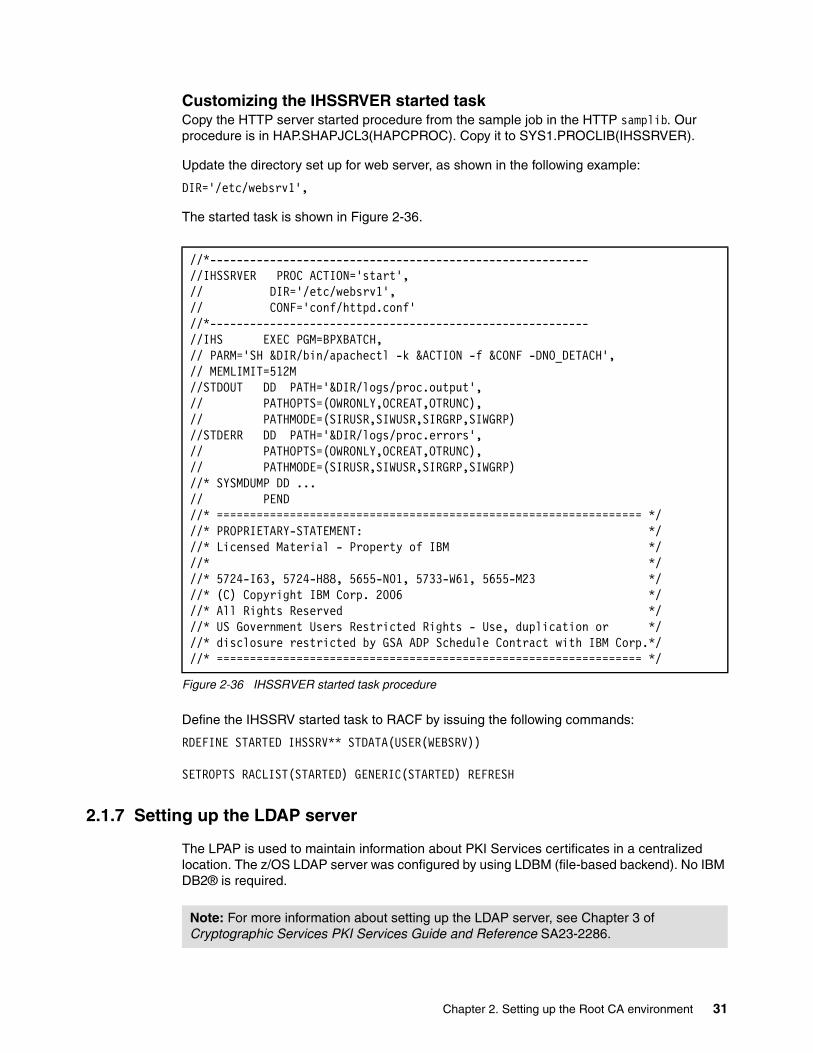
Customizing the IHSSRVER started taskCopy the HTTP server started procedure from the sample job in the HTTP samplib. Our procedure is in HAP.SHAPJCL3(HAPCPROC). Copy it to SYS1.PROCLIB(IHSSRVER).
Update the directory set up for web server, as shown in the following example:
DIR='/etc/websrv1',
The started task is shown in Figure 2-36.
Figure 2-36 IHSSRVER started task procedure
Define the IHSSRV started task to RACF by issuing the following commands:
RDEFINE STARTED IHSSRV** STDATA(USER(WEBSRV))
SETROPTS RACLIST(STARTED) GENERIC(STARTED) REFRESH
2.1.7 Setting up the LDAP server
The LPAP is used to maintain information about PKI Services certificates in a centralized location. The z/OS LDAP server was configured by using LDBM (file-based backend). No IBM DB2® is required.
//*--------------------------------------------------------- //IHSSRVER PROC ACTION='start', // DIR='/etc/websrv1', // CONF='conf/httpd.conf' //*--------------------------------------------------------- //IHS EXEC PGM=BPXBATCH, // PARM='SH &DIR/bin/apachectl -k &ACTION -f &CONF -DNO_DETACH', // MEMLIMIT=512M //STDOUT DD PATH='&DIR/logs/proc.output', // PATHOPTS=(OWRONLY,OCREAT,OTRUNC), // PATHMODE=(SIRUSR,SIWUSR,SIRGRP,SIWGRP) //STDERR DD PATH='&DIR/logs/proc.errors', // PATHOPTS=(OWRONLY,OCREAT,OTRUNC), // PATHMODE=(SIRUSR,SIWUSR,SIRGRP,SIWGRP) //* SYSMDUMP DD ... // PEND //* ================================================================ *///* PROPRIETARY-STATEMENT: *///* Licensed Material - Property of IBM *///* *///* 5724-I63, 5724-H88, 5655-N01, 5733-W61, 5655-M23 *///* (C) Copyright IBM Corp. 2006 *///* All Rights Reserved *///* US Government Users Restricted Rights - Use, duplication or *///* disclosure restricted by GSA ADP Schedule Contract with IBM Corp.*///* ================================================================ */
Note: For more information about setting up the LDAP server, see Chapter 3 of Cryptographic Services PKI Services Guide and Reference SA23-2286.
Chapter 2. Setting up the Root CA environment 31

Complete the following steps to set up and configure the LDAP server:
1. Copy ds.profile from /usr/lpp/ldap/etc to the home directory by using the following command:
cp /usr/lpp/ldap/etc/ds.profile /u/kwres01/ds.profile
2. Update it after /usr/lpp/ldap/examples/sample_server/ds.README, with the following information:
LDBM_SUFFIX="c=us" (To enable the ROOTCA, SUBCA1, and SUBCA2 certificates to be posted because they were created by using country=us)LDBM_SUFFIX="o=The Firm" (To enable the one year browser certificate be posted because it was created by using organization=The Firm)
OUTPUT_DATASET = LDAPCFG.GLD.CNFOUT
OUTPUT_DATASET_VOLUME = BH6CAT
LDBM_DATABASEDIRECTORY =/var/ldap/ldbm
SCHEMAPATH=/var/ldap/schema
ADMINDN=cn=Admin
ADMINPW=secret
PROG_SUFFIX = XX
APF_JOBCARD_1 = //LDAPAPF JOB MSGCLASS=H,NOTIFY=&SYSUID,
APF_JOBCARD_2 = // MSGLEVEL=(1,1),CLASS=A
PRGCTRL_JOBCARD_1 = //LDAPPC JOB MSGCLASS=H,NOTIFY=&SYSUID,
PRGCTRL_JOBCARD_2 = // MSGLEVEL=(1,1),CLASS=A
DB2_JOBCARD_1 =//LDAPDB2 JOB MSGCLASS=H,NOTIFY=&SYSUID,
DB2_JOBCARD_2 = // MSGLEVEL=(1,1),CLASS=A
RACF_JOBCARD_1 = //LDAPRACF JOB MSGCLASS=H,NOTIFY=&SYSUID,
RACF_JOBCARD_2 = // MSGLEVEL=(1,1),CLASS=A
3. Run the dsconfig utility under /usr/lpp/ldap/sbin by using the following command:
/usr/lpp/ldap/sbin/dsconfig -i /u/kwres01/ds.profile
4. Open the LDAPCFG.GLD.CNFOUT data set:
a. Submit the job in the RACF member. The job defines all of the RACF information for the LDAP server.
b. Submit the job in the APF member. A PROG member for the data sets to APF Authorize is in LDAPCFG.GLD.CNFOUT. Before submitting this job, this PROG member must be moved to the PARMLIB. To make the APF changes permanent, the PROG member must be added to the APF list that was created at IPL time.
5. Set up the started task by copying LDAPCFG.GLD.CNFOUT(GLDSRV) to SYS1.PROCLIB(GLDSRV).
32 z/OS PKI Services: Quick Set-up for Multiple CAs

6. Update LDAPCFG.GLD.CNFOUT(DSCONFIG) with listen ldap://:390.
7. Start the ldap server by using the - S GLDSRV command.
8. Add the schema that is needed by PKI by issuing the following commands:
ldapmodify -h wtsc76.itso.ibm.com -p 390 -D cn=admin -w secret -f /usr/lpp/ldap/etc/schema.user.ldif
ldapmodify -h wtsc76.itso.ibm.com -p 390 -D cn=admin -w secret -f /usr/lpp/ldap/etc/schema.IBM.ldif
9. Add a member to LDAPCFG.GLD.CNFOUT(SUFFIX), as shown in Figure 2-37.
Figure 2-37 LDAPCFG.GLD.CNFOUT member SUFFIX
10.Run the ldapadd command to add the suffix by specifying the following information:
ldapadd -h wtsc76.itso.ibm.com -p 390 -D cn=admin -w secret -f "//'ldapcfg.gld.cnfout(suffix)'"
11.Verify that the suffix was added by specifying the following information:
ldapsearch -h wtsc76.itso.ibm.com -p 390 -D cn=admin -w secret -b "o=The Firm" "objectclass=*"
The response is shown in Figure 2-38.
Figure 2-38 LDAP suffix verification
dn: c=us objectclass: top objectclass: country c: us dn: o=The Firm objectclass: top objectclass: organization o: The Firm
o=The Firm objectclass=top objectclass=organization o=The Firm
Note: For the production system, you might not want to make the LDAP password available in the configuration file after the initial setup.
For more information, see this website:
https://ibm.biz/Bdr3fE
Chapter 2. Setting up the Root CA environment 33

2.1.8 Preparing ROOTCA for use
Complete the following steps to prepare to start the rootca:
1. Start the rootca by using the following command:
s pkiservd,jobname=rootca,dir='/etc/pkiserv/rootca'
(or just s pkiservd,jobname=rootca)
2. Modify the ACL entry for CRL (which has critical attribute) so that any user can see the CRL:
a. Create a file that is named changeacl.ldif with the content that is shown in Figure 2-39.
Figure 2-39 ACL entry modifications
b. Issue the following command:
"ldapmodify -h wtsc76.itso.ibm.com -p 390 -D cn=admin -w secret -f changeacl.ldif
3. Start the HTTP server by specifying the S IHSSRVER command.
dn: OU=ROOTCA ITSO PKI Redbooks,O=IBM,C=US changetype: modify aclentry: group:cn=anybody:normal:rsc:system:rsc:critical:rsc
34 z/OS PKI Services: Quick Set-up for Multiple CAs

2.1.9 Enabling ROOTCA for use from the browser
Complete the following steps:
1. Enter the http://wtsc76.itso.ibm.com/Rootca/public-cgi/camain.rexx URL into a browser and the window that is shown in Figure 2-40 opens.
Figure 2-40 PKI Services Certificate Generation Application
2. Click Install Certificate to enable SSL sessions for PKI Services.
Note: You are accessing the rootca certificate that is in /var/pkiserv, which is specified in vhost80.conf.
Chapter 2. Setting up the Root CA environment 35

3. The window that is shown in Figure 2-41 opens. The certificate must be installed in the Trusted Root certificate Authorities store. Select Install Certificate.
Figure 2-41 Certificate store
4. Follow the wizard through to completion.
The certificates are successfully placed in the Trusted Root Certification Authorities store.
36 z/OS PKI Services: Quick Set-up for Multiple CAs

Chapter 3. Setting up SUBCA1 and SUBCA2 under ROOTCA
This chapter describes how to set up the intermediate CAs SUBCA1 and SUBCA2 and includes the following topics:
� “Creating SUBCA1 certificate request” on page 38� “Creating SUBCA1 certificate request” on page 38� “Retrieving SUBCA1 certificate” on page 43� “Adding the SUBCA1 certificate to RACF” on page 45� “Creating and customizing the UNIX files for SUBCA1” on page 47� “Creating the VSAM data sets for SUBCA1” on page 49� “Creating certificate, key ring, and authorization for SUBCA1” on page 49� “Starting SUBCA1” on page 50� “SUBCA2 set up” on page 53
3
© Copyright IBM Corp. 2016. All rights reserved. 37

3.1 SUBCA1 set up
The first intermediate certificate authority that is set up is named subca1. As an intermediate certificate authority, the digital certificate that is representing the SUBCA1 CA is digitally signed by the root certificate authority.
We must establish the chain of trust. If the root certificate authority is trusted, any certificates that are issued by the Intermediate also are trusted.
All of the ROOTCA configurations are used as the base for SUBCA1.
3.1.1 Creating SUBCA1 certificate request
Complete the following steps to create the PKCS#10 request by using the RACF RACDCERT commands:
1. Use the ISPF command shell to issue the following RACDCERT GENCERT command, which generated a certificate and a public and private key pair (the created certificate is not used, only the key pair is used going forward):
RACDCERT CERTAUTH GENCERT SUBJECTSDN(OU('SUBCA1 ITSO PKI Red Book') O('IBM') C('US')) WITHLABEL('SUBCA1 PKI CA')
2. Create the PKCS#10 certificate request by using RACDCERT GENREQ. Use the public and private key pair that was created in the previous step. The request is to be saved in the PKISRVD.SUBCA1.REQ data set. On the ISPF command shell, enter the following command:
RACDCERT CERTAUTH GENREQ(LABEL('SUBCA1 PKI CA')) DSN('PKISRVD.SUBCA1.REQ')
38 z/OS PKI Services: Quick Set-up for Multiple CAs

3.1.2 Requesting the SUBCA1 certificate to be signed by ROOTCA
SUBCA1 must make a request to the Rootca. Enter the following URL in a browser:
http://wtsc76.itso.ibm.com/Rootca/public-cgi/camain.rexx
Figure 3-1 shows the page that is displayed. Choose 5-Year PKI Intermediate CA Certificate from the drop-down list and then, click Request Certificate.
Figure 3-1 Intermediate CA certificate application
Chapter 3. Setting up SUBCA1 and SUBCA2 under ROOTCA 39

You are prompted to enter information about the certificate, as shown in Figure 3-2.
Figure 3-2 Top part of 5-Year PKI Intermediate CA Certificate form
Although most fields on this page are optional, the Pass phrase for securing this request field must be completed.
Note: Enter and remember a meaningful pass phrase. The pass phrase is used later to retrieve the digital certificate that was created by PKI services.
40 z/OS PKI Services: Quick Set-up for Multiple CAs

3. Scroll down the web page and see that to complete the certificate request, you must enter a Base64 encoded PKCS#10 certificate request, as shown in Figure 3-3.
Figure 3-3 PKCS#10 option
This information is needed because a CA certificate is being requested. CA certificates for z/OS PKI Services are required to be in RACF.
Note: Do not submit the certificate request or close browser window. We return to this window later in the process.
Chapter 3. Setting up SUBCA1 and SUBCA2 under ROOTCA 41

4. Open the data set PKISRVD.SUBCA1.REQ., which was created in “Creating SUBCA1 certificate request” on page 38. The content is shown in Figure 3-4.
Figure 3-4 Contents of PKCS#10 certificate request in Base64 format
5. Select the contents of the certificate request, including the comment lines at the top and bottom of the window. Select Copy from the toolbar.
6. Return to the web browser, where the request form for the 5-year PKI intermediate CA certificate should be still open. Paste the PKCS#10 request in the provided field, as shown in Figure 3-3 on page 41.
Do not complete any other information in the optional fields of the web form.
7. Click Submit certificate request to complete request. A page opens in which it is confirmed the request was submitted successfully, as shown in Figure 3-5.
Figure 3-5 Request submitted successfully
The certificate request is submitted.
-----BEGIN NEW CERTIFICATE REQUEST----- MIIC0zCCAbsCAQAwPTELMAkGA1UEBhMCVVMxDDAKBgNVBAoTA0lCTTEgMB4GA1UECxMXU1VCQ0ExIElCTSBQS0kgUmVkQm9va3MwggEiMA0GCSqGSIb3DQEBAQUAA4IBDwAwggEKAoIBAQCqRY97NPZLiatXJ3PvtLf03XLVIYj/cOu6IdIgoFiedvnZwDLQiu2ktxCDxJL1Lu1YAlRqxb70hHw4w5JF1BmRpf0gbfx9OlsT4r/cX66wFJ2kYzEfD9Osst/VPmOC0vcJhc/r2q9/kd6huYXPiy5HV8Y6X0OfsZVPW6unIOKHUnQZc/OWweVoYuthc5dl8KVM+jHZrn8ZxtrzqJKcyIeddb9GVLmvpGe36CLPXnToF+9qBI5Ztf7n2BEePrS8v+pgYzNva1iWXFW/gLbqN2wwVUTlP7GXzIuAHBs2z3H7FbgGAyxCNO/a1OKFpemcT4Y6jqr09Cl9u1TSVdo4sI0XAgMBAAGgUTBPBgkqhkiG9w0BCQ4xQjBAMB0GA1UdDgQWBBQ6EeGGOIHqqDD18ZvFG9gIzHmHfDAPBgNVHRMBAf8EBTADAQH/MA4GA1UdDwEB/wQEAwIBBjANBgkqhkiG9w0BAQsFAAOCAQEABl7lQEQMnMC2N5yTy4S6z2MfWEyN0FDn1Ztc1gfQD6t2V91iImPTaWfI3Oez2JMpSg1pTddbv9WiehXqav27KBhGIhcn2fi0OR1Q1OHfM3F0ZcayebXquf8z1iKvvFLxPBHQyQaXrO9sDKSX4efIIOAj/RiUYOMKOkUIcb7L46HVbmlar3zLvxGpZK0FYx9ZgfkpznBqTbwZ2Zw6Aaiadbo0BrvMc7aTT4lmRvnx15jIFSYS86pB1ZIFQrKj3q/6s0e1T2li+1nceKuCG9hd4c0Owo8Sk/uFTOTMGb3cXeuNRYPW5a+5z63msP44+fWlOJatdBsWR0+5vbo5/ZXHrA== -----END NEW CERTIFICATE REQUEST-----
Note: Entering information into the optional fields on the web form overrides the information in the PKCS#10 file.
42 z/OS PKI Services: Quick Set-up for Multiple CAs

The default configuration of PKI Services is to automatically approve all intermediary certificate requests and to generate all pending certificates every 3 minutes. By using this configuration, you can retrieve your certificate after the next scheduled update.
3.1.3 Retrieving SUBCA1 certificate
To retrieve the certificate, return to main user page by using the following URL (see Figure 3-6):
http://wtsc76.itso.ibm.com/Rootca/public-cgi/camain.rexx
Figure 3-6 PKI Services Certificate Generation Application main page
Complete the following steps:
1. Under Pick up a previously requested certificate, enter the assigned transaction ID that you received in 3.1.2, “Requesting the SUBCA1 certificate to be signed by ROOTCA” on page 39.
2. Select PKI Server certificate from the drop-down menu.
Note: Record the transaction ID because it is required to retrieve the digital certificate along with the pass phrase that was defined in the request.
Chapter 3. Setting up SUBCA1 and SUBCA2 under ROOTCA 43

3. Click Pick up certificate.
The window that opens is shown in Figure 3-7.
Figure 3-7 Retrieve Your PKI Server Certificate window
4. Enter the pass phrase that you used for the certificate request and click Continue.
If the certificate was not yet issued, the PKI Services web application returns the error message that is shown in Figure 3-8.
Figure 3-8 Request is yet to be issued
If this error is shown, wait for a few minutes and then, try again.
44 z/OS PKI Services: Quick Set-up for Multiple CAs

The web page that is returned that contains the digital certificate is shown in Figure 3-9. This certificate is signed by the RootCA.
Figure 3-9 Retrieved Digital Certificate created and signed by RootCA
3.1.4 Adding the SUBCA1 certificate to RACF
Complete the following steps to add the SUBCA1 certificate to the RACF database:
1. Copy the certificate from the browser. Ensure that the complete certificate is copied, including the comment lines.
2. Return to the 3270 emulation and open the 3.4 data set list utility.
3. Copy the PKISRVD.SUBCA1.REQ data set by entering a “/” character (without the quotes) in front of the data set and selecting option 17 - copy.
4. Choose a new data set name PKISRVD.SUBCA1.CRT.
5. Open PKISRVD.SUBCA1.CRT in edit mode and delete its content.
6. Paste the certificate from the PKI services web page as shown in Figure 3-10 on page 46 and Figure 3-11 on page 46. Make sure to copy the entire certificate, which might require more than one paste to the data set (depending on how many lines you can see on the 3270 panel). Use the paste next function if your emulator supports it.
Chapter 3. Setting up SUBCA1 and SUBCA2 under ROOTCA 45

Figure 3-10 Digital Certificate pasted into data set window 1 of 2
Figure 3-11 Digital Certificate pasted into data set window 2 of 2
7. Save the data set and then, go to the ISPF command shell. Enter the following command to add the certificate to RACF without specifying the label. It is added under the original label SUBCA1 PKI CA:
RACDCERT CERTAUTH ADD(‘PKISRVD.SUBCA1.CRT’)
8. To review this certificate, enter the following command:
RACDCERT CERTAUTH LIST(label('SUBCA1 PKI CA'))
The response is shown in Figure 3-12 on page 47.
46 z/OS PKI Services: Quick Set-up for Multiple CAs

Figure 3-12 Listing of SUBCA1 PKI CA digital certificate in RACF
The intermediate certificate for SUBCA1 is generated, signed by the Root CA (see Issuers’ name), and is now in RACF.
3.1.5 Creating and customizing the UNIX files for SUBCA1
The intermediate certificate authority is set up by using the same base infrastructure as the root CA. The web server and LDAP setup from the previous chapter is used.
In this section, we describe the process that was used to create the new PKI services certificate authority.
Creating Subca1 directoryFrom your 3270 emulation ISPF, go to the ISPF command shell (option 6) and enter OMVS. After you are in UNIX System Services, complete the following steps:
1. Browse to the following PKI directory:
cd /etc/pkiserv
2. Create a directory that is named subca2 by using the following command:
mkdir subca1
3. Copy the contents of rootca to subca1. The following copied files are then customized for subca1:
cp -p /etc/pkiserv/rootca/pkiserv.conf /etc/pkiserv/subca1cp -p /etc/pkiserv/rootca /pkiserv.tmpl /etc/pkiserv/subca1cp -p /etc/pkiserv/rootca/pkiserv.envars /etc/pkiserv/subca1cp -p /etc/pkiserv/rootca /*.form /etc/pkiserv/subca1
Label: SUBCA1 PKI CA Certificate ID: 2QiJmZmDhZmjgeLkwsPB8UDX0slAw8FAStatus: TRUST Start Date: 2016/09/06 00:00:00 End Date: 2021/09/04 23:59:59 Serial Number: >03< Issuer's Name: >OU=ROOTCA IBM PKI RedBooks.O=IBM.C=US< Subject's Name: >OU=SUBCA1 IBM PKI RedBooks.O=IBM.C=US< Signing Algorithm: sha256RSA Key Usage: CERTSIGN Key Type: RSA Key Size: 2048 Private Key: YES Ring Associations: *** No rings associated ***
Chapter 3. Setting up SUBCA1 and SUBCA2 under ROOTCA 47

Customizing pkiserv.conf for Subca1Complete the following steps:
1. Open the pkiserv.conf file by using the following command (the file contains the configuration setting for PKI Services):
oedit pkiserv.conf
2. Change all occurrences of rootca to subca1. Notice that upper and lowercase letters are used in different places.
3. Save and close pkiserv.conf.
Customizing pkiserv.tmpl for Subca1Complete the following steps:
1. Open the pkiserv.tmpl file by using the following command (this file contains the templates that are used to build the HTML windows and forms that are used in the web pages):
oedit pkiserv.tmpl
2. Change all occurrences of rootca to subca1. Notice that upper and lowercase letters are used in different places.
3. Save pkiserv.tmpl.
Customizing pkiserv.envars for Subca1The steps are as follows:
1. Open the pkiserv.envars file by using the following command (this file contains the Subca1 environmental variable for PKI services):
oedit pkiserv.envars
2. Change all occurrences of rootca to subca1. Notice that upper and lowercase letters are used in different places.
3. Save and close pkiserv.envars.
Customizing *.forms for Subca1Edit all of the *.form files to customize the domain information. Change all occurrences of rootca to subca1. Notice that upper and lowercase letters are used in different places.
Changing the file ownerComplete the following steps:
1. Check the file permission bits and owner of the configuration files by using the following command:
ls -lt
You can see that all files belong to the user ID that copied the files from rootca. This status must be changed so that the task that is started later can pick up the files (PKISRVD is our STC user for the PKI services daemon started task).
2. Change the file owner to PKI Services daemon user ID PKISRVD by using the following command:
chown PKISRVD *.*
48 z/OS PKI Services: Quick Set-up for Multiple CAs

3.1.6 Creating the VSAM data sets for SUBCA1
In “Defining the ROOTCA VSAM data sets” on page 7, the job IKYCVSAM was copied from SYS1.SAMPLIB to your set up data set to create the VSAM files for the root CA. Copy this data set and make the following edits:
� Change the job name.� Issue the c ROOTCA SUBCA1 all change command.
Submit the job. The SUBCA1 VSAM data sets are shown in Figure 3-13.
Figure 3-13 SUBCA1 VSAM data sets list
3.1.7 Creating certificate, key ring, and authorization for SUBCA1
Because most of the set-up steps were done for ROOTCA through IKYSETUP, we do not need to run IKYSETUP again for SUBCA1. Only profiles that are specific for SUBCA1 must be created. Complete the following steps to create the RACF key ring for SUBCA1 and connect the corresponding certificates to the key ring (the PKI user ID also is authorized to use the new domain):
1. Create a Registration Authority (RA) certificate with digital certificate that is signed by subca1, as shown in the following example:
RACDCERT ID(PKISRVD) GENCERT SUBJECTSDN(CN('Registration Authority') OU('SUBCA1 ITSO PKI Red Book') O('IBM') C('US')) KEYUSAGE(HANDSHAKE) SIGNWITH(CERTAUTH LABEL('SUBCA1 PKI CA')) NOTAFTER(DATE(2020/11/19)) WITHLABEL('SUBCA1 PKI RA')
PKISRVD.SUBCA1.VSAM.ICL.DA PKISRVD.SUBCA1.VSAM.ICL.IX PKISRVD.SUBCA1.VSAM.ICL.REQAIX PKISRVD.SUBCA1.VSAM.ICL.REQAIX.DA PKISRVD.SUBCA1.VSAM.ICL.REQAIX.IX PKISRVD.SUBCA1.VSAM.ICL.REQUESTR PKISRVD.SUBCA1.VSAM.ICL.STATAIX PKISRVD.SUBCA1.VSAM.ICL.STATAIX.DAPKISRVD.SUBCA1.VSAM.ICL.STATAIX.IXPKISRVD.SUBCA1.VSAM.ICL.STATUS PKISRVD.SUBCA1.VSAM.OST PKISRVD.SUBCA1.VSAM.OST.AIX PKISRVD.SUBCA1.VSAM.OST.AIX.DA PKISRVD.SUBCA1.VSAM.OST.AIX.IX PKISRVD.SUBCA1.VSAM.OST.DA PKISRVD.SUBCA1.VSAM.OST.IX PKISRVD.SUBCA1.VSAM.OST.PATH PKISRVD.SUBCA1.VSAM.OST.REQAIX PKISRVD.SUBCA1.VSAM.OST.REQAIX.DA PKISRVD.SUBCA1.VSAM.OST.REQAIX.IX PKISRVD.SUBCA1.VSAM.OST.REQUESTR PKISRVD.SUBCA1.VSAM.OST.STATAIX PKISRVD.SUBCA1.VSAM.OST.STATAIX.DAPKISRVD.SUBCA1.VSAM.OST.STATAIX.IXPKISRVD.SUBCA1.VSAM.OST.STATUS
Chapter 3. Setting up SUBCA1 and SUBCA2 under ROOTCA 49

2. Create the PKI Services key ring for SUBCA1 and connect the CA and RA certificates to it by issuing the following commands:
RACDCERT ADDRING(CAring.SUBCA1) ID(PKISRVD)
RACDCERT ID(PKISRVD) CONNECT(CERTAUTH LABEL('SUBCA1 PKI CA')RING(CAring.SUBCA1) USAGE(PERSONAL) DEFAULT)
RACDCERT ID(PKISRVD) CONNECT(LABEL('SUBCA1 PKI RA') RING(CAring.SUBCA1)USAGE(PERSONAL))
RACDCERT ID(PKISRVD) CONNECT(CERTAUTH LABEL('ROOTCA PKI CA') RING(CAring.SUBCA1))
3. List the content of the ring by issuing the following command. The response is shown in Figure 3-14:
RACDCERT ID(PKISRVD) LISTRING(CAring.SUBCA1)
Figure 3-14 SUBCA1 CAring response
4. Use the following definitions to allow the PKI Services user ID PKISERV to request certificate functions:
RDEFINE FACILITY IRR.RPKISERV.*.SUBCA1PERMIT IRR.RPKISERV.*.SUBCA1 CLASS(FACILITY) ID(PKISERV) ACCESS(CONTROL)
5. Create the profile to protect PKI Admin functions by issuing the following commands:
RDEFINE FACILITY IRR.RPKISERV.PKIADMIN.SUBCA1PERMIT IRR.RPKISERV.PKIADMIN.SUBCA1 CLASS(FACILITY) ID(PKIGRP) ACCESS(UPDATE)PERMIT IRR.RPKISERV.PKIADMIN.SUBCA1 CLASS(FACILITY) ID(PKISERV) ACCESS(NONE) SETROPTS RACLIST(FACILITY) REFRESH
6. Connect the SUBCA1 PKI CA certificate to the HTTP server key ring by using the following commands:
RACDCERT ID(WEBSRV) CONNECT(CERTAUTH LABEL('SUBCA1 PKI CA')RING(SSLring))
3.1.8 Starting SUBCA1
Complete the following steps to start the SUBCA1 domain:
1. Issue the following command to start SUBCA1:
s pkiservd,jobname=subca1,dir='/etc/pkiserv/subca1'
2. Complete the following steps to modify the ACL entry for CRL (which includes a critical attribute) so that any user can see the CRL:
a. Create a file that is named changeacl.ldif that includes the content that is shown in Figure 3-15 on page 51.
50 z/OS PKI Services: Quick Set-up for Multiple CAs

Figure 3-15 ACL entry modifications
b. Issue the following command:
ldapmodify -h wtsc76.itso.ibm.com -p 390 -D cn=admin -w secret -f changeacl.ldif
3. Stop and restart the HTTP server to pick up the update on the SSLring keyring by using the following commands:
S IHSSRVER,ACTION='STOP'S IHSSRVER
4. Enter the URL http://wtsc76.itso.ibm.com/Subca1/public-cgi/camain.rexx into a browser and the window that opens is shown in Figure 3-16.
Figure 3-16 SUBCA1 User page
dn: OU=SUBCA1 ITSO PKI Red Book,O=IBM,C=US changetype: modify aclentry: group:cn=anybody:normal:rsc:system:rsc:critical:rsc
Chapter 3. Setting up SUBCA1 and SUBCA2 under ROOTCA 51

5. Test the admin page by using the following URL:
http://wtsc76.itso.ibm.com/AdmSubca1/public-cgi/camain.rexx
The window that opens is shown in Figure 3-17.
Figure 3-17 SUBCA1 admin start page
52 z/OS PKI Services: Quick Set-up for Multiple CAs

3.2 SUBCA2 set up
The SUBCA2 set-up is the same as SUBCA1. Follow the same steps and change all of the SUBCA1 references to SUBCA2.
Access SUBCA2 User page by using the following URL:
http://wtsc76.itso.ibm.com/Subca2/public-cgi/camain.rexx
The page that opens is shown in Figure 3-18.
Figure 3-18 SUBCA2 User page
Chapter 3. Setting up SUBCA1 and SUBCA2 under ROOTCA 53

SUBCA2 User also can be accessed by using the following URL:
http://wtsc76.itso.ibm.com/AdmSubca2/public-cgi/camain.rexx
The page that opens is shown in Figure 3-19.
Figure 3-19 SUBCA2 admin start page
The three instances of PKI Services are now successfully set up with minimal configuration needed.
For more information about how to use the user and admin web pages, see the following YouTube® video:
https://youtu.be/U0oqk6siKkA
More configurations are available for production. For more information, see Chapter 2 of z/OS PKI Services Guide and Reference.
54 z/OS PKI Services: Quick Set-up for Multiple CAs

Related publications
The publications that are listed in this section are considered particularly suitable for a more detailed discussion of the topics that are covered in this book.
IBM Redbooks
The IBM Redbooks publication Managing Digital Certificates Across the Enterprise, SG24-8336 provides more information about the topic in this document.
You can search for, view, download or order this document and other Redbooks, Redpapers, Web Docs, draft, and other materials, at the following website:
ibm.com/redbooks
Other publications
The following publications are also relevant as further information sources:
� Cryptographic Services PKI Services Guide and Reference, SA23-2286� IBM HTTP server - powered by Apache, SC27-8417� IBM Tivoli Directory Server Administration and Use for z/OS, SC23-6788
Help from IBM
IBM Support and downloads
ibm.com/support
IBM Global Services
ibm.com/services
© Copyright IBM Corp. 2016. All rights reserved. 55

56 z/OS PKI Services: Quick Set-up for Multiple CAs

(0.1”spine)0.1”<
->0.169”
53<->
89 pages


ibm.com/redbooks
Printed in U.S.A.
Back cover
ISBN 0738443054
SG24-8337-00
®