zoom multitrak recording studio mrs-4 mrs-4 · thank you for purchasing the zoom multitrak...
TRANSCRIPT
Thank you for purchasing the ZOOM MultiTrak RecordingStudio MRS-4 (subsequently referred to as "the MRS-4").
The MRS-4 offers the following attractive features.
◆ Simultaneous 4-track playback/2-track recording 8 virtual takes per track add up to a total of 32 takes availablefor recording.
◆ Flexible track parameter settings Hi/Lo EQ, effect send, and other parameters can be setindividually for each track.
◆ Bounce feature supports recording from 4 tracks ofsimultaneous playback Even when there are no empty tracks, the MRS-4 allows youto bounce existing material onto 2 tracks, while performingsimultaneous playback of 4 tracks.
◆ Versatile effects The MRS-4 incorporates an insert effect for processing theinput signal, a send/return effect for use in a mixer loop, and amixdown effect for use on the master bus.
◆ Other sophisticated features Metronome, MIDI output, AUX input, long-stroke faders, andother exciting features make the MRS-4 a great all-roundpackage.
In order to take full advantage of the MRS-4's versatilefunctionality and to ensure trouble-free enjoyment, pleaseread this manual carefully. Keep this manual in a safeplace together with the warranty card.
Operation Manual

Safety Precautions
In this manual, symbols are used to highlight warningsand cautions for you to read so that accidents can beprevented. The meanings of these symbols are asfollows:
This symbol indicates explanationsabout extremely dangerous matters. Ifusers ignore this symbol and handle thedevice the wrong way, serious injury ordeath could result.
This symbol indicates explanationsabout dangerous matters. If users ignorethis symbol and handle the device thewrong way, bodily injury and damage tothe equipment could result.
Please observe the following safety tips and precautionsto ensure hazard-free use of the MRS-4.
About powerSince power consumption of this unit is fairly high, werecommend the use of an AC adapter wheneverpossible. When powering the unit from the batteries, useonly an alkaline type.
AC adapter operation • Be sure to use only an AC adapter which supplies 9 V DC,
300 mA and is equipped with a "center minus" plug (ZoomAD-0006). The use of an adapter other than the specified type maydamage the unit and pose a safety hazard.
• Connect the AC adapter only to an AC outlet that suppliesthe rated voltage required by the adapter.
• When disconnecting the AC adapter from the AC outlet,always grasp the adapter itself and do not pull at the cable.
• If the unit is not to be used for a long time, disconnect theAC adapter from the outlet.
Battery operation • Use four IEC R6 (size AA) batteries (alkaline or manganese). • The MRS-4 cannot be used for recharging.
Pay close attention to the labelling of the battery to makesure you choose the correct type.
• If the MRS-4 is not to be used for an extended period oftime, remove the battery from the unit.
• If batteries leakage has occurred, wipe the batterycompartment and the battery terminals carefully to removeall remnants of battery fluid.
• While using the unit, the battery compartment cover shouldbe closed.
Environment Avoid using your MRS-4 in environments where it willbe exposed to:
• Extreme temperature • High humidity or moisture • Excessive dust or sand • Excessive vibration or shock
Handling• Since the MRS-4 is a precision electronic device,
avoid applying excessive force to the controls. Do notoperate the keys or controls with your foot.
• Take care that no foreign objects (coins or pins etc.)or liquids can enter the unit.
• Be sure to turn the power to all equipment off beforemaking connections.
• Before moving the unit, turn the power off, anddisconnect all cables and the AC adapter.
AlterationsNever open the case of the MRS-4 or attempt tomodify the product in any way since this canresult in damage to the unit.
In Case of Trouble If there seems to be a defect or a problem withthe unit, immediately disconnect the AC adapteror remove the batteries to shut off the power.Then disconnect any other cables connected tothe unit.
Usage Precautions
• Electrical interference For safety considerations, the MRS-4 has been designedto provide maximum protection against the emission ofelectromagnetic radiation from inside the device, andprotection from external interference. However,equipment that is very susceptible to interference or thatemits powerful electromagnetic waves should not beplaced near the MRS-4, as the possibility of interferencecannot be ruled out entirely.
With any type of digital control device, the MRS-4included, electromagnetic interference can causemalfunctioning and can corrupt or destroy data. Careshould be taken to minimize the risk of damage.
• Cleaning Use a soft, dry cloth to clean the MRS-4. If necessary,slightly moisten the cloth. Do not use abrasive cleanser,wax, or solvents (such as paint thinner or cleaningalcohol), since these may dull the finish or damage thesurface.
Please keep this manual at hand for futurereference.
USAGE AND SAFETY PRECAUTIONS • • • • • • • • 2
Introduction • • • • • • • • • • • • • • • • • • • • • • • • • • • • • • • • • • • • • • • • • 4Internal configuration • • • • • • • • • • • • • • • • • • • • • • • • • • • • • • • • • 4
Recorder section • • • • • • • • • • • • • • • • • • • • • • • • • • • • • • • • • • • • • • 4Effect section • • • • • • • • • • • • • • • • • • • • • • • • • • • • • • • • • • • • • • • • • 5Mixer section • • • • • • • • • • • • • • • • • • • • • • • • • • • • • • • • • • • • • • • • • 5
SmartMedia • • • • • • • • • • • • • • • • • • • • • • • • • • • • • • • • • • • • • • • • • • • 5
Parts of the MRS-4 • • • • • • • • • • • • • • • • • • • • • • • • • • • • • • • 6Top panel • • • • • • • • • • • • • • • • • • • • • • • • • • • • • • • • • • • • • • • • • • • • • • 6Rear panel • • • • • • • • • • • • • • • • • • • • • • • • • • • • • • • • • • • • • • • • • • • • 7Front panel • • • • • • • • • • • • • • • • • • • • • • • • • • • • • • • • • • • • • • • • • • • • 7
Connections • • • • • • • • • • • • • • • • • • • • • • • • • • • • • • • • • • • • • • • • • 8Power on/off switching • • • • • • • • • • • • • • • • • • • • • • • • • • • • • • • 9
Turning power on • • • • • • • • • • • • • • • • • • • • • • • • • • • • • • • • • • • • 9Turning power off • • • • • • • • • • • • • • • • • • • • • • • • • • • • • • • • • • • • 9
Operating the unit on batteries • • • • • • • • • • • • • • • • • • • • • • • 9
Basic Operation • • • • • • • • • • • • • • • • • • • • • • • • • • • • • • • • • • • 10Step 1 Preparations for recording • • • • • • • • • • • • • • • • • • • • 10
1-1 Creating a new song • • • • • • • • • • • • • • • • • • • • • • • • • • • • • • 10
Step 2 Recording the first track • • • • • • • • • • • • • • • • • • • • • 122-1 Adjusting input sensitivity • • • • • • • • • • • • • • • • • • • • • • • • 122-2 Using the insert effect • • • • • • • • • • • • • • • • • • • • • • • • • • • • 132-3 Selecting a track and recording on it • • • • • • • • • • • • • • • 15
Step 3 Overdubbing • • • • • • • • • • • • • • • • • • • • • • • • • • • • • • • • • 173-1 Adjusting input sensitivity and
setting the insert effect • • • • • • • • • • • • • • • • • • • • • • • • • • • • 173-2 Selecting and recording to a track • • • • • • • • • • • • • • • • • 17
Step 4 Mixdown • • • • • • • • • • • • • • • • • • • • • • • • • • • • • • • • • • • • • • 184-1 Preparations for mixdown • • • • • • • • • • • • • • • • • • • • • • • • 184-2 Adjusting volume/pan/EQ • • • • • • • • • • • • • • • • • • • • • • • • 194-3 Using the send/return effect • • • • • • • • • • • • • • • • • • • • • • • 214-4 Using the mixdown effect • • • • • • • • • • • • • • • • • • • • • • • • 254-5 Recording on the master recorder • • • • • • • • • • • • • • • • • 27
Reference [Recorder] • • • • • • • • • • • • • • • • • • • • • • • • • • • 28Using V-takes • • • • • • • • • • • • • • • • • • • • • • • • • • • • • • • • • • • • • • • 28Combining multiple tracks (Bounce function) • • • • • • • 29Re-recording only a specified region (Punch-in/out function) • • • • • • • • • • • • • • • • • • • • • • • • • • • • 30
Using manual punch-in/out • • • • • • • • • • • • • • • • • • • • • • • • • • • 31Using auto punch-in/out • • • • • • • • • • • • • • • • • • • • • • • • • • • • • • 31
Reference [Locating a Point] • • • • • • • • • • • • • • • • • 33Moving to a desired point in a song (Locate function) • • • • • • • • • • • • • • • • • • • • • • • • • • • • • • • • • • • 33
Switching between time and measure indication • • • • 33Marking a point in a song (marker function) • • • • • • • • 34
Assigning a mark • • • • • • • • • • • • • • • • • • • • • • • • • • • • • • • • • • • • 34Moving to a mark location • • • • • • • • • • • • • • • • • • • • • • • • • • • 34Clearing a mark • • • • • • • • • • • • • • • • • • • • • • • • • • • • • • • • • • • • • 35
Playing back the same passage repeatedly(A-B Repeat) • • • • • • • • • • • • • • • • • • • • • • • • • • • • • • • • • • • • • • • • 36
Reference [Mixing] • • • • • • • • • • • • • • • • • • • • • • • • • • • • • • • 37Assigning two inputs to a track • • • • • • • • • • • • • • • • • • • • • • 37Adding the input signal to the mixdown • • • • • • • • • • • • • • 38Linking two tracks (stereo link function) • • • • • • • • • • • • • • 39
Reference [Track Editing] • • • • • • • • • • • • • • • • • • • • • • 40Copying a specified region of data to another location • • • • • • • • • • • • • • • • • • • • • • • • • • • • • • • • • • • • • • • • • • • • • 40
Copying the data of an entire track • • • • • • • • • • • • • • • • • • 41Erasing a specified segment • • • • • • • • • • • • • • • • • • • • • • • • • 42Erasing an entire track • • • • • • • • • • • • • • • • • • • • • • • • • • • • • • • 43Exchanging the data of entire tracks • • • • • • • • • • • • • • • • • 44
Reference [Song Functions] • • • • • • • • • • • • • • • • • • • 46Song menu basic functions • • • • • • • • • • • • • • • • • • • • • • • • • • 46Song menu items • • • • • • • • • • • • • • • • • • • • • • • • • • • • • • • • • • • • 47
Creating a new song (SONG NEW) • • • • • • • • • • • • • • • • • • • 47Reading in an existing song (SONG SELECT) • • • • • • • • • 47Checking the remaining recording time(SONG CAPACITY) • • • • • • • • • • • • • • • • • • • • • • • • • • • • • • • • 47
Copying a song (SONG COPY) • • • • • • • • • • • • • • • • • • • • • • 48Deleting a song (SONG DELETE) • • • • • • • • • • • • • • • • • • • • 48Protecting a song (SONG PROTECT) • • • • • • • • • • • • • • • • • 49Selecting the recording grade (SONG GRADE) • • • • • • • 49
Reference [Metronome/MIDI] • • • • • • • • • • • • • • • • • 50Basic metronome settings • • • • • • • • • • • • • • • • • • • • • • • • • • • 50Functions available with MIDI • • • • • • • • • • • • • • • • • • • • • • • • 51Synchronizing an external device to the MRS-4 • • • • • 51
Reference [Other Functions] • • • • • • • • • • • • • • • • • • 52Using the tuner • • • • • • • • • • • • • • • • • • • • • • • • • • • • • • • • • • • • • • • 52Formatting a SmartMedia card • • • • • • • • • • • • • • • • • • • • • • • 53Display adjustments • • • • • • • • • • • • • • • • • • • • • • • • • • • • • • • • • • 54Using the AUX IN jacks to save tracks • • • • • • • • • • • • • • • 55
Specifications • • • • • • • • • • • • • • • • • • • • • • • • • • • • • • • • • • • • • 56MRS-4 file configuration • • • • • • • • • • • • • • • • • • • • • • • • • • • • • 57File compatibility with PS-02 • • • • • • • • • • • • • • • • • • • • • • • • • 57MRS-4 Card Manager Software • • • • • • • • • • • • • • • • • • • • • • 57
Troubleshooting • • • • • • • • • • • • • • • • • • • • • • • • • • • • • • • • • • 58Playback problems • • • • • • • • • • • • • • • • • • • • • • • • • • • • • • • • • • 58Problems with recording • • • • • • • • • • • • • • • • • • • • • • • • • • • • • 58Problems with effects • • • • • • • • • • • • • • • • • • • • • • • • • • • • • • • • 59Problems with MIDI • • • • • • • • • • • • • • • • • • • • • • • • • • • • • • • • 59Other problems • • • • • • • • • • • • • • • • • • • • • • • • • • • • • • • • • • • • • • 59
MIDI Implementation • • • • • • • • • • • • • • • • • • • • • • • • • • • • 60MIDI implementation • • • • • • • • • • • • • • • • • • • • • • • • • • • • • • • • 60MIDI implementation chart • • • • • • • • • • • • • • • • • • • • • • • • • • • 61
Index • • • • • • • • • • • • • • • • • • • • • • • • • • • • • • • • • • • • • • • • • • • • • • • • • 62
Conte
nts
ZOOM MRS-4 3ZOOM MRS-4
USA
GE
AN
DSA
FE
TY
PR
EC
AU
TIO
NS
2
USAGE AND SAFETY PRECAUTIONS Contents
Warning
Caution
Caution
Caution
Caution
Warning
Caution
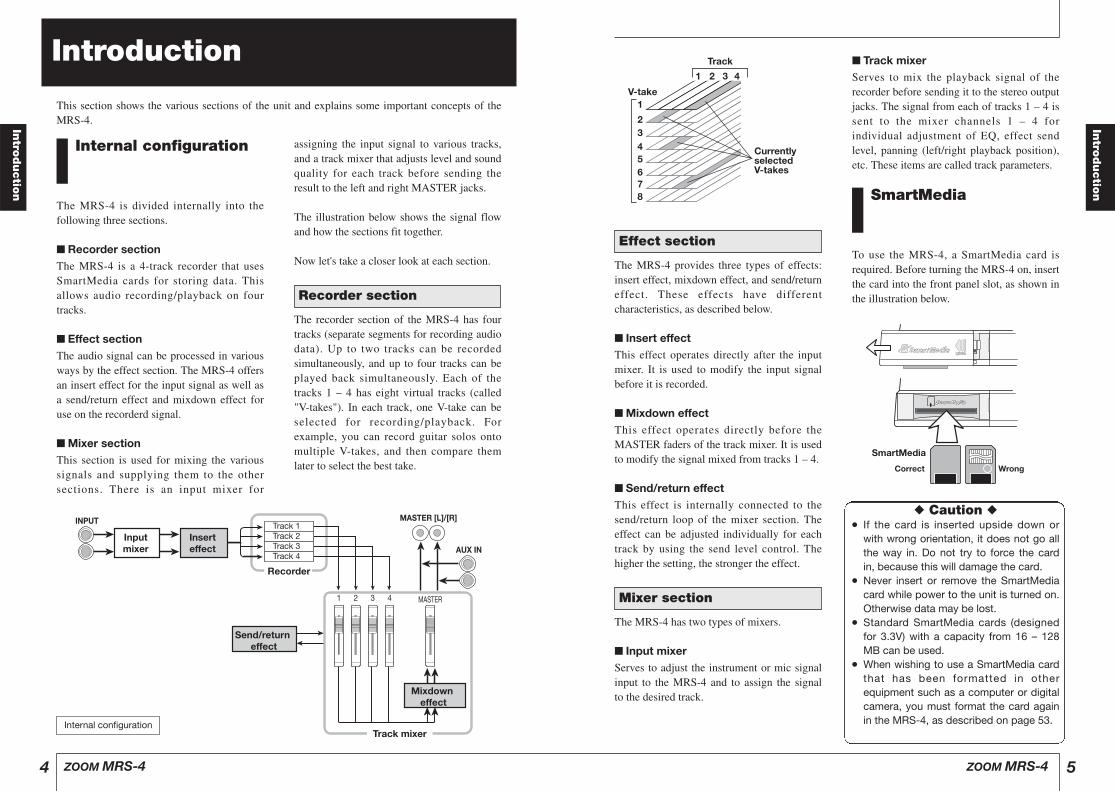
The MRS-4 provides three types of effects:insert effect, mixdown effect, and send/returneffect. These effects have differentcharacteristics, as described below.
■ Insert effect This effect operates directly after the inputmixer. It is used to modify the input signalbefore it is recorded.
■ Mixdown effect This effect operates directly before theMASTER faders of the track mixer. It is usedto modify the signal mixed from tracks 1 – 4.
■ Send/return effect This effect is internally connected to thesend/return loop of the mixer section. Theeffect can be adjusted individually for eachtrack by using the send level control. Thehigher the setting, the stronger the effect.
The MRS-4 has two types of mixers.
■ Input mixer Serves to adjust the instrument or mic signalinput to the MRS-4 and to assign the signalto the desired track.
■ Track mixer Serves to mix the playback signal of therecorder before sending it to the stereo outputjacks. The signal from each of tracks 1 – 4 issent to the mixer channels 1 – 4 forindividual adjustment of EQ, effect sendlevel, panning (left/right playback position),etc. These items are called track parameters.
SmartMedia
To use the MRS-4, a SmartMedia card isrequired. Before turning the MRS-4 on, insertthe card into the front panel slot, as shown inthe illustration below.
◆ Caution ◆● If the card is inserted upside down or
with wrong orientation, it does not go allthe way in. Do not try to force the cardin, because this will damage the card.
● Never insert or remove the SmartMediacard while power to the unit is turned on.Otherwise data may be lost.
● Standard SmartMedia cards (designedfor 3.3V) with a capacity from 16 – 128MB can be used.
● When wishing to use a SmartMedia cardthat has been formatted in otherequipment such as a computer or digitalcamera, you must format the card againin the MRS-4, as described on page 53.
SmartMedia
Correct Wrong
Mixer section
Effect section
1
1
2345678
2
V-take
3 4
Track
Currently selected V-takes
Intro
ductio
n
ZOOM MRS-4 5
Internal configuration
The MRS-4 is divided internally into thefollowing three sections.
■ Recorder section The MRS-4 is a 4-track recorder that usesSmartMedia cards for storing data. Thisallows audio recording/playback on fourtracks.
■ Effect section The audio signal can be processed in variousways by the effect section. The MRS-4 offersan insert effect for the input signal as well asa send/return effect and mixdown effect foruse on the recorderd signal.
■ Mixer section This section is used for mixing the varioussignals and supplying them to the othersections. There is an input mixer for
assigning the input signal to various tracks,and a track mixer that adjusts level and soundquality for each track before sending theresult to the left and right MASTER jacks.
The illustration below shows the signal flowand how the sections fit together.
Now let's take a closer look at each section.
The recorder section of the MRS-4 has fourtracks (separate segments for recording audiodata). Up to two tracks can be recordedsimultaneously, and up to four tracks can beplayed back simultaneously. Each of thetracks 1 – 4 has eight virtual tracks (called"V-takes"). In each track, one V-take can beselected for recording/playback. Forexample, you can record guitar solos ontomultiple V-takes, and then compare themlater to select the best take.
Recorder section
ZOOM MRS-4
Intro
ductio
n
4
Introduction
This section shows the various sections of the unit and explains some important concepts of theMRS-4.
Recorder
Insert effect
Input mixer
Track mixer
Track 1Track 2Track 3Track 4
Send/return effect
Mixdown effect
MASTER [L]/[R]INPUT
AUX IN
MASTER1 2 3 4
Internal configuration
Parts
of
the
MR
S-4
ZOOM MRS-4 7ZOOM MRS-4
Parts
of
the
MR
S-4
6
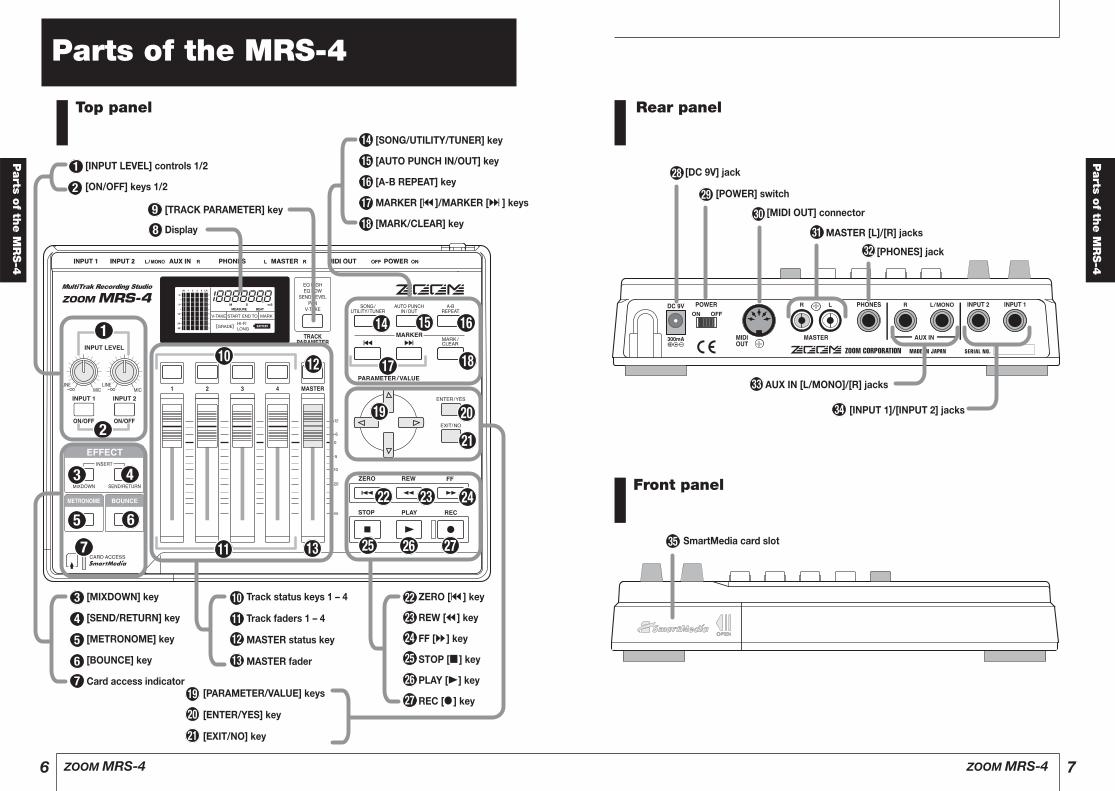
Parts of the MRS-4
Top panel Rear panel
Front panel
Display
[TRACK PARAMETER] key
[SONG/UTILITY/TUNER] key
[AUTO PUNCH IN/OUT] key
[A-B REPEAT] key
MARKER [U]/MARKER [I] keys
[MARK/CLEAR] key
[INPUT LEVEL] controls 1/2
[ON/OFF] keys 1/2
[MIXDOWN] key
[SEND/RETURN] key
[METRONOME] key
[BOUNCE] key
Card access indicator
Track status keys 1 – 4
Track faders 1 – 4
MASTER status key
MASTER fader
ZERO [U] key
REW [T] key
FF [Y] key
STOP [P] key
PLAY [R] key
REC [O] key [PARAMETER/VALUE] keys
[ENTER/YES] key
[EXIT/NO] key
[DC 9V] jack
[POWER] switch
[MIDI OUT] connector
MASTER [L]/[R] jacks
[PHONES] jack
[INPUT 1]/[INPUT 2] jacks
AUX IN [L/MONO]/[R] jacks
SmartMedia card slot
Power on/off switching
To turn the MRS-4 on or off, proceed asfollows.
1. Make sure that the MRS-4 and allother devices are turned off.
Turn down the volume at the sourceequipment, MRS-4, and monitor system.
2. Insert the SmartMedia card intothe SmartMedia card slot on thefront panel of the MRS-4, asdescribed on page 5.
3. Set the [POWER] switch of theMRS-4 to ON.
The MRS-4 starts up.
4. Turn the monitor system on.
1. Turn the monitor system off.
2. Set the [POWER] switch of theMRS-4 to OFF.
The indication "POWEROF" (power off)appears on the display, and the MRS-4 shutsdown.
Always follow the above procedure, and do notremove the SmartMedia card without first turningoff the power. Otherwise data may be destroyed.
◆ Caution ◆When operating the unit with the ACadapter, always use the [POWER]switch of the MRS-4 to turn the uniton and off. Never disconnect the ACadapter while the card accessindicator is lit. Otherwise data may bedestroyed.
Operating the unit onbatteries
The MRS-4 can be powered from batteries(not supplied). Follow the steps below toinsert the batteries.
1. Turn the unit over and open thebattery compartment cover.
2. Insert four fresh IEC R6 (size AA)batteries into the batterycompartment. The use of alkalinebatteries is recommended.
3. Close the battery compartmentcover.
If the indication "[ ]" flashes while the unitis powered from batteries, the batteries areexhausted. Replace the batteries as soon aspossible.
NOTE
Four IEC R6 (size AA) batteries
MRS-4 underside
NOTE
Turning power off
Turning power on
Connectio
ns
ZOOM MRS-4 9ZOOM MRS-4
Connectio
ns
8
Connections
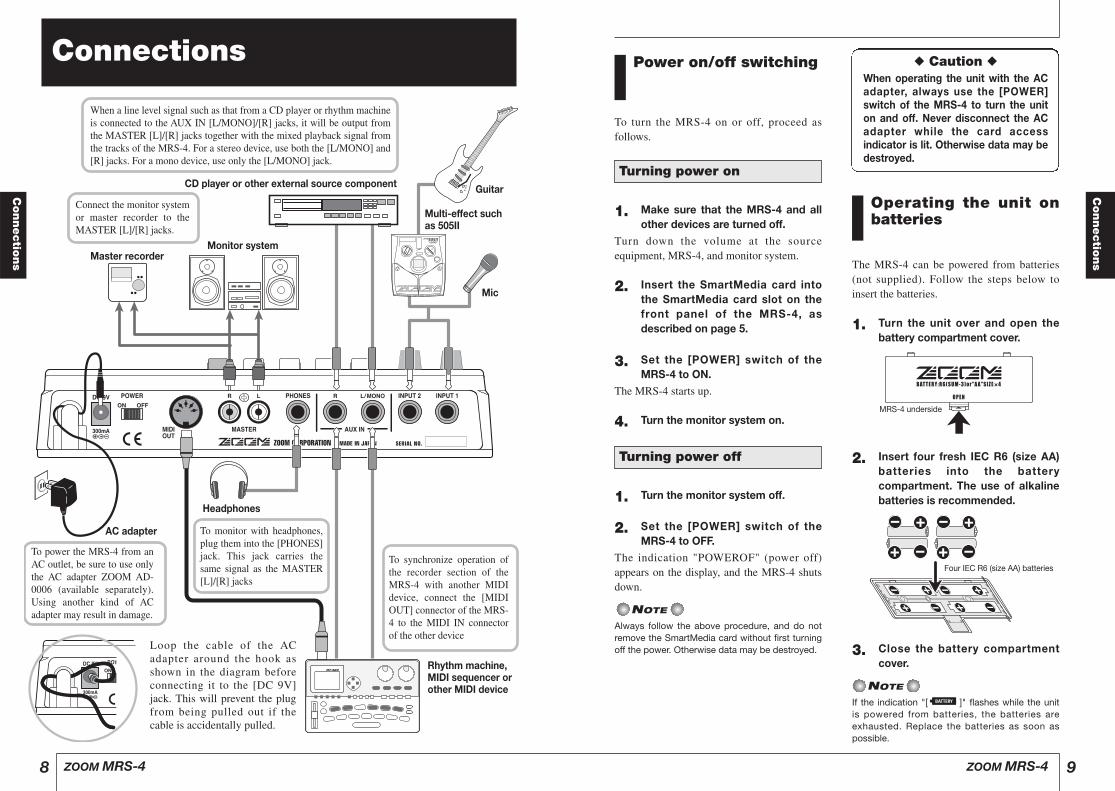
When a line level signal such as that from a CD player or rhythm machine is connected to the AUX IN [L/MONO]/[R] jacks, it will be output from the MASTER [L]/[R] jacks together with the mixed playback signal from the tracks of the MRS-4. For a stereo device, use both the [L/MONO] and [R] jacks. For a mono device, use only the [L/MONO] jack.
Connect the monitor system or master recorder to the MASTER [L]/[R] jacks.
To power the MRS-4 from an AC outlet, be sure to use only the AC adapter ZOOM AD-0006 (available separately). Using another kind of AC adapter may result in damage.
To synchronize operation of the recorder section of the MRS-4 with another MIDI device, connect the [MIDI OUT] connector of the MRS-4 to the MIDI IN connector of the other device
To monitor with headphones, plug them into the [PHONES] jack. This jack carries the same signal as the MASTER [L]/[R] jacks
Headphones
Multi-effect such as 505II
Mic
Guitar
Monitor system Master recorder
Rhythm machine, MIDI sequencer or other MIDI device
AC adapter
CD player or other external source component
Loop the cable of the ACadapter around the hook asshown in the diagram beforeconnecting it to the [DC 9V]jack. This will prevent the plugfrom being pulled out if thecable is accidentally pulled.

When you start to use the MRS-4 for recording, you must choose whether to create a new song oropen an existing song for modification.
1. Connect the monitor system to the MASTER [L]/[R] jacks. To use headphones for monitoring, connect them to the [PHONES] jack.
2. Make sure that a SmartMedia card is inserted in the SmartMedia card slot. Thenturn power on in the order MRS-4 ➜ monitor system. When the MRS-4 is turned on, it automatically checks whether the inserted SmartMediacard already contains any songs.
● When there are no songs on the SmartMedia card A new song is automatically created, and the display shows the following information. Thisdisplay condition is called the "main screen". The main screen is the starting point for alloperations.
● When there are songs on the SmartMedia card The following two indications appear alternately on the display.
When you press the [ENTER/YES] key in this condition, a new song is created, and themain screen appears. The recording will be automatically set to HiFi.
• If you press the [EXIT/NO] key at the above screen, or if no key is operated for 5seconds, the most recent song is automatically read into the unit. (For information onhow to create a new song after a song has been read in, see page 47.)
• If required, change the recording grade setting (➝ p. 49).
HINT
NEWSONG YES NO
000000
Current position within the song
Basic
Opera
tion
ZOOM MRS-4 11
Operation is divided into four major steps.
● Step 1: Preparations for recording Make the necessary connections and prepare to record a song.
● Step 2: Recording the first track Use the insert effect on the input signal if necessary and record the first track.
● Step 3: Overdubbing While listening to the recorded track, record the second and subsequent tracks(overdubbing).
● Step 4: Mixdown Adjust the level, panning, and EQ for each recorded track, and apply the send/returneffect to create a stereo mix. Apply the mixdown effect to the signal, and then send theresult to the master recorder.
In the MRS-4, all data required to play a piece you have created is collectively referred to as a"song".
A song contains the following information.
● All recording data from the recorder section ● All settings of the mixer section ● All settings of the effect section ● Other settings such as for metronome and tuner functions
Up to 15 songs can be stored on one SmartMedia card, provided that there is enough capacity. Byreading a song stored on a card back into the MRS-4, all previous settings are recreated (exceptfor fader setting positions).
Creating a new song1-1
Preparations for recordingStep 1
ZOOM MRS-4
Basic
Opera
tion
10
Basic Operation
This section describes basic operation steps of the MRS-4, starting with preparations forrecording and continuing through the final mixdown process.

The insert effect processes the signal from input 1/2 before it is sent to the tracks for recording. Inthis example, you apply the insert effect on the guitar signal supplied to the INPUT 1 jack. If youdo not wish to use the insert effect, proceed to section 2-3 on page 15.
1. Press the [MIXDOWN] key and the [SEND/RETURN] key simultaneously. The [MIXDOWN] key and [SEND/RETURN] key serve to select the effect to be used.Pressing both keys simultaneously causes the keys to flash in red. This indicates that theinsert effect has been activated.
While the [MIXDOWN] key and [SEND/RETURN] key are both flashing simultaneously,the mixdown effect and send/return effect cannot be used.
The display shows the currently selected algorithm (effect type).
The following algorithms are available for the insert effect.
2. Use the [PARAMETER/VALUE] keys to select the algorithm and the setting value.
LIMIT 0
NOTE
Using the insert effect2-2
ZOOM MRS-4 13
This section describes how to record an electric guitar connected to the [INPUT 1] jack on track 1to create the first track of a recording.
Connect the instrument to the input of the MRS-4 and adjust input sensitivity.
1. Connect the instrument to the [INPUT 1] jack on the MRS-4 (➜ p. 8).
2. Press the [ON/OFF] key 1 so that the key lights up. The [ON/OFF] keys 1/2 serve to activate their respective inputs. When the key is lit, theinput is active.
To record from an instrument with stereo output such as a synthesizer, connect the L/Routput of the device to the [INPUT 1]/[INPUT 2] jacks and set both [ON/OFF] keys 1/2 toON.
The MRS-4 can accept up to two simultaneous input signals.
3. While playing the instrument, use the [INPUT LEVEL] control 1 to adjust the inputsensitivity. The signal input level appears on the level meter (IN) in the left part of the display. Adjustthe control so that the 0 dB indicator does not light when you play the instrument at theloudest level.
0
INPUT 1 level INPUT 2 level
NOTE
HINT
Adjusting input sensitivity2-1
Recording the first track Step 2
ZOOM MRS-412
LIMIT 0
LIMIT 9
This effect suppresses signal peaks to keep the input signal below a certain level. During stereo recording, the effect monitors both inputs. Higher setting values produce stronger limiter action.
Algorithm 1 ( LIMIT 0 – LIMIT 9 )
Algorithm 2 ( COMP 0 – COMP 9 )
Algorithm 3 ( CAB CO, CAB BC, CAB ST )
COMP 0
COMP 9
This effect compresses the signal when the input signal exceeds a certain level. During stereo recording, the effect monitors both inputs. Higher setting values produce stronger compressor action.
CAB CO
CO
BC
ST
CAB BC
CAB ST
This is a cabinet simulator that duplicates the sound of a guitar amplifier. It is useful when a distortion effect is connected between the guitar and the input of the MRS-4. The abbreviation on the right indicates the amp type.
Combo amp
Bright combo amp
Stack amp
Insert effect algorithms
Basic
Opera
tion
Basic
Opera
tion
Record the guitar sound with insert effect on track 1, as follows.
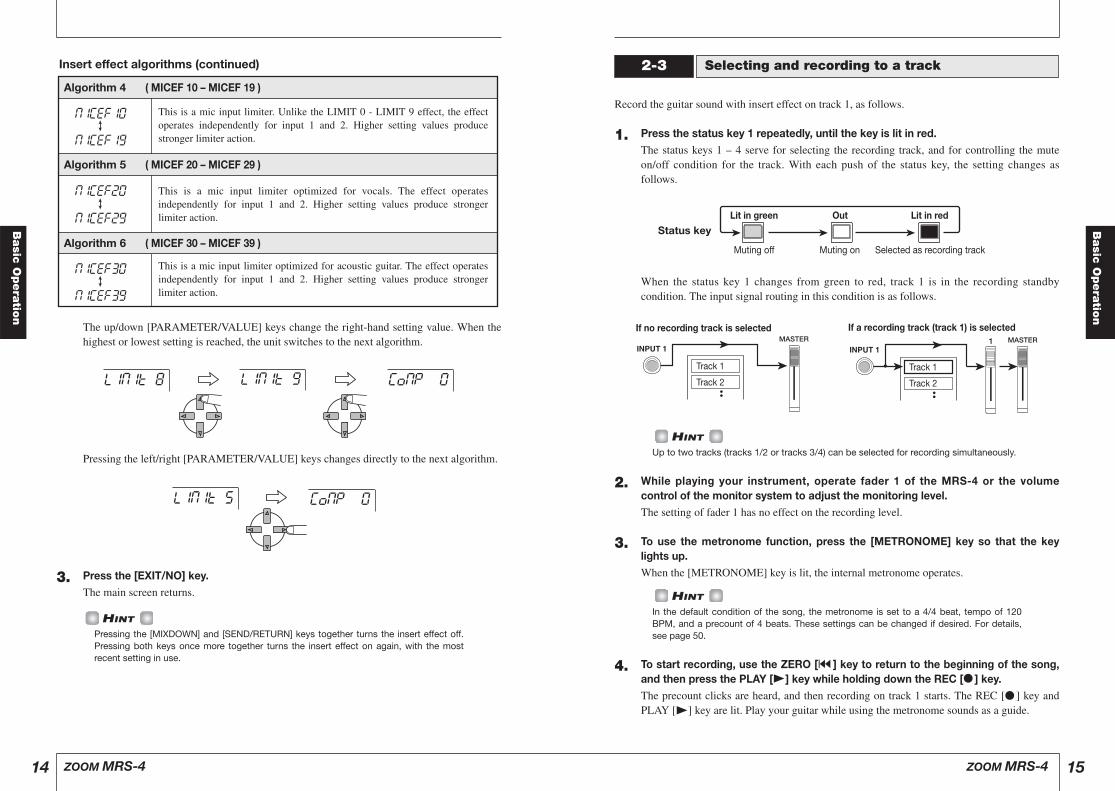
1. Press the status key 1 repeatedly, until the key is lit in red. The status keys 1 – 4 serve for selecting the recording track, and for controlling the muteon/off condition for the track. With each push of the status key, the setting changes asfollows.
When the status key 1 changes from green to red, track 1 is in the recording standbycondition. The input signal routing in this condition is as follows.
Up to two tracks (tracks 1/2 or tracks 3/4) can be selected for recording simultaneously.
2. While playing your instrument, operate fader 1 of the MRS-4 or the volumecontrol of the monitor system to adjust the monitoring level. The setting of fader 1 has no effect on the recording level.
3. To use the metronome function, press the [METRONOME] key so that the keylights up. When the [METRONOME] key is lit, the internal metronome operates.
In the default condition of the song, the metronome is set to a 4/4 beat, tempo of 120BPM, and a precount of 4 beats. These settings can be changed if desired. For details,see page 50.
4. To start recording, use the ZERO [U] key to return to the beginning of the song,and then press the PLAY [R] key while holding down the REC [O] key. The precount clicks are heard, and then recording on track 1 starts. The REC [O] key andPLAY [R] key are lit. Play your guitar while using the metronome sounds as a guide.
HINT
HINT
MASTERIf no recording track is selected
MASTER
If a recording track (track 1) is selected 1
Track 1
Track 2
Track 1
Track 2
Lit in green Out Lit in red
Muting off Muting on Selected as recording track
Status key
Selecting and recording to a track2-3
ZOOM MRS-4 15
The up/down [PARAMETER/VALUE] keys change the right-hand setting value. When thehighest or lowest setting is reached, the unit switches to the next algorithm.
Pressing the left/right [PARAMETER/VALUE] keys changes directly to the next algorithm.
3. Press the [EXIT/NO] key. The main screen returns.
Pressing the [MIXDOWN] and [SEND/RETURN] keys together turns the insert effect off.Pressing both keys once more together turns the insert effect on again, with the mostrecent setting in use.
HINT
LIMIT 5 COMP 0
LIMIT 8 LIMIT 9 COMP 0
ZOOM MRS-414
Algorithm 4 ( MICEF 10 – MICEF 19 )
Algorithm 5 ( MICEF 20 – MICEF 29 )
Algorithm 6 ( MICEF 30 – MICEF 39 )
MICEF10
MICEF19
This is a mic input limiter. Unlike the LIMIT 0 - LIMIT 9 effect, the effect operates independently for input 1 and 2. Higher setting values produce stronger limiter action.
MICEF20
MICEF29
This is a mic input limiter optimized for vocals. The effect operates independently for input 1 and 2. Higher setting values produce stronger limiter action.
MICEF30
MICEF39
This is a mic input limiter optimized for acoustic guitar. The effect operates independently for input 1 and 2. Higher setting values produce stronger limiter action.
Insert effect algorithms (continued)
Basic
Opera
tion
Basic
Opera
tion

ZOOM MRS-4 17
5. When your guitar play is finished, press the STOP [P] key. The REC [O] key and PLAY [R] key go out, and the recorder section stops. The displaybriefly shows "WAIT", and then the main screen reappears.
The length of the "WAIT" interval differs, depending on recording conditions.
6. To listen to the recording, use the ZERO [U] key to return to the beginning of thesong, and then press the PLAY [R] key. The recorded track is played back.
• To turn the metronome off while checking the recording, press the [METRONOME] keyso that the key is no longer lit.
• While the recorder is stopped, you can use the REW [T] key and FF [Y] key to movethe current position in 0.1 second units. If you then press the PLAY [R] key, playbackstarts from that position.
• The basic functions of the transport keys are explained below.
Basic functions of transport keys
7. To stop playback, press the STOP [P] key. To redo the recording, repeat steps 4 – 5.
8. Press the status key 1 so that the key is lit in green. The recording condition of track 1 is turned off.
ZERO [U] keyMoves to the start of the song (counter zero position).
STOP [P] key Stops the song.
FF [Y] key Moves forward from the current position in 0.1 second steps. Keeping the key depressed moves forward quickly. Pressing the REW [T] key while holding down the FF [Y] key moves forward in 1 second steps.
REW [T] key Moves backwards from the current position in 0.1 second steps. Keeping the key depressed moves back quickly. Pressing the FF [Y] key while holding down the REW [T] key moves backwards in 1 second steps.
REC [O] key When this key is held down while pressing the PLAY [R] key, the recorder starts to record. Pressing this key during playback causes punch-in, and pressing the key during recording causes punch-out.
PLAY [R] key Starts playback from the current position.
HINT
NOTE
Click Click Click Click Ding Tick Tick Tick Ding Tick Tick Tick
Record
~
Precount
ZOOM MRS-416
This section describes how to record another instrument on track 2 while listening to the guitarrecorded in step 2 (track 1).
1. Connect the instrument or mic to the [INPUT 1] jack.
2. Press the [ON/OFF] key 1 so that the key lights up.
3. While playing the instrument, use the [INPUT LEVEL] control 1 to adjust the inputsensitivity.
4. Press the [MIXDOWN] key and the [SEND/RETURN] key simultaneously, so thatthe keys are flashing in red.
5. Select the algorithm and set the value as was done in step 2.
6. Press the [EXIT/NO] key to return to the main screen.
Record the sound of the second instrument on track 2.
1. Press the status key 2 repeatedly, until the key is lit in red. Make sure that statuskey 1 is lit in green. This places track 2 into the recording standby condition.
2. Operate fader 2 to adjust the monitor level. If necessary, perform playback and adjust faders 1 and 2 for optimum balance between trackplayback sound and input signal.
3. To use the metronome function, press the [METRONOME] key so that the keylights up.
4. To start recording, use the ZERO [U] key to return to the beginning of the song,and then press the PLAY [R] key while holding down the REC [O] key. The precount clicks are heard, and then recording starts. The REC [O] key and PLAY [R]key are lit. Play your guitar while listening to the playback sound of track 1 and themetronome.
5. When recording is finished, press the STOP [P] key. The display briefly shows "WAIT", and then the main screen reappears.
Selecting a track and recording on it3-2
Adjusting input sensitivity and setting the insert effect3-1
Overdubbing Step 3
Basic
Opera
tion
Basic
Opera
tion

ZOOM MRS-4 19
The length of the "WAIT" interval depends on setting conditions.
6. To listen to the recording, use the ZERO [U] key to return to the beginning of thesong, and then press the PLAY [R] key. The recorded tracks 1 and 2 are played back. If necessary, adjust faders 1 and 2 for optimumbalance.
7. To stop playback, press the STOP [P] key.
8. Press the status key 2 so that the key is lit in green. You can record more tracks in the same way.
When recording of tracks 1 – 4 is completed, you can adjust the level, EQ, and panning of eachtrack to create the final stereo mix. This process is called mixdown.
When performing mixdown on the MRS-4, you can either record the completed song on anexternal master recorder, or on unused V-takes in the MRS-4. The example in this section explainshow to record on an external master recorder.
Connect the master recorder and make other preparations as follows.
1. Connect a master recorder (MD or DAT or similar) to the MASTER [L]/[R] jacks. The connection principle for an external master recorder is shown below.
Monitor system
Master recorder
LINE OUT
LINE IN
MRS-4
MASTER[L]/[R]
Preparations for mixdown4-1
MixdownStep 4
NOTE
ZOOM MRS-418
To listen to the final mix on the monitor system during mixdown, set the master recorderto monitor the input source. (For details, refer to the documentation of the masterrecorder.)
2. Make sure that all status keys are lit in green.
3. Set the [ON/OFF] keys 1/2 and the [METRONOME] key to OFF.
It is also possible to add the input signal from inputs 1/2 to the mix. In this case, set thedesired [ON/OFF] key to ON (➝ P. 38).
1. Set the [MASTER] fader to 0 dB.
2. While the main screen is shown, press the [TRACK PARAMETER] key. The track parameter menu appears. With this menu, you can change the settings forindividual tracks.
3. Use the status keys 1 – 4 to select the track. While the track parameter menu is shown, the status keys 1 – 4 serve for selecting a track.The status key for the currently selected track is lit in orange.
Selectable track parameters and settings are listed in the table below.
HIEQ ON
FADE100
SettingTrack parameter
Adjusting volume/pan/EQ4-2
HINT
HINT
HIEQ Switches high EQ on or off
HIG
Adjusts high EQ boost/cut from -12 (dB) to +12 (dB). This parameter is only shown when HI EQ is set to ON.
DisplayParameter Setting range Description
HIFSelects the frequency for high EQ boost/cut. This parameter is only shown when HI EQ is set to ON.
Track parameters and settings
ON/OFF
-12 – 12
500 – 8000(Hz)
HI EQ ON/OFF
HI EQ GAIN
HI EQFREQUENCY
Basic
Opera
tion
Basic
Opera
tion
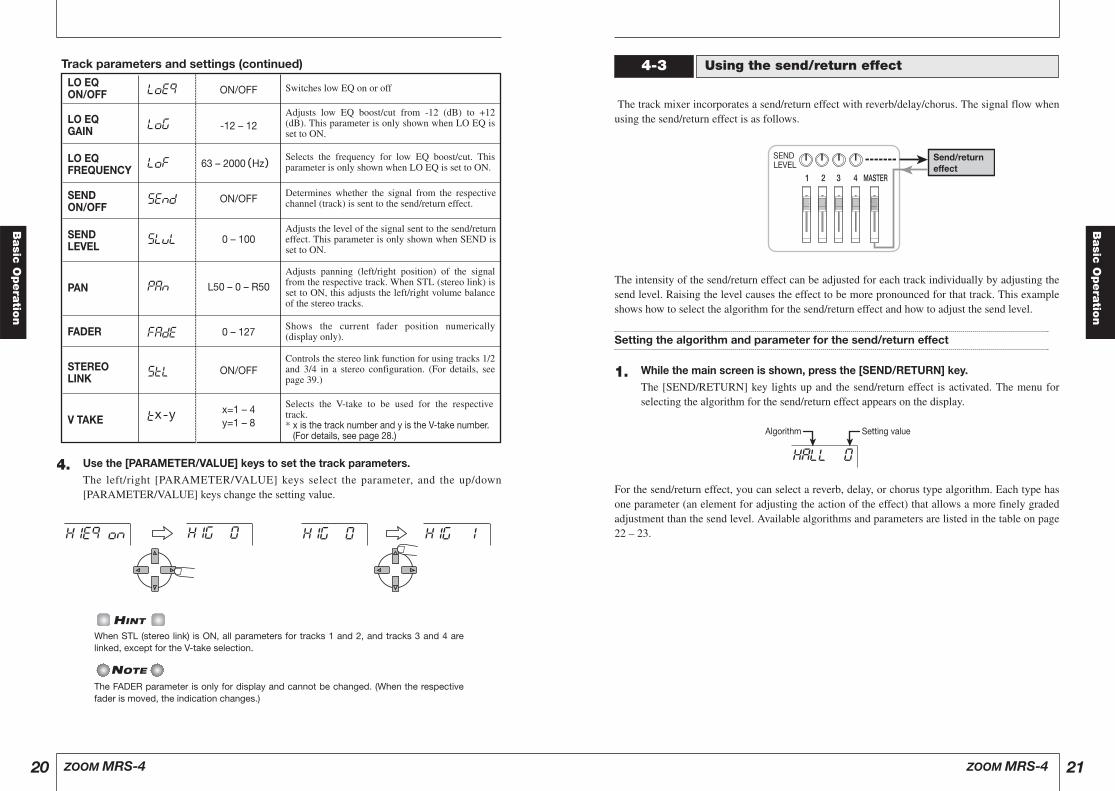
The track mixer incorporates a send/return effect with reverb/delay/chorus. The signal flow whenusing the send/return effect is as follows.
The intensity of the send/return effect can be adjusted for each track individually by adjusting thesend level. Raising the level causes the effect to be more pronounced for that track. This exampleshows how to select the algorithm for the send/return effect and how to adjust the send level.
Setting the algorithm and parameter for the send/return effect
1. While the main screen is shown, press the [SEND/RETURN] key. The [SEND/RETURN] key lights up and the send/return effect is activated. The menu forselecting the algorithm for the send/return effect appears on the display.
For the send/return effect, you can select a reverb, delay, or chorus type algorithm. Each type hasone parameter (an element for adjusting the action of the effect) that allows a more finely gradedadjustment than the send level. Available algorithms and parameters are listed in the table on page22 – 23.
HALL 0
Setting valueAlgorithm
31 2 4 MASTER
Send/return effect
SEND LEVEL
Using the send/return effect4-3
ZOOM MRS-4 21
4. Use the [PARAMETER/VALUE] keys to set the track parameters. The left/right [PARAMETER/VALUE] keys select the parameter, and the up/down[PARAMETER/VALUE] keys change the setting value.
When STL (stereo link) is ON, all parameters for tracks 1 and 2, and tracks 3 and 4 arelinked, except for the V-take selection.
The FADER parameter is only for display and cannot be changed. (When the respectivefader is moved, the indication changes.)
NOTE
HINT
HIEQ ON HIG 0 HIG 0 HIG 1
ZOOM MRS-420
LOEQ Switches low EQ on or off
LOGAdjusts low EQ boost/cut from -12 (dB) to +12 (dB). This parameter is only shown when LO EQ is set to ON.
LOFSelects the frequency for low EQ boost/cut. This parameter is only shown when LO EQ is set to ON.
Controls the stereo link function for using tracks 1/2 and 3/4 in a stereo configuration. (For details, see page 39.)
Track parameters and settings (continued)
ON/OFF
FADEShows the current fader position numerically (display only).0 – 127
-12 – 12
63 – 2000(Hz)
SENDDetermines whether the signal from the respective channel (track) is sent to the send/return effect.ON/OFF
SLVLAdjusts the level of the signal sent to the send/return effect. This parameter is only shown when SEND is set to ON.
0 – 100
STL
Tx-y
ON/OFF
Selects the V-take to be used for the respective track. * x is the track number and y is the V-take number. (For details, see page 28.)
x=1 – 4y=1 – 8
PAN
LO EQ ON/OFF
LO EQGAIN
LO EQFREQUENCY
FADER
SEND ON/OFF
SEND LEVEL
STEREO LINK
V TAKE
PAN
Adjusts panning (left/right position) of the signal from the respective track. When STL (stereo link) is set to ON, this adjusts the left/right volume balance of the stereo tracks.
L50 – 0 – R50
Basic
Opera
tion
Basic
Opera
tion
2. Use the [PARAMETER/VALUE] keys to select the algorithm and the setting value. The up/down [PARAMETER/VALUE] keys change the setting value. When the highest orlowest setting is reached, the unit switches to the next algorithm.
Pressing the left/right [PARAMETER/VALUE] keys changes directly to the next algorithm.
3. To change the parameter of the currently selected algorithm, press the[ENTER/YES] key. While the algorithm is displayed, pressing the [ENTER/YES] key calls up the parameter forthat algorithm.
DOBLE 0 TIME 2
ROOM 5 DOBLE 0
HALL 8 HALL 9 ROOM 0
ZOOM MRS-4 23ZOOM MRS-422
Adjusts the reverb tone. Higher settings produce stronger treble boost. (5 is the flat setting.)
Send/return effect algorithms and parameters
ParameterHALL 0
HALL 9
This is a stereo effect that adds hall type reverberation. Higher settings produce longer reverb time.
Algorithm 1 ( HALL 0 – HALL 9 )
( TONE 0 – TONE 10 )
TONE 0
TONE 10
Adjusts the reverb tone. Higher settings produce stronger treble boost. (5 is the flat setting.)
( TONE 0 – TONE 10 )Parameter
This is a stereo effect that adds room type reverberation. Higher settings produce longer reverb time.
( ROOM 0 – ROOM 9 )Algorithm 2
ROOM 0
ROOM 9 TONE 0
TONE 10
Adjusts the delay time in the range from 2 – 50 ms.
( TIME 2 – TIME 50 )Parameter
This is a mono doubling delay which adds a slightly delayed component to the original sound, giving the sound more body. Higher settings produce more delayed components.
( DOUBLE0 – DOUBLE9 )Algorithm 3
DOBLE 0
DOBLE 9 TIME 2
TIME 50
Adjusts the delay time in the range from 50 – 250 ms.
( TIME 50 – TIME 250 )Parameter
This is a mono short delay. Higher settings produce more delayed components.
( SHORT 0 – SHORT 9 )Algorithm 4
SHORT 0
SHORT 9 TIME 50
TIME250
Adjusts the delay time in the range from 250 ms (setting value 25) – 1000 ms (setting value 100).
ParameterLONG 0
LONG 9
This is a mono long delay. Higher settings produce more delayed components.
Algorithm 5 ( LONG 0 – LONG 9 )
( TIME 25 – TIME 100 )
TIME 25
TIME100
Adjusts the fluctuation rate. Higher values produce faster fluctuation.
( RATE 1 – RATE 50 )Parameter
This is a mono chorus effect. A component whose pitch shifts cyclically up and down is added to the original sound, resulting in a wavering, expansive sound.
( CHO MN )Algorithm 6
CHO MNRATE 1
RATE 50
Adjusts the fluctuation rate. Higher values produce faster fluctuation.
( RATE 1 – RATE 50 )Parameter
This is a stereo chorus effect. The pitch of left and right components are shifted upside down, resulting in a unique, expansive sound.
( CHO ST )Algorithm 7
CHO ST
RATE 1
RATE 50
Basic
Opera
tion
Basic
Opera
tion
10. While playing the song, use the up/down [PARAMETER/VALUE] keys to adjust thesend level for that track.
11. Perform the same steps for other tracks.
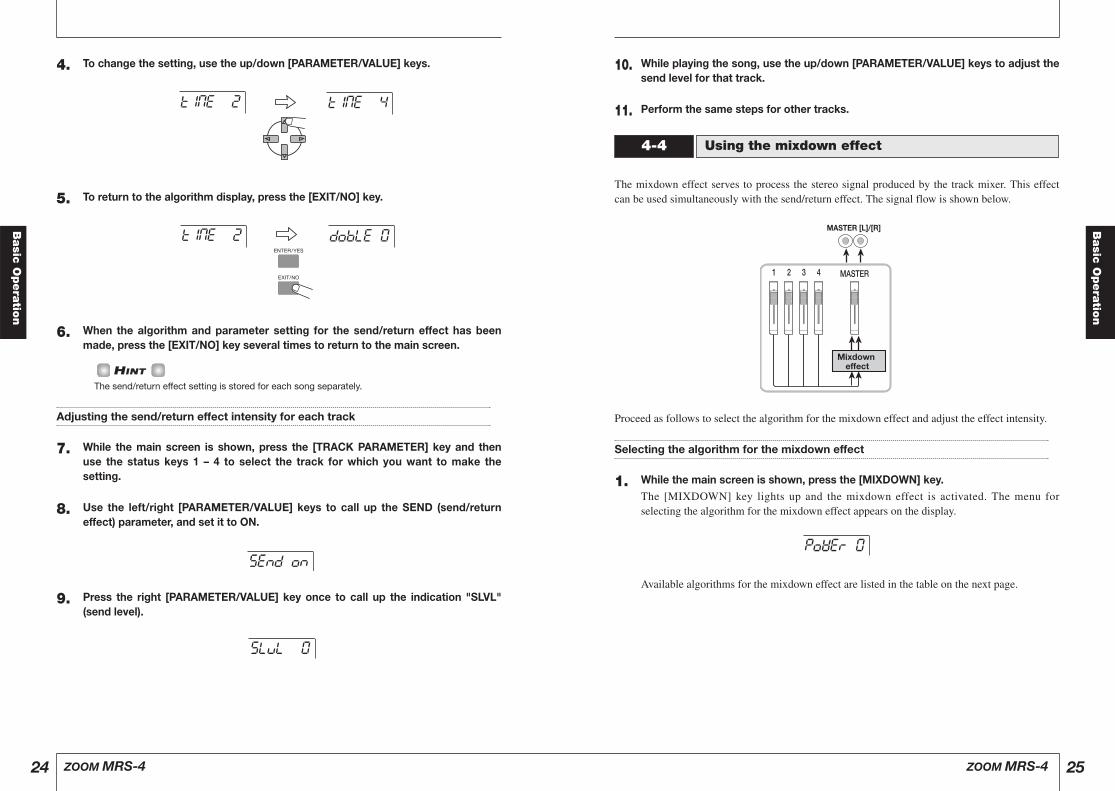
The mixdown effect serves to process the stereo signal produced by the track mixer. This effectcan be used simultaneously with the send/return effect. The signal flow is shown below.
Proceed as follows to select the algorithm for the mixdown effect and adjust the effect intensity.
Selecting the algorithm for the mixdown effect
1. While the main screen is shown, press the [MIXDOWN] key. The [MIXDOWN] key lights up and the mixdown effect is activated. The menu forselecting the algorithm for the mixdown effect appears on the display.
Available algorithms for the mixdown effect are listed in the table on the next page.
POWER 0
Mixdown effect
MASTER [L]/[R]
MASTER1 2 3 4
Using the mixdown effect4-4
ZOOM MRS-4 25
4. To change the setting, use the up/down [PARAMETER/VALUE] keys.
5. To return to the algorithm display, press the [EXIT/NO] key.
6. When the algorithm and parameter setting for the send/return effect has beenmade, press the [EXIT/NO] key several times to return to the main screen.
The send/return effect setting is stored for each song separately.
Adjusting the send/return effect intensity for each track
7. While the main screen is shown, press the [TRACK PARAMETER] key and thenuse the status keys 1 – 4 to select the track for which you want to make thesetting.
8. Use the left/right [PARAMETER/VALUE] keys to call up the SEND (send/returneffect) parameter, and set it to ON.
9. Press the right [PARAMETER/VALUE] key once to call up the indication "SLVL"(send level).
SLVL 0
SEND ON
HINT
TIME 2 DOBLE 0
TIME 2 TIME 4
ZOOM MRS-424
Basic
Opera
tion
Basic
Opera
tion
When the mixdown effect setting is completed, you are ready to record the final mix on themaster recorder.
1. Use the ZERO [U] key to return to the beginning of the song.
2. Set the master recorder to the recording condition.
3. Press the PLAY [R] key.
4. When the song has been completely recorded, stop the master recorder and theMRS-4.
5. To check the recording, rewind the master recorder and play the recording fromthe beginning.
Whenever you make any changes to a song on the MRS-4, the song is automaticallysaved on the SmartMedia card.
HINT
Recording on the master recorder4-5
ZOOM MRS-4 27
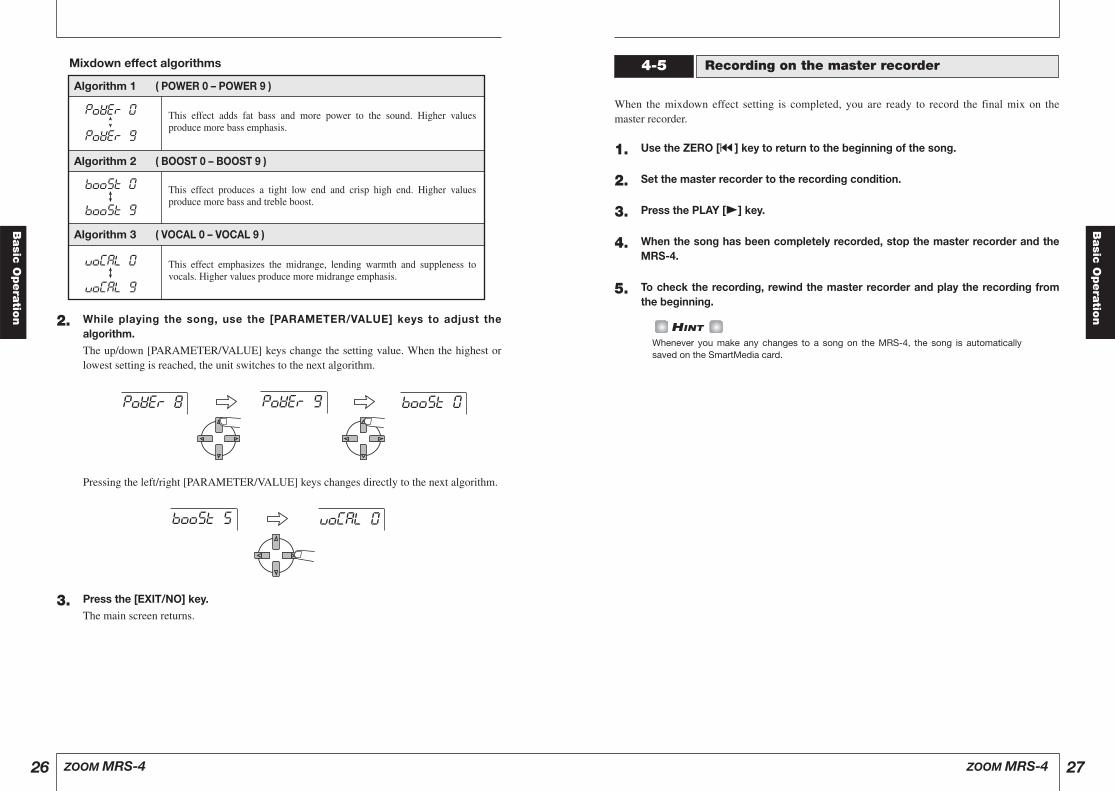
2. While playing the song, use the [PARAMETER/VALUE] keys to adjust thealgorithm. The up/down [PARAMETER/VALUE] keys change the setting value. When the highest orlowest setting is reached, the unit switches to the next algorithm.
Pressing the left/right [PARAMETER/VALUE] keys changes directly to the next algorithm.
3. Press the [EXIT/NO] key. The main screen returns.
BOOST 5 VOCAL 0
POWER 8 POWER 9 BOOST 0
ZOOM MRS-426
POWER 0
POWER 9
This effect adds fat bass and more power to the sound. Higher values produce more bass emphasis.
Algorithm 1 ( POWER 0 – POWER 9 )
Algorithm 2 ( BOOST 0 – BOOST 9 )
Algorithm 3 ( VOCAL 0 – VOCAL 9 )
BOOST 0
BOOST 9
This effect produces a tight low end and crisp high end. Higher values produce more bass and treble boost.
VOCAL 0
VOCAL 9
This effect emphasizes the midrange, lending warmth and suppleness to vocals. Higher values produce more midrange emphasis.
Mixdown effect algorithms
Basic
Opera
tion
Basic
Opera
tion

Combining multipletracks (Bounce function)
"Bounce" is a function that mixes therecorded content of several tracks and recordsthem on one or two tracks. This is sometimesalso called "ping-pong recording". Evenwhen all 4 tracks are recorded, the MRS-4allows you to play them back simultaneouslyand bounce them onto currently unused V-takes.
For example, after bouncing 4 tracks onto 1or 2 V-takes, switching the V-takes of thetracks allows you to listen to the bouncetarget tracks while overdubbing anotherinstrument on the remaining tracks. Insteadof using an external master recorder, it is alsopossible to perform mixdown onto twointernal V-takes.
This section describes how to bounce the V-takes 1 of tracks 1 – 4 onto V-takes 8 oftracks 1 and 2.
Specifying the bounce target V-take
1. While the main screen is shown,press the [SONG/UTILITY/TUNER]key, and then use the left/right[PARAMETER/VALUE] keys tobring the indication "BOUNCE"onto the display.
2. Press the [ENTER/YES] key. The display changes as follows.
At this screen, you can select the V-take ofthe bounce target track you plan to record to.
3. Use the up/down [PARAMETER/VALUE] keys to select the V-takeas follows.
● CR (Current) Record on currently selected V-take.
● 1 – 8 (V-take 1 – 8) Record on the specified V-take. In this example, let's select V-take 8.
4. Press the [EXIT/NO] key severaltimes to return to the main screen.
REC 8
REC CR
BOUNCE
1
12345678
2 3 4Track
Bounce
V-take
Refe
rence
[Record
er]
ZOOM MRS-4 29
Using V-takes
Each track 1 – 4 of the recorder containseight virtual tracks called "V-takes". For eachtrack, you can select one take, which will beused for recording and playback. Forexample, you can switch V-takes and recordimportant passages such as vocal or guitarsolos several times on the same track. Lateryou can compare them and select the best V-take. To switch the V-take for a track, proceed asfollows.
1. While the main screen is shown,press the [TRACK PARAMETER]key.
The track parameter menu appears.
2. Use the status keys 1 – 4 to selectthe track you wish to switch.
3. Use the left/right [PARAMETER/VALUE] keys to bring the V-takeindicator onto the display.
The track number and V-take number areshown at the top right of the display.
4. Use the up/down [PARAMETER/VALUE] keys to select the V-takenumber.
5. Repeat steps 2 – 4 as required toswitch V-takes for other tracks.
6. Press the [EXIT/NO] key to returnto the main screen.
12345678
Flashing:Currently selected
V-take
Out:Unrecorded V-take
Lit:Recorded V-take
V-takeTrack
T1-2
E T1-1
Track number V-take number
Indicator
Indicates an empty V-take.
ZOOM MRS-4
Refe
rence
[Record
er]
28
Reference [Recorder]
This section describes various advanced functions and operations of the recorder section of theMRS-4.
This section describes how to use manualpunch-in/out to re-record a region of apreviously recorded track.
1. Repeatedly press the status key ofthe track on which you want topunch-in/out, until the key is lit in red.
2. Raise the fader of the correspondingchannel to a suitable position.
3. While playing the instrumentconnected to the input, adjust theinput sensitivity.
If necessary, play back the recorder and usethe faders of the mixer section to adjust themix balance of your instrument and theplayback of the tracks.
4. Move to a point several measuresearlier than where you want topunch-in, and press the PLAY [R]key to begin playback.
When the metronome is on and playback isstarted from a point midway in a song, noprecount clicks are heard. Depending on thestart position, the metronome sound may startwithin a beat.
5. When you come to the punch-inlocation, press the REC [O] key.
The REC [O] key lights, and track recordingbegins from that location (punch-in).
6. When you come to the punch-outlocation, press the REC [O] oncemore.
The REC [O] key goes out, and the unit switchesfrom recording to playback (punch-out).
7. To stop the recorder, press theSTOP [P] key.
The display briefly shows "WAIT".
The length of the "WAIT" interval depends onsetting conditions.
8. To check the newly recordedcontent, move to the point of step4, and press the PLAY [R] key.
To redo punch-in/punch-out, repeat steps 4 – 7.
9. When the results are as desired,press the status key for that trackso that the key lights in green.
Auto punch-in/out is a function that lets youspecify beforehand the region to be re-recorded. Punch-in will occur automaticallywhen you reach the starting location (Inpoint), and punch-out will occur automaticallywhen you reach the ending location (Outpoint).
The procedure is as follows.
Setting the In/Out points
1. Repeatedly press the status key ofthe track on which you want topunch-in/out, until the key is lit in red.
2. Raise the fader of the correspondingchannel to a suitable position.
3. While playing the instrumentconnected to the input, adjust theinput sensitivity.
4. Move to the point at which youwant to punch-in, and press the[AUTO PUNCH IN/OUT] key.
The [AUTO PUNCH IN/OUT] key flashes.This sets the "In point" at which recordingwill begin.
Using auto punch-in/out
NOTE
Using manual punch-in/out
Refe
rence
[Record
er]
ZOOM MRS-4 31
Carrying out the bounce function
5. Adjust the level balance, pan, andEQ of tracks 1 – 4.
6. Press the [BOUNCE] key. The [BOUNCE] key lights up and the bouncefunction is activated.
If desired, you can also use the send/return effectand mixdown effect during bounce. (For details,see page 21, 25.)
7. On the main screen, press thestatus keys 1/2 for the bouncetarget tracks 1/2, so that the keysare lit in red.
Make sure that [ON/OFF] keys 1/2 and the[METRONOME] key are out.
8. Return to the beginning of thesong, and then press the PLAY [R]key while holding down the REC[O] key.
The mixed signal of tracks 1 – 4 is routedthrough the MASTER fader and recorded onthe bounce target (V-takes 8 of tracks 1 and2). The level meter L/R indication allowschecking the level.
• When bouncing in stereo, the odd-numberedtrack of the bounce destination isautomatically recorded as the left channel andthe even-numbered track as the right channel.
• By setting the ON/OFF keys 1/2 to ON, it ispossible to add the input signal from inputs1/2 to the bounced signal.
• The input signal from the AUX IN jacks andfrom the internal metronome is not recorded.
9. When recording is completed, stopthe recorder.
The display briefly shows "WAIT".
The length of the "WAIT" interval depends onsetting conditions.
10. On the target track, select the V-takes that were used as bouncetargets, return to the beginning ofthe song, and check the recording.
At this time, the status keys of tracks 3/4should be out, so that the tracks are muted.
To redo the bounce process, repeat steps 5 – 9.
When playing back bounce target V-takes, theparameters previously set for that track will beactive. Panning, EQ, and effect depth thereforemay be different from the actual recording. Toaccurately monitor the content of the bouncetarget, reset the track parameter settings.
11. When the results are as desired,press the [BOUNCE] key so thatthe key goes out.
The bounce function is turned off.
Re-recording only aspecified region (Punch-in/out function)
Punch-in/out is a function that lets you re-record just a specified region of a previouslyrecorded track. The action of switching atrack that is in play mode to record mode iscalled "punch-in", and the action of switchingback from recording to playback is called"punch-out".
The MRS-4 provides two ways to do this.You can use the panel keys to punch-in/outmanually ("manual punch-in/out"), or causepunch-in/out to occur automatically atpreviously specified points ("auto punch-in/out").
NOTE
NOTE
HINT
HINT
ZOOM MRS-4
Refe
rence
[Record
er]
30
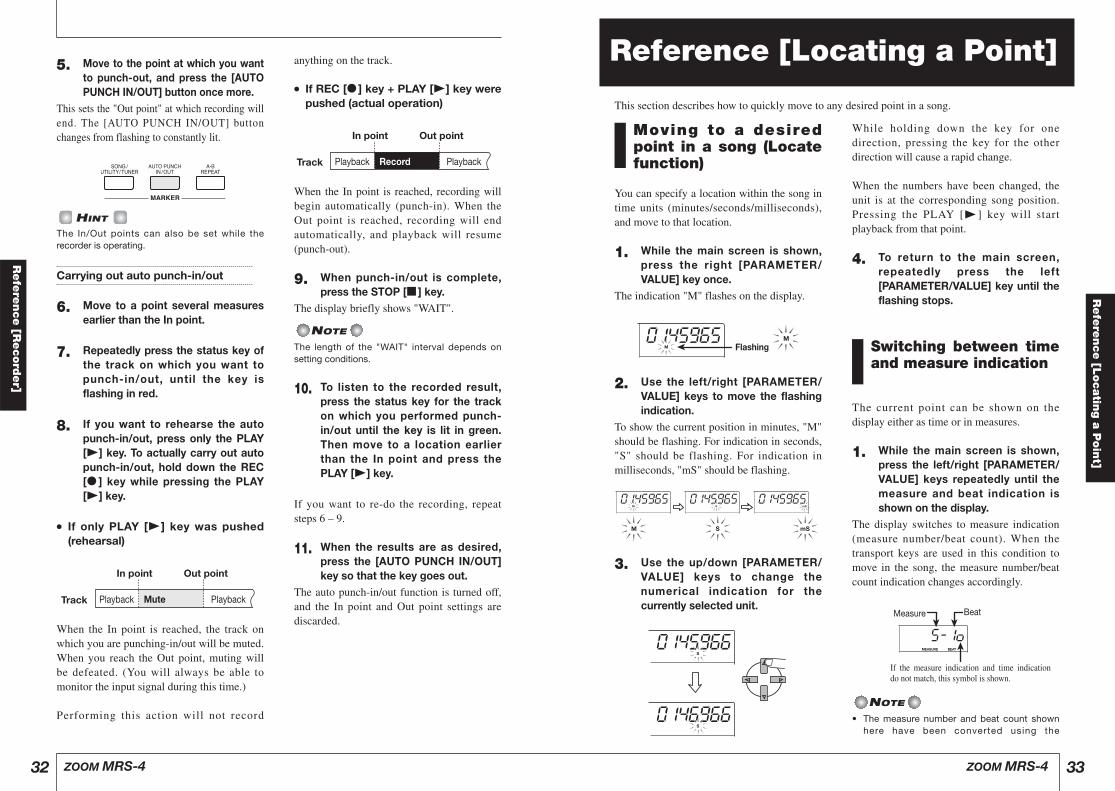
Moving to a desiredpoint in a song (Locatefunction)
You can specify a location within the song intime units (minutes/seconds/milliseconds),and move to that location.
1. While the main screen is shown,press the right [PARAMETER/VALUE] key once.
The indication "M" flashes on the display.
2. Use the left/right [PARAMETER/VALUE] keys to move the flashingindication.
To show the current position in minutes, "M"should be flashing. For indication in seconds,"S" should be flashing. For indication inmilliseconds, "mS" should be flashing.
3. Use the up/down [PARAMETER/VALUE] keys to change thenumerical indication for thecurrently selected unit.
While holding down the key for onedirection, pressing the key for the otherdirection will cause a rapid change.
When the numbers have been changed, theunit is at the corresponding song position.Pressing the PLAY [R ] key will startplayback from that point.
4. To return to the main screen,repeatedly press the left[PARAMETER/VALUE] key until theflashing stops.
Switching between timeand measure indication
The current point can be shown on thedisplay either as time or in measures.
1. While the main screen is shown,press the left/right [PARAMETER/VALUE] keys repeatedly until themeasure and beat indication isshown on the display.
The display switches to measure indication(measure number/beat count). When thetransport keys are used in this condition tomove in the song, the measure number/beatcount indication changes accordingly.
• The measure number and beat count shownhere have been converted using the
NOTE
Measure Beat
If the measure indication and time indication do not match, this symbol is shown.
5-1O0145966
0146966
0145965 0145965 0145965
0145965Flashing
Refe
rence
[Locatin
ga
Poin
t]
ZOOM MRS-4 33
5. Move to the point at which you wantto punch-out, and press the [AUTOPUNCH IN/OUT] button once more.
This sets the "Out point" at which recording willend. The [AUTO PUNCH IN/OUT] buttonchanges from flashing to constantly lit.
The In/Out points can also be set while therecorder is operating.
Carrying out auto punch-in/out
6. Move to a point several measuresearlier than the In point.
7. Repeatedly press the status key ofthe track on which you want topunch-in/out, until the key isflashing in red.
8. If you want to rehearse the autopunch-in/out, press only the PLAY[R] key. To actually carry out autopunch-in/out, hold down the REC[O] key while pressing the PLAY[R] key.
● If only PLAY [R] key was pushed(rehearsal)
When the In point is reached, the track onwhich you are punching-in/out will be muted.When you reach the Out point, muting willbe defeated. (You will always be able tomonitor the input signal during this time.)
Performing this action will not record
anything on the track.
● If REC [O] key + PLAY [R] key werepushed (actual operation)
When the In point is reached, recording willbegin automatically (punch-in). When theOut point is reached, recording will endautomatically, and playback will resume(punch-out).
9. When punch-in/out is complete,press the STOP [P] key.
The display briefly shows "WAIT".
The length of the "WAIT" interval depends onsetting conditions.
10. To listen to the recorded result,press the status key for the trackon which you performed punch-in/out until the key is lit in green.Then move to a location earlierthan the In point and press thePLAY [R] key.
If you want to re-do the recording, repeatsteps 6 – 9.
11. When the results are as desired,press the [AUTO PUNCH IN/OUT]key so that the key goes out.
The auto punch-in/out function is turned off,and the In point and Out point settings arediscarded.
NOTE
Track Playback PlaybackRecord
In point Out point
Track Playback PlaybackMute
In point Out point
HINT
ZOOM MRS-4
Refe
rence
[Record
er]
32
Reference [Locating a Point]
This section describes how to quickly move to any desired point in a song.

Specifying a mark directly
1. While the main screen is shown,press the left [PARAMETER/VALUE] key once.
The indication "MARK" flashes on thedisplay, and the number of the nearest markbefore the current location is shown.
2. Use the up/down [PARAMETER/VALUE] keys to select the desiredmark number.
As the mark number is changed, the unit alsomoves to that location.
You can clear (delete) an existing mark asfollows.
1. While the main screen is shown,press the left [PARAMETER/VALUE] key once. Then use theup/down [PARAMETER/VALUE]keys to select the desired marknumber.
If the mark position and the current position donot match, the mark cannot be deleted. If no dotis shown at the bottom right of the mark number,use the MARKER [U]/MARKER [Y] keys tobring the marker position and the current positionto match.
2. Press the [MARK/CLEAR] key. The selected mark is deleted, and thesubsequent marks are renumbered.
• Once deleted, a mark cannot be restored.
• The mark number 00 that corresponds to thebeginning of a song cannot be deleted.
NOTE
00 01 02 03
00 01 0302 04
Mark to be deleted
Marknumber
Song
Marknumber
Song
NOTE
02
Clearing a mark
01When the mark is the closest to the current location, a dot appears here.
Refe
rence
[Locatin
ga
Poin
t]
ZOOM MRS-4 35
metronome beat as reference. (For informationon how to change the metronome beat andtempo, see page 50.)
• This indication is for information only. Themeasure indication cannot be used to move toa point in the song.
2. To return to time indication, pressthe left [PARAMETER/VALUE] keyonce.
Marking a point in asong (marker function)
You can assign up to 50 marks in a song atany desired location, allowing you to quicklymove to that point later. This is convenientwhen you want to play back repeatedly froma specific location.
To assign a mark at a location in a song,proceed as follows.
1. Move to the point at which youwant to assign a mark.
If necessary, you can specify the currentpoint in minutes/seconds/milliseconds.
A mark can be assigned either during playback orwhen stopped.
2. Press the [MARK/CLEAR] key. A mark will be assigned to the currentlocation, and the mark number is shown.
The mark number is assigned automaticallyin ascending order from 01 to 50. (Thebeginning of the song always corresponds tothe mark number 00.) If you add a new markbetween two existing marks, the subsequentmarks will be renumbered.
Here's how to move to the location of a mark.This can be done in two ways: you can usekey operations, or specify the mark numberdirectly.
Using keys to move to a mark
1. While the main screen is shown,press either the MARKER [U] orthe MARKER [I] key.
Each time you press the key, the unit movesto the next mark before or after the currentlocation.
Current location
Song
Mark
Moving to a mark location
00 01 02 03
00 01 0302 04
Mark added
Marknumber
Song
Marknumber
Song
SET 02
Mark number
HINT
Assigning a mark
ZOOM MRS-4
Refe
rence
[Locatin
ga
Poin
t]
34

Assigning two inputs toa track
In the "Basic Operation" section, we learnedhow to record the signal from one input onone track. By using the input mixer, it is alsopossible to combine the signal from twoinputs onto one track, or to record it on twotracks separately. The procedure is describedbelow.
1. Connect the instrument ormicrophone to be recorded to the[INPUT 1]/[INPUT 2] jacks.
2. Set [ON/OFF] keys 1/2 to ON.
3. While listening to the sound,operate the [INPUT LEVEL]controls 1/2 to adjust the inputsensitivity.
The input level for each input can be checkedseparately on the display.
4. Repeatedly press the status key forthe track on which you want torecord, until the key is lit in red.The track is now in the recordingstandby condition.
The maximum number of tracks you canrecord to simultaneously is two. Only thecombination of tracks 1/2 or tracks 3/4 isallowed.
The signal flow from the input mixer to thetracks depends on the track selection and thestatus of the [ON/OFF] keys 1/2, as shown inthe illustrations.
● When only one recording track isselected
● When two recording tracks areselected (tracks 1/2 or tracks 3/4)
INPUT 1 or INPUT 2
INPUT 1
INPUT 2
Recorder
Recorder
Track
Track
Track
Track
Recorder
Recorder
INPUT 1 or INPUT 2
INPUT 1
INPUT 2
Track
Track
Refe
rence
[Mixin
g]
ZOOM MRS-4 37
Reference [Mixing]
This section describes advanced mixing techniques using the input mixer and track mixer.
Playing back the samepassage repeatedly (A-B Repeat)
A-B Repeat is a function that repeatedlyplays back a desired region of the song. Thisis useful when you want to listen to the sameregion repeatedly.
1. Move to the point at which youwant to begin repeat playback, andpress the [A-B REPEAT] key.
The [A-B REPEAT] key flashes, and therepeat start location (point A) is specified.
2. Move to the point at which youwant to end repeat playback, andpress the [A-B REPEAT] key.
The [A-B REPEAT] key will change fromflashing to constantly lit, and the repeat endlocation (point B) will be specified.
• If you specify a point B that is located earlierthan point A, the region from points B ➝ A willbe played repeatedly.
• If you want to redo the point A/B settings,press the [A-B REPEAT] key several times tomake it go out, and then repeat steps 1 – 2.
• Point A/B setting can be done when therecorder is either stopped or playing.
3. To begin repeat playback, pressthe PLAY [R] key.
Repeat playback will begin when you pressthe PLAY [R] key while the [A-B REPEAT]key is lit. When the end point (normally pointB) is reached, the recorder jumps to the startpoint (normally point A), and playbackcontinues.
4. To stop repeat playback, press theSTOP [P] key.
Even after pressing the STOP [P] key tostop playback, you can perform repeatplayback again as many times as desired, aslong as the [A-B REPEAT] key is lit.
5. To turn off repeat playback, pressthe [A-B REPEAT] key.
The [A-B REPEAT] key goes out, and repeatplayback will be turned off.
You can use repeat playback together with theauto punch-in/out function. By setting points Aand B outside the punch-in/out points, you canautomatically have the recorder return to point Aafter punch-out and play back the recordedsection for checking.
HINT
Playback
A B
HINT
ZOOM MRS-4
Refe
rence
[Locatin
ga
Poin
t]
36
7. Use the [PARAMETER/VALUE]keys to adjust the parameter.
The left/right [PARAMETER/VALUE] keysserve for selecting the parameter and theup/down [PARAMETER/VALUE] keys forsetting the value.
• When wishing to use the send/return effect,press the [SEND/RETURN] key to set it to ON,and then select the algorithm and parameter(➝ p. 21).
• When a signal is sent from the input mixer tothe send/return effect, only the signal outputfrom the MASTER [L]/[R] jacks reflects theeffect. The effect has no influence on the signalrecorded on the track.
8. When preparations are complete,play the instrument and performmixdown.
The input 1/2 signal is mixed to the track 1 –4 signal and sent to the master recorder. It isalso possible to apply the mixdown effect tothe mixed signal.
When bouncing the signal onto internal V-takes,the input signal can also be mixed in asdescribed above.
Linking two tracks(stereo link function)
This function allows you to link two tracks inthe track mixer, so that their parameters(except the V-take selection) are adjusted insync. This is convenient to control stereomaterial that was recorded on two tracks.
1. While the main screen is shown,press the [TRACK PARAMETER]key.
The track parameter menu appears.
2. Use the status keys 1 – 4 to selectone of the two tracks you want tolink.
3. Use the left/right [PARAMETER/VALUE] keys to call up the STL(stereo link) parameter.
4. Use the up/down [PARAMETER/VALUE] keys to set the STLparameter to ON.
When status key 1 or 2 was pressed in step 2,tracks 1 and 2 are linked. When status key 3or 4 was pressed, tracks 3 and 4 are linked.When two tracks are linked, the followingapplies.
● When the stereo link is activated, the PANparameter is set to 0 for both tracks. Thevalues for all other track parameters(except V-take selection) are copied fromthe odd-numbered track to the even-numbered track.
● When the parameter in one track ischanged, the parameter of the other trackalso changes accordingly (except V-takeselection).
● When the fader for the odd-numberedtrack is operated, the level in both trackschanges. (The fader of the even-numberedtrack is inactive.)
● The PAN parameter operates as aBALANCE parameter that adjusts thelevel balance between the two (left andright) channels.
5. To cancel the stereo link, set theSTL parameter to OFF.
STL ON
STL OF
HINT
NOTE
Refe
rence
[Mixin
g]
ZOOM MRS-4 39
● When no recording track is selected
• When when the insert effect is used, the basicsignal flow for inputs 1/2 remains same.
• Depending on the selected insert effectalgorithm, the level at input 1 and 2 may bewatched simultaneously for operation in bothchannels, or inputs 1 and 2 may operateindependently.
Adding the input signalto the mixdown
When performing mixdown, the input mixercan be used to add the signal from inputs 1/2.
1. Connect the master recorder to theMASTER [L]/[R] jacks and makethe necessary preparations formixdown (➜ p. 18).
2. Connect the instrument ormicrophone to add to the mix tothe [INPUT 1]/[INPUT 2] jacks.
3. Set the [ON/OFF] keys 1/2 to ON.
4. While listening to the sound, adjustthe input sensitivity with the[INPUT LEVEL] controls 1/2.
5. While the main screen is shown,press the [TRACK PARAMETER]key.
The track parameter menu for changing thesettings for individual tracks appears.
6. Press the [ON/OFF] key 1 or 2 toselect the input on which to operate.
Available parameters and their setting rangeare shown in the table below.
HINT
INPUT 1 or INPUT 2
INPUT 1
INPUT 2
Track mixer
MASTER fader
OUTPUT
L
R
Track mixer
MASTER fader
OUTPUT
L
R
ZOOM MRS-4
Refe
rence
[Mixin
g]
38
SEND Determines whether input signal is routed to send/return effect.
SLVLAdjusts signal level sent from input to send/return effect. Appears only if SEND parameter is set to ON.
Display Parameter Setting range Description
PANAdjusts panning (if only one input is active) or balance (if two inputs are active) for signal sent from input mixer to track and output.
Input setting parameters and setting range
ON/OFF
0~100
L50~0~R50
SEND/RETURN
SEND LEVEL
PAN

8. Specify the end point in the sameway as described in step 6.
9. When you have specified the endpoint, press the [ENTER/YES] key.
The screen for specifying the copydestination track and V-take appears.
10. Specify the copy destination trackand V-take in the same way asdescribed in step 4.
11. Specify the copy destination startpoint in the same way as describedin step 6.
The display changes as follows.
12. To execute the copy, press the[ENTER/YES] key.
While the copy is in progress, the remainingtime is shown on the display as a percentage,such as "doinG90". When the copy iscomplete, the "tr Edit" screen returns.
The length of the processing interval depends onsetting conditions.
By pressing the [EXIT/NO] key instead ofthe [ENTER/YES] key, you can return to thedisplay of the preceding step and makechanges.
Copying the data of anentire track
The recorded data of an entire track can becopied to another track. The recorded data atthe copy destination will be erased, andoverwritten by the copy source data.
1. While the main screen is shown,press the [TRACK PARAMETER]key.
The track parameter menu appears.
2. Use the status keys 1 – 4 to selectthe copy source track. Then usethe left/right [PARAMETER/VALUE]keys to call up the screen forselecting the V-take.
The track number and V-take number areshown.
3. Press the [ENTER/YES] key. The display changes as follows.
4. Press the right [PARAMETER/VALUE] key once to bring up theindication "CoPy" on the display.Then press the [ENTER/YES] key.
The copy source track number and V-takenumber are shown. (In the initial condition,this is the V-take currently set for the trackselected in step 2.)
ERASE
T1-1
Track number V-take number
NOTE
YES NO
DST 1-1
Copy destination track number
Copy destination V-take number
105560
Refe
rence
[Track
Editin
g]
ZOOM MRS-4 41
Copying a specifiedregion of data to anotherlocation
A specified region of recorded data can becopied to any location in any track. The datathat was previously at the copy destinationwill be erased and overwritten by the copysource data.
1. While the main screen is shown,press the [SONG/UTILITY/TUNER]key.
The display will show the song number.
2. Press the right [PARAMETER/VALUE]key once to bring up the indication"tr Edit" (track edit) on the display.Then press the [ENTER/YES] key.
The first item of the track edit menu appears.
3. Make sure that the display indicates"tr COPY" and press the [ENTER/YES] key.
The screen for specifying the copy sourcetrack and V-take appears.
4. Use the [PARAMETER/VALUE] keysto specify the copy source trackand V-take.
In "Src x-y", "x" is the copy source tracknumber and "y" is the V-take number. Use theleft/right [PARAMETER/VALUE] keys tomove the flashing section, and use the
up/down [PARAMETER/VALUE] keys tochange the number.
5. Press the [ENTER/YES] key. The screen for specifying the start point ofthe copy source appears.
6. Use the [PARAMETER/VALUE]keys to specify the copy sourcestart point.
The start location can be specified in two ways.
● Specifying the start point using timeunits
Press the right [PARAMETER/VALUE] keyuntil the desired time unit indication ("M" =minutes, "S" = seconds, "MS" = milliseconds)is flashing at the bottom of the display. Thenuse the up/down [PARAMETER/VALUE]keys to change the numeric value. You canalso use the ZERO [U] key, REW [T] key,and FF [Y] key to move the position (butplayback is not possible).
● Specifying the start point using apreset mark
Press the left [PARAMETER/VALUE] keyonce to bring up the mark number display(MARK indicator flashes). Then use theup/down [PARAMETER/VALUE] keys tospecify the mark number. You can also usethe MARKER [U]/MARKER [I] keys.
7. When you have specified the startpoint, press the [ENTER/YES] key.
The screen for specifying the end point of thecopy source appears.
103560
SRC 1-1
Copy source track number Copy source V-take
TR COPY
ZOOM MRS-4
Refe
rence
[Track
Editin
g]
40
Reference [Track Editing]
The audio data recorded on the tracks of the recorder can be edited in a variety of ways, includingerasing portions or copying. This section explains the track editing functions.
Use the left/right [PARAMETER/VALUE]keys to move the flashing section, and use theup/down [PARAMETER/VALUE] keys tochange the number.
5. Press the [ENTER/YES] key. A screen will appear that allows you to set astart point for the erase action.
6. Use the [PARAMETER/VALUE]keys to specify the start point forthe segment to be erased.
The start location can be specified in twoways. For information on how to specify theposition, see page 40.
7. When you have specified the startpoint, press the [ENTER/YES] key.
A screen will appear that allows you to setthe end point for the erase action.
8. Specify the end point in the sameway as described in step 6.
9. When you have specified the endpoint, press the [ENTER/YES] key.
The display changes as follows.
10. To execute the erase process,press the [ENTER/YES] key.
While erasing is in progress, the remainingtime is shown on the display as a percentage,such as "doinG90". When the copy iscomplete, the "tr Edit" screen returns.
The length of the processing interval depends onsetting conditions.
By pressing the [EXIT/NO] key instead ofthe [ENTER/YES] key, you can return to thedisplay of the preceding step and makechanges.
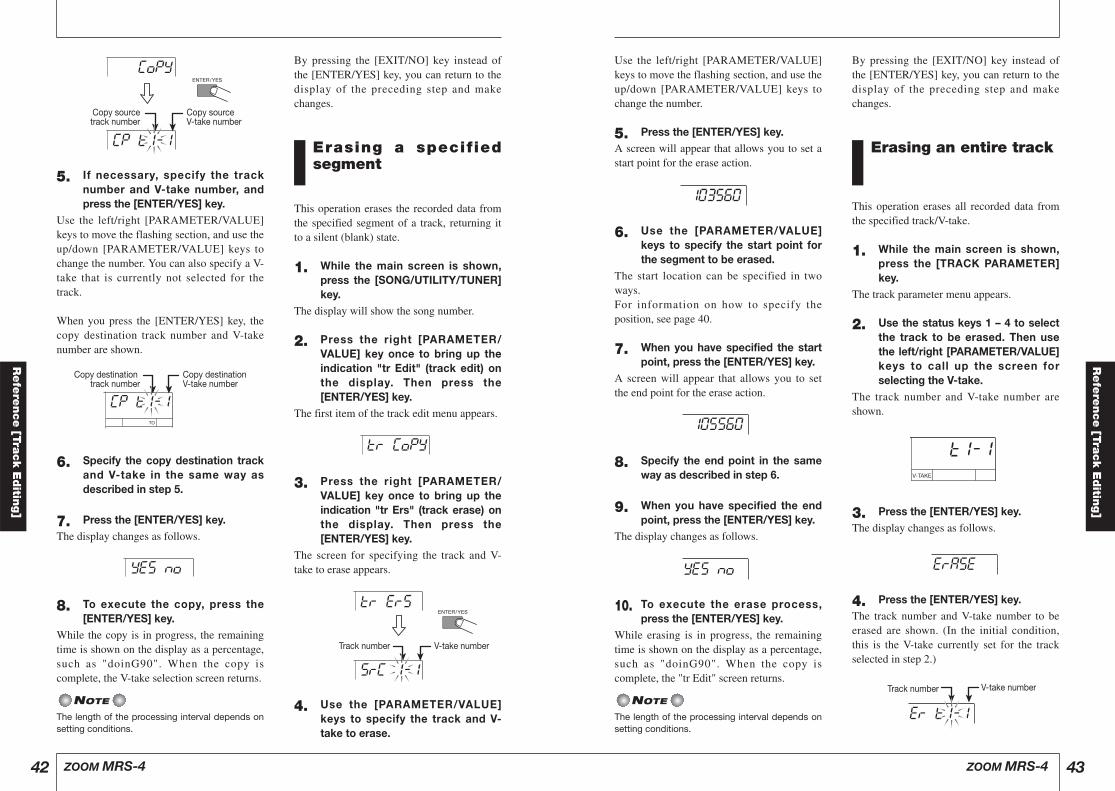
Erasing an entire track
This operation erases all recorded data fromthe specified track/V-take.
1. While the main screen is shown,press the [TRACK PARAMETER]key.
The track parameter menu appears.
2. Use the status keys 1 – 4 to selectthe track to be erased. Then usethe left/right [PARAMETER/VALUE]keys to call up the screen forselecting the V-take.
The track number and V-take number areshown.
3. Press the [ENTER/YES] key. The display changes as follows.
4. Press the [ENTER/YES] key. The track number and V-take number to beerased are shown. (In the initial condition,this is the V-take currently set for the trackselected in step 2.)
ER T1-1
Track number V-take number
ERASE
T1-1
NOTE
YES NO
105560
103560
Refe
rence
[Track
Editin
g]
ZOOM MRS-4 43
5. If necessary, specify the tracknumber and V-take number, andpress the [ENTER/YES] key.
Use the left/right [PARAMETER/VALUE]keys to move the flashing section, and use theup/down [PARAMETER/VALUE] keys tochange the number. You can also specify a V-take that is currently not selected for thetrack.
When you press the [ENTER/YES] key, thecopy destination track number and V-takenumber are shown.
6. Specify the copy destination trackand V-take in the same way asdescribed in step 5.
7. Press the [ENTER/YES] key. The display changes as follows.
8. To execute the copy, press the[ENTER/YES] key.
While the copy is in progress, the remainingtime is shown on the display as a percentage,such as "doinG90". When the copy iscomplete, the V-take selection screen returns.
The length of the processing interval depends onsetting conditions.
By pressing the [EXIT/NO] key instead ofthe [ENTER/YES] key, you can return to thedisplay of the preceding step and makechanges.
Erasing a specifiedsegment
This operation erases the recorded data fromthe specified segment of a track, returning itto a silent (blank) state.
1. While the main screen is shown,press the [SONG/UTILITY/TUNER]key.
The display will show the song number.
2. Press the right [PARAMETER/VALUE] key once to bring up theindication "tr Edit" (track edit) onthe display. Then press the[ENTER/YES] key.
The first item of the track edit menu appears.
3. Press the right [PARAMETER/VALUE] key once to bring up theindication "tr Ers" (track erase) onthe display. Then press the[ENTER/YES] key.
The screen for specifying the track and V-take to erase appears.
4. Use the [PARAMETER/VALUE]keys to specify the track and V-take to erase.
SRC 1-1
TR ERS
Track number V-take number
TR COPY
NOTE
YES NO
CP T1-1
Copy destination track number
Copy destination V-take number
CP T1-1
COPY
Copy source track number
Copy source V-take number
ZOOM MRS-4
Refe
rence
[Track
Editin
g]
42

5. If necessary, specify the tracknumber and V-take number, andpress the [ENTER/YES] key.
Use the left/right [PARAMETER/VALUE]keys to move the flashing section, and use theup/down [PARAMETER/VALUE] keys tochange the number. You can also specify a V-take that is currently not selected for thetrack.
When you press the [ENTER/YES] key, theexchange destination track number/V-takenumber are shown.
6. Use the [PARAMETER/VALUE]keys to specify the exchangedestination track and V-take.
7. Press the [ENTER/YES] key. The display changes as follows.
8. To execute the exchange process,press the [ENTER/YES] key.
While exchange is in progress, the remainingtime is shown on the display as a percentage,such as "doinG90". When the copy iscomplete, the V-take selection screen isshown.
By pressing the [EXIT/NO] key instead ofthe [ENTER/YES] key, you can return to thedisplay of the preceding step and makechanges.
YES NO
CH T1-1
Exchange destinationtrack number
Exchange destination V-take number
CH T1-1
CHANGE
Exchange source track number
Exchange source V-take number
Refe
rence
[Track
Editin
g]
ZOOM MRS-4 45
5. If necessary, specify the tracknumber and V-take number, andpress the [ENTER/YES] key.
Use the left/right [PARAMETER/VALUE]keys to move the flashing section, and use theup/down [PARAMETER/VALUE] keys tochange the number. You can also specify a V-take that is currently not selected for thetrack.
When you press the [ENTER/YES] key, thedisplay changes as follows.
6. To execute the erase process,press the [ENTER/YES] key.
While erasing is in progress, the remainingtime is shown on the display as a percentage,such as "doinG90". When the copy iscomplete, the "tr Edit" screen returns.
The length of the processing interval depends onsetting conditions.
By pressing the [EXIT/NO] key instead ofthe [ENTER/YES] key, you can return to thedisplay of the preceding step and makechanges.
Exchanging the data ofentire tracks
You can exchange the recorded data of twospecified tracks.
1. While the main screen is shown,press the [TRACK PARAMETER]key.
The track parameter menu appears.
2. Use the status keys 1 – 4 to selectthe exchange source track. Thenuse the left/right [PARAMETER/VALUE] keys to call up the screenfor selecting the V-take.
The track number and V-take number areshown.
3. Press the [ENTER/YES] key. The display changes as follows.
4. Press the right [PARAMETER/VALUE] key two times to bring upthe indication "CHAnGE" on thedisplay. Then press the [ENTER/YES] key.
The track number and V-take number to beused as exchange source are shown. (In theinitial condition, this is the V-take currentlyset for the track selected in step 2.)
ERASE
T1-1
NOTE
YES NO
ZOOM MRS-4
Refe
rence
[Track
Editin
g]
44

4. Press the [ENTER/YES] key. The screen for the item selected in step 3appears.
The subsequent steps differ for each item. Fordetails, see the following section.
Song menu items
Operation steps for the various song items aredescribed here.
To create a new song on the SmartMediacard, proceed as follows.
1. Select "SnG nEW" on the songmenu, and press the [ENTER/YES]key.
The indication "YES NO" appears on thedisplay.
The maximum number of songs that can bestored on one SmartMedia card is 15 (songnumbers 01 – 15), provided that there is enoughcapacity. If there are no more empty songnumbers, the indication "SnG FUL" is shown onthe display, and this item cannot be selected.
2. Press the [ENTER/YES] key. A new song is created, and the main screenreturns. The lowest available song number isautomatically assigned to the song.
To read in an existing song from theSmartMedia card, proceed as follows.
1. Select "SnG SEL" on the song menu,and press the [ENTER/YES] key.
The display changes as follows.
2. Use the up/down [PARAMETER/VALUE] keys to select the songnumber.
Only songs with recorded data can beselected.
3. Press the [ENTER/YES] key. The song is read into the memory of theMRS-4, and the main screen returns.
To check the remaining recording time forthe currently selected song, proceed asfollows.
1. Select "CAPACity" on the song menu,and press the [ENTER/YES] key.
The remaining recording capacity of the song(calculated for monaural tracks) is shown onthe display.
• This display is for reference only. It cannot bechanged.
• The capacity depends on the selectedrecording grade.
2. To return to the song menu, pressthe [EXIT/NO] key.
NOTE
802000
Checking the remainingrecording time (SONG CAPACITY)
Song number
SEL 01
Reading in an existing song(SONG SELECT)
NOTE
YES NO
Creating a new song (SONG NEW)
Refe
rence
[Song
Functio
ns]
ZOOM MRS-4 47
Song menu basic functions
The song menu that appears when you pressthe [SONG/UTILITY/TUNER] key lets youperform various song related functions. Thebasic operation principles described beloware similar for most items.
1. While the main screen is shown,press the [SONG/UTILITY/TUNER]key.
The number of the currently selected song(01 – 15) appears on the display. This is thetop screen of the song menu.
2. Press the [ENTER/YES] key. The first item of the song menu appears.
3. Use the left/right [PARAMETER/VALUE] keys to call up the desireditem.
The song menu has the following items.
SNG NEW
Song number
SONG01
ZOOM MRS-4
Refe
rence
[Song
Functio
ns]
46
Reference [Song Functions]
This section describes how to create a new song, how to read in an existing song, and how toperform other song related operations.
SNG NEW Create a new song
SNG SEL Read in an existing song.
DisplayItem Description
CAPCITY Show the remaining recording capacity based on the currently selected recording grade setting.
SNGCOPY Copy the contents of an entire song to an empty song.
SNG DELDelete an existing song. * This item does not appear if the currently selected song is protected.
PROTECT Protect a song from accidental deletion or overwriting.
Song menu items
GRADESet the recording grade (sound quality). * This item does not appear for songs that are already recorded.
SONG NEW
SONG SELECT
SONG CAPACITY
SONG COPY
SONG DELETE
SONG PROTECT
SONG GRADE

You can protect the currently selected song,so that no further recording or editing ispossible. When a song is protected, you canstill change effects or parameters, but youcannot store the results on the SmartMediacard.
1. From the song menu, select"ProtECt" and press the [ENTER/YES] key.
The current protection on/off status is shownon the display.
2. Use the up/down [PARAMETER/VALUE] keys to switch theprotection status between on andoff.
By pressing the [EXIT/NO] key you canreturn to the preceding screen.
Before starting to record a song, you canselect the recording grade from the followingtwo choices.
● HiFi: High-quality recording for bestsound
● LONG: Slightly lower quality recordingfor longer recording time
The default setting when you start a new song isHiFi. If you have not started to record yet, youcan switch to LONG.
1. From the song menu, select"GrAdE".
An indicator on the display shows thecurrently selected grade (HiFi or LONG).
It is not possible to change the grade setting for asong after you have recorded anything. Thereforethis item does not appear for recorded songs.
2. Use the up/down [PARAMETER/VALUE] keys to select the gradesetting.
3. Press the [ENTER/YES] key. The indication "YES NO" appears on thedisplay.
4. To carry out the grade setting,press the [ENTER/YES] key.
When the setting is completed, the songmenu appears again. By pressing the[EXIT/NO] key instead of the [ENTER/YES]key, you can return to the display of thepreceding step and make changes.
YES NO
GRADE
GRADE
NOTE
GRADEGrade
HINT
Selecting the recordinggrade (SONG GRADE)
PRT ON
PRT OFF
Protecting a song (SONG PROTECT)
Refe
rence
[Song
Functio
ns]
ZOOM MRS-4 49
To copy the entire contents of the currentlyselected song into an empty song number,proceed as follows.
1. Select "SnGCopy" on the songmenu, and press the [ENTER/YES]key.
2. Use the up/down [PARAMETER/VALUE] keys to select thedestination song number.
Only empty song numbers can be selected.
3. Press the [ENTER/YES] key. The indication "YES NO" appears on thedisplay.
4. To carry out the copy, press the[ENTER/YES] key.
When copying is completed, the song menuappears again. By pressing the [EXIT/NO]key instead of the [ENTER/YES] key, youcan return to the display of the preceding stepand make changes.
To delete the entire contents of a song on theSmartMedia card, proceed as follows.
1. Select "SnG dEL" on the songmenu, and press the [ENTER/YES]key.
The number of the signal that will be deletedappears on the display.
If the currently selected song is protected, the"SnG dEL" menu item does not appear. Turnprotection off first (➝ p. 49).
2. Use the left/right [PARAMETER/VALUE] keys to select the numberof the song you want to delete.
Numbers of protected songs or songs with nodata do not appear.
3. Press the [ENTER/YES] key. The indication "YES NO" appears on thedisplay.
4. To carry out the deletion, press the[ENTER/YES] key.
When deletion is completed, the song menuappears again. (If the current song wasdeleted, the song with the lowest number isread in.) By pressing the [EXIT/NO] keyinstead of the [ENTER/YES] key, you canreturn to the display of the preceding step andmake changes.
NOTE
DEL 01
Deleting a song (SONG DELETE)
YES NO
Copying a song (SONG COPY)
ZOOM MRS-4
Refe
rence
[Song
Functio
ns]
48

When the metronome is on and playback isstarted from a point midway in a song, noprecount clicks are heard. Depending on the startposition, the metronome sound may start partlythrough a beat.
Functions availablewith MIDI
MIDI (Musical Instrument Digital Interface) isa standard that allows various types of messagessuch as playing and timing information to beexchanged between devices such as electronicmusical instruments and computers.
The MRS-4 supports MIDI, and can transferthe following messages to another MIDI-compatible device via the [MIDI OUT]connector located on the rear panel.
● Timing clock Timing information used for synchronizationof MIDI devices such as rhythm machinesand MIDI sequencers. The internalmetronome of the MRS-4 divides a quarternote into 24 ticks and sends this as a timingsignal.
● Song position pointer A message that specifies the current locationin measures and beats, counted from the startof the song. The measure and beat count usesthe time signature of the internal metronomeas a reference.
● Start/Stop/Continue Message that controls transport movementsof a device.
By sending the above kinds of messages forexample to a rhythm machine or MIDIsequencer, the external device can besynchronized to the song of the MRS-4.
The MRS-4 supplies the above MIDI messages atall times. When not wishing to receive these at anexternal device, disconnect the MIDI cable.
Synchronizing anexternal device to theMRS-4
You can synchronize operation of an externalMIDI device such as a rhythm machine orMIDI sequencer to the song of the MRS-4.
1. Connect the MIDI IN connector ofthe other device to the [MIDI OUT]connector of the MRS-4. (Forinformation on connections, seepage 8.)
2. Set the rhythm machine, MIDIsequencer, or other MIDI device tosynchronize with an external MIDIclock.
For details, refer to the documentation of therhythm machine, MIDI sequencer, or otherMIDI device.
3. Set the metronome tempo andtime signature setting of the MRS-4 as required for the music piecethat you want to synchronize.
When synchronizing an external device to theMRS-4, the measure/beat positioninformation is referenced to the internalmetronome of the MRS-4. Therefore amatching setting should be used. (Forinformation on how to make metronomesettings, see page 50.)
4. Return to the start position of theMRS-4 song, and start playback.
When the precount is finished, a startmessage is sent to the external device, andthe device operates in sync with the MRS-4.When the song is stopped at the MRS-4, theexternal device is also stopped.
When the song is stopped midway, a songposition pointer indicating the current position issent. Consequently, provided that the metronometime signature setting matches, the externaldevice will start playback from the same positioneven if playback of the song at the MRS-4 isstarted midway.
HINT
NOTE
HINT
Refe
rence
[Metro
nom
e/M
IDI]
ZOOM MRS-4 51
Basic metronome settings
You can set the metronome tempo, timesignature, volume, and precount.
1. While the main screen is shown,press the [SONG/UTILITY/TUNER]key.
The number of the currently selected songappears on the display.
2. Use the left/right [PARAMETER/VALUE] keys to bring the indication"MEtro" (metronome menu) ontothe display.
3. Press the [ENTER/YES] key. The first item of the metronome menu isshown.
4. Use the left/right [PARAMETER/VALUE] keys to select the item,and use the up/down[PARAMETER/ VALUE] keys tochange the setting value.
Available items and their setting range areshown in the table below.
5. When the setting is complete,press the [EXIT/NO] key severaltimes to return to the main screen.
The metronome time signature and temposettings serve as reference for the measure/timesignature information shown on the display of theMRS-4, as well as for the position informationand clock information provided to external MIDIdevices.
When you press the PLAY [R] key at themetronome menu, the metronome sound onlyis heard. This is convenient for checking thetempo and level.
HINT
LVL 10
METRO
SONG01
ZOOM MRS-4
Refe
rence
[Metro
nom
e/M
IDI]
50
Reference [Metronome/MIDI]
This section describes how to make metronome settings and how to synchronize operation of theMRS-4 with other MIDI devices.
LVL Adjusts the metronome level.
BPM Adjusts the metronome tempo.
Display Item Description
SIGSets the metronome time signature. The setting range is 0/4 to 8/4.
PRCNT
Sets the number of beats for the precount. Available settings are oF (no precount) and 2 – 8 beats.
Metronome items and setting range
LEVEL
BPM(Tempo)
(Time signature) SIGNATURE
PRECOUNT
Setting range
0 – 15
40.0 – 250.0
0-4 – 8-4
oF, 2 – 8

7. When tuning is complete, press the[EXIT/NO] key several times toreturn to the main screen.
Formatting a SmartMediacard
Before starting to use an off-the-shelfSmartMedia card (designed for 3.3V,capacity 16 – 128 MB), you must first formatit in the MRS-4 as follows.
1. While the MRS-4 is turned off,insert the unformatted SmartMediacard into the card slot on the frontpanel (➜ P. 5).
2. Turn power to the MRS-4 on. The MRS-4 starts up.
Also when an unformatted SmartMedia card isinserted, the MRS-4 is operative, but when youtry to activate a transport function, the indication"noCARD" appears.
3. While the main screen is shown,press the [SONG/UTILITY/TUNER]key, and then use the left/right[PARAMETER/VALUE] keys tobring the indication "CArd" (cardmenu) onto the display.
4. Press the [ENTER/YES] key twotimes.
The display changes as follows.
5. To execute the formatting process,press the [ENTER/YES] key.
Formatting starts. When formatting iscompleted, the card menu appears again.Press the [EXIT/NO] key several times toreturn to the main screen.
By pressing the [EXIT/NO] key instead ofthe [ENTER/YES] key, you can return to thedisplay of the preceding step and makechanges.
CARD
FORMAT
YES NO
CARD
NOTE
Refe
rence
[Oth
er
Functio
ns]
ZOOM MRS-4 53
Using the tuner
The MRS-4 has a built-in chromatic tunerthat can be used when tuning an instrumentconnected to the [INPUT 1]/[INPUT 2]jacks. To use the tuner, proceed as follows.
1. Connect the instrument to the[INPUT 1]/[INPUT 2] jack and setthe appropriate [ON/OFF] key 1/2to ON.
2. While the main screen is shown,press the [SONG/UTILITY/TUNER]key.
The number of the currently selected song isshown.
3. Use the left/right [PARAMETER/VALUE] keys to call up theindication "tunEr" on the display,and then press the [ENTER/YES]key.
The tuner function is turned on, and the tunerreference pitch value is shown on the display.In this condition, all effects are bypassed(temporarily turned off).
During playback of a song, the tuner functioncannot be used.
4. Play a single note on the instrument. The nearest note to the one you played isshown on the display. An indicator to theright of the pitch shows by how much thepitch is off.
5. Tune your instrument until the noteindication shows that the note ismatched.
6. To change the reference pitch ofthe tuner, use the up/down[PARAMETER/VALUE] keys.
The default setting is A = 440 Hz. Theadjustment range is 435 – 445 Hz.
442
A
A#BCC#
D
D#
G
G#EFF#
A#8
Pitch is sharp
Note names
Correct pitch Pitch is flat
The more the pitch is off, the faster the indicator rotates.
NOTE
440 **
TUNER
Reference value
ZOOM MRS-4
Refe
rence
[Oth
er
Functio
ns]
52
Reference [Other Functions]
This section describes other convenient functions of the MRS-4.

Using the AUX IN jacksto save tracks
AUX IN is an input that accepts an externalsignal which is then mixed with the internalsignal of the MRS-4 and output as is at theMASTER [L]/[R] jacks. This can serve several purposes. For example,during track recording or overdubbing, youcould connect a rhythm machinesynchronized to the MRS-4 to the [AUX IN]jacks and reproduce this with the overallsound. This eliminates the need to record therhythm machine on its own track, therebyfreeing up tracks for other purposes. Theprocedure for doing this is described below.
Track recording/overdubbing
During track recording/overdubbing, connectthe output of a rhythm machine to the [AUXIN] jacks. Synchronize playback of therhythm machine to operation of the MRS-4,use tracks 1 – 4 for recording parts such asguitar, bass, vocal etc. while listening to thesound of the rhythm machine.
The output at the MASTER [L]/[R] jacksallows you to monitor the sound from theinstrument currently being recorded, theplayback sound of MRS-4 tracks, and therhythm machine sound input via the [AUXIN] jacks. However, the rhythm machinesound cannot be recorded on a track.
Bounce/mixdown
During bounce/mixdown, change the rhythmmachine connection over to the [INPUT1]/[INPUT 2] jacks. If you synchronizeoperation of the MRS-4 and the rhythmmachine, you can mix the rhythm machinesound with the playback sound from tracks 1– 4 for bounce/mixdown. The rhythmmachine mix ratio can be adjusted with the[INPUT LEVEL] control 1/2.
You can also apply the send/return effect andmixdown effect to the rhythm machine sound (➝ p. 21, 25).
Rhythm machine
MRS-4
MIDI OUT MIDI INLINE OUT
INPUT 1/2
MRS-4
MIDI OUT MIDI INLINE OUTAUX IN
Rhythm machine
Refe
rence
[Oth
er
Functio
ns]
ZOOM MRS-4 55
Display adjustments
You can adjust the display contrast andcontrol the backlight as follows.
1. While the main screen is shown,press the [SONG/UTILITY/TUNER]key, and then use the left/right[PARAMETER/VALUE] keys tobring the indication "Lcd" onto thedisplay.
2. Press the [ENTER/YES] key. The first item of the LCD menu is shown.
3. Use the left/right [PARAMETER/VALUE] keys to select the item, anduse the up/down [PARAMETER/VALUE] keys to adjust the settingvalue.
Available items and their setting range areshown in the table below.
When operating the MRS-4 on battery power,switching the backlight off will result in longerbattery life.
4. When the setting is complete,press the [EXIT/NO] key severaltimes to return to the main screen.
HINT
CONT 1
ZOOM MRS-4
Refe
rence
[Oth
er
Functio
ns]
54
CONT
LIT Switch the display backlight on and off.
CONTRAST
BACK LIGHT
0, 1, 2
ON, OF
Adjust the display contrast.
Display Item Description
Display items and setting range
Setting range

Specific
atio
ns
ZOOM MRS-4 57
Recorder Physical tracks: 4 Virtual takes: 32 (8 V-takes per track) Maximum number of simultaneous recording tracks:
2 Maximum number of simultaneous playback tracks:
4 Recording media: SmartMedia card 16 – 128 MB (3.3V) Recording grade: 32 kHz (HiFi) / 16 kHz (Long) Maximum recording time (converted to single monaural track):
16 MB = 8 min. or more (HiFi), 16 min. or more (Long) 32 MB = 16 min. or more (HiFi), 33 min. or more (Long) 64 MB = 33 min. or more (HiFi), 67 min. or more (Long) 128 MB = 67 min. or more (HiFi), 135 min. or more (Long)
Marker function: 50 points (per song) Locate function: min/sec/ms or measure/beat Track editing functions: Copy & paste, erase, exchange Punch-in/out function: Manual/auto Other functions: Bounce, A-B repeat
MixerFaders: 45 mm x 5 (Track 1 – 4, Master) Level meter indicator bars: 8 (Input 1/2, Track 1 – 4, Master L/R) Track parameters: Equalizer, Effect Send, Pan (Stereo operation: balance) Equalizer: High (f:500 – 8000 Hz, Gain: ±12 dB)
Low (f:63 – 2000 Hz, Gain: ±12 dB) Stereo Link: Tracks 1 + 2 or 3 + 4, selectable
EffectsMixdown effect: Power, Boost, Vocal Send/return effect: Hall, Room, Doubling, Delay, Chorus Insert effect: Compressor, Limiter, Cabinet Simulator, Mic Pre) Tuner function: Chromatic auto tuner
MetronomeTempo: 40.0 – 250.0 Time signature: 0/4-8/4 Precount: Off, 2 – 8
Maximum number of songs: 15 A/D converter: 20-bit, 64x oversampling D/A converter: 20-bit, 8x oversampling Sampling frequency: 32 kHz Display: MRS-4 original LCD (with backlight)
InputsInputs: 2 standard mono phone jacks Input level: - -50 to +4 dBm, continuously variable Input impedance: 1 to 500 kilohms, continuously variable AUX input (L/MONO, R): 2 standard mono phone jacks
Input impedance 10 kilohms (mono), 20 kilohms (stereo)
OutputsMaster out: RCA type phono jacks (L/R) Rated output level: -10 dBm (into load impedance 10 kilohms or higher) Output impedance: 1 kilohm max. Headphone output: standard stereo phone jack, 50 mW (into 32 ohms load) MIDI OUT
Dimensions: 220 (W) x 165 (D) x 56.3 (H) mm Weight: 700 g (without batteries) Power requirements: DC 9V, 300 mA from AC adapter Zoom AD-0006
4 batteries IEC R6 (size AA); battery life 5 hours or more (with alkaline batteries) Supplied accessory: SmartMedia card (32 MB)
0 dB = 0.775 Vrms Design and specifications subject to change without notice.
ZOOM MRS-4
Specific
atio
ns
56
Specifications MRS-4 file configuration
The MRS-4 stores the following file types onthe SmartMedia card.
● xx-yz.aud This file contains the audio data recorded ona V-take. The number of such files on theSmartMedia card corresponds to the numberof recorded V-takes. When a song is deleted,the V-take files belonging to that song aredeleted.
xx = song number (0 – 14) y = track number (0 – 3) z = V-take number (0 – 7)
● Songno.mr4 This file contains information about thecurrently used song number, global parametervalues, and mount information for the MRS-4Card Manager (see below).
● UtyprmXX.mr4 This file contains the default settings for allitems and song parameters. The number ofsuch files on the SmartMedia cardcorresponds to the number of songs that werecreated. When a song is deleted, this file isalso deleted.
xx = song number (0 – 14)
File compatibility withPS-02
Setting file
Setting files for the ZOOM PS-02 and theMRS-4 are not compatible. If a PS-02SmartMedia card is inserted in the MRS-4,the various setting files are disregarded.
Audio file
Audio files for the ZOOM PS-02 and theMRS-4 are theoretically not compatible. If aPS-02 SmartMedia card is inserted in theMRS-4, some audio files may be readable,but playback pitch will be different from theoriginal. Depending on the settings, someaudio files may not be readable at all.
Zoom Corporation assumes no responsibility forany consequences of using PS-02 SmartMedia inthe MRS-4.
MRS-4 Card ManagerSoftware
If you have Internet access, you candownload the MRS-4 Card Manager softwarefrom the Zoom Corporation web site free ofcharge (Windows/Macintosh versions). Itallows a computer equipped with aSmartMedia card reader to manage MRS-4data. The software provides the followingfunctions.
● Convert MRS-4 audio data into WAVfiles
● Convert WAV/AIFF format audio filesinto MRS-4 audio data
● Back up the SmartMedia cardcontents onto the hard disk of thecomputer
Web site of Zoom Corporation: http://www.zoom.co.jp/
NOTE
Recording times areapproximate. Actualtimes may besomewhat shorter,depending on settingconditions.
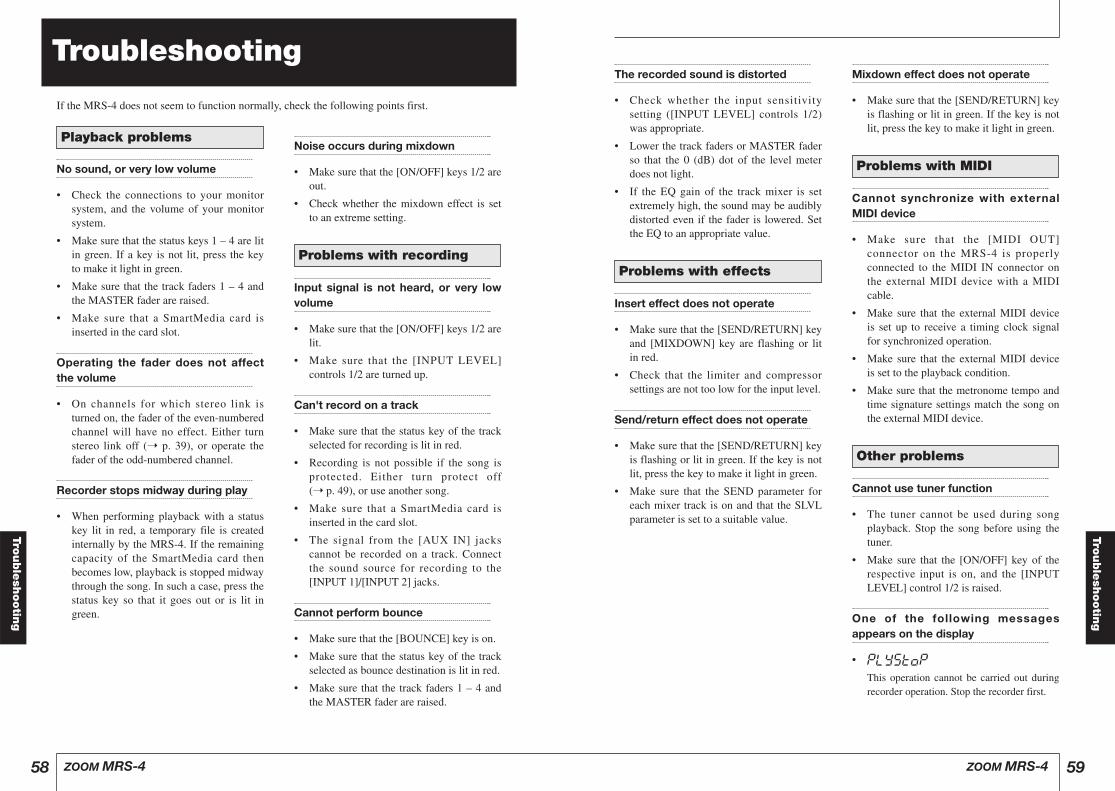
ZOOM MRS-4 59ZOOM MRS-458
The recorded sound is distorted
• Check whether the input sensitivitysetting ([INPUT LEVEL] controls 1/2)was appropriate.
• Lower the track faders or MASTER faderso that the 0 (dB) dot of the level meterdoes not light.
• If the EQ gain of the track mixer is setextremely high, the sound may be audiblydistorted even if the fader is lowered. Setthe EQ to an appropriate value.
Insert effect does not operate
• Make sure that the [SEND/RETURN] keyand [MIXDOWN] key are flashing or litin red.
• Check that the limiter and compressorsettings are not too low for the input level.
Send/return effect does not operate
• Make sure that the [SEND/RETURN] keyis flashing or lit in green. If the key is notlit, press the key to make it light in green.
• Make sure that the SEND parameter foreach mixer track is on and that the SLVLparameter is set to a suitable value.
Mixdown effect does not operate
• Make sure that the [SEND/RETURN] keyis flashing or lit in green. If the key is notlit, press the key to make it light in green.
Cannot synchronize with externalMIDI device
• Make sure that the [MIDI OUT]connector on the MRS-4 is properlyconnected to the MIDI IN connector onthe external MIDI device with a MIDIcable.
• Make sure that the external MIDI deviceis set up to receive a timing clock signalfor synchronized operation.
• Make sure that the external MIDI deviceis set to the playback condition.
• Make sure that the metronome tempo andtime signature settings match the song onthe external MIDI device.
Cannot use tuner function
• The tuner cannot be used during songplayback. Stop the song before using thetuner.
• Make sure that the [ON/OFF] key of therespective input is on, and the [INPUTLEVEL] control 1/2 is raised.
One of the following messagesappears on the display
• PLYSTOP
This operation cannot be carried out duringrecorder operation. Stop the recorder first.
Other problems
Problems with MIDI
Problems with effects
No sound, or very low volume
• Check the connections to your monitorsystem, and the volume of your monitorsystem.
• Make sure that the status keys 1 – 4 are litin green. If a key is not lit, press the keyto make it light in green.
• Make sure that the track faders 1 – 4 andthe MASTER fader are raised.
• Make sure that a SmartMedia card isinserted in the card slot.
Operating the fader does not affectthe volume
• On channels for which stereo link isturned on, the fader of the even-numberedchannel will have no effect. Either turnstereo link off (➝ p. 39), or operate thefader of the odd-numbered channel.
Recorder stops midway during play
• When performing playback with a statuskey lit in red, a temporary file is createdinternally by the MRS-4. If the remainingcapacity of the SmartMedia card thenbecomes low, playback is stopped midwaythrough the song. In such a case, press thestatus key so that it goes out or is lit ingreen.
Noise occurs during mixdown
• Make sure that the [ON/OFF] keys 1/2 areout.
• Check whether the mixdown effect is setto an extreme setting.
Input signal is not heard, or very lowvolume
• Make sure that the [ON/OFF] keys 1/2 arelit.
• Make sure that the [INPUT LEVEL]controls 1/2 are turned up.
Can't record on a track
• Make sure that the status key of the trackselected for recording is lit in red.
• Recording is not possible if the song isprotected. Either turn protect off (➝ p. 49), or use another song.
• Make sure that a SmartMedia card isinserted in the card slot.
• The signal from the [AUX IN] jackscannot be recorded on a track. Connectthe sound source for recording to the[INPUT 1]/[INPUT 2] jacks.
Cannot perform bounce
• Make sure that the [BOUNCE] key is on.
• Make sure that the status key of the trackselected as bounce destination is lit in red.
• Make sure that the track faders 1 – 4 andthe MASTER fader are raised.
Problems with recording
Playback problems
Troubleshooting
If the MRS-4 does not seem to function normally, check the following points first.
Trouble
shootin
g
Trouble
shootin
g
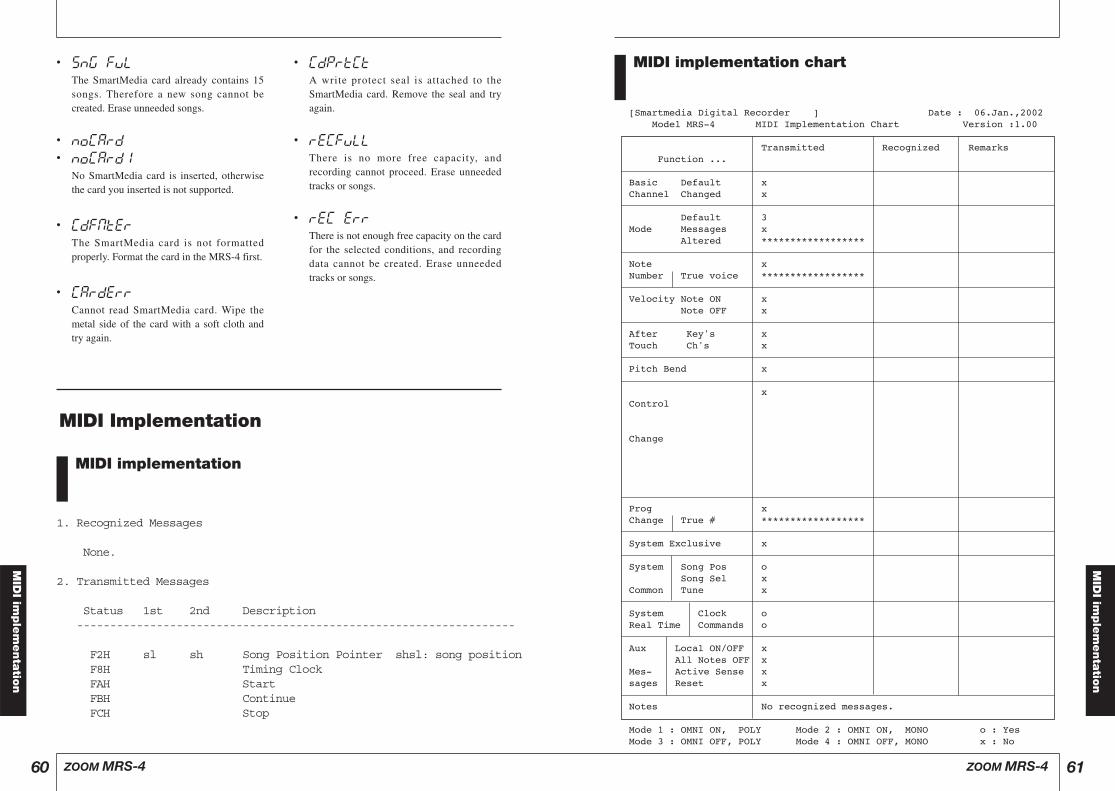
MIDI implementation chart
MID
Iim
ple
menta
tion
ZOOM MRS-4 61ZOOM MRS-4
MID
Iim
ple
menta
tion
60
[Smartmedia Digital Recorder ] Date : 06.Jan.,2002 Model MRS-4 MIDI Implementation Chart Version :1.00
Transmitted Recognized Remarks Function ...
Basic Default x Channel Changed x
Default 3 Mode Messages x Altered ******************
Note x Number True voice ******************
Velocity Note ON x Note OFF x
After Key's x Touch Ch's x
Pitch Bend x
x Control Change
Prog x Change True # ******************
System Exclusive x
System Song Pos o Song Sel x Common Tune x
System Clock o Real Time Commands o
Aux Local ON/OFF x All Notes OFF x Mes- Active Sense x sages Reset x
Notes No recognized messages.
Mode 1 : OMNI ON, POLY Mode 2 : OMNI ON, MONO o : Yes Mode 3 : OMNI OFF, POLY Mode 4 : OMNI OFF, MONO x : No
MIDI implementation
1. Recognized Messages
None.
2. Transmitted Messages
Status 1st 2nd Description------------------------------------------------------------------
F2H sl sh Song Position Pointer shsl: song positionF8H Timing ClockFAH StartFBH ContinueFCH Stop
MIDI Implementation
• SNG FUL
The SmartMedia card already contains 15songs. Therefore a new song cannot becreated. Erase unneeded songs.
• NOCARD
• NOCARD1
No SmartMedia card is inserted, otherwisethe card you inserted is not supported.
• CDFMTER
The SmartMedia card is not formattedproperly. Format the card in the MRS-4 first.
• CARDERR
Cannot read SmartMedia card. Wipe themetal side of the card with a soft cloth andtry again.
• CDPRTCT
A write protect seal is attached to theSmartMedia card. Remove the seal and tryagain.
• RECFULL
There is no more free capacity, andrecording cannot proceed. Erase unneededtracks or songs.
• REC ERR
There is not enough free capacity on the cardfor the selected conditions, and recordingdata cannot be created. Erase unneededtracks or songs.

Insert effect • • • • • • • • • • • • • • • • • • • • • • • • • • • • • • • • • • • • • • • • • • • • • 5, 13 Algorithm • • • • • • • • • • • • • • • • • • • • • • • • • • • • • • • • • • • • • • • • 13
◆ L Level meter • • • • • • • • • • • • • • • • • • • • • • • • • • • • • • • • • • • • • • • • • • • • • • • • • 12 Locate • • • • • • • • • • • • • • • • • • • • • • • • • • • • • • • • • • • • • • • • • • • • • • • • • • • • • • 33 Low EQ • • • • • • • • • • • • • • • • • • • • • • • • • • • • • • • • • • • • • • • • • • • • • • • • • • • • • 20
◆ M Main screen • • • • • • • • • • • • • • • • • • • • • • • • • • • • • • • • • • • • • • • • • • • • • • • • 11 Manual punch-in/out • • • • • • • • • • • • • • • • • • • • • • • • • • • • • • • • • • • • • 31 Mark • • • • • • • • • • • • • • • • • • • • • • • • • • • • • • • • • • • • • • • • • • • • • • • • • • • • • • 34 [MARK/CLEAR] key • • • • • • • • • • • • • • • • • • • • • • • • • • • • • • • • • • • 34
Deleting • • • • • • • • • • • • • • • • • • • • • • • • • • • • • • • • • • • • • • • • • • • 35 Locating • • • • • • • • • • • • • • • • • • • • • • • • • • • • • • • • • • • • • • • • • • 34 Setting • • • • • • • • • • • • • • • • • • • • • • • • • • • • • • • • • • • • • • • • • • • • • 34
MARK indicator • • • • • • • • • • • • • • • • • • • • • • • • • • • • • • • • • • • • • • • • • • 35 Marker • • • • • • • • • • • • • • • • • • • • • • • • • • • • • • • • • • • • • • • • • • • • • • • • • • • • • • 34 MARKER [U]/MARKER [Y] key • • • • • • • • • • • • • • • • 34 MASTER [L]/[R] jack • • • • • • • • • • • • • • • • • • • • • • • • • • • • • • • • • • • • 8 Measure display • • • • • • • • • • • • • • • • • • • • • • • • • • • • • • • • • • • • • • • • • • • 33
BEAT indicator • • • • • • • • • • • • • • • • • • • • • • • • • • • • • • • • • 33 Metronome • • • • • • • • • • • • • • • • • • • • • • • • • • • • • • • • • • • • • • • • • • • • • • • • • 50 [METRONOME] key • • • • • • • • • • • • • • • • • • • • • • • • • • • • • • • • • • • • 15 MIDI • • • • • • • • • • • • • • • • • • • • • • • • • • • • • • • • • • • • • • • • • • • • • • • • • • • • • • 51 MIDI implementation • • • • • • • • • • • • • • • • • • • • • • • • • • • • • • • • • • • 60 MIDI implementation chart • • • • • • • • • • • • • • • • • • • • • • • • • • • • 61 [MIDI OUT] jack • • • • • • • • • • • • • • • • • • • • • • • • • • • • • • • • • • • • • • • • • • 8 Mixdown • • • • • • • • • • • • • • • • • • • • • • • • • • • • • • • • • • • • • • • • • • • • • • • • • • • • 18
Adding an input signal • • • • • • • • • • • • • • • • • • • • • • • • 38 Mixdown effect • • • • • • • • • • • • • • • • • • • • • • • • • • • • • • • • • • • • • • • • 5, 25
Algorithm • • • • • • • • • • • • • • • • • • • • • • • • • • • • • • • • • • • • • • • • 26 Mixer • • • • • • • • • • • • • • • • • • • • • • • • • • • • • • • • • • • • • • • • • • • • • • • • • • • • • • • • 5 MRS-4 Card Manager • • • • • • • • • • • • • • • • • • • • • • • • • • • • • • • • • • • 57 [MIXDOWN] key • • • • • • • • • • • • • • • • • • • • • • • • • • • • • • • • • • • 13, 25
◆ O [ON/OFF] key • • • • • • • • • • • • • • • • • • • • • • • • • • • • • • • • • • • • • • • • 12, 37 Overdubbing • • • • • • • • • • • • • • • • • • • • • • • • • • • • • • • • • • • • • • • • • • • • • • • 17
◆ P Panning • • • • • • • • • • • • • • • • • • • • • • • • • • • • • • • • • • • • • • • • • • • • • • • • • • • • • • 20 Parameter • • • • • • • • • • • • • • • • • • • • • • • • • • • • • • • • • • • • • • • • • • • • • • • • • • • 21 [PARAMETER/VALUE] key • • • • • • • • • • • • • • • • • • • • • • • • • 14 [PHONES] jack • • • • • • • • • • • • • • • • • • • • • • • • • • • • • • • • • • • • • • • • • • • • • 8 PLAY [R] key • • • • • • • • • • • • • • • • • • • • • • • • • • • • • • • • • • • • • • • • • • • • 16 Point A • • • • • • • • • • • • • • • • • • • • • • • • • • • • • • • • • • • • • • • • • • • • • • • • • • • • • • 36 Point B • • • • • • • • • • • • • • • • • • • • • • • • • • • • • • • • • • • • • • • • • • • • • • • • • • • • • • 36 Power on/off • • • • • • • • • • • • • • • • • • • • • • • • • • • • • • • • • • • • • • • • • • • • • • • • • 9 Precount • • • • • • • • • • • • • • • • • • • • • • • • • • • • • • • • • • • • • • • • • • • • • • • • • • • • • 15 PS-02 file compatibility • • • • • • • • • • • • • • • • • • • • • • • • • • • • • • • • • 57 Punch-in/out • • • • • • • • • • • • • • • • • • • • • • • • • • • • • • • • • • • • • • • • • • • • • • • 30
In point • • • • • • • • • • • • • • • • • • • • • • • • • • • • • • • • • • • • • • • • • • • • 31 Out point • • • • • • • • • • • • • • • • • • • • • • • • • • • • • • • • • • • • • • • • • 31
◆ R Rear panel • • • • • • • • • • • • • • • • • • • • • • • • • • • • • • • • • • • • • • • • • • • • • • • • • • • • 7 Recorder • • • • • • • • • • • • • • • • • • • • • • • • • • • • • • • • • • • • • • • • • • • • • • • • • • • • • • 4 REC [O] key • • • • • • • • • • • • • • • • • • • • • • • • • • • • • • • • • • • • • • • • • • • • • • 16 REW [T] key • • • • • • • • • • • • • • • • • • • • • • • • • • • • • • • • • • • • • • • • • • • • • 16
◆ S Send/return effect • • • • • • • • • • • • • • • • • • • • • • • • • • • • • • • • • • • • • 5, 21
Algorithm • • • • • • • • • • • • • • • • • • • • • • • • • • • • • • • • • • • • • • • • 22 Parameters • • • • • • • • • • • • • • • • • • • • • • • • • • • • • • • • • • • • • • • 22
[SEND/RETURN] key • • • • • • • • • • • • • • • • • • • • • • • • • • • • • 13, 21 SmartMedia card • • • • • • • • • • • • • • • • • • • • • • • • • • • • • • • • • • • • • • • • • • • 5
Formatting • • • • • • • • • • • • • • • • • • • • • • • • • • • • • • • • • • • • • • • 53 Inserting • • • • • • • • • • • • • • • • • • • • • • • • • • • • • • • • • • • • • • • • • • • • 5
Song • • • • • • • • • • • • • • • • • • • • • • • • • • • • • • • • • • • • • • • • • • • • • • • • • 10, 46 Copying • • • • • • • • • • • • • • • • • • • • • • • • • • • • • • • • • • • • • • • • • • • 48 Creating • • • • • • • • • • • • • • • • • • • • • • • • • • • • • • • • • • • • • • 10, 47 Deleting • • • • • • • • • • • • • • • • • • • • • • • • • • • • • • • • • • • • • • • • • • • 48 Protecting • • • • • • • • • • • • • • • • • • • • • • • • • • • • • • • • • • • • • • • • 49 Reading in • • • • • • • • • • • • • • • • • • • • • • • • • • • • • • • • • • • • • • • • 47 Remaining time indication • • • • • • • • • • • • • • • • • • • 47 Selecting a recording grade • • • • • • • • • • • • • • • • • • 49
Song menu • • • • • • • • • • • • • • • • • • • • • • • • • • • • • • • • • • • • • • • • • • • • • • • • • 46 Song position pointer • • • • • • • • • • • • • • • • • • • • • • • • • • • • • • • • • • • • 51 Specifications • • • • • • • • • • • • • • • • • • • • • • • • • • • • • • • • • • • • • • • • • • • • • • 56 Start/Stop/Continue • • • • • • • • • • • • • • • • • • • • • • • • • • • • • • • • • • • • • • 51 Status key • • • • • • • • • • • • • • • • • • • • • • • • • • • • • • • • • • • • • • • • • • • • • • • • • • • 15 Stereo link • • • • • • • • • • • • • • • • • • • • • • • • • • • • • • • • • • • • • • • • • • • • • 20, 39 STOP [P] key • • • • • • • • • • • • • • • • • • • • • • • • • • • • • • • • • • • • • • • • • • • • • 16 Synchronization • • • • • • • • • • • • • • • • • • • • • • • • • • • • • • • • • • • • • • • • • • • 51
◆ T Time display • • • • • • • • • • • • • • • • • • • • • • • • • • • • • • • • • • • • • • • • • • • • • • • 33
MEASURE indicator • • • • • • • • • • • • • • • • • • • • • • • • • • 33 Timing clock • • • • • • • • • • • • • • • • • • • • • • • • • • • • • • • • • • • • • • • • • • • • • • • 51 Top panel • • • • • • • • • • • • • • • • • • • • • • • • • • • • • • • • • • • • • • • • • • • • • • • • • • • • • 6 Track • • • • • • • • • • • • • • • • • • • • • • • • • • • • • • • • • • • • • • • • • • • • • • • • • • • • • • 40
Copying • • • • • • • • • • • • • • • • • • • • • • • • • • • • • • • • • • • • • • • • • • 40 Copying all data • • • • • • • • • • • • • • • • • • • • • • • • • • • • • • • • 41 Erasing all data • • • • • • • • • • • • • • • • • • • • • • • • • • • • • • • • • • 43 Erasing specified data segment • • • • • • • • • • • • • 42 Exchanging • • • • • • • • • • • • • • • • • • • • • • • • • • • • • • • • • • • • • • • 44
Track mixer • • • • • • • • • • • • • • • • • • • • • • • • • • • • • • • • • • • • • • • • • • • • • • • • • • 5 Track number • • • • • • • • • • • • • • • • • • • • • • • • • • • • • • • • • • • • • • • • • • • • • • 28 Track parameters • • • • • • • • • • • • • • • • • • • • • • • • • • • • • • • • • • • • • • 5, 19 [TRACK PARAMETER] key • • • • • • • • • • • • • • • • • • • • • • • • • 19 Transport keys • • • • • • • • • • • • • • • • • • • • • • • • • • • • • • • • • • • • • • • • • • • • • 16 Tuner • • • • • • • • • • • • • • • • • • • • • • • • • • • • • • • • • • • • • • • • • • • • • • • • • • • • • • 52
◆ V V-take • • • • • • • • • • • • • • • • • • • • • • • • • • • • • • • • • • • • • • • • • • • • • • 4, 20, 28 V-TAKE indicator • • • • • • • • • • • • • • • • • • • • • • • • • • • • • • • • • • • • • • • • 28 V-take number • • • • • • • • • • • • • • • • • • • • • • • • • • • • • • • • • • • • • • • • • • • • • 28
◆ Z ZERO [U] key • • • • • • • • • • • • • • • • • • • • • • • • • • • • • • • • • • • • • • • • • • • 16
Index
ZOOM MRS-4 63
◆ DISPLAY
BOOST BOOST • • • • • • • • • • • • • • • • • • • • • • • • • • • 26
BOUNCE BOUNCE • • • • • • • • • • • • • • • • • • • • • • • • 29
CAB BC CAB BC • • • • • • • • • • • • • • • • • • • • • • • • • • 13
CAB CO CAB CO • • • • • • • • • • • • • • • • • • • • • • • • • • 13
CAB ST CAB ST • • • • • • • • • • • • • • • • • • • • • • • • • • 13
CAPCITY CAPCITY • • • • • • • • • • • • • • • • • • • • • • • • 47
CARD CARD • • • • • • • • • • • • • • • • • • • • • • • • • • • • • 53
CHANGE CHANGE • • • • • • • • • • • • • • • • • • • • • • • • 44
CHO MN CHO MN • • • • • • • • • • • • • • • • • • • • • • • • • 23
CHO ST CHO ST • • • • • • • • • • • • • • • • • • • • • • • • • • 23
COMP COMP • • • • • • • • • • • • • • • • • • • • • • • • • • • • • 13
COPY COPY • • • • • • • • • • • • • • • • • • • • • • • • • • • • • 41
DOBLE DOUBLE • • • • • • • • • • • • • • • • • • • • • • • • • 22
ERASE ERASE • • • • • • • • • • • • • • • • • • • • • • • • • • • 43
FADE FADE • • • • • • • • • • • • • • • • • • • • • • • • • • • • • • 20
FORMAT FORMAT • • • • • • • • • • • • • • • • • • • • • • • • • 53
GRADE GRADE • • • • • • • • • • • • • • • • • • • • • • • • • • • 49
HALL HALL • • • • • • • • • • • • • • • • • • • • • • • • • • • • • 22
HIEQ HI EQ • • • • • • • • • • • • • • • • • • • • • • • • • • • • • 19
LCD LCD • • • • • • • • • • • • • • • • • • • • • • • • • • • • • • • 54
LIMIT LIMIT • • • • • • • • • • • • • • • • • • • • • • • • • • • • • 13
LOEQ LO EQ • • • • • • • • • • • • • • • • • • • • • • • • • • • • 20
LONG LONG • • • • • • • • • • • • • • • • • • • • • • • • • • • • • 22
METRO METRO • • • • • • • • • • • • • • • • • • • • • • • • • • 50
MICEF MICEF • • • • • • • • • • • • • • • • • • • • • • • • • • • • 14
NEWSONG NEWSONG • • • • • • • • • • • • • • • • • • • • • 11
PAN PAN • • • • • • • • • • • • • • • • • • • • • • • • • • • 20, 38
POWER POWER • • • • • • • • • • • • • • • • • • • • • • • • • • 26
PROTECT PROTECT • • • • • • • • • • • • • • • • • • • • • • • • 49
ROOM ROOM • • • • • • • • • • • • • • • • • • • • • • • • • • • • 22
SEND SEND • • • • • • • • • • • • • • • • • • • • • • • • 24, 38
SHORT SHORT • • • • • • • • • • • • • • • • • • • • • • • • • • • 22
SLVL SLVL • • • • • • • • • • • • • • • • • • • • • • • • • 24, 38
SNG DEL SNG DEL • • • • • • • • • • • • • • • • • • • • • • • • 48
SNG NEW SNG NEW • • • • • • • • • • • • • • • • • • • • • • • 47
SNG SEL SNG SEL • • • • • • • • • • • • • • • • • • • • • • • • • 47
SNGCOPY SNGCOPY • • • • • • • • • • • • • • • • • • • • • • • 48
STL STL • • • • • • • • • • • • • • • • • • • • • • • • • • • • • • • • 39
TR COPY TR COPY • • • • • • • • • • • • • • • • • • • • • • • • 40
TR EDIT TR EDIT • • • • • • • • • • • • • • • • • • • • • • • • • 40
TR ERS TR ERS • • • • • • • • • • • • • • • • • • • • • • • • • • • 42
TUNER TUNER • • • • • • • • • • • • • • • • • • • • • • • • • • • 52
VOCAL VOCAL • • • • • • • • • • • • • • • • • • • • • • • • • • • 26
WAIT WAIT • • • • • • • • • • • • • • • • • • • • • • • • • • • • • • 16
◆ AA-B Repeat • • • • • • • • • • • • • • • • • • • • • • • • • • • • • • • • • • • • • • • • • • • • • • • • • 36 [A-B REPEAT] key • • • • • • • • • • • • • • • • • • • • • • • • • • • • • • • • • • • • • • 36 Algorithm • • • • • • • • • • • • • • • • • • • • • • • • • • • • • • • • • • • • • • • • • • • • • • • • • • • 13 Auto punch-in/out • • • • • • • • • • • • • • • • • • • • • • • • • • • • • • • • • • • • • • • • 31
Operation • • • • • • • • • • • • • • • • • • • • • • • • • • • • • • • • • • • • • • • • • 32 Rehearsal • • • • • • • • • • • • • • • • • • • • • • • • • • • • • • • • • • • • • • • • • 32
[AUX IN] jack • • • • • • • • • • • • • • • • • • • • • • • • • • • • • • • • • • • • • • • • • 8, 55
◆ BBatteries • • • • • • • • • • • • • • • • • • • • • • • • • • • • • • • • • • • • • • • • • • • • • • • • • • • • • • 9 Bounce • • • • • • • • • • • • • • • • • • • • • • • • • • • • • • • • • • • • • • • • • • • • • • • • • • • • • • 29 [BOUNCE] key • • • • • • • • • • • • • • • • • • • • • • • • • • • • • • • • • • • • • • • • • • • 30
◆ CConnections • • • • • • • • • • • • • • • • • • • • • • • • • • • • • • • • • • • • • • • • • • • • • • • • • 8
◆ EEditing a track • • • • • • • • • • • • • • • • • • • • • • • • • • • • • • • • • • • • • • • • • • • • • 40 Effects • • • • • • • • • • • • • • • • • • • • • • • • • • • • • • • • • • • • • • • • • • • • • • • • • • • • • • • • 5
Bypass • • • • • • • • • • • • • • • • • • • • • • • • • • • • • • • • • • • • • • • • • • • • 52 Error messages • • • • • • • • • • • • • • • • • • • • • • • • • • • • • • • • • • • • • • • • • • • • 59
◆ FFader • • • • • • • • • • • • • • • • • • • • • • • • • • • • • • • • • • • • • • • • • • • • • • • • • • • • • • 20 FF [Y] key • • • • • • • • • • • • • • • • • • • • • • • • • • • • • • • • • • • • • • • • • • • • • • • • 16 File configuration • • • • • • • • • • • • • • • • • • • • • • • • • • • • • • • • • • • • • • • • • 57 Front panel • • • • • • • • • • • • • • • • • • • • • • • • • • • • • • • • • • • • • • • • • • • • • • • • • • • 7
◆ HHi EQ • • • • • • • • • • • • • • • • • • • • • • • • • • • • • • • • • • • • • • • • • • • • • • • • • • • • • • 19
◆ IInput • • • • • • • • • • • • • • • • • • • • • • • • • • • • • • • • • • • • • • • • • • • • • • • • • • • • • • 38
Parameter • • • • • • • • • • • • • • • • • • • • • • • • • • • • • • • • • • • • • • • • • 38 [INPUT LEVEL] control • • • • • • • • • • • • • • • • • • • • • • • • • • 12, 37 Input mixer • • • • • • • • • • • • • • • • • • • • • • • • • • • • • • • • • • • • • • • • • • • • • • 5, 37 Input sensitivity • • • • • • • • • • • • • • • • • • • • • • • • • • • • • • • • • • • • • • • • • • • 12
ZOOM MRS-4
Index
62
Index

ZOOM CORPORATIONNOAH Bldg., 2-10-2, Miyanishi-cho, Fuchu-shi, Tokyo 183-0022, JapanPHONE: +81-42-369-7116 FAX: +81-42-369-7115Web Site: http://www.zoom.co.jp
Printed in Japan MRS-4 - 5000-2