zipform plus broker/administrator guide€¦ · create and modify agent templates, and prepare and...
TRANSCRIPT

zipForm® Plus Broker/Administrator Guide
“Great things in business are never done by one person,
they’re done by a team of people”
- Steve Jobs

zipForm® Plus Broker/Administrative Guide
www.zipLogix.com Page | 1
Table of Contents Welcome Brokers and Administrators! ............................................................................................................... 2
Administrative Features ..................................................................................................................................... 3
Adding Offices .................................................................................................................................................. 4
zipForm® Plus User Roles .................................................................................................................................. 6
Adding Users ..................................................................................................................................................... 7
Finding Users ................................................................................................................................................... 11
Deleting Users ................................................................................................................................................. 12
Reassigning Transactions ................................................................................................................................. 13
Moving an agent to a new office ..................................................................................................................... 13
Creating Broker Templates .............................................................................................................................. 14
Placeholders .................................................................................................................................................... 16
Setting Relative Due Dates .............................................................................................................................. 18
zipTMS® Transaction Management System .................................................................................................... 19
Reports ............................................................................................................................................................ 20
Broker Settings ................................................................................................................................................ 21
Message Center .............................................................................................................................................. 21
Revision Date 7.17.2018

zipForm® Plus Broker/Administrative Guide
www.zipLogix.com Page | 2
Welcome Brokers and Administrators!
We are excited to show you how zipForm® Plus allows you and your agents to work efficiently, accurately, and quickly throughout the transaction process. This guide will provide you with tools and helpful tips on how to set up your brokerage account, manage users, and work inside transaction files using our simple, integrated application.
zipForm® Plus works on today’s computers without any special downloads or plugins, maximizing your screen use and productivity. Easily select your preferred operating system or browser, including Google Chrome, Apple Safari, Mozilla Firefox, or Microsoft Internet Explorer 9 and above.

zipForm® Plus Broker/Administrative Guide
www.zipLogix.com Page | 3
Administrative Features
Welcome to your zipForm® Plus Administrator account. This Brokerage Edition of zipForm® Plus, offers powerful tools to allow administrators, like yourself, to streamline a workflow and keep your business organized. As an administrator, you will have the ability to:
• Develop seamless management of transactions and forms
• Generate reports at agent, office, and corporate levels
• Track and monitor agents’ transactions
• Create group templates and clauses
• Access your proprietary forms* library custom designed by zipLogix™
* Should you wish to have your proprietary forms designed, please contact your sales account
representative or email [email protected].
If you are unsure whether or not you have a zipForm® Plus Brokerage account, you can easily validate your version by signing into your zipForm® Plus account and locate the “Admin” tab on the toolbar. This signifies that you have the brokerage edition.
Every brokerage operates differently. Whether you are new to the zipForm® Plus Broker Edition, or a zipForm® veteran, we are here to guide you in finding the most efficient way to utilize zipForm® Plus for your business.

zipForm® Plus Broker/Administrative Guide
www.zipLogix.com Page | 4
If you are going to use multiple offices to manage your users, it is important to add those offices before adding your users.
Adding Offices
Click on the Admin tab, then click on “Offices”.
Click “New” to add your additional office.

zipForm® Plus Broker/Administrative Guide
www.zipLogix.com Page | 5
Complete the “General Information” section. The information you enter in the fields can* be displayed on zipForm® Plus transactions of the agents you assign to that office. You will have the option later to assign agents.
Tip
* When filling in your company information, please note that information in this section will be displayed on the bottom of your forms. This information will also be displayed on the bottom of your agents’ forms, should they be assigned to this specific office. See page eight for more information on how to assign agents to a specific office.

zipForm® Plus Broker/Administrative Guide
www.zipLogix.com Page | 6
zipForm® Plus User Roles
Before learning how to add your agents, you should know that there are four roles available, to which you can assign your new user, within a brokerage account.
1. Brokerage Administrator (Global): If you have more than one office location, the Brokerage Administrator manages all offices, agent accounts, transactions, form access, transaction reports, templates, and clauses for the entire brokerage.
2. Location Administrator (Office Specific): Admins are able to manage the agent accounts,
templates, clauses, and transactions for their office location.
3. Agents: Individual users who are able to create transactions and manage their personal accounts, including personal transactions, clauses, templates, and contacts. Admins are able to view agents’ transactions and templates, but are unable to view the agent contacts.
4. Transaction Coordinator: A Transaction Coordinator (TC) works on behalf of the agent or broker. A Transaction Coordinator may have the ability to create transactions, add/edit transactions and documents, add collaborative parties, request approval from broker or admins, create and modify agent templates, and prepare and send documents for electronic or digital signing.
Tip To add an office or user to your zipForm® Plus account, you must have available seats. “Seats” are the number of offices/users that can be attached to the brokerage account.
When all seats are “filled”, the Broker Administrator cannot add more offices/users until some are removed. You may add an office before adding additional seats by contacting your National Account Representative at 866-627-4729.

zipForm® Plus Broker/Administrative Guide
www.zipLogix.com Page | 7
Adding Users
Click on the “Admin” tab, then click on “Users”.
Click “New” to add a new agent.

zipForm® Plus Broker/Administrative Guide
www.zipLogix.com Page | 8
When creating a new user, you must assign a role to each agent and complete the necessary information to create your new user. If you are not familiar with the capabilities for each role, please refer to page six of this guide.
Select the office location to which you would like the agent to be assigned. An agent may be assigned to multiple offices. Be sure to select the office address that the agent would like reflected on the bottom of his/her forms.
Tip When creating usernames, be sure that usernames are unique. When a new user is created, the user has the ability to import/export their files into their account.

zipForm® Plus Broker/Administrative Guide
www.zipLogix.com Page | 9
Assign the necessary libraries for your agent/s and click next.
Assign the necessary products for your agent/s and click next.

zipForm® Plus Broker/Administrative Guide
www.zipLogix.com Page | 10
Based on the role you designated for your agent, you will be able to choose different permissions based on the actions your agent will perform in zipForm® Plus, click “Save”.
The new user will receive an email with the subject line “zipForm Plus® Password/ Account Set Up” from do-not-reply-zip- [email protected].
To sign in, the user must use the password that they set up along with the username entered by the admin when creating the account.

zipForm® Plus Broker/Administrative Guide
www.zipLogix.com Page | 11
Finding Users Agents may be found by email address, first name, last name, office, or status. You may also choose to search by applying a filter.
You may also change the view of your search by clicking the icon:

zipForm® Plus Broker/Administrative Guide
www.zipLogix.com Page | 12
Deleting Users If an agent no longer works for your brokerage, that agent can be deleted.
Deleting an agent will remove the agent from the “Agent List”. Seats purchased by your brokerage for libraries and products will be returned to the brokerage. These seats may then be used when adding a new agent to your brokerage account.
Click on “Admin” on the toolbar and go to “Users”. Click on the user, then click “Delete Account”.
Tip
• All users will share the same account expiration date as the rest of your users, regardless of when they were added to your account.
• Transactions created by the user remain the property of the brokerage and may be reassigned to other agents.
• A new agent can use the import feature to import transactions/templates/contacts/checklists into their new account.
• Brokers should ask the agent to log out of their account before files are transferred to that agent.

zipForm® Plus Broker/Administrative Guide
www.zipLogix.com Page | 13
Reassigning Transactions Transactions (if any) can be reassigned. You will be provided three options: “Delete All”, “Transfer Later” (Transactions will be sent to the Broker Admin account) or choose to “Transfer Now”.
When an agent is removed (deleted) from zipForm® Plus, all of that agents’ transactions may be reassigned to another agent (or agents) at that time, or they can be assigned at another time. If transactions are not reassigned when an agent is deleted, they can be moved using the “Transfer” button, located on the Transactions page. This tool only allows an Admin to transfer unassigned transactions of the original agent who was deleted.
Moving an agent to a new office It is possible to move users from one office to another, as long as the offices are located within the same Broker account. If an agent already has an account in zipForm® Plus, and the agent received permission from their previous Broker, you can arrange to transfer the agent’s account to your brokerage account by contacting the zipLogix™ Support Team at 586-840-0140.

zipForm® Plus Broker/Administrative Guide
www.zipLogix.com Page | 14
Click on the “Admin” toolbar and go to “Users”. Click on the user’s name then click on “Office Info”.
Creating Broker Templates
You can create and apply Brokerage Templates inside the zipForm® Plus Broker Edition. A Template includes the desired Parties, Documents, and Checklists that your agents can apply to their transactions. By creating a Template, you save time and reduce risk by ensuring that the correct documents are applied to a transaction every time.
To create a template, click on “Templates” located on the toolbar and click “New”.

zipForm® Plus Broker/Administrative Guide
www.zipLogix.com Page | 15
Choose which template type you would like to create.
Name your template and select the Property Type, Scope, Auto Apply, and Compliance Options. If you have any previous templates saved, you can also add those to your new template.
Understanding “Scope”: Global (Broker) Template All users will see and be able to use. Only a Broker Administrator can create this level of template. Location (Office) Template Only users from a certain office will see and be able to use. An Office Administrator or Broker Administrator can create this level of template. Individual (Agent) Template Only the agent who created the template can see and use.
Tip

zipForm® Plus Broker/Administrative Guide
www.zipLogix.com Page | 16
Select any forms you would like to add to your template from within the “All Forms” button. Forms can be located by Type, Name, Alphabetical order and/or the Search Function.
Once you add your desired forms to your template, you will have the option to select various ways of pulling in additional documents which may be stored on your computer.
From this area, you can also choose to create Placeholders. You can create a “Placeholder” as a reminder to add that specific document to your transaction when the time presents itself.
Placeholders
To create a placeholder in a template in your zipForm® Plus account, click on “Templates” on your toolbar, and click “Add Doc”. Select “Create Placeholder”.
zipForm® Plus Broker/Administrative Guide
www.zipLogix.com Page | 17
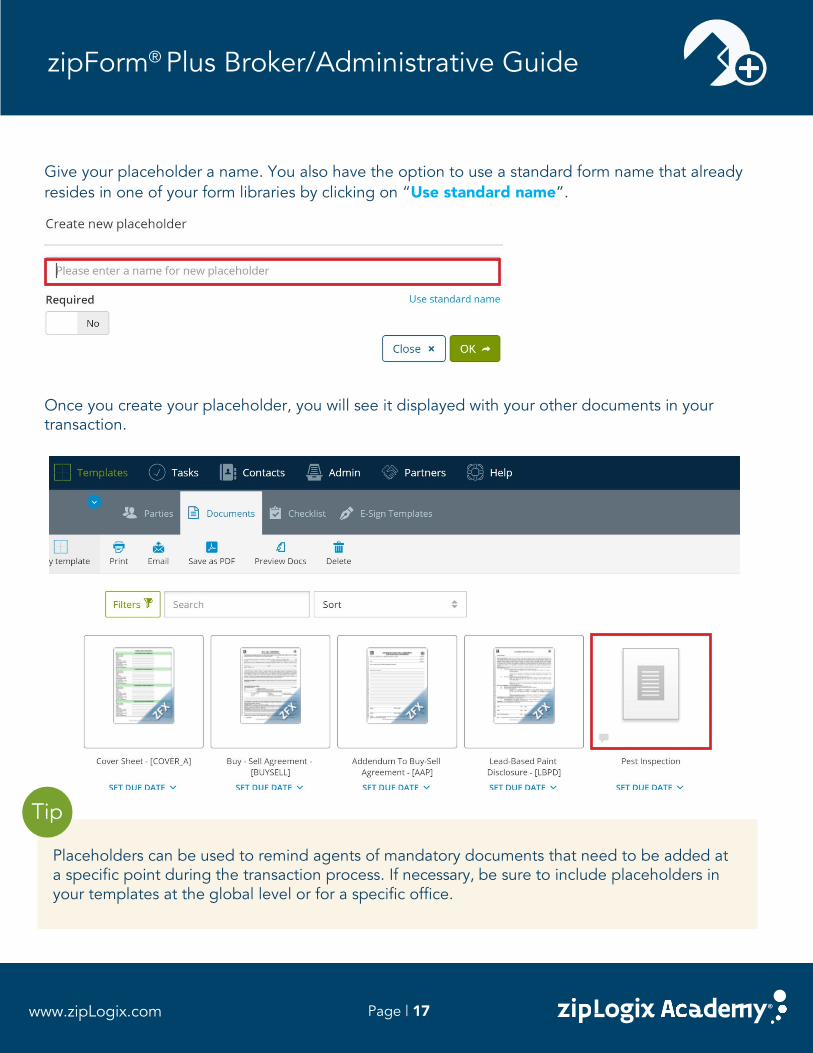
Give your placeholder a name. You also have the option to use a standard form name that already resides in one of your form libraries by clicking on “Use standard name”.
Once you create your placeholder, you will see it displayed with your other documents in your transaction.
Tip
Placeholders can be used to remind agents of mandatory documents that need to be added at a specific point during the transaction process. If necessary, be sure to include placeholders in your templates at the global level or for a specific office.

zipForm® Plus Broker/Administrative Guide
www.zipLogix.com Page | 18
Setting Relative Due Dates
When creating your Global or Office template, it’s most common to set a “Relative” due date.
Tip
Setting a relative due date allows you and your agents to apply the template to a transaction without a fixed date. Once a due date has been determined, and the template has been pulled into a transaction, you and your agents may then assign an active due date.

zipForm® Plus Broker/Administrative Guide
www.zipLogix.com Page | 19
zipTMS® Transaction Management System zipTMS® allows you to work with your office, track tasks, complete contracts, and manage important documentation from one easy location. The Tasks page in zipForm® Plus is where users will find all of their upcoming, current, and past tasks in a Calendar, Checklist, or Status Board view. Administrators may use this to see all of the tasks from each user in the Broker Edition account. All of the tasks displayed are generated from the Checklist tab inside Transaction folders.
Tip
zipTMS® is loaded with helpful features to help you stay on top of your business!
Seamless integration with zipForm® Plus for ease of use Manage transactions and checklists Create checklist templates for common transaction types Adjust the task view with calendar, list, or board view Manage all transactions at once with the overview dashboard Notifications assist you with staying on task Transaction History that records all tasks
For more assistance on zipTMS®, please explore our knowledge base to get the answers you need at: https://www.ziplogix.com/support/.

zipForm® Plus Broker/Administrative Guide
www.zipLogix.com Page | 20
Reports Administrators have the ability to access a number of reports inside their zipForm® Plus Broker account. To access these reports, click “Admin” on the toolbar, and then click “Reports”. By clicking on “All Offices”, you will be able to run a report on any office listed in the drop-down.
Tip
The following reports may be run by the Administrator:
• Transactions/Revenue: New/Active Listings, Pending/Closed/Expired/Fell Through Transactions
• Account Reports: Users, Form Libraries, and Products used • Activity/Performance: Agent Performance and Transaction Activity • Management/Oversight: Document Approval items, Tasks, Listings Expiring,

zipForm® Plus Broker/Administrative Guide
www.zipLogix.com Page | 21
Broker Settings As a Broker Administrator, you may customize your account permissions, notifications, security, and more! These customizable features are designed to help with efficiency and risk management, and can all be adjusted on a company-wide, or per office level.
Message Center The Message Center allows Administrators to broadcast messages to a particular office or to the entire brokerage. Messages will appear in the Notification Area on both zipForm® Plus and zipForm® Mobile platforms.