zen internet · single mailbox recovery for exchange 2000 | 2003 2.1 email notification the email...
TRANSCRIPT
Zen Internet, Sandbrook Park, Sandbrook Way, Rochdale OL11 1RY Registered in England No. 03101568 Tel: 01706 902000 Fax: 01706 902005 E-mail: [email protected] Web: www.zen.co.uk © Zen Internet 2015
Zen Internet
Online Data Backup
Zen Vault Professional Plug-ins
Issue: 2.0.08
Zen Internet, Sandbrook Park, Sandbrook Way, Rochdale OL11 1RY Registered in England No. 03101568 Tel: 01706 902000 Fax: 01706 902005 E-mail: [email protected] Web: www.zen.co.uk © Zen Internet 2015
Contents
1 Plug-in Installer ..................................................................................................................................................... 3
1.1 Installation and Configuration ..................................................................................................................... 3
2 Plug-ins ................................................................................................................................................................ 5
2.1 Email Notification ........................................................................................................................................ 5
2.1.1 Installing the report plug-in .................................................................................................................... 5
2.1.2 Configuration and use ........................................................................................................................... 5
2.2 System State Backup Plug-in ..................................................................................................................... 6
2.2.1 Installation and Configuration ............................................................................................................... 7
2.2.2 Restore Process .................................................................................................................................... 7
2.3 MS Exchange 2000 | 2003 | 2007 .............................................................................................................. 8
2.3.1 Installation and Configuration ............................................................................................................... 8
2.3.2 Full Backups vs Incremental Backups ................................................................................................. 9
2.3.3 How to restore a MS Exchange storage group ................................................................................... 10
2.4 MS SQL 2000 | 2005 ................................................................................................................................ 11
2.4.1 Installation and Configuration ............................................................................................................. 11
2.4.2 How to restore a SQL database from a backup device ...................................................................... 13
2.5 Oracle ....................................................................................................................................................... 14
2.5.1 Installation and Configuration ............................................................................................................. 14
2.5.2 How to recover an Oracle tablespace or datafile (Oracle 9i/10g only ................................................ 15
2.5.3 How to recover an Oracle tablespace or datafile ................................................................................ 16
2.5.4 Oracle tablespace or datafile .............................................................................................................. 17
2.6 Script Plug-in ............................................................................................................................................. 18
2.6.1 Installing the Script Plug-in ................................................................................................................. 18
2.6.2 Configuration and Use ........................................................................................................................ 19
2.7 Single Mailbox Recovery .......................................................................................................................... 20
2.7.1 Installing the Script Plugin ................................................................................................................... 20
2.7.2 Additional Server Configuration .......................................................................................................... 20
2.7.3 SMR backup – Configuring the backup settings ................................................................................. 20
2.7.4 Backup Settings .................................................................................................................................. 22
2.7.5 Output during a backup ....................................................................................................................... 22
2.7.6 SMR restore – Running a restore ....................................................................................................... 23
2.7.7 Restore Settings .................................................................................................................................. 24
2.7.8 Output during a restore ....................................................................................................................... 24
2.7.9 Exmerge .............................................................................................................................................. 25
Zen Internet, Sandbrook Park, Sandbrook Way, Rochdale OL11 1RY Registered in England No. 03101568 Tel: 01706 902000 Fax: 01706 902005 E-mail: [email protected] Web: www.zen.co.uk © Zen Internet 2015
1 Plug-in Installer The Plug-in Installer allows you to upgrade existing Zen Vault Professional Backup Clients with added
functionality by installing application specific plug-ins and other monitoring tools. You can also upgrade existing
plug-ins with this installer. As from Backup Professional v5.0, plug-ins can also be auto-updated during the
backup process, if enabled on the Storage Platform.
The Zen Vault Professional Client must be installed on the computer before you can install any plug-ins. Plug-ins
requires working space for the cache and disk space for creating a data dump and patches.
Note Ensure that the drive where the Backup Client is installed has enough free hard drive space to store an extra copy
of all the selected files. If not, move the to Backup, Cache and dump folder to another drive.
1.1 Installation and Configuration
The application does not have to be installed before updating the Backup Client. Simply run the Plug-in Installer
executable and supply the necessary information. The installer will prompt you to close the Zen Vault Professional
Client interface, if it is open, when running the Plug-in installer.
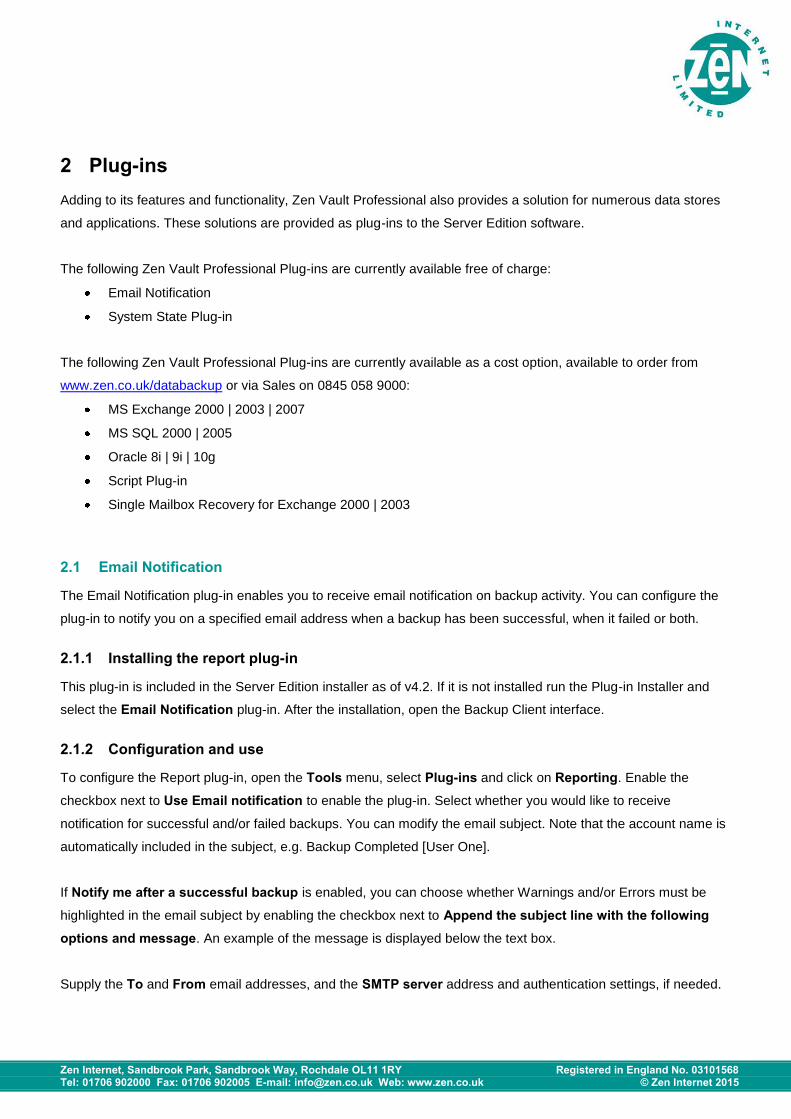
The Plug-in Installer displays a list of all the available plug-
ins that you can install. Plug-ins marked with are already
installed on the system. Any plug-ins marked with a blue
icon will be upgraded to the latest plug-in version.
Note All plug-ins are available to install. However, only those
ordered and paid for (where necessary) will be activated on
the online data backup platform.
‘Version Information’ displays the Plug-in Installer version information. Select or deselect any of the plug-ins by
clicking in the checkbox next to the plug-in name. After you have made all the necessary changes, click on Next. The next screen will display a summary of all the changes that you have requested. Click on Apply requested
changes to continue with the upgrade or Back if you want to modify your selection.
The Plug-in Installer stops the Zen Vault Professional service, install/upgrade/uninstall the selected plug-ins and
starts the service again. Click on Finish to close the application. After installing the plug-ins, open the Backup

Zen Internet, Sandbrook Park, Sandbrook Way, Rochdale OL11 1RY Registered in England No. 03101568 Tel: 01706 902000 Fax: 01706 902005 E-mail: [email protected] Web: www.zen.co.uk © Zen Internet 2015
Client and configure the installed plug-ins. For more information about the plug-ins, please refer
to the next chapter.
Note The Plug-in Installer does not remove the dump folder used by the plug-ins or any plug-in specific settings when
you remove plug-ins. You have to remove it manually if needed.
Zen Internet, Sandbrook Park, Sandbrook Way, Rochdale OL11 1RY Registered in England No. 03101568 Tel: 01706 902000 Fax: 01706 902005 E-mail: [email protected] Web: www.zen.co.uk © Zen Internet 2015
2 Plug-ins Adding to its features and functionality, Zen Vault Professional also provides a solution for numerous data stores
and applications. These solutions are provided as plug-ins to the Server Edition software.
The following Zen Vault Professional Plug-ins are currently available free of charge:
Email Notification
System State Plug-in
The following Zen Vault Professional Plug-ins are currently available as a cost option, available to order from
www.zen.co.uk/databackup or via Sales on 0845 058 9000:
MS Exchange 2000 | 2003 | 2007
MS SQL 2000 | 2005
Oracle 8i | 9i | 10g
Script Plug-in
Single Mailbox Recovery for Exchange 2000 | 2003
2.1 Email Notification
The Email Notification plug-in enables you to receive email notification on backup activity. You can configure the
plug-in to notify you on a specified email address when a backup has been successful, when it failed or both.
2.1.1 Installing the report plug-in
This plug-in is included in the Server Edition installer as of v4.2. If it is not installed run the Plug-in Installer and
select the Email Notification plug-in. After the installation, open the Backup Client interface.
2.1.2 Configuration and use
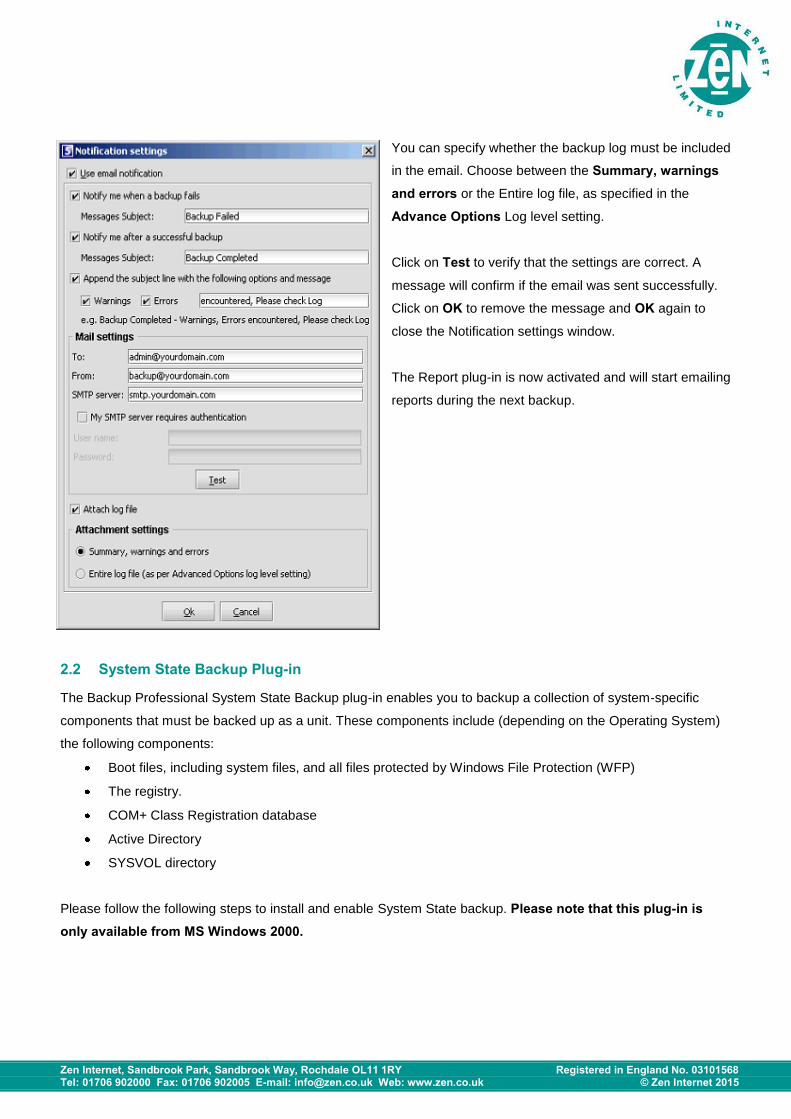
To configure the Report plug-in, open the Tools menu, select Plug-ins and click on Reporting. Enable the
checkbox next to Use Email notification to enable the plug-in. Select whether you would like to receive
notification for successful and/or failed backups. You can modify the email subject. Note that the account name is
automatically included in the subject, e.g. Backup Completed [User One].
If Notify me after a successful backup is enabled, you can choose whether Warnings and/or Errors must be
highlighted in the email subject by enabling the checkbox next to Append the subject line with the following options and message. An example of the message is displayed below the text box.
Supply the To and From email addresses, and the SMTP server address and authentication settings, if needed.
Zen Internet, Sandbrook Park, Sandbrook Way, Rochdale OL11 1RY Registered in England No. 03101568 Tel: 01706 902000 Fax: 01706 902005 E-mail: [email protected] Web: www.zen.co.uk © Zen Internet 2015
You can specify whether the backup log must be included
in the email. Choose between the Summary, warnings and errors or the Entire log file, as specified in the
Advance Options Log level setting.
Click on Test to verify that the settings are correct. A
message will confirm if the email was sent successfully.
Click on OK to remove the message and OK again to
close the Notification settings window.
The Report plug-in is now activated and will start emailing
reports during the next backup.
2.2 System State Backup Plug-in
The Backup Professional System State Backup plug-in enables you to backup a collection of system-specific
components that must be backed up as a unit. These components include (depending on the Operating System)
the following components:
Boot files, including system files, and all files protected by Windows File Protection (WFP)
The registry.
COM+ Class Registration database
Active Directory
SYSVOL directory
Please follow the following steps to install and enable System State backup. Please note that this plug-in is only available from MS Windows 2000.
Zen Internet, Sandbrook Park, Sandbrook Way, Rochdale OL11 1RY Registered in England No. 03101568 Tel: 01706 902000 Fax: 01706 902005 E-mail: [email protected] Web: www.zen.co.uk © Zen Internet 2015
2.2.1 Installation and Configuration
This plug-in is included in the Server Edition installer as of v4.2. If it is not installed run the Zen Vault Professional
Plug-in Installer and select the System State Backup plug-in. After the installation, open the Backup Client
interface.
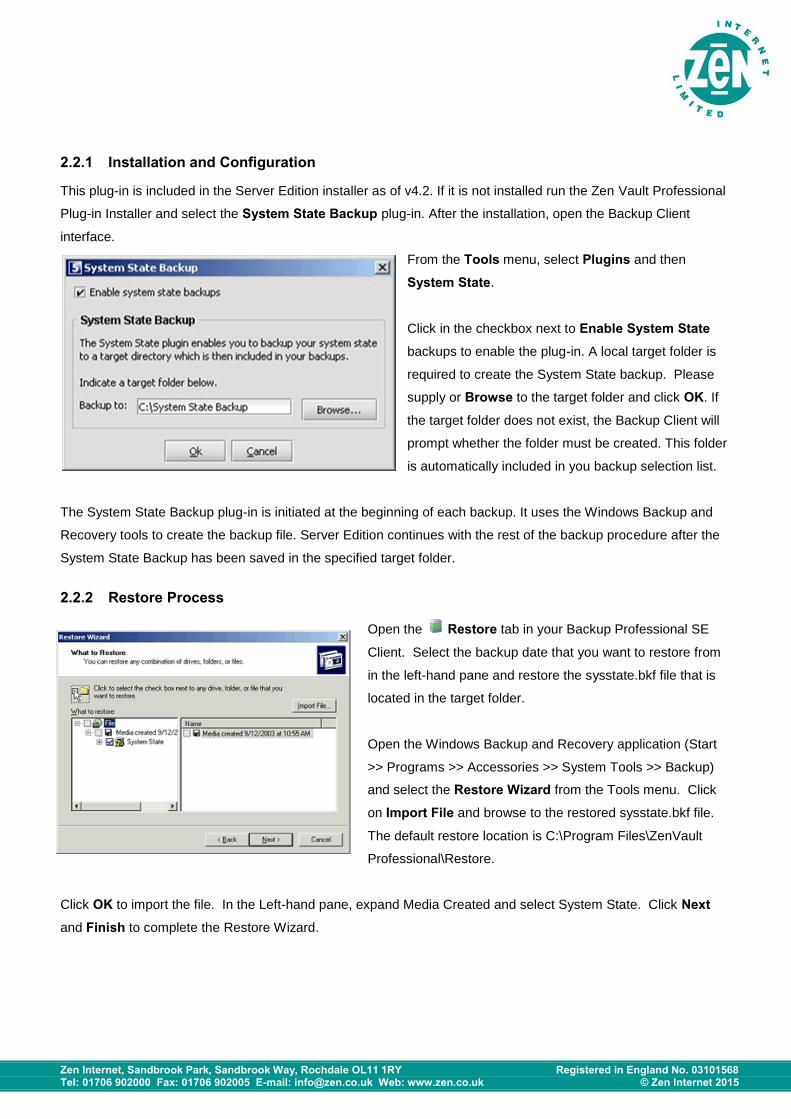
From the Tools menu, select Plugins and then
System State.
Click in the checkbox next to Enable System State
backups to enable the plug-in. A local target folder is
required to create the System State backup. Please
supply or Browse to the target folder and click OK. If
the target folder does not exist, the Backup Client will
prompt whether the folder must be created. This folder
is automatically included in you backup selection list.
The System State Backup plug-in is initiated at the beginning of each backup. It uses the Windows Backup and
Recovery tools to create the backup file. Server Edition continues with the rest of the backup procedure after the
System State Backup has been saved in the specified target folder.
2.2.2 Restore Process
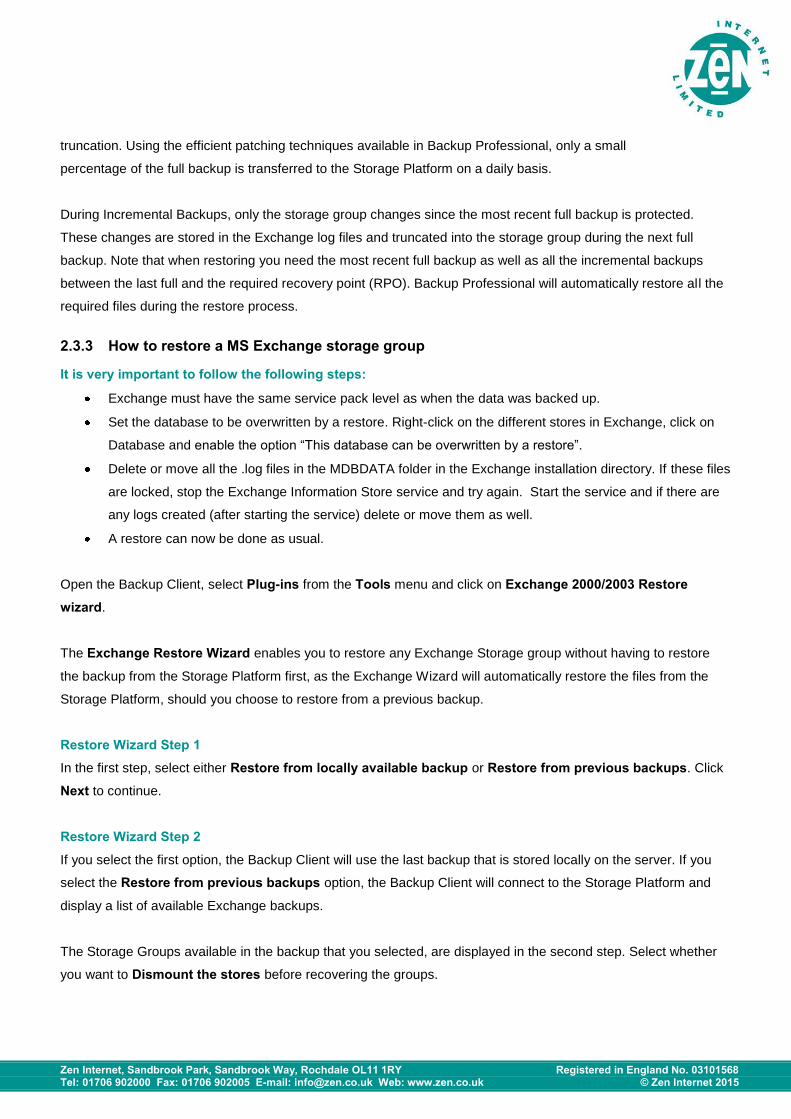
Open the Restore tab in your Backup Professional SE
Client. Select the backup date that you want to restore from
in the left-hand pane and restore the sysstate.bkf file that is
located in the target folder.
Open the Windows Backup and Recovery application (Start
>> Programs >> Accessories >> System Tools >> Backup)
and select the Restore Wizard from the Tools menu. Click
on Import File and browse to the restored sysstate.bkf file.
The default restore location is C:\Program Files\ZenVault
Professional\Restore.
Click OK to import the file. In the Left-hand pane, expand Media Created and select System State. Click Next and Finish to complete the Restore Wizard.

Zen Internet, Sandbrook Park, Sandbrook Way, Rochdale OL11 1RY Registered in England No. 03101568 Tel: 01706 902000 Fax: 01706 902005 E-mail: [email protected] Web: www.zen.co.uk © Zen Internet 2015
2.3 MS Exchange 2000 | 2003 | 2007
The MS Exchange 200x plug-in, combined with Zen Vault Professional, provides an automated backup solution
for any Exchange 2000, 2003 and 2007 storage group that you would like to backup. It enables a fast and flexible
way to protect vital Exchange data while the Exchange Server is in use.
2.3.1 Installation and Configuration
Note Zen Vault Professional with the MS Exchange Plug-in must be installed on an existing Exchange Server as it
automatically detects and configures the communications between the two applications. The Exchange Server
services must be running in order for the Plug-in to access the files selected for backup. If you wish to install the
Backup Client on a different machine then you must first install Exchange on that second machine as to provide
the libraries required by the Exchange plug-in.
If you are installing the Single Mailbox Recovery (SMR) plug-in as well, please do so before installing the
Exchange plug-in to ensure that the SMR mail profile is configured correctly.
Zen Vault Professional can be upgraded with the Exchange Plug-in by running the Plug-in Installer and selecting
the MS Exchange 2000/2003 plug-in. After the upgrade, open the Backup Professional Client to configure the
plug-in. Select Plug-ins from the Tools menu and click on Exchange 2000/2003 Backup settings.
Select where you would like the Backup Client to create a
Storage dump folder. This folder is used to dump a copy
of the selected storage groups from the Exchange server.
From here, the files will be encrypted and backed up. The
default dump folder is C:\Program Files\ZenVault
Professional SE\MSExchBackup.
Note Make sure that your computer has enough free hard drive
space to store a dump of all the selected storage groups.
The Backup Professional Client requires working space for the cache (which is compressed), a temporary copy of
each exchange storage group (the dump folder) and temporary disk space for creating patches to be sent to the
Storage Platform.
Zen Internet, Sandbrook Park, Sandbrook Way, Rochdale OL11 1RY Registered in England No. 03101568 Tel: 01706 902000 Fax: 01706 902005 E-mail: [email protected] Web: www.zen.co.uk © Zen Internet 2015
The next step is to select the storage group(s) that you would like to backup. You have the option
to select individual storage groups by expanding Servers and selecting the Storage Groups one by one. If you
tick the Servers box, you will automatically backup all the storage groups within the Server.
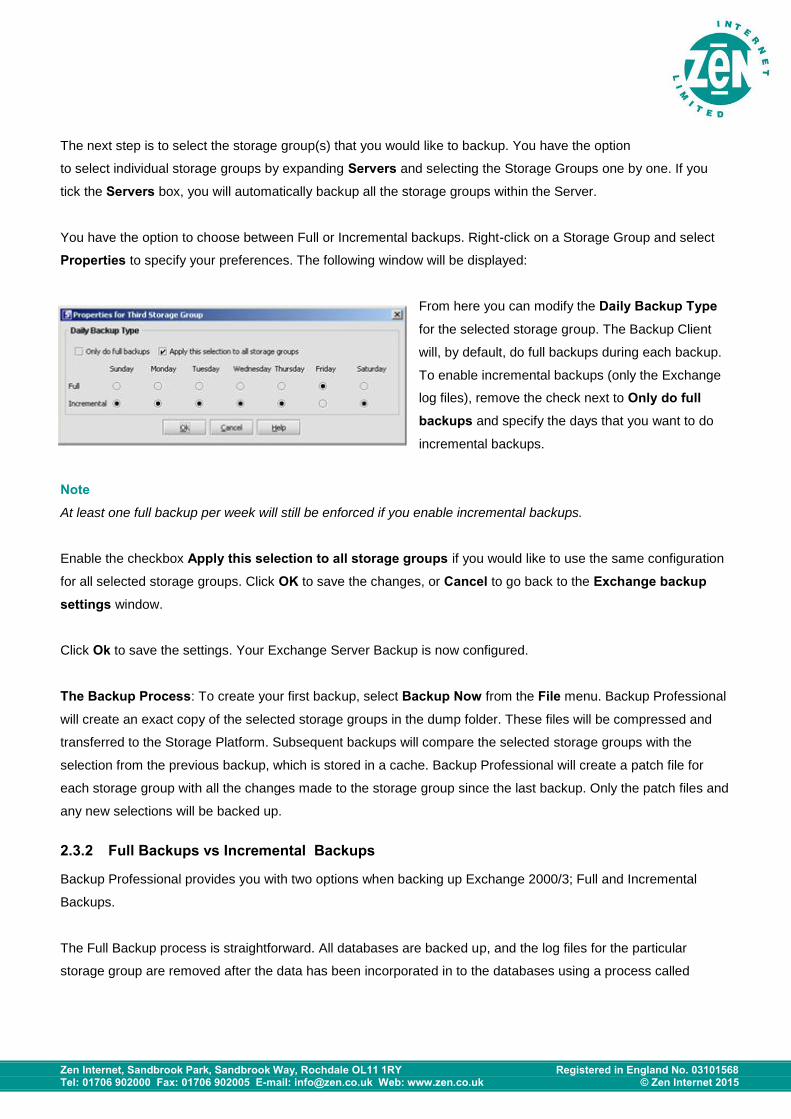
You have the option to choose between Full or Incremental backups. Right-click on a Storage Group and select
Properties to specify your preferences. The following window will be displayed:
From here you can modify the Daily Backup Type
for the selected storage group. The Backup Client
will, by default, do full backups during each backup.
To enable incremental backups (only the Exchange
log files), remove the check next to Only do full backups and specify the days that you want to do
incremental backups.
Note At least one full backup per week will still be enforced if you enable incremental backups.
Enable the checkbox Apply this selection to all storage groups if you would like to use the same configuration
for all selected storage groups. Click OK to save the changes, or Cancel to go back to the Exchange backup settings window.
Click Ok to save the settings. Your Exchange Server Backup is now configured.
The Backup Process: To create your first backup, select Backup Now from the File menu. Backup Professional
will create an exact copy of the selected storage groups in the dump folder. These files will be compressed and
transferred to the Storage Platform. Subsequent backups will compare the selected storage groups with the
selection from the previous backup, which is stored in a cache. Backup Professional will create a patch file for
each storage group with all the changes made to the storage group since the last backup. Only the patch files and
any new selections will be backed up.
2.3.2 Full Backups vs Incremental Backups
Backup Professional provides you with two options when backing up Exchange 2000/3; Full and Incremental
Backups.
The Full Backup process is straightforward. All databases are backed up, and the log files for the particular
storage group are removed after the data has been incorporated in to the databases using a process called
Zen Internet, Sandbrook Park, Sandbrook Way, Rochdale OL11 1RY Registered in England No. 03101568 Tel: 01706 902000 Fax: 01706 902005 E-mail: [email protected] Web: www.zen.co.uk © Zen Internet 2015
truncation. Using the efficient patching techniques available in Backup Professional, only a small
percentage of the full backup is transferred to the Storage Platform on a daily basis.
During Incremental Backups, only the storage group changes since the most recent full backup is protected.
These changes are stored in the Exchange log files and truncated into the storage group during the next full
backup. Note that when restoring you need the most recent full backup as well as all the incremental backups
between the last full and the required recovery point (RPO). Backup Professional will automatically restore all the
required files during the restore process.
2.3.3 How to restore a MS Exchange storage group
It is very important to follow the following steps:
Exchange must have the same service pack level as when the data was backed up.
Set the database to be overwritten by a restore. Right-click on the different stores in Exchange, click on
Database and enable the option “This database can be overwritten by a restore”.
Delete or move all the .log files in the MDBDATA folder in the Exchange installation directory. If these files
are locked, stop the Exchange Information Store service and try again. Start the service and if there are
any logs created (after starting the service) delete or move them as well.
A restore can now be done as usual.
Open the Backup Client, select Plug-ins from the Tools menu and click on Exchange 2000/2003 Restore wizard.
The Exchange Restore Wizard enables you to restore any Exchange Storage group without having to restore
the backup from the Storage Platform first, as the Exchange Wizard will automatically restore the files from the
Storage Platform, should you choose to restore from a previous backup.
Restore Wizard Step 1 In the first step, select either Restore from locally available backup or Restore from previous backups. Click
Next to continue.
Restore Wizard Step 2
If you select the first option, the Backup Client will use the last backup that is stored locally on the server. If you
select the Restore from previous backups option, the Backup Client will connect to the Storage Platform and
display a list of available Exchange backups.
The Storage Groups available in the backup that you selected, are displayed in the second step. Select whether
you want to Dismount the stores before recovering the groups.
Zen Internet, Sandbrook Park, Sandbrook Way, Rochdale OL11 1RY Registered in England No. 03101568 Tel: 01706 902000 Fax: 01706 902005 E-mail: [email protected] Web: www.zen.co.uk © Zen Internet 2015
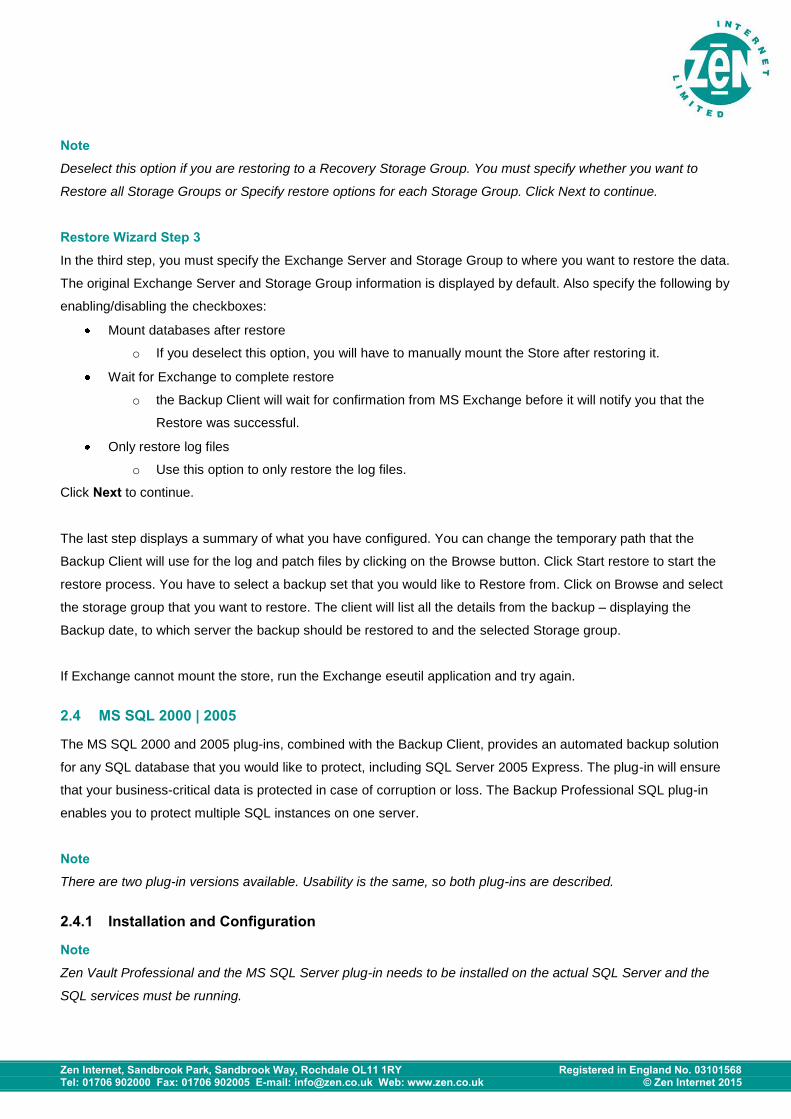
Note Deselect this option if you are restoring to a Recovery Storage Group. You must specify whether you want to
Restore all Storage Groups or Specify restore options for each Storage Group. Click Next to continue.
Restore Wizard Step 3
In the third step, you must specify the Exchange Server and Storage Group to where you want to restore the data.
The original Exchange Server and Storage Group information is displayed by default. Also specify the following by
enabling/disabling the checkboxes:
Mount databases after restore
o If you deselect this option, you will have to manually mount the Store after restoring it.
Wait for Exchange to complete restore
o the Backup Client will wait for confirmation from MS Exchange before it will notify you that the
Restore was successful.
Only restore log files
o Use this option to only restore the log files.
Click Next to continue.
The last step displays a summary of what you have configured. You can change the temporary path that the
Backup Client will use for the log and patch files by clicking on the Browse button. Click Start restore to start the
restore process. You have to select a backup set that you would like to Restore from. Click on Browse and select
the storage group that you want to restore. The client will list all the details from the backup – displaying the
Backup date, to which server the backup should be restored to and the selected Storage group.
If Exchange cannot mount the store, run the Exchange eseutil application and try again.
2.4 MS SQL 2000 | 2005
The MS SQL 2000 and 2005 plug-ins, combined with the Backup Client, provides an automated backup solution
for any SQL database that you would like to protect, including SQL Server 2005 Express. The plug-in will ensure
that your business-critical data is protected in case of corruption or loss. The Backup Professional SQL plug-in
enables you to protect multiple SQL instances on one server.
Note There are two plug-in versions available. Usability is the same, so both plug-ins are described.
2.4.1 Installation and Configuration
Note Zen Vault Professional and the MS SQL Server plug-in needs to be installed on the actual SQL Server and the
SQL services must be running.
Zen Internet, Sandbrook Park, Sandbrook Way, Rochdale OL11 1RY Registered in England No. 03101568 Tel: 01706 902000 Fax: 01706 902005 E-mail: [email protected] Web: www.zen.co.uk © Zen Internet 2015
Run the Plug-in Installer and select the MS SQL 2000 or 2005 plug-in to upgrade the Server
Edition Backup Client with the MS SQL Server plug-in. After the upgrade, open the Backup Professional Client.
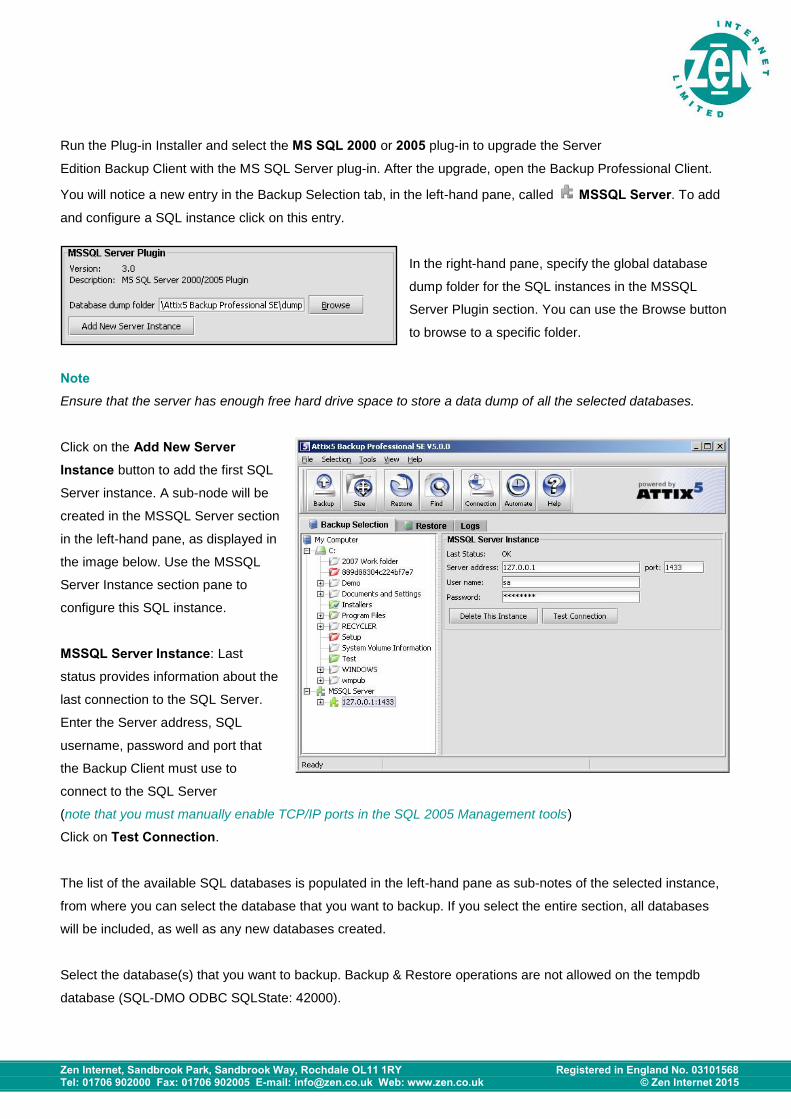
You will notice a new entry in the Backup Selection tab, in the left-hand pane, called MSSQL Server. To add
and configure a SQL instance click on this entry.
In the right-hand pane, specify the global database
dump folder for the SQL instances in the MSSQL
Server Plugin section. You can use the Browse button
to browse to a specific folder.
Note Ensure that the server has enough free hard drive space to store a data dump of all the selected databases.
Click on the Add New Server Instance button to add the first SQL
Server instance. A sub-node will be
created in the MSSQL Server section
in the left-hand pane, as displayed in
the image below. Use the MSSQL
Server Instance section pane to
configure this SQL instance.
MSSQL Server Instance: Last
status provides information about the
last connection to the SQL Server.
Enter the Server address, SQL
username, password and port that
the Backup Client must use to
connect to the SQL Server
(note that you must manually enable TCP/IP ports in the SQL 2005 Management tools)
Click on Test Connection.
The list of the available SQL databases is populated in the left-hand pane as sub-notes of the selected instance,
from where you can select the database that you want to backup. If you select the entire section, all databases
will be included, as well as any new databases created.
Select the database(s) that you want to backup. Backup & Restore operations are not allowed on the tempdb
database (SQL-DMO ODBC SQLState: 42000).
Zen Internet, Sandbrook Park, Sandbrook Way, Rochdale OL11 1RY Registered in England No. 03101568 Tel: 01706 902000 Fax: 01706 902005 E-mail: [email protected] Web: www.zen.co.uk © Zen Internet 2015
To add another instance, click on the MSSQL Server entry in the left-hand pane, and then on the
Add new server button in the right-hand MSSQL Server Plugin section. A new node will be added. Configure the
SQL Server settings and select the necessary databases.
Note Ensure that you have sufficient rights if protecting a remote server.
Verify that you have included all the required SQL databases in the left-hand pane before you initiate the first
backup. To create your first backup, select Backup Now from the File menu. Backup Professional will create an
exact copy of the selected databases in the dump folder. These files will be compressed and transferred to the
Storage Platform. The next backup will compare the selected storage groups with the selection from the previous
backup, which is stored in the cache. Backup Professional will create a patch file for each database. This file
consists of all the changes made to the database since the last backup. Only the patch files and any new
selections will be backed up.
2.4.2 How to restore a SQL database from a backup device
The first step is to restore the database from the Storage Platform. Click on the Restore tab and select the
dump folder from the specific backup date. From the File menu, click on Restore. Select a restore location and
restore the database.
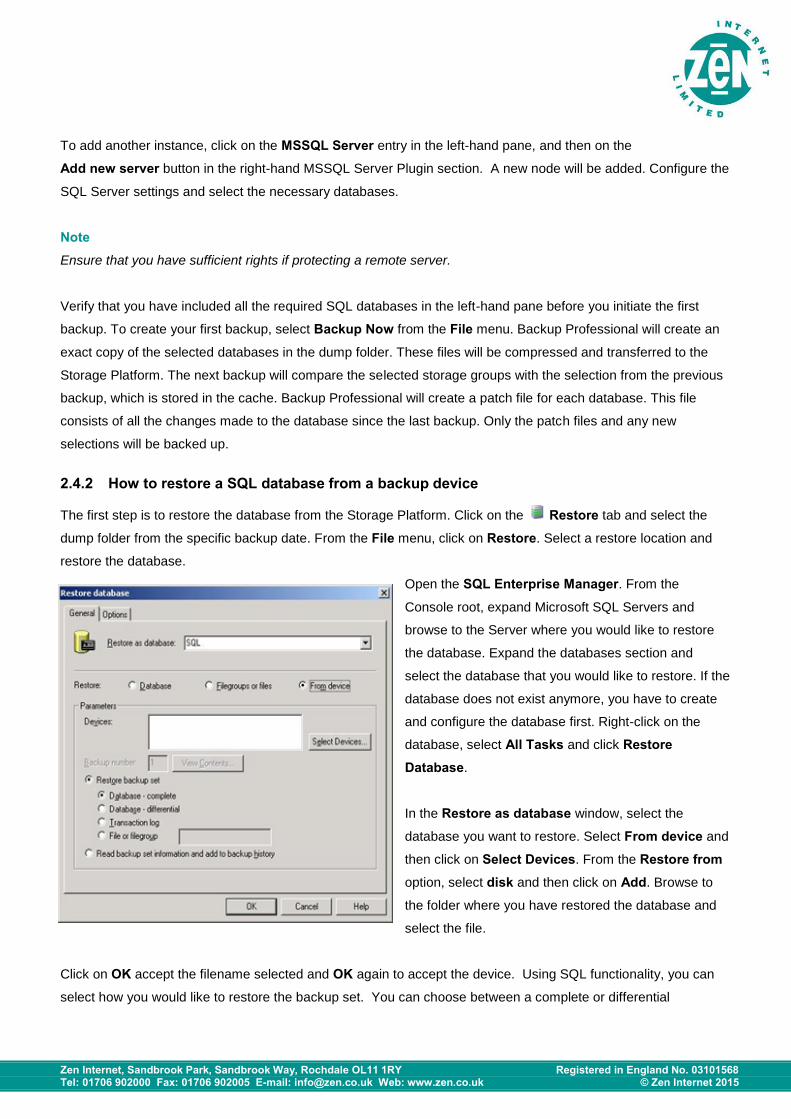
Open the SQL Enterprise Manager. From the
Console root, expand Microsoft SQL Servers and
browse to the Server where you would like to restore
the database. Expand the databases section and
select the database that you would like to restore. If the
database does not exist anymore, you have to create
and configure the database first. Right-click on the
database, select All Tasks and click Restore Database.
In the Restore as database window, select the
database you want to restore. Select From device and
then click on Select Devices. From the Restore from
option, select disk and then click on Add. Browse to
the folder where you have restored the database and
select the file.
Click on OK accept the filename selected and OK again to accept the device. Using SQL functionality, you can
select how you would like to restore the backup set. You can choose between a complete or differential
Zen Internet, Sandbrook Park, Sandbrook Way, Rochdale OL11 1RY Registered in England No. 03101568 Tel: 01706 902000 Fax: 01706 902005 E-mail: [email protected] Web: www.zen.co.uk © Zen Internet 2015
database, the transaction log or file group. If you are restoring to a new database you have to
enable SQL to overwrite the database.
Click on OK to start restoring the database. SQL Server Enterprise Manager will confirm that you have
successfully restored the selected database.
2.5 Oracle
The Oracle plug-in, combined with the Backup Client, provides an automated backup solution for your Oracle
Database at tablespace level. The plug-in will ensure that your business-critical data is protected in case of
corruption or loss.
2.5.1 Installation and Configuration
Note Zen Vault Professional with the Oracle plug-in needs to be installed on an Oracle Server and the Oracle services
must be running.
To upgrade Server Edition with one of the Oracle plug-ins, run the Plug-in Installer and select either the Oracle 8i or Oracle 9i/10g plug-ins. After the installation open the Backup Client.
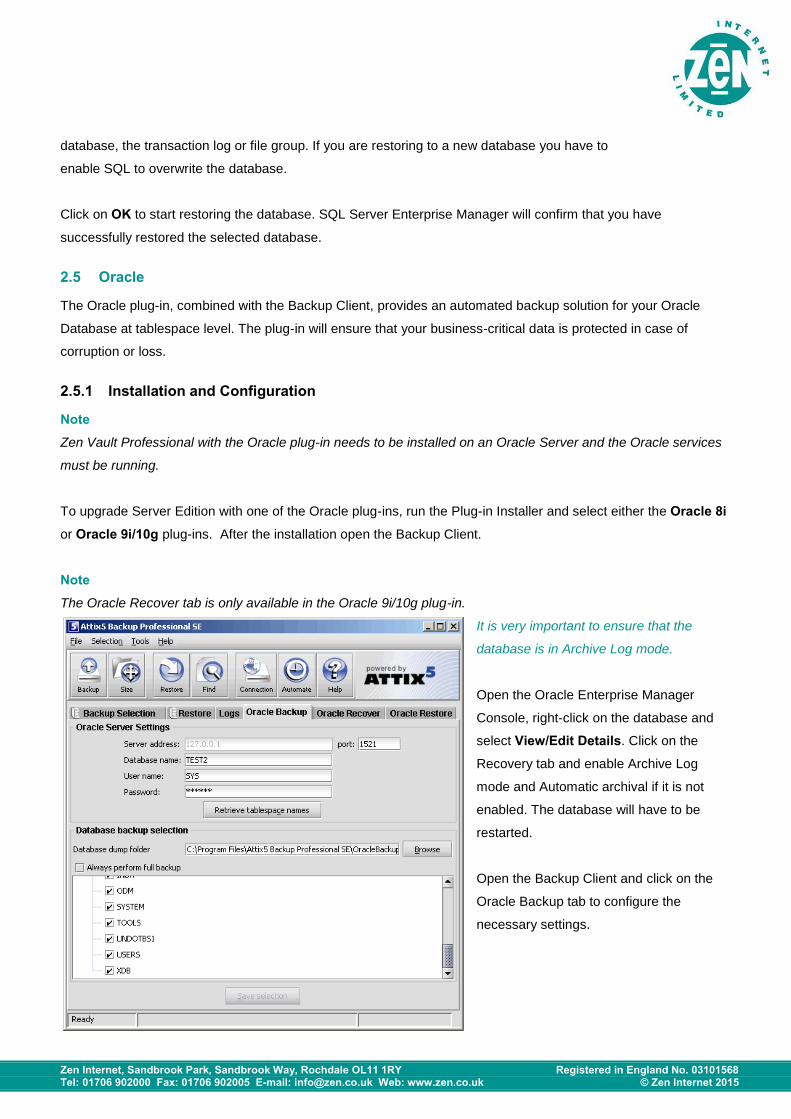
Note The Oracle Recover tab is only available in the Oracle 9i/10g plug-in.
It is very important to ensure that the
database is in Archive Log mode.
Open the Oracle Enterprise Manager
Console, right-click on the database and
select View/Edit Details. Click on the
Recovery tab and enable Archive Log
mode and Automatic archival if it is not
enabled. The database will have to be
restarted.
Open the Backup Client and click on the
Oracle Backup tab to configure the
necessary settings.
Zen Internet, Sandbrook Park, Sandbrook Way, Rochdale OL11 1RY Registered in England No. 03101568 Tel: 01706 902000 Fax: 01706 902005 E-mail: [email protected] Web: www.zen.co.uk © Zen Internet 2015
Oracle Server settings Enter the database name, user name and password that the Backup Client will use to connect to the Oracle database. Leave the port at its default setting of 1521. Click on Retrieve tablespace names. A list of all the
available tablespaces will be displayed.
Database backup selection
Select where you would like the Backup Client to create the Database dump folder. This folder is used by the
Backup Client to dump a copy of the selected datafiles from where they will be backed up. The default folder is
C:\Program Files\ZenVault Professional\OracleBackup.
Note Make sure that your computer has enough free hard drive space to store a data dump of the selected datafiles.
Select the tablespaces that you want to backup. Selecting the root (127.0.0.1) will backup all the tablespaces. The
Backup Client will perform a full backup of the selected files during each backup if you enable the checkbox next
to Perform Full Backup. If you do no enable full backups it will only backup the archive logs. Please note that the
Backup Client will perform a full backup on Sundays and the first time that a backup is initiated. Click on Save selection. Backup Professional will not backup the selected datafiles if you do not save the selection.
Your Oracle Server Backup is now configured. To create your first backup, select Backup Now from the File
menu. Backup Professional will create a hot backup of the selected datafiles in the dump folder. These files will be
compressed and transferred to the Storage Platform. The next backup will compare the selected storage groups
with the selection from the previous backup, which is stored in the cache. Backup Professional will create a patch
file for each datafile. This file consists of all the changes made to the datafile since the last backup. Only the patch
files and any new selections will be backed up.
2.5.2 How to recover an Oracle tablespace or datafile (Oracle 9i/10g only
You have the option to either recover or restore Oracle tablespaces or datafiles. If you recover the datafiles,
Backup Professional will ensure that the tablespace or datafile is offline, restore the data to its original place,
recover the data and place the datafiles online again.
This cannot be done with the System tablespace since it has to be online when you restore it.
The first step is to retrieve the files that you want to restore from the Storage Platform. Click on the Restore
tab and select the dump folder from the specific backup date. From the File menu, click on Restore. Select a
restore location and restore the files. Do not recreate the directory structure. After you have restored the dump
folder open the Oracle Recover tab.
Zen Internet, Sandbrook Park, Sandbrook Way, Rochdale OL11 1RY Registered in England No. 03101568 Tel: 01706 902000 Fax: 01706 902005 E-mail: [email protected] Web: www.zen.co.uk © Zen Internet 2015
Oracle Server Settings
Supply the Oracle database name and your user name and password that you use to connect to the Oracle
database.
Server Restore selection Use the Browse button and select the folder where you restored the data from the Restore tab.
Click on Retrieve Tablespaces. A list of the available tablespaces and datafiles will be displayed. Select the
datafiles that you wish to recover and click on Recover.
The files will be taken offline, the data will be restored to their original locations and the files will be recovered.
Backup Professional will place them online after they have been recovered.
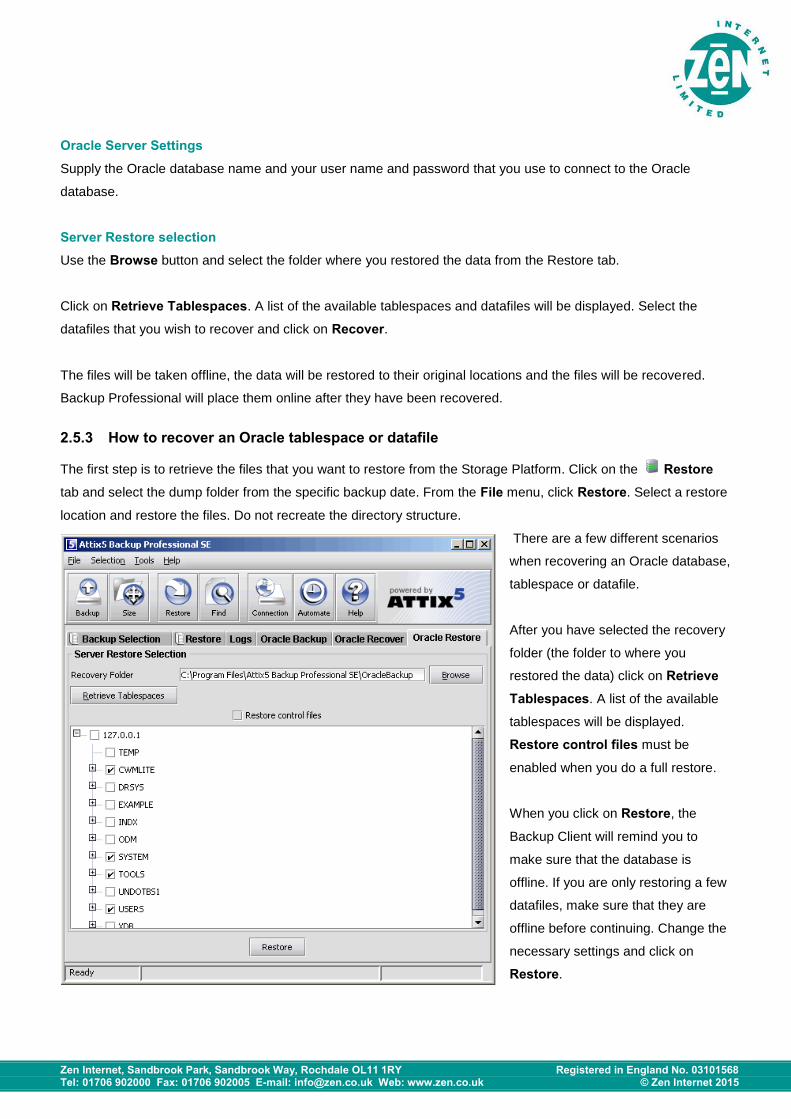
2.5.3 How to recover an Oracle tablespace or datafile
The first step is to retrieve the files that you want to restore from the Storage Platform. Click on the Restore
tab and select the dump folder from the specific backup date. From the File menu, click Restore. Select a restore
location and restore the files. Do not recreate the directory structure.
There are a few different scenarios
when recovering an Oracle database,
tablespace or datafile.
After you have selected the recovery
folder (the folder to where you
restored the data) click on Retrieve Tablespaces. A list of the available
tablespaces will be displayed.
Restore control files must be
enabled when you do a full restore.
When you click on Restore, the
Backup Client will remind you to
make sure that the database is
offline. If you are only restoring a few
datafiles, make sure that they are
offline before continuing. Change the
necessary settings and click on
Restore.

Zen Internet, Sandbrook Park, Sandbrook Way, Rochdale OL11 1RY Registered in England No. 03101568 Tel: 01706 902000 Fax: 01706 902005 E-mail: [email protected] Web: www.zen.co.uk © Zen Internet 2015
The Backup Client will restore the selected files to their original location but they will not be
recovered. After the client has restored the files, you have to manually recover the files and start the database.
The following examples provide some help if you prefer to restore the data using SQL Plus.
2.5.4 Oracle tablespace or datafile
The first step is to retrieve the files that you want to restore from the Storage Platform. Click on the Restore
tab and select the dump folder from the specific backup date. From the File menu, click Restore. Select a restore
location and restore the files. Do not recreate the directory structure.
Recovering a Closed Database
Media or hardware failure
Determine which datafile or datafiles need to be recovered.
Shutdown immediately
Open the Backup Client and restore the dump directory from the Storage Platform. Open the Oracle
Restore tab and select the files that you want to restore. Click on Restore.
Open SQL Plus with the following command: sqlplus /nolog
Connect / as sysdba
Mount the database with the startup mount; command
Recover datafile 'c:\data\datafile1.dbf'; or recover tablespace tablespacename; or recover database;
Open database
Recovering an Opened Database
Media or hardware failure (Not the System Tablespace)
Determine the datafile or datafiles that need to be recovered.
Open sqlplus /nolog and connect /as sysdba
Take the datafile offline alter database datafile 'filename' offline;
Open the Backup Client and restore the dump directory. Select the datafile that you want to restore.
Recover datafile 'c:\data\datafile1.dbf'; or recover tablespace tablespacename;
Bring the tablespace or datafile online (Step 16 in the next section – Recovery/Full Recovery)
Recovering a Database
Media or hardware failure (System Tablespace)
Unlike other tablespaces, the SYSTEM tablespace must be available in order to open the database.
Therefore, if any members of the system tablespace are damaged, they must be restored now. Before
doing this, make sure that the database is not open. It may be mounted. To make sure, run the following
command on the mounted, closed database.
C:\Oracle\Ora92\bin> sqlplus / nolog
Zen Internet, Sandbrook Park, Sandbrook Way, Rochdale OL11 1RY Registered in England No. 03101568 Tel: 01706 902000 Fax: 01706 902005 E-mail: [email protected] Web: www.zen.co.uk © Zen Internet 2015
connect / as sysdba
select status from v$instance; The following will be displayed:
STATUS
-------
MOUNTED
1 row selected.
If the database is not open, restore the damaged files from the most recent backup available restore
dump directory and select the datafiles. Once all damaged files in the system tablespace are restored, run
the following command on the mounted, closed database:
recover tablespace system;
alter database open;
quit
Full Media Recovery
Recovery to the same location
Open SQL Plus and stop the database with the shutdown abort; command.
Open the Backup Client and Restore the entire dumpfolder from the Storage Platform. Open the Oracle
Restore tab and restore all files including the control files.
Mount the database in SQL Plus: startup mount
Recover database using backup controlfile; Accept the default path that is suggested when restoring the
log files. If the last log file cannot be located run the recover database using backup controlfile; command
again and supply the path to the redo folder that you restored as well as the filename of the redo log file
within that folder.
Alter database open resetlogs;
The Oracle database will be opened and ready.
2.6 Script Plug-in
The Script plug-in enables you to execute scripts and batch files during the backup or restore processes. This
allows you to prepare an application for backup and to create a data dump of a database. You can also stop and
start applications or services before, during or after any backup.
2.6.1 Installing the Script Plug-in
To install the Script plug-in, run the Plug-in Installer and select the Script plug-in. After the installation, open the
Backup Client interface.
Zen Internet, Sandbrook Park, Sandbrook Way, Rochdale OL11 1RY Registered in England No. 03101568 Tel: 01706 902000 Fax: 01706 902005 E-mail: [email protected] Web: www.zen.co.uk © Zen Internet 2015
2.6.2 Configuration and Use
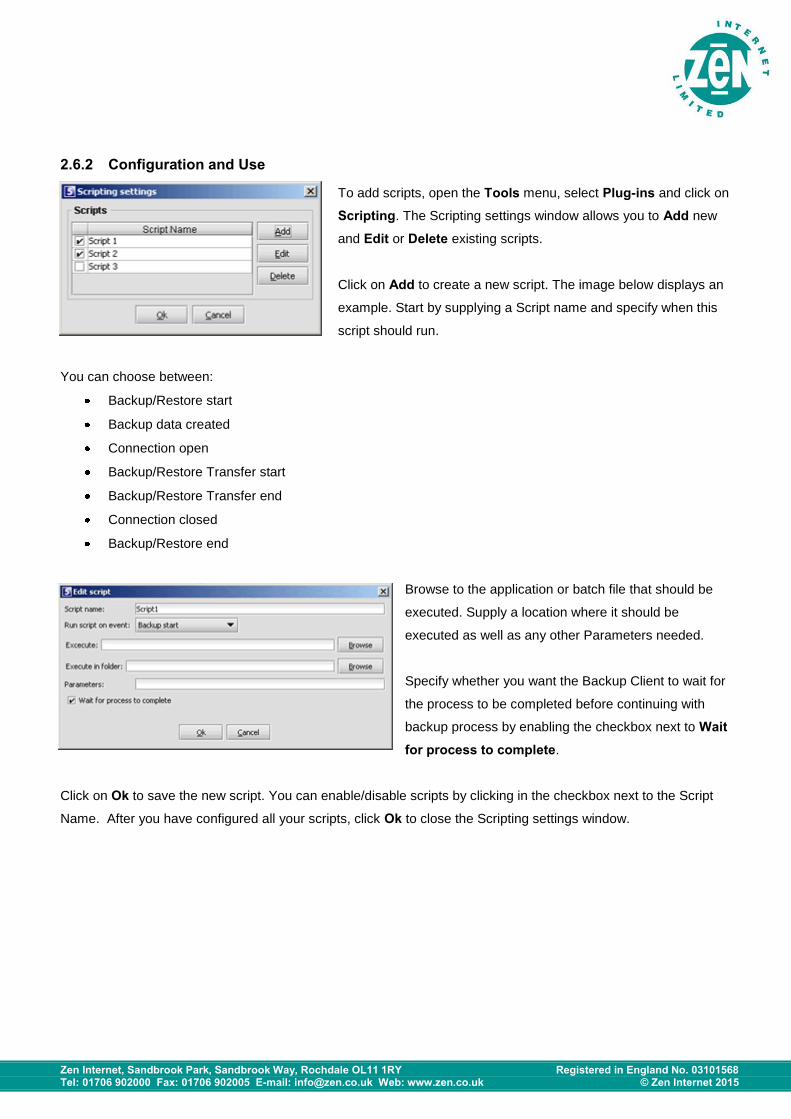
To add scripts, open the Tools menu, select Plug-ins and click on
Scripting. The Scripting settings window allows you to Add new
and Edit or Delete existing scripts.
Click on Add to create a new script. The image below displays an
example. Start by supplying a Script name and specify when this
script should run.
You can choose between:
Backup/Restore start
Backup data created
Connection open
Backup/Restore Transfer start
Backup/Restore Transfer end
Connection closed
Backup/Restore end
Browse to the application or batch file that should be
executed. Supply a location where it should be
executed as well as any other Parameters needed.
Specify whether you want the Backup Client to wait for
the process to be completed before continuing with
backup process by enabling the checkbox next to Wait for process to complete.
Click on Ok to save the new script. You can enable/disable scripts by clicking in the checkbox next to the Script
Name. After you have configured all your scripts, click Ok to close the Scripting settings window.
Zen Internet, Sandbrook Park, Sandbrook Way, Rochdale OL11 1RY Registered in England No. 03101568 Tel: 01706 902000 Fax: 01706 902005 E-mail: [email protected] Web: www.zen.co.uk © Zen Internet 2015
2.7 Single Mailbox Recovery
The SMR plug-in is used to backup and restore single Exchange server mailboxes. The SMR plug-in makes use
of a robust Exchange tool called ExMerge to perform the backup and restore operations. However the plug-in
presents a user interface façade to the ExMerge settings file (usually exmerge.ini) so that ExMerge can be
configured from the Backup Professional SE client. Once configured, ExMerge can be run in „batch‟ mode that
does not require user interaction.
SMR no longer requires MAPI or a MAPI profile to perform its functionality as the plug-in makes a native call via
the COM component to query LDAP for the list of Exchange mailboxes.
2.7.1 Installing the Script Plugin
To install the SMR plug-in on an existing SE Backup Client, run the Plug-in Installer and select the Exchange 2003 or Exchange 2000 Single Mailbox Recovery plug-in.
Additional files are created after running either SMR Backup, or SMR Restore, but these will be detailed later in
this chapter. These files pertain to ExMerge settings with SMR Backup files having a „smrb_‟ prefix, and SMR
Restore files having a „smrr_‟ prefix.
2.7.2 Additional Server Configuration
You have to change the Zen Vault Professional Service Log On during start-up from the Local System account to
an account with adequate permissions/administrative rights on the server to access the Exchange Information
Store. Open the Computer Management console by right-clicking on the My Computer icon and selecting
Manage. Expand the Services and Applications section and click on Services. Right-click on the Zen Vault Professional Service and select Properties. Click on the Log on tab, select an Administrator account and
supply the log on password.
Microsoft Exchange 2003 note You must add an ExMerge security group to the server if you are using Microsoft Exchange 2003. Add this group
by selecting Active Directory Users and Groups from the Administrative tools menu in the Control Panel. The user
that you selected for the ZenVault Professional Service start-up must be added to this group.
2.7.3 SMR backup – Configuring the backup settings
Select Plugins from the Tools menu and select SMR Backup. Enter the details as indicated in the dialog box
(screenshot available on the following page).
Folder to backup to
Specify where the mailbox PST‟s must be stored. SMR will specify <SE Root Dir>\pstbackups by default but this
can be modified to any location visible on your server, including mapped drives.
Zen Internet, Sandbrook Park, Sandbrook Way, Rochdale OL11 1RY Registered in England No. 03101568 Tel: 01706 902000 Fax: 01706 902005 E-mail: [email protected] Web: www.zen.co.uk © Zen Internet 2015
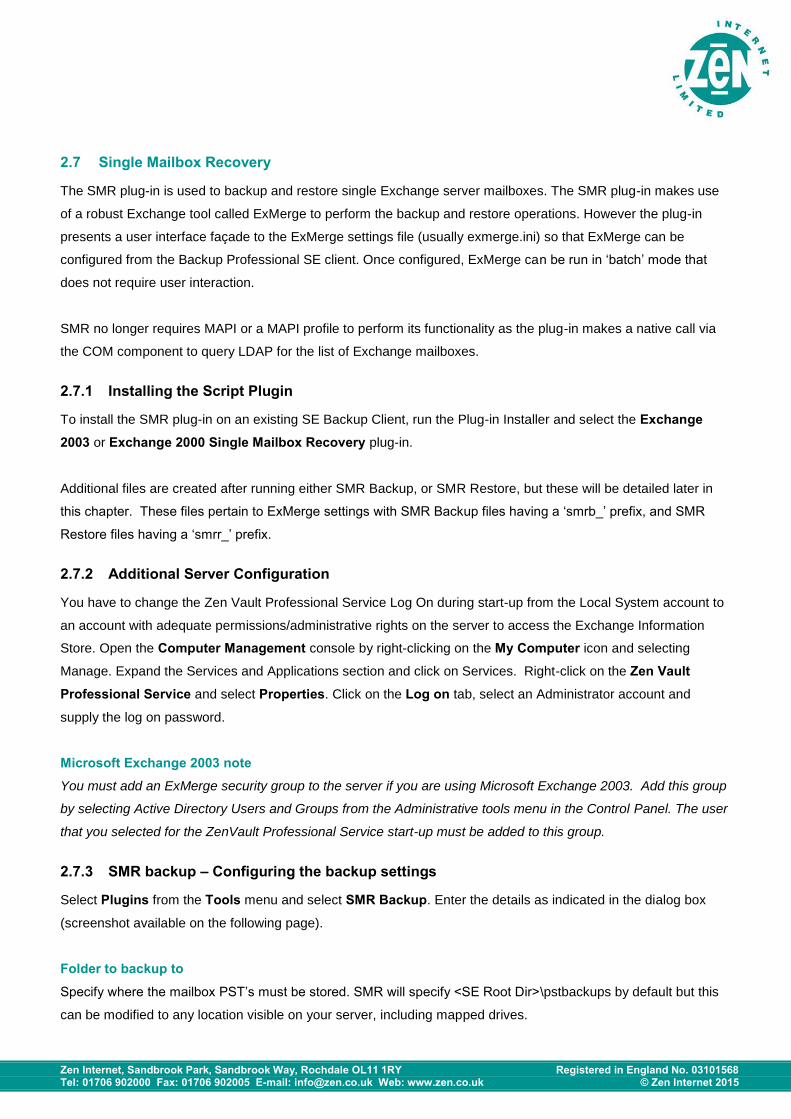
Exmerge appends a PST file with the changes since the
last backup. The file may therefore increase during each
backup and Exmerge cannot reduce the size of the PST
file. The Delete existing PST files option enables you to
specify that existing PST files must be deleted during the
backup process. A smaller file will be generated and
compared with the copy in the Cache to create the patch.
This option is especially useful after reducing mailbox
limits/sizes in the Exchange server. Click on Customize to
specify which days of the week you wish to delete the PST
files in the dump folder. All days are selected by default.
User mailboxes to back up Here you must provide the name of your Exchange server in the Server Name text field and the „Add …‟ and
„Remove’ buttons are used to select/remove the Exchange mailboxes. See the „Add…‟ note below.
The Verify button can be used to verify whether the selected mailboxes are in sync with Active Directory. The
plug-in will list any missing mailboxes and provide you with the option to remove them from the list.
Use the Localization button at the bottom of the SMR Backup window in case you are experiencing problems
connecting to the Exchange Server.
The Check Configuration button determines whether the SE
service has sufficient permissions to access Exchange and the
SMR Configuration Results page will provide in depth information
about the configuration, and possible permission issues.
Please ensure that your service account or one of its associated
groups is in the list of trustees with Send-As and Receive-As
rights set to Allow.
If it is not, you will have to correct your account configuration.
Failure to do so may compromise your SMR backups.
The one exception to this is if your SE account is setup as
LocalSystem. In this case, the „Check Configuration‟ feature will
Zen Internet, Sandbrook Park, Sandbrook Way, Rochdale OL11 1RY Registered in England No. 03101568 Tel: 01706 902000 Fax: 01706 902005 E-mail: [email protected] Web: www.zen.co.uk © Zen Internet 2015
simply warn you that it is set to LocalSystem. The onus will be on you to ensure that LocalSystem
is sufficient, or whether you need to setup a unique account for your SE service.
Exmerge logging option enables you to specify the level of information logged in the Exmerge logfile. You can
enable log file rolling and a log file retention period to limit the space required by these logs. Note that the plug-in
will process these options before each backup, so files may exceed their size, until the next backup.
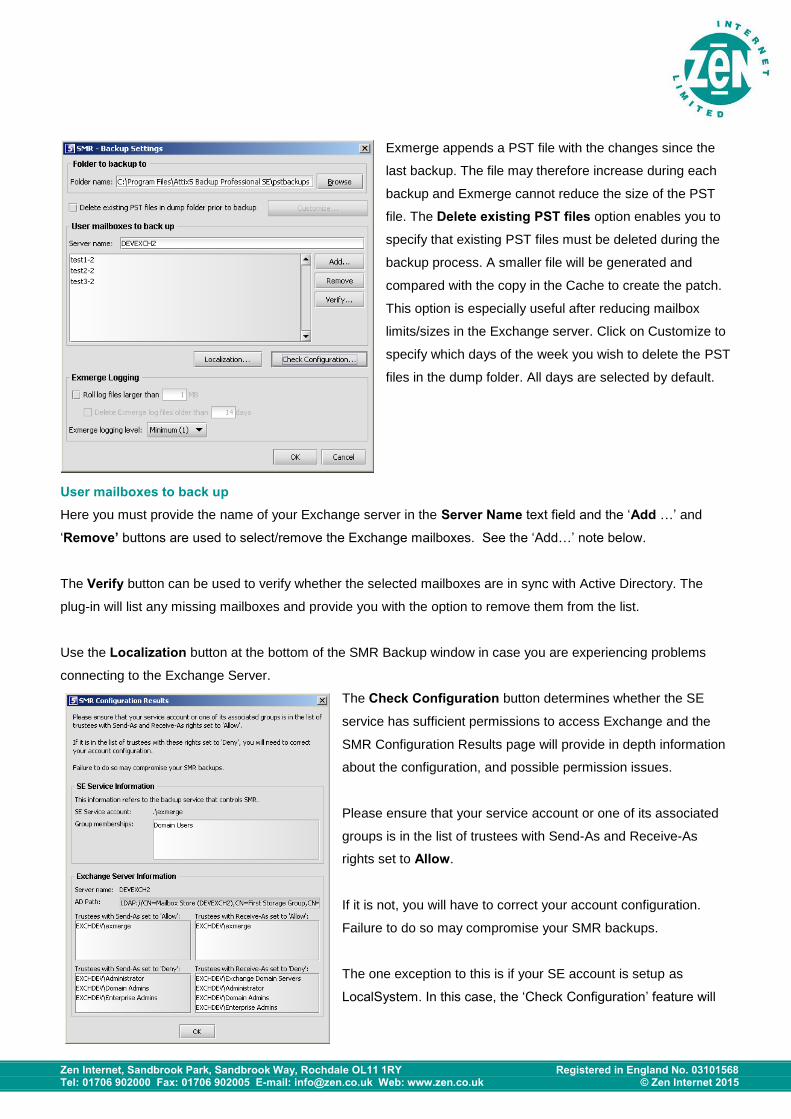
Click on the „Add…‟ button to retrieve a list of available user mailboxes on the indicated server as shown below.
Select the users from the „Available users‟ list by selecting the
users and clicking the „Add >‟ button to add them to the list of
„Selected users‟. Click OK to return to the previous dialog. The
selected users will now be shown in the list of mailboxes that
will be backed up (as is shown in image to the left).
Once you have completed your selection, click the OK button on the „Backup Settings‟ dialog box. This will store
your settings in a “.ini” file ready for your next manual or automatic backup.
2.7.4 Backup Settings
The settings you selected are stored in two files in the <SE Root Dir>. These files are:
smrb_exmerge.ini – this is the main settings file that ExMerge will use for the backups
smrb_mailboxes.txt – this indicates the mailboxes you selected from the list of available user mailboxes
Once you have completed your first backup, you will find an additional log file in the directory where you indicated
your mailbox PST files to be stored:
smrb_exmerge.log – this file provides detailed information about the backups performed and can be
examined if any errors are suspected to have occurred
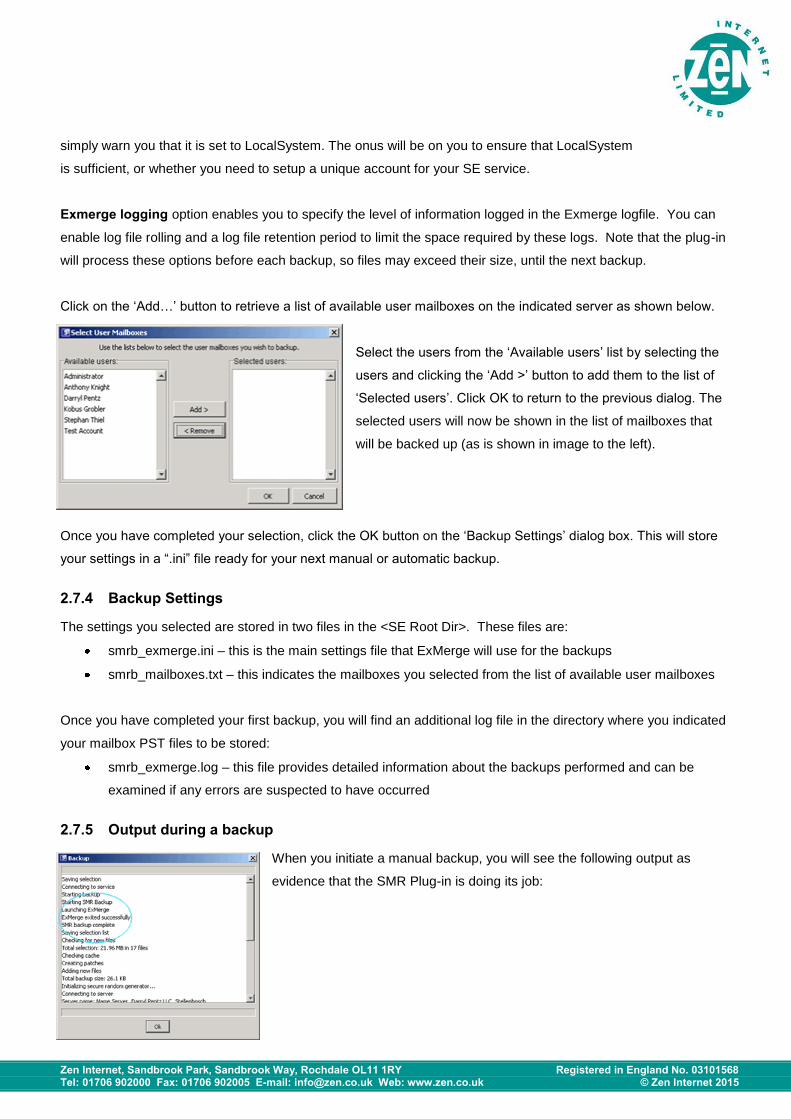
2.7.5 Output during a backup
When you initiate a manual backup, you will see the following output as
evidence that the SMR Plug-in is doing its job:
Zen Internet, Sandbrook Park, Sandbrook Way, Rochdale OL11 1RY Registered in England No. 03101568 Tel: 01706 902000 Fax: 01706 902005 E-mail: [email protected] Web: www.zen.co.uk © Zen Internet 2015
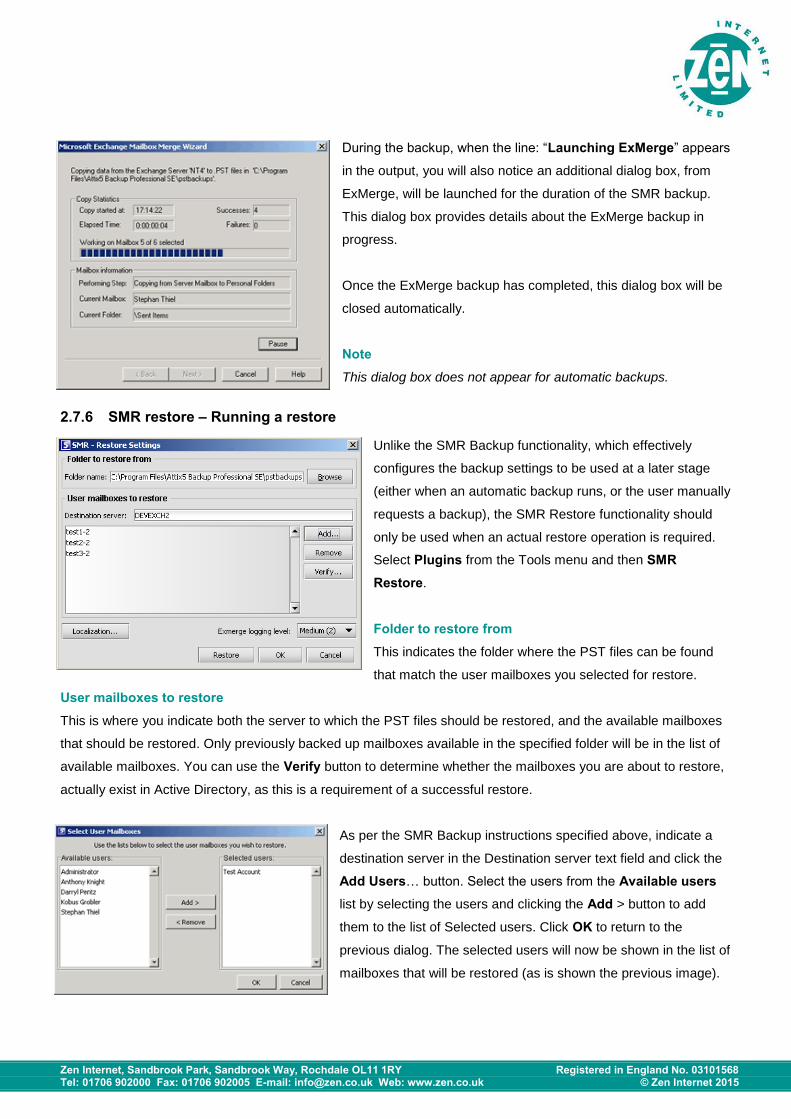
During the backup, when the line: “Launching ExMerge” appears
in the output, you will also notice an additional dialog box, from
ExMerge, will be launched for the duration of the SMR backup.
This dialog box provides details about the ExMerge backup in
progress.
Once the ExMerge backup has completed, this dialog box will be
closed automatically.
Note This dialog box does not appear for automatic backups.
2.7.6 SMR restore – Running a restore
Unlike the SMR Backup functionality, which effectively
configures the backup settings to be used at a later stage
(either when an automatic backup runs, or the user manually
requests a backup), the SMR Restore functionality should
only be used when an actual restore operation is required.
Select Plugins from the Tools menu and then SMR Restore.
Folder to restore from This indicates the folder where the PST files can be found
that match the user mailboxes you selected for restore.
User mailboxes to restore
This is where you indicate both the server to which the PST files should be restored, and the available mailboxes
that should be restored. Only previously backed up mailboxes available in the specified folder will be in the list of
available mailboxes. You can use the Verify button to determine whether the mailboxes you are about to restore,
actually exist in Active Directory, as this is a requirement of a successful restore.
As per the SMR Backup instructions specified above, indicate a
destination server in the Destination server text field and click the
Add Users… button. Select the users from the Available users
list by selecting the users and clicking the Add > button to add
them to the list of Selected users. Click OK to return to the
previous dialog. The selected users will now be shown in the list of
mailboxes that will be restored (as is shown the previous image).
Zen Internet, Sandbrook Park, Sandbrook Way, Rochdale OL11 1RY Registered in England No. 03101568 Tel: 01706 902000 Fax: 01706 902005 E-mail: [email protected] Web: www.zen.co.uk © Zen Internet 2015
Once you have completed your selection, click the Restore button on the Restore Settings dialog
box to begin the restore operation. This will store your settings in an .ini file and launch ExMerge to perform the
restore operation.
2.7.7 Restore Settings
The settings that are saved prior to the restore being launched are stored in two files in the <SE Root Dir>. These
files are:
smrr_exmerge.ini – this is the main settings file that ExMerge will use for the restore
smrr_mailboxes.txt – this indicates the mailboxes you selected, to be restored, from the list of available
user mailboxes
Once you have completed the restore, you will find an additional log file in the <SE Root Directory> as follows:
smrr_exmerge.log – this file provides detailed information about the backups performed and can be
examined if any errors are suspected to have occurred.
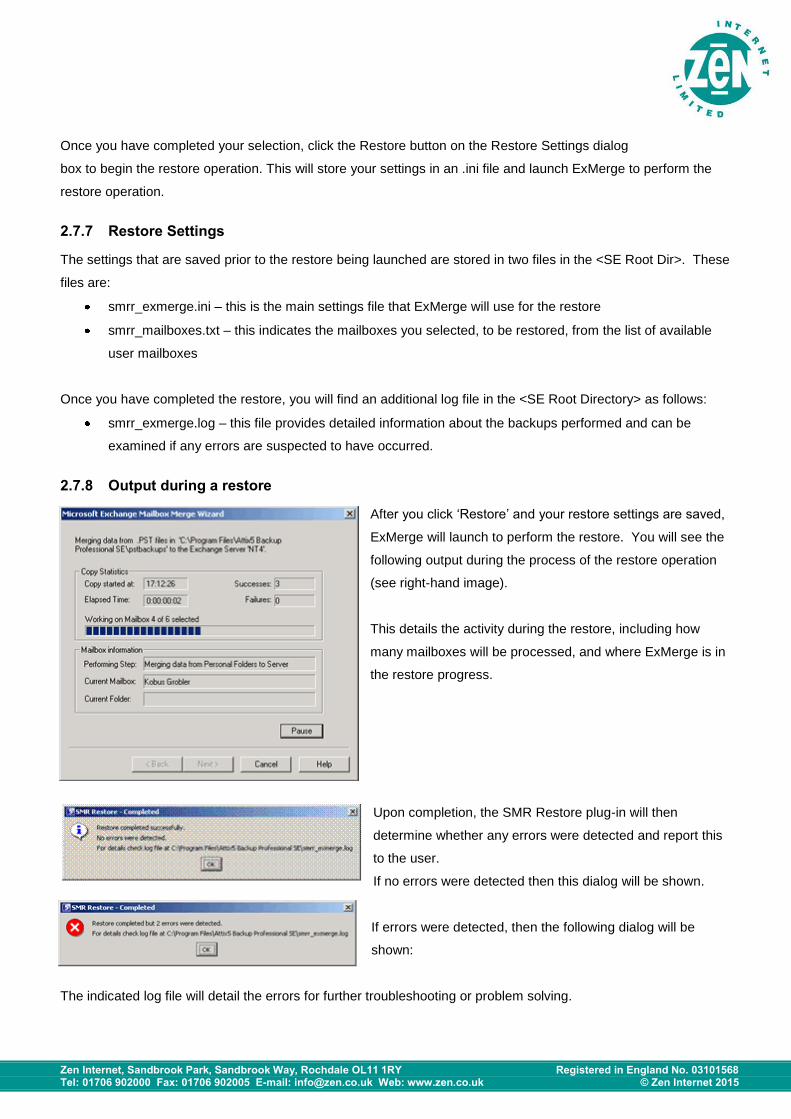
2.7.8 Output during a restore
After you click „Restore‟ and your restore settings are saved,
ExMerge will launch to perform the restore. You will see the
following output during the process of the restore operation
(see right-hand image).
This details the activity during the restore, including how
many mailboxes will be processed, and where ExMerge is in
the restore progress.
Upon completion, the SMR Restore plug-in will then
determine whether any errors were detected and report this
to the user.
If no errors were detected then this dialog will be shown.
If errors were detected, then the following dialog will be
shown:
The indicated log file will detail the errors for further troubleshooting or problem solving.

Zen Internet, Sandbrook Park, Sandbrook Way, Rochdale OL11 1RY Registered in England No. 03101568 Tel: 01706 902000 Fax: 01706 902005 E-mail: [email protected] Web: www.zen.co.uk © Zen Internet 2015
2.7.9 Exmerge
ExMerge is a utility provided free by Microsoft™. Its initial intention was to alleviate the burden of moving
mailboxes between servers, and migrating mailboxes from, say, Exchange 2000 to Exchange 2003. It primarily
uses MAPI to accomplish all of this functionality and is a very useful and configurable tool.
You will find an “Exmerge.doc” Word document provided with the SMR plug-in. This document provides some
insight into the functionality ExMerge provides. In addition to information about the various settings available for
configuration with ExMerge, you should read this document to understand what the various releases are, past and
current bugs, limitations of ExMerge etc. While we do not recommend that you manually change any of the
settings in the various configuration files, it is useful to know the full power of ExMerge‟s capabilities. Some
important configuration settings to take note of:
MergeAction
;This setting controls which merge procedure to use:
;
; Possible values:
; 0 - Extract (Merge data to Personal Folders)
; 1 - Import (Merge data from Personal Folders)
; 2 - Extract&Import (Export from one server and Import into another server)
;
; Default value: 0
SMR Backup: 0 SMR Restore: 1
SourceServerName
; Name of the source Exchange server, from which data will be extracted.
; This setting must be specified if the MergeAction specified is Extract or Extract&Import
SMR Backup only: set to whatever user specifies in ‘Server name’ text field
DestServerName
; Name of the destination Exchange server, to which data will be written.
; This setting must be specified if the MergeAction specified is Import or Extract&Import
SMR Restore only: set to whatever user specifies in ‘Server name’ text field
Zen Internet, Sandbrook Park, Sandbrook Way, Rochdale OL11 1RY Registered in England No. 03101568 Tel: 01706 902000 Fax: 01706 902005 E-mail: [email protected] Web: www.zen.co.uk © Zen Internet 2015
LogFileName
; Name of the log file to be used
;
; Default value: C:\ExMerge.log
SMR Backup: <PST Data Dir>\smrb_exmerge.log SMR Restore: <SE Root Dir>\smrr_exmerge.log
LoggingLevel
; Set the level of logging:
;
; Possible values:
; 0 - None
; 1 - Minimum
; 2 - Medium
; 3 - Maximum
; Default value is 0
SMR Backup and Restore: 2
DataDirectoryName
; Name of the directory to which .PST files will be written or where .PST files will be expected.
; If the directory does not exist, it will be created.
;
; Default value: C:\EXMERGEDATA
;
SMR Backup: set to value of ‘Folder to backup to’ text field SMR Restore: set to value of ‘Folder to restore from’ text field
FileContainingListOfMailboxes
; Name of a text file containing the Exchange Distinguished Names (DN) of mailboxes to be; worked on.
; Each line of the file should have the following format:
; <SourceDN> [, <TargetDN>]
; The TargetDN is optional. If it is specified, depending on what the selected merge action
; is, it will be used to get the name of the PST file to be generated, or the name of the
; mailbox into which data
; will be merged. By default, a comma is used as the delimiter between the source and
; target DNs. You
; can specify another delimiter, using the DelimiterUsedInMailboxFile setting.
;
Zen Internet, Sandbrook Park, Sandbrook Way, Rochdale OL11 1RY Registered in England No. 03101568 Tel: 01706 902000 Fax: 01706 902005 E-mail: [email protected] Web: www.zen.co.uk © Zen Internet 2015
; Blank lines are ignored.
; Lines beginning with a ##~ are ignored as comments
; If this setting is not specified, all mailboxes, except those for services (DS, IMS etc) on the
; specified server will be processed.
;
; Default value: Blank
SMR Backup: <SE Root Dir>\smrb_mailboxes.txt SMR Restore: <SE Root Dir>\smrr_mailboxes.txt
DataImportMethod ; This setting controls how the data will be copied from the source store to the target store.
;
; Possible values:
; 0 - Copy all messages from the source store to the target store
; 1 - Merge messages into the target store. Copy only those messages that do not exist in the target store.
; 2 - Replace existing messages in the target store. (If a message in the source store
; exists in the target store, delete that message in the target store and then copy the
; message from the target store.
; 3 - Archive existing messages from the source store into the target store. If this option
; is selected, the program will copy data from the source store to the target store and
; then delete the data from the source store.
;
;This option is only valid if the MergeAction is Extract.
;
; Default value: 1
SMR Backup and Restore: 1