zeiss smart services cloud connector
TRANSCRIPT

ZEISS Smart Services Cloud Connector
Technical description


Introduction
The Smart Services Cloud Connector (hereinafter also referred to as Cloud Connector) enables you to use theSmart Services Dashboard for monitoring ZEISS coordinate measuring machines (CMMs). It establishes a connection be-tween the CMM computer and the Smart Services Cloud:
The Cloud Connector here acts as an IoT Device Client which registers the CMM in the Smart Services Cloud and estab-lishes the connection.
This document provides a technical overview of the Cloud Connector and its method of operation (. Chapter 1: Architec-ture & technical description [Seite 6]) and deals with security aspects (. Chapter 2 Security considerations [Seite 8]).
Chapters . 3 [Seite 9], . 4 [Seite 13], and . 5 [Seite 16] describe the steps required to install, repair, and uninstall theCloud Connector.
Furthermore, useful installation tools as well as management and analysis of the Cloud Connector are described (in .Chapter 6: Operating system tools [Seite 17]) and frequently asked questions are answered in . Chapter 7 [Seite 23].
If you have any further questions, you will find the necessary contact data on the reverse side/last page of this document.
ZEISS Smart Services Cloud Connector // Version 4 3

4 ZEISS Smart Services Cloud Connector // Version 4
Table of Contents
1 Architecture & technical description 6
1.1 System overview 61.1.1 Communication 61.1.2 Certificates 71.1.3 Logging 7
1.2 File locations 7
2 Security considerations 8
2.1 Encryption 8
2.2 Minimized requirements for the network infrastruc-ture 8
2.3 Unique identification of the CMMs 8
2.4 Templates 8
3 Installation 9
3.1 System requirements 9
3.2 Installing the Cloud Connector 9
4 Repair and uninstallation 13
5 Migration 16
6 Operating system tools 17
6.1 Windows Installer 17
6.2 Management of Windows Services 176.2.1 Starting/Stopping services 176.2.2 Determining the status of the service 186.2.3 Determining the process ID of the service 186.2.4 Forced shutdown of a service 196.2.5 Uninstalling a service 19
6.3 Management of certificates 206.3.1 Calling up an overview of installed certificates 206.3.2 CMM certificate for Cloud Connector 20
7 Troubleshooting 23
7.1 Installation problems 23
7.2 Errors not in the log file 23
7.3 Network configuration 24
7.4 Cloud Connector cannot be uninstalled 25
7.5 Removing CMM certificates manually 25
7.6 Service cannot be stopped 25

5ZEISS Smart Services Cloud Connector // Version 4

1 ARCHITECTURE & TECHNICAL DESCRIPTION
1 Architecture & technical description
Technically speaking, the Cloud Connector is a local Windows service on the user's computer which receives defined CMMevents from the CMM Agent via Microsoft Message Queuing and transmits them to the Smart Services Cloud in a securemanner. The use of message queues also makes it possible to bridge over brief connection disruptions without any dataloss.
The Smart Services Cloud is the backend solution implemented on the basis of Microsoft Azure for ZEISS Smart Servicesfunctionalities such as e.g. the Smart Services Dashboard. It is operated according to international standards (e.g. ISO27001, HIPAA, FedRAMP, SOC1 and SOC2) which are certified and audited by Microsoft data centers located in Europe.
1.1 System overview
1.1.1 Communication
The Cloud Connector exclusively uses the AMQP protocol for communication with the Smart Services Cloud. All commu-nication is here encrypted using TLS. For use in different network topologies, the Cloud Connector utilizes a fallback mech-anism with a maximum requirement of two open ports on the firewall:
In a first step, the Cloud Connector tries to connect to the Smart Services Cloud via port 5671 by AMQP via TCP. If noconnection can be made via this port, the Cloud Connector uses port 443 by AMQP via Secure WebSockets.
This behavior enables the implementation of different scenarios and gives the user complete control only through corre-sponding configuration of the firewall. If port 5671 is used, the data traffic is separated from any other components whichcommunicate externally via port 443 and is clearly attributable to the Cloud Connector. If this is not desired, theCloud Connector can be operated in its own network by using port 443 with the minimum number of exactly one port ac-tivated.
The Cloud Connector also supports communication via proxy server.
ZEISS Smart Services Cloud Connector // Version 46

1ARCHITECTURE & TECHNICAL DESCRIPTION
7ZEISS Smart Services Cloud Connector // Version 4
1.1.2 Certificates
The identity of the CMMs is ensured via CMM certificates issued by Carl Zeiss Industrielle Messtechnik GmbH. TheCloud Connector can register itself in the Smart Services Cloud only with a valid CMM certificate. Each certificate isuniquely assigned to only one CMM and therefore represents a kind of ID. Technically speaking, the CMM certificate hasstored the CMM serial number as a common name (CN).
For this purpose, the CMM certificate is stored in the Microsoft Windows certificate store of the CMM computer and is usedby the Cloud Connector for registration and provisioning.
1.1.3 Logging
The Cloud Connector writes detailed information to log files. The transmitted events as well as information on the status ofthe Cloud Connector can be monitored herein. With a default configuration, the log files are saved to the preset storagelocation in a rolling system. This path can be set individually in the configuration file of the Cloud Connector. The corre-sponding section is:
"logger": {"LogLevel": "Info","FileName": "${specialfolder:folder=CommonDocuments}/ZEISS/Smart Services CloudConnector/logs/log.txt","Format": "${longdate} | ${level:uppercase=true} | ${logger} | ${message} ${excep-tion:format=toString,Data:maxInnerExceptionLevel=10}","AmountOfLogsToKeep": 10},
Here, the storage location can be set via the Property FileName and the number of old log files to be kept and not overwrit-ten can be set via AmountOfLogsToKeep. The format of the logged information should not be changed, since data which isrequired for analyses may otherwise be missing.
1.2 File locations
The Cloud Connector stores various artifacts at the following locations of the CMM computer:
Directory Purpose Storage location/default setting
Installation Storage of the program files re-quired for the Cloud Connector
C:\Program Files (x86)\ZEISS\Smart Services Cloud Connec-tor\
Configuration Storage of configuration files forthe Cloud Connector:
< preferences.json
< serviceconfig.json
C:\Users\Public\Documents\ZEISS\Smart Services Cloud Con-nector\
Logging Storage of log files written by theCloud Connector:
< log.txt
< log.[0-9].txt
C:\Users\Public\Documents\ZEISS\Smart Services Cloud Con-nector\logs

2 SECURITY CONSIDERATIONS
2 Security considerations
The Cloud Connector ensures the operational security, confidentiality, and integrity of transmitted data through variousmeasures. Security aspects are considered and regularly checked as part of the development process. However, measures tosafeguard the network itself are considered to be part of the user's obligation to cooperate as part of normal operation.
The following points are relevant from an architectural point of view.
2.1 Encryption
Every communication link used by the Cloud Connector (see . Communication [Seite 6]) is 256-bit encrypted at transportlevel by means of TLS 1.2 with the Advanced Encryption Standard (AES) (Secure AMQP protocol – AMQPS or WebSockets).
2.2 Minimized requirements for the network infrastructure
Any unnecessary complexity increases the security risk in software components. For this reason, and in order to be exe-cutable in the variously structured environments of the different companies using it, Cloud Connector has eliminated allunnecessary complexity. The requirements for the network infrastructure were minimized. So, in extreme cases, exactly onefirewall port is opened for communication with the Smart Services Cloud. Since the default external communication portfor encrypted http (443) is involved here, no changes in the firewall settings are required in many cases. Only outgoing con-nections are established by the Cloud Connector. No ports are to be opened for incoming communication.
2.3 Unique identification of the CMMs
In order to ensure the integrity and secure origin of the data, the CMMs are uniquely identified by CMM certificates issuedby ZEISS. This prevents attack scenarios that contaminate the CMM data with false data. Therefore, only data that has beenverified with a CMM certificate for this particular CMM can be transmitted to the Smart Services Cloud.
The certificates are generated via the ZEISS-internal private key infrastructure and made available to the user. These CMMcertificates must be handled with appropriate care and confidentiality on the user's side.
2.4 Templates
Another point regarding the minimization of security gaps is the avoidance of own implementations of safety-relevant parts.For this purpose, the Device SDK provided by Microsoft is exclusively used for communication by the Cloud Connector asstandard.
ZEISS Smart Services Cloud Connector // Version 48
3INSTALLATION
9ZEISS Smart Services Cloud Connector // Version 4
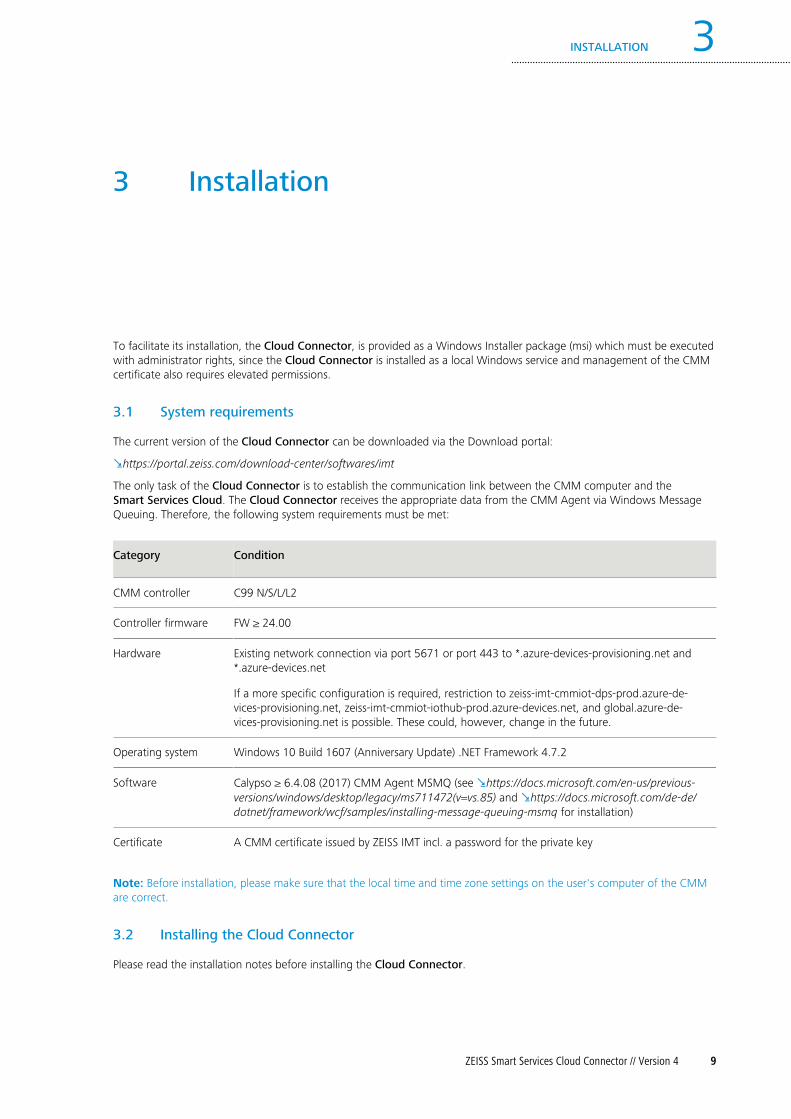
3 Installation
To facilitate its installation, the Cloud Connector, is provided as a Windows Installer package (msi) which must be executedwith administrator rights, since the Cloud Connector is installed as a local Windows service and management of the CMMcertificate also requires elevated permissions.
3.1 System requirements
The current version of the Cloud Connector can be downloaded via the Download portal:
.https://portal.zeiss.com/download-center/softwares/imt
The only task of the Cloud Connector is to establish the communication link between the CMM computer and theSmart Services Cloud. The Cloud Connector receives the appropriate data from the CMM Agent via Windows MessageQueuing. Therefore, the following system requirements must be met:
Category Condition
CMM controller C99 N/S/L/L2
Controller firmware FW ≥ 24.00
Hardware Existing network connection via port 5671 or port 443 to *.azure-devices-provisioning.net and*.azure-devices.net
If a more specific configuration is required, restriction to zeiss-imt-cmmiot-dps-prod.azure-de-vices-provisioning.net, zeiss-imt-cmmiot-iothub-prod.azure-devices.net, and global.azure-de-vices-provisioning.net is possible. These could, however, change in the future.
Operating system Windows 10 Build 1607 (Anniversary Update) .NET Framework 4.7.2
Software Calypso ≥ 6.4.08 (2017) CMM Agent MSMQ (see .https://docs.microsoft.com/en-us/previous-versions/windows/desktop/legacy/ms711472(v=vs.85) and .https://docs.microsoft.com/de-de/dotnet/framework/wcf/samples/installing-message-queuing-msmq for installation)
Certificate A CMM certificate issued by ZEISS IMT incl. a password for the private key
Note: Before installation, please make sure that the local time and time zone settings on the user's computer of the CMMare correct.
3.2 Installing the Cloud Connector
Please read the installation notes before installing the Cloud Connector.

3 INSTALLATION
Procedure
1 Start the setup of the Cloud Connector. Note: The current version of the Cloud Connector is displayed on the Wel-come page.
2 Accept the license conditions of the Cloud Connector.
ZEISS Smart Services Cloud Connector // Version 410

3INSTALLATION
11ZEISS Smart Services Cloud Connector // Version 4
3 Select the desired installation path for the Cloud Connector.
4 Optional: Upload the CMM certificate as a .pfx file if required. In addition to the certificate file, the password for theprivate key also is required. Note: The certificate is imported to the certificate store during the installation process.
5 Select Install to start the installation process.

3 INSTALLATION
6 After a successfully completed installation, the following message will appear. Note: If the installation is not completedsuccessfully, it will automatically be rolled back.
7 Finish the installation.
_ The installation process is complete.
ZEISS Smart Services Cloud Connector // Version 412

4REPAIR AND UNINSTALLATION
13ZEISS Smart Services Cloud Connector // Version 4
4 Repair and uninstallation
The Smart Services Cloud Connector Installer package also can be used for repair or uninstalling. When you start the In-staller, it immediately recognizes that the service has already been installed and opens the view for selecting repair, installa-tion or uninstallation.
Selection of repair/uninstallation
Depending on the action you select (uninstallation or repair), one of the following views then appears. After you confirmwith Remove/Repair, the selected system changes will be made.

4 REPAIR AND UNINSTALLATION
Selection of uninstallation
Selection of repair
ZEISS Smart Services Cloud Connector // Version 414

4REPAIR AND UNINSTALLATION
15ZEISS Smart Services Cloud Connector // Version 4
Query on closing affected applications

5 MIGRATION
5 Migration
If the CMM was already connected via the MasterConnect System, the installed Smart Services Service should be unin-stalled first; then the Cloud Connector should be re-installed (see . Installing the Cloud Connector [Seite 9]).
In addition, further clean-up work also can be performed optionally:
The Smart Services Service also required an entry in the hosts file of the operating system for communication with theMasterConnect System:
192.168.168.168 ckconnector.io
These are no longer required by Cloud Connector and can be removed.
In a default installation, the configuration and log files for the old Smart Services Service are located in the path:
C:\Users\Public\Documents\ZEISS\Smart Services Service
These are no longer required and can be removed. Any existing old certificates in the certificate store can be removed(see . Management of certificates [Seite 20]).
ZEISS Smart Services Cloud Connector // Version 416

6OPERATING SYSTEM TOOLS
17ZEISS Smart Services Cloud Connector // Version 4
6 Operating system tools
This chapter lists several tools which are available in Windows and can be used for the analysis of problem cases or for man-ual corrections. However, it should not generally be necessary to use most of these tools, since the Cloud Connector In-staller installs the Cloud Connector in an immediately usable condition.
6.1 Windows Installer
The supplied Windows Installer package can easily be started in the usual manner for Microsoft Windows environments, i.e.by double-clicking in the mode with the graphic user interface. The installation can, however, be adapted to meet your ownpersonal requirements using the msiexec command line tool.
In order to identify problems with the installation, a log file also can be written during the installation process:
msiexec /i SmartServices.Installer.msi /l*v install.log
The required information from the file on the CMM certificate and the certificate password can be transferred as commandline parameters:
msiexec /i SmartServices.Installer.msi /l*v install.log CERT_FILEPATH="[Certificatefilepath]" CERT_PASSWORD="[Certificate password]"
In addition, the Installer also uses the installation in the background (silent mode). Here, it is all the more important to havea log file written for the corresponding feedback and to transfer the parameters:
msiexec /qn /i SmartServices.Installer.msi /l*v install.log CERT_FILEPATH="[Cer-tificate file path]" CERT_PASSWORD="[Certificate password]"
6.2 Management of Windows Services
Since the Cloud Connector is integrated as a Windows service, all of the available tools also can be used for management.
The Service Management Console features a graphic user interface for Windows Services:
6.2.1 Starting/Stopping services
To start or stop services, proceed as follows:
Procedure
1 Press Windows + R.
g The Run window opens.

6 OPERATING SYSTEM TOOLS
2 Enter services.msc.
g The Services window in which the ZEISS Smart Services Cloud Connector service is displayed opens.
3 Start/Stop the service.
Optional procedure
1 Press Windows + R.
g The Run window opens.
2 Enter cmd.
3 Enter net start "Zeiss Smart Services Cloud Connector" in the command line.
4 Optional: Enter net stop "Zeiss Smart Services Cloud Connector" in the command line.
6.2.2 Determining the status of the service
To determine the current status of the service, proceed as follows:
Procedure
1 Open Windows PowerShell.
2 Enter Get-Service -name 'Zeiss Smart Services Cloud Connector'.
g The current status of the service is displayed.
6.2.3 Determining the process ID of the service
To determine the process ID of the service, proceed as follows:
Procedure
1 Press Windows + R.
g The Run window opens.
ZEISS Smart Services Cloud Connector // Version 418

6OPERATING SYSTEM TOOLS
19ZEISS Smart Services Cloud Connector // Version 4
2 Enter cmd.
3 Enter sc queryex "Zeiss Smart Services Cloud Connector" in the command line.
g The process ID of the service is displayed.
6.2.4 Forced shutdown of a service
If a service can no longer be stopped, proceed as follows:
NOTE
It cannot be ensured that the service will be in a consistent state following a hard termination!
Procedure
1 Press Windows + R.
g The Run window opens.
2 Enter cmd.
3 Enter taskkill /pid 31992 /f in the command line.
g The service is stopped.
6.2.5 Uninstalling a service
If it is no longer possible to uninstall a service with the Installer package, proceed as follows:
NOTE
Use this procedure only in an extreme emergency, e.g. if uninstallation via the Installer package no longer functionsproperly.
Procedure
1 Press Windows + R.
g The Run window opens.

6 OPERATING SYSTEM TOOLS
2 Enter cmd.
3 Enter sc delete "Zeiss Smart Services Cloud Connector" in the command line.
g The service is then uninstalled.
6.3 Management of certificates
Command line tools as well as tools with a graphic interface are available under Windows 10 for managing certificates inthe Windows certificate store. It should not generally be necessary to use these tools, since theSmart Services Cloud Connector Installer imports the CMM certificate to the certificate store and sets the required rights.
6.3.1 Calling up an overview of installed certificates
To call up an overview of the installed certificates, proceed as follows:
Procedure
1 Press Windows + R.
g The Run window opens.
2 Enter certlm.msc.
g The local certificate store is displayed.
6.3.2 CMM certificate for Cloud Connector
The CMM certificate for the Cloud Connector is saved in the certificate store of the local CMM. Using the managementconsole (see . Calling up an overview of installed certificates [Seite 20]), you can import certificates (Right-click - All tasks- Import), view the details of a certificate (Right-click - Open), or delete certificates (Right-click - Delete), whereby the latter-most function is possible only with administrator rights. This tool also can be used to check and change the access rights onthe private key of the certificate (Right-click - All tasks - Manage private keys). It is important here that local services havefull access to the Cloud Connector CMM certificate.
ZEISS Smart Services Cloud Connector // Version 420

6OPERATING SYSTEM TOOLS
21ZEISS Smart Services Cloud Connector // Version 4
Alternatively, certificate details also can be imported and output via the command line by entering certutil. In order toobtain an overview of the respective certificates, the corresponding name of the certificate store (my) also must be speci-fied:
certutil -store my
The output then lists the installed certificates in the following form:
In order to display specific CMM certificates corresponding to a given common name (in this context, corresponding to theserial number of the CMM), only the respective CN needs to be specified:
certutil -store my 08154711

6 OPERATING SYSTEM TOOLS
In order to delete a specific certificate, the name of the certificate store and the common name (CN) of the certificate to bedeleted must be specified:
certutil -delstore my a7584d23-8b12-4ef7-a980-84134a1fbd4e
ZEISS Smart Services Cloud Connector // Version 422

7TROUBLESHOOTING
23ZEISS Smart Services Cloud Connector // Version 4
7 Troubleshooting
7.1 Installation problems
If any problems arise during the installation process and the installation is canceled, detailed information can be collected bystarting the installation package with logging activated:
Procedure
1 Press Windows + R.
g The Run window opens.
2 Enter cmd.
3 Navigate to the directory where the installation package is stored.
4 Start the installation with logging: msiexec /i SmartServices.Installer.msi /l*v in-stall.log
_ All installation activities are then logged in the install.log file located in the corresponding directory. This file needs to behanded over to ZEISS Service for analysis purposes if necessary.
Note: If the installation is aborted or rolled back without a cause being found in the installation log, this may be due to thecertificate file path being too long. Therefore, the certificate should not be stored too deep in the directory tree.
7.2 Errors not in the log file
In order to analyze errors which do not show up in the log files, indications of their cause also can be obtained from theevent viewer.
Procedure
1 Press Windows + R.
g The Run window opens.

7 TROUBLESHOOTING
2 Enter eventvwr.
_ The corresponding warnings and errors are listed under Windows Logs in the category Application.
The causes of errors can be analyzed via the event details.
7.3 Network configuration
If successful connection between the Smart Services Cloud Connector and the cloud cannot be established despite possiblynecessary firewall unlocking, this may be because name resolution (DNS) is not possible on the corresponding PC. You canuse the nslookup command to check this.
Procedure
1 Press Windows + R.
g The Run window opens.
ZEISS Smart Services Cloud Connector // Version 424

7TROUBLESHOOTING
25ZEISS Smart Services Cloud Connector // Version 4
2 Enter nslookup global.azure-devices-provisioning.net.
_ This should allow the address to be resolved and a message similar to the following ones will be displayed:
Non-authorizing response:
Name: idsu-prod-am-001-su.westeurope.cloudapp.azure.com
Address: 23.100.8.130
Aliases: global.azure-devices-provisioning.net; id-prod-global-endpoint.trafficmanager.net
The same test has to be performed for both addresses: zeiss-imt-cmmiot-iothub-prod.azure-devices.net and zeiss-imt-cm-miot-dps-prod.azure-devices-provisioning.net.
7.4 Cloud Connector cannot be uninstalled
If an installation procedure is canceled or the msi package is no longer present in the operating system, it may no longer bepossible to uninstall the Cloud Connector. In this case, you can nevertheless try to uninstall the Cloud Connector using thetroubleshooting tool provided by Microsoft. A consistent status can then be established once again via re-installation. Thistool is available under the following link:
.https://support.microsoft.com/de-de/help/17588/windows-fix-problems-that-block-programs-being-installed-or-removed
7.5 Removing CMM certificates manually
The Cloud Connector certificates are saved in the Microsoft Windows certificate store and also can be removed there(see . Management of certificates [Seite 20]).
7.6 Service cannot be stopped
In its normal state, the Cloud Connector can be started/stopped via the Smart Services Monitor or in the Services Manage-ment (services.msc) via the context menu (see . Starting/Stopping services [Seite 17]):
If the service cannot be stopped by selecting Exit in the context menu and e.g. one of the following error messages is dis-played, a forced shutdown of the service is necessary (see . Forced shutdown of a service [Seite 19]).
sc queryex "Zeiss Smart Services Service"
SERVICE_NAME: Zeiss Smart Services ServiceTYPE : 10 WIN32_OWN_PROCESSSTATE : 4 RUNNING(STOPPABLE, NOT_PAUSABLE, ACCEPTS_SHUTDOWN)WIN32_EXIT_CODE : 0 (0x0)SERVICE_EXIT_CODE : 0 (0x0)CHECKPOINT : 0x0

7 TROUBLESHOOTING
WAIT_HINT : 0x0PID : 3932FLAGS :
taskkill /PID 3932 /F
ZEISS Smart Services Cloud Connector // Version 426

Notes

Carl ZeissIndustrielle Messtechnik GmbH73447 OberkochenGermany
Sales: +49 7364 20-6336Service: +49 7364 20-6337Fax: +49 7364 20-3870
EN_6
1252
-802
0402
Prin
ted
in G
erm
any.
CZ-
2021
-02-
09Su
bjec
t to
cha
nge
in d
esig
n an
d sc
ope
of d
eliv
ery
and
as a
res
ult
of o
ngoi
ng t
echn
ical
dev
elop
men
t.©
Car
l Zei
ss In
dust
rielle
Mes
stec
hnik
Gm
bH