zabukowski software nebula setups 2 setups 2 quick guide.pdf · nebula setups 2 quick guide what is...
TRANSCRIPT

Zabukowski SoftwareZabukowski Software
Nebula Setups 2Nebula Setups 2Quick GuideQuick Guiderevision 3, updated to v2.2revision 3, updated to v2.2
http://www.zabukowski.com/software
Written by Franci ZabukovecRevised by Rich Prewett
Copyright © Franci Zabukovec, 2013, 2014
Table of Contents
What is Nebula Setups ?..........................................................................3Installation............................................................................................4Uninstallation.........................................................................................4First start and basic setup........................................................................5Registration/license installation................................................................6Nebula Setups's user interface.................................................................7Creating a setup.....................................................................................7
Nebula repository browser....................................................................7Selecting and adding Nebula programs to a setup....................................8Setup editor in detail...........................................................................9Tweaking Nebula parameters...............................................................11Tweaks list in detail............................................................................11
Saving a setup.....................................................................................13Opening a setup (full version only)..........................................................14Importing a setup (full version only)........................................................15Setups Manager (full version only)..........................................................16Preferences..........................................................................................18Nebula Setups common folder................................................................20Appendix A: Important keyboard shortcuts...............................................21

Nebula Setups 2 Quick Guide
What is Nebula Setups ?
Nebula Setups is a standalone program, which allows you to create custom copies/versions of the original Acustica Audio Nebula VST plug-in. Each copy ofthe plug-in (so called setup) can have its own program list. This means that you can have, for example, one separate Nebula instance for equalizers, another for compressors, third for tapes etc. Another popular approach is to make a separate setup for each Nebula library.
Additional setup features:
• can have its own skin• can automatically load a Nebula program/preset at initialization• contain changed/tweaked Nebula parameters
Setups based work-flow can extremely enhance your experience with Nebula plug-ins in your DAW program, especially when a number of installed libraries /presets gets larger. Greatly sped up loading time and better overview and organization of your Nebula repository are some of the most important advantages over standard Nebula 'one-for-all' plug-in approach.
3
Nebula Setups 2 Quick Guide
Nebula Setups runs on Windows and Mac OSX compatible computers. If you want to use it, you should first install and authorize Nebula software on your computer. Version of installed Nebula software must be 1.3.7xx or greater.
32 (x86) and 64 (x64) bit versions of Nebula Setups are available for Windows and 64 (x64) bit version is available for Mac OSX. Each version is able to create setups for both x86 and x64 architectures.
Installation
• Windows: run Nebula Setups installation executable (.exe) and follow theinstructions on the screen.
• Mac OSX: mount Nebula Setups disk image (.dmg) and copy the application file to the desired directory (for example Applications folder).
Uninstallation
• Windows: use the standard uninstallation procedure ('Uninstall a program')
• Mac OSX: delete Nebula Setups application file(s)
4
Nebula Setups 2 Quick Guide
First start and basic setup
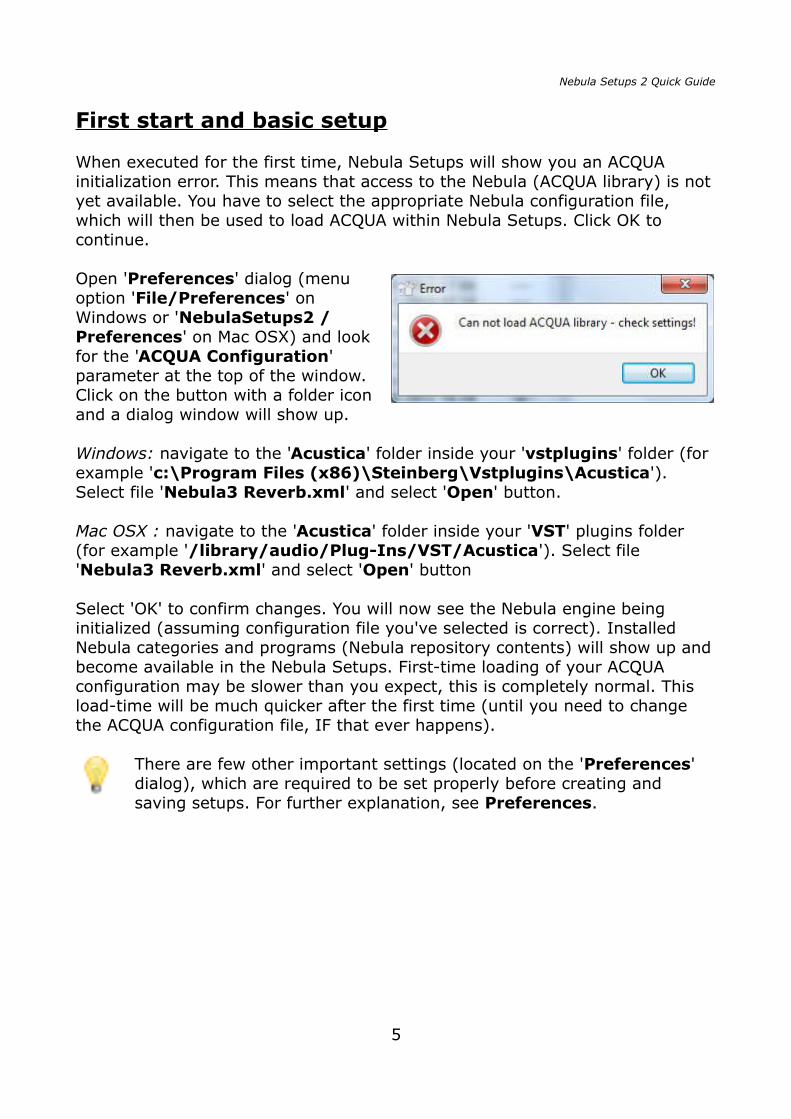
When executed for the first time, Nebula Setups will show you an ACQUA initialization error. This means that access to the Nebula (ACQUA library) is notyet available. You have to select the appropriate Nebula configuration file, which will then be used to load ACQUA within Nebula Setups. Click OK to continue.
Open 'Preferences' dialog (menuoption 'File/Preferences' onWindows or 'NebulaSetups2 /Preferences' on Mac OSX) and lookfor the 'ACQUA Configuration'parameter at the top of the window.Click on the button with a folder iconand a dialog window will show up.
Windows: navigate to the 'Acustica' folder inside your 'vstplugins' folder (for example 'c:\Program Files (x86)\Steinberg\Vstplugins\Acustica'). Select file 'Nebula3 Reverb.xml' and select 'Open' button.
Mac OSX : navigate to the 'Acustica' folder inside your 'VST' plugins folder (for example '/library/audio/Plug-Ins/VST/Acustica'). Select file 'Nebula3 Reverb.xml' and select 'Open' button
Select 'OK' to confirm changes. You will now see the Nebula engine being initialized (assuming configuration file you've selected is correct). Installed Nebula categories and programs (Nebula repository contents) will show up andbecome available in the Nebula Setups. First-time loading of your ACQUA configuration may be slower than you expect, this is completely normal. This load-time will be much quicker after the first time (until you need to change the ACQUA configuration file, IF that ever happens).
There are few other important settings (located on the 'Preferences' dialog), which are required to be set properly before creating and saving setups. For further explanation, see Preferences.
5

Nebula Setups 2 Quick Guide
Registration/license installation
Nebula Setups requires a valid license file to run. If the license file is not found,invalid or expired, Nebula Setups will continue to run with limited functionality. This means that some important functions will not be available (loading and importing setups, Setups Manager etc.). Basic setup creating is still possible, even without a valid license installed.
Once you acquire the license file, save it to a temporary folder of your choice, run Nebula Setups and select menu option 'Help/About Nebula Setups' on Windows or 'NebulaSetups2/About NebulaSetups2' on Mac OSX. A license information dialog will show up. Click on the 'Install license' button and select the previously saved license file from your temporary folder. When the license is imported, its data is displayed in the dialog window. If you want to remove the license from Nebula Setups, use the same button.
Note: when the license is already installed, the button is labeled 'Remove license'.
The same license file works on all supported operating systems. You can install your license on any computer, which has your licensed copy of Nebula software installed.
6

Nebula Setups 2 Quick Guide
Nebula Setups's user interface
Main program's window is divided into the repository browser on the top and a setup editor with tweaks list at the bottom. There are main menu, tool bars and context menus (mouse right-click) available.
Creating a setup
Creating a setup is in fact a very simple task. Basically, it goes like this: find and select desired programs with the repository browser, add them to a setup editor, select skin and default/auto-load program, tweak setup's parameters if needed and save setup.
Nebula repository browser
To find and select a desired Nebula program(s), use repository browser, locatedat the top of the main window. It consists of a category tree (left) and programlist (right). The later contains the categories, name, description, file name and number of each program. Columns can be reordered and resized
If the root node (named Nebula repository) of the category tree is selected, all programs from the repository will be shown on the right. Otherwise, only the programs which belong to the selected category will be shown.
You can change this behavior using option 'Show programs from subcategories', found on 'Preferences' dialog. If checked, programs from current category and all its subcategories will be shown on the right.
To expand or collapse the complete tree, use 'Expand all' and 'Collapse' options, found in the tree's context menu (mouse right-click).
7

Nebula Setups 2 Quick Guide
If you can't find a desired program(s) quickly, use a search tool. Above the category tree there is a drop down selection box, where you can define search mode. You can search by a program name, description or category only. In anymode, you must define text to be found by entering it in the text field to the right of the drop-down menu. If program name or description search is selected, the program list on the right will display only the programs, which names/descriptions contain the specified search text.
Note: if the program list is already filtered because a non-root category is selected in the category tree, searching will be limited to the already selected category. If you want to search through the whole repository, select the root category first.
When category search is selected, search will be performed inside the categorytree. There are 'Find next occurrence' and 'Find previous occurrence' buttons to help you browse through the search results.
If needed, use the red-cross button to quickly reset search text parameter.
Selecting and adding Nebula programs to a setup
To select ...
• a single program, just click on it in the repository's program list• multiple programs, click on the first desired program and then use
[Shift] or [Command]/[Ctrl] + mouse click to add an additional programs to the selection
To add selected program(s) to the current setup, do one of the following things:
• drag selected programs from repository's program list and drop them into setup editor
• use option 'Add selected program(s)', which can be found on:◦ main window's 'Editor' menu◦ context menu of the browser's program list ◦ setup editor's toolbar and context menu
Alternatively, you can add a whole category, including all its subcategories, at once using option 'Add program(s) from selected category'. In this case, you don't have to previously select program(s), just select category in the category tree.
This option can be found on:◦ main window's 'Editor' menu
8
Nebula Setups 2 Quick Guide
◦ context menu of the browser's category tree ◦ setup editor's toolbar and context menu
For each added program, its categories, name, description, file name and number will be displayed in a single row.
Multiple instances/duplicates of the same program are not allowed within a single setup. If a duplicate program is encountered while adding program(s), operation is canceled as a whole.
Setup editor in detail
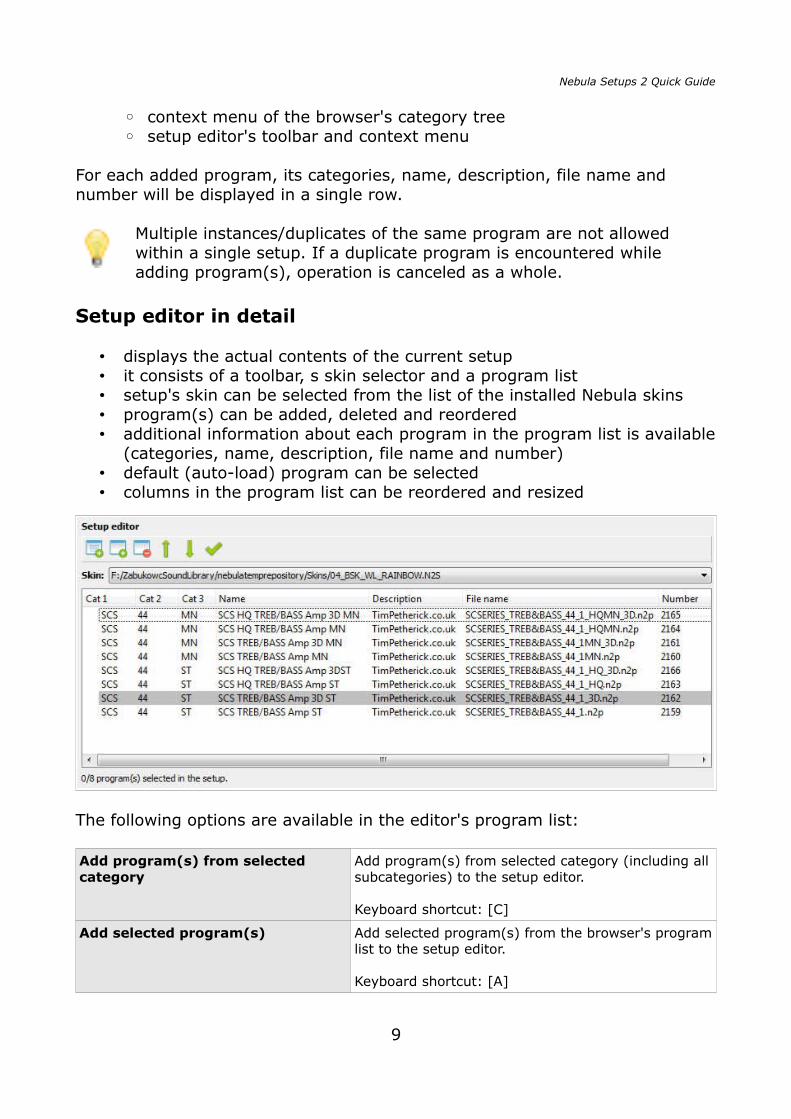
• displays the actual contents of the current setup• it consists of a toolbar, s skin selector and a program list• setup's skin can be selected from the list of the installed Nebula skins• program(s) can be added, deleted and reordered• additional information about each program in the program list is available
(categories, name, description, file name and number)• default (auto-load) program can be selected• columns in the program list can be reordered and resized
The following options are available in the editor's program list:
Add program(s) from selected category
Add program(s) from selected category (including allsubcategories) to the setup editor.
Keyboard shortcut: [C]
Add selected program(s) Add selected program(s) from the browser's programlist to the setup editor.
Keyboard shortcut: [A]
9
Nebula Setups 2 Quick Guide
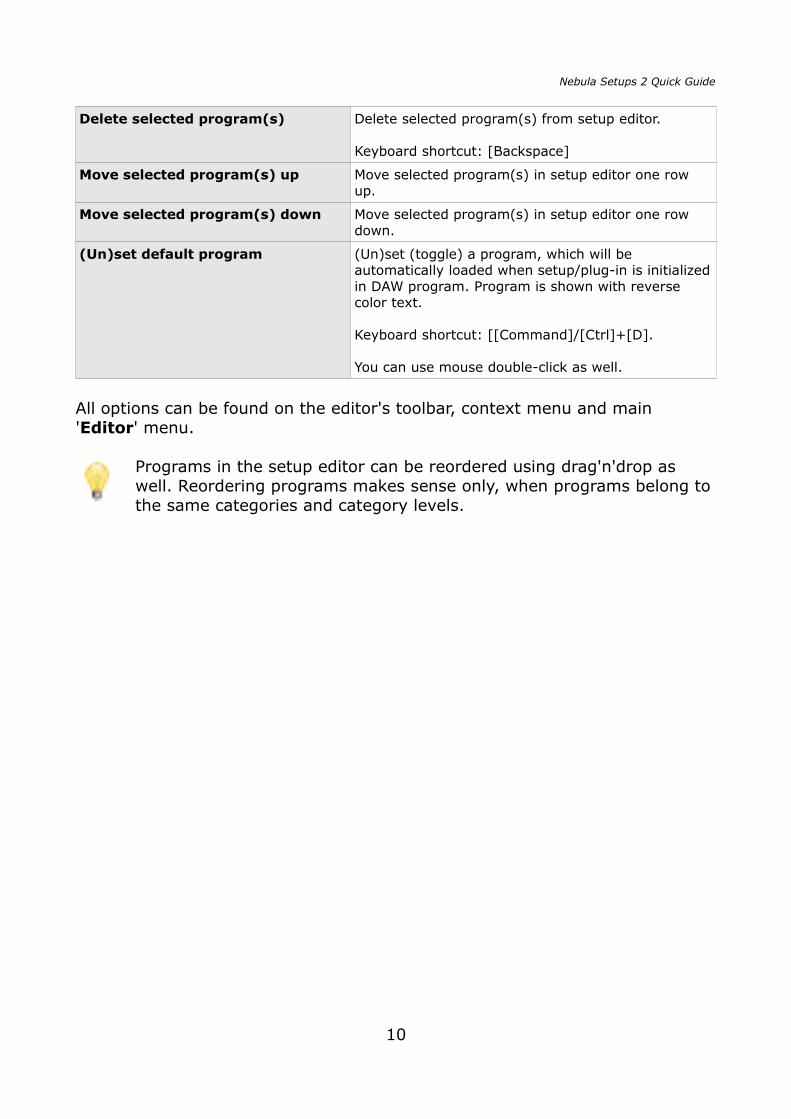
Delete selected program(s) Delete selected program(s) from setup editor.
Keyboard shortcut: [Backspace]
Move selected program(s) up Move selected program(s) in setup editor one row up.
Move selected program(s) down Move selected program(s) in setup editor one row down.
(Un)set default program (Un)set (toggle) a program, which will be automatically loaded when setup/plug-in is initializedin DAW program. Program is shown with reverse color text.
Keyboard shortcut: [[Command]/[Ctrl]+[D].
You can use mouse double-click as well.
All options can be found on the editor's toolbar, context menu and main 'Editor' menu.
Programs in the setup editor can be reordered using drag'n'drop as well. Reordering programs makes sense only, when programs belong tothe same categories and category levels.
10

Nebula Setups 2 Quick Guide
Tweaking Nebula parameters
Tweaking/tuning Nebula parameters (engine) for a specific functionality (compression for example) or performance/sound quality improvement is a known practice and necessity for many advanced Nebula users. Usually, parameters can be changed within Nebula plug-in (settings) or by directly editing Nebula XML configuration files with text editor.
Nebula Setups offers a very elegant and simple tweaking using a Tweaks list (Nebula parameter tweaks). It is located at the lower right side of the main window.
There are two kinds of Nebula tweaks available: Global and Local.
Global tweaks • they are a part of the global Nebula Setups preferences• they are applied to EVERY saved setup• they override default Nebula parameters
Local tweaks • they are a part of the setup, which defines them• they are applied ONLY to the setup which defines them
they override default Nebula parameters AND global tweaks
Tweaks list in detail
Following rules apply to both types of tweaks.
• list should contain tweaked parameters only• strange and unexpected things may happen when loading Nebula plug-in
with incorrect parameters/settings, so tweaking must be done with a
11

Nebula Setups 2 Quick Guide
great care • before tweaking, make sure you 100% know what you are doing and
why you are doing it • most of the available Nebula parameters should never be changed at all • there is absolutely no control of parameter values (make sure you enter
a valid parameter value)• duplicated tweaks are not allowed• the order of the tweaks in the list can be changed using a mouse drag
and drop – moving multiple items at once is supported• reusing the same tweaks list for the multiple setups is easy using
copy/paste operation
The following options are available in the tweaks list:
Add Nebula parameter You can choose any parameter from a drop down list. The list contains all existing Nebula parameters, known from thestandard Nebula XML configuration files. Only one instance of each parameter is allowed.
Edit Nebula parameter Edit/tweak value of the currently selected parameter. You can also double click on a current parameter in the list to edit it.
Delete selected Nebula parameter(s)
Delete selected parameter(s) from the list.
Copy Nebula parameter(s) Copy selected parameters to the clipboard.
Keyboard shortcut: [[Command]/[Ctrl]+[C].
Paste Nebula parameter(s) Paste copied parameters from the clipboard. Pasted items are always appended to the end of the list.
Keyboard shortcut: [[Command]/[Ctrl]+[V].
All options can be found on the tweak list's toolbar, context menu and main 'Tweaks' menu.
Tweaking following parameters will have no effect:
• SKINNAME• SETUPROMNAME• SCANBOOT
These parameters will always be internally overwritten with values, which guarantee proper setup configuration and functionality.
12
Nebula Setups 2 Quick Guide
Saving a setup
Don't forget, that setup can be successfully saved only, if program's preferences are set properly (see Preferences).
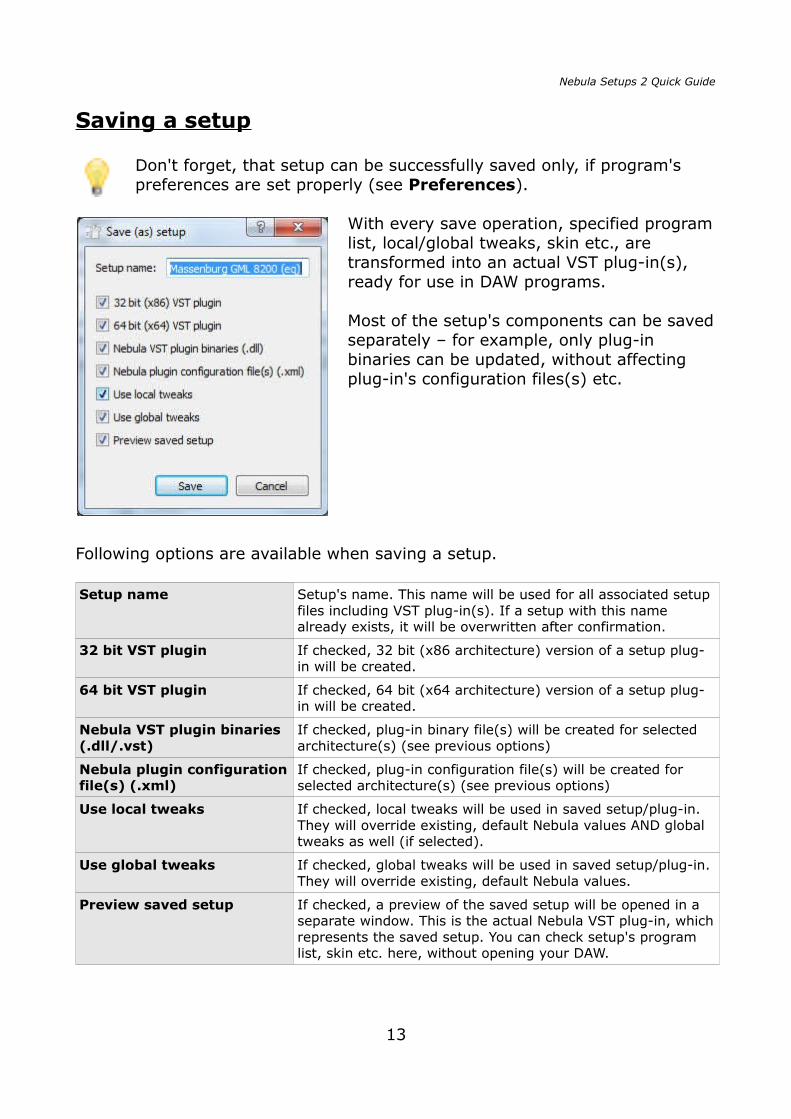
With every save operation, specified programlist, local/global tweaks, skin etc., are transformed into an actual VST plug-in(s), ready for use in DAW programs.
Most of the setup's components can be savedseparately – for example, only plug-in binaries can be updated, without affecting plug-in's configuration files(s) etc.
Following options are available when saving a setup.
Setup name Setup's name. This name will be used for all associated setup files including VST plug-in(s). If a setup with this name already exists, it will be overwritten after confirmation.
32 bit VST plugin If checked, 32 bit (x86 architecture) version of a setup plug-in will be created.
64 bit VST plugin If checked, 64 bit (x64 architecture) version of a setup plug-in will be created.
Nebula VST plugin binaries (.dll/.vst)
If checked, plug-in binary file(s) will be created for selected architecture(s) (see previous options)
Nebula plugin configurationfile(s) (.xml)
If checked, plug-in configuration file(s) will be created for selected architecture(s) (see previous options)
Use local tweaks If checked, local tweaks will be used in saved setup/plug-in. They will override existing, default Nebula values AND global tweaks as well (if selected).
Use global tweaks If checked, global tweaks will be used in saved setup/plug-in. They will override existing, default Nebula values.
Preview saved setup If checked, a preview of the saved setup will be opened in a separate window. This is the actual Nebula VST plug-in, whichrepresents the saved setup. You can check setup's program list, skin etc. here, without opening your DAW.
13
Nebula Setups 2 Quick Guide
When a setup is saved, you can check/test it immediately. Open your DAW program and load a VST plug-in, which has the same name as saved setup. Repeat this procedure for all chosen architectures.
Some 'behind the scenes' technical info: when a setup (with all options checked) is saved, a copy of the base Nebula VST plug-in(s) and its configuration file(s) is made with a name equal to setup's name. Program list with auto-load setting is created in Nebula's local setups directory. Plug-in's configuration file is adapted to the new setup as well. Finally, tweaks are applied to the newly created setup configuration file (see Preferences).
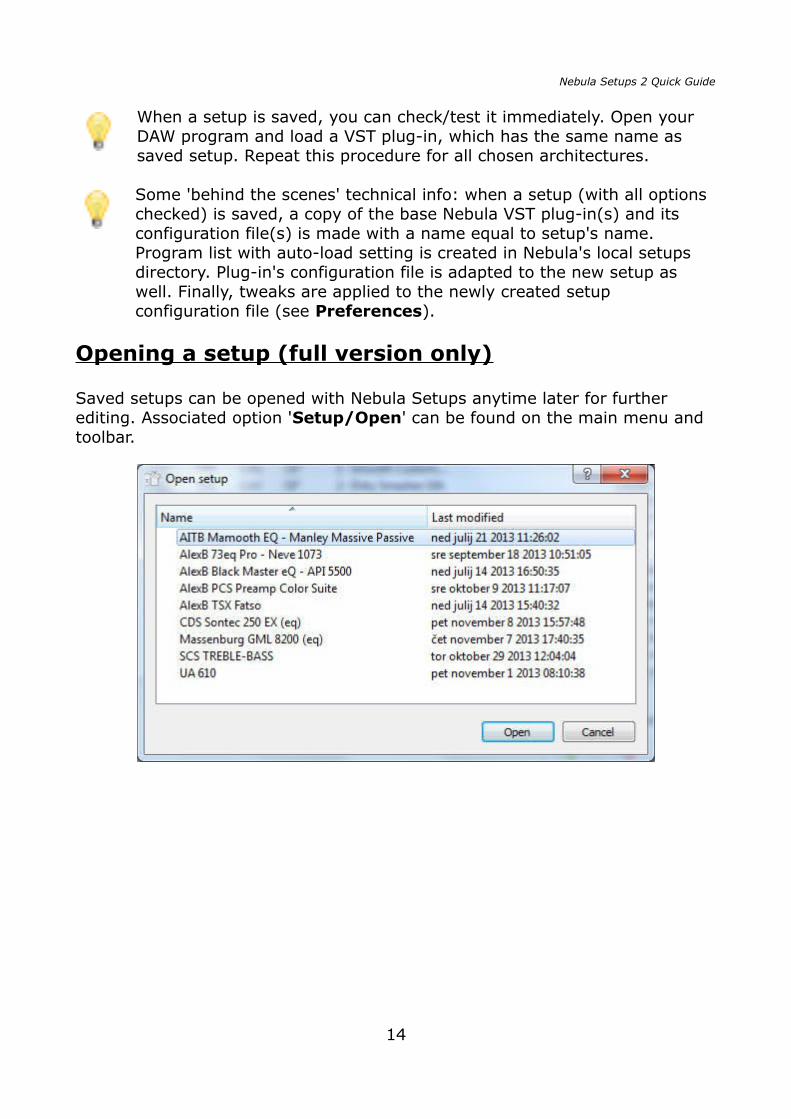
Opening a setup (full version only)
Saved setups can be opened with Nebula Setups anytime later for further editing. Associated option 'Setup/Open' can be found on the main menu and toolbar.
14
Nebula Setups 2 Quick Guide
Importing a setup (full version only)
Program provides two import options, which will help you to import your old, legacy setups (created manually or with Set-ups 1 program). This way they willbecome tracked setups (see Setups Manager) and their further management will be much more simple.
There are two import options available :
Import program list This option will import raw program list (XML file usually found in the setups sub folder of the Nebula Repository). Information about auto-load program will also be imported. Finally, you can select a skin and save everything together as a new, tracked setup.
Import setup from Nebula configuration file (Set-ups 1)
Option will import a complete setup from the Nebula plug-in's XML configuration file. The program list, auto-load program information and skin name will allbe imported. This is a preferred way to import manually created setups or the ones, created with Nebula Set-ups 1.x program. When saving imported setup, the original names of the setup files (plug-ins and configuration files) will be retained, so they will be visible in your DAW as before.
Note: if necessary, the program list file in the NebulaRepository setups sub folder will be renamed to match the setup's name. This is to avoid possible confusion with the file names and something you don't need to bother with at at all.
Import options can be found on the main toolbar and 'Setup' menu.
15
Nebula Setups 2 Quick Guide
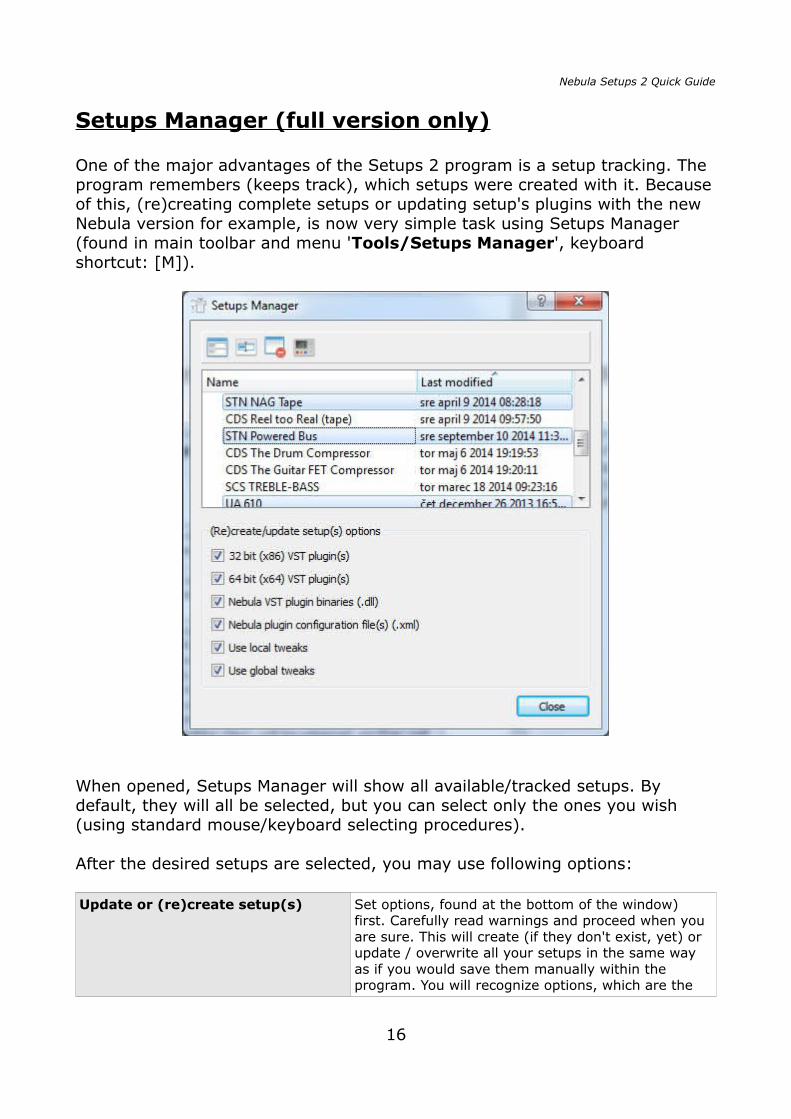
Setups Manager (full version only)
One of the major advantages of the Setups 2 program is a setup tracking. The program remembers (keeps track), which setups were created with it. Becauseof this, (re)creating complete setups or updating setup's plugins with the new Nebula version for example, is now very simple task using Setups Manager (found in main toolbar and menu 'Tools/Setups Manager', keyboard shortcut: [M]).
When opened, Setups Manager will show all available/tracked setups. By default, they will all be selected, but you can select only the ones you wish (using standard mouse/keyboard selecting procedures).
After the desired setups are selected, you may use following options:
Update or (re)create setup(s) Set options, found at the bottom of the window) first. Carefully read warnings and proceed when you are sure. This will create (if they don't exist, yet) or update / overwrite all your setups in the same way as if you would save them manually within the program. You will recognize options, which are the
16
Nebula Setups 2 Quick Guide
same as when manually saving a setup. When operation is completed, a list (log) of the processed setups is displayed.
Rename a setup Rename currently selected setup to a new name.
Note: a single setup must be selected for this operation (renaming of multiple setups at once is notsupported).
Delete setup(s) Delete selected setup(s).
Note: this destructive operation can not be undone, so be careful and don't forget to backup your stuff. When you delete a setup, all of its files will be permanently deleted (including common folder files, VST plug-ins files and Nebula repository setup files.
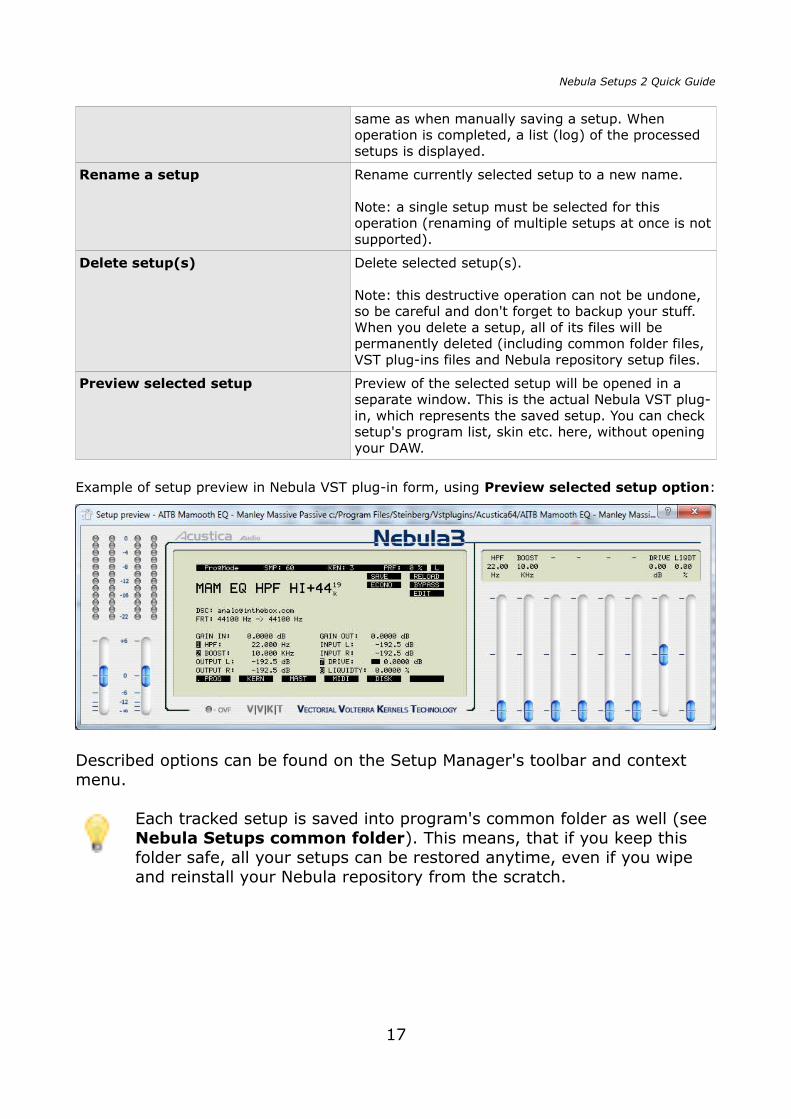
Preview selected setup Preview of the selected setup will be opened in a separate window. This is the actual Nebula VST plug-in, which represents the saved setup. You can check setup's program list, skin etc. here, without opening your DAW.
Example of setup preview in Nebula VST plug-in form, using Preview selected setup option:
Described options can be found on the Setup Manager's toolbar and context menu.
Each tracked setup is saved into program's common folder as well (see Nebula Setups common folder). This means, that if you keep this folder safe, all your setups can be restored anytime, even if you wipe and reinstall your Nebula repository from the scratch.
17
Nebula Setups 2 Quick Guide
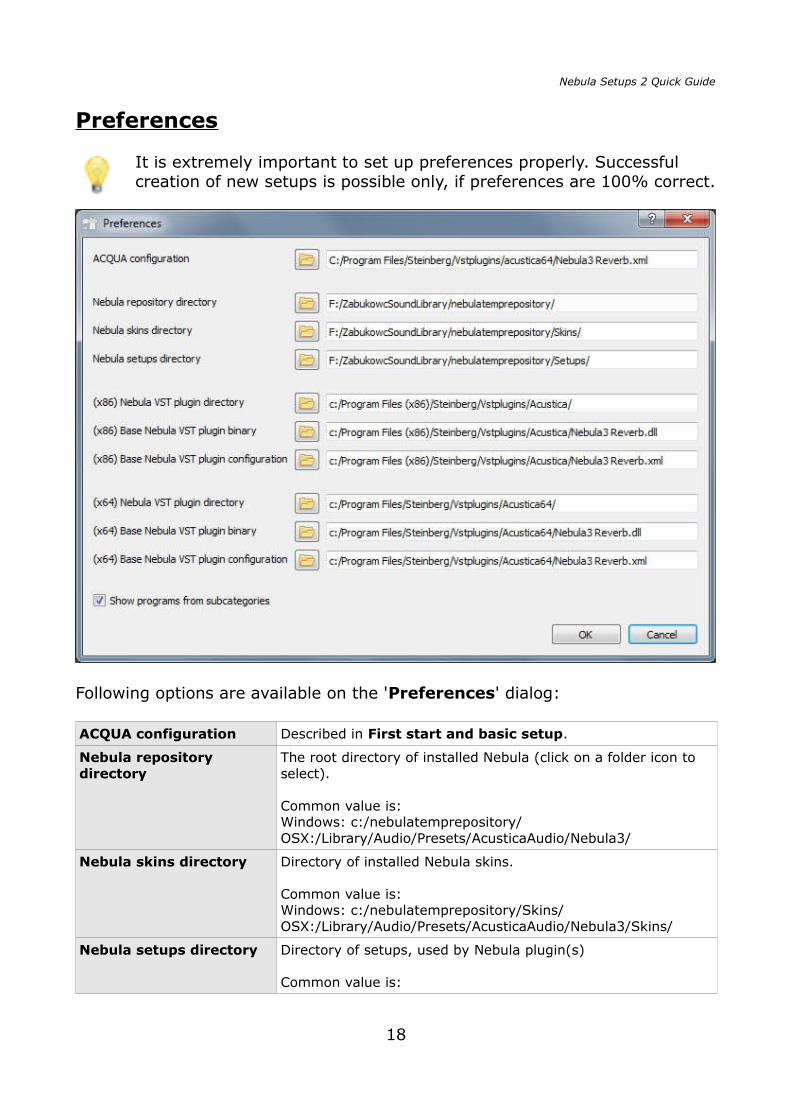
Preferences
It is extremely important to set up preferences properly. Successful creation of new setups is possible only, if preferences are 100% correct.
Following options are available on the 'Preferences' dialog:
ACQUA configuration Described in First start and basic setup.
Nebula repository directory
The root directory of installed Nebula (click on a folder icon to select).
Common value is:Windows: c:/nebulatemprepository/OSX:/Library/Audio/Presets/AcusticaAudio/Nebula3/
Nebula skins directory Directory of installed Nebula skins.
Common value is:Windows: c:/nebulatemprepository/Skins/OSX:/Library/Audio/Presets/AcusticaAudio/Nebula3/Skins/
Nebula setups directory Directory of setups, used by Nebula plugin(s)
Common value is:
18
Nebula Setups 2 Quick Guide
Windows: c:/nebulatemprepository/Setups/OSX:/Library/Audio/Presets/AcusticaAudio/Nebula3/Setups/
(x86) Nebula VST plugin directory
Directory, where 32 bit Nebula plugins are located.
Common value is:Windows: c:/Program Files (x86)/Steinberg/Vstplugins/OSX:/Library/Audio/Plug-Ins/VST/Acustica/
(x86) Base Nebula VST plugin binary
Full path of the original 32 bit Nebula plugin.
Common value is:Windows: c:/Program Files (x86)/Steinberg/Vstplugins/Nebula3 Reverb.dllOSX:/Library/Audio/Plug-Ins/VST/Acustica/Nebula3 Reverb.vst
(x86) Base Nebula VST plugin configuration
Full path of the original 32 bit Nebula configuration file.
Common value is:Windows: c:/Program Files (x86)/Steinberg/Vstplugins/Nebula3 Reverb.xmlOSX:/Library/Audio/Plug-Ins/VST/Acustica/Nebula3 Reverb.xml
(x64) Nebula VST plugin directory
Directory, where 64 bit Nebula plugins are located.
Common value is:Windows: c:/Program Files/Steinberg/Vstplugins/OSX:/Library/Audio/Plug-Ins/VST/Acustica64/
(x64) Base Nebula VST plugin binary
Full path of the original 64 bit Nebula plugin.
Common value is:Windows: c:/Program Files/Steinberg/Vstplugins/Nebula3 Reverb.dllOSX:/Library/Audio/Plug-Ins/VST/Acustica64/Nebula3 Reverb.vst
(x64) Base Nebula VST plugin configuration
Full path of the original 64 bit Nebula configuration file.
Common value is:Windows: c:/Program Files/Steinberg/Vstplugins/Nebula3 Reverb.xmlOSX:/Library/Audio/Plug-Ins/VST/Acustica64/Nebula3 Reverb.xml
Show programs from subcategories
Descibed in Nebula repository browser.
19
Nebula Setups 2 Quick Guide
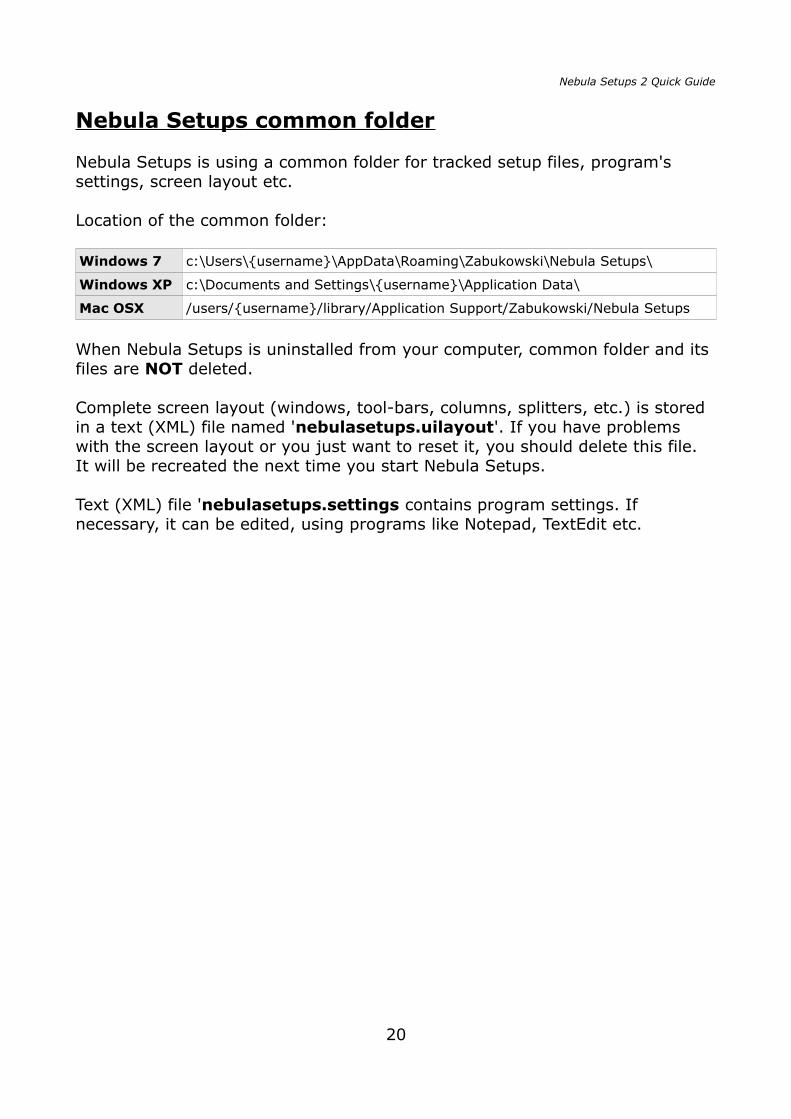
Nebula Setups common folder
Nebula Setups is using a common folder for tracked setup files, program's settings, screen layout etc.
Location of the common folder:
Windows 7 c:\Users\{username}\AppData\Roaming\Zabukowski\Nebula Setups\
Windows XP c:\Documents and Settings\{username}\Application Data\
Mac OSX /users/{username}/library/Application Support/Zabukowski/Nebula Setups
When Nebula Setups is uninstalled from your computer, common folder and its files are NOT deleted.
Complete screen layout (windows, tool-bars, columns, splitters, etc.) is stored in a text (XML) file named 'nebulasetups.uilayout'. If you have problems with the screen layout or you just want to reset it, you should delete this file. It will be recreated the next time you start Nebula Setups.
Text (XML) file 'nebulasetups.settings contains program settings. If necessary, it can be edited, using programs like Notepad, TextEdit etc.
20
Nebula Setups 2 Quick Guide
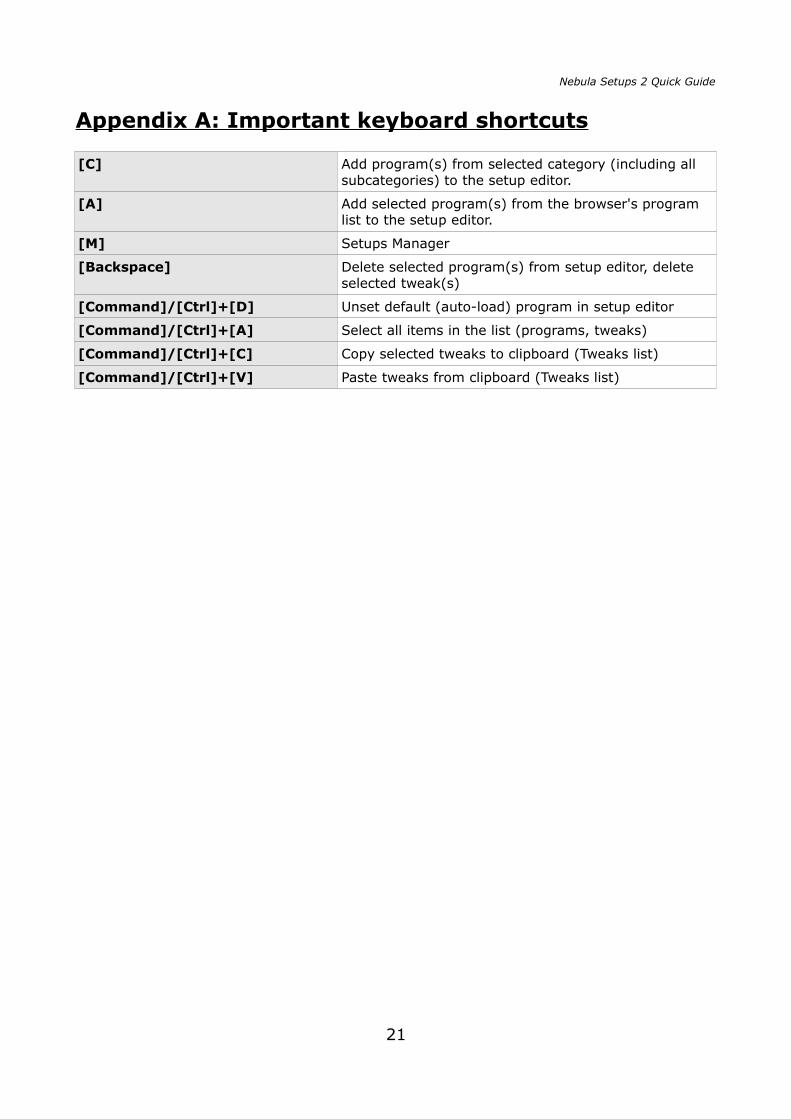
Appendix A: Important keyboard shortcuts
[C] Add program(s) from selected category (including all subcategories) to the setup editor.
[A] Add selected program(s) from the browser's program list to the setup editor.
[M] Setups Manager
[Backspace] Delete selected program(s) from setup editor, delete selected tweak(s)
[Command]/[Ctrl]+[D] Unset default (auto-load) program in setup editor
[Command]/[Ctrl]+[A] Select all items in the list (programs, tweaks)
[Command]/[Ctrl]+[C] Copy selected tweaks to clipboard (Tweaks list)
[Command]/[Ctrl]+[V] Paste tweaks from clipboard (Tweaks list)
21