zabbix cookbook - sample chapter
DESCRIPTION
Chapter No. 6 Working with TemplatesOver 70 hands-on recipes to get your infrastructure up and running with ZabbixFor more information : http://bit.ly/1FrchCTCopyTRANSCRIPT

Zabbix Cookbook
Patrik Uytterhoeven
Zabbix Cookbook
What this book will do for you...
Set up your Zabbix infrastructure effi ciently
Customize the Zabbix interface to suit your system needs
Create and customize your own user settings
Add groups, hosts, and items in Zabbix to accurately monitor your environment
Automate Zabbix to gather data from your inventory
Build maps with an overview of the entire IT infrastructure
Monitor websites and get statistics about access time, latency, and data usage
Monitor your VMware infrastructure in a quick and easy way with Zabbix
$ 44.99 US£ 29.99 UK
Prices do not include local sales tax or VAT where applicable
Inside the Cookbook... A straightforward and easy-to-follow format
A selection of the most important tasks and problems
Carefully organized instructions for solving the problem effi ciently
Clear explanations of what you did
Apply the solution to other situations
Quick answers to common problems
This book will teach you the skills required to successfully set up and confi gure a Zabbix server. We will guide you through the interface setup and explain all the features available in Zabbix.
You will begin with learning the Zabbix installation and confi guration steps in detail, and then move on to exploring its interface and architecture. You will then work with groups, users, and permissions. The book will then take you through monitoring and testing with Zabbix. Followed by this, you will gain insights into using templates, and also create impressive graphs and maps for data visualization and reporting. Towards the end of the book, you will learn how to maintain, upgrade, and troubleshoot your Zabbix infrastructure.
Patrik Uytterhoeven
Zabbix Cookbook
Over 70 hands-on recipes to get your infrastructure up and running with Zabbix
P U B L I S H I N GP U B L I S H I N G
community experience dist i l ledP
UB
LIS
HIN
GP
UB
LIS
HIN
G
Visit www.PacktPub.com for books, eBooks, code, downloads, and PacktLib.
Free Sample

In this package, you will find: The author biography
A preview chapter from the book, Chapter 6 'Working with Templates'
A synopsis of the book’s content
More information on Zabbix Cookbook
About the Author Patrik Uytterhoeven has over 16 years of experience in IT. Most of this time was
spent on HP Unix and Red Hat Linux. In late 2012, he joined Open-Future, a leading
open source integrator and the first Zabbix reseller and training partner in Belgium.
When Patrik joined Open-Future, he gained the opportunity to certify himself
as a Zabbix Certified Trainer. Since then, he has provided trainings and public
demonstrations not only in Belgium but also around the world, in countries such
as the Netherlands, Germany, Canada, and Ireland.
Because Patrik also has a deep interest in configuration management, he wrote
some Ansible roles for Red Hat 6.x and 7.x to deploy and update Zabbix.
These roles, and some others, can be found in the Ansible Galaxy at https://galaxy.ansible.com/list#/users/1375.
Patrik is also a technical reviewer of Learning Ansible and the upcoming book,
Ansible Configuration Management, both published by Packt Publishing.
I would like to thank my colleague Tom for helping me reviewing the
book. I would also like to thank my girlfriend Mui who had to spend
countless evenings alone before TV when I was writing this book.
I would also like to thank Open-Future the company I work for as
they gave me the time that was needed to for this book and at last
I would like to thank all the reviewers for the ideas and feedback
and the people from PacktLib. Without them this book would never
have been possible.

Zabbix Cookbook Since its first release in 2001, Zabbix has distinguished itself from other monitoring
solutions by providing great flexibility and performance. Hence, it is being used more
and more by large companies. This doesn't mean Zabbix can't be used in smaller setups.
As mentioned before, Zabbix is a very flexible monitoring tool that can start small and
grow big. Monitoring more than 100,000 devices with Zabbix is no issue at all.
This book will show you how to set up Zabbix and configure it to your needs,
be it in a small or a large setup.
What This Book Covers Chapter 1, Zabbix Configuration, covers the entire installation of Zabbix from scratch.
This includes installation of the Zabbix server and agent. At the end of this chapter
is the procedure to install Zabbix in a distributed way.
Chapter 2, Getting Around in Zabbix, helps you discover the frontend, explains the
Zabbix definitions, and shows you how to acknowledge triggers. To give you a better
understanding of what is possible with your Zabbix setup, this chapter goes a bit deeper
into the Zabbix architecture.
Chapter 3, Groups, Users, and Permissions, explains how to create hosts in Zabbix
and split them in groups. This chapter also covers how to create users and user groups.
Then it explains the different ways to authenticate and administer Zabbix.
Chapter 4, Monitoring with Zabbix, takes you to the next logical step— explaining
every item that can be created in Zabbix, by making use of easy-to-follow recipes.
Chapter 5, Testing with Triggers in Zabbix, shows you how to build triggers in an easy
way with the trigger constructor. This chapter also covers how to build more advanced
triggers and how to test them.
Chapter 6, Working with Templates, explains what templates are and how to create,
link, and nest them in Zabbix. This chapter also teaches you how to make use of macros
in your templates.
Chapter 7, Data Visualization and Reporting in Zabbix, explains the different ways
to visualize data in Zabbix by making use of graphs, screens, slideshows, and maps.
This chapter also covers how to create reports and SLA reports in Zabbix.
Chapter 8, Monitoring VMware and Proxies, shows you how to monitor your VMware
infrastructure. Then this chapter explains the different kinds of proxies and how to use
them for monitoring.

Chapter 9, Autodiscovery, demonstrates how to discover hosts on your network
with Zabbix and perform automation after the discovery. This chapter also introduces
automatic registration of active agents and low-level discovery of items.
Chapter 10, Zabbix Maintenance and API, explains how to place hosts in your Zabbix
in maintenance mode. This chapter also covers internal items in Zabbix, what to back
up, and some performance considerations. Last but not least, it covers the Zabbix API
and shows you how to add hosts with the API using examples.
Appendix, Upgrading and Troubleshooting Zabbix, is an overview demonstrating
how to upgrade your installation, how to troubleshoot Zabbix, and some best practices
to follow. This chapter teaches you some guidelines and talks about the upcoming Zabbix
version. It also shows you how to interact with the community, as this will probably
be the first point of contact when there are Zabbix-related issues.

143
6Working with Templates
In this chapter, we will cover the following topics:
Creating templates
Importing and exporting templates
Linking templates
Nesting templates
Macros in templates
IntroductionSo far in previous chapters, we have seen how to add hosts, create items, and add triggers to those items. Now imagine you have 10 servers with PostgreSQL and you want to monitor them. What will you do? You possibly will create items for each host to gather data and add triggers for each item. We then could copy all items and triggers 10 times to all other hosts. But what if you need to make changes? You will change it again on all hosts individually? What if we have to do this on 100 hosts, program something with the API? To make our life easier, we have templates in Zabbix. With templates we only have to create 1 item and 1 trigger. We can then link this template to all our hosts and reuse all our work over and over.
Creating templatesIn this recipe, we will show you how you can create templates in Zabbix. It's always advised to use templates as much as possible.

Working with Templates
144
Getting readyFor this recipe, we need a Zabbix server and access to the server with a Zabbix administrator or super administrator account.
How to do it ...1. From the menu, go to Confi guration | Templates.
2. Click on the Template button on the upper right corner.
3. In the fi eld Template name, you can write the name of your template, example. PostgreSQL template.
4. In the box Visible name, you can add a name that will be visible in Zabbix in case that the name of your template is too long or too cryptic for some reason.
5. In Groups, we will choose the group to which our template belongs. Here we select Templates as group.
6. In the Description box we can write a note. This can be handy for later if the name of your template is not informative enough to know what you monitor.
7. Next we click Add to save our templates.

Chapter 6
145
8. From the Confi guration | Templates page, we can now see our template in the list of templates.
9. As you can see each template has the option to add applications, items, triggers, graphs, screens, and so on, just like we had on our hosts.
How it worksTemplates are just a collection of items, triggers, applications, and so on, that we can reuse. Instead of creating each item or trigger and so on on every host, we just create a template. Then we make everything in our template and link it to a bunch of hosts so that we can reuse our work.
There's more...Templates are often used to link servers with the same service or application such as PostgreSQL, Apache, Zabbix agent, Red Hat, Ubuntu, proxies, and so.
Since Zabbix 2.2, web scenarios were added to the template. When you edit a already saved template, you will see some extra buttons at the end of the page. The Update button will, of course, update any changes made. The Clone button will duplicate your template into a new template and copy all entities like triggers, items, and so on inherited from linked templates. The Full clone will do the same as the Clone button but also copy directly attached items, triggers, and so on, from the template to the new template. Delete will obviously delete your template but all items will remain with the host while Delete and clear will remove all items from the linked hosts.
You cannot link a template to a host, if the template has items that are already on the host as each item on a host has to be unique.
See also https://www.zabbix.com/documentation/2.4/manual/config/
templates.
Importing and exporting templatesWhen we have templates made in Zabbix, it makes sense to back them up in case we want to use them later or to share them with, for instance, the community. In this recipe, we will show you how to import and export templates in Zabbix.

Working with Templates
146
Getting readyWhat do we need for this recipe? We need our Zabbix server properly set up. For this setup to work we also need an administrator or super administrator account.
How to do it...1. To export our template, we have to go in our menu to Confi guration | Templates.
2. Next, we select the template that we would like to export and select Export selected from the dropdown box.
3. Click on Go, now Zabbix will export the template in XML format to our disk.
When we want to import templates we have to follow more or less the same steps:
1. Our fi rst step is to go to Confi guration | Templates.
2. On the upper right corner, click Import.
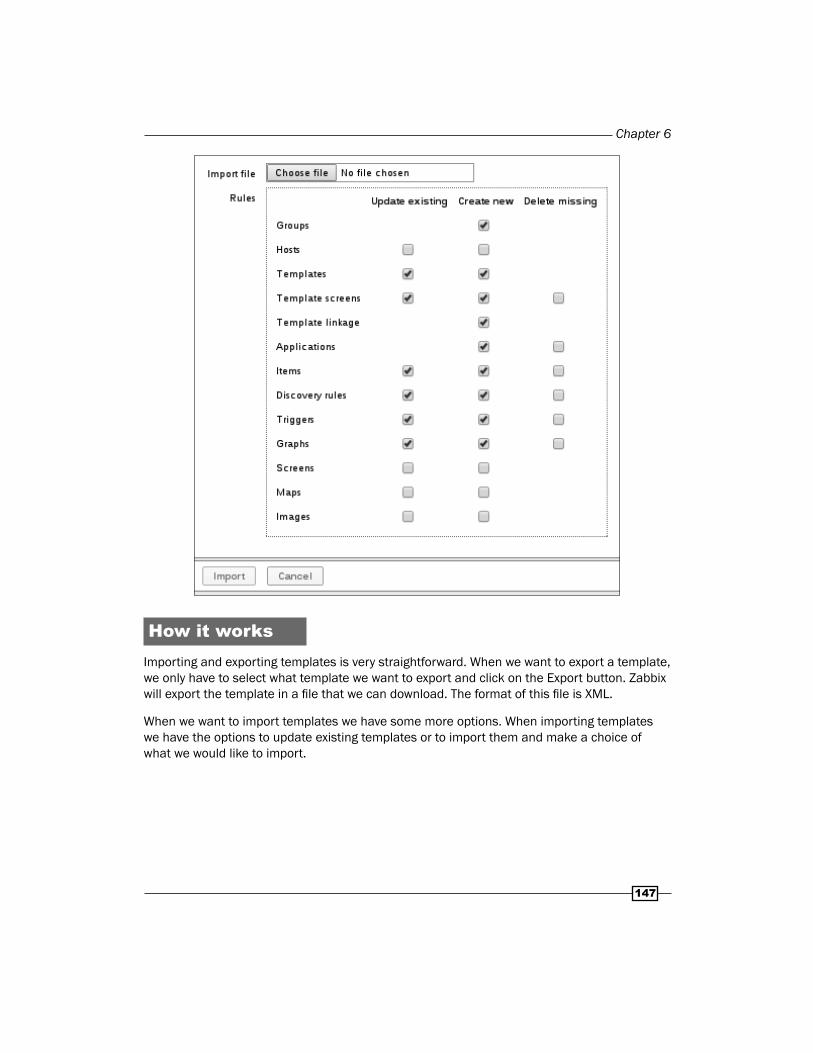
3. We now see a box where we can select the fi le that we want to import.
4. Make a selection of the possible options. There is a column to update missing data in case our template was already installed on our system and we wanted to update it with new features. We also have a column for new templates in case we don't want to install everything from our template. When importing hosts / templates using the Delete missing option, host / template macros not present in the imported XML fi le will be deleted too.
Chapter 6
147
How it worksImporting and exporting templates is very straightforward. When we want to export a template, we only have to select what template we want to export and click on the Export button. Zabbix will export the template in a fi le that we can download. The format of this fi le is XML.
When we want to import templates we have some more options. When importing templates we have the options to update existing templates or to import them and make a choice of what we would like to import.

Working with Templates
148
There's more...Besides templates, we can export and import also hosts, host groups, network maps, images, and screens. Images are exported in a Base64 format.
Import and exporting templates can be useful in case you want to back up your templates. It can also be useful if you have a development and a production environment. This way you could develop and test everything fi rst on the development machine, export templates and import them on the production environment.
Another way is to share them with the community (I highly recommend you to do this).
See also https://www.zabbix.com/documentation/2.4/manual/xml_export_
import?s[]=import&s[]=templates
http://en.wikipedia.org/wiki/Base64
http://zabbix.org/wiki/Zabbix_Templates
Linking templatesHaving templates is great, but you probably want to link it to a host as well, else we would not have much use of our templates. In this recipe, we will show you how to link those templates to your hosts.
Getting readyFor this recipe, we need a Zabbix server and access to the server with a Zabbix administrator or super administrator account. We also need a fresh host.
How to do it ...1. Go back to the menu Confi guration | Templates.
2. Select a template from the list, example. Template App Zabbix Agent. This can be done by clicking on its template name.
3. From the box Other | group, select the fresh host that you would like to link with this template and press the << button to move it to the box Hosts / Templates.

Chapter 6
149
4. Press the Update button at the bottom of the page.
There are probably already a few names in the box Hosts / Templates. Don't worry, those are already hosts or other templates that are linked to this template.
How it worksWe need to link our templates to hosts after we have created them. This way it is possible to link our template to multiple hosts.
It is also possible to link templates from the host itself. This can be done by clicking on the host from the menu Confi guration | Hosts. You then select the Templates tab and select a new template from the list or type the name in the Link new templates box. Don't forget to click Add afterwards to add your template to the host.
See also https://www.zabbix.com/documentation/2.4/manual/config/
templates/linking.
Working with Templates
150
Nesting templatesIt is also possible in Zabbix to link templates with each other. This may sound weird and unnecessary at fi rst but it's defi nitely a great feature. Imagine you have a web server with Apache, MySQL, and PHP. You could create 1 big template to monitor all items or you could create 3 templates. One for Apache, one for MySQL, and another one for PHP. But what if you have another web server that you would like to monitor? Do you add those three templates again to that host? What you could do in this case is create a new template Webserver and link it with the three templates we mentioned earlier. In this case, we only have to link 1 template Webserver to our webserver and we can still use the template Apache or MySQL in case we only want to monitor Apache or MySQL on another server.
Getting readyTo be able to do this recipe, you need a Zabbix server properly set up with an admin account or super administrator account setup.
How to do it...1. From the menu go, to Confi guration | Templates.
2. Click Create New Template.
3. Fill in the Template name, example. Webserver Template.
4. Add it in the group templates.
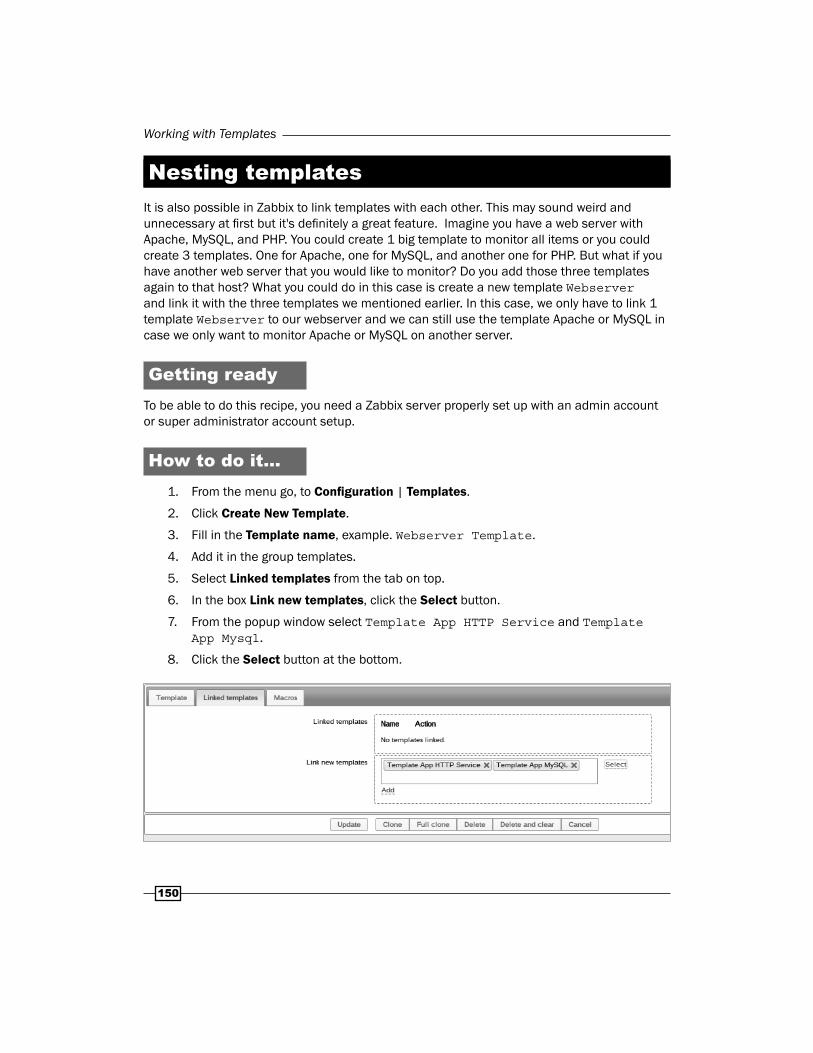
5. Select Linked templates from the tab on top.
6. In the box Link new templates, click the Select button.
7. From the popup window select Template App HTTP Service and Template App Mysql.
8. Click the Select button at the bottom.

Chapter 6
151
9. Back in the menu Linked templates, you now see the two templates we have selected, we still have to click Add.
10. And fi nally click Update.
How it worksIn the template menu we just create a new template. This template we link to two or more templates so that our new template will inherit all of the items of the linked templates. Our new template will then be linked to our host. This way we don't have to link two templates to our host but only one. Later it is possible to link more templates to the new template we have made.
In the Link new templates box, it is possible to type the name of the template if you know the name or part of the name, and then select it from a popup window.
There's more...When we go back to the menu Confi guration | Templates, we will see our template web server and in the column Linked templates we will see the names of the templates linked to our new template.
See also https://www.zabbix.com/documentation/2.4/manual/config/
templates/nesting
Macros in templatesIf you have a lot of servers then you probably want to have your templates a bit more dynamic. There are probably also some cases where a certain value in your template is not fi t for just one server in your park. For this, we can make use of macros in our templates.
Working with Templates
152
Getting readyFor this recipe to work, we need a Zabbix server and a Zabbix host. We also need to make sure that we have a SSH session active on port 22 on our host as we will monitor the SSH service on our host. For this, we will make use of macros. We also need to make use of the super administrator account in Zabbix.
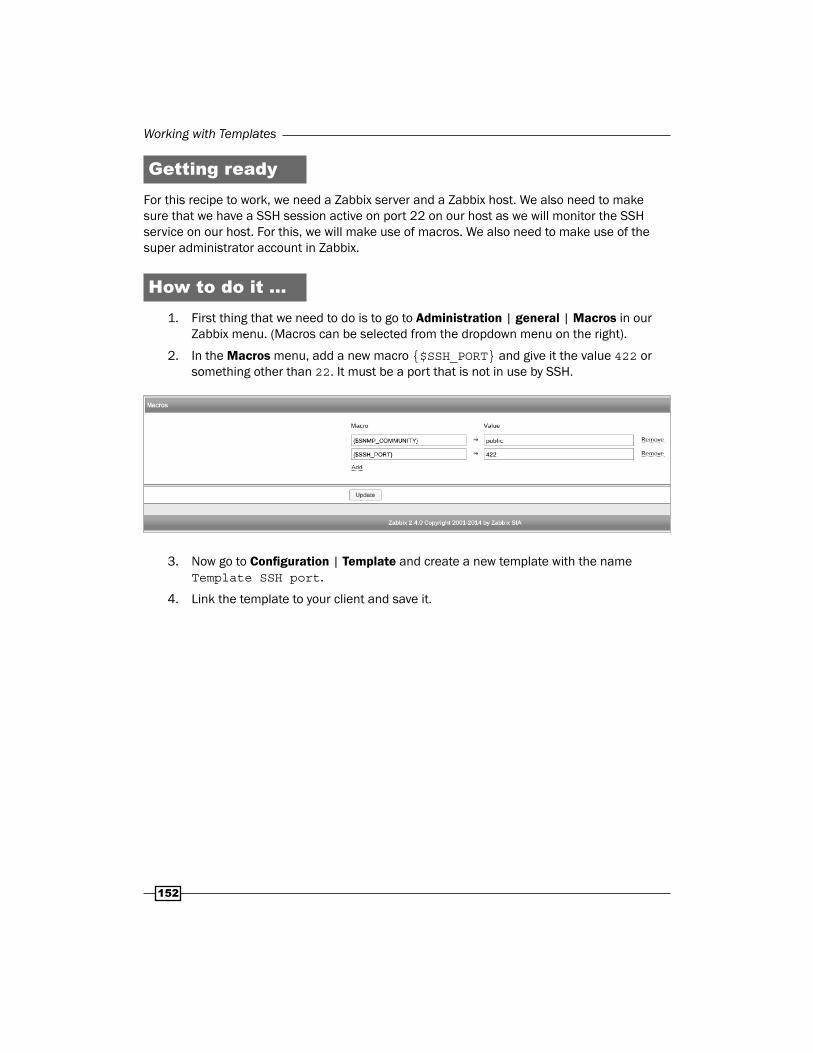
How to do it ...1. First thing that we need to do is to go to Administration | general | Macros in our
Zabbix menu. (Macros can be selected from the dropdown menu on the right).
2. In the Macros menu, add a new macro {$SSH_PORT} and give it the value 422 or something other than 22. It must be a port that is not in use by SSH.
3. Now go to Confi guration | Template and create a new template with the name Template SSH port.
4. Link the template to your client and save it.

Chapter 6
153
5. Next go to the Items in your template and create a new item.
6. Add a Name Check SSH port $3.
7. Select Type as Simple check.
8. Add the following Key: net.tcp.service[ssh,,{$SSH_PORT}]
9. The Type of information should be Numeric.
10. Data type should be Decimal.
11. Give in New application, an application name example. ssh check.

Working with Templates
154
12. Save your item.
13. Next we go to our host again from the menu Confi guration | Hosts.
14. We then go to the tab Macros in our host.

Chapter 6
155
15. Here we add the macro {$SSH_PORT} with value 22.
16. We now save our work.
17. Next when we go to Monitoring | Latest data, we will see that on our host for the SSH port the status is 1. This means that our service is up.
How it worksIn the Administration panel under General | Macros, we can defi ne global macros. Those global macros can be used in our templates. So by defi ning {$SSH_PORT} macro in our item to monitor the SSH port, we were telling our template to look to the global macro. This means that our template would always check, in this case, port 422. Because we defi ned a new macro on our host with the value 22, that specifi c macro was over written for only this particular host. So in our case the template would always look for a service on port 422, but only for our host it would look for a service on port 22.
See also https://www.zabbix.com/documentation/2.4/manual/config/macros/
usermacros
A complete list of supported macros can be found here:
https://www.zabbix.com/documentation/2.4/manual/appendix/macros/supported_by_location#additional_support_for_user_macros

Where to buy this book You can buy Zabbix Cookbook from the Packt Publishing website.
Alternatively, you can buy the book from Amazon, BN.com, Computer Manuals and most internet
book retailers.
Click here for ordering and shipping details.
www.PacktPub.com
Stay Connected:
Get more information Zabbix Cookbook