you are here choose how you would like to complete this
TRANSCRIPT

You Are Here
Start here! Build your Crane, evolve your design, and begin the In-The-Bucket Challenge!
Optional Lab Optional Challenges -Magnetic Materials Lab (Ages 8+)
-Space Mining Challenge* -Clip Hanger Challenge -Super Sort Challenge
Go Guide
*See Page 9
Choose how you would like to complete this activity. Download documents & videos at teachergeek.com/pickupstick

Page 1
Supplies
PICK-UP STICK PARTS MATERIALS YOU SUPPLY
These are the parts you need to build one Electromagnet Crane, plus some extras, so you can make your own unique designs.
Picture Name Qty Strips
30 cm (1 in) SKU 1821-31
3
Blocks SKU 1821-34
Wire Roll 5 m (16.4 ft)
SKU 1823-47
Screws 25 mm (1 in)
SKU 1821-22
Screws 50 mm (2 in)
SKU 1821-27
Mini-Hub Screws 16 mm (5/8 in)
SKU 1821-19
Battery Holder Single AA SKU 1821-62
Rubber Bands Small
SKU 1821-39
Nuts #10
SKU 1821-25
2
1
5
3
4
1
2
5
String 60 cm (24 in)
SKU 1823-47
1
• Phillips Screwdriver
• Pliers (optional)
• AA Battery
• Bowl
• Aluminum Foil (optional)
• Any two of: rice, beans, small candies, crumpled paper, etc. (for challenge on Page 9)
• Recycling Bin Materials
Modify materials to make even more creative designs with the Maker Tool Set
SKU 1823-84
Maker Cart Users: We recommend using Aluminum Wire for this activity (not included with Maker Carts until summer 2021).

Page 2
Screw 50 mm (2 in)
Block
2
Your wire and core are ready! Next, you’ll make them into an electromagnet!
3
1
Prepare the Parts
Scrape 2 cm (1 in) of enamel off both ends of the wire.
Scraped
2 cm (1 in) Missed Enamel
Not Scraped
Carefully uncoil both ends of the wire. Don’t tangle it!
Prepare Your Wire
Electromagnets are made by wrapping wire around a magnetic core.
Wire
Core
Make the Core
Turn a 50 mm (2 in) screw into a block.
Get your wire and core ready – they’ll become your magnet.

Page 3
Wrap one layer of wire down the screw, leaving 50 cm (20 in) of extra wire at the base.
Your magnet will get four layers of wire wrapping. After you add each layer, you’ll test your magnet.
Do you think more wraps will make your magnet stronger or weaker?
Wrap the First Layer
4
Don’t make your magnet like this… Neat magnets are stronger!

Page 4
Grab!
How many nuts can you pick up?
5
Test Your Magnet!
Flat side of battery against the spring.
6 Hook up your magnet and pick stuff up!
Don’t cut the wire! Don’t leave your magnet on! ! Don’t Overheat!
Put the battery into the holder.
The wire, battery, and battery holder can get very hot.
Do not permanently attach the magnet to the battery, run the magnet continuously, or cut the wire much shorter.
You may see sparks, but you won’t get shocked!

Page 5
Wrap More Layers
7 Wrap a second layer, then test your magnet!
8 Wrap a third layer, then test your magnet!
9 Wrap until both wires are the same length, then test it!
Layer 2
Layer 3
Layer 4
How many nuts can you grab now?
How many nuts can you grab now?
How many nuts can you grab now?
Both wires about 65 cm (25 in)
You’re ready to make an arm for your electromagnet!
Want to learn more about magnets? Download the Magnetic Materials Lab at teachergeek.com/pickupstick Ages 8+

Page 6
10 Attach two strips with two 25 mm (1 in) screws.
11
Make The Arm
Attach the electromagnet using a nut and a 25 mm (1 in) screw.
12
Attach the battery holder using two Mini Hub Screws.
Start both screws first, then tighten.
Screw 25 mm (1 in)
Nut
Optional: to tighten the nut
Test it out! Next, you’re going to add a switch.
Tip
Page 7
Off
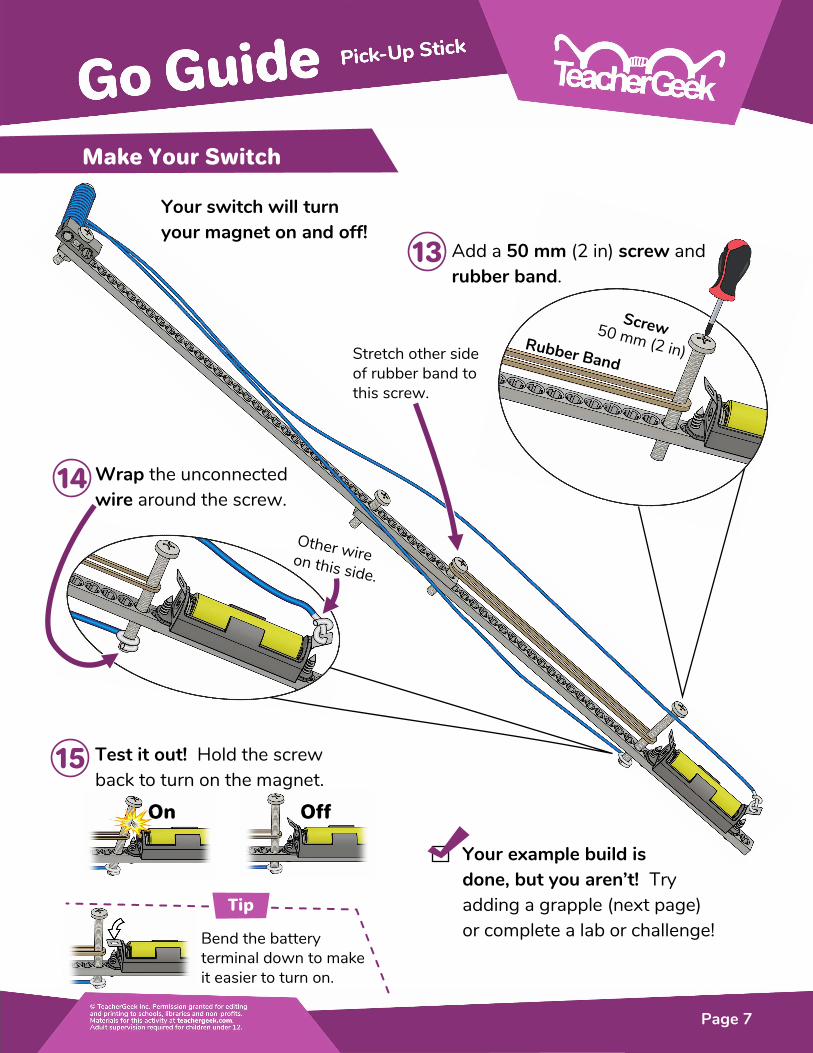
Make Your Switch
Add a 50 mm (2 in) screw and rubber band.
13
Wrap the unconnected wire around the screw.
14
Your switch will turn your magnet on and off!
Stretch other side of rubber band to this screw.
Bend the battery terminal down to make it easier to turn on.
On
Tip
Test it out! Hold the screw back to turn on the magnet.
15
Your example build is done, but you aren’t! Try adding a grapple (next page) or complete a lab or challenge!

Page 8
Add a Grapple
Grapples let you grab non-magnetic objects.
Grapple Idea #1
Grapple Idea #2
The strip moves when you pull the string.
The magnet moves when you pull the string.
Half Strip
These grapple ideas just get you started – you can make better ones. Tinker and experiment to make your own unique grapples!
You can cut or snap full strips to make half strips.
Tip

Page 9
Want more challenges? Download them at teachergeek.com/pickupstick
Space Mining Challenge
Crust Mantle Iron Core
Layers of 4-Vesta, a large asteroid in our solar system.
Redesign your crane to mine minerals from asteroids! Load the most minerals in the spacecraft to win!
Setup instructions on the gameboards. (Pages 10 & 12)
Smash through the crust (optional), gather minerals, and place them in the spacecraft to ship back to Earth!
(rules and limits for your design) Constraints
1. Bowl and game boards cannot be moved once the challenge begins
2. No body parts above gameboards
3. You have 2 minutes to per challenge attempt (you can retry it and change your design)

Page 10
Bowl Here
Iron (15 pieces): spare parts from this activity, or paperclips, etc.
Space Gems (optional; 5 pieces): small candies or crumpled colored paper, etc. (can’t be magnetic)
Mantle Material (enough to bury iron/gems): rice, beans, or pieces of crumpled paper, etc.
Crust (optional): stretch aluminum foil across top (add layers for greater challenge)
Challenge Rules
1. You cannot move bowl, or game boards once challenge begins
2. No body parts above gameboards
3. You have 2 minutes to complete challenge
Add These to the Bowl and Mix:
Page 10

Page 11
[back of game board]

Page 12
+2 points each screw/nut/paperclip
+6 points each gem
+8 points each nut
(stacking is ok)
Criteria: (what your crane must do)
Only add points for materials entirely inside the correct compartment.
-2 Points for each piece of material that doesn’t belong in the compartment (including mantle pieces)
-2 Points for each piece of material that’s not entirely in a compartment
Page 12

Page 13
[back of game board]