yoshi air water system -...
TRANSCRIPT

Leggere sempre le istruzioni prima dell'installazione Always read the instructions before the installation
Al termine dell’installazione, far sempre eseguire il primo avviamento dal Centro di Assistenza Tecnica Autorizzato AISIN di zona.
After the installation, always call the local AISIN Authorised Service Centre to perform the outdoor and indoor units commissioning.
YOSHI®AWS E1/E1J Yoshi Air Water System
MANUALE DI INSTALLAZIONE – INSTALLATION MANUAL 8-10-13-16-20-25 HP
Italia
noEn
glis
h
AWSMAN–E1/E1J–1309 IT EN


DICHIARAZIONE CE DI CONFORMITA’ CE DECLARATION OF CONFORMITY Dati identificativi del fabbricante: Identification of the manufacturer: Tecnocasa s.r.l. Sede legale: Via Manzoni, 17 60025 Loreto (AN) Italia Dichiara che l’insieme per la macchina YOSHI AWS (Air Water System) Declare that the assembly for the YOSHI AWS (Air Water System) unit: Modelli: Matricola: vedi targa dati Anno di costruzione: vedi targa Models: Serial n°: see product label Year of construction: see product label È conforme ai requisiti essenziali di sicurezza delle seguenti direttive: Is compliant to the essential safety requirement of the following directives:
DIRETTIVA PED 97/23/CE e successive modifiche – Cat. Rischio I° – (PED DIRECTIVE 97/23/CE and subsequent modification – Cat. Risk I°–)
DIRETTIVA MACCHINE 2006/42/CE e successive modifiche (MACHINE DIRECTIVE 2006/42/CE and subsequent modification)
DIRETTIVA BASSA TENSIONE LVD 2006/95/CE e successive modifiche
( LOW VOLTAGE DIRECTIVE LVD 2006/95/CE and subséquent modification)
DIRETTIVA COMPATIBILITA’ ELETTROMAGNETICA EMC 2004/108/CE e successive modifiche (ELECTROMAGNETIC COMPATIBILITY DIRECTIVE EMC 2004/108/CE and subsequent modification)
Rappresentante Legale (the Legal Representative)
Deu
tsch
AWS08HP E1/E1J AWS10HP E1/E1J AWS13HP E1/E1J AWS16HP E1/E1J AWS20HP E1/E1J AWS25HP E1/E1J

4
Modelli Capacità nominale(kW)
AWS RAFFREDDAMENTO RISCALDAMENTO
8 HP 21,0 23,5
10 HP 26,5 30,0
13 HP 33,5 37,5
16 HP 41,0 47,5
20 HP 52,0 60,0
Serie E1/E1J
25 HP 63,5 75,0
Precauzioni di sicurezza I simboli seguenti sono usati per evidenziare le indicazioni importanti di questo manuale. Bisogna sempre leggere,capire e seguire tutte le informazioni.
ATTENZIONE Il non rispetto delle prescrizioni indicate con questo simbolo potrebbe
causare gravi danni a persone o cose.
AVVERTENZA Il non rispetto delle prescrizioni indicate con questo simbolo potrebbe
causare danneggiamenti dell’unità.
Questo simbolo indica una azione proibita.
Questo simbolo indica una azione necessaria.
Avviso per l’installatore
ATTENZIONE
Questa unità deve essere installata da personale specializzato. L'installazione deve essere eseguita in accordo con il contenuto del manuale. Se l'unità non è installata in modo corretto possono esserci seri problemi quali: perdita d'acqua, shock elettrici e/o incendi, ecc.
Questo manuale contiene le prescrizioni tecniche e le procedure per la corretta installazione dell'unità AWS YOSHI ed è rivolto a personale tecnico che abbia già una minima conoscenza degli impianti a pompa di calore a gas. Il non rispetto delle procedure riportate nel manuale può causare malfunzionamenti o danni all’unità. È necessario leggere e capire totalmente il contenuto di questo manuale prima di iniziare l'installazione dell'unità AWS YOSHI.
Al termine dell’installazione, far sempre eseguire il primo avviamento dal Centro di Assistenza Tecnica Autorizzato AISIN di zona.
YOSHI®AWS E1/E1J Yoshi Air Water System
AWS MANUALE DI INSTALLAZIONE 8 HP-10 HP-13 HP-16 HP-20 HP-25 HP
Deu
tsch
5
INDICE
Caratteristiche tecniche
1 Dati tecnici e caratteristiche unità AWS ..................................................................................... 6
1.1 Norme generali per l’installazione ...................................................................................... 6 2 Prima dell’installazione ........................................................................................................... 7
2.1 Accessori in dotazione........................................................................................................ 7 2.2 Materiali da procurarsi ........................................................................................................ 7
3 Utilizzo di miscela acqua glicole ............................................................................................ 8 Installazione unità AWS 4 Installazione ............................................................................................................................. 8
4.1 Scelta del luogo .................................................................................................................. 8 4.2 Dimensioni esterne, attacchi idraulici e frigoriferi ............................................................... 9 4.3 Spazi per l’installazione .................................................................................................... 10
5 Linee frigorifere ..................................................................................................................... 11 5.1 Schema funzionale linee frigorifere .................................................................................. 11 5.2 Specifiche delle tubazioni ................................................................................................. 12 5.3 Carica aggiuntiva gas refrigerante.................................................................................... 13
6 Circuito frigorifero e circuito idraulico ................................................................................ 14 6.1 Modalità raffreddamento................................................................................................... 14 6.2 Modalità riscaldamento..................................................................................................... 14
Collegamenti elettrici, accessori e controllo 7 Collegamenti elettrici ............................................................................................................ 15
7.1 Collegamento elettrico con unità esterna GHP ................................................................ 15 7.2 Schema dettagliato dei collegamenti elettrici ................................................................... 16
8 Accessori modulo idronico .................................................................................................. 17 8.1 “Controller Plus”: Pannello di Controllo e Sonda Serbatoio di Accumulo ......................... 17
8.1.1. Pannello di controllo............................................................................................................................... 17 8.1.2. Sonda serbatoio di accumulo.................................................................................................................. 17
8.2 Sonda temperatura esterna.............................................................................................. 17 9 Pannello di controllo ............................................................................................................. 18 10 Regolazione del Modulo Idronico ........................................................................................ 19
10.1 Pannello di controllo...................................................................................................... 19 10.2 Impostazione dell’offset ................................................................................................ 20
11 Schemi di impianto................................................................................................................ 21 11.1 Impianto con accumulo centrale ................................................................................... 21 11.2 Impianto con separatore idraulico................................................................................. 21 11.3 Impianto ad anello......................................................................................................... 21 11.4 Centrale termo / frigorifera AWS E1 ............................................................................. 22 11.5 Centrale termo / frigorifera AWS E1 contabilizzazione consumi.................................. 23 11.6 Centrale termo / frigorifera AWS E1J a portata variabile senza disgiuntore idraulico (U.T.A.) ............... 24 11.7 Centrale termo / frigorifera AWS E1J a portata variabile con disgiuntore idraulico (fan coil .................. 25
12 Diagnosi delle anomalie (riferimento).................................................................................. 26 Tecnocasa S.p.A. declina ogni responsabilità per qualsiasi danno dovuto ad un uso improprio dell’unità, o ad una lettura parziale o superficiale delle informazioni contenute in questo manuale. Le specifiche, i disegni e le informazioni nel presente manuale possono variare senza preavviso. D
euts
ch

6
Tutte le Versioni AWS
8HP-E1 (E1J)
AWS 10HP-E1
(E1J)
AWS 13HP-E1
(E1J)
AWS 16HP-E1
(E1J)
AWS 20HP-E1
(E1J)
AWS 25HP-E1
(E1J) Codice Potenza unità esterna GHP collegata P224 P280 P355 P450 P560 P710
Capacità di raffreddamento nominale∗ kW 21,0 26,5 33,5 41,0 52,0 63,5 Temperatura dell’acqua out - [in] °C 7 – [11] 7 – [12] 7 – [12] 7 – [12] 7 – [12] 7 – [12]
Capacità di riscaldamento nominale ∗∗ kW 23,5 30,0 37,5 47,5 60,0 75,0 Temperatura dell’acqua out - [in] °C 45,5– [41] 45,5 – [40] 45,5 –[40] 45,5 – [40] 45,5 – [40] 45,5 – [40]
Portata m3/h 4,5 4,5 6,0 7,5 9,5 12,0 Modulazione potenza in raffreddamento (min-max) kW 10,0-21,0 10,0-26,5 10,0-33,5 17,0-41,0 17,0-52,0 17,0-63,5 Modulazione potenza in riscaldamento (min-max) kW 13,0-23,5 12,0-30,0 12,0-37,5 19,8-47,5 19,8-60,0 19,8-75,0
Alimentazione∗∗∗ V/Ph/Hz 230/1/50 Potenza elettrica kW 0,84 1,1
Corrente di spunto A 10 Versione con Pompa
(AWS E1 ) Prevalenza disponibile kPa 80 80 60 100 80 60
Alimentazione V/Ph/Hz 230/1/50 Versione senza Pompa
(AWS E1J) Corrente di spunto A 1,5 Perdita di carico scambiatore a piastre kPa 33 33 46 22 33 46
Attacchi idraulici Inch 2 (In ogni unità AWS sono inseriti nipless da 2” per il collegamento idraulico) Circuito
idraulico Diametro tubazioni circuito primario Inch
2 o superiori (In ogni unità AWS è inserito un filtro ad Y da 2” da installare sul circuito primario)
Attacchi frigoriferi (gas – liquido) mm 28,6 –12,7 28,6 – 18,0
Circuito frigorifero Diametro tubazioni GHP – AWS
(gas – liquido) mm 19,1 -9,5
∗∗∗∗ (12,7) 22,2 – 9,5∗∗∗∗ (12,7)
25,4 –12,7∗∗∗∗ (15,9)
28,6 – 15,9 ∗∗∗∗ (19,05)
28,6 -15,9 ∗∗∗∗(19,05)
35 – 15,9 ∗∗∗∗(19,05)
Altezza mm 915 Larghezza mm 710 Profondità mm 1020 Dimensioni e peso
Con Pompa /Senza Pompa kg 164/153 204/177
Unità esterne GHP collegabili Ogni unità AWS può essere collegata solo con una unità GHP AISIN ∗ La capacità di raffreddamento è calcolata secondo le seguenti condizioni di prova : temperatura acqua 7°C; temperatura esterna 35°C DB ∗∗ La capacità di riscaldamento è calcolata secondo le seguenti condizioni di prova : temperatura acqua 47°C ; temperatura esterna 7°C DB / 6°C WB ∗∗∗ É disponibile una versione dell’unità con pompa 230V, monofase, 60 Hz, previo ordine specifico. ∗∗∗∗ Se la distanza tra GHP e AWS supera i 40 metri, installare un tubo con il diametro indicato fra parentesi.
1.1 Norme generali per l’installazione
AVVERTENZA
Prevedere sempre l’installazione di valvola di sicurezza e vaso di espansione opportunamente dimensionato, non compresi nell’unità AWS. Qualora il serbatoio di accumulo fosse posizionato più in basso dell’unità AWS, prevedere l’installazione di una valvola jolly sul punto più alto dell’impianto. Il non rispetto di tale prescrizione può causare malfunzionamenti e/o danneggiamento dell’unità.
Prevedere sempre l’installazione di un serbatoio di accumulo, di dimensione adeguata alla capacità dell’unità AWS, munito di tubi antistratificazione. Il non rispetto di tale prescrizione può causare malfunzionamenti e/o danneggiamento dell’unità.
Verificare l’avvenuta installazione del filtro ad Y (fornito in dotazione) sulla tubazione di ritorno all’unità AWS del circuito primario. Nel caso di impianti multi unità, installare un filtro ad Y per ogni unità AWS. Il filtro deve essere posizionato a non meno di 50 cm dall’aspirazione della pompa. Il non rispetto di tali prescrizioni comporta la cessazione immediata della garanzia e può causare malfunzionamenti e/o danneggiamento dell’unità.
1 Dati tecnici e caratteristiche unità AWS

7
2.1 Accessori in dotazione I seguenti accessori sono forniti in dotazione con l’unità AWS YOSHI. Nome
Manuale installazione
Schema quadro elettrico
Filtro ad Y da 2” per tubo acqua [guarnizioni]
Nipless ottone da 2” [guarnizioni] ove previste
Quantità 1 1 1 - [2] 2 - [2] Dove si
trova All’interno del
pannello di controllo Nel vano principale vicino agli attacchi idraulici
Note Avere sempre cura dei libretti in dotazione
Per la corretta installazione fare riferimento all’apposita sezione del manuale
2.2 Materiali da procurarsi I seguenti materiali sono necessari per una corretta installazione dell’AWS YOSHI.
Materiale Applicazione Prigionieri Fissaggio a terra unità AWS(M8X4)
Dadi e rondelle Fissaggio a terra unità AWS (φ8X4)
Tappetino antivibrante Montaggio unità su strutture metalliche o a tetto
Tubazioni e raccordi in rame per climatizzazione
Realizzazione linee frigorifere (per materiali e procedure riferirsi al manuale di installazione dell’unità esterna GHP)
Tubazioni e raccordi in acciaio per acqua
Realizzazione linea idraulica (per materiali e procedure riferirsi all’apposita sezione del presente manuale)
Isolamento termico Per rivestimento tubi gas refrigerante e tubi acqua
Cavi elettrici Alimentazione unità AWS, collegamenti a terra, collegamento segnali ed accessori (per sezioni e tipi di cavi riferirsi all’apposita sezione del manuale installazione GHP)
Gas refrigerante R410A, bilancia di precisione e manometri
Carica integrativa circuito frigorifero (per il calcolo delle carica integrativa riferirsi all’apposita sezione del presente manuale)
Kit per saldatura ossiacetilenica
Bombole, lancia e bacchette di materiale d’apporto per saldare le tubazioni frigorifere
Bombola Azoto Esecuzione prova di tenuta (per le procedure riferirsi all’apposita sezione del manuale installazione GHP)
Pompa del vuoto Depressurizzazione circuito frigorifero (per le procedure riferirsi all’apposita sezione del manuale installazione GHP)
Tagliatubi realizzazione tubazioni dell’impianto frigorifero
ATTENZIONE
Non utilizzare materiali diversi da quelli specificati nel presente manuale. Il non rispetto di tale prescrizione potrebbe causare danni gravi alle persone o all’unità stessa.
Realizzare l’impianto in conformità con le normative vigenti nel luogo di installazione. Il non rispetto di tale prescrizione potrebbe costituire reato. Realizzare l’impianto in conformità con tutte le prescrizioni del presente manuale. Il non rispetto di tale prescrizione comporta la cessazione immediata della garanzia.
2 Prima dell’installazione

8
Utilizzare miscele di acqua e liquidi antigelo per abbassare il punto di congelamento dell’acqua. Il liquido maggiormente usato come anticongelante è il glicole etilico. La tabella riporta i fattori di riduzione della potenza frigorifera e della portata della pompa del modulo idronico in funzione della temperatura dell’acqua e della percentuale in peso di glicole nella miscela.
Acqua Glicole Fattore di riduzione della potenza frigorifera
Fattore di riduzione della portata pompa
°C % kg - - -2 5 0,995 0,99 -4 10 0,990 0,98 -6 15 0,985 0,96 -9 20 0,980 0,94
-12 25 0,975 0,92 -15 30 0,970 0,90 -19 35 0,965 0,88 -23 40 0,960 0,86 -29 45 0,955 0,83 -35 50 0,950 0,80
4.1 Scelta del luogo
ATTENZIONE
• L’unità NON DEVE essere installata in un’area dove sostanze volatili ed infiammabili siano prodotte, accumulate o maneggiate. Il non rispetto di tale prescrizione potrebbe causare danni gravi alle persone, incendi ed esplosioni.
• L’unità può essere installata sia all’aperto che al chiuso. Leggere attentamente il presente manuale per posizionare correttamente l’unità e garantire pertanto il corretto accesso alle parti interne.
• Se l’unità dovesse essere posizionata sul tetto di un edificio, assicurarsi di disporre di un accesso adatto e di installare dispositivi anticaduta come barriere e ringhiere.
• Installare sempre l'unità in una zona dove il suo normale rumore di funzionamento e le piccole vibrazioni
non causino disturbo ai vicini, specialmente nelle aree residenziali. Fare riferimento alle normative locali vigenti ove previsto.
• Installare l'unità in un luogo dove non si verifichi accumulo di acqua piovana. Prevedere opportuni drenaggi.
• Installare l'unità in un luogo dove non sia esposta a forti venti. Prevedere opportuni ancoraggi. • Per prevenire interferenze con altri dispositivi, posizionare l’unità AWS a debita distanza da
apparecchiature elettriche quali televisioni, computer, telefoni, antenne, ecc. • Qualora l'unità esterna fosse installata in una zona con abbondanti nevicate, prevedere la realizzazione
di una copertura antineve ed assicurarsi anche che il basamento sia abbastanza alto da non essere coperto dalla neve accumulata.
• Assicurarsi che il luogo di installazione sia sempre agevolmente accessibile in caso di manutenzione.
3 Utilizzo di miscela acqua glicole
4 Installazione

9
4.2 Dimensioni esterne, attacchi idraulici e frigoriferi
La tabella seguente riporta i diametri degli attacchi idraulici, frigoriferi, i diametri delle tubazioni e la loro posizione nei vari modelli di modulo idronico.
DATI TECNICI
Attacchi idraulici Inch 2
Tubazioni idrauliche circuito primario Inch
φ 2 o superiori Per alcune tipologie di impianto è necessario prevedere giunti antivibranti all’uscita dell’unità.
Il filtro ad Y in dotazione deve sempre essere installato ad almeno 50 cm di distanza dall’unità
(8 – 10 – 13) HP (16 – 20 – 25) HP Liquido Gas Liquido Gas Attacchi frigoriferi mm 12,7 28,6 18,0 28,6
8 HP 10 HP 13 HP 16 HP 20 HP 25 HP Liq. Gas Liq. Gas Liq. Gas Liq. Gas Liq. Gas Liq. Gas Tubazioni frigorifere
GHP – AWS mm 9,5 19,1 9,5 22,2 12,7 25,4 15,9 28,6 15,9 28,6 15,9 35,0
Liquido (16-20-25) HP (8-10-13) HP Gas (16-20-25) HP (8-10-13) HP
Acqua (8-10-13-16-20-25) HP
A B C D E Posizione attacchi frigoriferi e idraulici
mm 130 210 290 375 525
Dimensioni (L - A - P) mm 710 -915 -1020
A
B
C
D
E
VISTA FRONTALEVISTA LATERALE
915
710
1020
940
YOSHI
450
VISTA POSTERIORE
710
450
Liq.Gas Acqua
Deu
tsch

10
4.3 Spazi per l’installazione
Gli spazi minimi necessari per controlli e manutenzione sono indicati nelle tabelle sottostanti
Prevedere sempre ampi spazi per controlli e manutenzione delle tubazioni del refrigerante e dell’acqua.
Vista frontale Vista dall’alto
YOSHI
1 m o più
Lasciare sempre 1 metro o più sopra l’unità AWS
<Installazione singola >
Lasciare sempre almeno 500 mm sul lato destro
(AWS visto dal lato attacco tubi). <Installazione di più unità sovrapposte>
YOSHI
YOSHI
Acqua
Acqua
Quando le unità vengono
sovrapposte, posizionare le tubazioni dell’unità superiore in modo che sia
possibile smontare i pannelli dell’unità inferiore.
<Installazione di più unità affiancate>
Lasciare sempre almeno 500 mm sul lato destro
(AWS visto dal lato attacco tubi).
AVVERTENZA
Gli spazi minimi di installazione indicati sono necessari a garantire la corretta circolazione d’aria, il controllo e la manutenzione dell’unità AWS. Il non rispetto di tale prescrizione può causare lesioni personali al manutentore o malfunzionamenti dell’unità. Quando più unità sono installate nello stesso luogo, verificare che tutte siano facilmente accessibili e che le operazioni di manutenzione non siano ostacolate da pareti, tubazioni od altri oggetti. Gli spazi di manutenzione minimi sono indicati nella tabella sottostante.

11
5.1 Schema funzionale linee frigorifere
5 Linee frigorifere
ATTENZIONE
Tutte le saldature delle linee frigorifere AWS – GHP devono essere realizzate in conformità con quanto prescritto nel manuale di installazione dell’unità esterna GHP AISIN (saldatura in atmosfera controllata con azoto). Il non rispetto di tale prescrizione comporta la cessazione immediata della garanzia e può causare malfunzionamenti dell’unità.
Deu
tsch

12
5.2 Specifiche delle tubazioni
ATTENZIONE
Gli attacchi delle tubazioni frigorifere dell’unità AWS YOSHI hanno diametri differenti da quelli prescritti per le tubazioni di collegamento con l’unità esterna GHP AISIN. È pertanto necessario utilizzare opportuni adattatori (non in dotazione).
Per il corretto dimensionamento delle linee frigorifere fare riferimento alla tabella sottostante.
Dati d’impianto Diametro x Spessore (mm) Dislivello max. (m) Unità
AWS YOSHI GHP AISIN Gas Liquido Liquido (*)
Lunghezza max. Consentita (m)
(equivalente/effettiva) GHP
a terra GHP
a tetto
Olio compressore
[8 HP] 19,1x1,0 9,5x1,0 12,7x1,0 [10 HP] 22,2x1,0 9,5x 1,0 12,7x1,0 [13 HP] 25,4x1,0 12,7x1,0 15,9x1,0 [16 HP] 28,6x1,5 15,9x1,0 19,05x1,0 [20 HP] 28,6x1,5 15,9x1,0 19,05x1,0
GHP Multi Type AWS E1/E1J
[25 HP] 35,0x1,5 15,9x1,0 19,05x1,0
70/60 20 25 NL10
(*) Se la distanza tra GHP e AWS supera i 40 metri utilizzare un tubo del liquido di diametro maggiore come indicato in tabella. La linea frigorifera principale per l’unità AWS YOSHI deve essere realizzata rispettando le prescrizioni sotto riportate
Esempio di collegamento (Mostra il caso di 1 AWS collegato) In presenza di dislivello tra l’unità esterna e le unità interne inserire
nell’impianto una trappola per l’olio a collo d’oca sul tubo gas, almeno
ogni 10m di dislivello.
10 m
A
L
Unità esterna
f
AWS
H
Tubazioni Massima lunghezza della tubazione (L) (Equivalente/Effettiva) L = A 70/60m o meno
Installazione GHP a tetto 25 m o meno Dislivelli Dislivello tra unità esterna e unità interna (H) Installazione GHP a terra 20 m o meno
AVVERTENZA
Il collegamento misto di unità interne per espansione diretta ed AWS YOSHI ad una singola unità esterna non è consentito. L’unità AWS YOSHI può essere collegato esclusivamente ad una unità esterna GHP AISIN specifica per AWS di pari capacità.
ATTENZIONE
• Non superare mai le distanze prescritte quando si vuole collegare il modulo idronico AWS
YOSHI alla GHP AISIN. Il non rispetto di tale prescrizione comporta la cessazione immediata della garanzia e può causare malfunzionamenti dell’unità esterna GHP AISIN.

13
5.3 Carica aggiuntiva gas refrigerante
ATTENZIONE
Misurare accuratamente la lunghezza della tubazione del liquido e caricare con la quantità esatta di gas refrigerante. Il non rispetto di tale prescrizione può comportare malfunzionamenti dell’unità. Mentre si carica il gas refrigerante, indossare dei guanti di protezione idonei. Una fuoriuscita di gas, a contatto con la pelle, può provocare ustioni da freddo.
• Caricare sempre l’impianto quando il refrigerante si trova in fase liquida nella bombola. In caso
contrario la composizione del refrigerante può cambiare e quindi causare un calo delle prestazioni e danni all’unità.
• Usare sempre una bilancia per pesare la bombola di gas refrigerante. L’utilizzo di un cilindro di carica può causare cambiamenti nella composizione del refrigerante e quindi malfunzionamenti dell’unità.
• Per evitare contaminazioni con altri tipi di oli, accertarsi di usare utensili separati per ogni tipo di gas refrigerante. In particolare usare raccordi e tubi di collegamento tra bombola e impianto specifici per R410A.
Dopo aver verificato la carica iniziale sulla targa dati della GHP AISIN, determinare per mezzo della seguente formula, in base alla sezione e alla lunghezza delle tubazioni, la quantità di gas refrigerante da aggiungere. Considerare soltanto la lunghezza delle tubazioni del liquido Carica extra (kg) = (L0 x 0.250) + (L1 × 0.170) + (L2 × 0.110) + (L3 × 0.054) + QAWS
Il valore della quota variabile Q dipende dalla capacità dell’unità esterna GHP connessa con l’unità AWS YOSHI. Riferirsi alla tabella sottostante
Unità esterna Tipologia di impianto Valore Q (kg)
8 – 10 – 13 HP QAWS 0
16 – 20 – 25 HP QAWS + 1,5
AVVERTENZA
La carica aggiuntiva di gas refrigerante deve essere realizzata in conformità con quanto prescritto nel manuale di installazione dell’unità esterna GHP AISIN. Il non rispetto di tale prescrizione comporta la cessazione immediata della garanzia e può causare malfunzionamenti dell’unità.
L0: Lunghezza (m) delle tubazioni del liquido Ø 19.0 L1: Lunghezza (m) delle tubazioni del liquido Ø 15.9 L2: Lunghezza (m) delle tubazioni del liquido Ø 12.7 L3: Lunghezza (m) delle tubazioni del liquido Ø 9.52
Deu
tsch
14
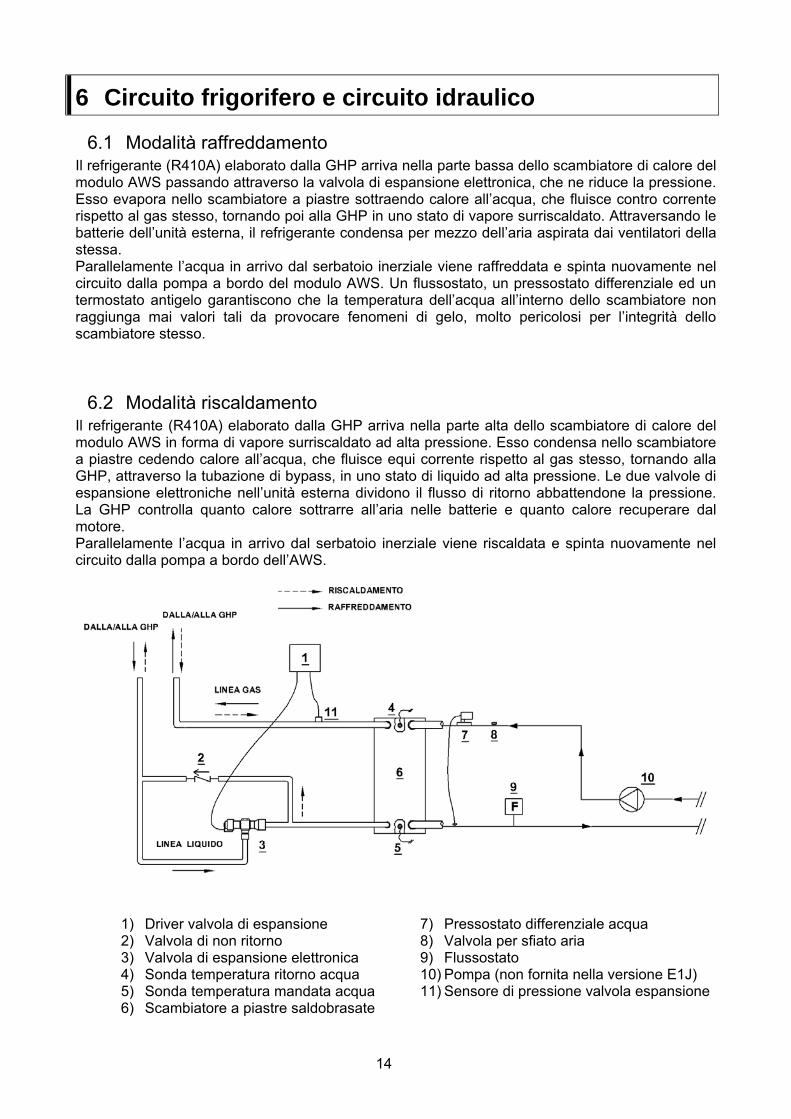
6.1 Modalità raffreddamento Il refrigerante (R410A) elaborato dalla GHP arriva nella parte bassa dello scambiatore di calore del modulo AWS passando attraverso la valvola di espansione elettronica, che ne riduce la pressione. Esso evapora nello scambiatore a piastre sottraendo calore all’acqua, che fluisce contro corrente rispetto al gas stesso, tornando poi alla GHP in uno stato di vapore surriscaldato. Attraversando le batterie dell’unità esterna, il refrigerante condensa per mezzo dell’aria aspirata dai ventilatori della stessa. Parallelamente l’acqua in arrivo dal serbatoio inerziale viene raffreddata e spinta nuovamente nel circuito dalla pompa a bordo del modulo AWS. Un flussostato, un pressostato differenziale ed un termostato antigelo garantiscono che la temperatura dell’acqua all’interno dello scambiatore non raggiunga mai valori tali da provocare fenomeni di gelo, molto pericolosi per l’integrità dello scambiatore stesso.
6.2 Modalità riscaldamento Il refrigerante (R410A) elaborato dalla GHP arriva nella parte alta dello scambiatore di calore del modulo AWS in forma di vapore surriscaldato ad alta pressione. Esso condensa nello scambiatore a piastre cedendo calore all’acqua, che fluisce equi corrente rispetto al gas stesso, tornando alla GHP, attraverso la tubazione di bypass, in uno stato di liquido ad alta pressione. Le due valvole di espansione elettroniche nell’unità esterna dividono il flusso di ritorno abbattendone la pressione. La GHP controlla quanto calore sottrarre all’aria nelle batterie e quanto calore recuperare dal motore. Parallelamente l’acqua in arrivo dal serbatoio inerziale viene riscaldata e spinta nuovamente nel circuito dalla pompa a bordo dell’AWS.
6 Circuito frigorifero e circuito idraulico
1) Driver valvola di espansione 2) Valvola di non ritorno 3) Valvola di espansione elettronica 4) Sonda temperatura ritorno acqua 5) Sonda temperatura mandata acqua 6) Scambiatore a piastre saldobrasate
7) Pressostato differenziale acqua 8) Valvola per sfiato aria 9) Flussostato 10) Pompa (non fornita nella versione E1J) 11) Sensore di pressione valvola espansione

15
7.1 Collegamento elettrico con unità esterna GHP Il tipo di alimentazione viene sempre indicato sulla targa dati. Controllare sempre quale tipo di alimentazione è necessaria per il corretto funzionamento dell’AWS YOSHI. Realizzare i collegamenti elettrici come descritto al paragrafo.
ATTENZIONE
• MAI collegare l’unità AWS YOSHI ad una linea elettrica condivisa con altre
apparecchiature. Utilizzare una linea elettrica dedicata munita di interruttore magnetotermico differenziale. Il non rispetto di tale prescrizione può causare malfunzionamenti dell’unità e pericolo per le persone e/o cose.
• MAI collegare i cavi di terra a tubazioni di acqua o gas ed ai parafulmini. • MAI alimentare elettricamente l’unità prima del collaudo finale che deve essere sempre
eseguito dal Centro di Assistenza Tecnica Autorizzato AISIN. Il non rispetto di tale prescrizione può causare danni irreversibili all’unità e comporta la cessazione immediata della validità della garanzia.
• Tutte le connessioni elettriche devono essere eseguite da personale tecnico specializzato, in conformità con le normative vigenti. Una dichiarazione di conformità dell’impianto elettrico deve essere rilasciata al termine del lavoro. Il non rispetto di tale prescrizione può causare incendi corto circuiti e danni irreversibili all’unità, oltre a rendere fuori legge l’installazione.
• Interrompere la corrente di rete dal quadro generale o dal contatore durante il collegamento elettrico dell’unità AWS YOSHI.
• Tutti i collegamenti elettrici, compreso quello di terra, devono essere realizzati con cavi di sezione idonea in base alle normative vigenti.
• Verificare sempre sulla targa dati il tipo di alimentazione necessario. Il non rispetto di tale prescrizione può causare danni irreversibili all’unità AWS YOSHI.
I – I: comunicazione unità esterna – AWS. O – O : comunicazione unità esterna – unità esterna (NON DISPONIBILE CON AWS). Q1 – Q2: morsetti presenti solo su GHP (16-20-25) HP. I morsetti possono essere utilizzati solo per l’espansione diretta.
NON ALIMENTARE MAI CON CORRENTE TRIFASE
7 Collegamenti elettrici
16
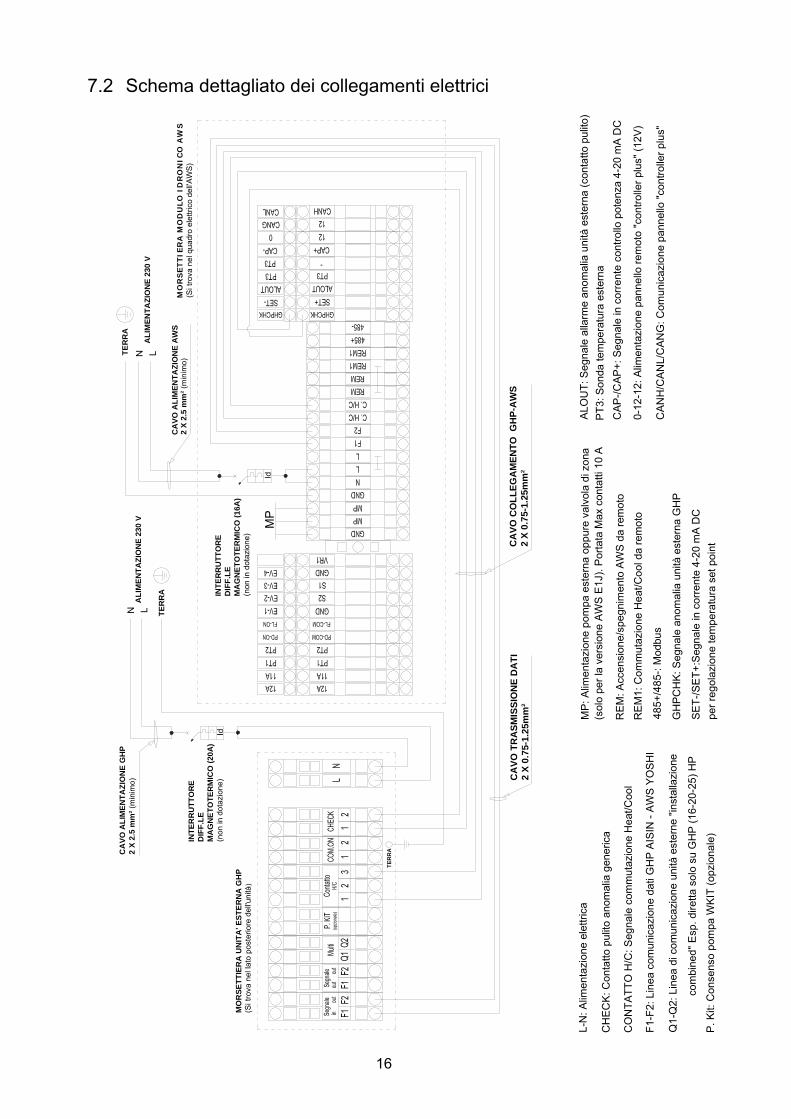
7.2 Schema dettagliato dei collegamenti elettrici
GH
PC
HK
: Seg
nale
ano
mal
ia u
nità
est
erna
GH
P
ALO
UT:
Seg
nale
alla
rme
anom
alia
uni
tà e
ster
na (c
onta
tto p
ulito
)P
T3: S
onda
tem
pera
tura
est
erna
CA
P-/C
AP
+: S
egna
le in
cor
rent
e co
ntro
llo p
oten
za 4
-20
mA
DC
0-12
-12:
Alim
enta
zion
e pa
nnel
lo re
mot
o "c
ontro
ller p
lus"
(12V
)
CA
NH
/CA
NL/
CA
NG
: Com
unic
azio
ne p
anne
llo "c
ontro
ller p
lus"
MO
RSE
TTIE
RA
UN
ITA
' EST
ERN
A G
HP
(Si t
rova
nel
lato
pos
terio
re d
ell'u
nità
)
ALI
MEN
TAZI
ON
E 23
0 V
CA
VO A
LIM
ENTA
ZIO
NE
AW
S2
X 2.
5 m
m² (
min
imo)
CA
VO A
LIM
ENTA
ZIO
NE
GH
P2
X 2.
5 m
m² (
min
imo)
LN
INTE
RR
UTT
OR
ED
IFF.
LEM
AG
NET
OTE
RM
ICO
(16A
)(n
on in
dot
azio
ne)
INTE
RR
UTT
OR
ED
IFF.
LEM
AG
NET
OTE
RM
ICO
(20A
)(n
on in
dot
azio
ne)
MO
RS
ETT
IER
A M
OD
ULO
ID
RO
NIC
O A
WS
(Si t
rova
nel
qua
dro
elet
trico
del
l'AW
S)
CA
VO T
RA
SMIS
SIO
NE
DA
TI2
X 0.
75-1
.25m
m²
CA
VO C
OLL
EGA
MEN
TO G
HP-
AW
S2
X 0.
75-1
.25m
m²
L-N
: Alim
enta
zion
e el
ettri
ca
CH
EC
K: C
onta
tto p
ulito
ano
mal
ia g
ener
ica
CO
NTA
TTO
H/C
: Seg
nale
com
mut
azio
ne H
eat/C
ool
F1-F
2: L
inea
com
unic
azio
ne d
ati G
HP
AIS
IN -
AW
S Y
OS
HI
Q1-
Q2:
Lin
ea d
i com
unic
azio
ne u
nità
est
erne
"ins
talla
zion
e
SE
T-/S
ET+
:Seg
nale
in c
orre
nte
4-20
mA
DC
RE
M1:
Com
mut
azio
ne H
eat/C
ool d
a re
mot
o
RE
M: A
ccen
sion
e/sp
egni
men
to A
WS
da
rem
oto
per r
egol
azio
ne te
mpe
ratu
ra s
et p
oint
485+
/485
-: M
odbu
s
MP
: Alim
enta
zion
e po
mpa
est
erna
opp
ure
valv
ola
di z
ona
(sol
o pe
r la
vers
ione
AW
S E
1J).
Por
tata
Max
con
tatti
10
A
MP
com
bine
d" E
sp. d
iretta
sol
o su
GH
P (1
6-20
-25)
HP
P. K
it: C
onse
nso
pom
pa W
KIT
(opz
iona
le)
ALI
MEN
TAZI
ON
E 23
0 V
LN
TER
RA
TER
RA
TER
RA
Deu
tsch

17
8.1 “Controller Plus”: Pannello di Controllo e Sonda Serbatoio di Accumulo
8.1.1. Pannello di controllo Pannello di controllo per la gestione a distanza del modulo idronico con il quale è possibile il controllo e la gestione di un solo modulo da postazione remota. Il cavo schermato di collegamento del pannello al modulo può avere una lunghezza massima di 60 metri. Il pannello consente di controllare e modificare i parametri di funzionamento del modulo (per informazioni dettagliate riguardo la gestione del modulo con il pannello remoto, consultare il “service manual” dell’AWS).
8.1.2. Sonda serbatoio di accumulo La sonda consente di arrestare la pompa del modulo idronico al raggiungimento della temperatura di set point. Deve essere installata sul serbatoio di accumulo e collegata al modulo idronico come mostrato nel disegno. Nota: Attenzione collegare i fili rispettando il colore dei cavi come mostrato nel disegno in basso.
8.2 Sonda temperatura esterna La sonda consente la regolazione della temperatura di mandata dell’acqua in funzione della temperatura dell’aria esterna mediante un segnale in corrente 4-20 mA.
8 Accessori modulo idronico

18
ATTENZIONE
• MAI modificare i parametri preimpostati (set point in raffreddamento e riscaldamento) del
termostato acqua. Il non rispetto di tale prescrizione può causare danni irreversibili all’unità e comporta la cessazione immediata della validità della garanzia.
• MAI bypassare le sicurezze interne dell’AWS YOSHI per eseguirne un avviamento forzato. Il non rispetto di tale prescrizione può causare danni irreversibili all’unità e comporta la cessazione immediata della validità della garanzia.
• MAI modificare le impostazioni del controllo remoto installato nel pannello di controllo. Il non rispetto di tale prescrizione può causare malfunzionamenti dell’unità.
• MAI alimentare elettricamente l’unità prima del collaudo finale che deve essere sempre eseguito dal Centro di Assistenza Tecnica Autorizzato AISIN. Il non rispetto di tale prescrizione può causare malfunzionamenti dell’unità e pericolo per le persone e/o cose.
• Le impostazioni di alcuni parametri di funzionamento dell’unità AWS YOSHI possono essere modificate previo richiesta al Centro di Assistenza Tecnica Autorizzato AISIN. Il non rispetto di tale prescrizione comporta la cessazione immediata della validità della garanzia.
• In caso di installazione di più unità è possibile installare un dispositivo esterno opzionale per il controllo della parzializzazione della potenza.
• Il termostato acqua a bordo macchina indica sempre la temperatura di ritorno del circuito primario. NON ABBASSARE MAI IL SET POINT AL DI SOTTO DI 8°C.
Il quadro elettrico dell’AWS YOSHI è rappresentato in figura. Nel caso di anomalia dell’unità esterna GHP AISIN, il codice di allarme relativo all’anomalia viene visualizzato sul display del controllo remoto. Verificare la tipologia di allarme sul manuale di installazione della GHP AISIN
I valori preimpostati per i set point del termostato sono: - Modalità raffreddamento: T set freddo = 8°C - Modalità riscaldamento: T set caldo = 44°C
L’unità AWS YOSHI è dotata dei seguenti dispositivi di sicurezza: - Pressostato differenziale: interviene fermando l’unità GHP AISIN in caso di mancato salto di
pressione tra ingresso ed uscita pompa. - Flussostato: interviene fermando l’unità GHP AISIN quando la circolazione di acqua nel
circuito primario è insufficiente. - Termostato antigelo: In estate interviene fermando l’unità GHP AISIN quando la temperatura
dell’acqua nel circuito primario scende sotto a + 5 °C. In inverno interviene se la temperatura dell’acqua scende sotto a + 5 °C avviando prima la pompa e poi, se necessario, la GHP.
- Interruttore sovraccarico pompa: interviene fermando la pompa dell’unità AWS YOSHI in caso di surriscaldamento della pompa stessa.
9 Pannello di controllo

19
10.1 Pannello di controllo L’unità AWS YOSHI ha la possibilità di far variare la capacità erogata, in un intervallo compreso tra il 25% ed il 100% della potenza nominale, in funzione della temperatura di ritorno dell’acqua sul circuito primario. La modulazione della capacità viene regolata secondo una banda proporzionale. Sarà sufficiente impostare dal menu utente del pannello di controllo le temperature di set point, ovvero i parametri “Tset” e l’ampiezza della banda proporzionale, ovvero il parametro “Range modulazione”. Man mano che la temperatura di ritorno dell’acqua sul circuito primario si avvicina al set point, la capacità dell’unità viene ridotta del 25%. Una volta raggiunto e superato il set point, il sistema effettua 6 controlli di temperatura consecutivi, ciascuno ogni 10 secondi; la mancata variazione di temperatura nel corso di tali controlli costituisce la condizione di arresto per l’unità. Nel caso in cui sia installato il sistema opzionale “Controller Plus”, una volta raggiunto il set point, la pompa di circolazione del primario si arresta. In caso contrario la pompa di circolazione del primario continua a funzionare, ma il sistema smette comunque di erogare capacità, fermando la GHP AISIN.
Esempio di modulazione in riscaldamento: La temperatura di set point in riscaldamento, ovvero il parametro “Tset caldo”, può variare in un intervallo compreso tra 30°C e 48°C. I valori impostati in fabbrica sono: “Tset caldo” = 44°C; “Range modulazione” = 5°C La tabella sottostante riporta il metodo di variazione della capacità ed un esempio numerico.
Capacità AWS [%]
Tset caldo [°C] Banda [°C] Min. temp. modulaz. [°C]
Temp. Mandata [°C]
100 A - ∆T 75 (A - ∆T) + (∆T •0,25) 50 (A - ∆T) + (∆T • 0,5) 25
A ∆T
(A - ∆T) + (∆T •0,75)
A + 1
Esempio numerico sulla minima temperatura di set point 100 25 75 26,25 50 27,5 25
30 5
28,75
31
Esempio numerico sulla massima temperatura di set point 100 41 75 42,75 50 44,5 25
48 7
46,25
49
10 Regolazione del Modulo Idronico

20
Esempio di modulazione in raffreddamento: La temperatura di set point in riscaldamento, ovvero il parametro “Tset freddo”, può variare in un intervallo compreso tra 6°C e 15°C. I valori impostati in fabbrica sono: “Tset freddo” = 8°C; “Range modulazione” = 5°C La tabella sottostante riporta il metodo di variazione della capacità ed un esempio numerico.
Capacità AWS [%]
Tset freddo [°C] Banda [°C] Max. temp. modulaz. [°C]
Temp. Mandata [°C]
100 A + ∆T 75 (A + ∆T) - (∆T •0,25) 50 (A + ∆T) - (∆T • 0,5) 25
A ∆T
(A + ∆T) - (∆T •0,75)
A - 1
Esempio numerico sulla minima temperatura di set point 100 11 75 9,75 50 8,5 25
6 5
7,25
5
Esempio numerico sulla massima temperatura di set point 100 22 75 20,25 50 18,5 25
15 7
16,75
14
10.2 Impostazione dell’offset L’unità AWS YOSHI permette inoltre di regolare l’offset per la temperatura di set point, ovvero la temperatura di ritorno dell’acqua sul circuito primario alla quale far ripartire la GHP AISIN ed iniziare nuovamente ad erogare potenza. I parametri “Offset Tset” sono modificabili dal menu utente dell’unità (vedi service manual AWS). Nel caso in cui sia installato il sistema opzionale “Controller Plus”, la temperatura del serbatoio di accumulo, misurata dalla sonda attiva in esso istallata costituisce il riferimento per la misura dell’offset, superato il quale la pompa di circolazione del primario viene riattivata. I valori impostati in fabbrica sono: Offset Tset caldo = 2°C Offset Tset freddo = 2°C

21
AVVERTENZA
Gli schemi di impianto sotto riportati rappresentano soluzioni di impianto puramente indicative. Una progettazione attenta da parte di personale qualificato è sempre necessaria. Ulteriori informazioni possono essere ottenute contattando l’ufficio tecnico AISIN oppure visitando il sito web www.aisin.it .
11.1 Impianto con accumulo centrale Questa soluzione è consigliata dal costruttore per ottimizzare il funzionamento dell’unità GHP AISIN nel caso di impianti a fan coil. In questa configurazione, la portata del circuito secondario deve essere sempre minore od uguale a quella del circuito primario. Il serbatoio di accumulo deve essere dotato di tubi anti stratificanti.
11.2 Impianto con separatore idraulico In questa configurazione, verificare che la prevalenza della pompa dell’unità AWS YOSHI sia sufficiente a vincere le perdite di carico del circuito primario. È possibile utilizzare serbatoi di accumulo orizzontali.
11.3 Impianto ad anello Questa configurazione è consigliata dal costruttore nel caso di impianti con Unità di Trattamento Aria (UTA). Verificare tuttavia, che la prevalenza della pompa dell’unità AWS YOHI sia sufficiente a vincere le perdite di carico di tutto il circuito.
11 Schemi di impianto
Deu
tsch

22
11.4 Centrale termo / frigorifera AWS E1

23
11.5 Centrale termo / frigorifera AWS E1 contabilizzazione consumi
Deu
tsch

24
11.6 Centrale termo / frigorifera AWS E1J a portata variabile senza disgiuntore idraulico (U.T.A.)
25
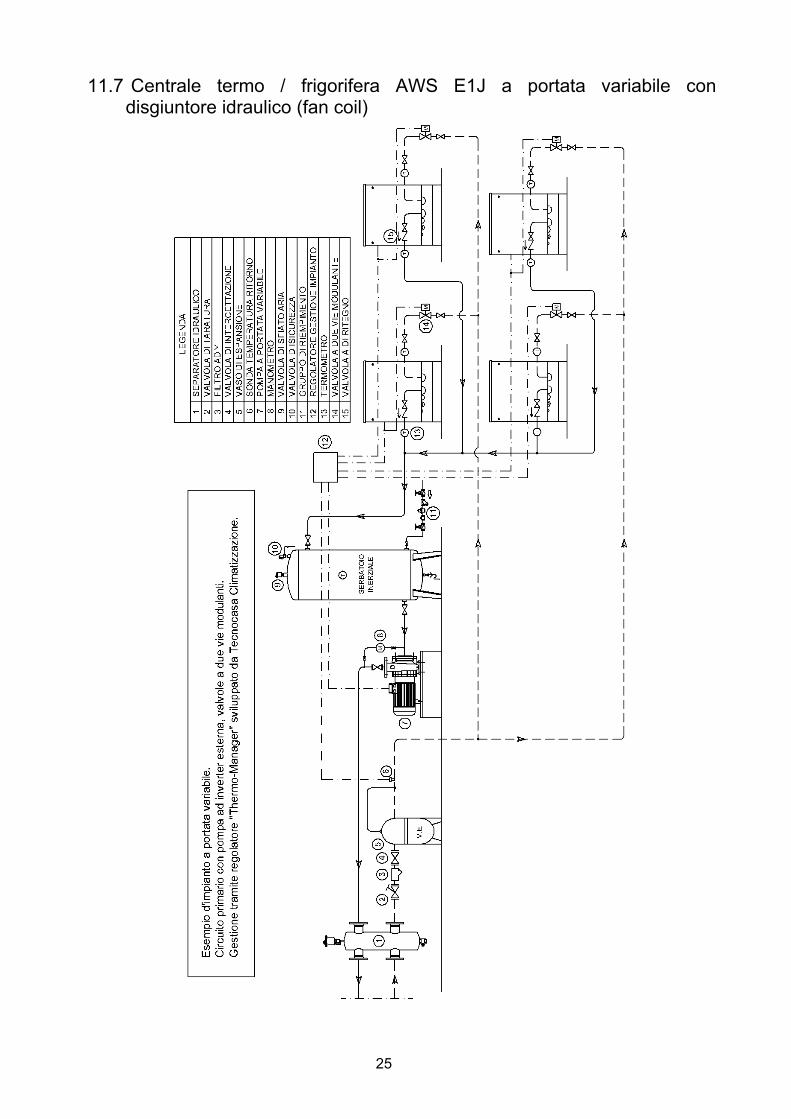
11.7 Centrale termo / frigorifera AWS E1J a portata variabile con disgiuntore idraulico (fan coil)

26
ATTENZIONE
• MAI arrestare il sistema GHP – AWS togliendo alimentazione durante il funzionamento. Il
non rispetto di tale prescrizione può causare danni irreversibili all’unità e comporta la cessazione immediata della validità della garanzia.
• MAI alimentare l’unità AWS YOSHI dopo aver alimentato l’unità esterna. Il non rispetto di tale prescrizione può causare malfunzionamenti dell’unità.
Di seguito sono indicate le possibili anomalie rilevabili direttamente dal pannello di controllo dell’AWS.
TIPO ALLARME CODICE ALLARME POSSIBILI CAUSE CONTROMISURA
Allarme Flussostato A1S1 • Filtro ad Y ostruito • Insufficiente portata
• Pulire filtro ad Y • Controllare la pressione del circuito
idraulico • Controllare il flussostato
Allarme Pressostato Differenziale A2S1
• Aria nell’impianto • Malfunzionamento
pompa
• Rimuovere l’aria • Controllare la pompa • Controllare il press. diff.le (confrontare
lo stato con il flussostato)
Allarme GHP A3S1 • Verificare il codice visualizzato sulla
GHP. Premere UP per gli allarmi in corso e DOWN per quelli in STAND-BY
Allarme Flussostato Manomesso A4S1
• Verificare il cablaggio del flussostato. • Verificare il funzionamento del
flussostato. • Verificare il layout di impianto (altre
pompe fanno circolare acqua quando non previsto
Allarme Antigelo A5S1
• Verificare il funzionamento della pompa, del flussostato e del press. diff.le
• Verificare che i valori di OFFSET in funzionamento estivo non siano eccessivi
• Verificare le sonde di temperatura e il loro cablaggio
Allarme Sonda Temperatura Ritorno A6S1 • Verificare la sonda e il cablaggio
Allarme Sonda Temperatura Antigelo A7S1 • Verificare la sonda e il cablaggio
Allarme Driver Valvola Espansione A8S1
• Utilizzare il display Carel. Premere “help” e verificare quale componente è in allarme
Allarme avviso manutenzione A13S1
La pompa di calore sta per raggiungere le 10.000 ore di funzionamento. Necessità di manutenzione ordinaria.
• Contattare il centro di assistenza tecnica Aisin.
Allarme manutenzione necessaria A14S1
La pompa di calore ha raggiunto le 10.000 ore di funzionamento. Necessità di manutenzione ordinaria.
• Resettare le ore di funzionamento (Vedi service manual pagina 35, paragrafo 13.3 “Reset ore di funzionamento”).
12 Diagnosi delle anomalie (riferimento)

27
Allarme Antigelo notturno A15S1
la temperatura dell’acqua nell’aws è scesa sotto al valore minimo di soglia
• Verificare la circolazione dell’acqua e l’esposizione a ridotte temperature esterne
Allarme mancata partenza A18S1
• Verificare impostazioni T1-T2 • Verificare il cablaggio 15-16 • Verificare il cablaggio C7-NO7

28
Tutte le anomalie visualizzabili sul display del controllo remoto sono sotto elencate. In caso di anomalia, contattare il Centro di Assistenza Tecnica Autorizzato Aisin che esegue la manutenzione dell’unità esterna.
R/C AWS
Indicazioni lampeggianti (ON per indicazione fissa) (OFF indicazione spenta)
Codice errore
Spia ON/OFF
Scritta TEST
No. Unità
Display Unità
esterna Tipo di
anomalia Possibili cause
A0 X X X 63-n Ingresso esterno • Attivazione dispositivo esterno di protezione • Errore impostazione controllo remoto
A1 X X X 20-n PC board unità interna
• Scheda PC board difettosa • Errore impostazione EEPROM
A3 X X X 95-n Scarico condensa
- Flussostato AWS
• Versione DE – malfunzionamento pompa scarico condensa delle unità interne.
• Versione AWS – intervento flussostato o termostato antigelo
A6 X X X 15-n Ventilatore unità interna
• Motore bloccato • Cablaggio scollegato
A7 ON X X 35-n Swing unità interna
• Malfunzionamento motore • Meccanismo bloccato
A9 X X X 21-n Pc board unità interna
• Malfunzionamento LEV • Cablaggio scollegato
AF ON OFF X 30-n Scarico condensa
• Installazione tubazioni scorretta (flusso inverso) • Tubazione ostruita
AH ON OFF X 31-n Ionizzatore • Malfunzionamento scheda unità interna • Malfunzionamento ionizzatore (optional)
AJ X X X 22-n Codice capacità • Impostazione capacità errata • Mancanza connettore codice capacità
C4 X X X 18-n • Malfunzionamento sensore scambiatore unità interna • Cablaggio scollegato
C5 X X X 19-n • Malfunzionamento sensore tubo gas unità interna • Cablaggio scollegato
C9 X X X 97-n
• Versione DE - Malfunzionamento sensore ripresa aria unità interna
• Versione AWS – Malfunzionamento gruppo resistenze • Cablaggio scollegato
CA X X X 98-n
Sensori di temperatura unità interna
• Malfunzionamento sensore mandata aria unità interna • Cablaggio scollegato
CJ ON OFF X 17-n Termostato controllo remoto
• Malfunzionamento sensore controllo remoto • Cablaggio scollegato
U3 X X X - Test run • Test run in corso
U4 X X X - Comunicazione • Unità esterna non alimentata • Errore trasmissione tra unità esterna ed interna
X X X 1-n Comunicazione • Collegamento doppio controllo remoto • Errore trasmissione controllo remoto U5
OFF ON OFF - • Malfunzionamento scheda PC board controllo remoto • Impostazioni errate controllo remoto
U8 X X OFF -
PC board controllo remoto • Errore comunicazione telecomando principale
telecomando secondario.
U9 X X X - Comunicazione • Errore trasmissione tra due unità interne • Errore trasmissione unità esterna unità interna
UC ON ON ON 36-n • Indirizzo controllo centralizzato doppio • Indirizzo di gruppo unità interne doppio
UE X X X 23-n
Controllo centralizzato • Errore di trasmissione tra controllo centralizzato e unità
interna
UF X X X 24-n • Errore comunicazione tra unità esterna ed interne • Collegamento elettrico errato
UH X X X - Comunicazione
• Errore indirizzo unità interna X X X 40-0∼2 • Errore EEPROM o errore programma
E1 X X X 84-3,4
Pc board unità esterna • Malfunzionamento scheda PCboard unità esterna
• Errore trasmissione tra microcomputer E3 X X X 86-0 • Allarme alta pressione circuito frigorifero E4 X X X 88-0
Errore funzionamento • Allarme bassa pressione circuito frigorifero
E7 X OFF X 86-10∼23 Ventilatori unità esterna
• Malfunzionamento ventilatori (1,2,3) unità esterna • Malfunzionamento scheda DCBL
EA X X X 57-0 Valvola 4 vie • Malfunzionamento valvola 4 vie • Cablaggio scollegato
EC X X X 80-0 Errore funzionamento • Surriscaldamento motore (temperatura antigelo >105°C)
EH X X X 80-10∼30 Pompa antigelo • Malfunzionamento pompa antigelo motore • Malfunzionamento scheda DCBL

29
R/C AWS
Indicazioni lampeggianti (ON per indicazione fissa) (OFF indicazione spenta)
Codice errore
Spia ON/OFF
Scritta TEST
No. Unità
Display Unità
esterna
Tipo di anomalia
Codice errore
Possibili cause
F3 X X X 91-0 • Allarme surriscaldamento scarico compressore (>120°C) F4 X X X 87-0,2
Errore funzionamento • Allarme surriscaldamento ripresa compressore (> 40°C)
FE X X X 81-0 Olio motore • Allarme pressione eccessiva olio motore • Livello olio motore insufficiente
FF X X X 58-0 Olio compressore
• Malfunzionamento valvola olio compressore • Cablaggio scollegato
FJ X X X 47-0 Catalizzatore • Surriscaldamento catalizzatore (ove installato)
H3 X X X 76-0 Pressostato di massima
• Malfunzionamento pressostato di massima • Cablaggio scollegato
H4 X X X 88-2 Pressostato di minima
• Malfunzionamento pressostato di minima • Cablaggio scollegato
H9 X X X 61-0 • Malfunzionamento sensore temperatura esterna • Cablaggio scollegato
H9 X X X 61-1 • Sensore temperatura esterna bruciato
HC X X X 70-0 • Malfunzionamento sensore temperatura antigelo motore • Cablaggio scollegato
HC X X X 80-1
Sensori di temperatura unità esterna
• Sensore temperatura antigelo motore bruciato HJ X X X 80-2 Antigelo motore • Livello antigelo motore insufficiente HF X OFF X EE-0 Manutenzione • Avviso manutenzione periodica
X X X 78-1∼5 • Sensori di temperatura scarico compressori scollegati J3
X X X 91-2∼7 • Sensori di temperatura scarico compressori bruciati X X X 54-0 • Sensori di temperatura sottoraffreddamento scollegati X X X 54-1 • Sensori di temperatura sottoraffreddamento bruciati X X X 55-0,1 • Sensori di temperatura uscita accumulatore scollegati
J4
X X X 55-2,3 • Sensori di temperatura uscita accumuolatore bruciati X X X 53-0,1 • Sensori di temperatura ripresa compressore scollegati
J5 X X X 53-2,3 • Sensori di temperatura ripresa compressore bruciati
X X X 65-0 • Sensori di temperatura scambiatore fase liquida scollegati J6
X X X 65-2 • Sensori di temperatura scambiatore fase liquida bruciati
X X X 66-0 • Sensori di temperatura scambiatore secondario fase liquida scollegati
J7 X X X 66-1
Sensori di temperatura unità esterna
• Sensori di temperatura scambiatore secondario fase liquida bruciati
X X X 67-0 • Sensori di temperatura tubo del liquido scollegati J8
X X X 67-2
Sensori di temperatura unità esterna • Sensori di temperatura tubo del liquido bruciati
JA X X X 73-0,1 • Malfunzionamento sensore di alta pressione
JC X X X 88-4
Sensori di pressione
unità esterna • Malfunzionamento sensore di bassa pressione
JE X X X 71-0 Pressostato olio • Pressostato olio motore scollegato X X X 72-0 • Sensore di temperatura vano motore scollegato X X X 72-1 • Sensore di temperatura vano motore bruciato JJ X X X 72-6
Sensori di temperatura unità esterna • Sensore di temperatura catalizzatore scollegato
LE X X X 75-1∼3 Alimentazione • Voltaggio sistema di accensione non corretto LF X X X 84-0 • Mancata partenza del motore LJ X X X 75-0
Errore funzionamento • Arresto critico del motore
P8 X X X 74-1∼4
74-6 82-0∼1
Motore • Regime di rotazione motore insufficiente • Regime di rotazione motore eccessivo
PE X X X 74-7 Elettrovalvole • Malfunzionamento elettrovalvole gas combustbile PF X X X 60-0 Starter • Mancato funzionamento motorino avviamento U0 X X X 88-5 Tubaz. frigorifere • Mancanza di gas refrigerante U7 X X X 4-0∼6 Comunicazione • Errore comunicazione tra unità esterna master e slave
UA X X X 43-0,1 44-n
Numero di unità interne
• Limite max di capacità superato • Numero eccessivo di unità collegate
Deu
tsch

30
Models
Rated Capacity (kW) AWS
COOLING HEATING
8 HP 21,0 23,5
10 HP 26,5 30,0
13 HP 33,5 37,5
16 HP 41,0 47,5
20 HP 52,0 60,0
E1/E1J Series
25 HP 63,5 75,0
Safety prescriptions The following symbols are used to indicate important instructions. Always read, understand and follow these instructions carefully.
WARNING Failure to observe the prescriptions indicated with this symbol could result in
serious injury or death.
CAUTION Failure to observe the prescriptions indicated with this symbol could result in
damage to the unit.
This symbol indicates a forbidden action.
This symbol indicates a necessary action.
Notice for the installer
WARNING
This unit has to be installed by specialised technical personnel. The installation must be performed in accordance with the contents of this manual. If this unit is not properly installed, it will not realize its full performance potential and could cause injury or damage.
This manual contains technical prescriptions, precautions and procedures to installa the YOSHI AWS unit properly. It addresses to specialised technical personnel with a basic knowledge of gas heat pumps installation methods. Failure to observe the procedures herein indicated, could result in malfunction and damage to the unit. Before beginning the installation of the YOSHI AWS unit, read and fully under stand the contents of this manual.
After the installation, always call the local AISIN Authorised Service Centre to perform the outdoor and indoor units commissioning.
YOSHI®AWS E1/E1J Yoshi Air Water System
AWS INSTALLATION MANUAL 8 HP-10 HP-13 HP-16 HP-20 HP-25 HP

31
INDEX
Specifications
1 AWS unit specifications........................................................................................................ 32
1.1 Installation prescriptions ................................................................................................... 32 2 Before installation ................................................................................................................. 33
2.1 Parts provided .................................................................................................................. 33 2.2 Locally procured parts ...................................................................................................... 33
3 Use of water and glycol mixture........................................................................................... 34 AWS unit installation 4 Installation.............................................................................................................................. 34
4.1 Selecting the location for installation ................................................................................ 34 4.2 External dimensions, hydraulic and refrigerant gas connections...................................... 35 4.3 Installation space.............................................................................................................. 36
5 Refrigerant pipes ................................................................................................................... 37 5.1 Outline drawing of refrigerant piping................................................................................. 37 5.2 Piping specifications ......................................................................................................... 38 5.3 Refrigerant gas extra charge ............................................................................................ 39
6 Refrigerant circuit and hydraulic circuit.............................................................................. 40 6.1 Cooling mode ................................................................................................................... 40 6.2 Heating mode ................................................................................................................... 40
AWS unit wiring 7 Electric wire installation........................................................................................................ 41
7.1 Wiring with GHP outdoor unit ........................................................................................... 41 7.2 Detailed wiring diagram .................................................................................................... 42
8 AWS Accessories .................................................................................................................. 43 8.1 Controller Plus: Control Panel and Probe Temperature Buffer Tank................................ 43
8.1.1 Control panel............................................................................................................................................... 43 8.1.2 Probe temperature buffer tank................................................................................................................... 43
The probe is used to stop the pump when the AWS reaches the set point temperature. It must be installed on the tank and connected to the AWS as shown in the drawing. ................................ 43 8.2 External probe temperature.............................................................................................. 43
9 Control panel.......................................................................................................................... 44 10 AWS Set Point Adjustment ................................................................................................... 45 11 Installation layouts ................................................................................................................ 47
11.1 Central storage tank installation.................................................................................... 47 11.2 Hydraulic separator installation..................................................................................... 47 11.3 Single pump installation ................................................................................................ 47 11.4 HVAC installation layout AWS E1................................................................................. 48 11.5 HVAC installation E1 with proportional distribution of consumption.............................. 49 11.6 HVAC installation AWS E1J variable flow rate no hydraulic separator (AHU) .............. 50 11.7 HVAC installation AWS E1J variable flow rate with hydraulic separator (fan coil)........ 51
12 Troubleshooting (reference)................................................................................................. 52
Tecnocasa S.p.A. declines any responsibility for any damage whatever caused by improper use of the unit and/or non compliance with the information contained in this manual. Specifications, drawings and technical information in this manual are subject to change without notice.
Deu
tsch

32
All versions AWS
8HP-E1 (E1J)
AWS 10HP-E1
(E1J)
AWS 13HP-E1
(E1J)
AWS 16HP-E1
(E1J)
AWS 20HP-E1
(E1J)
AWS 25HP-E1
(E1J) Capacity code of the connected GHP outdoor unit P224 P280 P355 P450 P560 P710
Rated cooling capacity∗ kW 21,0 26,5 33,5 41,0 52,0 63,5 Water temperature out - [in] °C 7 – [11] 7 – [12] 7 – [12] 7 – [12] 7 – [12] 7 – [12] Rated heating capacity ∗∗ kW 23,5 30,0 37,5 47,5 60,0 75,0
Water temperature out - [in] °C 45,5 – [41] 45,5 – [40] 45,5 – [40] 45,5 – [40] 45,5 – [40] 45,5 – [40] Flow rate m3/h 4,5 4,5 6,0 7,5 9,5 12,0
Capacity modulation rate cooling (min-max) kW 10,0-21,0 10,0-26,5 10,0-33,5 17,0-41,0 17,0-52,0 17,0-63,5 Capacity modulation rate heating (min-max) kW 13,0-23,5 12,0-30,0 12,0-37,5 19,8-47,5 19,8-60,0 19,8-75,0
Power supply∗∗∗ V/Ph/Hz 230/1/50 Power consumption kW 0,84 1,1
Starting current A 10 Version with pump
(AWS E1) Available static pressure kPa 80 80 60 100 80 60
Power supply V/Ph/Hz 230/1/50 Version without Pump (AWS E1J) Starting current A 1,5
Drop pressure plate heat exchanger kPa 33 33 46 22 33 46
Water pipes connection Inch 2 (Each AWS unit is delivered with 2” nipless fittings to be installed if necessary) Water circuit Primary circuit
pipes diameter Inch 2 or higher (Each AWS unit is fitted with a 2” Y-shape filter to be installed on the primary circuit)
Refrigerant gas connection (gas – liquid) mm 28,6 –12,7 28,6 – 18,0
Refrigerant circuit GHP – AWS pipes diameter (gas – liquid)
mm 19,1 – 9,5 ∗∗∗∗ (12,7)
22,2 – 9,5 ∗∗∗∗ (12,7)
25,4 – 12,7 ∗∗∗∗ (15,9)
28,6 – 15,88 ∗∗∗∗ (19,05)
28,6 – 15,88 ∗∗∗∗ (19,05)
35 – 15,88 ∗∗∗∗ (19,05)
Height mm 915 Width mm 1020 Depth mm 710
External dimensions and
weight With Pump/Without Pump kg 164/153 204/177
Connectable GHP outdoor units Each AWS unit can be connected with a single AISIN GHP outdoor unit ∗ Rated cooling capacity is measured according to the following conditions: water outlet temperature 7°C; outdoor temperature 35°C DB ∗∗ Rated heating capacity is measured according to the following conditions: water outlet temperature 47°C; outdoor temperature 7°C DB / 6°C WB ∗∗∗ A version fitted with 230V, single phase, 60 Hz is available upon order. ∗∗∗∗ If the distance between GHP and AWS exceeds 40 meters, install a pipe with the diameter indicated in brackets.
1.1 Installation prescriptions
CAUTION
Always foresee the installation of an emergency relief valve and a properly dimensioned expansion vessel. These devices are not built in the AWS unit. Where the storage tank should be installed lower than the AWS unit, foresee the installation of a jolly valve at the higher point of the water piping. Failure to observe these prescriptions could result in malfunction and/or damage to the unit.
Always foresee the installation of a buffer tank, fitted with anti stratification pipes, which size should be adequate to the AWS unit capacity. Failure to observe these prescription could result in malfunction and/or damage to the unit.
Always check that the Y-shape water filter (supplied with the unit) is installed on the primary circuit return pipe. In case of multi units plants, install one filter each AWS unit. Install the filter to not less than 50 cm from suction of the pump. Failure to observe this prescription makes the warranty no longer valid and could result in malfunction and/or damage to the unit.
WARNING
Welding, refrigerant gas and water piping installation should be always performed by specialised technical personnel in accordance with instructions and prescriptions mentioned in the present manual. Failure to observe this prescription makes the warranty no longer valid and could result in malfunction and/or damage to the YOSHI AWS unit.
1 AWS unit specifications

33
2.1 Parts provided The following parts are provided with the YOSHI AWS unit. Name
Installation manual
Control box wiring diagram
2” Y-shape filter For water pipe [gaskets]
2” brass nipless [gaskets] where provided
Quantity 1 1 1 - [2] 2 - [2]
Location Inside the control panel Inside the unit near the water connections
Note Always store the manuals in a dry and safe place
Refer to the prescriptions of this manual for the installation of the accessories
2.2 Locally procured parts The following items are required for installing the YOSHI AWS unit.
Part Application Anchor bolt For installing the AWS unit on the ground (M8X4)
Washer, Nuts For installing the AWS unit on the ground (φ8X4)
Ant vibrant carpet For installing the unit on metal bars or on the roof.
Copper pipe and fittings for refrigerant gas
Refrigerant gas piping (materials and procedures are described in the GHP outdoor unit installation manual)
Steel pipe and fittings for water
Water piping (materials and procedures are described in the present manual)
Insulation For refrigerant gas and water pipe insulation
Electrical wires AWS unit power supply, ground wiring, communication and accessories wiring (proper size and wire specifications are described in the GHP outdoor unit installation manual)
R410a refrigerant gas, precision scale and gauge manifolds
Refrigerant circuit extra charge (refrigerant extra charge is described in the present manual)
Oxy acetylene welding kit Gas bottles, nozzle and copper bars to weld refrigerant pipes
Nitrogen Bottle Refrigerant gas leakage test (the procedure is described in the GHP outdoor unit installation manual)
Vacuum pump Vacuum suction (the procedure is described in the GHP outdoor unit installation manual)
Pipe cutter Refrigerant gas piping installation
WARNING
Never use parts which are not compliant with those listed in the present manual. Failure to observe this prescription makes the warranty no longer valid and could result in malfunction and/or damage to the unit.
The installation of the unit must comply with national and local codes. Failure to observe this prescription could result in illegal act. The manufacturer specifically disclaims any liability whatsoever for any claims by any party if any of the procedures in this Installation Manual have not been followed. Failure to observe this prescription makes the warranty no longer valid.
2 Before installation

34
Use mixtures of water and antifreeze fluid to lower the freezing point of water. The liquid most commonly used as antifreeze is ethylene glycol. The table shows the reduction factors of the cooling capacity and the capacity of the pump of the AWS as a function of the water temperature and percentage by weight of glycol in the mixture.
Water Glycol Reduction factor of the cooling capacity
Reduction factor of the pump flowrate
°C % kg - - -2 5 0,995 0,99 -4 10 0,990 0,98 -6 15 0,985 0,96 -9 20 0,980 0,94
-12 25 0,975 0,92 -15 30 0,970 0,90 -19 35 0,965 0,88 -23 40 0,960 0,86 -29 45 0,955 0,83 -35 50 0,950 0,80
4.1 Selecting the location for installation
WARNING
• The unit MUST NOT be installed where flammable gas is generated, accumulated or handled. Failure to observe this prescription could result in damage of the unit, injury, fire or explosion.
• The AWS unit is for outdoor and indoor installation. Read the present manual carefully to select a proper installation location. Make sure maintenance space is provided around the unit.
• If the unit is installed at high location, provide a safe access by installing ladders or railings for the operator.
• Always install the AWS unit in an area where its smooth operating noise and small vibration won’t be a
disturb for the neighbours, particularly in residential areas. Comply to local standards where prescribed. • Always install the AWS unit in a level location where rainwater cannot accumulate. Provide proper drain
routes. • Always install the AWS unit in a location where it won’t be exposed to strong winds. Provide proper
anchor bolts. • The AWS unit might cause slight interference with other electrical equipment, such as televisions, radios,
computers and telephones. Provide proper clearances. • If the AWS unit is installed in a region with heavy snowfall, install a snow protection hood. The base for
the unit is high enough to avoid accumulation of snow in front of the body panels. • Allocate the route for loading/unloading the unit, materials and parts for maintenance at the installation
site.
3 Use of water and glycol mixture
4 Installation
35
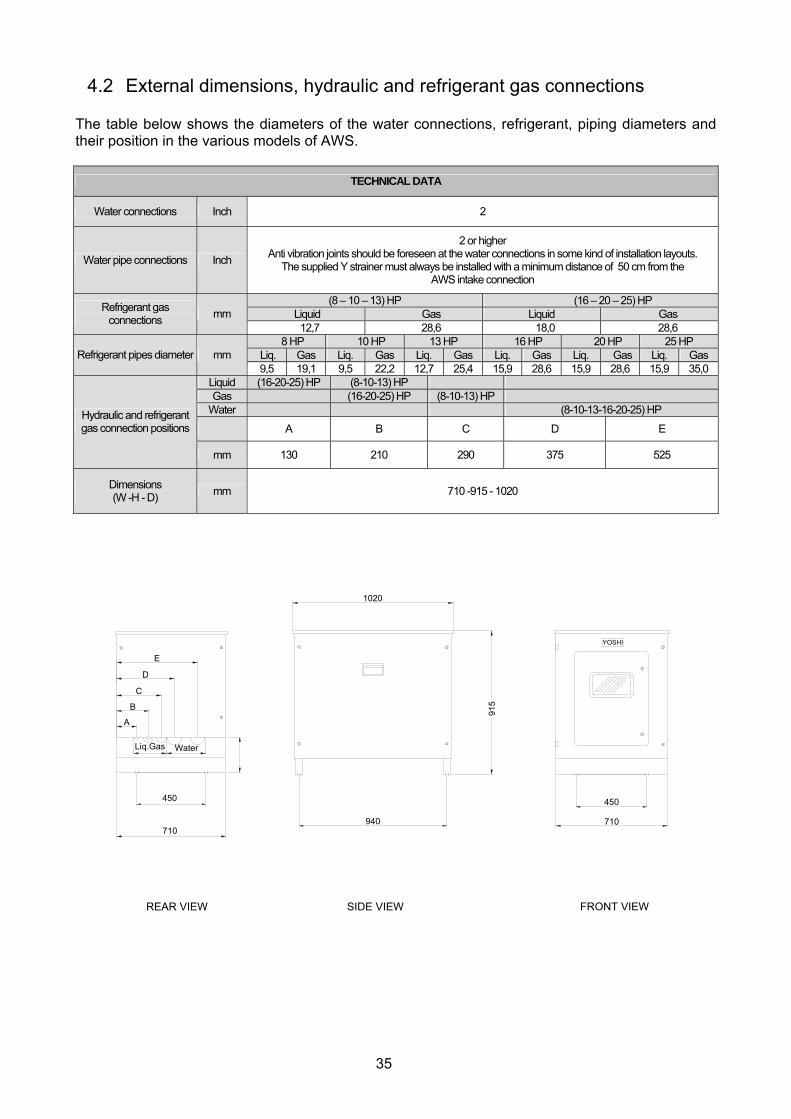
4.2 External dimensions, hydraulic and refrigerant gas connections The table below shows the diameters of the water connections, refrigerant, piping diameters and their position in the various models of AWS.
TECHNICAL DATA
Water connections Inch 2
Water pipe connections Inch
2 or higher Anti vibration joints should be foreseen at the water connections in some kind of installation layouts.
The supplied Y strainer must always be installed with a minimum distance of 50 cm from the AWS intake connection
(8 – 10 – 13) HP (16 – 20 – 25) HP Liquid Gas Liquid Gas Refrigerant gas
connections mm 12,7 28,6 18,0 28,6
8 HP 10 HP 13 HP 16 HP 20 HP 25 HP Liq. Gas Liq. Gas Liq. Gas Liq. Gas Liq. Gas Liq. Gas Refrigerant pipes diameter mm 9,5 19,1 9,5 22,2 12,7 25,4 15,9 28,6 15,9 28,6 15,9 35,0
Liquid (16-20-25) HP (8-10-13) HP Gas (16-20-25) HP (8-10-13) HP
Water (8-10-13-16-20-25) HP
A B C D E Hydraulic and refrigerant gas connection positions
mm 130 210 290 375 525
Dimensions (W -H - D) mm 710 -915 - 1020
A
B
C
D
E
915
710
1020
940
YOSHI
450
710
450
FRONT VIEWSIDE VIEWREAR VIEW
Liq.Gas Water

36
4.3 Installation space
Clearances for maintenance and inspection operations are described in the tables below.
Always provide ample space for inspecting and maintaining the piping for the refrigerant gas and for the water.
Front view Top view
YOSHI
1 m or more
Always provide 1 m or more above the AWS unit
<Single unit installation >
Always leave at least 500 mm on the right side (viewed from coupling tubes AWS)
<Overlapped multiple units installation>
YOSHI
YOSHI
Water
Water
When the units are overlapped, route the pipes of the upper unit so that all the body
panels of the lower unit can be disassembled.
<Multiple units installation>
Always leave at least 500 mm on the right side
(viewed from coupling tubes AWS)
CAUTION
• The minimum installation spaces are necessary to provide room for air circulation, inspection and maintenance of the AWS unit. Failure to observe this prescription could result in injury to the maintenance personnel and damage to the unit.
• When more units are installed in the same location, make sure that nearby walls, pipes or other objects, are not obstructions for maintenance operations. Maintenance space is described in the table below.
37
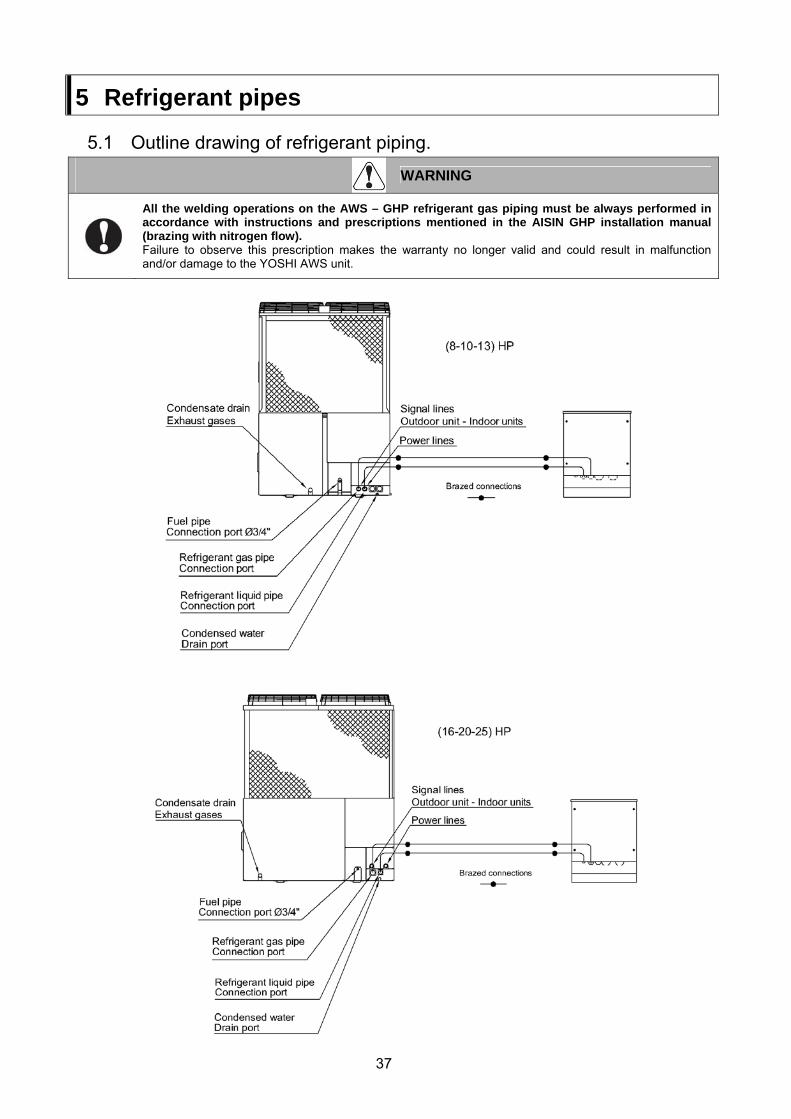
5.1 Outline drawing of refrigerant piping.
WARNING
All the welding operations on the AWS – GHP refrigerant gas piping must be always performed in accordance with instructions and prescriptions mentioned in the AISIN GHP installation manual (brazing with nitrogen flow). Failure to observe this prescription makes the warranty no longer valid and could result in malfunction and/or damage to the YOSHI AWS unit.
5 Refrigerant pipes

38
5.2 Piping specifications
WARNING
YOSHI AWS refrigerant gas connections diameter differs from the ones prescribed for the refrigerant gas line to the AISIN GHP outdoor unit. Therefore, install proper adapters (not supplied).
Select the proper AWS – GHP pipe diameter according to the table below.
Installation item Diameter x Thickness (mm) Max. height difference(m) YOSHI AWS
AISIN GHP Unit Gas Liquid Liquid (*)
Acceptable piping length (m)
(relative/actual) GHP
ground GHP roof
Compressor oil
[8 HP] 19,1x1,0 9,5x1,0 12,7x1,0 [10 HP] 22,2x1,0 9,5x 1,0 12,7x1,0 [13 HP] 25,4x1,0 12,7x1,0 15,9x1,0 [16 HP] 28,6x1,5 15,9x1,0 19,05x1,0 [20 HP] 28,6x1,5 15,9x1,0 19,05x1,0
GHP Multi Type AWS E1/E1J
[25 HP] 35,0x1,5 15,9x1,0 19,05x1,0
70/60 20 25 NL10
(*) If the distance between GHP and AWS exceeds 40 meters use a liquid tube of bigger diameter as indicated in the table. The refrigerant gas line for the YOSHI AWS unit must be designed and installed in accordance with the prescriptions here under listed.
Layout example (in case of AWS connection) If there is a height difference
between the locations of indoor and outdoor units, be sure to apply “trap
piping” on the vapour line within every 10 m as illustrated.
10 m
A
L
Outdoor unit
f
AWS
H
Piping length
Maximum piping length (L) (Relative/Actual) L = A 70/60m or less
When GHP outdoor unit is higher than AWS unit 25 m or less Height
difference Height difference between indoor unit and
outdoor unit (H) When GHP outdoor unit is lower than AWS unit 20 m or less
CAUTION
It is forbidden to connect direct expansion indoor units and YOSHI AWS to a single AISIN GHP outdoor unit simultaneously. The YOSHI AWS can be only connected to a specific AISIN GHP outdoor unit for AWS with the same capacity.
WARNING
• Never exceed the maximum accepted distances when connecting the YOSHI AWS to the
AISIN GHP outdoor unit. Failure to observe this prescription makes the warranty no longer valid and could result in malfunctioning of the YOSHI AWS unit.

39
5.3 Refrigerant gas extra charge
WARNING
Accurately measure the length of the piping and charge with the proper amount of refrigerant gas. Failure to observe this prescription could result in malfunctioning of the YOSHI AWS unit. When charging the refrigerant gas, make sure to wear proper protective gloves. Refrigerant gas leakages can cause frost bites.
• Always charge the refrigerant as a liquid in the tank. In case of charging as a gas may cause a
compositional change of the refrigerant, and could result in a performance decline or a breakdown.
• Always use a refrigerant scale when charging the refrigerant. Using a charging cylinder may cause a compositional change of the refrigerant, could result in a performance decline or a breakdown.
• To avoid cross-contamination with other oil types, make sure to separate maintenance tools according to the type of refrigerant used. In particular, never use the gauge manifold and charging hose with other refrigerants than R410a.
After confirming the factory charge on the AISIN GHP label, use the following equation to determine the necessary extra amount of refrigerant gas. Always refer to the liquid pipe lengths and diameters only. Extra chrg (kg) = (L0 x 0.250) + (L1 × 0.170) + (L2 × 0.110) + (L3 × 0.054) + QAWS
The value of the variable parameter Q depends on the capacity of the AISIN GHP outdoor unit connected to the YOSHI AWS. Use the table below as reference.
Outdoor unit Installation type Q (kg)
8 – 10 – 13 HP QAWS 0
16 – 20 – 25 HP QAWS + 1,5
CAUTION
The refrigerant extra charge must be done in accordance with the procedures described in the AISIN GHP installation manual. Failure to observe this prescription makes the warranty no longer no longer valid and could result in malfunctioning of the YOSHI AWS unit.
L0: Liquid pipe Ø 19.0 total length (m) L1: Liquid pipe Ø 15.9 total length (m) L2: Liquid pipe Ø 12.7 total length (m) L3: Liquid pipe Ø 9.52 total length (m)

40
6.1 Cooling mode The refrigerant (R410A) processed by the GHP flows through electronic expansion valve and enters the lower part of the AWS unit heat exchanger at low pressure. The gas evaporates in the plate heat exchanger by taking heat from the counter current water flow. It goes back to the GHP as overheated steam. The outdoor unit fans create an air flow through the heat exchanger and thus the refrigerant can condense. At the same time, the water coming from the buffer tank is cooled and pumped again into the primary circuit by the AWS built in pump. Flow switch, pressure switch and anti freeze thermo sensor overlook the water temperature never to drop inside the heat exchanger. In fact, water may freeze and the heat exchanger can be damaged.
6.2 Heating mode The refrigerant (R410A) processed by the GHP enters the upper part of the AWS unit heat exchanger as high pressure overheated steam. The gas condenses in the plate heat exchanger by ceasing heat to the co current water flow. It goes back to the GHP as high pressure liquid, through the bypass pipe. The two outdoor unit expansion valves divide the return flow, reducing its pressure. The GHP manages the evaporation through the heat exchanger and the heat recovery. At the same time, the water coming from the buffer tank is heated and pumped again into the primary circuit by the AWS built in pump.
6 Refrigerant circuit and hydraulic circuit
1) Driver expansion valve 2) Check valve 3) Electronic expansion valve 4) Water inlet temperature probe 5) Water outlet temperature probe 6) Plate heat exchanger
7) Water pressure difference switch 8) Air vent valve 9) Flow switch 10) Pump (not included in the version E1J) 11) Pressure switch expansion valve

41
7.1 Wiring with GHP outdoor unit Power supply specifications are always mentioned on the YOSHI AWS product label. Always check the power supply before installing the unit. Always perform the wiring in accordance with the prescriptions listed in the paragraph 0 of the present manual.
WARNING
• NEVER connect the YOSHI AWS unit to a common circuit with other appliances. Use a
dedicated branch circuit protected by an earth leakage breaker. Failure to observe this prescription could result in malfunctioning of the unit and hazards for people and/or things.
• NEVER ground the unit by connecting the wires to water or gas piping or to a lightning rod.
• NEVER switch on the power supply before the final commissioning is performed by the AISIN Authorised Service Centre. Failure to observe this prescription makes the warranty no longer valid and could result in malfunction and/or damage to the YOSHI AWS unit.
• All electrical installation work must be performed by specialised technical personnel in accordance with the local and national installation standards. A declaration of conformity must be provided by the installer. Failure to observe this prescription could result in electrical shock, fire or other hazards.
• Switch off the main circuit breaker or power meter during the electrical installation work of the YOSHI AWS unit.
• Always use the designated cable for wiring, including the ground wiring, according to the national standards.
• Always check the power supply specifications on the YOSHI AWS unit. Failure to observe this prescription could result in malfunction and/or damage to the YOSHI AWS unit.
I – I: communication line outdoor unit – AWS. O – O : communication line outdoor unit – outdoor unit (NOT AVAILABLE WITH AWS). Q1 – Q2: electrical terminals present only on GHP (16-20-25) HP. Terminals can be used only for direct expansion.
NEVER SUPPLY THE UNIT WITH THREE PHASE POWER
7 Electric wire installation

42
7.2 Detailed wiring diagram
POW
ER S
UPP
LY 2
30 V
LN
GR
OU
ND
ING
GH
PC
HK
: Gen
eral
ala
rm s
igna
l out
door
uni
t GH
P
ALO
UT:
Gen
eral
ala
rm s
igna
l out
door
uni
t (dr
y co
ntac
t)
PT3
: Out
side
tem
pera
ture
pro
be
CA
P-/C
AP
+: C
urre
nt s
igna
l pow
er c
ontro
l 4-2
0 m
A D
C
0-12
-12:
Pow
er s
uppl
y co
ntro
l pan
el "c
ontro
ller p
lus"
(12V
)
CA
NH
/CA
NL/
CA
NG
: Com
mun
icat
ion
line
pane
l "co
ntro
ller p
lus"
SIG
NA
L C
AB
LE2
X 0.
75-1
.25m
m²
GH
P-A
WS
CO
NN
ECTI
ON
CA
BLE
2 X
0.75
-1.2
5mm
²
GH
P PO
WER
WIR
E2
X 2.
5 m
m² (
min
sec
tion)
ELEC
TRIC
AL
LEA
KA
GE
BR
EAK
ER (2
0A)
(not
sup
plie
d)EL
ECTR
ICA
L LE
AK
AG
EB
REA
KER
(16A
)(n
ot s
uppl
ied)
AW
S PO
WER
WIR
E2
X 2.
5 m
m² (
min
sec
tion)
GH
P T
ER
MIN
AL B
LO
CK
(It is
loca
ted
in th
e re
ar s
ide
of th
e G
HP
)
AW
S T
ER
MIN
AL B
LO
CK
(It is
loca
ted
in th
e AW
S e
lect
ric b
ox)
GR
OU
ND
ING
L-N
: Pow
er s
uppl
y C
HE
CK
: Gen
eral
ala
rm d
ry c
onta
ct
CO
NTA
CT
H/C
: Hea
t/Coo
l sel
ectio
n si
gnal
F1-F
2: G
HP
AIS
IN -
AWS
YO
SHI c
omm
unic
atio
n
P. K
it: W
KIT
pum
p sw
itch
(opt
iona
l)
Q1-
Q2:
Out
door
uni
ts c
omm
unic
atio
n. "I
nsta
llatio
n
com
bine
d" E
xp. d
irect
. Onl
y on
GH
P (1
6-20
-25)
HP
MP
: Pow
er s
uppl
y ex
tern
al p
ump
or z
one
valv
e(o
nly
for A
WS
E1J
ver
sion
). M
ax 1
0 A
con
tact
s
REM
: AW
S re
mot
e O
N/O
FF s
elec
tion
RE
M1:
Hea
t/Coo
l rem
ote
sele
ctio
n
POW
ER S
UPP
LY 2
30 V
LN
SE
T-/S
ET+
:Seg
nale
in c
orre
nte
4-20
mA
DC
per r
egol
azio
ne te
mpe
ratu
ra s
et p
oint
485+
/485
-: M
odbu
s
MP
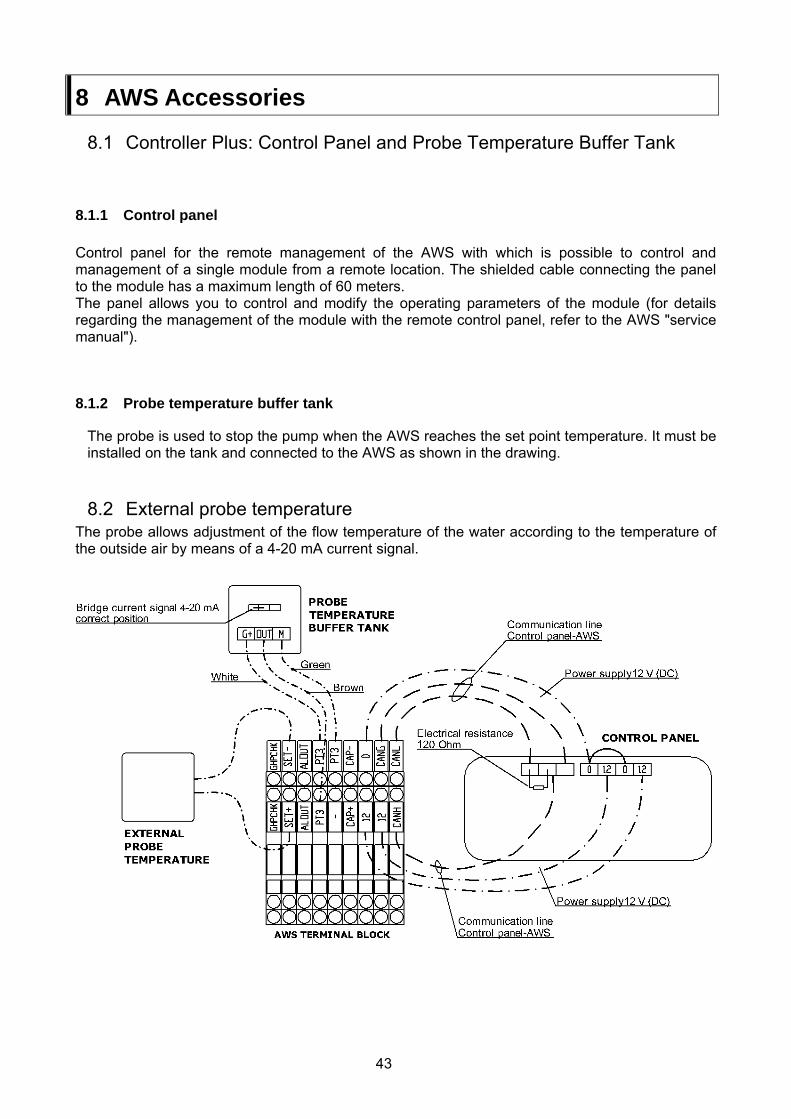
43
8.1 Controller Plus: Control Panel and Probe Temperature Buffer Tank
8.1.1 Control panel Control panel for the remote management of the AWS with which is possible to control and management of a single module from a remote location. The shielded cable connecting the panel to the module has a maximum length of 60 meters. The panel allows you to control and modify the operating parameters of the module (for details regarding the management of the module with the remote control panel, refer to the AWS "service manual").
8.1.2 Probe temperature buffer tank
The probe is used to stop the pump when the AWS reaches the set point temperature. It must be installed on the tank and connected to the AWS as shown in the drawing.
8.2 External probe temperature The probe allows adjustment of the flow temperature of the water according to the temperature of the outside air by means of a 4-20 mA current signal.
8 AWS Accessories

44
WARNING
• NEVER change the factory settings (cooling and heating set point) of the water
thermostat. Failure to observe this prescription makes the warranty no longer valid and could result in malfunction and/or damage to the unit.
• NEVER disconnect or bypass the YOSHI AWS built in safety devices for a forced operation of the unit. Failure to observe this prescription makes the warranty no longer valid and could result in malfunction and/or damage to the unit.
• NEVER change the factory settings of the remote controller fitted in the control panel. Failure to observe this prescription could result in malfunction and/or damage to the unit.
• NEVER switch on the power supply before the final commissioning is performed by the AISIN Authorised Service Centre. Failure to observe this prescription makes the warranty no longer valid and could result in malfunction and/or damage to the YOSHI AWS unit.
• Some operation parameters of the YOSHI AWS can be changed under request to the AISIN Authorised Service Centre. Failure to observe this prescription makes the warranty no longer valid.
• In case of multiple units installations it is possible to manage a proportional distribution of the capacity by an external optional device.
• The built in water thermostat always indicates the return temperature of the primary circuit. NEVER SET THE VALUE BELOW 8°C.
The YOSHI AWS control panel is represented below. In case of AISIN GHP outdoor unit malfunction, the error code will be displayed on the remote controller fitted in the YOSHI AWS control panel. Check the failure type on the AISIN GHP installation manual.
The water thermostat factory settings are: - COOL mode: T set cool = 8°C - HEAT mode: T set heat = 44°C
The YOSHI AWS has the following safety built in devices: - Pressure difference switch: the AISIN GHP outdoor unit stops in case of missing pressure
difference between inlet and outlet of the pump. - Flow switch: the AISIN GHP outdoor unit stops in case of insufficient water flow in the primary
circuit. - Antifreeze thermostat: In the summer the AISIN GHP outdoor unit stops in case of water
temperature in the primary circuit below +5°C. In the winter the pump is started when the water temperature is below +5 °C and, if necessary, also the GHP is started.
- Pump overload switch: the YOSHI AWS pump stops in case of overheating of the pump itself.
9 Control panel

45
10.1 Control panel
The unit AWS YOSHI has the possibility to vary the capacity delivered, in a range between 25% and 100% of rated power, as a function of the return water temperature on the primary circuit. The modulation of the capacity is adjusted according to a proportional band. Just adjust the temperature set point on the user menu on the control panel, that is the parameters "Tset" and the proportional band width (Range modulation parameter). As the return water temperature on the primary approaches the set point, the AWS capacity is reduced of 25%. Once the set point is reached and exceed, the system makes 6 consecutive temperature checks, one every each 10 seconds. If, during these controls, the temperature never goes below the set point the AWS stops. If the optional "Plus Controller" has been installed, once the set point has been reached and the AWS stops, the primary circulation pump halts. Otherwise, the primary circulation pump continues to run, nevertheless the AWS system is in stand-by. Example of modulation in heating: The set point temperature in heating, ie the parameter "Tset heat", may vary in a range between 30°C and 48°C. The factory settings are: Tset heat = 44°C; Modulation Range = 5°C The table below shows the method of variation of the capacity and a numerical example.
AWS Capacity [%]
Tset heat [°C] Modulation Range [°C]
Low Temperature Modulation [°C]
Outlet Temperature [°C]
100 A - ∆T 75 (A - ∆T) + (∆T•0,25) 50 (A - ∆T) + (∆T • 0,5) 25
A ∆T
(A - ∆T) + (∆T•0,75)
A + 1
Numerical example on the minimum temperature set point 100 25 75 26,25 50 27,5 25
30 5
28,75
31
Numerical example on the maximum temperature set point 100 41 75 42,75 50 44,5 25
48 7
46,25
49
10 AWS Set Point Adjustment

46
Example modulation in cooling: The set point temperature in cooling, ie the parameter "Tset cool", may vary in a range between 6°C and 15°C. The factory settings are: Tset cool= 8°C; Modulation Range = 5°C
AWS Capacity [%]
Tset cool [°C] Modulation Range [°C]
Max. Temperature Modulation [°C]
Outlet Temperature [°C]
100 A + ∆T 75 (A + ∆T) - (∆T•0,25) 50 (A + ∆T) - (∆T • 0,5) 25
A ∆T
(A + ∆T) - (∆T•0,75)
A - 1
Numerical example on the minimum temperature set point 100 11 75 9,75 50 8,5 25
6 5
7,25
5
Numerical example on the maximum temperature set point 100 22 75 20,25 50 18,5 25
15 7
16,75
14
10.2 Setting the offset The unit YOSHI AWS allows you to adjust the offset of the set point temperature, that is the return water temperature on the primary circuit. The parameters "Tset Offset " can be changed in the user menu, (please refer to the AWS service manual). If the optional "Controller Plus" has been installed, of the offset measurement will be made by its active probe, installed on the buffer tank. The factory settings are: Heat Tset Offset = 2°C Cool Tset Offset = 2°C

47
CAUTION
The installation layouts below are just representative of suggested possibilities. Always refer to technical qualified personnel for designing. Further information is available under request by AISIN technical department or on the website www.aisin.it .
11.1 Central storage tank installation This layout is recommended by the manufacturer for fan-coil installations. to optimise the operation of the AISIN GHP. When choosing this layout always make sure that the water flow of the primary and the secondary circuits are balanced. Moreover, the storage tank must be provided with anti stratification pipes.
11.2 Hydraulic separator installation When choosing this layout, make sure that the static pressure of the water pump fitted in the YOSHI AWS unit is enough to win the total pressure drop of the primary circuit. In this case it is possible to install horizontal storage tanks.
11.3 Single pump installation This layout is recommended by the manufacturer for Air Handling Unit (AHU) installations. Make sure that the static pressure of the water pump fitted in the YOSHI AWS unit is enough to win the total pressure drop of the whole circuit.
11 Installation layouts

48
11.4 HVAC installation layout AWS E1

49
11.5 HVAC installation E1 with proportional distribution of consumption

50
11.6 HVAC installation AWS E1J variable flow rate no hydraulic separator (AHU)

51
11.7 HVAC installation AWS E1J variable flow rate with hydraulic separator (fan coil)

52
WARNING
• NEVER stop the GHP – AWS system by switching off the power supply during the
operation. Failure to observe this prescription makes the warranty no longer valid and could result in malfunction and/or damage to the unit.
• NEVER switch on the YOSHI AWS power supply after switching on the GHP outdoor unit. Failure to observe this prescription could result in malfunction and/or damage to the unit.
The table below shows all the possible failures indicated directly by the YOSHI AWS control panel.
ALARM TYPE ALARM CODE POSSIBLE CAUSES SOLUTIONS
Flow switch alarm A1S1 • Y-filter clogged • Capacity insufficient
• Clean the Y-filter
• Check the pressure in the hydraulic circuit
• Check the flow switch
Pressure difference switch alarm A2S1 • Air in the system
• Pump malfunction
• Remove the air
• Replace the pump • Check the pressure differential switch
(compare the state with the flow switch)
GHP Alarm A3S1 • Check the code displayed on
the GHP. Press UP for the current alarms and DOWN for those in STAN-BY
Flowswitch tamper alarm A4S1
• Check the wiring of the flowswitch.
• Check the operation of the flowswitch. • Check the layout of plant (other
pumps make circulate water when not expected
Antifreeze alarm A5S1
• Check the operation of the pump, the flow switch and pressure differential switch
• Verify that the offset values in summer operation are not excessive
• Check the temperature probes and their wiring
Return temperature probe alarm A6S1 • Check the probe and the wiring
Antifreeze temperature probe alarm A7S1 • Check the probe and the wiring
Expansion valve driver alarm A8S1
• Use the Carel display. Press "help" and check which component is in alarm
Maintenance period warning A13S1
The heat pump is about to reach the 10.000 hours of operation. Need for routine maintenance.
• Contact the service centre Aisin
Maintenance period alarm A14S1
The heat pump has reached 10.000 hours of operation. Need for routine maintenance.
• Reset the hours of operation (See page 82, service manual paragraph 13.3 "Reset hours of operation").
12 Troubleshooting (reference)

53
Winter antifreeze protection A15S1
the water temperature inside the AWS dropped below the minimum threshold
• Check water circulation and make sure the unit is not exposed to severe outdoor conditions.
GHP starting failure A18S1 • Check T1T2 setting • Check wiring 15 - 16 • Check C7 – NO7 relay
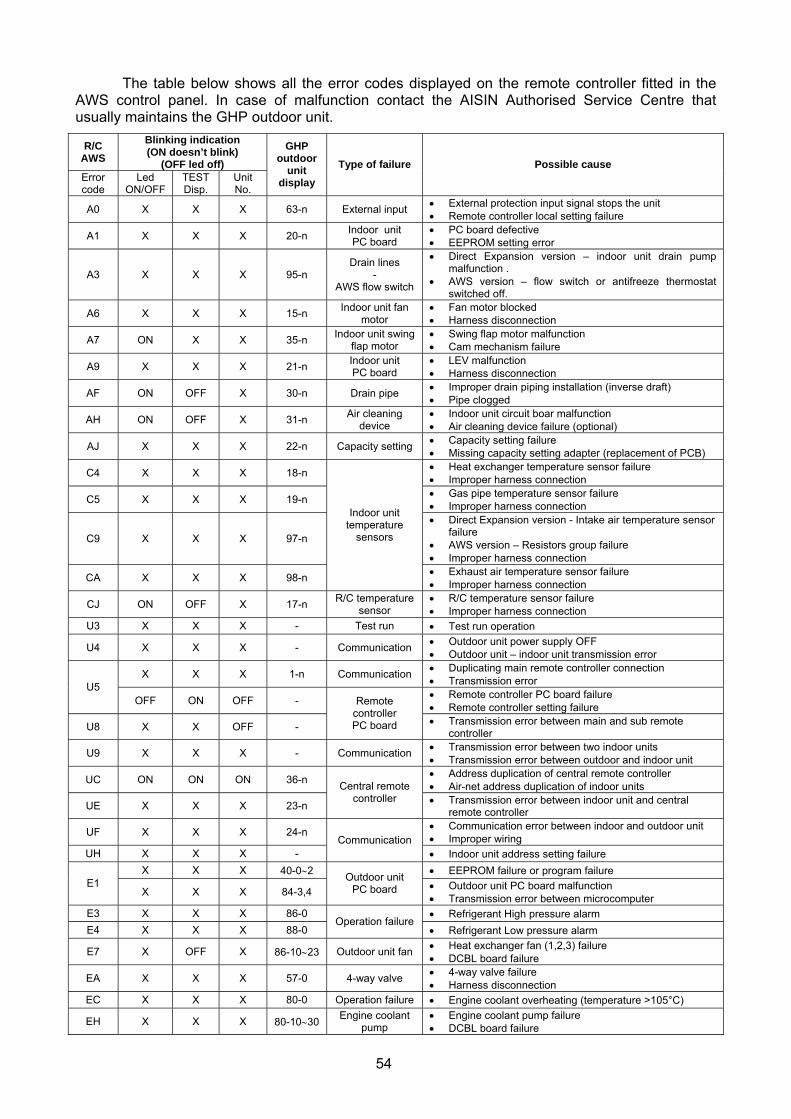
54
The table below shows all the error codes displayed on the remote controller fitted in the AWS control panel. In case of malfunction contact the AISIN Authorised Service Centre that usually maintains the GHP outdoor unit.
R/C AWS
Blinking indication (ON doesn’t blink)
(OFF led off) Error code
Led ON/OFF
TEST Disp.
Unit No.
GHP outdoor
unit display
Type of failure Possible cause
A0 X X X 63-n External input • External protection input signal stops the unit • Remote controller local setting failure
A1 X X X 20-n Indoor unit PC board
• PC board defective • EEPROM setting error
A3 X X X 95-n Drain lines
- AWS flow switch
• Direct Expansion version – indoor unit drain pump malfunction .
• AWS version – flow switch or antifreeze thermostat switched off.
A6 X X X 15-n Indoor unit fan motor
• Fan motor blocked • Harness disconnection
A7 ON X X 35-n Indoor unit swing flap motor
• Swing flap motor malfunction • Cam mechanism failure
A9 X X X 21-n Indoor unit PC board
• LEV malfunction • Harness disconnection
AF ON OFF X 30-n Drain pipe • Improper drain piping installation (inverse draft) • Pipe clogged
AH ON OFF X 31-n Air cleaning device
• Indoor unit circuit boar malfunction • Air cleaning device failure (optional)
AJ X X X 22-n Capacity setting • Capacity setting failure • Missing capacity setting adapter (replacement of PCB)
C4 X X X 18-n • Heat exchanger temperature sensor failure • Improper harness connection
C5 X X X 19-n • Gas pipe temperature sensor failure • Improper harness connection
C9 X X X 97-n
• Direct Expansion version - Intake air temperature sensor failure
• AWS version – Resistors group failure • Improper harness connection
CA X X X 98-n
Indoor unit temperature
sensors
• Exhaust air temperature sensor failure • Improper harness connection
CJ ON OFF X 17-n R/C temperature sensor
• R/C temperature sensor failure • Improper harness connection
U3 X X X - Test run • Test run operation
U4 X X X - Communication • Outdoor unit power supply OFF • Outdoor unit – indoor unit transmission error
X X X 1-n Communication • Duplicating main remote controller connection • Transmission error U5
OFF ON OFF - • Remote controller PC board failure • Remote controller setting failure
U8 X X OFF -
Remote controller PC board • Transmission error between main and sub remote
controller
U9 X X X - Communication • Transmission error between two indoor units • Transmission error between outdoor and indoor unit
UC ON ON ON 36-n • Address duplication of central remote controller • Air-net address duplication of indoor units
UE X X X 23-n
Central remote controller • Transmission error between indoor unit and central
remote controller
UF X X X 24-n • Communication error between indoor and outdoor unit • Improper wiring
UH X X X - Communication
• Indoor unit address setting failure X X X 40-0∼2 • EEPROM failure or program failure
E1 X X X 84-3,4
Outdoor unit PC board • Outdoor unit PC board malfunction
• Transmission error between microcomputer E3 X X X 86-0 • Refrigerant High pressure alarm E4 X X X 88-0
Operation failure • Refrigerant Low pressure alarm
E7 X OFF X 86-10∼23 Outdoor unit fan • Heat exchanger fan (1,2,3) failure • DCBL board failure
EA X X X 57-0 4-way valve • 4-way valve failure • Harness disconnection
EC X X X 80-0 Operation failure • Engine coolant overheating (temperature >105°C)
EH X X X 80-10∼30 Engine coolant pump
• Engine coolant pump failure • DCBL board failure

55
R/C AWS
Blinking indication (ON doesn’t blink)
(OFF led off) Error code
Led ON/OFF
TEST Disp.
Unit No.
GHP outdoor
unit display
Type of failure Error code Possible cause
F3 X X X 91-0 • Compressor discharge temperature too high (>120°C) F4 X X X 87-0,2
Operation failure • Compressor intake temperature too high (> 40°C)
FE X X X 81-0 Engine oil • Abnormal engine oil pressure • Engine oil level insufficient
FF X X X 58-0 Compressor oil • Refrigerant oil supply valve failure • Improper harness connection
FJ X X X 47-0 Catalyser • Catalyser overheating (where provided)
H3 X X X 76-0 High pressure switch
• High pressure switch malfunction • Improper harness connection
H4 X X X 88-2 Low pressure switch
• Low pressure switch malfunction • Improper harness connection
H9 X X X 61-0 • Outdoor temperature sensor malfunction • Improper harness connection
H9 X X X 61-1 • Outdoor temperature sensor short circuit
HC X X X 70-0 • Engine coolant temperature sensor malfunction • Improper harness connection
HC X X X 80-1
Outdoor unit temperature
sensors
• Engine coolant temperature sensor short circuit HJ X X X 80-2 Engine coolant • Engine coolant level insufficient HF X OFF X EE-0 Maintenance • Periodic maintenance alert
X X X 78-1∼5 • Compressor discharge temp sensor disconnected J3
X X X 91-2∼7 • Compressor discharge temp sensor short circuit X X X 54-0 • Super cooling heat ex. temp. sensor disconnected X X X 54-1 • Super cooling heat ex. temp. sensor short circuit X X X 55-0,1 • Accumulator outlet temp. sensor disconnected
J4
X X X 55-2,3 • Accumulator outlet temp. sensor short circuit X X X 53-0,1 • Compressor intake temp. sensor disconnected
J5 X X X 53-2,3 • Compressor intake temp. sensor short circuit
X X X 65-0 • Heat exchanger liquid pipe temp. sensor disconnected • Improper harness connection J6
X X X 65-2 • Heat exchanger liquid pipe temp. sensor short circuit
X X X 66-0 • Sub heat exchanger liquid pipe temp. sensor disconnected
J7 X X X 66-1
Outdoor unit temperature
sensors
• Sub heat exchanger liquid pipe temp. sensor short circuit
X X X 67-0 • Outdoor liquid pipe temp. sensor disconnected J8
X X X 67-2
Outdoor unit temperature
sensors • Outdoor liquid pipe temp. sensor short circuit
JA X X X 73-0,1 • High pressure sensor malfunction
JC X X X 88-4
Outdoor unit pressure sensors • Low pressure sensor malfunction
JE X X X 71-0 Oil pressure sw. • Oil pressure switch disconnected X X X 72-0 • Engine room temp. sensor disconnected X X X 72-1 • Engine room temp. sensor short circuit JJ X X X 72-6
Outdoor unit temperature
sensors • Catalyser temp. sensor disconnected LE X X X 75-1∼3 Igniter voltage • Igniter voltage too low or too high LF X X X 84-0 • Engine start failure – missing supply gas LJ X X X 75-0
Operation failure • Unwanted engine stop
P8 X X X 74-1∼4
74-6 82-0∼1
Engine • Insufficient starting engine speed (starter failure) • Abnormal engine speed (gas mixer failure)
PE X X X 74-7 Gas valves • Supply electro magnetic gas valves failure PF X X X 60-0 Starter • Starter failure U0 X X X 88-5 Ref. Piping • Refrigerant gas empty U7 X X X 4-0∼6 Communication • master / slave outdoor unit communication failure
UA X X X 43-0,1 44-n
Indoor unit number
• Over connection of capacity units • Too many indoor units connected

56
NOTE ………………………………………………………………………………………….. ………………………………………………………………………………………….. ………………………………………………………………………………………….. ………………………………………………………………………………………….. ………………………………………………………………………………………….. ………………………………………………………………………………………….. ………………………………………………………………………………………….. ………………………………………………………………………………………….. ………………………………………………………………………………………….. ………………………………………………………………………………………….. ………………………………………………………………………………………….. ………………………………………………………………………………………….. ………………………………………………………………………………………….. ………………………………………………………………………………………….. ………………………………………………………………………………………….. ………………………………………………………………………………………….. ………………………………………………………………………………………….. ………………………………………………………………………………………….. ………………………………………………………………………………………….. ………………………………………………………………………………………….. …………………………………………………………………………………………..

57
………………………………………………………………………………………….. ………………………………………………………………………………………….. ………………………………………………………………………………………….. ………………………………………………………………………………………….. ………………………………………………………………………………………….. ………………………………………………………………………………………….. ………………………………………………………………………………………….. ………………………………………………………………………………………….. ………………………………………………………………………………………….. ………………………………………………………………………………………….. ………………………………………………………………………………………….. ………………………………………………………………………………………….. ………………………………………………………………………………………….. ………………………………………………………………………………………….. ………………………………………………………………………………………….. ………………………………………………………………………………………….. ………………………………………………………………………………………….. ………………………………………………………………………………………….. ………………………………………………………………………………………….. ………………………………………………………………………………………….. …………………………………………………………………………………………..

58


29/08/2013