yes ssg vent window system · • aama/nwwda 101/i.s.2-97 • hc-60 rating ... a spot test is...
TRANSCRIPT
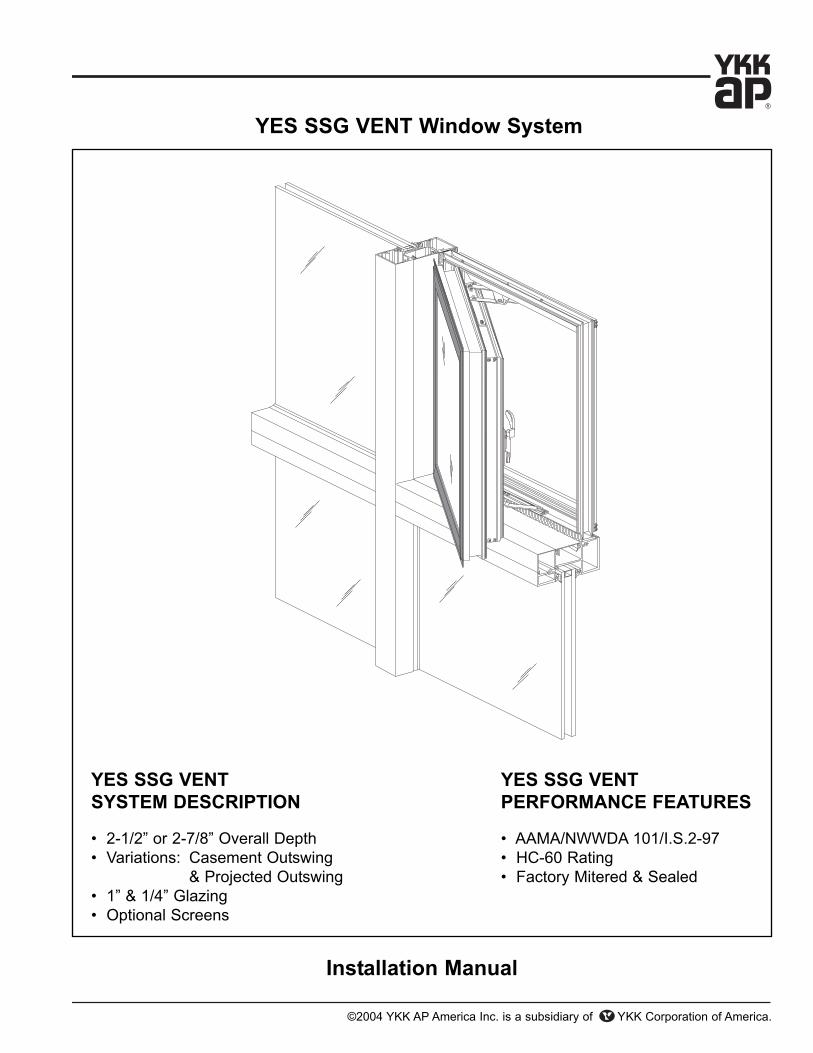
YES SSG VENT Window System
Installation Manual
©2004 YKK AP America Inc. is a subsidiary of YKK Corporation of America.
YES SSG VENT SYSTEM DESCRIPTION
• 2-1/2” or 2-7/8” Overall Depth • Variations: Casement Outswing
& Projected Outswing• 1” & 1/4” Glazing• Optional Screens
YES SSG VENT PERFORMANCE FEATURES
• AAMA/NWWDA 101/I.S.2-97• HC-60 Rating • Factory Mitered & Sealed


Effective Date: July 15, 2004
YES SSG VENT Window System
Page-i
TABLE OF CONTENTS
Installation Notes . . . . . . . . . . . . . . . . . . . . . . . . . . . . . . . . . . . . . . . . Page ii & iii
Hardware & Accessories . . . . . . . . . . . . . . . . . . . . . . . . . . . . . . . . . . Page iv
GENERAL INFORMATION
Size Limitations . . . . . . . . . . . . . . . . . . . . . . . . . . . . . . . . . . . . . . . . . . Page 1
Determine Frame and Glass Size . . . . . . . . . . . . . . . . . . . . . . . . . . . Page 1
GLAZING
Glazing . . . . . . . . . . . . . . . . . . . . . . . . . . . . . . . . . . . . . . . . . . . . . . . . Page 2 & 3
Apply Structural Silicone Sealant . . . . . . . . . . . . . . . . . . . . . . . . . . . . Page 4
Install Exterior Trim . . . . . . . . . . . . . . . . . . . . . . . . . . . . . . . . . . . . . . . Page 5
INSTALLATION
Install Window Frame . . . . . . . . . . . . . . . . . . . . . . . . . . . . . . . . . . . . . Page 5
Install Vent . . . . . . . . . . . . . . . . . . . . . . . . . . . . . . . . . . . . . . . . . . . . . Page 6

Effective Date: July 15, 2004
YES SSG VENT Window System
Page-ii
INSTALLATION NOTES
1. Do not drop, roll or drag boxes of aluminum framing. Move and stack boxes with proper support to prevent distortion. If fork lifts are used, be especially careful about striking the boxes when lifting or moving.
2. Store in a dry, out of the way area. If rain exposure, condensation or any water contact islikely, then all packaging material should be removed. Wet packaging materials will discolor and may stain aluminum finishes and paints.
3. All materials should be checked for quantity and quality upon receipt, YKK AP must be notified immediately of any discrepancies in shipment. Check to make sure that you have therequired shims, sealants, supplies, and tools necessary for the installation.
4. Carefully check the openings and surrounding conditions that will receive your material.Remember, if the construction is not per the construction documents, it is your responsibility to notify the general contractor in writing. Any discrepancies must be brought to the generalcontractor’s attention before you proceed with the installation.
5. Collect your shop drawings, materials, packing list, and this installation manual. Carefully review parts location, the sequence of installation, when you glaze it, and how youseal it. Installation instructions are of a general nature and may not cover every condition youwill encounter. The shop drawings and/or installation manuals were prepared specifically for the product.
6. Any material substitutions must be of equal or greater quality.
7. Make certain that material samples have been sent for compatibility testing for all manufacturer’s sealants involved. Make certain that sealants have been installed in strict accordance with the manufacturer’s recommendations and specifications.
8. All insulated units must be designed for Silicone Glazing. Only neutral curing siliconesmay be used.
9. Remember to isolate, in a approved manner, all aluminum from uncured masonry or other incompatible materials.
10. System-to-structure fasteners are not supplied by YKK AP. Fasteners called out on shopdrawings are to indicate minimum sizes for design loading.
11. If any questions arise concerning YKK AP products or their installation, contact YKK APfor clarification before proceeding.

Effective Date: July 15, 2004
YES SSG VENT Window System
Page-iii
INSTALLATION NOTES
12. YKK AP window installation is typically completed before drywall, flooring and other products which may still be in process. Take the extra time to wrap and protect the installedmaterial.
13. Cutting tolerances are plus or minus one thirty second unless otherwise specified.
14. YKK AP Model YES SSGVent windows are prefinished, prefabricated, and preassembled products, and must be protected against damage.
15.Concrete, mortar, plaster, muriatic acid and other alkaline and acid based construction and cleaning materials may be very harmful to window finishes and should be removed withwater and mild soap immediately or permanent damage or staining of the finishes will occur. A spot test is recommended before any cleaning agent is used, and abrasive type cleanersmust never be used.
16. Windows are never to be used as ladders, step stools, scaffolds or scaffold supports.
17. All work must start from, and be referenced to benchmarks, offset lines and/or column centerlines established by the architectural drawings and the general contractor.
18. All windows must be installed plumb, square, level and true, and in accordance withapproved shop drawings and these installation instructions.
19. Glass and glazing building codes governing the design and use of products vary widely.YKK AP America Inc. does not control the selection of products, product configurations, operating hardware and function, or glazing materials, and YKK AP assumes no responsibilityfor these design considerations. It is the responsibility of the design professional, owner, architect, specifier, general contractor, and the installer to make these selections in strict accordance with all applicable codes.
20. Check our website, www.ykkap.com, for the latest installation manual update prior to commencing work.

Effective Date: July 15, 2004
YES SSG VENT Window System
Page-iv
Hardware & Accessories
E1-1511E1-1512
4 Bar Hinge (10”)4 Bar Hinge (16”)
StainlessSteel
E1-1577E1-1578
Cam Handle (R)Cam Handle (L)
White BronzeUS25D
E1-1579 Keeper White BronzeUS25D
E1-1580 Temporary Glazing Retainer(Optional)
Mill Aluminum/PVC Sponge
E1-1585 Guide Roller Base(Factory Installed) Mill Aluminum
E2-0604 Corner Block Black EPDM Silicone Compatible
E2-0704 Setting Block Black EPDM Silicone Compatible
E2-0609 Glazing Spacer Black PolyurethaneFoam
E2-0610 Exterior Trim Black Polypropylene/TPE
E2-0625 Airtight Bulb Gasket Black Santoprene
E3-1103 Snubber(Factory Installed)
Black Nylon

Effective Date: July 15, 2004
YES SSG VENT Window System
Page-1
GENERAL INFORMATION
WINDOW MINIMUM MAXIMUM
Project 12” x 12” 60” x 36”
Casement 12” x 12” 36” x 60”
Size Limitations:
STEP 1DETERMINE FRAME & GLASS SIZE
-Carefully measure the daylight opening of the surrounding framing system at several places along the frame opening, both width and height.
-Select the smallest dimension measured andsubtract(–) 5/8” to obtain the window frame sizefor both the width and height.
-Glass size is equal to the daylight opening dimensions measured above minus(–) 1-3/4”.
See Detail 1.
DETAIL 1

GLAZINGSTEP 2 GLAZING
YES SSG Vents are delivered unglazed for bench glazing only.
Bench Glazing:-Remove the vent from the frame leaving the four bar hinge attached to the vent.-Using an approved cleaner, clean the surfaces of the glass and vent that will come into contact with the structural silicone.
See Detail 2.
Effective Date: July 15, 2004
YES SSG VENT Window System
Page-2
DETAIL 2
DETAIL 3
-Cut glazing spacers, E2-0609, for the vent:
Vertical: D.L.O. plus(+) 1-7/16”Horizontal: D.L.O. plus(+) 13/16”
-Install vertical spacers first and then the horizontal spacers between the verticals.
See Detail 3.

Effective Date: July 15, 2004
YES SSG VENT Window System
Page-3
-Set the glass down onto the glazing spacer, exterior side up.-Check to make sure that the glass is centered in the vent and that it is in full contact with the setting/corner blocks.
-Shim as required.-Check the vent to ensure that it is square by measuring the diagonals (corner to corner). The measured A/B difference should not exceed 1/16”: A = B (+/- 1/16”).
See Detail 5.
GLAZINGSTEP 2 (Continued)GLAZING
-Install corner blocks for casement vents and setting blocks for projected vents as shown below.See Detail 4 .
-Carefully lift the glass up and remove the protective film from the top of the silicone glazing spacer.
-Press the glass down firmly to obtain full adhesion with the glazing spacer.
Glazing Option:-Install temporary retainers, E1-1580, at 3” from each corner and then no more than 24” on center with PC-0806 fasteners(#8 x 3/8” PPHSMS).
See Detail 6.
DETAIL 4
DETAIL 5
DETAIL 6

Effective Date: July 15, 2004
YES SSG VENT Window System
Page-4
STEP 3APPLY STRUCTURAL SILICONE SEALANT
-Apply sealant on the exterior of the vent to protect the integrity of the insulated unit.
-Install an approved backer rod between the glass and vent along the top of the glass and down about 4 inches on each side.
-Apply masking tape to the glass and vent.-Apply sealant to the joint and immediately tool the sealant using positive pressure to ensure that the silicone sealant makes full contact with both the glass and vent.
-Immediately remove the masking tape after tooling. Do not let the sealant skim over.
See Detail 7 .
Caution: Verify silicone sealant compatibility with the insulated unit.
-Apply structural silicone to the interior of the vent:-Carefully turn the vent over so that the interioris facing up.
-Apply masking tape to the glass and vent.-Apply structural silicone sealant using positivepressure to completely fill the cavity between the glass and vent.
-Immediately tool the silicone sealant usingpositive pressure to ensure that the siliconesealant makes full contact with both the glass and vent.-Immediately remove the masking tape after tooling, before the silicone sealant skims over.
-Prior to moving the glazed vent, permit the structural silicone to fully cure, as recommended by the manufacturer.
See Detail 8.
GLAZING
DETAIL 7
DETAIL 8
Effective Date: July 15, 2004
YES SSG VENT Window System
Page-5
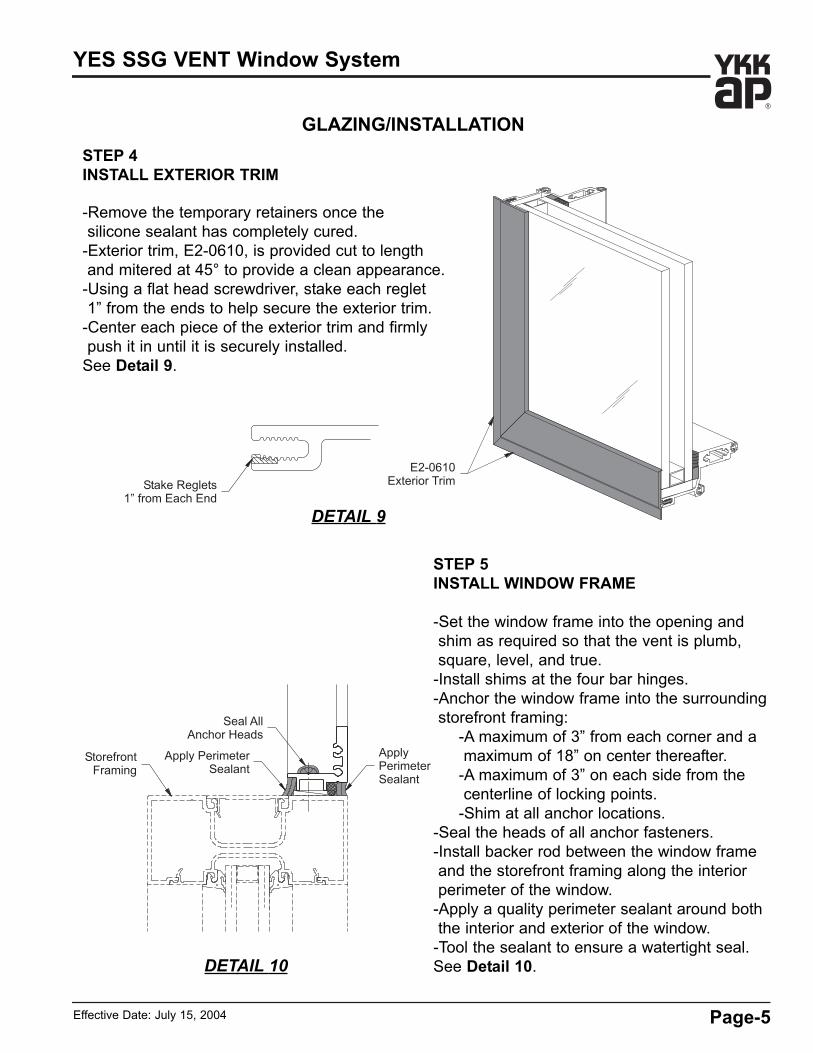
STEP 4INSTALL EXTERIOR TRIM
-Remove the temporary retainers once the silicone sealant has completely cured.
-Exterior trim, E2-0610, is provided cut to lengthand mitered at 45° to provide a clean appearance.
-Using a flat head screwdriver, stake each reglet1” from the ends to help secure the exterior trim.
-Center each piece of the exterior trim and firmlypush it in until it is securely installed.
See Detail 9.
GLAZING/INSTALLATION
STEP 5INSTALL WINDOW FRAME
-Set the window frame into the opening andshim as required so that the vent is plumb,square, level, and true.
-Install shims at the four bar hinges.-Anchor the window frame into the surroundingstorefront framing:
-A maximum of 3” from each corner and amaximum of 18” on center thereafter.
-A maximum of 3” on each side from thecenterline of locking points.
-Shim at all anchor locations.-Seal the heads of all anchor fasteners.-Install backer rod between the window frameand the storefront framing along the interior perimeter of the window.
-Apply a quality perimeter sealant around both the interior and exterior of the window.
-Tool the sealant to ensure a watertight seal.See Detail 10.
DETAIL 9
DETAIL 10

Effective Date: July 15, 2004
YES SSG VENT Window System
Page-6
STEP 6INSTALL VENT
-Carefully set the vent back into the window frame and reattach the four bar hinges.Be careful not to cross thread the fasteners.
-Loosen the two fasteners that attach each four bar hinge to the vent and adjust thevent so that it operates properly.
-Tighten the two fasteners of each hinge once adjustments are completed.
-Install fasteners that will fix the location of the four bar hinge:-Drill a 0.161” diameter (#20 drill bit) hole through the round holes in the four bar hinge, both at the vent and frame, and install the #10 stainlesssteel fasteners provided.
-Replace the fasteners at each end of the four bar hinge with stainless steel fastenersthat are 1” long, to help anchor the window to the surrounding storefront framing.
See Detail 11.
INSTALLATION
DETAIL 11


YKK AP America Inc.7680 The BluffsSuite 100Austell, Georgia 30168www.ykkap.com