year 2 technology assessment teacher guidelines | insect ... web viewyears 1–2. technology....
TRANSCRIPT

Insect designer
Years 1–2 TechnologyChildren use technology process to design and make a model insect. They explore materials and techniques, then select suitable resources to make their model.
Time allocation 7–8 hours
Student roles Investigate materials, tools and techniques suited to making a model insect. Construct the model, evaluate the process and reflect on learning.
Context for assessmentIn the accompanying Science assessment, Insect discovery, children designed an imagined new species. This assessment builds on that process by focusing on the materials and techniques children use to make a model of their insect design.
Note: If not using this assessment as a partner for Insect discovery, investigation and design phases will need to be added.
© The State of Queensland (Queensland Studies Authority) and its licensors 2009.All rights reserved. Please read the copyright notice on our website: www.qsa.qld.edu.au

This assessment gathers evidence of learning for the following Essential Learnings:
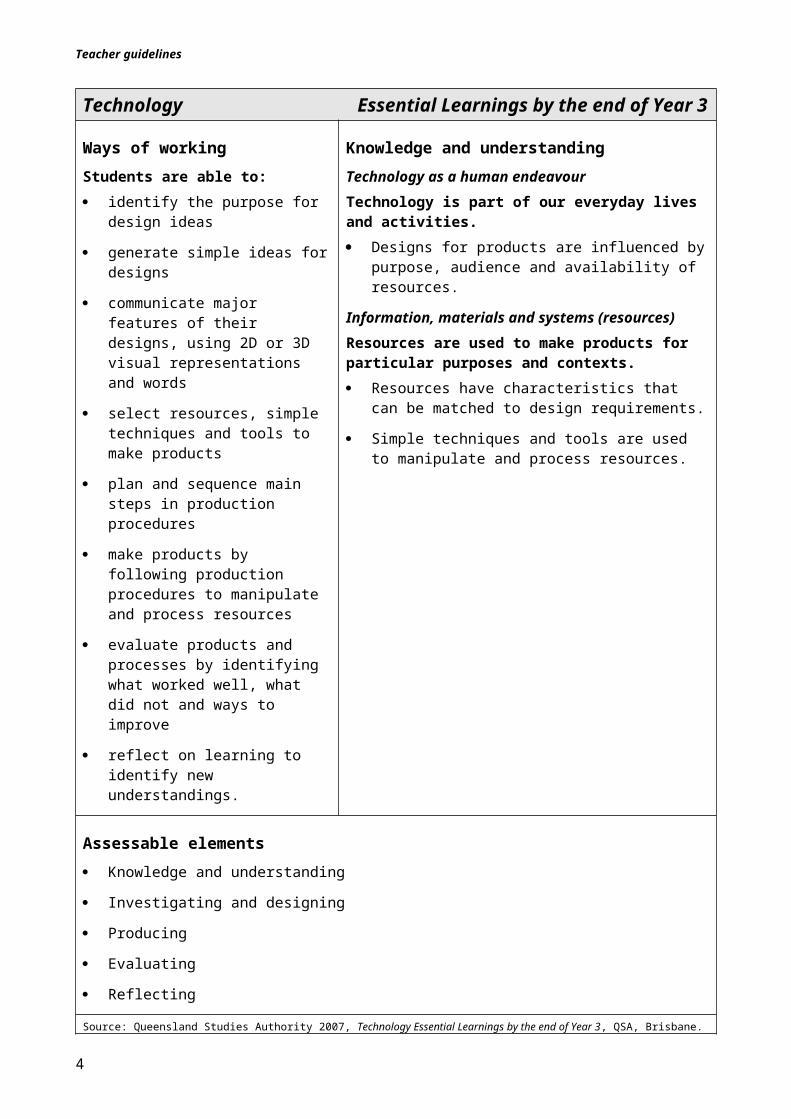
Technology Essential Learnings by the end of Year 3
Ways of workingStudents are able to: identify the purpose for design
ideas
generate simple ideas for designs
communicate major features of their designs, using 2D or 3D visual representations and words
select resources, simple techniques and tools to make products
plan and sequence main steps in production procedures
make products by following production procedures to manipulate and process resources
evaluate products and processes by identifying what worked well, what did not and ways to improve
reflect on learning to identify new understandings.
Knowledge and understandingTechnology as a human endeavourTechnology is part of our everyday lives and activities. Designs for products are influenced by purpose,
audience and availability of resources.
Information, materials and systems (resources)Resources are used to make products for particular purposes and contexts. Resources have characteristics that can be
matched to design requirements.
Simple techniques and tools are used to manipulate and process resources.
Assessable elements Knowledge and understanding
Investigating and designing
Producing
Evaluating
Reflecting
Source: Queensland Studies Authority 2007, Technology Essential Learnings by the end of Year 3, QSA, Brisbane.
© The State of Queensland (Queensland Studies Authority) and its licensors 2009.All rights reserved. Please read the copyright notice on our website: www.qsa.qld.edu.au

Years 1–2 Technology: Insect designer
Listed here are suggested learning experiences for children before implementing this assessment:
This assessment is designed to support the Science assessment Insect discovery. Before starting this design challenge, children will have investigated insects and created a design for an imagined new species.
In addressing this design challenge, children will work through the technology process: investigation, ideation, production and evaluation.
Children will benefit from prior experience with:
hands-on exploration of a variety of materials, tools and techniques
making labelled design drawings
making products following production procedures
reading and writing procedural texts
self and peer evaluation (formative and summative)
reflecting and talking about what they have learnt.
3
Teacher guidelines
Tech
nolo
gy (2
003)
Yea
rs 1
–10,
Que
ensl
and
Stu
dies
Aut
horit
y
4

Years 1–2 Technology: Insect designer
Teacher resources
Getting a buzz from insects — Queensland Museum site with clear, authoritative information about insects: <www.qm.qld.gov.au/features/insects>
Insect kits (and many other resources) are available from Queensland Museum Loans: <www.qm.qld.gov.au/education/loans>
PreparingConsider these points before implementing the assessment.
Well in advance of the assessment, start collecting a variety of suitable materials, e.g. paper, card, fabrics, plastics (shopping bags, food and drink containers, cling wrap), wire, string, straws, kebab sticks, foam rubber, paddle pop sticks, thread, play dough, egg cartons.
Provide access to tools, e.g. scissors, wire cutters, hole punches, pliers, and joining methods, e.g. staplers, tapes, wire, glues for paper, wood, plastic.
ImplementationConsider these points when implementing the assessment.
The key assessable item is the child’s Design folio. This can be a folder or scrap-book where children compile data and ideas, including:
notes and samples from experiments with tools and materials
sketches and design drawings
production plan
evaluation checklist.
The Appendixes in this booklet provide a number of templates that can be pasted as headings onto pages of the Design folios. Modify these to suit the ability levels of your children and available resources.
At each stage, engage in brainstorming sessions to build lists of relevant vocabulary, and post these on a Word wall for children to access. This collection may be classified into sub-themes (e.g. materials, tools, joins) as it develops.
The way children document their progress can be adapted to suit their literacy skills. Provide appropriate support so that literacy demands do not compromise the documentation of children’s technology thinking and skills. Children may:
cut and paste words into spaces
write or draw responses
5

Teacher guidelines
have an adult scribe their verbal response.
Sample implementation planThis table shows one way that this assessment can be implemented. It is a guide only — you may choose to use all, part, or none of the table. You may customise the table to suit your children and their school environment.
Suggested time Student activity Teacher role
Section 1. Design brief
45 minutes Read and discuss Appendix A: Design brief.
Note: This outline assumes children have already developed an insect design in the accompanying Science assessment. If not, they will need support to investigate insects and create a design drawing at this stage.
Start a Design folio and include the initial insect design and Appendix B: Checklist.
Make some initial design sketches identifying possible materials.
Use a poster of Appendix A: Design brief to guide initial discussion of the challenge. Adapt the brief to suit children and available resources.
Brainstorm design ideas on how children could make a model. Use a Word wall to collect relevant vocabulary.
Help children set up a scrap book or folder as their Design folio. Start by including their design drawing from the Insect discovery assessment.
Add Appendix B: Checklist to the Design folios and explain to children that this will guide them through the assessment.
Section 2. Investigate tools and materials
90 minutes Investigate joining materials:
Explore a collection of materials and ways to join them.
Brainstorm to create a list of relevant words.
Document the results of trials using Appendix C: How do you join materials?
Provide a variety of suitable materials and tools.
Facilitate discussion about suitability of materials for particular roles (e.g. What could we use for transparent wings? How could we make fuzzy antennae?)
Model how to complete Appendix C: How do you join materials? by using words from the “materials” and “joins” word lists to document trials.
Encourage exploration of new ideas. Facilitate class discussion:
What worked? What didn’t?
What was strong?
What will fall apart easily?
6

Years 1–2 Technology: Insect designer
90 minutes Investigate tools:
Experiment with cutting, bending and shaping different materials with a variety of tools.
Record using Appendix D: Which tool is best?
Provide a range of suitable tools and material samples. Demonstrate and discuss safe practices.
Encourage children to try many combinations and document the most interesting ones.
Demonstrate how to use words from the “tools” and “jobs” lists to document the testing in Appendix D: Which tool is best?
Section 3. Design
45 minutes Select a set of suitable materials and complete Appendix E: What materials will I use? in the Design folio.
Make a labelled design drawing identifying the materials and joins used for each part.
Refer to the Appendix A: Design brief or Appendix B: Checklist to make sure the design matches the requirements.
Support selection and recording of a relevant set of materials.
Model the creation of a labelled diagram. Discuss the difference between a “scientific” drawing that details structures and adaptations (as completed in Insect discovery) and a “technical” drawing that show materials and techniques for construction.
Ensure that drawings are compiled in the Design folio.
Extension activity: Children could use a code to identify joining methods (e.g. write a G where glue is to be used, T for tape, S for staple). The code would need a key to be included.
Section 4. Produce
30 minutes Write a production plan, using Appendix F: How will you make your model?, identifying steps and resources needed at each stage.
Model procedural text; provide suitable vocabulary list.
90 minutes Make the model. Provide suitable tools, materials and work spaces. Review safe practices.
Section 5. Evaluate and reflect
60 minutes Use the Appendix B: Checklist to ensure model is complete, and to evaluate the process.
View and discuss each others’ solutions to construction challenges.
Think about what has been learnt, and complete Appendix G: Reflecting.
Model appropriate language for critiquing each others’ work. Facilitate discussions (partners and whole class) identifying interesting solutions to problems.
Support children with vocabulary and ideas for reflective responses. Depending on the student, this may be best done orally.
7

Teacher guidelines
Resources for the assessment
Appendix A Design brief
Appendix B Checklist
Appendix C How do you join materials?
Appendix D Which tool is best?
Appendix E What materials will I use?
Appendix F How will you make your model?
Appendix G Reflecting
8

Years 1–2 Technology: Insect designer
During the learning process, you and your children should have developed a shared understanding of the curriculum expectations identified as part of the planning process.
After children have completed the assessment, identify, gather and interpret the information provided in responses. Use only the evidence in responses to make your judgment about the quality of the learning. Refer to the following documents to assist you in making standards-referenced judgments:
Guide to making judgments
Indicative A response
Sample responses (where available).
Making judgments about this assessmentNote: The assessment should focus on the process the child negotiates rather than the finished model. The Design folio is the main source of evidence for the assessment.
For further information, refer to the resource Using a Guide to making judgments, available in the Resources section of the Assessment Bank website.
Evaluate the information gathered from the assessment to inform teaching and learning strategies.
Involve students in the feedback process. Give children opportunities to ask follow-up questions and share their learning observations or experiences.
Focus feedback on a child’s personal progress. Emphasise continuous progress relative to their previous achievement and to the learning expectations — avoid comparing a child with their classmates.
For further information, refer to the resource Using feedback, available in the Resources section of the Assessment Bank website.
9

Appendix A
Design briefYou have investigated insects, and created a design for a new species. To show what your design really looks like, you will make a realistic model.

Appendix B
Your task: Make a 3D model of an insect.Investigate: Try out some different materials. Try using different kinds of tools. Test different ways to join things.Design: Make a design drawing. Use these insect facts in your design:- body: insects have three body parts
(head, thorax, abdomen)- legs: insects have six legs- wings: some insects have two or four
wings; some have none- wings and legs are all joined to the
thorax (middle body part). Plan the steps for making the model.Produce: Make your model look like your design. Make it strong.Evaluate: Keep finding ways to make your design
better.

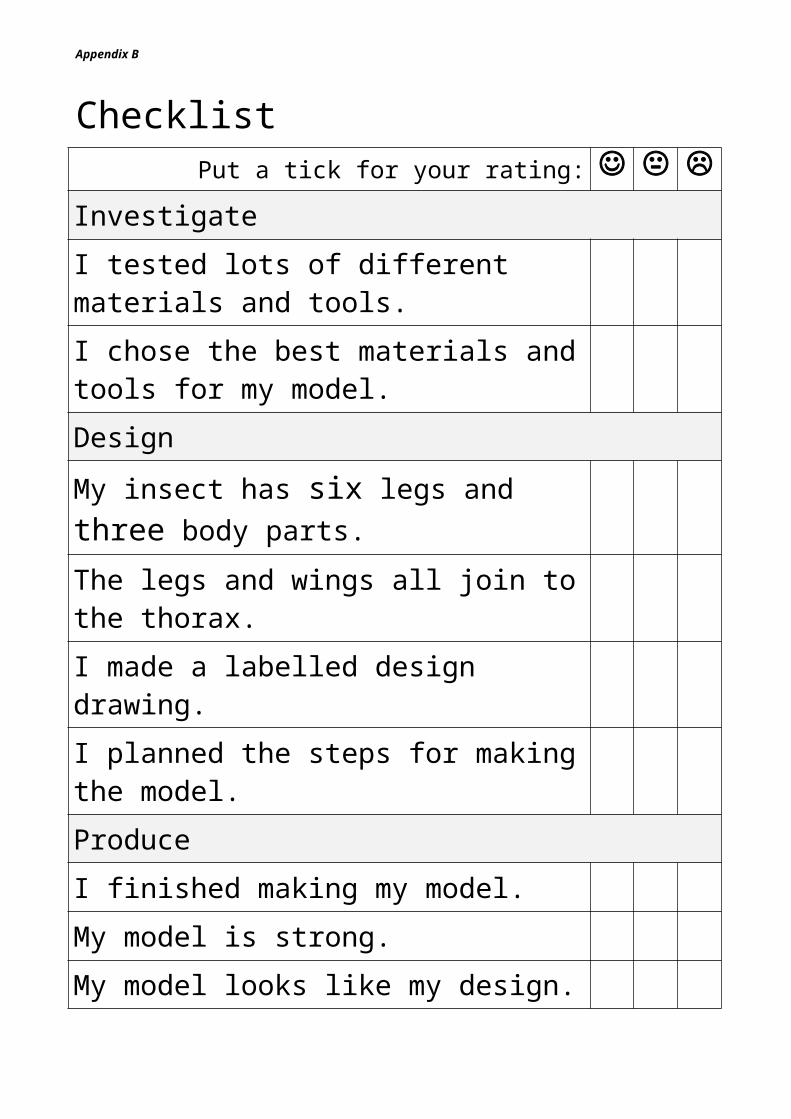
Appendix B
ChecklistPut a tick for your rating:
InvestigateI tested lots of different materials and tools.I chose the best materials and tools for my model.DesignMy insect has six legs and three body parts.The legs and wings all join to the thorax.I made a labelled design drawing.I planned the steps for making the model.ProduceI finished making my model.My model is strong.My model looks like my design.EvaluateI found ways to improve my design.My best improvement was:

Appendix B
I saw this good design idea on someone else’s model:

Appendix C
Investigate tools and materials
How do you join materials?Children test different ways to join materials. Encourage them to try materials they have never used before. Use a copy of the following table as column headings pasted into the Design folio to document the trials. Prior to the trials, develop a Word wall of relevant vocabulary.
--------------------------------------------------------------------------------------------------------------------------------------------------------
Material 1
Material 2
Joining method
Result
To join
to
I used
and found that
--------------------------------------------------------------------------------------------------------------------------------------------------------
Material 1
Material 2
Joining method
Result
To join
to
I use
and found that

Appendix B
d--------------------------------------------------------------------------------------------------------------------------------------------------------
Material 1
Material 2
Joining method
Result
To join
to
I used
and found that

Appendix C
How do you join materials? (continued)Suggested starting lists of vocabulary for a Word wall:
Some materials to try:paper cardboard kebab stick egg cartoncloth plastic bottle plastic bag paddle pop
stickwire string foil foam rubber
straws play dough pipe cleaner googly eyesOther:
Some joins to test:staple wood glue
(PVA)glue stick tape
craft glue tie with string sew skewerpaper clip nail paper fastener Blu-tack

Appendix C
Other:
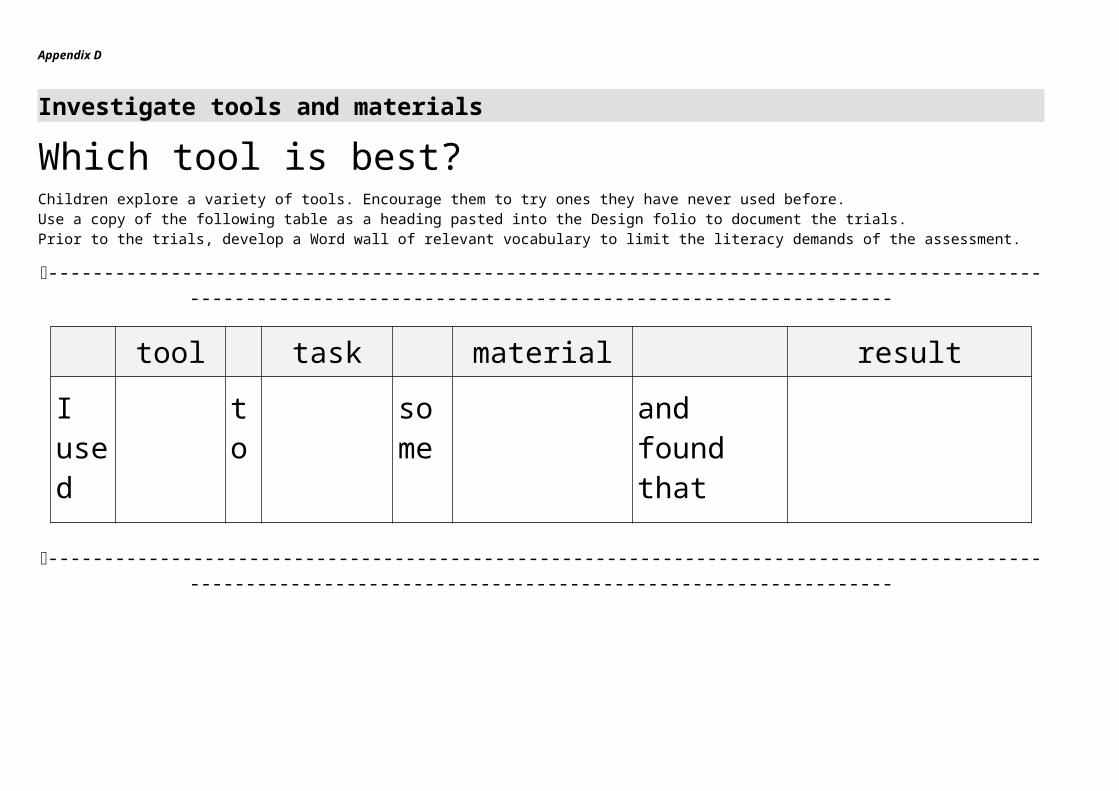
Appendix D
Investigate tools and materials
Which tool is best?Children explore a variety of tools. Encourage them to try ones they have never used before. Use a copy of the following table as a heading pasted into the Design folio to document the trials. Prior to the trials, develop a Word wall of relevant vocabulary to limit the literacy demands of the assessment.
--------------------------------------------------------------------------------------------------------------------------------------------------------
tool task material resultI used
to
some
and found that
--------------------------------------------------------------------------------------------------------------------------------------------------------
tool task material resultI used
to
some
and found that

Appendix C
--------------------------------------------------------------------------------------------------------------------------------------------------------
tool task material resultI used
to
some
and found that

Appendix D
Which tool is best? (continued)Suggested starting lists of vocabulary for Which tool is best? Word wall:
Some tools to try:stapler scissors pliers wire cutters
hole punch saw ruler brushsandpaper file Other:
Some tasks:cut bend join make a hole in
measure paint smooth shapeOther:

Appendix E
Design
What materials will I use?Children decide which material is best for each part of the model and draw, write or attach materials they plan to use. Use the table below in the Design folio.
--------------------------------------------------------------------------------------------------------------------------------------------------------
What materials will I use for my insect model?model part
material reason
I will make the
legs out of because
I will make the
body out of because
I will make the
out of because
--------------------------------------------------------------------------------------------------------------------------------------------------------

Appendix D
What materials will I use for my insect model?model part
material reason
I will make the
legs out of because
I will make the
body out of because
I will make the
out of because

Appendix F
Produce
How will you make your model?Write or draw the steps in making your model.
Step
What to do Tools and materials
1.
2.
3.
4.
Appendix G
Evaluate and reflect
ReflectingThink about what you have learnt, then write or talk about these questions:What did you learn about joining materials?
What did you learn about using tools?
What did you learn about designing?
What was the hardest part of making your model?
If you made another model, what would you do differently?