yealink sip-t20p server setup guide - elastix...to set up the elastix server for the yealink...
TRANSCRIPT

http://www.elastix.org
Yealink SIP-T20P and Elastix Server
Setup Guide
http://www.elastix.org
Yealink SIP-T20P and Elastix Server
Setup Guide
http://www.elastix.org
Yealink SIP-T20P and Elastix Server
Setup Guide

PaloSanto SolutionsYealink SIP-T20P Server Setup Guide
2
1.0 Setup DiagramFigure 1-1 is a setup diagram for a single IP Phone Yealink T20P configuration. The phoneis setup as a SIP telephony device.
Figure 1-1. Setup Diagram
2.0 Host PC EnvironmentTable 2-1. Host Server Environment Details
DescriptionHardware Type Elastix Appliance ELX-Series
Hardware Version ELX-3000Software Type Elastix
Software Version 2.3
3.0 Test Setup EquipmentTable 3-1. Test Setup Equipment
Equipment Model VersionIP (SIP) Phone N/A N/A
Yealink SIP-T20P FW: 9.50.0.50 (HW: 7.0.0.54)Switch N/A N/A

PaloSanto SolutionsYealink SIP-T20P Server Setup Guide
3
4.0 Setup ProcedureTo set up the Elastix Server for the Yealink SIP-T20G,
1. Go to the web address of the Elastix Server Login page. The web address isdetermined by the customer, for this guide we have used the IP address 192.168.1.652. On the Login page, type the username and password for an administrative user intothe Username and Password fields, see Figure 4-1. The username and password aredetermined by the customer.
Figure 4-1. Login
3. Press Enter or click on the Submit button to go to Elastix’s Dashboard
4. Once inside, click on the PBX tab on the menu at the top of the screen
Figure 4-2. Dashboard
5. Click on the Submit button to add an extension, see Figure 4-3. This will take you tothe Add SIP Extension page.

PaloSanto SolutionsYealink SIP-T20P Server Setup Guide
4
Figure 4-3. Add an Extension
6. On the Add SIP Extension page (Figure 4-4), fill in the following information:
• User Extension (301 in this example)• Display Name (‘YealinkT20P’ in this example)• secret (‘h7Dka3Rf9si0t’ in this example)
Figure 4-4. Add SIP Extension
7. Click on the ‘Submit’ button at the end of the page. The extension will be created andyou will see the page on Figure 4-5 displaying the “Apply Configuration Changes Here”pink ribbon on top of the screen.
8. Click in the “Apply Configuration Changes Here” link
PaloSanto SolutionsYealink SIP-T20P Server Setup Guide
5
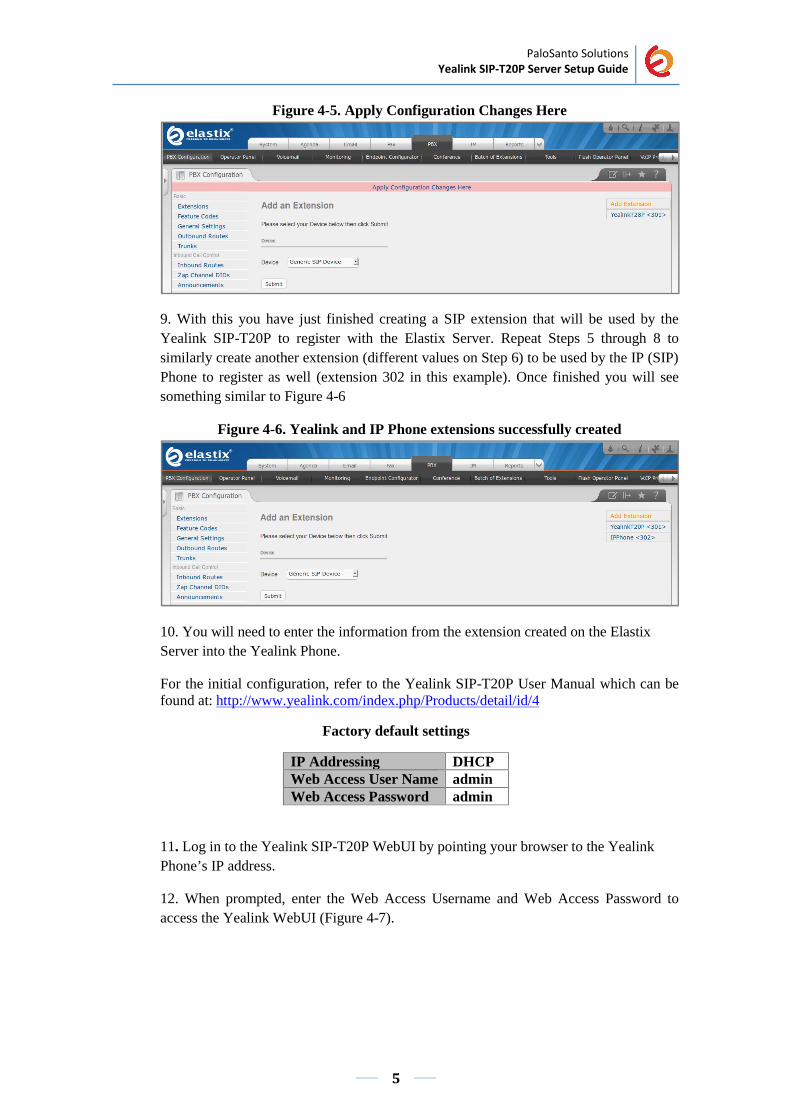
Figure 4-5. Apply Configuration Changes Here
9. With this you have just finished creating a SIP extension that will be used by theYealink SIP-T20P to register with the Elastix Server. Repeat Steps 5 through 8 tosimilarly create another extension (different values on Step 6) to be used by the IP (SIP)Phone to register as well (extension 302 in this example). Once finished you will seesomething similar to Figure 4-6
Figure 4-6. Yealink and IP Phone extensions successfully created
10. You will need to enter the information from the extension created on the ElastixServer into the Yealink Phone.
For the initial configuration, refer to the Yealink SIP-T20P User Manual which can befound at: http://www.yealink.com/index.php/Products/detail/id/4
Factory default settings
IP Addressing DHCPWeb Access User Name adminWeb Access Password admin
11. Log in to the Yealink SIP-T20P WebUI by pointing your browser to the YealinkPhone’s IP address.
12. When prompted, enter the Web Access Username and Web Access Password toaccess the Yealink WebUI (Figure 4-7).
PaloSanto SolutionsYealink SIP-T20P Server Setup Guide
5
Figure 4-5. Apply Configuration Changes Here
9. With this you have just finished creating a SIP extension that will be used by theYealink SIP-T20P to register with the Elastix Server. Repeat Steps 5 through 8 tosimilarly create another extension (different values on Step 6) to be used by the IP (SIP)Phone to register as well (extension 302 in this example). Once finished you will seesomething similar to Figure 4-6
Figure 4-6. Yealink and IP Phone extensions successfully created
10. You will need to enter the information from the extension created on the ElastixServer into the Yealink Phone.
For the initial configuration, refer to the Yealink SIP-T20P User Manual which can befound at: http://www.yealink.com/index.php/Products/detail/id/4
Factory default settings
IP Addressing DHCPWeb Access User Name adminWeb Access Password admin
11. Log in to the Yealink SIP-T20P WebUI by pointing your browser to the YealinkPhone’s IP address.
12. When prompted, enter the Web Access Username and Web Access Password toaccess the Yealink WebUI (Figure 4-7).

PaloSanto SolutionsYealink SIP-T20P Server Setup Guide
6
Figure 4-7. Yealink T20P WebUI Login
13. To set the language to English, go to “Teléfono => Preferencia” and change the“Lenguaje” parameter. (Figure 4.8)
Figure 4-8. Language
To register the Yealink Phone we have two methods: Manual Configuration andAutoProvisioning using Elastix’s Endpoint Configurator.

PaloSanto SolutionsYealink SIP-T20P Server Setup Guide
7
MANUAL CONFIGURATION
1. Use the information from the Add SIP Extension page (Figure 4-4) to enter thefollowing necessary information on “Account” section of the Yealink Phone WebUI(figure 4-9):
Account Active: ON Display Name: YealinkUser Register Name: 301 in this example User Name: 301 in this example Password: ‘h7Dka3Rf9si0t’ in this example SIP Server: Elastix Server’s IP Address (192.168.1.65 in this example)
Figure 4-9. Account
2. Once you have entered the required information, click on “Confirm” button located atthe end of the page. The phone should be registered now. To check this, refresh thecurrent page and see the Register Status of the account. If the phone is not registered,make sure you’ve entered the correct information (Figure 4.10).
Figure 4.10. Register Status
3. Configure the other IP (SIP) Phone with the correct parameters.
4. To test the Yealink SIP-T20P, pick up the previously configured IP (SIP) Phone andcall the SIP-T20P’s extension number (301 in this example). When the call isestablished, speak into the phone and verify that the other IP (SIP) Phone can hear yourvoice. Check this by calling from both ends. This step completes the manual procedure.

PaloSanto SolutionsYealink SIP-T20P Server Setup Guide
8
AUTOPROVISIONING USING ELASTIX’S ENDPOINTCONFIGURATOR
1. In the Yealink SIP-T20P WebUI, go to “Upgrade => Advance” section and set thefollowing parameters (Figure 4.11):
Custom option type: IP Address URL: Elastix Server IP Address (192.168.1.65 in this example) Check New Config: Power On
Figure 4.11 Upgrade
2. Click on “Confirm” button. Now, in the Elastix WebUI go to “PBX => EndpointConfigurator” (Figure 4-12).
Figure 4.12 Endpoint Configurator
3. Next to the “Discover Endpoints in this Network” button, type the address wherethe phone is located and hit Enter (or click the button). This will generate a list withall the phones available in that network (Figure 4-13).

PaloSanto SolutionsYealink SIP-T20P Server Setup Guide
9
Figure 4.13 Endpoint Configurator
4. In the row where the phone you want to autoprovision is located (find it accordingto either its MAC or IP Address). See figure 4.14:
Mark the checkbox From the drop-down list, select the correct “Phone Type” (phone model) of the
phone From the drop-down list, select the “User Extension” you want to assign to the
phone
Figure 4.14 Endpoint Configurator
5. Click the “Set” button. When the process finish loading, the phone will reboot byitself. In few seconds it’ll start applying the configuration. The phone should beregistered and ready for calls after this.
6. Configure the other IP (SIP) Phone with the correct parameters.
7. To test the Yealink SIP-T20P, pick up the previously configured IP (SIP) Phone andcall the SIP-T20P’s extension number (301 in this example). When the call isestablished, speak into the phone and verify that the other IP (SIP) Phone can hearyour voice. Check this by calling from both ends.