xtm mammoth 24.7 manual - competitionxmammoth rtr nitro monster truck without any of the hassles you...
TRANSCRIPT

1Need help or have any questions? Call us at 1-714-963-0329 or send us an Email at [email protected]
Thank you for purchasing the XTM Racing Mammoth RTR Nitro Monster Truck. This Operations Guide is provided to help you enjoy your newMammoth RTR Nitro Monster Truck without any of the hassles you might expect. Please read through all of the literature that is provided in the box.Doing so will help you become familiar with how your Mammoth RTR Nitro Monster Truck, XTM Racing 24.7 size engine and Hitec Lynx radio systemoperate.
✦✦✦✦✦IMPORTANT✦✦✦✦✦ Before operating your new Mammoth RTR Nitro Monster Truck, please read and understand the warnings listed on the next page.Failure to do so could lead to bodily harm and/or injury. The XTM Racing Mammoth RTR Nitro Monster Truck is not intended for persons under 12years of age, unless closely supervised by an adult.
The XTM Racing Mammoth RTR Nitro Monster Truck is distributed exclusively by Global Hobby Distributors18480 Bandilier Circle, Fountain Valley, CA 92708
All contents copyright © 2003, Global Hobby Distributors Version V1.0 September 2003
Kit Product # 145615
● XTM Racing 24.7 Engine w/Tuned Pipe & Header● Hitec Lynx Sport Radio System● XTM Racing High-Torque Metal-Gear Steering Servo● Dual-Disc Braking System● Full Set of Ball Bearings● Adjustable 2-Speed Transmission● Painted Body● 8 Threaded-Body Aluminum Shocks
● 3mm Anodized Aluminum Chassis w/Kicked-Up Front End● Front and Rear Bracing● Sealed Receiver/Battery Box● Adjustable Toe Angle for both Front and Rear● Adjustable Camber for both Front and Rear● Front Universals● Sealed, Cup-Style Front and Rear Differentials
OPERAOPERAOPERAOPERAOPERATIONS GUIDETIONS GUIDETIONS GUIDETIONS GUIDETIONS GUIDE

2 Visit our website at http://xtm.globalhobby.com or for Customer Service at http://globalservices.globalhobby.com
ENGINE WARNINGS
● Never use any fuel in your engine other than glow fuelsspecifically designed for use in model car engines. Use of anyother types of fuel can cause severe damage to the engine and/orpersonal injury. NEVER USE GASOLINE OR DIESEL FUEL!
● Never operate your model on any public streets. This couldcause traffic accidents, personal injury or property damage.
● Glow fuel engines emit exhaust vapors that are poisonous andcan be dangerous to your health. It is important that you operateyour engine in a very well-ventilated area, preferably outdoors.
● Before starting the engine, make sure that the throttle trim isset to the idle position. Starting the engine at any setting aboveidle can cause the model to lurch out of your hands.
● When the engine is running, there are certain parts that rotateat high speeds. Be careful not to touch the drive shafts, gears,clutch assembly or any other moving parts. Otherwise, seriousinjury could result.
● It is normal for the engine, exhaust header and tuned pipe toget very hot during operation. Never touch these parts whilethey are hot or you might be burned.
● Model car engines produce vibration when they are running. Itis important to periodically check the engine mounting screwsand other assemblies to ensure they are tight. Running theengine with the engine mounting screws loose can lead tosevere engine and/or chassis damage.
FUEL WARNINGS
● Glow fuels like those used in your Mammoth RTR NitroMonster Truck are poisonous. Follow all the precautions thatare printed on the fuel manufacturer's container.
● Keep fuel out of the reach of children.
● Glow fuel is extremely flammable. Keep away from high heat,sparks and flame.
GENERAL WARNINGS
● Under no circumstances should you operate your model incrowds of people. Serious injury could result.
● Never operate your model on busy streets or if there are carsaround.
● Do not use your model to chase pets or other animals.
● The radio system included in your model is not waterproof;therefore, do not drive through water, wet grass, mud or snow.
● Because your model is operated by radio control, it is importantto make sure you always are using fresh and/or fully chargedbatteries. Never allow the batteries to run low or you could losecontrol of the model.
● If your model becomes stuck, allow the engine to idle, thenretrieve your model by hand.
● To prevent excessive r.p.m.'s from damaging the engine and/ordrive-train components, we suggest reducing throttle while in theair during jumps.
If you should have any trouble with any of the steps listed in this Operations Guide, we have provided an extensive troubleshooting guidebeginning on page # 16. The troubleshooting guide is provided to help you find a quick and immediate resolution to a number ofproblems that might occur. If you cannot solve a problem using the troubleshooting guide, or if you have any other questions orconcerns, please contact us at the address below:
FOR YOUR INFORMATION
FOR YOUR SAFETY - PLEASE READ THESE WARNINGS FIRST!
Visit Our Websitehttp://globalservices.globalhobby.com
Global Services18480 Bandilier CircleFountain Valley CA 92708
Phone: (714) 963-0329 Fax: (714) 964-6236 Email: [email protected]
To allow us to serve your needs better, please include your email address with any correspondence you send to us. Your email address will be added to our CustomerService Database so you will automatically receive free updates and tech notices for your particular product. You will also receive repair status updates (if applicable) andother important information about your product as it becomes available.
IMPORTANT INFORMATION ABOUT YOUR EMAIL ADDRESSGlobal Hobby Distributors will not disclose the information it collects to outside parties. Global Hobby Distributors does not sell, trade, or rent
your personal information to others . Your privacy is important to us.
CHECK IT OUT! We urge you to come check out our website at http://globalservices.globalhobby.com. There you will find public message boardsfrequented by other XTM Racing product owners and the XTM Racing support staff. This is a great place to learn about new XTM Racing products,get help and suggestions for your current XTM Racing products or just simply hang out and chat with people that share your same interests.

3Need help or have any questions? Call us at 1-714-963-0329 or send us an Email at [email protected]
SECTION 1: OUR RECOMMENDATIONS
This section lists the recommended items necessary to run and maintain your new Mammoth RTR Nitro Monster Truck. We have testedthese items extensively with the Mammoth RTR Nitro Monster Truck and found that they offer the best in reliability and value.
What Fuel Do I Use in My Mammoth RTR Nitro Monster Truck?
Fuel can make a big difference in the way your engine performs. For the break-in period you should use a fuel specifically designed forR/C car engines that contains no more than 20% nitromethane. Once the engine has been adequately broken in (about 45 minutes ofrun-time) you can switch to an R/C car fuel containing up to, but no more than, 30% nitromethane.
✦✦✦✦✦WARNING✦✦✦✦✦ We do not recommend using fuels in your Mammoth RTR Nitro Monster Truck that are designed for R/C airplaneengine use. These fuels do not contain the proper amount of lubricants; therefore, they will cause the engine in your truck tooverheat and severe damage to the engine will result.
Use the following fuels for the best performance:
Trinity 16% Nitro Car Fuel - Part # 837826 (use this for break-in)
Trinity 20% Nitro Car Fuel - Part # 837828 (use this after break-in)
Trinity 30% Nitro Car Fuel - Part # 837832 (use this after break-in for more power)
How Do I Remove the Glow Plug?A long reach glow plug wrench is necessary to easily and quicklyremove and replace the engine's glow plug. The Magnum Long4-Way Wrench works great.
Do I Need to Purchase Extra Glow Plugs?Yes. Even though your Mammoth RTR Nitro Monster Truck comes with a glow plug already installed in the engine, glow plugs wear out,especially during the break-in period; therefore, it's a good idea to have a couple of spares handy.
The glow plug can make a big difference in how your engine performs. We recommend using a "hot" heat-range glow plug intendedspecifically for performance engines, like the Thunderbolt # 3 (P/N 115559) or the McCoy MC-59 (P/N 690215), for the break-in period.After the break-in period you may want to use a medium heat-range glow plug like the McCoy MC-8 (P/N 690205). Do not use glowplugs intended for four stroke airplane engines. Using the wrong type of glow plug will cause the engine to run erratically and make itdifficult to tune properly.
What Do I Use to Ignite the Glow Plug?A glow starter is a battery-operated device that, when attached tothe glow plug, heats the glow plug so that the engine can start. Theglow starter is then removed after the engine is running. TheMagnum Glow Starter with Meter is a perfect choice. It comescomplete with a battery, charger and a built-in meter to let you knowif your glow plug is good.
Do I need to Use a Fuel Bottle?Yes. Because fuel is packaged in quarts or gallons, you will need touse a smaller bottle with an extension tube or wand to fill the fueltank. Fueling using this method is much easier and a lot less messy.The Promax 500cc Fuel Bottle is a good choice.
Promax 500cc Fuel BottlePart # 360895
Magnum Long 4-Way WrenchPart # 237425
Magnum Glow Starterwith Meter Part # 237438

4 Visit our website at http://xtm.globalhobby.com or for Customer Service at http://globalservices.globalhobby.com
● Trinity "8 Pack" AA Alkaline batteries for the transmitter -- Part # 837801
● Trinity "4 Pack" AA Alkaline batteries for the receiver -- Part # 837800
● Trinity "Final Solution" after-run oil to "wet" the air filter and to lubricate the engine -- Part # 843744
● Emerald Nitro Car Cleaner to clean the chassis and engine -- Part # 340196
● Small, flat blade screwdriver to make engine adjustments -- Part # 146101
● Adjustable wrench and other assorted tools to make chassis adjustments
● 1.5mm hex wrench to make brake and 2-speed transmission adjustments
● Assorted weights of silicone shock oil to tune the shocks and differentials - Optional
Each radio system comes with stickers on the back of the transmitter and on the receiver showing which frequency the radio systemoperates on (either in the 27Mhz or 75Mhz band). No two radio systems can operate nearby each other if they are on the samefrequency. You can purchase transmitter and receiver crystals separately and change them if you plan on running your Mammoth RTRNitro Monster Truck with other people. We have provided a list of the frequencies that are available for your radio system.
SECTION 2: OTHER RECOMMENDED ITEMS
SECTION 3: BECOMING FAMILIAR WITH YOUR MAMMOTH RTR NITRO MONSTER TRUCK
Antenna: Transmits the signal from the transmitter to the receiver. The antenna should be completely extended during use.
Battery Cover: This cover houses the 8 AA Alkaline batteries that power the transmitter.
Crystal: This is the frequency crystal of the transmitter. You can change crystals in both the transmitter and the receiver (in the chassis) so that youand your friends can drive at the same time. No two radio systems nearby can be operated on the same frequency.
On-Off Switch: Turns the transmitter on and off. Two L.E.D.s show the power of the batteries.
Servo Reversing Switches: Allow you to quickly and easily change the direction the servos rotate by just flipping the switches on the topof the transmitter.
Steering Wheel: Controls the Mammoth RTR Nitro Monster Truck's steering. Turn the wheel to the right and the truck turns right. Turn the wheel tothe left and the truck turns left.
Throttle/Brake Trigger: Controls the speed and braking ability of your Mammoth RTR Nitro Monster Truck. Pull the trigger to accelerate, releasethe trigger to decelerate, and push the trigger to brake.
Trim Levers: These levers, one for steering and one for throttle/brake control, allow you to fine tune the servo's center by sliding the levers on thetransmitter back and forth.
Channel # Frequency Part # (tx/rx)
67427xx/66427xx
01 16.99502 27.04503 27.09504 27.14505 27.19506 27.255
61 75.410
90 75.990
Through 67475xx/66475xx
Note that "xx" is the actual channel numberyou want to purchase.
27Mhz
75Mhz

5Need help or have any questions? Call us at 1-714-963-0329 or send us an Email at [email protected]
2-Speed Transmission: The 2-speed transmission automatically shifts from low to high gear for awesome top speed and features an adjustableshift point.
Air Filter: The air filter is made of foam and prevents dirt and debris from entering the engine through the carburetor.
Battery Box w/On-Off Switch: This is where the receiver battery, receiver and on-off switch is mounted. The battery box protects these electroniccomponents from dust, dirt and oil.
Body Mount: Made of high-impact plastic for strength, the body mount secures the body into place. There is one body mount assembly on the frontof the chassis and one on the back of the chassis. Both body mounts are adjustable to suit different bodies.
Engine: The Mammoth RTR Nitro Monster Truck includes the powerful XTM Racing 24.7 engine with pull-starter and tuned pipe for ease of use andgreat performance.
Front Bumper: Made out of high-impact nylon, the front bumper protects the chassis from most head-on impacts.
Fuel Tank: The fuel tank holds the fuel that your engine uses. This fuel tank includes a fuel pressure nipple that connects to the tuned pipe topressurize the fuel system and also features a quick-flip type lid for fast refueling.
Pull-Start Handle: Used to start the engine in place of an electric starter.
Receiver Antenna: Receives the signals from the transmitter. The antenna should always be extended during use and never cut shorter.
Shock: Each shock is oil-filled and uses a spring that is well suited for most off-road conditions. The shocks feature threaded shock bodies thatallow the shocks to be easily tuned for different driving conditions. The Mammoth RTR Nitro Monster Truck features eight shocks.
Steering Servo: This servo controls the vehicle's steering. A "servo saver" is used to help prevent the servo gears from being stripped out.
Steering Tie-Rod: The tie-rod connects the steering linkage and the castor block. The tie-rods are adjustable so you can make toe-angleadjustments to the front wheels.
Tuned Pipe: The tuned pipe is an expansion muffler that greatly increases the power output of the engine.
Wheel/Tire Assembly: The Mammoth RTR Nitro Monster Truck includes molded rubber tires with a tread pattern that is good for most off-roadapplications. The wheels are molded in one piece from high-impact plastic for strength.
Note: Photo Above May Differ From Production Model

6 Visit our website at http://xtm.globalhobby.com or for Customer Service at http://globalservices.globalhobby.com
Now that you are familiar with the major component parts of your Mammoth RTR Nitro Monster Truck, and with the functions of the HitecLynx Sport transmitter, it's time to prepare your Mammoth RTR Nitro Monster Truck for its first run.
✦✦✦✦✦IMPORTANT✦✦✦✦✦ Before continuing, please double-check that you've read and understand the warnings printed on page # 2. It'simportant that you understand this information before preparing to run your Mammoth RTR Nitro Monster Truck. Also, remember, ifyou have any questions or encounter any problems, you can contact us using the information listed near the bottom of page # 2.
❑ Push the antenna down into the molded hole in the top of the transmitter.
❑ Thread the antenna (clockwise) into place and tighten it gently until it stops.
✦✦✦✦✦IMPORTANT✦✦✦✦✦ Do not force the antenna into place or tighten it too strongly. Doingso could cause damage to the antenna and/or transmitter.
❑ Remove the plastic battery cover from the bottom of the transmitter.
❑ Install 8 AA Alkaline batteries into the battery tray, double-checking to make sure thatthe polarity is correct.
❑ Reinstall the battery cover and set the transmitter aside for now.
❑ Open the battery box cover by pushing on the molded tab at the back of the batterybox cover and lifting up on the back of the cover. The battery box cover is hinged at thefront for convenience.
❑ Remove the battery holder from the battery box.
✦✦✦✦✦IMPORTANT✦✦✦✦✦ You may need to temporarily remove the receiver to get to the batteryholder. Don't unplug anything from the receiver. The battery holder plug has alreadybeen plugged into the switch. Do not unplug it when removing the batter holder.
❑ Install 4 AA Alkaline batteries into the battery holder, double-checking to make surethat the polarity is correct.
✦✦✦✦✦IMPORTANT✦✦✦✦✦ Make sure that the batteries are pushed firmly into place. Theyshould not be loose. If for any reason the plug from the battery holder is not pluggedinto the switch plug, plug them together now. The plugs can fit together only one way.
SECTION 4: PREPARING TO RUN YOUR MAMMOTH RTR NITRO MONSTER TRUCK
Step 1: Final Assembly

7Need help or have any questions? Call us at 1-714-963-0329 or send us an Email at [email protected]
❑ Push the battery holder into the battery box, along with the wire and plugs, thenmount the receiver upside down on top of the battery holder, making sure it won't interferewith the on-off switch when the battery box cover is reinstalled.
❑ Reinstall the battery box cover, making sure that you don't pinch any wires.
✦✦✦✦✦IMPORTANT✦✦✦✦✦ Make sure that the tab at the back of the battery box cover snapsfirmly into the battery box. This will ensure that the battery box cover doesn't comeloose during use.
❑ Slide the receiver antenna into one end of the plastic antenna tube and out theother end.
✦✦✦✦✦IMPORTANT✦✦✦✦✦ To make it easier to slide the antenna through the tube, first makesure there are no kinks or bends in the antenna wire, then wet the antenna wire withglass cleaner. The glass cleaner will make the antenna slide easily through the tube.
❑ Push the end of the antenna tube firmly into the molded hole in the top of the receiverbox cover where the antenna exits.
✦✦✦✦✦IMPORTANT✦✦✦✦✦ Leave the excess antenna hanging from the top of the tube. Underno circumstances should you cut or shorten the antenna.
❑ Slide the transmitter's on-off switch forward to turn on the transmitter. The green LEDshould glow brightly.
✦✦✦✦✦IMPORTANT✦✦✦✦✦ If the green LED does not glow or if the red LED is glowing, check thebatteries in the transmitter and replace them if necessary.
❑ Slide the receiver's on-off switch to turn the receiver on. You should hear the servosmove to their proper positions. Notice that the on-off positions are molded into the top ofthe switch cover.
✦✦✦✦✦IMPORTANT✦✦✦✦✦ Always turn on the transmitter first, followed by the receiver. Afteryou're done, turn off the receiver first, then turn off the transmitter. This will prevent thepossibility of a runaway model or damage to the servos.

8 Visit our website at http://xtm.globalhobby.com or for Customer Service at http://globalservices.globalhobby.com
Step 2: Range Checking the Radio System
❑ With the transmitter and the receiver turned on, rotate thetransmitter's wheel forward (to the right). The front wheels on theMammoth RTR Nitro Monster Truck should turn right.
✦✦✦✦✦IMPORTANT✦✦✦✦✦ If the wheels don't turn right, flip the steeringservo reversing switch on the top of the transmitter to change thedirection. Refer to the transmitter photo on page # 4 if you don'tremember how to use the servo reversing switches.
❑ Rotate the transmitter's wheel backward (to the left). The frontwheels on the Mammoth RTR Nitro Monster Truck should turn left.
❑ Let go of the wheel. The Mammoth RTR Nitro Monster Truck'swheels should return to center.
✦✦✦✦✦IMPORTANT✦✦✦✦✦ If the wheels do not point straight ahead (center)after you return the steering wheel to center, move the steeringtrim lever on the transmitter to adjust the wheels so that they pointstraight ahead. Refer to the transmitter photo on page # 4 if youdon't remember how to use the servo trim levers.
Step 3: Checking the Steering and Throttle/Brake Controls
To ensure that the radio system is operating properly and prevent any chance of a runaway model, the radio system should be rangechecked before the first run of the day and/or after a crash. To range check the radio system, do the following:
❑ With the transmitter and receiver turned on, extend the transmitter antenna completely.
✦✦✦✦✦IMPORTANT✦✦✦✦✦ Remember to always turn on the transmitter first, then turn on the receiver.
❑ With the Mammoth RTR Nitro Monster Truck on the ground (without the engine running) walk away from it about 150 feet. Move thesteering wheel while looking at the vehicle's wheels. The wheels should pivot back and forth as you rotate the steering wheel backand forth. Because of the Mammoth RTR Nitro Monster Truck's weight and large wheels, the steering won't operate perfectly smoothlyunless you lift the front of the truck off the ground. This tendency goes away as soon as the truck is rolling.
✦✦✦✦✦IMPORTANT✦✦✦✦✦ If the radio system does not operate properly, please refer to the troubleshooting guide starting on page # 16 beforecontinuing further. Never attempt to operate your Mammoth RTR Nitro Monster Truck if the radio control system is not functioningproperly. Doing so could be harmful to others around you and/or to you or your model.
We suggest doing the steering tests while lifting the front of the truck off the ground. This will allow the steering systemto operate without any binding.PRO TIP

9Need help or have any questions? Call us at 1-714-963-0329 or send us an Email at [email protected]
❑ Carefully pull the air filter assembly off of the carburetor.
❑ Pull back on the throttle trigger. The carburetor barrel shouldopen completely and both brakes should be disengaged.
❑ Let go of the trigger and the carburetor barrel should return to itsidle position - open about 1/16". The brakes should still be disengaged.
✦✦✦✦✦IMPORTANT✦✦✦✦✦ If the carburetor barrel does not open when youpull back on the trigger, flip the throttle servo reversing switch onthe top of the transmitter to change the direction.
If the carburetor barrel does not open completely, move the throttletrim lever on the transmitter until the barrel is opened completelywhen you pull back completely on the trigger.
❑ Push the throttle trigger forward. The carburetor barrel shouldstay in the idle position (open about 1/16") and the brake linkageshould move forward and engage both of the brakes.
❑ Let go of the trigger and both brakes should disengage.
✦✦✦✦✦IMPORTANT✦✦✦✦✦ If necessary, you can adjust the brake linkage bysliding the wheel collars (on the brake linkage wire) forward or back.See page # 15 "Adjusting the Brake Linkage" for more details.
❑ Turn off the transmitter and receiver for now and push the airfilter back onto the carburetor.
✦✦✦✦✦WARNING✦✦✦✦✦ Never run your Mammoth RTR Nitro Monster Truckwithout the air filter installed on the carburetor.
Idle Stop Screw:The idle stop screw is preset from the factory and should not requireadjustment. The idle stop screw adjusts the closure of the throttlebarrel. We recommend that the idle stop screw be adjusted so thatthe carburetor barrel stays open about 1/16". Turning the screwclockwise will cause the barrel to stay open more. Turning the screwcounterclockwise will allow the barrel to close more.
High Speed Needle Valve:The high speed needle valve is preset from the factory for the initial starting procedure. Do not make adjustments to it at this time. Thehigh speed needle valve is used to meter the air/fuel mixture at full throttle. Turn the needle valve clockwise to lean the mixture or turnthe needle valve counterclockwise to richen the mixture. When you start the engine for the very first time, the needle valve should beturned in completely, then backed out 3 turns. When you start the engine after that, leave the needle valve in the same position it wasin when you shut down the engine.
SECTION 5: BECOMING FAMILIAR WITH THE XTM RACING 24.7 NITRO ENGINE
Please refer to the photo below to familiarize yourself with your engine's carburetor. You should have a small flat blade screwdriverhandy to make adjustments to the carburetor.
Your Mammoth RTR Nitro Monster Truck comes equipped with the user-friendly and powerful XTM Racing 24.7 nitro engine. Beforestarting the engine for the first time, please read these next two sections very carefully.

10 Visit our website at http://xtm.globalhobby.com or for Customer Service at http://globalservices.globalhobby.com
Low Speed Needle Valve:The low speed needle valve is preset from the factory for the initial starting procedure. Do not make adjustments to it at this time. Thelow speed needle valve meters the air/fuel mixture at idle and during transition from idle to full throttle. Turn the low speed needle valveclockwise to lean the mixture. Turn the low speed needle valve counterclockwise to richen the mixture. The low speed needle valve ispreset from the factory, but minor adjustments may need to be made to suit your application: fuel used, glow plug and environment allcontribute to the setting. If you need to reset the low speed needle valve to the factory setting, follow these simple procedures:
● Open the carburetor barrel completely.
● While holding the carburetor barrel open with your fingers, use a flat blade screwdriver to turn the low speed needle valve clockwiseuntil it stops. From this point, turn the low speed needle valve counterclockwise 8-1/2 turns. This is the factory setting.
SECTION 6: FUELING AND STARTING THE XTM RACING 24.7 NITRO ENGINE
❑ Lift the fuel tank lid and carefully fill the fuel tank until the fuel level is just below the topof the tank.
✦✦✦✦✦WARNING✦✦✦✦✦ Use fuel that is appropriate for nitro car and buggy engines. Do notuse gasoline or diesel fuel!
❑ Prime the engine by first opening the throttle completely and covering the exhaustopening in the tuned pipe with your thumb, then pull the pull-starter cord several timesuntil you see fuel just start to enter the carburetor through the fuel line.
✦✦✦✦✦IMPORTANT✦✦✦✦✦ Do not pull the cord all the way out or damage to the pull-starter willoccur. Use a couple of short pulls - about 7 or 8 inches long.
❑ Using your glow plug wrench, verify that the glow plug is installed in the cylinder head and tight. If it's not already preinstalled, installit using one copper gasket.
If at any time the pull-starter becomes very tight or difficult to pull - STOP! The engine has become flooded and the excess fuelmust be removed from the engine or damage to the pull-starter and/or engine could occur. To remove the excess fuel from theengine follow the procedures listed below:
● Completely close the high speed needle valve until it bottoms out.● Remove the glow plug from the cylinder head.● With a rag over the top of the engine, pull the pull-starter cord several times to expel the excess fuel from the engine.● Check to make sure that the glow plug has not been fouled, then reinstall it.● Reset the high speed needle valve 3 turns out from bottom.
WARNING!! PLEASE READ THIS BEFORE STARTING YOUR ENGINE FOR THE FIRST TIME!!
✦✦✦✦✦WARNING✦✦✦✦✦ Under no circumstances should you operate the engine without the air filter installed on the carburetor. The air filterprevents dust and debris from entering the engine and damaging it. If you operate your engine at any time without the air filterinstalled, the engine will not be covered under warranty should it need repair.
If, during the break-in process, the pull-starter assembly slips when you try to start the engine, the one-way bearing andpull-starter shaft may be coated with excess fuel oil. If this is the case, carefully remove the one-way bearing and the pull-startershaft, clean them with rubbing alcohol and reassemble the parts. Use the engine exploded parts view included with your truck to seehow the parts are assembled. Also, be careful when removing the pull-starter assembly to ensure that the recoil spring does not blow out.
PRO TIP

11Need help or have any questions? Call us at 1-714-963-0329 or send us an Email at [email protected]
❑ Remove your finger from the exhaust opening in the tuned pipe and close the throttledown to the idle position.
❑ While holding the truck with one hand, carefully pull on the pull-starter cord 3 timesusing short, quick pulls.
✦✦✦✦✦IMPORTANT✦✦✦✦✦ If you can't turn the engine over using the pull-starter, don't force it.The engine is probably flooded. See the warning and resolution on the previous page.
❑ Connect a fully charged glow starter to the top of the glow plug, making sure that theglow starter is locked firmly onto the top of the glow plug. You don't want it to fall off whileyou're trying to start the engine.
❑ While holding the truck with one hand, carefully pull on the pull-starter cord using short,quick pulls, until the engine starts.
❑ After the engine starts, release the pull-starter cord, allow the engine to run for about10 seconds, then remove the glow starter from the glow plug.
✦✦✦✦✦IMPORTANT✦✦✦✦✦ If the engine does not start after a dozen pulls, refer to the trouble-shooting guide starting on page # 16 before continuing.
❑ To stop the engine, carefully pinch the fuel line with your fingers until the engine stops.Make sure to pinch the fuel pick-up line and not the fuel pressure line. The fuel pick-upline is the one connected to the carburetor.
✦✦✦✦✦WARNING✦✦✦✦✦ Be careful not to touch any parts of the engine or tuned pipe becausethey will be hot.
Fuel Recommendation:Fuel can make a big difference in the way your engine performs. For the break-in period you should use a fuel specifically designed forR/C car engines that contains no more than 20% nitromethane. Once the engine has been adequately broken in (about 45 minutes ofrun-time) you can switch to an R/C car fuel containing up to, but no more than, 30% nitromethane.
✦✦✦✦✦WARNING✦✦✦✦✦ We do not recommend using fuels designed for R/C airplane engine use. These fuels do not contain the properamount of lubricants; therefore, they will cause the engine to overheat and severe damage to the engine will result.
SECTION 7: BREAKING IN THE XTM RACING 24.7 NITRO ENGINE

12 Visit our website at http://xtm.globalhobby.com or for Customer Service at http://globalservices.globalhobby.com
Glow Plug Recommendation:The glow plug can make a big difference in how your engine performs. We recommend using a "hot" heat-range glow plug intendedspecifically for performance engines like the Thunderbolt # 3 (P/N 115559) or the McCoy MC-59 (P/N 690215) during the break-inprocess. After the break-in period you may want to use a medium heat-range glow plug like the McCoy MC-8 (P/N 690205). Do notuse glow plugs intended for four stroke airplane engines. Using the wrong type of glow plug will cause the engine to run erraticallyand make it difficult to tune properly.
Air Filter:The air filter is a very important part of your engine. Failure to use the air filter will damage the engine in a very short period of time. Ifyou are driving your vehicle in very dusty conditions, we suggest wetting the foam air filter element with after-run oil to prevent fine dustparticles from passing through the filter element.
Step 1: Breaking In the Engine
✦✦✦✦✦IMPORTANT✦✦✦✦✦ The XTM Racing 24.7 nitro engine is an ABC engine.The cylinder sleeve is tapered at the top, causing severe resistance whenthe piston moves through the top of the stroke. This is normal. Whenthe engine heats up to operating temperature, this resistance will decreaseand the proper clearance will be achieved. The break-in procedure willguide you through the steps necessary to properly break in your newengine. Please follow the steps closely.
The break-in process allows the engine parts to perfectly fit to each otherand properly protect each part from premature wear. The engine shouldbe broken in using a good quality R/C car fuel that contains no more than20% nitromethane.
❑ Follow the previous procedures to fill the fuel tank and start the engine.
❑ Once the engine starts, keep the glow starter attached to the glow plugand let the engine run for about 10 seconds without giving it throttle. Thiswill allow the engine to warm up. At this point the engine should be runningvery "rich" and there should be excessive white smoke coming from thetuned pipe. The engine will also sound like it's running rough.
❑ After the engine has been running for about 10 seconds, remove theglow starter from the glow plug. Advance the throttle in short, quick burstsand drive the truck around for about 2-3 minutes. If the engine is runningrich enough, you should notice excessive white smoke coming from thetuned pipe and the engine should sound like it�s running very rough. Also,the truck will barely be moving. If there is not excessive white smokecoming from the tuned pipe, richen the high speed needle valve. After 2-3minutes stop the engine by pinching the fuel line to the carburetor.
❑ Let the engine cool for approximately 10 minutes, then restart it. Set thehigh speed needle valve mixture to a slightly leaner setting, about 1/8 turnmore in. Repeat the procedure above then stop the engine and let it coolfor approximately 10 minutes.
❑ Repeat the procedure above, while leaning the needle valve slightly moreeach time. In all, you should run the engine a total of about 45 minutes.After 45 minutes of run-time the engine will be broken in. Run the enginewith the needle valve set slightly rich, but lean enough to power thetruck adequately. At this point the engine should hold a good setting on thehigh speed needle valve and you can begin to fine tune the needle valvesettings to increase performance.
✦✦✦✦✦IMPORTANT✦✦✦✦✦ It is of the utmost importance that the engine never beleaned out too much. When running the engine, you should always beable to see a trail of white smoke coming from the tuned pipe. If you can�t,stop the engine immediately and richen the high speed needle valvemixture. You should also make sure there is plenty of air flowing overthe cylinder head to keep the engine from overheating.
✦✦✦✦✦IMPORTANT✦✦✦✦✦ Be careful to never lean out the engine too much.Remember that the lubricants for your engine are suspended in the fuel.If you lean out the fuel mixture too much you will also be lowering theamount of lubricant entering your engine. Less lubricant means morechance of your engine overheating and possible engine failure.
Setting the High Speed Needle Valve:
❑ Start the engine and remove the glow starter from the glow plug, thenallow the engine to warm up for about 10 seconds.
❑ After the engine has warmed up, drive the truck as you normally would.If the engine seems to be running rich, lean the high speed needle valveabout 1/16 of a turn at a time until the desired setting is achieved. Alwaysmake sure you run the engine slightly rich - you want to be able to see awhite exhaust trail at all times.
To get more power from your engine you can use fuels containing upto 30% nitromethane. We must caution you, though, that once you runthe engine with increased nitro you may not get satisfactory results ifyou decide to go back to a lower nitro content. Also, if you use fuelscontaining 30% nitro, we highly suggest adding a .10mm head gasket(# 148418) to lower the compression ratio. If you don�t lower thecompression ratio, overheating and erratic running will likely occur.
Setting the Low Speed Needle Valve:
❑ Start the engine and lean out the high speed needle valve as per theprevious procedures. Close the throttle until the engine slows down enoughso that the clutch is disengaged and the wheels don�t turn when the truck islifted from the ground. Allow the engine to idle for about 10-15 seconds.
❑ While holding the truck off the ground (making sure to keep yourfingers out of the moving parts) quickly open the throttle in a short burst. Ifthe engine just stops running as soon as the throttle is advanced, the lowspeed needle valve is too lean. With the engine stopped, richen the lowspeed needle valve about 1/16 of a turn.
❑ Restart the engine and repeat the procedure above until the engine willtransition smoothly and quickly. Very slight hesitation in the transition is normal.
❑ If you quickly advance the throttle and the engine seems to be very richduring transition (i.e., lots of smoke coming from the tuned pipe and veryrough sounding), the low speed needle valve is too rich. With the enginestopped, lean the low speed needle valve about 1/16 of a turn.
❑ Restart the engine and repeat the procedure above until the engine willtransition smoothly and quickly. Very slight hesitation in the transition is normal.
❑ Now drive the truck as you normally would for a while to get a feel forhow the engine reacts to throttle. Now that you know the proper way to tunethe engine, you can make slight adjustments to the carburetor until you aresatisfied with the performance.
After your engine has been broken in, you can set the high and low speedneedle valves for optimum engine performance.
Step 2: Fine Tuning the Engine

13Need help or have any questions? Call us at 1-714-963-0329 or send us an Email at [email protected]
SECTION 8: INSTALLING THE BODY
❑ Not much to installing the body. Begin by peeling away the thin plastic protective layer from the top of the body, then install the bodyonto the chassis, using four body clips to hold it in place.
The body mounts are adjustable and can be lowered or raised if you decide to purchase and install a different body.
✦✦✦✦✦IMPORTANT✦✦✦✦✦ After the body is installed, double-check that no part of the body interferes with the chassis, tuned exhaust systemor tires. This is especially true in the case of the front tires. When they are turned from lock-to-lock, they should not hit the body.
SECTION 9: MAKING CHASSIS ADJUSTMENTS
Chassis alignment and geometry are important if you want your Mammoth RTR Nitro Monster Truck to perform well. A good performingtruck means a truck that is easier to drive, too. Follow our guidelines in this section to get the most out of your Mammoth RTR NitroMonster Truck.
✦✦✦✦✦IMPORTANT✦✦✦✦✦ It's very important when making changes to the settings of your truck that you make the settings the same for eachside. For example, if you change the camber angle on the right front tire, you should change the camber angle on the left front tirethe same amount. If you change the spring tension on the left front shocks, you should change the spring tension on the right frontshocks the same amount, and so on.
Do not make any changes that are more than 3 degrees from the initial settings listed or the handling characteristics of your truck willbecome very poor.
RECOMMENDED INITIAL SETTINGS:● 0 degrees toe-in on the front and rear for overall best 4WD driveability on most surfaces.
☞ Adding more than 3 degrees of toe-in or toe-out will result in excessive loss of speedand erratic handling.
✦✦✦✦✦IMPORTANT✦✦✦✦✦ For more precise toe-in adjustments, use the R.P.M. Toe-in Gaugepart # 708049.
The toe angle is the angle of both front tires (or rear tires) to each other, when viewed from above. Toe-in is when the front of both tirespoint toward each other and toe-out is when the front of both tires point away from each other.
● For the front tires, toe-in will make your truck track straighter, but the steering will be more sensitive. Toe-out will desensitize thesteering, making the truck a little more driver-friendly.
● For the rear tires, if you're running on a smooth surface, we suggest no toe-in. If you are running on a rough surface, we suggest about1 - 2 degrees of toe-in. This will give the rear end a little more "bite."
Step 1: Adjusting the Toe Angle
To adjust the toe-in on the rear tires, use one of the different composite toe angle blocksprovided in your kit to set the desired toe angle. For convenience, the degree of toe anglein each block is molded into the back of the blocks.
To change the rear toe angle block, first remove the rear bumper by removing the twobumper-retaining screws on the bottom of the chassis. Second, carefully remove the twoC-Clips holding the rear hinge pins in place. Next, remove the two screws that hold thetoe angle block in place. Replace the toe-angle block with the desired one. Installation isthe reverse of the disassembly procedure.
PRO TIP
To adjust the toe-angle of the front tires, turn the tie-rods (steel rods connecting each wheel to the steering arm) in or out with anadjustable wrench. To adjust the toe angle of the rear tires, you need to replace the toe angle block, using the reference below:

14 Visit our website at http://xtm.globalhobby.com or for Customer Service at http://globalservices.globalhobby.com
By adjusting the spring tension of the shocks, you can increase steering sensitivity and increase the ride-height of your vehicle. How youdrive your vehicle will dictate what settings you should be using. As an example, if you're using your vehicle off-road and going over lotsof jumps, you may want to increase the spring tension of the front shocks to help prevent the front of the vehicle from bottoming out.
RECOMMENDED INITIAL SETTINGS:
● We recommend initially leaving the adjustment rings in the factory locations.
Step 3: Adjusting Shock Spring Tension
Camber is referred to as the amount of the tire's surface that contacts the ground. Tires that are exactly perpendicular to ground have0 degrees of camber. If the top of the tire leans in toward the chassis, the tire has negative camber. If the top of the tire leans out awayfrom the chassis, the tire has positive camber.
RECOMMENDED INITIAL CAMBER SETTINGS:
● For driving on smooth surfaces set both the front and back wheels at 0 degrees.
● For driving on rough surfaces set the front wheels at -1 degree and the back wheels at -2 degrees.
Step 2: Adjusting the Camber Angle
Changing the shock oil (the oil inside the shocks) will change the dampening characteristics of the shocks. Typically, if you are runningon smooth surfaces, use a heavier weight oil. If you are running on rough surfaces, use a lighter weight oil.
✦✦✦✦✦IMPORTANT✦✦✦✦✦ We recommend using only 100% Silicone Shock Oil. Do not use motor oil. The shock oil in the Mammoth RTR NitroMonster Truck's shocks is good for most off-road applications.
Shock springs are easy to change and can make a difference in the way your truck handles relative to the type of terrain you're runningon. If you run your truck off-road, in a smooth, high-traction area, use stiffer springs to reduce body roll and weight shift. If the areawhere you run your truck is very bumpy, you might consider using softer springs to help absorb the bumps. If the area is bumpy and youuse harder springs, the truck will have a tendency to jump and hop around. The shock springs included with the Mammoth RTR NitroMonster Truck are suitable for most general off-road applications, but experimentation with different shock springs may be necessary tofind a setup that suits your particular driving style and location. And, as described above, you can make subtle suspensionadjustments by using different shock springs on the outer and inner shocks separately. As an example, you could use stiff springs onthe outer shocks and soft springs on the inner shocks. This will have the affect of using medium springs on all shocks.
Step 4: Adjusting Shock Dampening and Replacement Shock Springs
Adjust the camber angle of the wheels by turning the upper turnbuckles in or out using an adjustable wrench.
☞ Camber settings should be measuredwith the vehicle at its normal ride height.
✦✦✦✦✦IMPORTANT✦✦✦✦✦ For more precisecamber adjustments, use the R.P.M.Precision Camber Gauge part # 708099.
Negative Camber Positive Camber
Increase or decrease spring tension by threading the adjustment ring up or down theshock body. Threading the ring down increases spring tension and the truck's ride height,threading the ring up decreases spring tension.
☞ When adjusting the spring tension, make sure to adjust the right and left sides equally.
You can make subtle suspension adjustments by adjusting the outer and inner shocksseparately. As an example, if you thread all four adjusting rings down on the front shocksto stiffen the front suspension, but you find the front suspension to be too stiff, you canthread the ring on each of two inner shocks up to reduce those shocks' spring tension.This will have the affect of changing both shocks very slightly.
15Need help or have any questions? Call us at 1-714-963-0329 or send us an Email at [email protected]
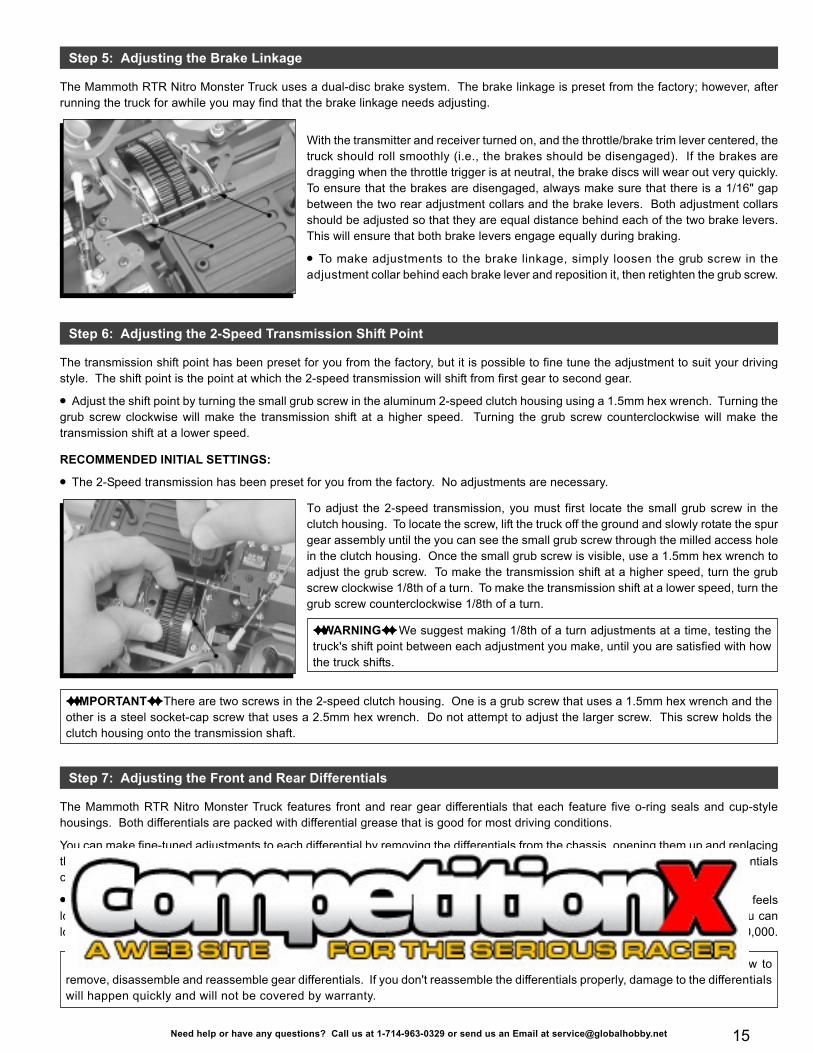
With the transmitter and receiver turned on, and the throttle/brake trim lever centered, thetruck should roll smoothly (i.e., the brakes should be disengaged). If the brakes aredragging when the throttle trigger is at neutral, the brake discs will wear out very quickly.To ensure that the brakes are disengaged, always make sure that there is a 1/16" gapbetween the two rear adjustment collars and the brake levers. Both adjustment collarsshould be adjusted so that they are equal distance behind each of the two brake levers.This will ensure that both brake levers engage equally during braking.
● To make adjustments to the brake linkage, simply loosen the grub screw in theadjustment collar behind each brake lever and reposition it, then retighten the grub screw.
The Mammoth RTR Nitro Monster Truck uses a dual-disc brake system. The brake linkage is preset from the factory; however, afterrunning the truck for awhile you may find that the brake linkage needs adjusting.
Step 5: Adjusting the Brake Linkage
The transmission shift point has been preset for you from the factory, but it is possible to fine tune the adjustment to suit your drivingstyle. The shift point is the point at which the 2-speed transmission will shift from first gear to second gear.
● Adjust the shift point by turning the small grub screw in the aluminum 2-speed clutch housing using a 1.5mm hex wrench. Turning thegrub screw clockwise will make the transmission shift at a higher speed. Turning the grub screw counterclockwise will make thetransmission shift at a lower speed.
RECOMMENDED INITIAL SETTINGS:● The 2-Speed transmission has been preset for you from the factory. No adjustments are necessary.
Step 6: Adjusting the 2-Speed Transmission Shift Point
To adjust the 2-speed transmission, you must first locate the small grub screw in theclutch housing. To locate the screw, lift the truck off the ground and slowly rotate the spurgear assembly until the you can see the small grub screw through the milled access holein the clutch housing. Once the small grub screw is visible, use a 1.5mm hex wrench toadjust the grub screw. To make the transmission shift at a higher speed, turn the grubscrew clockwise 1/8th of a turn. To make the transmission shift at a lower speed, turn thegrub screw counterclockwise 1/8th of a turn.
✦✦✦✦✦WARNING✦✦✦✦✦ We suggest making 1/8th of a turn adjustments at a time, testing thetruck's shift point between each adjustment you make, until you are satisfied with howthe truck shifts.
✦✦✦✦✦IMPORTANT✦✦✦✦✦ There are two screws in the 2-speed clutch housing. One is a grub screw that uses a 1.5mm hex wrench and theother is a steel socket-cap screw that uses a 2.5mm hex wrench. Do not attempt to adjust the larger screw. This screw holds theclutch housing onto the transmission shaft.
The Mammoth RTR Nitro Monster Truck features front and rear gear differentials that each feature five o-ring seals and cup-stylehousings. Both differentials are packed with differential grease that is good for most driving conditions.
You can make fine-tuned adjustments to each differential by removing the differentials from the chassis, opening them up and replacingthe grease already inside the differentials with heavy-weight silicone shock oil. Removal, disassembly and reinstallation of the differentialscan be done using the exploded parts diagram included with your kit.
● Adding heavier silicone oil will tighten the differentials and adding lighter silicone oil will loosen the differentials. If your truck feelsloose during turns, you can tighten the front differential or loosen the rear differential. If your truck is pushing during turns, you canloosen the front differential or tighten the rear differential. We recommend using silicone shock oil weights between 30,000 and 100,000.
✦✦✦✦✦WARNING✦✦✦✦✦ We don't recommend attempting to make adjustments to the differentials unless you have knowledge of how toremove, disassemble and reassemble gear differentials. If you don't reassemble the differentials properly, damage to the differentialswill happen quickly and will not be covered by warranty.
Step 7: Adjusting the Front and Rear Differentials

16 Visit our website at http://xtm.globalhobby.com or for Customer Service at http://globalservices.globalhobby.com
Following a simple maintenance schedule will ensure that your Mammoth RTR Nitro Monster Truck, engine and radio system operatein top condition every time you use them. It is strongly suggested.
● Check the foam air filter element for dirt blockage. If the foamis dirty, remove it from the filter housing and wash it in liquid soapand warm water. Dry the foam element with a paper towel,reinstall it and "wet" it with after-run oil.
● Check the chassis for any loose screws, especially the engine,tuned pipe and outdrive cup mounting screws. Tighten them ifnecessary.
● Check the steering linkage and the throttle/brake linkage forany signs of wear or misalignment. Tighten and/or readjust themif necessary.
● Once in a while, remove the wheels and clean the wheel bearingsusing a bearing cleaner. This will remove any dust and grit thatmay, over time, damage the bearings. After cleaning thebearings, re-oil them using a good quality bearing oil. Never runthe bearings dry or damage to the bearings will result.
● Check the fuel system, including the fuel tank and fuel lines,for any signs of cracking or looseness. Replace any fuel line yoususpect may be damaged.
● Periodically check the condition of the transmitter and receiverbatteries. If you think they might be low, replace them with afresh set.
● Included in your kit is a plastic sprue that includes some plasticreplacement parts. Included are fuel line clips, throttle linkagemounts and other small accessories.
● After a period of time the chassis will accumulate a lot of dirtand debris, especially around the engine area. This build-upshould be cleaned off using a high-powered spray cleaner likeEmerald Nitro Car Cleaner. Some nitro car cleaners will damageanodized and/or plated parts. Test on an inconspicuousarea first.
● After cleaning the chassis and engine with Nitro Car Cleaneryou should oil the moving parts of the chassis. Do not oil theclutch bell, spur gears or the brake discs.
● Always use new fuel and keep the cap on the fuel tightly closed.As fuel ages it absorbs water, which degrades the fuels performanceand will cause erratic engine operation.
● After you have finished using the engine for the day, removethe glow plug and squirt several drops of a high-quality after-runoil into the cylinder. Reinstall the glow plug and crank the engineover a couple of times (without the glow starter attached) todistribute the oil. This will prevent corrosion inside the engine.
● Never leave unused fuel in the fuel tank for more than a coupleof days. The nitromethane and methanol in the fuel willevaporate, leaving the oil behind. This will eventually turn into athick sludge that will require replacement of the fuel tank to fix.
SECTION 10: MAINTAINING YOUR MAMMOTH RTR NITRO MONSTER TRUCK
This troubleshooting guide has been provided to help you diagnose and solve most problems that you may encounter with yourMammoth RTR Nitro Monster Truck. Most problems encountered can be solved by carefully following the problem-cause-solutionsections. If you cannot solve the problem using this troubleshooting guide, please feel free to contact us at the address, phone numberor email address shown on the second page of this Operations Guide.
IF YOU'RE HAVING A PROBLEM WITH THE HITEC LYNX SPORT RADIO SYSTEM:
PROBLEM CAUSE SOLUTION
1) Radio system does not operate A) Transmitter and/or receiver batteries are low A) Replace transmitter and/or receiver batteriesB) Batteries are installed incorrectly B) Check that the polarity of the batteries is correctC) Receiver battery connector is loose C) Check that receiver battery connector is plugged in and tight
2) Operating range is short A) Transmitter antenna is retracted A) Extended transmitter antenna completelyB) Receiver antenna is not extended B) Extend receiver antenna completelyC) Receiver antenna is cut C) Return receiver to Hitec/RCD for repairD) Transmitter and/or receiver batteries are low D) Replace transmitter and/or receiver batteries
3) Servos do not operate normally A) Transmitter and/or receiver batteries are low A) Replace transmitter and/or receiver batteriesB) Servo gear stripped or otherwise damaged B) Return to Hitec/RCD for repair
4) When engine is running, radio A) Receiver crystal is loose A) Remove and reinstall the receiver crystalsystem operates erratically B) Receiver battery connector is loose B) Check that receiver battery connector is tight
C) Damage to receiver after a crash C) Return to Hitec/RCD for repair
SECTION 11: TROUBLESHOOTING GUIDE

17Need help or have any questions? Call us at 1-714-963-0329 or send us an Email at [email protected]
PROBLEM CAUSE SOLUTION
1) Engine does not start A) Failed glow plug A) Replace glow plug with new oneB) Glow Starter not charged and/or faulty B) Fully charge glow starter and/or replaceC) Idle mixture screw set too lean C) Reset idle mixture to factory setting (P10)D) Old or contaminated fuel D) Replace with new fuelE) Engine flooded with too much fuel E) Remove glow plug and expel fuel from cylinder (P10)F) Air leak in fuel system and/or engine F) Replace fuel lines and/or tighten all engine bolts
2) Engine does not draw fuel A) Air leak in fuel system and/or engine A) Replace fuel lines and/or tighten all engine boltsB) High speed needle valve fully closed B) Reset high speed needle valve to factory setting (P9)C) Idle mixture screw set too lean C) Reset idle mixture to factory setting (P10)D) Fuel lines kinked D) Check and straighten fuel linesE) Defective fuel tank E) Replace fuel tank
3) Engine does not transition A) Failed and/or wrong type glow plug A) Replace with new recommended glow plug (P12)B) Old and/or wrong type fuel B) Replace with new recommended fuel (P3)C) High speed needle valve set too rich C) Reset high speed needle valve to leaner setting (P12)D) Idle mixture set too lean D) Set idle mixture richer (P12)E) Idle mixture set too rich E) Set idle mixture leaner (P12)F) Air leak in fuel system and/or engine F) Replace fuel lines and/or tighten all engine bolts
4) Engine overheats A) Engine running too lean A) Richen high speed needle valve (P12)B) Body too Restrictive B) Open larger vents in body to allow air to enter and exitC) Wrong type of fuel used C) Use fuel recommended only for R/C cars (P3)D) Engine not fully broken in D) Allow engine further break-in time (P12)
5) Engine vibrates excessively A) Engine and/or engine mounts loose A) Tighten all engine and engine mounting bolts
6) Engine does not idle down A) Idle stop screw out of adjustment A) Adjust idle stop screw to factory setting (P10)B) Engine has developed an air leak B) Check and tighten all engine screwsC) One or more carburetor O-rings damaged C) Replace carburetor O-rings
7) Pull-Start Assembly Slips A) One-way bearing coated with oil A) Clean one-way bearing using rubbing alcohol (P10)
IF YOU'RE HAVING A PROBLEM WITH THE XTM RACING 24.7 ENGINE AND/OR PULL-STARTER ASSEMBLY:
IF YOU'RE HAVING A PROBLEM WITH THE MAMMOTH RTR NITRO MONSTER TRUCK CHASSIS:
PROBLEM CAUSE SOLUTION
1) Vehicle pulls to one side A) Steering trim out of adjustment A) Readjust trim to center both wheels (P8)B) Toe angle out of adjustment B) Readjust toe angle (P13)C) One wheel is hanging or has damaged bearing C) Remove wheel and clean bearing. Replace if necessary
2) Brakes seem ineffective A) Brake linkage out of adjustment A) Readjust brake linkage (P15)B) Brake disc(s) worn B) Replace affected brake disc(s)
3) Clutch does not engage A) Clutch shoes damaged or worn A) Replace clutch shoesB) Clutch bell damaged or worn B) Replace clutch bell
4) Clutch does not disengage A) Clutch springs worn or damaged A) Replace clutch springs
5) Vehicle does not "go" A) Stripped spur gear(s) A) Replace spur gear(s)B) Stripped differential gear(s) B) Replace differential gear(s)
6) Suspension not smooth or free A) One or more shocks sticking A) Clean and/or rebuild the affected shockB) Bent shock shaft B) Rebuild affected shockC) Bent or otherwise damaged hinge pin C) Replace hinge pin
7) Shocks leaking oil A) Shock seals worn A) Replace shock sealsB) Bent shock shaft B) Rebuild affected shock
8) 2-speed transmission shifts A) Shift point not adjusted properly A) Readjust shift point (P13)at too high or too low a speed

18 Visit our website at http://xtm.globalhobby.com or for Customer Service at http://globalservices.globalhobby.com

19Need help or have any questions? Call us at 1-714-963-0329 or send us an Email at [email protected]

20 Visit our website at http://xtm.globalhobby.com or for Customer Service at http://globalservices.globalhobby.com
IMPORTANT WARRANTY SERVICE INFORMATION
Before returning your Mammoth RTR Nitro Monster Truck for warranty consideration, the status of the unit must be within the guaranteeas stated above. Do not return your Mammoth RTR Nitro Monster Truck to the place of purchase. They are not authorized or equippedto perform warranty work on XTM Racing products. When requesting warranty service, please observe the following:
● Crash damage will not be covered under warranty. Do not request warranty service for a crash-damaged product.
● If you are requesting warranty on anything other than just the radio control system, always send your vehicle complete with thetransmitter. Please unplug and/or remove the batteries both from the transmitter and the vehicle before returning it. We like to have thevehicle complete so it can be thoroughly tested before returning it to you.
● If you are requesting warranty service for only the radio system do not send the radio system or the vehicle to us. Remove the radiosystem from the vehicle and return it to Hitec/RCD for warranty consideration. See Special Notice above.● Include a note detailing the problem or service you are requesting. Service cannot be provided without this information. Include yourdaytime phone number, shipping address and/or email address in the event we need more details pertaining to the service requested.
● If your vehicle is out of the warranty period you may request an estimate of services at the time you return your vehicle for service. Anomission of this request implies permission for Global Services to service your vehicle at our discretion.
● Include a method of payment for any service charges.
● Send the unit to us by United Parcel Service, Federal Express or by Insured Mail. Postage is non-refundable. Send your package to:
IMPORTANT WARRANTY INFORMATION - PLEASE READ!
Your XTM Racing Mammoth RTR Nitro Monster Truck is warranted against manufacturer defects in materials and workmanship for aperiod of 90 days from the date of purchase. Warranty service will be provided within 90 days of the date of purchase only if you areable to provide the original or a copy of the original dated sales receipt.
SPECIAL NOTICE
The radio control system preinstalled in your XTM Racing Mammoth RTR Nitro Monster Truck is manufactured and warranted byHitec/RCD North America. This includes the transmitter, receiver, servos, battery box and on/off switch. Do not return the radiosystem to Global Services. It must be removed from the truck and returned to Hitec/RCD at the address shown:
Hitec/RCD, Inc.Attn: Customer Service Center12115 Paine StreetPoway, CA 92064
To locate the dealer nearest you, please call us at (714) 963-0133 or visit our dealer directory on the Internet atwww.globalhobby.com/where2buy.htm
or Order Directly From Us at the Address, Phone Number or Web Site Shown Above
Visit Our Websitehttp://globalservices.globalhobby.com
Global Services18480 Bandilier CircleFountain Valley CA 92708
Phone: (714) 963-0329 Fax: (714) 964-6236 Email: [email protected]
PURCHASING REPLACEMENT PARTS
Included with your Mammoth RTR Nitro Monster Truck is a separate listing of available replacement parts. The part numbers foreach part are provided for ordering convenience. Replacement parts are available through your local authorized XTM Racingdealer or directly from us.