xtl 300 user guide - dymodownload.dymo.com/dymo/user-guides/xtl/xtl300/ug/... · 1 xtl® 300 user...
TRANSCRIPT

User Guide
XTL™ 300

Copyright© 2015 Sanford, L.P. All rights reserved. Rev. 12/31/19No part of this document or the software may be reproduced or transmitted in any form or by any means or translated into another language without the prior written consent of Sanford, L.P.“Sans” is a DejaVu font. The DejaVu fonts are based on Vera fonts copyright © by Bitstream, Inc. Glyphs in the DejaVu fonts imported from Arev fonts are copyright © by Tavmjong Bah. All Rights Reserved.
Trademarks
DYMO and XTL are trademarks or registered trademarks in the US and other countries. All other trademarks are the property of their respective holders.
FCC StatementCaution: The user is cautioned that changes or modifications not expressly approved by the party responsible for compliance could void the user's authority to operate the equipment.Note: This equipment has been tested and found to comply with the limits for a Class B digital device, pursuant to part 15 of the FCC Rules. These limits are designed to provide reasonable protection against harmful interference in a residential installation. This equipment generates, uses and can radiate radio frequency energy and, if not installed and used in accordance with the instructions, may cause harmful interference to radio communications. However, there is no guarantee that interference will not occur in a particular installation. If this equipment does cause harmful interference to radio or television reception, which can be determined by turning the equipment off and on, the user is encouraged to try to correct the interference by one or more of the following measures: Reorient or relocate the receiving antenna. Increase the separation between the equipment and receiver. Connect the equipment into an outlet on a circuit different from that to which the
receiver is connected. Consult the dealer or an experienced radio/TV technician for help.
Legal NoticesThe PDF-417 barcode software program is distributed under the Mozilla Public License v2.1 ("MPL"). The QR code barcode software program and the Qt application framework software program, provided by The Qt Company, are each distributed under the Lesser General Public License v2.1 or greater ("LGPLv2.1"). The label maker software contains components that are distributed under the BSD license. For copies of each of licenses mentioned above, or information on how to obtain the relevant source code, visit:
http://mediaserver.newellrubbermaid.com/industrial/License/Licenses.htmTo request copies of corresponding source or object code licensed by one of the foregoing licenses, send a money order or check for USD $10 to:
DYMO License RequestNewell Rubbermaid6655 Peachtree Dunwoody RoadAtlanta, GA 30328USA
Please indicate the licensed software and the license stated above in your request.
3 XTL® 300User Guide
Contents
1 About Your New Label Maker1 Registering Your Label Maker1 What’s New
2 Getting to Know Your Label Maker
2 Connecting the Power2 Charging the Battery3 Removing and Replacing the Battery
4 About Labels4 Inserting the Label Cartridge4 Removing the Label Cartridge5 Selecting a Label Cartridge5 Removing the Label Backing
6 Using Your Label Maker6 Keypad9 LCD Display10 Status Bar10 Home Screen11 Action Bar11 Label Editor12 Navigating Labels
13 Using the Label Applications13 Setting Default Label Properties14 Quick Label14 General Label15 Patch Panel Label16 Flag Label16 Laminated Cable Wrap Label17 Cable Wrap Label18 Heat-Shrink Tube Label18 110-Block Label19 Horizontal Breaker Label20 Vertical Breaker Label20 Terminal Block Label21 Asset Tracking Label22 Distribution Panel Label22 Materials Management Label23 Changing Label Applications
24 Editing and Formatting Text on Labels24 Editing Text24 Changing the Text Size24 Changing the Text Style25 Rotating the Text25 Aligning the Text25 Inserting Punctuation26 Inserting Symbols26 Inserting International Characters26 Creating a Vertical Label

4 XTL® 300User Guide
27 Working with Objects on a Label27 Inserting a Text Box27 Inserting an Image28 Inserting a Barcode29 Deleting an Object
29 Creating a Series of Labels
31 Using the Library31 Saving Labels31 Opening Saved Labels31 Deleting Saved Labels
31 Using Favorites
33 Changing the Settings33 Changing the Language33 Changing the Units of Measure33 Changing the Screen Brightness34 Changing the Auto Shut-off Time34 Changing the Recall Data Setting34 Setting Print Options35 Print Range35 Number of Copies35 Collate36 Mirror36 Cut Labels36 Feed36 Setting the Default Barcode37 Restoring the Label Application Default Settings37 Restoring Factory Default Settings
38 Connecting the Label Maker to your Computer38 Downloading and Installing DYMO ID™ Software38 Connecting the Label Maker to your Computer39 About DYMO ID Software39 Transferring Files39 Updating the Label Maker Software
41 Caring for the Label Maker41 Cleaning the Label Maker41 Cleaning the Print Head42 Cleaning the Sensors42 Cleaning the Cutter Blade
43 Troubleshooting
46 Images and Symbols46 ISO47 GHS48 WHMIS48 Electrical48 Pro AV49 Arrows49 Symbols
5 XTL® 300User Guide
50 Rechargeable Battery Safety Precautions
50 Environmental Information

1 XTL® 300User Guide
About Your New Label Maker
With the DYMO® XTL™ 300 electronic label maker, you can design and print multiple label types, including barcode labels, panel labels, and heat shrink tubes.
The label maker uses DYMO XTL™ label cartridges in label widths of 1/4”, 3/8”,1/2”, 3/4”, or 1” (6 mm, 9 mm, 12 mm, 19 mm, or 24 mm). Labels are available in a full range of temperature, chemical, and UV-resistant materials, including continuous tape and pre-sized labels.
Visit www.dymo.com for information on obtaining labels and accessories for your label maker.
Registering Your Label Maker
Visit www.dymo.com/register to register your label maker online. During the registration process you will need the serial number, which is located inside the label compartment cover.
Register your label maker to receive these benefits:
Notification of software upgrades by email
Special offers and new product announcements
What’s New
See Updating the Label Maker Software on page 39.
Version 1.1
Resize a QR code to automatically fit the selected label size.
Choose the number of times the text is repeated on the label with the improved Cable Wrap label application.
2 XTL® 300User Guide
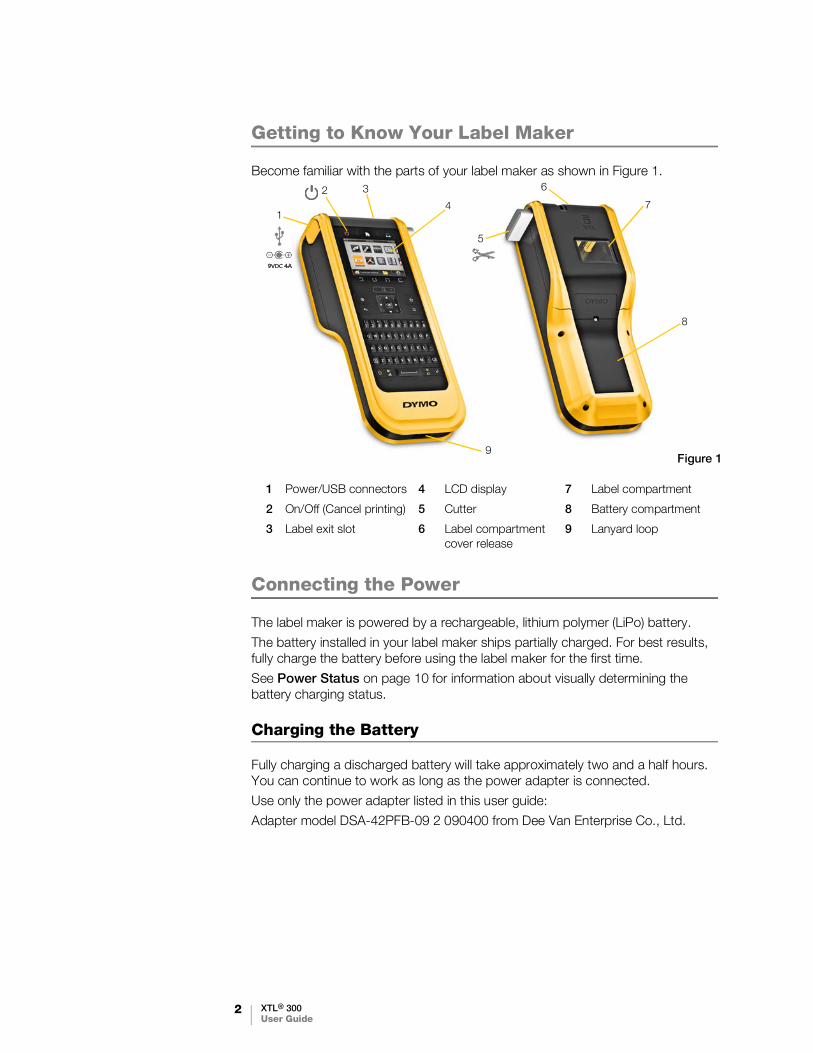
Getting to Know Your Label Maker
Become familiar with the parts of your label maker as shown in Figure 1.
Connecting the Power
The label maker is powered by a rechargeable, lithium polymer (LiPo) battery.
The battery installed in your label maker ships partially charged. For best results, fully charge the battery before using the label maker for the first time.
See Power Status on page 10 for information about visually determining the battery charging status.
Charging the Battery
Fully charging a discharged battery will take approximately two and a half hours. You can continue to work as long as the power adapter is connected.
Use only the power adapter listed in this user guide:
Adapter model DSA-42PFB-09 2 090400 from Dee Van Enterprise Co., Ltd.
1 Power/USB connectors 4 LCD display 7 Label compartment
2 On/Off (Cancel printing) 5 Cutter 8 Battery compartment
3 Label exit slot 6 Label compartment cover release
9 Lanyard loop
2 3
5
9
4 7
8
1
6
Figure 1
3 XTL® 300User Guide
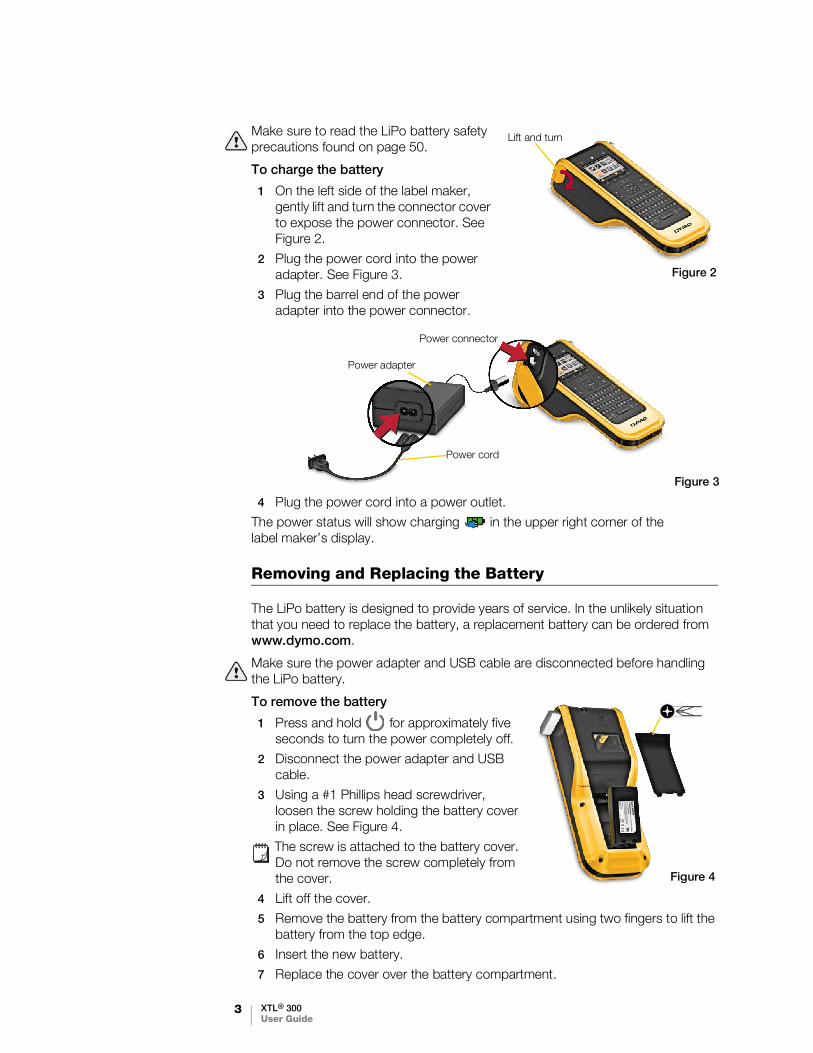
Make sure to read the LiPo battery safety precautions found on page 50.
To charge the battery
1 On the left side of the label maker, gently lift and turn the connector cover to expose the power connector. See Figure 2.
2 Plug the power cord into the power adapter. See Figure 3.
3 Plug the barrel end of the power adapter into the power connector.
4 Plug the power cord into a power outlet.
The power status will show charging in the upper right corner of the label maker’s display.
Removing and Replacing the Battery
The LiPo battery is designed to provide years of service. In the unlikely situation that you need to replace the battery, a replacement battery can be ordered from www.dymo.com.
Make sure the power adapter and USB cable are disconnected before handling the LiPo battery.
To remove the battery
1 Press and hold for approximately five seconds to turn the power completely off.
2 Disconnect the power adapter and USB cable.
3 Using a #1 Phillips head screwdriver, loosen the screw holding the battery cover in place. See Figure 4.
The screw is attached to the battery cover. Do not remove the screw completely from the cover.
4 Lift off the cover.
5 Remove the battery from the battery compartment using two fingers to lift the battery from the top edge.
6 Insert the new battery.
7 Replace the cover over the battery compartment.
Figure 2
Lift and turn
Figure 3
Power adapter
Power cord
Power connector
Figure 4

4 XTL® 300User Guide
8 Tighten the screw only until the battery cover is secure.
Make sure to read the LiPo Safety Precautions found on page 50.
About Labels
The label maker uses DYMO XTL™ label cartridges in label widths of 1/4”, 3/8”,1/2”, 3/4”, or 1” (6 mm, 9 mm, 12 mm, 19 mm, or 24 mm). Labels are available as continuous tape or pre-sized labels for specific applications.
The label cartridge that is inserted in the label maker determines the type of labels you can create and print. For example, if you have a 1” continuous label cartridge inserted, you will not be able to create a heat-shrink tube or laminated cable wrap label.
See Using the Label Applications on page 13 for information about the types of labels you can use with each label application.
Visit www.dymo.com for information on obtaining labels for your label maker.
Inserting the Label Cartridge
A sensitive electronic chip is embedded in the side of each label cartridge. This chip contains information that is read by the label maker and DYMO ID™ software. This chip must be kept clean to function properly.
Do not touch the electronic chip in the side of the label cartridge; oils from your hand may prevent the chip from working properly. See Figure 5.
To insert the label cartridge
1 Press the label compartment release and lift the cover. See Figure 6.
2 Make sure the tape and ribbon are taut across the mouth of the label cartridge and that the tape passes between the label guides. See Figure 5.
To tighten the ribbon, turn the ribbon rewind spool in the direction indicated by the arrow on the cartridge.
3 Insert the label cartridge and press firmly until the cartridge ‘clicks’ into place.
4 Close the label compartment cover.
Removing the Label Cartridge
You can design labels without a label cartridge inserted in the label maker. Just remember to insert a compatible label cartridge before attempting to print. See Using the Label Applications on page 13.
Figure 5Do not touch!
Ribbon rewind
Label guides
Press and lift
Figure 6

5 XTL® 300User Guide
To remove the label cartridge
1 Press the label compartment release and lift the cover. See Figure 6.
2 Remove the label cartridge.
You can now create labels using any of the label applications. When you start a new label, you will be asked to select a label cartridge to use.
Selecting a Label Cartridge
You can design any type of label when the label compartment is empty. Each time you select a label application, you are asked to select the properties for your new label.
To choose a label cartridge
1 Remove the label cartridge from the label maker.
You are warned that the label compartment is empty.
2 Select a label application from the Home screen.
You are asked to select a label cartridge.
The labels available for you to choose from are filtered to show only those label cartridges appropriate for the label application you selected.
3 Do one of the following:
• Enter the part number of the label cartridge you wish to use.
• Scroll through the list of labels and select a specific label.
• Select Wizard. You are asked to select the properties for the label you wish to create.
Removing the Label Backing
DYMO XTL™ continuous labels have an easy-to-peel split back for easy removal of the label backing.
Does not apply to heat-shrink tubing or pre-sized labels.
To remove the continuous label backing
1 Locate the split on the label backing.
2 Gently pinch the label lengthwise, folding toward the printed side of the label. The label backing separates.
3 Carefully peel away the backing from the label.
To remove pre-sized labels from the backing
Gently lift the corner of the label and peel the label from the backing.
Remove split backing
Continuous labels
Figure 7
Pre-sized labels
Peel label from backing
Figure 8

6 XTL® 300User Guide
Using Your Label Maker
Become familiar with the features and function keys on your label maker.
Keypad
In addition to the alphanumeric keys, a number of function keys give you quick access to the features of your label maker.
Power
The key turns the power on and off. Pressing also cancels printing.
To conserve power, the screen dims after thirty seconds of inactivity and the label maker enters standby mode after three minutes of inactivity. After approximately ten more minutes of inactivity, the label maker automatically shuts off.
1 On/Off (Cancel printing) 8 Save 15 Shift
2 Home 9 Number/Symbol keys 16 Caps lock
3 Print/Print options 10 Backspace/Delete 17 Navigation
4 LCD display 11 Return 18 Back
5 Function keys 12 Rotate/Align 19 New label/Clear
6 Zoom 13 Space bar 20 OK
7 Favorites 14 Text size/Text style
1 2
4
5
8
9
7
111415
16
1819
10
17
20
12
3
13
6
Figure 9

7 XTL® 300User Guide
You can change the amount of time the label maker remains in standby mode before automatically shutting off. See Changing the Auto Shut-off Time on page 34.
When the label maker is turned off, the current label and settings are remembered so you can continue working the next time the label maker is turned on.
If the battery is removed and the power adapter is disconnected, the label and settings you are currently editing will be lost.
Home
The key returns you to the Home screen from any screen. See Home Screen on page 10 for more information about the Home screen.
The key prints the currently displayed label.
Cutter Button
The button on the side of the label maker cuts the label.
When printing multiple copies, the label maker pauses between each label allowing you to cut before printing the next label.
You can change this setting so that the label maker prints all labels continuously and you can cut once at the end. A label separator cut mark is printed between each label to show where each label should be cut. See Cut Labels on page 36.
Zoom
The keys zoom in or out on a label you are editing. Zoom only applies when editing a label.
Shift
The key when used with another key selects the function or symbol printed above that key.
To turn power on Press .
To turn on the display when in standby mode
Press any key once.
To turn power completely off Press and hold for five seconds.
To print immediately Press once.
To set print options Press and hold for several seconds.
To cancel printing Press once while label maker is printing.
Press + a letterInserts an uppercase letter. Inserts a lowercase letter if Caps Lock is turned on.
Press + a number Inserts the symbol over the selected number.
8 XTL® 300User Guide
The key is also used with the navigation keys to select text in a text box. See Navigation Keys on page 9.
Clear
The key clears a label of all text and formatting or, if in a list screen, removes the selected item.
Save
The key saves the labels you are currently editing. See Saving Labels on page 31.
Favorites
The key opens the list of labels and images that you previously assigned to Favorites.
Back
The key cancels an action or exits from a menu without making a selection.
Caps Lock
The key toggles capitalization on and off.
Backspace
The key deletes the character, barcode, or image to the left of the cursor.
Press + Opens the Style tool. See Changing the Text Style on page 24.
Press + Opens the Align tool. See Aligning the Text on page 25.
on a label edit screen Deletes all text and formating leaving a single blank label.
in a list screenDeletes a saved label selected. Also deletes a template or an image added by you. Included images or templates cannot be deleted.
Selecting a favorite label Opens that label file in the appropriate label editor.
Selecting a favorite imageInserts the image into the label being edited at the current cursor postion.
Press on a label edit screen
Undoes the last edit to the label.
Press on a wizard screen Moves back one page of the wizard.
Press in a list or menu Moves up one level in the list or menu.
Caps lock turned on All letters that you enter are capitalized. The indicator appears in the status bar.
Caps lock turned off All letters entered appear in lowercase.

9 XTL® 300User Guide
OK
The key makes a selection, such as choosing a label application, a label file, an image, a list item, or a setting.
Throughout this user guide, using the instruction to “select” implies performing the step followed by pressing to complete the action.
Navigation Keys
The navigation keys operate as follows:
LCD Display
The LCD display is divided into three areas:
In a text box or moves the cursor one character to the left or right.
or moves the cursor up or down one line.Pressing in any corner of the navigation key will move the cursor to the beginning or end of the current line.
+ or selects characters beginning at the cursor position to the right or left.
+ or selects characters beginning at the cursor position to the same position in the line above or below.
+ a corner of the navigation key selects characters beginning at the cursor position to the beginning or end of the text box.
In a multi-cell label such as patch panel
or moves the cursor one cell to the left or right. At the end of the label, moves the cursor to the next label.
In menus and lists Use the navigation keys along with to select an item.
Status bar
Label edit area
Action bar

10 XTL® 300User Guide
Status Bar
The status bar contains a number of indicators that show label information, label type, Caps lock, USB connection, and power status.
Power Status
The power status is shown at the top right of the display and shows the current battery status.
Home Screen
The Home screen contains all the label editor applications. This is where you will start creating labels for your specific application.
When you press the key while editing a label, the Home screen is displayed; however, your current editing session remains active in the background. To return to editing the label, select Continue editing.
If you select a new label application and the label currently being edited is not yet saved, you are prompted to save the label.
When you press the key while in a menu or settings screen, any settings or other actions that have not been saved or confirmed are lost.
Level of battery charge remaining.
Connected to power adapter and charging. Bars will move from left to right while charging is in progress.
Very low battery charge remaining; you may not be able to print.
Battery completely discharged or missing.
Current labeltype and widthin label maker
Power status
Label type selected USB connection status
Caps lock indicator
Open a saved label
Select a label type
Change the settings
Continue editingthe current label
Current label typeand width in the
label makerPower status
Label type selected USB connection status
Caps lock indicator

11 XTL® 300User Guide
The Home screen contains the following three actions:
Action Bar
Four function keys are located below the LCD display. These keys are used to select actions that are available as you are editing labels.
In the example above, you can press either of the two left functions keys to continue editing the current label.
The actions associated with each function key are specific to your current task.
Label Editor
Each label application contains a custom editor for the type of label you are creating. At the bottom of the label editor are four features which are enabled when that feature is available based on your label type and content.
Continue editing Return to the label you were editing before pressing .
Open a saved label file Open a previously saved label file.
Settings Change the label maker settings.
Properties
Change the properties for the label. Available for label types where properties can be customized. See the properties available for each label type in Using the Label Applications on page 13.
Insert
Add a text box, symbol, barcode, or image object. The objects available depend on the label type selected. See Working with Objects on a Label on page 27.
Continue editingthe current label
Open a saved label
Change the Settings
Action bar
Function keys
Insert text box, barcode,
symbol, or image
Create a series of
labels
Go to the next label
Set labelproperties
Current label/Number of labels Label length

12 XTL® 300User Guide
Navigating Labels
When a label file contain more than one label, you can view each label. You can also locate and fix labels with errors before printing.
To view labels
1 In the label editor, select Go to.
2 Use the functions key to select Labels.
3 Use or to select the label you wish to view. The label appears in the editor.
4 Select Done when finished.
To find errors
1 In the label editor, select Go to.
2 Use the functions key to select Errors.
3 Use or to select the label with the error you wish to fix. The label appears in the editor.
4 Select Done when finished.
Serialize
Automatically fill panel labels, or automatically create a series of single labels. See Creating a Series of Labels on page 29.
Go to
View a series of labels, one at a time. Only available when the current file contains more than one label. Also used to locate label errors.
13 XTL® 300User Guide
Using the Label Applications
The label maker includes a number of label applications that make it easy to create a label for your specific job.
Label applications appropriate for the currently inserted label cartridge appear to the left of those label applications that are not compatible.
A caution symbol appears when a label application and the current label cartridge are not a match.
The following label applications are available for your specific labeling job and are described in detail in this section:
You can create and save labels for applications that are not compatible with the currently inserted label cartridge by removing the cartridge and leaving the label compartment empty. However, make sure the correct label cartridge is inserted before attempting to print.
This section describes each label application and the label properties you can change to customize your label.
Setting Default Label Properties
Most label editors contain a wizard which steps you through the properties that must be set each time you create a label. For labels you use frequently, you can avoid stepping through the wizard by setting default properties for that label type.
To set default label properties
1 While in a label editor, select .
2 Select a property and change the setting as appropriate.
3 Select Set as default on the bottom of the property list.
4 Select OK to confirm.
Next time you select that label application, you will not have to set properties to get started. You can change the properties for an individual label at any time by selecting .
You can always clear any default label properties you set for a label application. See Restoring the Label Application Default Settings on page 37.
Quick Cable Wrap Patch Panel 110-block Laminated Cable Wrap
Terminal Block
Asset Tracking
General Flag Distribution Panel
Horizontal Breaker
Heat-shrink Tube
Vertical Breaker
Materials Management

14 XTL® 300User Guide
Quick Label
The Quick label is a simple, text-only label. No properties need to be set to get started. As you add or delete text, the length of the label will change automatically to fit the text.
A single text object is included on the label by default. Barcodes and images cannot be added, and you cannot create multiple labels using serialization.
All text formatting can be applied to this label. Text formatting applies to all text on the label. To apply text formatting to only some of the text, create a general label.
Quick labels can be printed on any type of continuous labels.
The label properties you can set are:
To create a quick label
1 From the Home screen, select Quick.
2 Add text and formatting.
General Label
The General Label editor has no special formatting or templates associated with it. To create a custom design, you can add text, a barcode, or an image. See Working with Objects on a Label on page 27 for more information.
This type of label allows one text, one barcode, and one image object.
Text size and style apply to all the text on a single line. You can apply different text sizes and styles to each line of text on the label.
Use serialization to automatically create a series of labels. See Creating a Series of Labels on page 29.
General labels can be printed on both continuous and pre-sized labels.
The label properties you can set are:
Label outline Yes - Show label outline.No - Hide label outline. (Default)
Leader/trailer match
Yes - Blank space is equal at the beginning and end of the label. (Default)No - No blank space added at the end of the label.
Label orientation
Landscape (Default)
Portrait
Changing the label orientation removes any content on the label, creating a new blank label.
Label length Minimum: 1” (25.4 mm)This property is only available for continuous label cartridges. You cannot change the label length when a pre-sized label is selected.
Label outline Yes - Show label outline.No - Hide label outline. (Default)
Leader/trailer match
Yes - Blank space is equal at the beginning and end of the label. (Default)No - No blank is space added at the end of the label.This property is only available for continuous label cartridges.

15 XTL® 300User Guide
To create a general label
1 From the Home screen, select General.
2 Follow the steps to configure your label.
3 Add text and formatting.
Patch Panel Label
The Patch Panel editor allows you to quickly create a label that can be applied to datacom and electrical panels. Each label can contain up to 99 ports and you can divide the ports into equal groups.
One text object is already added for each port. Barcodes and images cannot be added to a Patch Panel label.
Text size and style apply to all ports on the label and to all labels in the file. When Auto fit text is selected for font size, the text in each port is automatically resized to fit that port. So you may see differences in text size for each port.
Use serialization to automatically populate the ports. When all the ports are filled on the current label, a new label is created. See Creating a Series of Labels on page 29.
Patch panel labels can be printed on any type of continuous labels.
The label properties you can set are:
You create a patch panel label by using a pre-designed template or by entering the label properties manually. See Transferring Files on page 39 for information about transferring the latest templates from your computer.
To use a patch panel template
1 From the Home screen, select Patch Panel.
2 Select Apply template.
3 Select the template you wish to use.
4 Add some text and formatting.
Port numbers Number of ports - maximum of 99 portsIn groups of - Number of ports available per group is determined by the number of ports selected so that each group is equal.
Label setup Continuous - Print groups of ports as one continuous label.
Separate - Print each group of ports as a separate label. (Default)
Dimensions Center to center distance - Distance from the center of one port to the center of the next port. Minimum: 5/32” (3.8 mm) Maximum: 20” (508 mm)Group clearance - Distance between groups of ports when one continuous label is selected. Minimum: 1/64” (0.4 mm)Maximum: 20” (508 mm)
Separator lines Yes - Print a separator line between each port. (Default)No - Don’t print a separate line between each port.
Label outline Yes - Show label outline.No - Hide label outline. (Default)

16 XTL® 300User Guide
To create a patch panel label manually
1 From the Home screen, select Patch Panel.
2 Follow the steps to configure your label.
3 Add text and formatting.
Flag Label
The flag label is one of several cable management specific labels. The flag label consists of two matching segments that when wrapped around a cable form a flag allowing the user to see the same data from both sides.
One text object is automatically added to the label. You can add an image and barcode object to a flag label.
Text size and style apply to all the text on a single line. You can apply different text sizes and styles to each line of text on the label.
Use serialization to automatically create a series of labels. See Creating a Series of Labels on page 29.
Flag labels can be printed on any type of continuous labels. A vertical dashed line will be printed in the center of the wrap part of the label to help you easily center the label on the cable.
The label properties you can set are:
To create a flag label
1 From the Home screen, select Flag.
2 Do one of the following:
• Select the cable type.
• Select Custom and then select the cable diameter.
3 Follow the steps to configure your label.
4 Add text and formatting.
Laminated Cable Wrap Label
The laminated cable wrap label is one of several cable management specific labels. This label contains two segments: a segment for the label content and an adhesive-backed, transparent segment that wraps around the cable covering the printed content for durability.
One text object is automatically added to the label. You can add an image and a barcode object to a laminated cable wrap label.
Cable type and diameter
Cable type: CAT 5/6, COAX, AWG: 4/0 - 2/0, AWG: 0 - 2, AWG: 3 - 5, AWG: 6+, or CustomDiameter: Available when Custom is selected for Cable type.
Minimum: 5/32” (4 mm)Maximum: 2” (50.8 mm)
Flag length Minimum: 7/16” (11.1 mm)Maximum: 10” (254 mm)
Label outline Yes - Show label outline.No - Hide label outline. (Default)

17 XTL® 300User Guide
Text size and style apply to all the text on a single line. You can apply different text sizes and styles to each line of text on the label.
Laminated cable wrap labels can only be printed using pre-sized Laminated Wire/Cable Wrap label cartridges.
Use serialization to automatically create a series of labels. See Creating a Series of Labels on page 29.
Laminated cable wrap label properties are based on the label cartridge selected and cannot be changed.
To create a laminated cable wrap label
1 From the Home screen, select Laminated Cable Wrap.Text size and style apply to the currently selected text. If no text is selected, the size and style apply to all the text in the text box.
2 Add text and formatting.
Cable Wrap Label
The cable wrap label is one of several cable management specific labels. The content of the cable wrap label is repeated several times so that it can be viewed from any angle when the label is wrapped around the cable.
One text object is automatically added to the label. Barcodes and images cannot be added to a cable wrap label.
Text size and style apply to all text on the label.
Use serialization to automatically create a series of labels. See Creating a Series of Labels on page 29.
Cable wrap labels can be printed on any type of continuous labels.
The label properties you can set are:
To create a cable wrap label
1 From the Home screen, select Cable Wrap.
2 Do one of the following:
• Select the cable type.
• Select Custom and then select the cable diameter.
3 Follow the steps to configure your label.
4 Add text and formatting.
Cable type and diameter
Cable type: CAT 5/6, COAX, AWG: 4/0 - 2/0, AWG: 0 - 2, AWG: 3 - 5, AWG: 6+, or CustomDiameter - Available when Custom is selected for Cable type.
Minimum: 5/32” (4 mm)Maximum: 2” (50.8 mm)
Text repeat Auto repeat (default) - Number of repeats is determined by label size. Minimum 4 repeats.User selected: Minimum: 1; Maximum: 20

18 XTL® 300User Guide
Heat-Shrink Tube Label
The heat-shrink tube label is one of several cable management specific labels. Heat shrink tube labels can be printed on any continuous or pre-sized Heat-Shrink Tube labels.
One text object is automatically added to the label. You can add an image and a barcode object to heat-shrink tube labels.
Text size and style apply to all the text on a single line. You can apply different text sizes and styles to each line of text on the label.
Use serialization to automatically create a series of labels. See Creating a Series of Labels on page 29.
The following table should help you in choosing the correct label width for your application.
The label properties you can set are:
To create a heat shrink tube label
1 From the Home screen, select Heat-Shrink Tube.
2 Follow the steps to configure your label.
3 Add text and formatting.
110-Block Label
The 110-block label is one of several datacom specific labels. You enter data into one of three pre-defined block formats depending on the block type you select.
One text object is automatically added for each block. Barcodes and images cannot be added to 110-block labels.
Text size and style apply to all blocks on the label and all labels in the file. When Auto fit text is selected for font size, the text is automatically resized to fit that block. So you may see differences in text size for each block.
Heat-shrink tube size
Minimum cable diameter
Maximum cable diameter
Minimum AWG
Maximum AWG
1/4” (6 mm) 0.05” (1.24 mm) 0.14” (3.5 mm) 16 7
1/2” (12 mm) 0.12” (3 mm) 0.28” (7.2 mm) 8 1
1” (24 mm) 0.22” (5.5 mm) 0.57” (14.50 mm) 3 4/0+
Label orientation
Landscape (Default)
Portrait
Changing the label orientation removes any content on the label, creating a new blank label.
Label length Minimum: 1 1/4” (31.75 mm)Default: 2” (50.8 mm)
Label outline Yes - Show label outline.No - Hide label outline. (Default)
Leader/trailer match
Yes - Blank space is equal at the beginning and end of the label. (Default)No - No blank space added at the end of the label. This property is only available for continuous label cartridges.
19 XTL® 300User Guide
Use serialization to automatically populate the blocks. When all the blocks are filled on the current label, a new label is created. See Creating a Series of Labels on page 29.
110-block labels can be printed on any type of continuous labels.
The label properties you can set are:
To create a 110-block label
1 From the Home screen, select 110-Block.
2 Select a block type.
3 Add text for each block.
4 Add formatting as desired.
Horizontal Breaker Label
The horizontal breaker label is one of two types of labels for use on a breaker box. See Vertical Breaker Label on page 20.
One text object is automatically added for each breaker. Barcodes and images cannot be added to horizontal breaker labels.
Text size and style apply to all breakers on the label and all labels in the file. When Auto fit text is selected for font size, the text is automatically resized to fit that breaker. So you may see differences in text size for each breaker.
Use serialization to automatically populate the breakers. When all the breakers are filled on the current label, a new label is created. See Creating a Series of Labels on page 29.
Horizontal breaker labels can be printed on any type of continuous labels.
The label properties you can set are:
To create a horizontal breaker label
1 From the Home screen, select Horizontal Breaker.
Block type C4-4 pair - Data gradeC4-4 pair - Voice gradeC5-5 pair - Voice grade
Separator lines Yes - Print a separator line between each block. No - Don’t print a separator line between each block. (Default)
Label outline Yes - Show label outline.No - Hide label outline. (Default)
Breaker dimensions
Number of breakers - Maximum: 99 breakersBreaker width - Minimum: 1/4” (6.35 mm); Maximum: 5” (126.9 mm)
Breaker multipliers
Multiplier for each breaker. Maximum: 4 Can be manually entered in 0.5 increments, such as 2.5, 3.5 and so on.
Label outline Yes - Show label outline.No - Hide label outline. (Default)
Separator lines Yes - Print a separator line between each breaker. (Default)No - Don’t print a separator line between each breaker.
Leader/trailer match
Yes - Blank space is equal at the beginning and end of the label. (Default)No - No blank space added at the end of the label.
20 XTL® 300User Guide
2 Follow the step to configure your label.
3 Add text for each breaker.
4 Add formatting as desired.
Vertical Breaker Label
The vertical breaker label is one of two types of labels for use on a breaker box. See Horizontal Breaker Label on page 19.
One text object is automatically added for each breaker. Barcodes and images cannot be added to vertical breaker labels.
Text size and style apply to all breakers on the label and all labels in the file. When Auto fit text is selected for font size, the text is automatically resized to fit that breaker. So you may see differences in text size for each breaker.
Use serialization to automatically populate the breakers. When all the breakers are filled on the current label, a new label is created. See Creating a Series of Labels on page 29.
Vertical breaker labels can be printed on any type of continuous labels.
The label properties you can set are:
To create a vertical breaker label
1 From the Home screen, select Vertical Breaker.
2 Follow the steps to configure your label.
3 Add text for each breaker.
4 Add formatting as desired.
Terminal Block Label
Terminal block labels are created by specifying the orientation (portrait or landscape), the number of blocks, and the block height.
One text object is automatically added for each block. Barcodes and images cannot be added to terminal block labels.
Text size and style apply to all blocks on the label and all labels in the file. When Auto fit text is selected for font size, the text is automatically resized to fit that block. So you may see differences in text size for each block.
Breaker dimensions
Number of breakers - Maximum: 99 breakersBreaker height - Minimum: 1/4” (6.35 mm); Maximum: 5” (126.9 mm)
Breaker poles Number of poles for each breaker. Maximum: 3
Label outline Yes - Show label outline.No - Hide label outline. (Default)
Separator lines Yes - Print a separator line between each breaker. (Default)No - Don’t print a separator line between each breaker.
Leader/trailer match
Yes - Blank space is equal at the beginning and end of the label. (Default)No - No blank space added at the end of the label.

21 XTL® 300User Guide
Use serialization to automatically populate the blocks. When all the blocks are filled on the current label, a new label is created. See Creating a Series of Labels on page 29.
Terminal block labels can be printed on any type of continuous labels.
The label properties you can set are:
To create a terminal block label
1 From the Home screen, select Terminal Block.
2 Follow the steps to configure your label.
3 Add text for each block.
4 Add formatting as desired.
Asset Tracking Label
Asset tracking labels are created using pre-designed templates. The list of available templates is based on the label cartridge you have selected. See Transferring Files on page 39 for information about transferring the latest templates from your computer.
You can edit any text, barcode, or image objects on the label but you cannot edit the template to add or delete objects.
Text size and style apply to all the text on a single line. You can apply different text sizes and styles to each line of text on the label.
Use serialization to automatically create a series of labels. See Creating a Series of Labels on page 29.
Asset tracking labels can be printed on any type of continuous or pre-sized labels.
The label properties you can set are:
Label orientation Portrait (Default)
Landscape
Changing the label orientation removes any content on the label, creating a new blank label.
Terminal block dimensions
Number of blocks. Maximum: 99 blocksBlock height. Minimum: 5/32” (3.8 mm); Maximum: 20” (508 mm)
Label outline Yes - Show label outline.No - Hide label outline. (Default)
Separator lines Yes - Print a separator line between each block. (Default)No - Don’t print a separator line between each block.
Leader/trailer match
Yes - Blank space is equal at the beginning and end of the label.No - No blank space is added at the end of the label. (Default)
Label outline Yes - Show label outline.No - Hide label outline. (Default)
Leader/trailer match
Yes - Blank space is equal at the beginning and end of the label.No - No blank space is added at the end of the label. (Default)Available only when a continuous label cartridge is selected.

22 XTL® 300User Guide
To create an asset tracking label
1 From the Home screen, select Asset Tracking.
2 Select the template you would like to use.
3 Add text and formatting.
Distribution Panel Label
Distribution panel labels are created by specifying the number of connectors and the center to center distance between each connector.
One text object is automatically added for each connector. Barcodes and images cannot be added to distribution panel labels.
Text size and style apply to all connectors on the label and all labels in the file. When Auto fit text is selected for font size, the text is automatically resized to fit that connector. So you may see differences in text size for each connector.
Use serialization to automatically populate the connectors. When all the connectors are filled on the current label, a new label is created. See Creating a Series of Labels on page 29.
Distribution panel labels can be printed on any type of continuous labels.
The label properties you can set are:
To create a distribution panel label
1 From the Home screen, Distribution Panel.
2 Follow the steps to configure your label.
3 Add text for each connector.
4 Add formatting as desired.
Materials Management Label
Materials Management labels are created using pre-designed templates. The list of available templates is based on the label cartridge you have selected. See Transferring Files on page 39 for information about transferring the latest templates from your computer.
You can edit any text, barcode, or image objects on the label but you cannot edit the template to add or delete objects.
Text size and style apply to all the text on a single line. You can apply different text sizes and styles to each line of text on the label.
Use serialization to automatically create a series of labels. See Creating a Series of Labels on page 29.
Panel dimensions Number of connectors - Maximum: 99 connectorsCenter to center distance - Distance from the center of one connector to the center of the next connector.
Minimum: 5/32” (3.8 mm)Maximum: 20” (508 mm)
Label outline Yes - Show label outline.No - Hide label outline. (Default)
Separator lines Yes - Print a separator line between each connector. (Default)No - Don’t print a separator line between each connector.
23 XTL® 300User Guide
Materials Management labels can only be printed on 3/4” (19 mm) and 1” (24 mm) wide continuous or pre-sized labels.
The label properties you can set are:
To create a materials management label
1 From the Home screen, select .
2 Select the template you would like to use.
3 Add text and formatting.
Changing Label Applications
After creating labels in one label application, you can change to a different label application. In some cases you will be asked if you want to reuse the data from the previous application.
For some label applications, you may wish to create more than one type of label using the same data. For example, you create a 24 port patch panel label and you also want 24 cable wrap labels to place on the cables. The data recall feature allows you to switch label applications and recall the data to the new application.
See Changing the Recall Data Setting on page 34 to change the default setting.
Data recall is not available for label applications.
To change the label application
1 Press Home.
2 Select the new label application.
If data recall is available for that application, a Recall data dialog box displays.
3 Select one of the following:
• Recall once - Recall data from the previous label this one time only. You will continue to be asked each time data recall is available.
• Always recall - Always recall data from the previous label. From now on data will always be recalled to the new label when possible.
• Not this time - Don’t recall data this one time. You will continue to be asked each time data recall is available.
• Never recall - You will never be asked to recall data.
• Select Continue.
The new label application is populated with the recalled data.
Label outline Yes - Show label outline.No - Hide label outline. (Default)
Leader/trailer match
Yes - Blank space is equal at the beginning and end of the label.No - No blank space is added at the end of the label. (Default)Available only when a continuous label cartridge is selected.

24 XTL® 300User Guide
Editing and Formatting Text on Labels
This section describes the following:
Changing text size and style
Rotating and aligning the text
Inserting punctuation, symbols, and special characters
Creating a vertical label
The following sections describe formatting text using the keypad. You can also access the formatting tools from Properties.
Editing Text
The number of lines of text that you can insert on a label depends on the size of the text and the width of the label. If the text is too large or you add too many lines, you will see a warning icon and receive an error message when you try to print.
To edit text in a text box
Select the text box and add text using the keypad.
Use the navigation keys to move through existing text.
Press to add a new line.
Select blocks of text using + the navigation keys.
See Navigation Keys on page 9 for information about moving the cursor and selecting text.
Changing the Text Size
You can select the font size for the text or you can have the text automatically sized to fit the available space on the label.
See each label type in Using the Label Applications on page 13 for how changes to the text size are applied to that type of label.
To change the text size
1 Select some text.To apply the size to all the text, select the text box.
2 Press . The Font Size tool appears.
3 Use or to select a font size from the list or select Auto fit text.
You can also enter a size directly in the Font size box.
Changing the Text Style
You can add bold, italic, and underline to your text. You can also add a box around the text.
See Using the Label Applications on page 13 for how changes to the text style are applied to each type of label.
25 XTL® 300User Guide
To change the text style.
1 Select some text.To apply the style to all the text, select the text box.
2 Press + . The Text Style tool appears.
3 Use the function keys to select one or more styles.
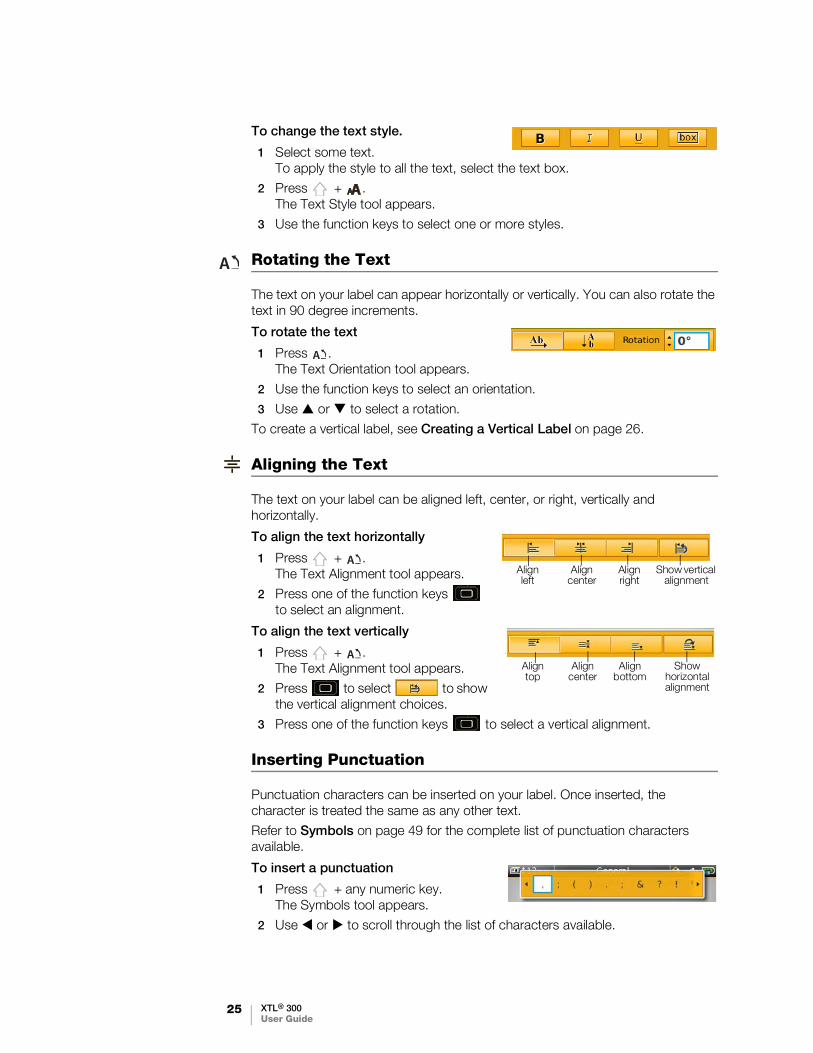
Rotating the Text
The text on your label can appear horizontally or vertically. You can also rotate the text in 90 degree increments.
To rotate the text
1 Press . The Text Orientation tool appears.
2 Use the function keys to select an orientation.
3 Use or to select a rotation.
To create a vertical label, see Creating a Vertical Label on page 26.
Aligning the Text
The text on your label can be aligned left, center, or right, vertically and horizontally.
To align the text horizontally
1 Press + . The Text Alignment tool appears.
2 Press one of the function keys to select an alignment.
To align the text vertically
1 Press + . The Text Alignment tool appears.
2 Press to select to show the vertical alignment choices.
3 Press one of the function keys to select a vertical alignment.
Inserting Punctuation
Punctuation characters can be inserted on your label. Once inserted, the character is treated the same as any other text.
Refer to Symbols on page 49 for the complete list of punctuation characters available.
To insert a punctuation
1 Press + any numeric key. The Symbols tool appears.
2 Use or to scroll through the list of characters available.
Align left
Align center
Align right
Show vertical alignment
Align top
Align center
Align bottom
Show horizontal alignment

26 XTL® 300User Guide
The currently selected character is inserted at the cursor position and the Symbols tool disappears after a few seconds.
Inserting Symbols
Fractions and other symbols can be inserted on your label. Once inserted, the symbol becomes a character and is treated the same as text. You can apply bold and underline to most symbols.
Refer to Symbols on page 49 for the complete list of symbols available.
To insert a symbol
1 From the edit screen, select .
2 Select Symbol and a category.
3 Select the desired symbol and press . The symbol is inserted at the cursor position.
Symbols can also be inserted from the Symbols tool as described in Inserting Punctuation above.
Inserting International Characters
The label maker supports the extended Latin character set. Similar to using a mobile phone, holding down a letter key will display all the variations of that letter.
The order in which the variations appear depends on the language you have selected. For example, if French is selected as the language and you hold down the letter a, you will see à á â ã ä å and so on through all the variations available.
To insert a character
1 Press and hold an alphanumeric key. The Diacritical tool appears and the selected character is added to the label at the cursor position.
2 Use or to select the desired character. The character is inserted and the Diacritical tool disappears after a few seconds.
Creating a Vertical Label
You can create a vertical label with the text in a horizontal or vertical orientation. The instructions in this section are for a general label type.
To create a vertical label
1 From the Home screen, select General.
2 Select Portrait as the label orientation.
3 Select the label length.
4 Add your text and formatting.
5 Press and select to change the text to a vertical orientation.
Vertical text on a portrait label

27 XTL® 300User Guide
Working with Objects on a Label
Depending on the label type, you can add text box, image, or barcode objects to design your label. See Using the Label Applications on page 13 for a description of which objects can be used on each label type.
The label edit area is divided into five positions as shown: above, below, center, left, right. Each object type is represented by an icon:
A blue border appears around the object when the object is selected.
A new object can replace a default object already on the label or you can place the new object above, below, to the right, or to the left of the default object.
To select an object
Use the navigation keys to select an object on the label.
To move an object
1 Select the object, and then select Location.
2 Use the arrow keys to move the object to a new location.
To delete an object
Use the navigation keys to select the object and press .
Inserting a Text Box
Most labels include at least one text box by default. Only one text object is allowed on a label. In most cases, a single text box will already be positioned on the label when the editor starts. Depending on the label type, you can change the text box location or, if the label includes a barcode or image, you can delete the text box.
To insert a text box
1 Select and select Text.
2 Use the navigation keys to select the location for the text box.
3 Add text and formatting.
To edit the text box formatting
1 Select the text box and press . The properties menu appears.
2 Select Text format.
3 Use the function keys to change the format.
Inserting an Image
You can add one or more images to some label types.
See Using the Label Applications on page 13 for a description of which objects can be used on each label type
Text object Barcode object Image object

28 XTL® 300User Guide
A number of standard images are built into your label maker. You can also transfer images from your computer to the label maker for use on your labels. The image categories are:
See Images and Symbols on page 46 for the complete list of images included.
A Custom category is added to the category list when you have transferred custom images from your computer to the label maker.
You can mark images you use frequently as Favorites for easy access. See Using Favorites on page 31 for more information.
To insert an image
1 From the edit screen, select and then select Image.
2 Select the image you want to insert.
3 Use the navigation keys to select the location for the image.
4 Select the Size and Alignment.
To edit the image properties
1 Use the navigation keys to select the image and press . The image properties list appears.
2 Select the property you wish to change.
3 Change the settings and press .
4 When finished editing properties, select Close.
To change the image
1 Use the navigation keys to select the image and press . The properties menu appears.
2 Select Change image.
3 Select a new image.
Inserting a Barcode
The label maker can generate the following types of barcodes.
This User Guide assumes that you already understand the differences between barcode types and have a plan in place to incorporate barcodes into your organization. If you need to learn more about barcodes, many excellent how-to books are available at local libraries and book stores.
Code 128 is the default barcode type. You can choose another type as your default barcode. See Setting the Default Barcode on page 36.
Warning
Mandatory
Prohibit
Fire and Exit
First aid
GHS
WHMIS
Electrical
ProAV
Arrows
Code 128 Codabar EAN 8
Code 39 EAN 13 UPC A
Code 39 w/Mod 43 PDF 417 QR

29 XTL® 300User Guide
You can add a barcode to the following label types: general, flag, heat-shrink tube, and laminated cable wrap. If a barcode already exists on a template, the barcode can be edited.
By default the barcode text appears below the barcode. You can choose to show the text above the barcode or hide the text. Optionally, you can add text before and after the barcode. Showing barcode text is not available for PDF 417 and QR codes.
QR codes can contain the following information:
Text only
Phone number
SMS text message
Web page URL
To add a barcode
1 From the edit screen, select and then select Barcode.
2 Select the barcode type.
3 Enter the barcode data.
4 Use the navigation keys to set the barcode location on the label.
5 Select the barcode size and alignment.
To change the barcode text position
1 Select the barcode and press .
2 Select Barcode text.
3 Make sure the Show barcode text check box is selected.
4 Select one of the following:
• Text above barcode
• Text below barcode
To edit a barcode
1 Select the barcode and press .
2 Select the property you wish to change.
3 Change the settings and press .
4 When finished editing properties, select Close.
Deleting an Object
You must have at least one object on a label.
To delete an object
Select the object and press .
Creating a Series of Labels
You can quickly create a series of labels using the serialization feature.
To create a series, you:
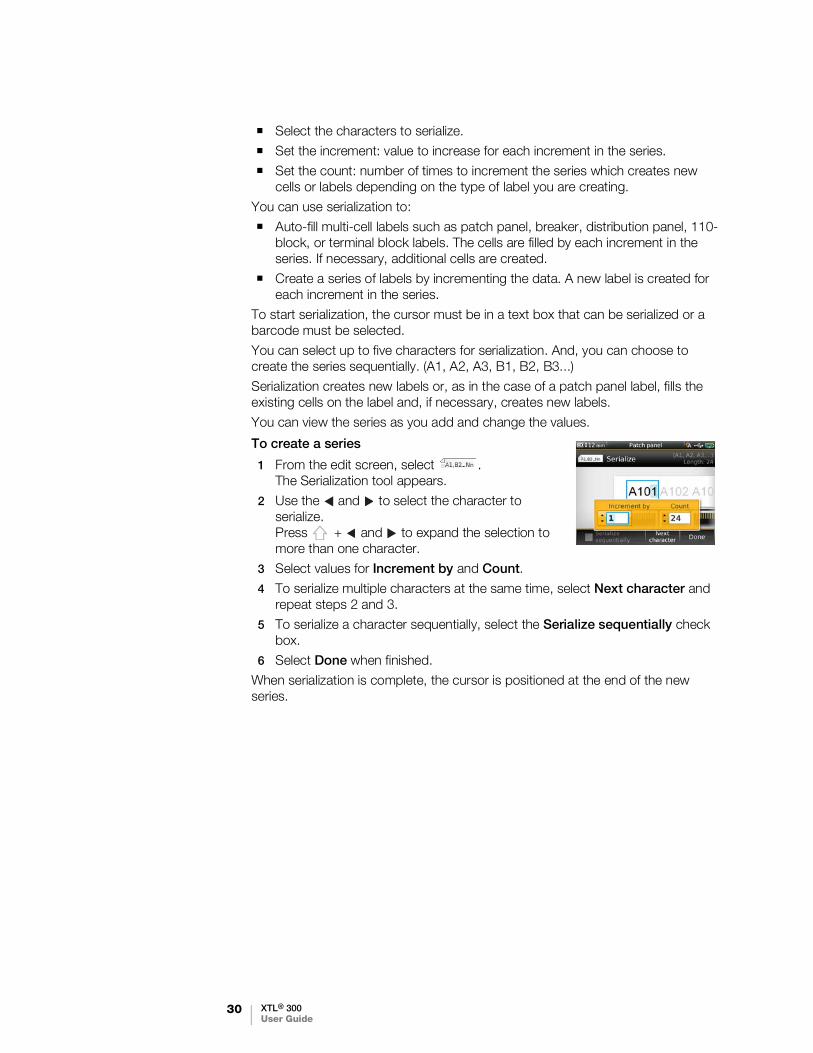
30 XTL® 300User Guide
Select the characters to serialize.
Set the increment: value to increase for each increment in the series.
Set the count: number of times to increment the series which creates new cells or labels depending on the type of label you are creating.
You can use serialization to:
Auto-fill multi-cell labels such as patch panel, breaker, distribution panel, 110-block, or terminal block labels. The cells are filled by each increment in the series. If necessary, additional cells are created.
Create a series of labels by incrementing the data. A new label is created for each increment in the series.
To start serialization, the cursor must be in a text box that can be serialized or a barcode must be selected.
You can select up to five characters for serialization. And, you can choose to create the series sequentially. (A1, A2, A3, B1, B2, B3...)
Serialization creates new labels or, as in the case of a patch panel label, fills the existing cells on the label and, if necessary, creates new labels.
You can view the series as you add and change the values.
To create a series
1 From the edit screen, select . The Serialization tool appears.
2 Use the and to select the character to serialize. Press + and to expand the selection to more than one character.
3 Select values for Increment by and Count.
4 To serialize multiple characters at the same time, select Next character and repeat steps 2 and 3.
5 To serialize a character sequentially, select the Serialize sequentially check box.
6 Select Done when finished.
When serialization is complete, the cursor is positioned at the end of the new series.

31 XTL® 300User Guide
Using the Library
You can save your labels to the label maker’s memory so that you can print them later or use them as a template for future labels of the same type.
Saving Labels
When you save labels, all content and formatting are saved, and you give the label file a unique name. The label cartridge information is also saved with the label.
The following characters cannot be used in file names: > : “ / \ | ? * ,
To save labels
1 From the label edit screen, select .
2 Enter a name and press .
If the memory is full, you are asked to delete some saved labels before you can save a new label.
Opening Saved Labels
Label cartridge information is saved with the label file. When you open a saved label and the label cartridge currently selected is not a match for the label information saved with that label, a message appears asking if you want to change the label cartridge selection.
To open a saved label
1 From the Home screen, select .
2 Select the label you want to open and press .
Deleting Saved Labels
You can free memory space by deleting labels you no longer need.
To delete saved labels
1 From the Home screen, select .
2 Select the label you want to delete and press .
3 Select to confirm.
Using Favorites
A quick way to access saved labels and images you use frequently is to assign them to Favorites.
To add an image to Favorites
1 From the edit screen, select and select Image.
2 Navigate to the desired image and select Add to favorites.The next to the image is highlighted.
To add a saved label to Favorites
1 From the Home screen, select .

32 XTL® 300User Guide
2 Navigate to the desired label file and select Add to favorites.The next to the file name is highlighted.
To use a Favorite label or image
1 Press and select Labels or Images.
2 Select the item you want to use and press .
To remove a Favorite
1 Press and select Labels or Images.
2 Navigate to the item you want to delete.
3 Select Remove from favorites.The next to the item is no longer highlighted.

33 XTL® 300User Guide
Changing the Settings
You can change the following settings:
Changing the Language
Changing the Units of Measure
Changing the Screen Brightness
Changing the Auto Shut-off Time
Changing the Recall Data Setting
Setting Print Options
Setting the Default Barcode
All settings remain in effect until you change them again.
You can also restore certain factory settings:
Restoring the Label Application Default Settings
Restoring Factory Default Settings
Changing the Language
Changing the language setting only affects the text and menus in the display.
To change the language
1 From the Home screen, select and select Language.
2 Select a language and select Done.
The language is changed immediately.
Changing the Units of Measure
You can choose to work in millimeters or inches. The default unit of measure is inches.
To change the units of measure
1 From the Home screen, select and select Units of measure.
2 Select the Inches or mm and select Done.
Changing the Screen Brightness
You can change the brightness of the LCD display to accommodate different lighting situations.
To change the brightness
1 From the Home screen, select and select Screen brightness.
2 Use the and keys to select the brightness level you prefer and select Done.

34 XTL® 300User Guide
Changing the Auto Shut-off Time
To conserve power, the screen will dim after thirty seconds of inactivity and the label maker will enter standby mode after three minutes of inactivity. After ten more minutes of inactivity, the label maker automatically shuts off.
You can change the amount of time the label maker remains in standby mode before automatically shutting off. Although not recommended, you can also set auto shut-off to Never.
To change the auto shut-off time
1 From the Home screen, select and select Auto shut-off.
2 Select the number of minutes until the power is automatically turned off and select Done.
Changing the Recall Data Setting
When you switch label applications, data from the previous label can sometimes be used on the new label. Recalling data applies to text-only labels.
When data recall is possible and the recall data setting is turned on, you are given several recall options:
Recall once - Recall data from the previous label this one time only. You will continue to be asked each time data recall is available.
Always recall - Always recall data from the previous label. From now on data will always be recalled to the new label when possible.
Not this time - Don’t recall data this one time. You will continue to be asked each time data recall is available.
Never recall - You will never be asked to recall data.
When you choose Always recall or Never recall, you can reverse this setting.
To change data recall
1 From the Home screen, select and then select Recall data.
2 Select Yes or No, and then select Done.
Setting Print Options
Several print options are available for printing your labels. You can change the options each time you print or you can save the options you use most often as default settings.
The options you can set are:
Print Range
Number of Copies
Collate
Mirror
Cut Labels
Feed
You can change these print options in two ways:
At the time you print labels: the options apply to that one print job.

35 XTL® 300User Guide
As defaults through the Settings menu: the options will apply to all future print jobs. If you set defaults, you will still be able to change the print options individually for a specific label when needed.
To change the default print options
1 From the Home screen, select and then Print options.
2 Make your desired changes to the print options.
3 Select Done when finished.
These settings will be the default settings every time you print.
To change these settings for an individual print job, press and hold to display the print options menu.
Print Range
While working with multiple labels, you can choose to print all labels, the current label, or a range of labels.
This setting is not saved with your label file.
To set the print range
1 Press and hold to display the print options menu.
2 Select Print range.
3 Select the range you wish to print.
4 Select Done and then press .
Number of Copies
You can print up to 99 copies of the same label at one time.
This setting is not saved with your label file.
To set the number of copies to print
1 Press and hold to display the print options menu.
2 Select Copies.
3 Select the number of copies to print.
4 Select Done and then press .
When printing is finished, the number of copies to print returns to the value set as default.
Collate
When printing multiple copies of a group of labels, by default the labels are printed collated. You can choose not to collate the labels, if desired. If you choose to have the labels print normally, all the copies of the first label are printed before the next label starts printing.
The following example shows three copies of a group of three labels printed with and without collation.
Collated
A101 A102 A103 A101 A102 A103 A101 A102 A103
Not collated

36 XTL® 300User Guide
A101 A101 A101 A102 A102 A102 A103 A103 A103
This setting is saved with your label file.
To turn off collation
1 Press and hold to display the print options menu.
2 Select Collate and then select Don’t collate labels.
3 Select Done and then press .
Mirror
The mirror option allows you to print the contents of your label backwards, from right to left, as you would see the contents of your label in a mirror.
This setting is not saved with your label file.
To print from right to left
1 Press and hold to display the print options menu.
2 Select Mirror and then select Mirror content.
3 Select Done and then press .
Cut Labels
When printing multiple copies, the label maker pauses between each label allowing you to cut before printing the next label.
You can change this setting so that the label maker prints all labels continuously and you can cut once at the end. A label separator cut mark is printed between each label to show where each label should be cut.
To choose when to cut multiple labels
1 Press and hold to display the print options menu.
2 Select Cut labels.
3 Select one of the following:
• All labels
• Each label (default)
4 Select Done and then press .
Feed
You may need to feed additional label material before you cut a label or feed a label that does not advance from the label exit slot properly.
To feed the label
1 Press and hold to display the print options menu.
2 Select Feed to advance the label by 1/4” (6 mm).
Setting the Default Barcode
The default barcode type will be inserted automatically each time you insert a barcode on a label. The factory default barcode type is Code 128.
XTL 300

37 XTL® 300User Guide
To change the default barcode
1 From the Home screen, select .
2 Select Default settings and then Default barcode.
3 Select the barcode type to be used as the default and then select Done.
Restoring the Label Application Default Settings
From within each label editor you can choose to set the current properties as the custom default properties for that label type. When custom default properties are set, you avoid having to step through the label application wizard each time you create that type of label. See Setting Default Label Properties on page 13.
You use this setting to remove the custom default label properties you previously set for a label application.
To restore the label application default properties
1 From the Home screen, select .
2 Select Default settings and then Default label properties.
3 Select the label application you want to reset.
To restore all label application default properties, select Reset all.
4 At the confirmation screen, press to confirm.
You will now have to set the properties each time you create a label for this label type.
Restoring Factory Default Settings
You can remove any custom settings you made and restore the label maker to the factory default settings. Restoring does not remove your saved labels, favorites, or transferred files.
To change the restore the factory default settings
1 From the Home screen, select and then select Restore factory settings.
2 At the confirmation screen, press to confirm.
38 XTL® 300User Guide
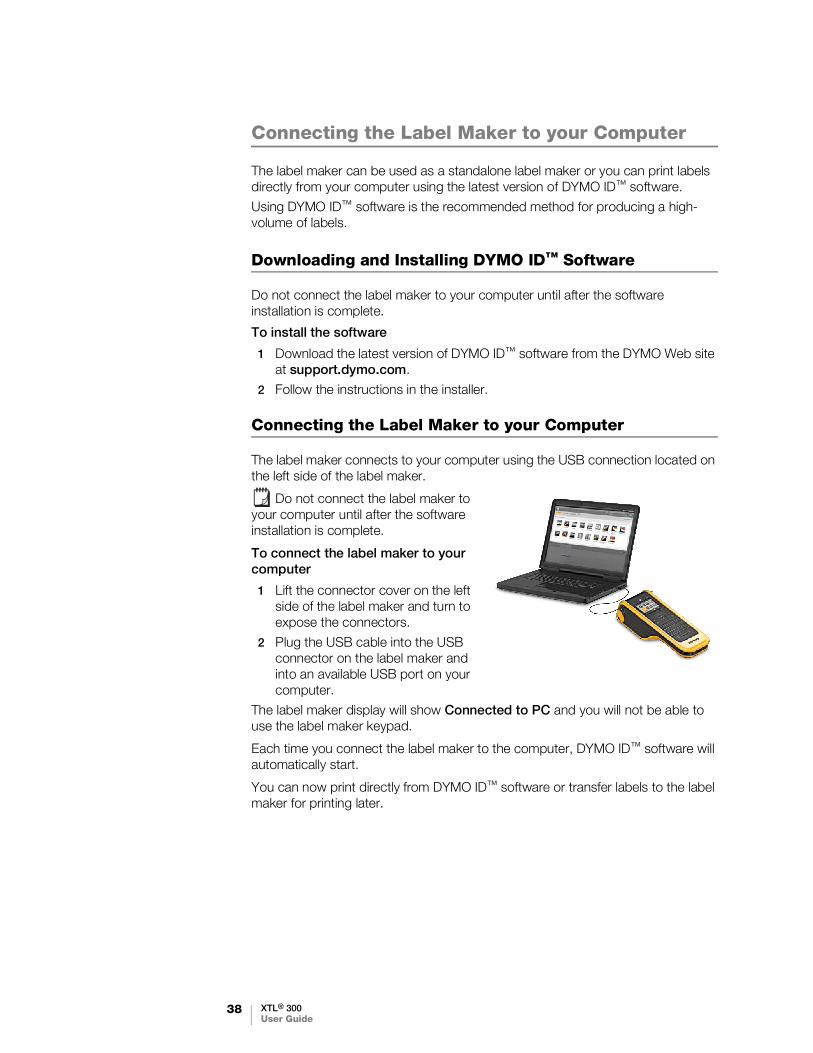
Connecting the Label Maker to your Computer
The label maker can be used as a standalone label maker or you can print labels directly from your computer using the latest version of DYMO ID™ software.
Using DYMO ID™ software is the recommended method for producing a high-volume of labels.
Downloading and Installing DYMO ID™ Software
Do not connect the label maker to your computer until after the software installation is complete.
To install the software
1 Download the latest version of DYMO ID™ software from the DYMO Web site at support.dymo.com.
2 Follow the instructions in the installer.
Connecting the Label Maker to your Computer
The label maker connects to your computer using the USB connection located on the left side of the label maker.
Do not connect the label maker to your computer until after the software installation is complete.
To connect the label maker to your computer
1 Lift the connector cover on the left side of the label maker and turn to expose the connectors.
2 Plug the USB cable into the USB connector on the label maker and into an available USB port on your computer.
The label maker display will show Connected to PC and you will not be able to use the label maker keypad.
Each time you connect the label maker to the computer, DYMO ID™ software will automatically start.
You can now print directly from DYMO ID™ software or transfer labels to the label maker for printing later.
39 XTL® 300User Guide
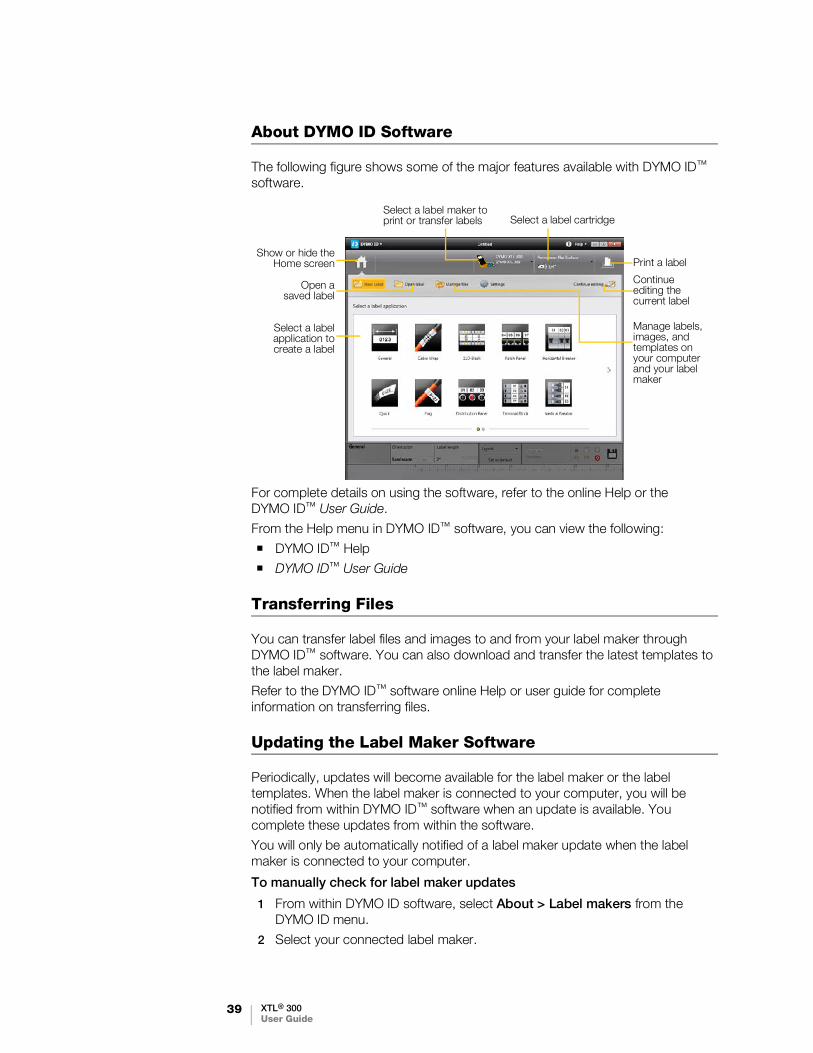
About DYMO ID Software
The following figure shows some of the major features available with DYMO ID™ software.
For complete details on using the software, refer to the online Help or the DYMO ID™ User Guide.
From the Help menu in DYMO ID™ software, you can view the following:
DYMO ID™ Help
DYMO ID™ User Guide
Transferring Files
You can transfer label files and images to and from your label maker through DYMO ID™ software. You can also download and transfer the latest templates to the label maker.
Refer to the DYMO ID™ software online Help or user guide for complete information on transferring files.
Updating the Label Maker Software
Periodically, updates will become available for the label maker or the label templates. When the label maker is connected to your computer, you will be notified from within DYMO ID™ software when an update is available. You complete these updates from within the software.
You will only be automatically notified of a label maker update when the label maker is connected to your computer.
To manually check for label maker updates
1 From within DYMO ID software, select About > Label makers from the DYMO ID menu.
2 Select your connected label maker.
Select a labelapplication tocreate a label
Select a label maker to print or transfer labels Select a label cartridge
Print a label
Open asaved label
Show or hide theHome screen
Continue editing the current label
Manage labels, images, and templates on your computer and your label maker
40 XTL® 300User Guide
3 If an update is available, follow the instructions when prompted by the software.
4 When update is complete, turn the power off and then on again.
Press and hold for at least five seconds to make sure the power is completely off and not just in standby mode.
Refer to the DYMO ID™ software online Help or user guide for information about label maker software or template updates.

41 XTL® 300User Guide
Caring for the Label Maker
Your label maker is designed to give you long and trouble-free service, while requiring only occasional maintenance.
Clean your label maker from time to time to keep it working properly.
A cleaning tool is located inside the label compartment cover. The tool has two pads, a felt pad for cleaning the print head and a sponge pad for cleaning the sensors. See Figure 10.
Cleaning the Label Maker
Clean the keypad, display, and outside of the label maker using a soft damp cloth.
Do not put water or any other liquid directly on the display or keypad.
Clean the inside of the label compartment using a small, soft brush or cotton swab to wipe away stray particles.
Cleaning the Print Head
To keep printing clear and crisp labels, occasionally clean the print head. Use the cleaning tool that came with your label maker.
The print head is very delicate, so use care when cleaning.
To clean the print head
1 Press the label compartment release and lift the cover.
2 Remove the label cartridge.
3 Remove the cleaning tool from inside the label compartment cover. See Figure 10.
4 Gently wipe the felt side of the tool across the print head. See Figure 11.
5 Replace the cleaning tool, insert the label cartridge, and close the cover.
Cleaning tool
Figure 10
Cleaning tool
Figure 11
Print head

42 XTL® 300User Guide
Cleaning the Sensors
Several sensors inside the label compartment need periodic cleaning to remove dust and other particles that may have accumulated.
To clean the sensors
1 Press the label compartment release and lift the cover.
2 Remove the label cartridge.
3 Remove the cleaning tool from inside the label compartment cover.
4 Use the sponge end of the cleaning tool to gently wipe the sensors using an up and down motion (not side to side). See Figure 12 for sensor locations.
Cleaning the Cutter Blade
Clean the cutter blade each time you replace the label cartridge.
To clean the cutter blade
1 Press the label compartment release and lift the cover.
2 Remove the label cartridge.
3 Insert a straightened paper clip (or other pointed object) in the small hole shown in Figure 13 to release the cutter mechanism.
4 While pressing the paper clip down, pull the cutter mechanism straight out from the side of the label maker.
5 Place the cutter blade on a flat surface with the blade side facing up.
6 Use a cotton swab and alcohol to clean both sides of the blade. See Figure 14.
The cutter blade is extremely sharp. Use caution when cleaning.
7 After cleaning the blade, insert the cutter mechanism back into the label maker and press into place.
Sensors
Figure 12
Figure 13
Pull straight out
Press and hold
Cutter blades
Figure 14

43 XTL® 300User Guide
Troubleshooting
Review the following if you encounter a problem with your label maker.
Problem/Error Message Solution
Poor print quality Attach the power adapter to the label maker to recharge the battery. See Charging the Battery on page 2.
Clean the print head. See Cleaning the Print Head on page 41.
Ensure the label cartridge is inserted properly.
Replace the label cartridge.
Labels wrapped around roller in label exit slot
Do not attempt to disassemble the label maker. Contact DYMO Customer Care for instructions (http://support.dymo.com).
Labels running lowLabel cartridge empty
You are about to run out of labels. Replace the label cartridge. Printing will resume from the last complete label printed.
Poor cutter performance Clean the cutter blade. See Cleaning the Cutter Blade on page 42.
Label maker does not turn on Press and hold key for at least five seconds.
Ensure the power adapter is connected to a working wall outlet.
Attach the power adapter to the label maker to recharge the battery. See Charging the Battery on page 2.
Cover is open The label cartridge cover is open. Close the label cartridge cover to continue printing.
Label cartridge is missing No label cartridge is detected in the label maker.
Insert a label cartridge.
If label cartridge is inserted, see Label cartridge not recognized.
Label cartridge not recognized
Make sure that the label cartridge is compatible with the label maker and is inserted correctly.
Make sure the contacts in the label maker and the electronic chip on the label cartridge are free of dirt. See Cleaning the Sensors on page 42.
If necessary, clean the electronic chip on the side of the label cartridge with a small amount of alcohol on a cotton swab.
Label application - cartridge mismatch
This error can occur for several reasons:
The label cartridge in the label maker is not appropriate for the label application you are trying to use.
The label you are trying to print cannot be printed on this label cartridge.
The label cartridge in the label maker does not match the label you are trying to print. In this case, you can continue printing but the results may not match the label you see in the label editor.
44 XTL® 300User Guide
If you need further assistance, visit the Support section of the DYMO Web site at support.dymo.com.
No cutter present The cutter mechanism in the label maker is missing. Make sure the cutter mechanism is inserted properly. See the Cleaning the Cutter Blade on page 42 for instructions on removing and replacing the cutter mechanism.
Cutter jam The cutter blade is not operating properly.
Clean the cutter blade.
Click Continue in the error message dialog box to clear the error condition.
See the Cleaning the Cutter Blade on page 42 for instructions on removing and replacing the cutter mechanism.
Label jam The labels are not feeding properly in the label maker.
Feed the label manually. See Feed on page 36.
Remove and reinsert the label cartridge.
Label maker overheated The label maker has overheated. Wait for a few moments until the label maker cools down to resume printing.
Invalid file A label or image file cannot be read. Delete the file and transfer the file from your computer again. See Transferring Files on page 39 for more information.
Error An error message with no explanation means a problem with the label maker has been detected but no further information can be supplied. Turn the label maker off and then on again. If this does not solve the problem, contact Customer Support at support.dymo.com.
Problem/Error Message Solution

45 XTL® 300User Guide

46 XTL® 300User Guide
Images and Symbols
Every effort has been made to provide a complete and accurate set of identification symbols for your convenience.
Many of the symbols included are subject to strict Global regulations. Prior to using these symbols, make sure the symbol, in combination with the color and terminology used, meet all regulatory requirements as appropriate.
DYMO assumes no liability to any party for any incidental or consequential loss or damage caused by using the data content integrated into this device. The marks integrated into this device can be subject to periodic revision without notice.
The following tables show the symbols available by category. The source for the symbols is shown for each symbol set where applicable.
ISO
ISO symbols are reproduced with the permission of the International Organization for Standardization, ISO. The corresponding standard can be obtained from any ISO member and from the Web site of the ISO Central Secretariat at the following address: www.iso.org. Copyright remains with ISO.
Warning
Mandatory

47 XTL® 300User Guide
Prohibit
Fire and Exit
First Aid
GHS

48 XTL® 300User Guide
WHMIS
The Hazard Symbols of WHMIS, http://www.hc-sc.gc.ca/ewh-semt/occup-travail/whmis-simdut/symbols-signaux-eng.php, Health Canada, 2011.
Reproduced with the permission of the Minister of Public Works and Government Services Canada, 2012.
Electrical
Pro AV

49 XTL® 300User Guide
Arrows
Symbols

50 XTL® 300User Guide
Rechargeable Battery Safety Precautions
Battery type: LiPolymer 7.4V 1500mAh 11.1Wh
Inaccurate handling of a lithium-ion polymer rechargeable battery may cause leakage, heat, smoke, an explosion, or fire. This could cause deterioration of performance or failure. This may also damage the protection device installed in the battery. This could damage equipment or injure users. Thoroughly follow the instructions below.
Danger
Use the battery only in the XTL 300 label maker.
Battery can only be charged while inserted in the label maker using the charging adapter provided (9VDC/4A).
Do not connect directly to an electric outlet or cigarette lighter charger.
Do not store battery close to fire or inside the car where temperature may be over 60°C.
Warning
Stop charging the battery if charging is not completed within three hours.
Caution
Do not use the label maker or battery in a place that generates static electricity.
Use the label maker only at room temperature.
Battery can only be charged within +10°C to 35°C temperature range.
Battery can only be discharged within -10°C to 60°C temperature range.
Use only an authentic DYMO battery.
Environmental Information
The equipment that you have bought requires the extraction and use of natural resources for its production. It may contain substances that are hazardous to health and the environment.
In order to avoid the dissemination of those substances in our environment, and to diminish the pressure on natural resources, we encourage you to use the appropriate take-back systems. These systems will reuse or recycle most of the materials of your end-of-life equipment in an environmentally sound way.
The crossed-bin symbol marked on your device indicates you should use these systems.
If you need more information on the collection, reuse, and recycling of this product, please contact your local or regional waste administration.
You can also contact DYMO for more information on the environmental performance of our products.

51 XTL® 300User Guide