xerox workcentre c2424 copier-printer user guide:...
TRANSCRIPT
WorkCentre® C2424 Copier-Printer
This chapter includes:
■ "Basic Printing" on page 5-2■ "Print Fonts" on page 5-3■ "Adjusting Printing Options" on page 5-6■ "Automatic 2-Sided Printing" on page 5-12■ "Transparencies" on page 5-14■ "Envelopes" on page 5-18■ "Labels, Business Cards, and Index Cards" on page 5-23■ "Specialty Paper" on page 5-28■ "Custom Size Paper" on page 5-49■ "Advanced Options" on page 5-52
Printing
Copyright © 2005 Xerox Corporation. All Rights Reserved.5-1
Basic Printing
Basic PrintingThis section includes:
■ "Overview of Basic Steps" on page 5-2■ "Factors Affecting Printing Performance" on page 5-2
Overview of Basic StepsFollow these steps to print jobs:
1. Load paper in the tray. For information about loading trays, see the Loading Media chapter of this guide, or go to Getting Started/Loading Media on the User Documentation CD-ROM.
2. If prompted by the control panel, either confirm the paper type and size or change it as required.
3. From the application, access the Print dialog box.
4. If desired, select printing options in the printer driver.
■ For information about accessing and using the driver, see "Obtaining the Printer Driver" on page 5-6.
■ For information about specifying print options, see "Adjusting Printing Options" on page 5-6.
5. Send the job to the printer from the application’s Print dialog box.
Factors Affecting Printing Performance
Many factors affect a print job. They include the print speed (stated in number of pages per
minute), the media used, download time, and system processing time.
The computer download time and system processing time are affected by several factors including:
■ System memory■ Connection type (network or USB)■ Network operating system■ System configuration■ File size and type of graphics■ Computer speed
NoteAdditional system memory (RAM) may improve overall printer functions, but will not increase the pages per minute (ppm) ability of the system.
WorkCentre® C2424 Copier-Printer5-2
Print Fonts
Print FontsThis section includes:
■ "Types of Fonts" on page 5-3■ "Viewing a List of System Fonts Available for Printing" on page 5-3■ "Printing a List of System Fonts" on page 5-4■ "Downloading Fonts" on page 5-5
Types of FontsYour system uses the following types of fonts for printing:
■ Printer-resident PostScript and PCL fonts, which are always available for printing■ Fonts downloaded into system memory■ Fonts downloaded with your print job from the application
Adobe Type Manager (ATM) software enables your computer to display these fonts on your computer screen as they will appear in your prints.
If you do not have ATM on your computer:
1. Install ATM from the WorkCentre C2424 Software CD-ROM.
2. Install the system’s screen fonts for your computer from the ATM folder.
Viewing a List of System Fonts Available for PrintingTo view a list of available PCL or PostScript fonts, use CentreWare IS:
1. Launch your web browser.
2. Enter your system’s IP address in the browser’s Address field (http://xxx.xxx.xxx.xxx).
3. Click the Properties button.
4. Click the Web Server folder on the left sidebar, then click Font Files.
WorkCentre® C2424 Copier-Printer5-3
Print Fonts
Printing a List of System FontsTo print a list of available PostScript or PCL fonts, use:
■ The control panel■ CentreWare IS■ The printer driver
Using the Control Panel
To print either a PCL font list or a PostScript font list and samples from the control panel:
1. Press the System Setup button.
2. In the menu, select Information, then press the Enter button.
3. Select Information Pages, then press the Enter button.
4. Select either PCL Font List or PostScript Font List, then press the Enter button to print.
Using CentreWare IS
To print either a PostScript or PCL font list from CentreWare IS:
1. Launch your web browser.
2. Enter your system’s IP address in the browser’s Address field (http://xxx.xxx.xxx.xxx).
3. Click the Print button.
4. Select the appropriate Font List.
5. Click the Print button.
Using a Windows Printer DriverTo print either a PostScript or PCL font list from your printer driver:
1. Select Start, select Settings, then select Printers.
2. Right-click the WorkCentre C2424 system, then select Properties.
3. Select the Troubleshooting tab.
4. In the Printer Information Pages drop-down list, select PostScript Font List or PCL Font List.
5. Click the Print button.
WorkCentre® C2424 Copier-Printer5-4

Print Fonts
Downloading FontsTo supplement the resident fonts (which are always available for printing), downloadable fonts can be sent from your computer and stored in the system’s memory or on the system’s hard drive.
NoteIf you turn the system off, the fonts you download to memory are deleted. You must download them again when you turn the system on.
Before printing, verify that the fonts specified in your document are installed in the system or are set up to download correctly. If your document has a font not currently in your system, or downloaded with your print job, a different font will be used.
The system accepts the following downloadable fonts for printing:
■ PCL■ Type 1■ Type 3 ■ TrueType (scalable to any point size; looks the same on-screen and printed).
Downloading Fonts from the CentreWare Font Management UtilityThe CentreWare Font Management Utility (FMU) is a Windows and Macintosh application that helps manage fonts, macros and forms on a printer’s hard drive. Downloading fonts to a printer can improve printing performance and reduce network traffic. You can list, print, delete, and download PostScript and PCL fonts using the Font Management Utility.
To download the Font Management Utility, go to www.xerox.com/office/drivers and use the Key word search FMU.
WorkCentre® C2424 Copier-Printer5-5
Adjusting Printing Options
Adjusting Printing OptionsThis section includes:
■ "Obtaining the Printer Driver" on page 5-6■ "Setting the Print Default Tray" on page 5-7■ "Selecting Printing Preferences (Windows)" on page 5-8■ "Selecting Printing Options for an Individual Job (Windows)" on page 5-8■ "Selecting Printing Options for an Individual Job (Macintosh)" on page 5-10
For information about special printing options, see "Advanced Options" on page 5-52.
Obtaining the Printer Driver
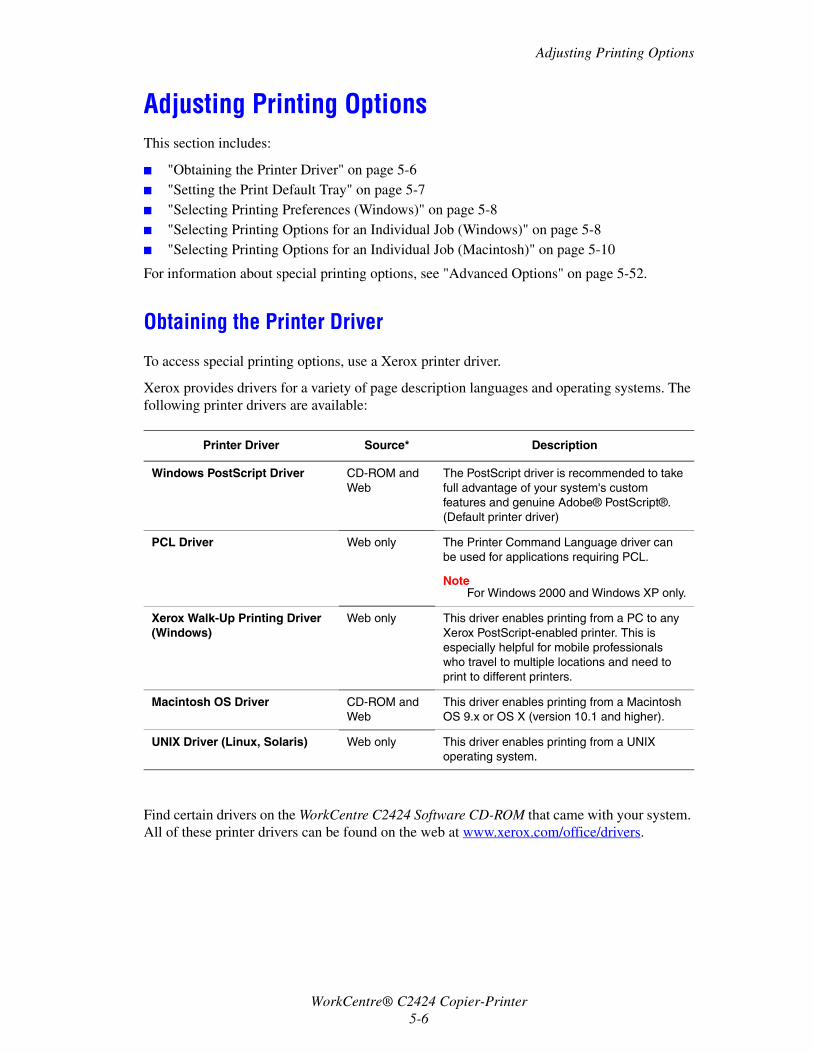
To access special printing options, use a Xerox printer driver.
Xerox provides drivers for a variety of page description languages and operating systems. The following printer drivers are available:
Find certain drivers on the WorkCentre C2424 Software CD-ROM that came with your system. All of these printer drivers can be found on the web at www.xerox.com/office/drivers.
Printer Driver Source* Description
Windows PostScript Driver CD-ROM and Web
The PostScript driver is recommended to take full advantage of your system's custom features and genuine Adobe® PostScript®. (Default printer driver)
PCL Driver Web only The Printer Command Language driver can be used for applications requiring PCL.
NoteNoteNoteFor Windows 2000 and Windows XP only.
Xerox Walk-Up Printing Driver (Windows)
Web only This driver enables printing from a PC to any Xerox PostScript-enabled printer. This is especially helpful for mobile professionals who travel to multiple locations and need to print to different printers.
Macintosh OS Driver CD-ROM and Web
This driver enables printing from a Macintosh OS 9.x or OS X (version 10.1 and higher).
UNIX Driver (Linux, Solaris) Web only This driver enables printing from a UNIX operating system.
WorkCentre® C2424 Copier-Printer5-6
Adjusting Printing Options
Setting the Print Default TrayTo select the default tray for printing, use either:
■ The control panel■ CentreWare IS
NoteThe printer driver overrides the control panel and CentreWare IS settings.
Using the Control Panel
To select the default tray for printing:
1. On the control panel, press the System Setup button.
2. In the menu, select Job Defaults Setup, then press the Enter button.
3. Select Print Defaults Setup, then press the Enter button.
4. Select Paper Handling Setup, then press the Enter button.
5. Select Paper Source, then press the Enter button.
6. Scroll to the desired tray or Auto Select.7. Press the Enter button to save the changes.
Using CentreWare IS
To select the default tray for printing:
1. Launch your web browser.
2. Enter your system’s IP address in the browser’s Address field (http://xxx.xxx.xxx.xxx).
3. Click Properties.
4. Click the General folder on the left sidebar, then click Printer Defaults.
5. Scroll to Print Mode Settings, then select the tray from the Paper Source drop-down list.
6. Click Save Changes at the bottom of the screen.
WorkCentre® C2424 Copier-Printer5-7
Adjusting Printing Options
Selecting Printing Preferences (Windows)Printer preferences control all of your jobs, unless you overwrite them specifically for your job. For example, if you want to use automatic 2-sided printing for most jobs, set this option in printer settings.
1. Click Start, select Settings, then click Printers.
2. In the Printers folder, right-click the icon for your printer.
3. From the popup menu, select Printer Preferences or Properties.
4. Make selections from the driver tabs. See the “Printing Options for Windows Operating Systems” table for specific printing options.
5. Click the OK button to save your selections.
Note
For more information about Windows printer driver options, click the Help button on the printer driver tab to view the online help.
Selecting Printing Options for an Individual Job (Windows)If you want to use special printing options for a particular job, change the driver settings before sending the job to the printer. For example, if you want to use High-Resolution/Photo print-quality mode for a particular graphic, select this setting in the driver before printing that job.
1. With the desired document or graphic open in your application, access the Print dialog box.
2. Select the WorkCentre C2424 Copier-Printer for use and click its Properties button to open the printer driver.
3. Make selections from the driver tabs. See the following table for specific printing options.
4. Click the OK button to save your selections.
5. Print the job.
NoteFor more information about Windows printer driver options, click the Help button on the printer driver tab to view the online help.
WorkCentre® C2424 Copier-Printer5-8
Adjusting Printing Options
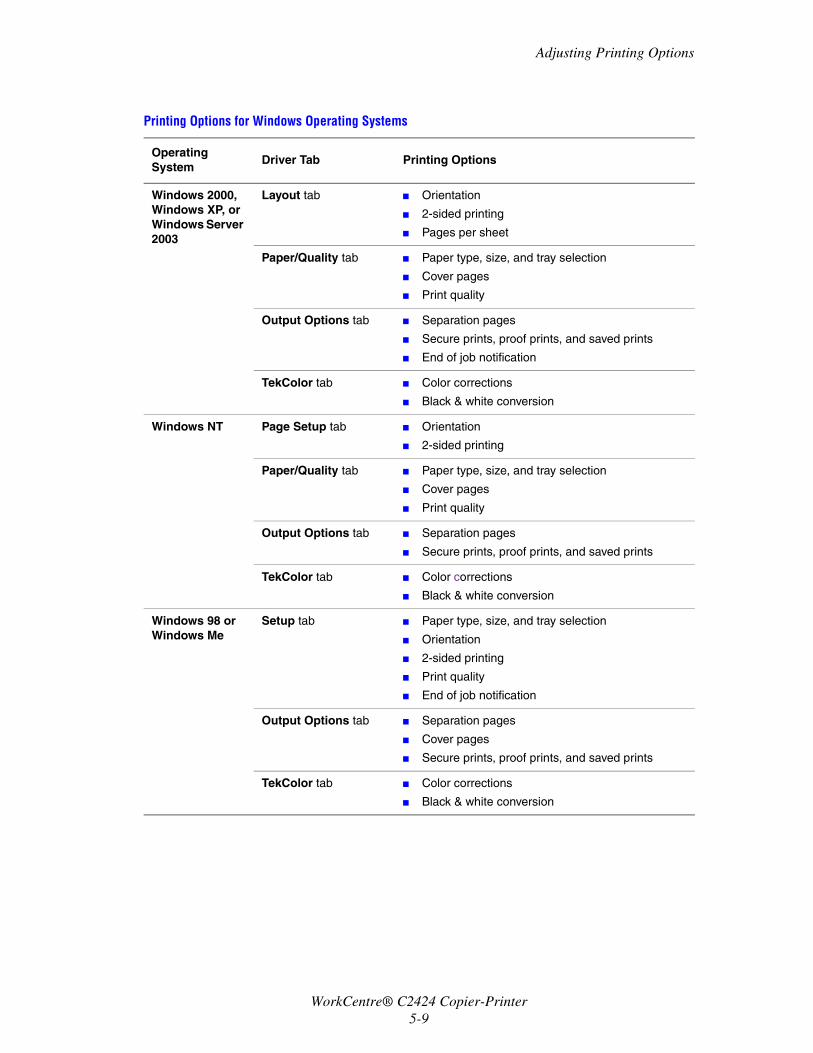
Printing Options for Windows Operating Systems
Operating System
Driver Tab Printing Options
Windows 2000, Windows XP, or Windows Server 2003
Layout tab ■ Orientation
■ 2-sided printing
■ Pages per sheet
Paper/Quality tab ■ Paper type, size, and tray selection
■ Cover pages
■ Print quality
Output Options tab ■ Separation pages
■ Secure prints, proof prints, and saved prints
■ End of job notification
TekColor tab ■ Color corrections
■ Black & white conversion
Windows NT Page Setup tab ■ Orientation
■ 2-sided printing
Paper/Quality tab ■ Paper type, size, and tray selection
■ Cover pages
■ Print quality
Output Options tab ■ Separation pages
■ Secure prints, proof prints, and saved prints
TekColor tab ■ Color corrections
■ Black & white conversion
Windows 98 or Windows Me
Setup tab ■ Paper type, size, and tray selection
■ Orientation
■ 2-sided printing
■ Print quality
■ End of job notification
Output Options tab ■ Separation pages
■ Cover pages
■ Secure prints, proof prints, and saved prints
TekColor tab ■ Color corrections
■ Black & white conversion
WorkCentre® C2424 Copier-Printer5-9
Adjusting Printing Options
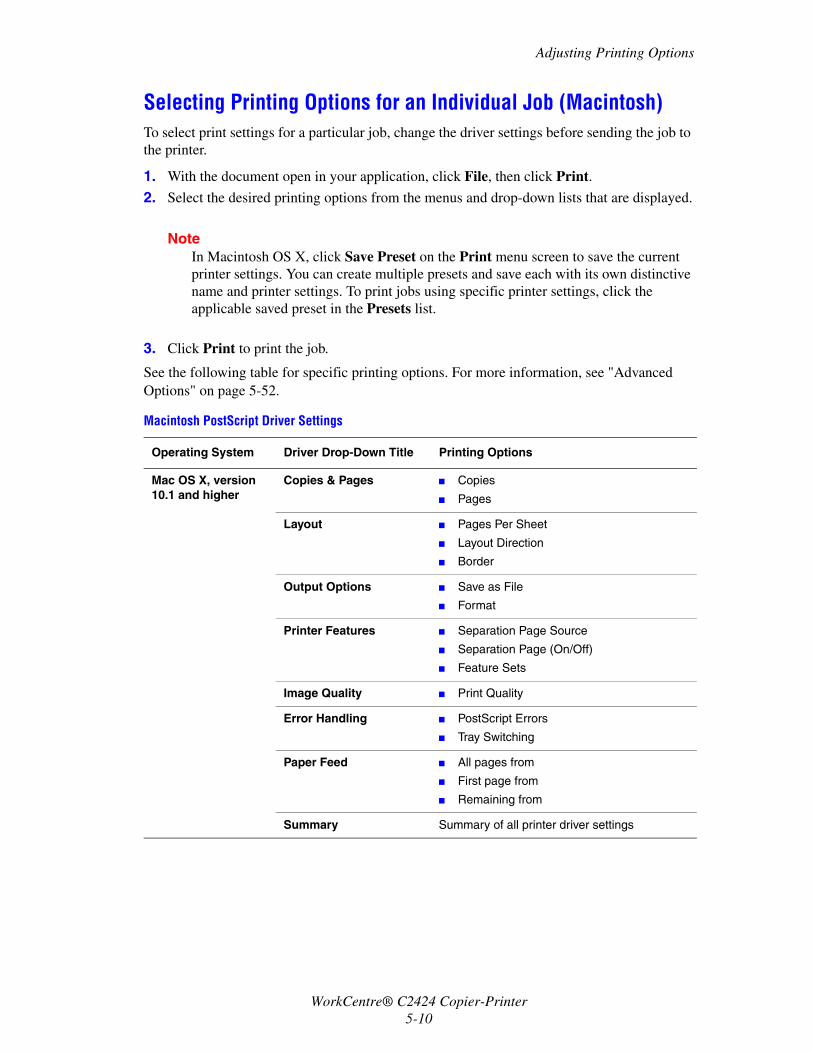
Selecting Printing Options for an Individual Job (Macintosh)To select print settings for a particular job, change the driver settings before sending the job to the printer.
1. With the document open in your application, click File, then click Print.
2. Select the desired printing options from the menus and drop-down lists that are displayed.
NoteIn Macintosh OS X, click Save Preset on the Print menu screen to save the current printer settings. You can create multiple presets and save each with its own distinctive name and printer settings. To print jobs using specific printer settings, click the applicable saved preset in the Presets list.
3. Click Print to print the job.
See the following table for specific printing options. For more information, see "Advanced Options" on page 5-52.
Macintosh PostScript Driver Settings
Operating System Driver Drop-Down Title Printing Options
Mac OS X, version 10.1 and higher
Copies & Pages ■ Copies
■ Pages
Layout ■ Pages Per Sheet
■ Layout Direction
■ Border
Output Options ■ Save as File
■ Format
Printer Features ■ Separation Page Source
■ Separation Page (On/Off)
■ Feature Sets
Image Quality ■ Print Quality
Error Handling ■ PostScript Errors
■ Tray Switching
Paper Feed ■ All pages from
■ First page from
■ Remaining from
Summary Summary of all printer driver settings
WorkCentre® C2424 Copier-Printer5-10
Adjusting Printing Options
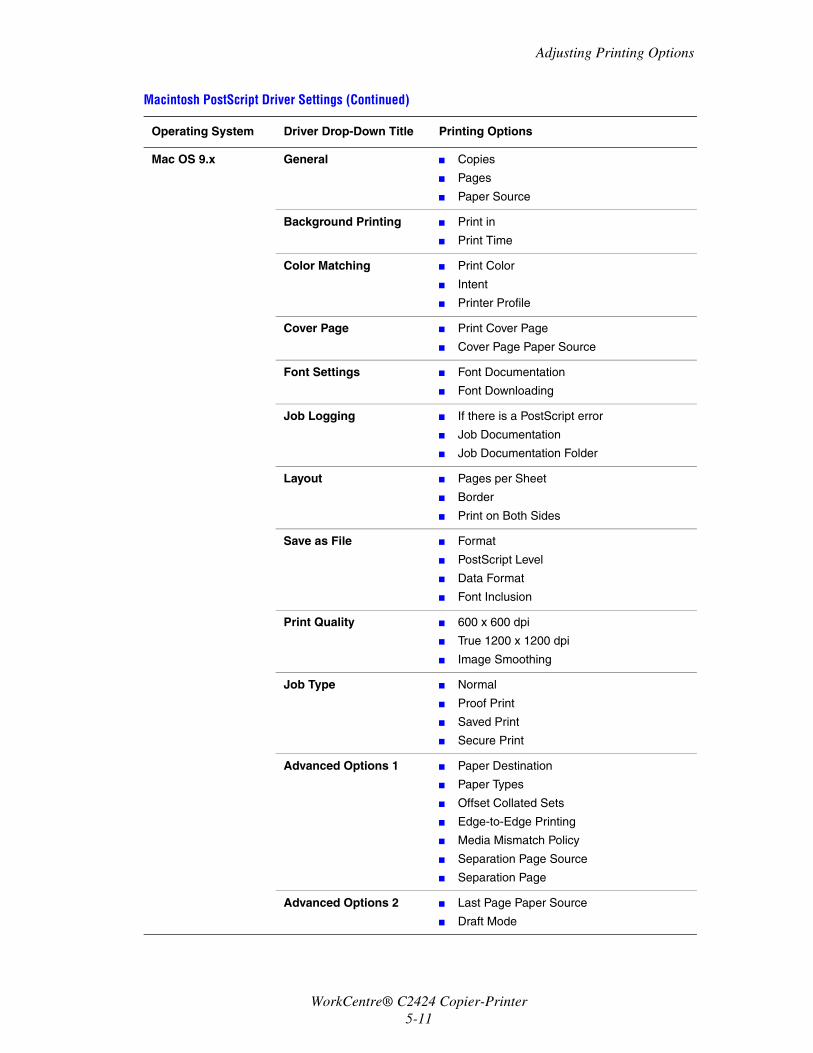
Mac OS 9.x General ■ Copies
■ Pages
■ Paper Source
Background Printing ■ Print in
■ Print Time
Color Matching ■ Print Color
■ Intent
■ Printer Profile
Cover Page ■ Print Cover Page
■ Cover Page Paper Source
Font Settings ■ Font Documentation
■ Font Downloading
Job Logging ■ If there is a PostScript error
■ Job Documentation
■ Job Documentation Folder
Layout ■ Pages per Sheet
■ Border
■ Print on Both Sides
Save as File ■ Format
■ PostScript Level
■ Data Format
■ Font Inclusion
Print Quality ■ 600 x 600 dpi
■ True 1200 x 1200 dpi
■ Image Smoothing
Job Type ■ Normal
■ Proof Print
■ Saved Print
■ Secure Print
Advanced Options 1 ■ Paper Destination
■ Paper Types
■ Offset Collated Sets
■ Edge-to-Edge Printing
■ Media Mismatch Policy
■ Separation Page Source
■ Separation Page
Advanced Options 2 ■ Last Page Paper Source
■ Draft Mode
Macintosh PostScript Driver Settings (Continued)
Operating System Driver Drop-Down Title Printing Options
WorkCentre® C2424 Copier-Printer5-11
Automatic 2-Sided Printing
Automatic 2-Sided PrintingThis section includes:
■ "Guidelines" on page 5-12■ "Binding Edge" on page 5-12■ "Overview of Steps for 2-Sided Printing" on page 5-13■ "Selecting 2-Sided Printing in the Driver" on page 5-13
GuidelinesBefore printing a 2-sided document, verify that you are using paper that meets the following requirements:
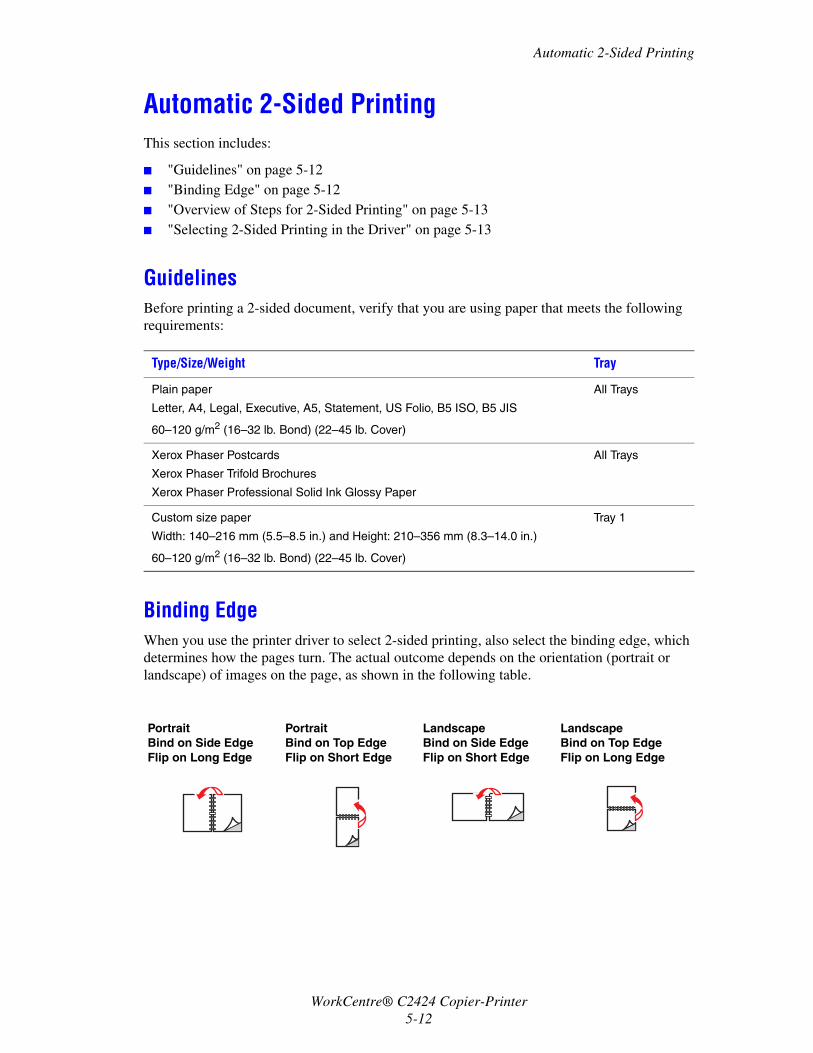
Binding EdgeWhen you use the printer driver to select 2-sided printing, also select the binding edge, which determines how the pages turn. The actual outcome depends on the orientation (portrait or landscape) of images on the page, as shown in the following table.
Type/Size/Weight Tray
Plain paper
Letter, A4, Legal, Executive, A5, Statement, US Folio, B5 ISO, B5 JIS
60–120 g/m2 (16–32 lb. Bond) (22–45 lb. Cover)
All Trays
Xerox Phaser Postcards
Xerox Phaser Trifold Brochures
Xerox Phaser Professional Solid Ink Glossy Paper
All Trays
Custom size paper
Width: 140–216 mm (5.5–8.5 in.) and Height: 210–356 mm (8.3–14.0 in.)
60–120 g/m2 (16–32 lb. Bond) (22–45 lb. Cover)
Tray 1
PortraitBind on Side EdgeFlip on Long Edge
PortraitBind on Top EdgeFlip on Short Edge
LandscapeBind on Side EdgeFlip on Short Edge
LandscapeBind on Top EdgeFlip on Long Edge
WorkCentre® C2424 Copier-Printer5-12
Automatic 2-Sided Printing
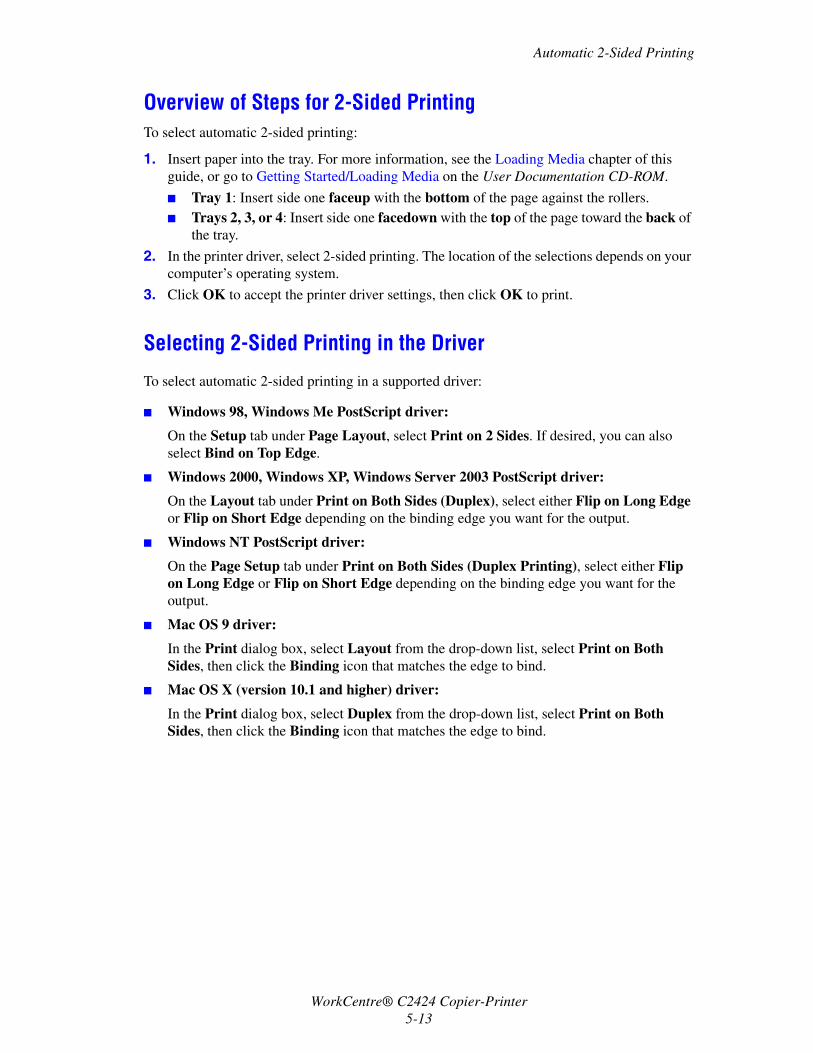
Overview of Steps for 2-Sided PrintingTo select automatic 2-sided printing:
1. Insert paper into the tray. For more information, see the Loading Media chapter of this guide, or go to Getting Started/Loading Media on the User Documentation CD-ROM.
■ Tray 1: Insert side one faceup with the bottom of the page against the rollers.■ Trays 2, 3, or 4: Insert side one facedown with the top of the page toward the back of
the tray.
2. In the printer driver, select 2-sided printing. The location of the selections depends on your computer’s operating system.
3. Click OK to accept the printer driver settings, then click OK to print.
Selecting 2-Sided Printing in the Driver
To select automatic 2-sided printing in a supported driver:
■ Windows 98, Windows Me PostScript driver:
On the Setup tab under Page Layout, select Print on 2 Sides. If desired, you can also select Bind on Top Edge.
■ Windows 2000, Windows XP, Windows Server 2003 PostScript driver:
On the Layout tab under Print on Both Sides (Duplex), select either Flip on Long Edge or Flip on Short Edge depending on the binding edge you want for the output.
■ Windows NT PostScript driver:
On the Page Setup tab under Print on Both Sides (Duplex Printing), select either Flip on Long Edge or Flip on Short Edge depending on the binding edge you want for the output.
■ Mac OS 9 driver:
In the Print dialog box, select Layout from the drop-down list, select Print on Both Sides, then click the Binding icon that matches the edge to bind.
■ Mac OS X (version 10.1 and higher) driver:
In the Print dialog box, select Duplex from the drop-down list, select Print on Both Sides, then click the Binding icon that matches the edge to bind.
WorkCentre® C2424 Copier-Printer5-13
Transparencies
TransparenciesThis section includes:
■ "Guidelines" on page 5-14■ "Printing Transparencies from Tray 1" on page 5-15■ "Printing Transparencies from Tray 2, 3, or 4" on page 5-16
Transparencies can be printed from any tray. They should be printed on one side only.
For best results, use only Xerox transparencies specified for your WorkCentre C2424 Copier-Printer.
To order paper, transparencies, or other specialty media, contact your local reseller or go to www.xerox.com/office/supplies.
Guidelines■ Remove all paper before loading transparencies in the tray.■ Do not load transparencies above the fill line; it may cause the system to jam.■ Handle transparencies by the edges using both hands to avoid fingerprints and creases,
which can cause poor print quality.■ Be sure to change the paper type to Transparencies on the control panel.■ Do not use transparencies with stripes on the side.
Videos are available with instructions for printing transparencies. Videos are located on the User Documentation CD-ROM and at www.xerox.com/office/c2424support.
WorkCentre® C2424 Copier-Printer5-14

Transparencies
Printing Transparencies from Tray 11. Insert transparencies into Tray 1.
NoteDo not load transparencies above the fill line.
2. Adjust the paper guides to fit against the transparencies.
3. At the control panel:
a. Select Change, then press the Enter button. b. Select the size of the transparencies, then press the Enter button.c. Select Transparency for paper type, then press the Enter button to save your
selection.
4. In the printer driver, select either Transparency as the paper type or Tray 1 as the paper source.
2424-009
2424-041
WorkCentre® C2424 Copier-Printer5-15
Transparencies
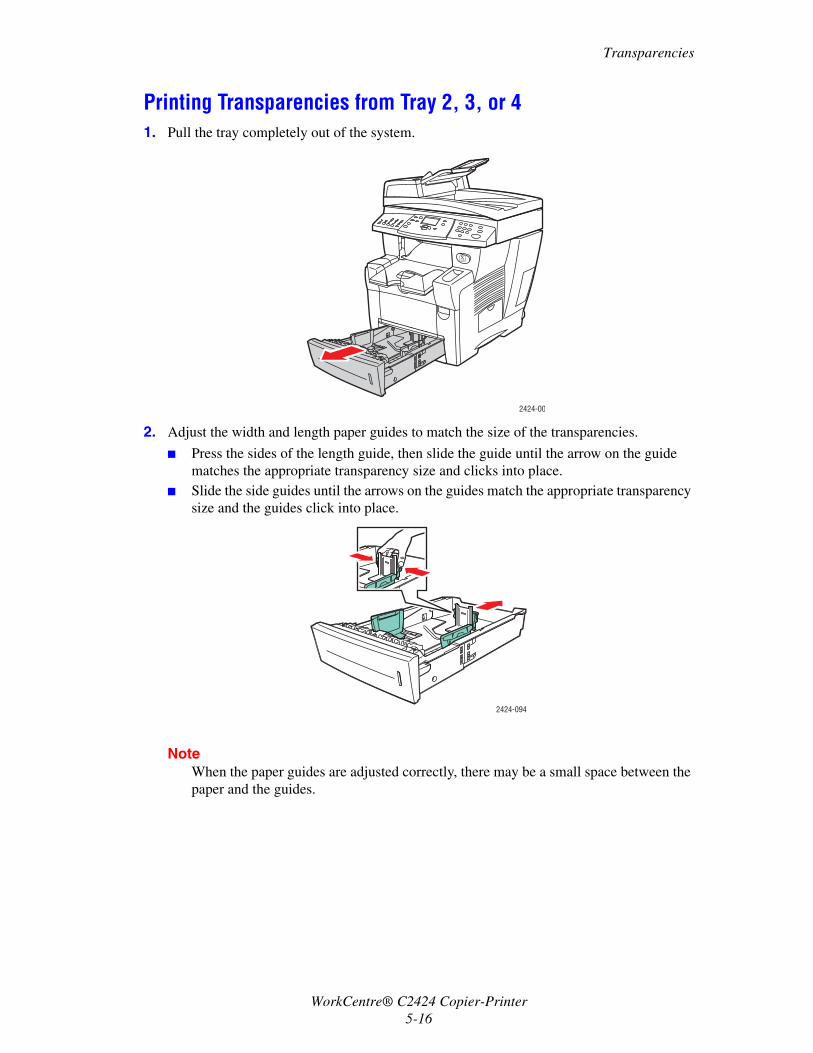
Printing Transparencies from Tray 2, 3, or 41. Pull the tray completely out of the system.
2. Adjust the width and length paper guides to match the size of the transparencies.
■ Press the sides of the length guide, then slide the guide until the arrow on the guide matches the appropriate transparency size and clicks into place.
■ Slide the side guides until the arrows on the guides match the appropriate transparency size and the guides click into place.
NoteWhen the paper guides are adjusted correctly, there may be a small space between the paper and the guides.
2424-00
2424-094
WorkCentre® C2424 Copier-Printer5-16
Transparencies
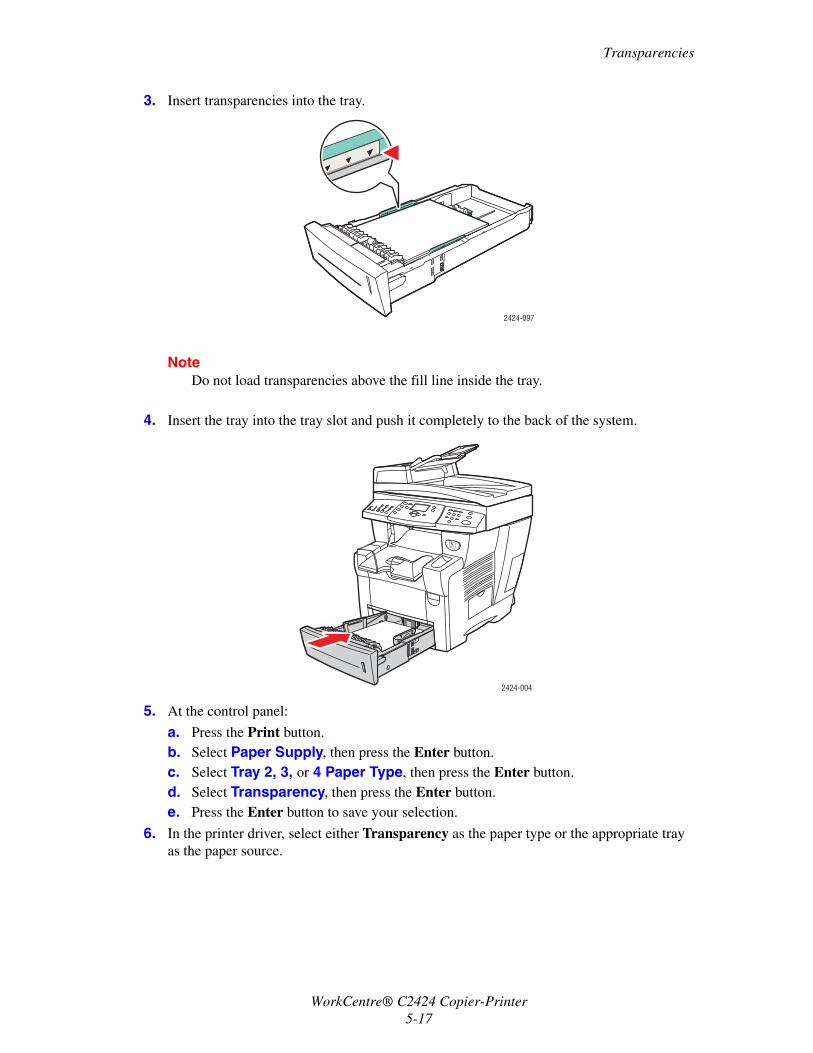
3. Insert transparencies into the tray.
NoteDo not load transparencies above the fill line inside the tray.
4. Insert the tray into the tray slot and push it completely to the back of the system.
5. At the control panel:
a. Press the Print button.b. Select Paper Supply, then press the Enter button.c. Select Tray 2, 3, or 4 Paper Type, then press the Enter button.d. Select Transparency, then press the Enter button.e. Press the Enter button to save your selection.
6. In the printer driver, select either Transparency as the paper type or the appropriate tray as the paper source.
2424-097
2424-004
WorkCentre® C2424 Copier-Printer5-17

Envelopes
EnvelopesThis section includes:
■ "Guidelines" on page 5-18■ "Printing Envelopes from Tray 1" on page 5-20■ "Printing Envelopes from Tray 2, 3, or 4" on page 5-21
GuidelinesThese envelopes can be printed from any tray:
■ #10 Commercial (4.12 x 9.5 in.)■ DL (110 x 220 mm)■ C5 (162 x 229 mm)
These envelopes must be printed from Tray 1:
■ #5 ½ Baronial (4.375 x 5.75 in.)■ #6 ¾ Commercial (3.625 x 6.5 in.)■ Monarch (3.87 x 7.5 in.)■ #6 ½ Booklet (6 x 9 in.)■ Lee (5.25 x 7.25 in.)
Videos are available with instructions for loading envelopes. Videos are located on the User Documentation CD-ROM and at www.xerox.com/office/c2424support.
WorkCentre® C2424 Copier-Printer5-18

Envelopes
Successful envelope printing is highly dependent on the quality and construction of the envelopes. Follow these guidelines when printing envelopes:
■ All envelopes should be printed single-sided only. ■ Use only paper envelopes. ■ Do not use envelopes with windows, metal clasps, or adhesives with release strips.■ Some wrinkling and embossing may occur when printing envelopes.
NoteEnvelopes with side seams, end-flaps, or with flat, announcement style flaps may jam.
Storing Envelopes
■ Maintain constant temperatures and relative humidity.
■ Store unused envelopes in their packaging to avoid the effects of moisture and dryness which can affect print quality and cause wrinkling. Excessive moisture can cause the envelopes to seal before or during printing.
Preparing to Print■ All envelopes should be printed single-sided only.■ Remove air “bubbles” from the envelopes before loading by setting a heavy book on top of
the envelopes.
If ink is missing around the envelope seams:
■ Move the location of the text to another place on the envelope.■ Use a different envelope style.■ Use lighter weight envelopes.
Supported Not Supported
WorkCentre® C2424 Copier-Printer5-19
Envelopes
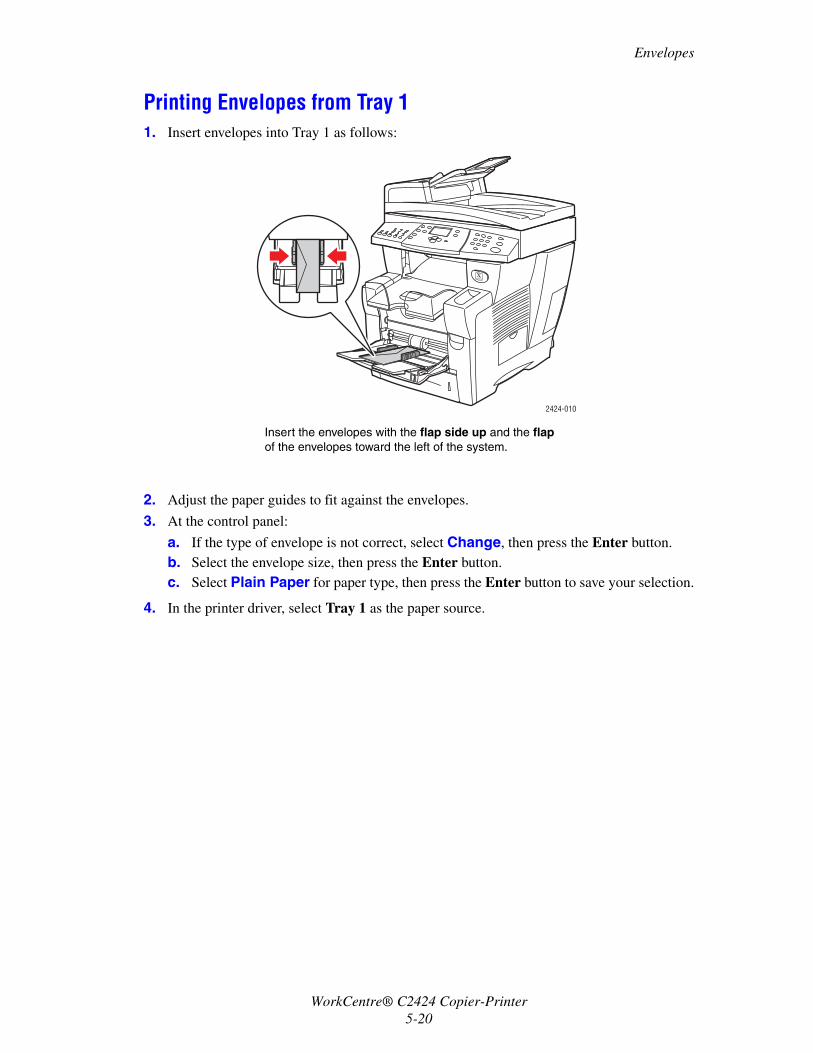
Printing Envelopes from Tray 11. Insert envelopes into Tray 1 as follows:
2. Adjust the paper guides to fit against the envelopes.
3. At the control panel:
a. If the type of envelope is not correct, select Change, then press the Enter button.b. Select the envelope size, then press the Enter button.c. Select Plain Paper for paper type, then press the Enter button to save your selection.
4. In the printer driver, select Tray 1 as the paper source.
Insert the envelopes with the flap side up and the flap of the envelopes toward the left of the system.
2424-010
WorkCentre® C2424 Copier-Printer5-20

Envelopes
Printing Envelopes from Tray 2, 3, or 41. Pull the tray completely out of the system.
2. Adjust the paper guides to match the size of the envelopes.
■ Press the sides of the length guide and slide the guide until the arrow on the guide matches the appropriate envelope size and clicks into place.
■ Slide the side guides until the arrows on the guides match the appropriate envelope size and the guides click into place.
NoteWhen the paper guides are adjusted correctly, there may be a small space between the paper and the guides.
2424-001
2424-099
WorkCentre® C2424 Copier-Printer5-21
Envelopes
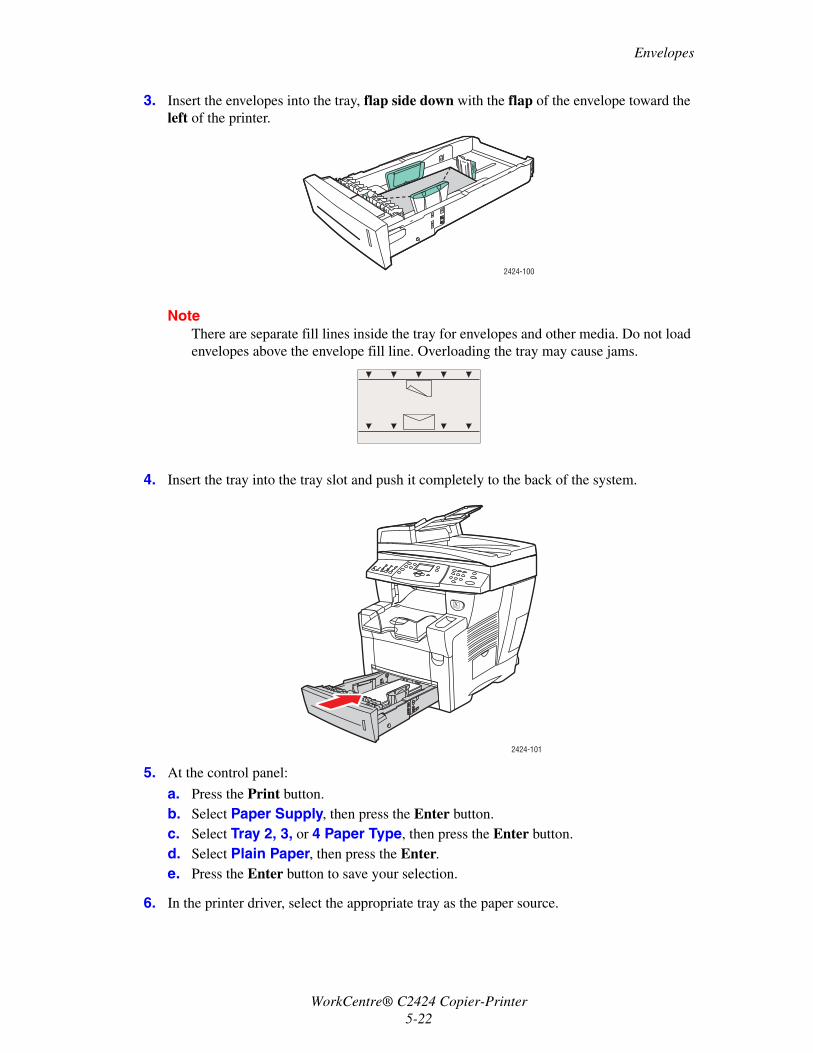
3. Insert the envelopes into the tray, flap side down with the flap of the envelope toward the left of the printer.
NoteThere are separate fill lines inside the tray for envelopes and other media. Do not load envelopes above the envelope fill line. Overloading the tray may cause jams.
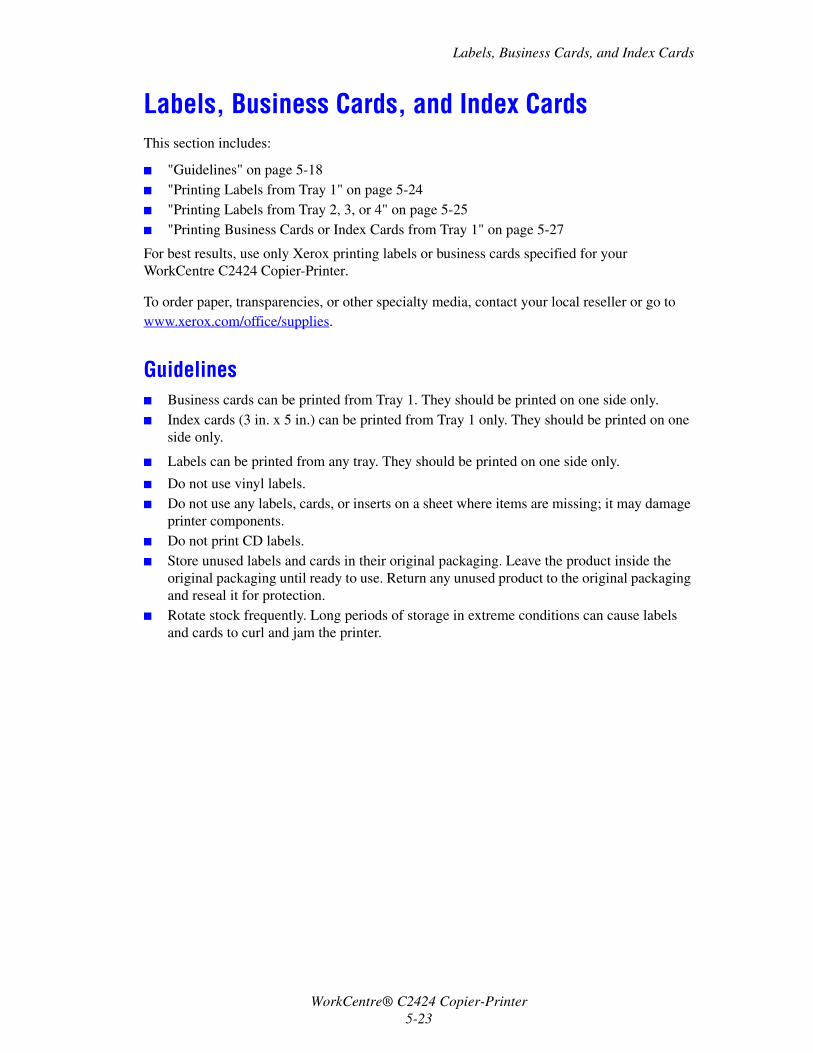
4. Insert the tray into the tray slot and push it completely to the back of the system.
5. At the control panel:
a. Press the Print button.b. Select Paper Supply, then press the Enter button.c. Select Tray 2, 3, or 4 Paper Type, then press the Enter button.d. Select Plain Paper, then press the Enter.e. Press the Enter button to save your selection.
6. In the printer driver, select the appropriate tray as the paper source.
2424-100
2424-101
WorkCentre® C2424 Copier-Printer5-22
Labels, Business Cards, and Index Cards
Labels, Business Cards, and Index CardsThis section includes:
■ "Guidelines" on page 5-18■ "Printing Labels from Tray 1" on page 5-24■ "Printing Labels from Tray 2, 3, or 4" on page 5-25■ "Printing Business Cards or Index Cards from Tray 1" on page 5-27
For best results, use only Xerox printing labels or business cards specified for your WorkCentre C2424 Copier-Printer.
To order paper, transparencies, or other specialty media, contact your local reseller or go to www.xerox.com/office/supplies.
Guidelines■ Business cards can be printed from Tray 1. They should be printed on one side only.■ Index cards (3 in. x 5 in.) can be printed from Tray 1 only. They should be printed on one
side only.
■ Labels can be printed from any tray. They should be printed on one side only.
■ Do not use vinyl labels.■ Do not use any labels, cards, or inserts on a sheet where items are missing; it may damage
printer components.■ Do not print CD labels.■ Store unused labels and cards in their original packaging. Leave the product inside the
original packaging until ready to use. Return any unused product to the original packaging and reseal it for protection.
■ Rotate stock frequently. Long periods of storage in extreme conditions can cause labels and cards to curl and jam the printer.
WorkCentre® C2424 Copier-Printer5-23
Labels, Business Cards, and Index Cards
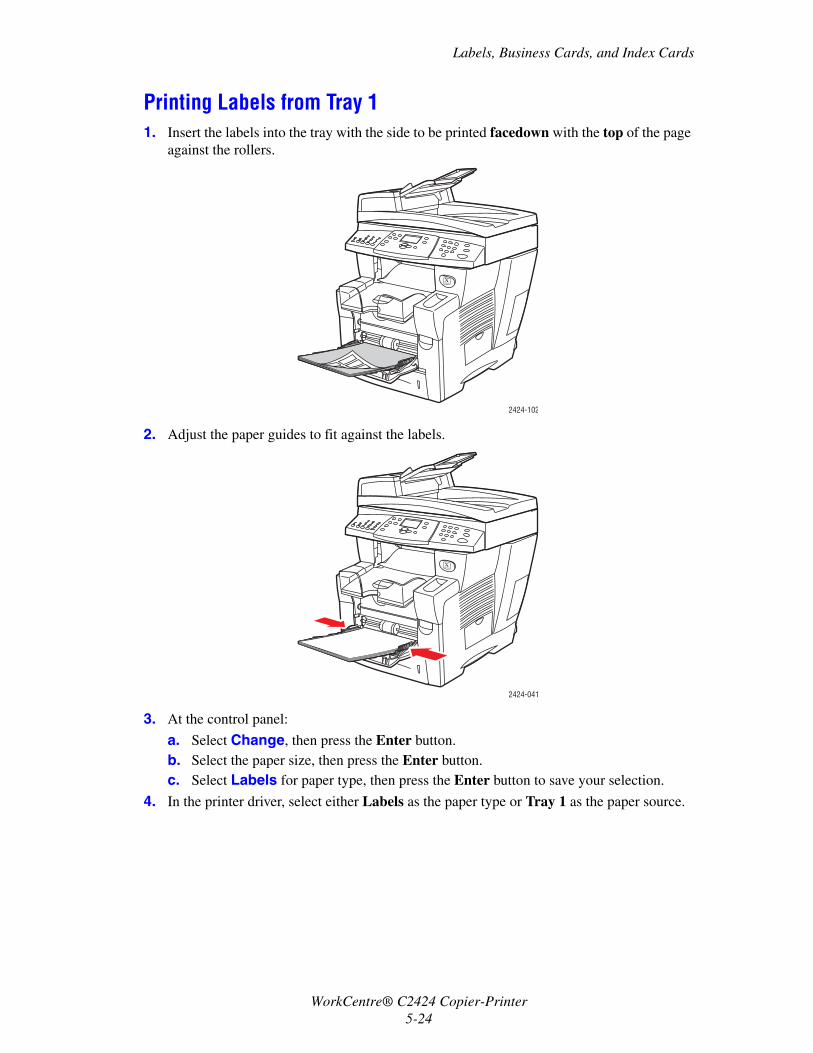
Printing Labels from Tray 11. Insert the labels into the tray with the side to be printed facedown with the top of the page
against the rollers.
2. Adjust the paper guides to fit against the labels.
3. At the control panel:
a. Select Change, then press the Enter button. b. Select the paper size, then press the Enter button.c. Select Labels for paper type, then press the Enter button to save your selection.
4. In the printer driver, select either Labels as the paper type or Tray 1 as the paper source.
2424-102
2424-041
WorkCentre® C2424 Copier-Printer5-24
Labels, Business Cards, and Index Cards
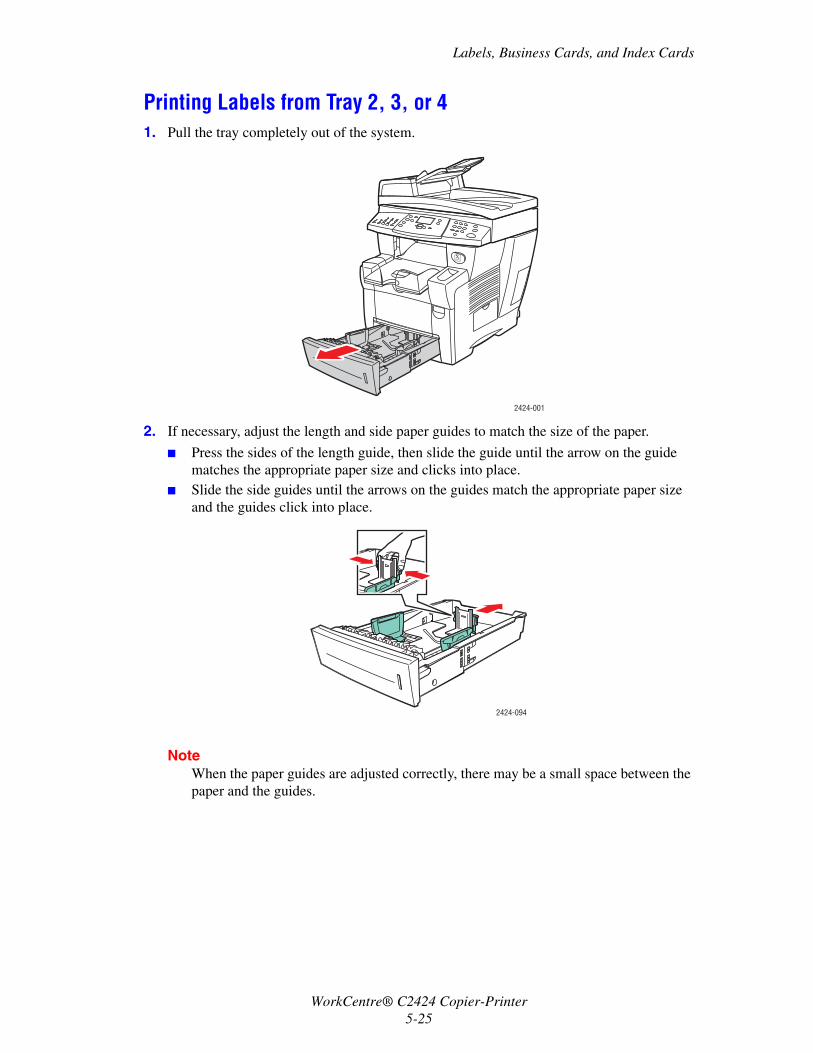
Printing Labels from Tray 2, 3, or 41. Pull the tray completely out of the system.
2. If necessary, adjust the length and side paper guides to match the size of the paper.
■ Press the sides of the length guide, then slide the guide until the arrow on the guide matches the appropriate paper size and clicks into place.
■ Slide the side guides until the arrows on the guides match the appropriate paper size and the guides click into place.
NoteWhen the paper guides are adjusted correctly, there may be a small space between the paper and the guides.
2424-001
2424-094
WorkCentre® C2424 Copier-Printer5-25
Labels, Business Cards, and Index Cards
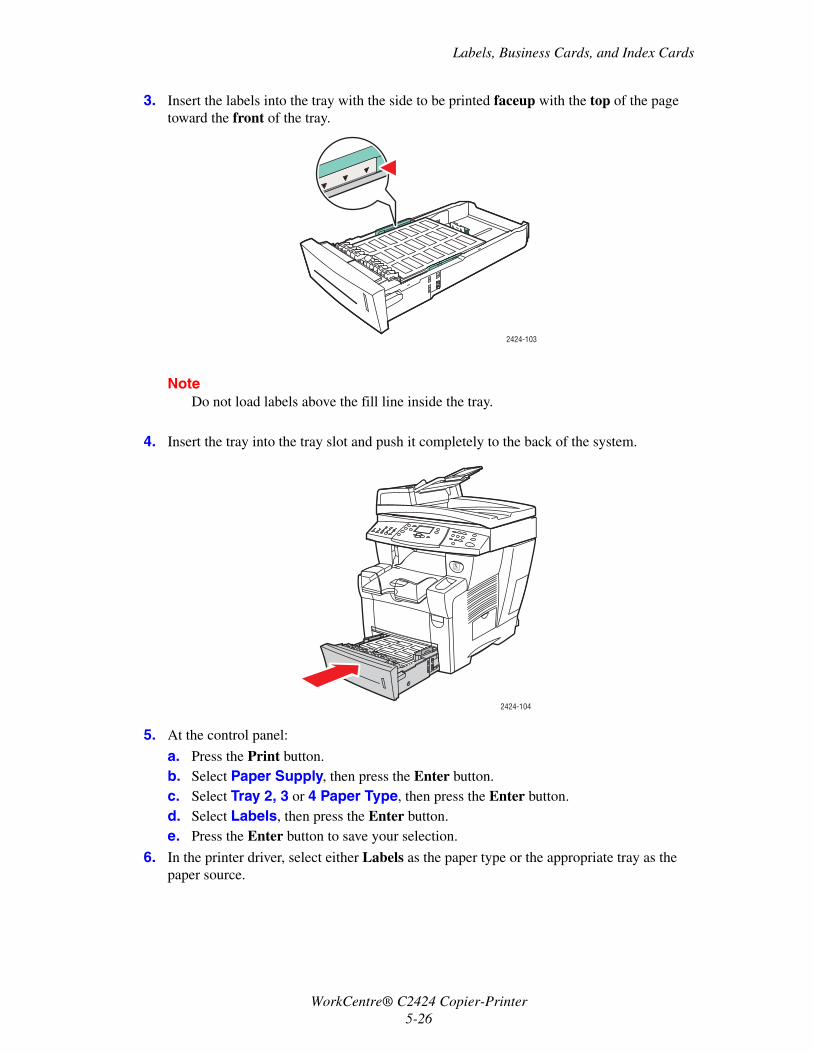
3. Insert the labels into the tray with the side to be printed faceup with the top of the page toward the front of the tray.
NoteDo not load labels above the fill line inside the tray.
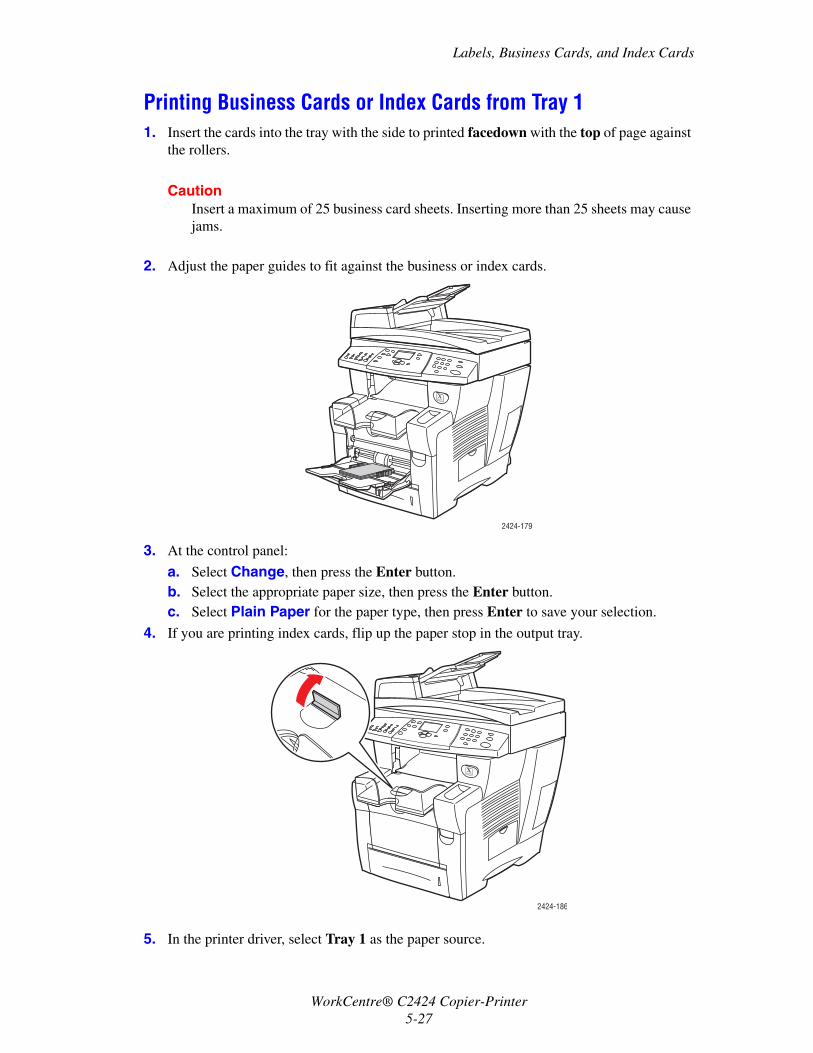
4. Insert the tray into the tray slot and push it completely to the back of the system.
5. At the control panel:
a. Press the Print button.b. Select Paper Supply, then press the Enter button.c. Select Tray 2, 3 or 4 Paper Type, then press the Enter button.d. Select Labels, then press the Enter button.e. Press the Enter button to save your selection.
6. In the printer driver, select either Labels as the paper type or the appropriate tray as the paper source.
2424-103
2424-104
WorkCentre® C2424 Copier-Printer5-26
Labels, Business Cards, and Index Cards
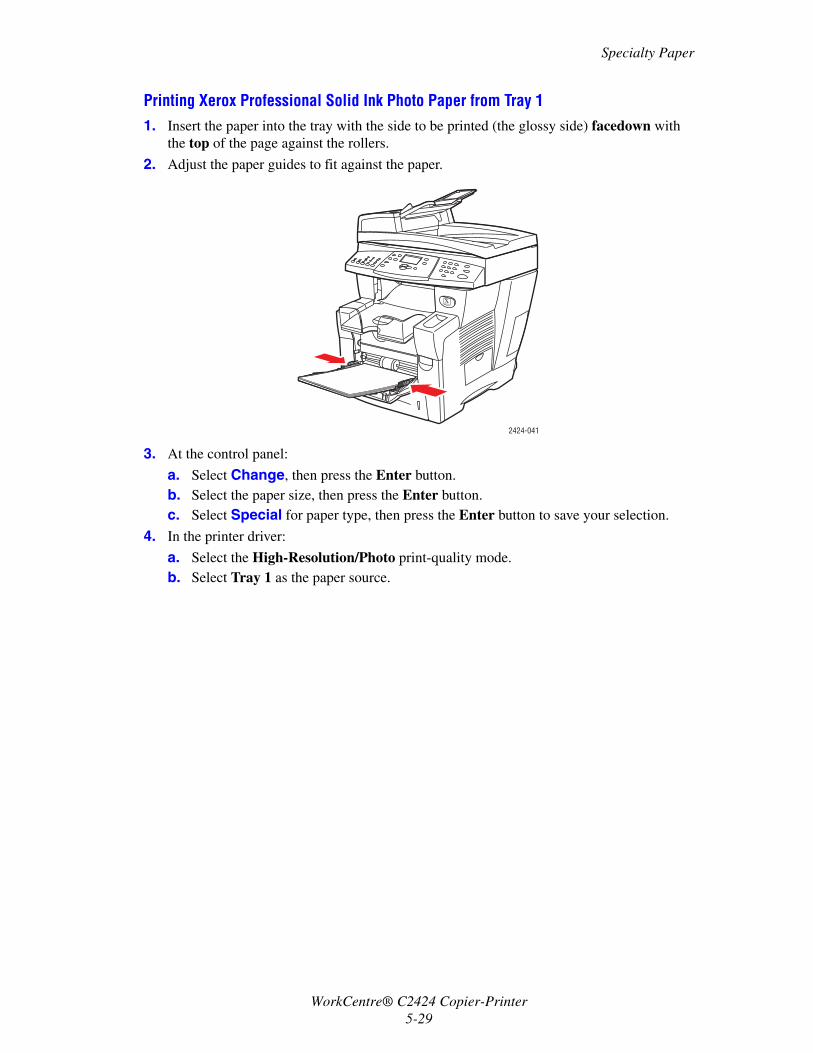
Printing Business Cards or Index Cards from Tray 11. Insert the cards into the tray with the side to printed facedown with the top of page against
the rollers.
CautionInsert a maximum of 25 business card sheets. Inserting more than 25 sheets may cause jams.
2. Adjust the paper guides to fit against the business or index cards.
3. At the control panel:
a. Select Change, then press the Enter button. b. Select the appropriate paper size, then press the Enter button.c. Select Plain Paper for the paper type, then press Enter to save your selection.
4. If you are printing index cards, flip up the paper stop in the output tray.
5. In the printer driver, select Tray 1 as the paper source.
2424-179
2424-186
WorkCentre® C2424 Copier-Printer5-27

Specialty Paper
Specialty PaperThis section includes:
■ "Photo Paper" on page 5-28■ "Postcards and Trifold Brochures" on page 5-32■ "Weatherproof Paper" on page 5-36■ "Glossy Paper" on page 5-40■ "Carbonless Paper" on page 5-43
Photo PaperFor best results, use only Xerox Professional Solid Ink Photo Paper specified for your WorkCentre C2424 Copier-Printer.
To order paper, transparencies, or other specialty media, contact your local reseller or go to www.xerox.com/office/supplies.
Guidelines■ You can use any tray when printing on Xerox Professional Solid Ink Photo Paper.■ Only print on the glossy side of the paper. ■ Do not open sealed packages of photo paper until you are ready to load them into the
printer.■ Load only the amount of paper you are planning to use. Reinsert unused paper in the
original wrapper and seal. Rotate paper stock frequently.■ For best results, select the High-Resolution/Photo print-quality mode in the printer driver.
For more information, see "Selecting Print-Quality Modes" on page 5-53.
WorkCentre® C2424 Copier-Printer5-28
Specialty Paper
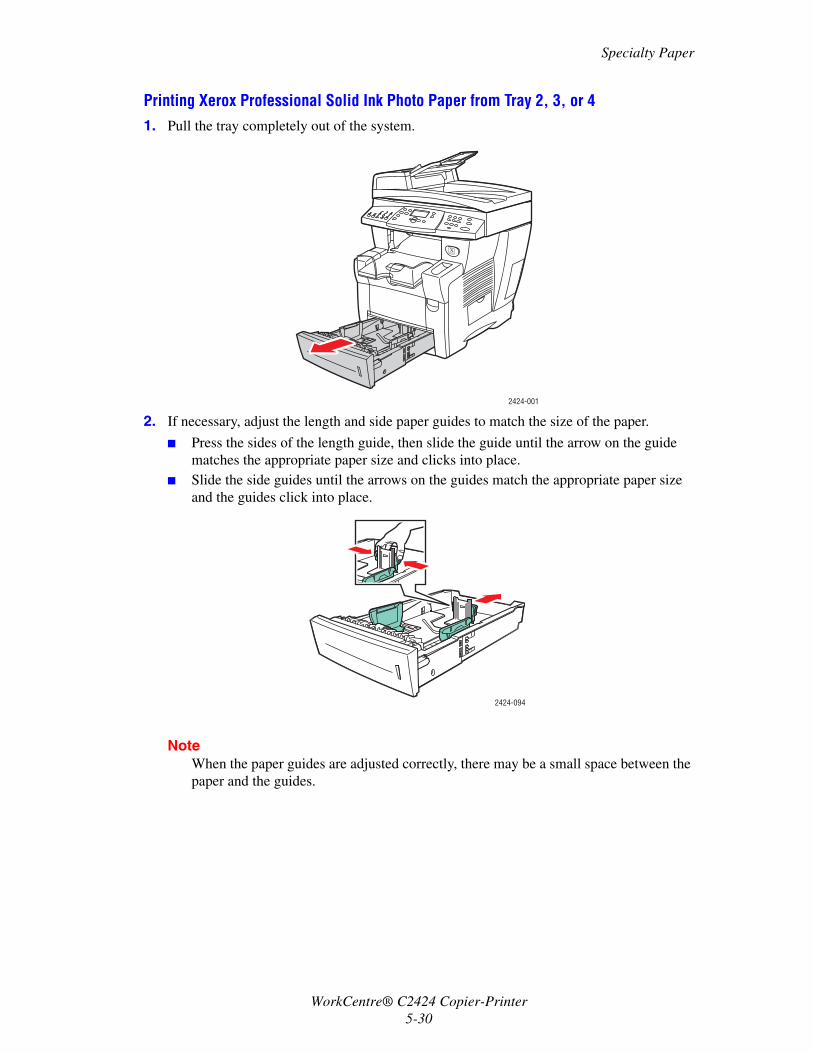
Printing Xerox Professional Solid Ink Photo Paper from Tray 11. Insert the paper into the tray with the side to be printed (the glossy side) facedown with
the top of the page against the rollers.
2. Adjust the paper guides to fit against the paper.
3. At the control panel:
a. Select Change, then press the Enter button. b. Select the paper size, then press the Enter button.c. Select Special for paper type, then press the Enter button to save your selection.
4. In the printer driver:
a. Select the High-Resolution/Photo print-quality mode.b. Select Tray 1 as the paper source.
2424-041
WorkCentre® C2424 Copier-Printer5-29
Specialty Paper
Printing Xerox Professional Solid Ink Photo Paper from Tray 2, 3, or 41. Pull the tray completely out of the system.
2. If necessary, adjust the length and side paper guides to match the size of the paper.
■ Press the sides of the length guide, then slide the guide until the arrow on the guide matches the appropriate paper size and clicks into place.
■ Slide the side guides until the arrows on the guides match the appropriate paper size and the guides click into place.
NoteWhen the paper guides are adjusted correctly, there may be a small space between the paper and the guides.
2424-001
2424-094
WorkCentre® C2424 Copier-Printer5-30

Specialty Paper
3. Insert the paper into the tray, with the side to be printed (the glossy side) faceup with the top of the page toward the front of the tray.
NoteDo not load paper above the fill line inside the tray.
4. Insert the tray into the tray slot and push it completely to the back of the system.
5. At the control panel:
a. Press the Print button.b. Select Paper Supply, then press the Enter button.c. Select Tray 2, 3 or 4 Paper Type, then press the Enter button.d. Select Special, then press the Enter button.e. Press the Enter button to save your selection.
6. In the printer driver:
a. Select the High-Resolution/Photo print-quality mode.b. Select the appropriate tray as the paper source.
2424-097
2424-004
WorkCentre® C2424 Copier-Printer5-31
Specialty Paper
Postcards and Trifold BrochuresXerox Phaser Postcards and Trifold Brochures can be printed from any tray. Both postcards and trifold brochures can be printed on two sides.
For best results, use only postcards and trifold brochures specified for your WorkCentre C2424 Copier-Printer.
To order paper, transparencies, or other specialty media, contact your local reseller or go to www.xerox.com/office/supplies.
Templates for postcards and trifold brochures are available on the Xerox web site at www.colorconnection.xerox.com.
Guidelines■ Store postcards and trifold brochures in their original packaging.■ Do not store postcards and trifold brochures in extremely dry or humid conditions or
extremely hot or cold conditions. Storing postcards and trifold brochures in extreme conditions may cause them to jam in the printer or cause print quality problems.
■ Rotate stock frequently. Long periods of storage in extreme conditions can cause the postcards and trifold brochures to curl and jam the printer.
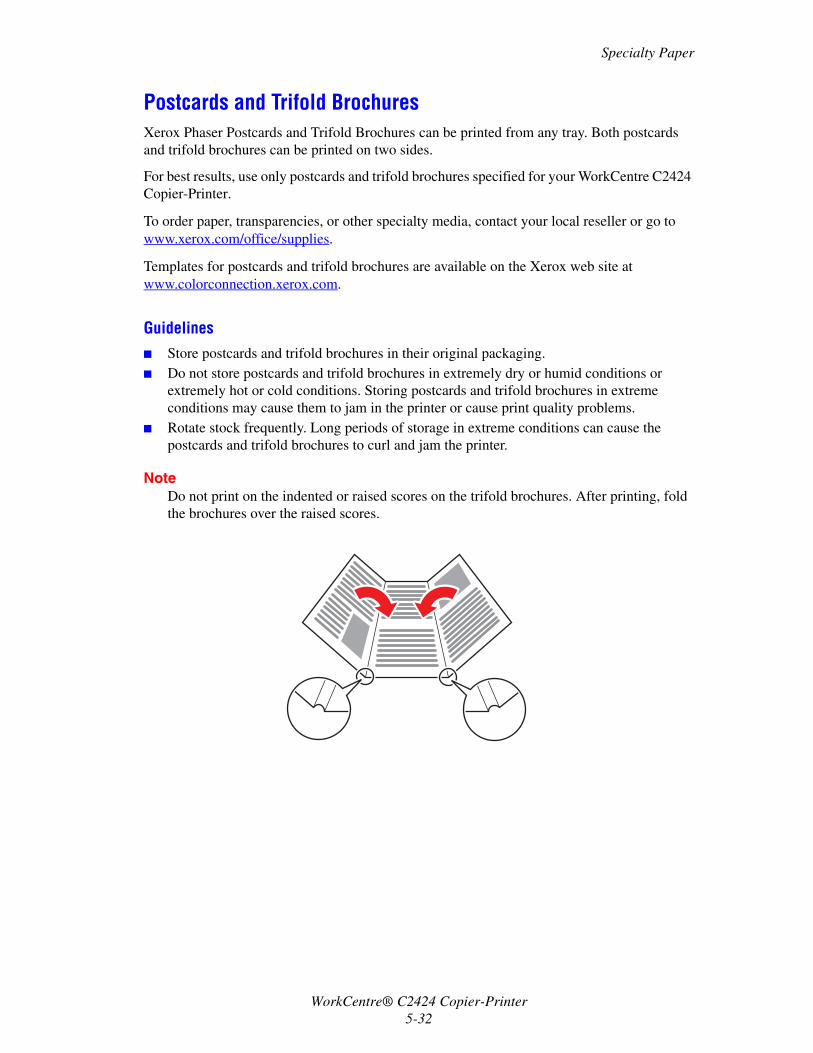
NoteDo not print on the indented or raised scores on the trifold brochures. After printing, fold the brochures over the raised scores.
WorkCentre® C2424 Copier-Printer5-32
Specialty Paper
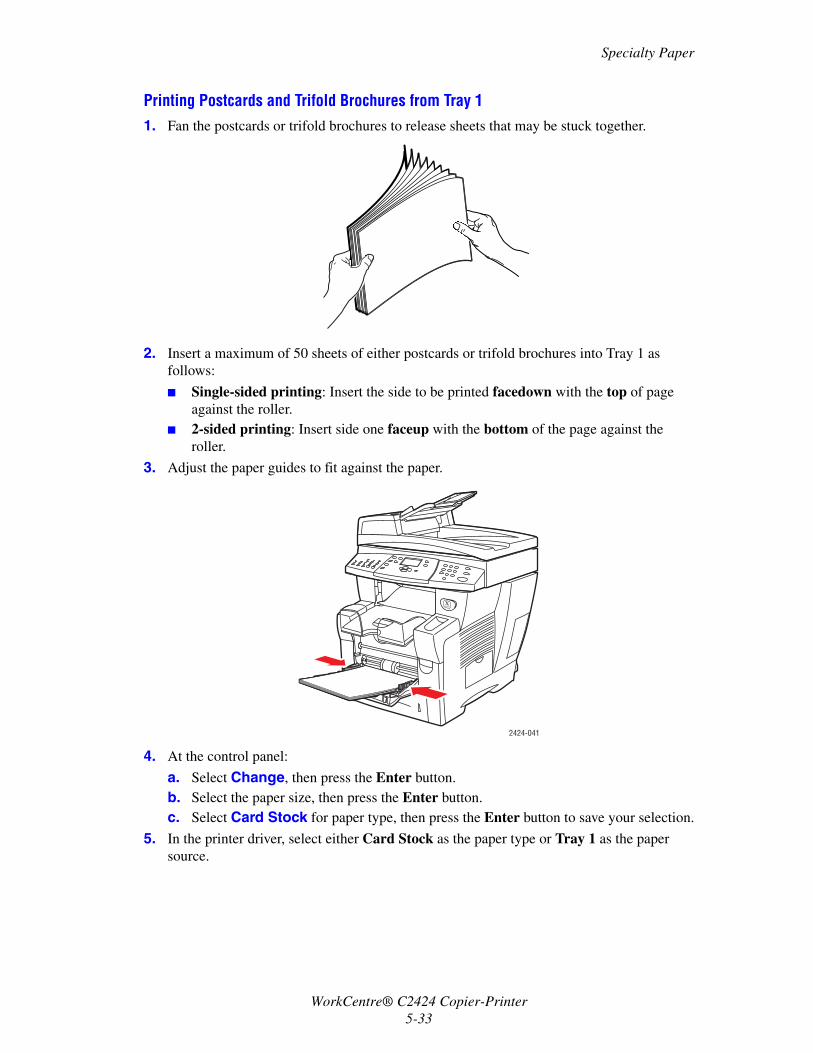
Printing Postcards and Trifold Brochures from Tray 11. Fan the postcards or trifold brochures to release sheets that may be stuck together.
2. Insert a maximum of 50 sheets of either postcards or trifold brochures into Tray 1 as follows:
■ Single-sided printing: Insert the side to be printed facedown with the top of page against the roller.
■ 2-sided printing: Insert side one faceup with the bottom of the page against the roller.
3. Adjust the paper guides to fit against the paper.
4. At the control panel:
a. Select Change, then press the Enter button.b. Select the paper size, then press the Enter button.c. Select Card Stock for paper type, then press the Enter button to save your selection.
5. In the printer driver, select either Card Stock as the paper type or Tray 1 as the paper source.
2424-041
WorkCentre® C2424 Copier-Printer5-33
Specialty Paper
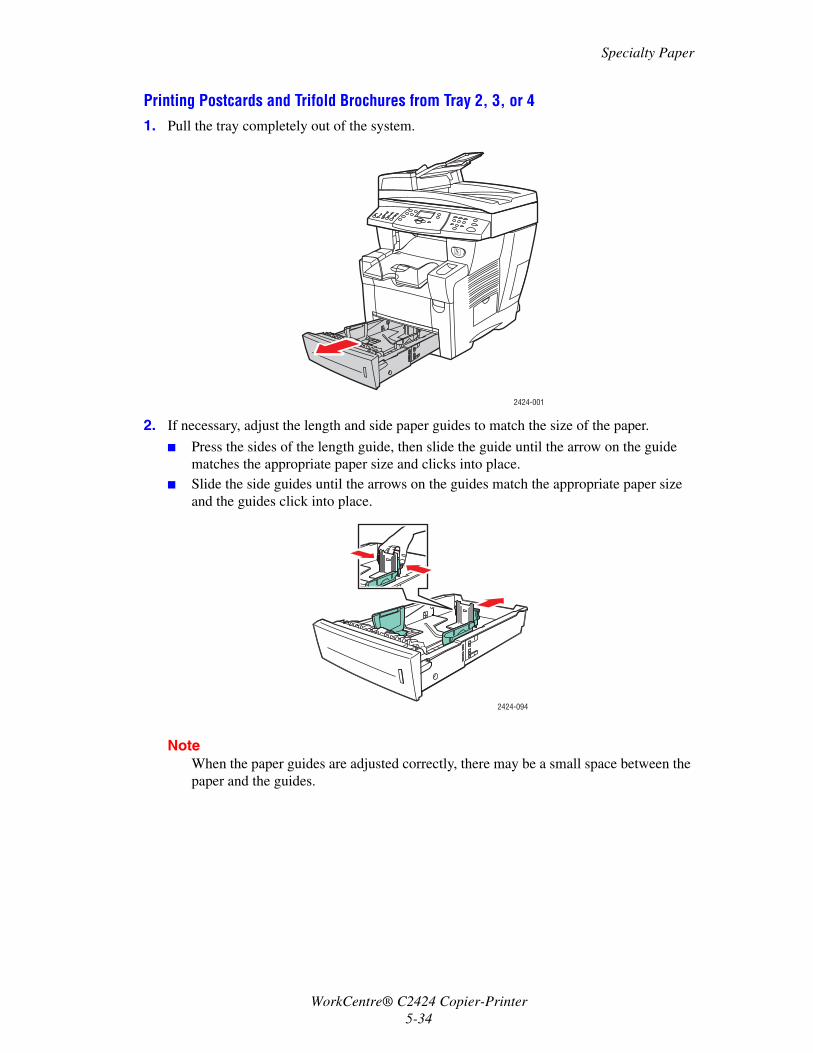
Printing Postcards and Trifold Brochures from Tray 2, 3, or 41. Pull the tray completely out of the system.
2. If necessary, adjust the length and side paper guides to match the size of the paper.
■ Press the sides of the length guide, then slide the guide until the arrow on the guide matches the appropriate paper size and clicks into place.
■ Slide the side guides until the arrows on the guides match the appropriate paper size and the guides click into place.
NoteWhen the paper guides are adjusted correctly, there may be a small space between the paper and the guides.
2424-001
2424-094
WorkCentre® C2424 Copier-Printer5-34
Specialty Paper
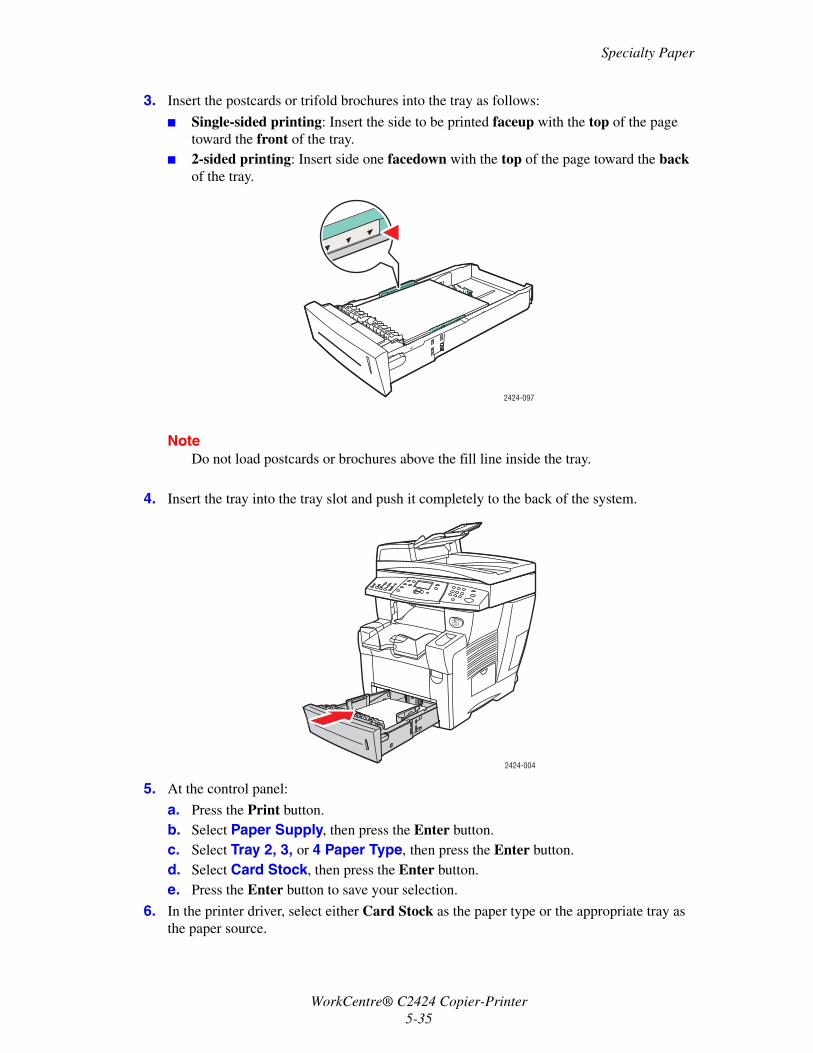
3. Insert the postcards or trifold brochures into the tray as follows:
■ Single-sided printing: Insert the side to be printed faceup with the top of the page toward the front of the tray.
■ 2-sided printing: Insert side one facedown with the top of the page toward the back of the tray.
NoteDo not load postcards or brochures above the fill line inside the tray.
4. Insert the tray into the tray slot and push it completely to the back of the system.
5. At the control panel:
a. Press the Print button.b. Select Paper Supply, then press the Enter button.c. Select Tray 2, 3, or 4 Paper Type, then press the Enter button.d. Select Card Stock, then press the Enter button.e. Press the Enter button to save your selection.
6. In the printer driver, select either Card Stock as the paper type or the appropriate tray as the paper source.
2424-097
2424-004
WorkCentre® C2424 Copier-Printer5-35
Specialty Paper
Weatherproof PaperWeatherproof paper can be printed from any tray. You can load paper to the fill line in the tray, however, the printer has better feed reliability if you load fewer sheets in the tray.
For best results, use only Xerox Phaser Weatherproof Paper specified for your WorkCentre C2424 Copier-Printer.
To order paper, transparencies, or other specialty media, contact your local reseller or go to www.xerox.com/office/supplies.
Guidelines
■ Store weatherproof paper flat in the original packaging.
■ Leave the weatherproof paper in its original packaging until you are ready to use it.■ Do not store weatherproof paper in extremely dry or humid conditions or extremely hot or
cold conditions. Storing weatherproof paper in extreme conditions may cause it to jam in the system or cause print quality problems.
■ Remove the weatherproof paper from the packaging and allow it to acclimate to the room temperature and humidity prior to printing.
■ Do not leave the paper in the system when you are finished printing. This may cause the paper to curl and jam the printer.
■ Rotate stock frequently. Long periods of storage in extreme conditions can cause the weatherproof paper to curl and jam the printer.
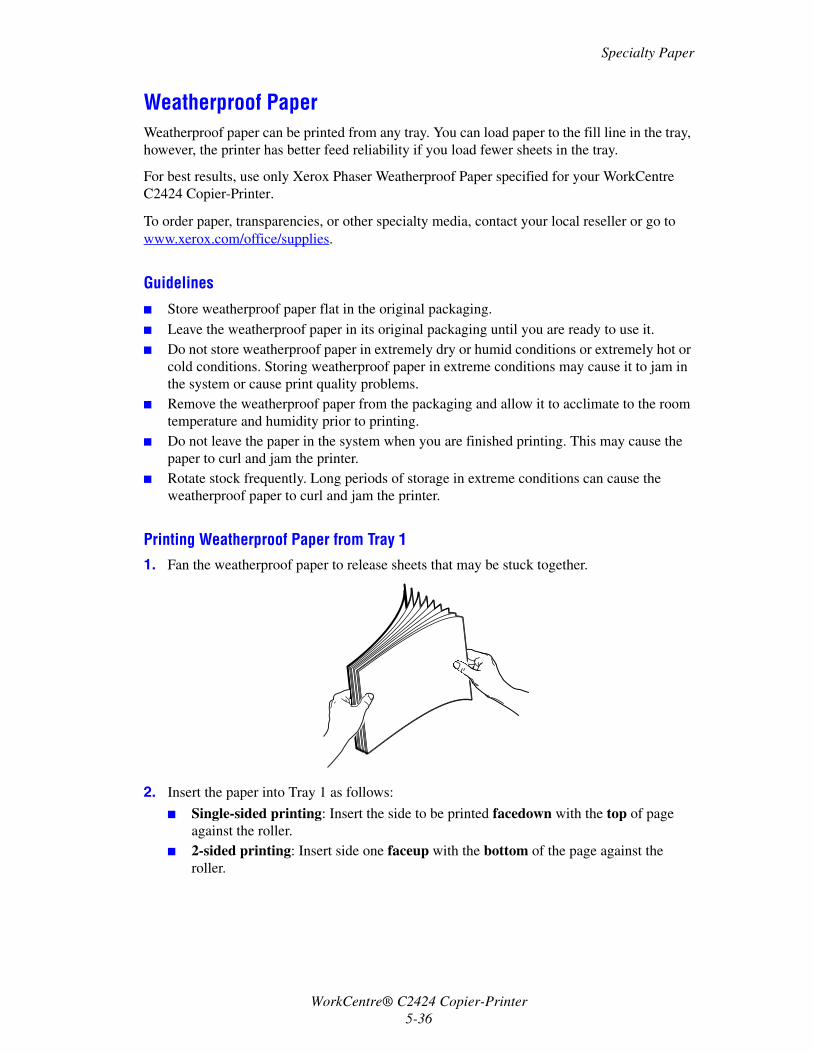
Printing Weatherproof Paper from Tray 11. Fan the weatherproof paper to release sheets that may be stuck together.
2. Insert the paper into Tray 1 as follows:
■ Single-sided printing: Insert the side to be printed facedown with the top of page against the roller.
■ 2-sided printing: Insert side one faceup with the bottom of the page against the roller.
WorkCentre® C2424 Copier-Printer5-36

Specialty Paper
3. Adjust the paper guides to fit against the paper.
4. At the control panel:
a. Select Change, then press the Enter button. b. Select the paper size, then press the Enter button.c. Select Plain Paper for paper type, then press the Enter button to save your selection.
5. In the printer driver, select Tray 1 as the paper source.
Printing Weatherproof Paper from Tray 2, 3, or 41. Pull the tray completely out of the system.
2424-041
2424-001
WorkCentre® C2424 Copier-Printer5-37

Specialty Paper
2. If necessary, adjust the length and side paper guides to match the size of the paper.
■ Press the sides of the length guide, then slide the guide until the arrow on the guide matches the appropriate paper size and clicks into place.
■ Slide the side guides until the arrows on the guides match the appropriate paper size and the guides click into place.
NoteWhen the paper guides are adjusted correctly, there may be a small space between the paper and the guides.
3. Insert the paper into the tray.
■ Single-sided printing: Insert the side to be printed faceup with the top of the page toward the front of the tray.
■ 2-sided printing: Insert side one facedown with the top of the page toward the back of the tray.
NoteDo not load paper above the fill line inside the tray.
2424-094
2424-097
WorkCentre® C2424 Copier-Printer5-38

Specialty Paper
4. Insert the tray into the tray slot and push it completely to the back of the system.
5. At the control panel:
a. Press the Print button.b. Select Paper Supply, then press the Enter button.c. Select Tray 2, 3, or 4 Paper Type, then press the Enter button.d. Select Plain Paper, then press the Enter button.e. Press the Enter button to save your selection.
6. In the printer driver, select the appropriate tray as the paper source.
2424-004
WorkCentre® C2424 Copier-Printer5-39
Specialty Paper
Glossy PaperXerox Professional Solid Ink Glossy Paper can be printed, 1- or 2-sided, from any tray.
To order paper, transparencies, or other specialty media, contact your local reseller or go to www.xerox.com/office/supplies.
Guidelines
■ Do not open sealed packages of glossy paper until you are ready to load them into the system.
■ Leave glossy paper in the original wrapper until ready for use.■ Remove all other paper from the tray before loading glossy paper.■ Load only the amount of paper you replanning to use. Do not leave glossy paper in the tray
when you are finished printing. Reinsert unused paper in the original wrapper and seal.■ Rotate stock frequently.
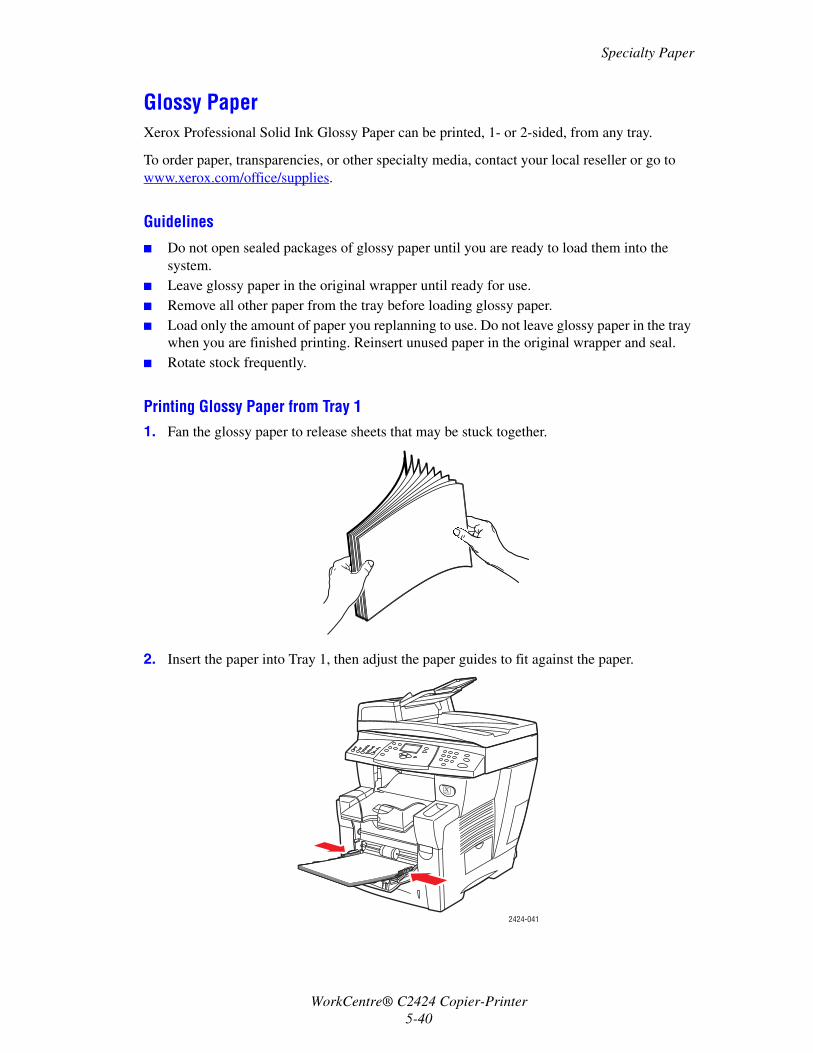
Printing Glossy Paper from Tray 11. Fan the glossy paper to release sheets that may be stuck together.
2. Insert the paper into Tray 1, then adjust the paper guides to fit against the paper.
2424-041
WorkCentre® C2424 Copier-Printer5-40
Specialty Paper
3. On the control panel:
a. Select Change, then press the Enter button. b. Select the paper size, then press the Enter button.c. Select Special for paper type, then press the Enter button to save your selection.
4. In the printer driver, select Tray 1 as the paper source.
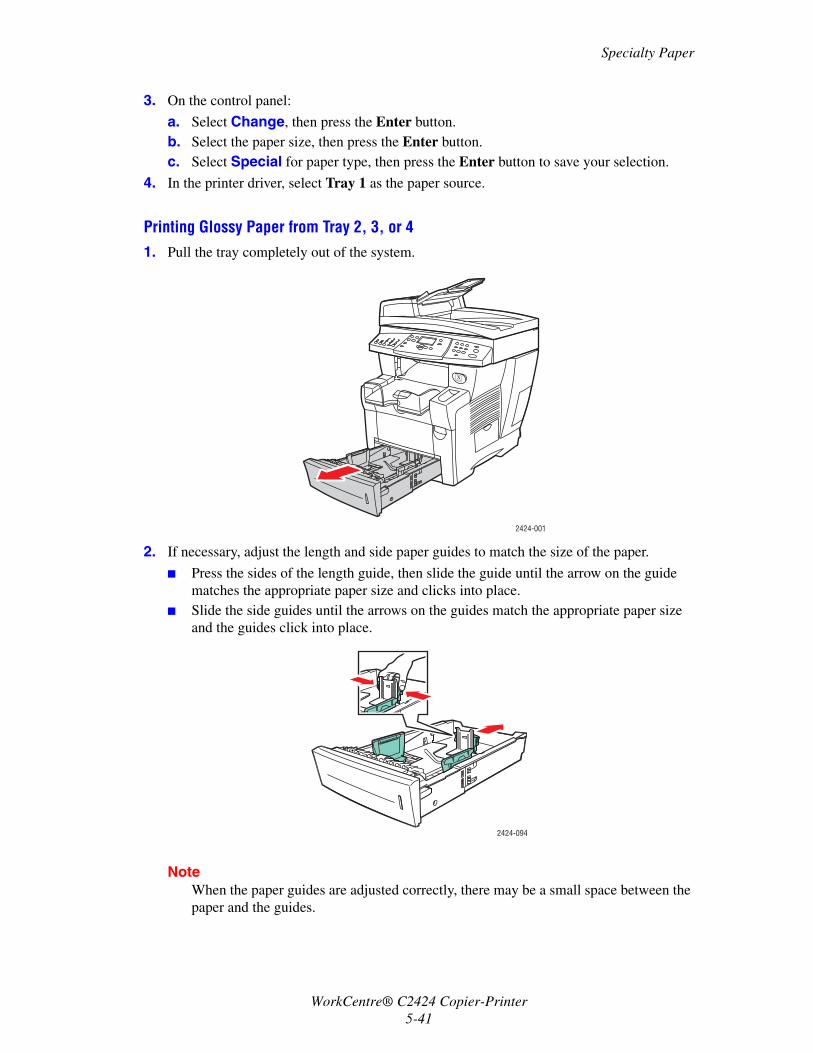
Printing Glossy Paper from Tray 2, 3, or 41. Pull the tray completely out of the system.
2. If necessary, adjust the length and side paper guides to match the size of the paper.
■ Press the sides of the length guide, then slide the guide until the arrow on the guide matches the appropriate paper size and clicks into place.
■ Slide the side guides until the arrows on the guides match the appropriate paper size and the guides click into place.
NoteWhen the paper guides are adjusted correctly, there may be a small space between the paper and the guides.
2424-001
2424-094
WorkCentre® C2424 Copier-Printer5-41
Specialty Paper
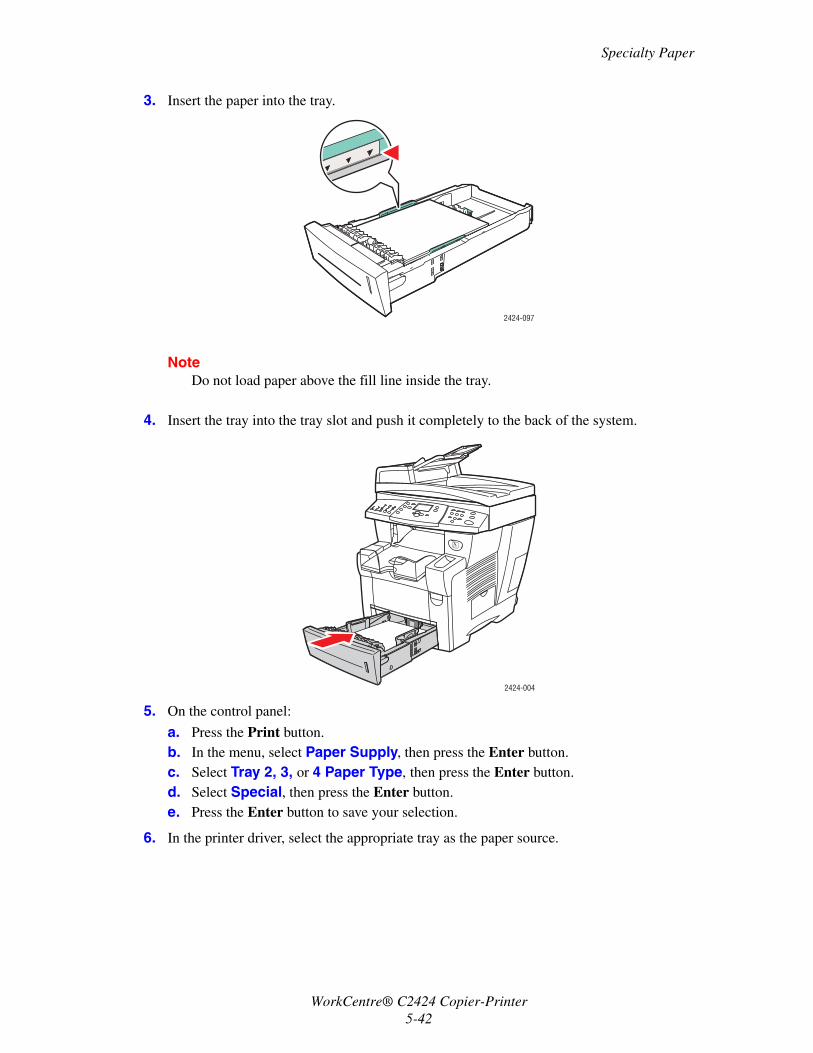
3. Insert the paper into the tray.
NoteDo not load paper above the fill line inside the tray.
4. Insert the tray into the tray slot and push it completely to the back of the system.
5. On the control panel:
a. Press the Print button.b. In the menu, select Paper Supply, then press the Enter button.c. Select Tray 2, 3, or 4 Paper Type, then press the Enter button.d. Select Special, then press the Enter button.e. Press the Enter button to save your selection.
6. In the printer driver, select the appropriate tray as the paper source.
2424-097
2424-004
WorkCentre® C2424 Copier-Printer5-42
Specialty Paper
Carbonless PaperXerox Carbonless Paper reams are pre-collated into sets of two or more sheets. The first sheet of a set is white; the subsequent sheets are different colors.
■ Most carbonless paper reams are straight collated, with the first sheet of a set on top. ■ Reverse collated reams are stacked in the opposite order, with last sheet of a set on top.
You can print Xerox Carbonless Paper from any tray.
To order paper, transparencies, or other specialty media, contact your local reseller or go to www.xerox.com/office/supplies.
Guidelines
■ Do not open sealed packages of carbonless paper until you are ready to load them.■ Do not leave unused carbonless paper in the paper trays. Seal and store unused paper in the
original wrapper.■ Xerox Carbonless Paper has an odor that differs from regular paper. This is normal and is
not harmful in any way.■ Rotate stock frequently. For best results, use carbonless paper within one year from the
date of purchase.■ The friction feed action of the paper tray may cause a slight scuff mark on the second or
subsequent sheets.■ If you encounter a paper jam while running carbonless paper, maintain the integrity of the
pre-collated sets by:a. Checking the color of the last printed sheet.b. Discarding sheets from the input tray so that the next sheet to print is the correct color
sequence.
Printing Xerox Carbonless Paper from Tray 11. Find the label on the end of the paper ream package. The label contains an arrow pointing
to the top of the ream.
2. Open the package, and select the number of sets that you want to print. A set contains a white sheet, followed by one or more colored sheets.
NoteIt is important that the sheets be printed in the correct order. Do not change the order of the sheets.
WorkCentre® C2424 Copier-Printer5-43

Specialty Paper
3. Insert the paper into Tray 1, with the top side of the paper facedown in the tray.
NoteDo not load paper above the fill line inside the tray.
4. Adjust the paper guides to fit against the paper.
1. Pink
2. Canary
3. White
2424-184
12 3
2424-041
WorkCentre® C2424 Copier-Printer5-44
Specialty Paper
5. On the control panel:
a. Select Change, then press the Enter button. b. Select the paper size, then press the Enter button.c. Select Special for paper type, then press the Enter button to save your selection.
6. In the printer driver, select Tray 1 as the paper source.
NoteDo not select Proof Prints during the print job. It will disturb the sequence of the pre-collated sets.
7. To ensure the carbonless paper sets are properly loaded in the tray:
a. Print one complete set.b. Remove the set from the output tray.c. Mark the top, white sheet of the printed set with a pen or a pencil.■ If the paper is loaded correctly, the mark should appear on the printed side of the
subsequent colored sheets within a few seconds.■ If a mark does not appear, repeat Steps 1–7 to make sure the paper is loaded correctly.
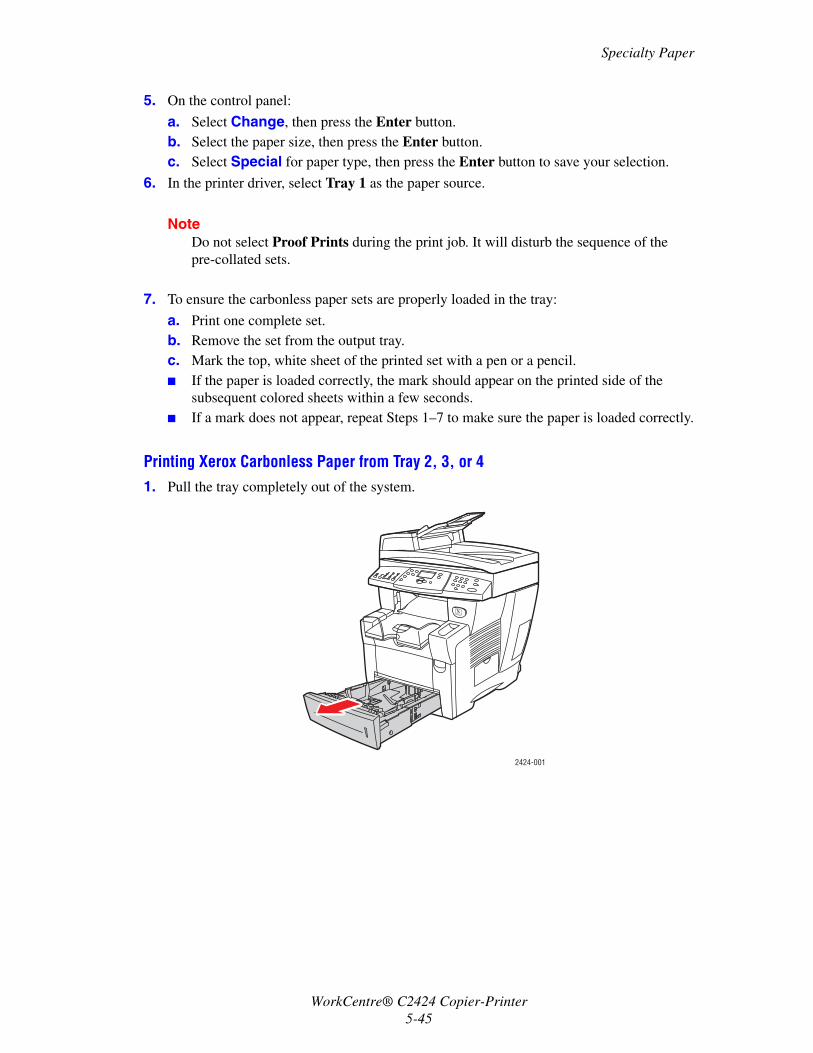
Printing Xerox Carbonless Paper from Tray 2, 3, or 41. Pull the tray completely out of the system.
2424-001
WorkCentre® C2424 Copier-Printer5-45
Specialty Paper
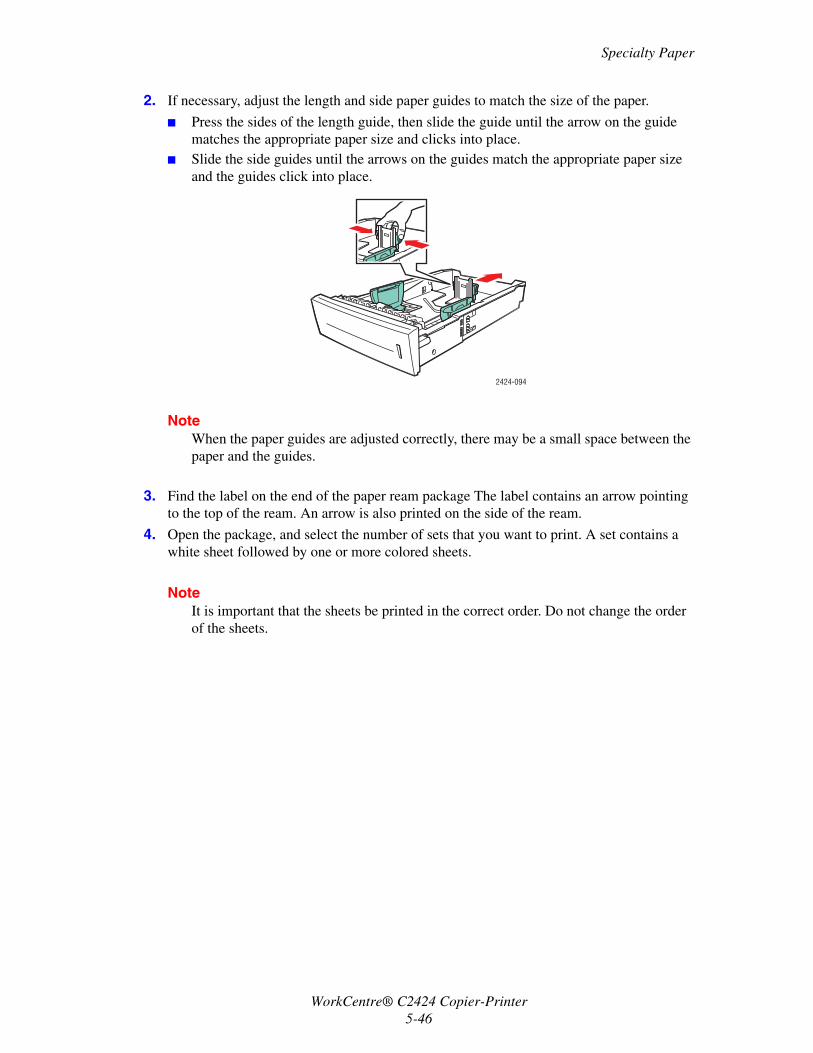
2. If necessary, adjust the length and side paper guides to match the size of the paper.
■ Press the sides of the length guide, then slide the guide until the arrow on the guide matches the appropriate paper size and clicks into place.
■ Slide the side guides until the arrows on the guides match the appropriate paper size and the guides click into place.
NoteWhen the paper guides are adjusted correctly, there may be a small space between the paper and the guides.
3. Find the label on the end of the paper ream package The label contains an arrow pointing to the top of the ream. An arrow is also printed on the side of the ream.
4. Open the package, and select the number of sets that you want to print. A set contains a white sheet followed by one or more colored sheets.
NoteIt is important that the sheets be printed in the correct order. Do not change the order of the sheets.
2424-094
WorkCentre® C2424 Copier-Printer5-46
Specialty Paper
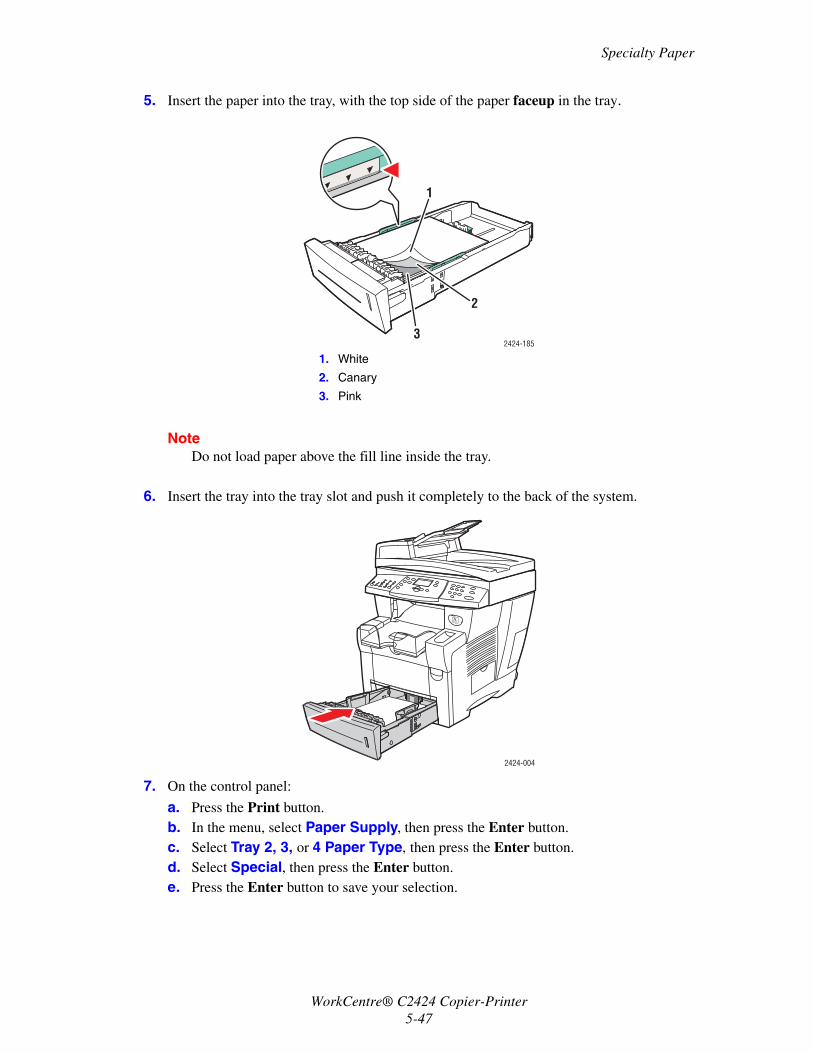
5. Insert the paper into the tray, with the top side of the paper faceup in the tray.
NoteDo not load paper above the fill line inside the tray.
6. Insert the tray into the tray slot and push it completely to the back of the system.
7. On the control panel:
a. Press the Print button.b. In the menu, select Paper Supply, then press the Enter button.c. Select Tray 2, 3, or 4 Paper Type, then press the Enter button.d. Select Special, then press the Enter button.e. Press the Enter button to save your selection.
1. White
2. Canary
3. Pink
2424-185
1
2
3
2424-004
WorkCentre® C2424 Copier-Printer5-47
Specialty Paper
8. In the printer driver, select the appropriate tray as the paper source.
NoteDo not select Proof Prints during the print job. It will disturb the sequence of the pre-collated sets.
9. To ensure the carbonless paper sets are properly loaded in the tray:
a. Print one complete set.b. Remove the printed set from the output tray.c. Mark the top, white sheet of the printed set with a pen or a pencil.■ If the paper is loaded correctly, the mark should appear on the printed side of the
subsequent colored sheets within a few seconds.■ If a mark does not appear, repeat Steps 1–9 to make sure the paper is loaded correctly.
WorkCentre® C2424 Copier-Printer5-48
Custom Size Paper
Custom Size PaperThis section includes:
■ "Guidelines" on page 5-49■ "Printing Custom Size Paper from Tray 1" on page 5-50
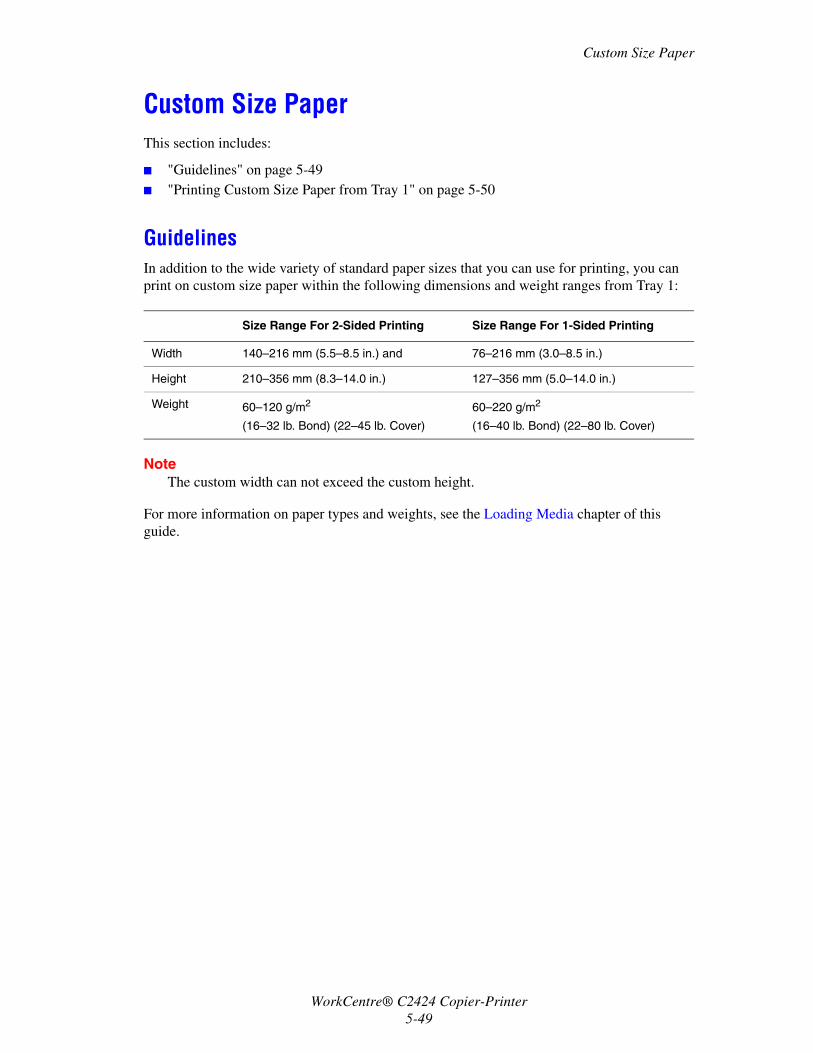
GuidelinesIn addition to the wide variety of standard paper sizes that you can use for printing, you can print on custom size paper within the following dimensions and weight ranges from Tray 1:
NoteThe custom width can not exceed the custom height.
For more information on paper types and weights, see the Loading Media chapter of this guide.
Size Range For 2-Sided Printing Size Range For 1-Sided Printing
Width 140–216 mm (5.5–8.5 in.) and 76–216 mm (3.0–8.5 in.)
Height 210–356 mm (8.3–14.0 in.) 127–356 mm (5.0–14.0 in.)
Weight 60–120 g/m2
(16–32 lb. Bond) (22–45 lb. Cover)
60–220 g/m2
(16–40 lb. Bond) (22–80 lb. Cover)
WorkCentre® C2424 Copier-Printer5-49
Custom Size Paper
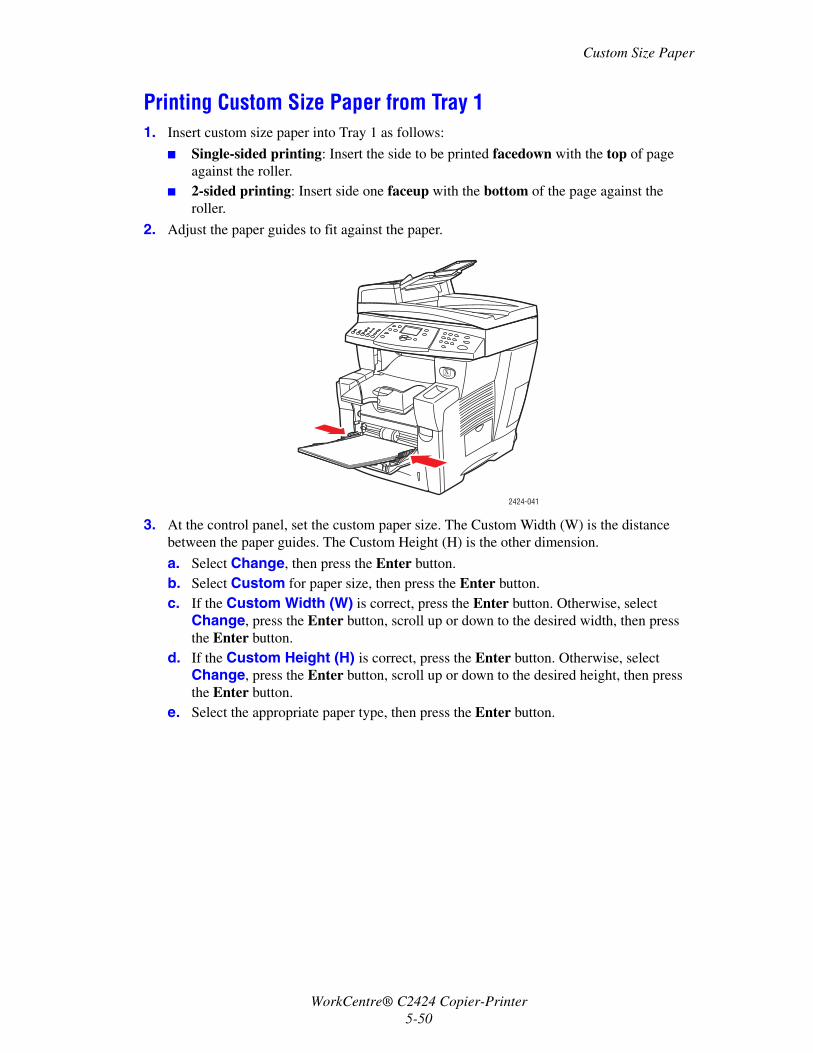
Printing Custom Size Paper from Tray 11. Insert custom size paper into Tray 1 as follows:
■ Single-sided printing: Insert the side to be printed facedown with the top of page against the roller.
■ 2-sided printing: Insert side one faceup with the bottom of the page against the roller.
2. Adjust the paper guides to fit against the paper.
3. At the control panel, set the custom paper size. The Custom Width (W) is the distance between the paper guides. The Custom Height (H) is the other dimension.
a. Select Change, then press the Enter button. b. Select Custom for paper size, then press the Enter button.c. If the Custom Width (W) is correct, press the Enter button. Otherwise, select
Change, press the Enter button, scroll up or down to the desired width, then press the Enter button.
d. If the Custom Height (H) is correct, press the Enter button. Otherwise, select Change, press the Enter button, scroll up or down to the desired height, then press the Enter button.
e. Select the appropriate paper type, then press the Enter button.
2424-041
WorkCentre® C2424 Copier-Printer5-50
Custom Size Paper
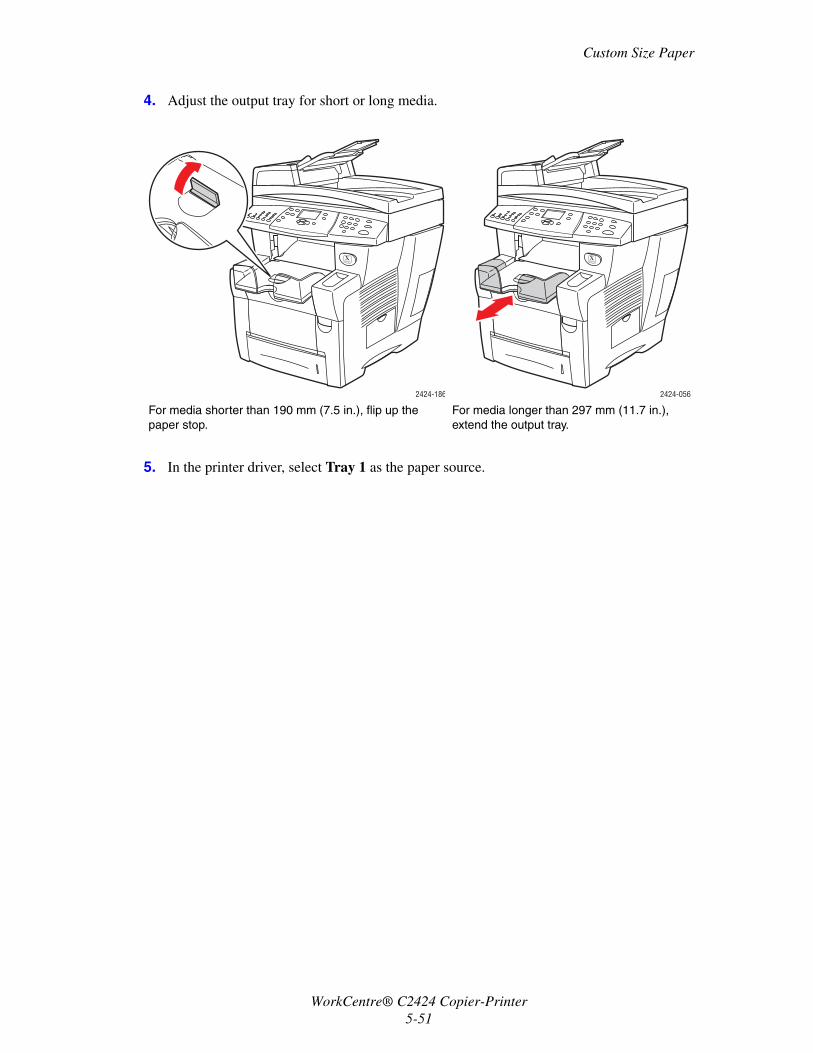
4. Adjust the output tray for short or long media.
5. In the printer driver, select Tray 1 as the paper source.
For media shorter than 190 mm (7.5 in.), flip up the paper stop.
For media longer than 297 mm (11.7 in.), extend the output tray.
2424-186 2424-056
WorkCentre® C2424 Copier-Printer5-51
Advanced Options
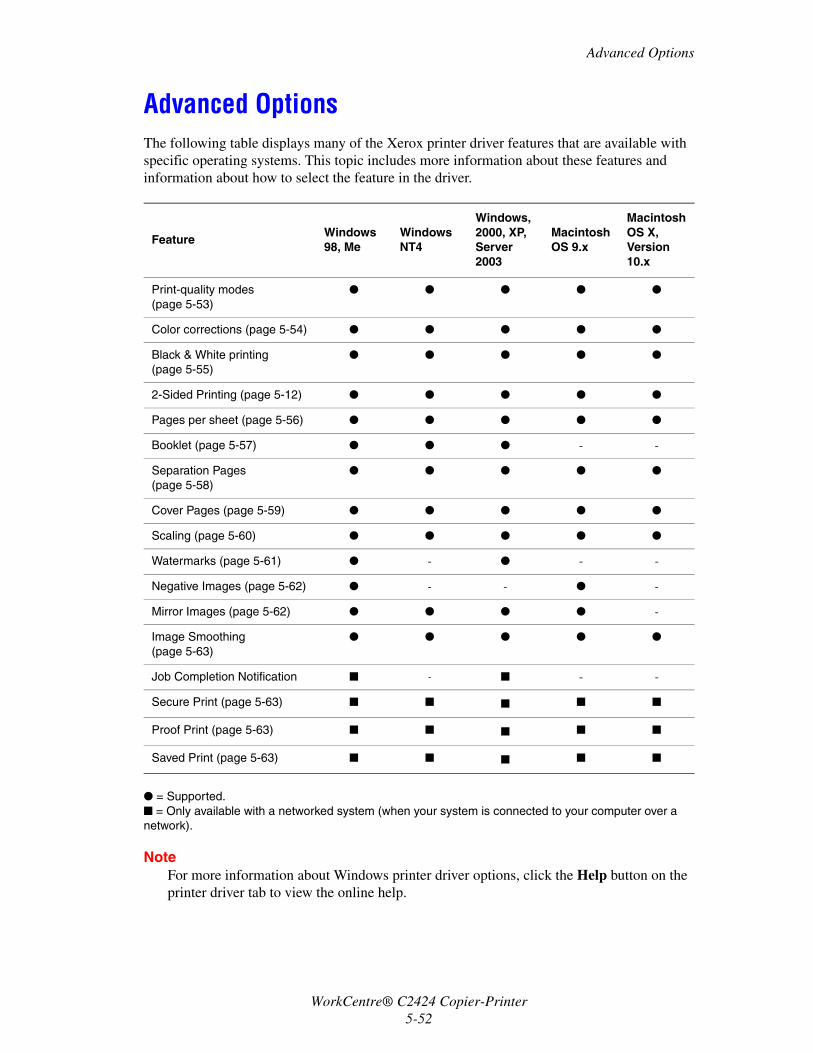
Advanced OptionsThe following table displays many of the Xerox printer driver features that are available with specific operating systems. This topic includes more information about these features and information about how to select the feature in the driver.
● = Supported.■ = Only available with a networked system (when your system is connected to your computer over a network).
NoteFor more information about Windows printer driver options, click the Help button on the printer driver tab to view the online help.
FeatureWindows 98, Me
Windows NT4
Windows, 2000, XP, Server 2003
Macintosh OS 9.x
Macintosh OS X, Version 10.x
Print-quality modes (page 5-53)
● ● ● ● ●
Color corrections (page 5-54) ● ● ● ● ●
Black & White printing (page 5-55)
● ● ● ● ●
2-Sided Printing (page 5-12) ● ● ● ● ●
Pages per sheet (page 5-56) ● ● ● ● ●
Booklet (page 5-57) ● ● ● - -
Separation Pages (page 5-58)
● ● ● ● ●
Cover Pages (page 5-59) ● ● ● ● ●
Scaling (page 5-60) ● ● ● ● ●
Watermarks (page 5-61) ● - ● - -
Negative Images (page 5-62) ● - - ● -
Mirror Images (page 5-62) ● ● ● ● -
Image Smoothing (page 5-63)
● ● ● ● ●
Job Completion Notification ■ - ■ - -
Secure Print (page 5-63) ■ ■ ■ ■ ■
Proof Print (page 5-63) ■ ■ ■ ■ ■
Saved Print (page 5-63) ■ ■ ■ ■ ■
WorkCentre® C2424 Copier-Printer5-52

Advanced Options
Selecting Print-Quality Modes You can select from four print-quality modes, as shown in the following table.
To select the print-quality mode in a supported driver:
■ Windows 98, Windows Me PostScript driver:
On the Setup tab, select a print-quality mode.
■ Windows 2000, Windows XP, Windows Server 2003, Windows NT PostScript driver:
On the Paper/Quality tab, select a print-quality mode.
■ Mac OS 9 driver:
In the Print dialog box, click General, select Print Quality from the drop-down list, then select the desired mode for Quality.
■ Mac OS X (version 10.1 and higher) driver:
In the Print dialog box, select Image Quality from the drop-down list, then select a print quality mode from the Print Quality drop-down list.
Print-Quality Mode Type of Print Job
Fast Color Fastest full-color mode, useful for many images and previewing your work. Rapidly produces review documents; useful for rush jobs. Not recommended for documents containing small text, fine detail, or large areas of bright solid fill.
Standard General-purpose mode for full-color printing. Produces crisp, bright prints at high speed. Recommended for vibrant, saturated color prints.
Enhanced Best mode for business presentations. Produces superior text resolution and very smooth light colors. This mode takes longer to process and print than Standard or Fast Color.
High-Resolution/Photo Highest-quality mode for color prints. Provides the best detail and smoothness for photographic images. Produces highest-quality color prints, with the best text resolution and smoothest light colors. This mode takes longer to process and print than the other modes.
WorkCentre® C2424 Copier-Printer5-53

Advanced Options
Adjusting Color Using TekColor CorrectionsThe TekColor correction options provide simulations of different color devices. Automatic is the default correction for general image processing. See the following table to determine what option you want to use.
For more information on color matching and ICC profiles, go to www.xerox.com/office/c2424infoSMART.
To select the color correction in a supported driver:
■ Windows 98, Windows Me PostScript driver:
On the TekColor tab, select the desired color correction. Some of the color corrections are grouped under Office Color or Press Match.
■ Windows 2000, Windows XP, Windows Server 2003, Windows NT PostScript driver:
On the TekColor tab, select the desired color correction. Some of the color corrections are grouped under Office Color or Press Match.
■ Mac OS 9 driver:
In the Print dialog box, click General, select TekColor from the drop-down list, then select the desired correction for Color.
■ Mac OS X (version 10.1 and higher) driver:
In the Print dialog box, select Image Quality from the drop-down list, then select the desired color correction option from the Color Correction drop-down list.
Type of Print JobColor CorrectionOption
Description
Producing most print jobs Automatic(Default setting)
Provides the best results for documents with a mixture of graphics, text, and pictures.
Matching the sRGB display for screen and print images
Office ColorsRGB Display
Simulates computer display colors (RGB).
Producing bar and pie charts, spread sheets, and organizational charts
Office ColorsRGB Vivid
Produces the brightest, most saturated colors.
Using the C2424 PANTONE® Color Chart for process PANTONE Color matching
Office ColorNone
No color correction is made to colors.
Using SWOP press standards Press MatchSWOP
Matches Specifications for Web Offset Publications (SWOP) press standards.
Using the Euroscale 4-color process press mode
Press MatchEuroscale
Emulates the Euroscale 4-color process press mode.
Using the Imation Matchprint press standard
Press MatchCommercial
Matches Imation Matchprint proofs.
Producing a black-and-white version of a color document
Black and White Transforms all color to equivalent gray levels, and attempts to preserve color differences as gray density differences.
WorkCentre® C2424 Copier-Printer5-54
Advanced Options
Printing in Black and WhiteIf you want your output in black, white, and shades of gray, you can select Black & White in a supported printer driver:
■ Windows 98, Windows Me, Windows 2000, Windows XP, Windows Server 2003, Windows NT PostScript driver:
On the TekColor tab, select Black & White.
■ Mac OS 9 driver:
In the Print dialog box, select General, select TekColor from the drop-down list, then select Black & White.
■ Mac OS X (version 10.1 and higher) driver:
In the Print dialog box, select the Printer Features drop-down list, then select the Print Quality/Color tab. Select Black & White.
WorkCentre® C2424 Copier-Printer5-55
Advanced Options
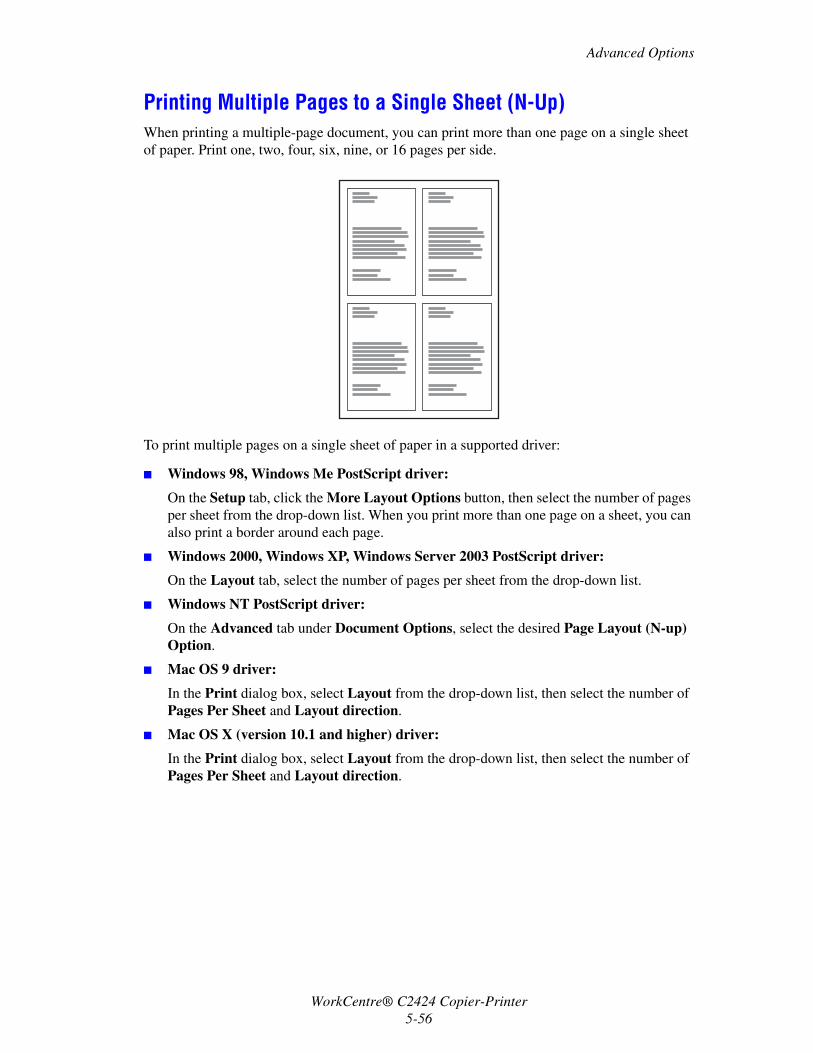
Printing Multiple Pages to a Single Sheet (N-Up)When printing a multiple-page document, you can print more than one page on a single sheet of paper. Print one, two, four, six, nine, or 16 pages per side.
To print multiple pages on a single sheet of paper in a supported driver:
■ Windows 98, Windows Me PostScript driver:
On the Setup tab, click the More Layout Options button, then select the number of pages per sheet from the drop-down list. When you print more than one page on a sheet, you can also print a border around each page.
■ Windows 2000, Windows XP, Windows Server 2003 PostScript driver:
On the Layout tab, select the number of pages per sheet from the drop-down list.
■ Windows NT PostScript driver:
On the Advanced tab under Document Options, select the desired Page Layout (N-up) Option.
■ Mac OS 9 driver:
In the Print dialog box, select Layout from the drop-down list, then select the number of Pages Per Sheet and Layout direction.
■ Mac OS X (version 10.1 and higher) driver:
In the Print dialog box, select Layout from the drop-down list, then select the number of Pages Per Sheet and Layout direction.
WorkCentre® C2424 Copier-Printer5-56
Advanced Options
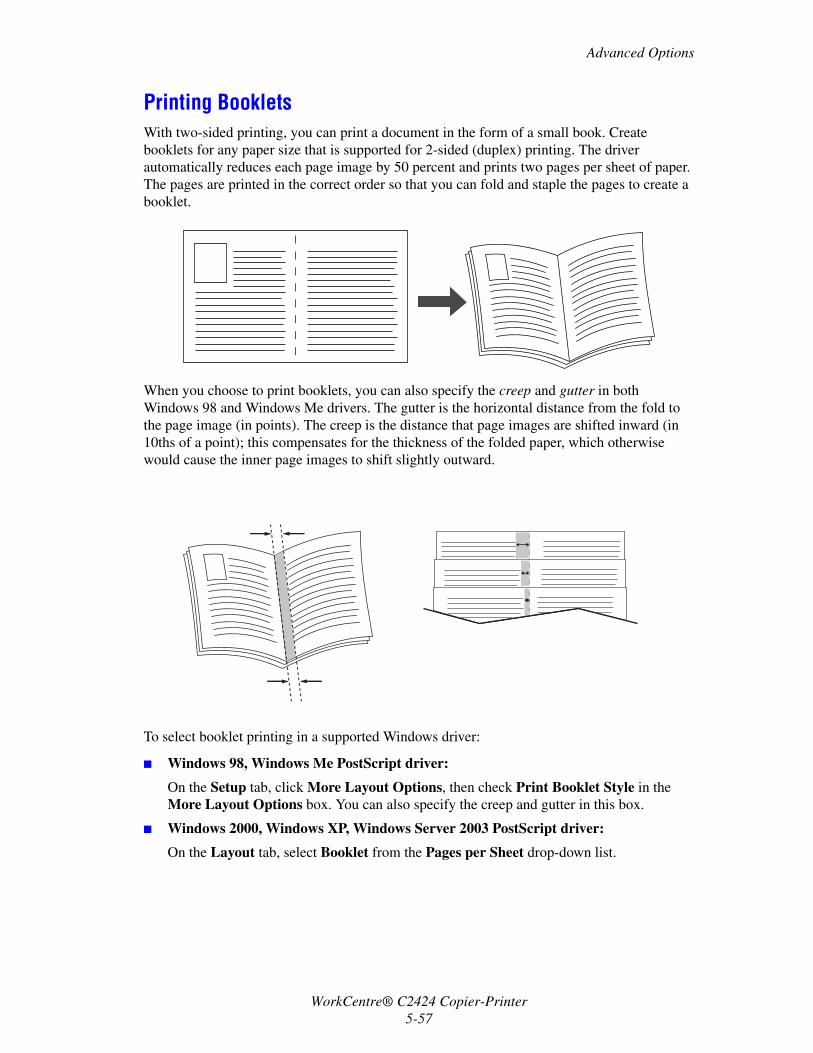
Printing BookletsWith two-sided printing, you can print a document in the form of a small book. Create booklets for any paper size that is supported for 2-sided (duplex) printing. The driver automatically reduces each page image by 50 percent and prints two pages per sheet of paper. The pages are printed in the correct order so that you can fold and staple the pages to create a booklet.
When you choose to print booklets, you can also specify the creep and gutter in both Windows 98 and Windows Me drivers. The gutter is the horizontal distance from the fold to the page image (in points). The creep is the distance that page images are shifted inward (in 10ths of a point); this compensates for the thickness of the folded paper, which otherwise would cause the inner page images to shift slightly outward.
To select booklet printing in a supported Windows driver:
■ Windows 98, Windows Me PostScript driver:
On the Setup tab, click More Layout Options, then check Print Booklet Style in the More Layout Options box. You can also specify the creep and gutter in this box.
■ Windows 2000, Windows XP, Windows Server 2003 PostScript driver:
On the Layout tab, select Booklet from the Pages per Sheet drop-down list.
WorkCentre® C2424 Copier-Printer5-57

Advanced Options
Printing Separation PagesA separation page (a divider page or slipsheet) can be inserted after a print job, between copies of a print job, or between individual pages of a print job. Specify the tray to use as the source for the separation pages.
To specify separation pages in a supported driver:
■ Windows 98, Windows Me PostScript driver:
On the Output Options tab, select the location of the separation pages and the tray source.
■ Windows 2000, Windows XP, Windows Server 2003, Windows NT PostScript driver:
On the Output Options tab, select the location of the separation pages and the tray source.
■ Mac OS 9 driver:
In the Print dialog box, select Advanced Options 1 from the drop-down list, select the paper source from the Separation Page Source drop-down list, then select On from the Separation Page drop-down list.
■ Mac OS X (version 10.1 and higher) driver:
In the Print dialog box, select the Printer Features drop-down list, select Separation Page and Source from the drop-down list, then select On from the Separation Page drop-down list.
WorkCentre® C2424 Copier-Printer5-58
Advanced Options
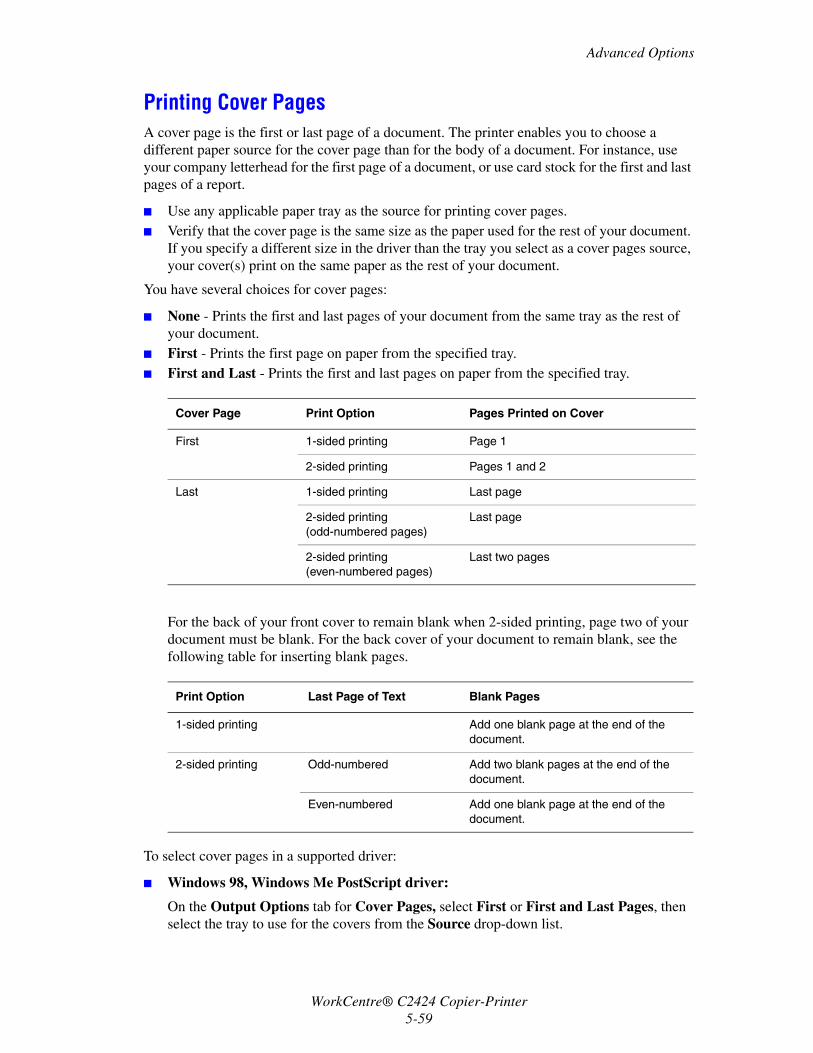
Printing Cover PagesA cover page is the first or last page of a document. The printer enables you to choose a different paper source for the cover page than for the body of a document. For instance, use your company letterhead for the first page of a document, or use card stock for the first and last pages of a report.
■ Use any applicable paper tray as the source for printing cover pages.■ Verify that the cover page is the same size as the paper used for the rest of your document.
If you specify a different size in the driver than the tray you select as a cover pages source, your cover(s) print on the same paper as the rest of your document.
You have several choices for cover pages:
■ None - Prints the first and last pages of your document from the same tray as the rest of your document.
■ First - Prints the first page on paper from the specified tray. ■ First and Last - Prints the first and last pages on paper from the specified tray.
For the back of your front cover to remain blank when 2-sided printing, page two of your document must be blank. For the back cover of your document to remain blank, see the following table for inserting blank pages.
To select cover pages in a supported driver:
■ Windows 98, Windows Me PostScript driver:
On the Output Options tab for Cover Pages, select First or First and Last Pages, then select the tray to use for the covers from the Source drop-down list.
Cover Page Print Option Pages Printed on Cover
First 1-sided printing Page 1
2-sided printing Pages 1 and 2
Last 1-sided printing Last page
2-sided printing(odd-numbered pages)
Last page
2-sided printing (even-numbered pages)
Last two pages
Print Option Last Page of Text Blank Pages
1-sided printing Add one blank page at the end of the document.
2-sided printing Odd-numbered Add two blank pages at the end of the document.
Even-numbered Add one blank page at the end of the document.
WorkCentre® C2424 Copier-Printer5-59
Advanced Options
■ Windows 2000, Windows XP, Windows Server 2003, Windows NT PostScript driver:
On the Paper/Quality tab under Cover Pages, select First or First and Last Page, then select the tray to use for the covers from the Source drop-down list.
■ Mac OS 9 driver:
In the Print dialog box, click General, select First Page, then select the tray from the drop-down list.
■ Mac OS X (version 10.1 and higher) driver: a. In the Print dialog box, select Paper Feed, then select First Page From.b. In the Printer Features dialog box, select Last Page Paper Source.
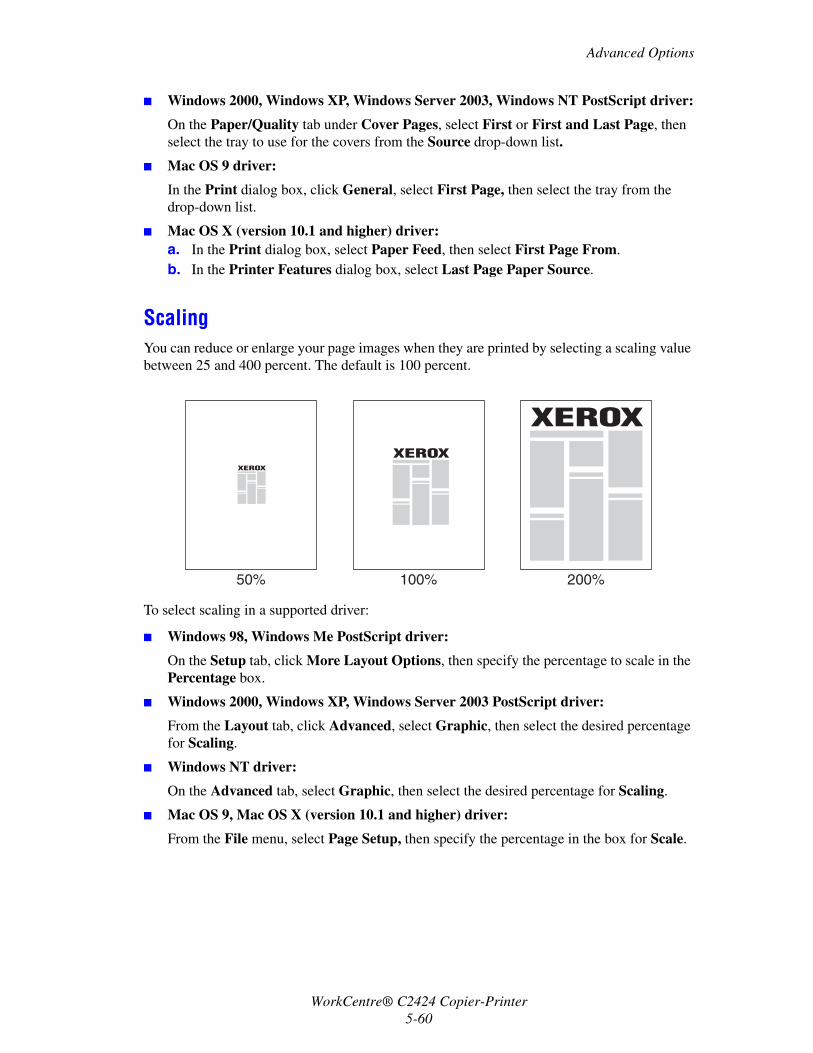
ScalingYou can reduce or enlarge your page images when they are printed by selecting a scaling value between 25 and 400 percent. The default is 100 percent.
To select scaling in a supported driver:
■ Windows 98, Windows Me PostScript driver:
On the Setup tab, click More Layout Options, then specify the percentage to scale in the Percentage box.
■ Windows 2000, Windows XP, Windows Server 2003 PostScript driver:
From the Layout tab, click Advanced, select Graphic, then select the desired percentage for Scaling.
■ Windows NT driver:
On the Advanced tab, select Graphic, then select the desired percentage for Scaling.
■ Mac OS 9, Mac OS X (version 10.1 and higher) driver:
From the File menu, select Page Setup, then specify the percentage in the box for Scale.
50% 100% 200%
WorkCentre® C2424 Copier-Printer5-60

Advanced Options
Printing WatermarksA watermark is additional text that can be printed across one or more pages. For example, terms like Draft, Confidential, Date, Version that you might stamp on a page before distribution, can be inserted with a watermark.
In some Windows drivers, you can:
■ Create a watermark■ Edit an existing watermark’s text, color, location, and angle■ Place a watermark on either the first page or every page in a document■ Print the watermark in the background■ Print the text of the watermark as an outline (instead of filled text)
NoteNot all applications support watermark printing.
To select, create, and edit watermarks using a supported Windows driver:
■ Windows 98, Windows Me PostScript driver:
On the Setup tab, click the More Layout Options button, then click the Watermark button to display the Watermarks dialog box.
■ Windows 2000, Windows XP, Windows Server 2003 PostScript driver:
On the Layout tab, click the Advanced button. In the box under Document Options and Printer Features, select Watermarks, then click the Modify button to display the Modify Watermarks dialog box.
WorkCentre® C2424 Copier-Printer5-61

Advanced Options
Printing Negative and Mirror ImagesYou can print pages as a negative image (reverses the light and dark areas in your printed image) or mirror image (flips images horizontally on pages when printed).
Negative Image
Mirror Image
To select negative or mirror images in a supported driver:
■ Windows 98, Windows Me PostScript driver:
On the Setup tab, click More Layout Options, then select Print as a Negative Image or Print as a Mirror Image.
■ Windows 2000, Windows XP, Windows Server 2003 PostScript driver:
From the Layout tab, click Advanced. Under Document Options and PostScript Options, select Yes for Mirrored Output.
■ Windows NT driver:
On the Advanced tab, under Document Options and PostScript Options, select Yes for Mirrored Output or Negative Output.
■ Mac OS 9 driver:
From the File menu, select Page Setup, choose PostScript Options from the drop-down list, then select Invert Image (to print a negative image) or Flip Horizontal (to print a mirror image).
M M
B B
WorkCentre® C2424 Copier-Printer5-62
Advanced Options
Smoothing ImagesImage smoothing blends adjacent colors in low-resolution images for smoother color transitions. For example, use image smoothing to improve the appearance of a 72 dpi image downloaded from the World Wide Web. Image smoothing is not recommended for images with resolutions of 300 dpi or higher.
NotePrint processing is slower when this option is selected.
To select image smoothing in a supported driver:
■ Windows 98, Windows Me PostScript driver:
On the Setup tab, click More Layout Options, then click the Image Smoothing checkbox.
■ Windows 2000, Windows XP, Windows Server 2003 Post Script driver:
From the Layout tab, click the Advanced button. In the box under Document Options and Printer Features, select On for Image Smoothing.
■ Windows NT driver:
On the Advanced tab under Printer Features, select On for Image Smoothing.
■ Mac OS 9 driver:
In the Print dialog box, click General, select Advanced Options from the drop-down list, then select On for Image Smoothing.
■ Mac OS X (version 10.1 and higher) driver:
In the Print dialog box, select the Printer Features drop-down list, then select On for Image Smoothing.
Printing Secure, Proof, and Saved Print Jobs
NoteThese jobs are stored on the hard drive and remain in the system even when it is turned off.
Choose one of the following special job types:
■ Secure Print: Prints confidential documents. Your four-digit numeric password-protected jobs are stored on the system’s hard drive. The jobs print only after your user name and four-digit numeric password are entered on the control panel. The jobs are automatically deleted from the hard drive after printing.
■ Proof Print: Prints only one copy of the job in order to proof the copy. To print additional copies, select the job name on the control panel. The job is automatically deleted from the hard drive after printing. If you do not want to print the remaining copies, delete the job at the control panel.
WorkCentre® C2424 Copier-Printer5-63
Advanced Options
■ Saved Print: Stores the job on the system’s hard drive so you can print it on demand from the control panel. The job is not deleted after printing. This is useful for any document you frequently print, such as tax forms, personnel forms, or requisition forms.
NoteProtected Jobs are jobs that have been copied or moved from the Public Jobs group in CentreWare IS. For more information, click the Help button in CentreWare IS to view the online help.
Sending Secure, Proof, and Saved Print Jobs
Use a supported driver to specify a job as a secure print, proof print, or saved print job:
■ Windows 98, Windows Me, Windows 2000, Windows XP, Windows Server 2003, Windows NT PostScript driver:
On the Output Options tab, choose the job type under Walk-Up Features. For a secure print job, enter a 4-digit password to assign to this job. For a proof print or saved print job, enter the name you want to give this job.
■ Mac OS 9 driver:
In the Print dialog box, click on General, select Job Type from the drop-down list, then choose the job type. For a secure print job, enter a 4-digit password to assign to this job. For a proof print or saved print job, enter the name you want to give this job in the Job Name field.
■ Mac OS X (version 10.1 and higher) driver:
In the Print dialog box, select Job Types from the drop-down list, then select Secure Print, Proof Print, or Saved Print from the Job Type drop-down list. For a secure print job, enter a document name (up to 20 alpha characters) in the Document Name field. Enter a four-digit number, ranging from 0000 through 9999, in the Job Password field.
Printing Secure Print JobsTo print a secure print job, specify the four-digit numeric password at the control panel:
1. On the control panel, press the Print button.
2. In the menu, select Secure Print Jobs, then press the Enter button.
3. Scroll to your User Name, then press the Enter button.
4. Use the keypad on the control panel to enter the four digits of the numeric password, then press the Enter button.
5. If more than one secure print job is entered with a password, select the desired job to print or select All of Them, then press the Enter button.
6. Select Print and Delete, then press the Enter button to print.
WorkCentre® C2424 Copier-Printer5-64

Advanced Options
Printing Proof and Saved Print JobsTo print a saved print job or the additional copies of a proof print job, select the job name at the control panel:
1. On the control panel, press the Print button.
2. In the menu, select Proof Print Jobs or Saved Print Jobs, then press the Enter button.
3. Scroll to the job name, then press the Enter button.
4. Select Print and Delete (for proof prints) or Print and Save (for saved prints), then press the Enter button.
5. Use the keypad on the control panel to enter the desired number of copies, then press the Enter button to print the job.
Deleting Secure, Proof, and Saved Print JobsThere is a limit per type (secure, proof, saved job types) to the number of jobs that can be stored on the hard drive. When a new print job would exceed the space on the hard drive for that type, the oldest job of that type is automatically deleted before adding a new job. To save space:
■ Periodically delete saved print jobs that are no longer needed■ Delete secure print and proof print jobs that you don’t want to print
To delete a secure print job without printing it, specify the 4-digit password at the control panel:
1. On the control panel, press the Print button.
2. Select Secure Print Jobs, then press the Enter button.
3. Scroll to your User Name, then press the Enter button.
4. Use the keypad on the right side of the control panel to enter the four digits of the numeric password, then press the Enter button.
5. If more than one secure print job is entered with a password, select the desired job to delete or select All of Them, then press the Enter button.
6. Select Delete, then press the Enter button to print.
7. When prompted at the control panel whether you want to delete the jobs, select Yes, then press the Enter button.
To delete a saved print job or a proof print job, select the job name at the control panel:
1. On the control panel, press the Print button.
2. In the menu, select Proof Print Jobs or Saved Print Jobs, then press the Enter button.
3. Scroll to the job name, then press the Enter button.
4. Select Delete, then press the Enter button.
5. When prompted at the control panel whether you want to delete the jobs, select Yes, then press the Enter button.
WorkCentre® C2424 Copier-Printer5-65