xerox workcentre 5855 - home - seattle public schools workcentre 5855 identifying the control panel...
TRANSCRIPT

Xerox WorkCentre 5855
Identifying the Control Panel Buttons
1. Services Home: Provides access to the services available on the device.
2. Services: Returns the display to the previous Copy, Fax, or Scan feature screen when the Job Status screen or
Machine Status screen is displayed.
3. Job Status: Use to check the progress of active jobs, or display detailed information about completed jobs.
4. Machine Status: Use to check the device status, the billing meters, the status of consumables, or print the user
documentation and reports. Use this button also when accessing the Tools mode.
5. Touch Screen: Use to select programing features and display fault clearance procedures and general device
information.
6. Log In/Out: Use to enter log in details, and to log out.
7. Help: Displays help messages for device features.
8. Numeric Keypad: Use to enter alphanumeric characters.
9. Dial Pause : Use to insert a pause when dialing a fax number.
10. ‘C’ Cancel Entry: Cancels the previous entry made on the Numeric Keypad.
11. Language: Use to select a different language for the touch screen options.
12. Power: Use to select Energy Saver mode, perform a quick restart or to power on or off the device.
13. Clear All: Press once to clear a current entry. Press twice to return to default settings.
14. Interrupt Printing: Use to pause the job which is currently printing, to run a more urgent copy job.
15. Stop: Stops the job in progress.
16. Start: Use to start a job.

Making Copies
Xerox WorkCentre 5735/5740/5745/5755/5765/5775/5790Copy
37
Making Copies
1. Load your documents face up in the document feeder input tray. Adjust the guide to just touch the documents.Or...........Lift up the document feeder. Place the document face down onto the document glass and register it to the arrow at the top right rear corner. Close the document feeder.
2. Press the Clear All (AC) button once to cancel any previous screen programing selections.3. Press the Services Home button and select the Copy
option. The Copy features are displayed.
4. Select the required features using the touch screen:
5. Enter the copy quantity using the numeric keypad and press Start to scan the originals.6. Remove the originals from the document feeder or document glass when scanning has completed.
Note: The Copy job enters the job list ready for printing.
7. Select Job Status to view the job list and check the status of your job.
If your job is held in the list it requires additional resources to print. To identify the resources required, select the job and select Job Details. Once the resources are available the job will print.
Reduce / Enlarge can be used to reduce or enlarge the image by 25% to 400%.
Paper Supply is used to select the required tray and size of paper for the copy output.
2 Sided Copy is used to produce 1 or 2-sided copy output.
Copy Output is used to select collate, staple or fold options (depending on the finishing device available).

Copy Options
Xerox WorkCentre 5735/5740/5745/5755/5765/5775/5790Copy
38
Copy Options
The Copy tab includes basic copying selections such as Reduce/Enlarge, Paper Supply, 2-Sided Copy and Copy Output. Each option is described in detail below.
Reduce/Enlarge
A variety of options are available on your device to enable you to reduce or enlarge the output from your original, including selecting a specific ratio - either proportionately or independently - and choosing from a selection of pre-defined preset buttons. For convenience, easy access to ratio selections can be found on the Copy tab in the Reduce/Enlarge area. Use the More... button to access further options not on the main screen.
Images from originals placed on the document glass can be enlarged or reduced by any ratio between 400% and 25%. Images from originals fed through the document feeder can be enlarged or reduced by any ratio between 200% and 25%.• Use the arrow buttons on the Copy screen to select the required reduction or enlargement
percentage.
• Alternatively, select the ratio button and use the numeric keypad to type in the ratio required.
• Set the ratio window to 100% if you want your output image to be the same size as your original.• Other options are listed below including A3 to A4 reduction, Auto and More.
Proportional %
Selections made on this screen will reduce or enlarge the image by the same ratio in both directions so that the image gets bigger or smaller, but the proportions remain the same.
• Select the Variable % button and use the numeric keypad or the arrow buttons to enter the ratio required.
• Use the Presets buttons to select 100%, Auto % or commonly used ratios which can be set up by your Administrator. The selected proportional ratios in percentages are shown next to the button. When Auto % is selected, the device chooses the best ratio to reduce or enlarge the original onto the selected paper size. You must specify a paper tray before using this option.

Copy Options
Xerox WorkCentre 5735/5740/5745/5755/5765/5775/5790Copy
39
Independent X-Y%
This selection enables you to set different reduction or enlargement ratios for the X (width) and the Y (length) of the image. This will produce a distorted copy of your original.
• Select the Variable X-Y% buttons and use the numeric keypad or the arrow buttons to enter the Width - X% and Length - Y% ratios required.
• Use the Presets (X/Y%) buttons to select 100%/100%, Auto Independent X-Y% or commonly used ratios which can be set up by your Administrator. The selected X and Y ratios in percentages are shown next to the button. Use 100% / 100% to produce an image the same size as your original.Auto Independent X-Y% automatically fits the image of your original onto the paper you have selected. The reduction or enlargement may not be proportional, the device will distort the image so that it will fit onto the paper. You must specify a paper tray before using this option or select Auto Select on the Paper Supply screen.
Select Save to save your selections and exit.
Paper Supply
On the Paper Supply section of the Copy tab you have the option to select one of the paper trays, or Auto Select. Use More... to access all the options.• Auto Select automatically selects the appropriate paper size for each original based on the size of
the original and any directly selected magnification ratios.• Alternatively, you can select a paper tray that contains the size and type of paper you require. The
size and type of media loaded in each tray is displayed.
When the More... button is selected, the Paper Supply screen is displayed showing all the trays and the size, color and type of media loaded in each tray.• A user can select which tray to use from this list. The
chosen tray is highlighted in blue.• If the Auto Tray Switching feature has been enabled
by your System Administrator and the same size, color and type of media is loaded in more than one other tray, the device will automatically switch from the active tray to another if media in the active tray runs out.
Select Save to save your selections and exit.
Copy Options
Xerox WorkCentre 5735/5740/5745/5755/5765/5775/5790Copy
40
2 Sided Copy
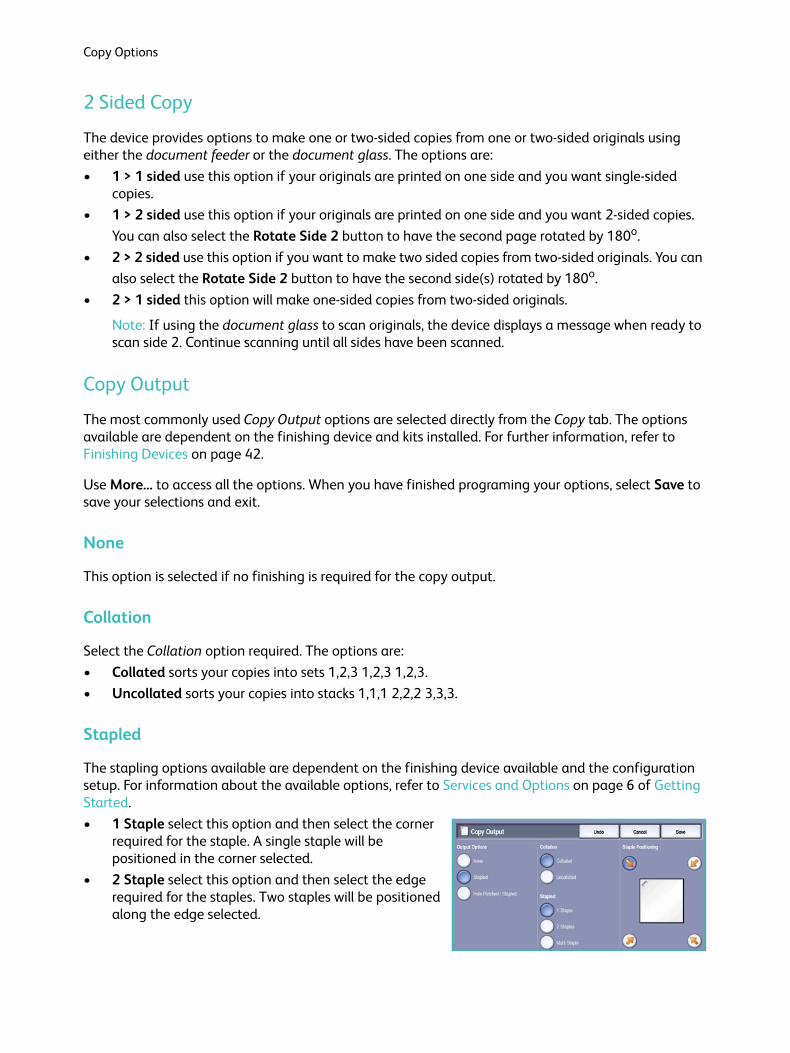
The device provides options to make one or two-sided copies from one or two-sided originals using either the document feeder or the document glass. The options are:• 1 > 1 sided use this option if your originals are printed on one side and you want single-sided
copies.• 1 > 2 sided use this option if your originals are printed on one side and you want 2-sided copies.
You can also select the Rotate Side 2 button to have the second page rotated by 180o.• 2 > 2 sided use this option if you want to make two sided copies from two-sided originals. You can
also select the Rotate Side 2 button to have the second side(s) rotated by 180o.• 2 > 1 sided this option will make one-sided copies from two-sided originals.
Note: If using the document glass to scan originals, the device displays a message when ready to scan side 2. Continue scanning until all sides have been scanned.
Copy Output
The most commonly used Copy Output options are selected directly from the Copy tab. The options available are dependent on the finishing device and kits installed. For further information, refer to Finishing Devices on page 42.
Use More... to access all the options. When you have finished programing your options, select Save to save your selections and exit.
None
This option is selected if no finishing is required for the copy output.
Collation
Select the Collation option required. The options are:• Collated sorts your copies into sets 1,2,3 1,2,3 1,2,3.• Uncollated sorts your copies into stacks 1,1,1 2,2,2 3,3,3.
Stapled
The stapling options available are dependent on the finishing device available and the configuration setup. For information about the available options, refer to Services and Options on page 6 of Getting Started. • 1 Staple select this option and then select the corner
required for the staple. A single staple will be positioned in the corner selected.
• 2 Staple select this option and then select the edge required for the staples. Two staples will be positioned along the edge selected.

Copy Options
Xerox WorkCentre 5735/5740/5745/5755/5765/5775/5790Copy
41
• Multi Staple when this option is selected, depending on the size of your media, either three or four staples will be positioned on the edge selected. For example:• 4 Staples = A4 LEF, A3, 8.5x11” LEF, 11x17”, 8x10” LEF.• 3 Staples = 8x10” SEF, 8.5x11” SEF, 8.5x5.5” LEF, A4 SEF, A5 LEF, 8.5x14” SEF, B5 SEF.
Note: SEF is Short Edge Feed and LEF is Long Edge Feed.
Note: For some staple selections the device will rotate the image. If you are unable to staple, ensure that Image Rotation is On in Tools. Refer to Auto Image Rotation on page 264 of Administration and Accounting.
Hole Punched/Stapled
The Hole Punched/Stapled options available are dependent on the finishing device and Hole Punch Kit available. For information about the available options, refer to Services and Options on page 6 of Getting Started.
This option is selected if you require your output to be hole punched or hole punched and stapled. Each sheet will be punched individually so there is no limit to the number of pages in the set. Hole punching can only be selected for A4 LEF and A3 (8.5x11” LEF and 11x17”) paper. Select the Collation option required prior to selecting the required Hole Punched/Stapled option. The options are:• Hole Punched Only select this option to hole punch
your sets or stacks on the left edge.• 1 Staple select this option to hole punch your sets and
add a single staple. Select the location required for the staple.
• 2 Staples select this option to hole punch your sets or stacks and add two staples. Select the edge required for the staples.
Booklet
If your device is fitted with the High Volume Finisher with Booklet Maker, you can use the Booklet feature to automatically produce folded and stapled booklets. The following Booklet Maker specifications apply:• Paper Sizes A3, 11x17”, A4, 8.5x11”, 8.5x13” and 8.5x14”.• Paper weight 60 to 216 gsm (16 to 57 lb).• All media must be Short Edge Feed (SEF).• Booklet thickness:
• For Folded and Stapled booklets a maximum of 15 sheets of 80 gsm (20 lb) or equivalent thickness. For example you can have 13 sheets of 80 gsm (20 lb) and a cover sheet of 160 gsm (43 lb).
• For Folded Only booklets a maximum of 5 sheets of 80 gsm (20 lb) or equivalent thickness. For example you can have 3 sheets of 80 gsm (20 lb) and a cover sheet of 200 gsm (53 lb).

Copy Options
Xerox WorkCentre 5735/5740/5745/5755/5765/5775/5790Copy
42
Using the Booklet Creation - On option the device will scan your originals and automatically reduce and arrange the images in the correct sequence on your selected media, so that a booklet is created when the copy set is folded in half. A cover can be inserted onto the booklet automatically, refer to Covers on page 50.
The options are:
Booklet Creation• Off select this option if you want your output layout to
match your originals. For example, if your originals are already in a booklet layout.
• On select this option if you want the device to automatically reduce and arrange the images to create a booklet layout.
Finishing• Folded & Stapled will staple and fold the output along the center margin to produce booklets.• Fold Only will fold the output along the center margin to produce booklets.• None select this option if you do not want the device to fold and staple your output.
Tri-Folded
If the optional Tri-fold Module is installed on your device, a single sheet of A4 or 8.5x11” media in a weight range of 60 to 120 gsm (16 to 32 lb) can be folded in a C Fold or Z Fold. Originals must always be loaded Short Edge Feed (SEF).
• C Fold the page will be folded as shown. Select Collated for sets or Uncollated for stacks.
• Z Fold the page will be folded as shown. Select Collated for sets or Uncollated for stacks.
Finishing Devices
Finishing Device Description
Basic Office Finisher • Holds up to 250 sheets of paper in the Top Tray, and up to 1000 sheets in the Stacker Tray.
• Paper weight 60 to 216 gsm (16 to 57 lb).• The Stacker can collate, stack and staple your output, depending on the
features selected. It staples between 2 and 30 sheets of 80 gsm (20 lb) paper, less if using heavyweight paper or tabs.
• The staple cartridge for the Basic Office Finisher contains 3000 staples.
Note: Double Staple is not available with the Basic Office Finisher.

Copy Options
Xerox WorkCentre 5735/5740/5745/5755/5765/5775/5790Copy
43
Advanced Office Finisher • Holds up to 250 sheets of paper in the Top Tray, and up to 1500 sheets in the Stacker Tray.
• Paper weight 60 to 216 gsm (16 to 57 lb).• The Advanced Office Finisher can collate, stack, staple and hole punch
(if available) your output depending on the features selected. It staples between 2 and 50 sheets of 80 gsm (20 lb) paper, less if using heavyweight paper or tabs.
• Use the Pause button on the top of the finisher to pause printing and unload the output tray. Press the button again to resume.
• The finisher stapler has 1 staple cartridge containing 5000 staples.• This finisher can be fitted with the optional 2, 3 or 4 Hole-Punch kit.
High Volume Finisher • Holds up to 250 sheets of paper in the Top Tray, and up to 3000 sheets in the Stacker Tray.
• Paper weight 60 to 216 gsm (16 to 57 lb).• The High Volume Finisher can collate, stack, staple and hole punch (if
available) your output depending on the features selected. It staples between 2 and 100 sheets of 80 gsm (20 lb) paper, less if using heavyweight paper or tabs.
• Use the Pause button on the top of the finisher to pause printing and unload the output tray. Press the button again to resume.
• This finisher can be fitted with the optional 2, 3 or 4 Hole-Punch kit and the Tray 6 (Post Process Inserter) kit.
• The High Volume Finisher is also available with a Booklet Maker which enables booklets to be folded and stapled. Folded sheets and booklets are delivered to the booklet tray which can hold between 10 and 30 booklets, depending upon the number of pages. If the flap on the right of the tray is folded down, an unlimited number of booklets can be collected in a suitable container.
• If you have a High Volume Finisher with Booklet Maker, a Tri-fold module can also be fitted. This enables your device to produce tri-folded output. With the Tri-fold module fitted, the capacity of the finisher stacker tray is reduced to 2000 sheets and a maximum paper weight of 120 gsm (32lb).
Finishing Device Description

Image Quality
Xerox WorkCentre 5735/5740/5745/5755/5765/5775/5790Copy
44
Image Quality
Your device can enhance the quality of your output using the Image Quality features. This section describes the options available and when they would usually be used. This includes features such as setting the device to suit the type of input and controlling the lightness, darkness, sharpness and contrast of the image.
Original Type
This feature provides a convenient way to enhance the copy quality of your output based on the type of original images you are copying and how they were produced.• Photo and Text is recommended for text and line art
originals.• Text produces sharper edges and is recommended for
text and line art.• Photo is used specifically for originals containing
photos or continuous tones without any text or line art. Produces the best quality for photos but reduced quality text and line art.
• Halftone Photo is used if your original is from a magazine or newspaper that contains photographs or text.
Select Save to save your selections and exit.
Image Options
Image Options provides options for changing the appearance of the copy output. The options are:
Lighten/Darken
This provides manual control to adjust the lightness or darkness of the scanned images.• Move the indicator down to darken the scanned
image, for light originals such as pencil images.• Move the indicator up to lighten the scanned image,
for dark originals such as halftones or originals with colored backgrounds.
Sharpness
This provides manual control to adjust the sharpness of the scanned images.• Move the indicator up to sharpen the scanned image.• Move the indicator down to soften the scanned image.

Image Quality
Xerox WorkCentre 5735/5740/5745/5755/5765/5775/5790Copy
45
Screen
This option is available with Photo and Text, Text and Halftone Photo Original Type options. The Screen options are as follows:• Auto reduces the risk of blotches or small areas that have a different texture or pattern
appearance than the surrounding area.• Special enhances continuous tone photographs or high frequency halftone images. It is used to
create smoother, less grainy output for continuous tone and halftone images.
Select Save to save your selections and exit.
Image Enhancement
Image Enhancement provides options for improving the quality of the output, by reducing the background or adjusting the contrast. The options are:
Background Suppression
This enhances originals that have colored backgrounds, by reducing or eliminating the background on the output copy. This option is useful when your original is on colored paper.• Select Auto Suppression to automatically suppress
unwanted background.• Select Off to turn the Background Suppression feature
off, particularly when: • The Darken adjustment does not produce a satisfactory output from light originals.• The original has a gray or colored border, such as a certificate.• You want to bring out fine detail that was lost due to a dark edge when using bound originals.
Contrast
This feature controls the image density on the output and compensates for an original that has too much or too little contrast on the image.• Move the indicator towards high to reproduce more vivid blacks and whites for sharper text and
lines but less detail in pictures.• Move the indicator towards low to reproduce more detail in light and dark areas of the original.
Select Save to save your selections and exit.

Layout Adjustment
Xerox WorkCentre 5735/5740/5745/5755/5765/5775/5790Copy
46
Layout Adjustment
Using the Layout Adjustment features you can change the appearance of your output image. This includes shifting the image, producing a mirror image, deleting an area from any or all of the edges of the original and copying from bound originals.
Original Size
Original Size allows you to specify automatic size detection of the originals, mixed size originals, or the specific size of the image to be scanned. The options are:• Auto Detect is the default setting and enables
automatic size sensing. The size detected is matched to a standard size paper.
• Preset Scan Areas allows you to define the size of your original from a list of preset, standard original sizes. You can view the list by using the scroll bar.
• Custom Scan Areas is used to enter a specific area for scanning. Measure the area to be scanned on the original and enter the X and Y axis measurements into the fields provided. Only the area specified is scanned.
• Mixed Size Originals allows you scan documents containing different size pages. The pages must be the same width, like A4 LEF and A3 SEF (8.5x11” LEF and 11x17” SEF), other combinations are shown on the screen. The device detects the size of the documents and can produce the following output:• If Auto Reduce/Enlarge and a specific Paper Supply is selected, all the images are reduced
or enlarged and copied onto the same size paper.• If Auto Paper supply is selected, the images are copied size for size and a mix of paper sizes
will be output.
Select Save to save your selections and exit.
Book Copying
CAUTION: Do Not close the document feeder when scanning bound originals.
This feature enables you to specify which page or pages of a book are to be scanned. The book original is placed face down on the document glass with the spine of the book lined up with the marker at the centre of the rear edge of the document glass. Align the top of the bound original against the rear edge of the document glass.

Layout Adjustment
Xerox WorkCentre 5735/5740/5745/5755/5765/5775/5790Copy
47
The device will identify the size of the original during scanning. If the pages have a black or dark colored border the device will assume that the pages are smaller than they really are. To overcome this use the Custom Scan Areas feature in Original Size to enter the exact size of the page. Refer to Original Size on page 46 for more information.• Both Pages use to scan both pages, the left page of
the book first will be scanned first. Use the arrow buttons to specify an amount from 0 to 50 mm (0 to 2”) to be deleted from the center of the book in order to delete unwanted marks reproduced from the gutter of the book.
• Left then Right or Right then Left is used to scan both pages, but the pages will be scanned in the order specified. These options replace the Both Pages option and will not be displayed unless enabled in Tools. Refer to Display Options on page 253 of Administration and Accounting.
• Left Page Only use to scan the left page only. Use the arrow buttons to specify an amount from 0 to 25mm (0 to 1”) to be deleted from the right side of the page in order to delete unwanted marks reproduced from the gutter of the book.
• Right Page Only use to scan the right page only. Use the arrow buttons to specify an amount from 0 to 25mm (0 to 1”) to be deleted from the left side of the page in order to delete unwanted marks reproduced from the gutter of the book.
Select Save to save your selections and exit.
Image Shift
Image Shift allows you to move the position of the image on the output page. The options are:• Auto Center automatically centers the scanned image on the output paper. To work effectively,
the original should be smaller than the selected output media or alternatively, the image should be reduced.
• Margin Shift moves the image up / down or left / right on the page to give a bigger or smaller margins. Enter the shift required by selecting a field or use the arrow buttons. The amount of shift is in 1 mm (0.1”) increments up to 50 mm (2.0”).When copying 2-sided there are two options:• Adjust the margin of side two independently of
side one.• Use Mirror Side 1 for side two to mirror the image shift set for side one if a binding margin is
required.
Select Save to save your selections and exit.
Layout Adjustment
Xerox WorkCentre 5735/5740/5745/5755/5765/5775/5790Copy
48
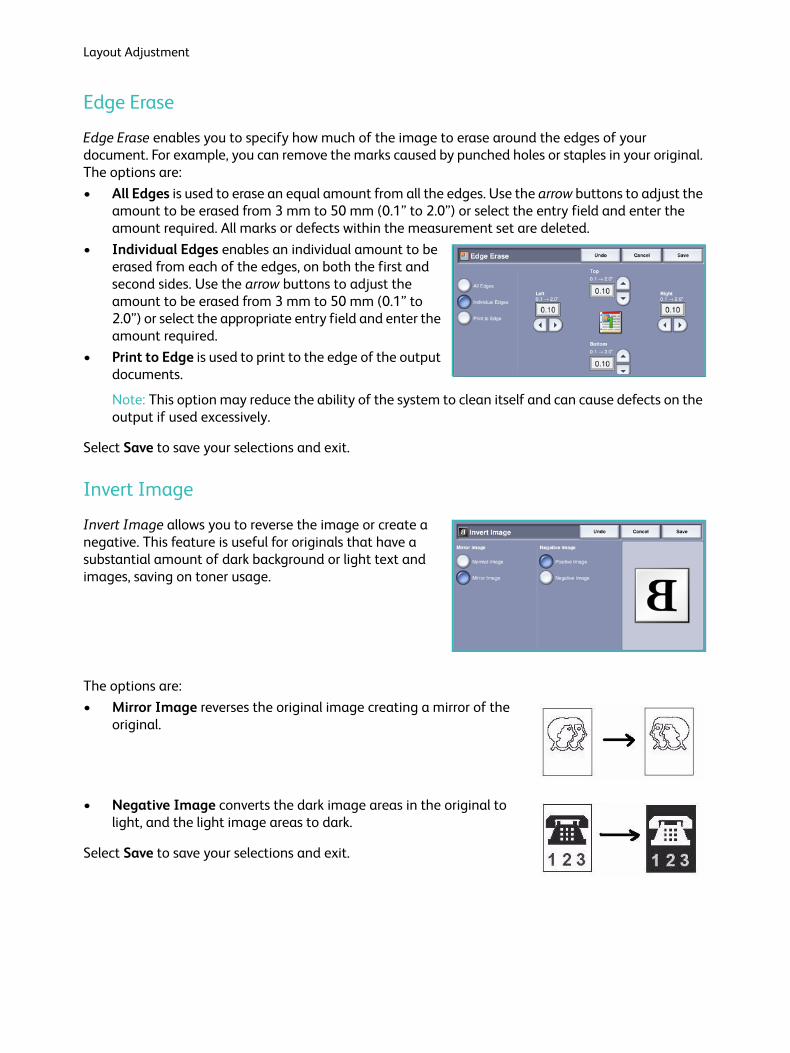
Edge Erase
Edge Erase enables you to specify how much of the image to erase around the edges of your document. For example, you can remove the marks caused by punched holes or staples in your original. The options are:• All Edges is used to erase an equal amount from all the edges. Use the arrow buttons to adjust the
amount to be erased from 3 mm to 50 mm (0.1” to 2.0”) or select the entry field and enter the amount required. All marks or defects within the measurement set are deleted.
• Individual Edges enables an individual amount to be erased from each of the edges, on both the first and second sides. Use the arrow buttons to adjust the amount to be erased from 3 mm to 50 mm (0.1” to 2.0”) or select the appropriate entry field and enter the amount required.
• Print to Edge is used to print to the edge of the output documents.
Note: This option may reduce the ability of the system to clean itself and can cause defects on the output if used excessively.
Select Save to save your selections and exit.
Invert Image
Invert Image allows you to reverse the image or create a negative. This feature is useful for originals that have a substantial amount of dark background or light text and images, saving on toner usage.
The options are:• Mirror Image reverses the original image creating a mirror of the
original.
• Negative Image converts the dark image areas in the original to light, and the light image areas to dark.
Select Save to save your selections and exit.

Output Format
Xerox WorkCentre 5735/5740/5745/5755/5765/5775/5790Copy
49
Output Format
The output options allow you to manipulate the copied images and enhance the appearance and style of your copy jobs. For example, you can add covers or annotations to your copies, create booklets, combine several images onto one page and interleave transparencies.
Booklet Creation
Booklet Creation enables the production of booklets from 1 or 2 sided originals. The device will scan your originals and automatically reduce and arrange the images in the correct sequence on your selected copy paper, so that a booklet is created when the copy set is folded in half.
A cover can be inserted onto the booklet automatically. Refer to Covers on page 50 for more information.
If your device is fitted with the High Volume Finisher with Booklet Maker you can use the Booklet Creation feature to automatically produce folded and stapled booklets. The following Booklet Maker specifications apply:• Paper Sizes A3, 11x17”, A4, 8.5x11”, 8.5x13” and
8.5x14”.• Paper weight 60 to 216 gsm (16 to 57 lb).• All media must be Short Edge Feed (SEF).• Booklet thickness:
• For Folded and Stapled booklets a maximum of 15 sheets of 80 gsm (20 lb) or equivalent thickness. For example you can have 13 sheets of 80 gsm (20 lb) and a cover sheet of 160 gsm (43 lb).
• For Folded Only booklets a maximum of 5 sheets of 80 gsm (20 lb) or equivalent thickness. For example you can have 3 sheets of 80 gsm (20 lb) and a cover sheet of 200 gsm (53 lb).
To create a booklet:
1. On the Copy tab, select the Paper Supply required for the job. If stapling and/or folding is required a Short Edge Feed (SEF) paper supply must be selected.
Note: Booklet Creation is not available if Auto Paper is selected.

Output Format
Xerox WorkCentre 5735/5740/5745/5755/5765/5775/5790Copy
50
2. Select the On button on the Booklet Creation screen.3. If the High Volume Finisher with Booklet Maker is
installed, select the finishing option required:• Folded & Stapled will staple and fold the output
along the center margin to produce booklets.• Fold Only will fold the output along the center
margin to produce booklets.4. Select the Original Input, either 1 Sided Originals or
2 Sided Originals depending on the originals being scanned.5. Select the Reading Order required for the finished output, either Left to Right or Right to Left.
Note: This option will not be displayed if it has not been enabled in Tools. Refer to Set Copy Defaults on page 255 of Administration and Accounting.
6. Select Save to confirm your selections.7. Load your originals into the document feeder and select Start to run the job.
Covers
Covers enables blank or printed pages to be added to the front, back or front and back of your set. This option is also used to add a cover to a booklet. The covers can be a different media to the rest of your job.
Note: Covers cannot be used with Auto Paper Supply, a paper supply must be specified.
Use the following instructions to program Covers:
1. On the Copy tab, select the paper you want to use for the main body of the job. 2. Load the media to be used for the covers into another paper tray, ensuring that it is in the same
size and orientation as the paper you are using for the main body of your job.
Note: For further information about loading media, refer to Paper and Media on page 211.
Update the Paper Settings screen and Confirm your selections.3. Select Covers from the Output Format tab.4. Select the Covers Option required:
• No Covers• Front Cover Only adds a blank or printed cover to
the front of the document.• Back Cover Only adds a blank or printed cover to
the back of the document.• Front & Back Covers adds a blank or printed cover
to the front and back of the document. The printing and paper supply options can be programmed individually for each cover.
• Booklet Cover used to add a cover to a booklet if using the Booklet Creation option.5. Select the Printing Options required for the selected covers:
• Blank provides a blank sheet as the cover.• 1 Sided prints an image on one side of the cover.

Output Format
Xerox WorkCentre 5735/5740/5745/5755/5765/5775/5790Copy
51
• 2 Sided prints an image on both sides of the cover.• 2 Sided, Rotate Side 2 prints an image on both sides of the cover. The image on the second
side is rotated to change the read orientation.6. Select the Paper Supply required for the selected covers.7. Select Save to confirm your selections.8. Load your originals into the document feeder and select Start to run the job.
Inserts
Inserts enables blank pages on a different media to be inserted into your document, or for specified pages to be printed on a different media. Up to two sources of media can be used for the inserts. If inserting blank pages, a blank sheet must be inserted in the appropriate place in your original document prior to scanning.
If you have a High Volume Finisher and the optional Tray 6 (Inserter) installed, you can feed the inserts from this tray. Media loaded into Tray 6 (Inserter) is not part of the printing process, therefore blank pages do not need to be added to your original document. When entering the insert page numbers, the insert sheets are counted as a page.
Note: Inserts cannot be used with Auto Paper Supply, a paper supply must be specified.
Use the following instructions to program Inserts.
1. On the Copy tab, select the paper you want to use for the main body of the job. 2. Load the media to be used for the inserts into another paper tray, ensuring that it is in the same
orientation as the paper you are using for the main body of your job.
Note: For further information about loading media, refer to Paper and Media on page 211.
Update the Paper Settings screen and Confirm your selections.3. If blank inserts are required, add blank sheets to your set of originals where the inserts are to be
placed.4. Select Inserts from the Output Format tab.5. Select On to enable inserts.6. Enter the page number of the insert. The page
numbers are the physical page numbers and not the page numbers which may already be printed on the document.For copying 2-sided to 2-sided, each page of your document has 2 page numbers, so you need to count each side of your document.If using the optional Tray 6 (Inserter) each insert counts as 1 page, and the page numbers entered for remaining inserts must take this into account. Use the Tray 6 Supply option if using the inserter to feed the inserts.Use the arrow buttons or select the entry box and use the numeric keypad to enter the page number.

Output Format
Xerox WorkCentre 5735/5740/5745/5755/5765/5775/5790Copy
52
7. Select the Paper Supply required for the insert using the Paper Supply 1 or Paper Supply 2 options.If a tab insert is required, ensure the paper tray containing the tabs is selected. For instructions on loading tabs, select the Tab Loading Instructions option. Ensure the correct tab sequence and number of tabs are loaded for the job. If printing on the tabs, use the Tab Shift option to enter the amount of shift required to ensure the tab image prints correctly on the tab.
8. Select Add Insert to add the insert to the list.A summary of the inserts using each paper supply is displayed.To delete the last insert entry, use the Delete Last Insert option.
9. Continue programing the inserts required.10. Select Save to confirm the selections.11. Load your originals into the document feeder and select Start to run the job.
Annotations
The Annotations feature enables you to automatically add a comment, page number, today’s date or Bates Stamp to your copy output. You can select any or all of these annotation options and specify where on the copy output they should appear. You can also select the appearance of the annotations such as the font size.
The options are:• Page Numbers to automatically print a page number
in a specified position on the page. Page numbers are automatically increased by one. For 2 sided copy output the page number is printed on both sides and counts as two pages.
• Comment to add up to 50 alphanumeric characters in a specified position on the page. An existing comment can be amended, or a new comment can be created and edited.
• Date to add today’s date in a specified format and position on the page. The date printed is the date set on your device.
• Bates Stamp to add a selected Bates Stamp in a specified position on the page. Bates Stamping is used primarily in the legal and business fields and consists of a set prefix (such as a case number or client reference) together with a page number applied to a document as it is being processed. The prefix can contain up to 8 alphanumeric characters. You can add a new prefix or choose an existing one from the list provided.
Output Format
Xerox WorkCentre 5735/5740/5745/5755/5765/5775/5790Copy
53
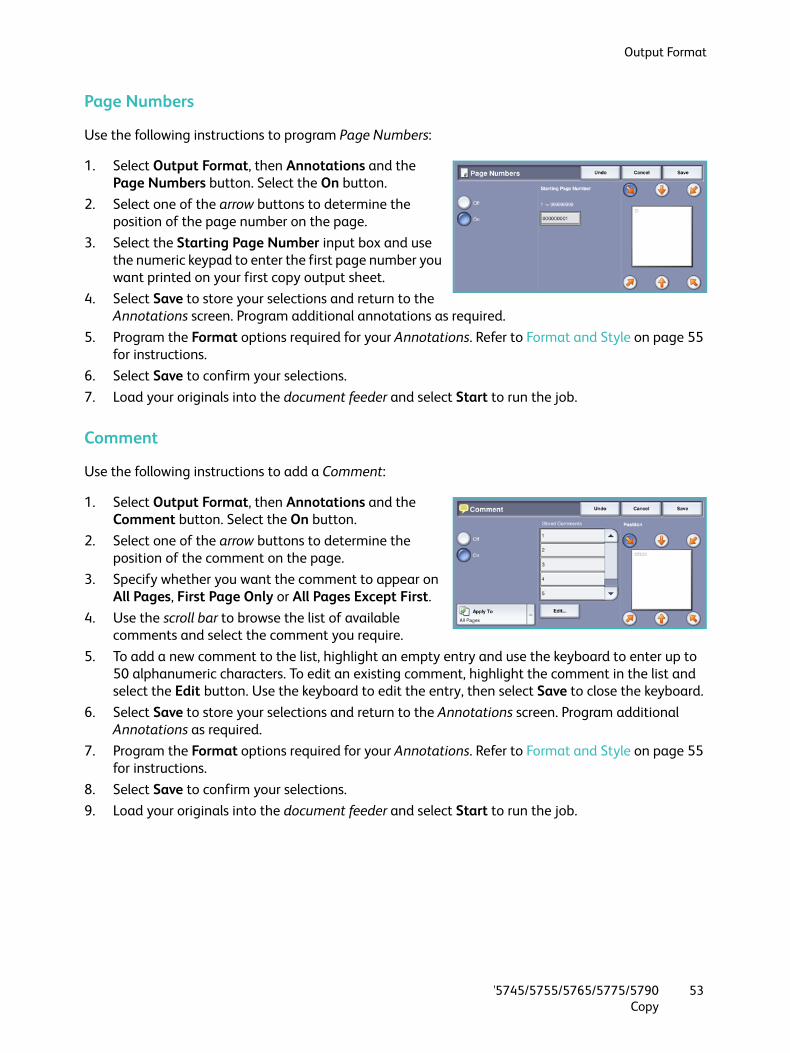
Page Numbers
Use the following instructions to program Page Numbers:
1. Select Output Format, then Annotations and the Page Numbers button. Select the On button.
2. Select one of the arrow buttons to determine the position of the page number on the page.
3. Select the Starting Page Number input box and use the numeric keypad to enter the first page number you want printed on your first copy output sheet.
4. Select Save to store your selections and return to the Annotations screen. Program additional annotations as required.
5. Program the Format options required for your Annotations. Refer to Format and Style on page 55 for instructions.
6. Select Save to confirm your selections.7. Load your originals into the document feeder and select Start to run the job.
Comment
Use the following instructions to add a Comment:
1. Select Output Format, then Annotations and the Comment button. Select the On button.
2. Select one of the arrow buttons to determine the position of the comment on the page.
3. Specify whether you want the comment to appear on All Pages, First Page Only or All Pages Except First.
4. Use the scroll bar to browse the list of available comments and select the comment you require.
5. To add a new comment to the list, highlight an empty entry and use the keyboard to enter up to 50 alphanumeric characters. To edit an existing comment, highlight the comment in the list and select the Edit button. Use the keyboard to edit the entry, then select Save to close the keyboard.
6. Select Save to store your selections and return to the Annotations screen. Program additional Annotations as required.
7. Program the Format options required for your Annotations. Refer to Format and Style on page 55 for instructions.
8. Select Save to confirm your selections.9. Load your originals into the document feeder and select Start to run the job.

Output Format
Xerox WorkCentre 5735/5740/5745/5755/5765/5775/5790Copy
54
Date
Use the following instructions to add the Date:
1. Select Output Format, then Annotations and the Date button. Select the On button.
2. Select one of the arrow buttons to determine the position of the date on the page.
3. Specify the date format by selecting the DD/MM/YYYY, the MM/DD/YYYY or the YYYY/MM/DD button.
4. Specify whether you want the date to appear on All Pages, First Page Only or All Pages Except First
5. Select Save to store your selections and return to the Annotations screen. Program additional Annotations as required.
6. Program the Format options required for your Annotations. Refer to Format and Style on page 55 for instructions.
7. Select Save to confirm your selections.8. Load your originals into the document feeder and select Start to run the job.
Bates Stamp
Use the following instructions to program a Bates Stamp:
1. Select Output Format, then Annotations and the Bates Stamp button. Select the On button.
2. Select one of the arrow buttons to determine the position of the Bates Stamp on the page.
3. Select the Starting Page Number box and use the numeric keypad to enter a starting page number. Leading zeros may be entered to set the starting page number length, for example 000000001.
4. Select the Prefix option and use the keyboard to enter a prefix. Up to eight alphanumeric characters can be entered. Select Save to close the keyboard.
5. Select Save to store your selections and return to the Annotations screen. Program additional Annotations as required.
6. Program the Format options required for your Annotations. Refer to Format and Style on page 55 for instructions.
7. Select Save to confirm your selections.8. Load your originals into the document feeder and select Start to run the job.

Output Format
Xerox WorkCentre 5735/5740/5745/5755/5765/5775/5790Copy
55
Format and Style
To specify the orientation, style and printing requirements for the selected annotations, select the Format option:• Orientation use to specify if the annotation is printed
Portrait or Landscape.• Font Size use the -/+ buttons to select a font size for
the annotation, or select the entry box and enter the size required using the numeric keypad.
• Appearance is used to specify if the annotated text is Opaque or Transparent. Opaque text is placed on top of the copy output and no image is visible under the annotated text. Transparent text allows the copy image to remain visible under the annotated text.
• Side 2 options are used to specify the printing requirements if the output is 2-sided.• Same as Side 1 settings will apply to both Side 1 and Side 2 of your output.• Mirror Side 1 Flip on Long Edge output will open from right to left like a book, with the
binding edge on the left. The position of the annotation on Side 2 will mirror Side 1. For example, if a page number is positioned in the bottom left corner of Side 1, it will appear in the bottom right corner of Side 2.
• Mirror Side 1 Flip on Short Edge output will open from bottom to top like a calendar, with the binding edge at the top. The position of the annotation on Side 2 will mirror Side 1. For example, if a page number is positioned in the bottom left corner of Side 1, it will appear in the top left corner of Side 2.
Select Save to save your selections and exit.
Transparency Separators
Use Transparency Separators to interleave each printed transparency with a blank or printed sheet of paper from a specified paper tray.
1. Select the Transparency Separators button on the Output Format tab.2. Select the Transparency Separators option required:
• Off• Blank Separators adds a blank sheet to each
transparency.• Imaged Separators adds a copy of each
transparency.3. Select the paper tray containing the paper for the
separators. The selected paper should match the size and orientation of the transparencies. If necessary, select More... to access all the paper tray options.
4. Select Save to confirm the selections.5. Load your originals into the document feeder and select Start to run the job.
For instructions on loading transparencies into the paper tray, refer to Media Types on page 225 of Paper and Media.

Output Format
Xerox WorkCentre 5735/5740/5745/5755/5765/5775/5790Copy
56
Page Layout
The Page Layout feature is ideal for handouts, story boards or for archival purposes. It allows up to 36 images to fit onto one sheet of paper. Your device will reduce or enlarge the images as needed, to display them either in landscape or portrait orientation on one page, based on the paper supply selected. The options are:
Note: Some features cannot be used with the Page Layout feature and will be grayed out on the touch screen.
The examples shown here are typical outputs that can be produced when using the Page Layout feature.
Note: The practical limit is for 16 images on A4 (8.5x11”) paper.
1. Select the tray that contains the paper you want to use.
Note: Page Layout is not available if Auto Paper is selected.
2. Select the Page Layout button on the Output Format tab.
3. Select the Pages per Side to enable the Page Layout option.
4. Select the Orientation of Images, Upright for portrait images or Sideways for landscape images.
5. Enter the number of Rows and Columns required using the arrow buttons, between 1 and 6.6. Select Save to confirm the selections.7. Load your originals into the document feeder and select Start to run the job.
4 Originals using 2 rows and 2 columns
6 Originals using 3 rows and 2 columns
2 Originals using 2 rows and 1 column

Job Assembly
Xerox WorkCentre 5735/5740/5745/5755/5765/5775/5790Copy
57
Job Assembly
Use the productivity features available on the Job Assembly tab to program a job that requires individual selections for specific pages or sections, produce a Sample Job before printing the whole job or for storing and retrieving frequently run job settings.
Build Job
Use this feature to build a job that requires different settings for each page, or a segment of pages.
You can select the appropriate settings to be applied to individual pages or segments of a completed job. First split the originals into sections for individual programing.
1. Select Build Job on the Job Assembly tab.2. Switch on Build Job by selecting the On button and
select Save.3. Select the features required for the first segment of
the job.If using Build Job for a job with tabs, ensure the tabs are loaded correctly and select the tray containing the tabs. For loading instructions, select the Tab Loading Instructions... option.
Note: If tab media is selected, the image will be shifted 13mm (0.5”) to the right automatically if the tab original is A4 or 8.5x11” size.
4. Load the first segment originals and press Start.5. Remove the first segment originals after they have been scanned. The Build Job screen displays
the first segment in the list. The following options can be applied to any segment:• Sample Last Segment produces a proof print of the last segment scanned. The proof is
delivered to the output module. If you are satisfied with the proof you can continue programing the Build Job.
• Delete Last Segment deletes the last segment scanned. You can continue programing the Build Job.
• Delete All Segments deletes the current Build Job and returns you to the main Build Job screen.
6. Select the options required for the second segment.
Some pages with text and some with photos
Some pages 2 sided and some 1 sided
Various sized originals
More than 100 pages

Job Assembly
Xerox WorkCentre 5735/5740/5745/5755/5765/5775/5790Copy
58
7. Load the second segment originals and press Start.8. Repeat these steps until all segments of your job have been programmed and scanned.9. After the last segment has been scanned, select End Build Job to indicate you have finished
scanning and the job will be processed and printed.
Sample Job
When copying a large number of sets, use the Sample Job feature to review a proof copy to ensure that all the print settings are correct before printing the remaining sets.
1. Select the Sample Job button on the Job Assembly tab.2. Select the On button and the Save button.3. Load the originals in the document feeder and
program the job requirements. Enter the total quantity required and press the Start button.One copy set of the job, the Sample Job, is printed. The whole job is held in the Job List.
4. Access your job by selecting the Job Status button. The job has the status Held: Sample Made.
5. Select the job in the list.If the Sample Job is acceptable, select Release. The programmed number of sets will be produced.If the Sample Job is unacceptable, select Delete and Delete Job to confirm. Your job will be deleted from the list.

Job Assembly
Xerox WorkCentre 5735/5740/5745/5755/5765/5775/5790Copy
59
Save Job for Reprint
The Save Job For Reprint feature allows you to scan hard-copy documents as an electronic file (or Job) and place it into a folder located on the device. The job settings, such as 2-sided and image quality selections, are also stored with the image.
Once stored you can select and output that job as many times as you need. Many of the job settings that were applied when the document was originally stored are also recalled and displayed to the user when the job is selected. These settings can be modified and will be applied to the output job.
To store a job for reprinting:
1. Program the required job features.2. Select the Save Job For Reprint button on the Job
Assembly tab.3. Select the Save Job for Reprint option required:
• Copy & Save is used to store the job and print a copy of the job.
• Save Only stores the job without printing.4. Select a folder location to store the job.5. Select New Job Name and enter a name for the job using the keyboard.
Select Save to save the job name and return to the previous screen.6. Load your originals into the document feeder and select Start to run the job.
The job is scanned and saved with the name entered, in the folder selected. If Copy & Save was selected, a copy of the job is also printed.
For information about File Folder Management, refer to Managing Folders on page 186 of Save and Reprint Jobs.
Save Current Settings
Up to ten combinations of commonly used feature selections can be retained in the device memory as Saved Settings. The device stores only the programing of the job, NOT the image. Each time Saved Settings are retrieved and used, the image must be scanned. To save the current settings:
1. Program the required job features.2. Select the Save Current Settings button on the Job
Assembly tab.3. Use the arrow buttons to enter a number for the saved
settings.If a number has already been used to store settings previously a confirmation message is displayed. Select Overwrite to replace the stored settings or Cancel to cancel the Save Current Settings operation.
4. Select Save Settings.The settings are stored and can be accessed using the Retrieve Saved Settings feature.

Job Assembly
Xerox WorkCentre 5735/5740/5745/5755/5765/5775/5790Copy
60
Retrieve Saved Settings
This feature enables you to Retrieve Saved Settings from the device memory and apply them to the current job. Changes can be made to the retrieved settings, but these will not be stored with the saved settings. To retrieve saved settings:
1. Select the Retrieve Saved Settings button on the Job Assembly tab.
2. Use the arrow buttons to enter the number for the saved settings.
3. Select the Load Settings button, to retrieve the programing information.The recalled programing features become active.
4. You can modify the features further. These additional modifications are not saved with the saved settings. Modify the selections as required.
5. Load your originals and press the Start button to run the job.

Fax
Xerox WorkCentre 5735/5740/5745/5755/5765/5775/5790Fax
66
Fax
If Authentication or Accounting has been enabled on your device you may have to enter log in details to access the features. Refer to Log In / Out on page 25 of Getting Started.
1. To select the Fax service, press the Services Home button.
2. Select the Fax option.When a service is selected on the device, additional options and features are displayed. Most feature screens include the following buttons to confirm or cancel your choices.• Undo resets the current screen to the values that
were displayed when the screen was opened.• Cancel resets the screen and returns to the previous screen.• Save saves the selections made and returns to the previous screen.• Close closes the screen and returns to the previous screen.If an option is not required, use the Off option to disable a feature.
Sending a Fax
1. Load your documents face up in the document feeder input tray. Adjust the guide to touch the documents.Or...........Lift up the document feeder. Place the document face down onto the document glass and register it to the arrow at the top right rear corner. Close the document feeder.
2. Press the Clear All (AC) button once to cancel any previous screen programing selections.3. Press the Services Home button and select the Fax
option. The Fax features are displayed.4. Enter the recipient’s fax number by:
• Keypad Dial - select the Enter Number area on the touch screen and enter the number using the numeric keypad.
• Manual Dial - if a telephone handset is attached to the device, select the Manual Dial key and dial the number using the handset or the numeric keypad.
• Speed Dial - select the Enter Number area and enter the 3 digit speed dial number, then select the Speed Dial option.
• Address Book - select the Address Book button to access the fax address book. Select an entry from the Address Book to add to the Recipient list. Continue adding recipients as required and select Close to return to the previous screen.
Note: To use the Batch Send feature to send multiple faxes to the same destination in one transmission, refer to Batch Send on page 69 for instructions.

Fax
Xerox WorkCentre 5735/5740/5745/5755/5765/5775/5790Fax
67
5. If required, select Add to add the number entered to the Recipient list. Enter additional numbers as required. The fax will be sent to all the numbers in the Recipient list.
6. Select the required features for your fax job using the touch screen:
7. Press Start to scan the originals and process the fax job. Remove the originals from the document feeder or document glass when scanning has completed.
Note: The Fax job enters the job list ready for sending.
8. Select Job Status to view the job list and check the status of your job.
Dialing Options
The dialing options enable you to enter the destination fax number or numbers. Select the appropriate dialing option for your fax job.
Manual Dialing
1. Select the fax number field and enter the fax number required using the numeric keypad.
2. If special characters are required, use the Dialing Characters option to enter the number plus additional dialing characters. Refer to Dialing Characters on page 68 for further information.
3. Select Add to add the number to the Recipient list. Enter additional numbers as required.
4. To amend the Recipient list:• Select the entry in the list. If necessary, use the scroll bar to access all the entries.• Use Edit to amend the entry. Use Remove to delete the entry from the list, or Remove All to
delete all entries.The fax will be sent to all the numbers in the Recipient list.
Dialing Characters are alphanumeric characters which have a specific fax function and can be entered as part of the fax number.
Cover Letter allows you to send a fax with a covering letter.
2-Sided Scanning is used to select whether your originals are 1-sided or 2-sided.
Original Type is used to define the original document as text, text and photo, photo or halftone photo.
Resolution can be used to optimize the resolution settings.

Fax
Xerox WorkCentre 5735/5740/5745/5755/5765/5775/5790Fax
68
Speed Dialing
If numbers have been entered into the Address Book they can be accessed via a Speed Dial number. Each entry in the Address Book is allocated a 3-digit Speed Dial number, shown next to the entry. For
information about the Address Book, refer to Address Book on page 71.
1. Select the Speed Dial option.2. Select the fax number entry field and enter the 3-digit
speed dial number.3. Select Add to add the number to the Recipient list.4. Enter additional numbers as required.
Speed Dialing can be combined with Manual Dialing to build the Recipient list.
Dialing Characters
Additional dialing characters can be accessed by selecting the Dialing Characters button. Use this option to enter the fax number if special characters are required. To enter a fax number using the dialing characters:
1. Select the Dialing Characters button.2. Use the numeric keypad to enter the number plus
additional dialing characters.The following characters are available:• Dial Pause [,] use to pause between numbers. For
additional pause time, add multiple pauses. If you are using charge code numbers, enter a pause after the fax number but before the charge code number.
• Pulse to Tone [:] use to switch between pulse and tone dialing.• Mask Data [/] use to protect confidential information. For example, if a special charge code
or credit card number is required for a call, simply use the Mask Data character. Select the / character before entering confidential numbers. After the last confidential numbers, select / again to turn the mask data off. Characters between the / symbols will appear as *.
• Wait for Dial Tone [=] suspends dialing until an expected network tone is detected. It can also be used to detect a specific tone when accessing an outside line or other service.
• Begin DTMF [*] Starts a sequence of DTMF (Dual Tone Multi-frequency) characters.• End DTMF [#] Ends a sequence of DTMF (Dual Tone Multi-frequency) characters.• Start Mailbox Signalling [!] pauses regular fax dialing and starts DTMF (Dual Tone Multi-
frequency) procedure for the fax mailbox.• Optional Readability Characters [Space ( ) - ] these are used for readability purposes but
do not affect the number entered. For example, if you wish to identify the area code of a fax number, use the Readability Characters (1234) 567890.
If more than one fax line is available, the following characters are also available:

Fax
Xerox WorkCentre 5735/5740/5745/5755/5765/5775/5790Fax
69
• Line 1 [<1>] selects line 1 to dial the number. Using the line selection identifier temporarily overwrites the fax settings and is for the current job only.
• Line 2 [<2>] selects line 2 to dial the number. Using the line selection identifier temporarily overwrites the fax settings and is for the current job only.
3. When you have entered the fax number and dialing characters required, select Add to add the number to the Recipient list.
4. Select Close to return to the fax options.
Batch Send
The Batch Send feature allows several fax jobs to be sent to the same destination fax machine during one transmission. This reduces the connection time and provides a reduced call connection charge. Batch Send is enabled from Tools. For more information about enabling the Batch Send feature refer to Batch Send on page 259 of Administration and Accounting.
Once Batch Send has been enabled, it applies to all fax transmissions. Once Batch Send has been enabled, program your fax job settings as required. To allow other fax jobs to be transmitted with your job add a delay to the transmission time. For more information refer to Delay Send on page 78.
Enter the destination fax number and select the Start button. Your job is submitted to the job list, ready for transmission. When a new fax job is submitted that has the same destination as the held fax job, a pop-up message is displayed.
When the delayed time has elapsed, all faxes to the same destination are linked together and transmitted. All individual fax job settings are maintained, except the communication speed which uses the speed of the first fax job for the remaining jobs.
Note: If Batch Send is enabled and a delay send job is programmed, any subsequent fax jobs programmed to send to the same destination will automatically be added to the batch and delayed until the scheduled time.
2-Sided Scanning
The 2-Sided Scanning option allows you to set whether 1 or 2 sides of your original document are scanned. Documents must first be loaded in the document feeder to enable the 2 Sided option. The options are:• 1-Sided is used if your originals are single-sided.• 2-Sided is used if your originals are double-sided. The document feeder must be used to scan your
originals with this option.• 2-Sided, Rotate Side 2 select if your original is double-sided and opens up like a calendar.
Original Type
Use this option to define the type of original being used for scanning. Making the correct selection enhances the quality of your output image. The options are:• Photo & Text is recommended for originals containing high quality photographs and halftones.
Using this setting the scanned image will contain high quality pictures though the sharpness of text and line art is slightly reduced.

Fax
Xerox WorkCentre 5735/5740/5745/5755/5765/5775/5790Fax
70
• Photo is used specifically for originals containing photos or continuous tones without any text or line art. Produces the best quality for photos but reduced quality text and line art.
• Text produces sharper edges and is recommended for text and line art. This option requires less communication time.
• Halftone Photo is used if your original is from a magazine or newspaper that contains photographs or text.
Resolution
The Resolution affects the appearance of the fax at the receiving fax terminal. A higher resolution produces a better quality image. A lower resolution reduces communication time. The options are:• Standard (200x100 dpi) is recommended for text originals. It requires less communication time
but does not produce the best image quality for graphics and photos.• Fine (200 dpi) is recommended for line art and photos. This is the best choice in most cases.• Superfine (600 dpi) is recommended for photos and halftones, or images that have gray tones. It
requires more communication time, but produces the best image quality.
Cover Letter
The Cover Letter feature attaches a cover letter to the document being transmitted. Using the cover letter feature replaces the routine of manually sending a cover letter each time you send a document.
The Cover Letter includes the following information:• To the recipients name, can be entered at the device.• From the sender’s name, as entered at the device.• Comment the comment as specified from the comment list.• Start Time the date and time of the fax transmission. Depending on the setup, the time is
displayed as a 12 or 24 hour clock. This information is added automatically to the cover letter.• Pages the page count, excluding the cover page. This information is added automatically to the
cover letter.• Fax number the number of the sending fax device. This information is added automatically to the
cover letter.
To select a Cover Letter:
1. Select the Cover Letter button and select On.2. Select the To... field and enter the name of the recipient using the keyboard.
• Up to 30 alphanumeric characters can be entered.• To delete a character use the backspace key, or to clear the entire entry select the X button.• Use the Keyboards... button to access additional language keyboards.
3. Select the From... field and enter the name of the sender using the keyboard.

Fax
Xerox WorkCentre 5735/5740/5745/5755/5765/5775/5790Fax
71
4. Select the comment required from the list.If a customized comment is required, select a spare comment slot and select Edit. Enter the text required using the keyboard, then select Save.
5. To delete a comment from the list, select the comment and select Clear. A confirmation screen is displayed, select Clear.
6. Select Save to save your selections and exit.
Address Book
The Address Book is used to store individual fax numbers or groups of fax numbers which are used frequently. Up to 200 individual entries and 40 Group entries can be stored. For each number stored, transmission settings can also be set. The Address Book can be accessed from all screens where a fax number requires entering. Use the following instructions to set up and use Individual or Group entries.
Using the Address Book
If numbers have been entered into the Address Book they can be accessed via the Address Book button.
1. Select the Address Book button. A list of individuals entered in the Address Book is displayed.
2. Select the required recipient and select Add to Recipients from the drop-down menu. The number is added to the Recipient list.Continue adding recipients as required.
3. To add a Group entry to the list, select the Individuals drop-down menu and select Groups. The available Groups are displayed. Select the Group required and select Add to Recipients from the drop-down menu.The Group is added to the Recipient list.
4. To edit an existing entry, select the entry from the list and select the Edit Details button. Edit the entry as required and select Save.
5. To clear an entry from the list, select the entry requiring deletion and select Clear Entry from the drop-down menu. A confirmation screen is displayed, select Clear Entry.
6. Select Close to return to the fax options screen.
The fax will be sent to all the numbers in the Recipient list.

Fax
Xerox WorkCentre 5735/5740/5745/5755/5765/5775/5790Fax
72
Using Chain Dial
The Chain Dial feature allows you to create a single fax recipient by adding 2 or more fax numbers together. For example, an area code may be stored separately to the telephone number. Chain dialing combines these 2 entries into a single fax number.
1. Select Address Book and then the Chain Dial button.2. If numbers or special dialing characters are required
before the fax number, use the numeric keypad to enter the numbers and characters required.
3. Select the Address Book entry required and select Add to Recipient.
4. The fax number is added to the number in the Recipient entry box.Continue adding numbers using the numeric keypad or Address Book until the number is complete.
5. Select Save to save your number and return to the Address Book screen.6. Select Close to return to the fax options.
The number displays in the Recipient list.
Setting up the Address Book
Individuals
1. Select the Fax tab and the Address Book button.2. Select the Individuals button from the drop-down
menu.3. Select an empty slot from the list of entries. If
necessary, use the scroll bar.
4. Select the Individual Name... field and enter the name of the recipient using the keyboard.To delete a character use the backspace key, or to clear the entire entry select the X button.Select Save.
5. Select the Fax Number field and enter the fax number of the recipient using the keypad. Use the Dialing Characters button to enter the number if special characters are required. Refer to Dialing Characters on page 68 for further information.
6. Select a Starting Rate for the recipient. Use the drop-down menu to select a speed for the option selected. Refer to Starting Rate on page 77 for further information.
7. Select Cover Letter and select On to include a covering note for the recipient. Complete the details required, refer to Cover Letter on page 70 for further information.

Fax
Xerox WorkCentre 5735/5740/5745/5755/5765/5775/5790Fax
73
8. Select the Save button. The new entry is displayed in the list.9. To amend an entry, select the entry and use the Edit Details option.
Groups
Group entries allow you to group individual entries under one number, for regularly used broadcast transmissions. When transmitting a fax you only have to enter the one group number to send to multiple destinations. Fax numbers can only be added to a group if they are entered as an individual entry.
1. To add a Group entry, select the Fax tab and the Address Book button.2. Select the Groups option from the drop-down menu.3. Select an empty slot from the list of entries. If
necessary, use the scroll bar.
4. Select the Group Name... field and enter the name of the Group using the keyboard.To delete a character use the backspace key, or to clear the entire entry select the X button.Select Save.
5. Select the Add Recipients button to add recipients to the Group.
6. Individual or Group recipients can be added to a Group:• To add an individual entry, select Individuals from the drop-down menu. Select the entry
required and select Add to Group.• To add a group entry to the new group, select Group from the drop-down menu. Select the
group entry required and select Add to Group.7. Continue adding individuals and groups until all the recipients have been added.8. Use Remove to delete any unwanted entries from the Group.9. Select Save when you have finished adding recipients. The recipients display in the list.10. Select Close to return to the Address Book screen. The new Group has been created.11. To amend a Group entry, use the Edit Details option.
Fax
Xerox WorkCentre 5735/5740/5745/5755/5765/5775/5790Fax
74
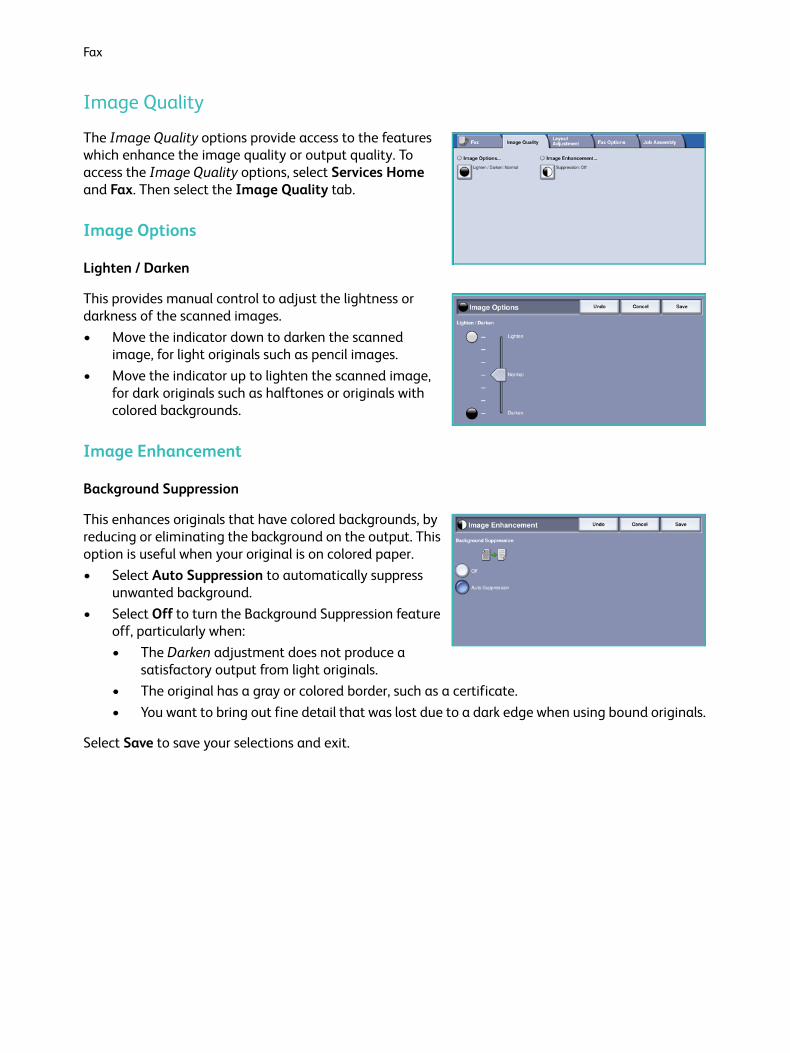
Image Quality
The Image Quality options provide access to the features which enhance the image quality or output quality. To access the Image Quality options, select Services Home and Fax. Then select the Image Quality tab.
Image Options
Lighten / Darken
This provides manual control to adjust the lightness or darkness of the scanned images.• Move the indicator down to darken the scanned
image, for light originals such as pencil images.• Move the indicator up to lighten the scanned image,
for dark originals such as halftones or originals with colored backgrounds.
Image Enhancement
Background Suppression
This enhances originals that have colored backgrounds, by reducing or eliminating the background on the output. This option is useful when your original is on colored paper.• Select Auto Suppression to automatically suppress
unwanted background.• Select Off to turn the Background Suppression feature
off, particularly when: • The Darken adjustment does not produce a
satisfactory output from light originals.• The original has a gray or colored border, such as a certificate.• You want to bring out fine detail that was lost due to a dark edge when using bound originals.
Select Save to save your selections and exit.

Fax
Xerox WorkCentre 5735/5740/5745/5755/5765/5775/5790Fax
75
Layout Adjustment
The Layout Adjustment options allow you to specify the type and size of document for scanning, for example a custom size or book original. You can also specify how to process documents that are too big for the receiving fax machine. To access the Layout Adjustment options, select Services Home and Fax. Then select the Layout Adjustment tab.
Original Size
Select Original Size to enter the size of your document when scanning from the document glass or the document feeder. Your device uses this information to calculate the size of your original and the scanned image. You can also select Auto Detect for automatic size detection, or Mixed Size Originals if scanning a mix of sizes. The options are:• Auto Detect is the default setting and enables
automatic size sensing. The size detected is matched to a standard size paper.
• Pre-set Scan Areas allows you to define the size of your original from a list of pre-set, standard document sizes. You can view the list by using the scroll bar.
• Custom Scan Areas is used to enter a specific area for scanning. Measure the area to be scanned on the original and enter the X and Y axis measurements into the fields provided. Only the area specified is scanned.
• Mixed Size Originals allows you scan documents containing different size pages. The pages must be the same width, like A4 LEF and A3 SEF (8.5x11” LEF and 11x17” SEF), other combinations are shown on the screen. The device will detect the size of the documents and determine whether the receiving fax machine can support the various paper sizes. If the receiving fax cannot support the page sizes, the image is reduced or enlarged to fit.
Select Save to save your selections and exit.
Reduce/Split
Select Reduce/Split to specify how your faxed document is printed if your document paper size is larger than the receiving fax machine's capabilities. The options are:• Reduce to Fit this option reduces the image to fit the
paper size of the receiving fax machine.• Split Across Pages this option splits the document
into 2 equal parts, or the majority of the image is put on to 1 page and the remainder on the next page.
Select Save to save your selections and exit.

Fax
Xerox WorkCentre 5735/5740/5745/5755/5765/5775/5790Fax
76
Book Faxing
CAUTION: Do not close the document feeder when scanning bound originals.
Select Book Faxing to specify which page or pages of a book are to be scanned. The book original is placed face down on the document glass with the spine of the book lined up with the marker on the rear edge of the document glass. Align the top of the bound original against the rear edge of the document glass.
The device will identify the size of the original during scanning. If the pages have a black or dark colored border the device will assume that the pages are smaller than they really are. To overcome this use the Custom Scan Areas feature in Original Size to enter the exact size of the page. Refer to Original Size on page 75 for more information.
The options are:• Both Pages use to scan both pages, the left page of
the book first will be scanned first. Use the arrow buttons to specify an amount from 0 to 50 mm (0 to 2”) to be deleted from the center of the book in order to delete unwanted marks reproduced from the gutter of the book.
• Left then Right or Right then Left is used to scan both pages, but the pages will be scanned in the order specified. These options replace the Both Pages option and will not be displayed unless enabled in Tools. Refer to Display Options on page 253 of Administration and Accounting.
• Left Page Only use to scan the left page only. Use the arrow buttons to specify an amount from 0 to 25mm (0 to 1”) to be deleted from the right side of the page in order to delete unwanted marks reproduced from the gutter of the book.
• Right Page Only use to scan the right page only. Use the arrow buttons to specify an amount from 0 to 25mm (0 to 1”) to be deleted from the left side of the page in order to delete unwanted marks reproduced from the gutter of the book.
Select Save to save your selections and exit.
Several pages of a bound document can be faxed using the Build Job feature. Refer to Build Job on page 83 for more information.

Fax
Xerox WorkCentre 5735/5740/5745/5755/5765/5775/5790Fax
77
Fax Options
The Fax Options allow you to specify how your fax document is transmitted and how it is printed at the receiving fax machine. To access the Fax Options, select Services Home and Fax. Then select the Fax Options tab.
Confirmation Report
Select Confirmation Report to print a broadcast report to identify the success or failure of a fax job. The options displayed depend on the settings enabled in Tools. Refer to the System Administrator Guide for more information.
The options are:
Print Confirmation• Use to print a transmission report containing details about the fax, together with a reduced copy
of the first faxed page.• The Confirmation report is printed after every transmission.• When sending a fax to multiple recipients, one report is printed listing all of the recipients.
Print On Error Only• Select this option to print the Confirmation report only if an error occurs with the transmission.
Select Save to save your selections and exit.
Starting Rate
Use Starting Rate to select the top transmission speed of your fax job. The actual transmission speed will depend on the receiving fax machine. The options are:
Super G3 (33.6 Kbps)• The fastest fax transmission rates and the default option.• Determines the transmission rate to be used based on the maximum capabilities of the receiving
fax machine.• This rate minimizes transmission errors by using Error Correction Mode (ECM). Initial transmission
speed is 33,600 Bits Per Second (bps).
G3 (14.4 Kbps)• The standard Group 3 fax transmission rates. These are used in fax environments where there is
existing noise or stress on the phone network which prevents higher speed fax transmissions working well.
• Selects the transmission rate based on the maximum capabilities of the receiving fax machine.

Fax
Xerox WorkCentre 5735/5740/5745/5755/5765/5775/5790Fax
78
• Initial transmission speed is 14,400 Bits Per Second (bps). This rate minimizes transmission errors by using Error Correction Mode (ECM).
Forced (4800 bps)• Used in areas of low quality communication, when experiencing telephone noise, or when fax
connections are susceptible to errors.• Forced (4800 bps) is a slower transmission rate but is less susceptible to errors. In some regional
areas the use of Forced (4800 bps) is restricted.
Select Save to save your selections and exit.
Delay Send
Select Delay Send to specify the time within the next 24 hours that you want the fax to be transmitted. Use this feature to transmit faxes during off-peak hours or when sending to another country or time zone. Delay Send can also be used with Mailbox and Polling options.
1. Select Specified Time and select either the Hour or the Minute field to enter a time to send your fax.
2. Use the arrow buttons or numeric keypad to enter the hours and minutes.If the device is set up to display the time using a 12 hour clock, you must also select either the AM or PM button.
3. Select Save to save your selections and exit.
Once scanned, the fax will be stored in memory and sent at the specified time.
Note: Delay Send can be used for Batch Send fax jobs. For more info refer to Batch Send on page 69.
Send Header Text
This feature allows you to add header text information when sending the fax. This is in addition to the standard header text. The information is printed in the header at the top of each page of the fax transmission. The information included is displayed on the screen and can be customized using Tools. Refer to the System Administrator Guide for more information.
Select On then Save to enable the Send Header Text to print on the fax output.

Fax
Xerox WorkCentre 5735/5740/5745/5755/5765/5775/5790Fax
79
Mailboxes
Mailboxes are areas of device memory where incoming faxes are stored or from which outgoing faxes can be polled. Mailboxes enable you to store all received fax documents until it is convenient to retrieve them. Conversely, storing fax documents in a mailbox for Polling allows a remote user or users to retrieve the fax on demand.
Mailboxes must be set up by the System Administrator before fax documents can be stored in them. The device can contain up to 200 electronic mailboxes within its memory. To allow a remote user to fax to your mailbox they must know your mailbox number. To retrieve a document from your mailbox the remote user must know your mailbox number and if, appropriate, your passcode.
The mailbox passcode ensures that the fax documents held in the mailbox are secure and can only be accessed by an authorized user. The passcode is a 4 digit number. If the mailbox has been setup with a passcode of 0000 then any combination of numbers, including no numbers, can be entered as the passcode to gain access to the mailbox.
Select the Mailboxes button. The options are:
Send to a Remote Mailbox
This feature enables you to send a fax directly to an individual's private mailbox on a remote machine. The remote machine must have mailbox capabilities.
1. Select Send to a Remote Mailbox.2. Select the Fax Number entry field and enter the
recipient's fax number using the numeric keypad. Alternatively, select the Address Book option and select the recipient from the directory.To send to a remote mailbox you must know the recipients mailbox number.
3. Select the Mailbox Number entry field and enter the mailbox number, between 001 and 255.
4. Select Save to save your selections and exit.5. If required, use Delay Send to program a specific time to send the fax. Refer to Delay Send on
page 78 for more information.6. Load the originals and select Start on the control panel to send the fax to the recipient's mailbox.
A Store to Remote Mailbox message is displayed for information.
If enabled by your System Administrator, a report is printed once the documents are sent to the remote mailbox.

Fax
Xerox WorkCentre 5735/5740/5745/5755/5765/5775/5790Fax
80
Store to Local Mailbox
This feature allows you to store documents to be polled. The document is stored in your mailbox and automatically sent to a remote fax machine when requested.
1. Select the Store to Mailbox button.2. Select the Mailbox Number entry field and enter the
mailbox number, between 001 and 200.3. Select the Mailbox Passcode entry field and enter the
4-digit mailbox passcode.4. Load the originals and select Start.
Your fax job is scanned and stored in the mailbox and the Mailboxes screen returns.
Print Mailbox Documents
Faxes stored in your mailbox can be printed.
1. Select the Print Mailbox Documents button.2. Select the Mailbox Number entry field and enter the
mailbox number, between 001 and 200.3. Select the Mailbox Passcode entry field and enter the
4-digit mailbox passcode.4. Select Start to print the contents of the mailbox.
The documents may be deleted after printing, depending on the Mailbox & Polling Policies set.
Delete Mailbox Documents
All the faxes stored in your mailbox can be deleted. Mailbox Documents are faxes you have stored ready for Polling and faxes that you have received in your mailbox.
1. Select the Delete Mailbox Documents button.2. Select the Mailbox Number entry field and enter the
mailbox number, between 001 and 200.3. Select the Mailbox Passcode entry field and enter the
4-digit mailbox passcode.4. Select Start to delete the contents of the mailbox.
Note: The storage time for faxes is set up by the System Administrator.
A confirmation screen is displayed prior to deleting the faxes stored in the selected mailbox.

Fax
Xerox WorkCentre 5735/5740/5745/5755/5765/5775/5790Fax
81
Polling
Using the Polling function, documents stored on a remote fax machine can be retrieved and printed on your device. Alternatively, documents stored on your device can be polled by a remote fax machine. Polling is a useful way of constantly providing access to updated information without having to re-distribute it.
Local Polling
The Local Polling feature allows a fax document to be left in the memory of your device to be retrieved by another fax machine. If the fax document is in memory it may be polled once and deleted, or polled several times, depending on the Mailbox & Polling Policies set.
Select the Local Polling button and then On to enable Local Polling. The options are:• Secure Polling is used for sensitive documents. Access is only granted if the fax numbers of the
retrieving devices have been entered, or if the Allow All Address Book numbers access option is selected.a. Select the Secure Polling button and then Enabled.b. Select the Polling Passcodes button and add the
fax numbers of the devices retrieving the document. Alternatively, select Allow All Address Book numbers access to enable all fax numbers stored in the Address Book access to the document.
c. Use Add to add more than one number to the list. To delete a number from the list, select the entry and select Delete.
d. Select Close to exit.e. Load the originals to be stored for polling and press Start.The originals are scanned and stored in memory ready to be polled.
• Print Polling Documents prints the documents stored in memory.• Delete Polling Documents deletes all stored documents. A confirmation screen is displayed,
select Delete All or Cancel.
Select Save to save your selections and exit.

Fax
Xerox WorkCentre 5735/5740/5745/5755/5765/5775/5790Fax
82
Poll Remote Fax
The Poll a Remote Fax feature allows you to call a remote fax machine. The call locates and retrieves faxes stored at the remote machine. Remote Polling allows you to poll a remote machine immediately or at a specified time. More than one remote machine can be polled at a time.
1. Select the Poll a Remote Fax button and select On. Then select Save.
2. Enter the fax numbers of the devices which are being polled. Use Add to add more than one number to the list.Use the Speed Dial or Address Book option to add a specific number from the directory.
3. If required, use Delay Send to program a specific time to poll the remote machine. Refer to Delay Send on page 78 for more information.
4. Select Start to commence polling.
The remote device is polled and the retrieved document printed.
Poll Remote Mailbox
The Poll Remote Mailbox feature allows you to call a remote machine which has a mailbox setup. The call locates and retrieves the faxes stored within the mailbox. The mailbox number and passcode must be known.
1. Select the Poll a Remote Mailbox button.2. Select the Fax Number entry field and enter the fax
number of the device being polled using the numeric keypad. Use the Address Book option to add the number if required.Use the Dialing Characters option to enter the number if special characters are required. Refer to Dialing Characters on page 68 for more information.
3. Select the Mailbox Number entry field and enter the mailbox number, between 001 and 200.4. Select the Mailbox Passcode entry field and enter the 4-digit mailbox passcode.5. Select Start to commence polling the mailbox.
The remote device mailbox is polled and the retrieved document printed.
Fax Reports
Various fax reports are available for printing on your device. Select one of the following reports to print:• Activity Report prints details of the last 50 fax transactions.• Address Book Individuals Report prints details of all entries in the individual directory.• Address Book Group Report prints details of all groups in the group directory.• Options Report prints details of the fax card configuration.

Fax
Xerox WorkCentre 5735/5740/5745/5755/5765/5775/5790Fax
83
• Pending Jobs Report prints information about jobs currently queued in the device memory and details of available memory.
Select Print Report to print the selected report.
Job Assembly
This tab provides access to the Build Job feature for compiling jobs which have different originals or programing requirements within a job. To access the Job Assembly options, select Services Home and Fax. Then select the Job Assembly tab.
Build Job
Use this feature to build a job that requires different settings for each page, or a segment of pages.
You can select the appropriate settings to be applied to individual pages or segments of a completed job. First split the originals into sections for individual programing.
1. Select Build Job on the Job Assembly tab.2. Switch on Build Job by selecting the On button and
select Save.3. Select the options required for the first segment of the
job.4. Load the first segment originals and press Start.5. Remove the first segment originals. The Build Job
screen displays the first segment in the list. The following options can be applied:• Delete Last Segment deletes the last segment scanned. You can continue programing the
Build Job.• Delete All Segments deletes the current Build Job and returns you to the main Build Job
screen.6. Select the options required for the second segment.7. Load the second segment originals and press Start.8. Repeat these steps until all segments of your job have been programmed and scanned.9. After the last segment has been scanned, select End Build Job to indicate you have finished
scanning and the job can be processed and completed.
Some pages with text and some with photos
Some pages 2 sided and some 1 sided
Various sized originals
More than 100 pages

Getting Started
WorkCentre® 5845/5855/5865/5875/5890 61Getting Started Guide
Sending an E-mail
Use the E-mail feature to scan images and send them to a recipient as an attachment to an e-mail.
Note: This option must be made available by your System Administrator.
If Authentication or Accounting has been enabled on your device you may have to enter login details to access the E-mail features.
1. Load your documents face up in the document feeder input tray. Adjust the guide to just touch the documents.OrLift up the document feeder. Place the document face down onto the document glass and register it to the arrow at the top left corner. Close the document feeder.
2. Press the Clear All button on the control panel to cancel any previous programming selections.3. Press the Services Home button.4. Select the E-mail button on the touch screen.5. If required, select the E-mail tab. This is usually the active tab when the E-mail service opens.6. Select the New Recipient... button.7. Use the touch screen keyboard to enter the e-mail address of the recipient.
• The number of alphanumeric characters that can be entered depends on the size of the characters chosen. Once the end of the entry box has been reached no more characters can be added.
• To delete a character use the backspace X button.• Use the special characters button to access special characters such as $ and %.• Buttons with an icon in the lower right corner have accented or additional characters
available. Select and hold the button to view related characters in a pop-up menu. Select the desired character from the pop-up menu.
8. Select the Add button.• If you want to send the document to more than one recipient enter the additional details, one
recipient at a time, and select the Add button again until all the recipients have been added.9. If required, select Cc from the To: dropdown menu to copy a recipient on the e-mail. Use the touch
screen keyboard to enter the recipient details and then select the Add button.
Note: At least one To address must be selected, documents cannot be sent to a Cc address alone.
10. Select the Close button to save the information you entered.11. If required, select the From... button and use the touch screen keyboard to enter or edit the From
address for the e-mail.
Note: Your System Administrator may choose to lock the From button to prevent the preset From address being altered.
• Select the OK button.12. If required, select the Subject... button and use the touch screen keyboard to enter or edit the
subject title for the e-mail.• Select the OK button.

Getting Started
62 WorkCentre® 5845/5855/5865/5875/5890 Getting Started Guide
13. If required, select the File Name button and use the touch screen keyboard to enter a name for the file created from your scanned document. If you choose not to enter a file name a default name entered by your System Administrator will be used.• Select the OK button.
14. Select any options required.15. Press the Start button on the control panel to scan the original.16. Remove the original from the document feeder or document glass when scanning has completed.
The job enters the job list ready for processing.17. Press the Job Status button on the device control panel to view the job list and check the status of
the job.

Email – Detailed Options
Email TabOutput Color
o Auto Detect allows the device to select the most appropriate color setting.
o Black and White produces black and white output even if the originals were color.
o Grayscale produces output using various shades of gray.
o Color produces full color output.
2-Sided Scanning
o 1-Sided use this option if your originals are printed on 1 side.
o 2-Sided use this option if your originals are 2-sided. The document feeder must be used to scan your
originals with this option.
o 2-Sided, Rotate Side 2 use this option if your originals are 2-sided and open up like a calendar. The
document feeder must be used to scan your originals with this option.
Original Type
o Photo and Text produces high quality pictures but slightly reduces the sharpness of text and line
art. This setting is recommended for originals containing high quality photographs or line art andtext.
o Photo gives the best quality for photos but reduced quality text and line art. It is the best option for
originals containing photos or continuous tones without any text or line art.
o Text produces sharper edges and is recommended for text and line art.
o Map is used if your original is a map.
o Newspaper / Magazine is used if your original is from a magazine or newspaper that contains
photographs or text.
NOTE: The Text option requires less transmission time.
File Name
Enter the desired file name.
Advanced Settings TabPresets
o Sharing and Printing produces a medium sized file, small enough to share but high enough quality to print.
o High Quality Printing produces a large, high quality file.
o Archival - Small File Size produces a small, lower quality file suitable for viewing on a screen, but the print
quality will be poor.
o Simple Scan produces a basic scanned file, no advanced settings are selected.
o OCR produces a high quality, large file with OCR (Optical Character Recognition) enabled. This file is fully
searchable.

5855 Troubleshooting and Maintenance
Cleaning the Document Glass and Constant Velocity Transport Glass
To ensure optimum print quality at all times, regularly clean the glass areas of your device. This helps avoid output
with streaks, smears and other marks that may transfer from the glass area when scanning documents.When youuse the document feeder, your documents will pass over the stationary scanner using the Constant VelocityTransport glass. Any dirt or marks on this piece of glass will cause lines or streaks on your copies, faxes or scannedimages. Also, any marks or dirt on the Constant Velocity Transport roll may show through the document and appear
on your scanned images.
1. Use a lint-free cloth, lightly dampened with Xerox Anti-Static or general cleaning fluid (or another suitable non-
abrasive glass cleaner) to clean the document glass and the Constant Velocity Transport glass (the narrow strip of
glass to the left of the main document glass).
2. Wipe away any residue with a clean cloth or paper towel.
3. Use a lint-free cloth, lightly dampened with water, Xerox cleaning fluid or Xerox film remover to clean the under side
of the document cover or document feeder and the complete circumference of the Constant Velocity Transport roll.
WARNING: When cleaning the device do NOT use organic or strong chemical solvents or aerosol cleaners. Do NOT
pour fluids directly onto any area. Use supplies and cleaning materials only as directed in this documentation. Keep
all cleaning materials out of the reach of children.
WARNING: Do not use pressurized air-spray cleaning aids on or in this equipment. Some pressurized air-spray
containers contain explosive mixtures and are not suitable for use in electrical applications. Use of such cleaners canresult in a risk of explosion and fire.
Cleaning the Control Panel, Touch Screen, Document Feeder and Output Trays
Regular cleaning keeps the touch screen, control panel and other device areas free from dust and dirt.
1. Use a soft, lint-free cloth, lightly dampened with water.
2. Wipe clean the entire area of the control panel, including the touch screen.
3. Wipe clean the document feeder, output trays, paper trays and other outside areas of your device.
4. Remove any residue with a clean cloth or paper towel.
Replacing the Toner Cartridge
The Toner Cartridge is a replaceable unit on the device. You will be notified by the device when the cartridge needsreplacing.
WARNING: When replacing consumables do NOT remove the covers or guards that are fastened with screws. You
cannot maintain or service any of the parts that are behind these covers and guards. Do NOT attempt any
maintenance procedure that is NOT specifically described in the documentation supplied with your device.
1. Open the front door on the device.
2. Release the Toner Cartridge.
3. Replace the used consumable with the new consumable.

4. Latch the Toner Cartridge.
5. Close the front door of the device.
Replacing the Waste Toner Bottle
The Waste Toner Bottle is a replaceable unit on the device. You will be notified by the device when it requiresreplacing.
WARNING: When replacing consumables do NOT remove the covers or guards that are fastened with screws. You
cannot maintain or service any of the parts that are behind these covers and guards. Do NOT attempt any
maintenance procedure that is NOT specifically described in the documentation supplied with your device.
1. Open the Waste Toner Bottle door on the device.
2. Remove the Waste Toner Bottle.
3. Replace the used consumable with the new consumable.
NOTE: For more detailed instructions see the device touch screen or the instructions provided with the replacement
consumable.
4. Close the Waste Toner Bottle door on the device.

Resolution
o 72 dpi produces the smallest file size and is recommended for output displayed on a computer.
o 100 dpi delivers low image quality and is recommended for low quality text documents. This setting should
ideally be used for output displayed on a computer rather than printed.
o 150 dpi produce average quality text and low image quality for photos and graphics, this resolution is
recommended for average quality text documents and line art.
o 200 dpi produces average quality text and low quality photos and graphics. This resolution is recommended
for average quality text documents and line art.
o 300 dpi produces higher quality output. This setting is recommended for high quality text documents that are
to pass through OCR (Optical Character Recognition) applications. It is also recommended for high quality
line art or medium quality photos and graphics. This is the best default resolution choice in most cases.
o 400 dpi produces average image quality for photos and graphics and is recommended for photos and
graphics.
o 600 dpi produces the largest image file size, but delivers the best image quality. This setting is
recommended for high quality photos and graphics.
Quality/File Size
o Move the indicator towards Normal Quality / Small File Size for a smaller file and lower quality image. Thisproduces small files by using advanced compression techniques. Image quality is acceptable but some
quality degradation and character substitution errors may occur with some originals.
o Move the indicator towards the middle of the scale to produce better image quality and larger files, but not
the highest quality or largest files.
o Move the indicator towards Highest Quality / Largest File Size to produce the largest files with the maximumimage quality. Large files are not ideal for sharing and transmitting over a network.
Image Options
The Image Options features give you choices for changing the appearance of the output. Use the Lighten / Darken options to manually adjust the lightness or darkness of the image. Light originals
containing pencil images may produce better output if the darkness is increased. Dark originals such ashalftones or documents with colored backgrounds may need to be lightened.
Use the Sharpness option to manually control the sharpness of the scanned images. Use the Saturation option to manually control the brightness of the color in the scanned images.
NOTE: If you select black and white output rather than color output the saturation option will not beavailable.
Image Enhancement
The Image Enhancement options improve the quality of your output by reducing the background or adjustingthe contrast.
Use the Background Suppression option to enhance originals that have colored backgrounds, by reducing oreliminating the background on the output. This option is useful when your original is on colored paper.
Use the Contrast option to control the image density on the output and compensate for an original that hastoo much or too little contrast on the image.
Layout Adjustment TabOriginal Orientation
o Portrait Originals the images on the originals are in a LEF orientation.

o Landscape Originals the images on the originals are in a SEF orientation.
o Upright Images the images on the originals are loaded in a upright orientation in the Document Feeder.
o Sideways Images the images on the originals are loaded in a sideways orientation in the Document
Feeder.
Original Size
o Auto Detect enables automatic size sensing, this is the default setting. The size detected is matched to a
standard paper size.
o Preset Scan Area defines the size of your original from a list of preset, standard original sizes. You can
view the list by using the scroll bar.
o Custom Scan Area sets a specific area for scanning and is useful for scanning receipts. Measure the width
(X) and height (Y) of the original to be scanned and enter the X and Y measurements into the fields
provided.
o Mixed Size Originals scans documents containing different sized pages. The pages must be the same
width, such as A4 (8.5 x 11”) LEF and A3 (11 x 17”) SEF, other combinations are shown on the devicetouchscreen. The device detects the size of the documents and will produce different output depending on
the combinations selected.
NOTE: SEF is Short Edge Feed (where the short edge of the paper is the leading edge when the paper is fed
into the device). LEF is Long Edge Feed (where the paper is oriented so that the long edge is fed into the device
first).
Edge Erase
o All Edges erases an equal amount from all the edges. Use the arrow buttons to adjust the amount to be
erased from 3 mm (0.1”) to 50 mm (2.0”) or select the entry field and use the numeric keypad to enter theamount required.
o Individual Edges enables a different amount to be erased from each of the edges, on both the first and
second sides. Use the arrow buttons to adjust the amount to be erased from 3mm (0.1”) to 50mm (2.0”) or
select the appropriate entry field and use the numeric keypad to enter the amount required.
Blank Page Management
o Include Blank Pages includes any pages with no image on them in your job.
o Remove Blank Pages ignores non-imaged pages in your originals when scanning. This setting is useful
when scanning 2-sided originals that may have no image on side 2 for some pages.
Email Options TabFile Format
o PDF (Portable Document Format) produces a single file, or an individual file per page.The output is not
searchable. Depending on the receiving device, the PDF selection may not be compatible when the
resolution is set to 200 dpi. This option is best used for sharing and printing documents.
o PDF/A produces a single file, or an individual file per page. The output is not searchable. This is best used
for long-term archival storage of electronic documents.
o XPS (XML Paper Specification) outputs a single file, or an individual file per page. The output is not
searchable. XPS is best used for sharing and printing documents containing text and photos.
o TIFF (Tagged Image File Format) produces a single file or an individual file per page. The output is not
searchable. TIFFs are best used for archiving.

o JPEG produces files best used for on-screen viewing and sharing of files. JPEG files are not searchable or
created as multi-page documents.
o Multi-Page produces a single file containing several pages of scanned images.
o 1 File per Page produces a separate file for each image scanned.Image Only produces images that are not
searchable.
o Searchable results in searchable text. If required, use the drop-down menu to change the language your
document is written in.
Message
Use the Message option to add a brief message to the file that will be sent.
Reply to
Use the Reply To option to include an e-mail address you want the recipient to reply to. This option is useful if youwant the recipient to reply to your e-mail address rather than to the device.