xerox® adaptive cmyk plus technology for the xerox ... · 2 *ask your print service provider which...
TRANSCRIPT

Gra p hic D e s ign a n d Fi l e P rep a ra t io n Guide l in e s
X E R O X ® A D A P T I V E C M Y K P L U S T E C H N O L O G Y F O R T H E X E R O X ® P R I M E L I N K ® C 9 0 6 5 / C 9 0 7 0 P R I N T E R

TABLE OF CONTENTS
Your design dreams realized . . . . . . . . . . . . . . . . . . . . . . 1
Getting familiar with Vivid Toners . . . . . . . . . . . . . 6
Designing with a Vivid Toner spot color . . . . . . 10
Designing with multiple Vivid Toner spot colors . . . . . . . . . . . . . . . . . . . . . . . . . . . . . . . . . . . . . . . . . . . . . 16
Designing with CMYK and Vivid Toners . . . . . . 22
Getting familiar with Fluorescent Toners . . . . . . . . . . . . . . . . . . . . . . . . . . . . . . . . . 28
Designing with Fluorescent spot colors . . . . . . 30
Design in CMYK, print in Fluorescent . . . . . . . . . 36
Workflow settings for print production . . . . . . 40
Insider Insights . . . . . . . . . . . . . . . . . . . . . . . . . . . . . . . . . . . . . . 44

1
Your design dreams real ized .
Welcome to more visual “wow!”
Most print designers we know dream of working on a project that involves specialty effects. There are a number of eye-catching finishes that can be applied by industrial printing companies, including using spot Fluorescent inks during printing or adding foiling or varnishes post-print. However, the extra cost and time involved can make these projects difficult to achieve, especially for smaller runs.
Xerox® Adaptive CMYK Plus Technology for the Xerox® PrimeLink® C9065/C9070 Printer changes that.
This innovative accessory lets you add high-value enhancements to short-run digital easily and cost-effectively with Gold, White, Silver, and Clear Toners, or with Fluorescent Cyan, Fluorescent Magenta, and Fluorescent Yellow Toners.

2 *Ask your print service provider which Specialty Toner colors they have available.
Xerox® Adaptive CMYK Plus Technology makes it easy for you to breathe more inspiration into print while sticking to your clients’ budgets and timelines.
USING TRADITIONAL METHODS TO ADD SPARKLE AND GLOW:
USING ADAPTIVE CMYK PLUS TECHNOLOGY:
Say goodbye to cost ly processes and hel lo to new jobs .
Add days to your production timeline.
While beautiful, post-process specialty enhancements like foil stamping are labor- and time-intensive.
Add cost.
All that labor makes foil stamping expensive. Also, it can be applied only to static (non-variable) elements.
Deliver more enhancements—on demand.
Add a wide variety of fluorescent or metallic, white, and clear embellishments to any job element, whether it be static or variable.* Jobs are printed at the same speed as CMYK-only. No extra time is needed for setup or drying!
Ideal for:
Greeting cards and invitations
Flyers and brochures
Posters and signage
Event tickets, gift vouchers, and more!

3
Xerox® Adaptive CMYK Plus Technology gives you a whole new way to think about design when you are creating for a Xerox® PrimeLink® C9065/C9070 Printer.
BREATHE INSPIRATION INTO PRINT WITH THIS FLEXIBLE OPTION:
FYFMK FC
Create eye-stoppingly colorful prints that glow under UV light!
Run exciting new applications with shimmering metallics, White, and Clear.
Get the consistent 4c process quality you count on.
*The Fluorescent Toner set may only be purchased in combination with the Vivid Toner set.
Print traditional digital applications with CMYK:
Swap out toners for the Xerox® Vivid Specialty Toner set:
Swap out toners for the Xerox® Fluorescent Specialty Toner set:*
You can also choose to run jobs with any TWO of the toner sets. This will require an additional, manual pass. We encourage you to work with your print provider to ensure the final result matches your expectations.
ClrSG WYMK C
Your new go-to design tool .

4
Imagine it .Create it .
Achieve it .

5
This guide will walk you through many ways to think about using Specialty Toners on the Xerox® PrimeLink® C9065/C9070 Printer. Best practices for file preparation are included to ensure print results match your design intent.
The design and file preparation steps included in this guide assume a working knowledge of Adobe® Creative Suite components.
Print instructions assume the press operator is familiar with the PrimeLink® Printer and print server options.
+

6
Getting familiar with Vivid Toners

7
Create a spot color effect:
Each of our Vivid Toner Kit colors— Gold, White, Silver, and Clear— can be used on its own to create stunning spot effects. Our metallic inks contain reflective metallic pigments that deliver true sparkle and shine, amplifying your designs.
Use more than one spot color effect together:
Want to use more than one spot effect in a job? No problem! Adaptive CMYK Plus Technology loads four Vivid Toners at the same time, so you aren’t limited to only one enhancement color per job.
Layer CMYK with Vivid Toners:
When you need a vibrant visual, think about the impact Vivid Toners can make when layered with CMYK. By re-running your base CMYK art with a second pass of Vivid Toners, you can add a high-impact layer of “wow”—simply and cost-effectively.
Get ready to shine.
Create stunning specialty effects with Vivid Toners:
8
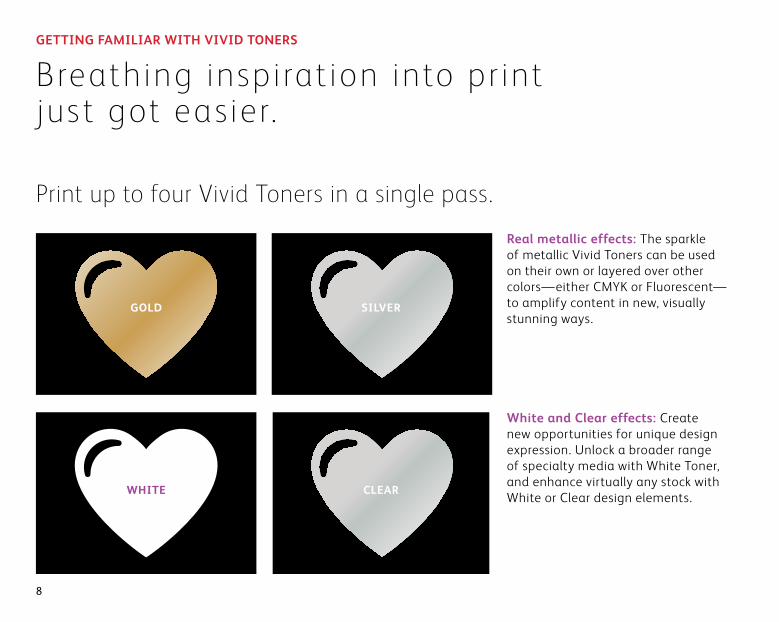
Print up to four Vivid Toners in a single pass.
Real metallic effects: The sparkle of metallic Vivid Toners can be used on their own or layered over other colors—either CMYK or Fluorescent—to amplify content in new, visually stunning ways.
White and Clear effects: Create new opportunities for unique design expression. Unlock a broader range of specialty media with White Toner, and enhance virtually any stock with White or Clear design elements.
Breathing inspirat ion into pr int just got easier.
CLEAR
SILVER
WHITE
GOLD
GETTING FAMILIAR WITH VIVID TONERS

9
Xerox® Adaptive CMYK Plus Technology is an innovative accessory kit that lets your print provider swap out their Xerox® PrimeLink® C9065/C9070 Printer’s CMYK Toner with high-value Vivid Toners in minutes.
While Vivid Toners register well to each other on each side of a page, there can be some variation on jobs that require multiple toner sets, due to the fact that paper must be manually re-run through the press after the toners are swapped. Planning for this with designs that allow for registration variation will help you maximize the technology’s benefits. You will learn more in this guide.
YMK C
Vivid Toners replace CMYK in the PrimeLink Printer as a set:
Toner colors cannot be mixed across sets or placed in different cartridge positions.
LAYER ORDER, OBJECT OVERLAPPING, AND TRANSPARENCY EFFECTS FOR VIVID TONERS ARE ALL SET IN YOUR DESIGN APPLICATIONS. THIS GUIDE WILL GIVE YOU BEST PRACTICES TO FOLLOW FOR VARIOUS DESIGN TECHNIQUES.
ClrSG W

10
Designing with a Vivid Toner spot color

11
Add spark le and shine with Gold , White, Si lver, or Clear.
DESIGNING WITH A VIVID TONER SPOT COLOR
Make your designs stand out with a simple spot color effect.
Spot effects are stunning in their simplicity.
Use Gold, White, Silver, or Clear Vivid Kit Toners alone to add immediate, cost-effective value to graphics and text.
Spot color effects can be created in several ways:
• In smaller areas, like graphics or text using a single toner.
• In larger flood areas, as with a Clear overlay.
12
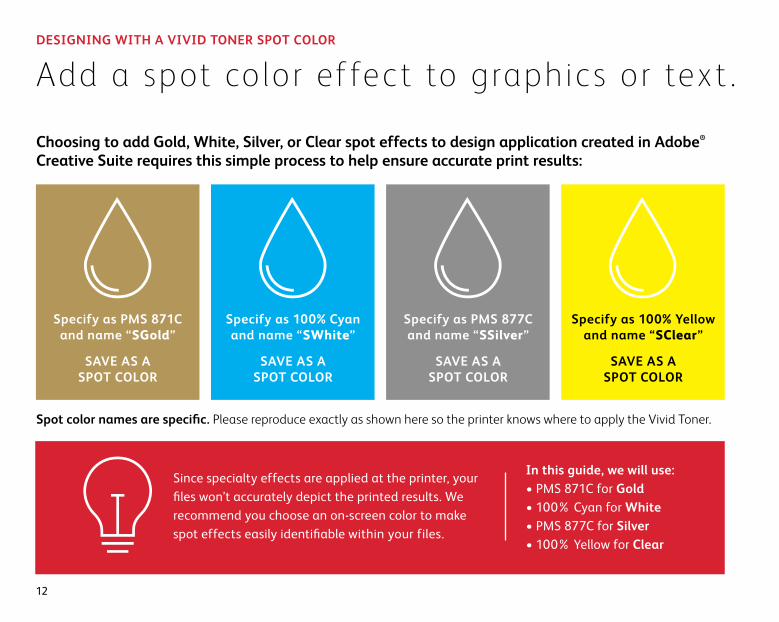
Specify as PMS 877C and name “SSilver”
SAVE AS A SPOT COLOR
Specify as 100% Cyan and name “SWhite”
SAVE AS A SPOT COLOR
Add a spot color ef fec t to graphic s or text . DESIGNING WITH A VIVID TONER SPOT COLOR
Choosing to add Gold, White, Silver, or Clear spot effects to design application created in Adobe® Creative Suite requires this simple process to help ensure accurate print results:
Spot color names are specific. Please reproduce exactly as shown here so the printer knows where to apply the Vivid Toner.
Since specialty effects are applied at the printer, your files won’t accurately depict the printed results. We recommend you choose an on-screen color to make spot effects easily identifiable within your files.
In this guide, we will use: • PMS 871C for Gold • 100% Cyan for White • PMS 877C for Silver • 100% Yellow for Clear
Specify as 100% Yellow and name “SClear”
SAVE AS A SPOT COLOR
Specify as PMS 871C and name “SGold”
SAVE AS A SPOT COLOR

13
In this example, we’ll show you how to create a graphic with a specialty fill.
Spot effects can be created in just a few simple steps. Start by determining what spot effect you want—Gold, White, Silver, or Clear—and where that effect will be applied within your design.
This example uses:
SGold
DESIGNING WITH A VIVID TONER
SPOT COLOR

14
Add a spot ef fec t to graphic s or text .
While this example uses Adobe® Illustrator®, the same concepts apply in Adobe® InDesign®.
1 CREATE A GRAPHIC OR TEXT
Import vector objects, draw and fill a shape, or select text that will have the Gold Toner applied in Adobe® InDesign®.
2 CREATE YOUR ON-SCREEN COLOR
Add PANTONE® 871C to your file so that when you’re working on screen, the graphic looks similar to your desired Gold output.
3 DEFINE THE VIVID SPOT COLOR
Designate your PANTONE® 871C swatch as a Spot Color and name it SGold.
REMINDER: Color names are specific and case sensitive. Please reproduce exactly as shown here! The names let the printer know where to apply the Vivid Toner.
2
1
3
DESIGNING WITH A VIVID TONER SPOT COLOR

15
When you hand your job off for production, be sure to tell your print provider to run it with the Xerox®
Vivid Toner Kit.*
They will need to have the Xerox® Adaptive CMYK Plus Technology.
Remember to ask for a proof on your specified stock. This will help ensure the printed result matches your design intent.
4 FILL YOUR OBJECT
Select the objects in your layer and fill them with the SGold color.
4
Good communication with your print provider is key!
*See the Workflow Settings for Print Production section in this Guide for more detail on print settings
DESIGNING WITH A VIVID TONER
SPOT COLOR

16
Designing with multiple Vivid Toner spot colors

17
Add spark le and shine with Gold , White, Si lver, and/or Clear.
DESIGNING WITH MULTIPLE VIVID TONER SPOT COLORS
Print up to four spot Vivid Toner colors in ONE pass.*
Amplify the power of Vivid Toner spot effects by using more than one color at a time.
Adaptive CMYK Technology allows a print provider with a Xerox® PrimeLink® C9065/C9070 Printer to swap out their CMYK Toners with Vivid Toners, giving you the ability to print up to four high-value specialty spot colors at the same time.
The key thing to remember when overlapping objects: knockout and transparency are created based on layer order and object effect (i.e., Multiply) within your design file.
See the Insider Insights section at the end of this guide for more information.
*Each “pass” represents a single trip through the printer.
18
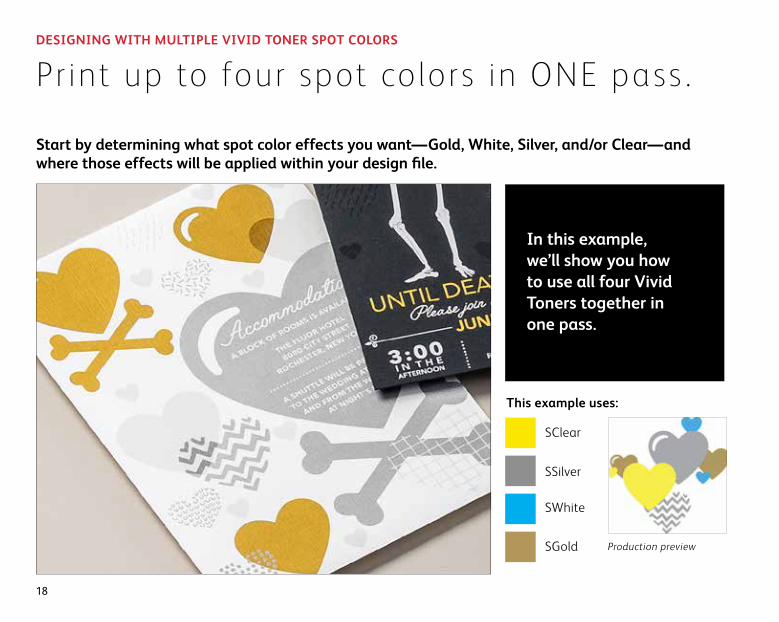
In this example, we’ll show you how to use all four Vivid Toners together in one pass.
Pr int up to four spot colors in ONE pass .
Start by determining what spot color effects you want—Gold, White, Silver, and/or Clear—and where those effects will be applied within your design file.
This example uses:
SClear
SSilver
SWhite
SGold Production preview
DESIGNING WITH MULTIPLE VIVID TONER SPOT COLORS
19
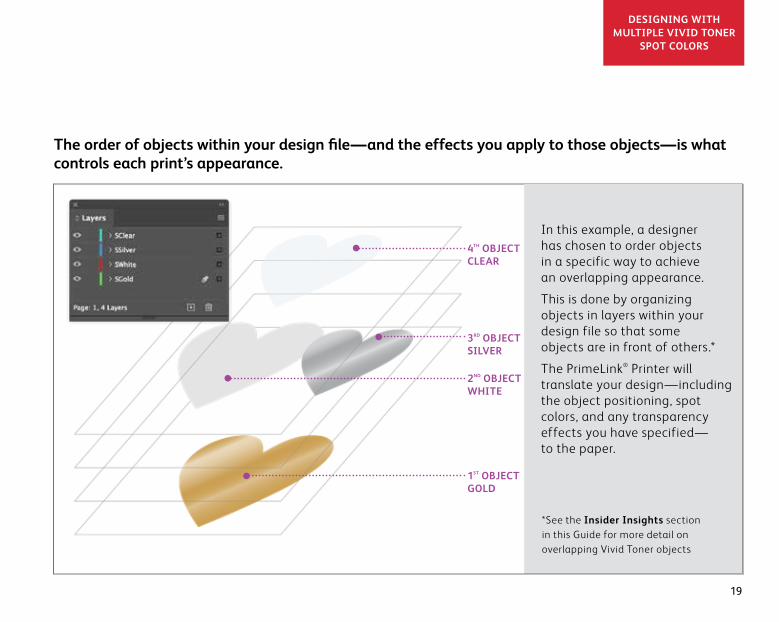
The order of objects within your design file—and the effects you apply to those objects—is what controls each print’s appearance.
3RD OBJECT SILVER
4TH OBJECT CLEAR
2ND OBJECT WHITE
1ST OBJECT GOLD
In this example, a designer has chosen to order objects in a specific way to achieve an overlapping appearance.
This is done by organizing objects in layers within your design file so that some objects are in front of others.*
The PrimeLink® Printer will translate your design—including the object positioning, spot colors, and any transparency effects you have specified— to the paper.
*See the Insider Insights section in this Guide for more detail on overlapping Vivid Toner objects
DESIGNING WITH MULTIPLE VIVID TONER
SPOT COLORS

20
Use more than one spot ef fec t together.
Up to four Vivid Toners can be used in a design file—and may even be placed so they overlap—depending on the desired result.
1 CREATE YOUR DESIGN
Create your design and decide where you want your spot colors to appear.
2 DEFINE YOUR SPOT COLORS
Make sure your spot colors are set up and named correctly:
SClear (Capitalized), SSilver (Capitalized), SWhite (Capitalized), and SGold (Capitalized)
All should be designated as CMYK Spot Colors.
2
1
3
3 FILL YOUR OBJECTS
Decide where you want to use your Vivid Kit Toners to create an exciting “wow” effect.
NOTE: Make note of where objects overlap in your design and decide whether you want them to sit on top of one another or visually blend with a transparency effect.
DESIGNING WITH MULTIPLE VIVID TONER SPOT COLORS

21
4
4 IF YOU HAVE MULTIPLE VIVID TONER OBJECTS OVERLAPPING IN A DESIGN
Depending on the desired effect, you may choose to Multiply the overlay objects so the two spot layers blend. Clear should ALWAYS be set to Multiply to achieve the best sheen.
See the “Insider Insights” section at the end of this guide for more information on Multiply.
For more information on overlapping Vivid Toner objects in your design files, refer to the Design Tool for Xerox® Adaptive CMYK Plus Technology (available from your Xerox rep).
DESIGNING WITH MULTIPLE VIVID TONER
SPOT COLORS

22
Designing with CMYK and Vivid Toners

23
Create eye-catching designs with up to eight colors on a page.
DESIGNING WITH CMYK AND VIVID TONERS
Print CMYK and Vivid Toner colors in TWO passes.
Layering CMYK prints with Vivid Toners unleashes a whole new set of design possibilities.
Use solids or tints of Gold, White, Silver, or Clear Toners with CMYK to bring a whole-new “wow” factor to digital print.
CMYK and Vivid Toners are printed in two passes, so designs must be optimized so they do not require exact registration between the two toner sets.
24
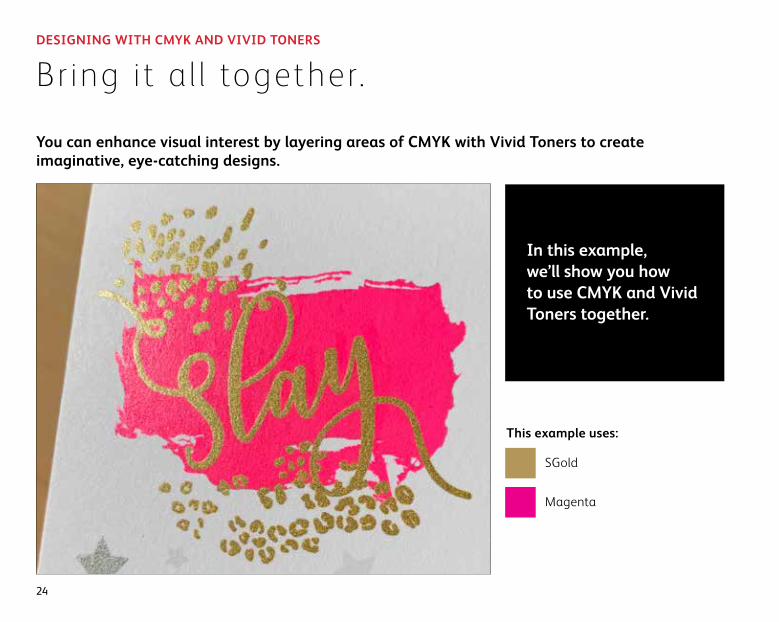
In this example, we’ll show you how to use CMYK and Vivid Toners together.
Bring it a l l together.DESIGNING WITH CMYK AND VIVID TONERS
You can enhance visual interest by layering areas of CMYK with Vivid Toners to create imaginative, eye-catching designs.
This example uses:
Magenta
SGold

25
Layering Vivid Toners on top of CMYK can amplify their impact...
NOTE: Because a two-pass job like this requires the paper to be manually run through the printer a second time, you should design for registration variation.
For more information on this, see the Insider Insights section at the end of this guide.
When designing for jobs that use both CMYK and Vivid Toners, you should apply CMYK in the first pass and Vivid Toners in the second.
Choose where each toner set’s colors will stand on their own and where they will be layered within your design.
2ND PASS GOLD
1ST PASS MAGENTA
DESIGNING WITH CMYK AND
VIVID TONERS

26
Bring it a l l together.DESIGNING WITH CMYK AND VIVID TONERS
Creating designs that use both CMYK and Vivid Toners uses different principles from those you learned for creating spot Vivid Toner designs with overlapping elements, and requires two different print passes.
1 CREATE YOUR DESIGN
Create your design and decide where you want your spot colors to appear.
2 DEFINE YOUR SPOT COLOR
Make sure your spot color is set up and named correctly:
SGold (Capitalized)
It should be designated as a CMYK Spot Color.
21
3
3 FILL YOUR OBJECT
Decide where you want to use your Vivid Kit Toners to create the best “wow” effect you can!

27
DESIGNING WITH CMYK AND
VIVID TONERS
4
4 MULTIPLY YOUR OBJECTS
Depending on the desired effect, you may choose to Multiply the overlay objects so the two spot layers print as desired.
Clear should ALWAYS be
set to Multiply to achieve the best sheen.
28
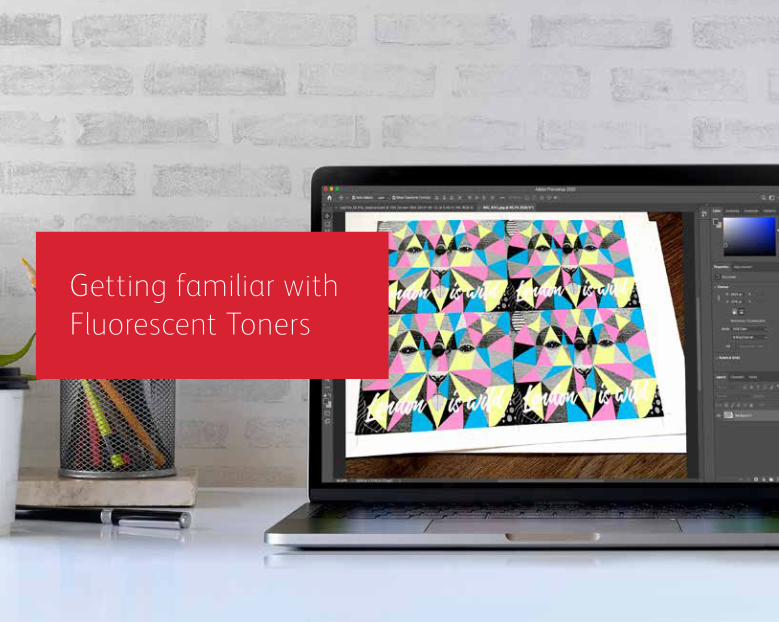
Getting familiar with Fluorescent Toners

29
Create an eye-catching “Spot Wow” with Fluorescent spot colors:
Fluorescent Cyan, Fluorescent Magenta, and Fluorescent Yellow can be used on their own or layered with Grayscale imagery to grab—and hold—attention.
Unlock an intriguing glow with blended Fluorescent process printing:
Because the Fluorescent Toner Kit contains Fluorescent Cyan, Fluorescent Magenta, and Fluorescent Yellow—in addition to Black—you can design in CMYK and still get an extra pop and glow when you print with blends.
Specify various Fluorescent Spot colors for added pop!
Design as you would for standard CMYK to create blends of Fluorescent colors.
Get ready to glow.
Create stunning specialty effects with Fluorescent Toners:
Bottom line: Unlike using Vivid Toners, there are 2 ways to design for the Fluorescent Toner Kit.
“Spot Wow” Fluorescent Toner Workflow
“Blended” Fluorescent Toner Workflow
1
2
30
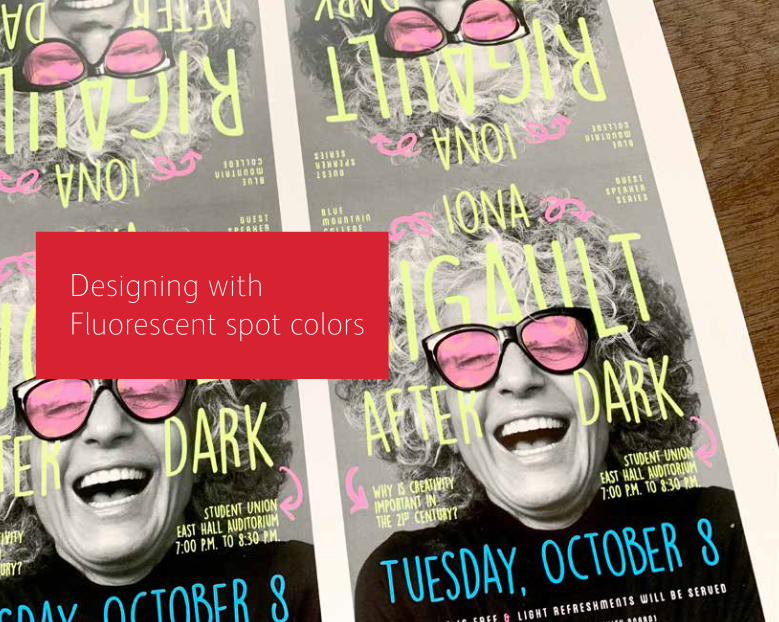
Designing with Fluorescent spot colors

31
Specify ing F luorescent spot colors .
DESIGNING WITH FLUORESCENT SPOT COLORS
Make your designs stand out with Fluorescent spot colors.
Spot effects are stunning in their simplicity.
Creating Fluorescent spot colors is simple.
The easiest way to use Fluorescent Toners is to specify a spot (or spots) of Fluorescent Cyan, Fluorescent Magenta, or Fluorescent Yellow.
Contrasting Fluorescent Toners with Black elements within a design helps Fluorescent colors pop even more.
Note: Some Fluorescent colors pop more than others. Always be sure to test your jobs to be sure they are printing as expected.

32
Add a spot color ef fec t to graphic s or text . DESIGNING WITH FLUORESCENT SPOT COLORS
Naming Fluorescent colors correctly and specifying them as “Spots” in your Adobe® design file will deliver more saturated colors when printing.
If you leave these colors tagged as “Process” in your design file, they will still print with fluorescence—but they will not be as saturated as when they are tagged as “Spot.”
Specify as 100% Yellow and name “FYellow”
SAVE AS A SPOT COLOR
Specify as 100% Magenta and name “FMagenta”
SAVE AS A SPOT COLOR
Specify as 100% Cyan and name “FCyan”
SAVE AS A SPOT COLOR

33
In this example, we’ll show you how to create specialty Fluorescent fills for text and vector art.
Spot effects can be created in just a few simple steps. Start by determining which Fluorescent spot color(s) you want and where each effect will be applied within your design.
This example uses:
FCyan
FMagenta
FYellow
DESIGNING WITH FLUORESCENT SPOT COLORS

34
Add a spot ef fec t to graphic s or text . DESIGNING WITH FLUORESCENT SPOT COLORS
While this example uses Adobe® InDesign®, the same concepts apply in Adobe® lllustrator®.
1 SET UP YOUR LAYERS
While this isn’t 100% necessary, working in layers will help you keep a clean working file.
Create a base layer for your
Grayscale image. Next add a layer for your Fluorescent art and text.
2 IMPORT YOUR GRAYSCALE IMAGE
Open your Grayscale image and place it on the Grayscale image layer.
3 CREATE FLUORESCENT DESIGN ELEMENTS
Next, create the elements you wish to be Fluorescent and place them on the Fluorescent art layer.
1
2 3
35
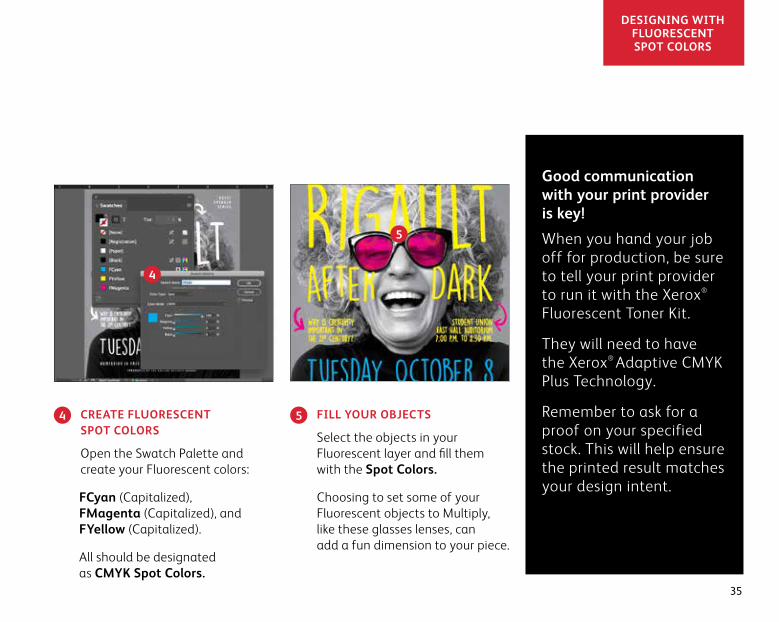
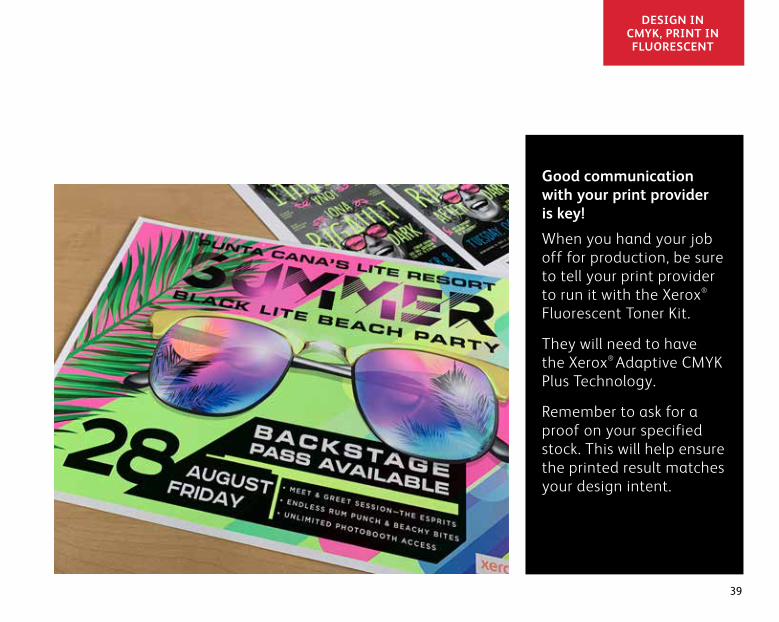
When you hand your job off for production, be sure to tell your print provider to run it with the Xerox®
Fluorescent Toner Kit.
They will need to have the Xerox® Adaptive CMYK Plus Technology.
Remember to ask for a proof on your specified stock. This will help ensure the printed result matches your design intent.
4 CREATE FLUORESCENT SPOT COLORS
Open the Swatch Palette and create your Fluorescent colors:
FCyan (Capitalized), FMagenta (Capitalized), and FYellow (Capitalized).
All should be designated as CMYK Spot Colors.
5 FILL YOUR OBJECTS
Select the objects in your Fluorescent layer and fill them with the Spot Colors.
Choosing to set some of your Fluorescent objects to Multiply, like these glasses lenses, can add a fun dimension to your piece.
5
Good communication with your print provider is key!
DESIGNING WITH FLUORESCENT SPOT COLORS
4

36
Design in CMYK, print in Fluorescent

37
Give your ar t new “glow” in pr int .
DESIGN IN CMYK, PRINT IN FLUORESCENT
Make your designs stand out with the POP of blended Fluorescent colors.
Don’t change a thing about your design! Just change toners.
Since the Fluorescent Toner Kit contains Fluorescent Cyan, Fluorescent Magenta, and Fluorescent Yellow along with process Black, it lets you print process CMYK images with an intriguing pop and glow.
The Fluorescent Toner Kit is different from the Vivid Kit in that the colors can be blended together, just like with CMYK process printing.

38
Bring a new glow to your CMYK ar t .DESIGN IN CMYK, PRINT IN FLUORESCENT
While this example uses Adobe® lllustrator®, the same concepts apply in Adobe® lnDesign®.
1 OPEN OR CREATE YOUR CMYK ARTWORK
Start with an existing CMYK file or create new art.
2 MAXIMIZE YOUR IMPACT
Contrasting areas of fluorescent color with Black in your design can amplify the effect of the Fluorescent Toners when your file is printed.
3 PRINT WITH FLUORESCENT TONERS
Fluorescent Toners make your process color designs pop and glow with minimal effort!
1
2
3
39
DESIGN IN CMYK, PRINT IN FLUORESCENT
When you hand your job off for production, be sure to tell your print provider to run it with the Xerox®
Fluorescent Toner Kit.
They will need to have the Xerox® Adaptive CMYK Plus Technology.
Remember to ask for a proof on your specified stock. This will help ensure the printed result matches your design intent.
Good communication with your print provider is key!

40
Workflow settings for print production
41
Set yourself up for success .
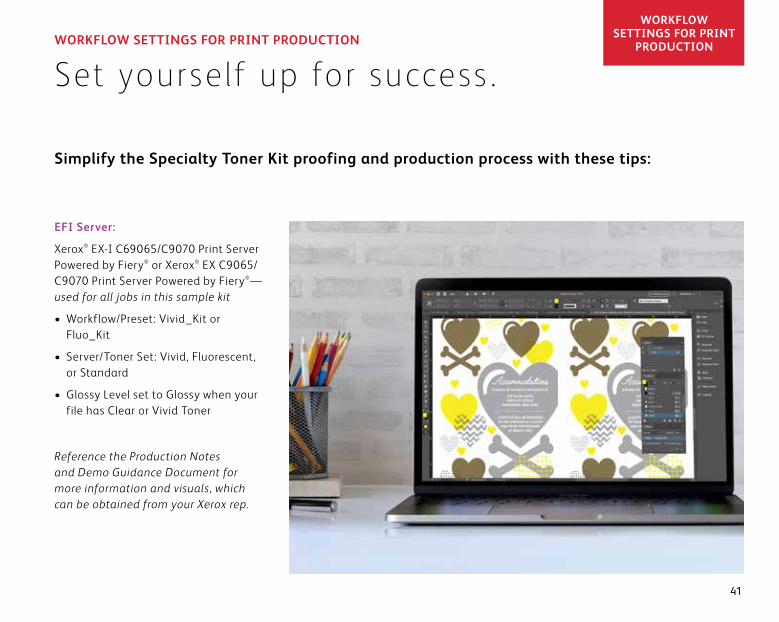
Simplify the Specialty Toner Kit proofing and production process with these tips:
EFI Server:
Xerox® EX-I C69065/C9070 Print Server Powered by Fiery® or Xerox® EX C9065/C9070 Print Server Powered by Fiery®—used for all jobs in this sample kit
• Workflow/Preset: Vivid_Kit or Fluo_Kit
• Server/Toner Set: Vivid, Fluorescent, or Standard
• Glossy Level set to Glossy when your file has Clear or Vivid Toner
Reference the Production Notes and Demo Guidance Document for more information and visuals, which can be obtained from your Xerox rep.
WORKFLOW SETTINGS FOR PRINT PRODUCTIONWORKFLOW
SETTINGS FOR PRINT PRODUCTION

42
Color breakdowns across the workflow, from design to print:
Preview: To get here, right-click on the job you are printing and select Preview. This will let you see what the designer sees.
Preview: To get here, right-click on the job you are printing and select Preview. This will let you see what the designer sees.
Printed Output
Printed Output
Vivid Toners
Spot Wow Fluorescent Toners Workflow
Gold
White
Silver
Clear
Designer View:Adobe Cloud Display
Designer View:Adobe Cloud Display
Set up as Spot Color: PMS 871C and named SGoldSet up as Spot Color: 100% Cyan and named SWhiteSet up as Spot Color: PMS 877C and named SSilverSet up as Spot Color: 100% Yellow and named SClear
Printer View on EFI Server: Preview (processed job)
Printer View on EFI Server: Preview (processed job)
Displays as Gold
Displays as Cyan
Displays as Grey
Displays as Yellow
EFI Preflight Report What you'll see
What you'll seeEFI Preflight Report
Spot Color: SGold
Fluorescent CyanSet up as Spot Color: 100% Cyan and named FCyan
Displays as Cyan Spot Color: FCyan
Spot Color: SWhite
Fluorescent MagentaSet up as Spot Color: 100% Magenta and named FMagenta
Displays as Magenta Spot Color: FMagenta
Spot Color: SSilver
Fluorescent YellowSet up as Spot Color: 100% Yellow and named FYellow
Displays as Yellow Spot Color: FYellow
Spot Color: SClear

43
Preview: To get here, right-click on the job you are printing and select Preview. This will let you see what the designer sees.
Printed OutputNote: The CMYK or RGB blends in the design will be created using the Fluorescent Specialty Toners and black toner.
Blended Fluorescent Toners Workflow
Designer View:Adobe Cloud Display
Printer View on EFI Server: Preview (processed job)
What you'll seeEFI Preflight Report
Fluorescent Cyan CMYK or RGB blends as used in the design
Blends as used in the design Cyan
Fluorescent Magenta CMYK or RGB blends as used in the design
Blends as used in the design Magenta
Fluorescent Yellow CMYK or RGB blends as used in the design
Blends as used in the design Yellow
For more information on design best practices for Xerox® Adaptive CMYK Plus Technology, please refer to the Design and File Preparation Guidelines for the Xerox® PrimeLink® C9065/C9070 Printer on Xerox.com.

44
INSIDER INSIGHTS
Xerox® Adaptive CMYK Plus Technology is an innovative accessory kit that lets your print provider swap out their Xerox® PrimeLink® C9065/C9070 Printer’s CMYK Toner with high-value Specialty Toners in minutes.
While Specialty Toners register well to each other on each side of a page, there can be some variation on jobs that require both CMYK and Specialty Toners, due to the fact that paper must be manually re-run through the printer after the toners are swapped. Planning for this with designs that allow for registration variation will help you maximize the technology’s benefits.

45
The enhancement techniques shown in this guide will print differently depending on your stock surface. Coated or silk sheets deliver smoother effects than uncoated.
It’s always a good idea to proof a design on your chosen stock prior to a full production run. This will help ensure the final result matches your design intent.
Design for registration variation in these scenarios:
When you’re planning on using Specialty Toners in addition to CMYK,
OR
When you’re planning on running 2-sided jobs.
Intentionally overlap and set to Multiply Leave ample white spaceOR

46
Over lapping objec t s when designing for the Vivid Toner set .
INSIDER INSIGHTS
When overlapping specialty objects, the order of the Vivid Toners in the printer does NOT matter.What DOES matter are the following variables with respect to layout and settings within your design file:
• Object position in the Layers palette
• Object settings in the Effects/Transparency palette
YMK C
Clr
Clr
S
S
G
G
W
W
Print Engine Order:CMYK Toners
Print Engine Order:Vivid Toners
Design Applications: On-screen Preview
SGold on screen:PMS 871C
SWhite on screen:
100% Cyan
SSilver on screen:PMS 877C
SClear on screen:
100% Yellow
For more information on overlapping Vivid Toner objects in your design files, refer to the Design Tool for Xerox® Adaptive CMYK Plus Technology (available from your Xerox rep).

47
INSIDER INSIGHTS
Overlapping Vivid objects using Normal:
TOP(Clear)
TOP(Gold)
(Silver)
(Silver)
NORMAL
NORMAL
NORMAL
NORMAL
NORMAL
NORMAL
This example shows the printed design effects achieved by:
1. The objects’ position in the Layers palette (Top layer, Bottom layer).
2. The objects’ setting in the Effects/Transparency palette when set to Normal.
The Top layer Vivid Toner object (circle) will always overprint the Bottom layer Vivid Toner object (circle) when all the objects are set to Normal.
(Clear)TOP (White)
While these examples showcase Vivid Toner colors, the same principles apply if you are Overlapping or Multiplying Fluorescent Spot colors.

48
Over lapping objec t s when designing with ONLY Vivid Toners .
INSIDER INSIGHTS
Overlapping Vivid objects using Multiply and Normal:
TOP(Gold)
(Clear)TOP (White)
(Silver)
(Silver)
NORMAL
NORMAL
NORMAL
MULTIPLY
MULTIPLY
MULTIPLY
This example shows the printed design effects achieved by:
1. The objects’ position in the Layers palette (Top layer, Bottom layer).
2. The objects’ setting in the Effects/Transparency palette, when set to Multiply and Normal.
The Top layer Vivid Toner object (circle)—in combination with the setting Multiply—will always show a transparency effect with the Bottom Vivid Toner object layer (Normal setting).
TOP(Clear)
In this printed example, the Vivid Toner object (Clear circle) is set to Multiply, but it is NOT the Top layer; therefore, the two overlapping Vivid Toner objects (Clear and White circles) do not have transparency in the overlapping portion of the two objects.
The Top layer (White circle) would have to be set to Multiply to have transparency in the overlapping portion of the two objects (White and Clear circles).

49
INSIDER INSIGHTS
Working with Clear Specialty Toner:To achieve the best sheen on your printed output when using Clear Toner, you should always set Clear objects to Multiply in the Effects/Transparency palette within your design file:
CLEAR STARS SET TO MULTIPLY IN THE DESIGN FILE

50
Over lapping objec t s when designing with ONLY Vivid Toners .
INSIDER INSIGHTS
Overlapping Vivid objects using only Multiply:
TOP(Gold)
(Clear)TOP (White)
(Silver)
(Silver)
MULTIPLY
MULTIPLY
MULTIPLY
MULTIPLY
MULTIPLY
MULTIPLY
This example shows the printed design effects achieved by:
1. The objects’ position in the Layers palette (Top layer, Bottom layer).
2. The objects’ setting in the Effects/Transparency palette, when all are set to Multiply.
The Top layer Vivid Toner object (circle) in combination with the setting Multiply, will always show a transparency effect with the Bottom Vivid Toner object layer when it is also set to Multiply.
TOP(Clear) Refer to the Vivid Shape Tool for the full information on overlapping Vivid objects.
It can be obtained on SMART Centre or from your Xerox Rep.
51
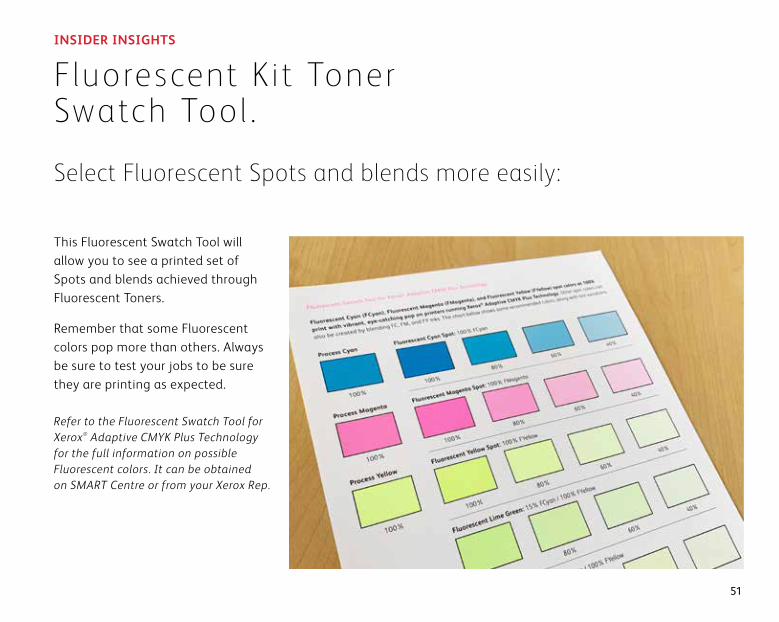
Fluorescent K it Toner Swatch Tool .
INSIDER INSIGHTS
Select Fluorescent Spots and blends more easily:
This Fluorescent Swatch Tool will allow you to see a printed set of Spots and blends achieved through Fluorescent Toners.
Remember that some Fluorescent colors pop more than others. Always be sure to test your jobs to be sure they are printing as expected.
Refer to the Fluorescent Swatch Tool for Xerox® Adaptive CMYK Plus Technology for the full information on possible Fluorescent colors. It can be obtained on SMART Centre or from your Xerox Rep.
52
©2020 Xerox Corporation. All rights reserved. Xerox® and PrimeLink® are trademarks of Xerox Corporation in the United States and/or other countries. 02/20 BR28322 PC9GL-01UA
It’s time to bring more imagination to every printed page. Expectations for digital print are changing. How will you adapt? Xerox® Adaptive CMYK Plus Technology triples your design freedom by giving you the power to add new high-end specialty enhancements using the Xerox® PrimeLink® C9065/C9070 Printer. Glowing Fluorescents. Glimmering Golds. Eye-catching Silver. A versatile layer of White. Plus, elegant Clear accents.
Xerox® Adaptive CMYK Plus Technology means designers have more freedom to explore. More opportunity to bring ideas to life. And more ways to be sure print pieces get noticed.
Breathing inspirat ion into pr int .
For more information, visit Xerox.com