xbox 360 rf module replacement - amazon web services · step 1 — hard drive grasp the hard drive...
TRANSCRIPT

Xbox 360 RF Module ReplacementRF module replacement.
Written By: Walter Galan
Xbox 360 RF Module Replacement
© iFixit — CC BY-NC-SA www.iFixit.com Page 1 of 19

INTRODUCTION
Use this guide to replace the circuit board housing the status LEDs beneath the power button.
TOOLS:Spudger (1)
T10 Torx Screwdriver (1)
T8 Torx Screwdriver (1)
Xbox 360 Opening Tool (1)
PARTS:Xbox 360 RF Module (1)
Xbox 360 RF Module Replacement
© iFixit — CC BY-NC-SA www.iFixit.com Page 2 of 19

Step 1 — Hard Drive
Grasp the hard drive assembly and press the release button while lifting its front edge.
Remove the hard drive assembly from the top vent.
Step 2 — Bottom Vent
Stand the console vertically with thebottom edge facing up.
Throughout the following openingprocedure, the finger of an Xbox 360opening tool can be used in place ofa spudger.
Insert the flat end of a spudger orthe edge of an Xbox 360 openingtool into the small gap at the frontedge of the bottom vent.
Pry the front edge of the bottom ventaway from the faceplate.
Xbox 360 RF Module Replacement
© iFixit — CC BY-NC-SA www.iFixit.com Page 3 of 19

Step 3
In the next few steps, you will use the tip of a spudger or the finger of an Xbox 360 opening tool torelease the clips along the left and right sides of the bottom vent. Their locations are highlighted inred.
You will insert the tool into the holes molded into the white plastic side case pieces.
Step 4
To release the clips, work from the front edge of the bottom vent.
While slightly lifting the front edge of the bottom vent, use the tip of a spudger to push the clipsclosest to the front of the bottom vent towards the inside of the console.
Xbox 360 RF Module Replacement
© iFixit — CC BY-NC-SA www.iFixit.com Page 4 of 19

Step 5
Repeat the same process to release the two center clips on the bottom vent.
Step 6
Use the tip of your spudger to release the clips on the bottom vent nearest the back of the Xbox.
Xbox 360 RF Module Replacement
© iFixit — CC BY-NC-SA www.iFixit.com Page 5 of 19

Step 7
Remove the bottom vent from the360.
Xbox 360 RF Module Replacement
© iFixit — CC BY-NC-SA www.iFixit.com Page 6 of 19

Step 8 — Faceplate
Insert the edge of a spudger between the faceplate and the outer casing near the power button.
Run your spudger along the edge of the faceplate to release the clips securing it to the front of theconsole.
You may also accomplish this task by using the edge of the Xbox 360 opening tool, but it mayscratch the plastic case.
Alternatively, you can use your hands to carefully pull the faceplate away from the Xbox.
Xbox 360 RF Module Replacement
© iFixit — CC BY-NC-SA www.iFixit.com Page 7 of 19

Step 9
Repeat the same motions aspreviously mentioned to release theleft side of the faceplate.
Step 10
Remove the faceplate from the frontface of the console.
Xbox 360 RF Module Replacement
© iFixit — CC BY-NC-SA www.iFixit.com Page 8 of 19

Step 11 — Top Vent
Stand the console vertically with the top edge facing up.
The top vent is secured to the console via clips. The first two clips are located underneath the topvent closest to the faceplate, as shown in the pictures.
Step 12
Insert the flat end of a spudger into the small gaps previously mentioned to release the clips.
You may also use the long finger of an Xbox 360 opening tool to accomplish this task.
Xbox 360 RF Module Replacement
© iFixit — CC BY-NC-SA www.iFixit.com Page 9 of 19

Step 13
In the next few steps, you will use the tip of a spudger or the finger of an Xbox 360 opening tool torelease the clips along the left and right sides of the top vent. Their locations are highlighted in red.
Step 14
To release the clips, work from the middle of the top vent.
While slightly lifting the front edge of the top vent, use the tip of a spudger to push the clips closestto the center of the top vent towards the inside of the console.
Xbox 360 RF Module Replacement
© iFixit — CC BY-NC-SA www.iFixit.com Page 10 of 19

Step 15
Use the tip of your spudger torelease the clip on the top ventnearest the back of the Xbox's uppercase.
Step 16
The last clip is hidden underneath the rubber foot nearest the back of the console.
Use the tip of your spudger to release the clip on the top vent nearest the back of the Xbox.
Remove the top vent from the 360.
Xbox 360 RF Module Replacement
© iFixit — CC BY-NC-SA www.iFixit.com Page 11 of 19

Step 17 — Lower Case
Carefully peel the warranty stickeroff the console.
Step 18
The upper and lower cases are attached via several latches, located in the front and back of theconsole. These latches must be disengaged to separate the upper case from the console.
Use the flat end of a spudger to release the following latches:
Above the front-facing USB ports.
Beneath the front-facing USB ports.
Above the Memory Unit slots.
Xbox 360 RF Module Replacement
© iFixit — CC BY-NC-SA www.iFixit.com Page 12 of 19

Step 19
Insert the flat end of a spudger andpry upwards to release the lastremaining latch located above theeject button.
Step 20
Slightly lift the front portion of thelower case to ensure that thelatches in the front have beencompletely released.
Xbox 360 RF Module Replacement
© iFixit — CC BY-NC-SA www.iFixit.com Page 13 of 19

Step 21
The upper and lower cases are held together by seven release latches located on the back of theconsole. Their locations are highlighted in red.
Step 22
Press the Xbox 360 opening tool down into the clips securing the lower case to the upper casenear the I/O ports.
While pressing down on the tool, push the lower and upper cases apart to separate the retainingclips.
Xbox 360 RF Module Replacement
© iFixit — CC BY-NC-SA www.iFixit.com Page 14 of 19

Step 23
While pushing the upper and lower cases apart, use the tip of a spudger or the finger of an Xbox360 opening tool to push the long clip highlighted in red toward the center of the 360.
The clip should release, leaving the clips near the power connector as the only thing holding theupper and lower cases together.
Step 24
Press the Xbox 360 opening tooldown into the two remaining clipsnear the power connector.
Push the upper and lower casesapart to fully release the retainingclips.
Xbox 360 RF Module Replacement
© iFixit — CC BY-NC-SA www.iFixit.com Page 15 of 19
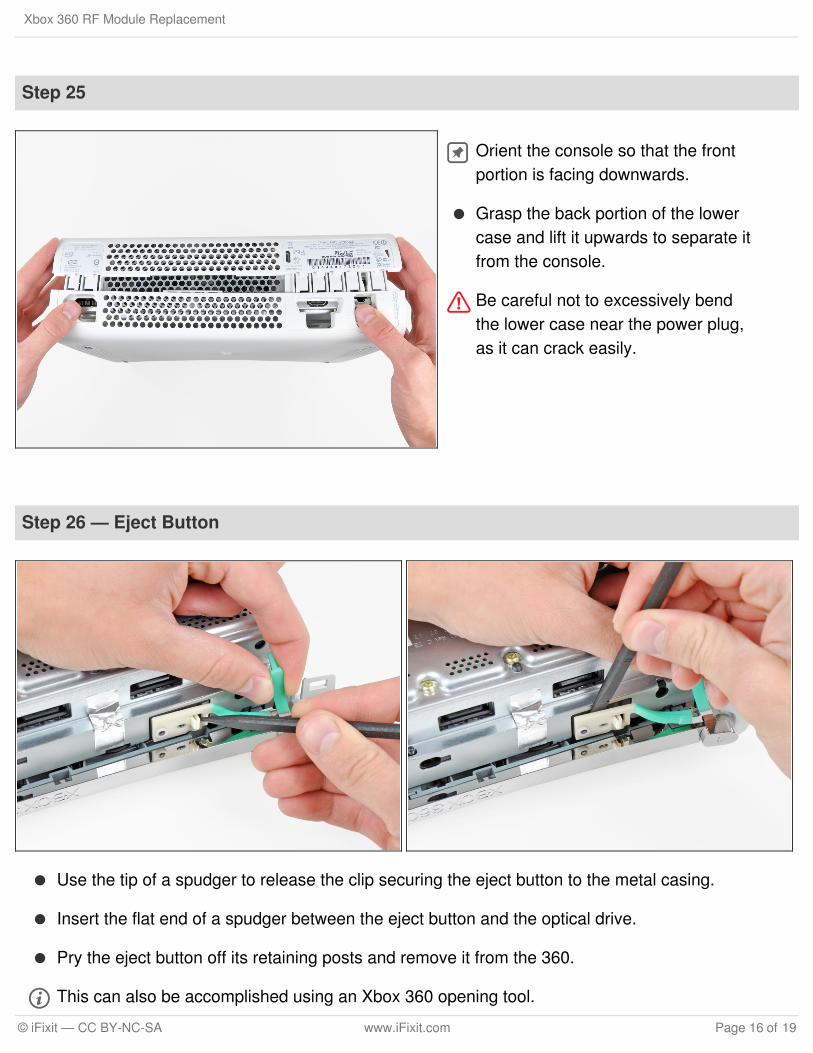
Step 25
Orient the console so that the frontportion is facing downwards.
Grasp the back portion of the lowercase and lift it upwards to separate itfrom the console.
Be careful not to excessively bendthe lower case near the power plug,as it can crack easily.
Step 26 — Eject Button
Use the tip of a spudger to release the clip securing the eject button to the metal casing.
Insert the flat end of a spudger between the eject button and the optical drive.
Pry the eject button off its retaining posts and remove it from the 360.
This can also be accomplished using an Xbox 360 opening tool.
Xbox 360 RF Module Replacement
© iFixit — CC BY-NC-SA www.iFixit.com Page 16 of 19

Step 27 — Upper Case
Remove the six silver 64 mm T10Torx screws securing the uppercase to the metal casing.
Step 28
Orient the console so that the uppercase is facing upwards.
Lift the upper case straight up andremove it from the console.
Xbox 360 RF Module Replacement
© iFixit — CC BY-NC-SA www.iFixit.com Page 17 of 19

Step 29 — RF Module
Use the flat end of a spudger to release the clips securing the plastic RF module shield along thetop and the left edge of the power button board.
Lift and remove the RF module shield from the console.
Step 30
Remove three 5.6 mm T8 Torxscrews securing the RF module tothe metal chassis.
Xbox 360 RF Module Replacement
© iFixit — CC BY-NC-SA www.iFixit.com Page 18 of 19

To reassemble your device, follow these instructions in reverse order.
This document was last generated on 2018-05-16 09:15:50 AM.
Step 31
Grasp the RF module and lift it straight up to disconnect it from its socket on the motherboard.
Remove the RF module from the console.
Xbox 360 RF Module Replacement
© iFixit — CC BY-NC-SA www.iFixit.com Page 19 of 19