x35c lowtemp-manual-2-letter size
TRANSCRIPT

X-35CX-35C
DECEMBER 2005For operator. Do not discard.
INSTALLATION, OPERATION, AND MAINTENANCE
DISHWASHER MANUAL
MODEL
Congratulations on the purchase of your new Jet-TechX-35C dishwasher.
Jet-Tech dishwashers have been used dependably for many years. This manual has been written to help YOU, the operator, perform your job more efficiently, because your job is one of the “most important” in this restaurant. WHY? One reason is that your product, the dishes and glasses, are the first thing that the customer sees when he sits down. Clean, sparkling dishes and silverware leave a favorable impression on the customer when he observes the table setting. Customers mean profit and profit means jobs yes, your job, the cook, the waiters, and the manager you are a part of a team. The Jet-Tech dishwasher is a tool which you can use to make your job easier and which will help you deliver clean dishes.
Should you or the individual installing this unit have any questions or comments, please don't hesitate to contact our Customer Service Department (888-275-4538 x: 611).
Thank you for your support.
JET-TECH SYSTEMS 5659 ROYALMOUNT Montreal, Quebec H4P 2P9 Tel.: 888-275-4538 (888-ASK-4-JET); 514-737-9701 Fax: 514-737-2792 e-mail: [email protected]
3
Contents
INTRO PAGE PAGE 3PAGE 5-6
TIMER ADJUSTMENT PAGE 7-8STARTING INSTRUCTIONS PAGE 9
CLEANING PAGE 12-13
CONTACT INFORMATION PAGE 15PARTS LIST PAGE 16-17
CONNECTING YOUR NEW X-35C
OPERATING INSTRUCTIONS PAGE 10-11
TROUBLESHOOTING PAGE 14-15
4

CONNECTING YOUR NEW X-35C
This dishwasher must be installed on a level, rigid, nonflammable surface. To ensure that the machine is level, install the feet (shipped in the wash tank of the machine) and adjust them accordingly. Be sure to provide adequate space for the water, drain and electrical connections.
ELECTRICAL
A 115 volt, 60 Hz, Single Phase circuit is required for this unit. This unit will draw 13 amperes on a 115 volt circuit.
The top cover must be removed for the electrical hook-up. The electrical connection will be made directly on the power switch. Replace the top cover once the connection is completed.
WATER SUPPLY
The water connection can be made directly on the shut-off valve on top of the unit. It will require a 1/2 NPT male fitting. The flowing water pressure cannot be less than 18 psi or exceed 35 psi. If the water pressure exceeds the prescribed amount, you will get premature failure and thus may void the warranty. The timer will need to adjusted to compensate for the water pressure. Incoming water temperature must be 140º F +/- 5º( 60º C). Make sure that the water is free from calcium and hard water deposits. For these situations, a water softener system is highly recommended. Build-up of calcium and lime deposits in the washer may occur and servicing will be required on a more frequent basis which will not be covered by the warranty.
DRAIN
This dishwasher has a gravity drain. A 2" OD connection should be made under the dishwasher. Please consult your local codes for this type of installation. It is important not to reduce the size of the pipe.
IMPORTANT NOTEReasonable access to and around the machine for service must be provided.
5
120 volts

Disconnecting of hard plumbing or removal of counter tops or cabinets, etc., for servicing is not covered by warranty.
CHEMICAL INSTALLATION
All the chemical pumps, located on the control box at the top, are activated by a timer. Priming switch above will help draw the product in each corresponding lines. The BLEU tubing is for the rinse-aid, or drying agent. The RED tubing is for the detergent, and the CLEAR tubing is for the sanitizing solution.
WARNINGWhenever manipulating chemicals, use appropriate protection (eyes and hands) as these chemicals are corrosive.
Detergent: High sequestrant alkaline solution200 ppmSanitizer: Chlorine solution (min. 120F, 49C) min: 50 ppm (as NaOCl)Iodine Solution (min. 75F, 24C) min: 12.5 ppm- max: 25 ppmQuaternary ammonium solution (min. 75F, 24C)min: 150 ppm - max:400 ppmRinse-Aid: Low foam rinse-aid, surfactant isopropanol50 ppm
See local health code for appropriate quantities and usage.Contact your chemical representatives for calibration and supply.
DertegentRed Tube
SanitizerClear tube
Rinse-AidBlue Tube
6
PrimingSwitches
ADJUSTING THE TIMER
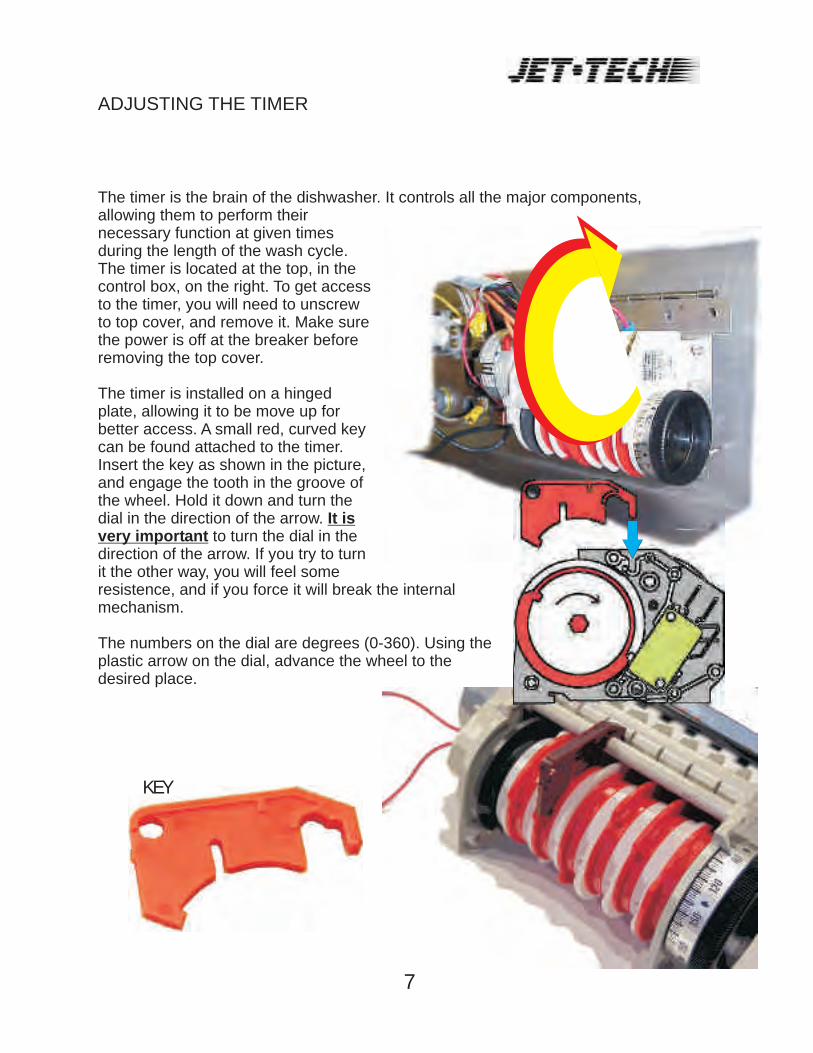
The timer is the brain of the dishwasher. It controls all the major components, allowing them to perform their necessary function at given times during the length of the wash cycle. The timer is located at the top, in the control box, on the right. To get access to the timer, you will need to unscrew to top cover, and remove it. Make sure the power is off at the breaker before removing the top cover.
The timer is installed on a hinged plate, allowing it to be move up for better access. A small red, curved key can be found attached to the timer.Insert the key as shown in the picture, and engage the tooth in the groove of the wheel. Hold it down and turn the dial in the direction of the arrow. It is very important to turn the dial in the direction of the arrow. If you try to turn it the other way, you will feel some resistence, and if you force it will break the internal mechanism.
The numbers on the dial are degrees (0-360). Using the plastic arrow on the dial, advance the wheel to the desired place.
KEY
7

Factory setting.DRAIN 180-200FILL 190-250DET 10-20SANI 220-222RINSE 220-222
REFERENCE TABLEDegrees = Seconds0 = 045 = 1190 = 22135 = 34180 = 45225 = 56270 = 67315 = 79360 = 90
8
KEY
WHEELS
DIAL
PLASTICARROW
DISHWASHER OPERATION
STARTING INSTRUCTIONS
1) Start-up of the Jet-Tech Dishwashera) Lift doors about two inches from the bottom.
b) Turn power ON. The switch is located at the back of the control panel.c) Drain water if it is cold by pushing the drain button on the control panel until all
the water is out of the machine.d) Open doors fully to inspect interior.e) Check and clean the drain screenf) Replace it properly into the sump housingg) Check wash arm spray tips. If they're clogged, clean with a toothpick and
rinse at the sinkh) Check that chemical lines run to chemical containers:i) Red detergent line
ii) Blue rinse additive lineiii) Clear/white sanitizer linei) Replace wash arms..
j) Close doors to about two inches from the bottom. k) Press the fill switch, and fill for about 20 seconds.l) Check the water temperature (it should be approximately 140 degrees F or 60
degrees C). m) Open doors fully, and insert the tray of dishes into the machine and close the
doors.i) Start the machine by closing the door completely.
After the machine stops, the cycle light will switch off, raise the doors, remove the tray, and allow dishes to dry before stacking.
The Jet-Tech Dish machine will complete the wash and rinse cycle and automatically feed the proper amount of chemicals, and turn itself off.
9
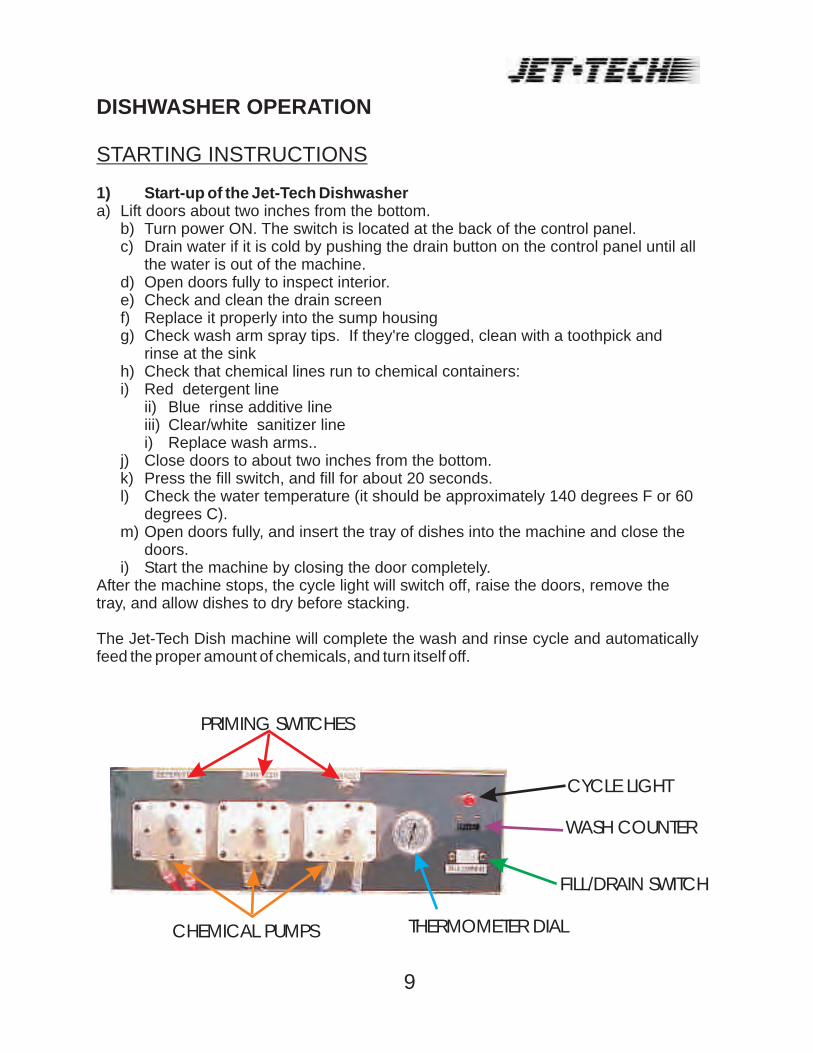
CYCLE LIGHT
WASH COUNTER
FILL/DRAIN SWITCH
THERMOMETER DIALCHEMICAL PUMPS
PRIMING SWITCHES

10
OPERATING INSTRUCTIONS
Dishes are expensive. An average plate can cost over $5.00. Be very careful when preparing and handling dishes.
A. Scrapping. Scrapping operations are necessary to remove, mechanically or by hand, the remaining food from dishes prior to the dishwashing operation. The purpose of scrapping is to keep excessive garbage from going into the dishwashing machine. Hand scrapping is done by hand or with a rubber spatula. The use of a pre-rinse hose for wet scrapping of dishes before they go into the machine is ideal for removing small particles of soil not removed by the hand scrapping operation. It also saves labor because less time will be required in the full scrapping operation if the water scrapping method is used, plus a better job can be assured using this method. Water scrapping is a must, but if it is not available, a rubber spatula or glove can be provided for you to do a thorough job of hand scrapping the dishes.
B. Racking Dishes. Properly placing the dishes in the rack before washing is one of the most important jobs the operator must perform. Every surface of a soiled dish must be reached by the machine sprays to provide sufficient scrubbing action in the time that the dish is being sprayed by detergent solution. Piling dishes won't save you time. Many of the dishes will not be cleaned during the wash cycle and will require sorting and washing a second time. Be a PRO do it right the first time. Be sure to

11
rack all the sized plates. If you sort and rack properly, it will be easier and save you time.
Note in the illustration that the plates are racked with overlapping and that the sprays from the top spray arm will strike the food contact surfaces of the dishes (the face of the dishes).
Racking Glasses. Glasses, cups, bowls and other deep dishes must be racked faced down so as not to carry out wash waster and so that the sprays can work on the internal surfaces. Rack glasses and cups in a properly sized compartmentalized glass rack. Allow to air dry. Glass washing is very important. A customer may gain his first impression of an establishment when he is served his glass of water. They should be placed in the racks upside down in each compartment. The rinse additive is injected into the rinse water to prevent spotting and speed the drying process. (Note: Your chemical representative can help you select the proper glass rack for your glasses.)
Racking Flatware. Flatware may be washed in many ways. It is recommended that all flatware be pre-soaked in a deep pan, generally a bus pan, using a pre-soak detergent. This will prevent adhering of soil on flatware and reduce tarnishing. A pre-soak detergent is especially useful for the removal of protein oil such as egg, syrup. It is recommended that 30 minutes be allotted for pre-soaking, if possible. After pre-soaking, the flatware is placed in a wash basket with handles down to prevent them from “nesting” which provides maximum exposure to the wash process.

12
C. Stacking and Storage. The stacking and storage of dishes that are being washed and sanitized is very important. A dish may be perfectly washed but at risk of being contaminated from the handling after washing. Avoid storing dishes where they may be soiled. Minimize handling the dishes with the hand on the food contact surfaces (towel drying is an incorrect procedure). Do not stack plates and dishes higher than 12 inches; their combined weight can destroy the porcelain surface on the bottom plates.
D. Cleaning the Jet-Tech Dishwasher. Certain times of the day should be reserved to clean the dishwashing machine. Follow the cleaning and inspection procedures listed below.
Cleaning the Drain Screen Remove the drain screen and thoroughly clean all foreign material from the screen. Do not bang the screen on the table to jar food loose. Use the faucet or pre-rinse hose. Check the seat casting where the drain stopper sets to make sure no foreign material is present. Re-install drain screen and determine that it is the proper position.
Cleaning the Wash Arms - Inspect the upper and lower spray arms to insure that they are not clogged with food scraps. Otherwise, full and uniform spray pressures will not be delivered to the soiled dishes.
If there is any question as to the spray arm nozzles being clear of food scraps, they should be removed and cleaned. To remove the arm, loosen nut and pull arm out of spray base. The arm can be checked for locked jets by running water into the hug and observing that all jets are flowing. Clogged jets can be cleared with a toothpick or small wire and the entire arm can be

13
flushed out by removing the end plugs. Remember to replace the end plugs after cleaning the arm.
After the arm has been thoroughly cleaned, re-install and check that arm is fully inserted in the bearing support. Hand tighten thumb screws. Too-tight screws can break off in spray base.
E. Empty the Scrap Tray. Remove the scrap tray drawer and thoroughly rinse out. Change the tray after each meal or else once an hour, if it's very busy.
F. Check Operation. Operate the machine and watch detergent sanitizer, and rinse additive delivery tubes where they extend into the open sump on the machine. Watch to insure that the chemicals are delivered during the cycle. Remember: red tube detergent; blue tube rinse additive; and clear/white tube sanitizer. Check temperature at the end of the cycle for 140 degrees F (60 degrees C).
G. Cleanup. Wipe down the machine and check the chemical level in the containers. Also inspect the machine for leaks or other items that night cause trouble during a rush period. You are now ready to wash dishes.
H. Remember: The chemical containers should be saved for pickup by the serviceman during his regular call. Do not throw them in the trash bin.
IMPORTANTAlways drain the dishwasher at night. The chlorine in the water will damage the wash tank after awhile.

14
TROUBLE SHOOTING THE JET-TECH DISHWASHER
A. Won't Start1. Check the master switch on the back of control panel to make sure that it is “on”.2. Check circuit breaker which services the dishwasher. Make sure it is “on”.3. Only after checking steps 1 and 2, call the Jet-Tech service people.
B. Out of Chemicals1. Check back-up supply of chemicals. REMEMBER: Red product label to red tube, blue product label to blue tube, and clear/white product label to clear/white tube. Note that sometime extra product is left in the storage area at the direction of the restaurant manager.
C. Dishes/Glasses are Not Clean1. Before you call the Jet-Tech service people, clear your temperature gauge on the machine. Check to be sure that you have at least 120 degrees F water. The Jet-Tech dishwasher must have hot water delivered from the primary heater at 120 140 degrees F. If temperature is okay, then proceed to step 2.2. Check your water softener for salt or obvious malfunction. Your service agreement from Jet-Tech calls for hot/soft water, If the water softener appears okay, there is one final check before you call the Jet-Tech service people. 3. Check the screen and wash arm tips. If they are clear, call us, the Jet-Tech service people.
D. Machine Won't Hold Water1. Check under the drain ball for a knife, spoon, fork, or foreign material, then remove.
E. Water Running on the Floor1. If it is running from the scrap accumulator (The tray at base of the dishwasher) don't call us! Call your plumber the drain is clogged.
F. Water won't Drain from the Machine1. Check the drain sump for obvious clogging. If it appears clear, call the Jet-Tech service people. Lift the drain ball manually, the water should drain in 6 seconds or less.
G. Water Coming Out of the Door (going all over)1. Someone didn't replace the end plugs on the wash arm or didn't tighten them. 2. Check inside the scrap accumulator drawer. If the end plug came off during operation, it will be inside the scrap tray next to the machine. Simply replace it. If it is lost, call us the Jet-Tech people.

15
Phone:1-888-275-4538514-737-9701Fax:514-737-2792
MODEL: X-35CSERIAL:________________DATE INSTALLED:___/___/___
SERVICE:______________________________________________
CHEMICALS:______________________________________________
IMPORTANT NOTES
Locate and clearly identify the water shut-off valve that supplies the dishwasher and the fuse box or breaker switches.
Only qualified and/or licensed technicians can repair this piece of equipment. Removing panels will expose wires and live current. The breaker switch should be switched off or fuses removed before removing the panels. The water supply must also be turned off.
CONTACT INFORMATION
H. Machine Won't Shut Off1. You can turn off the machine in an emergency by turning off the master switch located at the back of the control box.
I. Machine Won't Fill1. Check valve at the top, make sure handle is turned on. If it is, call us the Jet-Tech service people.
J. Spray Arms Won't Spin1. Check the bearings for obstructions. They are easily clogged by grit, string from tea bags, or fiber from napkins or straw wrappers.
K. Dishes Are Coming Out Soapy1. Make sure water temperature is above 120 degrees F; hot water disperses suds.2. Determine that machine is draining properly so that no soapy water carries into the rinse.3. Make sure that no other source of detergent is finding its' way into the rinse cycle.

Part# Description PRICE07-2703 door guide 07-9004 thermometer w/capillary19-5043 1/2" vacuum breaker44-0110 peristaltic pump cover44-0141 clear squeeze tube (10" ea.req'd)44-0150 pump shaft seal44-0220 FEET red detergent line44-0230 FEET blue rinse line44-0240 FEET #3 clear vinyl line44-0256 thumbscrew44-0258 thumbscrew adaptor 44-0264 spray arm bearing44-0266 23" spray arm 44-0290 mounting cast iron - PUMP44-0300 pump cover sm cast iron 44-0310 impeller open l cast iron 44-0330 3x17"bucket probe (pvc 1/4")per ft 44-0350 12"X1 1/2" clear sump hose44-0360 O-ring for pump44-0370 3/16 barb fitting44-0400 1 h.p. motor 44-0441 rocker switch 44-0461 3/8" Cycle light-estimate44-0470 insta start relay44-0480 insta start socket44-0491 90 second timer44-0500 mercury relay 44-0510 drain solenoid 44-0520 peristaltic pump 48 rpm motor 44-0560 110 ac counter 44-0570 hose clamp 44-0571 1/2" PVC 90º CONNECTOR44-0572 1/2" PVC STR. CONNECTOR 44-0573 FEET 1/2" nonmetallic conduit44-0581 door switch magnet44-0590 cube relay timer 44-0620 3/8" brass plugs44-0630 30 amp switch44-0640 bulkhead fitting44-1110 1/2" close nipple brass 44-1130 1/2" street 90 deg brass44-1180 1/2" water solenoid 44-1220 1-1/4" male adapter 44-1660 momentary toggle switch
16

44-1670 rubber boot 44-1720 fill/drain label 44-1820 ball valve 1/2" FIP 44-1830 1/2" brass 90º elbow 44-1880 teflon tape 44-1891 3/8" romex connector44-1900 4" cable ties 44-2020 TR-1 open rack (12.41 cdn) 44-2030 TR-3 plate rack (12.41 cdn) 44-4020 Panduit DNF14-187-M terminal44-6010 bolts- pump cover to mounting44-6010 bolts- mounting to motor 44-6030 screw- s/s pump cover
17