x irr us wifi inspector guide
TRANSCRIPT

7/28/2019 x Irr Us Wifi Inspector Guide
http://slidepdf.com/reader/full/x-irr-us-wifi-inspector-guide 1/11
Page 1
Xirrus Wi-Fi Inspector Version 1.2.1
User’s Guid
Description
The Xirrus Wi-Fi Inspector is a utility for monitoring Wi-Fi networks and managing the Wi-Fi operation of a laptop. Operating on
Windows 7, Vista, or XP, the Wi-Fi Inspector provides detailed information about available Wi-Fi networks, management of a
laptop’s Wi-Fi connection, and tools to troubleshoot Wi-Fi connectivity issues. It provides a useful tool for anyone deploying and
operating Wi-Fi.
Applications
The Wi-Fi Inspector can be used for a number of practical applications, including:
Searching for Wi-Fi networks
Troubleshooting Wi-Fi connectivity issues
Verifying Wi-Fi coverage (site survey)
Managing a laptop’s Wi-Fi connection
Locating Wi-Fi devices
Detecting rogue APs
Verifying AP settings
Aiming Wi-Fi antennas
Wi-Fi Education
7/28/2019 x Irr Us Wifi Inspector Guide
http://slidepdf.com/reader/full/x-irr-us-wifi-inspector-guide 2/11
Page 2
Xirrus Wi-Fi Inspector Version 1.2.1
User’s Guid
Features Dynamic radar view displaying local Wi-Fi network names and relative distance
Detailed information table of all local Wi-Fi networks
Display of laptop’s Wi-Fi connection details and most important network addresses
Connection, Quality, and Speed tests for troubleshooting the Wi-Fi network connection
Real-time graph of signal strength of one or more Wi-Fi networks with 8 minute history
Locate mode for tracking Wi-Fi network signal strength, including audible beep
Export Wi-Fi networks to .csv file
Directly Connect/Disconnect to Wi-Fi networks
Option to Enable/Disable Wi-Fi adapter (Windows 7 and Vista only)
Integrated glossary of Wi-Fi terms
What’s New
The Xirrus Wi-Fi Inspector 1.2.1 release includes the following:
Updated vendor mac address table to include more manufacturers in the networks vendor column.
Changed Speed Test and Quality Test to open a new tab in the default browser instead of opening a new web controlwindow due to flash compatibility issues.
Resolved issue that could cause application to crash occasionally on certain platforms.
Added instructions on sorting, grouping and filtering of networks to the user guide.
Added a summary display to the Networks window for total SSID’s and BSSID’s.
Export networks now correctly formats dual channel radios in same column.
Requirements
Installation and operation of the Xirrus Wi-Fi Inspector requires the following:
1. Windows 7, Vista, or XP SP2 or later
2. Wi-Fi adapter, either built-in or external
3. Adobe Flash Player for running Speed Test. If you do not have the Flash Player installed, it can be downloaded from:http://get.adobe.com/flashplayer/
4. Microsoft .NET Framework 2.0 or later. To check if it is installed, go to Control Panel – Add/Remove Programs and lookfor Microsoft .NET Framework. If it is not present, download and install from:http://msdn.microsoft.com/en-us/netframework
Installation
1. Download the Xirrus Wi-Fi Inspector version 1.2.1 executable from the Wi-Fi Tools section of the Xirrus web site at
http://www.xirrus.com/Products/Wi-Fi-Inspector
2. If upgrading from a version earlier than 1.2 it is necessary to uninstall Wi-Fi Inspector before installing the 1.2.1version. To uninstall the old version, open the Windows Control Panel, then select Add/Remove Programs. Find theXirrus Wi-Fi Inspector, then select Change/Remove and follow the instructions to uninstall.
3. Double click on the Wi-Fi Inspector executable file to install, then follow the instructions as prompted. The applicationwill install an icon on your desktop.
4. Start the Wi-Fi Inspector by double clicking the application icon on the desktop:

7/28/2019 x Irr Us Wifi Inspector Guide
http://slidepdf.com/reader/full/x-irr-us-wifi-inspector-guide 3/11
Page 3
Xirrus Wi-Fi Inspector Version 1.2.1
User’s Guid
Operation The Wi-Fi Inspector is laid out in 4 tiled windows, each displaying different real-time information about the current Wi-Fienvironment. A menu ribbon at the top displays a number of options to control the operation of the application. The followingsections describe the different functions of the application and their usage.
LayoutsThe layout of the 4 windows within the application can be changed via the options in the Layout section of the menu. By default,all 4 windows are displayed. For example by selecting Radar, History, or Networks, only that particular window is shown.Customized views can be created by dragging the separators between windows to resize them, or selecting the icon in theupper left of each window to collapse/expand it.
Radar The Radar displays a dynamic view of the Wi-Fi networks (SSIDs) in the local area. The names of the networks and acorresponding dot are displayed in a circular display with their relative distance from the center of the radar based on thestrength of their Wi-Fi signal. The orientation of networks around the circle does not indicate actual angle of location, but namesare spread for readability. As the signal strength changes for a particular network, the name and dot will move towards thecenter of the Radar (stronger) or further away (weaker).
By default, the size of the Radar is small and placed in the upper left hand corner of the application face. A total of 4 networknames are displayed, with additional non-labeled dots indicating other networks. The Radar display can be expanded to largesize by selecting “Radar” from the Layout section of the menu. This will expand the Radar to full size with up to 10 networknames displayed.

7/28/2019 x Irr Us Wifi Inspector Guide
http://slidepdf.com/reader/full/x-irr-us-wifi-inspector-guide 4/11
Page 4
Xirrus Wi-Fi Inspector Version 1.2.1
User’s Guid
ConnectionThe Connection window displays detailed information about the current Wi-Fi connection. Wireless information – SSID, BSSID,Channel, Signal level, and Network Mode – is displayed on the left. Address information associated with the connection isdisplayed to the right. The address information includes the MAC address of the Wi-Fi adapter, the laptop’s IP address, the DNSserver address, Gateway address, and External IP address that the system is using to access the Internet. The External IPaddress is normally an IP address from your Internet Service Provider’s network.
To the far right of the Connection window, two buttons provide functions to manage your laptop’s Wi-Fi connection. TheConnect/Disconnect button opens the Windows Wireless Network Connection window from which a Wi-Fi network can bechosen to connect or disconnect. The Enable/Disable button (Windows 7 and Vista only) allows you to turn on or turn off the Wi-Fi adapter on your laptop.
NetworksThe Networks window displays a dynamic table of all Wi-Fi networks (SSIDs) that the laptop is detecting in its area. This tableupdates periodically based on the Polling Interval setting in the Settings window (see below). The row of the currently connectedWi-Fi network (if connected) is highlighted in orange.
A description of the information presented in the Networks table is as follows:
SSID: Name of the Wi-Fi network. This is the name of the network that displays in the Windows Wireless NetworkConnection window.
Signal: Signal level of the Wi-Fi network in either dBm or %. A colored bar graph displays the signal level in pictorialform – green is displayed for signals -70dBm and above, yellow for signals -71dBm to -80dBm, orange for -81dBm to -90dBm, and red for -91dBm and below. A desirable signal level for a robust Wi-Fi connection will be green.
Network Mode: Type of Wi-Fi network, either 802.11b, 802.11a, 802.11g, or 802.11n.
Default Encryption: The default encryption type used on the network, whether None, WEP, TKIP, or AES-CCMP. For definition of these terms, see the Glossary.

7/28/2019 x Irr Us Wifi Inspector Guide
http://slidepdf.com/reader/full/x-irr-us-wifi-inspector-guide 5/11
Page 5
Xirrus Wi-Fi Inspector Version 1.2.1
User’s Guid
Default Authentication: The default authentication type used on the network, whether Open, WPA/PSK, or WPA2/802.1x.
Vendor: The name of the manufacturer of the AP or Wi-Fi device operating the Wi-Fi network.
BSSID: The MAC address of the AP or Wi-Fi device.
Channel: The Wi-Fi channel the Wi-Fi network is operating on.
Frequency: The frequency of the Wi-Fi channel, in MHz.
Network Type: The type of operation of the Wi-Fi device operating the Wi-Fi network, either Access Point or Ad Hoc.
Graph: Check box to enable/disable graphing of the signal level of the Wi-Fi network over time.
Sorting NetworksThe Networks window table also provides sorting for each column. If you are connected to a network, this network will alwaysremain at the top of the table, highlighted in orange. The remaining networks will be sorted by the column selected and directionof the arrow. For example, clicking on the signal column will sort the networks by signal strength, either highest to lowest, or
lowest to highest. The example below shows signal strength sorted by strongest (lowest) first after the connected network:
Grouping NetworksIt is also possible to group networks by multiple criteria, by dragging the desired column up to the top of the window. For
example to group networks by SSID and Authentication, you would drag the SSID column followed by the Default Auth columnas shown below:

7/28/2019 x Irr Us Wifi Inspector Guide
http://slidepdf.com/reader/full/x-irr-us-wifi-inspector-guide 6/11
Page 6
Xirrus Wi-Fi Inspector Version 1.2.1
User’s Guid
Changing Column Order You can also change the order of the columns, simply by dragging the column to where you want it to appear in the Networkwindow, for example changing the column order to show SSID followed by network mode and then channel etc as shown below:
Filtering NetworksEach column in the Networks window table allows for filtering of the networks displayed. Each column provides a funnel “icon”when you mouse over the column. If you select this funnel, you will be presented with a menu for that column that allows you toselect a specific filter. Selecting custom allows for advanced filtering criteria. For example, if you wanted to only view networkswith a specific SSID you would mouse over the SSID column, click on the filter icon and select the desired SSID from the menu.

7/28/2019 x Irr Us Wifi Inspector Guide
http://slidepdf.com/reader/full/x-irr-us-wifi-inspector-guide 7/11
Page 7
Xirrus Wi-Fi Inspector Version 1.2.1
User’s Guid
Locate The Locate Mode is entered from the Networks window and can be used to help determine the location of a specific Wi-Finetwork. This mode operates similar to a Geiger counter, using sound and visual information to indicate proximity. Enter LocateMode by right clicking on the network to locate, then select the Locate option. When in Locate mode:
The selected network is highlighted in yellow on the Networks table
The selected network is displayed on the Radar
The selected network is graphed in the History window
An audible beep sounds, the frequency of which reflects signal strength. The more rapid the beep, the closer thenetwork and the slower the beep, the further away.
To exit Locate mode, select “Exit Locate” from the Settings menu or the Connection window.
Signal History The Signal History window displays a graph of Wi-Fi network signal levels over time. Networks can be chosen to graph byselecting the checkbox to the far right in the Networks table. More than one network can be chosen to graph at one time. Up to500 seconds (about 8 minutes) of signal level history is graphed. Right clicking on the graph provides the options to ResetChart, which clears all graph information, and Select All Networks, which graphs all of the networks currently in the Networkstable (or the 10 strongest if more than 10). Hold the Shift key down and left click with the mouse to zoom in on the graph. Usethe Alt key with a left click of the mouse to zoom out on the graph.

7/28/2019 x Irr Us Wifi Inspector Guide
http://slidepdf.com/reader/full/x-irr-us-wifi-inspector-guide 8/11
Page 8
Xirrus Wi-Fi Inspector Version 1.2.1
User’s Guid
Tests The Wi-Fi Inspector includes three built in tests to assist in troubleshooting and characterization of a Wi-Fi connection – theConnection, Quality, and Speed tests.
From the Tests menu, Connection Test runs 5 Pings each directed to the DNS server, Gateway, and an Internet address, plusruns a DNS lookup. A pop up window displays the test results with an indication of Pass, Warning, or Fail result. Any lost Pingsor an average Ping latency of greater than 100 msec to the Gateway or DNS server or greater than 250 msec to the Internet willresult in a ‘Warning’. Ping or DNS lookup failure will result in a ‘Fail’.

7/28/2019 x Irr Us Wifi Inspector Guide
http://slidepdf.com/reader/full/x-irr-us-wifi-inspector-guide 9/11
Page 9
Xirrus Wi-Fi Inspector Version 1.2.1
User’s Guid
The Quality Test links to the www.pingtest.net web site which provides the ability to run a test which measures the quality of your connection from your laptop to the Internet. Click on a server location indicated by the icons on the map to start the test.Results provide the packet loss, latency, and jitter on your connection, plus an overall quality grade. The Speed Test links to thewww.speedtest.net web site from which performance tests to the Internet can be executed. Click on a server location to start thetest. After the test, latency and download/upload speeds are provided for the connection from your laptop to the Internet.
Troubleshooting Using the information presented by the Wi-Fi Inspector and the built-in tests, a simple four-step process can be used to quicklyanalyze and troubleshoot issues with a system’s wireless and network connection. End users can run the utility and report theinformation presented back to their Helpdesk as part of diagnosing issues.
1. Wireless configuration information is displayed and updated in real-time in the Connection window. The Wireless sub-section indicates if the system is currently connected to the wireless network. If “NA” is listed in these fields, the system
is not connected to the wirelessly and troubleshooting should begin with the Wi-Fi connection.
2. Network configuration information is displayed and updated in real-time in the Connection window. The Addresses sub-section displays IP address data, including the laptop’s IP, Gateway, DNS, and External IP addresses. The External IPis the IP address of the laptop’s connection to the Internet – normally from the ISP (Internet Service Provider).If “NA” is listed in one or more of these fields, the system may not be appropriately connected to the network for proper communication to occur. An IP address of the form “169.254.x.x” indicates the laptop is probably not receivingaddresses via DHCP. An “NA” for the External IP likely indicates there is no Internet connection.
3. Network connectivity is tested by selecting “Connection Test” from the menu. The Connection Test checks the state of the network connection by sending 5 Pings to each of the Gateway, DNS, and an Internet IP address. If not all Pingswere successful or the average latency is high (greater than 100 msec to the Gateway or DNS server, or greater than250 msec to the Internet), there may be an issue with the quality of the wireless connection or the configuration of thewired network. No successful Pings to the Internet indicates that the Internet connection is down.
4. Network performance is tested by selecting “Quality Test” and “Speed Test” from the menu. These tests runperformance tests from external Internet server to your laptop. The results of the Quality Test, summarized as a letter grade, indicate the ability to run all types of applications over your Internet connection, in particular VoIP and streamingmedia which are sensitive to delay and packet loss. The results of the Speed Test provide the upstream anddownstream speed of your connection. If the numbers are lower than expected for the speed of your Internetconnection (whether T3, T1, DSL, etc.) or lower than previously measured, there may be issues with the quality of your wireless connection, congestion on the network, or issues with your ISP.
Polling The polling interval of the application determines how frequently the Wi-Fi adapter scans the air to update information about thelocal networks. The default setting is every 5 seconds and is set via the Settings window – see below. Polling is on by defaultbut can be turned off by selecting “Stop” from the Polling menu. The “Refresh” option executes an immediate poll.
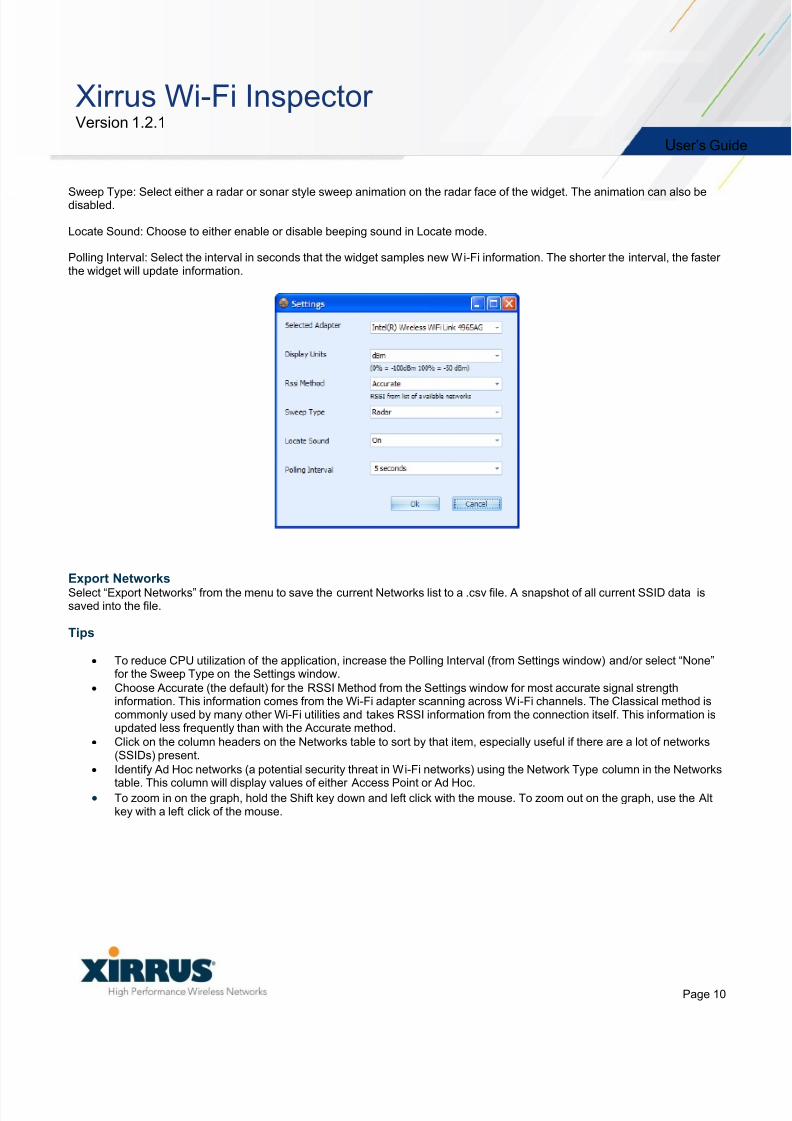
Settings To change application settings, click on the Settings button from the menu. Settings include:
Selected Adapter: Choose the Wi-Fi adapter to display information about on the main widget face (when more than one adapter is present on your system)
Display Units: Select units to display signal strength (RSSI), either % or dBm. A 0% signal corresponds to -100dBm. A 100%signal corresponds to -50dBm or greater.
RSSI Method: Select either Accurate or Classic method. The Accurate method is the default and best indication of current signalstrength.
7/28/2019 x Irr Us Wifi Inspector Guide
http://slidepdf.com/reader/full/x-irr-us-wifi-inspector-guide 10/11
Page 10
Xirrus Wi-Fi Inspector Version 1.2.1
User’s Guid
Sweep Type: Select either a radar or sonar style sweep animation on the radar face of the widget. The animation can also bedisabled.
Locate Sound: Choose to either enable or disable beeping sound in Locate mode.
Polling Interval: Select the interval in seconds that the widget samples new Wi-Fi information. The shorter the interval, the faster the widget will update information.
Export Networks Select “Export Networks” from the menu to save the current Networks list to a .csv file. A snapshot of all current SSID data issaved into the file.
Tips
To reduce CPU utilization of the application, increase the Polling Interval (from Settings window) and/or select “None”for the Sweep Type on the Settings window.
Choose Accurate (the default) for the RSSI Method from the Settings window for most accurate signal strengthinformation. This information comes from the Wi-Fi adapter scanning across Wi-Fi channels. The Classical method iscommonly used by many other Wi-Fi utilities and takes RSSI information from the connection itself. This information isupdated less frequently than with the Accurate method.
Click on the column headers on the Networks table to sort by that item, especially useful if there are a lot of networks(SSIDs) present.
Identify Ad Hoc networks (a potential security threat in Wi-Fi networks) using the Network Type column in the Networks
table. This column will display values of either Access Point or Ad Hoc. To zoom in on the graph, hold the Shift key down and left click with the mouse. To zoom out on the graph, use the Alt
key with a left click of the mouse.
7/28/2019 x Irr Us Wifi Inspector Guide
http://slidepdf.com/reader/full/x-irr-us-wifi-inspector-guide 11/11
Xirrus Wi-Fi Inspector Version 1.2.1
User’s Guid
Known IssuesFollowing are known issues with the 1.2 version of the Xirrus Wi-Fi Inspector:
The Enable/Disable network adapter function requires administrator privileges to enable/disable the Wi-Fi networkadapter.
The Wi-Fi Inspector may not run properly on systems running virtualization software such as VMware or VirtualPC.
Monitored radio signal levels may be less accurate than the connected radio due to limitations of the Windows driver.
UpdatesThe Xirrus Wi-Fi Inspector may be updated periodically with new features and fixes. The latest versions are posted for freedownload from the Xirrus website, Wi-Fi Tools page: http://www.xirrus.com/Products/Wi-Fi-Inspector
Support/Feedback The Wi-Fi Inspector is a free tool and does not come with a guarantee of support. However, inquiries and feedback about theXirrus Wi-Fi Inspector can be made by sending an email to
Also Available Xirrus also provides a line of free Wi-Fi gadgets and widgets for Windows and Mac OS systems that provide similar functionalityas the Wi-Fi Inspector. Gadgets and widgets are mini-applications that run on the desktop. Check the Xirrus web site for thelatest available gadgets and widgets: http://www.xirrus.com/Products/Wi-Fi-Inspector