wv bms incident management system (ims) ims portal manual.pdfabout the bms incident management...
TRANSCRIPT

WV BMS INCIDENT MANAGEMENT SYSTEM (IMS)
Portal User Guide v2.3
Abstract This guide provides instruction on basic functions of the WV IMS Portal. If you have procedure or regulatory questions, please contact your Program Operations Manager.

1
About the BMS Incident Management System - Portal The BMS Incident Management System (IMS) Web Portal is designed for specific Medicaid Home and Community-Based Service (HCBS) providers to submit incident information regarding Medicaid recipients. The system will allow for incident reporting, follow-up, data tracking, and reports. Provider agency directors will be established as a Primary User for the agency and will assign agency staff with user profiles and access. Provider agency director or designee will be responsible for overall agency incident reporting and compliance with Medicaid policy. The Agency Director system role is responsible for also closing out users who are no longer with the provider agency. The Agency Director will be responsible for reporting "no monthly incidents" when the agency has not reported any incident for the calendar month. Note: The examples provided in this guide reflect views available to the highest security level in the system. Not all users will see the same screen content as some menu and button options are not available for the system role being used.
Date Created June 2018
Maintained By WV Bureau of Medical Services
Version
Number
Modified
By
Modifications Made Date
Modified
Status
2.3 MB-C Added section titled “How to switch between multiple
profiles”
10/11/18 FINAL
2
Table of Contents Definitions .......................................................................................................................................................... 3
Getting Started ................................................................................................................................................... 3
System Role Definitions: ................................................................................................................................ 3
Portal Access ...................................................................................................................................................... 5
Register as a New Agency .............................................................................................................................. 5
Register as a New User .................................................................................................................................. 5
Password Rules .............................................................................................................................................. 7
Password Reset .............................................................................................................................................. 8
Logging In (Existing User) ............................................................................................................................. 10
Requesting additional profiles ..................................................................................................................... 11
Main Menu ....................................................................................................................................................... 15
Add New Incident......................................................................................................................................... 15
Editing Existing Incidents – Unlocked .......................................................................................................... 20
Incident Modification Request – Edit a Locked Incident ............................................................................. 21
Incident Follow-Up (Unlocked Incidents)..................................................................................................... 23
How to Access Printable Forms ....................................................................................................................... 24
Printing an Incident .......................................................................................................................................... 25
Printing a Medicaid Fraud Referral or Adult Protective Services Form ........................................................... 25
Documents ....................................................................................................................................................... 26
How to Change the Person’s Address .............................................................................................................. 26
Reports ............................................................................................................................................................. 27
To run/view a report .................................................................................................................................... 27
Report Types (Definition and Screen Shot) .................................................................................................. 27
Exporting and Printing a Report ................................................................................................................... 31
Important Messages ........................................................................................................................................ 33
Director User Options ...................................................................................................................................... 33
No Monthly Incidents .................................................................................................................................. 33
Manage Users .............................................................................................................................................. 35
Troubleshooting ............................................................................................................................................... 37
Incorrect profile selection during registration – How to fix ........................................................................ 37
3
Definitions APS or CPS – Adult Protective Services or Child Protective Services Child Agency- Agency sites/locations that operate under or are associated with the Parent Agency umbrella. CRM- System utilized by state representatives such as BMS or BMS representatives (contractors). Completed- Status of an incident indicating that a user has completed all possible actions on the incident. Director – Provider agency executive director. Modification Request to change information on an incident. No Incident Report- Monthly report submitted by provider agencies when no incidents occurred within the calendar month. Operating Agency (OA)–BMS contracted entity responsible for the monitoring of program incidents. IMS Portal - Web-based system for Home Community Based Services (HCBS) providers to enter incidents. Parent Agency – single umbrella agency or an agency with multiple sites or agency locations. (See Child Agency) Person- Medicaid participant (member). Program Type - HCBS programs (ADW, IDDW, TBIW and PC) Role- The level of access as related to the function and system view granted to the user. User- Person who accesses the IMS system with a unique user ID, password and is linked to an agency.
Getting Started
System Role Definitions:
Agency Director: Oversees, monitors and reports on multiple locations and multiple program types.
Program Administrator/Admin: Approves and monitors system access for one or more office locations.
Program Supervisor: Reports and monitors incidents entered by one or more case managers/service
coordinators or nurses.
Agency User: Manages cases and enters incidents – only sees cases he or she entered.
Access to the portal is dependent upon your approved system role. The higher level of your system role, the more you will be able to see and do in the IMS. The Agency Director is in control of who accesses the IMS for the agency and assigns system roles to agency staff that are approved to use the IMS. Below is a description of who might use these system roles, his/her viewability, access and what he/she can do in the system.

4
IMS-Portal System Role
Type
Who is it? What is the View and Access?
What functions can be performed based on system
Role Type
Agency Director
Executive Director, Agency director, etc. Or designee appointed by the Agency
Note: Can view all programs provided by the agency: All agency incidents Monthly No Incident Report Manage user page All portal reports All compliance notices Agency menu page
Add staff Approve roles Approve users Enter an incident Enter follow up APS or fraud report* APS referral form creation* Run agency reports
Program Administrator (Admin)
Director of the program for an agency
Program admin. staff associated with one or more office locations, limited by Program Type (ADW, TBIW, IDDW, PC) Agency incidents Monthly No Incident Report All portal reports All compliance reports Agency menu page
Approve users Enter an incident Enter follow up APS or fraud report* APS referral form creation* Run agency reports
Agency Supervisor
Typically, a site supervisor or office supervisor, that monitors Case Mangers, RN, Service Coordinators
Only incidents, reports and data associated with one office location, limited by Program Type (ADW, TBIW, IDDW, PC)
Enters incidents Monitors incident compliance at site/program APS referral form creation*
Agency User Person entering incidents
Only incidents the user entered, limited by Program Type (ADW, TBIW, IDDW, PC) Only follow up related to an incident the user entered. Only compliance prompts related to incident the user entered.
Enter an incident Follow up APS referral form creation* Medicaid fraud referral form creation*
* Form creation does not submit the information to the appropriate organization or parties, but serves as a function to simplify completing the form. The information captured in IMS is entered onto the form for you and allows you to type in missing information, print and submit by following current procedures and methods.
CRM Role: As you work with your program operations managers you will hear the term CRM. CRM is the primary system housing the data you see on the IMS Portal. Only BMS or BMS representatives will have access in the CRM. CRM users will have access to all programs assigned to the representative, all incidents, all follow-up and program participants within all programs assigned to the representative.
5
Portal Access
To access the IMS website, use the following link: https://dhhrimsportal.wv.gov
Register as a New Agency
Registration for a New Agency: A new provider agency will contact the Operating Agency (OA) to request registration. The OA for Aged and Disabled Waiver and the State Plan Personal Care (PC) Program is the WV Bureau of Senior Services (BoSS) and the OA for the IDD Waiver and the TBI Waiver is KEPRO. The OA with the respective program type will register the new agency in the IMS CRM.). Please check the IMS Contact Us page for program and technical support. The Agency Director or any new users cannot register until the new provider agency has been registered in the IMS. Following the registration of the provider agency, the director can begin to register himself/herself in the system. Then, register his/her employees who will access the system. Directions for user registration are below.
Register as a New User Select the link: https://dhhrimsportal.wv.gov
Registration of a New User: The director (or designee) will be responsible for managing and approving new registrations of all users for their respective agency. The director (or their designee) will be responsible for immediately deactivating any user who leaves the provider agency.
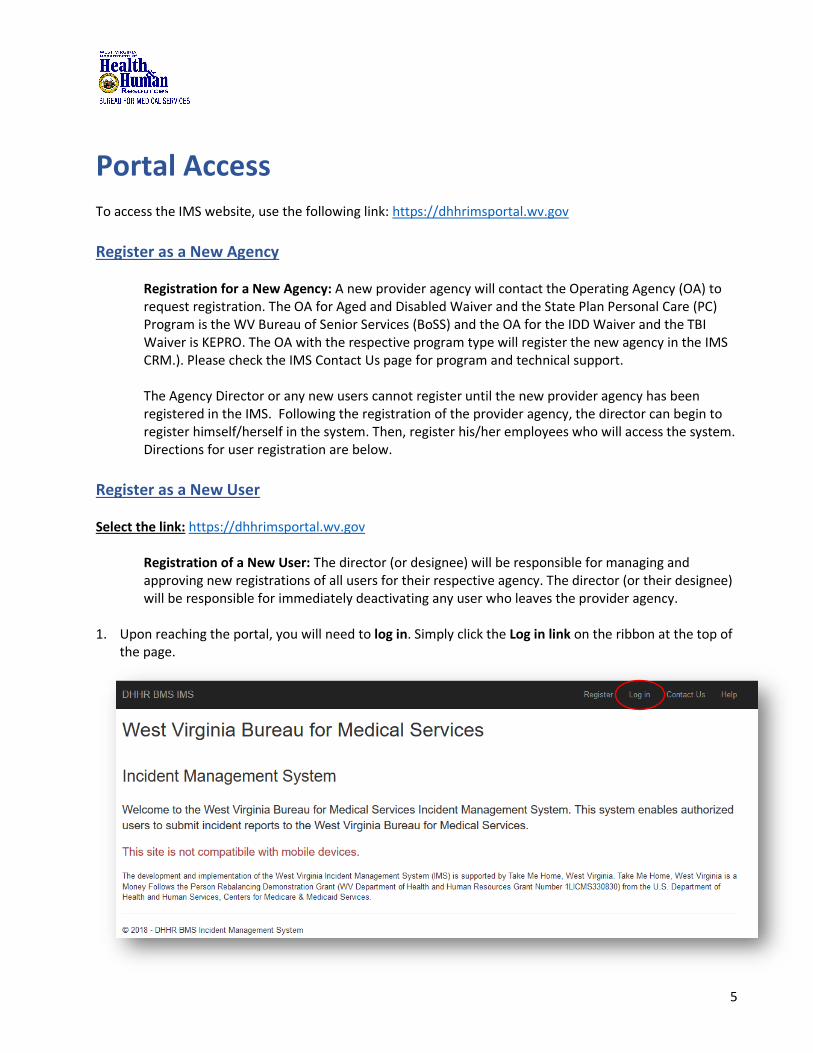
1. Upon reaching the portal, you will need to log in. Simply click the Log in link on the ribbon at the top of
the page.
6
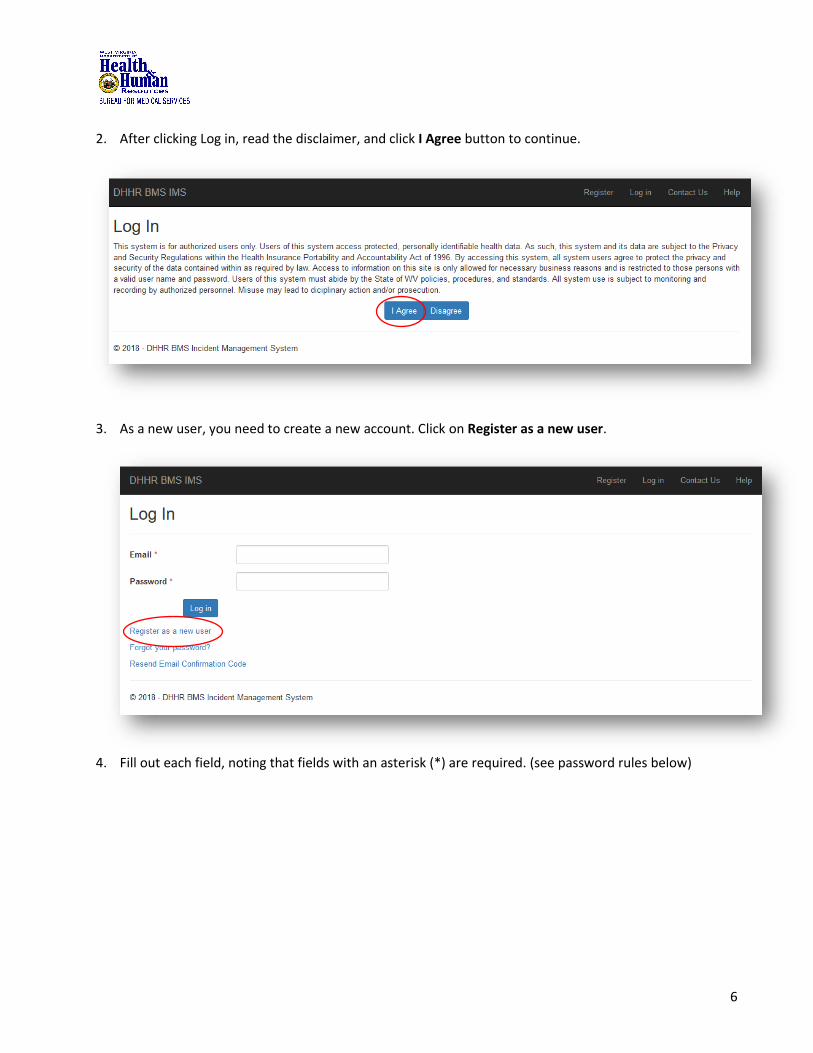
2. After clicking Log in, read the disclaimer, and click I Agree button to continue.
3. As a new user, you need to create a new account. Click on Register as a new user.
4. Fill out each field, noting that fields with an asterisk (*) are required. (see password rules below)
7
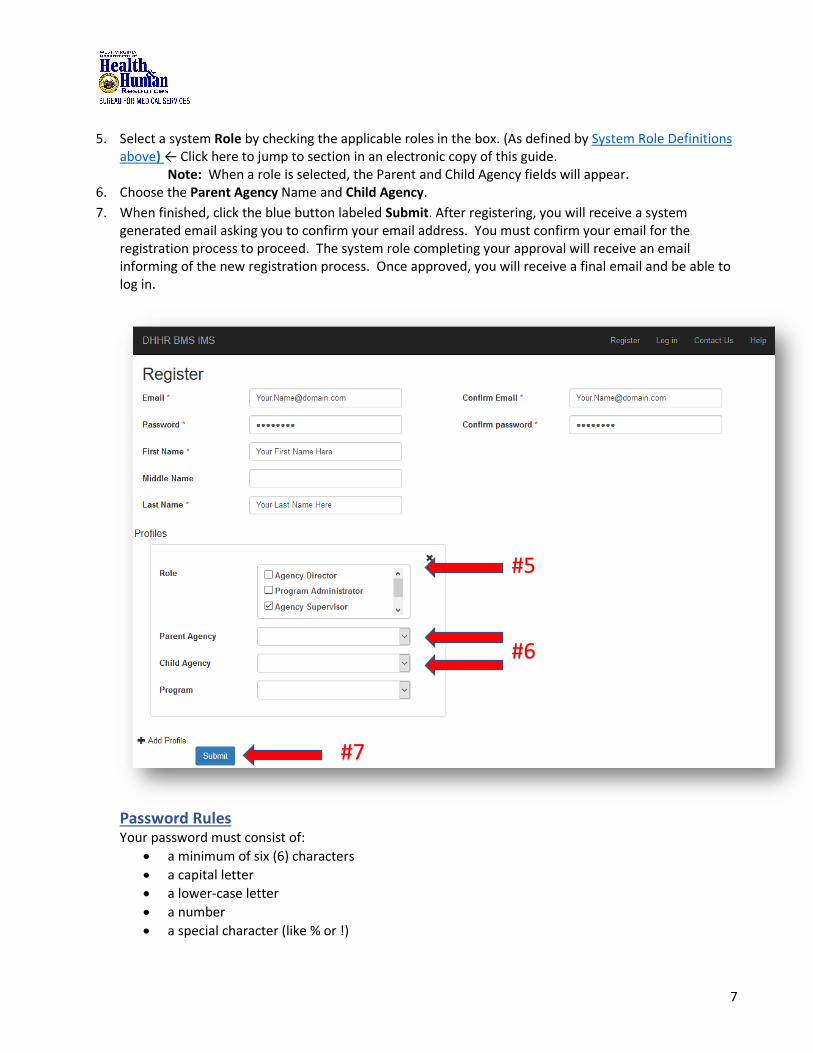
5. Select a system Role by checking the applicable roles in the box. (As defined by System Role Definitions
above) ← Click here to jump to section in an electronic copy of this guide. Note: When a role is selected, the Parent and Child Agency fields will appear.
6. Choose the Parent Agency Name and Child Agency.
7. When finished, click the blue button labeled Submit. After registering, you will receive a system generated email asking you to confirm your email address. You must confirm your email for the registration process to proceed. The system role completing your approval will receive an email informing of the new registration process. Once approved, you will receive a final email and be able to log in.
Password Rules
Your password must consist of:
• a minimum of six (6) characters
• a capital letter
• a lower-case letter
• a number
• a special character (like % or !)
#6
#7
#5
8
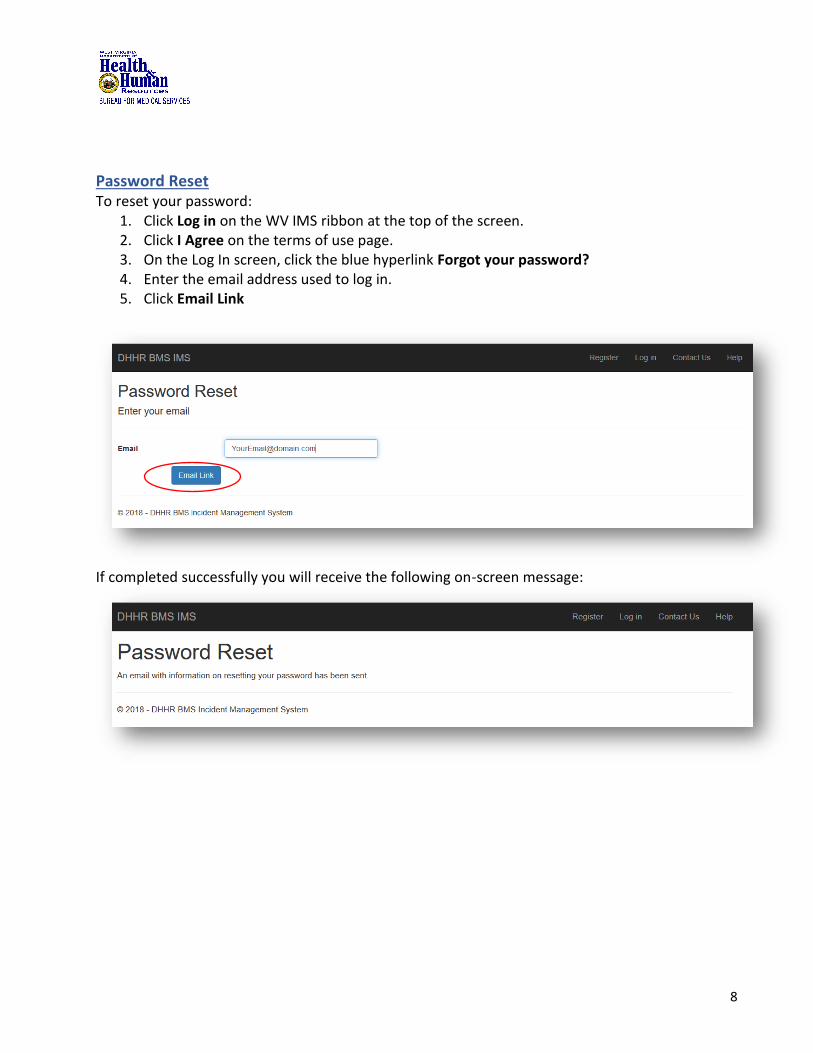
Password Reset To reset your password:
1. Click Log in on the WV IMS ribbon at the top of the screen. 2. Click I Agree on the terms of use page. 3. On the Log In screen, click the blue hyperlink Forgot your password? 4. Enter the email address used to log in. 5. Click Email Link
If completed successfully you will receive the following on-screen message:

9
You will receive an email containing a link that will allow you to reset your password.
6. Click the blue hyperlink provided in the email.
7. Complete the empty fields of information. (see Password Rules above) 8. Click Reset
If successful, you will receive an on-screen message indicating the password has been reset and providing a blue hyperlink to take you back to the login screen.

10
If you receive errors, follow the on-screen instructions to correct any errors.
Logging In (Existing User)
1. Open a browser and type in: https://dhhrimsportal.wv.gov 2. Click Log in 3. After clicking Log in, read and understand the Terms of Use 4. Click I Agree
5. Enter your Email and Password 6. Click Log in

11
NOTE: If you have multiple User Profiles you will be directed to select the profile you wish to use by clicking the radio button, this screen will only display if you have more than one system user profile.
Requesting additional profiles An existing user may request additional profiles in order to obtain a new role and/or program. The request will require approval by the agency director or the director’s designee. Follow the steps below to request additional profiles.
1. Log into the WVIMS Portal using your existing ID and password. (https://dhhrimsportal.wv.gov) 2. In the black menu bar at the top of the screen, click on your email address to access options for
your user acc The options for your account will be presented:
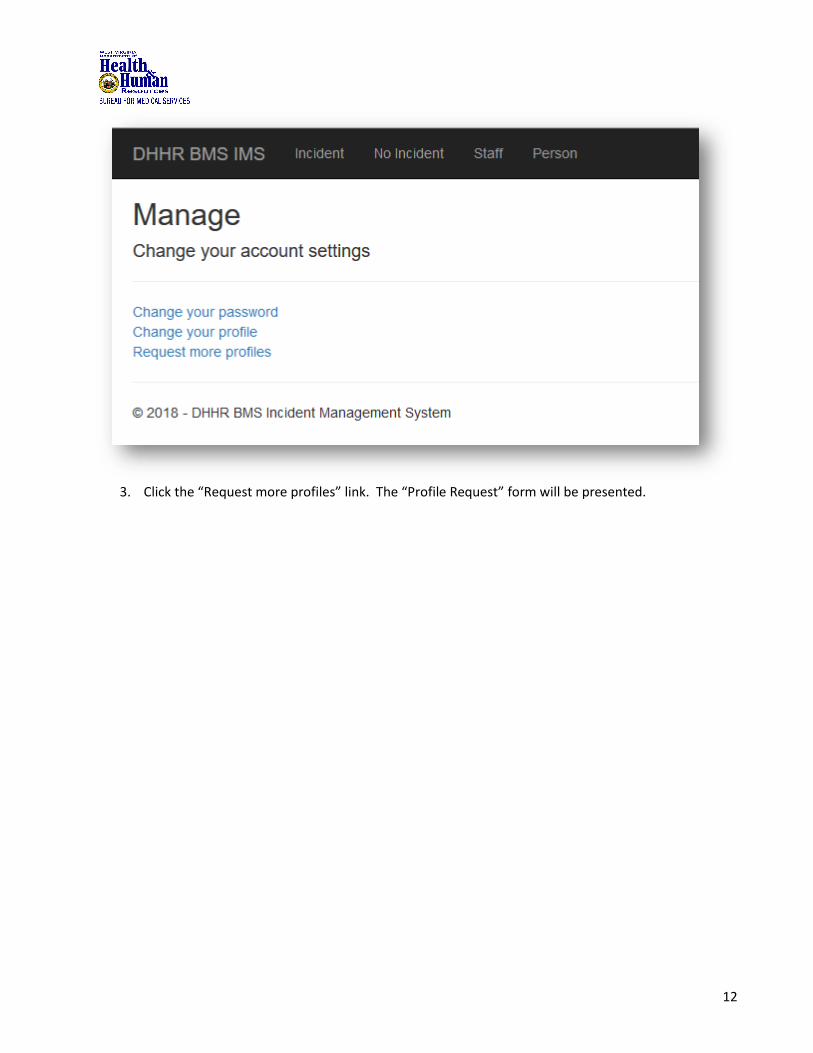
• Change your password – Clicking this link will present you with a screen requesting your current password, new password and to confirm your password.
• Change your profile – Allows you to switch between profiles and perform tasks allowable by the associated roles.
• Request more profiles – Gives you the Profile Request form where you will be able to choose role, parent agency, child agency and program for the new/additional profile.
12
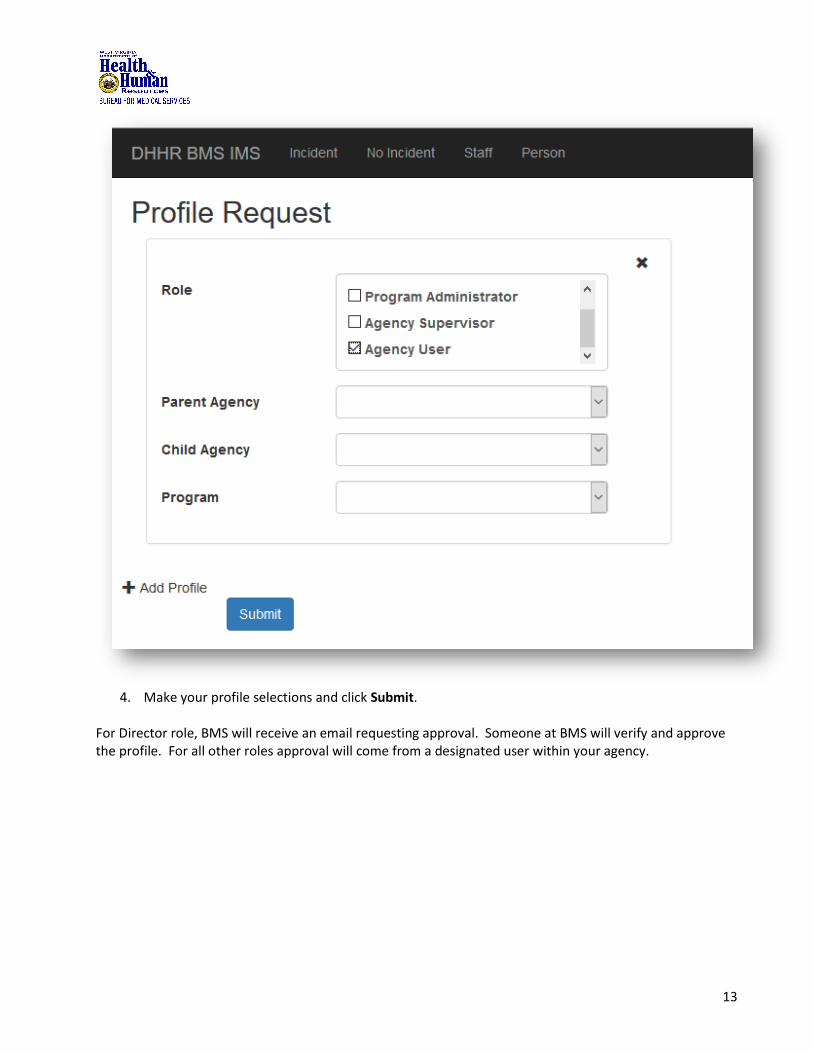
3. Click the “Request more profiles” link. The “Profile Request” form will be presented.
13
4. Make your profile selections and click Submit.
For Director role, BMS will receive an email requesting approval. Someone at BMS will verify and approve the profile. For all other roles approval will come from a designated user within your agency.
14
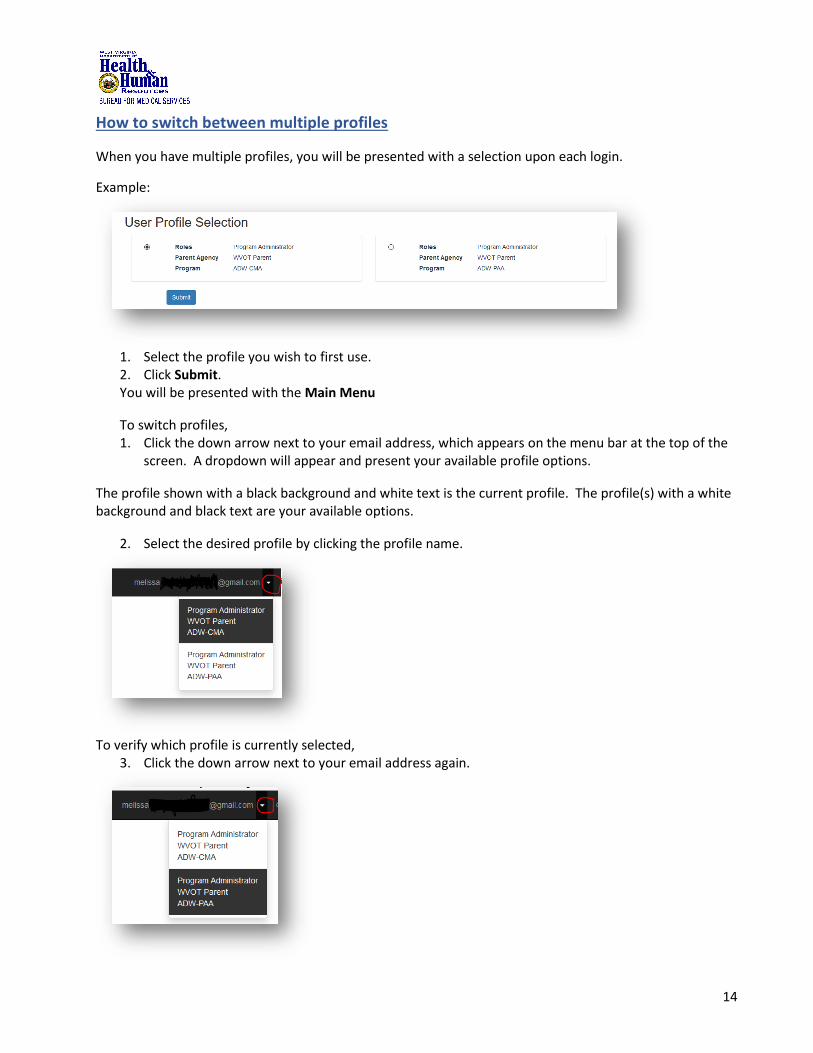
How to switch between multiple profiles
When you have multiple profiles, you will be presented with a selection upon each login.
Example:
1. Select the profile you wish to first use. 2. Click Submit. You will be presented with the Main Menu
To switch profiles, 1. Click the down arrow next to your email address, which appears on the menu bar at the top of the
screen. A dropdown will appear and present your available profile options.
The profile shown with a black background and white text is the current profile. The profile(s) with a white background and black text are your available options.
2. Select the desired profile by clicking the profile name.
To verify which profile is currently selected,
3. Click the down arrow next to your email address again.

15
Main Menu The Main Menu is the first screen you will see upon logging in. There are many options for using this portal found on the Main Menu. Each option has a brief description underneath to notify you what it does.
• DHHR BMS IMS to the left on the ribbon will take you back to the Main Menu.
• Incident allows you to see all incidents for the programs in your login profile for your agency.
• No Incident allows the director (or designee) to see all “no incident” reports that have been submitted and provides a link at the top of the list to submit a new “no incident” report.
• Staff Provides a list of all staff registered to use IMS for your agency. You can click on the staff members name to see the details of their log in profile.
• By clicking the User Email on the ribbon will bring up options to change your password, change your profile and request more profiles.
• By clicking the down arrow to the right of the User Email you are presented with a list of profiles you are already registered for and can switch to a new profile without logging out.
• Contact Us on the ribbon provides both program and technical support information, which will allow you to contact different people for extra assistance with issues or questions you may have concerning specific areas or concepts.
• Help will provide you with Definitions of the screens and instructions for each field.
• Log-Off allows you to log off the system. Note: Your agency computer should be set with a short time per guidelines
Main Menu options available to all users
These are the options to which all users have access.
• Add a New Incident
• Edit an existing incident o Editing and adding follow-up to an unlocked incident o Request an incident modification for a locked incident
• Printing incidents and APS referral forms
• Running, exporting and printing reports (based on system user role)
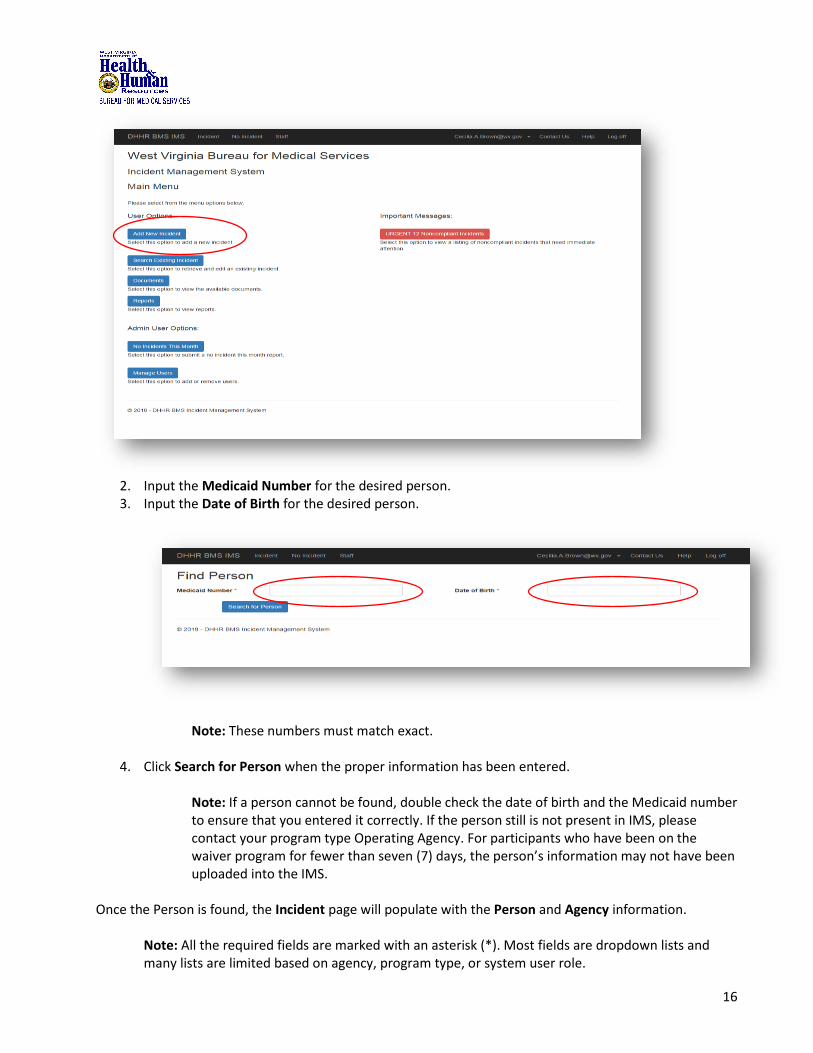
Add New Incident
1. Select Add New Incident from the Main Menu. You will then be directed to the Find Person page.
16
2. Input the Medicaid Number for the desired person. 3. Input the Date of Birth for the desired person.
Note: These numbers must match exact.
4. Click Search for Person when the proper information has been entered. Note: If a person cannot be found, double check the date of birth and the Medicaid number to ensure that you entered it correctly. If the person still is not present in IMS, please contact your program type Operating Agency. For participants who have been on the waiver program for fewer than seven (7) days, the person’s information may not have been uploaded into the IMS.
Once the Person is found, the Incident page will populate with the Person and Agency information.
Note: All the required fields are marked with an asterisk (*). Most fields are dropdown lists and many lists are limited based on agency, program type, or system user role.
17
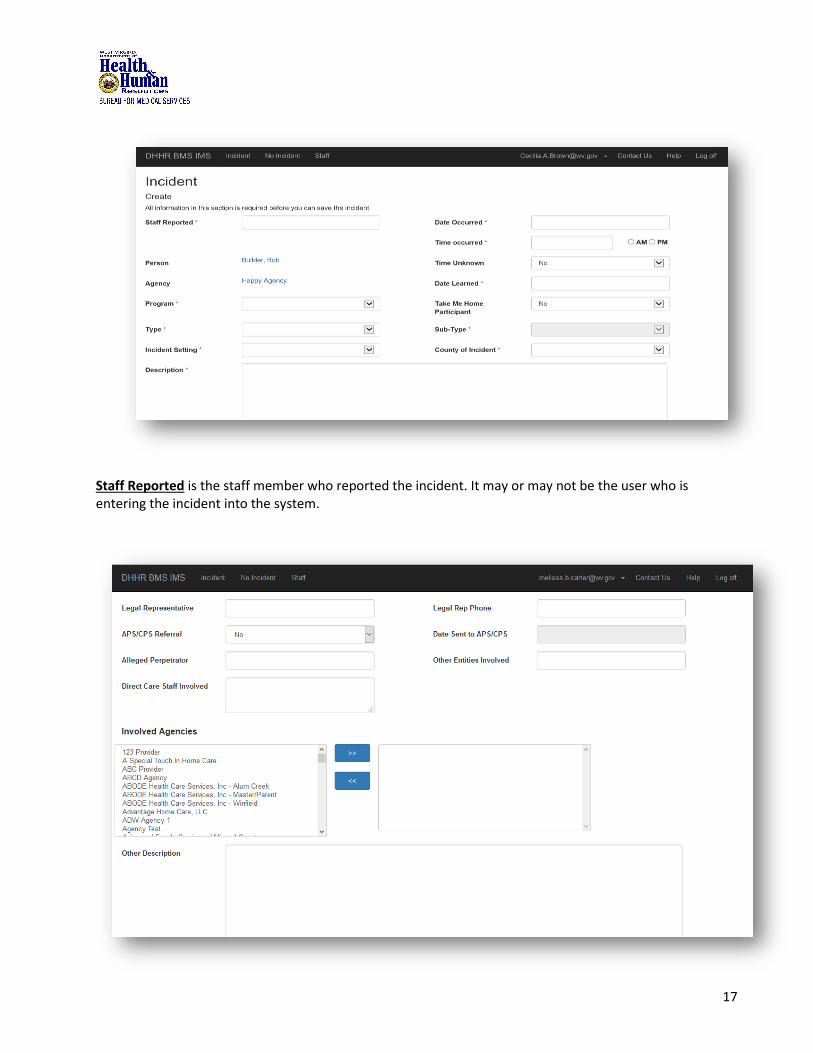
Staff Reported is the staff member who reported the incident. It may or may not be the user who is entering the incident into the system.
18
Other Entities Involved are non-staff who were involved in the incident. APS (Adult Protective Services or CPS (Child Protective Services) Referral- An incident may be submitted without a name of the perpetrator. Answering yes for an APS or CPS referral will require entry of the date it was referred Other Description additional information about the incident that doesn’t fit in the fields provided under Description.
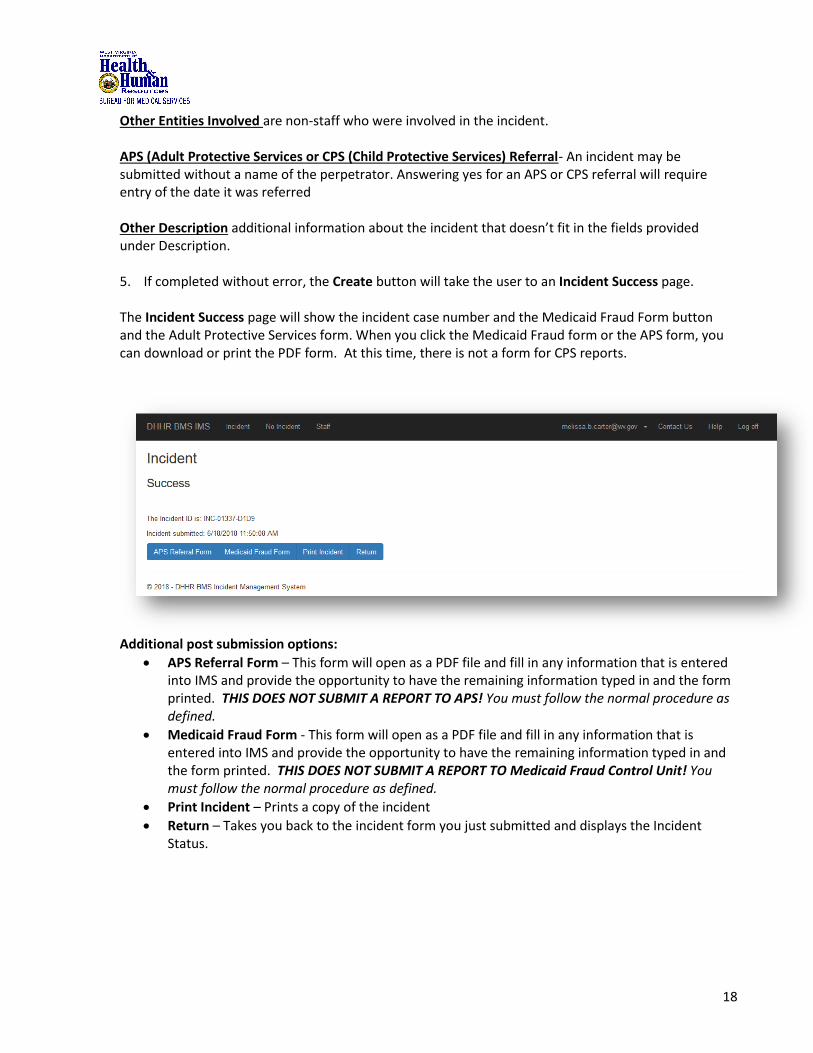
5. If completed without error, the Create button will take the user to an Incident Success page. The Incident Success page will show the incident case number and the Medicaid Fraud Form button and the Adult Protective Services form. When you click the Medicaid Fraud form or the APS form, you can download or print the PDF form. At this time, there is not a form for CPS reports.
Additional post submission options:
• APS Referral Form – This form will open as a PDF file and fill in any information that is entered into IMS and provide the opportunity to have the remaining information typed in and the form printed. THIS DOES NOT SUBMIT A REPORT TO APS! You must follow the normal procedure as defined.
• Medicaid Fraud Form - This form will open as a PDF file and fill in any information that is entered into IMS and provide the opportunity to have the remaining information typed in and the form printed. THIS DOES NOT SUBMIT A REPORT TO Medicaid Fraud Control Unit! You must follow the normal procedure as defined.
• Print Incident – Prints a copy of the incident
• Return – Takes you back to the incident form you just submitted and displays the Incident Status.
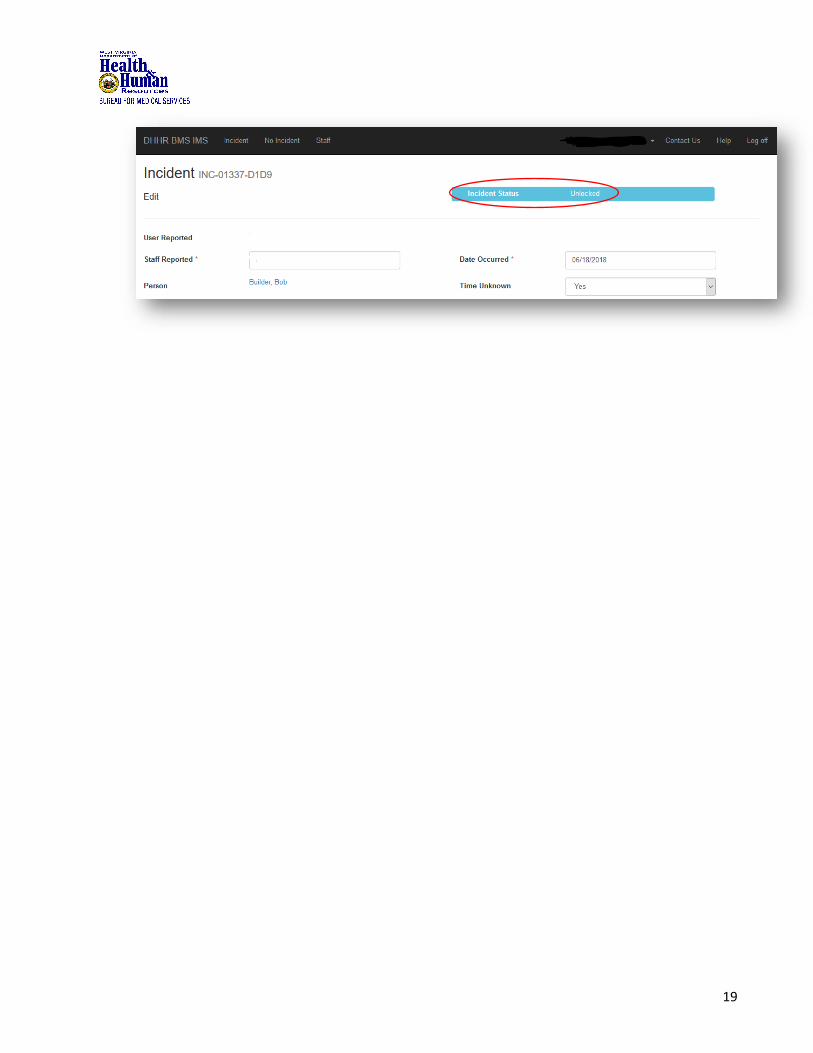
19
20
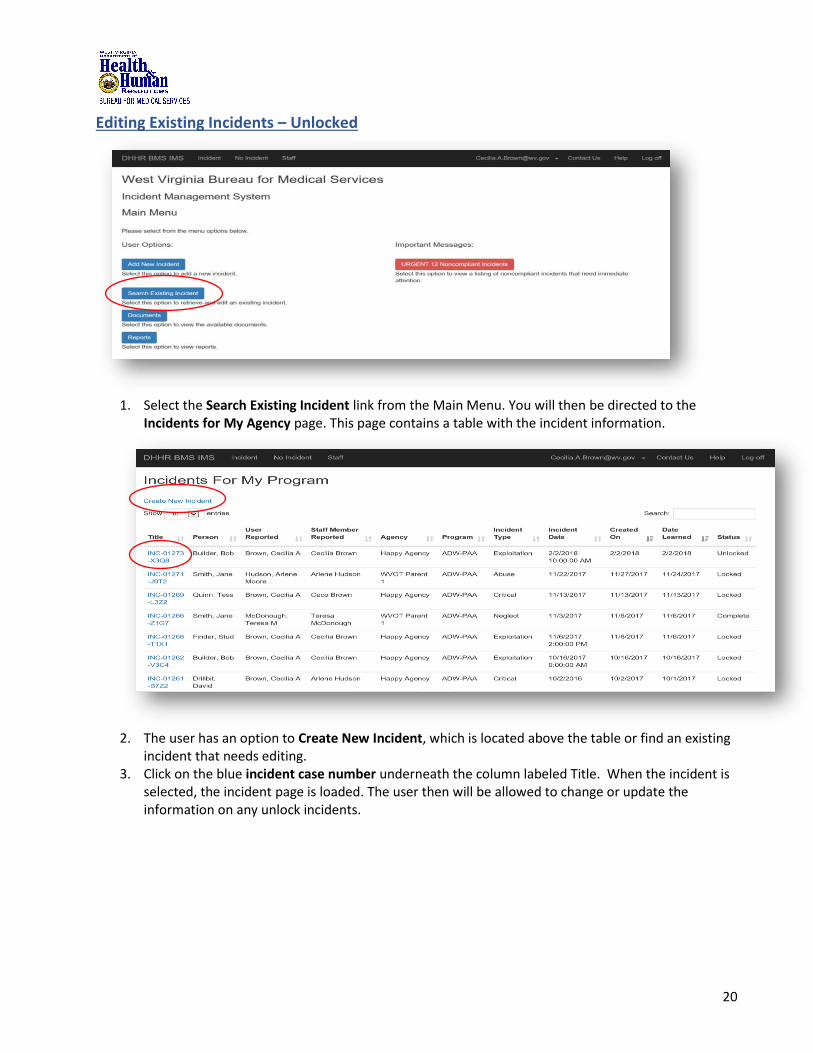
Editing Existing Incidents – Unlocked
1. Select the Search Existing Incident link from the Main Menu. You will then be directed to the
Incidents for My Agency page. This page contains a table with the incident information.
2. The user has an option to Create New Incident, which is located above the table or find an existing
incident that needs editing. 3. Click on the blue incident case number underneath the column labeled Title. When the incident is
selected, the incident page is loaded. The user then will be allowed to change or update the information on any unlock incidents.
21
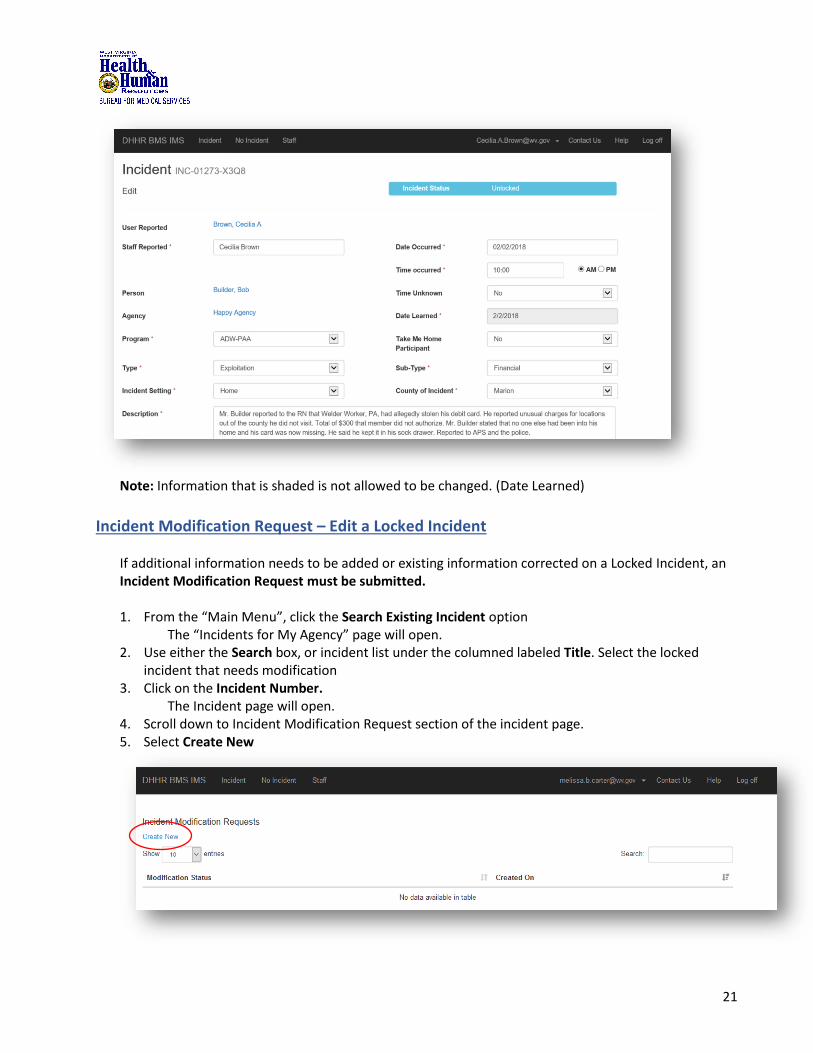
Note: Information that is shaded is not allowed to be changed. (Date Learned)
Incident Modification Request – Edit a Locked Incident
If additional information needs to be added or existing information corrected on a Locked Incident, an Incident Modification Request must be submitted. 1. From the “Main Menu”, click the Search Existing Incident option
The “Incidents for My Agency” page will open. 2. Use either the Search box, or incident list under the columned labeled Title. Select the locked
incident that needs modification 3. Click on the Incident Number.
The Incident page will open. 4. Scroll down to Incident Modification Request section of the incident page. 5. Select Create New

22
You will be directed to the “Incident Modification Page” in which you will be required to describe the reason for the request. 6. Once documented, click the Create button.
The “Incident Modification Request Success” page will display.
NOTE: After 5 seconds your screen will be redirected to the incident Modification Status will show as Pending after the request is successful submitted. Incident status will change to approved, when the Request has been reviewed and unlocked by the program type OA.
The user who submitted the Incident Modification Request will receive an email when the incident has been unlocked. The email informs that the incident is unlocked and provides a link to the IMS website so the user can log in and modify the report. IMPORTANT: The incident will re-lock again after one business day (24 hours from the date & time unlocked) or when the incident is saved after being modified.
23
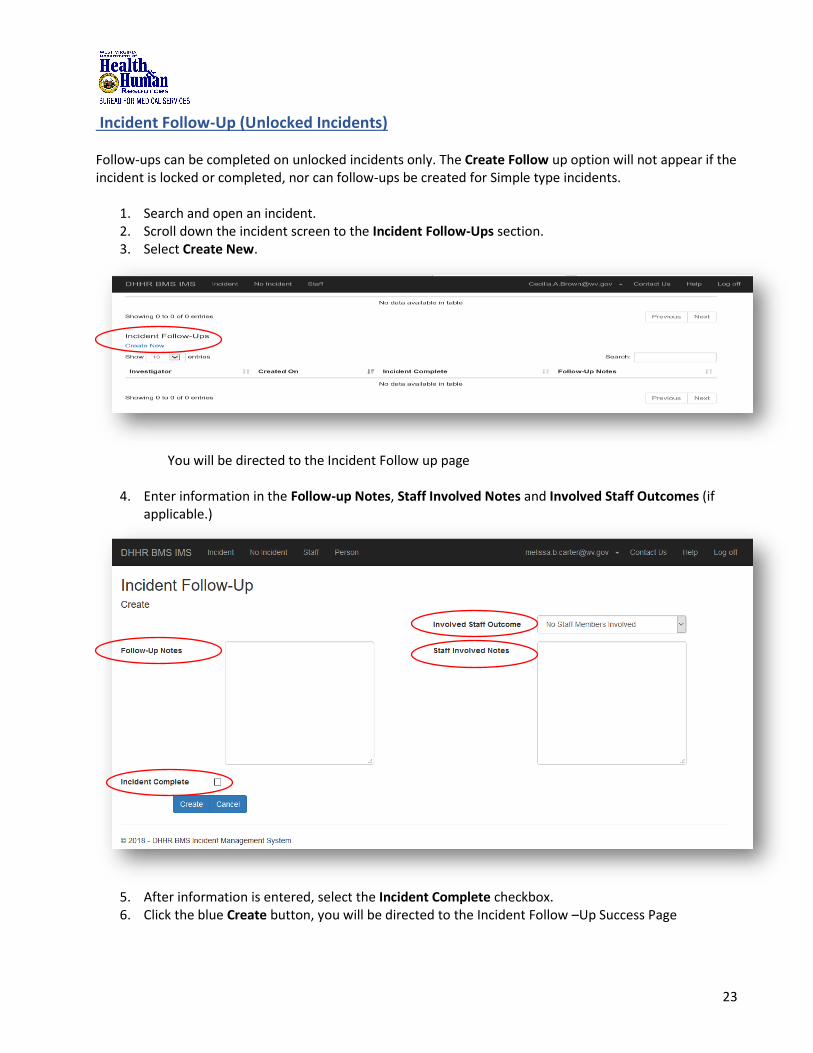
Incident Follow-Up (Unlocked Incidents) Follow-ups can be completed on unlocked incidents only. The Create Follow up option will not appear if the incident is locked or completed, nor can follow-ups be created for Simple type incidents.
1. Search and open an incident. 2. Scroll down the incident screen to the Incident Follow-Ups section. 3. Select Create New.
You will be directed to the Incident Follow up page
4. Enter information in the Follow-up Notes, Staff Involved Notes and Involved Staff Outcomes (if applicable.)
5. After information is entered, select the Incident Complete checkbox. 6. Click the blue Create button, you will be directed to the Incident Follow –Up Success Page
24
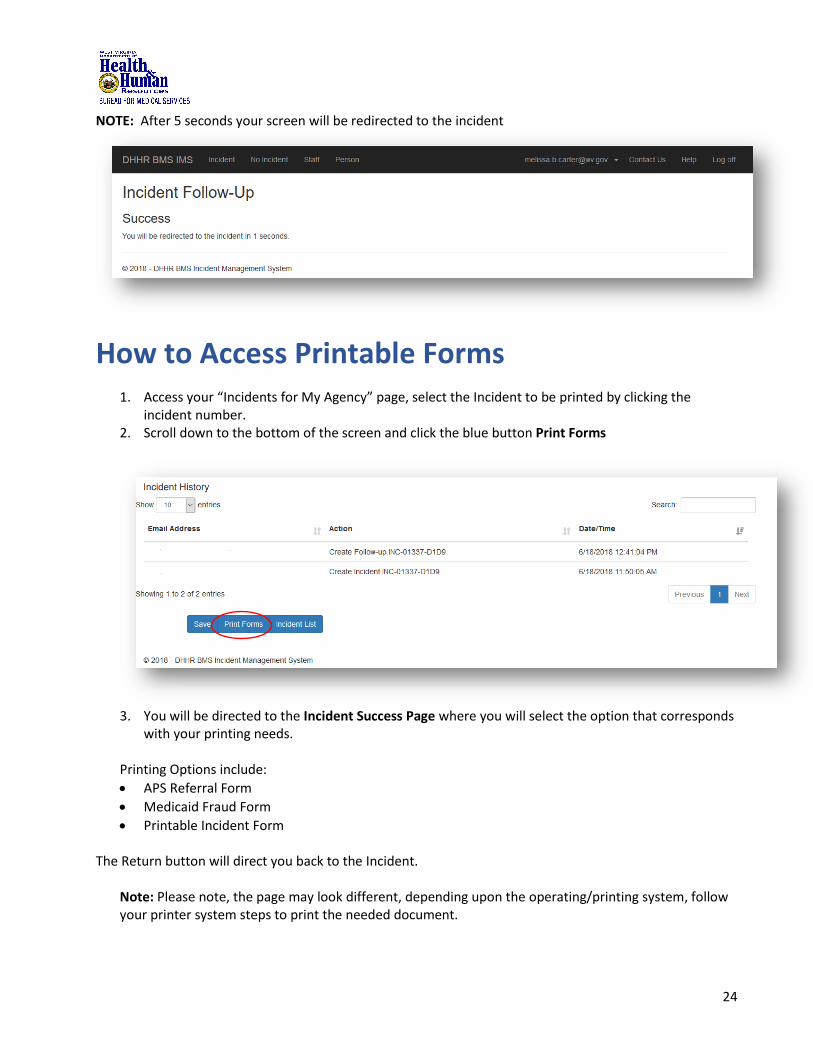
NOTE: After 5 seconds your screen will be redirected to the incident
How to Access Printable Forms 1. Access your “Incidents for My Agency” page, select the Incident to be printed by clicking the
incident number. 2. Scroll down to the bottom of the screen and click the blue button Print Forms
3. You will be directed to the Incident Success Page where you will select the option that corresponds
with your printing needs.
Printing Options include:
• APS Referral Form
• Medicaid Fraud Form
• Printable Incident Form The Return button will direct you back to the Incident.
Note: Please note, the page may look different, depending upon the operating/printing system, follow your printer system steps to print the needed document.

25
Printing an Incident 1. From the Incident Success Page, click the Print Incident button. 2. You will then be prompted to either Open, Save, or Cancel. Click Open. A PDF form will then open. 3. From here, you can view, save, print, and e-mail the Incident report.
Printing a Medicaid Fraud Referral or Adult Protective Services Form
1. From the Incident Success Page, click the Medicaid Fraud Form or the APS Referral Form button. 2. You will then be prompted to either Open, Save, or Cancel. Click Open. A PDF form will then open,
auto filled with the information that was entered into the IMS system. 3. Additional information may be typed on the form. 4. From here, you can view, save, print, and e-mail the Referral Forms.
Note: If you choose not to save the form, you can always bring it back up by repeating steps 1 and 2 on this page. However, your original changes to the form will not be saved. If you require an electronic copy of the completed form choose “Save As” and save a copy to your machine.
26
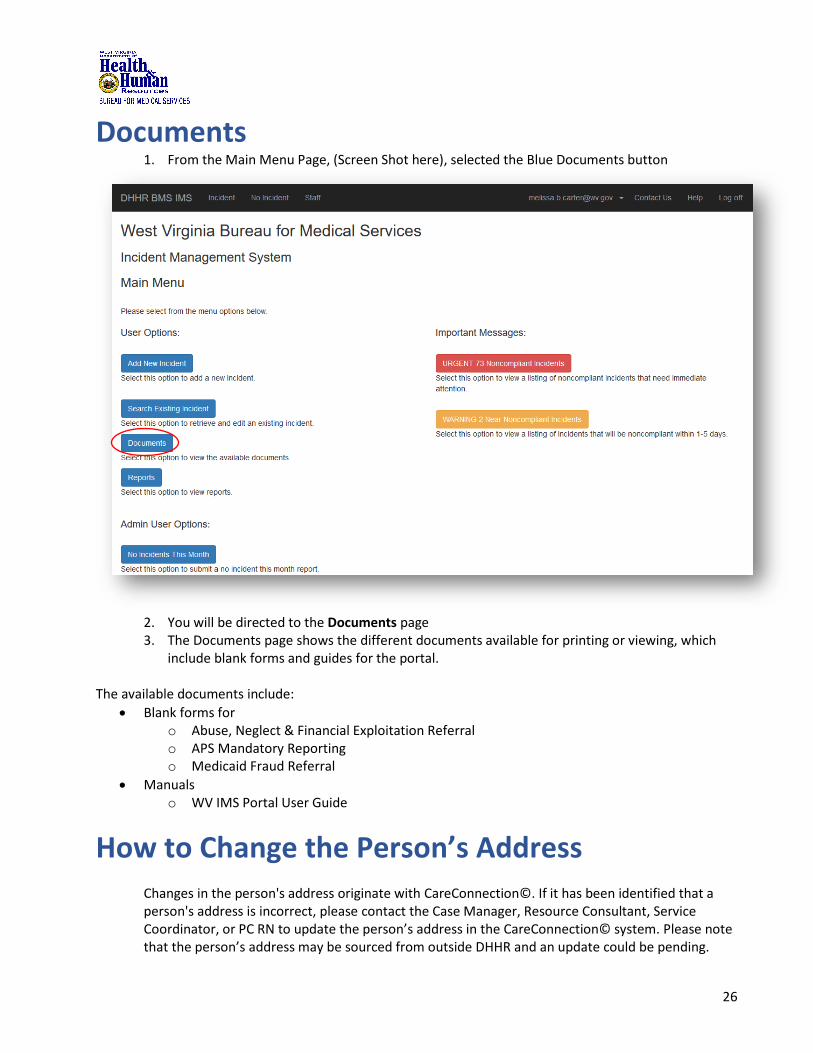
Documents 1. From the Main Menu Page, (Screen Shot here), selected the Blue Documents button
2. You will be directed to the Documents page 3. The Documents page shows the different documents available for printing or viewing, which
include blank forms and guides for the portal. The available documents include:
• Blank forms for o Abuse, Neglect & Financial Exploitation Referral o APS Mandatory Reporting o Medicaid Fraud Referral
• Manuals o WV IMS Portal User Guide
How to Change the Person’s Address
Changes in the person's address originate with CareConnection©. If it has been identified that a person's address is incorrect, please contact the Case Manager, Resource Consultant, Service Coordinator, or PC RN to update the person’s address in the CareConnection© system. Please note that the person’s address may be sourced from outside DHHR and an update could be pending.
27
Reports
The system has seven (7) available reports. Viewing of reports is based on the user’s system role and access. An Agency User may not see all reports but an Agency Director will see all reports. Each report has a different function and yields different data results for monitoring of your agency's incident management system compliance. Reports include:
• Non-Compliant Incident Report
• Near Non-Compliant Incident Report
• Compliance Follow-up Report
• User Access Report
• APS-CPS Referral Report
• Agency Non-Compliant Report
• Incidents by Agency Report Note: Report availability is based on user profile. You may only see some of these reports.
To run/view a report
1. Click on the report name. This will open the selection criteria specific for that report. 2. Choose the dates by clicking on the calendar picker icon beside the date field (for those with a
date range) or by typing in a date (M/D/YYYY). 3. Make selections from the dropdowns available (Agency, incident types and program types, e). 4. Then, click on "View Report" to the top right of the screen. The report will appear.
Report Types (Definition and Screen Shot) Noncompliant Incident Report: Incidents that are considered noncompliant with Medicaid policy. Incidents submitted in the IMS beyond the one business day policy requirement for incident reporting.

28
Near Noncompliant Incident Report: This report allows an agency to review all incidents that are 9 to 14 days from the date the agency learned of the incident (follow-up is due within 14 days). This is one of the most important reports for an agency to run, as it helps monitor incident compliance.
Compliance Follow-Up Report: An agency will enter a range of dates (from and to) for the report, choose all or only select incident types and program types. The report will show a list of incidents and the total number of incidents that were out of compliance for the 14-day incident follow-up. This report is another critical report to monitor incident compliance.

29
Agency Noncompliant Report: This report shows if the agency did not submit any incidents for the month and had not submitted a Monthly No Incident Report. This allows the director to monitor across agency sites and programs to ensure either incidents were entered or Monthly No Incident Report was entered.
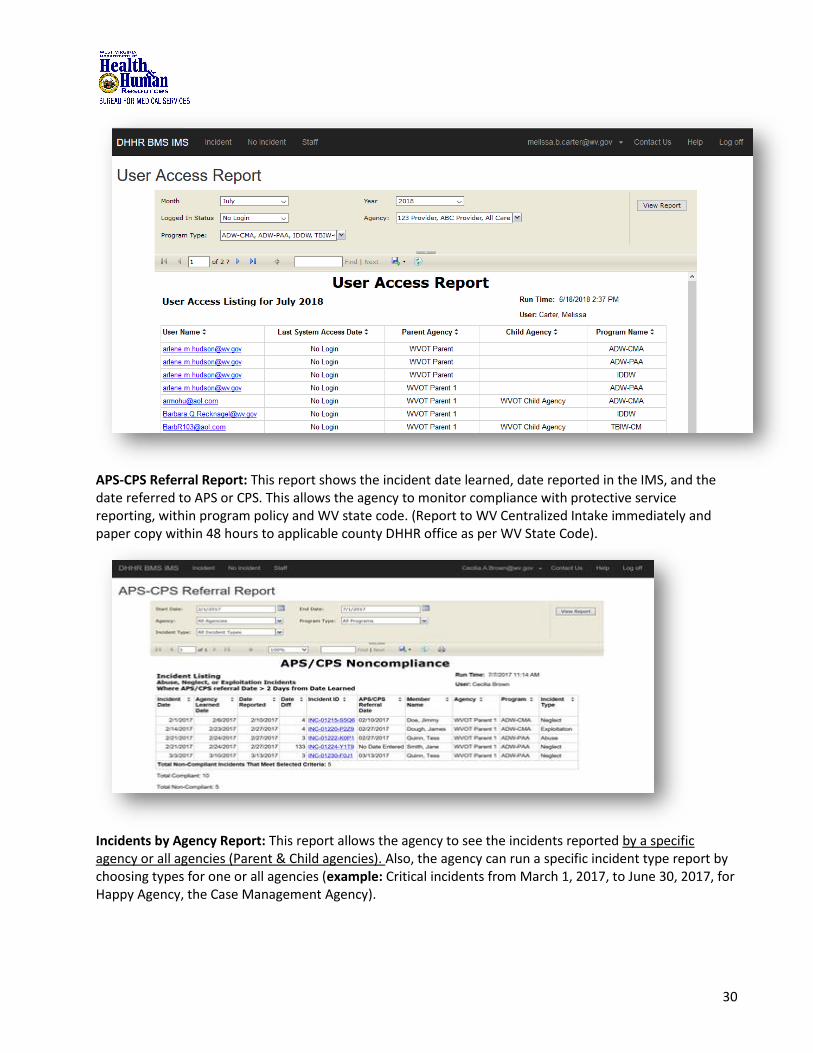
User Access Report: This report allows the agency to monitor system users by month/year and logged-in status.
30
APS-CPS Referral Report: This report shows the incident date learned, date reported in the IMS, and the date referred to APS or CPS. This allows the agency to monitor compliance with protective service reporting, within program policy and WV state code. (Report to WV Centralized Intake immediately and paper copy within 48 hours to applicable county DHHR office as per WV State Code).
Incidents by Agency Report: This report allows the agency to see the incidents reported by a specific agency or all agencies (Parent & Child agencies). Also, the agency can run a specific incident type report by choosing types for one or all agencies (example: Critical incidents from March 1, 2017, to June 30, 2017, for Happy Agency, the Case Management Agency).

31
Exporting and Printing a Report To export a file (report), click on the Save button at the top of the report, a drop down menu will appear with seven (7) options, select the option the correspond with your needs and system (computer) function and the report will be imported into the selected export options/programs.
Print: Click on the printer icon to the right of the Save file icon above.
Example of a Report that was imported into Excel.
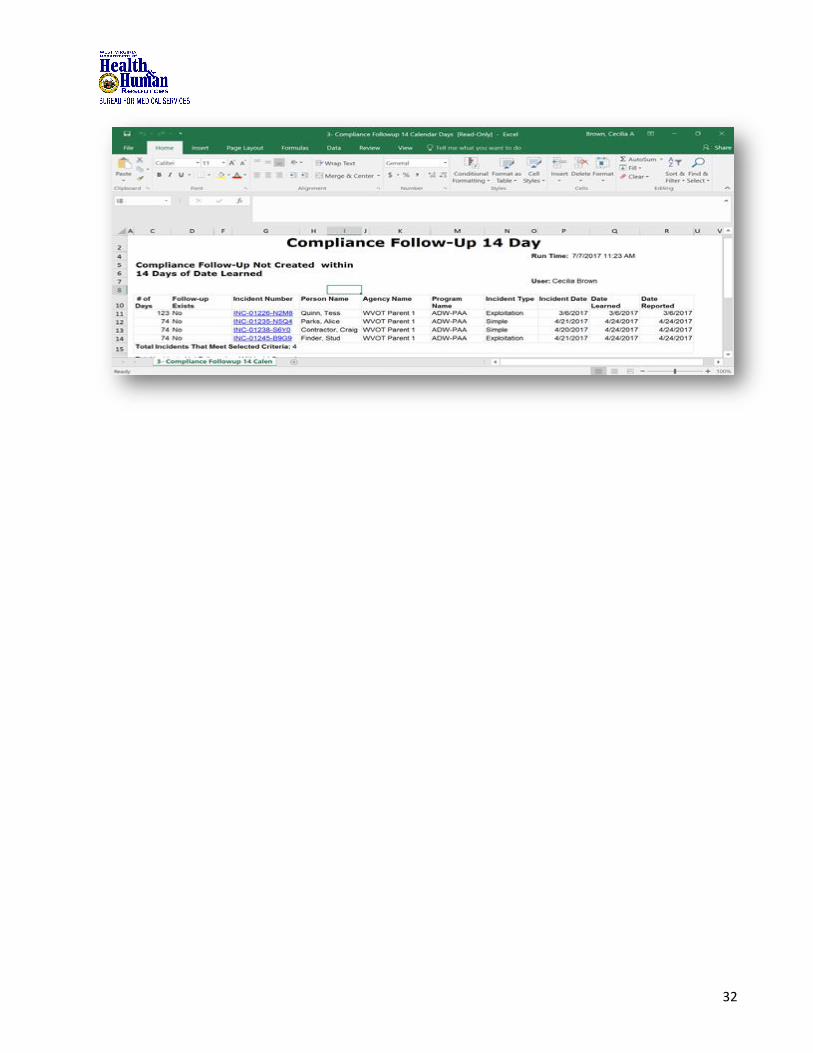
32

33
Important Messages
The Main Menu will display different types of Important Messages that need to be addressed. There is a color code for the messages:
• Red messages are urgent, and need to be handled promptly.
• Orange messages are not urgent, but will need attention.
• Blue messages (not shown) are incidents that the user requested to be unlocked, approved, and need resubmitted.
Director User Options The Director role has several responsibilities that others do not have, such as the “No Monthly Incidents” report.
No Monthly Incidents IMPORTANT NOTE: To maintain incident reporting compliance, Medicaid policy requires the agency to enter “No Monthly Incidents” for every month that your agency does not enter an incident in the IMS. If multiple programs have no incidents, each must have a separate report submitted.
1. From the Main Menu, click on No Incidents This Month.
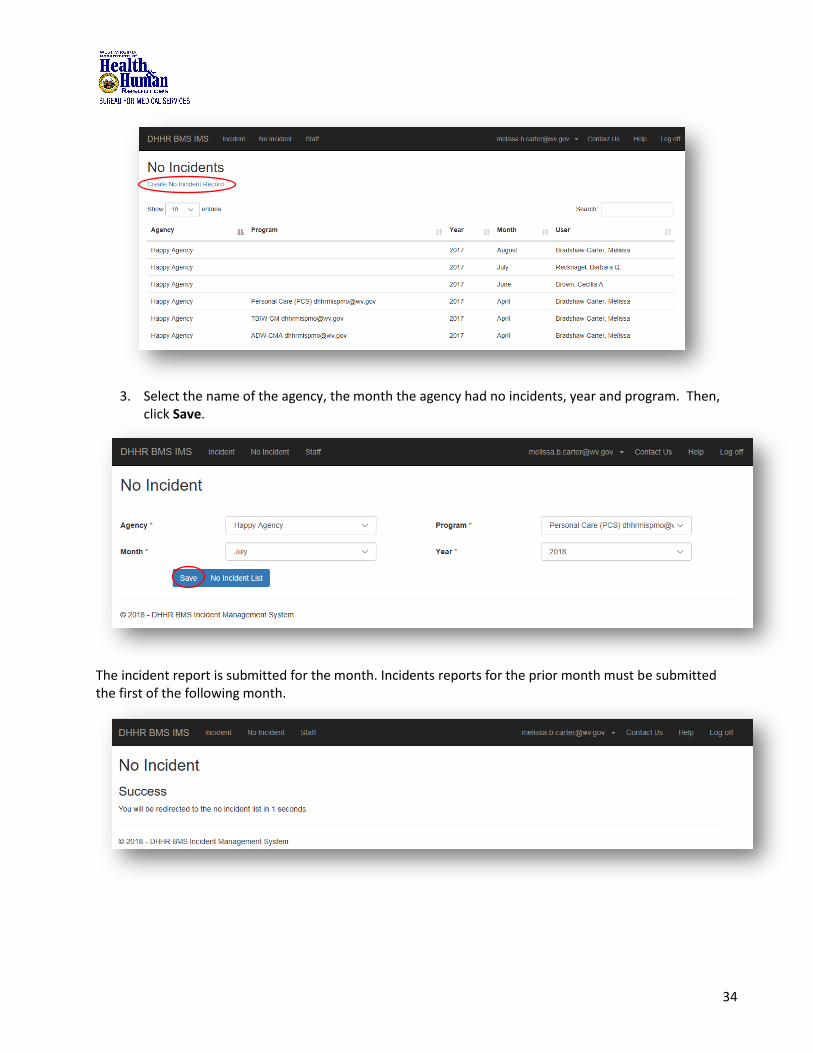
2. Click the Create No Incident Record link to create a new No Incident Report.
Note: No Incidents are sorted by the agency name, then by the year and month to show the most recent No Monthly Incidents.
34
3. Select the name of the agency, the month the agency had no incidents, year and program. Then,
click Save.
The incident report is submitted for the month. Incidents reports for the prior month must be submitted the first of the following month.
35
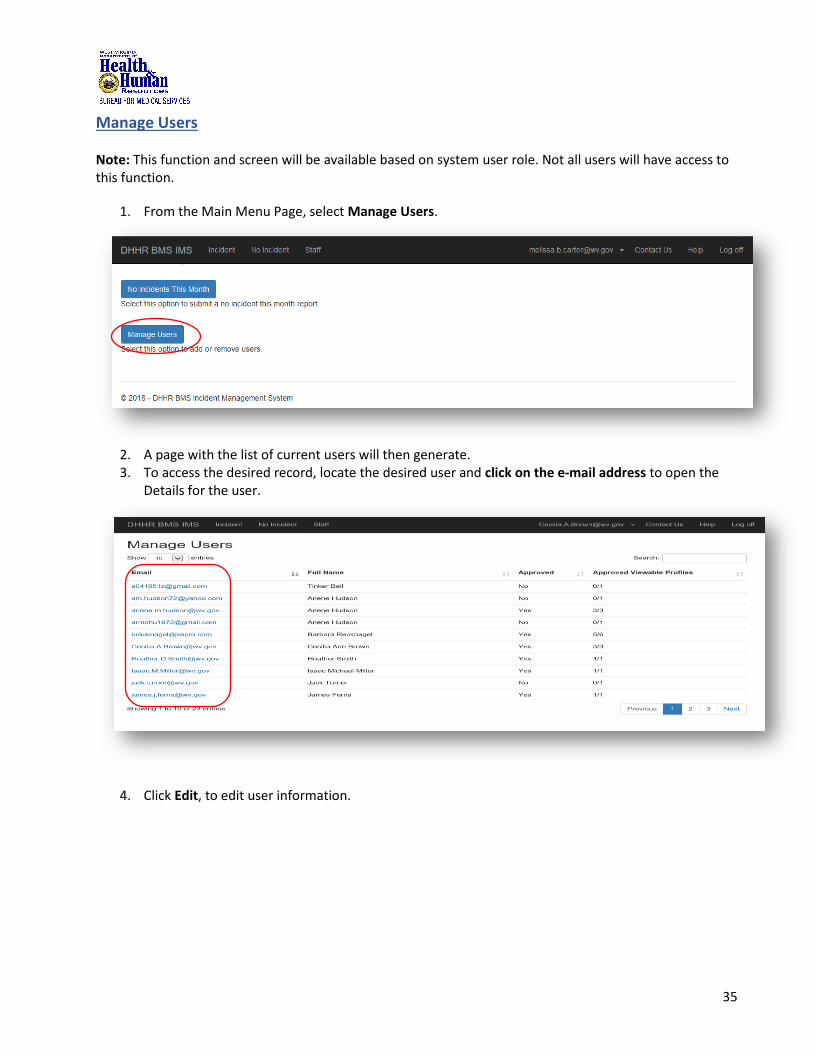
Manage Users Note: This function and screen will be available based on system user role. Not all users will have access to this function.
1. From the Main Menu Page, select Manage Users.
2. A page with the list of current users will then generate. 3. To access the desired record, locate the desired user and click on the e-mail address to open the
Details for the user.
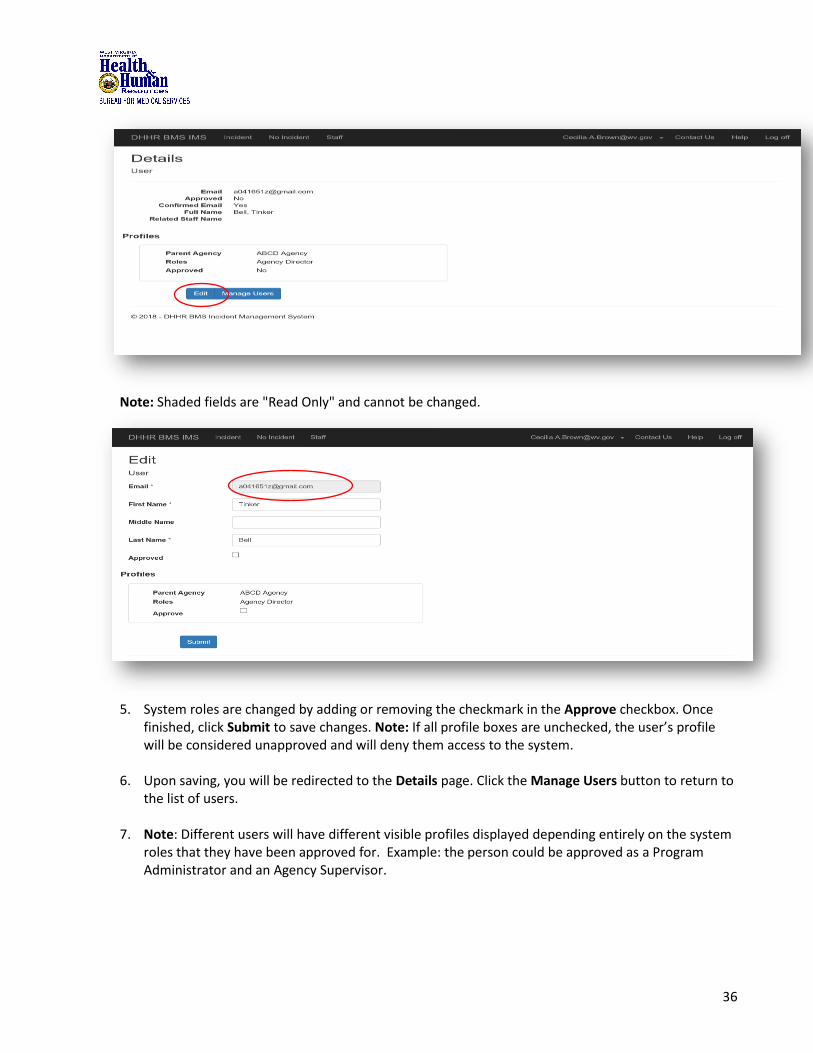
4. Click Edit, to edit user information.
36
Note: Shaded fields are "Read Only" and cannot be changed.
5. System roles are changed by adding or removing the checkmark in the Approve checkbox. Once
finished, click Submit to save changes. Note: If all profile boxes are unchecked, the user’s profile will be considered unapproved and will deny them access to the system.
6. Upon saving, you will be redirected to the Details page. Click the Manage Users button to return to
the list of users.
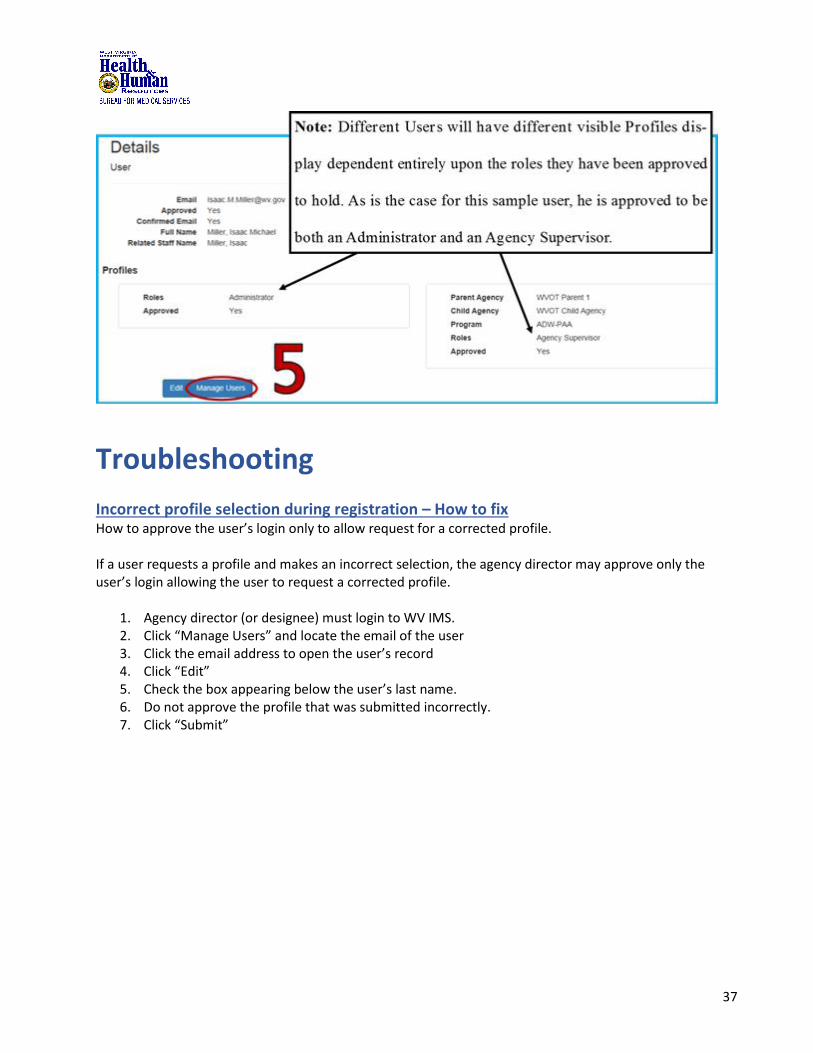
7. Note: Different users will have different visible profiles displayed depending entirely on the system roles that they have been approved for. Example: the person could be approved as a Program Administrator and an Agency Supervisor.
37
Troubleshooting
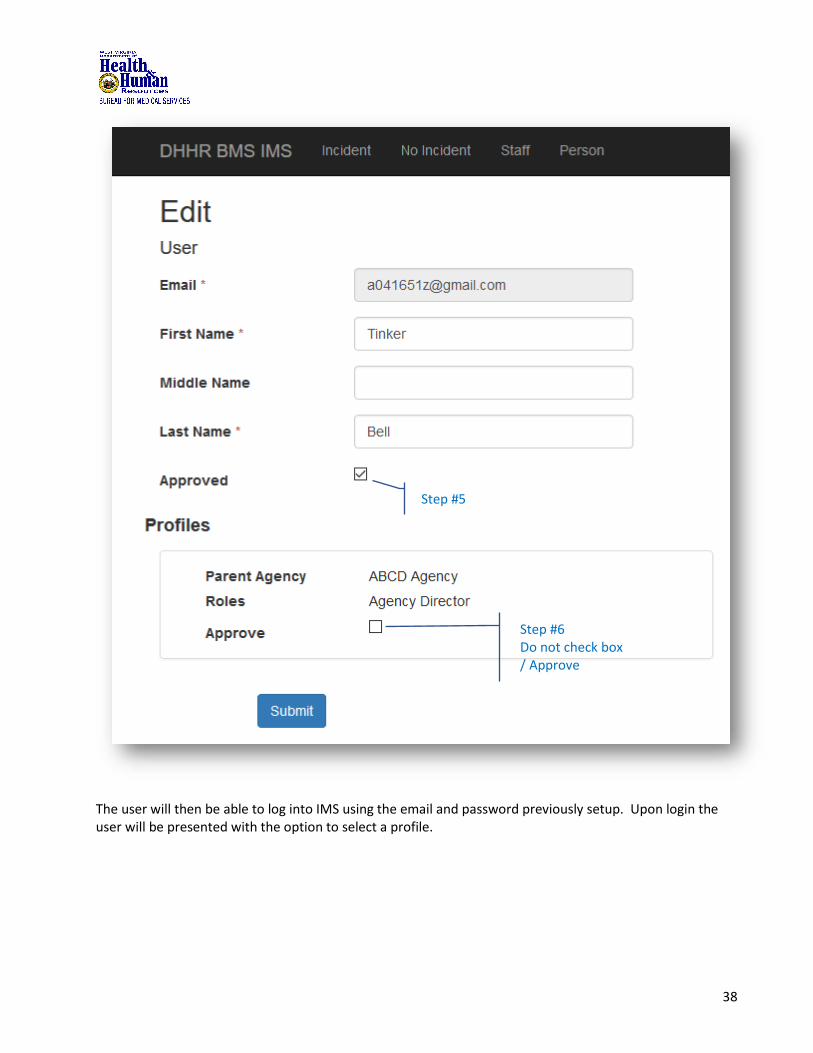
Incorrect profile selection during registration – How to fix How to approve the user’s login only to allow request for a corrected profile. If a user requests a profile and makes an incorrect selection, the agency director may approve only the user’s login allowing the user to request a corrected profile.
1. Agency director (or designee) must login to WV IMS. 2. Click “Manage Users” and locate the email of the user 3. Click the email address to open the user’s record 4. Click “Edit” 5. Check the box appearing below the user’s last name. 6. Do not approve the profile that was submitted incorrectly. 7. Click “Submit”
38
The user will then be able to log into IMS using the email and password previously setup. Upon login the user will be presented with the option to select a profile.
Step #5
Step #6 Do not check box / Approve