writing add-ins for visual studio - buecher.de filewriting add-ins for visual studio .net les smith...
TRANSCRIPT

Writing Add-ins forVisual Studio .NET
LES SMITH
0260fmat.qxd 7/1/02 1:23 PM Page i

Writing Add-ins for Visual Studio .NETCopyright © 2002 by Les Smith
All rights reserved. No part of this work may be reproduced or transmitted in any form or by anymeans, electronic or mechanical, including photocopying, recording, or by any informationstorage or retrieval system, without the prior written permission of the copyright owner and thepublisher.
ISBN (pbk): 1-59059-026-0Printed and bound in the United States of America 12345678910
Trademarked names may appear in this book. Rather than use a trademark symbol with everyoccurrence of a trademarked name, we use the names only in an editorial fashion and to thebenefit of the trademark owner, with no intention of infringement of the trademark.
Technical Reviewer: Bob FlickingerEditorial Directors: Dan Appleman, Peter Blackburn, Gary Cornell, Jason Gilmore, Simon Hayes,Karen Watterson, John ZukowskiManaging Editor: Grace WongProject Manager and Development Editor: Tracy Brown CollinsCopy Editor: Nicole LeClercProduction Manager: Kari BrooksCompositor: Impressions Book and Journal Services, Inc.Indexer: Ron StraussCover Designer: Kurt KramesManufacturing Manager: Tom DebolskiMarketing Manager: Stephanie Rodriguez
Distributed to the book trade in the United States by Springer-Verlag New York, Inc., 175 FifthAvenue, New York, NY, 10010 and outside the United States by Springer-Verlag GmbH & Co. KG,Tiergartenstr. 17, 69112 Heidelberg, Germany.
In the United States, phone 1-800-SPRINGER, email [email protected], or visithttp://www.springer-ny.com.Outside the United States, fax +49 6221 345229, email [email protected], or visithttp://www.springer.de.
For information on translations, please contact Apress directly at 2560 Ninth Street, Suite 219,Berkeley, CA 94710. Phone 510-549-5930, fax: 510-549-5939, email [email protected], or visithttp://www.apress.com.
The information in this book is distributed on an “as is” basis, without warranty. Although everyprecaution has been taken in the preparation of this work, neither the author nor Apress shallhave any liability to any person or entity with respect to any loss or damage caused or alleged tobe caused directly or indirectly by the information contained in this work.
The source code for this book is available to readers at http://www.apress.com in the Downloadssection.
0260fmat.qxd 7/1/02 1:23 PM Page ii

CHAPTER 5
Manipulating Codein Windows
“What matters most in life is not so much how much time we have, but whatwe do with the time we are given.”
—Author Unknown
THUS FAR, IN WORKING WITH CODE in the IDE’s Text Editor windows, I’ve made veryfew references to the extensibility object of Visual Studio .NET. I’ve done this fortwo reasons. First, I wanted to get quickly and simply into building some usablefunctionality in an add-in. Second, I wanted to demonstrate the use of somecommon methods that you can reuse most of the time for retrieving code froma code window, performing some operation on the code, and subsequently put-ting it back into the code window without having to constantly be concernedwith the complex syntax of the extensibility object. I suspect that the library rou-tines I’ve provided for retrieval and replacement of code in a window will workfor you 90 percent of the time you want to work on code.
In this chapter, I concentrate on the text-handling objects in the extensibilitymodel. There will obviously be times when you will need to do something to orwith code windows that goes beyond simply retrieving and putting back code.Therefore, you must explore some of the extensive details of the text-handlingobjects. In this chapter, I introduce you to the Documents collection and theDocument object as a lead-in to learning how to control the Visual Studio .NETCode Editor.
113
TIP I don’t want to jump ahead into the subject of macros(which is reserved for Chapter 8). However, if you’re alreadyfamiliar with the use of macros in Visual Studio .NET, youcan take the code from the short example snippets in the nextfew topics, enclose it with Sub/End Sub, and actually executethese examples in the Macros IDE. Because I’m illustratingcode snippets in the context of an add-in, if you choose to exe-cute the code in the Macro Explorer, substitute DTE for oVBwherever you find it in the code samples.
0260ch05.qxd 7/1/02 2:00 PM Page 113

Listing 5-1. Closing Saved Documents
‘ Close all saved documents.
Dim i As Integer
With oVB
Try
For i = 1 To .Documents.Count
If .Documents.Item(i).Saved Then
.Documents.Item(i).Close()
End If
Next I
Catch
‘ Ignore any error we raise attempting to close
End Try
End With
The Document Object
The Document object refers to an open document or designer in the IDE. Thisbasically means the code windows, form designers, and other windows that arenot tool windows. Additionally, these windows have an area in which text can beedited. The Document object has properties, methods, and events, all of whichcan be called members, with which you can manipulate the active document orthe document that you make the active document. If you are editing a text file in the Visual Studio editor, a TextDocument object is associated with it. The
The Documents Collection
The Documents collection contains all of the Document objects in the IDE. Eachobject represents an open document. You can reference all of the open docu-ments by looping through the Documents collection. Executing the code samplein Listing 5-1 in an add-in closes all open documents that have been previouslysaved.
114
Chapter 5
NOTE When DTE is the parent object in sample code, andI am discussing code within an add-in, I will always use theapplication object and substitute the variable name oVB forDTE. You will remember from Chapter 3 that I used oVB asa short name for the application object. DTE will be used as the real object when I discuss code examples in Chapter 8.
0260ch05.qxd 7/1/02 2:00 PM Page 114

default property for a Document object is the Name property. You can referencethe object by using oVB.Documents.Item(...) or oVB.ActiveDocument.
A simple example of referencing the active document in the IDE is shown inListing 5-2. If you execute this code in an add-in, a message box will display thename of the active document or code window, including its full path, and a textmessage denoting whether the document is read-only or writable.
Listing 5-2. Document Object Example
Dim doc As Document
Dim s As String
Set doc = oVB.ActiveDocument
s = “Active Document: “
s = s & doc.Path & doc.Name & “ is “ & Iif(doc.ReadOnly, “Read-Only”, _
“Writable”)
MsgBox(s)
Manipulating the Code Editor
The Visual Studio .NET Code Editor is a sophisticated text editor that handles thetext editing for the .NET languages, such VB .NET, Visual C++ .NET, and VisualC# .NET. Text is written to a buffer that displays in a text document. You can usethe automation objects of the Visual Studio .NET Code Editor to control the oper-ation of the text behind the scenes in the text buffer as well as the view.
115
Manipulating Code in Windows
NOTE Two entities are being controlled by the Visual Studio.NET Code Editor. First, there is the text displayed in the CodeEditor that you are viewing. Second, there is a text buffer thatis being manipulated behind the scenes. Two differentautomation objects control these two distinct objects,TextPoint and EditPoint, which I discuss in the following sections. TextSelection refers to the visible text selection. Youcan assign multiple TextSelection objects, but they alwaysrefer to the same selected text. You can have multipleEditPoint objects, and they can all have different positions in the text buffer.
0260ch05.qxd 7/1/02 2:00 PM Page 115

You can use four major objects in the Code Editor to control the operation ofthe editor:
• TextSelection object: Use this object to manipulate text in the visible docu-ment. The TextSelection object represents the insertion point where thecaret is currently positioned or the selected text in the visible document.
• TextPoint object: This object allows you to find locations in a document.You can use the TextPoint object to find line numbers, characters in a line,absolute character locations from the beginning of a document, and dis-play columns. TextPoint objects operate on text displayed in a code editor,which is different from the EditPoint object (described next). When youedit a document, TextPoint objects do not move relative to their surround-ing text. This means that if text is inserted before a TextPoint, the value ofits AbsoluteCharOffset property is incremented to reflect its new locationbecause the TextPoint has moved further down in the document.
• EditPoint object: This object is similar to the TextPoint object, but it can bemoved around and can modify text in the text buffer.
• VirtualPoint object: This object is similar to the TextPoint object except thatit has an added capability to query virtual space locations in a document.TextSelection.StartPoint and TextSelection.EndPoint return VirtualPointobjects. Virtual space is the empty space to the right of existing lines oftext, and virtual points exist in this area.
The TextSelection and EditPoint objects are the two main objects with whichyou can manipulate code in the Visual Studio .NET Code Editor. You can usethese objects to
• Select, delete, add, and move text around in the text buffer or the visiblecode window.
• Move the caret, or insertion point, around in the text buffer or the visiblecode window.
• Indent text in the text buffer or the visible code window.
• Add, remove, and navigate to bookmarks in the Code Editor.
• Find and replace text based on a specified pattern.
116
Chapter 5
0260ch05.qxd 7/1/02 2:00 PM Page 116

• Create an outline section in the text buffer and visible code window. To cre-ate an outline means to create a Region, which can be collapsed (hidden)or expanded.
• Retrieve information about the text, such as the top and bottom of the doc-ument, text position, and so forth.
TextSelection Object
The properties and methods of the TextSelection object are analogous to editorcommands in the Visual Studio IDE. Like the IDE, text selection operations areaffected by the Code Editor’s global state. Any operation attempting to modifya text document will fail if it affects any characters contained in a read-only blockor if the text document itself is read-only.
If you place the code snippet in Listing 5-3 in an add-in, it will commenta selected block of Visual Basic code using the TextSelection object. This snippetis designed to be used in an add-in, but you could also use it in a macro bychanging oVB to DTE.
Listing 5-3. Using the TextSelection Object
Dim sel As TextSelection = DTE.ActiveDocument.Selection()
Dim stpt As EditPoint = sel.TopPoint.CreateEditPoint()
Dim endpt As TextPoint = sel.BottomPoint
Try
Do While (stpt.LessThan(endpt))
stpt.Insert(“‘“)
stpt.LineDown()
stpt.StartOfLine()
Loop
Catch
End Try
Listing 5-3 illustrates the use of several properties and methods of theTextSelection object:
• Insert: Moves the selection object to the end of the current line.
117
Manipulating Code in Windows
0260ch05.qxd 7/1/02 2:00 PM Page 117

• LineDown: Moves the pointer to the selected line down the number of linesindicated by the parameter passed to the method. The default parameter is 1. Although it is not illustrated in this example, the LineUp methodmoves the line pointer up a number of lines.
• StartOfLine: Moves the object to the beginning of the current line.
Listing 5-3 also illustrates the use of the EditPoint and TextPoint objects. Thelines of code extracted from the larger snippet set a pointer to the beginning ofthe selection by creating an EditPoint object:
Dim stpt As EditPoint = sel.TopPoint.CreateEditPoint()
The next line creates a TextPoint object that points to the bottom of theselected text block:
Dim endpt As TextPoint = sel.BottomPoint
VirtualPoint Object
You can use the VirtualPoint object to manipulate text beyond the right mar-gin (the left margin in bidirectional windows) of the text document. The codesnippet in Listing 5-4 inserts a comment at the end of the line when the cursor ispositioned anywhere in a line of code.
Listing 5-4. Insert Method of the TextSelection Object
Dim objSel As TextSelection = oVB.ActiveDocument.Selection
objSel.EndOfLine()
objSel.Insert(“ ‘ End of line comment”)
For example, you can position the cursor anywhere in the following line:
intNum = 1
Now if you execute the code snippet using the VirtualPoint object shown in theprevious line of code, the line of code will look like this:
intNum = 1 ‘ End of line comment
With the VirtualPoint object, you can find and display (for illustrative pur-poses) several points within a selected line of code. For example, the block ofcode in Listing 5-5 will display three different values.
118
Chapter 5
0260ch05.qxd 7/1/02 2:00 PM Page 118

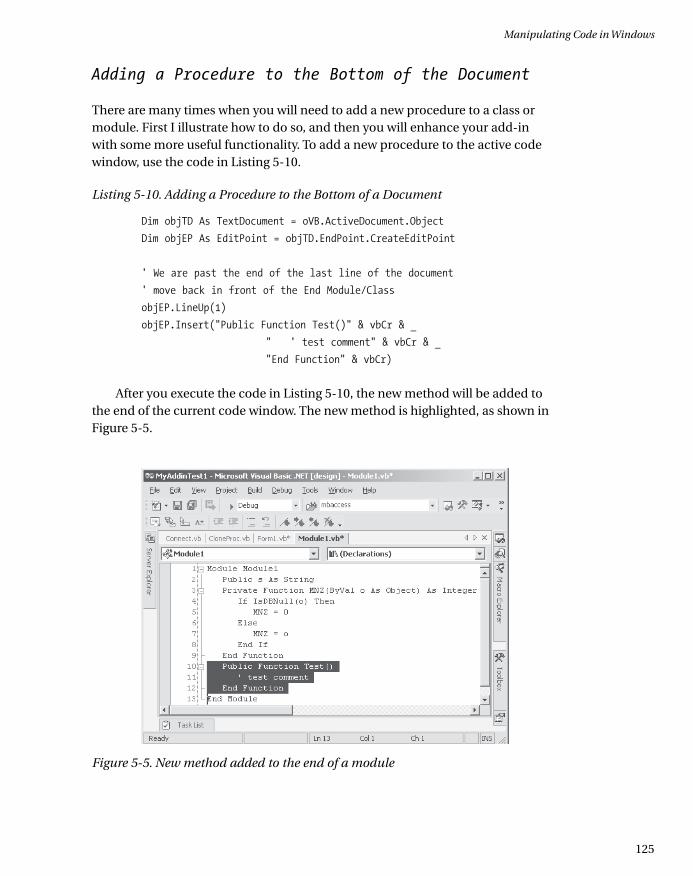
If you run the VirtualPoint example code snippet in Listing 5-5, you will seethe MessageBox shown in Figure 5-2.
Listing 5-5. Using the VirtualPoint Object
‘ VirtualPoint Example
‘ Before running this example, open a text document.
Dim objSel As TextSelection = DTE.ActiveDocument.Selection
Dim objActive As VirtualPoint = objSel.ActivePoint
‘ Collapse the selection to the beginning of the line.
objSel.StartOfLine()
‘ objActive is “live”, tied to the position of the actual selection,
‘ so it will reflect the new position.
Dim iCol As Long = objActive.DisplayColumn
‘ Move the selection to the end of the line.
objSel.EndOfLine()
‘ Display the DisplayColumn
MsgBox(“DisplayColumn: “ & iCol & Chr(10) & _
“Line length: “ & (objActive.DisplayColumn - iCol) & _
“ display characters.” & Chr(10) & _
“VirtualCharOffset value: “ & objActive.VirtualCharOffset &_
vbCr &”VirtualDisplayColumn value: “ & _
objActive.VirtualDisplayColumn)
In Figure 5-1, you will note a block of code with the cursor positioned at thebeginning of line 88 in the code editor.
119
Manipulating Code in Windows
NOTE To illustrate the VirtualPoint object, I am using themacro facility to run the code example. It is easier to do thatfor this simple example than to use an add-in. The code willexecute in an add-in in exactly the same way that it will exe-cute in the Macro Explorer. The only modification required inthe code is changing DTE to oVB. Chapter 8 explores themacro facility in depth.
0260ch05.qxd 7/1/02 2:00 PM Page 119
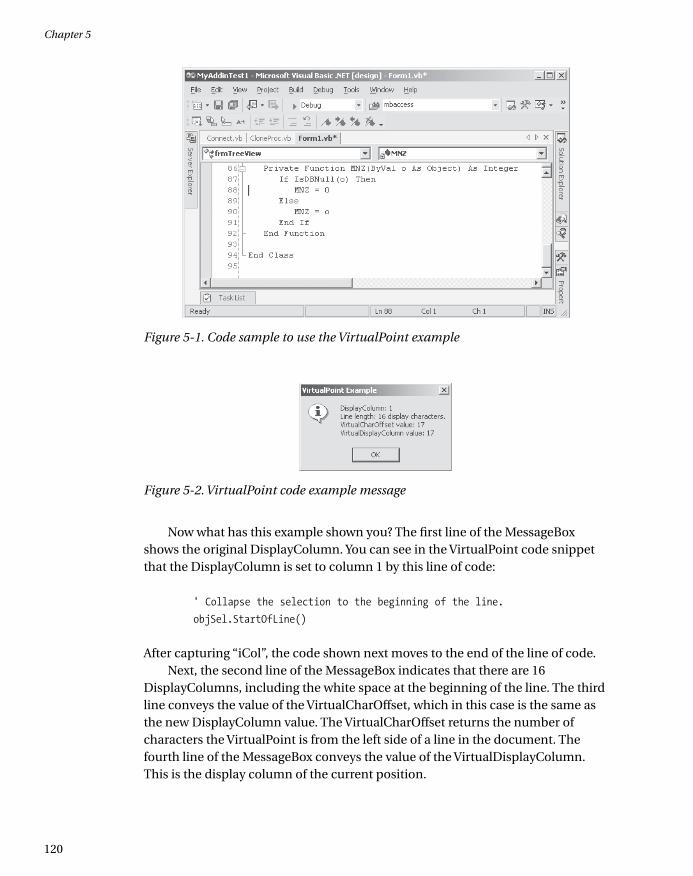
Now what has this example shown you? The first line of the MessageBoxshows the original DisplayColumn. You can see in the VirtualPoint code snippetthat the DisplayColumn is set to column 1 by this line of code:
‘ Collapse the selection to the beginning of the line.
objSel.StartOfLine()
After capturing “iCol”, the code shown next moves to the end of the line of code.Next, the second line of the MessageBox indicates that there are 16
DisplayColumns, including the white space at the beginning of the line. The thirdline conveys the value of the VirtualCharOffset, which in this case is the same asthe new DisplayColumn value. The VirtualCharOffset returns the number ofcharacters the VirtualPoint is from the left side of a line in the document. Thefourth line of the MessageBox conveys the value of the VirtualDisplayColumn.This is the display column of the current position.
120
Chapter 5
Figure 5-1. Code sample to use the VirtualPoint example
Figure 5-2. VirtualPoint code example message
0260ch05.qxd 7/1/02 2:00 PM Page 120

Practical Uses for Editor Automation Objects
At this point, you have only scratched the surface with respect to the large num-ber of properties and methods you can use to manipulate code in editorwindows. It is beyond the scope of this chapter to investigate each and every oneof those properties and methods. You can do that on your own as you find thatyou have a specific need I have not covered. MSDN for Visual Studio .NET con-tains a hierarchical chart of all of the objects within the automation model.
Now I want to illustrate how to use some of the objects, methods, and prop-erties that I believe you’ll find most useful. Again, you’ll place them into reusablecode methods so that you can continue to use them in your development of add-in functionality. As I’ve stated more than once, this will allow you to quicklyimplement new functionality without concerning yourself with the details of theextensibility model.
Retrieving Code from a Document
The Selection property of the TextSelection object returns an object representingthe current selection on the object. For example, if a user selects a block of text ina document or code window, the code snippet in Listing 5-6 will retrieve theselected block and place it into a string object named selCodeBlock.
Listing 5-6. Retrieving Code from the Text Editor
Dim selCodeBlock As TextSelection = oVB.ActiveDocument.Selection()
Dim S As String
S = selCodeBlock.Text
The variable (object) S will now contain the text the user selected in theactive document or code window. I illustrated the use of the Selection property in Chapter 3, when I demonstrated the GetCodeFromWindow method shown inListing 5-7.
Listing 5-7. Retrieving Code from a Document
Shared Function GetCodeFromWindow() As String
Dim s As String
Dim selCodeBlock As TextSelection = oVB.ActiveDocument.Selection()
Try
GetCodeFromWindow = selCodeBlock.Text
121
Manipulating Code in Windows
0260ch05.qxd 7/1/02 2:00 PM Page 121

Catch e As System.Exception
MsgBox(“Error: “ & e.Message, MsgBoxStyle.Critical, _
“GetCodeFromWindow”)
End Try
End Function
Calling GetCodeFromWindow, as shown in the following code snippet, willreturn in the variable S the block of code the user selected in the Text Editor window.
Dim S As String
S = GetCodeFromWindow()
Putting Code Back into the Window
The second method in the pair that retrieves and replaces code in the CodeEditor is the PutCodeBack method shown in Listing 5-8.
Listing 5-8. Replacing Code in the Text Editor Window
Shared Sub PutCodeBack(ByVal s As String)
Dim selCodeBlock As TextSelection
Dim datobj As New System.Windows.Forms.DataObject()
Try
selCodeBlock = CType(oVB.ActiveDocument.Selection(), _
EnvDTE.TextSelection)
datobj.SetData(System.Windows.Forms.DataFormats.Text, s)
System.Windows.Forms.Clipboard.SetDataObject(datobj)
selCodeBlock.Paste ()
Catch e As System.Exception
MsgBox(“Could not put code back in window.”, _
MsgBoxStyle.Critical, _
“PutCodeBackInWindow”)
End Try
End Sub
This method not only illustrates the use of the TextSelection object, but italso shows how to put text onto the Clipboard. In VB 6.0, you could place code onthe Clipboard with this one line of code:
Clipboard.SetText S
122
Chapter 5
0260ch05.qxd 7/1/02 2:00 PM Page 122

In VB .NET, placing code on the Clipboard is a little more involved, as shownby this snippet from the PutCodeBack method, which I demonstrated in Chapter 3:
Dim datobj As New System.Windows.Forms.DataObject()
datobj.SetData(System.Windows.Forms.DataFormats.Text, s)
Once the code has been placed on the Clipboard, you can use the Pastemethod of the TextSelection object to replace the code in the ActiveSelection.
Inserting Code at the Top of a Module
In the process of building add-in functionality, you will probably encounter theneed to build and insert module-level variables into a code module. This isa fairly common requirement for more advanced add-ins. The code in Listing 5-9illustrates how to do this.
Listing 5-9. Inserting Module-Level Variables
01 Dim objTextDoc As TextDocument
02 Dim objMovePt As EditPoint
03 Dim objEditPt As EditPoint, iCtr As Integer
04
05 ‘ Get a handle to the current document and create an EditPoint.
07 objTextDoc = DTE.ActiveDocument.Object
08 objEditPt = objTextDoc.StartPoint.CreateEditPoint
09 objEditPt.LineDown(1)
10
11 ‘ Insert a new variable line
12 objEditPt.Insert(“ Public s As String” & vbCr)
Line 07 sets a TextDocument object (pointer) to the current document in thetext editor. Line 08 moves the insertion point to the top of the document by creat-ing an EditPoint object. Because you want to insert the new variable within the module (in other words, after the module definition line), line 09 moves theinsertion point down one line. Line 12 simply uses the EditPoint object’s Insertmethod to insert the new module-level variable. Figure 5-3 shows the samplemodule before the code to insert the variable is executed.
Once the code to insert the variable is executed, the code window will appearas shown in Figure 5-4. The inserted line is highlighted. Obviously, this is a verysimple example that includes no Imports or Inherits statements. If either of thesestatements were included, you would need to move down past them beforeinserting the variable.
123
Manipulating Code in Windows
0260ch05.qxd 7/1/02 2:00 PM Page 123

124
Chapter 5
Figure 5-3. Module before the insertion of a module-level variable
Figure 5-4. Module after the variable is inserted
0260ch05.qxd 7/1/02 2:00 PM Page 124
Adding a Procedure to the Bottom of the Document
There are many times when you will need to add a new procedure to a class ormodule. First I illustrate how to do so, and then you will enhance your add-inwith some more useful functionality. To add a new procedure to the active codewindow, use the code in Listing 5-10.
Listing 5-10. Adding a Procedure to the Bottom of a Document
Dim objTD As TextDocument = oVB.ActiveDocument.Object
Dim objEP As EditPoint = objTD.EndPoint.CreateEditPoint
‘ We are past the end of the last line of the document
‘ move back in front of the End Module/Class
objEP.LineUp(1)
objEP.Insert(“Public Function Test()” & vbCr & _
“ ‘ test comment” & vbCr & _
“End Function” & vbCr)
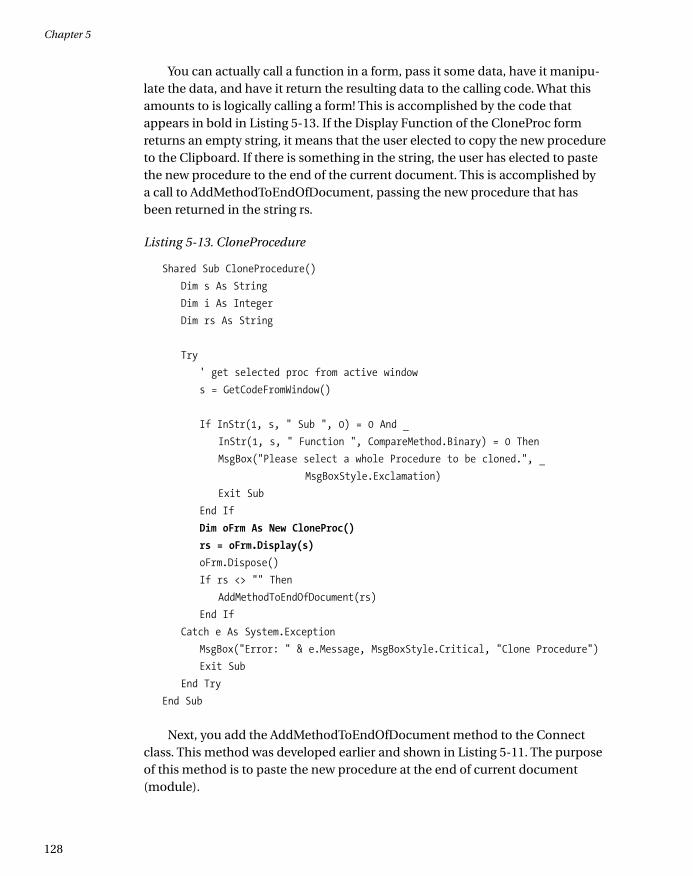
After you execute the code in Listing 5-10, the new method will be added tothe end of the current code window. The new method is highlighted, as shown inFigure 5-5.
125
Manipulating Code in Windows
Figure 5-5. New method added to the end of a module
0260ch05.qxd 7/1/02 2:00 PM Page 125

Now you will create a new method for your library of reusable methods.Again, you will be able to use this one in the future. To create the reusablemethod, simply remove the hard code that adds Function Test and add a param-eter to the procedure definition in which you will encapsulate the code (seeListing 5-11). Obviously, you will make this a Shared procedure so that it can becalled from anywhere in the project.
Listing 5-11. AddMethodToEndOfDocument
Shared Sub AddMethodToEndOfDocument(ByVal NewMethod As String)
Dim objTD As TextDocument = oVB.ActiveDocument.Object
Dim objEP As EditPoint = objTD.EndPoint.CreateEditPoint
‘ We are past the end of the last line of the document
‘ move back in front of the End Module/Class
objEP.LineUp(1)
objEP.Insert(NewMethod)
End Sub
Finally, a typical call to create a new method is shown in the following code.Although this is no more creative than the original example, you will go on to addreal, usable functionality to your add-in.
AddMethodToEndOfDocument(“ Public Function Test()” & vbCr & _
“ ‘ test comment” & vbCr & _
“ End Function” & vbCr)
Cloning a Procedure
One of the most useful features that an add-in can provide is the capability toclone objects, including procedures. In this section, you will enhance your add-inonce again, with probably the most useful tool yet! You will use the add-in thatyou have been building throughout the book thus far.
First, you need to add another menu item to the TreeView. Load up theMyAddinTest1 solution and open the menu form (Form1.vb). Right-click theTreeView control and select Properties from the pop-up menu. The property win-dow should be displayed for the TreeView control. Click the Nodes property andthen click the ellipsis to open the TreeNode Editor. Click the top-level node(Smart Desktop) of the TreeView. Finally, click the AddChild button and typeClone Procedure into the Label box. Click the OK button to close the designer. Ifyou open the TreeView by clicking the plus sign (+) on the top-level node, you willsee that you have added your new menu item.
126
Chapter 5
0260ch05.qxd 7/1/02 2:00 PM Page 126

Next, you need to add a handler for the new menu option. To do so, go to thecode for Form1.vb and add the code in Listing 5-12 to the tvMenu_AfterSelectevent handler. Add the two boldface lines just before the Case Else statement inthe event handler.
Listing 5-12. Adding to the AfterSelect Event
Private Sub tvMenu_AfterSelect(ByVal sender As Object, ByVal e As _
System.Windows.Forms.TreeViewEventArgs) Handles�
tvMenu.AfterSelect
Dim i As Integer
Select Case UCase$(e.Node.Text)
Case “SMART DESKTOP” ‘ignore root clicks
Case “BLOCK COMMENT”
Call Connect.BlockComment()
Case “UNCOMMENT”
Call Connect.BlockUnComment()
Case “BLOCK CHANGE”
Call Connect.BlockChange()
Case “BLOCK DELETE”
Call Connect.BlockDelete()
Case “PROC ERROR HANDLER”
Call Connect.GenLocalErrorTrap()
Case “CLONE PROCEDURE”
Call Connect.CloneProcedure()
Case Else
MsgBox(“Please click on a Child Node.”, _
MsgBoxStyle.Information, “Unknown Request”)
End Select
End Sub
You now need to add two new methods to the Connect class (Connect.vb).The first is named CloneProcedure, which is shown in Listing 5-13. When theadd-in user selects a procedure to clone, the CloneProcedure method willretrieve the selected procedure from the active document. CloneProcedure willcall GetCodeFromWindow to get the selected block from the active window. Afterperforming a cursory test to ensure that the user has selected a procedure, it callsa public Display function of a new form that you have yet to build. This form willdisplay the selected procedure, and allow the user to change the name of the pro-cedure and elect to either paste the new procedure to the current window or copythe new procedure to the Clipboard.
127
Manipulating Code in Windows
0260ch05.qxd 7/1/02 2:00 PM Page 127
You can actually call a function in a form, pass it some data, have it manipu-late the data, and have it return the resulting data to the calling code. What thisamounts to is logically calling a form! This is accomplished by the code thatappears in bold in Listing 5-13. If the Display Function of the CloneProc formreturns an empty string, it means that the user elected to copy the new procedureto the Clipboard. If there is something in the string, the user has elected to pastethe new procedure to the end of the current document. This is accomplished bya call to AddMethodToEndOfDocument, passing the new procedure that hasbeen returned in the string rs.
Listing 5-13. CloneProcedure
Shared Sub CloneProcedure()
Dim s As String
Dim i As Integer
Dim rs As String
Try
‘ get selected proc from active window
s = GetCodeFromWindow()
If InStr(1, s, “ Sub “, 0) = 0 And _
InStr(1, s, “ Function “, CompareMethod.Binary) = 0 Then
MsgBox(“Please select a whole Procedure to be cloned.”, _
MsgBoxStyle.Exclamation)
Exit Sub
End If
Dim oFrm As New CloneProc()
rs = oFrm.Display(s)
oFrm.Dispose()
If rs <> “” Then
AddMethodToEndOfDocument(rs)
End If
Catch e As System.Exception
MsgBox(“Error: “ & e.Message, MsgBoxStyle.Critical, “Clone Procedure”)
Exit Sub
End Try
End Sub
Next, you add the AddMethodToEndOfDocument method to the Connectclass. This method was developed earlier and shown in Listing 5-11. The purposeof this method is to paste the new procedure at the end of current document(module).
128
Chapter 5
0260ch05.qxd 7/1/02 2:00 PM Page 128

Finally, you add a new form to the add-in project. You create the form, createa scrolling TextBox, and place two command buttons on the TextBox. Listing 5-14contains the complete code for the form.
Listing 5-14. CloneProc Form Code
Option Strict On
Public Class CloneProc
Inherits System.Windows.Forms.Form
#Region “ Windows Form Designer generated code “
Public Sub New()
MyBase.New()
‘This call is required by the Windows Form Designer.
InitializeComponent()
‘Add any initialization after the InitializeComponent() call
End Sub
‘Form overrides dispose to clean up the component list.
Protected Overloads Overrides Sub Dispose(ByVal disposing As Boolean)
If disposing Then
If Not (components Is Nothing) Then
components.Dispose()
End If
End If
MyBase.Dispose(disposing)
End Sub
‘Required by the Windows Form Designer
Private components As System.ComponentModel.IContainer
‘NOTE: The following procedure is required by the Windows Form Designer
‘It can be modified using the Windows Form Designer.
‘Do not modify it using the code editor.
Friend WithEvents txtProcToClone As System.Windows.Forms.TextBox
Friend WithEvents btnPasteToModule As System.Windows.Forms.Button
Friend WithEvents btnCopyToClipboard As System.Windows.Forms.Button
<System.Diagnostics.DebuggerStepThrough()> _
129
Manipulating Code in Windows
0260ch05.qxd 7/1/02 2:00 PM Page 129
Private Sub InitializeComponent()
Me.txtProcToClone = New System.Windows.Forms.TextBox()
Me.btnPasteToModule = New System.Windows.Forms.Button()
Me.btnCopyToClipboard = New System.Windows.Forms.Button()
Me.SuspendLayout()
‘
‘txtProcToClone
‘
Me.txtProcToClone.Multiline = True
Me.txtProcToClone.Name = “txtProcToClone”
Me.txtProcToClone.ScrollBars = System.Windows.Forms.ScrollBars.Both
Me.txtProcToClone.Size = New System.Drawing.Size(512, 229)
Me.txtProcToClone.TabIndex = 0
Me.txtProcToClone.Text = “”
‘
‘btnPasteToModule
‘
Me.btnPasteToModule.Location = New System.Drawing.Point(389, 240)
Me.btnPasteToModule.Name = “btnPasteToModule”
Me.btnPasteToModule.Size = New System.Drawing.Size(115, 32)
Me.btnPasteToModule.TabIndex = 1
Me.btnPasteToModule.Text = “&Paste To Module”
‘
‘btnCopyToClipboard
‘
Me.btnCopyToClipboard.Location = New System.Drawing.Point(263, 240)
Me.btnCopyToClipboard.Name = “btnCopyToClipboard”
Me.btnCopyToClipboard.Size = New System.Drawing.Size(115, 32)
Me.btnCopyToClipboard.TabIndex = 2
Me.btnCopyToClipboard.Text = “&Copy To Clipboard”
‘Label1
‘
Me.Label1.Location = New System.Drawing.Point(16, 240)
Me.Label1.Name = “Label1”
Me.Label1.Size = New System.Drawing.Size(192, 24)
Me.Label1.TabIndex = 3
Me.Label1.Text = _
“Change the name of the Method and click the desired button.”
‘
‘CloneProc
‘
Me.AutoScaleBaseSize = New System.Drawing.Size(5, 13)
Me.ClientSize = New System.Drawing.Size(514, 277)
130
Chapter 5
0260ch05.qxd 7/1/02 2:00 PM Page 130

Me.Controls.AddRange(New System.Windows.Forms.Control() _
{Me.btnCopyToClipboard, Me.btnPasteToModule, Me.txtProcToClone})
Me.Name = “CloneProc”
Me.Text = “CloneProc”
Me.TopMost = True
Me.ResumeLayout(False)
End Sub
#End Region
Dim sTextSave As String
Dim sOrigType As String
Dim sOrigName As String
Dim bFormLoading As Boolean
Dim mbWait As Boolean
Public Function Display(ByVal sText As String) As String
Dim sTemp As String
Dim sWord As String
Dim i As Integer
sTextSave = sText
‘ get the “Sub Name(“
sTemp = Microsoft.VisualBasic.Left(sText, InStr(sText, “(“) - 1)
If InStr(sTemp, “Sub”) > 0 Then
sOrigType = “Sub”
Else
sOrigType = “Function”
End If
‘ loop to get proc orig name
‘ when loop terminates, sOrigName is the name
Do While Len(Trim$(sTemp)) > 0
sWord = Connect.GetToken(sTemp, “_”)
If Trim$(sWord) <> “” Then
sOrigName = sWord
Else
Exit Do
End If
Loop
131
Manipulating Code in Windows
0260ch05.qxd 7/1/02 2:00 PM Page 131

Me.Show()
mbWait = True
Do While mbWait
System.Windows.Forms.Application.DoEvents()
Loop
sTemp = sTextSave
Return sTemp
Return sTextSave
End Function
Private Sub UpdateFunctionReturns()
‘ If the procedure is a function, get the
‘ name and propagate it through the function
‘ also propagate any changes from the sub to a
‘ function and vice versa through the proc.
Dim sWord As String
Dim NextWord As String
Dim sTemp As String
Dim nL As Integer
Dim sTemp2 As String
Dim i As Integer
Dim sNewName As String
Dim sNewType As String
Dim sLine As String
Dim sTempLine As String
Dim bFoundProcType As Boolean
sTemp = Me.txtProcToClone.Text
sTemp2 = “”
nL = Connect.MLCount(sTemp, 0)
For i = 1 To nL
sLine = Connect.MemoLine(sTemp, 0, i)
‘ if Proc Def Line get new name, assumming it was changed
If Not bFoundProcType And _
(InStr(sLine, “Sub “) > 0 Or _
InStr(sLine, “Function “) > 0) _
Then
‘ loop to get proc new name and new type
132
Chapter 5
0260ch05.qxd 7/1/02 2:00 PM Page 132

‘ when loop terminates, sNewName is the name
bFoundProcType = True
sTempLine = sLine
Do While Trim$(sTempLine) <> “”
sWord = Connect.GetToken(sTempLine, “”)
If sWord = “Sub” Then
sNewType = “Sub”
Exit Do
ElseIf sWord = “Function” Then
sNewType = “Function”
Exit Do
End If
Loop
sNewName = Connect.GetToken(sTempLine, “_”)
ElseIf bFoundProcType Then
‘ if the type changed, we must substitute the new type
‘ for the old type and change any functions name returns
‘ if new type is a function
sLine = Replace(sLine, sOrigType, sNewType)
sLine = Replace(sLine, sOrigName, sNewName)
End If
GetNextLine:
‘ write the output string
sTemp2 = sTemp2 & sLine & vbCrLf
Next
Me.txtProcToClone.Text = sTemp2
End Sub
Private Sub CloneProc_Load(ByVal sender As System.Object, ByVal e As _
System.EventArgs) Handles MyBase.Load
Me.txtProcToClone.Text = sTextSave
End Sub
Private Sub btnCopyToClipboard_Click(ByVal sender As System.Object, _
ByVal e As _
System.EventArgs) _
Handles btnCopyToClipboard.Click
Dim datobj As New System.Windows.Forms.DataObject()
UpdateFunctionReturns()
datobj.SetData(System.Windows.Forms.DataFormats.Text, txtProcToClone.Text)
133
Manipulating Code in Windows
0260ch05.qxd 7/1/02 2:00 PM Page 133

mbWait = False
End Sub
Private Sub btnPasteToModule_Click(ByVal sender As System.Object, ByVal e As _
System.EventArgs) Handles btnPasteToModule.Click
UpdateFunctionReturns()
sTextSave = Me.txtProcToClone.Text
mbWait = False
End Sub
Protected Overrides Sub Finalize()
MyBase.Finalize()
End Sub
Private Sub CloneProc_Closed(ByVal sender As Object, _
ByVal e As System.EventArgs) Handles MyBase.Closed
sTextSave = “”
mbWait = False
End Sub
End Class
Two major methods of interest are in the form in Listing 5-14. The first is the Display function. This function facilitates the “calling” of the form from theCloneProcedure method of the Connect class. This function puts the passedparameter, in this case a procedure to be cloned, into the module-level variablesTextSave. The contents of sTextSave then gets placed into the TextBox of theform in the CloneProc_Load event. It then sets a Boolean, mbWait, to True.Finally, the method shows the form and loops in a DoEvents loop, waiting onmbWait to be changed to False. This Boolean will be set to false by either of thebutton handler events.
The second major method of interest is UpdateFunctionReturns. Once theuser has changed the name of the procedure in the TextBox and one of the twobuttons is clicked, the Display function breaks out of the wait loop. At that point,it calls the UpdateFunctionReturns method. This method loops through each line of code in the cloned procedure, replacing any occurrence of the originalname of the procedure with the new name. You can even change the procedurefrom a Sub to a Function or vice versa.
After you add the new form and all of the new code previously described tothe project, you run the add-in, as I have illustrated in previous chapters. In thesecond, or client, version of Visual Studio, select the WindowsApplication1 proj-ect. Next, select the procedure named MNZ in total, as shown in Figure 5-6.
134
Chapter 5
0260ch05.qxd 7/1/02 2:00 PM Page 134

Now, click the Clone Procedure node of the TreeView in the add-in’s menuform. This will cause the CloneProc form to be loaded with the selected proce-dure displayed in its text box, as shown in Figure 5-7.
Then change the name of the procedure from MNZ to MakeNullZero. Finally,click the Paste to Module button. The new procedure will be added to the end ofthe module as shown in Figure 5-8.
135
Manipulating Code in Windows
Figure 5-6. Selecting the procedure to be cloned
Figure 5-7. CloneProc form
0260ch05.qxd 7/1/02 2:00 PM Page 135
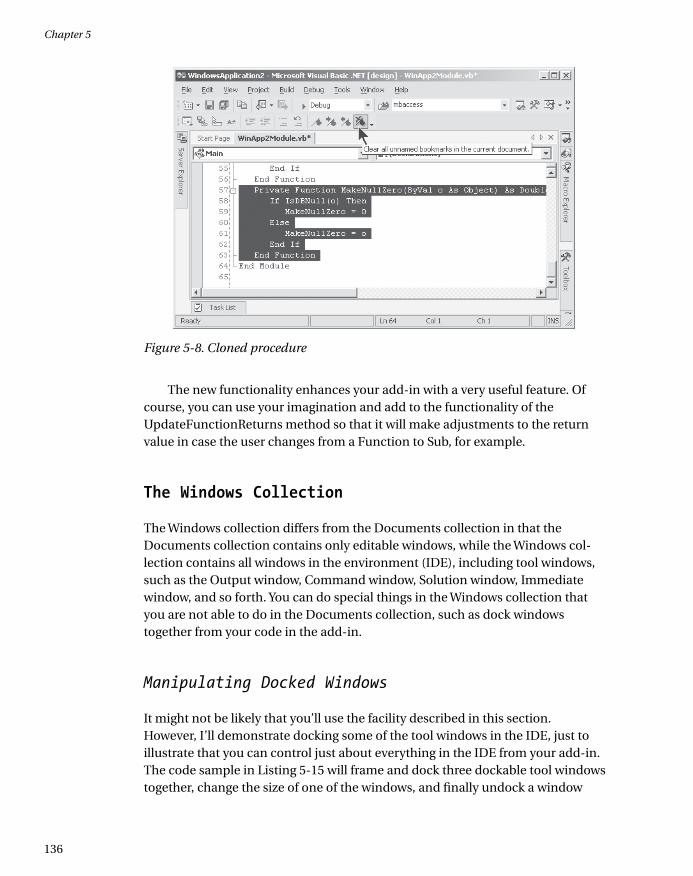
The new functionality enhances your add-in with a very useful feature. Ofcourse, you can use your imagination and add to the functionality of theUpdateFunctionReturns method so that it will make adjustments to the returnvalue in case the user changes from a Function to Sub, for example.
The Windows Collection
The Windows collection differs from the Documents collection in that theDocuments collection contains only editable windows, while the Windows col-lection contains all windows in the environment (IDE), including tool windows,such as the Output window, Command window, Solution window, Immediatewindow, and so forth. You can do special things in the Windows collection thatyou are not able to do in the Documents collection, such as dock windowstogether from your code in the add-in.
Manipulating Docked Windows
It might not be likely that you’ll use the facility described in this section.However, I’ll demonstrate docking some of the tool windows in the IDE, just toillustrate that you can control just about everything in the IDE from your add-in.The code sample in Listing 5-15 will frame and dock three dockable tool windowstogether, change the size of one of the windows, and finally undock a window
136
Chapter 5
Figure 5-8. Cloned procedure
0260ch05.qxd 7/1/02 2:00 PM Page 136

from the frame. Because it’s fairly unlikely that you would use this particular codein an add-in, I’m going to use a feature of the IDE that I haven’t yet introduced:the Macro Explorer. You’ll investigate the Macro Explorer in Chapter 8, but fornow, if you have never used it, this will be a simple exercise.
First, open any project in Visual Studio. The type of project does not matter,as this demo will not alter the project. This demo will only manipulate tool win-dows, but there must be a project open in order for the tool windows to bevisible.
Next, if the Macro Explorer window is not visible, select Tools ➢ Macros ➢Macro Explorer. You can also open the Macro Explorer by pressing Alt-F8. In thewindow, you should see a TreeView with a node named My Macros. If there areno modules under My Macros, right-click the My Macros node and click the NewModule menu option. If there is a module (child node) there already, you canopen the Macros IDE by right-clicking the module and clicking the Edit menuoption.
When the Macros IDE opens, it will look much like the regular IDE. Copy thecode in its entirety from Listing 5-15 and paste it into the macro module that youopened in the Macros IDE.
Next, switch back to the regular IDE, and in the Macro Explorer windowright-click the DockingExample TreeView node. When the pop-up menu appears,click Run and watch the tool windows as they are manipulated. Message boxeswill describe what’s happening. That’s all there is to it!
137
Manipulating Code in Windows
NOTE Because this code is being executed in the Macros IDErather than in an add-in, I have changed the normal appli-cation object name oVB to DTE. You must always referencethe development environment in the Macros IDE by using theDTE object.
Listing 5-15. Docking Tool Windows Example
Sub DockingExample()
Dim WinFrame As Window
Dim Win1 As Window
Dim Win2 As Window
Dim Win3 As Window
‘ Create three tool windows in the IDE
Win1 = DTE.Windows.Item(Constants.vsWindowKindSolutionExplorer)
Win2 = DTE.Windows.Item(Constants.vsWindowKindToolbox)
Win3 = DTE.Windows.Item(Constants.vsWindowKindCommandWindow)
0260ch05.qxd 7/1/02 2:00 PM Page 137

‘Create a linked window frame and dock the Solution Explorer
‘ and Toolbox windows together inside it.
WinFrame = DTE.Windows.CreateLinkedWindowFrame(Win1, Win2, _
vsLinkedWindowType.vsLinkedWindowTypeDocked)
MsgBox(“Total number of windows in the linked window frame: “ & _
WinFrame.LinkedWindows.Count)
‘ Add the Command window
‘ to the frame with the other two.
WinFrame.LinkedWindows.Add(Win3)
MsgBox(“Total number of windows in the linked window frame: “ & _
WinFrame.LinkedWindows.Count)
‘Resize the entire linked window frame.
WinFrame.Width = 400
WinFrame.Height = 700
MsgBox(“Frame height and width changed. Now “ & _
“changing Command window height.”)
‘Resize the Command window.
WinFrame.LinkedWindows.Item(3).Height = 600
MsgBox(“Now undocking the Command window from the frame.”)
‘ Undock the Command window from the frame.
WinFrame.LinkedWindows.Remove(Win3)
End Sub
Clearing the Command Window
Let’s take time for one more simple exercise related to the tool windows in theIDE. This time you will open a new instance of the Output window, which iswhere the results of Debug.Writeline messages appear. You will place some textinto the window and then display a message box so that you can see the text inthe Output window. Finally, the code will clear the Output window, which, by theway, might be a feature that you’ll want to add to your add-in. I’m sure that bynow you are able to do that without my help if you choose.
Again, you will use the macro facility to demonstrate this functionality.Follow the steps described in the previous section and place the code fromListing 5-16 into the Macros IDE. In the regular IDE, right-clickOutputWindowExample and choose the Run option.
138
Chapter 5
0260ch05.qxd 7/1/02 2:00 PM Page 138

Listing 5-16. Output Window Example
Sub OutputWindowExample()
‘ Get a reference to the Command window.
Dim win As Window = _
DTE.Windows.Item(EnvDTE.Constants.vsWindowKindCommandWindow)
Dim CW As CommandWindow = win.Object
‘ Insert some information text into the Command window.
CW.OutputString(“This text will be displayed in the output window”)
‘ Clear the contents of the Command window.
MsgBox(“Click Ok to clear the Command window...”)
CW.Clear()
End Sub
Summary
In this chapter you explored several of the many objects and properties withwhich you can manipulate code in the text editor. There are others, and you willsee some of them in Chapter 6 when I discuss the manipulation of forms andcontrols.
Once again, you added new functionality to the desktop add-in that you havebeen developing. At the same time, you added to the library of reusable objectsthat you will use throughout the development of add-ins. Finally, you looked atways to manipulate the various tool windows in the IDE.
In Chapter 6 you’ll learn how to create a Windows application and add a formwith associated controls. You’ll also manipulate the various properties of the con-trols, including resizing and repositioning, programmatically from an add-in.
139
Manipulating Code in Windows
0260ch05.qxd 7/1/02 2:00 PM Page 139