wqfte702 exercises getting started guide
DESCRIPTION
Websphere MQ file trasnfer editionTRANSCRIPT

WebSphere MQ File Transfer Edition 7.0.2
Getting Started Exercise V1.0
Renate FrankenWebSphere Technical Sales – [email protected]
13. Dec. 2009 Page 1 of 91

About WebSphere MQ File Transfer Edition
IBM® WebSphere® MQ File Transfer Edition is an IBM solution for Managed File transfer based to the market leader messaging middleware. WebSphere MQ.Managed File Transfer stands for reliable, manageable, secure file transfer.
This means that WebSphere MQ File Transfer Edition contains WebSphere MQ or can be installed on an existing WebSphere MQ network.
WebSphere MQ File Transfer Edition, hereafter called MQ FTE, needs a configured WebSphere MQ (hereafter called MQ) network before installation and configuration.
You need one MQ FTE coordination queue manager in a MQ FTE network which knows all configured MQ FTE agents and which receives the status messages.This component uses the new MQ V7 publish/subscribe and must be therefore a WebSphere MQ V7 queue manager. The other queue managers could be WebSphere MQ V6.The endpoints of a file transfer are the MQ FTE agents. An agent is a MQ application which reads and writes the files. It can be installed on a MQ server or on a MQ client.The command queue manager is the access queue manager for a file transfer invocation to control the access for file transfers. The MQ FTE Eclipse Tooling is the MQ Explorer with a MQ FTE plugin and it is used as MQ FTE graphical user interface (GUI). Other invocation through XML message, Ant script or command line or bridging to FTP or SFTP are also possible. These functions will be shown later in the lab.
For more information visit the Internet on: http://www-01.ibm.com/software/integration/wmq/filetransfer/index.html
13. Dec. 2009 Page 2 of 91

About this Labs
This lab is designed for anyone who wants to get familiar with the basic functions of WebSphere MQ File Transfer Edition. Each step introduces you to a different component or function of WebSphere MQ File Transfer Edition, showing you how to install and configure MQ FTE and to run, monitor and enhance file transfers.
It will help you getting comfortable with the base capabilities available to you in MQ FTE. After completing this lab, you will be able to accomplish the following tasks:
• Installation and Configuration• Install and configure WebSphere MQ V 7.0.1
(using the WebSphere MQ – Getting started Exercise)• Install WebSphere MQ File Transfer Edition V7.0.2 and configure a MQ FTE agent.
• Configure a second MQ FTE agent using the command line interface
• Install the MQ FTE Tools with the Eclipse tooling
• Run simple file transfer samples
• Run simple file transfers using the Eclipse tooling
• Run simple file transfers using the command line
• MQ FTE Ant scripts
• Setup the MQ Explorer to develop ANT scripts for MQ FTE
• How to create and run a Ant script with the MQ Explorer
• Script more complex files transfers which Ant
• Bridge a MQ FTE file transfer to an FTP server
• Install FileZilla as sample FTP server
• Configure the MQ FTE Protocol Bridge Agent
• Run some file transfers from and to FTP
• Using the database logger
• Setup the databaselogger
• Start the databaselogger and view the result
• Security with 7.0.2
Note:In the following description, we use WMQ for IBM® WebSphere® MQ and MQ FTE for IBM®
WebSphere® MQ File Transfer Edition.
13. Dec. 2009 Page 3 of 91

Table of ContentsAbout WebSphere MQ File Transfer Edition .......................................................................................2About this Labs......................................................................................................................................3Installation and Configuration...............................................................................................................5
1)Install and configure MQ 7.0.1......................................................................................................52)Install and configure MQ File Transfer Edition 7.0.2....................................................................63)Configure and run a second MQ FTE agent AgentB using the command line interface.............184)Install the MQ FTE Tools with the Eclipse Tooling....................................................................19
Run simple file transfers......................................................................................................................261)Run simple file transfer samples using the Eclipse Tooling........................................................262)Run simple file transfers using the command line.......................................................................42
Using MQ FTE Ant scripts..................................................................................................................441)Setup the MQ Explorer to develop ANT scripts for MQ FTE.....................................................442)How to create and run a Ant script...............................................................................................513)Understand Ant and develop more complex MQ FTE Ant scripts..............................................61
Bridge a MQ FTE file transfer to a FTP server...................................................................................681)Setup FileZilla..............................................................................................................................682)Configure a MQ FTE Protocol Bridge Agent..............................................................................713)Run some MQ FTE – FTP samples.............................................................................................72
Using the database logger....................................................................................................................771)Setup the databaselogger..............................................................................................................772)Start the databaselogger and view the results...............................................................................85
Enhanced security with MQ FTE 702.................................................................................................87More information.................................................................................................................................91
13. Dec. 2009 Page 4 of 91

Installation and Configuration
1) Install and configure MQ 7.0.1
The install and configure MQ FTE, we have to install and configure WebSphere MQ first.
1. Setup WebSphere MQWe will create two WebSphere MQ queue managers QMA and QMB and create the sender and receiver channel pairs..Later-on during the MQ FTE configuration, we use QMA as queue manager for AgentA, as Coordination Queue Manager and as Command Queue Manager. We will use the queue manager QMB as queue manager for the MQ FTE Agent AgentB.
If you are not familiar with MQ, run the WebSphere MQ – Getting started Exercise lab first. This lab contains the description how to setup MQ. We will use that configuration for the following labs.The WebSphere MQ – Getting started Exercise is available on
https://knowledgecommunity.raleigh.ibm.com/KnowledgeWeb/protect/command.wss/doUTSubmissionDisplay?icID=1980&ukc_system=WKC
If you have not access, contact me: [email protected].
If you are familiar with WebSphere MQ, you can also create two queue managers:QMA : Port 1415, XMITQ:QMB, Senderchannel QMA.QMB, Receiverchannel QMB.QMAQMB : Port 1416, XMITQ:QMA, Senderchannel QMB.QMA, Receiverchannel QMA.QMB
13. Dec. 2009 Page 5 of 91

2) Install and configure MQ File Transfer Edition 7.0.2
Objective of this lab:
Install and configure WebSphere MQ File Transfer Edition as a base for the following labs.
(a) Check the System requirements before installation. They can be found here: http://www-01.ibm.com/software/integration/wmq/filetransfer/requirements/index.html
Note: If you have a WebSphere MQ server locally installed, you need a MQ FTE server license, if you have no WebSphere MQ server installed, you need a MQ FTE client license which includes the WebSphere MQ client.
(b) Start Install.exe to launch the installation. You can find it under <MQFTEInstallCode>\server\Windows_x86\Disk1\InstData\VM.( in the predefined lab, the MQFTEInstall Code is available under C:\Installable\WMQFTE702)
The following installation window should appear. This lab describes a English installation. Click the Select Button to continue.
13. Dec. 2009 Page 6 of 91

(c) Read the text and click the Next button
(d) Select I accept the terms in the license agreement and click the Next button.
13. Dec. 2009 Page 7 of 91

(e) Change the installation path to C:\IBM\WMQFTE and click the Next button.
13. Dec. 2009 Page 8 of 91

(f) Change the Configuration folder to C:\IBM\WMQFTE\config and click the Next button.
(g) Enter QMA as queue manager name for the MQ FTE coordination queue manager name. Select Bindings which means we use the local MQ server installation. Click Next.
13. Dec. 2009 Page 9 of 91

Note:A MQ server connection (transport mode binding) requires only the queue manager name. The only different using a MQ client connection (transport mode client) here would be to specify in addition the hostname or IP address of the target queue manager, the port and the name of the MQ server connection channel which default would be SYSTEM.DEF.SVRCONN.
Note:The settings for the installation are done. The next steps are for the configuration of an MQ FTE agent. The configuration could also be done later after the completion of the installation. To configure later on, we could here also skip the configuration.
(h) Now enter the MQ FTE agent name AgentA, enter the agent's queue manager name QMA and select Binding for the local MQ Server queue manager.
Note:The agent name could be any name but it have to be unique within you MQ FTE network. A practical sample could something similar as StoreBerlin or HeadquarterLondon. Later on in the lab you see that transfer files between MQ FTE agents using the GUI, you have only to know the MQ FTE agent names.For a production system it would make sense to think in advance about MQ FTE agent names conventions in your environment.
13. Dec. 2009 Page 10 of 91

Note: You could also separate the coordination queue manager and the agent queue manager using two different MQ queue managers also on different systems connected via MQ sender and receiver channel or using a MQ cluster. These two different MQ FTE queue managers use different queues so we can also use also one MQ queue manager for both MQ FTE queue managers like here QMA. You can also use a separate MQ queue manager for the MQ FTE command queue manager. It could be used for security settings. To keep it simple in this lab, we use for the coordination queue manager, command queue manager and agent queue manager for agent AgentA always the same queue manager QMA for this lab.
(i) Enter QMA as command queue manager name and select Bindings and click Next.
13. Dec. 2009 Page 11 of 91

(j) Check the Pre-Installation Summary and click Install.
(k) Read the text.This means that the MQ FTE installation and configuration only sets the corresponding environment and properties without creating the dedicated queues in WebSphere MQ.To create the queues, MQ FTE has created the corresponding script files which you have to run with the runmqsc command after this configuration. This have to be done only once for coordination queue manager but for every new MQ FTE agent. Click Next.
13. Dec. 2009 Page 12 of 91

(l) Read the text and click Next.
(m) Click Done.
13. Dec. 2009 Page 13 of 91

(n) Expand the MQ FTE config directory C:\IBM\WMQFTE\config. You should see the following structure:
The first directory in config directory starts with the Coordination Queue Manger name, then the agents sub directory with a directory for each created agent. The properties files contain the configuration data for the MQ FTE components. The *.mqsc files are the created MQ scripts to create or delete the corresponding MQ queues.
(o) Open a command prompt, switch to the C.\IBM\WMQFTE\config\QMA directory and run the command: runmqsc QMA < QMA.mqsc. This command has to be executed once to create the MQ objects for the MQ FTE coordination queue manager.
13. Dec. 2009 Page 14 of 91

(p) Control the reply messages for all commands executed and no error occurred.
(q) Switch to the directory C:\IBM\WMQFTE\config\QMA\agents\AGENTA directory and execute the command runmqsc QMA < AGENTA_create.mqsc. Control here also the MQ reply messages.
13. Dec. 2009 Page 15 of 91

(r) Now we have completed the configuration and can start the MQ FTE agent AgentA. Therefore switch to the directory C:\IBM\WMQFTE\bin. List the directory using the dir command. Here you see all the MQ FTE provided command line commands.
(s) If you want to check the parameters for a command use the -h option.E.g. fteStartAgent – h list you all possible parameters for the MQ FTE command. to start a MQ FTE agent. To start the MQ FTE agent AgentA, execute fteStartAgent AgentA.
Check the new AgentA Log file C:\IBM\WMQFTE\config\QMA\agents\AGENTA\logs\output0.logYou should see the following success messages:00000001 AgentRuntime I BFGAG0058I: The agent has successfully initialized.00000001 AgentRuntime I BFGAG0059I: The agent has been successfully started.
13. Dec. 2009 Page 16 of 91

Note:For a production system you should think about starting the agent at system start-up time.
Congratulation, you have finished this lab
You have now a running MQ FTE agent AgentA, ready to execute.But before we execute some MQ FTE transfer commands, we will first create a second MQ FTE agent AgentB and install the MQ FTE GUI (Graphical User Interface) in the next labs.
13. Dec. 2009 Page 17 of 91

3) Configure and run a second MQ FTE agent AgentB using the command line interface
Now we create the second MQ FTE agent AgentB which uses the already existing and running queue manager QMB as MQ FTE agent queue manager for the new MQ FTE agent AgentB.Before we continue ensure that the queue manager QMB is running and that the channels between QMA and QMB are running.
(a) Execute the following MQ FTE command in the MQFTE bin directory to create AgentB:fteCreateAgent -agentName AgentB -agentQMgr QMB
(b) Ensure that your get the following success messages.
(c) As for the AgentA we have now to run the runmqsc command to create the AgentB queues on QMB and to start the AgentB.Therefore switch to the new directory C:\IBM\WMQFTE\config\QMA\agents\AGENTB and execute the command: runmqsc QMB < AGENTB_create.mqsc
(d) Return to the MQFTE bin directory C:\IBM\WMQFTE\bin and start AgentB with the following command: fteStartAgent AgentB.
Congratulation, you have finished this lab
You have created and started a second MQ FTE Agent AgentB
13. Dec. 2009 Page 18 of 91

4) Install the MQ FTE Tools with the Eclipse Tooling
This lab shows how to install the MQ FTE tools which includes the MQ FTE Eclipse Tooling which is a plug-in into the already installed MQ Explorer. The MQ Explorer could be installed as part of WebSphere MQ or as standalone SupportPac which can be downloaded here as SupportPac MS0T:http://www-01.ibm.com/support/docview.wss?rs=171&uid=swg27007197#1
(a) Before you start to install the MQ Explorer Plugin, ensure that the MQ Explorer is not running. Otherwise close it.
(b) Start Install.exe to launch the installation. You can find it under <MQFTEInstallCode>\tools\Windows_x86\Disk1\InstData\VM
The following installation window should appear. This lab describes a English installation. Click the Select Button to continue.
13. Dec. 2009 Page 19 of 91

(c) Read and follow the instructions and click Next.
(d) Select I accept the terms in the license agreement and click Next.
13. Dec. 2009 Page 20 of 91
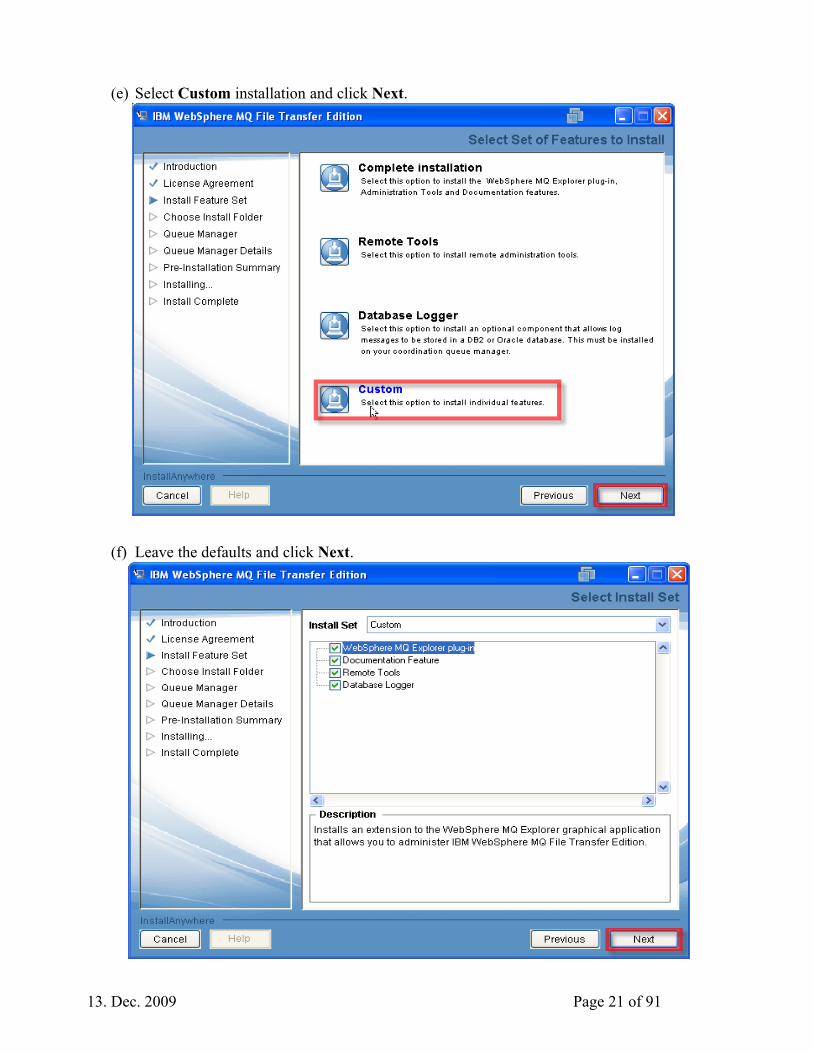
(e) Select Custom installation and click Next.
(f) Leave the defaults and click Next.
13. Dec. 2009 Page 21 of 91

(g) Change the installation path to C:\IBM\WMQFTE and click Next.
(h) Change the configuration path to C:\IBM\WMQFTE\config and click Next.
13. Dec. 2009 Page 22 of 91

(i) Click Use existing. (We have already configured the name of the coordination queue manger and the command queue manger and to connect with binding mode, so we can just reuse it and have not to define it once more)
(j) Click Install.
13. Dec. 2009 Page 23 of 91

(k) Click Done.
(l) To validate the installation start the MQ Explorer. You should now see on the left side in the MQ Explorer Navigator the Managed File transfer directory tree.
13. Dec. 2009 Page 24 of 91

(m)Selecting Transfer Log in the Managed File Transfer tree on the left side in the MQ Explorer Navigator you see on the right side of the MQ Explorer the Managed File Transfer – Current Transfer Process View and you see an additional Tab MQ Explorer – Content To see both right panes at the same time for the next file transfer lab, you can select the Managed File Transfer – Current Transfer Progress tab with the left mouse button, keep the mouse button pressed and drop the tab to the lower button of the pane. When this black fat arrow appears at the bottom, release the mouse button
Then you should have the split right pane with both views, which should look like the following picture:
Congratulation, you have finished this lab
13. Dec. 2009 Page 25 of 91

Run simple file transfers1) Run simple file transfer samples using the Eclipse Tooling
There are several ways to start a file transfer with MQ FTE.
• using the Eclipse Tooling as Graphical User Interface (GUI) to initiate file transfers which will be shown in this lab
• using the MQ FTE provided commands in the MQFTE\bin directory shown in the next lab
• using ANT scripts shown in a following
• or just by putting well defined MQ FTE XML messages in dedicated agent queues.
This lab shows you the MQ FTE Eclipse Tooling:
(a) If not already started, start the MQ Explorer.
(b) To initiate a file transfer, right click Transfer Log and select New Transfer... .
Note:You can also right click Transfer Template or Pending Transfer to initiate a file transfer.
13. Dec. 2009 Page 26 of 91

(c) Complete the next screen.For the From: Agent use the select button on the right side and select AGENTA.Enter the complete path of your file to transfer. If you use a prepared image, there are some sample files like Data.50k in the directory C:\Student\Data prepared for you. So can enter the file C:\Student\Data\Data.50k Otherwise create your own directory and copy any file to use for the transfer.
For the To:Agent use the select button on the right side and select AGENTB.Enter a target directory for the file, for example C:\Student\Data\MQFTEB.The target File name is already inserted by the GUI, but you can overwrite it if you wish.Click Finish to initiate your first ad-hoc file transfer.
Note:To initiate this file transfer, you need no knowledge about the underlying MQ infrastructure.You need only to know your logical agent names of the source and the target system.The MQ Explorer works here as a MQ client application connected directly or indirectly to the MQ FTE coordination queue manager. So you can initiate such a file transfer from every where in the MQ network and with no direct access to the source or target system and you can check the results on the MQ Explorer as shown next.If you see your Agent not in the list, it is not started or the channel to the coordination queue manager is not running.
13. Dec. 2009 Page 27 of 91

(d) You should get the following view in your MQ Explorer:
Note:It could take some seconds to see the result in the MQ Explorer. The reason therefor is that the MQ Explorer is a MQ Application which shows MQ messages and the MQ messages are asynchronous. So some delays are more a question of the MQ Explorer refresh rate than the MQ FTE performance. You can enforce a MQ Explorer refresh by press the Refresh button on the upper right side of a pane
Note:If you see only a Completion State like Queued or Recovering then check your environment. Are the MQ channels running ? Are your FTE Agents running or successful started ?
13. Dec. 2009 Page 28 of 91

(e) Check the detailed log. Therefor right click the corresponding log entry in the Transfer Log and select Properties.
(f) Select XML on the left side to see the more detailed log on the right side.Remember this view for a later lab with ANT scripts where we will see here also the other command invocation results. Click OK to close this view.
Note:These are also the information which are hold by the coordination manager and which can be received through MQ subscribe for further processing, for example from a monitoring tools or which could be stored in a database.MQ FTE provides already a databaselogging process to write these messages transactional in a database to keep these information for auditing purposes.
13. Dec. 2009 Page 29 of 91

(g) Initiate a new file transfer with the same values as done before and let's have a deeper look into the MQ FTE file transfer options before you press the Finish button:1. Once entered a file or directory, you have not to enter the values again. You can use now the arrows on the right side to select one of your previous values.(These values are hold in the MQ Explorer workspace which you find and modify here: in the description file dialog_settings.xml here in our imageC:\Documents and Settings\Administrator\Application Data\IBM\MQ Explorer\.metadata\.plugins\com.ibm.wmqfte.explorer )2. To execute the sames file transfer as before, you have to select the flag for overwrite files on the destination file system that have the same name, otherwise you will retrieve an error for a duplicate file. (for test reasons, you can also click now the Finish button without the marked overwrite check and see the result)
Note:here are some explanations of the other flags which you can try.:Mode:The mode is important if you transfer files for example from ASCII file system to a EBCDIC file system. To read a text file from an ASCII system on a EBCDIC system, select the Text
13. Dec. 2009 Page 30 of 91

transfer option so the two ASCII specific hex values for Carriage Return/Line Feed will be converted into the EBCDIC specific hex value. But if you transfer executables with this option, they could be changed and can not be executed anymore. So you should use binary mode to transfer executables or files which may not be converted. Checksum:Checksum is a typical mechanism for the unreliable FTP protocol to check that the complete file arrived on the destination. MQ FTE uses the reliable WebSphere MQ to transport the file. So there is no really need to use this mechanism with MQ FTE but it is supported.File Transfer Group:You can use a file transfer group to transfer several file from one agent to another agent with on MQ FTE transfer invocation. The only limitation is that the source and destination agent have to be the same for all file transfers in this group.
(h) Click the Advance tab to get to the following screen:.
Note:You can use MQ FTE to transfer files over an existing MQ network V6 or V7 which is already used for messaging. Very often messaging applications are time-critical and therefore file transfers are done during night to avoid high network traffic during peek times. With the setting on this page we can use a MQ benefit to prioritize messages.Which means, the default priority for file transfers using MQ FTE is 0, the lowest priority. So you can transfer files during the day and use the time during lower network traffic to transfer files. But time-critical messages with higher priority are preferred by MQ and these messages can send between file transfers and have not to wait until a complete file is transferred.
Leave the default and click Next.
13. Dec. 2009 Page 31 of 91

(i) The following settings are for scheduling this transfer.You will see all the settings on this screen after you check Enable scheduled transfer and when you select the Repeat flag.Out first file transfer was an ad-hoc file transfer, initiated immediately after the click on the Finish button.With these settings here we can schedule a transfer to a dedicated time and timezone or we schedule repeating transfers, for example every Saturday morning.Scheduled transfers are displayed and can be changed or canceled in the Pending Transfers view in the MQ Explorer's Navigation view.
13. Dec. 2009 Page 32 of 91

(j) Select the Triggers tab at the top.
The Triggers page is to set additional conditions for a file transfer and is a logical AND with the scheduler.To set the Schedule and the Triggers page like shown in this sample means, that every Saturday morning AND if the file Data.10k exists in the C:\Student\Data directory then start the file transfer.If you are looking how to set the condition to start a file transfer as soon a files arrive, you should have a look at Monitors in the MQ Explorer Navigator or wait until it will be covered later in this lab.
Before we continue with the Next button, deselect the Enable triggered transfer and deselect Enable scheduled transfer on the Schedule page.
13. Dec. 2009 Page 33 of 91

(k) The next page can be used to set medadata attribute-value pairs.This can be used to get additional attribute values in the log messages which can be used for advanced filtering or further dedicated analysis of the MQ FTE logs.You can add her some sample values, click the Add button and finally click the Next button to continue.
13. Dec. 2009 Page 34 of 91

(l) Now we get to the last page for the file transfer settings.This page can be used to store the transfer settings as transfer template to execute it later on several times. To store it as template, select the Save transfer settings as a template flag and enter a template filename like MyTransfer.Click the Finish Button.
Note:I you choose to save the settings as template, no ad-hoc file transfer is initiated. The specified file transfer is only saved as template, which can be found as template in the MQ Explorer Transfer Template View.
13. Dec. 2009 Page 35 of 91

(m)Select Transfer Templates, right click your created Transfer Template and click Submit.
(n) Open the transfer log properties for the executed transfer and look for your specified metadata. Click OK to close the properties window.
13. Dec. 2009 Page 36 of 91

(o) As last transfer using the Eclipse tooling, we use the monitor. With the monitor, we can trigger a file transfer through a directory event. For example start as soon a specified file is appears or is updated.Therefore right click Monitors in the MQ Explorer Navigator and select New Monitor...
(p) Enter a name, e.g. MyMonitor, for your new monitor Name, enter the directory to watch an the trigger condition, e.g. trigger when file match pattern trigger.dat, which means start a transfer as soon the file trigger.dat is created or updated. Click Next
13. Dec. 2009 Page 37 of 91

(q) Specify your file transfer to start, for example our first file transfer sample data. To run the monitor several times again in this lab, set the overwrite flag and click Finish. (otherwise the second file transfer will fail with the duplicate file error message)
13. Dec. 2009 Page 38 of 91

(r) Create the specified C:\Student\Data\Monitor directory and create the file trigger.dat in this directory. Watch the right lower Progress window.As soon as you create the file in the directory, you should see a new completed file progress entry.Now update the file trigger.dat, for example through open and save (update) the file. You should see again a new entry in the progress pane. Before we continue to the next lab, right click the created Monitor MYMONITOR and delete this entry.
(s) Let's create an additional Monitor which monitors a complete directory and which transfers all files arriving in the directory. To create a new Monitor, right click Monitors and select New Monitor... .
13. Dec. 2009 Page 39 of 91

(t) Enter the name for the new Monitor for example MonMonitorInEnter a new directory to monitor for example C:\Student\MonitorIn.Enter * to match all files arriving in this directory. Click the Advanced tab at the top.
(u) On this page you can specify the time for the Monitor to poll the specified directory.Set this time to 5 seconds to see faster results in this lab. Click Next >
13. Dec. 2009 Page 40 of 91

(v) Because we want to copy all the files of a directory, we use now variable substitution for the incoming files and the resulting filenames.
Enter ${filepath}.as file and ${fileName} as to file name. Click Finish.
(w)Create the new directory C:\Student\MonitorIn and drop some files into the new directory. Watch the Transfer log and the Current Transfer Progress in the MQ FTE Eclipse Tooling.
Congratulation, you have finished this lab.
13. Dec. 2009 Page 41 of 91

2) Run simple file transfers using the command line
This lab shows you the MQ FTE provided commands in the MQFTE\bin directory. We have already used the command fteStartAgent.cmd to start a MQ FTE agent.
(a) Use a command prompt, switch to the c:\IBM\MQFTE\bin directory and list the available commands:
(b) Most of the commands are self-explained by their name. To know the parameters of a command, invoke it and use the -h option.We will have now a look at the fteCreateTransfer command.Invoke the following command: fteCreateTransfer -h
13. Dec. 2009 Page 42 of 91

(c) The minimum to invoke a file transfer via command line is:fteCreateTransfer -sa AgentName -da AgentName -dd DestinationDirectoryName SouceFilespec(sa is the source agent, da the destination agent, dd destination directory)for example execute the following command:fteCreateTransfer -sa AgentA -da AgentB -dd C:\Student\Data\MQFTEB c:\Student\Data\Data.50k
(d) Check the result with the MQ FTE Eclipse Tooling.This command should result in an error because of a duplicate file.You can see it in the GUI but not in the command line.The reason therefore is that the command line interface sends an asynchronous message to MQFTE to start a file transfer. If you want to use this command in a script and you need the result before you continue, add the option -w for wait for the command completion. Invoke now the following command:fteCreateTransfer -sa AgentA -da AgentB -dd C:\Student\Data\MQFTEB -w c:\Student\Data\Data.50kYou can see now a difference with the additional completion message.
(e) The error occurs, because the file already exists in the destination directory transferred during the previous labs. Extend the command not with the -de overwrite option to overwrite the exiting file on the destination. Invoke now:fteCreateTransfer -sa AgentA -da AgentB -dd C:\Data\MQFTEB -w -de overwrite c:\Data\Data.50kNote:The options are similar to the transfer option in the Eclipse Tooling.As you see perhaps in the command line help for the SourceFileSpec option, you can also copy several file like Data.* or complete directories with or without sub-directories.At this point you should know that to specify for example Data* uses the names resolution of the running source system. This could result into a different list of files or unexpected behavior on different operating systems. You can avoid the OS wildcard expansion using single or double quotes. E.g. “Data*”Compare the result of these both commands:fteCreateTransfer -sa AgentA -da AgentB -dd C:\Data\MQFTEB -w c:\Data*fteCreateTransfer -sa AgentA -da AgentB -dd C:\Data\MQFTEB -w “c:\Data*”
Congratulation, you have finished this lab
13. Dec. 2009 Page 43 of 91

Using MQ FTE Ant scripts1) Setup the MQ Explorer to develop ANT scripts for MQ FTE
The following lab shows you some MQ FTE Ant scripts as samples to get an impression how powerful it can be used and which can also be used as base to modify.
For more information about Apache Ant goto http://ant.apache.org/ ..
The MQ Explorer is a Eclipse based tool. So we can use it also as an Ant script development environment.
But before we develop with ANT, we customize some MQ Explorer setting which have to be done only once.
(a) Start the MQ Explorer if not already started.
(b) Click Window -> Preferences..
13. Dec. 2009 Page 44 of 91

(c) Select WebSphere MQ Explorer and select in an Eclipse Workbench to use the MQ Explorer as an Eclipse development environment. Otherwise you can not open further Ecplipse perspectives.
(d) Click General, open Perspectives and select In a new window. For later scripting we have now one window for the ANT script an one window to watch the transfers in another MQ FTE Eclipse Tooling window. Click Apply
13. Dec. 2009 Page 45 of 91

(e) Select General->Editors->File Associations and click the Add... button on the right side.
(f) Enter .xml as File type and click OK.
13. Dec. 2009 Page 46 of 91

(g) Select AntEditor in the Associated editors box, click Default. Now we associate XML files with the ANT Editor.
13. Dec. 2009 Page 47 of 91

(h) Now we set the global environment for our Ant scripts. ThereforeSelect Ant->Runtime, select Global Entries and press the Add external JARs... button.
(i) Select all the jar files in the installation directory C:\IBM\WMQFTE\lib path and click the Open button. So we have not always to add all the libraries to a project.
13. Dec. 2009 Page 48 of 91

(j) On the next screen click the check box Do not show this warning again and click the Yes button.
(k) Now press the Ant Home... button.
13. Dec. 2009 Page 49 of 91

(l) Select the C:\IBM\WMQFTE\ant directory and click OK.
(m)Click OK on the next screen.
(n) Click OK to save the settings and close the preferences window.
(o) Close and restart the MQ Explorer to acitvate the changes.
Congratulation, you have finished the lab
13. Dec. 2009 Page 50 of 91

2) How to create and run a Ant script
Now we start to write our first Ant script. The first Ant script is a simple script with is a similar file copy as done before using the GUI to show the steps to create and run a Ant script.
(a) Open the perspective Resource. Therefore click Window->Open Perspective->Others...
(b) Select the perspective Resource and click OK.
13. Dec. 2009 Page 51 of 91

(c) A new Resource-Eclipse SDK windows should be opened.Click File->New->Project...
13. Dec. 2009 Page 52 of 91

(d) Select General->Project and click Next>
(e) Enter a project name like MyAnt and click Finish.
13. Dec. 2009 Page 53 of 91

(f) Right click the new Project MyAnt and select New->File
(g) Enter a filename like MyCopy.xml and click Finish.
13. Dec. 2009 Page 54 of 91

(h) On the right should be opened a XML Editor. Enter the following sample code in the new file MyCopy.xml.
Press Ctrl-S to save the file. This code copies the file Data.50k from AgentA to AgentB like the labs before.For a prepared image, this code is also provided in the C:\Student\Ant directory.
<?xml version="1.0" encoding="UTF-8"?><project xmlns:fte="antlib:com.ibm.wmqfte.ant.taskdefs" default="step1">
<target name="init"><property name="cmd.qmgr" value="QMA"/><property name="src" value="AgentA@QMA"/><property name="dst" value="AgentB@QMB"/><property name="src.file" value="C:\Student\Data\Data.50k"/><property name="dst.file" value="C:\Student\Data\MQFTEB\Data.50k"/>
</target>
<target name="step1" depends="init"><fte:filecopy cmdqm="${cmd.qmgr}"
src="${src}"dst="${dst}"rcproperty="copy.result"><fte:filespec srcfilespec="${src.file}"
dstfile="${dst.file}" overwrite="true"/></fte:filecopy>
</target></project>
Note:We run this sample first and learn how to run it in Eclipse and Command Line. Lateron we will go more in the details of this Ant script.
13. Dec. 2009 Page 55 of 91

(i) Click the small green arrow icon and selet Open External Tools Dialog...
(j) Click the New launch configuration icon.
13. Dec. 2009 Page 56 of 91

(k) Because we have already set the environment before, just click the Run button.
(l) Check the Console.You should see the successfully completion message.Congratulation, you run your first Ant script.
13. Dec. 2009 Page 57 of 91

(m)Before we continue with a more complex sample, let's run the script from command line.Therefore right click the filename MyCopy.xml in the Project Explorer and select Export...
(n) Select General->File System and click Next.
13. Dec. 2009 Page 58 of 91

(o) Enter a directory name like C:\IBM\MyANTs and click Finish.
(p) Click Yes in the message box.
(q) Open a command prompt, change to the \IBM\WMQFTE\bin directory and enter the following command:fteant -f C:\IBM\MyAnts\MyCopy.xmlYou can start Ant script with the fteant command. Use -h to view the options. With the -f option, you can specify the Ant file to execute.
13. Dec. 2009 Page 59 of 91

(r) The following properties are set in the Ant script.
<property name="cmd.qmgr" value="QMA"/><property name="src" value="AgentA@QMA"/><property name="dst" value="AgentB@QMB"/><property name="src.file" value="C:\Student\Data\Data.50k"/><property name="dst.file" value="C:\Student\Data\MQFTEB\Data.50k"/>
You can overwrite the variables with the invocation of the Ant script. Enter the following command:fteant -D src.file=C:\Data\Data.1M -D dst.file=C:\Data\MQFTEB\Data.1M -f C:\IBM\MyAnts\MyCopy.xmland check the result in the Eclipse Tooling.
13. Dec. 2009 Page 60 of 91

3) Understand Ant and develop more complex MQ FTE Ant scripts
With MQ FTE you can execute Ant script on every MQ FTE component whether it is a MQ FTE agent, the Eclipse tooling or the Coordination Queue Manager and you can invoke it to run remote on one of these MQ FTE compontents.The Ant script actually is a build file which describes the steps to be executed. The single steps of an Ant script are called target. So this script builds the target step1, step1 is dependent on init. So the init target (here to initialize the properties) is build first. Then the target step1 is executed.
MQ FTE provides several Ant script extensions. One extension is fte:filecopy to copy files and fte:filemove to move files and the nested paramters like fte:filespec or fte:call.The required filecopy parameters are src for the source agent and dst for the target agent.The nested paramter filecopy specifies the file details like filename, directory name, checksum, overwrite, …. paramters which you already used in the other labs.
Fte:call can be used to invoke commands which could also run on every MQ FTE component.A very important possibility is to run commands or Ant script befor or after you transfer a file. So you can run commands on the source befor or after the file is send and you can run commands on the target system befor or after a files is received on the destination agent
In the next sample we use this possibility to zip a directory before the file transfer, invoke a file transfer for the zipfile and finally unzip the zipfile on the destination system..
13. Dec. 2009 Page 61 of 91

Here the zip and unzip sample:(in the image avalable as C:\Student\Ant\MyZipUnzipCopy.xml )
<?xml version="1.0" encoding="UTF-8"?><project xmlns:fte="antlib:com.ibm.wmqfte.ant.taskdefs" name="copy zipped files" default="job"><description>fte copy of a zipped file</description><!-- set properties -->
<target name="init"><property name="cmd.qmgr" value="QMA"/><property name="src" value="AgentA@QMA"/><property name="dst" value="AgentB@QMB"/><property name="src.dir" value="c:\Student\Data\"/><property name="src.zipfile" value="c:\Student\Data\zipfile.zip"/><property name="dst.zipfile" value="c:\Student\MQFTEB\zipfile.zip"/><property name="dst.dir" value="C:\Student\MQFTEB\"/><fte:uuid length="8" property="jobNumber"/>
</target>
<!-- copy files --><target name="step1" depends="init" description="copy zipped files">
<fte:filecopy cmdqm="${cmd.qmgr}" src="${src}" dst="${dst}" outcome="await" rcproperty="step1.result">
<fte:metadata><fte:entry name="jobNumber" value="${jobNumber}"/>
</fte:metadata><fte:filespec srcfilespec="${src.zipfile}"
dstdir="${dst.dir}" overwrite="true"/>
<!-- zip.exe zipfile srcdir --><fte:presrc command="zip" type="executable" successrc="0">
<fte:arg value="${src.zipfile}" /> <fte:arg value="-j " /> <fte:arg value="${src.dir}*.*" />
</fte:presrc><!-- unzip.exe zipfile -d dstdir --><fte:postdst command="unzip.exe" type="executable" successrc="0">
<fte:arg value="-o " /><fte:arg value="${dst.zipfile}" /><fte:arg value="-d " /><fte:arg value="${dst.dir}" />
</fte:postdst></fte:filecopy>
</target><!-- Check errors -->
<target name="check1" depends="step1" description="Check errors"><condition property="step1-error">
<not><equals arg1="${step1.result}" arg2="0" />
</not></condition><fail if="step1-error" message="step1 transfer failed MAXRC=${step1.result}."></fail>
</target><target name="job" depends="init, step1,check1" />
</project>
13. Dec. 2009 Page 62 of 91

(a) As before create a new File MyZipUnzipCopy.xml (available in the image as C:\Student\Ant\MyZipUnzipCopy.xml), open external Tool Dialog... and launch a new configuration and run it.
(b) Have a look at the detailed log properties. It will contain some errors.
This script file tries to invokes a zip command on the source system and will try to invoke a unzip command on the target system. These commands have to be available on the source and target system and the agent properties have to be enhanced with the path to these executables to be able to invoke commands on these systems.
(c) Edit the file agent.properties of AgentA.You can find it here: C:\IBM\WMQFTE\config\QMA\agents\AGENTA
Add the following line in the agent.properties file:commandPath=C:\\IBM\\MQFTECMDA
(d) Copy a zip.exe into the directory C:\IBM\MQFTECMDA. (in the image zip.exe is available in C:\Student\Ant).
Enter fteStopAgent AgentA and fteStartAgent AgentA in the C:\IBM\WMQFTE\bin directory to stop and start the agent to activate the new agent.properties changes.
(e) Edit the agent.properties of AgentB.You can find it here: C:\IBM\WMQFTE\config\QMA\agents\AGENTB
Add the following line in the agent.properties file:commandPath=C:\\IBM\\MQFTECMDB
(f) Copy a unzip.exe into the directory C:\IBM\MQFTECMDB. (in the image unzip.exe is available in C:\Student\Ant).
(g) Enter fteStopAgent AgentB and fteStartAgent AgentB in the C:\IBM\WMQFTE\bin directory to stop and start the agent to activate the new agent.properties changes.
13. Dec. 2009 Page 63 of 91

(h) Switch back to the Resource Eclipse SDK and run the script again.
(i) Check the Log properties again.
(j) We used the fte:presrc and fte:postdst to execute the zip and unzip program which means we used the MQ FTE Ant extension to invoke these programs.
<fte:filecopy …. <!-- zip.exe zipfile -j srcdir --><fte:presrc command="zip" type="executable" successrc="0"> <fte:arg value="${src.zipfile}" />
<fte:arg value="-j " /><fte:arg value="${src.dir}*.*" />
</fte:presrc><!-- unzip.exe -o zipfile -d dstdir →<fte:postdst command="unzip.exe" type="executable" successrc="0">
<fte:arg value="-o " /><fte:arg value="${dst.zipfile}" /><fte:arg value="-d " /><fte:arg value="${dst.dir}" />
</fte:postdst>
As we see in the Transfer Log, these commands run under MQ FTE control and the details are visible in the log properties.
Sure can we invoke also native Ant commands within such an ANT scripts, but be aware the invocation of them directly means to run them not visible in the MQ FTE log.
13. Dec. 2009 Page 64 of 91

(k) Check the additional properties per command. Therefor right click the command result in the Transfer Log and select Properties.
13. Dec. 2009 Page 65 of 91

(l) Checkout the additional messages from standard out.
(m)Additional optional lab:Instead of invoke a command on the destination system, we can also invoke a Ant script on the destination. You can copy the previous sample and exchange the fte:postdst command with the following lines to invoke an Ant script, stored on the target agent command directory. (in the image available as MyZipAntUnzipCopy.xml and AntUnzip.xml)
<fte:postdst command="ANTunzip.xml" retrycount="0" retrywait="0" successrc="0" type="antscript"> <fte:target name="job" /> <fte:property name="zip.file" value="${dst.zipfile}" /> <fte:property name="zip.dir" value="${dst.dir}" /> <fte:property name="dst" value="${dst}" /> <fte:property name="cmd.qmgr" value="${cmd.qmgr}" /></fte:postdst>
The Ant script on the destination system in the file ANTunzip.xml could look like the following sample:
<?xml version="1.0" encoding="UTF-8"?><project xmlns:fte="antlib:com.ibm.wmqfte.ant.taskdefs" name="unzip" default="job"><description>Unzip on destination</description><!-- unzip files →<target name="unzip" description="unzipped files"> <echo message="start unzip: ${zip.file}" /> <unzip src="${zip.file}" dest="${zip.dir}"> </unzip> </target> <target name="job" depends="unzip" /> </project>
13. Dec. 2009 Page 66 of 91

(n) As last Ant sample, we remove the fte:postdst invocation and use a fte:call on the remote system to unzip the transferred file.(in the image available as MyzipCallUnzipCopy.xml) So remove the fte:postdst invocation and add the following target:
<target name="unzip" depends="step1" description="unzip files"> <fte:call cmdqm="${cmd.qmgr}" agent="${dst}" rcproperty="unzip.rc" jobname="${job.id}"> <fte:command command="unzip" type="executable" successrc="0" retrycount="5" retrywait="30"> <fte:arg value="-o" /> <fte:arg value="${dst.zipfile}" /> <fte:arg value="-d " /> <fte:arg value="${dst.dir}" /> </fte:command> </fte:call></target>
But if you add a new target, you have to add this target to your dependcy list, so change also the target job and add the unzip as additional target::<target name="job" depends="init, step1,check1,unzip" />
(o) Check out the Transfer Log. See the difference.With fte:call you can invoke remote call on a MQ FTE component.But you get an additional Transfer Log entry. To use a job-name to correlate the invocations could be a good idea.
Note:These samples should give you a first impression about the MQ FTE Ant extensions.Error handling could be improved, but I hope you see the new powerful dimensions of these extensions.Possible Ant scripts could also be used:to build file distributions list, iterations of file transfers, or to invoke other programs like bridges to other protocols.
More MQ FTE Ant samples, for example how to send a email if a transfer error occures, could be found in the <MQ FTE installation directory>\sampels\fteant
For more information about Apache Ant goto http://ant.apache.org/ ..
Congratulation, you have finished this lab
13. Dec. 2009 Page 67 of 91

Bridge a MQ FTE file transfer to a FTP server
New with MQ FTE V7.02 we can use a MQ FTE Protocol Bridge Agent to connect MQ FTE to another protocol. Currently FTP and SFTP are supported as protocol. This could be very useful if you want transfer file from or to a MQ FTE environment from or to a FTP Server.
In terms of MQ FTE, it is just an other MQ FTE agent with additional settings for a FTP Server. Which means you still transfer files with MQ FTE from one agent to another agent. And if this agent is a protocol bridge agent to FTP, then the file is not stored to the file system but send or received from the specified FTP Server.
We use the Open Source FTP Server FileZilla to demonstrate the MQ FTE FTP bridge functionality.FileZilla can be downloaded from here: http://filezilla-project.org/ You will find the FileZilla Server 9.33 download in the prepared image in the C:\installable directory. This image used wpsadmin as userid and demo4me as password.)
In this lab, we will setup FileZilla, create and configure a MQ FTE FTP Bridge agent and run some simple file transfers.
1) Setup FileZilla
(a) Install Filezilla using the defaults. Therefor invoke C:\installable\FileZilla_Server-0_9_33.exe, use all defaults, click always Next until the last screen to Install.
(b) Double click the new FileZilla Server Interface icon on the desktop, enter your password, click Always connect to this server and click OK.
13. Dec. 2009 Page 68 of 91

(c) In the upcoming window, click Edit->Users.
(d) Click the Add button and enter a userid which will be enabled to send and receive files to this FTP server and click OK. To show the userid mapping, we use here in the sample a different userid wpsuser.
13. Dec. 2009 Page 69 of 91

(e) Click the Password check box and enter a password for wpsuser, for example enter demo4me.
(f) Select Shared folders on the left side. Click the Add button to add the C:\Student\FTP directory and enable this directory for Write, Delete and Append access..Click OK. FileZilla is now ready for FTP file transfer.
Note:The default behavior, which can be changed with the agent.properties, it to transfer a fileXXX.yyy and store it as XXX.yyy.part during the file transfer and rename it after successful transfer to XXX.yyy. So we need Delete rights or have to change the behavior in the MQ FTE agent properties.If a file transfer is interrupted, MQ FTE retries it several time. If the connection is established again, MQ FTE appends the not transferred part of the file. So you need Append rights, too.
13. Dec. 2009 Page 70 of 91

2) Configure a MQ FTE Protocol Bridge Agent(a) The next step is to create the MQ FTE protocol bridge agent. This agent can be used as the
other MQ FTE agents to transfer files. But it needs additional configuration parameters to define the protocol, which will be FTP in our lab and we will use the queue manager QMB as MQ FTE protocol bridge agent queue manager.To configure a MQ FTE protocol bridge agent to connect to the just configured FileZille FTP server, invoke the following command:fteCreateBridgeAgent -agentName FTPAgent -agentQMgr QMB -bt FTP -bh localhost -bm WINDOWS -btz Europe/Berlin -bsl en_US -bfe UTF8 -brr 8
This means create an agent (like before) plus hostname, operating system, timezone and encoding of the FTP server with 8 retries if the connection fails.
(b) In addition to a normal MQ FTE agent, we have to modify for a protocol bridge agent the credentials which are used to authorize to the FTP server.Therefor open the file ProtocolBridgeCredentials.xml which can be found in the new directory C:\IBM\WMQFTE\config\QMA\agents\FTPAGENT and insert the following line:<tns:user name="wpsadmin" serverUserId="wpsuser" serverPassword="demo4me" />like shown here and save the updated file:
Note:In the image we work with the userid wpsadmin but we added wpsuser in FileZilla.
13. Dec. 2009 Page 71 of 91

(c) As we are already used with normal MQ FTE agents, we have to create the agent queues for this new agent. Therefore invoke runmqsc QMB < FTPAGENT_create.mqsc in the directory C:\IBM\WMQFTE\config\QMA\agents\FTPAGENT
(d) Start the new agent. Therefor invoke fteStartAgent FTPAgent in the MQ FTE bin directory.
3) Run some MQ FTE – FTP samples(a) Switch to the MQ Explorer and initiate a new file transfer to this new agent.
13. Dec. 2009 Page 72 of 91

(b) Check the transfer result in the transfer log
and check the target directory C:\Student\FTP\ .
13. Dec. 2009 Page 73 of 91

(c) As you can send files the files from any MQ FTE agent to any other MQ FTE agent, you can also send file to a FTP server and also receive files from a FTP server.You can just try it with the following settings:
13. Dec. 2009 Page 74 of 91

(d) Optional you can run more tests to see the reliability of MQFTE.The image contains already a very large file Data.500M in the C:\Student\LargeData directory to transfer. We can use this file that we have enough time to interrupt a file transfer.
So initiate a new file transfer and wait until you see ongoing transfer:
(e) You can interrupt the transfer through stopping the FTP server. Therefore click the flash icon.
13. Dec. 2009 Page 75 of 91

(f) Wait until you see the status Stalled in the Current Transfer Progress view.
(g) Start the FTP server again by click on the Flash icon.The transfer should continue and complete.
You can run more testcases, for example simulate a network problem with stopping the queue manager QMB (with the immediately option). Check the transfer status and logs and restart the Queue Manager.
13. Dec. 2009 Page 76 of 91

Using the database logger
A MQ FTE Explorer shows the transfer logs message which are published to the MQ FTE coordination queue manager. These messages can also be used by every authorized MQ Application which subscribes to this information, for example a Monitor.
New with MQ FTE 7.0.1 it provides a databaselogger to store these messages for auditing or analysis purpose transactional in a database. DB2 or Oracle database are supported.To use the databaselogger you have to install the MQ FTE tools which we have already installed in a previous lab.To run this lab, we use the DB2 V9.5.
If not already installed, install DB2 V9.5
1) Setup the databaselogger
(a) After successful DB2 V9.5 installation click onStart->All Programs->IBM DB2->DB2COPY1(default)->Command Line Tools->Command Line Processor
(b) Enter: create database FTEAUDIT to create a database FTEAUDIT and hit the enter button.
(c) Enter: connect to FTEAUDIT to connect to the new database.
13. Dec. 2009 Page 77 of 91

(d) Enter quit to get to the command prompt
(e) Enter now db2 -t -f C:\IBM\WMQFTE\tools\sql\ftelog_tables_db2.sql to create the predefined tables for MQ FTE.
(f) Enter db2 GRANT CONNECT ON DATABASE TO USER MUSR_MQADMIN to grant access to this database for the userid MUSR_MQADMIN.(this is the default MQ userid on Windows system)
(g) To store the transfer logs reliable in the database, we have to setup MQ and DB2 to insert the MQ messages under transaction control.into the database. So we have to configure Transaction Support. We use DB2 as resource manager and MQ as Transaction coordinator. So enter for DB2:db2 UPDATE DBM CFG USING TP_MON_NAME MQ
(h) Enter exit to quit the DB2 command window.
(i) To enable MQ as transaction coordinator, copy the file <mqinstalldir>\java\lib\jdbc\jdbcdb2.dll to the directory <mqinstalldir>\exits.With our lab installation settings copy c:\IBM\WMQ\java\lib\jdbc\jdbcdb2.dll to the directory C:\IBM\WMQ\exits.With this copy, the queue manager can find this SwitchFile dynamical at the WMQ queue manager startup time.
(j) Swith to the MQ Explorer, right click the coordination queue manager QMA and select Properties.
13. Dec. 2009 Page 78 of 91

(k) Select XA resoure managers on the left side and click the Add... button.
(l) Enter the values:Name: FTESwitchFile: jdbcdb2.dllXAOpenString: db=FTEAUDIT, uid=MUSR_MQADMIN, pwd=demo4me, toc=p, tpm=MQThreadOfcontrol: Process(FTEAUDIT is the databasename, MUSR_MQADMIN is userid and demo4me will be the new password for the MUSR_MQADMIN userid which we will set next)
Click OK to add these values, then click Apply and OK to close the QMA properties. Close the MQ Explorer.
13. Dec. 2009 Page 79 of 91

(m)Stop the IBM MQSeries Service.Therefore click Start->Control Panel->Administrative Tools->Computer Management.Select Services on the left side and right click IBM MQSeries and select Stop.
(n) MUSR_MQADMIN is the userid which is created by WebSphere MQ on Windows and which is used to start the MQ Services. You can see it if you have a look at the running MQ processes in the Task Manager. Look for services starting with amq*.We have to set now the password for the MQ userid MUSR_MQADMIN.Open the folder System Tools->Local Users and Groups->Users on the left side. Right click MUSR_MQADMIN on the right side and select Set Password...
13. Dec. 2009 Page 80 of 91

(o) Click Proceed on the next window.
(p) Enter the new password demo4me for the use MUSR_MQADMIN and click OK..
13. Dec. 2009 Page 81 of 91

(q) Right click the user MUSR_MQADMIN again, select Properties and select the Member Of tab. Click the Add... button.
(r) Enter DB2USERS as object name and click the Check Names button. The hostname should appear at the beginning, so you have selected an existing Group. Click Ok.
(s) Close the Computer Management window.
13. Dec. 2009 Page 82 of 91

(t) Set the password for IBM® MQSeries® Service COM server. Therefore start the program DCOMCNFG.EXE in a command prompt.
(u) Open on the left side component Services->Computers->My computer->DCOM Config.Click Yes in the next two upcomming DCOM Configuration Warning! Window.Right click IBM MQSeries Services and select Properties.
13. Dec. 2009 Page 83 of 91

(v) Select the Identity tab and enter two times the new password demo4me which already entered in the XAOpenString.Click Apply and OK and close the Component Services window.
(w)Now we have to customize the databaselogger properties.(a sample was available with MQ FTE 701 which seams missing now if we use an existing configuration)Create the file databaselogger.properties in the coordination manager config directory C:\IBM\WMQFTE\config\QMA and add the following lines:
(x) Restart the system.
13. Dec. 2009 Page 84 of 91

2) Start the databaselogger and view the results
(a) Now switch to the C:\IBM\WMQFTE\tools\bin directory and start the databaselogger.Enter fteStartDatabaseLogger -F(we start it with the -F option to run for our first test the databaselogger in foreground to test)
(b) Check the output0.log file in the directory C:\IBM\WMQFTE\config\QMA\logs for any databaselogger message.
(c) Run a simple File Transfer.
(d) Start the DB2 control center. Therefore click Start->All Programs->IBM DB2->DB2COPY1->General Administration Tools->Control Center
(e) Open left in the folder Control Center->All Databases->FTEAUDIT->Tables. In the right upper pane Tables select a MQ FTE Table like TRANSFER_ITEM. In the lower rigth pane click Open.
13. Dec. 2009 Page 85 of 91

(f) You should see now your first lines in the database.
Congratulation, you have completed this lab
13. Dec. 2009 Page 86 of 91

Enhanced security with MQ FTE 702
This lab describes some general thought and tips to run MQ FTE file transfers with the new security settings. It is not completed it the sense that it contains all possibilities and steps in details.
To run the new MQ FTE 702 security, it requires an additional system or image with different users to show the authorization.
(a) Before you start with the MQ configuration you should be able to ping each other system.(b) Create on each system an additional queue manager, for example QMC on your current
system.(c) Create queue manager QMD on your new system.(d) Create and start the MQ channels.(e) To use the new more granular security settings requires that both agents, the source and the
destination agent, are created with the new authority checking option or these agents needs the corresponding queues and agent properties settings.
Create a new MQ FTE agent AgentC on your current system, let's call it system1, with the option -ac for enforce advanced security: fteCreateAgent -agentName AgentC -agentQMgr QMC -ac
(f) Create a new MQ FTE agent AgentD on your new sysetem, let's call it system2 with the option -ac to enforce advanced security:fteCreateAgent -agentName AgentD -agentQMgr QMD -ac
(g) Let's assume, you system 2 runs under the user wspuser and not in a Domain.So we have first to create a user wpsadmin on system 2 and a user wspuser on system1.
(h) The agent queue managers have additional queues which are used for authorization.Here the details
FTE Authority MQ Authority Queue MQ authoritydistributed z/OS
Administration § SYSTEM.FTE.AUTHADM1.<agent_name> Browse ReadTransfer source § SYSTEM.FTE.AUTHTRN1.<source_agent_name> Browse ReadTransfer destination § SYSTEM.FTE.AUTHTRN1.<destination_agent_name> Put UpdateMonitor § SYSTEM.FTE.AUTHMON1.<monitor_agent_name> Browse ReadMonitor operations § SYSTEM.FTE.AUTHOPS1.<agent_name> Set AlterSchedule § SYSTEM.FTE.AUTHSCH1.<source_agent_name> Browse ReadSchedule operations § SYSTEM.FTE.AUTHOPS1.<agent_name> Put Update
Transfer operations § SYSTEM.FTE.AUTHOPS1.<source_agent_name> § SYSTEM.FTE.AUTHOPS1.<destination_agent_name> Browse Read
Receive a transfer from <source_agent> § SYSTEM.FTE.AUTHAGT1.<source_agent_name> Browse Read
Send a transfer to <destination_agent> § SYSTEM.FTE.AUTHAGT1.<destination_agent_name> Put Update
Note: In the following description I used the user id's for authorization. In a production system you would think about user groups for authorization to the needed queues. Or groups which may send files or groups which have more administration rights.
13. Dec. 2009 Page 87 of 91

(i) To transfer now files from AgentC to AgentD, we have to authorize the user wpsadmin from system 1 for some queues on system 2.In addition we have to authorize the system 2 user wpsuser to some queues on system 1.
To set the MQ authorization for a user you can use the command line command setmqaut or use the MQ Explorer.
Here a sample for the commandline (this authorize the user wpsuser to the queue SYSTEM.FTE.AUTHADM1.AGENTC on queue manager QMC for browse access):setmqaut -m QMC -t queue -n SYSTEM.FTE.AUTHADM1.AgentC -u wpsuser +browse
(j) To use the MQ Explorer click the Show Systems Object button on the right upper corner to see the MQ FTE admin queues.Right click the dedicated queue and selectObject Authorities->Manage Authority Records...
13. Dec. 2009 Page 88 of 91

(k) Open the Specific Profiles tree on the left side. Select the Users tab and press the New... button.
(l) Add the userid and set the needed authorization, for example Browse. Click OK.
13. Dec. 2009 Page 89 of 91

(m)Now to transfer a file from AgentC to AgentD we have to add the following authorizations:
On the source Agent AgentC, the target user wpsuser needs the following queue authorizations:SYSTEM.FTE.AUTHTRN1.AGENTC Browse accessSYSTEM.FTE.AUTHAGT1.AGENTC Browse access
On the destination AgentC, the source user wpsadmin needs the following queues autorization: SYSTEM.FTE.AUTHTRN1.AGENTD Put access ..SYSTEM.FTE.AUTHAGT1.AGENTD Put access
(n) In addition, we use the new userSandboxes.xml to define the directories which are allowed to write transferred files or which are excluded to transfer files.As a sample, can add the following lines to the UserSaneboxes.xml on the destination agent directory C:\IBM\WMQFTE\config\QMA\agents\AGENTE
<tns:include name="C:\Student\Data\*"/><tns:exclude name="C:\Student\Ant\**"/>
(o) Now run some sample file transfers and check the transfer log.
13. Dec. 2009 Page 90 of 91

More information
WebSphere MQ File Transfer Edition 7.0.2http://www-01.ibm.com/software/integration/wmq/filetransfer/index.html
WebSphere MQ File Transfer Edition 7.0.2 Information Center:http://publib.boulder.ibm.com/infocenter/wmqfte/v7r0/index.jsp
WebSphere MQ V7.0.1 Information Centerhttp://publib.boulder.ibm.com/infocenter/wmqv7/v7r0/index.jsp
DB2 v9.5 Information Centerhttp://publib.boulder.ibm.com/infocenter/db2luw/v9r5/index.jsp
WebSphere MQ Family - SupportPacs:http://www-01.ibm.com/support/docview.wss?rs=977&uid=swg27007205
WebSphere on YouTubehttp://www.youtube.com/user/WebSphereEducation
WebSphere on Twitterhttp://twitter.com/websphere_edu
WebSphere on Facebookhttp://www.facebook.com/websphereeducation
13. Dec. 2009 Page 91 of 91