wpilib robot programming cookbook · 2012-09-02 · wpilib robot programming cookbook page . robot...
TRANSCRIPT

WPILib Robot Programming Cookbook
Robot programming recipes for cooksof all levels
October 9, 2011
WPILib Robot Programming Cookbook
Page
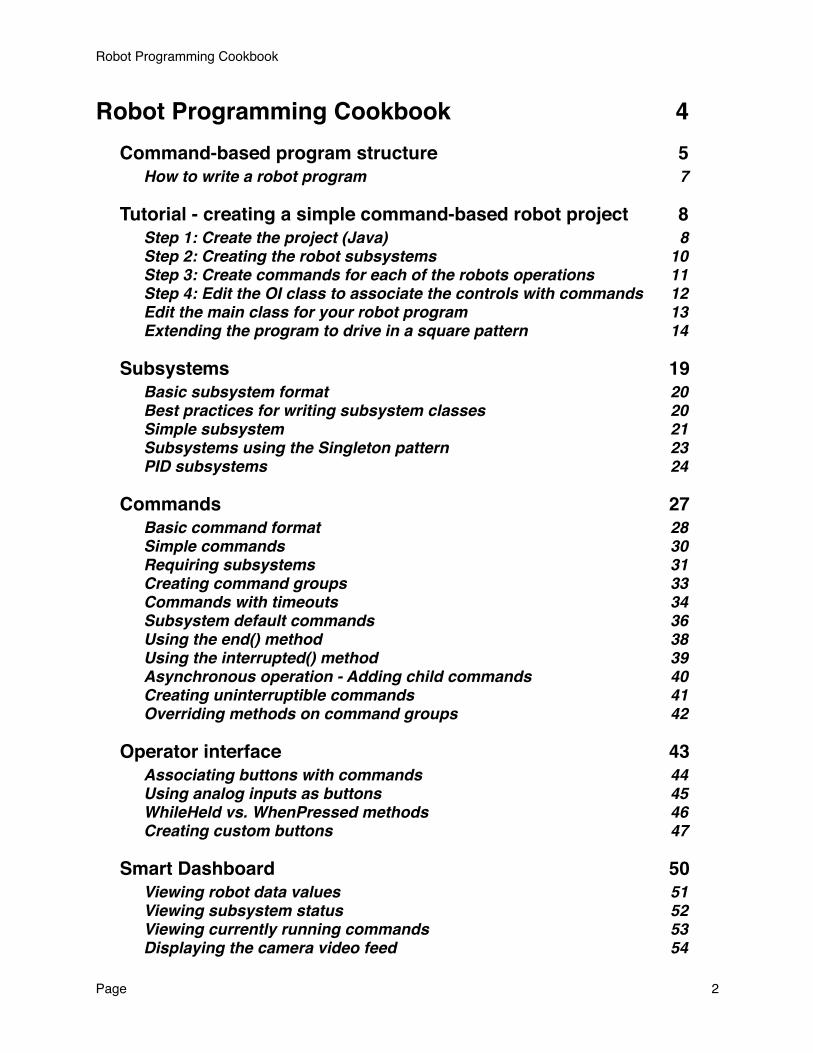
Robot Programming Cookbook! 4Command-based program structure ! 5
How to write a robot program! 7
Tutorial - creating a simple command-based robot project! 8Step 1: Create the project (Java)! 8Step 2: Creating the robot subsystems! 10Step 3: Create commands for each of the robots operations! 11Step 4: Edit the OI class to associate the controls with commands! 12Edit the main class for your robot program! 13Extending the program to drive in a square pattern! 14
Subsystems ! 19Basic subsystem format! 20Best practices for writing subsystem classes! 20Simple subsystem! 21Subsystems using the Singleton pattern! 23PID subsystems! 24
Commands! 27Basic command format! 28Simple commands! 30Requiring subsystems! 31Creating command groups! 33Commands with timeouts! 34Subsystem default commands! 36Using the end() method! 38Using the interrupted() method! 39Asynchronous operation - Adding child commands! 40Creating uninterruptible commands! 41Overriding methods on command groups! 42
Operator interface ! 43Associating buttons with commands! 44Using analog inputs as buttons! 45WhileHeld vs. WhenPressed methods! 46Creating custom buttons! 47
Smart Dashboard! 50Viewing robot data values! 51Viewing subsystem status! 52Viewing currently running commands! 53Displaying the camera video feed! 54
Robot Programming Cookbook
Page ! 2

Testing commands! 55PID tuning with the PIDCommand objects! 56Creating buttons that run commands! 57Using a SendableChooser for selecting autonomous programs! 58Creating custom widgets! 60Editing preferences with the Smart Dashboard! 61How it works! 62
Classes to help make the robot drive ! 63Controlling the driving distance! 64Controlling the driving direction! 65
Utilities ! 66Preferences class! 67NetworkTables for communications! 68
Laptop based Vision system! 69Installing the Java vision components! 70Structure of a simple vision program! 71Sending data to the robot! 72Detecting circular targets! 73Measuring distance to a target! 74
Debugging your programs ! 75Using Smart Dashboard for debugging! 76
Glossary! 77
Robot Programming Cookbook
Page ! 3

Robot Programming CookbookThis is a guide for writing robot programs using the classes provided by WPILib library. It describes best practices as intended by the authors of the library. It is hoped this makes your programs better by showing you the intended use of the library and all its features.For the 2012 FRC competition, the library goes beyond just operation of sensors, motors, and the driver station. Presented is a methodology for writing robot programs that we believe will simplify programming and debugging of your robots. There are a number of classes that are new for 2012 such as Commands, NetworkTables, significant SmartDashboard improvements, driver station based vision processing. Taken in aggregate, these changes support a new simpler approach to designing, and developing software for your robot.Throughout the book , each new concept will be introduced with sample code taken directly from a real world robot. The examples are drawn from various 2011 FRC robots whose code has been reimplemented using the new library. One of the robot used in the examples is shown below.
An elevator with preset stops for each goal height that is controlled with a PID loop
A camera for automated scoring with a switchable LED illuminator that sends images back to the driver station for processing
To score the mini-bot at the end of the match there is an alignment device to align the robot with the tower base and a ramp that engages the pole to act as a launch pad.
A gripper with a pair of rollers that can collect tubes and stop automatically
This document is organized so that you can look through it initially to get the idea about how to program robots, then later go to specific sections to solve problems that you might have.
Robot Programming Cookbook
! Page 4

Command-based program structurePrograms based on the WPILib library are organized around two fundamental concepts: Subsystems and Commands.
Gripper
SubsystemsMiniBot
Launcher
Ball Shooter
Arm
Elevator
WristDriveLine
StowWrist
CommandsLaunchMiniBot
DriveToGoal ElevatorToHighPosition
DriveForwardAndScore
DeployMiniBot
MoveToScoringPosition
Subsystems define the capabilities of each part of the robot and are subclasses of Subsystem.
Commands define the operation of the robot incorporating the capabilities defined in the subsystems. Commands are subclasses of Command or CommandGroup.Commands run when scheduled or in response to buttons being pressed or virtual buttons from the SmartDashboard.
Commands let you break up the tasks of operating the robot into small chunks. Each command has an execute() method that does some work and an isFinished() method that tells if it is done. This happens on every update from the driver station or about every 20ms. Commands can be grouped together and executed sequentially, starting the next one in the group as the previous one finishes.
DriveToGoal RaiseElevator SetWristPosition ScoreTube
Currently executing command
Sometimes it is desirable to have several operations happening concurrently. In the previous example you might want to set the wrist position while the elevator is moving up. In this case a command group can start a child command (or command group) running.
Robot Programming Cookbook
! Page 5

DriveToGoal RaiseElevator
SetWristPosition
ScoreTube
At this point the elevator and the
wrist are both moving at the
same time
What’s really happening? Each time the driver station gets new data, the periodic method of your robot template is called. It runs a scheduler that, in turn calls the execute() and isFinished() methods on each command that is currently active.This brings up some questions about concurrency, such as ensuring that the ScoreTube command doesn’t start running before both the SetWristPosition and RaiseElevator commands have both finished. Those will be addressed later.It is important to understand that creating a command or adding commands to a group doesn’t start the command running. This happens when they are explicitly scheduled using the run() method on the your command object. Usually this happens automatically in response to operator interface button presses or other events, but sometimes you have to do it manually such as starting a command for the autonomous period.You can look at the generated main class in a command-based robot project and see the code that does this.
Wait for new data from the driver station
execute()
isFinished()
execute()
isFinished()
SetWristPosition command
RaiseElevator command
Robot Programming Cookbook
! Page 6

How to write a robot programUsing this methodology writing the robot program becomes following these steps:1. Create the project.
In Java create a CommandBasedRobotTemplate project.2. Create the subsystems for your robot.
Once you have done the initial design for the robot (you know what subsystems it has but not necessarily how they work or what sensors or motors each uses) create Subsystem classes. This is important: you don’t have to have a working or even fully designed robot for this step. Just create the subsystem classes and methods that define the capabilities of each subsystem. As the design of each subsystem is completed, fill in the missing details in the subsystems.
3. Create commands to make the subsystems perform the tasks it needs to do. Commands define the tasks and sequencing of tasks to perform more complex operations on the robot. Commands execute sequentially and can be tied to autonomous modes and operator interface buttons to determine when they should run.
4. Tie the commands to the user interface buttons to get the robot operating. Create an OI (operator interface) class that connects all your commands (and groups) to OI buttons and controls. Then when buttons are pressed the commands will be scheduled.
5. Write any additional commands needed for autonomous operation. Autonomous programs are usually multistep, more complex sequences of commands to do some task. Once you have defined the basic commands (previous step) it’s easy to combine them into larger groups for doing complex operations.
6. Instrument the robot using the SmartDashboard. You can easily create a dashboard program for your robot that shows status as it operates. You can even have it tell you what commands are operating at any time, the status of each subsystem, or even control it through buttons and other UI elements. These features are all built into the library and the dashboard.
That’s it, you’re done! Go practice driving the robot before shipping it.Note:! These steps outlined above will work to get you started although they don’t
necessarily have to be followed in order, and you can approach the problem in any order. This just presents an order that will work and that will be followed in the subsequent examples.
Robot Programming Cookbook
! Page 7

Tutorial - creating a simple command-based robot projectThis section will walk you through creating a simple project that is implemented using the command-based approach described in this document.The command-based approach really makes a difference when writing more complex programs, but to get started here is how to create a simple program that just gets the robot driving with a joystick. Later we’ll extend it to do more interesting things where the power of the command based programming model starts to be more apparent.Step 1: Create the project (Java)The method of creating a program varies depending on the chosen language. In Java, using Netbeans, there is a built-in project type called “CommandBasedRobot” that makes getting started a little easier. To create a project, select “New project...” from the file menu. Select “CommandBasedRobotTemplateProject”.
Next choose the project name, package name, and main class name. The package is designed to make sure that code written by you doesn’t conflict with code written by others, making it possible to share code between developers.You can change any of these things later so don’t worry too much about the names you choose.
Robot Programming Cookbook
! Page 8

Clicking on Finish will create a project with the structure shown here. There is your package with two sub-packages, one for commands and one for subsystems. The project also includes a sample command and a sample subsystem. Those should be replaced with your own, the samples are just to show where you should put your own code. This structure is in no way required, but it might help with the organization of your own projects.
A main program to initialize and launch everything else
An operator interface class (OI) to create the connections between your joysticks and commands.
A sample command as part of the commands package
A sample subsystem as part of the subsystems package
The main robot class is the starting point for your program and it has code to launch your autonomous code and guarantee that commands are scheduled at the appropriate times. The ExampleCommand.java and ExampleSubsystem.java classes are just samples and can be deleted or edited into your own commands and subsystems.
Robot Programming Cookbook
! Page 9
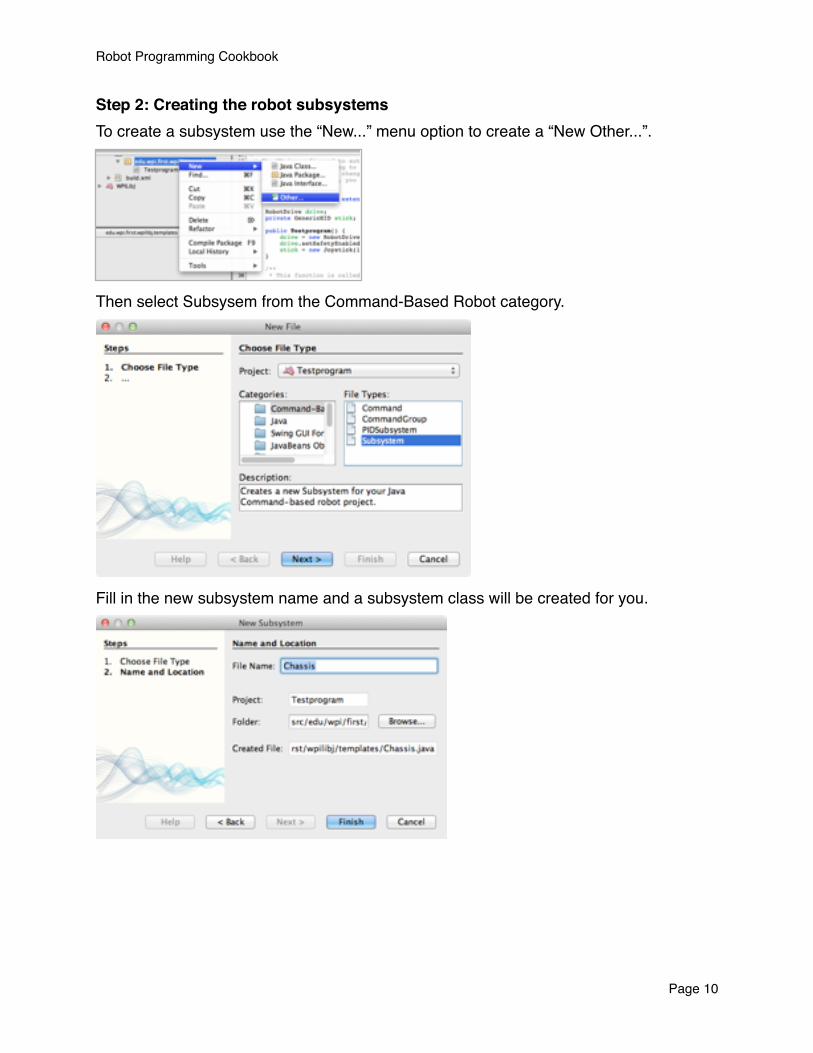
Step 2: Creating the robot subsystemsTo create a subsystem use the “New...” menu option to create a “New Other...”.
Then select Subsysem from the Command-Based Robot category.
Fill in the new subsystem name and a subsystem class will be created for you.
Robot Programming Cookbook
! Page 10

Now the new generated subsystem class can be filled out. Our simple robot only has a driveline so that is the only subsystem. The subsystem class looks like this:
Step 3: Create commands for each of the robots operationsThe robot only drives based on the joystick input so you might create a command to do exactly that called DriveWithJoystick. Since this command uses the Chassis subsystem, it is important to require it (using the requires()) method. This will ensure that any commands that we write later that also use the driveline will not conflict.
public class Chassis extends Subsystem { public static final int LEFT_MOTOR_PORT = 2; public static final int RIGHT_MOTOR_PORT = 1;
public static final double TURN_AMOUNT = 1.0; public static final double FORWARD_SPEED = 1.0;
private static Chassis instance = null;
private RobotDrive drive;
public static Chassis getInstance() { if(instance == null) { instance = new Chassis(); instance.setDefaultCommand(new DriveWithJoystick()); } return instance; }
private Chassis() { drive = new RobotDrive(LEFT_MOTOR_PORT, RIGHT_MOTOR_PORT); drive.setSafetyEnabled(false); // to simplify explanation (not good practice) }
public void straight() { drive.arcadeDrive(-FORWARD_SPEED, 0.0); // start driving forward } public void turnLeft() { drive.arcadeDrive(0.0, TURN_AMOUNT); // start turning }
public void driveWithJoystick() { drive.arcadeDrive(OI.getInstance().getJoystick()); }
Robot Programming Cookbook
! Page 11

Commands can be created using the “New other...” menu option, but this time select “New Command” and fill in the class name. Once done, the command can be filled out, in this case to make the DriveWithJoystick command.
Since this is the default operation that the driveline does when it’s not being asked to do anything else, you can go back to the Chassis subsystem and set TankDrive to be the default command for that subsystem.Step 4: Edit the OI class to associate the controls with commandsIn this simple example we create an instance of the Joystick object, and can return its reference, but that’s all for now.
public class DriveWithJoystick extends Command { Chassis m_chassis;
public DriveWithJoystick() { m_chassis = Chassis.getInstance(); requires(m_chassis); // reserve the chassis subsystem }
protected void initialize() { }
protected void execute() { m_chassis.driveWithJoystick(); }
protected boolean isFinished() { return false; }
// Called once after isFinished returns true protected void end() { }
protected void interrupted() { }}
Robot Programming Cookbook
! Page 12

Later we’ll add more complex commands to get the sample robot to do more operations tied to the operator interface and those associations will go here.Edit the main class for your robot programThe default main program is actually more than we need since there is no autonomous code in this example. Here is the sample CommandBasedRobot class.
That’s all you need to get started. The DriveWithJoystick command is the default command for the Chassis so the robot will drive using two joysticks during the tele-op period. It’s fairly complex for such a simple program, but as you’ll see, it is very easy to extend to get much more interesting behavior.
public class OI { public static final int JOYSTICK_PORT = 1; private static OI instance = null; private Joystick stick; private OI() { stick = new Joystick(JOYSTICK_PORT); } public static OI getInstance() { if (instance == null) instance = new OI(); return instance; }
public Joystick getJoystick() { return stick; }}
public class RobotThing extends IterativeRobot {
Command autonomousCommand;
public void robotInit() { // called when the robot is started (powered on) OI.getInstance(); Chassis.getInstance(); }
public void teleopPeriodic() { // called for each driver station update (every 20ms) Scheduler.getInstance().run(); }}
Robot Programming Cookbook
! Page 13

Extending the program to drive in a square patternNow for the interesting part of this exercise. We’ll extend the program from the previous section to drive in a square pattern during the autonomous period and assist the driver by driving in a square pattern at the touch of the trigger button on the joystick. You can imagine that if you were to write code to score a tube or some other complex operation in a game, it might be useful to have this code available both to the autonomous and tele-op parts of the program.Our sample program will use simple timing to get the robot to drive the correct distances for the sides of the square and the 90 degree turns. In a more robust program you would probably want to use sensors like encoders and gyros to get more consistent performance from your robot.
Robot Programming Cookbook
! Page 14

Add two commands, one to drive the robot forward for a specified period of time and another to execute a 90 degree right turn for a specified period of time. In both cases, these commands start the robot moving, wait the required time, then stop the robot. As said before, to be more accurate and repeatable, both of these commands should use feedback from sensors, but more on that later. For both of these commands it’s important to require the Chassis subsystem. This will cause the default DriveWithJoysticks command to stop executing when these commands are invoked since they also require the Chassis subsystem.
Notice that a timeout is passed to the DriveStraight class in the constructor. When the object is scheduled (when it actually runs, not when it’s created), the timeout is set. This happens in the initialize() method that is called whenever the DriveStraight command is scheduled.
public class DriveStraight extends Command { private double m_timeout;
public DriveStraight(double timeout) { m_timeout = timeout; requires(Chassis.getInstance()); }
protected void initialize() { setTimeout(m_timeout); }
protected void execute() { Chassis.getInstance().straight(); }
protected boolean isFinished() { return isTimedOut(); }
protected void end() { }
protected void interrupted() { }}
Robot Programming Cookbook
! Page 15

The Turn command uses a timeout to time the turn in exactly the same way as the DriveStraight command in the previous section.Now create a CommandGroup that consists of the commands required to drive in a square pattern. This group will be scheduled when a button is pressed or during the autonomous part of the match.Remember that the arguments in the constructors for DriveStraight and Turn are the length of time to drive.
public class Turn extends Command { private double m_timeout;
public Turn(double timeout) { m_timeout = timeout; requires(Chassis.getInstance()); }
protected void initialize() { setTimeout(m_timeout); }
protected void execute() { Chassis.getInstance().turnLeft(); }
protected boolean isFinished() { return isTimedOut(); }
protected void end() { }
protected void interrupted() { }}
Robot Programming Cookbook
! Page 16

Now modify the OI class to associate the DriveInSquare command group with the trigger button on the right joystick. Whenever the joystick is pressed, the robot will drive in a square pattern. When the command is completed, the default command for the DriveLine subsystem will run - DriveViaJoysticks.
public class DriveInASquare extends CommandGroup {
public DriveInASquare() { add(new DriveStraight(1)); add(new Turn(1)); add(new DriveStraight(1)); add(new Turn(1)); add(new DriveStraight(1)); add(new Turn(1)); add(new DriveStraight(1)); }}
public class OI { public static final int JOYSTICK_PORT = 1; private static OI instance = null;
private Joystick stick; private JoystickButton trigger; private OI() { stick = new Joystick(JOYSTICK_PORT); trigger = new JoystickButton(stick, Joystick.ButtonType.kTop.value); trigger.whenPressed(new DriveInASquare()); } public static OI getInstance() { if (instance == null) instance = new OI(); return instance; }
public Joystick getJoystick() { return stick; }}
Robot Programming Cookbook
! Page 17
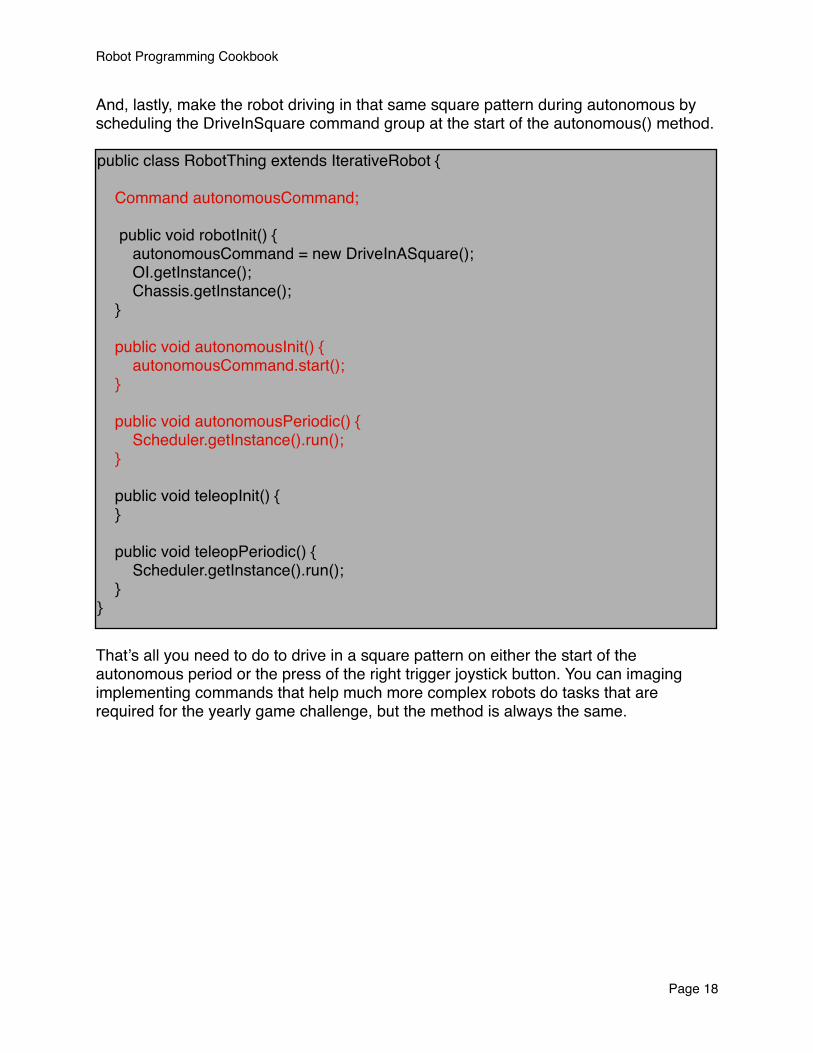
And, lastly, make the robot driving in that same square pattern during autonomous by scheduling the DriveInSquare command group at the start of the autonomous() method.
That’s all you need to do to drive in a square pattern on either the start of the autonomous period or the press of the right trigger joystick button. You can imaging implementing commands that help much more complex robots do tasks that are required for the yearly game challenge, but the method is always the same.
public class RobotThing extends IterativeRobot {
Command autonomousCommand;
public void robotInit() { autonomousCommand = new DriveInASquare(); OI.getInstance(); Chassis.getInstance(); }
public void autonomousInit() { autonomousCommand.start(); }
public void autonomousPeriodic() { Scheduler.getInstance().run(); }
public void teleopInit() { }
public void teleopPeriodic() { Scheduler.getInstance().run(); }}
Robot Programming Cookbook
! Page 18
SubsystemsSubsystems are classes that you write to define how each piece of the robot works. Each subsystem class is a subclass of the WPILib Subsystem class. You write methods to define each of the capabilities of the subsystem. For example, a gripper might have methods grab() and release() that grab scoring objects and release them. It is important to note that these methods would just set setpoints on the gripper, not do a timed operation. If something runs over a period of time, it should be a command. All of the state for the subsystem is contained within the subsystem, and the only public methods are the ones that describe the subsystems capabilities.Note: It’s important that there are no waits or delays in the subsystem methods.For subsystems like elevators there might be methods like moveToMiddle() or moveToTop() to move the elevator to the middle or top scoring position. In these cases the subsystem would use a PIDSubsystem object to move the elevator in the background to the desired position. The command would simply set up the PID in its constructor, then the method moveToTop() would set a target position for the PID loop. The PID loop would then run on its own driving the elevator the appropriate position.
Robot Programming Cookbook
! Page 19
Basic subsystem formatA subsystem defines a piece of the robot. So inside the subsystem there should be several sections:• The definitions of the actual devices that make up the subsystem, for example,
motors, sensors, etc. Each of these object references should be private to the subsystem and never directly referenced from outside the subsystem class.
• The getInstance() method that creates an instance of the subsystem. Subsystems should be created as singletons. That means that there will only be one instance of the subsystem no matter how many times it’s referenced. You can ensure that the constructor is never called from outside the subsystem by declaring it private.
• The public methods for accessing the subsystem are the only way the rest of the robot program operates that subsystem. This ensures that if you want to change the subsystem later, you only need to look at the public methods (interface) and you’re guaranteed that none of the rest of the robot code references anything else.
Best practices for writing subsystem classesThere are a number of well understood object oriented programming practices that have been developed. For the most flexibility in your programming following these practices will make your easier to debug and easier to extend.1. Write the Subsystem class so that it extends the WPILib Subsystem base class.2. Make everything private unless it absolutely needs to be shared with the other
elements of the program. Often there are a number of methods that are part of a class to help it implement its operations. These methods should almost always be declared private and therefore not visible to the rest of the program. This will make it possible to modify a subsystem without effecting the rest of the program.
3. Have only loose coupling between your subsystems. Coupling is the degree to which one subsystem (class) relies on the other subsystems. If a particular subsystem relies on the behavior of another subsystem then modifications to one subsystem ripples into changes in other subsystems. This makes the program much more complex to extend or change.
4. Create your subsystems using the Singleton design pattern to ensure that there is only a single instance of each subsystem. More on this later.
Robot Programming Cookbook
! Page 20
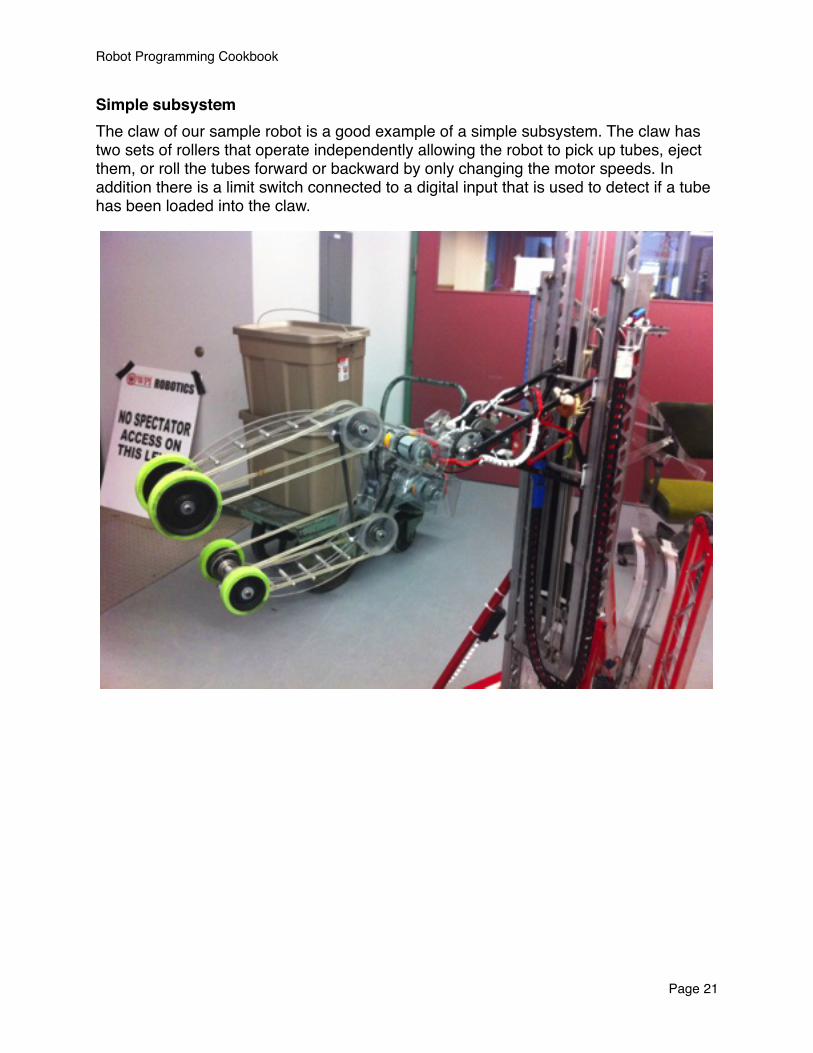
Simple subsystemThe claw of our sample robot is a good example of a simple subsystem. The claw has two sets of rollers that operate independently allowing the robot to pick up tubes, eject them, or roll the tubes forward or backward by only changing the motor speeds. In addition there is a limit switch connected to a digital input that is used to detect if a tube has been loaded into the claw.
Robot Programming Cookbook
! Page 21

The claw subsystem class is very straightforward and looks like this:
The two capabilities of this subsystem are the set() method and the isHasTube() method. Those two methods are the only way that the rest of the program can operate the claw. And - this is important - the class could have been written and the methods stubbed out without knowing anything about how the claw operates. Once done, you can continue with writing the robot program.
public class Claw extends Subsystem {
private SpeedController top = new Victor(7); private SpeedController bottom = new Victor(6); private DigitalInput hasTubeSwitch = new DigitalInput(3);
private static Claw instance;
public static Claw getInstance() { if (instance == null) { instance = new Claw(); instance.setDefaultCommand(new ClawDoNothing()); } return instance; }
private Claw() { }
public void set(double upperSpeed, double lowerSpeed) { top.set(-upperSpeed); bottom.set(lowerSpeed); }
public boolean isHasTube() { return !hasTubeSwitch.get(); }}
Define some motors and a DigitalInput for a limit switch
Create a method to set the top and bottom roller speeds
Add a way to see if a tube has been collected
Robot Programming Cookbook
! Page 22

Subsystems using the Singleton patternGenerally there would only be a single instance of any subsystem since there is only one on the robot. For example, one elevator, one drive base, one gripper. To ensure that only one instance is created, the Singleton design pattern is used. The idea is that rather than creating an instance of the class using the new operator, a public static getInstance() method is called. getInstance() creates the object on the first call, and returns the saved reference on subsequent calls thus ensuring only one copy.To be sure that there is only one, the constructor for the subsystem is made private or protected. A private constructor can only be referenced from within the class (the getInstance() method), and guarantees that nobody working on the project will accidentally make a second instance.The code looks like this:
Notice that there is a private static variable of the class type called instance that holds the single instance of this class. It is initially null (in Java uninitialized memory is set to zero). In the getInstance() method a check is made to see if this is the first time being called, and if so, an instance is created by using the new operator. Otherwise the existing instance is returned.
public class CameraLight extends Subsystem { private static final boolean ON = false; private static final boolean OFF = !ON;
private final DigitalOutput camera = new DigitalOutput(13);
private static CameraLight instance;
public static CameraLight getInstance() { if (instance == null) { instance = new CameraLight(); setDefaultCommand(new CameraLightSetting(false)); } return instance; }
private CameraLight() { }
public void setCameraOn(boolean on) { camera.set(on ? ON : OFF); }}
Robot Programming Cookbook
! Page 23
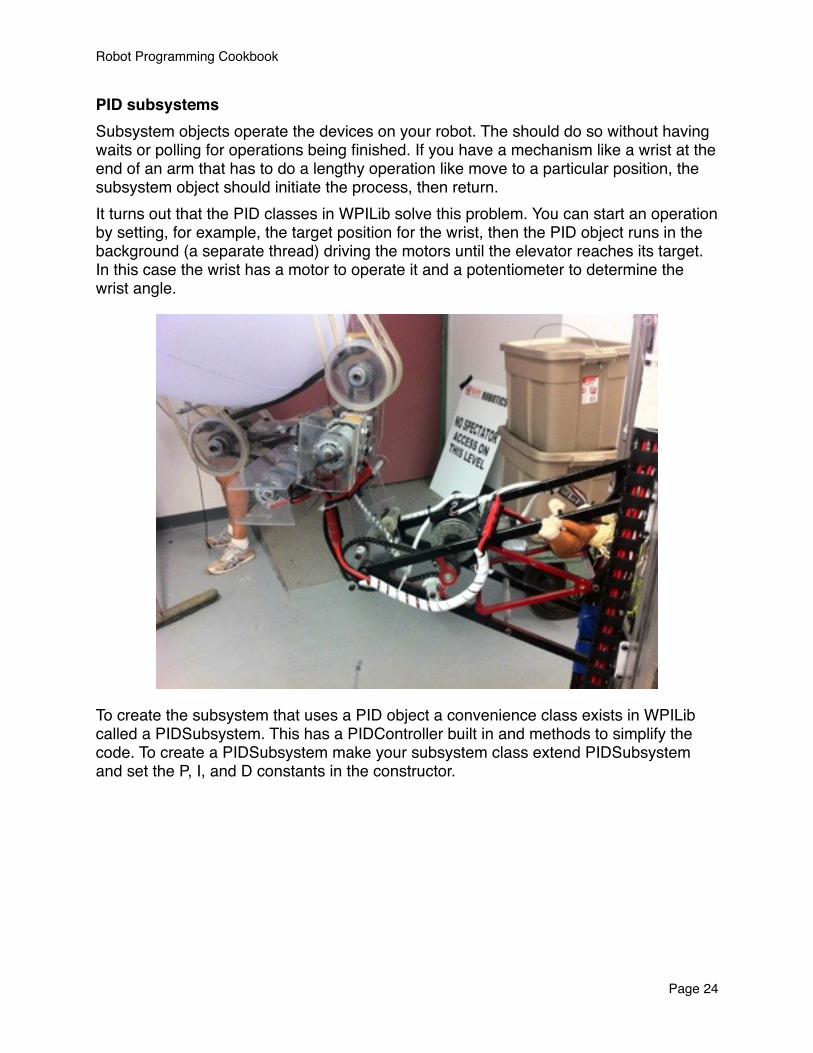
PID subsystemsSubsystem objects operate the devices on your robot. The should do so without having waits or polling for operations being finished. If you have a mechanism like a wrist at the end of an arm that has to do a lengthy operation like move to a particular position, the subsystem object should initiate the process, then return.It turns out that the PID classes in WPILib solve this problem. You can start an operation by setting, for example, the target position for the wrist, then the PID object runs in the background (a separate thread) driving the motors until the elevator reaches its target. In this case the wrist has a motor to operate it and a potentiometer to determine the wrist angle.
To create the subsystem that uses a PID object a convenience class exists in WPILib called a PIDSubsystem. This has a PIDController built in and methods to simplify the code. To create a PIDSubsystem make your subsystem class extend PIDSubsystem and set the P, I, and D constants in the constructor.
Robot Programming Cookbook
! Page 24
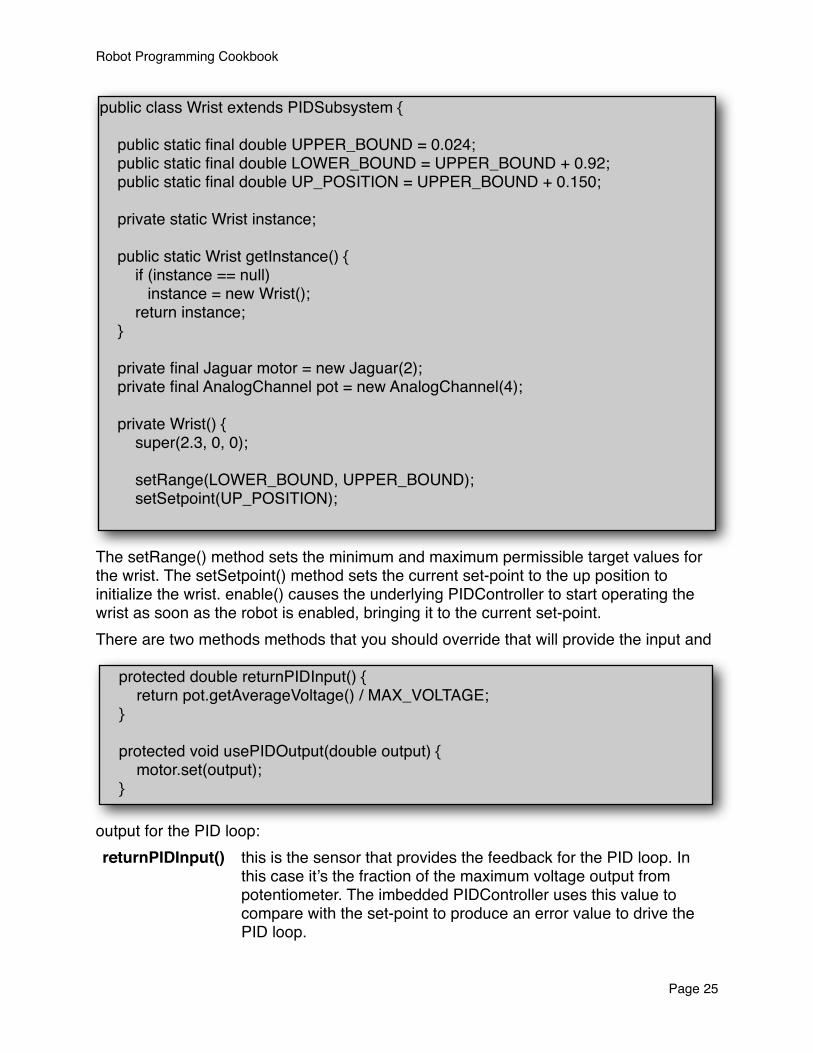
The setRange() method sets the minimum and maximum permissible target values for the wrist. The setSetpoint() method sets the current set-point to the up position to initialize the wrist. enable() causes the underlying PIDController to start operating the wrist as soon as the robot is enabled, bringing it to the current set-point.There are two methods methods that you should override that will provide the input and
output for the PID loop:returnPIDInput() this is the sensor that provides the feedback for the PID loop. In
this case it’s the fraction of the maximum voltage output from potentiometer. The imbedded PIDController uses this value to compare with the set-point to produce an error value to drive the PID loop.
public class Wrist extends PIDSubsystem {
public static final double UPPER_BOUND = 0.024; public static final double LOWER_BOUND = UPPER_BOUND + 0.92; public static final double UP_POSITION = UPPER_BOUND + 0.150;
private static Wrist instance;
public static Wrist getInstance() { if (instance == null)! instance = new Wrist(); return instance; }
private final Jaguar motor = new Jaguar(2); private final AnalogChannel pot = new AnalogChannel(4); private Wrist() { super(2.3, 0, 0);
setRange(LOWER_BOUND, UPPER_BOUND); setSetpoint(UP_POSITION);
protected double returnPIDInput() { return pot.getAverageVoltage() / MAX_VOLTAGE; }
protected void usePIDOutput(double output) { motor.set(output); }
Robot Programming Cookbook
! Page 25

usePIDOutput() this value is the output from the PID loop that should drive the (in this case) wrist motor. It will be called from the PIDController thread to periodically update the motor speed.
There are additional functions that may be useful to override as part of the PIDCommand and they are documented in the reference manual for the particular language.Finally, there are the methods for the wrist subsystem that set the position it should move to. These methods simply set the PID set-points to cause the PID loop to run the wrist in the background.
Notice the jogUp() and jogDown() methods move the set-point to a position relative to the current position and are controlled through a command that is attached to a momentary up/down switch.A status method was added so that other code in the robot could determine if the wrist has reached its desired position. This was necessary for operations where the commands that operated the wrist could report being finished.
public void stowed() { setSetpoint(UP_POSITION); }
public void tiltForScoring() { setSetpoint(SCORING_POSITION); }
public void down() { setSetpoint(DOWN_POSITION); }
public void jogUp() { setSetpointRelative(-.01); }
public void jogDown() { setSetpointRelative(.01); }
public boolean atSetpoint() { return Math.abs(getPosition() - getSetpoint()) < .1; }
Robot Programming Cookbook
! Page 26

CommandsCommands are schedulable pieces of robot code, each one a class subclassed from Command or CommandGroup. Commands can be individual units of code or groups of commands that execute one after another. At any time there may be a number of active commands. Each time data is received from the driver station (about every 20ms) the execute() methods in all active commands are called to make more progress on that command. After executing each command the isFinished() method is called to determine if the command is done. If it is, that command no longer runs. If it was part of a command group, the next command in the group becomes active. The continues as long as there are any active commands or groups.
Command group 1
Command group 2
Command 3Green commands are currently running. At each driver station
update their execute() methods are called. The commands each continue running until the isFinished() method returns false.
Commands and groups are associated with operator interface buttons and autonomous modes and run automatically when needed. You can write a single command that, for example, scores a tube and it can be used in the autonomous code or in the operator control code.
Robot Programming Cookbook
! Page 27
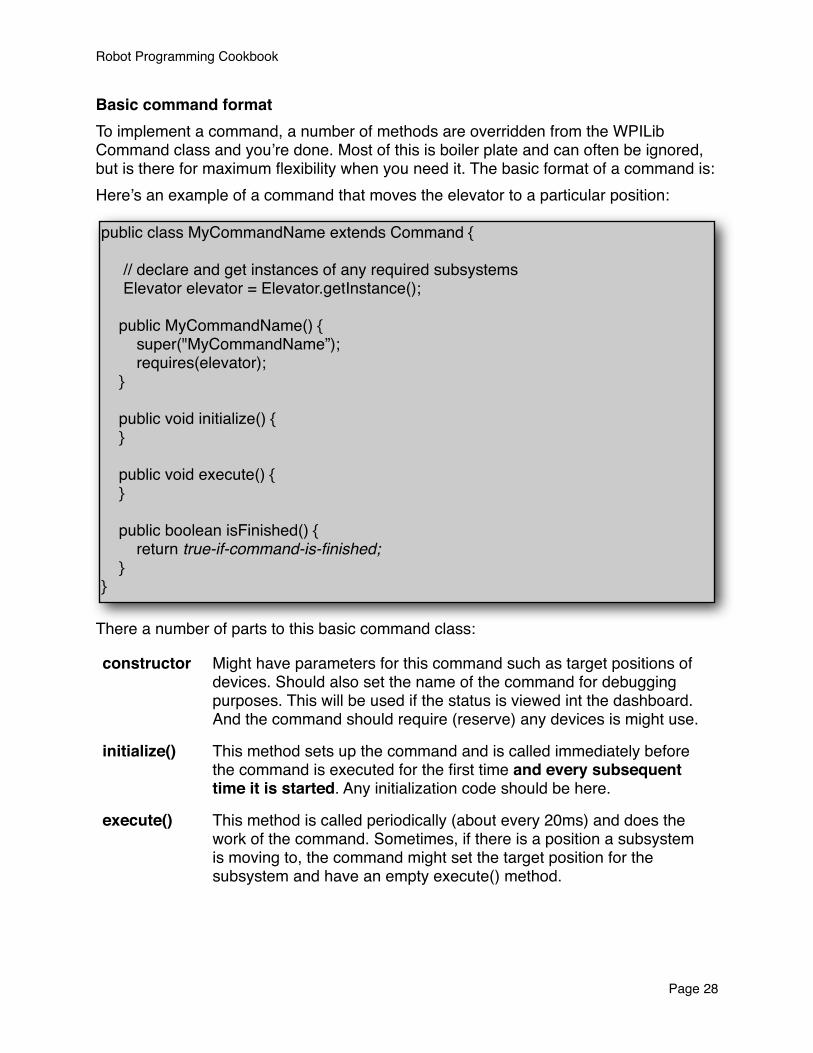
Basic command formatTo implement a command, a number of methods are overridden from the WPILib Command class and you’re done. Most of this is boiler plate and can often be ignored, but is there for maximum flexibility when you need it. The basic format of a command is:Here’s an example of a command that moves the elevator to a particular position:
There a number of parts to this basic command class:
constructor Might have parameters for this command such as target positions of devices. Should also set the name of the command for debugging purposes. This will be used if the status is viewed int the dashboard. And the command should require (reserve) any devices is might use.
initialize() This method sets up the command and is called immediately before the command is executed for the first time and every subsequent time it is started. Any initialization code should be here.
execute() This method is called periodically (about every 20ms) and does the work of the command. Sometimes, if there is a position a subsystem is moving to, the command might set the target position for the subsystem and have an empty execute() method.
public class MyCommandName extends Command {
// declare and get instances of any required subsystems Elevator elevator = Elevator.getInstance();
public MyCommandName() { super("MyCommandName”); requires(elevator); }
public void initialize() { }
public void execute() { }
public boolean isFinished() { return true-if-command-is-finished; }}
Robot Programming Cookbook
! Page 28
isFinished() This method returns true if the command is finished. This would be the case if the command has reached its target position, run for the set time, etc.
There are other methods that might be useful to override and these will be discussed in later sections.
Robot Programming Cookbook
! Page 29

Simple commandsHere’s an example of a command that moves the elevator to a particular position:
The constructor has a few parameters to set the position the elevator should move to. When this command is scheduled, it will run periodically
public class ElevatorToPosition extends Command {
double position; Elevator elevator = Elevator.getInstance();
public ElevatorToPosition(double position) { super("MoveElevatorTo" + (int) position);
requires(elevator);
this.position = position; }
public void initialize() { elevator.setPosition(position); }
public void execute() { }
public boolean isFinished() { return elevator.atSetpoint(); }}
Robot Programming Cookbook
! Page 30
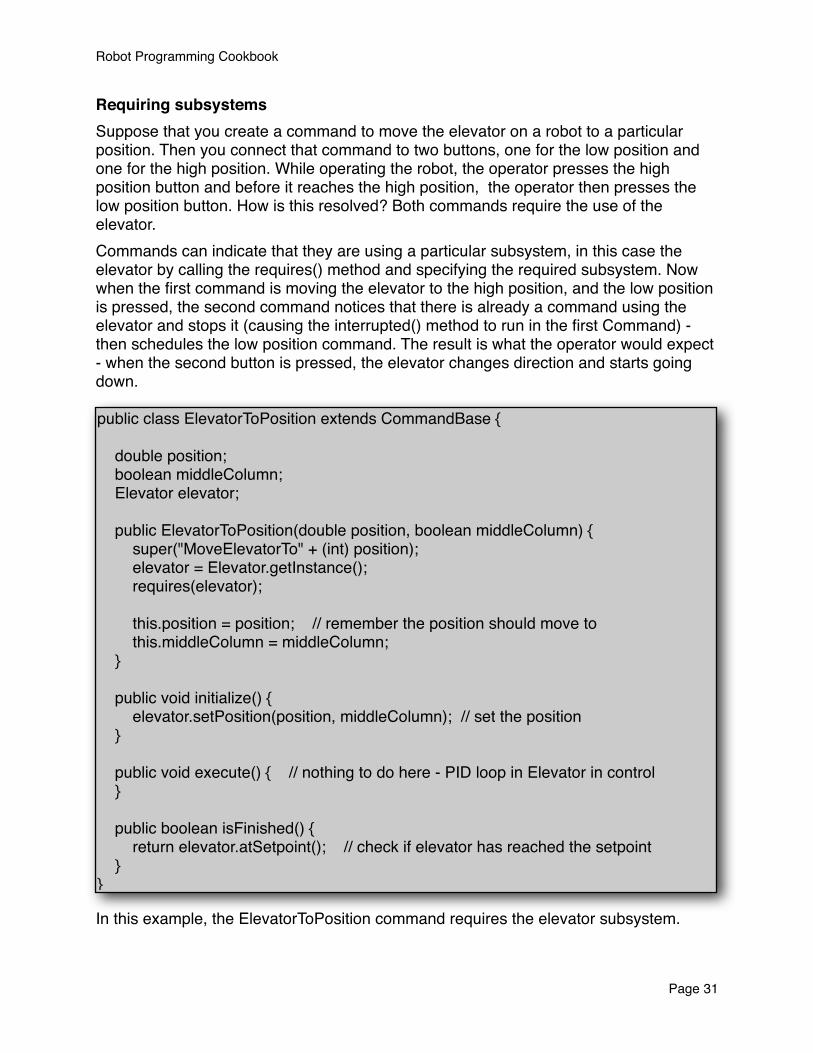
Requiring subsystemsSuppose that you create a command to move the elevator on a robot to a particular position. Then you connect that command to two buttons, one for the low position and one for the high position. While operating the robot, the operator presses the high position button and before it reaches the high position, the operator then presses the low position button. How is this resolved? Both commands require the use of the elevator.Commands can indicate that they are using a particular subsystem, in this case the elevator by calling the requires() method and specifying the required subsystem. Now when the first command is moving the elevator to the high position, and the low position is pressed, the second command notices that there is already a command using the elevator and stops it (causing the interrupted() method to run in the first Command) - then schedules the low position command. The result is what the operator would expect - when the second button is pressed, the elevator changes direction and starts going down.
In this example, the ElevatorToPosition command requires the elevator subsystem.
public class ElevatorToPosition extends CommandBase {
double position; boolean middleColumn; Elevator elevator;
public ElevatorToPosition(double position, boolean middleColumn) { super("MoveElevatorTo" + (int) position); elevator = Elevator.getInstance(); requires(elevator);
this.position = position; // remember the position should move to this.middleColumn = middleColumn; }
public void initialize() { elevator.setPosition(position, middleColumn); // set the position }
public void execute() { // nothing to do here - PID loop in Elevator in control }
public boolean isFinished() { return elevator.atSetpoint(); // check if elevator has reached the setpoint }}
Robot Programming Cookbook
! Page 31

When it is scheduled again at some other position, the currently running instance is stopped and the new instance is started, making the elevator head in a new direction.
Robot Programming Cookbook
! Page 32

Creating command groupsOften robots need to execute more complex multistep operations. To create a single command to do all the steps you create a CommandGroup and add each of the individual commands to it. A CommandGroup is simply a container that holds a number of commands that execute sequentially. When a command in the group finishes, the next one is started until the entire group of commands has finished.CommandGroups can be used interchangeably with Commands. In fact, the CommandGroup is a subclass of Command. Also CommandGroups will automatically require all the subsystems of the commands in the group. There is no need to explicitly require subsystems in the command group.Once the group is created it can be tied to a single button on your user interface - pressing a single button will cause all the commands in this group to execute sequentially.Here is an example of a CommandGroup that collects a tube.
On our sample robot collecting a tube is a number of steps, each already defined as a command. The steps are:1. move the elevator to the lowest position (the addChild() method starts this running
asynchronously - more on that later)2. move the wrist down, start the rollers ingesting the tube (suck - runs until a limit
switch is tripped indicated the tube has been collected)3. turn off the rollers (ClawDoNothing)4. and move the wrist up to the scoring position.All these are achieved by adding the individual commands to the CommandGroup called CollectTube.
public class CollectTube extends CommandGroup{
public CollectTube() { addChild(new ElevatorToPosition(Elevator.BASE_LINE, false)); addChild(new WristToPosition(Wrist.DOWN_POSITION)); add(new Suck()); add(new ClawDoNothing()); add(new WristToPosition(Wrist.UP_POSITION)); }}
Robot Programming Cookbook
! Page 33

Commands with timeoutsOften you want a command to run for some amount of time, then stop. When commands start, the current time is automatically recorded so it becomes an easy test to see if the required time has passed. You need only to set the timeout in the initialize() method, then check it in the isFinished() method.
You can see that demonstrated in this sample.In addition there is a built-in, waitCommand() command that just waits for a specified period of time at which time it ends. This is useful in a command group where you need to introduce a delay between two existing commands. In this example, there is a 0.2
public class MinibotLaunch extends CommandBase {
boolean fired = false;
public MinibotLaunch() { requires(deployment); requires(driveline); setTimeout(.5); }
public void initialize() { deployment.arm(); fired = true; deployment.launch(); }
public void execute() { driveline.drive(-.5, -.5); }
public void end() { deployment.endLaunch(); driveline.drive(0, 0); }
public boolean isFinished() { return !fired || isTimedOut(); }}
Robot Programming Cookbook
! Page 34
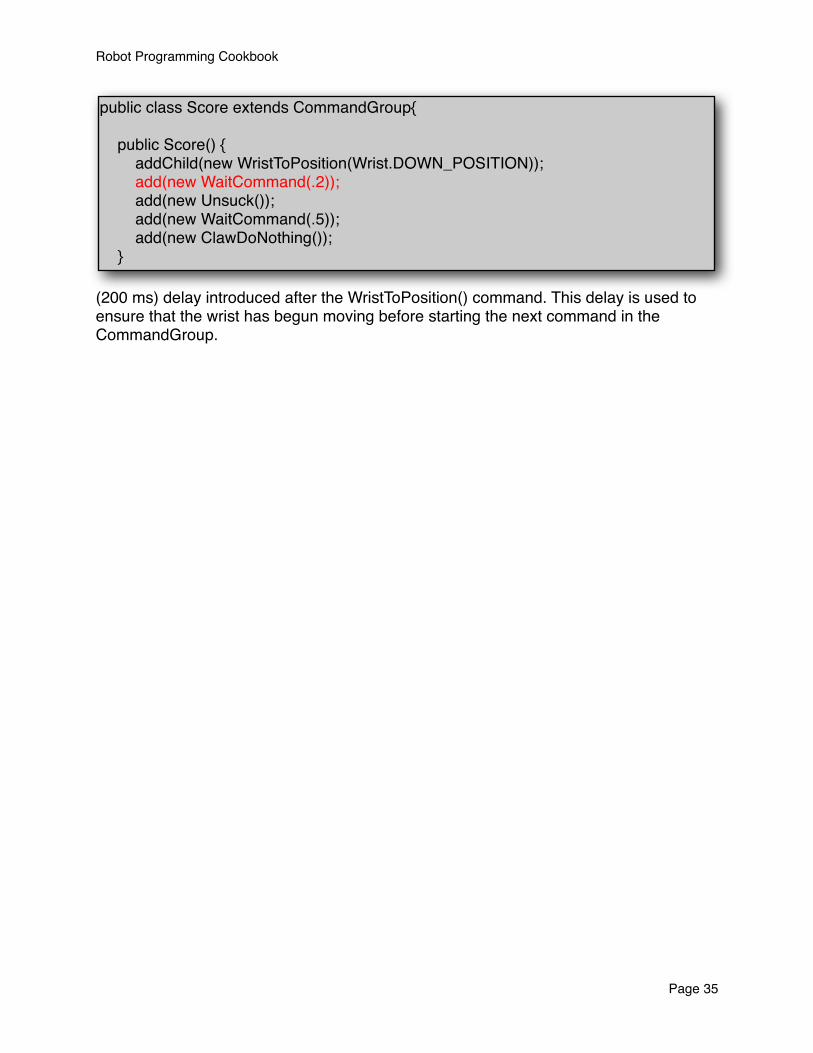
(200 ms) delay introduced after the WristToPosition() command. This delay is used to ensure that the wrist has begun moving before starting the next command in the CommandGroup.
public class Score extends CommandGroup{
public Score() { addChild(new WristToPosition(Wrist.DOWN_POSITION)); add(new WaitCommand(.2)); add(new Unsuck()); add(new WaitCommand(.5)); add(new ClawDoNothing()); }
Robot Programming Cookbook
! Page 35
Subsystem default commandsYou can specify default commands that will run for any subsystem. These default commands will run when no other command is running for the subsystem. You might want the robot to be driven with the joysticks unless there is some operator assistance command running. Suppose your robot is normally driven with the joysticks, but you have a command that will track to a target and fire when a button is pressed. You could tie the track and score command to a button on the operator interface but have the command that drives with the joysticks as a default command for the drivetrain. Note:! Need to highlight the fact that the default command needs to be set outside of
the constructor.Unending commandsCommands have two ways of ending: the isFinished() method returns true and the command will no longer be scheduled or another command that uses the same resources. Suppose there were two commands:1. DriveUsingJoysticks - this command drives the robot in a pure teleoperated fashion
using joysticks controlled by an operator. It never exits explicitly - its isFinished() method always returns false and is the default command for the DriveTrain subsystem.
2. ScoreOnGoal - this command uses some sensors to drive to the goal and score a game piece provided the robot is in range, but it doesn’t do it completely autonomously.
Robot Programming Cookbook
! Page 36

If the DriveUsingJoysticks command running and a button is pressed to trigger the ScoreOnGoal command, then, provided they both require the DriveTrain subsystem, the DriveUsingJoysticks command would be stopped and the ScoreOnGoal command would start running. When it finished and returned true from its isFinished() method, then it the DriveUsingJoysticks command would restart since it was the default command for the DriveTrain subsystem.
public class DriveWithJoysticks extends Command {
private DriveLine driveLine = DriveLine.getInstance();
public DriveWithJoysticks() { requires(driveLine); }
protected void initialize() { }
protected void execute() { driveLine.tankDrive(); }
protected boolean isFinished() { return false; }
protected void end() { }
protected void interrupted() { }}
Robot Programming Cookbook
! Page 37

Using the end() methodThe end() method is called when a command completes and is a way of cleaning up or setting the state of a subsystem to a reasonable value. For example, a command might run a motor for a fixed amount of time, then have to stop it after the time runs out. Using a window motor is a good example because it can run against a stop, then stall a little longer to make sure that the motion is complete. Here’s an example of a command to operate a gripper that uses the end() method to stop the motor after it’s done.
This command runs for exactly 1.0 seconds, then finishes. But before the next command is scheduled, the gripper motor is stopped.
public class OpenGripper extends Command {
private Gripper gripper = Gripper.getInstance();
public OpenGripper() { requires(gripper); }
protected void initialize() { setTimeout(1.0); gripper.open(); }
protected void execute() { }
protected boolean isFinished() { return isTimedOut(); }
protected void end() { gripper.stop(); }
protected void interrupted() { }}
Robot Programming Cookbook
! Page 38

Using the interrupted() method
Robot Programming Cookbook
! Page 39

Asynchronous operation - Adding child commandsOne of the most difficult things for human operators to do is control two mechanisms at the same time. This is what computers are good at. The command scheduler has the ability to run many commands simultaneously. This happens if you have commands associated with buttons and press multiple buttons that trigger non-conflicting commands.You can also schedule a command manually by calling the start() method on a command reference. This will schedule that command immediately and the current command will continue running.In a CommandGroup object additional commands are added to the group using the add() method. An alternative is to call the addChild() method. In this case, the child command will be immediately scheduled (when that command group gets to that point).
In this example the green command adds another command group as a child of the first one. Those three commands run asynchronously while the original group continues.In the example below, a child command drives the robot for 4 seconds while the gripper is open and closed. The gripper operations run while the robot is driven.
Notice that the command group doesn’t have any requires() method calls. This is because the required subsystems for a group consist of the required subsystems of each command or group added to the group. This includes child commands and groups added.
public class DriveAndMoveGripper extends CommandGroup {
public DriveAndMoveGripper() { addChild(new DriveFor4Seconds()); add(new CloseGripper()); add(new OpenGripper()); }}
Robot Programming Cookbook
! Page 40
Creating uninterruptible commands
Robot Programming Cookbook
! Page 41

Overriding methods on command groups
Robot Programming Cookbook
! Page 42

Operator interfaceThere are a number of features built into WPILib to help create an easy to program operator interface. You can associate commands that you write with buttons on your operator interface. The buttons can be either joystick buttons, extended I/O digital buttons, or extended I/O analog buttons. And you can easily create your own buttons that are controlled some other way such as from your dashboard.There are two steps in connecting a command or group to a button:1. Create an instance of the appropriate button class such as DigitalIOButton,
AnalogIOButton, or JoystickButton.2. Use the whenPressed() or whileHeld() methods on the Button object to associate the
button with a Command or CommandGroup object.When the button is pressed during the tele-op part of the game, the associated command will automatically run. In the case of whileHeld() the command will be run over and over again while the button is pressed.You can also create your own buttons to handle special cases like modifier buttons, keyboard inputs, or any other requirements. This is described later in this document.A good method of handling all these buttons and associations is to create a class called OI. It should have a constructor that creates the Button objects (see later) for your robot and associates commands with them. Implementing the OI class as a singleton with a getInstance() method makes it easy to be sure the constructor is run when the program is started (see hyperlink).
Robot Programming Cookbook
! Page 43
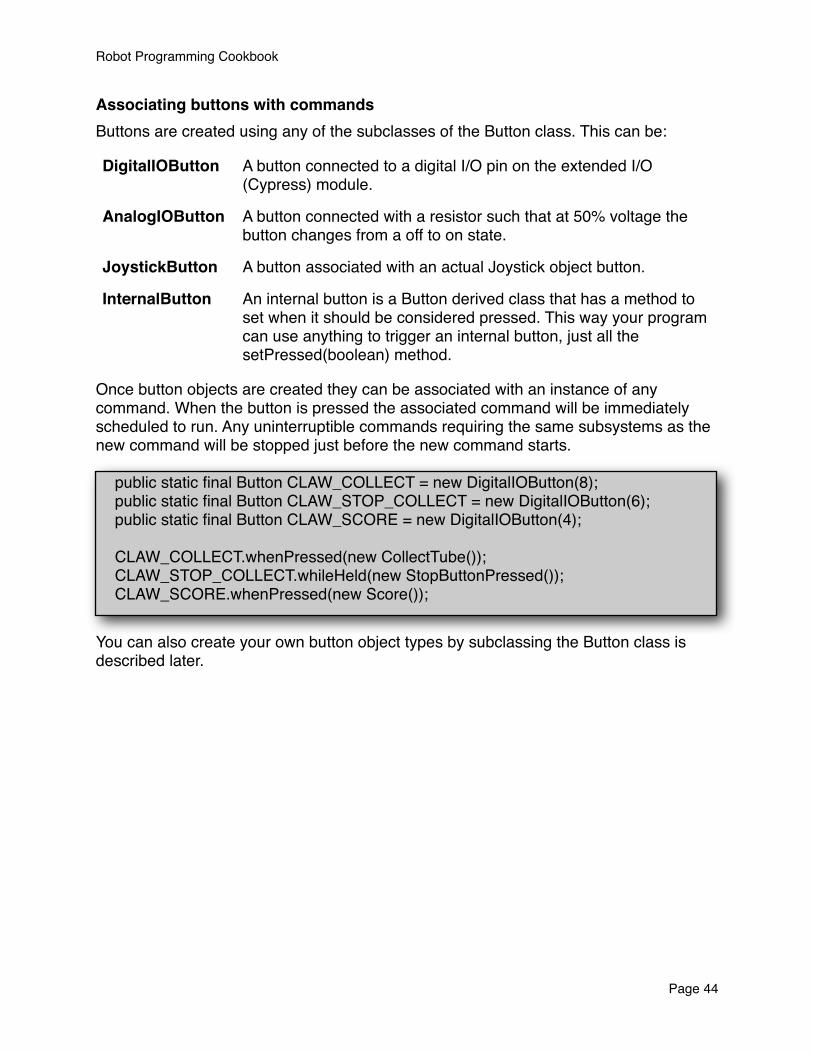
Associating buttons with commandsButtons are created using any of the subclasses of the Button class. This can be:
DigitalIOButton A button connected to a digital I/O pin on the extended I/O (Cypress) module.
AnalogIOButton A button connected with a resistor such that at 50% voltage the button changes from a off to on state.
JoystickButton A button associated with an actual Joystick object button.
InternalButton An internal button is a Button derived class that has a method to set when it should be considered pressed. This way your program can use anything to trigger an internal button, just all the setPressed(boolean) method.
Once button objects are created they can be associated with an instance of any command. When the button is pressed the associated command will be immediately scheduled to run. Any uninterruptible commands requiring the same subsystems as the new command will be stopped just before the new command starts.
You can also create your own button object types by subclassing the Button class is described later.
public static final Button CLAW_COLLECT = new DigitalIOButton(8); public static final Button CLAW_STOP_COLLECT = new DigitalIOButton(6); public static final Button CLAW_SCORE = new DigitalIOButton(4); CLAW_COLLECT.whenPressed(new CollectTube()); CLAW_STOP_COLLECT.whileHeld(new StopButtonPressed()); CLAW_SCORE.whenPressed(new Score());
Robot Programming Cookbook
! Page 44

Using analog inputs as buttonsOften when designing an operator interface for a robot there are more buttons and switches than digital I/O ports. When this happens analog ports can be used to read digital values by using a resistor to set the voltage that appears on the analog input. When the switch is open (not pressed) the voltage on the input pin is near 5.0V. When the switch is closed (pressed) the voltage becomes 0.0 volts. The AnalogIOButton class simplifies reading values that work this way.To use it, create an instance of an AnalogIOButton with the analog input port number. A threshold value of 0.5 is built into the class. Values less than 0.5 will return true and values greater than the threshold will return false.
This code will run the ElevatorJog() command when either the Jog up or Jog down buttons are pressed. In the case of the sample robot, the switch is a lever that is either pushed up or down. The commands will continuously be scheduled while the switch is held in the up or down position (see next section).Notice that the code for the analog button is almost identical to the DigitalIOButton which makes the software especially easy to use. You can put off the decision until late in the design process since the differences are contained within the button objects.
public static final Button ELEV_JOG_UP = new AnalogIOButton(5); public static final Button ELEV_JOG_DOWN = new AnalogIOButton(7);
ELEV_JOG_UP.whileHeld(new ElevatorJog(true)); ELEV_JOG_DOWN.whileHeld(new ElevatorJog(false));
Robot Programming Cookbook
! Page 45

WhileHeld vs. WhenPressed methodsThere are two Button class methods that can be used to cause the button value to be monitored, whenPressed() and whileHeld(). Each of these responds to button inputs in a different way.
WhenPressed runs the associated command once when the button is pressed. After the command completes it won’t be run again unless the button is released then pressed again.
WhileHeld runs the command over and over again as long as the button is held in the on position. When the button is pressed, the associated command initialize() method will be called followed by repeated calls to execute(). If the command finished while the button is still pressed, the initialize method will be called again and the cycle will repeat until the button is released. When the button is released the interrupted() method on the command will be called.
Robot Programming Cookbook
! Page 46

Creating custom buttonsOften a program will need to use multiple buttons or other special cases to register a button being pressed. The possibilities are endless and can’t be exhaustively encoded in the library. To make it easy to create your own button objects with custom triggering simply create a class that extends Button.The Button class has an abstract method, boolean get() that must be implemented by your Button subclass and simply returns true or false depending on the state of your button.
On our sample robot there are three lights that turn on when the camera sees the target lined up and in range. When the lights are all on and one of the fixed elevator position buttons is pressed an auto-score command is triggered to drive to the goal and score a tube. This is implemented with the AndLightsButton() object.
Then the auto score command object is associated with the combination of the 3 lights turned on and the appropriate level button pressed at the same time. The operator
public class AndLightsButton extends Button {
Button button;
public AndLightsButton(Button b) { button = b; }
public boolean get() { return button.get()! ! && OI.BLUE_LIGHT.get()! ! && OI.RED_LIGHT.get()! ! && OI.WHITE_LIGHT.get(); }}
Robot Programming Cookbook
! Page 47

interface has two sets of three buttons that allow it to score on either set of goals (high or low).
Remember that in the game there were some sets of goals that were higher than others and the two sets of buttons selected which position to go to.For each of the 6 positions an AndLightsButton button object is created, then associated with the command GoToTargetAutonomous(position). When the button is pressed, the correct command is scheduled.Notice that this is exactly the same code that runs during the autonomous part of the program. The GoToTargetAutonomous command is just reused unchanged when the button is pressed to get the autonomous scoring behavior in the tele-op mode of the match.
Robot Programming Cookbook
! Page 48

new AndLightsButton(ELEV_INNER_BOTTOM).whenPressed(new GoToTargetAutonomous(Elevator.BOTTOM, true)); new AndLightsButton(ELEV_INNER_MIDDLE).whenPressed(new GoToTargetAutonomous(Elevator.MIDDLE, true)); new AndLightsButton(ELEV_INNER_TOP).whenPressed(new GoToTargetAutonomous(Elevator.TOP, true)); new AndLightsButton(ELEV_OUTER_BOTTOM).whenPressed(new GoToTargetAutonomous(Elevator.BOTTOM, false)); new AndLightsButton(ELEV_OUTER_MIDDLE).whenPressed(new GoToTargetAutonomous(Elevator.MIDDLE, false)); new AndLightsButton(ELEV_OUTER_TOP).whenPressed(new GoToTargetAutonomous(Elevator.TOP, false));
Robot Programming Cookbook
! Page 49

Smart DashboardThe SmartDashboard is a Java program that will display robot data in real time. Typically you would run the SmartDashboard on your driver station laptop although it could also run on a different computer on the same network. The SmartDashboard helps you with these things:• Displays robot data of your choice while the program is running. It can be displayed as
simple text fields or more elaborately in many other display types like graphics, dials, etc.
• Displays the state of the robot program such as the currently executing commands and the status of any subsystems
• Displays buttons that you can press to cause variables to be set on your robot• Allows you to choose startup options on the dashboard that can be read by the robot
programThe displayed data is automatically formatted in real-time as the data is sent from the robot, but you can change the format or the display widget types and then save the new screen layouts to be used again later.And with all these options, it is still extremely simple to use. To display some data on the dashboard, simply call one of the SmartDashboard methods with the data and its name and the value will automatically appear on the dashboard screen.The following sections in this document list the ways of displaying data on the SmartDashboard and interacting with it. Many of these are one-way, that is the robot supplies a value and it appears on the dashboard. Others are bi-directional - the program causes the widget to be displayed, but you can interact with it from the dashboard and change values on the robot. You should skim through the document to see all the options available to you.
Robot Programming Cookbook
! Page 50
Viewing robot data values
Robot Programming Cookbook
! Page 51
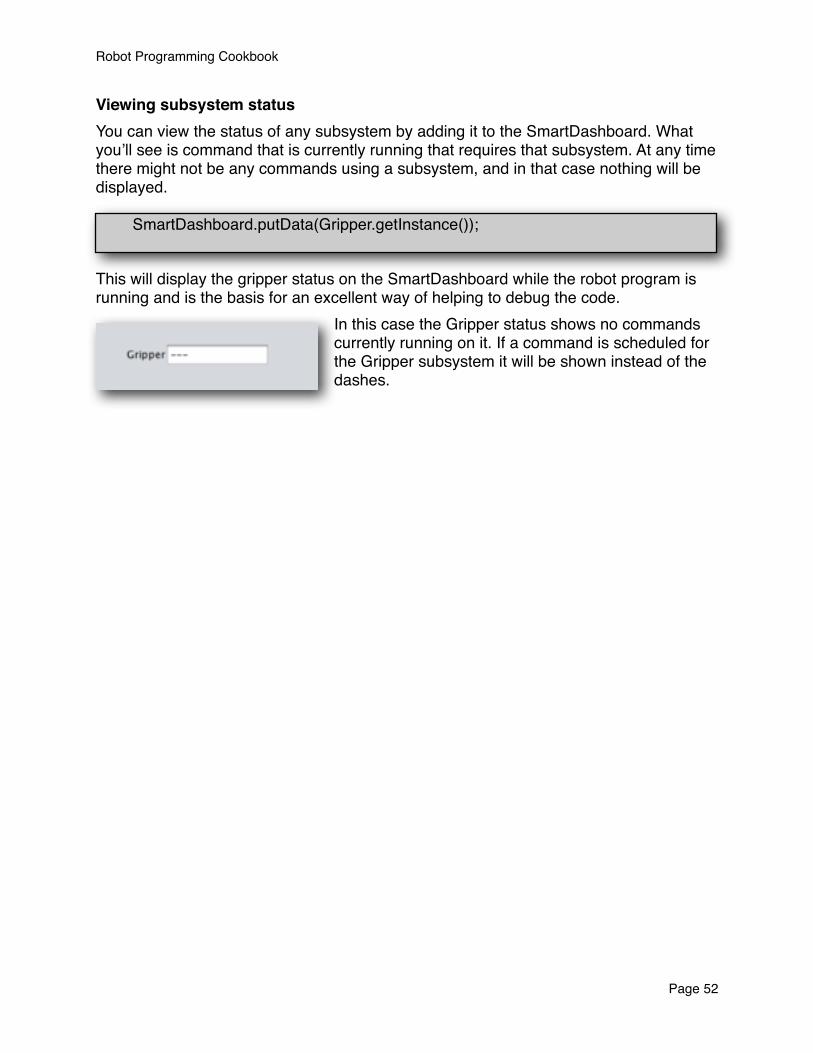
Viewing subsystem statusYou can view the status of any subsystem by adding it to the SmartDashboard. What you’ll see is command that is currently running that requires that subsystem. At any time there might not be any commands using a subsystem, and in that case nothing will be displayed.
This will display the gripper status on the SmartDashboard while the robot program is running and is the basis for an excellent way of helping to debug the code.
In this case the Gripper status shows no commands currently running on it. If a command is scheduled for the Gripper subsystem it will be shown instead of the dashes.
SmartDashboard.putData(Gripper.getInstance());
Robot Programming Cookbook
! Page 52
Viewing currently running commandsRobot programs are just sets of running commands, many of which can run concurrently. To better understand what your program is doing at any time, you can use the SmartDashboard to view which commands are running. The Scheduler is a class in WPILib that maintains the list of all the running commands and advances them as they complete. To view which commands are running at any time, add the following line of code to the robotInit() method in your program:
it will cause a list of all the commands currently running to be displayed on the SmartDashboard. For debugging purposes you will also have the option of canceling any of the running commands from the dashboard interface.
SmartDashboard.putData("SchedulerData", Scheduler.getInstance());
Robot Programming Cookbook
! Page 53
Displaying the camera video feedYou can display the camera video feed on the SmartDashboard.
Robot Programming Cookbook
! Page 54
Testing commands
Robot Programming Cookbook
! Page 55

PID tuning with the PIDCommand objects
Robot Programming Cookbook
! Page 56

Creating buttons that run commands
Robot Programming Cookbook
! Page 57

Using a SendableChooser for selecting autonomous programsOften a team will develop multiple autonomous programs or have other startup options that need to be set before the match starts. Typically this is done using various switches, buttons, and other operator interface hardware. These methods usually require complex programming of driver station inputs and sometimes obscure command sequences.Using the SmartDashboard you can easily program in those types of options. The SendableChooser class will let you list a number of named options on the dashboard that can be selected using the mouse. Then the robot program can retrieve the options at any time and run the appropriate code.Here is an example of using the SendableChooser to pick one of two autonomous commands to run at the start of the autonomous period in the game. In this program fragment there are two command classes called DoSomeAutonomousStuff and DoSomeOtherStuff that represent possible autonomous options.The steps to create the choice field for autonomous options are:1. Create a SendableChooser object2. Add each of the autonomous commands to it. The one added using addDefault() will
be selected when the widget is created on the screen.3. Add the SendableChooser to the SmartDashboard by using
SmartDashboard.putData(). This will create a set of radio buttons (chooser) to let the operator select which option should be used.
4. In the autonomous method, get the selected mode and start it.
public class RobotTemplate extends CommandBasedRobot {
Command autonomousCommand; SendableChooser autoChooser;
public void robotInit() { NetworkTable.initialize(); autoChooser = new SendableChooser(); autoChooser.addDefault("Default program", new DoSomeAutonomousStuff()); autoChooser.addObject("Experimental auto", new DoSomeOtherStuff();); SmartDashboard.putData("Autonomous mode chooser", autoChooser); }
public void autonomous() { autonomousCommand = (Command) autoChooser.getSelected(); autonomousCommand.start(); }}
Robot Programming Cookbook
! Page 58

On the screen in the SmartDashboard you will see the two options displayed with radio buttons and the operator can choose the one to use:
Notice that the option labeled “Default program” is checked by default because it was added to the SendableChooser using the addDefault() method.
Robot Programming Cookbook
! Page 59

Creating custom widgetsYou can create your own widgets (SmartDashboard display elements) by writing simple Java classes that extending...
Robot Programming Cookbook
! Page 60

Editing preferences with the Smart DashboardThere is a provided Preference class described in this document that allows you to set options that are written to the robot controller flash memory. You can also modify these preference values using the SmartDashboard.
Robot Programming Cookbook
! Page 61

How it worksThe SmartDashboard displays named data and in particular display data of type SmartDashboardNamedData or SmartDashboardData. You will see that many of the classes in WPILib are designed to display their status on the dashboard and are subclasses of SmartDashboardData or SmartDashboardNamedData. Any of those objects can just be passed to SmartDashboard.putData(“name”, some-SmartDashboardData-value) or to SmartDashboard.putData(some-SmartDashboardNamedData-value).
Robot Programming Cookbook
! Page 62

Classes to help make the robot drivediscuss RobotDrive class and its methods
Robot Programming Cookbook
! Page 63
Controlling the driving distanceUsing timing, encoders, rangefinding, and the camera
Robot Programming Cookbook
! Page 64

Controlling the driving directionUsing timing, gyros, encoders and the camera
Robot Programming Cookbook
! Page 65

Utilities
Robot Programming Cookbook
! Page 66

Preferences classOften in programs you might like to store data that is persistent between program runs. For example, potentiometer calibration values that measure the height of an arm are dependent on the exact mounting of the potentiometer. The preference class allows you to store data in the flash memory on the micro-controller with names for each value. Later you can retrieve the values by asking for them by name.Preference values can also be viewed using the SmartDashboard.
Robot Programming Cookbook
! Page 67

NetworkTables for communicationsNetworkTables allows the programmer to easily send data between a laptop (either the driver station laptop or another laptop) and the robot. The data transfer is:• Bidirectional - the data can be send from either the driver station to the robot or from
the robot to the driver station.• Named - the data that is sent is named, that is your program on either side can set a
value for a name and the value becomes available on the other side of the connection.• Full notification - you can be notified when data arrives through a callback mechanism
so the program doesn’t have to poll for new values.• Multiple named tables - the data is stored in a tabular format where each row has a
name and value. The tables are themselves named, and you can have multiple tables.• Transactional model - you can ensure that a group of values are updated
simultaneously. For example, camera target information for a given image should all be updated together. You can force a set of values to not be make available until it is all there.
Robot Programming Cookbook
! Page 68

Laptop based Vision systemVision-based program often requires a large amount of computation, sometimes more than can be comfortably be run on the robot controller (cRIO). In this case an alternative implementation is to run the vision code on the driver station computer or another laptop that is on the network with the driver station computer. The camera can be connected directly to a switch on the robot and the robot controller never has to process images, and can devote all of its resources to responding to the other sensors and driving the robot.Typically camera images are processed in real-time and reduced to some small set of values, for example, the distance to a target, x position of the target, size of the target, etc. WPILib has implemented a set of classes that easily facilitate the passing of data between the robot and the driver station - and this communication is bi-directional. These classes are collectively called NetworkTable and allow the programmer to set the values of named data on one one side and the data is automatically updated on the other side. To do the image processing there are a number of libraries available. National Instruments provides the NI Vision library and we have also provided Java wrappers for the open source OpenCV library. The OpenCV library will be discussed in the following sections of this document.
Robot Programming Cookbook
! Page 69

Installing the Java vision components
Robot Programming Cookbook
! Page 70

Structure of a simple vision program
Robot Programming Cookbook
! Page 71

Sending data to the robot
Robot Programming Cookbook
! Page 72
Detecting circular targets
Robot Programming Cookbook
! Page 73

Measuring distance to a target
Robot Programming Cookbook
! Page 74
Debugging your programs
Robot Programming Cookbook
! Page 75
Using Smart Dashboard for debugging
Robot Programming Cookbook
! Page 76

GlossaryButtonCommandJoystickButtonNetworkTablePIDPIDCommandPIDSubsystemSmartDashboardSubsystem
Robot Programming Cookbook
! Page 77