workspace and task reference guide - rct11.msbexpress.net
TRANSCRIPT


Copyright© 2017 CoreLogic®, Inc. All rights reserved.
No part of this publication may be reproduced or transmitted in any form or by anymeans, electronic or mechanical,
including photocopy, recording, or storage in a retrieval system, without the prior written permission of CoreLogic.
The information contained in this publication has been obtained from sources generally believed to be reliable.
However, CoreLogic makes no representation or warranty of any kind, express or implied, as to the accuracy or con-
tent of the information, nor does CoreLogic warrant its merchantability or fitness for a particular purpose. Under no
circumstances will CoreLogic be liable for direct, indirect, special, consequential or incidental damages (including
lost profits), even if CoreLogic has been advised of the possibility of such damages, caused directly or indirectly by
errors or omissions in the information.
CoreLogic on theWeb

RCT Express 4 Workspace and Task Reference Guide
Contents
Chapter 1: Introduction to RCT 1
System Requirements 2
Technical Support 4
Chapter 2: The RCT Workspace 5
Dashboards 6
Dashboard, Main 7
Advanced Entry 8
Valuation Page 9
Policy Information 11
Building Information 15
MMH foundations: 24
Staircase, Basement with Railing 24
Staircase, Basement, Wide with Railing 25
Example 1: 27
Example 2: 28
Example 3: 28
Valuation Totals 32
Materials 33
Kitchen and BathWizard 35
Options 36
Attachments 37
Attachment Name 37
Page 3

RCT Express 4 Workspace and Task Reference Guide
Caption 37
Notes 37
Comments 38
Contents Valuation 39
Custom Items 42
Markup and Adjustments 43
Adjustment Factor 43
Depreciation Factor 43
Condition, Effective Age, and Depreciation Percentage 43
Condition 43
Effective Age 44
Depreciation Percentage 44
Depreciation Table, Mobile-Manufactured Housing - Historical 47
Depreciation Table, Mobile-Manufactured Housing - Physical 49
Condition 49
Effective Age 50
Mobile-Manufactured Housing – SingleWide Depreciation Table 50
Mobile-Manufactured Housing –Multi-Wide Depreciation Table 52
Additional Fields 55
Reload Assumptions 56
Refresh Roof Age 57
Reports 58
Cost Detail Report Definitions 60
RCT Cost Detail Report Definitions 60
Page 4

RCT Express 4 Workspace and Task Reference Guide
Equipment Column: 61
Equipment Line: 61
AerialAssist™ 63
Property Imagery 64
RCT Alerts 67
Locating the error or warning: 67
Hazard Summary 70
Hazard Risks 72
Available Hazards: 72
HazardMap 84
GeoSpatial Information 87
Match Code Key 90
Permit Data 94
Using the Help System 95
Search the Help System 96
Narrow your search by using filters 97
Print a Help Topic 100
Interactive Help 101
Chapter 3: How to... 102
Log in to RCT 103
Request a Forgotten Password 103
Change Your Password 103
Create a New Valuation 104
Create a Renters (Contents Only) Valuation 106
Page 5

RCT Express 4 Workspace and Task Reference Guide
Find an Existing Valuation 108
Filter Items 109
Sort Columns 110
Edit a Valuation 112
View Valuation History 113
View AerialAssist™ 114
View Property Imagery 117
Create a Comparison Report 120
Generate a Report 121
Edit Policy Information 122
124
MMH foundations: 126
Staircase, Basement with Railing 127
Staircase, Basement, Wide with Railing 127
Example 1: 130
Example 2: 130
Example 3: 131
InterChange Scores 131
Levels of InterChange confidence scores 131
How to use InterChange confidence scores 131
Interactive Help 132
Contents Valuation 133
Refresh Roof Age 136
Add a Section 137
Page 6

RCT Express 4 Workspace and Task Reference Guide
MMH foundations: 140
Staircase, Basement with Railing 141
Staircase, Basement, Wide with Railing 141
Example 1: 144
Example 2: 144
Example 3: 145
Delete a Section 146
Add or Edit Materials 147
Search for definitions of materials or building features in the online help. 151
Add a feature or material 152
Add or edit from thematerials pane 153
Kitchen and BathWizard 157
Preview a Valuation 158
Download a Report 159
Email a Report 160
Copy a Valuation 161
Delete a Valuation 162
Add Attachments 163
Edit an Attachment 164
Delete an Attachment 165
Add Comments 166
Add Custom Items 167
Enter Markups and Adjustments 170
Additional Fields Settings 171
Page 7

RCT Express 4 Workspace and Task Reference Guide
Manage Additional Fields 172
Create Additional Fields 174
Edit Additional Fields 178
Additional Fields 182
Save a Valuation 183
How to Turn Off Internet Explorer Compatibility View 184
Option One: Using the Address bar 184
Note: Displaying the Tools menu in Internet Explorer 184
Option Two: Using the Tools menu 185
Option Three: Using Compatibility View Settings 186
Option Four: Using Developer Tools 188
Page 8

Chapter 1: Introduction to RCTRCT (Residential Component Technology®) Express is a web-based, hosted system used to cal-
culate a property’s reconstruction cost based upon the risk-specific features of the individual prop-
erty. Depending on system licenses, RCT may also provide address-specific information
regarding the property including square footage, year-built, number of stories, roof age, geo-
spatial hazard information, building permit data, and the ability to estimate the value of the prop-
erty’s contents.
If you want further information about CoreLogic or its products, you can visit us at ourwebsite.
CoreLogic also has an online Knowledge Center that contains property research and industry
knowledge information.
Page 1
RCT Express 4 Workspace and Task Reference Guide -

System Requirements
RCT system requirements:
l Browsers supported:
l Internet Explorer v9, 11, and Edge (Windows) Compatibility mode should not be
enabled.
l Chrome (Current version, Windows)
l Firefox (Current version, Windows)
l Safari (Current version, Windows)
l Browsersmust have Javascript turned on.
l Browsersmust have cookie support turned on.
l Browsers need to support the PDF viewer within the browser in order to view generated
reports.
l Minimum screen resolution: 1024 x 768
Note:We realize that you may be using various operating systems and Internet browsers
within your organization. Some of these Internet browsers not listed above maywork.
However, any browser not listed above has not been fully tested by CoreLogic.
How to enable Javascript in Internet Explorer:
1. In Internet Explorer select Internet Options from the Tools menu.2. Click the Security tab.3. ClickCustom level… in Security level for this zone.4. Scroll down to Scripting, near the bottom of the list.
5. UnderActive scripting, choose Enable.6. ClickOK to leave Security Settings. ClickOK to leave Internet Options.
How to enable cookie support in Internet Explorer:
1. Open Internet Explorer.
2. Click the Tools button, and then click Internet Options.3. Click the Privacy tab, and then, under Settings, move the slider toMedium (check with
your system administrator) and then clickOK.
Page 2
RCT Express 4 Workspace and Task Reference Guide - System Requirements

How to configure the PDF viewer in Adobe Acrobat:
1. Quit Internet Explorer.
2. Start Adobe Acrobat or Adobe Reader.
3. Choose Edit > Preferences in Acrobat or Reader.4. Select Internet in the list on the left.5. CheckDisplay PDF in Browser and clickOK.6. Restart Internet Explorer.
Note:When using IE do not use Compatibility
View. If you need to use Compatibility View for
other websites, edit your settings in IE under Tools
> Compatibility View Settings.
How to turn off Compatibility View in IE
If Internet Explorer is run in compatibility mode, then any of several functionsmay not work prop-
erly. Some of these functions work in some versions of IE while in Compatibility Mode, but not oth-
ers.
l The "Create Valuation" button on the dashboard may be disabled which prohibits creating
a new valuation.
l Material edits may not be saved. In other cases the materials cannot be edited.
l The panel which displays the Materials for the valuation may not appear.
l The layout of the web pages is visibly different. Some text areas are not aligned property
and some iconsmay not be displayed.
l Various error messagesmay appear indicating one of several JavaScript errors.
Page 3
RCT Express 4 Workspace and Task Reference Guide - System Requirements

Technical Support
If you have questions about or problemswith the system, first look in the online help for assist-
ance. If you still cannot solve your problem, contact the CoreLogic support desk:
l Voice: 800-809-0017
l Email: CoreLogic Support
The Help Desk is available Monday - Friday between 7 a.m. and 7 p.m. Central Time and on
Saturday and Sunday between 8 a.m. and 5 p.m. Central Time.
Before calling the support desk, please have the following information available:
l Internet browser type and version
l Is a pop-up blocker running on your system?
l An exact description of your question or problem, including what you were doing when the
problem occurred
l The exact text of any error messages
If you want further information about CoreLogic or its products, you can visit us at ourwebsite.
CoreLogic also has an online Knowledge Center that contains property research and industry
knowledge information.
Page 4
RCT Express 4 Workspace and Task Reference Guide - Technical Support

Chapter 2: The RCT WorkspaceThe RCT workspace provides easy access to the features you use to create and edit valuations.
Many features are available at multiple points in the system to help make your workflow easy and
efficient.
This section describes the RCT workspace and the features that you can use.
Select an item from the side menu on the right to view detailed descriptions.
For step-by-step procedures on all of the tasks in RCT see the "How to..." on page 102 section.
Page 5
RCT Express 4 Workspace and Task Reference Guide -

Dashboards
Different dashboard viewsmay be available depending on your configuration and permissions.
After logging in, your default dashboard will be displayed.
Custom dashboards display valuations delivered from different sources (ExpressLync, FIT, etc.)
and are customizable.
If you have access to different dashboards, you can switch between them by selecting the Dash-
boardsmenu and clicking the desired dashboard from the list.
Page 6
RCT Express 4 Workspace and Task Reference Guide - Dashboards

Dashboard, Main
Use the main dashboard to begin new valuations. You can also view a list of existing valuations,
search for valuations, preview valuation information, download reports, and more.
Area: Description:
1 Create New Valuation Use this field to create a new valuation.
2 Find Existing Valuation Use this field to find an existing valuation.
3 Valuation Panel This area lists all valuations or the results of any search.
The list may be filtered to easily locate specific valuations.
4 Shortcut icons This area has shortcut icons that you can use to display a
preview of the valuation information, download reports,
and email, copy, or delete a valuation.
5 Use Advanced Entry Check this box to use the Advanced Entry feature.
6 Condo/Co-op, Mobile-
Manufactured Home, and
Renters (Contents Only)
Use these check boxes if you are going to create a valu-
ation for a Condo/Co-op or Mobile-Manufactured home
style, or if you are going to create a renters (contents
only) valuation.
Page 7
RCT Express 4 Workspace and Task Reference Guide - Dashboards

Advanced Entry
The advanced entry method is especially designed to be used by field estimating and inspection
professionals assigned to evaluate truly unique mansion-grade homes. Advanced entry enables
field professionals to estimate even the most complex floor plans and designs including vertical or
horizontal sections, multiple level basements, garages with finished living area, servant’s quar-
ters, and guest houses. Additional features include:
l Section-specific material selection entry for highly detailed estimates
l Superstructure adjustments necessary for accurate high value structural costs
l Efficient material selection
l Extensive roof style, shape, and pitch adjustments
l Wings/sections can be defined as coverage A or B
l Garage-specific wall, foundation, and material finishes
l Basement adjustments including multiple story basements, depth, material and finishes,
walkout, and exposed wall options
l Location-specific data and calculations for site access, foundations, and materials
To use advanced entry select theAdvanced Entry check box on the "Dashboard, Main" on the
previous page.
Page 8
RCT Express 4 Workspace and Task Reference Guide - Dashboards

Valuation Page
The Valuation page consists of different panels that provide policy information, building inform-
ation, valuation totals, and information about materials.
Panel: Description:
1 Policy Information The Policy Information panel displays the address, insured's
name, effective date, and so forth for the policy. To edit the
information, click the Edit button.
2 Building Inform-
ation
The Building Information panel displays specific information
including the year built, construction type, and size of the
home. To edit the information, click the Edit button.
Page 9
RCT Express 4 Workspace and Task Reference Guide - Valuation Page

3 Valuation Totals The Valuation Totals panel displays a summary of the
replacement cost information calculated by RCT. For a
detailed view, click theMore Info link in the title bar of the
panel.
4 Materials TheMaterials panel is used to view and edit the building
materials.
5 AerialAssist™ Aerial images of the property may be available on this panel.
6 Property Imagery The Property Imagery panel displays exterior and interior
photos of the property.
7 RCT Alerts TheRCT Alerts slide-out panel provides decision making
information and validation errors and warnings.
8 Hazard Summary TheHazard Summary slide-out panel provides hazard
information for the property.
9 Permit Data The Permit Data slide out panel provides information on
building permits pulled for the property.
Page 10
RCT Express 4 Workspace and Task Reference Guide - Valuation Page
Policy Information
The Policy Information panel displays the address, insured's name, effective date, etc. for the
policy. To edit this information, click the Edit button.
Property Address
This is the address of the property being valued.
You can enter up to 30 characters.
Note: If the insured’s contact information is the same as the insured property address,
select the Same as Property Address check box. If the contact information is different,
do not select the check box and enter the contact address information into the fields that
are displayed.
Same as Property Address
Select this check box to copy the location information to the contact information. If the contact
information is different from the property location information, do not select this check box.
Policy Number
This is the policy identifier assigned to the valuation.
When creating a new valuation, an estimate number (for example, Estimate-1000) is auto-
matically filled in for you.
To enter the policy number click theAssign Policy Number icon ( ).
When entering the actual policy number, you can enter up to 30 characters. You can use symbols
like dashes, apostrophes, quotes, and so forth.
Note: The policy number is a required field and must be unique.
Insured's Full Name
This is the name of the owner of the residence being valued. You can later use the insured name
to locate the valuation when you want to open, view, or delete it.
Page 11
RCT Express 4 Workspace and Task Reference Guide - Valuation Page

You can enter up to 30 characters for each insured. If the policy has two insureds, you can enter
the second insured name in the Second Insured Full Name field.
Second Insured
If the policy has two insureds, you can enter the second insured name in theSecond Insured
Full Name field.
Estimate Expiration Date
This is the date the estimate will expire and be removed from the system if the estimate has not
been assigned a policy or record number. Typically this date is set to 90 days from the creation of
the valuation.
Click the Calendar icon ( ) to select the date from a calendar.
Effective Date
This is the date when the policy is put into effect.
Click theCalendar icon ( ) to select the date from a calendar.
Renewal Date
This is the date when the policy is up for renewal.
Click theCalendar icon ( ) to select the date from a calendar.
Current Coverage
This is the current coverage A amount for the policy.
l Coverage A (Dwelling) is the part of the dwelling policy that covers the dwelling and
attached additions (for example, screened porches and breezeways, attached garage, and
so on). Coverage A also covers the materials and supplies for the construction, alteration,
or repair of the residence.
Enter the current dollar amount (up to $999,999,999) of coverage A for the policy. This amount
prints in the body of the report. Note: Do not enter dollar signs or commas.
Account Number
This is the account number or identifier assigned to the policy.
Page 12
RCT Express 4 Workspace and Task Reference Guide - Valuation Page

You can enter up to 20 characters.
Longitude
Longitude is the exact angular distance East andWest for the geographical location of a property.
Enter a longitude that falls between -180 and 180, with a maximum of 10 numeric characters.
For example: -88.213382
Latitude
Latitude is the exact angular distance North and South for the geographical location of a property.
Enter a latitude that falls between -90 and 90, with a maximum of 10 numeric characters.
For example: 43.018375
Mailing Address
This is the insured’s address if different from the property being valued.
You can enter up to 30 characters. If the address requires two lines, use the field directly below
the Mailing Address field to enter the second line.
Mailing City
This is the insured’s city if different from the property being valued.
You can enter up to 30 characters.
Mailing State/Province
This is the insured’s state/province if different from the property being valued.
You can enter the state (province in Canada) of the insured by typing its two-character abbre-
viation.
Mailing ZIP/Postal Code
This is the insured’s ZIP/postal code if different from the property being valued.
For a U.S. address, you must enter a valid 5-digit ZIP code. For a Canadian address, you must
enter a valid 6-character alphanumeric Canadian postal code.
Page 13
RCT Express 4 Workspace and Task Reference Guide - Valuation Page

Phone Number
This is the insured's home phone number.
You can enter up to 12 characters.
Fax
Enter the fax number for the contact person.
Enter the email address for the contact person.
Page 14
RCT Express 4 Workspace and Task Reference Guide - Valuation Page

Building Information
The Building Information panel displays specific information about the year built, construction
type, and size of the home, and so on. To edit building information click the Edit button on the
Building Information pane.
Sections (if added) are also shown on the building information page. See "Add a Section"
Section Name
For the main home this defaults to "Main Home" and is not editable. If you add sections, each sec-
tion can have a unique name.
Number of Families
This is the number of family units (1 through 4 for the U.S. or 1 through 6 for Canada) in the res-
idence. The number of families (along with the ZIP/postal code, year built, style and home size) is
used in the cost calculations and to set the default material selections for the home.
Select the appropriate number of families from the drop-down list. The default is 1 family.
Site Access
Select the type of access available to the home’s location from the following choices:
l Flat Area/Easy Access Roads: Site accessibility is easy for people, equipment, and
materials to get to, in, and around the site. Accessibility for items such as a place for work-
ers to park their vehicles, a level area for unloading and storing materials, and the ability of
delivery trucks to get directly to the site is also relatively easy.
l Slightly Congested Road: Site accessibility may be slightly difficult for people, equip-
ment, and materials to get to, in, and around the site. Accessibility for items such as a
place for workers to park their vehiclesmay also be slightly difficult. There may be a
slightly unlevel area for the unloading and storage of materials and delivery trucksmay or
may not be able to get directly up to the site.
l Narrow Roads/Hillside Area: Site accessibility may be slightly difficult for people, equip-
ment, and materials to get to, in, and around the site. Accessibility for items such as a
place for workers to park their vehiclesmay also be slightly difficult. Due to site slope, stor-
Page 15
RCT Express 4 Workspace and Task Reference Guide - Valuation Page
age and unloading of materials requires accommodations not observed in level sites.
Materials and delivery trucksmay not be able to get directly to the site.
l Difficult Access/Steep Terrain: Site accessibility may be difficult for people, equip-
ment, and materials to get to, in, and around the site. Accessibility for items such as a
place for workers to park their vehiclesmay be difficult and delivery trucksmay have dif-
ficulty getting to the site. In some cases, materials may need to be unloaded into smaller
vehicles and delivered up to the site, then unloaded again. This condition is also found
with mountain construction.
l Mountain Region: Accounts for the building costs in mountain resort areas where costs
are high and site access is more challenging than standard conditions. These two factors
combined comprise the mountain region conditions, which accounts for the labor rates and
material costs reflecting the higher demand for labor and material in addition to added chal-
lenges involved in material delivery in these areas.
Note: If a mountain region home is built on a hillside, you should enter an appropriate hill-
side foundation percentage on the Building Information dialog, and enter a hillside slope
using the drop-down list.
l Island Access/Short Distance (1 mile or less): Site accessibility is not possible for
people, equipment, and materials without the use of boat, ferry or work barge (one mile or
less). Islands not connected to a mainland by bridges, tunnels or roads are difficult to
access and will increase the construction cost.
l Island Access/Long Distance (1 mile or more): Site accessibility is not possible for
people, equipment, and materials without the use of boat, ferry or work barge (one mile or
more). Islands not connected to a mainland by bridges, tunnels or roads are difficult to
access and will increase the construction cost.
l Elevator Access: Site accessibility for condos, apartments, and co-op units is made
through elevator access. To get people, equipment, and materials to, in, and around the
site, elevatorsmust be used. Delivery trucksmust be unloaded and materials must be
loaded and then unloaded from the elevator. The additional labor must be taken into
account when dealing with elevator access.
l Isolated Rural Area: People, equipment, and materials are not locally available. Remote
sites are difficult to access and will increase the construction cost.
Page 16
RCT Express 4 Workspace and Task Reference Guide - Valuation Page

Year Built
Enter the year this section of the residence was built, using a full four-digit year between 1799 and
the current year plus 1 (for example, if the current year is 2015, you can enter 2016).
Note: If the year built is before 1940, you must also select Construction Type (Standard, Vintage,
or Standard/Vintage combo).
Roof Age
Roof age data is provided by RCT or may be user entered. The roof age is displayed in the Build-
ing Information pane on the valuation screen and on the Edit Building Information dialog. When a
valuation is created RCT will provide the roof age and the roof age confidence score. This requires
a complete address and the year built information.
You maymanually enter the roof age on the Edit Building Information dialog. If the roof age is
manually entered, the roof age confidence score does not display.
The roof age and confidence score may be updated by selectingOptions > Refresh Roof Age
on the valuation screen.
Roof age and roof age confidence score are displayed on the Standard and Detailed reports.
Roof Age Confidence Score
Roof age lookups are address-specific lookups that return both a roof age and a roof age con-
fidence score. The confidence score is a calculated score (low, medium, high, or modeled) used
to indicate the confidence in the roof age that is being provided. Confidence levels are determined
by the presence or absence of a roof permit or the greater of year built/permit coverage start date
within a jurisdiction and the level of rigor of the jurisdiction that enforces roof permits.
The roof age confidence score is displayed on the Edit Building Information dialog.
The roof age and confidence score may be updated by selectingOptions > Refresh Roof Age
on the valuation screen.
Roof age and roof age confidence score are displayed on the Standard and Detailed reports.
Overall Score
The Overall Score is a confidence interval score measuring levels of accuracy for the InterChange
Page 17
RCT Express 4 Workspace and Task Reference Guide - Valuation Page

data for a given property record compared to a baseline set of data. The overall score is for the
property record in its entirety. The confidence score is available for the main home only and only
for U.S. addresses.
Administrators are able to set a threshold for the score. If the score is less than the defined
threshold, an alert will be displayed on theRCT Alerts panel. The alert message will display
"Verify with the home owner the pre-populated data in the valuation."
The score will indicate a confidence interval score of low, medium,or high.
Total Living Area Score
The Total Living Area Score is a confidence interval score measuring levels of accuracy for the
InterChange data for a given property record compared to a baseline set of data. The total living
area score is for the total living area value of the property record. The confidence score is avail-
able for the main home only and only for U.S. addresses.
Administrators are able to set a threshold for the score. If the score is less than the defined
threshold, an alert will be displayed on theRCT Alerts panel. The alert message will display
"Verify with the home owner the pre-populated data in the valuation."
If a user changes the total living area on the Edit Building Information screen, the total living area
score will no longer appear.
The score will indicate a confidence interval score of low, medium,or high.
Year Built Score
The Year Built Score is a confidence interval score measuring levels of accuracy for the Inter-
Change data for a given property record compared to a baseline set of data. The year built score
is for the year built value in the property record. The confidence score is available for the main
home only and only for U.S. addresses.
Administrators are able to set a threshold for the score. If the score is less than the defined
threshold, an alert will be displayed on theRCT Alerts panel. The alert message will display
"Verify with the home owner the pre-populated data in the valuation."
If a user changes the year built value in the Edit Building Information screen, the year built score
will no longer appear.
Page 18
RCT Express 4 Workspace and Task Reference Guide - Valuation Page

The score will indicate a confidence interval score of low, medium,or high.
Number of Stories Score
The Number of Stories Score is a confidence interval score measuring levels of accuracy for the
InterChange data for a given property record compared to a baseline set of data. The number of
stories score is for the number of stories value in the property record. The confidence score is avail-
able for the main home only and only for U.S. addresses.
Administrators are able to set a threshold for the score. If the score is less than the defined
threshold, an alert will be displayed on theRCT Alerts panel. The alert message will display
"Verify with the home owner the pre-populated data in the valuation."
If a user changes the number of stories on the Edit Building Information screen, the number of
stories score will no longer be displayed.
The score will indicate a confidence interval score of low, medium,or high.
Construction Type
To select the construction type for each section of the home, click the drop-down arrow and select
the appropriate option from the following choices:
l Standard: This option calculates replacement cost using modern construction techniques
and materials.
l Vintage: Available for homes built before 1940, this option calculates reproduction cost
using the type of building options for homes built before 1940.
l Standard/Vintage: Available for homes built before 1940, this calculates the cost using
modern (standard) construction techniques, but loads the appropriate pre-1940 or pre-
1930 material selection assumptions. This choice is only available on systemswith a cus-
tom configuration.
Characteristics for each of the construction types are listed below.
Standard Construction Type: (Homes built from
1940 to present)
Ceiling Height 8 feet
Page 19
RCT Express 4 Workspace and Task Reference Guide - Valuation Page

Wall Framing2" x 4" standard
wood
Roof Framing Standard wood
Sheathing (walls and roof) Plywood, 4' x 8'
Interior Walls and Ceiling Sheetrock
Other featuresSoftwood interior
stairs
Vintage Construction Type: (Homes built in 1939 and
earlier)
Ceiling Height 10 feet
Wall Framing Rough lumber
Roof Framing Rough lumber
Sheathing (walls and roof)Tongue and
groove
Interior Walls and Ceiling
Wood lath,
gypsum plaster,
hardwood crown
and base molding
Other featuresHardwood interior
stairs
Standard/Vintage Combination Construction Type:
Ceiling Height 8 feet
Wall Framing2" x 4" standard
wood
Roof Framing Standard wood
Page 20
RCT Express 4 Workspace and Task Reference Guide - Valuation Page

Sheathing (walls and roof) Plywood, 4' x 8'
Interior Walls and CeilingWood lath,
gypsum plaster
Other featuresSoftwood interior
stairs
The Standard/Vintage Combo construction type option in RCT combines the standard con-
struction type engineering and structural framing specifications with the vintage interior finish
material characteristics of the vintage construction type. For example:
l Standard construction type specifications would account for the structural framing, interior
wall framing, floor and ceiling framing, exterior wall and roof framing, wall height and par-
tition density.
l Vintage construction type specifications would include the partition wall materials, wall fin-
ish materials, ceiling material with finishes and floor finish materials.
Note: This option is not available in the Advanced Entry Method.
Number of Stories
This is the total number of stories for the home.
Enter the number of floors above ground. You can change the number of stories for some styles,
in which case theNumber of Stories field is enabled. For other styles, the number of stories can-
not be changed, so the field remains disabled.
Note: For styles such as bi-level, tri-level, split level and raised ranch, the number of stories will
automatically be set during calculation.
If there is a fraction of a story, enter it as a decimal, not as a fraction (for a 1-1/2 story home enter
1.5, not 1 1/2). For a Cape Cod with an upper floor smaller than the first floor, enter 1.5 or 1.75,
depending on the amount of finished area on the upper floor.
Finished Living Area
Finished living area is the total finished floor area of the main home or section. Do not include any
Page 21
RCT Express 4 Workspace and Task Reference Guide - Valuation Page

built-in garage area and any finished basement area, or bi-level unfinished lower level area. Fin-
ished living area is used to calculate the total living area. Finished living area is entered indi-
vidually for the main home and for each section or wing that may be added.
Example 1:
If you have a 2,400 sq. ft. 2-story home with no built-in garage and no unfinished lower level area
(home is not a Bi-level, Raised Ranch or Split-Foyer), you have 2,400 sq. ft. of finished living
area.
2,400 sq. ft. total living area minus 0 sq. ft. built-in garage, minus 0 sq. ft. of lower level unfin-
ished area equals 2,400 sq. ft. of finished living area.
Example 2:
If you have a 2,400 sq. ft. Bi-level home with a 400 sq. ft. built-in garage, you have 2,000 sq. ft. of
finished living area.
2,400 sq. ft. total living area minus 400 sq. ft. built-in garage equals 2,000 sq. ft. of finished living
area.
Example 3:
If you have a 2,400 sq. ft. Bi-level home with 420 sq. ft. unfinished lower level (35% unfinished
lower level), you have 1,980 sq. ft. of finished living area.
1200 sq. ft per level, so 1,200 minus 420 sq. ft. of lower level unfinished equals 780 sq. ft. of
lower level finished.
1,200 sq. ft. upper level total living area plus 780 sq. ft. of lower level total living area (finished),
equals 1,980 sq. ft. of finished living area finished living area.
Example 4:
If you have a 2,400 sq. ft. Bi-level home with a 400 sq. ft. built-in garage and 400 sq. ft. of unfin-
ished lower level (50% unfinished lower level), you have 1,600 sq. ft. of finished living area.
1200 sq. ft per level, so 1,200 minus 400 sq. ft. built-in garage = 800 sq. ft. of lower level. 800 sq.
ft. of lower level times 50% unfinished lower level = 400 sq. ft. of lower level unfinished area and
400 sq. ft. of lower level finished area.
Page 22
RCT Express 4 Workspace and Task Reference Guide - Valuation Page

1,200 sq. ft. upper level total living area plus 400 sq. ft. of lower level total living area (finished),
equals 1,600 sq. ft. of finished living area finished living area.
Calculated Total Living Area
The calculated total living area is calculated by the system based on the Finished Living Area you
entered. If you add a built-in garage the system will automatically adjust the Total Living Area
appropriately.
Foundation Type
The available foundation types are listed below. Click a graphic or the name beneath a graphic to
go to a full page description.
Note: If the foundation type is basement, (below grade, daylight, and walkout), make sure that all
of the following data fields are also included:
l Foundation Materials
l Basement Depth
l Number of Basement Levels
l Staircase, Basement
Enter the total percentage of each foundation type found in the home.
Basement, Day-
light
Crawl Space, Excav-
ated
Piers
Basement, Below
Grade
Crawl Space, Unex-
cavated
Slab at Grade
Page 23
RCT Express 4 Workspace and Task Reference Guide - Valuation Page

Basement,
Walkout
Hillside
MMH foundations:
Post and Pier Foundation, MMH
Foundation Materials
The available choices for foundation materials are listed below.
Enter the total percentage of each foundation material used in the home.
Block Fieldstone
Brick Steel
Concrete Wood, Treated
Basement Stairs
Staircase, Basement with Railing
A 3' wide, floating metal staircase with oak treads and single oak handrail with scroll spindles.
Note: If the foundation type is basement, (below grade, daylight, andwalkout), make sure that
all of the following data fields in the Basement Information section are also included:
l Basement Depth
l Number of Basement Levels
l Staircase, Basement
Included in Cost: Center stringer, base plate, top support plate, oak treads, oak handrail with
scroll spindles, and installation labor. Oak handrail and treads receive 2 coats of clear varnish and
preprimed metal parts receive 1 coat of metal paint.
Enter the total number of flights (staircases) of basement staircases found in the home. A max-
imum entry of 10 is allowed.
Page 24
RCT Express 4 Workspace and Task Reference Guide - Valuation Page

Staircase, Basement, Wide with Railing
A 4' wide, floating metal staircase with oak treads and single oak handrail with scroll spindles.
Note: If the foundation type is basement, (below grade, daylight, andwalkout), make sure that
all of the following data fields in the Basement Information section are also included:
l Basement Depth
l Number of Basement Levels
l Staircase, Basement
Included in Cost: Center stringer, base plate, top support plate, oak treads, oak handrail with
scroll spindles, and installation labor. Oak handrail and treads receive 2 coats of clear varnish and
pre-primed metal parts receive 1 coat of metal paint.
Enter the total number of flights (staircases) of wide basement staircases found in the home. A
maximum entry of 20 is allowed.
Number of Basement Levels
The number of basement levels or basement stories in the home.
Note: If the foundation type is basement, (below grade, daylight, andwalkout), make sure that
all of the following data fields in the Basement Information section are also included:
l Basement Depth
l Number of Basement Levels
l Staircase, Basement
Enter the total number of basement levels or stories found in the home. A maximum entry of 2 is
allowed.
Basement Depth
A perpendicular measurement downward from the grade level to the basement floor. Also
referred to as basement floor story height or floor-to-floor height.
Note: If the foundation type is basement, (below grade, daylight, andwalkout), make sure that
all of the following data fields under the Basement Information section are also included:
Page 25
RCT Express 4 Workspace and Task Reference Guide - Valuation Page

l Basement Depth
l Number of Basement Levels
l Staircase, Basement
Enter the total number of feet between 7 and 20.
Basement Finish
Listed below is a comparison of the finish and construction details in basement finishes.
Standard Finish Custom Finish
Drywall installed around the
perimeter, over the insu-
lation
Drywall installed around the
perimeter, over the insu-
lation
Interior drywall partitions Ample interior drywall par-
titions
Hollow core doors Solid core doors
Painted drywall wall finishes Partial millwork paneling
and painted drywall wall fin-
ishes
Painted drywall ceiling Painted drywall ceiling and
linear wood ceiling
Carpet and vinyl tile floor fin-
ishes
High quality carpet floor fin-
ish
Standard electrical outlets
and lighting
Ample electrical outlets and
lighting
Standard heating system Heating and air conditioning
system
% Lower Level Unfinished
This is the total percentage of the residence that has an unfinished lower level (lowest level). This
applies to bi-level, split-foyer and raised ranch styles.
Page 26
RCT Express 4 Workspace and Task Reference Guide - Valuation Page

Note: Do not include built-in garage area when calculating the percentage of the lower level that
is unfinished.
How to enter the percentage lower level unfinished:
1. On the Edit Building Information panel, make sure the Home Style is set to either a bi-
level, split foyer, or raised ranch style. The% lower level unfinished field appears once one
of those home styles is selected.
2. Click the link to show the % Lower Level Unfinished section.
3. Enter the percentage of the residence that has an unfinished lower level.
4. ClickSave.
Example 1:
If you have a 2,400 sq. ft. bi-level home with a 400 sq. ft. built-in garage and 800 sq. ft. of unfin-
ished lower level, you have 100% lower level unfinished.
1,200 sq. ft. per level, so 1,200 – 400 sq. ft. built-in garage = 800 sq. ft. of lower level area, and all
is unfinished, so 100% is unfinished.
Page 27
RCT Express 4 Workspace and Task Reference Guide - Valuation Page

Example 2:
If you have a 2,400 sq. ft. bi-level home with a 400 sq. ft. built-in garage and 400 sq. ft. of unfin-
ished lower level, you have 50% lower level unfinished.
1,200 sq. ft. per level, so 1,200 – 400 sq. ft. built-in garage = 800 sq. ft. of lower level area – 400
sq. ft. of unfinished lower level = 400 sq. ft. of finished area = 50% unfinished lower level area.
Example 3:
If you have a 2,400 sq. ft. bi-level home with a 400 sq. ft. built-in garage and 0 sq. ft. of unfinished
lower level, you have 0% lower level unfinished.
1,200 sq. ft. per level, so 1,200 – 400 sq. ft. built-in garage = 800 sq. ft. of lower level area – 0 sq.
ft. of unfinished lower level = 800 sq. ft. of finished area = 0% unfinished lower level area.
Enter the percentage of the lower level of the home that is unfinished.
Wall Height
The vertical distance from the finished floor surface to the ceiling above it. This is also known as
floor-to-ceiling height. Enter the percentage of the home (or section of the home if it has wings or
is sectioned) that are between 7’ and 40’ high walls.
Note: Measuring from the top of a finished floor to the ceiling above it, will give you the wall
height or floor-to-ceiling height. RCT automatically accounts for the joist area (joist height/di-
mensions) to set the story height or floor-to-floor height, which will get the exterior wall size and
area correct.
First you must enter the percentage of the home that the wall height applies to, and then enter
the actual wall height in feet between 7.0 and 40.0. The total percentagesmust equal 100%.
Example: If the home is a 2-story, 2000 square feet, and the first floor wall height or floor-to-ceil-
ing height of the home is 10’ high and the second floor is 8’ high, the entries would be:
Page 28
RCT Express 4 Workspace and Task Reference Guide - Valuation Page

Example: In a 2000 square foot home, 500 square feet (25%) is a great room with a 16 foot ceil-
ing (not a cathedral ceiling) and the remaining 1500 square feet (75%) has a 10 foot ceiling. In the
Wall Height fields enter 25% for the 16 foot portion, and 75% for the 10 foot portion.
Note: The total of all wall height percentages should equal 100%.
Perimeter
Use this option to enter the perimeter or select the shape of the home.
Using the option buttons, click a perimeter option then either select the applicable shape or enter
a linear footage. The options are:
l Calculate Using Shape: Select this option if you want the system to automatically cal-
culate the perimeter based upon the shape of the home or section, then select one of the
following shapes.
l Measured Perimeter:Select this option if you want to enter the actual perimeter of the
home (or the section) then type the ground floor perimeter (in linear feet) in the perimeter
field.
l When using Measured Perimeter It is important to account for the perimeter of the home
when you are breaking the home into Main Home andWings to ensure that any shared
walls between the main home and the wing are not counted twice Always account for all
the walls of the perimeter of the main home and only the additional walls of the wing.
Square Rectangular Slightly Irregular
Page 29
RCT Express 4 Workspace and Task Reference Guide - Valuation Page

Irregular Very Irregular
Section Type (if Advanced Entry is selected)
In addition to being able to divide the home into the main home and one or more sections, you
can also specify the section type (for example, whole house, vertical or horizontal, basement, gar-
age, and so on). By using the horizontal section choices, you can identify whether or not a section
includes the ground floor of the building (this means that the foundation, roof area, and perimeter
can be calculated based upon the ground floor area of the specific section).
Example: For a 3 story house with a horizontal section for each floor, enter the following section
types:
Main Home: Horizontal Ground Floor
Section 1 (Second Floor): Horizontal Upper Floor
Section 2 (Third Floor): Horizontal Upper Floor
Use the drop-down list to select the applicable section type option. Note: This option is only avail-
able in the Advanced Entry method.
Coverage Type (if Advanced Entry is selected)
For individual sections, you can specify whether the cost for that section is part of coverage A or
coverage B in the policy.
l Coverage A (dwelling) is the part of the dwelling policy that covers the dwelling and
attached additions (for example, screened porches and breezeways, attached garage,
etc.). Coverage A also covers the materials and supplies for the construction, alteration, or
repair of the residence.
l Coverage B (other structures) is the part of the dwelling policy that covers unattached struc-
tures like private garage or a tool shed.
Page 30
RCT Express 4 Workspace and Task Reference Guide - Valuation Page

When applicable, use the drop-down list to select a coverage option.
Page 31
RCT Express 4 Workspace and Task Reference Guide - Valuation Page

Valuation Totals
The Valuation Totals panel displays a summary of the replacement cost information calculation
and, if configured, the contents valuation.
For a detailed view click theMore Info link.
If you have made changes click the button to refresh the valuation totals.
The Calculate button does not appear unless changes have been made and the information
needs to be re-calculated.
Page 32
RCT Express 4 Workspace and Task Reference Guide - Valuation Page

Materials
Use the materials panel to add or edit building materials and features for the valuation.
Materials are grouped by interior and exterior and are listed under subcategories such as Exterior
Walls, Ceilings, and so on. (These groupsmay be customized for individual users. The online help
shows the default arrangement).
Note:Wings (sections) display on the Building Information page since all foundation
materials are included on that page.
Adding or editing materials:
Materials may be added or edited in a number of different ways. See the "Add or Edit Materials" on
page 147 topic for step-by-step procedures or click theHelp link on the materials panel.
Note:When using Advanced Entry there are no defaulted materials. All materials must
be added manually for the home being valued.
To save space on the screen somematerial sections are collapsed. For example:
Page 33
RCT Express 4 Workspace and Task Reference Guide - Materials

The number in parentheses indicates howmanymaterials exist in that section. Click the blue
arrow to expand the section. For example:
If you edit the materials the valuation data is changed so theCalculate button appears in the
"Valuation Totals" on page 32 pane. After you add or edit materials, click theCalculate button to
refresh the replacement cost.
Page 34
RCT Express 4 Workspace and Task Reference Guide - Materials
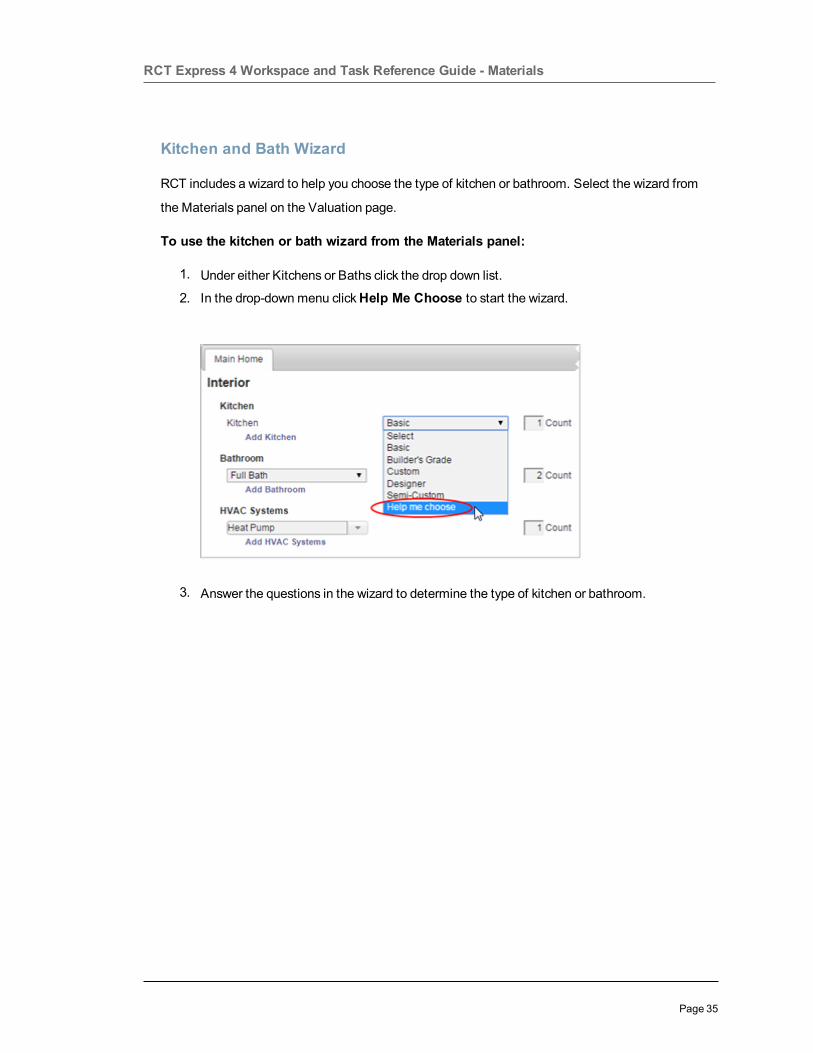
Kitchen and Bath Wizard
RCT includes a wizard to help you choose the type of kitchen or bathroom. Select the wizard from
the Materials panel on the Valuation page.
To use the kitchen or bath wizard from the Materials panel:
1. Under either Kitchens or Baths click the drop down list.
2. In the drop-downmenu clickHelp Me Choose to start the wizard.
3. Answer the questions in the wizard to determine the type of kitchen or bathroom.
Page 35
RCT Express 4 Workspace and Task Reference Guide - Materials

Options
On the valuation screen, use the selections on the optionsmenu to add various items. Select an
item from the side menu on the right to view a description of each item.
An asterisk appears next to the Optionsmenu when information has been added to one of the
optional features. Display the Optionsmenu to see which feature has information. A number in
parenthesis indicates howmany items have been added to each option. An asterisk ( * ) indicates
that the optional feature has data.
Example: A change to markups and adjustments has been performed for this valuation.
Page 36
RCT Express 4 Workspace and Task Reference Guide - Options

Attachments
You can add items such as photos, legal documents, and architectural drawings to the valuation.
You can include the following file types:
l Graphics (.bmp, .gif, .jpg, .png)
l Portable Document Format (PDF)
l Microsoft Word (.doc, .docx)
l Microsoft Excel (.xls)
Attachment Name
The attachment name is the file name and path for the attachment you select.
You can type the attachment name in the field or use theBrowse button to locate the file.
Caption
Enter a caption for each attachment that you add. This field is optional.
Notes
Add any notes to an attachment in this field. This field is optional.
Page 37
RCT Express 4 Workspace and Task Reference Guide - Options

Comments
You can add comments to a valuation that appear in the header of the report. There are two types
of comments. You can enter one comment of each type.
Note: Permission to view or edit comments is based upon the user role defined by your
administrator.
Agent Comment
Remarks entered as an agent comment appear on the standard, detail, and data entry reports.
Depending on your defined role (set by the Administrator) you may or may not be able to add or
edit this comment.
Each valuation is limited to one agent comment which may contain a maximum of 511 char-
acters.
Underwriter Comment
Remarks entered as an underwriter comment appear on the standard, detail, and data entry
reports. Depending on your defined role (set by the Administrator) you may or may not be able to
add or edit this comment. Each valuation is limited to one underwriter comment which may con-
tain a maximum of 511 characters.
Page 38
RCT Express 4 Workspace and Task Reference Guide - Options

Contents Valuation
A contents value estimate is created from theContents Valuation dialog.
To create a contents valuation:
1. From the valuation screen, select Options > Contents Valuation to open the dialog.2. Enter the location and head of household information. Some information such as the
address, type of home, finished living area, and namemay come from the building inform-
ation if it exists in the valuation already. If the address and finished living area is pre-pop-
ulated from the valuation, that information cannot be edited on this dialog. You can edit
type of home and name on this dialog and the valuation will be updated when Save is
clicked.
Required fields are indicated with a red asterisk ( * ). Household incomemay or may not be
required depending on your configuration settings. The household income field may not
appear on this dialog if it is not enabled.
3. Enter additional occupants by clickingAdd Another Occupant and entering the inform-
ation. You can add up to 5 additional occupants.
Page 39
RCT Express 4 Workspace and Task Reference Guide - Options

4. Enter the optional information by selecting all the items that apply.
5. ClickSave. The contents value estimate will be calculated and the dialog will close.
Note:When adding additional occupants enter a range for age between 1 and 150. For
infants under one year of age, use 1 year.
The Valuation Totals pane will display the estimated contents value.
Example:
ClickMore Info on the Valuation Totals pane to display details of the valuation totals including
the contents estimate, broken down by inventory category.
Example:
Page 40
RCT Express 4 Workspace and Task Reference Guide - Options

The contents estimate results will be displayed in the Standard, Detail, and Home Owner reports.
Page 41
RCT Express 4 Workspace and Task Reference Guide - Options

Custom Items
Use the Custom Items dialog to add materials and costs found in the home that are not available
within the program.
You can add a custom item whenever you enter or edit valuation data.
Custom items appear on the Standard, Detailed, Data Entry, and Homeowners reports.
Page 42
RCT Express 4 Workspace and Task Reference Guide - Options

Markup and Adjustments
Use this feature to make adjustments to user adjustment factors, depreciation, and cost exclu-
sions (where applicable).
Select an item from the side menu to view detailed information about each feature.
Adjustment Factor
Enter an adjustment factor to increase or decrease all costs in the valuation.
Enter a percentage between –99% and 99%. The factor can be expressed as a positive or neg-
ative percentage. For example: To increase all costs by 4 1/2%, enter 4.5 in the adjustment factor
field.
Depreciation Factor
You can depreciate a valuation either by specifying an effective age or a total percentage.
Note: The depreciation will apply to both the home and attached structures.
To depreciate by a total percentage, enter a value between 0 and 100. For example, to depreciate
costs by 12 1/2%, enter 12.5 in the Depreciation Percentage field.
Condition, Effective Age, and Depreciation Percentage
Depreciation is a lessening in value or worth of a residence caused by wear and tear from use,
structural defects, building service deficiencies, and exposure to elements.
Two items are taken into account when determining normal depreciation, Condition and Effective
Age.
Condition
The following conditions consider the desirability and usefulness of a residence.
l Satisfactory +: The residence is in perfect, like new condition. It is extremely attractive,
highly desirable, and very well maintained with no evidence of physical deterioration. Its
building services are modern, proper, and adequate.
Page 43
RCT Express 4 Workspace and Task Reference Guide - Options

l Satisfactory:Although not new, the residence is quite attractive and desirable. It has
been well maintained, however, someminor deterioration is visible. Its building services
are proper and adequate. Most insurable residences can be considered satisfactory.
l Satisfactory -: The residence is showing signs of normal wear and tear due to both cli-
mate and deferred maintenance. It is still attractive, desirable, and its building services are
functional.
Effective Age
Effective age is the number or years of apparent age, sometimes determined by deducting the
estimated remaining life from normal life. Remodeling or renovation can reduce the effective age.
Actual age is the number of years between the date the residence was built and the present date.
The effective age, not the actual age, is used in conjunction with the condition to estimate an
appropriate amount of depreciation.
Depreciation Percentage
Effective Age in Years Condition and Typical Life Expectancy in Years
Satisfactory +
60 Years
Satisfactory
55 Years
Satisfactory –
50 Years
1 0% 1% 1%
2 1% 2% 2%
3 2% 2% 3%
4 3% 3% 4%
5 4% 4% 5%
6 4% 5% 6%
7 5% 6% 7%
8 6% 7% 8%
9 7% 8% 10%
10 8% 9% 11%
11 9% 10% 12%
12 10% 11% 13%
Page 44
RCT Express 4 Workspace and Task Reference Guide - Options

13 11% 12% 15%
14 12% 13% 16%
15 12% 15% 17%
16 13% 16% 19%
17 15% 17% 20%
18 16% 19% 22%
19 17% 20% 24%
20 18% 21% 25%
21 19% 22% 26%
22 20% 23% 28%
23 21% 24% 29%
24 23% 26% 31%
25 24% 27% 33%
26 25% 29% 35%
27 26% 31% 37%
28 28% 33% 39%
29 29% 34% 41%
30 31% 36% 44%
31 32% 38% 46%
32 34% 40% 47%
33 35% 42% 49%
34 37% 44% 51%
35 38% 45% 53%
36 40% 47% 55%
37 41% 49% 57%
38 43% 51% 59%
39 45% 53% 61%
Page 45
RCT Express 4 Workspace and Task Reference Guide - Options

40 47% 55% 63%
41 49% 57% 64%
42 51% 59% 66%
43 52% 60% 67%
44 54% 62% 69%
45 55% 63% 70%
46 57% 65% 72%
47 59% 66% 73%
48 61% 68% 75%
49 62% 69% 76%
50 64% 71% 77%
51 65% 72% 78%
52 66% 73% 78%
53 68% 75% 79%
54 69% 76% 79%
55 70% 77% 80%
56 71% 78%
57 72% 78%
58 72% 79%
59 73% 79%
60 74% 80%
61 75%
62 76%
63 76%
64 77%
65 78%
70 80%
75
Page 46
RCT Express 4 Workspace and Task Reference Guide - Options

Options
Depreciation Table, Mobile-Manufactured Housing - Historical
Historical depreciation estimates the value of the home if it were to be replaced with a home found on the
open market. The concept behind historical depreciation is based upon the principle that a willing buyer
would not paymore for a home than what it would have cost originally. This would be true of homes that
are new or 10 years old.
Year Built Single-Wide Multi-Wide
2018 1.00 1.00
2017 1.00 1.00
2016 1.00 1.00
2015 0.97 0.93
2014 0.95 0.87
2013 0.92 0.82
2012 0.90 0.81
2011 0.90 0.78
2010 0.87 0.75
2009 0.85 0.73
2008 0.83 0.70
2007 0.80 0.68
2006 0.77 0.65
2005 0.70 0.61
2004 0.65 0.58
2003 0.61 0.54
2002 0.59 0.54
2001 0.59 0.54
2000 0.58 0.52
1999 0.55 0.49
1998 0.55 0.47
1997 0.53 0.45
47

Chapter 2: The RCTWorkspace
1996 0.53 0.44
1995 0.53 0.44
1994 0.52 0.44
1993 0.51 0.42
1992 0.50 0.42
1991 0.47 0.42
1990 0.47 0.42
1989 0.47 0.42
1988 0.47 0.42
1987 0.47 0.42
1986 0.47 0.42
1985 0.47 0.42
1984 0.47 0.42
1983 0.47 0.42
1982 0.47 0.42
1981 0.47 0.42
1980 0.47 0.42
1979 0.47 0.42
1978 0.47 0.42
1977 0.47 0.42
1976 0.47 0.42
1975 0.47 0.42
1974 0.47 0.42
1973 0.47 0.42
1972 0.47 0.42
1971 0.47 0.42
1970 0.47 0.42
1969 0.47 0.42
1968 0.47 0.42
Page 48

Options
1967 0.47 0.42
1966 0.47 0.42
1965 0.47 0.42
1964 0.47 0.42
1963 0.47 0.42
1962 0.47 0.42
1961 0.47 0.42
1960 0.47 0.42
1959 0.47 0.42
1958 0.47 0.42
1957 0.47 0.42
1956 0.47 0.42
1955 0.47 0.42
1954 0.47 0.42
1953 0.47 0.42
1952 0.47 0.42
1951 0.47 0.42
1950 0.47 0.42
Depreciation Table, Mobile-Manufactured Housing - Physical
Depreciation is a lessening in value or worth of a mobile-manufactured housing unit caused by wear and
tear from use, structural defects, building service deficiencies, and exposure to elements.
Two items are taken into account when determining normal depreciation: Condition and Effective Age.
Condition
The condition factors consider the desirability and usefulness of a mobile-manufactured housing unit:
l Satisfactory+: The mobile-manufactured housing unit is in perfect, like new condition. It is
extremely attractive, highly desirable, and very well maintained with no evidence of physical deteri-
oration. Its building services are modern, proper, and adequate.
49

Chapter 2: The RCTWorkspace
l Satisfactory: Although not new, the mobile-manufactured housing unit is quite attractive and desir-
able. It has been well maintained, however, someminor deterioration is visible. Its building services
are proper and adequate. Most insurable mobile-manufactured housing units can be considered sat-
isfactory.
l Satisfactory-: The mobile-manufactured housing unit is showing signs of normal wear and tear due
to both climate and deferred maintenance. It is still attractive, desirable, and its building services are
functional.
Effective Age
Effective age is the number or years of apparent age, sometimes determined by deducting the estimated
remaining life from normal life. Remodeling or renovation can reduce the effective age. Actual age is the
number of years between the date the mobile-manufactured housing unit was built and the present date.
The effective age, not the actual age, is used in conjunction with the condition to estimate an appropriate
amount of depreciation.
Mobile-Manufactured Housing – Single Wide Depreciation Table
Condition
Effective Age Satisfactory + Satisfactory Satisfactory -
1 1% 2% 3%
2 2% 4% 5%
3 3% 6% 8%
4 4% 7% 10%
5 6% 8% 12%
6 7% 9% 14%
7 8% 10% 15%
8 10% 12% 17%
9 11% 14% 19%
10 13% 16% 21%
11 14% 18% 22%
12 15% 20% 24%
13 17% 22% 26%
14 19% 24% 29%
Page 50

Options
15 21% 26% 32%
16 23% 28% 34%
17 25% 30% 37%
18 27% 32% 40%
19 28% 34% 43%
20 30% 37% 45%
21 32% 39% 48%
22 34% 42% 51%
23 36% 44% 54%
24 38% 47% 57%
25 40% 50% 60%
26 43% 52% 62%
27 45% 55% 65%
28 47% 57% 68%
29 49% 59% 70%
30 52% 62% 71%
31 54% 64% 72%
32 56% 67% 74%
33 58% 69% 75%
34 60% 71% 77%
35 62% 72% 78%
36 65% 74% 79%
37 67% 75% 79%
38 69% 77% 80%
39 70% 78%
40 72% 79%
41 73% 79%
42 75% 80%
43 76%
44 77%
51

Chapter 2: The RCTWorkspace
45 78%
46 79%
47 79%
48 80%
Mobile-Manufactured Housing – Multi-Wide Depreciation Table
Condition
Effective Age Satisfactory + Satisfactory Satisfactory -
1 1% 1% 1%
2 2% 2% 2%
3 2% 3% 3%
4 3% 4% 4%
5 4% 5% 6%
6 5% 6% 7%
7 6% 7% 8%
8 7% 8% 10%
9 8% 10% 11%
10 9% 11% 13%
11 10% 12% 14%
12 11% 13% 15%
13 12% 15% 17%
14 13% 16% 19%
15 15% 17% 21%
16 16% 19% 23%
17 17% 20% 25%
18 19% 22% 27%
19 20% 24% 28%
20 21% 25% 30%
21 22% 26% 32%
22 23% 28% 34%
Page 52

Options
23 24% 29% 36%
24 26% 31% 38%
25 27% 33% 40%
26 29% 35% 43%
27 31% 37% 45%
28 33% 39% 47%
29 34% 41% 49%
30 36% 44% 52%
31 38% 46% 54%
32 40% 47% 56%
33 42% 49% 58%
34 44% 51% 60%
35 45% 53% 62%
36 47% 55% 65%
37 49% 57% 67%
38 51% 59% 69%
39 53% 61% 70%
40 55% 63% 72%
41 57% 64% 73%
42 59% 66% 75%
43 60% 67% 76%
44 62% 69% 77%
45 63% 70% 78%
46 65% 72% 79%
47 66% 73% 79%
48 68% 75% 80%
49 69% 76%
50 71% 77%
51 72% 78%
52 73% 78%
53

Chapter 2: The RCTWorkspace
53 75% 79%
54 76% 79%
55 77% 80%
56 78%
57 78%
58 79%
59 79%
60 80%
Page 54

Additional Fields
Additional fields are custom fields that can be used to pass through data that will not affect the cal-
culation of reconstruction cost. Additional fields can be enabled for specific user roles. When Addi-
tional fields are used in a valuation, the information is included on the standard, detailed, and
comparison reports. An administrator configures and manages Additional fields. A user can view
or enter information into the fields for a valuation (if their user role is enabled for this feature).
To enter or view information in Additional fields:
1. In a valuation, select Options > Additional Fields. The Additional Fields dialog opens.
Example: (Field names are for demo purposes. Actual field names are defined when cre-
ating additional fields)
2. Enter values in the appropriate fields. Some valuesmay be selected from a dropdown list.
Some fields have multiple items that you can select. Click in the blank field to display the
choices and then select one or more items. Currency fields automatically insert a $ sym-
bol. Date fields have a calendar icon ( ); click the icon to select a date from a calendar.
3. ClickSavewhen done.
Additional fields with values entered appear on Detailed, Standard, and Comparison reports.
Page 55
RCT Express 4 Workspace and Task Reference Guide - Options

Reload Assumptions
The assumption data that is used for a valuation is determined by some of the input fields. If you
make a significant change to one of these fields, such as the ZIP or postal code, finished living
area, year built, construction type, number of families, or home style, then you should reload the
assumptions.
Note:When you reload assumptions anymaterial information (material selections or
changes, quantity or count or square feet, etc.) you have entered about the home is over-
written. You will need to re-enter this material information if it is still desired. Once you
click Reload Assumptions you cannot stop the process. There is no undo function after the
process completes.
Select Options > Reload Assumptions to clear all the data in the valuation and reapply all
available information.
Page 56
RCT Express 4 Workspace and Task Reference Guide - Options

Refresh Roof Age
The roof age and roof age confidence score may be updated to get the latest data.
Note: Using the Refresh Roof Age function is a billable event.
To refresh roof age:
1. Open the valuation that you want to update.
2. Select Options > Refresh Roof Age. The Edit Building Information dialog opens show-
ing the refreshed data.
3. ClickSave on the Edit Building Information dialog.4. Save the valuation.
Page 57
RCT Express 4 Workspace and Task Reference Guide - Options

Reports
Access the various report types from theReports menu on the Valuation page.
Attachments Report
The attachments report contains the attachments (photos, PDF files, and so on) for the valuation.
Note: The Attachments Report, Hazard Report, InterChange Summary Report, and Property
Imagery Report are only available if the valuation you are creating generates that specific data.
Comparison Report
The comparison report feature allows you to view a side-by-side comparison of two different ver-
sions of the same policy or estimate.
Data Entry Report
The data entry report contains all the data entered for the valuation, except for the attachments.
This includes the general information, comments, building data (including length/width data if
entered), special conditions, materials/components summary, custom items, and cost markups
and adjustments.
Detailed Report
The detailed report contains the general information and a cost breakdown by cost type (framing,
walls, roof, and so on).
Hazard Report
The hazard report contains the general information, standardized address information, and haz-
ard summary information. Note: The Attachments Report, Hazard Report, InterChange Sum-
mary Report, and Property Imagery Report are only available if the valuation you are creating
generates that specific data.
Homeowner Report
This report is intended to inform the homeowner of the home features and cost components used
to produce their reconstruction cost estimate. The cost components detailed on the report include
labor, materials and supplies, demolition and debris removal, contractors overhead, profit and per-
mits, and architect’s plan.
Page 58
RCT Express 4 Workspace and Task Reference Guide - Reports

Homeowner Reconstruction Cost Notification Report
This report is intended to inform the homeowner of the home features and cost components used
to produce their reconstruction cost estimate. The cost components detailed on the report include
labor, materials and supplies, demolition and debris removal, contractors overhead, profit and per-
mits, and architect’s plan.
This report meets the requirements as defined by the California Department of Insurance reg-
ulations, effective June 27, 2011.
InterChange Summary Report
This report displays a summary of all the building data characteristics, the materials, and the
quantity information found within the database for the specified residence.
Using InterChange (Property Pre-Fill for Canadian addresses) data, RCT Express populates the
appropriate valuation data fields. The system then uses the default material selections from the
MSB knowledge tables to fill in any fields that have not already been populated. The default
material selections from the knowledge table will not overwrite any data that is obtained through
InterChange or Property Pre-Fill.
Note: InterChange is used for addresses in the United States. Property Pre-Fill is used for
Canadian addresses.
Note: The Attachments Report, Hazard Report, InterChange Summary Report, and Property
Imagery Report are only available if the valuation you are creating generates that specific data.
Preburn Score Report
When the current wildfire risk score is calculated, it takes into account areas where the brush (fuel
for fire) has previously burned. This results in a reduced score based on the absence of brushfire
risk.
The preburn wildfire risk score does not use the brushfire burn data we have at our disposal.
Instead, the score is calculated as if the previously burned brush still exists. This results in a
higher risk score in areas where brush has previously burned.
Page 59
RCT Express 4 Workspace and Task Reference Guide - Reports

After a number of years, the brush will most likely grow back. In that case, the preburn wildfire
score and wildfire risk score will be the same.
Property Imagery Report
The property imagery report contains all of the images that are available for the property thru the
Property Imagery feature.
Note: This is a separately licensed service. This option will not be displayed on sites that
do not have a Property Imagery license.
Note: The Attachments Report, Hazard Report, InterChange Summary Report, and Property
Imagery Report are only available if the valuation you are creating generates that specific data.
Standard Report
The standard report contains the general information, comments, cost summary, building inform-
ation, and materials/components summary.
Reports use the Adobe PDF (Portable Document Format) file format for preview and print
options.
Cost Detail Report Definitions
RCT Cost Detail Report Definitions
Foundation: Foundation Cost which includes excavation work, footings, foundation walls, piers,
etc.
Slab on grade: Cost for concrete slab.
Framing: Framing Costs which includes floor framing, ceiling framing, roof framing, exterior and
interior wall framing, and wall, roof, and floor sheathing.
Roofing: Cost for roof cover which includes roof cover and insulation, vent pipes, flashing, and
gutters.
Exterior Walls: Cost for exterior walls which includes wall cover, insulation, exterior doors, and
windows.
Page 60
RCT Express 4 Workspace and Task Reference Guide - Cost Detail Report Definitions

Partitions: Partition wall cost includes drywall or plaster and interior doors.
Wall Finishes: Wall finish costs include wall cover (paint, wallpaper, etc.) for both walls and ceil-
ing and moldings.
Floor Finishes: Floor finish costs include floor cover (carpet, tile, etc.)
Ceiling Finishes: Ceiling finish is the ceiling cover (drywall, plaster, acoustical tile, etc.)
Equipment: See note below
Conveying Systems: Costs associated with lifts, elevators, and dumbwaiters.
Plumbing: Plumbing cost includes the cost of rough-in plumbing, bathroom fixtures, kitchen
sinks, and water heaters.
HVAC: HVAC costs include any heating or cooling unit and ductwork.
Electrical: Electrical costs include rough-in electrical, service panel, lights, switches, etc.
Attached Structures: Costs associated with garages, porches, decks, etc.
General Conditions: General conditions include architect fees, taxes, fees, required fringes,
and other items that are not easily categorized into the other components of a building.
Note: Description of Cost Detail Equipment Column and the Equipment line that appear on the
RCT report:
Equipment Column:
Costs that are displayed in this column represent those related to the equipment that was used to
actually construct the residence. Usually most or all of these costs appear in the Foundation or
Slab on Grade lines and represent costs for the heavy equipment used for grading and excav-
ating. Contractor’s expenses for lifting equipment, floor sanders, paint sprayers, and the like will
also appear here.
Equipment Line:
Costs that are shown here are for the cabinetry and appliances included in kitchen packages.
Also, if the user hasmade entries for Fireplaces, Wood Stove. French Doors, Hot Tub, Jacuzzi,
Page 61
RCT Express 4 Workspace and Task Reference Guide - Cost Detail Report Definitions

Wet Bar, Vanity, Spiral Stairs, Central Burglar Alarm, Central Vacuum, Intercom, or Central Fire
Alarm, those costs will appear on the Equipment Line.
Page 62
RCT Express 4 Workspace and Task Reference Guide - Cost Detail Report Definitions

AerialAssist™
During the valuation process you can view aerial images of the property. Note: This feature is
only available if your site and user role has the correct permissions.
By using the aerial imagery during the valuation process, you will be able to visually survey the
property and estimate the reconstruction cost more accurately.
Example:
Page 63
RCT Express 4 Workspace and Task Reference Guide - AerialAssist™

Property Imagery
The Property Imagery tab on the valuation screen displays the available photos of the property,
both exterior and interior.
Note: This is a separately licensed service. This option will not be displayed on sites that
do not have a Property Imagery license.
You can zoom in or out on an image by clicking the + or - buttons. The date of the image is shown
in the lower right corner. Note that the date may not show if you zoom in since it could be off the
screen.
Page 64
RCT Express 4 Workspace and Task Reference Guide - Property Imagery

You can zoom in on an image to viewmore detail and then press and hold the left mouse button
and drag to view different parts of the image.
Page 65
RCT Express 4 Workspace and Task Reference Guide - Property Imagery

To view different images, click the left or right arrows or click a thumbnail image to display it full
size.
A report showing all of the available images is available under theReportsmenu.
Page 66
RCT Express 4 Workspace and Task Reference Guide - Property Imagery

RCT Alerts
RCT Alerts provide decision making information, validation errors, and warnings.
The system displays alerts in a slide out panel. On the Valuation page click theRCT Alerts tab to
display the panel.
The messages are grouped by the main home and each wing/section. If the warning or error mes-
sage is for the overall building, it is listed under the main home section.
A red dot indicates an error. You cannot calculate a reconstruction cost if errors exist. You can
save the valuation.
A yellow dot indicates awarning. You can calculate a reconstruction cost but should check
the warning message and correct the issue for the highest accuracy. You can save the valuation.
A green dot is an information only alert. It recommends items you maywant to confirm or
double check. You can calculate a reconstruction cost and save the valuation.
Example:
Locating the error or warning:
Errors and warnings are clickable. When you point your mouse cursor at an error or a warning, it
will be underlined. Click it and the field that has the error will be highlighted.
Example:
Page 67
RCT Express 4 Workspace and Task Reference Guide - RCT Alerts

Clicking the error in the example above will highlight the roof shape field.
You can then click "Add Roof Shape" and make a selection.
Then clickCalculate in the Valuation Totals panel and the error will clear.
A situation could also exist where the error could be fixed in more than one place. For example, if
a 1 story home style is selected and then a built-in garage is added, an error occurs. A 1 story
home cannot have a built-in garage. So you could correct the error by either changing the home
style or by changing the garage type. RCT Alerts will highlight both areas where the error could be
Page 68
RCT Express 4 Workspace and Task Reference Guide - RCT Alerts

fixed, in this case on the Building Information panel (Edit is highlighted to prompt you to open and
edit that info) and on the materials panel where you can edit the garage type.
Note: You can save a valuation that has both warnings and errors. You cannot calculate a
reconstruction cost if errors exist.
Page 69
RCT Express 4 Workspace and Task Reference Guide - RCT Alerts

Hazard Summary
Hazard information is displayed in a slide out panel. On the Valuation page click theHazard
Summary tab to display the panel.
Click a specific hazard item in the list to display the details.
Example: Earthquake Risk
Page 70
RCT Express 4 Workspace and Task Reference Guide - Hazard Summary

Page 71
RCT Express 4 Workspace and Task Reference Guide - Hazard Summary

Hazard Risks
Using geographic information, risk data can be mapped to aid you in risk assessment. The list
below identifies the types of hazards that you can select.
Available Hazards:
Label: Description:
Page 72
RCT Express 4 Workspace and Task Reference Guide - Hazard Summary

Hail Insight™ This event-driven hail data provides a
proxy to pre-existing roof damage caused
by hail events, in the form of a 10-point
score. This hazard also displays the hail
diameter size in inches at different radius
points from the center of the hail storm at
the address provided. This data is
provided for the most recent and largest
hail event dates. The Hail Event Risk
Score is based on 3-years of historical hail
event data, starting the day prior to the
moment it is pulled.
Data Elements: Hail Event Risk Score,
Hail Events 1.00-2.00”, Hail Events
Greater Than or Equal to 2.00”, Most
Recent Hail Event Date, Most Recent Max-
imum Diameter in Inches at Point, Most
Recent Maximum Diameter in Inches (1
Mile Radius), Most Recent Maximum Dia-
meter in Inches (3 Mile Radius), Most
Recent Maximum Diameter in Inches (10
Mile Radius), Largest Hail Event Date,
Largest Maximum Diameter in Inches at
Point, Largest Maximum Diameter in
Inches (1 Mile Radius), Largest Maximum
Diameter in Inches (3 Mile Radius),
Largest Maximum Diameter in Inches (10
Mile Radius).
Hail diameters less than 0.75" will not
appear as hail events, as these hail dia-
meters are deemed unsubstantial to the
risk of pre-existing roof damage.
Page 73
RCT Express 4 Workspace and Task Reference Guide - Hazard Summary

Note: This command is valid for all states.
Wildfire This hazard assigns a fuel risk factor to the
supplied address and displays the distance
to the nearest high or very high fuel loc-
ation. Wildfire risk score is a value determ-
ined by combining information from the
wildfire and firebreak data sets. It uses this
information to assign each address a risk
score ranging from 1 (lowest risk) to 100
(highest risk).
Data Elements: Fuel Rank, Next Worse
Fuel Rank, Distance to Next Worse, Dir-
ection to Next Worse, Bearing to Next
Worse.
Note: This command is valid only in the fol-
lowing states: AK, AZ, CA, CO, FL, ID,
MT, NM, NV, OK, OR, TX, UT, WA and
WY.
Page 74
RCT Express 4 Workspace and Task Reference Guide - Hazard Summary

Coastline This hazard displays the distance to the
nearest body of water along with the
names of the nearest major and minor
water features.
Data Elements: Distance to Coast, Dir-
ection to Coast, Minor Water Feature,
Major Water Feature, SeawardWater
Feature, Distance to SeawardWater
Feature, Direction to SeawardWater
Feature.
Note: This command is valid only in the fol-
lowing states: AK, AL, CA, CT, DE, FL,
GA, HI, IL, IN, LA, MA, MD, ME, MI, MN,
MS, NC, NH, NJ, NY, OH, OR, PA, RI,
SC, TX, VA, WA, andWI.
Earthquake Fault This hazard identifies the nearest earth-
quake fault and related details for the sup-
plied address.
Data Elements: Distance to Fault, Fault
Name, Age of Fault.
Note: This command is valid only in CA.
Page 75
RCT Express 4 Workspace and Task Reference Guide - Hazard Summary

Earthquake Risk This hazard identifies the Earthquake
Risk, the Modified Mercalli Intensity (MMI)
Score and MMI damage potential, soil
type, and liquefaction risk for the supplied
address.
Data Elements: Earthquake Risk Score,
the Modified Mercalli Intensity (MMI)
Score, MMI Experience, MMI Damage
Potential, PeakGround Acceleration Risk,
PeakGround Acceleration Score, and Soil
Susceptibility Index.
Note: Default coverage will be the entire
US.
Premium Tax This data provides information on
premium tax districts. The rules and taxing
authorities vary by state.
Data Elements: Vary by state.
Note: This command is valid only in AL,
AZ, CA, DE, FL, GA, IL, KY, LA, MD,
MN, MS, NJ, NY, NC, ND, PA, SC and
WV.
Sinkhole This hazard identifies sinkhole collapse
risk, sinkhole risk value and distance to
high/very high risk for the supplied
address.
Data Elements: Sinkhole Collapse Risk,
Sinkhole Risk Value, Distance to
High/Very High Risk.
Note: This command is valid only in FL.
Page 76
RCT Express 4 Workspace and Task Reference Guide - Hazard Summary

Windpool This hazard indicates whether the supplied
address falls inside or outside a windpool
zone. Windpool zones are coastal areas in
hurricane-prone states that are eligible for
participation in state-sponsored insurance
pools.
Data Elements: Windpool Territory, Loca-
tion of Risk.
Note: This hazard is valid only in AL, FL,
GA, LA, MS, NC, NJ, SC, and TX.
Hail This hazard assigns a hail risk factor to the
supplied address and displays the poten-
tial of a hail event occurring in a given time
period.
Data Elements: Hail Risk, 10-year Prob-
ability, Hail Risk Value.
Note: This hazard is valid in all states
except AK and HI.
Wind DrivenWater This data assigns a storm surge risk factor
for an address located in Gulf and Atlantic
states. This is also referred to as hurricane
driven water and storm surge. This risk
deals with water that is pushed by high
winds on shore and into bays, inlets, rivers
and other water ways causing flooding.
Data Elements: Storm surge risk, Storm
Surge Risk Value.
Note: This hazard is valid only in AL, CT,
DC, DE, FL, GA, LA, MA, MD, ME, MS,
NC, NH, NJ, NY, PA, RI, SC, TX and VA.
Page 77
RCT Express 4 Workspace and Task Reference Guide - Hazard Summary

Hurricane This data provides risk scores by county for
tropical storms, hurricanes and intense hur-
ricane force (category 3+) winds.
Data Elements: County, Yearly Probability
of Tropical Storm Force winds, Yearly
Probability of Tropical Storm Force in
Vicinity, 50 Year Probability of Tropical
Storm Force, Yearly Probability of Hur-
ricane Force, Yearly Probability of Hur-
ricane Force in Vicinity, 50 Year
Probability of Hurricane Force, Yearly
Probability of Intense Hurricane Force
(Cat 3+),Yearly Probability of Intense Hur-
ricane Force in Vicinity (Cat 3+), 50 Year
Probability of Intense Hurricane Force
(Cat 3+).
Note: This hazard is valid only in AL, CT,
DE, FL, GA, LA, MA, MD, ME, MS, NC,
NH, NJ, NY, RI, SC, TX and VA.
Page 78
RCT Express 4 Workspace and Task Reference Guide - Hazard Summary

DamagingWinds This data provides information relating to
the risk of straight line winds, hurricane
winds, tornadoes and an aggregate dam-
aging wind risk score.
Data Elements: Straight LineWinds Risk
Value, Risk of Hurricane ForceWinds, 10-
year Probability of Straight LineWinds,
Hurricane ForceWinds Risk Value, Risk of
Hurricane ForceWinds, 100-year Prob-
ability of HurricaneWinds, TornadoWinds
Risk Value, Risk of TornadoWinds, 10-
year Probability of TornadoWinds, Spe-
cial Wind Region.
Note: This hazard is valid in all states
except AK and HI.
Page 79
RCT Express 4 Workspace and Task Reference Guide - Hazard Summary

Proximity to Wild-
land
This data provides information about struc-
ture density and proximity to wildland
areas. Most large destructive wildfires
occur at the interface of urban and wild-
land regions. Recent California fires are an
excellent example of this, where fires that
originate in undeveloped areas of national
forests spread down canyons and slopes
to areas where new housing developments
lay. Firebreak data provides information
about structure density and proximity to
wildland.
Data Elements: Structure Density,
Distance to Nearest Wildland, Direction to
Nearest Wildland, and Bearing to Nearest
Wildland.
Note: This hazard is valid only in AK, AZ,
CA, CO, FL, ID, MT, NV, NM, OR, UT,
WA andWY.
Fire Protection This data provides information regarding
the closest responding fire station, includ-
ing: physical address, responding fire
department, and department type.
Note: This command is valid for all U.S.
states.
Page 80
RCT Express 4 Workspace and Task Reference Guide - Hazard Summary

Fire Protection
Extended
This hazard member can be used in place
of the Fire Protection member above. This
data provides information regarding up to
the 4 closest responding fire stations,
including those from mutual aid fire
response areas. The data includes phys-
ical address, responding fire department
and department type. Note: This com-
mand is valid for all U.S. states.
ESA (Elevation,
slope, and aspect)
This data identifies elevation, slope, and
aspect measurements for the supplied
address.
Data Elements: Elevation (feet), SlopePer-
cent, Slope (degrees), Aspect (direction
slope faces), AspecDesc.
Note: Default coverage will be the entire
US.
Flood This hazard identifies a flood hazard zone
and related details for the supplied
address.
Data Elements: FEMA Community Code,
FIRM Panel Number, Flood Zone, Coastal
Barrier Res. Area, FIRM Panel Type,
FIRM Panel Suffix.
Note: Default coverage will be the entire
US.
Page 81
RCT Express 4 Workspace and Task Reference Guide - Hazard Summary

Wildfire Risk Score This data assigns a risk score ranging from
1 (lowest risk) to 100 (highest risk) to the
supplied address. Wildfire risk score is a
value determined by combining inform-
ation from the wildfire and firebreak data
sets.
Data Element: Wildfire Risk Score.
Note: This hazard is valid only in AK, AZ,
CA, CO, FL, ID, MT, NV, NM, OK, OR,
TX, UT, WA, andWY.
Lava Flow This data provides general lava flow haz-
ard zones for the large island of Hawaii.
This data depicts areas of lava flow for the
five volcanoes on the island of Hawaii.
Data Elements: Hazard Zone, Mountain
Zone.
Note: This hazard is valid only in HI.
Windblown
Debris/Wind
Speed Zone
This hazard defines regions where wind
speed is 120 mph or greater and any area
within one mile of the coast where the
wind speed is less than 120 mph but
greater than 110 mph.
Data Elements: Wind Speed Zone, Wind-
Born Debris Region, Terrain Exposure Cat-
egory.
Note: This command is valid only for FL.
Page 82
RCT Express 4 Workspace and Task Reference Guide - Hazard Summary

Tsunami Evac-
uation Zone
This data shows planned areas of evac-
uation for the supplied address in the
event of tsunami. This layer covers the
entire state of Hawaii and is based on
source data available from the Pacific
Disaster Center (PDC).
Data Elements: Evacuation Zone, Evac-
uation Zone Name.
Note: This hazard is valid only in HI.
Custom Universal
Rating Territories
Custom rating territories as defined by
Universal.
Note: This command is valid only for FL,
GA, HI, NC, SC.
Page 83
RCT Express 4 Workspace and Task Reference Guide - Hazard Summary
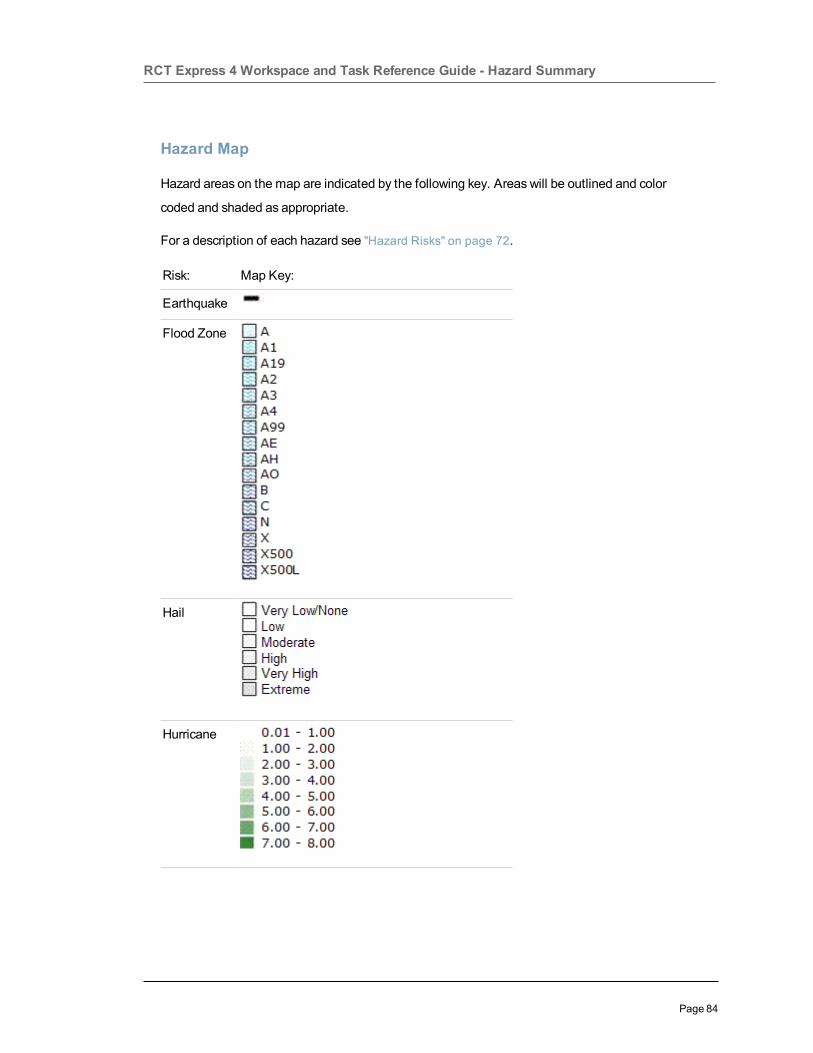
Hazard Map
Hazard areas on the map are indicated by the following key. Areas will be outlined and color
coded and shaded as appropriate.
For a description of each hazard see "Hazard Risks" on page 72.
Risk: Map Key:
Earthquake
Flood Zone
Hail
Hurricane
Page 84
RCT Express 4 Workspace and Task Reference Guide - Hazard Summary

Lava Flow
HZONE
Tsunami
Evacuation
Zone
Wind Driven
Water
Wind Driven
Debris
Wind speed
MPH
Damaging
Winds
Fire Station
Sinkhole
Sinkhole
Risk
Wildland
Page 85
RCT Express 4 Workspace and Task Reference Guide - Hazard Summary

Brushfire
Coast
Island
Territory
Page 86
RCT Express 4 Workspace and Task Reference Guide - Hazard Summary
GeoSpatial Information
This section displays geographic and spatial data for the structure location.
Label: Description:
Block
Code
This is the U.S. Census block code.
Loca-
tion
Code
This is the Geostan code detailing the known qualities
of the location. An address location code has three
characters:
l The first character is always an "A" indicating an
address location.
l The second character is either an "S" (indicating
a location on a street range) or an "X" (indic-
ating a location on an intersection of two
streets).
l The third character is a digit indicating other
qualities about the location.
Page 87
RCT Express 4 Workspace and Task Reference Guide - Hazard Summary

Match
Code
This is a 5-character alphanumeric code indicating the
accuracy of the geographic location and the quality of
the addressmatch.
For example, certain codes indicate why a match could
not be made, such as no matching streets being found.
Other codesmay provide detailed information about
how the match differs from the address provided, such
as when the city name changes between the input and
the output addresses.
l First character (alphabetic): describes the type
of match.
l Second character (alphanumeric): describes a
change in the city type.
l Third character (alphanumeric): describes a
change in the street name.
l Fourth character (alphanumeric): describes a
change in the cross street (for intersections) or
building name.
l Fifth character (alphanumeric): describes a
change in the house/unit number.
Note: For all characters, a value of “0” indicates
no changes transpired.
Example:
"Match Code Key" on page 90
Page 88
RCT Express 4 Workspace and Task Reference Guide - Hazard Summary

Sourc-
e
The source value displays the provider system used for
the standardized address.
Page 89
RCT Express 4 Workspace and Task Reference Guide - Hazard Summary

Match Code Key
Example:
First Character Describes Address Match
A: Matched to a discrete address (a single house number, not a range).
C: Matched to the center of the street that has the best street namematch, but no house number
match. Used the closest house number range (unless the street has no house numbers).
F: Matched to the center of the street that has the best street namematch, but no house number
match. Used the closest house number range (unless the street has no house numbers). A match
to another street with a poorer namematch, but with a valid house number, was rejected.
I: Intersection address.
R: Interpolated in house number range.
Second Character Describes City Match
0: No changesmade to city line.
1: City name changed.
2: State changed.
3: City and state changed.
4: Postal code changed.
5: City and postal code changed.
6: State and postal code changed.
7: City, state, and postal code changed.
Page 90
RCT Express 4 Workspace and Task Reference Guide - Hazard Summary

8: Country changed.
9: Country and city name changed.
A: Country and state changed.
B: Country, city, and state changed.
C: Country and postal code changed.
D: Country, city, and postal code changed.
E: Country, state, and postal code changed.
F: Country, city, state, and postal code changed.
Third Character Describes Street Name Match
0: No changesmade to street name elements.
1: Directional changed.
2: Suffix changed.
3: Directional and suffix changed.
4: Name (anything else) changed.
5: Directional and name changed.
6: Suffix and name changed.
7: Directional, suffix, and name changed.
8: One or more words ignored to make match.
9: One or more words ignored to make match, and directional changed.
A: One or more words ignored to make match, and suffix changed.
B: One or more words ignored to make match, and directional and suffix changed.
C: One or more words ignored to make match, and name changed.
D: One or more words ignored to make match, directional and name changed.
E: One or more words ignored to make match, suffix and name changed.
Page 91
RCT Express 4 Workspace and Task Reference Guide - Hazard Summary

F: One or more words ignored to make match, directional, suffix, and name changed.
Fourth Character Describes Cross Street Name for Intersection Match
For intersection matches, this character describes cross street name changes. The codes used
are the same as the third character. For other matches, the codes are:
0: No changesmade.
1: Building name changed.
2: Firm name changed.
3: Both building and firm changed.
4: Multiple match was automatically resolved according to the current.
5: Building name changed and multiple match was resolved.
6: Firm name changed and multiple match was resolved.
7: Building and firm changed and multiple match was resolved.
Fifth Character Describes Number Matches
0: No changesmade to house or unit number.
1: House number changed.
2: House number parity mismatch.
3: House number changed and parity mismatch.
4: Unit type changed.
5: Unit type and house number changed.
6: Unit type and house number parity changed.
7: Unit type, house number, and parity changed.
8: Unit number parity mismatch.
9: Unit number parity mismatch and house number changed.
A: Unit number parity mismatch and house number parity mismatch.
Page 92
RCT Express 4 Workspace and Task Reference Guide - Hazard Summary

B: Unit number parity mismatch, house number changed, and parity mismatch.
C: Unit number parity mismatch and unit type changed.
D: Unit number parity mismatch, unit type and house number changed.
E: Unit number parity mismatch, unit type and house number parity changed.
F: Unit number parity mismatch, unit type and house number (including parity) changed.
The following codes describe the reasons for non-matches. For example, a U0001 code indicates
that the city in the input address could not be found, in that case, no match.
Match Codes for Non-Matches
U0001: City not found.
U0002: No matching streets.
U0003: No qualifying street segments.
M0000: Multi-match, two or more segmentsmatch with equal scores.
Page 93
RCT Express 4 Workspace and Task Reference Guide - Hazard Summary

Permit Data
The Permit Data feature provides information about building permits which have been pulled on a
property. You can use this information to follow up with homeowners about possible unreported
changes to the property value.
Permit data appears on the Standard and Detailed reports.
The system displays permit data in the slide out panel. On the Valuation page click the Permit
Data tab to display the panel.
Example:
Click the X in the upper right corner to close the panel.
Page 94
RCT Express 4 Workspace and Task Reference Guide - Permit Data

Using the Help System
The RCT Express help system offers many different ways of displaying information and helping
you find the correct information.
l Search for a topic. Both the home page and all of the topic pages have a search bar. The
search can be filtered to help narrow the results.
l Help can be displayed by clicking theHelp link on any page or dialog in the RCT Express
application.
l Click a field name in the application to display the definition for that field.
l Use the menus at the top of any help topic to locate a topic.
l Use the menus at the right side of a help topic to display related topics.
l Use the breadcrumbs at the top of the help topic content to see where you are in the help
system.
l RCT Express also includes an interactive help feature where making certain selections in
a help topic will automatically enter the appropriate information into your valuation.
l Print a help topic.
Page 95
RCT Express 4 Workspace and Task Reference Guide - Using the Help System

Search the Help System
The fastest way to locate any topic within the help system is to do a search. The search bar is at
the top of every topic and on the home page. You can search all the files or narrow your search by
categories.
To search the help system:
1. Enter the word or phrase you want to search for. By default, the system will search all the
files of the help system.
2. Click the magnifying glass icon (or press the Enter key on your keyboard) to search. To
clear the search field press ESC on your keyboard.
The results of the search appears below the search bar. For example, if you searched for "hail"
the results would appear as shown below:
The name of the topics that contain your search word are displayed along with the first few words
of the topic. Click the name of the topic to display it.
Page 96
RCT Express 4 Workspace and Task Reference Guide - Using the Help System

When you open the topic, the search words you used will be highlighted in yellow:
You can remove the highlighting by clicking theRemove Highlights icon. The topic will then
appear without highlights.
Narrow your search by using filters
Sometimes a search will return a large number of topics and it could be harder to find the one
you're looking for. You can narrow your search by using search filters.
For example, if you wanted to search for the topic on how to add a new section, you may have just
entered the word "section" and searched. The system returned 113 results with topics that contain
that word! But by using a filter you can narrow your search down to just a few topics.
Page 97
RCT Express 4 Workspace and Task Reference Guide - Using the Help System

To narrow your search, select a search filter. Click the Filter icon and select one of the categories
from the drop down list.
Once you select the category the system will search again but only for those topics within the cat-
egory. So if you entered the word "section" and selected the category "how to" the search would
be narrowed and only 8 results would be returned, making it much easier to find the topic you're
looking for.
Page 98
RCT Express 4 Workspace and Task Reference Guide - Using the Help System

Note: Remember, that if you search within a category and can't find what you are looking
for, just change the category to "All Files" and search again
Page 99
RCT Express 4 Workspace and Task Reference Guide - Using the Help System

Print a Help Topic
Help topicsmay be printed.
To print a help topic:
1. Display the topic you want to print.
2. Click the Print icon ( ) above the help topic.
3. Select the printer that you want to use and clickOK.
Page 100
RCT Express 4 Workspace and Task Reference Guide - Using the Help System

Interactive Help
When you enter information in the Edit Building Information dialog, RCT provides an interactive
help feature for home styles. Interactive help automatically enters pertinent information into the
building information dialog after you make a selection from the help topic.
Important: If you select the help topics from other locations within the help system this feature is
not available. It only appears when you select home styles in the Edit Building Information dia-
log.
To use interactive help with the Style field:
1. On the Edit Building Information dialog, clickStyle to display the help topic that shows all
the available home styles.
2. Underneath each home style graphic is a "Select" link. Pick the home style you want and
clickSelect. All pertinent information for that style is automatically entered into RCT.
Page 101
RCT Express 4 Workspace and Task Reference Guide - Using the Help System

Chapter 3: How to...Select a topic from the side menu on the right to view step-by-step procedures for accomplishing
the various tasks in RCT.
Page 102
RCT Express 4 Workspace and Task Reference Guide -

Log in to RCT
When you access your RCT Express site you must first log in to the system to access your valu-
ations.
1. Enter your user name.
2. Enter your password. Your password is case sensitive.
3. Click Login.
Both your user name and password are set by your system administrator.
Note: If your company uses Fast Track with seamless login, you may never see this
screen and will automatically be logged in.
Request a Forgotten Password
If you have forgotten your password, click theDid you forget your Password? link on the Log
In page and enter your user name. If the information matches our records, an email will be sent to
you with the requested information; otherwise, a message appears directing you to contact Tech-
nical Support.
Change Your Password
To change your password:
1. From the Toolsmenu select Change My Information.2. Enter your old password. (Passwords are case sensitive)
3. Enter your new password. (The system will prompt you if your password does not meet
password strength requirements)
4. Re-enter your new password to confirm.
5. ClickSave.
Page 103
RCT Express 4 Workspace and Task Reference Guide - Log in to RCT

Create a New Valuation
New valuations are created from the dashboard.
To create a new valuation:
1. In theCreate New Valuation field enter the address including the ZIP code. If you are
creating a valuation for a Condo/Co-op home style or a Mobile-Manufactured home style,
or if you want to create aRenters - Contents Only valuation, select the appropriate check
box. When you select either style check box and create a valuation, the building inform-
ation for that particular home style will automatically be applied. If you are creating a valu-
ation for a home style other than Condo/Co-op or Mobile-Manufactured home, then you
can select the home style on the Building Information screen.
As you enter an address the system may display address selections that you can choose.
2. ClickCreate Valuation. The system creates the valuation and displays the Valuation
pagewith all known information entered.
If there is no information from InterChange when you create a new valuation, the Edit
Building Information dialog will open automatically so you can begin to enter information
about the home.
3. Edit building information, materials, or any other information as necessary.
Select Standardized Address
If the address you entered is not recognized as a valid USPS or Canadian postal address the sys-
tem may prompt you to Select a Standardized Address and may display one or more address
options from which you may choose on the Select Standardized Address panel. Under the Select
Page 104
RCT Express 4 Workspace and Task Reference Guide - Create a New Valuation

column select the appropriate address and click the Select Standardized Address button, or click
the Use the User Entered Address button to proceed with no pre-filled address specific inform-
ation. It will display the Edit Building Information panel.
Note: If the home is brand new construction then its addressmay not have made it into
the USPS database yet and you should use the “user entered address”.
Page 105
RCT Express 4 Workspace and Task Reference Guide - Create a New Valuation
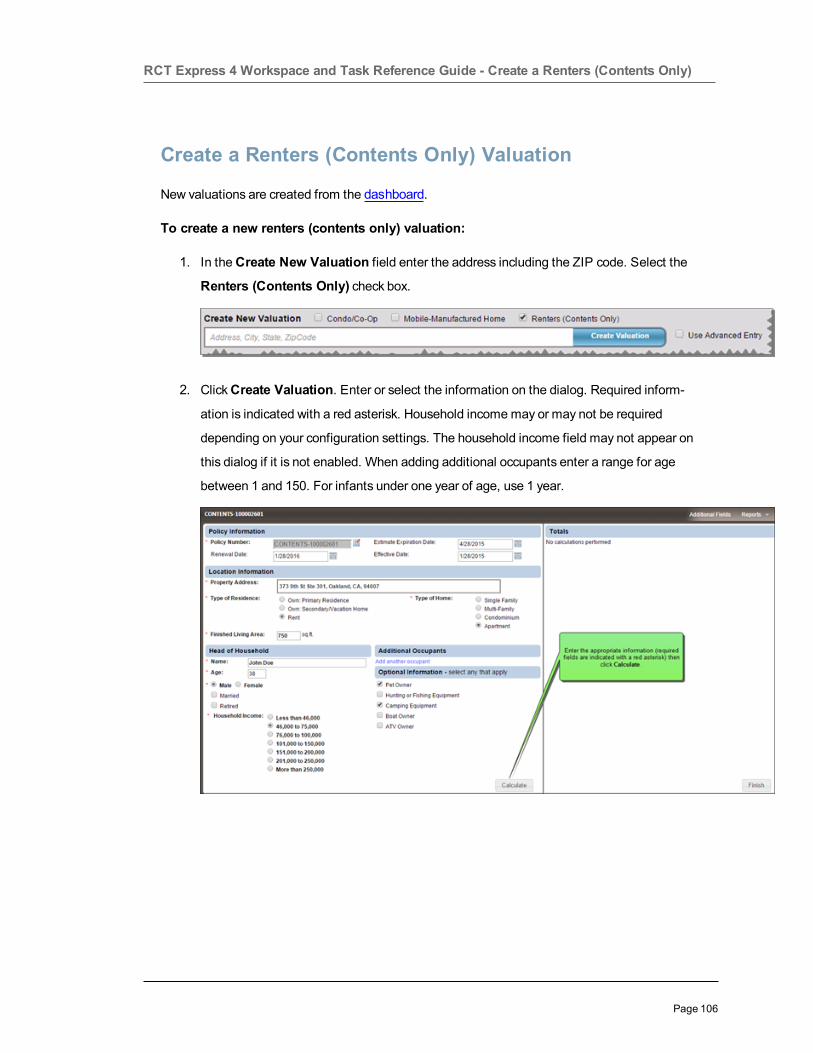
Create a Renters (Contents Only) Valuation
New valuations are created from the dashboard.
To create a new renters (contents only) valuation:
1. In theCreate New Valuation field enter the address including the ZIP code. Select the
Renters (Contents Only) check box.
2. ClickCreate Valuation. Enter or select the information on the dialog. Required inform-
ation is indicated with a red asterisk. Household incomemay or may not be required
depending on your configuration settings. The household income field may not appear on
this dialog if it is not enabled. When adding additional occupants enter a range for age
between 1 and 150. For infants under one year of age, use 1 year.
Page 106
RCT Express 4 Workspace and Task Reference Guide - Create a Renters (Contents Only)

3. ClickCalculate to generate the contents estimate.
4. The calculated results are displayed in the right hand pane of the dialog. You can scroll to
see more of the information.
5. Select Contents Report from theReports menu to generate a PDF report of the estim-
ate. If Additional Fields have been configured, you can select theAdditional Fields dia-
log from the menu.
6. Click Finish to return to the dashboard.
Note: If you make changes to any of the parameters and then clickCalculate again to
regenerate the estimate, it is a new billable transaction event.
Page 107
RCT Express 4 Workspace and Task Reference Guide - Create a Renters (Contents Only)

Find an Existing Valuation
You can search for an existing valuation from the dashboard. You can also filter the list of valu-
ations to limit the display to only those items you are interested in.
To find an existing valuation:
1. In the Find Existing Valuation field enter a policy number, insured name, address, city,
state, or ZIP/postal code. As you enter characters the system displays a list of valuations
that match the characters that you are entering. You can select from this list if you see the
valuation you want. Note: You must enter at least 4 characters.
2. ClickSearch.
The dashboard will display only those valuations that contain the information you entered
in the Find Existing Valuation field.
To clear the search delete any characters in the search field and clickSearch.
Page 108
RCT Express 4 Workspace and Task Reference Guide - Find an Existing Valuation

Filter Items
You can filter a list to narrow the number of items that appear. You can filter on one column or
you can combine filter criteria for multiple columns.
To filter valuations:
1. Select the filter icon ( ) in the column header for the column that you want to filter. The
filter definition pane appears.
Example:
2. Use the drop-down list to select the type of filter such as "Contains" or "StartsWith" and
enter the filter criteria you want to apply in the blank field. For example "Main St" is shown
above. You can enter a second filter parameter if desired.
3. Click the Filter button ( ).
4. If you want to filter on more than one column, repeat these steps for each additional
column.
A column that has a filter applied displays the filter icon with a highlighted background:
To clear filters:
1. To clear the filter for a column click the filter icon ( ) to display the filter definition pane.
2. Click the Clear Filter button ( ).
Page 109
RCT Express 4 Workspace and Task Reference Guide - Filter Items

Sort Columns
You can sort the list of valuations in the dashboard in ascending order (from lowest to highest) or
descending order (from highest to lowest).
To sort a column:
1. Click a column heading to sort the valuations based on that column. An arrow appears to
indicate that the column is sorted in either ascending or descending order.
Example:
2. Click the column heading again to switch between ascending and descending order.
3. To cancel the sorting, click the column heading until the arrow disappears. (Clicking the
column heading cycles between ascending, descending, and none).
You can sort multiple columns at the same time. In the following example, the State/Province
column was sorted first, then theCity column was sorted. The result is that states are sorted in
ascending order and the cities within each state are also sorted in ascending order.
Page 110
RCT Express 4 Workspace and Task Reference Guide - Sort Columns

Page 111
RCT Express 4 Workspace and Task Reference Guide - Sort Columns

Edit a Valuation
Select a valuation from the dashboard to open it for editing. You can search for an existing valu-
ation or filter the list of valuations.
Note: You cannot open a valuation file if it is already open by another user. If this occurs,
RCT will display a message stating that the valuation file is currently in use and you must
wait until the other user has closed the file before you can open it.
To edit a valuation:
1. On the Dashboard, click the policy number of the valuation that you want to edit. The valu-
ation page opens.2. "Edit Policy Information" on page 122.
3. "" on page 124.
4. "Add or Edit Materials" on page 147.
Page 112
RCT Express 4 Workspace and Task Reference Guide - Edit a Valuation

View Valuation History
Expand a valuation in the dashboard to show the history.
To view a valuation history:
1. Click the plus button ( ) next to a valuation to display all the iterations.
Example:
2. Click the PDF icon ( ) next to an iteration to select and view a report.
Page 113
RCT Express 4 Workspace and Task Reference Guide - View Valuation History

View AerialAssist™
Aerial images of the property can be viewed by selecting theAerialAssist tab in a valuation.
To view Aerial Images:
1. On the valuation page, click the AerialAssist tab (the property addressmust be complete).
Example image:
Page 114
RCT Express 4 Workspace and Task Reference Guide - View AerialAssist™
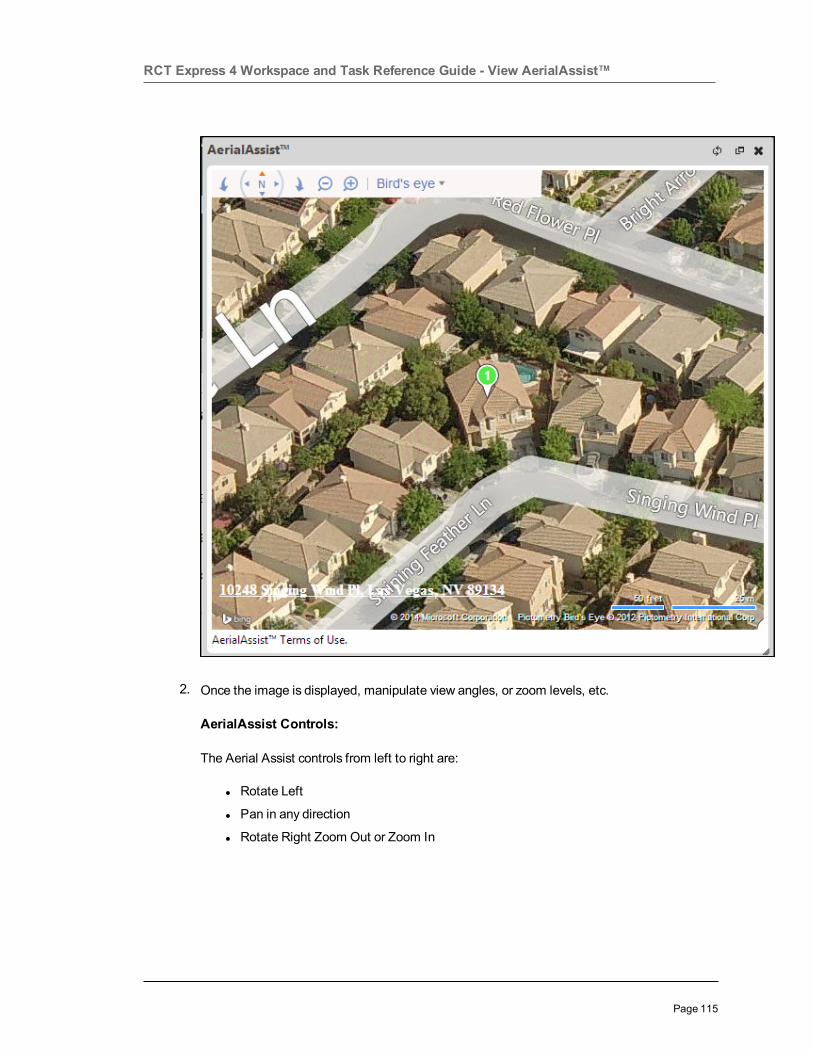
2. Once the image is displayed, manipulate view angles, or zoom levels, etc.
AerialAssist Controls:
The Aerial Assist controls from left to right are:
l Rotate Left
l Pan in any direction
l Rotate Right Zoom Out or Zoom In
Page 115
RCT Express 4 Workspace and Task Reference Guide - View AerialAssist™

l Birds eye drop-downmenu. Select to view a standard road map view, an automatic
view that switches to the best map style as you zoom, or a bird's eye view for a bet-
ter angle of aerial photography.
Page 116
RCT Express 4 Workspace and Task Reference Guide - View AerialAssist™

View Property Imagery
You can view exterior and interior photos (if available) of the property by using the Property
Imagery feature.
To display property imagery:
1. On the Valuation page, click the Property Imagery tab.
Example:
Page 117
RCT Express 4 Workspace and Task Reference Guide - View Property Imagery

2. Use the + or - buttons to zoom in or out. Select a different image by clicking a thumbnail to
open a full size image, or click the left or right arrows on the image to move to a different
Page 118
RCT Express 4 Workspace and Task Reference Guide - View Property Imagery

one.
3. When zoomed in, press the left mouse button and drag to view different parts of the
image.
Page 119
RCT Express 4 Workspace and Task Reference Guide - View Property Imagery

Create a Comparison Report
Comparison reports can only be created from the dashboard. The compare feature is only avail-
able after selecting at least two iterations of a policy.
To create a comparison report:
1. Click the plus button ( ) next to a valuation to display all the iterations.
2. Use the check boxes to select two items to compare. Once two are selected theCompare
button appears.
3. Click the Compare button to generate a comparison report.
Note: Reports for individual instances can be generated by clicking the PDF icon ( )
and selecting the type of report desired from the drop-down list.
Page 120
RCT Express 4 Workspace and Task Reference Guide - Create a Comparison Report

Generate a Report
Various types of reports may be generated for a valuation. You can view, save, or print reports.
To generate a report:
1. Open a valuation.
2. From the main menu, select Reports and the specific type of report you wish to generate.
A file download dialog appears.
3. Select Open or Save. Open will display the report as a PDF file. Save prompts you for a
location to save the file. If you open the file, you can read it and then save it using the save
command in the Acrobat viewer. If you save the file to your hard drive, a dialog will inform
you when the download is complete.
Reports may also be generated (downloaded) from the Dashboard.
Page 121
RCT Express 4 Workspace and Task Reference Guide - Generate a Report

Edit Policy Information
Use this dialog to edit the location, policy, and contact information for the valuation.
How to edit policy information:
1. In the policy information panel click the Edit button.
The Edit Policy Information dialog opens.
Page 122
RCT Express 4 Workspace and Task Reference Guide - Edit Policy Information

2. Enter the desired information. Required fields are indicated with an asterisk.
3. Use the calendar icon ( ) to select dates from a calendar for fields requiring a date.
4. ClickSave.
Page 123
RCT Express 4 Workspace and Task Reference Guide - Edit Policy Information

Edit Building Information
Use the Edit Building Information dialog to enter or edit information about the building, including
sections.
To edit building information:
1. In theBuilding Information panel, click the Edit button.
2. The Edit Building Information dialog appears.
Page 124
RCT Express 4 Workspace and Task Reference Guide -

3. Enter the building information in the appropriate fields. Required fields are indicated with
an asterisk. Certain fields include the Interactive Help feature.
4. If you need to add a section clickAdd a Section orWing at the bottom of the dialog.
5. ClickSave to save and update the information. If any errors exist they will be displayed
after clicking Save.
Foundation Type
The available foundation types are listed below. Click a graphic or the name beneath a graphic to
go to a full page description.
Page 125
RCT Express 4 Workspace and Task Reference Guide -

Note: If the foundation type is basement, (below grade, daylight, and walkout), make sure that all
of the following data fields are also included:
l Foundation Materials
l Basement Depth
l Number of Basement Levels
l Staircase, Basement
Enter the total percentage of each foundation type found in the home.
Basement, Day-
light
Crawl Space, Excav-
ated
Piers
Basement, Below
Grade
Crawl Space, Unex-
cavated
Slab at Grade
Basement,
Walkout
Hillside
MMH foundations:
Post and Pier Foundation, MMH
Foundation Materials
The available choices for foundation materials are listed below.
Enter the total percentage of each foundation material used in the home.
Page 126
RCT Express 4 Workspace and Task Reference Guide -

Block Fieldstone
Brick Steel
Concrete Wood, Treated
Basement Stairs
Staircase, Basement with Railing
A 3' wide, floating metal staircase with oak treads and single oak handrail with scroll spindles.
Note: If the foundation type is basement, (below grade, daylight, andwalkout), make sure that
all of the following data fields in the Basement Information section are also included:
l Basement Depth
l Number of Basement Levels
l Staircase, Basement
Included in Cost: Center stringer, base plate, top support plate, oak treads, oak handrail with
scroll spindles, and installation labor. Oak handrail and treads receive 2 coats of clear varnish and
preprimed metal parts receive 1 coat of metal paint.
Enter the total number of flights (staircases) of basement staircases found in the home. A max-
imum entry of 10 is allowed.
Staircase, Basement, Wide with Railing
A 4' wide, floating metal staircase with oak treads and single oak handrail with scroll spindles.
Note: If the foundation type is basement, (below grade, daylight, andwalkout), make sure that
all of the following data fields in the Basement Information section are also included:
l Basement Depth
l Number of Basement Levels
l Staircase, Basement
Included in Cost: Center stringer, base plate, top support plate, oak treads, oak handrail with
scroll spindles, and installation labor. Oak handrail and treads receive 2 coats of clear varnish and
pre-primed metal parts receive 1 coat of metal paint.
Page 127
RCT Express 4 Workspace and Task Reference Guide -
Enter the total number of flights (staircases) of wide basement staircases found in the home. A
maximum entry of 20 is allowed.
Number of Basement Levels
The number of basement levels or basement stories in the home.
Note: If the foundation type is basement, (below grade, daylight, andwalkout), make sure that
all of the following data fields in the Basement Information section are also included:
l Basement Depth
l Number of Basement Levels
l Staircase, Basement
Enter the total number of basement levels or stories found in the home. A maximum entry of 2 is
allowed.
Basement Depth
A perpendicular measurement downward from the grade level to the basement floor. Also
referred to as basement floor story height or floor-to-floor height.
Note: If the foundation type is basement, (below grade, daylight, andwalkout), make sure that
all of the following data fields under the Basement Information section are also included:
l Basement Depth
l Number of Basement Levels
l Staircase, Basement
Enter the total number of feet between 7 and 20.
Basement Finish
Listed below is a comparison of the finish and construction details in basement finishes.
Standard Finish Custom Finish
Drywall installed around the
perimeter, over the insu-
lation
Drywall installed around the
perimeter, over the insu-
lation
Page 128
RCT Express 4 Workspace and Task Reference Guide -

Interior drywall partitions Ample interior drywall par-
titions
Hollow core doors Solid core doors
Painted drywall wall finishes Partial millwork paneling
and painted drywall wall fin-
ishes
Painted drywall ceiling Painted drywall ceiling and
linear wood ceiling
Carpet and vinyl tile floor fin-
ishes
High quality carpet floor fin-
ish
Standard electrical outlets
and lighting
Ample electrical outlets and
lighting
Standard heating system Heating and air conditioning
system
% Lower Level Unfinished
This is the total percentage of the residence that has an unfinished lower level (lowest level). This
applies to bi-level, split-foyer and raised ranch styles.
Note: Do not include built-in garage area when calculating the percentage of the lower level that
is unfinished.
How to enter the percentage lower level unfinished:
1. On the Edit Building Information panel, make sure the Home Style is set to either a bi-
level, split foyer, or raised ranch style. The% lower level unfinished field appears once one
of those home styles is selected.
Page 129
RCT Express 4 Workspace and Task Reference Guide -

2. Click the link to show the % Lower Level Unfinished section.
3. Enter the percentage of the residence that has an unfinished lower level.
4. ClickSave.
Example 1:
If you have a 2,400 sq. ft. bi-level home with a 400 sq. ft. built-in garage and 800 sq. ft. of unfin-
ished lower level, you have 100% lower level unfinished.
1,200 sq. ft. per level, so 1,200 – 400 sq. ft. built-in garage = 800 sq. ft. of lower level area, and all
is unfinished, so 100% is unfinished.
Example 2:
If you have a 2,400 sq. ft. bi-level home with a 400 sq. ft. built-in garage and 400 sq. ft. of unfin-
ished lower level, you have 50% lower level unfinished.
1,200 sq. ft. per level, so 1,200 – 400 sq. ft. built-in garage = 800 sq. ft. of lower level area – 400
sq. ft. of unfinished lower level = 400 sq. ft. of finished area = 50% unfinished lower level area.
Page 130
RCT Express 4 Workspace and Task Reference Guide -

Example 3:
If you have a 2,400 sq. ft. bi-level home with a 400 sq. ft. built-in garage and 0 sq. ft. of unfinished
lower level, you have 0% lower level unfinished.
1,200 sq. ft. per level, so 1,200 – 400 sq. ft. built-in garage = 800 sq. ft. of lower level area – 0 sq.
ft. of unfinished lower level = 800 sq. ft. of finished area = 0% unfinished lower level area.
Enter the percentage of the lower level of the home that is unfinished.
InterChange Scores
The InterChange confidence score is an individual score measuring levels of accuracy for a given
property record in its entirety or a subset of property characteristic data (TLA, Year Built, Number
of Stories) when compared to a baseline set of data.
Levels of InterChange confidence scores
l High
l Medium
l Low
How to use InterChange confidence scores
Proper usage of InterChange confidence scores depends on individual carrier guidelines. While
select carriers opt to use High and Medium confidence data points as pass-through data and forgo
validation with the homeowner, other carriers may prefer to validate each data point regardless of
the level of score. Please consult your carrier for recommended usage of the InterChange con-
fidence score.
Page 131
RCT Express 4 Workspace and Task Reference Guide -

Interactive Help
When you enter information in the Edit Building Information dialog, RCT provides an interactive
help feature for home styles. Interactive help automatically enters pertinent information into the
building information dialog after you make a selection from the help topic.
Important: If you select the help topics from other locations within the help system this feature is
not available. It only appears when you select home styles in the Edit Building Information dia-
log.
To use interactive help with the Style field:
1. On the Edit Building Information dialog, clickStyle to display the help topic that shows all
the available home styles.
2. Underneath each home style graphic is a "Select" link. Pick the home style you want and
clickSelect. All pertinent information for that style is automatically entered into RCT.
Page 132
RCT Express 4 Workspace and Task Reference Guide -

Contents Valuation
A contents value estimate is created from theContents Valuation dialog.
To create a contents valuation:
1. From the valuation screen, select Options > Contents Valuation to open the dialog.2. Enter the location and head of household information. Some information such as the
address, type of home, finished living area, and namemay come from the building inform-
ation if it exists in the valuation already. If the address and finished living area is pre-pop-
ulated from the valuation, that information cannot be edited on this dialog. You can edit
type of home and name on this dialog and the valuation will be updated when Save is
clicked.
Required fields are indicated with a red asterisk ( * ). Household incomemay or may not be
required depending on your configuration settings. The household income field may not
appear on this dialog if it is not enabled.
3. Enter additional occupants by clickingAdd Another Occupant and entering the inform-
ation. You can add up to 5 additional occupants.
Page 133
RCT Express 4 Workspace and Task Reference Guide - Contents Valuation

4. Enter the optional information by selecting all the items that apply.
5. ClickSave. The contents value estimate will be calculated and the dialog will close.
Note:When adding additional occupants enter a range for age between 1 and 150. For
infants under one year of age, use 1 year.
The Valuation Totals pane will display the estimated contents value.
Example:
ClickMore Info on the Valuation Totals pane to display details of the valuation totals including
the contents estimate, broken down by inventory category.
Example:
Page 134
RCT Express 4 Workspace and Task Reference Guide - Contents Valuation

The contents estimate results will be displayed in the Standard, Detail, and Home Owner reports.
Page 135
RCT Express 4 Workspace and Task Reference Guide - Contents Valuation
Refresh Roof Age
The roof age and roof age confidence score may be updated to get the latest data.
Note: Using the Refresh Roof Age function is a billable event.
To refresh roof age:
1. Open the valuation that you want to update.
2. Select Options > Refresh Roof Age. The Edit Building Information dialog opens show-
ing the refreshed data.
3. ClickSave on the Edit Building Information dialog.4. Save the valuation.
Page 136
RCT Express 4 Workspace and Task Reference Guide - Refresh Roof Age

Add a Section
Use the Edit Building Information dialog to add sections or wings. The Section (or wing) feature of
RCT offers the ability to capture unique parts of a home that may differ from the Main Home. Sec-
tions often account for but are not limited to additions, differences in the number of stories or
unique floor plans. RCT allows you to divide the home into the Main Home and section areas.
Only use a section to account for additions if the addition has significant differences in age, mater-
ial type or methods of construction. Sectionsmay also be used for homes that have a different
number of stories, whether an addition or not, when the portion is clearly identifiable from the
main home and contains differing attributes. This can apply when the home has a significant dif-
ference in style between the Main Home and the Section or a difference in construction, such as
slab versus basement. While sometimes subjective, the use of sections should be justifiable as a
result of a characteristic being substantially different.
To add a section or wing:
1. On theBuilding Information panel, click the Edit button. The Edit Building Inform-
ation dialog appears.
Page 137
RCT Express 4 Workspace and Task Reference Guide - Add a Section

2. ClickAdd a Section or Wing.
A new section is added with the fields available for editing. The main home section col-lapses at the top of the screen and the new section opens below. Click to plus sign ( ) to
reopen the main home section. (When the main home reopens, the other sections will col-
lapse at the bottom of the screen. One section will remain open at all times. The only way
to close a section is to open a collapsed section or create a new one.)
Page 138
RCT Express 4 Workspace and Task Reference Guide - Add a Section

3. Enter the information for the section in the appropriate fields.
4. ClickSave to save and update the information. If any errors exist they will be displayed
after clicking Save.
Foundation Type
The available foundation types are listed below. Click a graphic or the name beneath a graphic to
go to a full page description.
Note: If the foundation type is basement, (below grade, daylight, and walkout), make sure that all
of the following data fields are also included:
l Foundation Materials
l Basement Depth
l Number of Basement Levels
l Staircase, Basement
Page 139
RCT Express 4 Workspace and Task Reference Guide - Add a Section

Enter the total percentage of each foundation type found in the home.
Basement, Day-
light
Crawl Space, Excav-
ated
Piers
Basement, Below
Grade
Crawl Space, Unex-
cavated
Slab at Grade
Basement,
Walkout
Hillside
MMH foundations:
Post and Pier Foundation, MMH
Foundation Materials
The available choices for foundation materials are listed below.
Enter the total percentage of each foundation material used in the home.
Block Fieldstone
Brick Steel
Concrete Wood, Treated
Page 140
RCT Express 4 Workspace and Task Reference Guide - Add a Section

Basement Stairs
Staircase, Basement with Railing
A 3' wide, floating metal staircase with oak treads and single oak handrail with scroll spindles.
Note: If the foundation type is basement, (below grade, daylight, andwalkout), make sure that
all of the following data fields in the Basement Information section are also included:
l Basement Depth
l Number of Basement Levels
l Staircase, Basement
Included in Cost: Center stringer, base plate, top support plate, oak treads, oak handrail with
scroll spindles, and installation labor. Oak handrail and treads receive 2 coats of clear varnish and
preprimed metal parts receive 1 coat of metal paint.
Enter the total number of flights (staircases) of basement staircases found in the home. A max-
imum entry of 10 is allowed.
Staircase, Basement, Wide with Railing
A 4' wide, floating metal staircase with oak treads and single oak handrail with scroll spindles.
Note: If the foundation type is basement, (below grade, daylight, andwalkout), make sure that
all of the following data fields in the Basement Information section are also included:
l Basement Depth
l Number of Basement Levels
l Staircase, Basement
Included in Cost: Center stringer, base plate, top support plate, oak treads, oak handrail with
scroll spindles, and installation labor. Oak handrail and treads receive 2 coats of clear varnish and
pre-primed metal parts receive 1 coat of metal paint.
Enter the total number of flights (staircases) of wide basement staircases found in the home. A
maximum entry of 20 is allowed.
Number of Basement Levels
The number of basement levels or basement stories in the home.
Page 141
RCT Express 4 Workspace and Task Reference Guide - Add a Section

Note: If the foundation type is basement, (below grade, daylight, andwalkout), make sure that
all of the following data fields in the Basement Information section are also included:
l Basement Depth
l Number of Basement Levels
l Staircase, Basement
Enter the total number of basement levels or stories found in the home. A maximum entry of 2 is
allowed.
Basement Depth
A perpendicular measurement downward from the grade level to the basement floor. Also
referred to as basement floor story height or floor-to-floor height.
Note: If the foundation type is basement, (below grade, daylight, andwalkout), make sure that
all of the following data fields under the Basement Information section are also included:
l Basement Depth
l Number of Basement Levels
l Staircase, Basement
Enter the total number of feet between 7 and 20.
Basement Finish
Listed below is a comparison of the finish and construction details in basement finishes.
Standard Finish Custom Finish
Drywall installed around the
perimeter, over the insu-
lation
Drywall installed around the
perimeter, over the insu-
lation
Interior drywall partitions Ample interior drywall par-
titions
Hollow core doors Solid core doors
Page 142
RCT Express 4 Workspace and Task Reference Guide - Add a Section

Painted drywall wall finishes Partial millwork paneling
and painted drywall wall fin-
ishes
Painted drywall ceiling Painted drywall ceiling and
linear wood ceiling
Carpet and vinyl tile floor fin-
ishes
High quality carpet floor fin-
ish
Standard electrical outlets
and lighting
Ample electrical outlets and
lighting
Standard heating system Heating and air conditioning
system
% Lower Level Unfinished
This is the total percentage of the residence that has an unfinished lower level (lowest level). This
applies to bi-level, split-foyer and raised ranch styles.
Note: Do not include built-in garage area when calculating the percentage of the lower level that
is unfinished.
How to enter the percentage lower level unfinished:
1. On the Edit Building Information panel, make sure the Home Style is set to either a bi-
level, split foyer, or raised ranch style. The% lower level unfinished field appears once one
of those home styles is selected.
Page 143
RCT Express 4 Workspace and Task Reference Guide - Add a Section

2. Click the link to show the % Lower Level Unfinished section.
3. Enter the percentage of the residence that has an unfinished lower level.
4. ClickSave.
Example 1:
If you have a 2,400 sq. ft. bi-level home with a 400 sq. ft. built-in garage and 800 sq. ft. of unfin-
ished lower level, you have 100% lower level unfinished.
1,200 sq. ft. per level, so 1,200 – 400 sq. ft. built-in garage = 800 sq. ft. of lower level area, and all
is unfinished, so 100% is unfinished.
Example 2:
If you have a 2,400 sq. ft. bi-level home with a 400 sq. ft. built-in garage and 400 sq. ft. of unfin-
ished lower level, you have 50% lower level unfinished.
1,200 sq. ft. per level, so 1,200 – 400 sq. ft. built-in garage = 800 sq. ft. of lower level area – 400
sq. ft. of unfinished lower level = 400 sq. ft. of finished area = 50% unfinished lower level area.
Page 144
RCT Express 4 Workspace and Task Reference Guide - Add a Section

Example 3:
If you have a 2,400 sq. ft. bi-level home with a 400 sq. ft. built-in garage and 0 sq. ft. of unfinished
lower level, you have 0% lower level unfinished.
1,200 sq. ft. per level, so 1,200 – 400 sq. ft. built-in garage = 800 sq. ft. of lower level area – 0 sq.
ft. of unfinished lower level = 800 sq. ft. of finished area = 0% unfinished lower level area.
Enter the percentage of the lower level of the home that is unfinished.
Page 145
RCT Express 4 Workspace and Task Reference Guide - Add a Section

Delete a Section
Follow these steps to delete sections/wings from the Edit Building Information dialog.
To delete a section:
1. On the Building Information panel, click the Edit button. The Edit Building Inform-
ation dialog appears.
2. Click theDelete icon ( ) for the section you wish to delete.
3. ClickSave to save and update the information. If any errors exist they will be displayed
after you click Save.
Page 146
RCT Express 4 Workspace and Task Reference Guide - Delete a Section

Add or Edit Materials
Use the materials screen to add or edit building materials for the valuation. There are two dif-
ferent ways to add new features or materials.
The easiest way to add a new feature or material is to use the following method:
Add a feature or material
To add a feature or material:
1. In the text box next toAdd a feature or material, type the name of the material or fea-
ture that you want to add.
As you type the name, a drop-down list displaysmaterials that match what you type.
2. Select the desired item from the list then enter the unit of measure.
3. ClickAdd. The material or feature will be added to the materials page.4. After you add the material, the Valuation Total pane will indicate that the valuation data
Page 147
RCT Express 4 Workspace and Task Reference Guide - Add or Edit Materials

has changed. Click Calculate to update the totals.
You can also add or edit features and materials from the materials pane:
Add or edit from the materials pane
To add a material:
1. Click "Add name of material group", for example "Add Kitchen".
A field appears where you can select the newmaterial and add the unit of measure.
Page 148
RCT Express 4 Workspace and Task Reference Guide - Add or Edit Materials

2. Select the desired material from the drop down list.
3. Add the unit of measure, such as the number of kitchens in our example. The system
shows "User" next to the material to indicate that this material was added by a user and
not by the system.
Page 149
RCT Express 4 Workspace and Task Reference Guide - Add or Edit Materials

To edit or delete a material:
1. Select a different material or change the unit of measure to edit a material.
2. To delete a material click the delete icon .
3. After you add, edit, or delete a material, the Valuation Totals pane will indicate that the
valuation data has changed. ClickCalculate to update the totals. You can continue to
add, edit, or delete multiple materials before you calculate.
4. When you are finished editing the valuation, click the Finish button.
Page 150
RCT Express 4 Workspace and Task Reference Guide - Add or Edit Materials

A dialog opens asking whether you want to save the valuation, discard your changes, or
return to the valuation and continue editing. ClickSave to save your changes.
5. After you save the valuation, the system returns to the valuation dashboard.
Note: If you are in the Kitchens or Baths section awizard is available to help you select
the correct feature.
Search for definitions of materials or building features in the online
help.
The best way to find information on individual building materials or features is to search the online
help system.
Search the Help system
Page 151
RCT Express 4 Workspace and Task Reference Guide - Add or Edit Materials

Add a feature or material
To add a feature or material:
1. In the text box next toAdd a feature or material, type the name of the material or fea-
ture that you want to add.
As you type the name, a drop-down list displaysmaterials that match what you type.
2. Select the desired item from the list then enter the unit of measure.
3. ClickAdd. The material or feature will be added to the materials page.4. After you add the material, the Valuation Total pane will indicate that the valuation data
has changed. Click Calculate to update the totals.
Page 152
RCT Express 4 Workspace and Task Reference Guide - Add or Edit Materials

Add or edit from the materials pane
To add a material:
1. Click "Add name of material group", for example "Add Kitchen".
A field appears where you can select the newmaterial and add the unit of measure.
Page 153
RCT Express 4 Workspace and Task Reference Guide - Add or Edit Materials
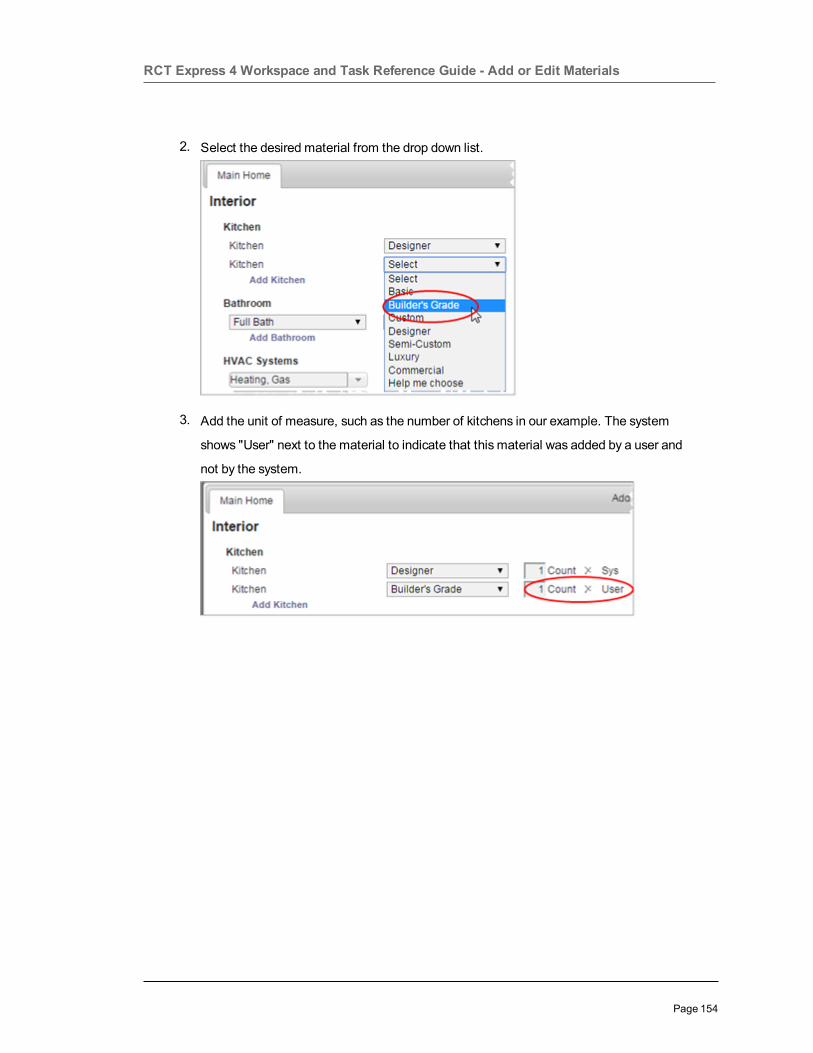
2. Select the desired material from the drop down list.
3. Add the unit of measure, such as the number of kitchens in our example. The system
shows "User" next to the material to indicate that this material was added by a user and
not by the system.
Page 154
RCT Express 4 Workspace and Task Reference Guide - Add or Edit Materials

To edit or delete a material:
1. Select a different material or change the unit of measure to edit a material.
2. To delete a material click the delete icon .
3. After you add, edit, or delete a material, the Valuation Totals pane will indicate that the
valuation data has changed. ClickCalculate to update the totals. You can continue to
add, edit, or delete multiple materials before you calculate.
4. When you are finished editing the valuation, click the Finish button.
Page 155
RCT Express 4 Workspace and Task Reference Guide - Add or Edit Materials

A dialog opens asking whether you want to save the valuation, discard your changes, or
return to the valuation and continue editing. ClickSave to save your changes.
5. After you save the valuation, the system returns to the valuation dashboard.
Note: If you are in the Kitchens or Baths section awizard is available to help you select
the correct feature.
Page 156
RCT Express 4 Workspace and Task Reference Guide - Add or Edit Materials

Kitchen and Bath Wizard
RCT includes a wizard to help you choose the type of kitchen or bathroom. Select the wizard from
the Materials panel on the Valuation page.
To use the kitchen or bath wizard from the Materials panel:
1. Under either Kitchens or Baths click the drop down list.
2. In the drop-downmenu clickHelp Me Choose to start the wizard.
3. Answer the questions in the wizard to determine the type of kitchen or bathroom.
Page 157
RCT Express 4 Workspace and Task Reference Guide - Kitchen and Bath Wizard

Preview a Valuation
On the valuation dashboard you can display a preview of the valuation without opening it. The pre-
view displays the essential information about the valuation in a popup window. Preview displays
information about the valuation including the reconstruction cost without editing the valuation or
running a report. This is useful because editing a valuation always causes a recalculation whereas
previewing does not.
To preview a valuation:
1. Click the Preview icon ( ) for the valuation you want to view. The valuation information
appears in a popup window.
Example:
2. To close the popup window, click theClose button.
Page 158
RCT Express 4 Workspace and Task Reference Guide - Preview a Valuation

Download a Report
You can download a report from the valuation dashboardwithout having to open the valuation.
To download a report:
1. Click the PDF icon ( ) for the desired valuation. A list of available reports appears.
2. Select the report type you want to download. A file download dialog appears.
3. Select Open or Save. Open displays the report as a PDF file. Save prompts you for a loc-
ation to save the file.
If you open the file, you can read it and then save it using the save command in the
Acrobat viewer.
Reports may also be generated from the valuation pane.
Page 159
RCT Express 4 Workspace and Task Reference Guide - Download a Report

Email a Report
You can email a Homeowner report from the valuation dashboardwithout opening the valuation.
To email a report:
1. Click the email icon ( ) for the valuation that you want to send. The email dialog
appears.
2. Enter the email address of the person you want to send the file to. You can also enter a
subject and a message.
3. ClickSend to email the report.
Page 160
RCT Express 4 Workspace and Task Reference Guide - Email a Report

Copy a Valuation
You can copy the information from one valuation to another from the valuation dashboard.
To copy a valuation:
1. Click the copy icon ( ) for the valuation you want to copy. The Copy Valuation dialog
appears.
2. Enter the policy number of the valuation you want to create using the information from the
valuation you are copying. A new valuation will be created using the details from the valu-
ation that was copied and you will be taken directly into the newly created valuation to
update or save.
3. ClickOK.
Note: This feature copies the policy information, building information, and materials to
the new valuation but it does not copy the costs.
Page 161
RCT Express 4 Workspace and Task Reference Guide - Copy a Valuation

Delete a Valuation
You can delete a valuation from the list on the valuation dashboard.
To delete a valuation:
1. Click the Delete icon ( ) for the valuation you want to delete. The Delete Policy dialog
appears.
2. ClickYes if you're sure you want to delete the policy.
Page 162
RCT Express 4 Workspace and Task Reference Guide - Delete a Valuation

Add Attachments
You can add items such as photos, legal documents, or architectural drawings to the valuation.
You can attach the following file types:
l Graphics (.bmp, .gif, .jpg, .png)
l PDF
l Microsoft Word
l Microsoft Excel
To add attachments:
1. On the Valuation page, select Attachments from the Options menu. The Attachments
dialog opens and displays any attachments currently added.
2. ClickAdd Attachment. TheAdd Attachment dialog opens.3. Use theBrowse button to locate the attachment you want to add. Once you locate the file
you want to use, clickOpen. The file path and name is shown in the Attachment Name
field.
4. Add a caption and any notes if desired.
5. ClickUpload. The file is uploaded and displayed in the Attachments dialog.
If you have multiple attachments use the navigation buttons to scroll through them. Click an
attachment to open it.
Page 163
RCT Express 4 Workspace and Task Reference Guide - Add Attachments

Edit an Attachment
You can edit the caption or notes for an attachment.
To edit an attachment:
1. On the Valuation page, select Attachments from theOptions menu. The Attachments
dialog opens and displays any attachments currently added.
2. Select the attachment you want to edit and clickEdit. TheUpdate Attachment dialog
opens.
Example:
3. Edit the caption or notes fields, and then clickUpdate.
Page 164
RCT Express 4 Workspace and Task Reference Guide - Edit an Attachment

Delete an Attachment
You can delete an existing attachment for a valuation.
To delete an attachment:
1. On the Valuation page, select Attachments from theOptions menu. The Attachments
dialog opens and displays any attachments currently added.
2. Select the attachment you want to delete and clickDelete. TheDelete Attachment dia-
log opens.
Example:
3. ClickYes to delete the attachment.
Page 165
RCT Express 4 Workspace and Task Reference Guide - Delete an Attachment
Add Comments
You can add comments to a valuation. Comments appear on the standard, detail, and data entry
reports. Comment types include agent comments and underwriter comments. You can enter one
comment of each type. Each comment field has a maximum of 511 characters.
Note: Permission to view or edit comments is based upon the user role defined by your
administrator.
Agent Comment
Remarks entered as an agent comment appear on the standard, detail, and data entry reports.
Depending on your defined role (set by the Administrator) you may or may not be able to add or
edit this comment.
Each valuation is limited to one agent comment which may contain a maximum of 511 char-
acters.
Underwriter Comment
Remarks entered as an underwriter comment appear on the standard, detail, and data entry
reports. Depending on your defined role (set by the Administrator) you may or may not be able to
add or edit this comment.
Each valuation is limited to one underwriter comment which may contain a maximum of 511 char-
acters.
To add comments to a valuation:
1. Open a valuation.
2. On theOptions menu, select Comments. The Comments dialog opens.3. Enter your remarks for the underwriter or agent comments.
4. ClickSave.
Page 166
RCT Express 4 Workspace and Task Reference Guide - Add Comments

Add Custom Items
Use the Custom Items dialog to add materials and costs found in the home that are not available
in RCT Express.
To add custom items:
1. Open a valuation.
2. From theOptions menu, clickCustom Items. The Custom Items dialog opens. Any cus-
tom items already defined will be shown. You can edit any existing custom item.
3. ClickAdd Custom Item.
4. Enter the information for the custom item. Required fields are indicated with an asterisk.
5. ClickSave. Repeat for any additional custom items you wish to add.
Note: You must add at least one Unit Cost (labor, equipment, or material). If you don't
know the breakdown of cost by unit you can select Lump Sum Cost as the Unit of Measure
and then enter one Total Cost.
Custom items appear on the Standard, Detailed, Data Entry, and Homeowners reports.
The following fields are used to define custom items:
Description
This is a brief description of the custom item you are entering.
Enter up to 70 characters. This is a required field.
Comments
Enter any comments that can help define the custom item.
This field is optional.
Quantity
Enter the actual number of custom items. This number is used to calculate the total cost.
This is a required field.
Page 167
RCT Express 4 Workspace and Task Reference Guide - Add Custom Items

Unit of Measure
Select the unit of measure for the custom item.
Use the drop-down list to select the appropriate unit.
This is a required field.
When defining a custom item you must add at least one Unit Cost (labor, equipment, or material).
If you don't know the breakdown of cost by unit you can select Lump Sum Cost as the Unit of
Measure and then enter just one Total Cost.
Report Location
Enter the material system location for the custom item you are defining. This controls which
material system the custom item will be grouped with on reports.
Use the drop-down list to select the appropriate location.
This is a required field.
Coverage Type
This is the current coverage A amount for the policy.
l Coverage A (Dwelling) is the part of the dwelling policy that covers the dwelling and
attached additions (for example, screened porches and breezeways, attached garage, and
so on). Coverage A also covers the materials and supplies for the construction, alteration,
or repair of the residence.
Enter the current dollar amount (up to $999,999,999) of coverage A for the policy. This amount
prints in the body of the report. Note: Do not enter dollar signs or commas.
Labor Cost
This is the per unit labor cost for the custom item.
Enter a dollar amount between 0 -10,000,000. You can include decimal amounts (for example,
1000.50) but do not enter the dollar signs or commas.
The total labor cost is computed bymultiplying the per unit labor cost by the custom item quantity.
Page 168
RCT Express 4 Workspace and Task Reference Guide - Add Custom Items

Note: The labor cost can be combined with equipment costs and/or material costs to reach the
total cost, but at least one individual cost (labor, equipment, or material) must be entered for each
custom item.
Equipment Cost
This is the per unit equipment cost for the custom item.
Enter a dollar amount between 0 -10,000,000. You can include decimal amounts (for example,
1000.50) but do not enter the dollar signs or commas.
The total equipment cost is computed bymultiplying the per unit equipment cost by the custom
item quantity.
Note: The equipment cost can be combined with labor costs and/or material costs to reach the
total cost, but at least one individual cost (labor, equipment, or material) must be entered for each
custom item.
Material Cost
This is the per unit material cost for the custom item.
Enter a dollar amount between 0 -10,000,000. You can include decimal amounts (for example,
1000.50) but do not enter the dollar signs or commas.
The total material cost is computed bymultiplying the per unit material cost by the custom item
quantity.
Note: The material cost can be combined with labor costs and/or equipment costs to reach the
total cost, but at least one individual cost (labor, equipment, or material) must be entered for each
custom item.
Total Cost
This is the cost of the custom item when using Lump Sum Cost as the unit of measure.
When defining a custom item you must add at least one Unit Cost (labor, equipment, or material).
If you don't know the breakdown of cost by unit you can select Lump Sum Cost as the Unit of
Measure and then enter one Total Cost.
Page 169
RCT Express 4 Workspace and Task Reference Guide - Add Custom Items

Enter Markups and Adjustments
Use this feature to edit user adjustment factors, depreciation, and cost exclusions (where applic-
able).
To enter markups and adjustments:
1. On the Valuation page, select Markups and Adjustments from theOptions menu. The
Markup and Adjustments dialog opens.
2. Select the type of depreciation.
l None
l Calculate Based on Effective Age
l Use Depreciation Percentage
3. If you select Calculate Based on Effective Age, enter the age in years and select the con-
dition.
4. If you select Use Depreciation Percentage, enter the percent.
5. Select the type of value basis.
l Reconstruction
l New construction
6. ClickSave.
Page 170
RCT Express 4 Workspace and Task Reference Guide - Enter Markups and Adjustments

Additional Fields Settings
To access this dialog go to the dashboard and select Tools > Configuration Settings and then
click + next toAdditional Fields Settings. Use this dialog to enable the feature and to enable
additional fields for specific user roles.
Additional fields are client defined fields that can be used to pass through data that will not affect
the calculation of reconstruction cost. Examples of how the additional fields can be used is for
identifying a particular company or line of business that a valuation is being created for, or for
passing cost accounting data that is used for billing back internal costs.
Additional fields can be enabled for specific user roles. When additional fields are used and dis-
played in a valuation, the information is included on the standard, detailed, and comparison
reports. An administrator configures and manages additional fields. A user can view or enter
information into the fields for a valuation (if their user role is enabled for this feature).
To enable additional fields:
1. To enable the feature, select the Enable Additional fields check box.2. Enable the feature for specific user roles by selecting the check box next to the desired
user roles.
3. ClickSave. Click the - icon to collapse the Additional Fields settings. ClickClose to close
the Configuration Settings dialog and return to the dashboard.
Page 171
RCT Express 4 Workspace and Task Reference Guide - Additional Fields Settings
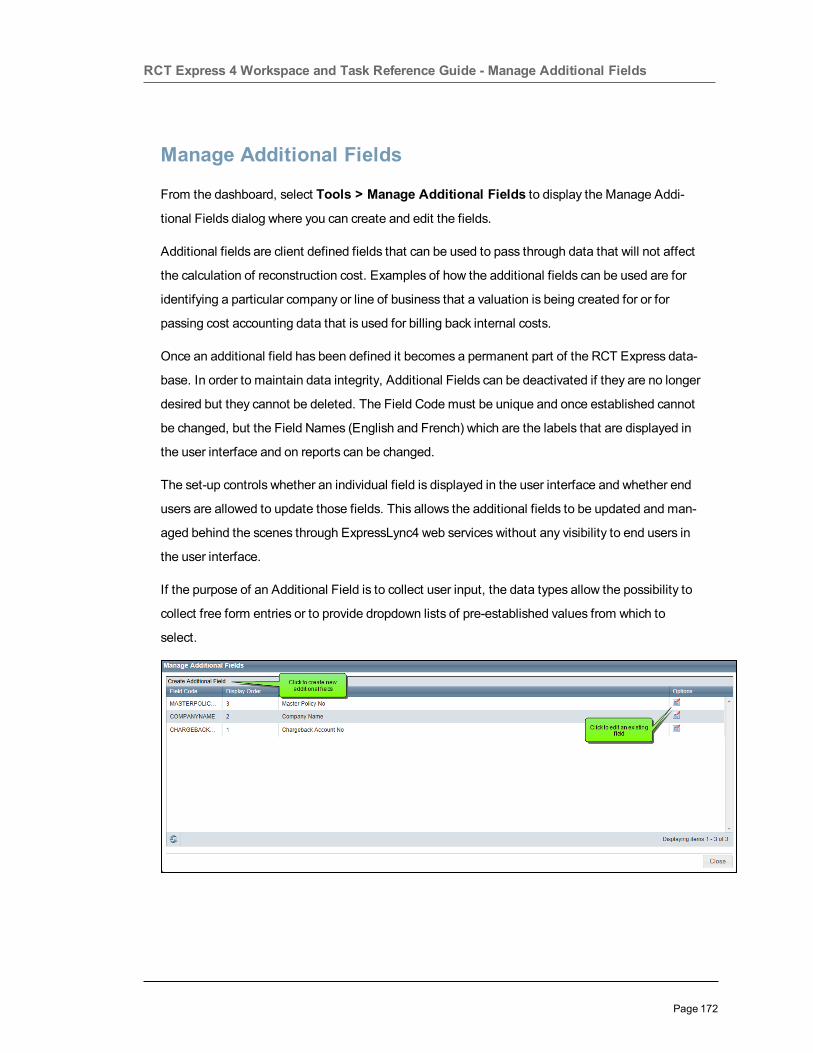
Manage Additional Fields
From the dashboard, select Tools > Manage Additional Fields to display the Manage Addi-
tional Fields dialog where you can create and edit the fields.
Additional fields are client defined fields that can be used to pass through data that will not affect
the calculation of reconstruction cost. Examples of how the additional fields can be used are for
identifying a particular company or line of business that a valuation is being created for or for
passing cost accounting data that is used for billing back internal costs.
Once an additional field has been defined it becomes a permanent part of the RCT Express data-
base. In order to maintain data integrity, Additional Fields can be deactivated if they are no longer
desired but they cannot be deleted. The Field Code must be unique and once established cannot
be changed, but the Field Names (English and French) which are the labels that are displayed in
the user interface and on reports can be changed.
The set-up controls whether an individual field is displayed in the user interface and whether end
users are allowed to update those fields. This allows the additional fields to be updated and man-
aged behind the scenes through ExpressLync4 web services without any visibility to end users in
the user interface.
If the purpose of an Additional Field is to collect user input, the data types allow the possibility to
collect free form entries or to provide dropdown lists of pre-established values from which to
select.
Page 172
RCT Express 4 Workspace and Task Reference Guide - Manage Additional Fields

On theManage Additional Fields dialog you can view the fields that have already been defined.
The Field Code, Display Order, and Field Name is displayed.
You can create a new field by clickingCreate Additional Field.
You can edit an existing field by clicking theEdit button ( ) in theOptions column for the
field you wish to edit.
Additional fields are enabled under Tools > Configuration Settings.
Page 173
RCT Express 4 Workspace and Task Reference Guide - Manage Additional Fields

Create Additional Fields
To create Additional fields:
1. From the dashboard select Tools > Manage Additional Fields.2. On the Manage Additional Fields dialog, clickCreate Additional Field.The Create Addi-
tional Field dialog opens.
3. Enter the desired information into each field. Required fields are indicated with a red aster-
isk ( * ).4. ClickSavewhen done. Repeat the procedure to create more Additional fields.
Field definitions:
Field Code
Enter a name used to identify the field. The field code is not displayed to the user. This field must
be unique.
English Field Name
Enter a name for the field. This field name is displayed to the user.
Page 174
RCT Express 4 Workspace and Task Reference Guide - Create Additional Fields

French Field Name
Optionally, enter a French field name.
Display Order
Enter a numeric value for the order in which you want the fields displayed. The system will display
an alert message if the number for the display order has been previously used for another field.
Active
Selecting the Active field makes the field eligible to be displayed to the user. The Display field can
then be used to turn the display of the field on or off to the user. If Active is unchecked the field is
now inactive and is not eligible to be displayed to the user regardless of the state of the Display
field (Active has priority over Display). The active field is a quick way to turn the field on or off
while keeping all the original settings for the field. Note that unchecking the Active field will hide
the field going forward, but the field will still be displayed for previous versions of a valuation.
Display
If set to Yes, the user can see the field (if it is Active). If set to No, the user cannot see the field.
Editable
If set to Yes, the user can edit the information in the field. If set to No, the field is read-only and
cannot be edited.
Data Type
Select the data type for the field. It can be one of the following types:
Currency: This format is used for dollar amounts. A $ symbol is automatically inserted.
Date: If the date format is selected for the data type, a calendar icon ( ) appears next to the
field. A user can select the date from the calendar or type the date in mm/dd/yyyy format.
Decimal: This format is used for decimal value entries.
Whole Number: This format is used for whole number values (no decimal places).
Page 175
RCT Express 4 Workspace and Task Reference Guide - Create Additional Fields

Lookup: This format is used to define values that can be selected from a dropdown list. The user
can then select one item from the dropdown list when entering values in Additional fields for a
valuation.
When you select Lookup as the data type the following fields appear:
Enter a value in the field option (English or French) and clickAdd. Repeat for the additional val-
ues. As you enter them, they are shown in a table:
Multi-lookup: This format is used to define multiple values that can be selected. The user can
then select multiple itemswhen entering values in Additional fields for a valuation.
When you select Multi-Lookup as the data type the following fields appear:
Page 176
RCT Express 4 Workspace and Task Reference Guide - Create Additional Fields

Enter a value in the field option (English or French) and clickAdd. Repeat for the additional val-
ues. As you enter them, they are shown in a table:
String: This format is used for strings of alphanumeric characters.
Page 177
RCT Express 4 Workspace and Task Reference Guide - Create Additional Fields

Edit Additional Fields
To edit Additional fields:
1. From the dashboard select Tools > Manage Additional Fields.
2. On the Manage Additional Fields dialog, click the edit icon ( ) for the field you wish to
edit. The Edit Additional Field dialog opens. The field code and the data type cannot be
edited.
3. Enter the desired information into each field. Required fields are indicated with a red aster-
isk ( * ).4. ClickSavewhen done. Repeat the procedure to edit additional Additional fields.
Field definitions:
Field Code
Enter a name used to identify the field. The field code is not displayed to the user. This field must
be unique.
Page 178
RCT Express 4 Workspace and Task Reference Guide - Edit Additional Fields

English Field Name
Enter a name for the field. This field name is displayed to the user.
French Field Name
Optionally, enter a French field name.
Display Order
Enter a numeric value for the order in which you want the fields displayed. The system will display
an alert message if the number for the display order has been previously used for another field.
Active
Selecting the Active field makes the field eligible to be displayed to the user. The Display field can
then be used to turn the display of the field on or off to the user. If Active is unchecked the field is
now inactive and is not eligible to be displayed to the user regardless of the state of the Display
field (Active has priority over Display). The active field is a quick way to turn the field on or off
while keeping all the original settings for the field. Note that unchecking the Active field will hide
the field going forward, but the field will still be displayed for previous versions of a valuation.
Display
If set to Yes, the user can see the field (if it is Active). If set to No, the user cannot see the field.
Editable
If set to Yes, the user can edit the information in the field. If set to No, the field is read-only and
cannot be edited.
Data Type
Select the data type for the field. It can be one of the following types:
Currency: This format is used for dollar amounts. A $ symbol is automatically inserted.
Date: If the date format is selected for the data type, a calendar icon ( ) appears next to the
field. A user can select the date from the calendar or type the date in mm/dd/yyyy format.
Decimal: This format is used for decimal value entries.
Whole Number: This format is used for whole number values (no decimal places).
Page 179
RCT Express 4 Workspace and Task Reference Guide - Edit Additional Fields

Lookup: This format is used to define values that can be selected from a dropdown list. The user
can then select one item from the dropdown list when entering values in Additional fields for a
valuation.
When you select Lookup as the data type the following fields appear:
Enter a value in the field option (English or French) and clickAdd. Repeat for the additional val-
ues. As you enter them, they are shown in a table:
Multi-lookup: This format is used to define multiple values that can be selected. The user can
then select multiple itemswhen entering values in Additional fields for a valuation.
When you select Multi-Lookup as the data type the following fields appear:
Page 180
RCT Express 4 Workspace and Task Reference Guide - Edit Additional Fields

Enter a value in the field option (English or French) and clickAdd. Repeat for the additional val-
ues. As you enter them, they are shown in a table:
String: This format is used for strings of alphanumeric characters.
Page 181
RCT Express 4 Workspace and Task Reference Guide - Edit Additional Fields

Additional Fields
Additional fields are custom fields that can be used to pass through data that will not affect the cal-
culation of reconstruction cost. Additional fields can be enabled for specific user roles. When Addi-
tional fields are used in a valuation, the information is included on the standard, detailed, and
comparison reports. An administrator configures and manages Additional fields. A user can view
or enter information into the fields for a valuation (if their user role is enabled for this feature).
To enter or view information in Additional fields:
1. In a valuation, select Options > Additional Fields. The Additional Fields dialog opens.
Example: (Field names are for demo purposes. Actual field names are defined when cre-
ating additional fields)
2. Enter values in the appropriate fields. Some valuesmay be selected from a dropdown list.
Some fields have multiple items that you can select. Click in the blank field to display the
choices and then select one or more items. Currency fields automatically insert a $ sym-
bol. Date fields have a calendar icon ( ); click the icon to select a date from a calendar.
3. ClickSavewhen done.
Additional fields with values entered appear on Detailed, Standard, and Comparison reports.
Page 182
RCT Express 4 Workspace and Task Reference Guide - Additional Fields

Save a Valuation
To save a valuation:
1. When you are finished editing the valuation, click the Finish button.
A dialog opens asking whether you want to save the valuation, discard your changes, or
return to the valuation and continue editing.
2. After you save the valuation, the system returns to the valuation dashboard.
Page 183
RCT Express 4 Workspace and Task Reference Guide - Save a Valuation

How to Turn Off Internet Explorer Compatibility View
RCT Express has been tested in Internet Explorer with Compatibility View turned off. You may
encounter less than optimal results if you have Compatibility View turned on, therefore we recom-
mend that you turn off Compatibility View in Internet Explorer.
There are a number of different ways to turn off Compatibility View in IE.
Option One: Using the Address bar
l If Compatibility View is “on” the icon will be highlighted blue as shown in the graphic
above.
l Click the highlighted icon to turn off Compatibility View. The icon will turn gray as shown
below.
Note: Displaying the Tools menu in Internet Explorer
The next options use the Tools menu in IE.
l If the Tools menu is not currently displayed in IE, right click in any open area to display the
toolbar options.
l Select “Menu bar”.
Page 184
RCT Express 4 Workspace and Task Reference Guide - How to Turn Off Internet Explorer
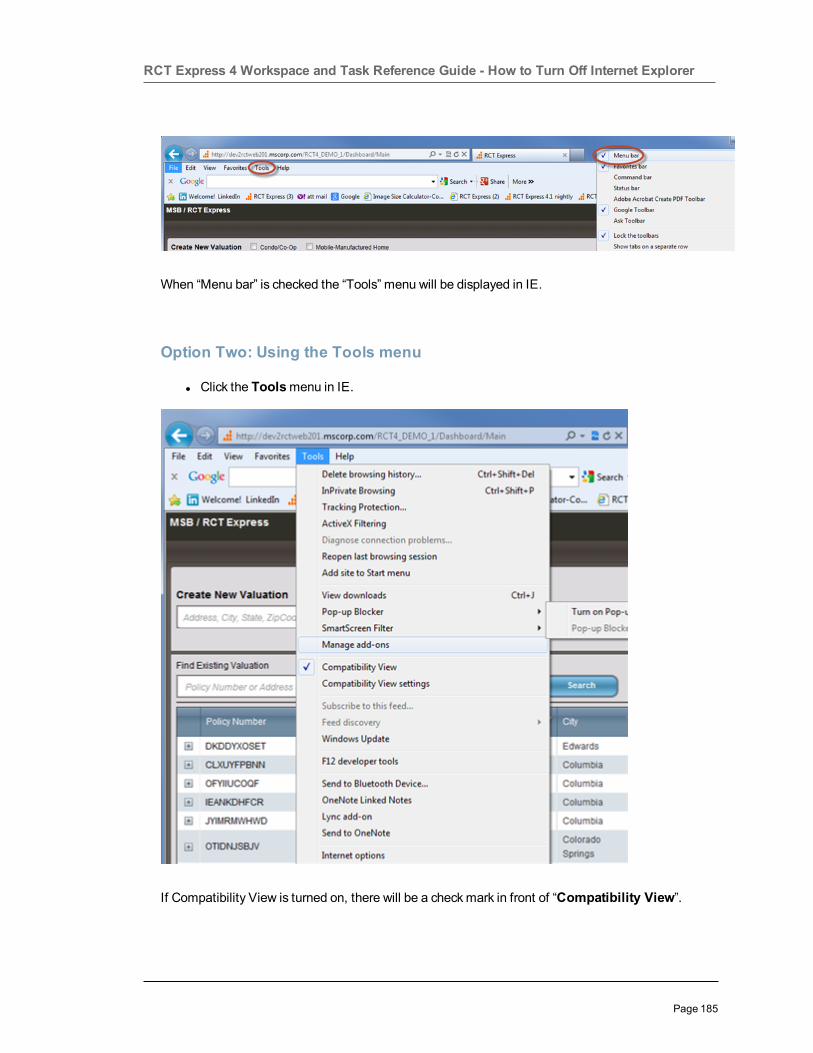
When “Menu bar” is checked the “Tools” menu will be displayed in IE.
Option Two: Using the Tools menu
l Click the Toolsmenu in IE.
If Compatibility View is turned on, there will be a checkmark in front of “Compatibility View”.
Page 185
RCT Express 4 Workspace and Task Reference Guide - How to Turn Off Internet Explorer

To turn this off, click the checkmark. Compatibility View will be turned off and the checkmark will
no longer appear.
“Compatibility View” in not checked, indicating that it is turned off.
Option Three: Using Compatibility View Settings
l Go to the Toolsmenu and clickCompatibility View Settings.
Page 186
RCT Express 4 Workspace and Task Reference Guide - How to Turn Off Internet Explorer

The Compatibility View Settings dialog appears:
Page 187
RCT Express 4 Workspace and Task Reference Guide - How to Turn Off Internet Explorer

l In this dialog, uncheck the “Display all websites in Compatibility View” option.l Make sure your RCT Express site isNOT listed in the “Websites you’ve added to Com-
patibility View” box. If it is, select it and clickRemove.l When done, clickClose.
Option Four: Using Developer Tools
Use this method to ensure that all settings are correct.
l Go to Tools and select Developer Tools
Page 188
RCT Express 4 Workspace and Task Reference Guide - How to Turn Off Internet Explorer
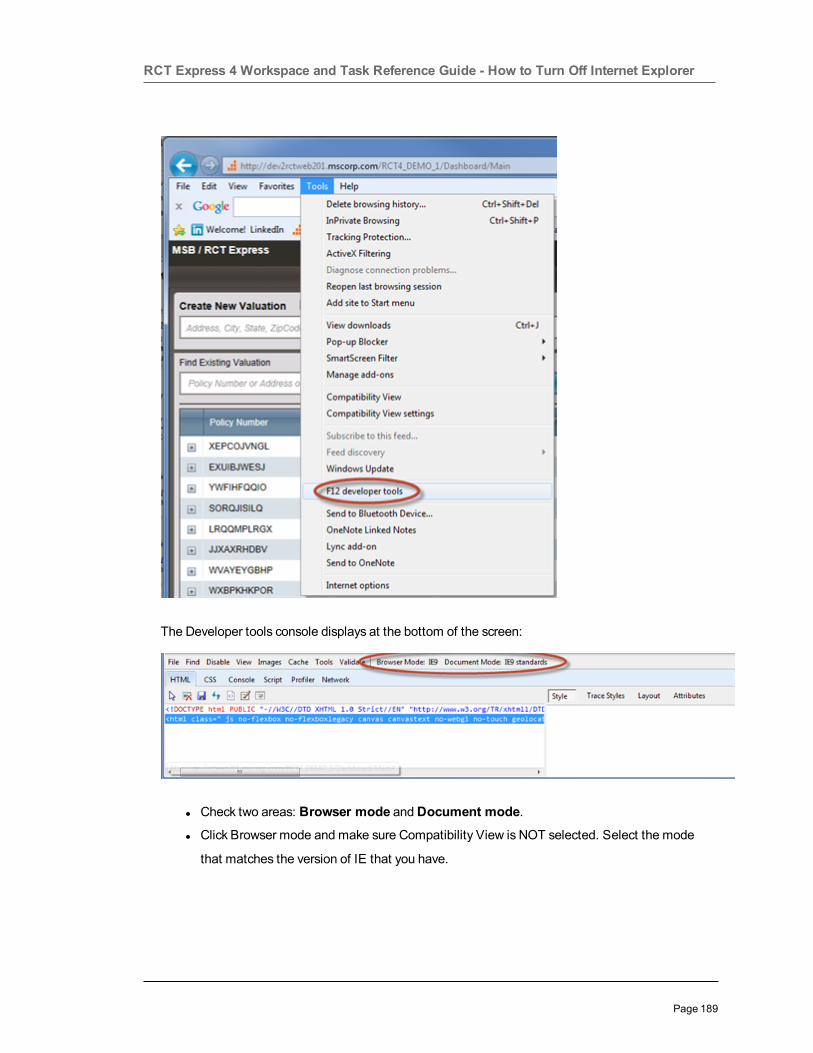
The Developer tools console displays at the bottom of the screen:
l Check two areas: Browser mode andDocument mode.l Click Browser mode and make sure Compatibility View is NOT selected. Select the mode
that matches the version of IE that you have.
Page 189
RCT Express 4 Workspace and Task Reference Guide - How to Turn Off Internet Explorer

l Next, check Document mode and make sure Quirksmode is NOT selected. Select the
mode that matches the version of IE that you have.
Making these settings will make sure that Compatibility View is turned off.
Page 190
RCT Express 4 Workspace and Task Reference Guide - How to Turn Off Internet Explorer