worksoft execution suite installation guide
TRANSCRIPT

Worksoft, Inc. · 15851 Dallas Parkway, Suite 855 · Addison, TX 75001www.worksoft.com · 866-836-1773
Worksoft Certify® Execution Suite
Installation Guide

PN WESIG 1004 091619
Worksoft Certify Execution Suite Installation Guide
Version 10
© Copyright 2019 by Worksoft, Inc. All rights reserved.Worksoft is a business name of Worksoft, Inc. Information in this document is subject to change and revision without notice. No part of this manual may be reproduced by any means, electronic or mechanical, for any purpose other than the purchaser’s personal use, without prior written permission from Worksoft.Worksoft provides this documentation “as is” without warranty of any kind, either express or implied. Worksoft may revise information in this document without notice and does not represent a commitment on the part of Worksoft, Inc.Worksoft, Inc. may have patents or pending patent applications covering subject matter in this document. The furnishing of this document does not give you any license to these patents except as expressly provided in any written license agreement from Worksoft, Inc.
Trademarks
Worksoft Certify® is a registered trademark of Worksoft, Inc.All other trademarks and trade names mentioned in this guide are the property of their respective owners.

Table of Contents
Chapter 1 Preparing For Installation . . . . . . . . . . . . . . . . . . . . . . . . . . . . . . . . . . . . . . . . 6Understanding Worksoft Execution Suite . . . . . . . . . . . . . . . . . . . . . . . . . . . . . . . . . . . . . . . . . . . . . 7
System Requirements . . . . . . . . . . . . . . . . . . . . . . . . . . . . . . . . . . . . . . . . . . . . . . . . . . . . . . . 7Port Requirements . . . . . . . . . . . . . . . . . . . . . . . . . . . . . . . . . . . . . . . . . . . . . . . . . . . . . . . . . . 7
Configuring Your Application Server . . . . . . . . . . . . . . . . . . . . . . . . . . . . . . . . . . . . . . . . . . . . . . . . 8Adding Roles and Features . . . . . . . . . . . . . . . . . . . . . . . . . . . . . . . . . . . . . . . . . . . . . . . . . . . . 8Configuring the Web Server Role (IIS) . . . . . . . . . . . . . . . . . . . . . . . . . . . . . . . . . . . . . . . . . . . 15Configuring Application/Json Mime-Type Compression . . . . . . . . . . . . . . . . . . . . . . . . . . . . . . . 17
Enabling IIS Services . . . . . . . . . . . . . . . . . . . . . . . . . . . . . . . . . . . . . . . . . . . . . . . . . . . . . . . . . . 18Create Inbound and Outbound Rules in the Windows Firewall . . . . . . . . . . . . . . . . . . . . . . . . . . . . . 19
Chapter 2 Preparing Your SAP Systems for Certify Impact . . . . . . . . . . . . . . . . . . . . . 27Overview . . . . . . . . . . . . . . . . . . . . . . . . . . . . . . . . . . . . . . . . . . . . . . . . . . . . . . . . . . . . . . . . . . 28Creating a Certify System Account in your SAP System . . . . . . . . . . . . . . . . . . . . . . . . . . . . . . . . . . 28Installing Certify Impact Transports in Your SAP System . . . . . . . . . . . . . . . . . . . . . . . . . . . . . . . . . 29
Chapter 3 Installing Worksoft Application Server . . . . . . . . . . . . . . . . . . . . . . . . . . . . . 30Installing Worksoft Application Server . . . . . . . . . . . . . . . . . . . . . . . . . . . . . . . . . . . . . . . . . . . . . . 31Disabling Interactive Service Detection Service . . . . . . . . . . . . . . . . . . . . . . . . . . . . . . . . . . . . . . . . 34
Chapter 4 Configuring the Worksoft Management Studio . . . . . . . . . . . . . . . . . . . . . . 36Overview . . . . . . . . . . . . . . . . . . . . . . . . . . . . . . . . . . . . . . . . . . . . . . . . . . . . . . . . . . . . . . . . . . 37
Exploring Worksoft Management Studio . . . . . . . . . . . . . . . . . . . . . . . . . . . . . . . . . . . . . . . . . . 37Creating Your Worksoft Management Studio Database . . . . . . . . . . . . . . . . . . . . . . . . . . . . . . . . . . 39Registering and Creating Certify Execution Suite Databases . . . . . . . . . . . . . . . . . . . . . . . . . . . . . . . 42Registering SAP Systems . . . . . . . . . . . . . . . . . . . . . . . . . . . . . . . . . . . . . . . . . . . . . . . . . . . . . . . 46Configuring Certify Impact . . . . . . . . . . . . . . . . . . . . . . . . . . . . . . . . . . . . . . . . . . . . . . . . . . . . . . 48Registering Users . . . . . . . . . . . . . . . . . . . . . . . . . . . . . . . . . . . . . . . . . . . . . . . . . . . . . . . . . . . . 49
Exporting a List of Users . . . . . . . . . . . . . . . . . . . . . . . . . . . . . . . . . . . . . . . . . . . . . . . . . . . . 51Configuring Your Email Service . . . . . . . . . . . . . . . . . . . . . . . . . . . . . . . . . . . . . . . . . . . . . . . . . . . 52Configuring Your LDAP Authentication Service . . . . . . . . . . . . . . . . . . . . . . . . . . . . . . . . . . . . . . . . 53Adding RDP Servers . . . . . . . . . . . . . . . . . . . . . . . . . . . . . . . . . . . . . . . . . . . . . . . . . . . . . . . . . . . 56Modifying Maintenance Window Text . . . . . . . . . . . . . . . . . . . . . . . . . . . . . . . . . . . . . . . . . . . . . . 57
Worksoft Certify Execution Suite Installation Guide 3

Chapter 5 Adding Bookmarks . . . . . . . . . . . . . . . . . . . . . . . . . . . . . . . . . . . . . . . . . . . . . 59Creating Bookmarks . . . . . . . . . . . . . . . . . . . . . . . . . . . . . . . . . . . . . . . . . . . . . . . . . . . . . . . . . . 60
Executing a Bookmark . . . . . . . . . . . . . . . . . . . . . . . . . . . . . . . . . . . . . . . . . . . . . . . . . . . . . . 64
Chapter 6 Configuring Multi-Tenant Spaces . . . . . . . . . . . . . . . . . . . . . . . . . . . . . . . . . 65Overview . . . . . . . . . . . . . . . . . . . . . . . . . . . . . . . . . . . . . . . . . . . . . . . . . . . . . . . . . . . . . . . . . . 66Adding Tenants . . . . . . . . . . . . . . . . . . . . . . . . . . . . . . . . . . . . . . . . . . . . . . . . . . . . . . . . . . . . . . 66
Switching Between Tenants . . . . . . . . . . . . . . . . . . . . . . . . . . . . . . . . . . . . . . . . . . . . . . . . . . 67Adding Users to Tenants . . . . . . . . . . . . . . . . . . . . . . . . . . . . . . . . . . . . . . . . . . . . . . . . . . . . . . . 68
Chapter 7 Installing Remote Certify Execution Manager Agents . . . . . . . . . . . . . . . . . 71Installing Remote Certify Execution Manager Agents . . . . . . . . . . . . . . . . . . . . . . . . . . . . . . . . . . . . 72
Administrator Rights . . . . . . . . . . . . . . . . . . . . . . . . . . . . . . . . . . . . . . . . . . . . . . . . . . . . . . . 72Configuring Resource Client Machines . . . . . . . . . . . . . . . . . . . . . . . . . . . . . . . . . . . . . . . . . . . . . . 75
Enabling and Starting Net.TCP Port Sharing Service . . . . . . . . . . . . . . . . . . . . . . . . . . . . . . . . . 75Create Inbound and Outbound Rules for Port 4242 in the Windows Firewall . . . . . . . . . . . . . . . . 77Configuring Resource Machine to be Responsive to Execution Manager Pings . . . . . . . . . . . . . . . 85Disabling Windows Fast User Switching Mode . . . . . . . . . . . . . . . . . . . . . . . . . . . . . . . . . . . . . 86
Accessing the Certify Execution Manager Agent . . . . . . . . . . . . . . . . . . . . . . . . . . . . . . . . . . . . . . . 86Best Practices for Using RDP with Multiple Local Users . . . . . . . . . . . . . . . . . . . . . . . . . . . . . . . . . . 87
Avoiding Initial Log on Time Consumption . . . . . . . . . . . . . . . . . . . . . . . . . . . . . . . . . . . . . . . . 87Avoiding Requests Failure . . . . . . . . . . . . . . . . . . . . . . . . . . . . . . . . . . . . . . . . . . . . . . . . . . . 87
Troubleshooting RDP Sessions . . . . . . . . . . . . . . . . . . . . . . . . . . . . . . . . . . . . . . . . . . . . . . . . . . . 88
Chapter 8 Upgrading Worksoft Certify Execution Suite . . . . . . . . . . . . . . . . . . . . . . . . 89Upgrading Worksoft Certify Execution Suite v9.2 to v10 . . . . . . . . . . . . . . . . . . . . . . . . . . . . . . . . . 90Upgrading Databases for Multi-Tenancy . . . . . . . . . . . . . . . . . . . . . . . . . . . . . . . . . . . . . . . . . . . . . 92Updating Resources . . . . . . . . . . . . . . . . . . . . . . . . . . . . . . . . . . . . . . . . . . . . . . . . . . . . . . . . . . . 93Upgrading Worksoft Certify Execution Suite v10.0.0 to v10.0.X . . . . . . . . . . . . . . . . . . . . . . . . . . . . 94
Chapter 9 Accessing Worksoft Certify Execution Suite . . . . . . . . . . . . . . . . . . . . . . . . . 95Accessing Certify Impact . . . . . . . . . . . . . . . . . . . . . . . . . . . . . . . . . . . . . . . . . . . . . . . . . . . . . . . 96Accessing Certify Execution Manager . . . . . . . . . . . . . . . . . . . . . . . . . . . . . . . . . . . . . . . . . . . . . . . 96REST API Support for Execution Manager . . . . . . . . . . . . . . . . . . . . . . . . . . . . . . . . . . . . . . . . . . . 96
Chapter 10 Configuring HP Quality Center Integration . . . . . . . . . . . . . . . . . . . . . . . . 97Overview . . . . . . . . . . . . . . . . . . . . . . . . . . . . . . . . . . . . . . . . . . . . . . . . . . . . . . . . . . . . . . . . . . 98Installing the HP Quality Center Connectivity Add-On Tool . . . . . . . . . . . . . . . . . . . . . . . . . . . . . . . . 98Integrating Worksoft Execution Suite with HP ALM . . . . . . . . . . . . . . . . . . . . . . . . . . . . . . . . . . . . . 99
Integrating with Certify Impact . . . . . . . . . . . . . . . . . . . . . . . . . . . . . . . . . . . . . . . . . . . . . . . .100
4 Worksoft Certify Execution Suite Installation Guide

Chapter 11 Configuring Panaya TDx Integration . . . . . . . . . . . . . . . . . . . . . . . . . . . . 101Overview . . . . . . . . . . . . . . . . . . . . . . . . . . . . . . . . . . . . . . . . . . . . . . . . . . . . . . . . . . . . . . . . . .102Configuring Certify BPP . . . . . . . . . . . . . . . . . . . . . . . . . . . . . . . . . . . . . . . . . . . . . . . . . . . . . . . .102Adding Panaya TDx Information to Worksoft Management Studio . . . . . . . . . . . . . . . . . . . . . . . . . .104Creating Bookmarks for Panaya TDx Integration . . . . . . . . . . . . . . . . . . . . . . . . . . . . . . . . . . . . . . .105Creating a Worksoft Automation Cycle . . . . . . . . . . . . . . . . . . . . . . . . . . . . . . . . . . . . . . . . . . . . . .105
Appendix A Troubleshooting . . . . . . . . . . . . . . . . . . . . . . . . . . . . . . . . . . . . . . . . . . . . 107Verifying the Worksoft Management Studio Configuration File . . . . . . . . . . . . . . . . . . . . . . . . . . . . .107
Appendix B Using HTTPS on Your Application Server . . . . . . . . . . . . . . . . . . . . . . . . . 108
Appendix C Creating Worksoft Certify Execution Suite Databases with Apply.exe . 110Creating or Updating the Worksoft Management Studio Database . . . . . . . . . . . . . . . . . . . . . . . . . .110Creating or Updating a Certify Execution Manager Database . . . . . . . . . . . . . . . . . . . . . . . . . . . . . .111Creating or Updating a Certify Impact Database . . . . . . . . . . . . . . . . . . . . . . . . . . . . . . . . . . . . . . .112
Appendix D Creating a Task in the Windows Task Scheduler . . . . . . . . . . . . . . . . . . 114
Worksoft Certify Execution Suite Installation Guide 5

Chapter 1 Preparing For Installation
In This Chapter
Understanding Worksoft Execution Suite ................................................................................. 7Configuring Your Application Server ........................................................................................ 8Enabling IIS Services ........................................................................................................... 18Create Inbound and Outbound Rules in the Windows Firewall................................................. 19
Worksoft Certify Execution Suite Installation Guide 6

Understanding Worksoft Execution Suite
Understanding Worksoft Execution Suite
The Worksoft Certify® Execution Suite consists of the following applications: Worksoft Management Studio™ - Registers database settings, data sources, and SAP systems that you
intend to use with the Worksoft products. Certify Execution Manager™ - Schedules and manages the remote execution of Worksoft Certify®
processes. Certify Impact™ - Provides you with the ability to quickly deploy changes to your SAP® systems by
identifying and executing a minimal set of Worksoft Certify processes for impacted programs and transactions.
System RequirementsBefore you begin to install the Certify Execution Suite, verify that your environment has the needed system requirements installed. For information about system requirements and planning your environment, see the Worksoft Help Portal.
Port Requirements
Worksoft Certify Execution Suite requires that you use the following ports when configuring the product:
LDAP Port Requirements
If you are using LDAP for authentication, you will need to use the following ports and protocol:
Warning:Do not install Worksoft Certify Execution Suite on the same server as the Worksoft Certify API data service because of the constraint of bandwidth on the network interface controller (NIC card).
Component Port Number
Worksoft Application Server 80 and 443
Execution Manager Agent 4242
Type of Traffic AD and AD DS Usage Protocol and Port Number
LDAP Directory, Replication, User and Computer Authentication, Group Policy, Trusts
TCP and UDP 389
LDAP SSL Directory, Replication, User and Computer Authentication, Group Policy, Trusts
TCP 363
LDAP GC Directory, Replication, User and Computer Authentication, Group Policy, Trusts
TCP 3268
LDAP GC SSL Directory, Replication, User and Computer Authentication, Group Policy, Trusts
TCP 3269
Worksoft Certify Execution Suite Installation Guide 7

Configuring Your Application Server
Configuring Your Application Server
One or more web application servers are required. There are window services and web applications that will be installed for each of the products in the Worksoft Certify Execution Suite. Read Planning and Provisioning for the Worksoft Execution Suite in the Worksoft Help Portal to determine if additional web application servers will be required.In order to transform your application server into a web server, Microsoft® Internet Information Services (IIS) must be installed in order to host Worksoft Web services and Worksoft web applications. After you have installed IIS, you will need to configure the Server Manager.This chapter will guide you to configuring the minimum requirements for Worksoft products. You may need assistance from your IT administrator.
Adding Roles and Features
The Server Manager allows you to add specific roles and features to your web server that are required for Worksoft products.
To add roles and features to your web server:
1 From the Start menu, select Administrative Tools > Server Manager.The Server Manager opens.
2 In the Navigation pane, select Dashboard.3 In the Summary Tasks pane, select Add Roles and Features.
The Add Roles Wizard opens.
8 Worksoft Certify Execution Suite Installation Guide

Adding Roles and Features
4 Click Next.The Select Installation Type page appears.
5 Select the Role-based or feature-based installation option.6 Click Next.
Worksoft Certify Execution Suite Installation Guide 9

Adding Roles and Features
The Select Server Roles page appears.
7 From the Server Roles list, select the Web Server (IIS) role.8 Click Next.
After you have added the roles to the web server, you will add features to the web server.
10 Worksoft Certify Execution Suite Installation Guide

Adding Roles and Features
A dialog box appears asking if you want to add features to the web server.
9 In the Add Features dialog box, select the Include Management Tools (if applicable) option.10 Click Add Features.
The Select Features page appears.
Worksoft Certify Execution Suite Installation Guide 11

Adding Roles and Features
11 Select the .NET Framework 3.5.1 Features, .NET Framework 4.5, and all of their child nodes.
12 Select WCF Services and all of its child nodes:• HTTP Activation• Message Queuing (MSMQ) Activation• Named Pipe Activation• TCP Activation• TCP Port SharingYou may receive a message that states the following:To install Active Directory Rights Management Services Tools, this server must be joined to a domain. Before you can continue, you must join this server to a domain. Cancel this wizard and join the server to a domain. Then, run this wizard again.If you do receive this message, cancel the wizard and join the wizard to the domain.
12 Worksoft Certify Execution Suite Installation Guide

Adding Roles and Features
13 Select IIS Hostable Web Core.
14 Use the scroll bar and select the Media Foundation.15 Use the scroll bar and select the Windows Process Activation Service and all of its child nodes:
• Process Model• .NET Environment 3.5• Configuration APIs
Worksoft Certify Execution Suite Installation Guide 13

Adding Roles and Features
16 Click Next.The Web Server Role (IIS) page appears.
14 Worksoft Certify Execution Suite Installation Guide

Configuring the Web Server Role (IIS)
Configuring the Web Server Role (IIS)
After you have added your roles and features, you will now need to configure the Web Server role (IIS) in the Server Manager.1 Click Next on the Web Server Role (IIS) screen.
The Select Role Services page appears.
Worksoft Certify Execution Suite Installation Guide 15
Configuring the Web Server Role (IIS)
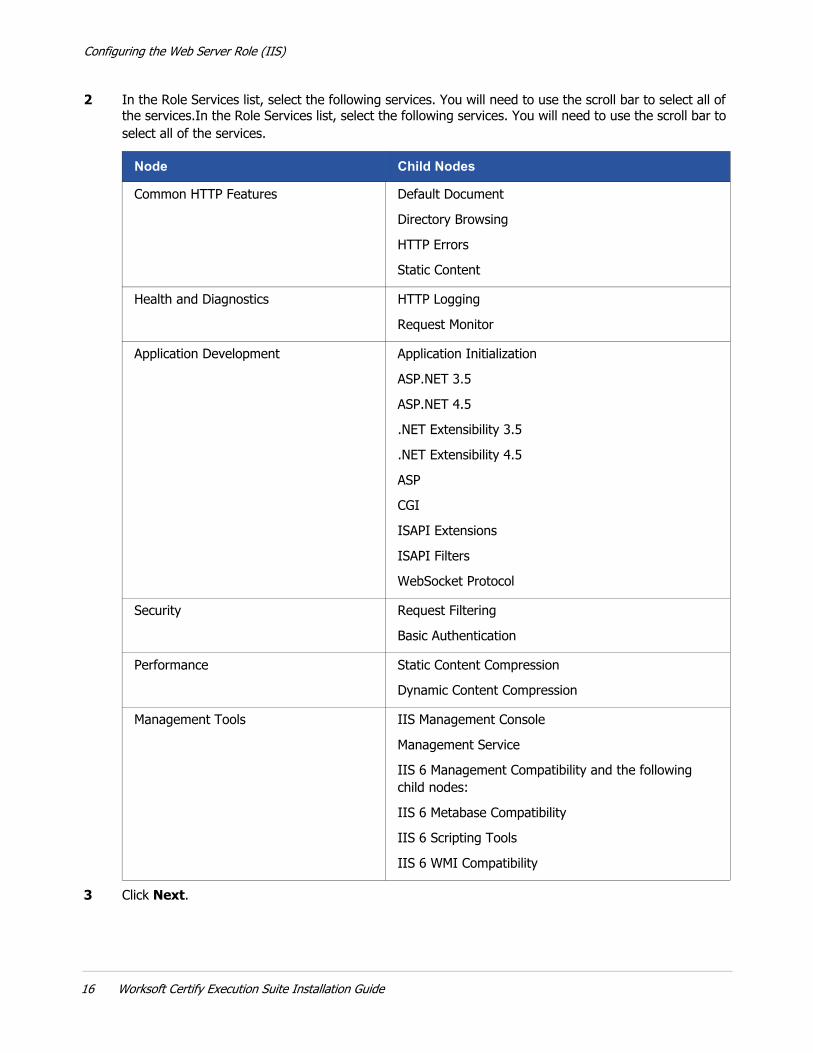
2 In the Role Services list, select the following services. You will need to use the scroll bar to select all of the services.In the Role Services list, select the following services. You will need to use the scroll bar to select all of the services.
3 Click Next.
Node Child Nodes
Common HTTP Features Default Document
Directory Browsing
HTTP Errors
Static Content
Health and Diagnostics HTTP Logging
Request Monitor
Application Development Application Initialization
ASP.NET 3.5
ASP.NET 4.5
.NET Extensibility 3.5
.NET Extensibility 4.5
ASP
CGI
ISAPI Extensions
ISAPI Filters
WebSocket Protocol
Security Request Filtering
Basic Authentication
Performance Static Content Compression
Dynamic Content Compression
Management Tools IIS Management Console
Management Service
IIS 6 Management Compatibility and the following child nodes:
IIS 6 Metabase Compatibility
IIS 6 Scripting Tools
IIS 6 WMI Compatibility
16 Worksoft Certify Execution Suite Installation Guide

Configuring Application/Json Mime-Type Compression
The Confirm Installation Selections page appears.
4 Click Install to install the role services.
Configuring Application/Json Mime-Type Compression
After you have enabled dynamic content compression within IIS, you need to configure HTTP Compression for the application/json mime-type. Worksoft Execution Suite uses dynamic content compression to improve performance. In order to implement this performance improvement, HTTP compression must be enabled for the application/json mime-type. When the Dynamic Content Compression feature is enabled, it will overwrite any previous HTTP compression settings. If the application/json mime-type was already included in the list of allowed dynamic mime-types before the Dynamic Content Compression feature is enabled, it will be removed.
To configure application/json mime-type compression:
1 Open a Command Prompt window in Administrator’s mode on the server.2 Type the following command, cd inetsrv to change the directory to
%systemroot%\system32\inetsrv.3 At the command prompt, run the following command to enable HTTP compression for the application/
json mime-type:appcmd.exe set config -section:system.webServer/httpCompression /+"dynamicTypes.[mimeType='application/json',enabled='True']" /commit:apphost
4 To verify the setting, open IIS Manager.5 In the left Navigation pane, click on your server.
Worksoft Certify Execution Suite Installation Guide 17

Enabling IIS Services
6 In the Management section, double-click the Configuration Editor.The Configuration Editor opens.
7 In the Configuration Editor, select system.webServer > httpCompression.8 Click the dynamicTypes ellipse.9 Verify that application/json is listed in the dynamic compression mime types.10 Close the editor without saving.
Enabling IIS Services
You will now need to verify that several IIS services are enabled.
To verify IIS services are enabled:
1 If the Server Manager is not open, select Administrative Tools > Server Manager from the Start menuThe Server Manager opens.
2 In the Navigation pane, select IIS.3 In the right Services pane, verify that the following services are enabled and running:
• Application Host Helper Service• IIS Admin Service• Windows Process Activation Service• World Wide Web Publishing Service
4 If any of these window services are not running, you will need to start these services.To start a service, select the service from the list and click Start in the right menu. You are also able to start your services by going to Administrative Tools > Services on your machine.
18 Worksoft Certify Execution Suite Installation Guide

Create Inbound and Outbound Rules in the Windows Firewall
Create Inbound and Outbound Rules in the Windows Firewall
You need to add an inbound rule and an outbound rule for port 4242 with the Windows Firewall with Advanced Settings tool on your server in order to communicate with your resource machines.
To add an inbound rule:
1 Open Windows Firewall with Advanced Settings on your server.2 In the left Navigation pane, click Inbound Rules.
3 In the right Actions pane, click New Rule.
Worksoft Certify Execution Suite Installation Guide 19

Create Inbound and Outbound Rules in the Windows Firewall
The New Inbound Rule Wizard opens.
4 In the Rule Type tab, click Port.5 Click Next.
The Protocol and Ports tab appears.
6 Select the Specific Local Ports option and type the port number 4242 in the text field.
20 Worksoft Certify Execution Suite Installation Guide

Create Inbound and Outbound Rules in the Windows Firewall
7 Click Next.The Action tab appears.
8 Select the Allow the Connection option.9 Click Next.
The Profile tab appears.
Worksoft Certify Execution Suite Installation Guide 21

Create Inbound and Outbound Rules in the Windows Firewall
10 Select the appropriate options:• Domain• Private• Public
11 Click Next.The Name tab appears.
12 In the Name field, type in a name for this new inbound rule.13 In the Description field, type in a description. This step is optional.14 Click Finish.
The inbound rule is added. You now need to create an outbound rule.
22 Worksoft Certify Execution Suite Installation Guide

Create Inbound and Outbound Rules in the Windows Firewall
To add an outbound rule:
1 Open Windows Firewall with Advanced Settings on your server.2 In the left Navigation pane, click Outbound Rules.3 In the right Actions pane, click New Rule.
The New Outbound Rule Wizard opens.
4 In the Rule Type tab, click Port.5 Click Next.
Worksoft Certify Execution Suite Installation Guide 23

Create Inbound and Outbound Rules in the Windows Firewall
The Protocol and Ports tab appears.
6 Select the Specific Local Ports option and type the port number 4242 in the text field.7 Click Next.
The Action tab appears.
24 Worksoft Certify Execution Suite Installation Guide
Create Inbound and Outbound Rules in the Windows Firewall
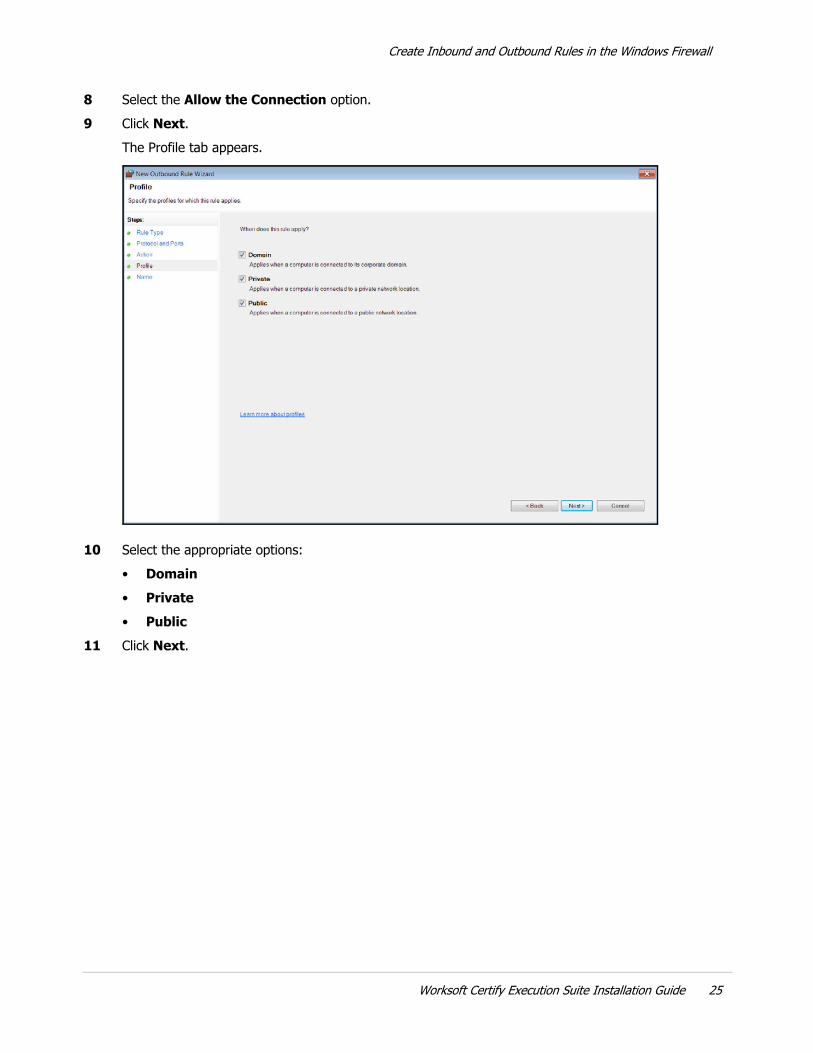
8 Select the Allow the Connection option.9 Click Next.
The Profile tab appears.
10 Select the appropriate options:• Domain• Private• Public
11 Click Next.
Worksoft Certify Execution Suite Installation Guide 25

Create Inbound and Outbound Rules in the Windows Firewall
The Name tab appears.
12 In the Name field, type in a name for this new outbound rule.13 In the Description field, type in a description. This step is optional.14 Click Finish.
The outbound rule is added.
26 Worksoft Certify Execution Suite Installation Guide

Chapter 2 Preparing Your SAP Systems for Certify Impact
In This Chapter
Overview ............................................................................................................................ 28Creating a Certify System Account in your SAP System........................................................... 28Installing Certify Impact Transports in Your SAP System......................................................... 29
Worksoft Certify Execution Suite Installation Guide 27

Overview
Overview
If you do not intend to use Certify Impact, you do not need to follow these instructions.If you plan to use Certify Impact, you must have your SAP BASIS administrator assist you with preparing the SAP systems. In order to prepare your SAP system, you will need to do the following: Create a Certify system account in your SAP systems Install Certify Impact transports in your SAP systemsIf you choose to use the SAP Business Process Change Analyzer (BPCA) analysis type, one of the systems you register with the Worksoft Management Studio must be your SAP system hosting SAP® Solution Manager. You will later supply an alias system name during registration to the Certify Execution Suite web installer.
Creating a Certify System Account in your SAP System
Certify Impact connects to SAP systems through a Remote Function Call (RFC) by using a configured user account. Use the SU01 transaction code and create the user account with the following information:
Setting Value
User Type SAP CPIC user for RFC communication
User Name Account user name
Name must have the same account credentials as when you register your SAP systems with the Worksoft Management Studio.
Password User password
Defaults Date format: “MM/DD/YYYY”
Decimal notation: 1,234,567.89
Profiles Ability to execute the following transport function modules:• S_A• CPIC• S_A.SCON• S_A.SYSTEM
Type of User System
28 Worksoft Certify Execution Suite Installation Guide

Installing Certify Impact Transports in Your SAP System
Installing Certify Impact Transports in Your SAP System
Your SAP BASIS administrator needs to install Certify Impact transports into your SAP system. These transport files are located in the Worksoft Customer Portal. You need a User ID and password to access these transports. Select the transports that are best suited for your SAP system: IDES BPCA S4HanaWhen running the SAP transports, turn off component checking because these SAP transports were created in a Worksoft SAP system that contains different components than your system.
Note: If you are using S4Hana, you can analyze SAP ECC components, but currently it does not analyze the web components.
Worksoft Certify Execution Suite Installation Guide 29

Chapter 3 Installing Worksoft Application Server
In This Chapter
Installing Worksoft Application Server ................................................................................... 31Disabling Interactive Service Detection Service ...................................................................... 34
Worksoft Certify Execution Suite Installation Guide 30

Installing Worksoft Application Server
Installing Worksoft Application Server
The Worksoft Application Server installs the Worksoft Management Studio. The Management Studio tool registers database settings, data sources, and SAP systems that you intend to use with the Worksoft products.The domain user name is required for installation. The domain user must be an administrator of the machine in order to install the Worksoft Application Server.
To install the Worksoft Application Server:
1 In your software distribution folder, right-click the WorksoftApplicationServer.exe file and select Run as administrator.The Worksoft Application Server Wizard opens.
2 Click Next to begin the installation process.
Worksoft Certify Execution Suite Installation Guide 31

Installing Worksoft Application Server
After your system has been analyzed, the Destination page appears.
3 If you want to accept the default directory for your installation files, click Next.If you do not want to accept the default directory for the installation files, click the Change button to select a different installation directory for the Certify client, and then click Next.The Worksoft Application Server page appears.
32 Worksoft Certify Execution Suite Installation Guide

Installing Worksoft Application Server
4 If you want to accept Default Web Site as your website, click Next.If you have other websites configured in the IIS, select the server from the drop-down list and click Next.The Starting Installation page appears.
5 Click Next.Then the installation completes, the Completed Installation page appears.
6 Click Finish.
Worksoft Certify Execution Suite Installation Guide 33

Disabling Interactive Service Detection Service
Disabling Interactive Service Detection Service
You need to disable the Interactive Service Detection service on your application server because it interferes with RDP functionality.
To disable Interactive Service Detection service:
1 On your application server, open the Services program.
2 From the Services list, right-click on Interactive Service Detection and select Properties.
34 Worksoft Certify Execution Suite Installation Guide

Disabling Interactive Service Detection Service
The Properties dialog box opens.
3 From the Startup type drop-down list, select Disabled.4 Verify that the Service status is marked Stopped.5 Click OK.
Worksoft Certify Execution Suite Installation Guide 35
Chapter 4 Configuring the Worksoft Management Studio
In This Chapter
Overview ............................................................................................................................ 37Creating Your Worksoft Management Studio Database ........................................................... 39Registering and Creating Certify Execution Suite Databases .................................................... 42Registering SAP Systems...................................................................................................... 46Configuring Certify Impact ................................................................................................... 48Registering Users ................................................................................................................ 49Configuring Your Email Service ............................................................................................. 52Configuring Your LDAP Authentication Service ....................................................................... 53Adding RDP Servers............................................................................................................. 56Modifying Maintenance Window Text .................................................................................... 57
Worksoft Certify Execution Suite Installation Guide 36

Overview
Overview
On your web server where IIS is installed, you will need to configure your system in the Worksoft Management Studio. The Worksoft Application Server installed the Worksoft Management Studio.Within the Worksoft Management Studio, you will need to do the following Management Studio configuration tasks:
Create a Worksoft Management Studio database
Register all Worksoft Certify databases
Create and register a Worksoft Execution Manager database Create and register a Certify Impact database Configure Certify Impact
Specify product users
Configure services
The Management Studio database maintains configuration information used by Worksoft applications and services. Certify Execution Manager and Certify Impact leverage information from the Worksoft Management Studio.
Exploring Worksoft Management Studio
Worksoft Management Studio consists of the following navigation tabs:
Navigation Tab Description
User Administration Register users and roles for each product.
Master Configuration Create the following databases:• Management Studio• Execution Manager• Impact• Analyze• BPPConfigure the following:• SMTP settings• Maintenance window text• Tenant administration
Configuration • LDAP Configuration - Configure your LDAP authentication service.• Execution Manager - Disable notifications for each Certify process.• Impact - Select your analysis engine and test execution integration.• Certify Configuration - Add your Certify databases.• Bookmark Administration - Create a shortcut to specific Certify
process folders, Certify processes, or HP ALM test sets that you are able to run through web API.
Worksoft Certify Execution Suite Installation Guide 37

Exploring Worksoft Management Studio
When you open Worksoft Management Studio, you will be able to see what part of your configuration requires attention by visual indicators.
Listed below are the visual indicators:1. A red X means that there is either mandatory missing information or a failure with the current
configuration. Each tab provides diagnostic information that will explain what failed and how to resolve the failure.
2. An animated circle means a diagnostic test is being performed to see if the configuration is complete and functional. If the test is successful, the circle will disappear, and if not successful, a red X will show a failure.
3. An exclamation mark means that there is an optional configuration that is available. No configuration has been made in these tabs, and you may want to configure these options in the future.
Integration Configure your connections with the following products:• ALM integration• Panaya integration• Analyze connections• Certify/Analyze integration• SAP systems
Change History Display change history.
Navigation Tab Description
38 Worksoft Certify Execution Suite Installation Guide

Creating Your Worksoft Management Studio Database
Creating Your Worksoft Management Studio Database
The Management Studio database maintains configuration information used by Worksoft applications and services. Certify Execution Manager and Certify Impact leverage information from the Worksoft Management Studio.Only one Management Studio database is needed regardless of how many Certify databases already exist.
To create the Worksoft Management Studio database:
1 Open the Worksoft Management Studio on your web server by navigating to the following address: http://localhost/ManagementStudio.The Management Studio Installation page opens.
2 Type in the Worksoft Management Studio URL address.If you did not use the default website during installation, your URL address will be different. The implementation of your network landscape will need to be considered when choosing a URL address. Verify that the URL can be accessed by all users.The URL address should either be a domain or a machine name for on-premise installations. If using a machine name, you will need to decide if a fully-qualified domain and machine name is required. Do not use IP addresses.If your DNS settings require a fully-qualified machine name complete with domain, please make those changes accordingly.
Worksoft Certify Execution Suite Installation Guide 39

Creating Your Worksoft Management Studio Database
If their is a load balancer in front of one or more web servers, then the URL address should point to the load balancer domain. If you have any questions about your specific URL address, please ask your IT administrator.If you intend to use HTTPS for your application server, you will need to first configure your server with HTTP, and then you will be able to reconfigure the application server to use HTTPS. For more information, see Appendix B, “Using HTTPS on Your Application Server,” on page 108.
3 In the Management Studio Database section, type in the server name in the SQL Server field.
Note: If your SQL Server database administrator does not approve of creating or updating the databases from within the web application for any reason, then they are able to manually create databases by using database scripts that are packaged within our distribution folder. For more information, see Appendix C, “Creating Worksoft Certify Execution Suite Databases with Apply.exe,” on page 110.
4 For SQL Database Authentication, type the SQL user name and password in the fields to access the database server.The user name and password must have enough SQL Server permissions to create a database. After you created your database, you are able to use a different SQL user name and password.
5 In the Database Name field, type in the name of the Management Studio database.Worksoft recommends using the database name ManagementStudio for easy identification.
6 Click the Test Configuration button to test your connection.If the test fails, the reason for the database connection failure appears.After it detects that the database does not exist, a Create button appears.
7 Click the Create button to create a new database.If your SQL Server database administrator created the database with the Apply.exe tool or you are upgrading your database, then you will click the Update button.After creating the database, your SQL Server database administrator should review the database settings and configuration so that it meets expectations and adheres to appropriate best practices, such as using an appropriate recovery model.
8 Click Continue.After saving the Management Studio configuration, you will be prompted to log on to the Management Studio.
9 If you are a new user, type [email protected] in the User Name field.If you are upgrading from v9.2 to v10, use your existing Worksoft Management Studio email address as your user name.
10 If you are a new user, type password in the password field.If you are upgrading from v9.2 to v10, use the password that you created for your Worksoft Management Studio.
40 Worksoft Certify Execution Suite Installation Guide

Creating Your Worksoft Management Studio Database
11 Click Login.After applying this configuration, you have successfully enabled Management Studio to be operational.The User Administration tab opens.
12 Click the Master Configuration tab.
13 If you want to enable verbose logging, select the Enable Verbose Logging option in the Management Studio Options section and click Save Changes.
Worksoft Certify Execution Suite Installation Guide 41

Registering and Creating Certify Execution Suite Databases
Registering and Creating Certify Execution Suite Databases
Databases that should be created or registered in Worksoft Management Studio include the following: Execution Manager database Worksoft Certify databases Certify Impact databaseIf you are upgrading from v9.2 to v10, see Chapter 8 “Upgrading Worksoft Certify Execution Suite.”
To create a Certify Execution Manager database:
1 In the Worksoft Management Studio, click the Master Configuration tab.2 Click the Execution Manager tab.
The Execution Manager tab opens.
3 In the SQL Server field, type in the name of your SQL server.
Note: If your SQL Server database administrator does not approve of creating or updating the databases from within the web application for any reason, then manually create databases by using database scripts that are packaged within our distribution folder. For more information, see Appendix C, “Creating Worksoft Certify Execution Suite Databases with Apply.exe,” on page 110.
42 Worksoft Certify Execution Suite Installation Guide

Registering and Creating Certify Execution Suite Databases
4 In the SQL User and Password fields, type in the SQL server user name and password.The user name and password that you use will need to have enough SQL Server permissions to create a database. After you created your database, you are able to use a different SQL user name and password for use of the product.
5 In the Database Name field, type in the name for your new database.Worksoft recommends using the database name ExecutionManager for easy identification.
6 Click the Test Configuration button to test the connection.7 After it detects that the database does not exist, click Create to create a new Certify Execution Manager
database.If your SQL Server database administrator created the database with the Apply.exe tool, then you will click the Update button.After creating the database, your SQL Server database administrator should review the database settings and configuration so that it meets expectations and adheres to appropriate best practices, such as using an appropriate recovery model.
8 Scroll down the Execution Manager tab to verify that the Execution Manager services are running.
9 Click Save Changes.
Note: If you want to register additional Remote Desktop Protocol (RDP) servers, you can add servers in the RDP Servers section. Only a single web server is required for the Certify Execution Suite. For more information, see “Adding RDP Servers” on page 56.
Worksoft Certify Execution Suite Installation Guide 43

Registering and Creating Certify Execution Suite Databases
To register Worksoft Certify databases:
1 In the Worksoft Management Studio, click the Configuration > Certify Configuration tab.The Certify Databases tab opens.
2 Click the Add button on the right side of the screen.The Add Certify Database dialog box opens.
3 In the Name field, type in a unique name for your database. This name will appear in Certify Execution Manager and Certify Impact as the database alias.
4 In the SQL Server field, type in the name of your SQL server.5 In the SQL User and Password fields, type in the SQL server user name and password.6 In the Database field, start typing in the name for your database.
A list of Certify database names appear.7 Select a database.
If your database does not appear in the list, the permissions for the SQL User must not be adequate, or the database does not exist. Consult your database administrator.
8 Click the Test Configuration button to test the connection.If the test fails, the reason for the database connection failure appears.
9 Click Add to save your registered Certify database.When you save your Certify database, this database appears in the Certify Databases pane.
10 If you need to add another Certify database, repeat this process.
44 Worksoft Certify Execution Suite Installation Guide

Registering and Creating Certify Execution Suite Databases
To create a Certify Impact database:
If you do not intend to use Certify Impact, you do not need to create a database.1 In the Worksoft Management Studio, click the Master Configuration tab.2 Click the Impact tab.
The Impact tab opens.
3 In the SQL Server field, type in the name of your SQL server.
Note: If your SQL Server database administrator does not approve of creating or updating the databases from within the web application for any reason, then manually create databases by using database scripts that are packaged within our distribution folder. For more information, see Appendix C, “Creating Worksoft Certify Execution Suite Databases with Apply.exe,” on page 110.
4 In the SQL User and Password fields, type in the SQL server user name and password.The user name and password that you use will need to have enough SQL Server permissions to create a database. After the database is created, you are able to use a different SQL user name and password.
5 In the Database Name field, type in the name for your new database.Worksoft recommends using the database name Impact for easy identification.
6 Click the Test Configuration button to test the connection.
Worksoft Certify Execution Suite Installation Guide 45

Registering SAP Systems
7 After it detects that the database does not exist, click Create to create a new Certify Impact database.If your SQL Server database administrator created the database with the Apply.exe tool, then you will click the Update button.After creating the database, your SQL Server database administrator should review the database settings and configuration so that it meets expectations and adheres to appropriate best practices, such as using an appropriate recovery model.
8 Click Save Changes.
Registering SAP Systems
If you plan to use Certify Impact, then you must register one or more SAP systems in Worksoft Management Studio. If you intend to just use Execution Manager, go to “Registering Users” on page 49.Before you register your SAP system, you must have prepared your systems. For more information, see Chapter 2 “Preparing Your SAP Systems for Certify Impact.”
To register SAP systems:
1 In the Worksoft Management Studio, click the Integration > SAP Systems tab.The SAP Systems tab opens.
2 Click the Add button on the right side of the screen.The Add SAP System dialog box opens.
46 Worksoft Certify Execution Suite Installation Guide

Registering SAP Systems
You have the option of providing your SAP information in the text fields or an SAP connection string. For more information about using the SAP connection string, go to page 47.
3 In the Name field, type in the name of your SAP system.4 In the App Server Host field, type the IP address of where your application server is being hosted.5 Type in the system number and SAP client number in their respective fields.6 Type in the SAP user and password in their respective fields.7 Click Test Configuration.
The Status section shows if your configuration was successful.
8 Click Save to save your SAP system.Your SAP system is now listed in the tab.
To use an SAP connection string to register your SAP system:
Instead of completing all the fields, you can just use an SAP connection string to register your system.1 In the SAP Connection String field, type in a string for your SAP system.
Example: TYPE=3; ASHOST=192.168.3.56; SYSNR=01; CLIENT=800; LANG=EN; USER=jdoe; PASSWD=password123;
2 Click Test Configuration.The Status section shows if your configuration was successful.
3 Click Save to save your SAP system.
Worksoft Certify Execution Suite Installation Guide 47

Configuring Certify Impact
Configuring Certify Impact
If you intend to use Certify Impact, you will need to configure the following: Analysis engine Test execution integrationYou will also need to add one or more SAP systems. For more information, see Chapter 2, “Preparing Your SAP Systems for Certify Impact,” on page 27.
To configure Certify Impact:
1 Click the Configuration > Impact tab.The Impact tab opens.
2 Select an Analysis Engine option:• Worksoft Certify Impact• SAP BPCAIf you choose to use the SAP Business Process Change Analyzer (BPCA) analysis type, one of your SAP systems registered with Worksoft Management Studio must be hosting SAP® Solution Manager.
3 Select a Test Execution Integration option:• Worksoft Execution Manager• HP Quality CenterFor more information on how to integrate with HP Application Lifecycle Management® (ALM), see Chapter 10 “Configuring HP Quality Center Integration.”
4 Click Test Configuration to test the connection.
48 Worksoft Certify Execution Suite Installation Guide
Registering Users
Registering Users
The next step to configuring Worksoft Management Studio is to register users who will be using the Worksoft Execution Suite. There are two ways to register users: Manually create users in Worksoft Management Studio Import users from a Microsoft Excel® spreadsheet
To manually create users in Worksoft Management Studio:
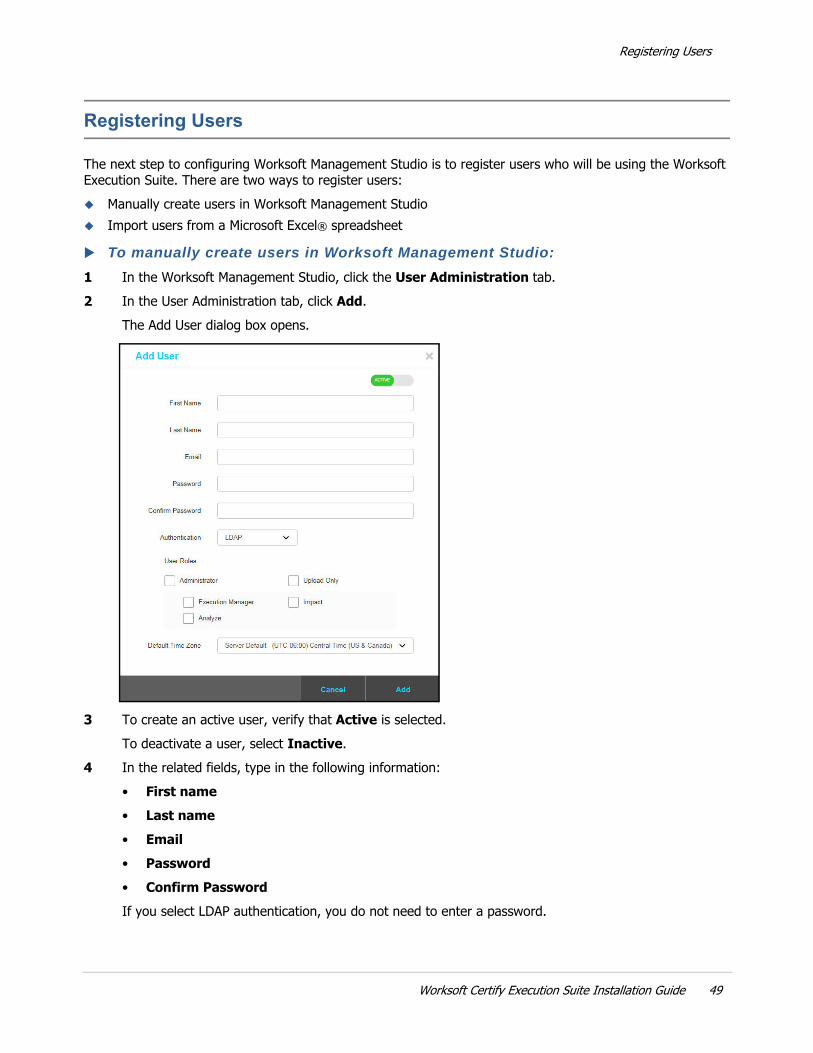
1 In the Worksoft Management Studio, click the User Administration tab.2 In the User Administration tab, click Add.
The Add User dialog box opens.
3 To create an active user, verify that Active is selected.To deactivate a user, select Inactive.
4 In the related fields, type in the following information:• First name• Last name• Email• Password• Confirm PasswordIf you select LDAP authentication, you do not need to enter a password.
Worksoft Certify Execution Suite Installation Guide 49

Registering Users
5 From the Authentication drop-down list, select an authentication option:• LDAP• WorksoftThe LDAP option only appears if you have already configured it. For more information, see “To configure your LDAP authentication service:” on page 53.
6 If you want to give the user administrative rights, select the Administrator option. Administrators have access to all products. The Upload Only option is for Worksoft Analyze users.
7 Select the Execution Manager and/or Impact roles for the user.8 From the Default Time Zone drop-down list, select your preferred time zone for Certify Execution
Manager or keep it as the server default time.9 Click Add.
The user name appears in the User Administration tab.
Users with a green icon are active, and users with a gray icon are inactive. 10 Repeat this process to add more users. To edit a user, click the Edit icon next to the user.
50 Worksoft Certify Execution Suite Installation Guide

Exporting a List of Users
To register users by importing from a Microsoft Excel spreadsheet:
1 In the Worksoft Management Studio, click the User Administration tab.2 In the User Administration tab, click Import.
The Import User dialog box opens.
3 To download an Excel template, click Download Sample Upload File.Use this template to create your own Excel spreadsheet.
4 Click the Choose File button and select the CSV file that you want to import.5 After you have selected your file, click the Import button.
The users are imported into the Worksoft Management Studio and appear in the User Administration tab.
Exporting a List of Users
From the Users Administration tab, you can export a list of the users in a CSV file.
To export a list of users:
1 Click Export in the Users Administration tab.A message appears.
2 Click Open to open the file in Microsoft Excel or click Save to save the CSV file.
Worksoft Certify Execution Suite Installation Guide 51

Configuring Your Email Service
Configuring Your Email Service
The Certify Execution Manager and Certify Impact sends out email notifications when Certify Execution Manager request or Certify Impact analysis completes execution. You will need to specify the SMTP server that will send out the email notifications.
To configure your email service:
1 In the Worksoft Management Studio, click the Master Configuration tab.The Master Configuration tab opens.
2 Scroll down to the SMTP Configuration section.
3 In the SMTP Configuration section, type in the following information:• From Email• SMTP Host• SMTP Port• SMTP User Name• SMTP Password
52 Worksoft Certify Execution Suite Installation Guide

Configuring Your LDAP Authentication Service
4 If you want to use a SSL certificate, select the SSL option.5 If you are using tenant spaces and want to use the Master Configuration SMTP configuration, select the
Offers to Tenant Spaces option.6 Click the Test Configuration button to test your connection.
If the test fails, the reason for the failure appears.If the settings are not valid, the Certify Execution Suite will still be functional; however, the size of your log file will be affected since the products will log errors for all of the failed email notifications.
Configuring Your LDAP Authentication Service
Worksoft Execution Suite allows you to authenticate users against your Lightweight Directory Access Protocol (LDAP) system. During the log on process, the user name and password combinations will be validated against LDAP.
To configure your LDAP authentication service:
1 In the Worksoft Management Studio, click the Configuration tab.The Configuration tab opens.
Worksoft Certify Execution Suite Installation Guide 53
Configuring Your LDAP Authentication Service
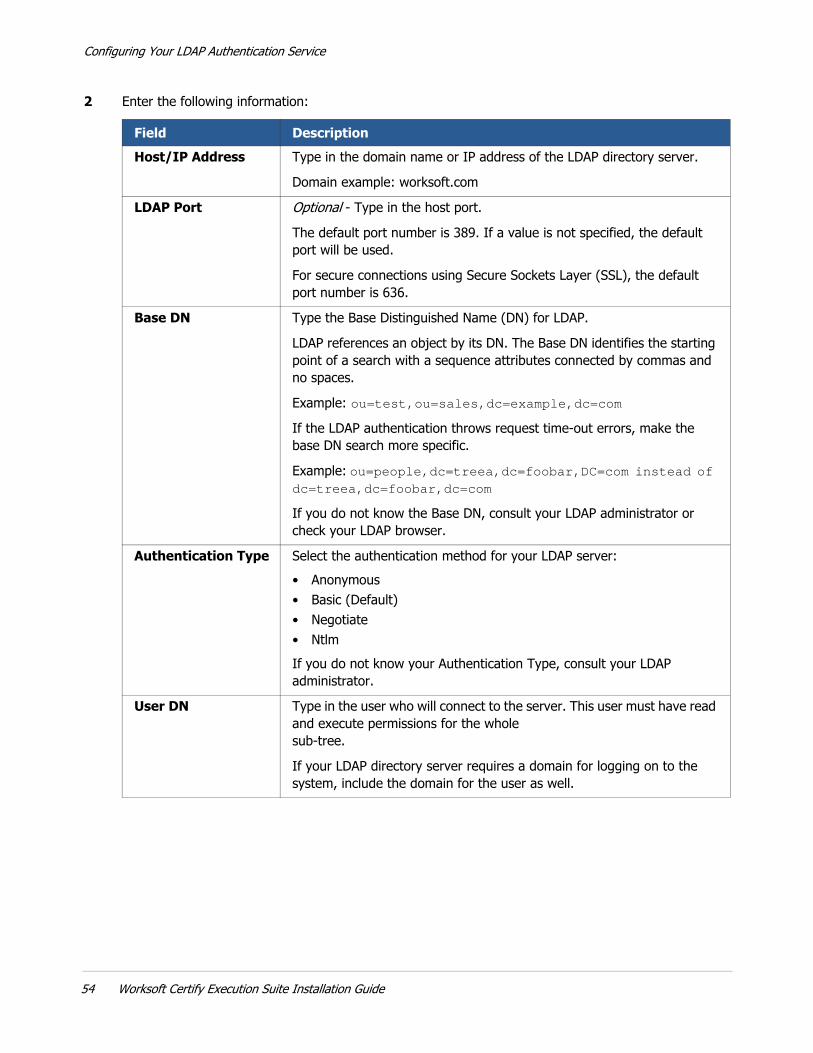
2 Enter the following information:
Field DescriptionHost/IP Address Type in the domain name or IP address of the LDAP directory server.
Domain example: worksoft.com
LDAP Port Optional - Type in the host port.
The default port number is 389. If a value is not specified, the default port will be used.
For secure connections using Secure Sockets Layer (SSL), the default port number is 636.
Base DN Type the Base Distinguished Name (DN) for LDAP.
LDAP references an object by its DN. The Base DN identifies the starting point of a search with a sequence attributes connected by commas and no spaces.
Example: ou=test,ou=sales,dc=example,dc=com
If the LDAP authentication throws request time-out errors, make the base DN search more specific.
Example: ou=people,dc=treea,dc=foobar,DC=com instead of dc=treea,dc=foobar,dc=com
If you do not know the Base DN, consult your LDAP administrator or check your LDAP browser.
Authentication Type Select the authentication method for your LDAP server:• Anonymous • Basic (Default) • Negotiate • Ntlm If you do not know your Authentication Type, consult your LDAP administrator.
User DN Type in the user who will connect to the server. This user must have read and execute permissions for the whole sub-tree.
If your LDAP directory server requires a domain for logging on to the system, include the domain for the user as well.
54 Worksoft Certify Execution Suite Installation Guide
Configuring Your LDAP Authentication Service
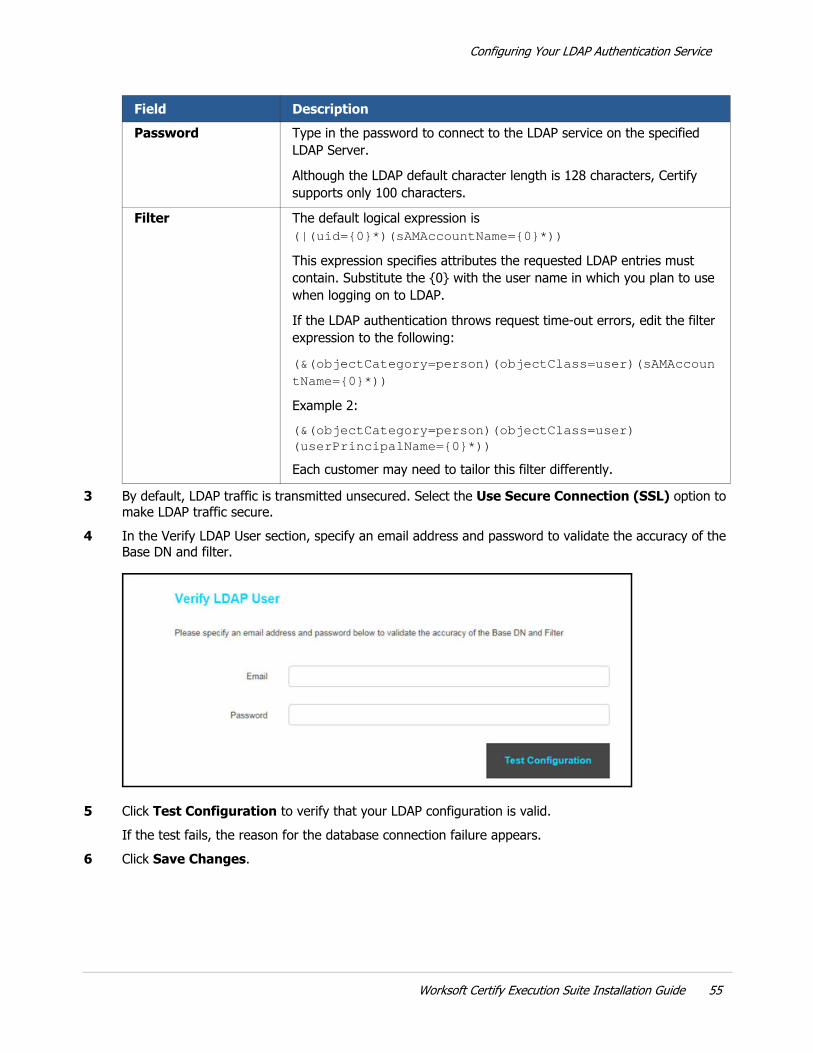
3 By default, LDAP traffic is transmitted unsecured. Select the Use Secure Connection (SSL) option to make LDAP traffic secure.
4 In the Verify LDAP User section, specify an email address and password to validate the accuracy of the Base DN and filter.
5 Click Test Configuration to verify that your LDAP configuration is valid.If the test fails, the reason for the database connection failure appears.
6 Click Save Changes.
Password Type in the password to connect to the LDAP service on the specified LDAP Server.
Although the LDAP default character length is 128 characters, Certify supports only 100 characters.
Filter The default logical expression is (|(uid={0}*)(sAMAccountName={0}*))
This expression specifies attributes the requested LDAP entries must contain. Substitute the {0} with the user name in which you plan to use when logging on to LDAP.
If the LDAP authentication throws request time-out errors, edit the filter expression to the following:
(&(objectCategory=person)(objectClass=user)(sAMAccountName={0}*))
Example 2:(&(objectCategory=person)(objectClass=user)(userPrincipalName={0}*))
Each customer may need to tailor this filter differently.
Field Description
Worksoft Certify Execution Suite Installation Guide 55

Adding RDP Servers
Adding RDP Servers
You are able to register additional Remote Desktop Protocol (RDP) servers within the Worksoft Management Studio. Only a single web server is required for the Certify Execution Suite.However, if you determined that you need additional RDP servers after reviewing the system requirements at docs.worksoft.com, then you will need to add these additional Execution Manager web servers in Worksoft Management Studio.Any additional RDP servers must have the same system requirements and configuration as your main web server. Also, all of the servers must have the same version of Certify Execution Manager installed. If any requirement is not met or a different version of Execution Manager is installed, then the RDP server will report failures.
To add additional RDP servers:
1 In the Worksoft Management Studio, click the Master Configuration tab.2 Click the Execution Manager tab.
The Execution Manager tab opens.3 Scroll down the tab until you see the RDP Servers section.
4 Click Add.The Add RDP Server dialog box opens.
56 Worksoft Certify Execution Suite Installation Guide

Modifying Maintenance Window Text
5 In the Name field, type in the name of your additional RDP server.The name of the server must be different from the original web server.
6 Click Test Configuration.Worksoft Management Studio inspects the server to verify the requirements, services are running, and the version of Certify Execution Manager. If conditions are not me, the status reports errors and failures. Before you can add the server, you will need to fix the errors on your server.
7 If your server passes the test, click Add to add your server.The server is listed in the RDP Servers section.
Modifying Maintenance Window Text
An administrator is able to modify the text shown in the login dialog box for Worksoft Management Studio and Worksoft Execution Suite.
The text that can be modified is meant for notifying when a product will not be available due to weekly scheduled maintenance. However, it can be modified and used for different purposes.If you decide not to modify the text, then no information appears in your login dialog box, as shown below.
Worksoft Certify Execution Suite Installation Guide 57
Modifying Maintenance Window Text
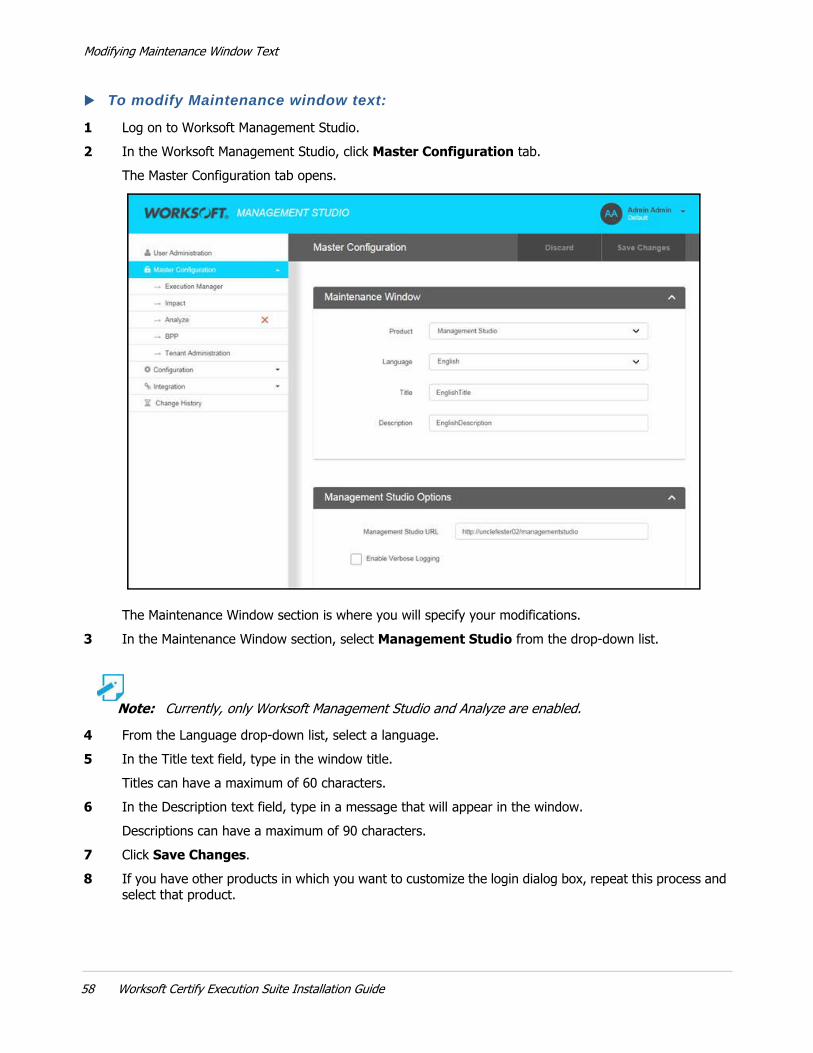
To modify Maintenance window text:
1 Log on to Worksoft Management Studio.2 In the Worksoft Management Studio, click Master Configuration tab.
The Master Configuration tab opens.
The Maintenance Window section is where you will specify your modifications.3 In the Maintenance Window section, select Management Studio from the drop-down list.
Note: Currently, only Worksoft Management Studio and Analyze are enabled.
4 From the Language drop-down list, select a language.5 In the Title text field, type in the window title.
Titles can have a maximum of 60 characters.6 In the Description text field, type in a message that will appear in the window.
Descriptions can have a maximum of 90 characters.7 Click Save Changes.8 If you have other products in which you want to customize the login dialog box, repeat this process and
select that product.
58 Worksoft Certify Execution Suite Installation Guide

Chapter 5 Adding Bookmarks
In This Chapter
Creating Bookmarks............................................................................................................. 60
Worksoft Certify Execution Suite Installation Guide 59
Creating Bookmarks
Creating Bookmarks
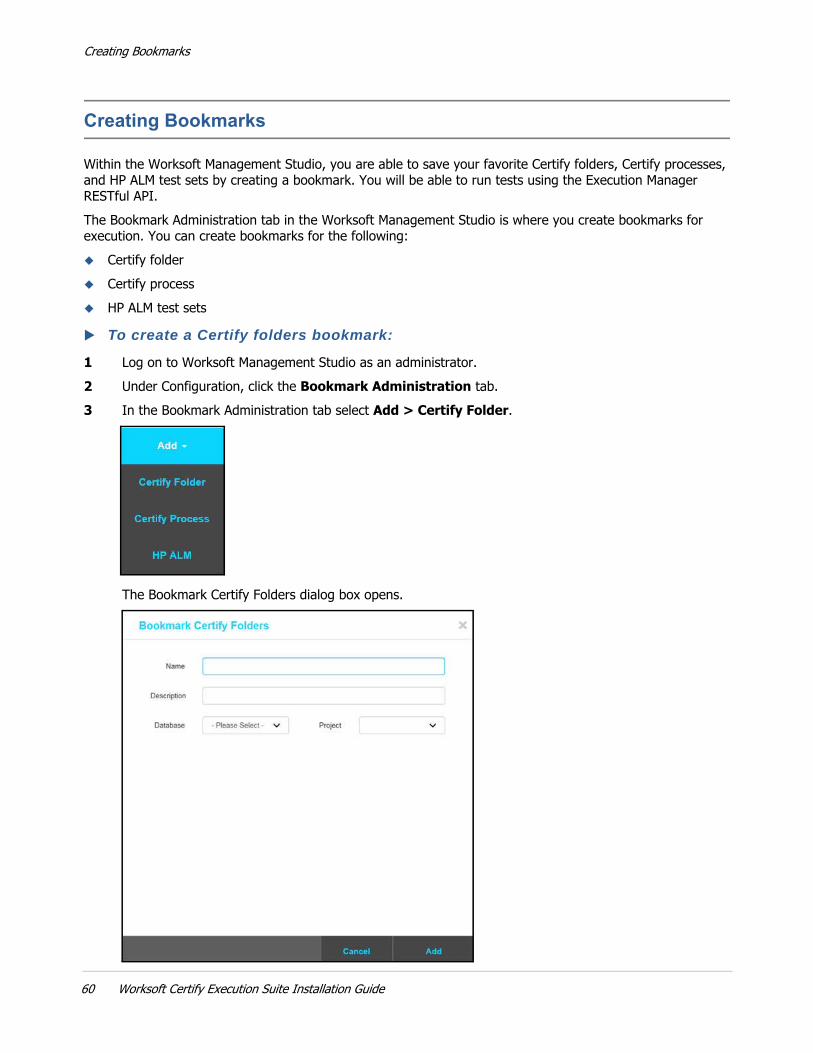
Within the Worksoft Management Studio, you are able to save your favorite Certify folders, Certify processes, and HP ALM test sets by creating a bookmark. You will be able to run tests using the Execution Manager RESTful API.The Bookmark Administration tab in the Worksoft Management Studio is where you create bookmarks for execution. You can create bookmarks for the following: Certify folder Certify process HP ALM test sets
To create a Certify folders bookmark:
1 Log on to Worksoft Management Studio as an administrator.2 Under Configuration, click the Bookmark Administration tab.3 In the Bookmark Administration tab select Add > Certify Folder.
The Bookmark Certify Folders dialog box opens.
60 Worksoft Certify Execution Suite Installation Guide

Creating Bookmarks
4 In the Name text field, type the name for your Certify folders bookmark.5 In the Description text field, type a description for this Certify folders bookmark.6 From the Database drop-down list, select the Certify database that contains the project which contains
the process folder(s) you want to bookmark.All Certify databases that are registered in Worksoft Management Studio are listed.
7 From the Project drop-down list, select the project that contains the process folder(s) you want to bookmark.Folders within the project are shown.
8 Select the Certify process folders that you want to include in your bookmark.9 Click Add.
The bookmark is added to the Bookmark Administration tab.
You will notice that the Certify folders bookmark that you created has a Folder icon next to it.
Worksoft Certify Execution Suite Installation Guide 61
Creating Bookmarks
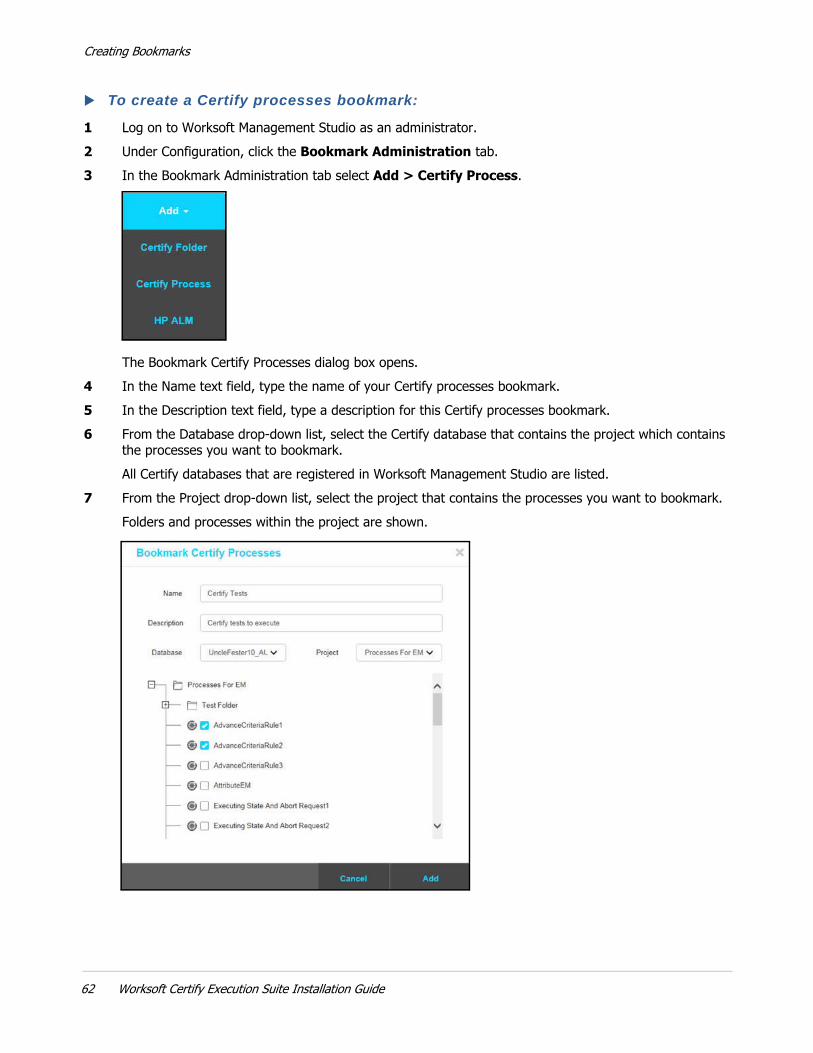
To create a Certify processes bookmark:
1 Log on to Worksoft Management Studio as an administrator.2 Under Configuration, click the Bookmark Administration tab.3 In the Bookmark Administration tab select Add > Certify Process.
The Bookmark Certify Processes dialog box opens.4 In the Name text field, type the name of your Certify processes bookmark.5 In the Description text field, type a description for this Certify processes bookmark.6 From the Database drop-down list, select the Certify database that contains the project which contains
the processes you want to bookmark.All Certify databases that are registered in Worksoft Management Studio are listed.
7 From the Project drop-down list, select the project that contains the processes you want to bookmark.Folders and processes within the project are shown.
62 Worksoft Certify Execution Suite Installation Guide
Creating Bookmarks
8 Select the Certify processes that you want to include in your bookmark.9 Click Add.
The bookmark is added to the Bookmark Administration tab.
You will notice that the Certify processes bookmark that you created has a Process icon next to it.
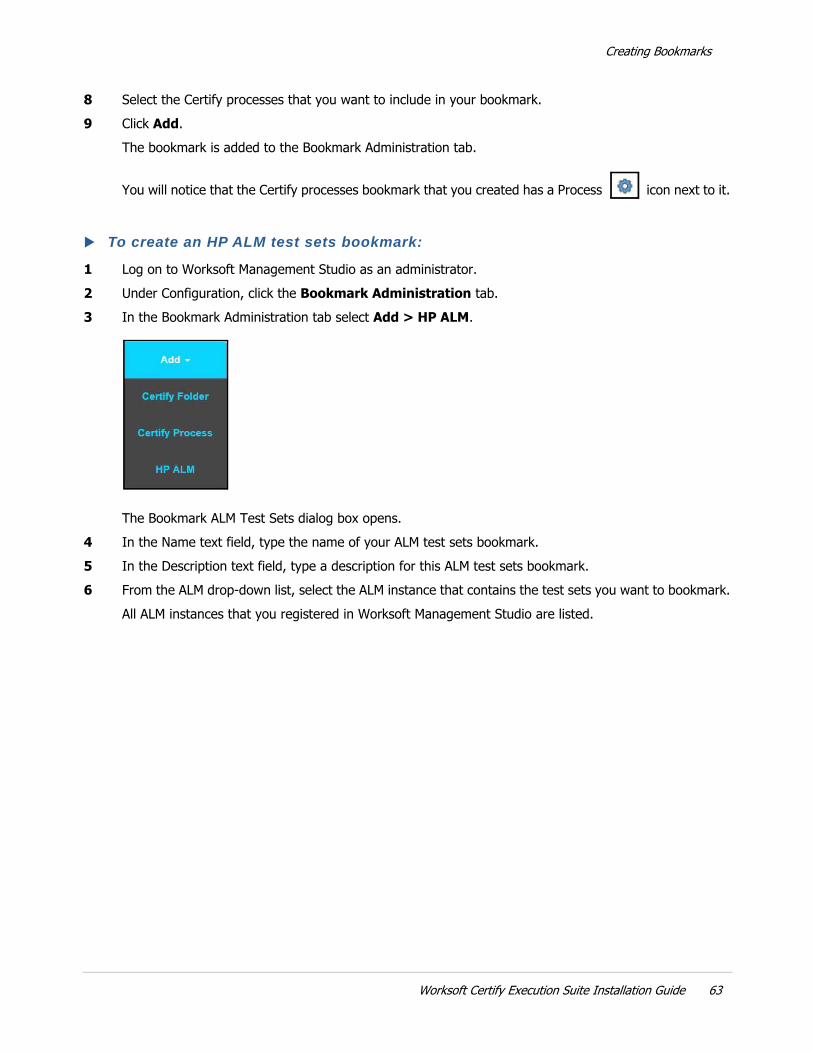
To create an HP ALM test sets bookmark:
1 Log on to Worksoft Management Studio as an administrator.2 Under Configuration, click the Bookmark Administration tab.3 In the Bookmark Administration tab select Add > HP ALM.
The Bookmark ALM Test Sets dialog box opens.4 In the Name text field, type the name of your ALM test sets bookmark.5 In the Description text field, type a description for this ALM test sets bookmark.6 From the ALM drop-down list, select the ALM instance that contains the test sets you want to bookmark.
All ALM instances that you registered in Worksoft Management Studio are listed.
Worksoft Certify Execution Suite Installation Guide 63
Executing a Bookmark
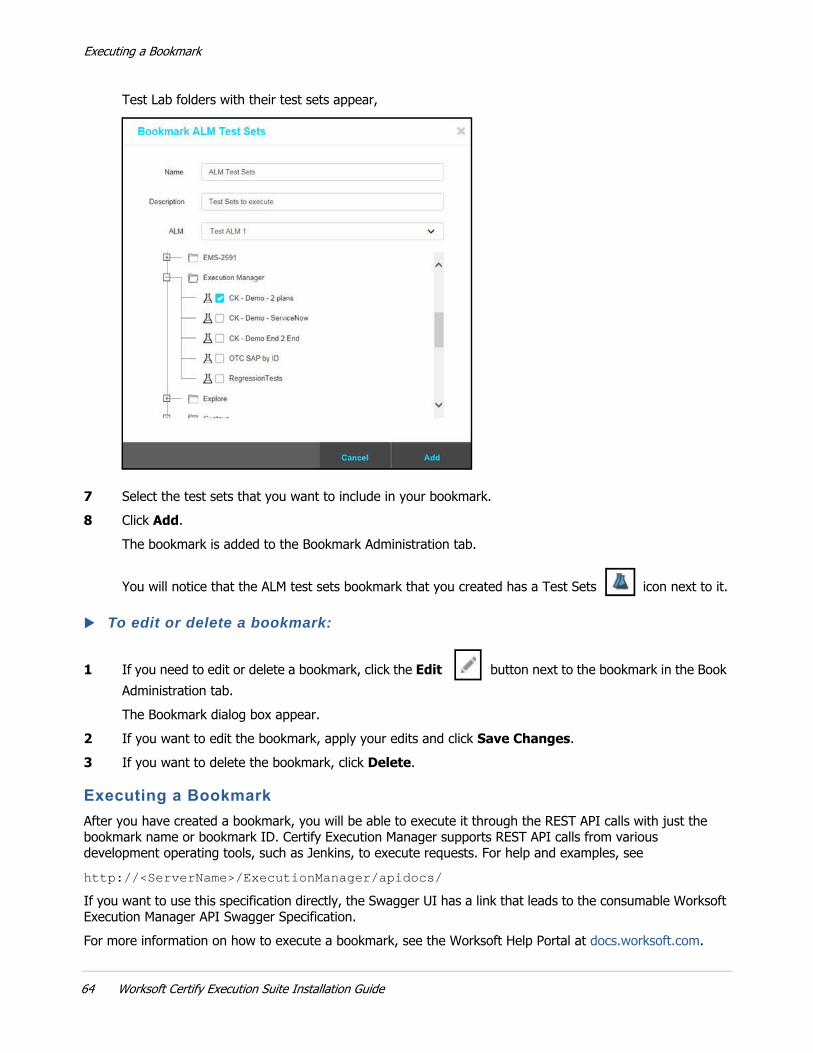
Test Lab folders with their test sets appear,
7 Select the test sets that you want to include in your bookmark.8 Click Add.
The bookmark is added to the Bookmark Administration tab.
You will notice that the ALM test sets bookmark that you created has a Test Sets icon next to it.
To edit or delete a bookmark:
1 If you need to edit or delete a bookmark, click the Edit button next to the bookmark in the Book Administration tab.The Bookmark dialog box appear.
2 If you want to edit the bookmark, apply your edits and click Save Changes.3 If you want to delete the bookmark, click Delete.
Executing a Bookmark
After you have created a bookmark, you will be able to execute it through the REST API calls with just the bookmark name or bookmark ID. Certify Execution Manager supports REST API calls from various development operating tools, such as Jenkins, to execute requests. For help and examples, seehttp://<ServerName>/ExecutionManager/apidocs/
If you want to use this specification directly, the Swagger UI has a link that leads to the consumable Worksoft Execution Manager API Swagger Specification.For more information on how to execute a bookmark, see the Worksoft Help Portal at docs.worksoft.com.
64 Worksoft Certify Execution Suite Installation Guide

Chapter 6 Configuring Multi-Tenant Spaces
In This Chapter
Overview ............................................................................................................................ 66Adding Tenants ................................................................................................................... 66Adding Users to Tenants ...................................................................................................... 68
Worksoft Certify Execution Suite Installation Guide 65

Overview
Overview
Tenant Administration Option is for large companies who want to add multi-tenant support. Each tenant has isolated data for each of the products, and it is able to leverage the SMTP settings or configure a specific one.When Worksoft Management Studio is installed, a single primary tenant is created by default, and this tenant is responsible for configuring the master configuration. From the primary tenant space, an administrator can create other tenant spaces if they want to partition data within their organization.The administrator manages all tenants within Management Studio and assigns users to each tenant. These users will be managed by administrators in that tenant space.
Adding Tenants
Administrators add tenants in the Tenant Administration tab within the Worksoft Management Studio.
To add tenants:
1 Log on to Worksoft Management Studio as an administrator.2 Under Master Configuration, click the Tenant Administration tab.
The Tenant Administration tab opens.3 Click Add to create a new tenant.
The Add Tenant dialog box opens.
66 Worksoft Certify Execution Suite Installation Guide
Switching Between Tenants
4 To create an active tenant, verify that Active is selected.5 In the related fields, type in the following information:
• Tenant Name• Email• First Name• Last Name• Website• PhoneThe user that you specify will be the main administrator for this new tenant space. The default password for the administrator is password.
6 If you want to limit the number of users, deselect the No user limit option and type in the number of users.If you do not want to limit the number of users, leave this option selected.
7 From the Default Time Zone drop-down list, select your preferred time zone for Certify Execution Manager.The time zone that you selected becomes the default time zone for this tenant and all users added to this tenant.
8 Click Add.The new tenant appears in the Tenant Administration tab.
9 Log out of Worksoft Management Studio by clicking the arrow in the right-hand corner and selecting Logout.
10 Log on to Worksoft Management Studio with the email address you specified when creating the tenant and the default password.You will now be able to perform administration tasks for the newly created tenant.
11 Repeat this process for creating additional tenants.When creating additional tenants, an email account can be associated with more than one tenant space.
Switching Between Tenants
To switch between tenants, the administrator must log out of the Worksoft Management Studio. When logging on to Management Studio, the administrator must select a tenant from the Tenant list.As long as the passwords for the tenant administrators are the same, then they will be able to select tenants from the Tenant list. If the password for either administrator is changed, then the user will not see the Tenant list and will only be able to manage the tenant in which it was created.
Worksoft Certify Execution Suite Installation Guide 67

Adding Users to Tenants
Adding Users to Tenants
You will now add users to your multiple tenants by one of the following methods: Manually add users in Worksoft Management Studio Import users from a Microsoft Excel® spreadsheet
To manually add users to tenants:
1 Log on to Worksoft Management Studio as the tenant administrator.2 From the Tenant list, select the tenant in which you would like to create a new Execution Manager or
Certify Impact user.1 In the Worksoft Management Studio, click the User Administration tab.2 In the User Administration tab, click Add.
The Add User dialog box opens.
3 To create an active user, verify that Active is selected.To deactivate a user, select Inactive.
68 Worksoft Certify Execution Suite Installation Guide
Adding Users to Tenants
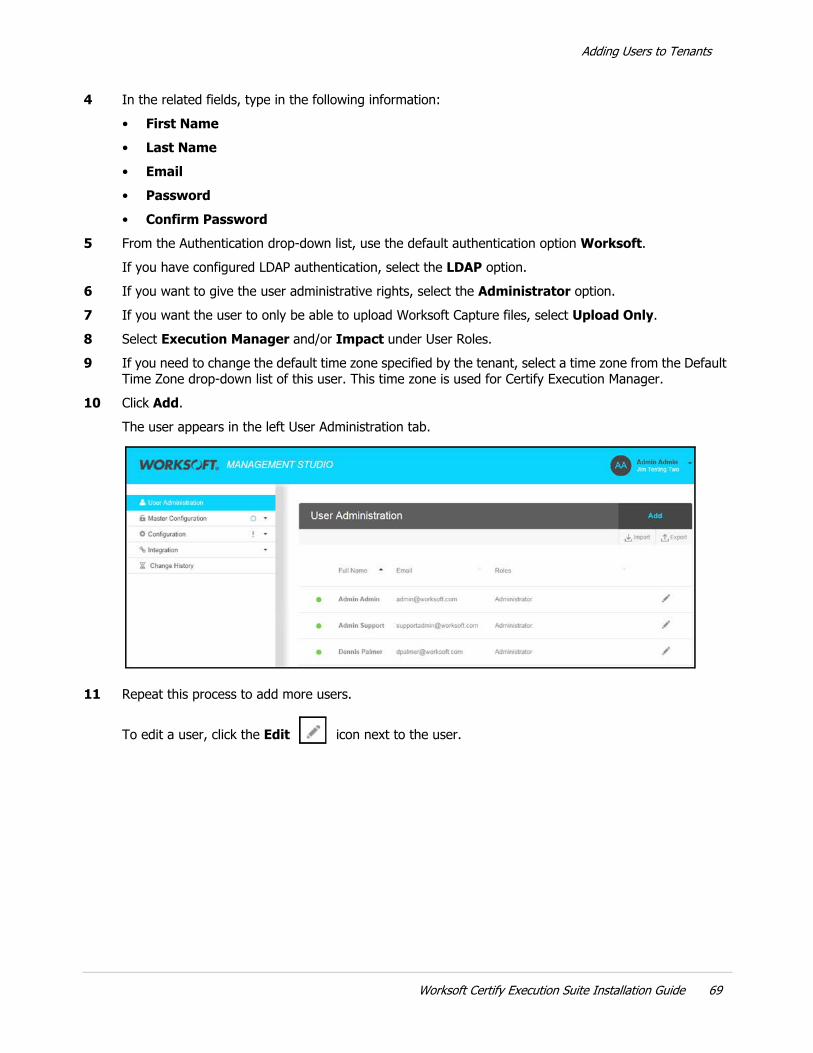
4 In the related fields, type in the following information:• First Name• Last Name• Email• Password• Confirm Password
5 From the Authentication drop-down list, use the default authentication option Worksoft.If you have configured LDAP authentication, select the LDAP option.
6 If you want to give the user administrative rights, select the Administrator option.7 If you want the user to only be able to upload Worksoft Capture files, select Upload Only.8 Select Execution Manager and/or Impact under User Roles.9 If you need to change the default time zone specified by the tenant, select a time zone from the Default
Time Zone drop-down list of this user. This time zone is used for Certify Execution Manager.10 Click Add.
The user appears in the left User Administration tab.
11 Repeat this process to add more users.
To edit a user, click the Edit icon next to the user.
Worksoft Certify Execution Suite Installation Guide 69

Adding Users to Tenants
To add users by importing from a Microsoft Excel spreadsheet:
1 In the Worksoft Management Studio, click the User Administration tab.2 In the User Administration tab, click Import.
The Import User dialog box opens.
3 To download an Excel template, click Download Sample Upload File.Use this template to create your own Excel spreadsheet.
4 Click the Choose File button and select the CSV file that you want to import.5 After you have selected your file, click the Import button.
The users are imported into the Worksoft Management Studio and appear in the Users Administration tab.
70 Worksoft Certify Execution Suite Installation Guide

Chapter 7 Installing Remote Certify Execution Manager Agents
In This Chapter
Installing Remote Certify Execution Manager Agents .............................................................. 72Configuring Resource Client Machines ................................................................................... 75Accessing the Certify Execution Manager Agent ..................................................................... 86Best Practices for Using RDP with Multiple Local Users ........................................................... 87
Worksoft Certify Execution Suite Installation Guide 71

Installing Remote Certify Execution Manager Agents
Installing Remote Certify Execution Manager Agents
In order to use the Worksoft Certify Execution Manager, you will need to install a Certify Execution Manager Agent on each dedicated machine allocated for remote execution. The Certify Execution Suite Server communicates with the Agents and sends requests to start executing processes and projects.In order for the Server to communicate with the Agents, port 4242 must be open.You are able to install Certify Execution Manager Agents two different ways: From the software distribution folder From Certify Execution Manager
If the Certify Execution Manager Agent is not installed on the default C: drive, then you will need to create an AGENT_LOCATION parameter when you configure a resource in Execution Manager.
Also, if Worksoft Certify is not installed on the default C: drive, then you will need to create a CERTIFY_LOCATION parameter when you configure a resource.
Administrator Rights
When installing the Execution Agent, you must have full Administrator rights to the Execution Agent machine. If you create a Service user for running the Execution Agent in continuous mode, the Service user must have full Administrator rights to the machine in order to start the Execution Agent as an Administrator.Administrator rights are needed because without full Administrator privileges, the Execution Manager Agent will be prevented from executing Certify processes by any malware detection and prevention software that is running on the machine. The Execution Manager Agent is an executable whose sole purpose is to start the Certify command line executable (Certify.exe) and pass in command line parameters to execute a process in Certify. When Certify is executing a process, it might also execute DOS commands or other applications in order to test them. This scenario, where one executable starts another executable which then starts additional applications or executes DOS system commands, is a known hallmark of malware that is automatically prevented by all malware detection software.
72 Worksoft Certify Execution Suite Installation Guide

Administrator Rights
To install a Certify Execution Manager Agent from the software distribution folder:
1 In your software distribution folder, right-click the Remote Execution Agent.exe file and selectRun as administrator.The Certify Execution Manager Agent installer opens.
2 Click Next.When the system analysis has completed, the Destination Folder page appears.
Worksoft Certify Execution Suite Installation Guide 73

Administrator Rights
3 If you want to accept the default directory for your installation files, click Next.If you do not want to accept the default directory for the installation files, click the Change button to select a different installation directory for the Certify client, and then click Next.If the directory is different, you will also need to update the directory in the Execution Manager Resources page.The Completing the Certify Execution Manager Agent Installation page appears.
4 Click Finish.Certify Execution Manager Agent installation is complete. Repeat this installation process for all of the client machines that you intend to use with the Execution Manager Server.The Certify Execution Manager Agent must be running in order for the Execution Manager Server to connect with the machine that will be executing Certify processes. When you start Certify Execution Manager, the agent will automatically start. When you log off, the Agent shuts down.
To install a Certify Execution Manager Agent from the Certify Execution Manager:
1 From Certify Execution Manager, click the Resources tab.2 In the right pane, click Download E/M Agent.
A message appears asking if you want to open or save the ExecutionManagerAgent.zip file.3 Click Open, Save, or Save As.4 If you clicked Save or Save As, unzip the ExecutionManagerAgent.zip file.5 Right-click Execution Manager Agent.exe and select Run as administrator.
The Certify Execution Manager Agent installer opens. For information about the installation process, see “To install a Certify Execution Manager Agent from the software distribution folder:” on page 73.
74 Worksoft Certify Execution Suite Installation Guide

Configuring Resource Client Machines
Configuring Resource Client Machines
The resource machine where Certify Execution Manager Agent is installed needs to be able to respond to pings from the web server when you utilize Remote Desktop Protocol (RDP). You will need to complete the following settings in order for your machines to successfully execute requests: Enable and start the Net.TCP Port Sharing Service. Create inbound and outbound rules for port 4242 in the Windows Firewall. Configure resource machines to be responsive to Execution Manager pings Disable Windows Fast User Switching mode
Enabling and Starting Net.TCP Port Sharing Service
You need to enable and start the Net.TCP Port Sharing Service on your resource machine.
To enable and start Net.TCP Port sharing service:
1 Go to the Start menu on your machine and select Run.2 Enter Services.msc in the Open field and click OK.
The Services window opens.3 From the Services list, search for the Net.TCP Port Sharing Service.4 Verify that the Net.TCP Port Sharing Service is set to Automatic in the Start Type field and Running in
the Status field.
Worksoft Certify Execution Suite Installation Guide 75

Enabling and Starting Net.TCP Port Sharing Service
5 If the Service is set to Disabled, then right-click on the Service and select Properties.The Properties dialog box opens.
6 In the Startup Type drop-down list, select Automatic.7 Click Start to begin the service.8 Click OK.
76 Worksoft Certify Execution Suite Installation Guide

Create Inbound and Outbound Rules for Port 4242 in the Windows Firewall
Create Inbound and Outbound Rules for Port 4242 in the Windows Firewall
You need to add an inbound rule and an outbound rule for port 4242 with the Windows Firewall with Advanced Settings tool on your resource machine in order to communicate with your application server.
To add an inbound rule:
1 Open Windows Firewall with Advanced Settings on your machine.2 In the left Navigation pane, click Inbound Rules.
3 In the right Actions pane, click New Rule.
Worksoft Certify Execution Suite Installation Guide 77

Create Inbound and Outbound Rules for Port 4242 in the Windows Firewall
The New Inbound Rule Wizard opens.
4 In the Rule Type tab, click Port.5 Click Next.
The Protocol and Ports tab appears.
6 Select the Specific Local Ports option and type the port number 4242 in the text field.
78 Worksoft Certify Execution Suite Installation Guide

Create Inbound and Outbound Rules for Port 4242 in the Windows Firewall
7 Click Next.The Action tab appears.
8 Select the Allow the Connection option.9 Click Next.
The Profile tab appears.
Worksoft Certify Execution Suite Installation Guide 79
Create Inbound and Outbound Rules for Port 4242 in the Windows Firewall
10 Select the appropriate options:• Domain• Private• Public
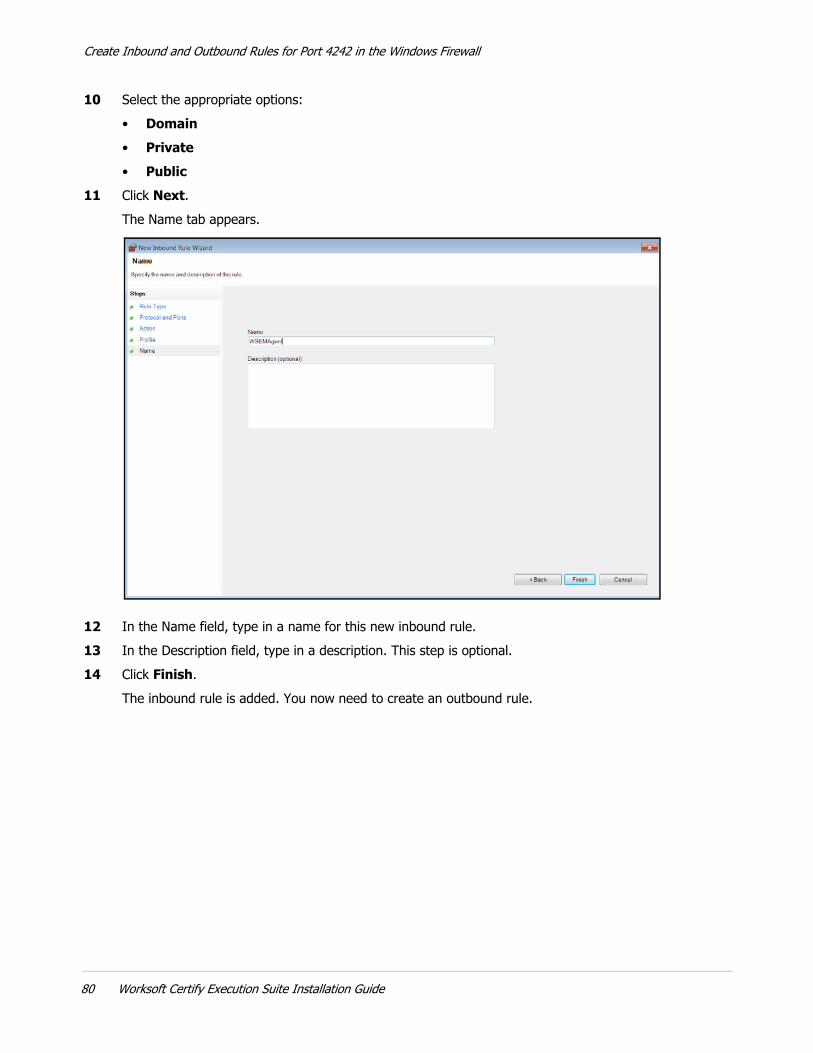
11 Click Next.The Name tab appears.
12 In the Name field, type in a name for this new inbound rule.13 In the Description field, type in a description. This step is optional.14 Click Finish.
The inbound rule is added. You now need to create an outbound rule.
80 Worksoft Certify Execution Suite Installation Guide

Create Inbound and Outbound Rules for Port 4242 in the Windows Firewall
To add an outbound rule:
1 Open Windows Firewall with Advanced Settings on your machine.2 In the left Navigation pane, click Outbound Rules.3 In the right Actions pane, click New Rule.
The New Outbound Rule Wizard opens.
4 In the Rule Type tab, click Port.5 Click Next.
Worksoft Certify Execution Suite Installation Guide 81

Create Inbound and Outbound Rules for Port 4242 in the Windows Firewall
The Protocol and Ports tab appears.
6 Select the Specific Local Ports option and type the port number 4242 in the text field.7 Click Next.
The Action tab appears.
8 Select the Allow the Connection option.
82 Worksoft Certify Execution Suite Installation Guide

Create Inbound and Outbound Rules for Port 4242 in the Windows Firewall
9 Click Next.The Profile tab appears.
10 Select the appropriate options:• Domain• Private• Public
11 Click Next.
Worksoft Certify Execution Suite Installation Guide 83

Create Inbound and Outbound Rules for Port 4242 in the Windows Firewall
The Name tab appears.
12 In the Name field, type in a name for this new outbound rule.13 In the Description field, type in a description. This step is optional.14 Click Finish.
The outbound rule is added.
84 Worksoft Certify Execution Suite Installation Guide

Configuring Resource Machine to be Responsive to Execution Manager Pings
Configuring Resource Machine to be Responsive to Execution Manager Pings
In order for you to be able to ping your resource machine in the Certify Execution Manager Resources screen, you will need to enable the following inbound rules: File and Printer Sharing (Echo Request - ICMPv4-In) File and Printer Sharing (Echo Request - ICMPv6-In)
To configure your resource machine to be responsive to pings:
1 Open Windows Firewall with Advanced Settings tool on your machine.2 In the left Navigation pane, click Inbound Rules.
3 Verify that the following inbound rules are enabled:• File and Printer Sharing (Echo Request - ICMPv4-In)• File and Printer Sharing (Echo Request - ICMPv6-In)
4 If any of these rules are not enabled, right-click on the No next to the rule in the Enabled column and select Enable Rule.
5 After you have enabled all of these rules, close the Windows Firewall with Advanced Settings tool.
Note: If you have a Citrix environment, the Citrix server must be configured to support RDP sessions. Test your configuration by running mstsc.exe. This configuration setting is not enabled by default.
Worksoft Certify Execution Suite Installation Guide 85
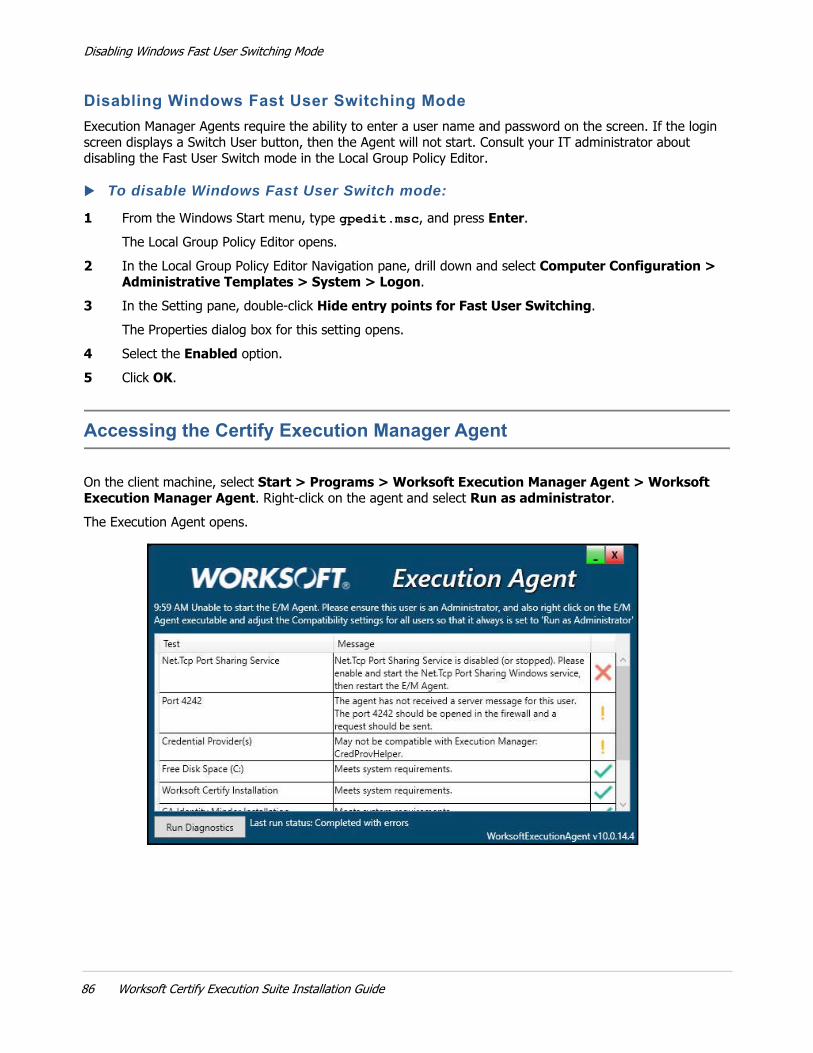
Disabling Windows Fast User Switching Mode
Disabling Windows Fast User Switching Mode
Execution Manager Agents require the ability to enter a user name and password on the screen. If the login screen displays a Switch User button, then the Agent will not start. Consult your IT administrator about disabling the Fast User Switch mode in the Local Group Policy Editor.
To disable Windows Fast User Switch mode:
1 From the Windows Start menu, type gpedit.msc, and press Enter.The Local Group Policy Editor opens.
2 In the Local Group Policy Editor Navigation pane, drill down and select Computer Configuration > Administrative Templates > System > Logon.
3 In the Setting pane, double-click Hide entry points for Fast User Switching.The Properties dialog box for this setting opens.
4 Select the Enabled option.5 Click OK.
Accessing the Certify Execution Manager Agent
On the client machine, select Start > Programs > Worksoft Execution Manager Agent > Worksoft Execution Manager Agent. Right-click on the agent and select Run as administrator.The Execution Agent opens.
86 Worksoft Certify Execution Suite Installation Guide

Best Practices for Using RDP with Multiple Local Users
When you start the Execution Agent, you will see a list of diagnostic tests that have been performed on your machine. Each test displays one of the following status icons:
The last run diagnostics status also displays below the grid.Each time the Execution Manager starts, it automatically performs the analysis and reports these findings. If you make adjustments to the configuration and policy, click Run Diagnostics to run the tests again and to see if all the tests passed.
Best Practices for Using RDP with Multiple Local Users
If you have multiple local users running tests using RDP, you will need to configure your machine to avoid initial log on time consumption and requests failing to execute.
Avoiding Initial Log on Time Consumption
After creating a local user on a machine, manually log on as the new user because the initial log on to Windows is sometimes time consuming.
Avoiding Requests Failure
Even if the local user running tests belongs to the Administrator group on the machine, you will still need to turn off the User Account Control notifications. If you do not turn them off, the requests fail to execute.
Icon Description
Test passed.
Mandatory configuration was not met and must be fixed. You will not be able to execute requests.
Warning that there is a failure, but requests still might be able to run.
Worksoft Certify Execution Suite Installation Guide 87
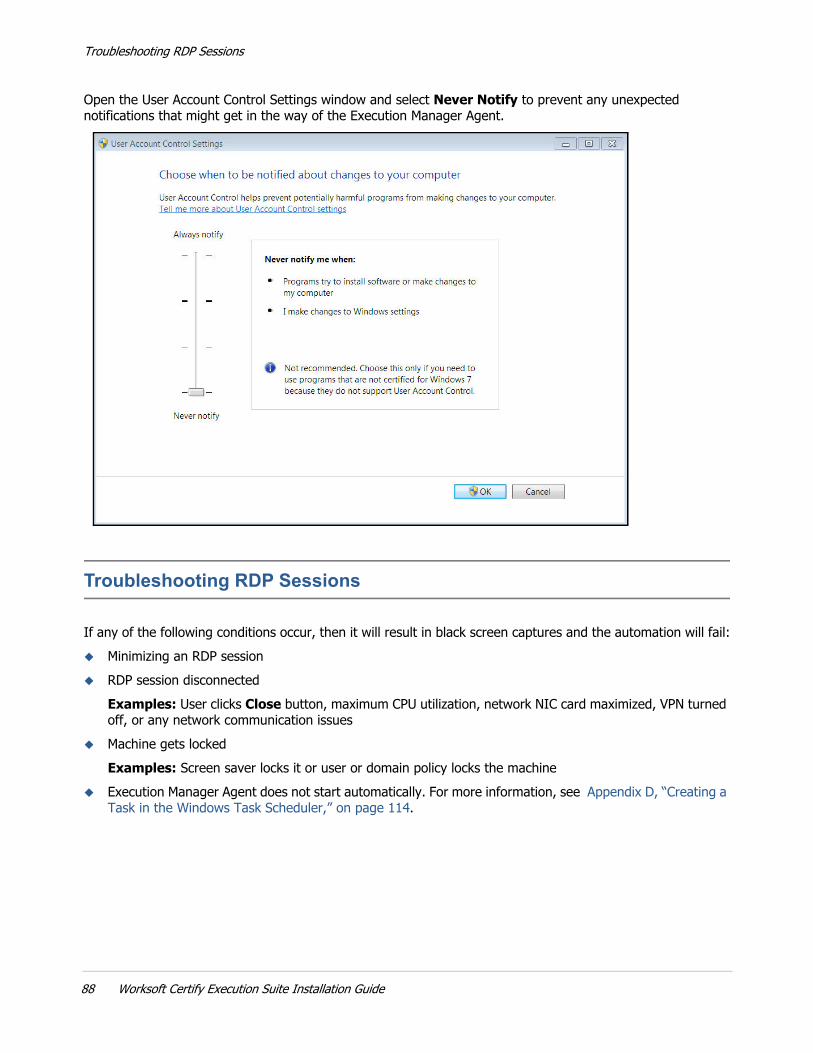
Troubleshooting RDP Sessions
Open the User Account Control Settings window and select Never Notify to prevent any unexpected notifications that might get in the way of the Execution Manager Agent.
Troubleshooting RDP Sessions
If any of the following conditions occur, then it will result in black screen captures and the automation will fail: Minimizing an RDP session RDP session disconnected
Examples: User clicks Close button, maximum CPU utilization, network NIC card maximized, VPN turned off, or any network communication issues
Machine gets lockedExamples: Screen saver locks it or user or domain policy locks the machine
Execution Manager Agent does not start automatically. For more information, see Appendix D, “Creating a Task in the Windows Task Scheduler,” on page 114.
88 Worksoft Certify Execution Suite Installation Guide

Chapter 8 Upgrading Worksoft Certify Execution Suite
In This Chapter
Upgrading Worksoft Certify Execution Suite v9.2 to v10 ......................................................... 90Upgrading Databases for Multi-Tenancy ................................................................................ 92Updating Resources ............................................................................................................. 93Upgrading Worksoft Certify Execution Suite v10.0.0 to v10.0.X ............................................... 94
Worksoft Certify Execution Suite Installation Guide 89

Upgrading Worksoft Certify Execution Suite v9.2 to v10
Upgrading Worksoft Certify Execution Suite v9.2 to v10
1 Uninstall Worksoft Certify Execution Suite v9.2.2 After you uninstall the Execution Suite, delete the Worksoft Application Server folder in the
following default location: C:\Program Files (x86)\Worksoft
3 Install the Worksoft Application Server v10. For information on how to install the server, see Chapter 3 “Installing Worksoft Application Server.”
4 Open the Worksoft Management Studio on a local machine by navigating to the following address: http://localhost/ManagementStudio.The Management Studio Installation page opens.
5 Type in the Worksoft Management Studio URL address.If you did not use the default website during installation, your URL address will be different. The implementation of your network landscape will need to be considered when choosing a URL address. Verify that the URL can be accessed by all users.The URL address should either be a domain or a machine name for on-premise installations. If using a machine name, you will need to decide if a fully-qualified domain and machine name is required. Do not use IP addresses.If your DNS settings require a fully-qualified machine name complete with domain, please make those changes accordingly.
90 Worksoft Certify Execution Suite Installation Guide

Upgrading Worksoft Certify Execution Suite v9.2 to v10
If their is a load balancer in front of one or more web servers, then the URL address should point to the load balancer domain. If you have any questions about your specific URL address, please ask your IT administrator.If you intend to use HTTPS for your application server, you will need to first configure your server with HTTP, and then you will be able to reconfigure the application server to use HTTPS. For more information, see Appendix B, “Using HTTPS on Your Application Server,” on page 108.
6 If you want to enable verbose logging, select the Enable Verbose Logging option.7 To view the status of your services, click the Services down arrow.8 In the Management Studio Database section, type in the server name in the SQL Server field.9 For SQL Database Authentication, type the SQL user name and password in the fields to access the
database server.The SQL Server user account must have necessary permissions to create or update the database. If needed, you are able to use a temporary SQL Server administrator with permissions, and then update the SQL Server user credentials for only this database.
10 In the Database Name field, type in the name of the Management Studio database.11 Click the Update button.
A message appears asking if you want to update the Worksoft Management Studio database.12 Click Update.13 Click Continue.
After saving the Management Studio configuration, you will be prompted to log on to the Management Studio.
14 In the User Name field, use your existing Worksoft Management Studio email address as your user name.
15 In the Password field, use the password that you created for Worksoft Management Studio.16 Click Login.17 In the Worksoft Management Studio, click the Master Configuration tab.18 Click the Execution Manager tab.
The Execution Manager tab opens.19 Click the Update button to update the database.
A message appears asking if you want to update the Certify Execution Manager database.20 Click Update.21 Click the Impact tab.
The Impact tab opens.
Worksoft Certify Execution Suite Installation Guide 91

Upgrading Databases for Multi-Tenancy
22 Click the Update button to update the database.A message appears asking if you want to update the Certify Impact database.
23 Click Update.
Note: If you have more than one Certify Execution Manager and Certify Impact databases, you are able to easily update the database. Start typing the name of the database in the field, and a list of database names appear. If your database does not appear in the list, the permissions for the SQL User must not be adequate. Consult your database administrator.
Upgrading Databases for Multi-Tenancy
To finish the upgrade process, open the Microsoft SQL Management Studio to configure databases for multi-tenancy. Because of the major architecture updates, there is an extra manual step that is required by your Microsoft SQL Server database administrator. You will need to have permissions and access to manually run two database scripts.
To upgrade Certify Execution Manager database for multi-tenancy:
1 Open the Microsoft SQL Management Studio.2 Open the Databases folder for ExecutionServer.3 Open the Populate-tenant.sql file in the Microsoft SQL Management Studio.4 In the Use line, add the Execution Manager database name that needs to be upgraded for
multi-tenancy.
This line verifies that the Execution Manager database is the focus, and it will be the actual database updated during this operation. Use the full name of the Execution Manager database.
5 In the Declare line, add your Execution Manager database and the SQL Management Studio database that you will need sync with for the multi-tenancy.
This line verifies that this TSQL script knows the name of the Management Studio database, and it will be querying information required from the Management Studio database to perform the update on the Execution Manager database. Use the full name of the Management Studio database within the single quotes at the end of this line, as shown in red.
6 Run the SQL query.7 Verify that you get a success message after the query has completed.
92 Worksoft Certify Execution Suite Installation Guide

Updating Resources
To upgrade Certify Impact database for multi-tenancy:
1 Open the Microsoft SQL Management Studio.2 Open the Databases folder for Impact.3 Open the Populate-tenant.sql file in the Microsoft SQL Management Studio.4 In the Use line, add the Certify Impact database name that needs to be upgraded for multi-tenancy.
This line verifies that the Certify Impact database is the focus, and it will be the actual database updated during this operation. Use the full name of the Certify Impact database.
5 In the Declare line, add your Certify Impact database and the SQL Management Studio database that you will need sync with for the multi-tenancy.This line verifies that this TSQL script knows the name of the Management Studio database, and it will be querying information required from the Management Studio database to perform the update on the Certify Impact database. Use the full name of the Management Studio database within the single quotes at the end of this line.
6 Run the SQL query.7 Verify that you get a success message after the query has completed.
Updating Resources
Certify Execution Manager v10 provides the ability for concurrent Remote Desktop Protocol (RDP) user sessions on remote machines for continuous testing in parallel and helps remove several constraints and limitations.With this version, you will need to add users to your resources. Resource machines need to be powered on, but they no longer need to have the Execution Manager Agent running. Execution Manager starts the Agent before execution. You will need to edit each resource and configure user credentials in order for processes to execute properly.In this release, Certify Execution Manager will automatically: Identify an available machine and an available user account. Reserve the machine and user account for the duration of executing a Certify process. Log on to the reserved machine using the user account to automatically start the Execution Manager
Agent. Start Certify to execute the process and results are saved in the Certify database. Close Certify and Execution Manager Agent when the execution of the Certify process is complete. Log out of the machine.The machine and user account will then be available for subsequent executions of other Certify processes.For information on how to configure and register your resources, see the topic Upgrade to Certify Execution Manager v10 in the Worksoft Help Portal.
Note: If you are upgrading from v9.2 to v10, you will need to provide additional settings for your LDAP Connection. For more information, see “To configure your LDAP authentication service:” on page 53.
Worksoft Certify Execution Suite Installation Guide 93

Upgrading Worksoft Certify Execution Suite v10.0.0 to v10.0.X
Upgrading Worksoft Certify Execution Suite v10.0.0 to v10.0.X
Before upgrading Worksoft Certify Execution Suite, verify that you have installed Media Foundation when you configured your application server. For more information, see page 13.
To upgrade Worksoft Certify Execution Suite v10 to v10.0.1:
1 From the distribution package, run the installer.The application will install on top of the previous version.
2 In the Worksoft Management Studio, verify that all of your configurations are set correctly.Any configuration problems will be highlighted in the color red. After you have reset your configurations, you are ready to start using the applications.
3 Each time you perform an upgrade, you will need to update the following databases:• Management Studio• Execution Manager• Certify Impact
94 Worksoft Certify Execution Suite Installation Guide

Chapter 9 Accessing Worksoft Certify Execution Suite
In This Chapter
Accessing Certify Impact ...................................................................................................... 96Accessing Certify Execution Manager .................................................................................... 96REST API Support for Execution Manager.............................................................................. 96
Worksoft Certify Execution Suite Installation Guide 95

Accessing Certify Impact
Accessing Certify Impact
The URL address for Certify Impact is http://<servername>/Impact/
Accessing Certify Execution Manager
The URL address for Certify Execution Manager is http://<servername>/ExecutionManager/
REST API Support for Execution Manager
Certify Execution Manager supports REST API calls from various development operating tools, such as Jenkins, to execute requests. For help and examples, see http://<ServerName>/ExecutionManager/apidocs/
If you want to use this specification directly, the Swagger UI has a link that leads to the consumable Worksoft Execution Manager API Swagger Spec.
96 Worksoft Certify Execution Suite Installation Guide

Chapter 10 Configuring HP Quality Center Integration
In This Chapter
Overview ............................................................................................................................ 98Installing the HP Quality Center Connectivity Add-On Tool...................................................... 98Integrating Worksoft Execution Suite with HP ALM................................................................. 99
Worksoft Certify Execution Suite Installation Guide 97

Overview
Overview
You are able to integrate with HP Application Lifecycle Management® (ALM) and leverage your test sets from Certify Execution Manager. The Certify Execution Manager runs HP ALM test sets in parallel which reduces the time needed for regression testing. The results are stored directly into HP ALM, and a consistent audit log is provided. In order to run HP ALM test sets from Certify Execution Manager, the web server hosting Worksoft Execution Suite and each resource machine must have the following: HP ALM Client installed HP ALM Connectivity tools installed HP ALM Client registeredFor information on how to install the HP ALM Client and register it, go to the HP ALM site.
Installing the HP Quality Center Connectivity Add-On Tool
To connect HP Quality Center with the Worksoft Execution Suite, you need to install the HP Quality Center Connectivity Add-On tool on the web server hosting Worksoft Execution Suite and each resource machine.
To install the HP Quality Center connectivity add-on tool:
1 Open the HP Quality Center Application Lifecycle Management (ALM) site.2 Click Tools.3 On the ALM Tools screen, click HP ALM Connectivity.4 Click Download HP ALM Connectivity.5 On the HP ALM Connectivity screen, click Save and save the TDConnect.exe file.6 Browse to where you saved the file, and right-click on TDConnect.exe and select
Run as administrator.After the installation completes, a message appears.
7 Click OK.
98 Worksoft Certify Execution Suite Installation Guide

Integrating Worksoft Execution Suite with HP ALM
Integrating Worksoft Execution Suite with HP ALM
If you plan to integrate with HP ALM, you will need to validate your connection with Worksoft Management Studio.
To validate HP ALM with Worksoft Execution Suite:
1 In the Worksoft Management Studio, click the Integration tab.2 Click the ALM Integration tab.
The ALM Integration tab opens.3 Click Add.
The Add ALM Configuration dialog box opens.
Worksoft Certify Execution Suite Installation Guide 99

Integrating with Certify Impact
4 Enter the following information:
5 Click Test Configuration.Information about the connection appears in the Status section.
Integrating with Certify Impact
To integrate with Certify Impact, select HP Quality Center as the Test Execution Integration option in the Configuration tab. For more information, see “Configuring Certify Impact” on page 48.
Field Description
Name Name for your HP ALM connection
Instance URL HP ALM URL address
Domain HP ALM domain
Project HP ALM project
User HP ALM user name
Password HP ALM password
100 Worksoft Certify Execution Suite Installation Guide
Chapter 11 Configuring Panaya TDx Integration
In This Chapter
Overview .......................................................................................................................... 102Configuring Certify BPP ...................................................................................................... 102Adding Panaya TDx Information to Worksoft Management Studio ......................................... 104Creating Bookmarks for Panaya TDx Integration .................................................................. 105Creating a Worksoft Automation Cycle ................................................................................ 105
Worksoft Certify Execution Suite Installation Guide 101

Overview
Overview
Worksoft supports the integration with the Panaya Test Dynamix (TDx) Platform. The common workflow for TDx is the reporting of test results based on build numbers. Worksoft Certify results can contain an application and build number to correlate results with reporting on changes in the build.In order to enable this integration with TDx, you will need to complete the following: Enable Panaya TDx for API integration. Configure Certify Business Process Procedure (Certify BPP) in Worksoft Management Studio. Certify BPP is
used to create comprehensive reports for test results. Add Panaya TDx information to Worksoft Management Studio for integration. Create bookmarks in Worksoft Management Studio for Certify processes that you want to make available in
Panaya TDx.
Configuring Certify BPP
After you have enabled Panaya TDx for API integration, you will open Worksoft Management Studio to complete the configuration. The first step is to configure Certify BPP. Certify BPP is a web-based reporting tool that automatically generates comprehensive reports for development, quality assurance, training, and compliance. For more information about Certify BPP, see the Worksoft Help Portal.Certify BPP has Certify databases specified in its configuration file. Each Certify database in Certify BPP has an alias name, and each Certify database in Worksoft Management Studio has an alias name. You must verify that the Certify databases in the Certify BPP configuration file match the database names in Worksoft Management Studio.If there are differences in the database names, Worksoft recommends that you change the names within the Certify BPP configuration file.
To configure Certify BPP:
1 Open Worksoft Management Studio.1 In the Worksoft Management Studio, click the Master Configuration tab.2 Click the BPP tab.
102 Worksoft Certify Execution Suite Installation Guide

Configuring Certify BPP
The BPP tab opens.
3 In the Instance URL text field, type in the URL address for your Certify BPP instance.Examples: http://machinename or https://machinename
4 Click Test Configuration.
Worksoft Certify Execution Suite Installation Guide 103

Adding Panaya TDx Information to Worksoft Management Studio
Adding Panaya TDx Information to Worksoft Management Studio
The next step is to add Panaya TDx information to Worksoft Management Studio so that the Worksoft Integration Gateway can point to the instance.
To add Panaya TDx information:
1 In the Worksoft Management Studio, click the Integration tab.2 Click the Panaya Integration tab.
The Panaya Integration tab opens.
3 In the Service URL field, type in the URL address for your Panaya instance.4 In the System UID field, type in the unique identification number for Panaya.
To find the UID in Panaya, open the Settings panel and select Configuration. In the Automatic Testing Tool section, click on Copy UID To Clipboard.
5 In the User and Password fields, type in your Panaya credentials in the respective fields.6 In the Polling Interval field, type in the number of seconds Execution Manager will query for new tasks
in Panaya TDx. The recommended value from Panaya is 60 seconds or greater.
104 Worksoft Certify Execution Suite Installation Guide

Creating Bookmarks for Panaya TDx Integration
7 In the BPP Report Template drop-down list, select the template that you want to use for your report.You must have Certify BPP configured in order to see the templates list.You can select multiple templates by pressing the <Ctrl> key while selecting several templates or by pressing the <Shift> key when selecting a consecutive range of templates. If more than one template is specified, one report is generated for each template. For example, if you selected three report templates, each process will generate three reports.
8 In the Certify Results Folder field, type in the name of the folder in which your results will be saved.9 Click Test Configuration.
A message appears if the connection was successful.
Creating Bookmarks for Panaya TDx Integration
The next step is to create bookmarks in Worksoft Management Studio that will point to the Certify processes that you want to make available in Panaya TDx. Worksoft Management Studio integrates with Panaya TDx with bookmarks. When using Panaya, a user can select either a single bookmark or all bookmarks. As a result, the Certify processes are added to a Panaya Worksoft Automation Cycle accordingly.For information on how to create bookmarks, see Chapter 5, “Adding Bookmarks,” on page 59.After you have completed creating bookmarks, your integration is complete.
Creating a Worksoft Automation Cycle
After you have configured the integration, create a new automation cycle in Panaya and select the Worksoft Automation option.
Worksoft Certify Execution Suite Installation Guide 105

Creating a Worksoft Automation Cycle
In order for Panaya to communicate with Worksoft Integration Gateway, you need to do the following: Select the new Worksoft cycle in the Navigation pane. Click the Sync Settings tab. In the Sync Settings tab, click New. From the Machine drop-down list, select the host name of Worksoft Management Studio and click Save. Click Sync and click the Refresh button.Under the Worksoft cycle, the Worksoft project and processes appear.
Now that the Certify processes appear within Panaya, it is possible to create one or more Panaya playlists using one or more of these processes at any time. When you run the Panaya playlist, the Worksoft Integration Gateway will be instructed to begin execution. An Execution Manager request is created within Execution Manager automatically. The new request contains each of the Certify processes that were added to the Panaya playlist. For more information about Panaya playlists, go to Panaya’s web page.After test execution is complete, you can view the results in Panaya TDx. The results appear in a report that utilizes the Certify BPP template you specified in Worksoft Management Studio.
106 Worksoft Certify Execution Suite Installation Guide

Worksoft Certify Execution Suite Installation Guide 107
Appendix A Troubleshooting
Before contacting Worksoft Support, use the Worksoft Diagnostics tool that is located in the Tools folder of the installation package. When you run the Worksoft Diagnostics tool on your web server, this tool generates a diagnostic results file.
To create a diagnostic results file with the Worksoft Diagnostics tool:
1 In the Tools folder of the installation directory, copy the worksoftdiagnostics.exe file to your web server.
2 Right-click on the worksoftdiagnostics.exe file and select Run as Administrator.3 Click the Start button.
The process will take several minutes. The WorksoftDiagnostic_<machine name>.html file opens in the default browser on the machine.
4 Review the diagnostic results file and follow the instructions listed in the file.5 After you have completed the tasks listed in the file, rerun the tool again if you are still having trouble
with installation.6 If needed, send the last results file to Worksoft Support.If you still have trouble installing the Worksoft Certify Execution Suite, go to the Worksoft Community site to view solutions to issues that you may have encountered with the installation. In order to utilize the Worksoft Community site, you will need to register on this site: http://portal.worksoft.com/.
Verifying the Worksoft Management Studio Configuration File
If you are having trouble with Worksoft Management Studio’s URL address, you can verify the address in the configuration file.
To verify the Worksoft Management Studio configuration file:
1 Open the Worksoft Management Studio configuration file in Notepad. Go to the following default folder to open the file:C:\Program Files (x86)\Worksoft\Worksoft Application Server\ManagementStudio\web.config
2 In the configuration file, find the setting <add key="MgmtStudioURL" value=.3 Verify that the URL address matches the one that you entered in the Configuration tab of the
Management Studio.Example: https://worksoftMSServer.worksoft.com/managementstudio
4 Save the updated configuration file.

Appendix B Using HTTPS on Your Application Server
If you intend to use HTTPS for your application server, you will need to leave the HTTP binding on default port 80. After you have reconfigured the application server to use HTTPS, the port will now default to 443. You will need both ports open.In order to use HTTPS on your application server, you will need to do the following: Request an SSL Certificate from your IT department. Add the certificate to IIS. Add new binding to port 443. Configure your database in the Worksoft Management Studio. Verify your SSL Settings on your application server.
Note: Before you begin your configuration, verify that your application server has been set up and working with HTTP.
To configure your database in the Worksoft Management Studio:
1 Open the Worksoft Management Studio on your web server by navigating to the following address: http://localhost/ManagementStudio.
2 Click the Master Configuration tab.
Worksoft Certify Execution Suite Installation Guide 108

3 In the Management Studio URL field, change HTTP to HTTPS.The URL address must match the address from the Issued To column in the Server Certificates window. Example: https://worksoftMSServer.worksoft.com/managementstudio
4 Click Save Changes.5 Close the Worksoft Management Studio.
To verify your SSL Settings on your application server:
1 Open the IIS Manager on your application server.2 In the IIS Connections pane, select Sites > Default Web Site > Management Studio.3 In the middle pane, double-click SSL Settings.4 Verify that the Require SSL option is not selected.5 Go back to the IIS Connections pane, and select Sites > Default Web Site > SAPWebService.6 In the middle pane, double-click SSL Settings.7 Verify that the Require SSL option is not selected.8 Close the IIS Manager.
Worksoft Certify Execution Suite Installation Guide 109

Appendix C Creating Worksoft Certify Execution Suite Databases with Apply.exe
You will create and update your Worksoft Certify Execution Suite databases in the Worksoft Management Studio. If your database administrator needs to create these databases, they are able to utilize the Apply.exe tools in the Databases folder within your Worksoft Certify Execution Suite distribution package.This Appendix will show you how to update all of your databases with the Apply.exe tool.
Creating or Updating the Worksoft Management Studio Database
The Worksoft Management Studio tool registers database settings, data sources, and SAP systems that you intend to use for Worksoft products. The Management Studio database maintains configuration information used by applications and services. Only one Management Studio database is needed regardless of how many Certify databases already exist.
To create a Worksoft Management Studio database:
1 Locate the Apply.exe utility within your Worksoft Certify Execution Suite distribution package:...\Databases\ManagementStudio
2 Double-click Apply.exe.The Apply utility opens.
Worksoft Certify Execution Suite Installation Guide 110
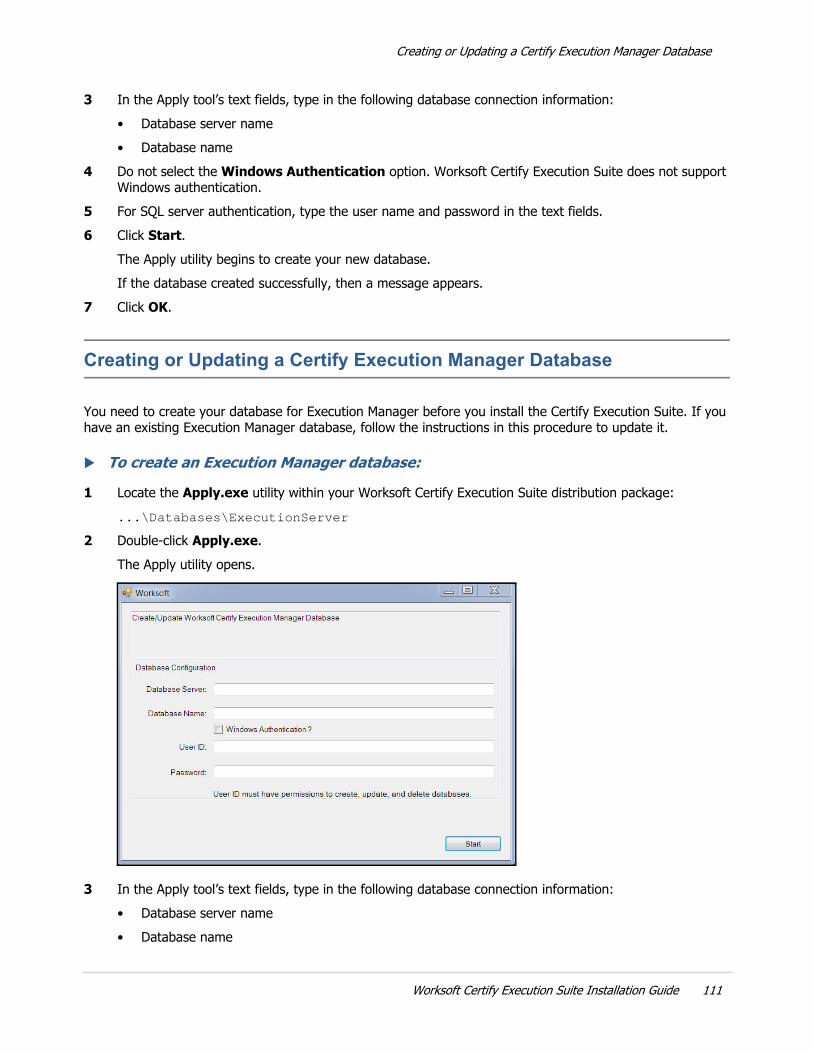
Creating or Updating a Certify Execution Manager Database
3 In the Apply tool’s text fields, type in the following database connection information:• Database server name• Database name
4 Do not select the Windows Authentication option. Worksoft Certify Execution Suite does not support Windows authentication.
5 For SQL server authentication, type the user name and password in the text fields.6 Click Start.
The Apply utility begins to create your new database.If the database created successfully, then a message appears.
7 Click OK.
Creating or Updating a Certify Execution Manager Database
You need to create your database for Execution Manager before you install the Certify Execution Suite. If you have an existing Execution Manager database, follow the instructions in this procedure to update it.
To create an Execution Manager database:
1 Locate the Apply.exe utility within your Worksoft Certify Execution Suite distribution package:...\Databases\ExecutionServer
2 Double-click Apply.exe.The Apply utility opens.
3 In the Apply tool’s text fields, type in the following database connection information:• Database server name• Database name
Worksoft Certify Execution Suite Installation Guide 111

Creating or Updating a Certify Impact Database
4 Do not select the Windows Authentication option. Worksoft Certify Execution Suite does not support Windows authentication.
5 For SQL server authentication, type the user name and password in the text fields.6 Click Start.
The Apply utility begins to create your new database.If the database created successfully, then a message appears.
7 Click OK.
Creating or Updating a Certify Impact Database
You need to create your database for Certify Impact before you install the Certify Execution Suite. If you have an existing Certify Impact database, follow the instructions in this procedure to update it.
To create a Certify Impact database:
1 Locate the Apply.exe utility within your Certify Execution Suite distribution package:...\Databases\Impact
2 Double-click Apply.exe.The Apply utility opens.
3 In the Apply tool’s text fields, type in the following database connection information:• Database server name• Database name
4 Do not select the Windows Authentication option. Worksoft Certify Execution Suite does not support Windows authentication.
112 Worksoft Certify Execution Suite Installation Guide

Creating or Updating a Certify Impact Database
5 For SQL server authentication, type the user name and password in the text fields.6 Click Start.
The Apply utility begins to create your new Certify Impact database.If the database created successfully, then a message appears.
7 Click OK.
Worksoft Certify Execution Suite Installation Guide 113

Appendix D Creating a Task in the Windows Task Scheduler
The Windows Task Scheduler can be used to start an Execution Manager Agent if you notice that the Agent does not automatically start after the RDP session starts. In some cases, the application security configuration prevents starting the Execution Manager Agent application with elevated privileges. In this case the Windows Task Scheduler should be used to initiate the Execution Manager Agent with elevated privileges on user login.
To create a task in Windows Task Scheduler:
1 From the Windows Start menu, open Task Scheduler.
2 In the right Actions pane, select Create Task.
Worksoft Certify Execution Suite Installation Guide 114

The Create Task dialog box opens.
3 In the Name field of the General tab, type in Start EM Agent.4 In the Description field, type Start EM Agent on user login.5 Click the Change User or Group button.
The Select User or Group dialog box opens.
6 In the Enter the Object Name field, type Users. 7 Click Check Names.
The text field auto populates with <machine_name>\Users.8 Click OK.
Worksoft Certify Execution Suite Installation Guide 115

The dialog box closes, and BUILTIN\Users appears in the User Account field.
9 In the Security Options section, select the following:• Run only when user is logged on• Run with highest privileges
10 Click the Triggers tab.
116 Worksoft Certify Execution Suite Installation Guide
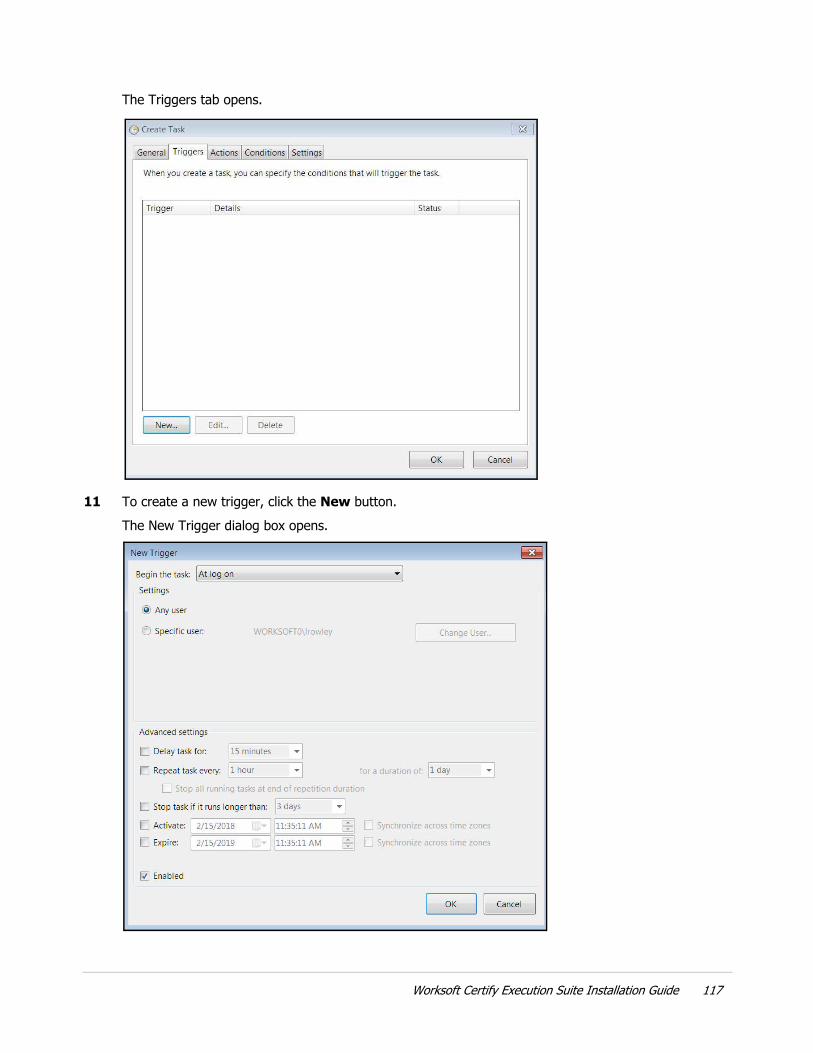
The Triggers tab opens.
11 To create a new trigger, click the New button.The New Trigger dialog box opens.
Worksoft Certify Execution Suite Installation Guide 117

12 In the Begin the task drop-down list, select At log on.13 Click OK.
The new trigger appears in the Triggers tab.
14 Click the Actions tab.The Actions tab opens.
118 Worksoft Certify Execution Suite Installation Guide
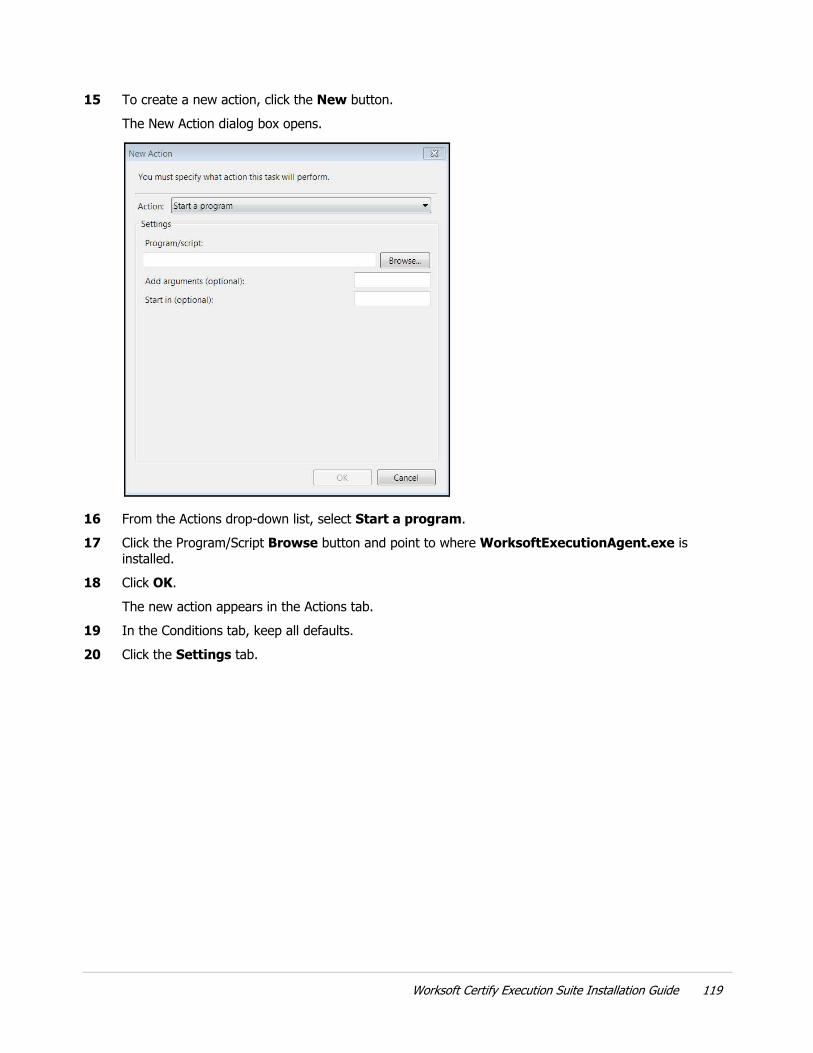
15 To create a new action, click the New button.The New Action dialog box opens.
16 From the Actions drop-down list, select Start a program.17 Click the Program/Script Browse button and point to where WorksoftExecutionAgent.exe is
installed.18 Click OK.
The new action appears in the Actions tab.19 In the Conditions tab, keep all defaults.20 Click the Settings tab.
Worksoft Certify Execution Suite Installation Guide 119

The Settings tab opens.
21 Verify that the following two options are NOT selected:• Stop the task if it runs longer than:• If the running task does not end when requested, force it to stop.
22 From the If the task is running.... drop-down list, select Run a new instance in parallel.23 Click OK.
120 Worksoft Certify Execution Suite Installation Guide