workshop pro - incendo ventures · prosale user manual 3 1.0 account receivable account receivable...
TRANSCRIPT

Workshop Pro Enterprise Version
By Incendo Ventures SdnBhd
USER MANUAL

ProSale User Manual
1
Index
1.0 Account Receivable…………………………………………………….......…………….….….......….…..
1.1 Customer Category Setup…..………………………………………................….........…………....
1.2 Customer Class Setup………………………………..…………….......…………….…………..….
1.3 Customer Registration……..……………………………………….......…..……….………….…...
1.4 Entering Customer Opening Balance Transaction……………………..........................……….…..
1.5 Job Card………………………………………………….………………….….….......….………...
1.6 Invoicing………………………………………………………………….……........…….………...
1.6.1 Sales Invoice…………………...........………………………….......…….……..………..
1.6.2 Trade In Item……………………...…………………………………........…..………….
1.7 Receipt……………………………………………………………………………........……..……..
1.8 Customer Credit Note/Sales Return..............…………………..……………….......……...……….
1.9 Customer Debit Note………………………………………………………….......…….…………..
2.0 Accounts Payable……….....…….……………………………………………………………......………...
2.1 Creditor Category………………….......…………………………………………..............………..
2.2 Creditor Class………………………………………………………………..................…………...
2.3 Creditor registration…………………………………………...…..………………….......………...
2.4 Creditor Opening Balance………………………………………………….……..............………...
2.5 Purchase Order………………………………………….….……………………….......…….….....
2.6 Purchase Invoice……………………………………………………………...............…….……….
2.7 Payment……………………………………………………………………...............……………...
2.8 Creditor Credit Note/Purchase Return..………………………………………….......……………...
2.9 Creditor Debit Note……………………………………………………….…............….…………..
3.0Stock………………......…………………………………………….……………….............….…………...
3.1 Stock Category……………………………………………………………............……….….…….
3.2 Stock Class………………………………………………………..…….....……...…...….….……..
3.3 Stock Brand……………………………………………………………………....…...….….……...
3.4 Unit of Measurement (UOM)………………………………........…………………..............……...
3.5 Stock Registration………………………………………..…………..………………....….……….
3.6 Stock In………………………………………………………….….....………………..…..……….
3.7 Stock Out……………………………………....……………………......……..……….…..……….

ProSale User Manual
2
4.0 Services………………………………....……...…………………………………….………........……….
4.1 Services Item......................................................................................................................................
4.2 Services Package…………………………....……………………………….…........………..…….
5.0 Vehicle……………………...…………………………………………….……………….….......…….…...
5.1 Vehicle Info Setup…………………………………......…….……………………........…..……….
5.2 Vehicle Sales Type……………………………….......………………….………............…..……...
5.3 Vehicle Model………………………….....……………………………...............…………..……..
5.4 Vehicle Booking………………………….....…………………………………........……..………..
5.5 Vehicle Allocation………………………......…………………………………........………..……..
5.6 Vehicle List…………………………………………..…………………...............…….…….…….
5.7 Insurance Cover Note………………….......…………………………………………….....……….
5.8 Vehicle Purchase…………………........……………………………………………….........……...
5.9 Vehicle Sales…………………...……………………………………………………..….......……..
6.0 Reports………………………………………………...……………..………………….……........………..
6.1 Account Receivable………………………………........…………………………..........…………..
6.2 Account Payable…………………………….............…………………………….…..…………….
6.3 Inventory…………………………………........…..................………………….…….…...……….
6.4 Vehicles………………………………........………………………………………….....………….
ProSale User Manual
3
1.0 Account Receivable
Account receivable module consists of Customer Category Setup, Customer Class Setup, Customer
Registration, Customer Class Setup and Customer Registration.
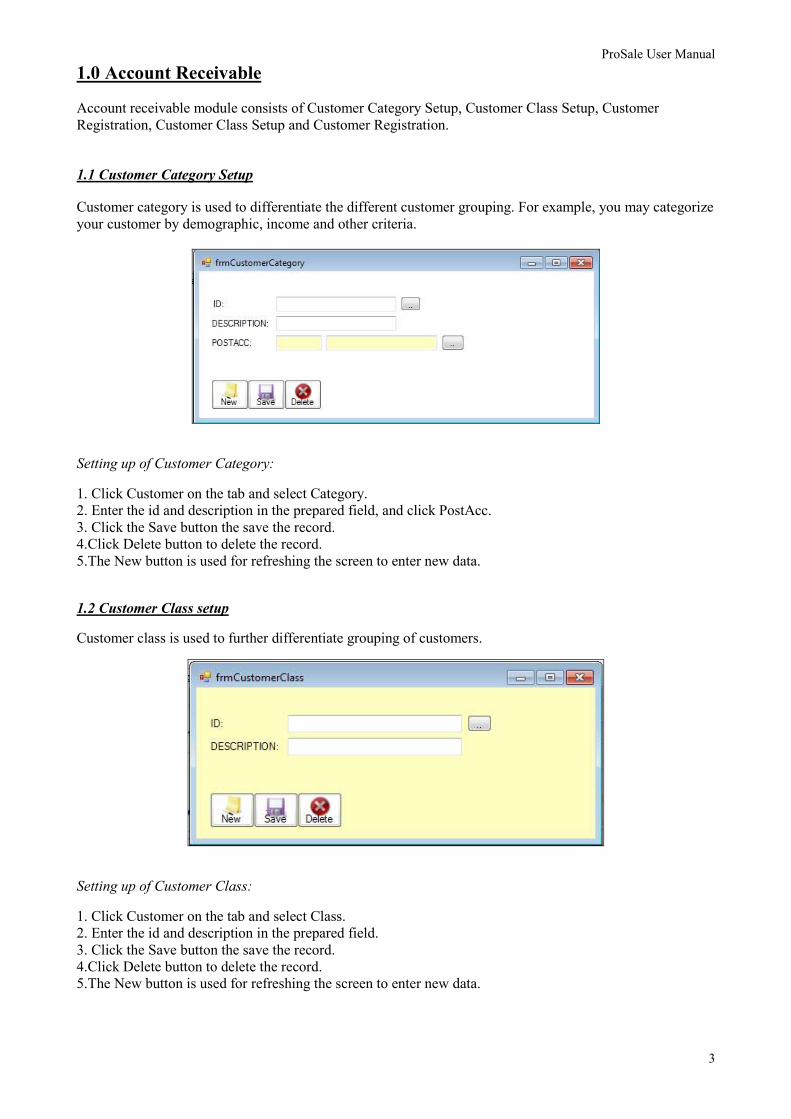
1.1 Customer Category Setup
Customer category is used to differentiate the different customer grouping. For example, you may categorize
your customer by demographic, income and other criteria.
Setting up of Customer Category:
1. Click Customer on the tab and select Category.
2. Enter the id and description in the prepared field, and click PostAcc.
3. Click the Save button the save the record.
4.Click Delete button to delete the record.
5.The New button is used for refreshing the screen to enter new data.
1.2 Customer Class setup
Customer class is used to further differentiate grouping of customers.
Setting up of Customer Class:
1. Click Customer on the tab and select Class.
2. Enter the id and description in the prepared field.
3. Click the Save button the save the record.
4.Click Delete button to delete the record.
5.The New button is used for refreshing the screen to enter new data.

ProSale User Manual
4
1.3 Customer Registration
Customer Registration is set up to keep track the information of the customers such as their contact details,
transaction activities as well as for credit control purposes.
Setting up Customer record:
1. Click on the shortcut button to obtain the Customer Maintenance Screen.
2. Fill in the relevant information in the customer information. Enter a unique code for eachcustomer in
Customer Code. No duplication of code is allowed as it is the main identity of the customer. There are
certain selection field in the customer windows, click and select from the drop down box for category,
class and salesman field.
3. Fill in customer GST section if they provide relevant information.
4. Fill in vehicle information (Model, Make, Colour etc with selection bar need to
preset in advance) in the vehicle information. Multi vehicle can group under same customer account.
5. Click the Save button the save the record.
6. Click Delete button to delete the record.
7. The New button is used for refreshing the screen to enter new data.
A
B
After select vehicle regno,
click to view Service history
C
B
A
Customer information Vehicle Information
C
Click to auto generate a
new customer code

ProSale User Manual
5
1.4 Entering Customer Opening Balance Transaction
Setting up of Customer Opening Balance:
1. Click Customer and select Customer Opening Balance.
2. Retrieve the customer opening balance wish to be entered.
3. Enter the Date, Customer Reference No, Term and Amount.
4. Enter more opening transaction if needed.
5. Click the Save button the save the record.
6. Click Delete button to delete the record.
7. Click on to check for matching info.
8. The New button is used for refreshing the screen to enter new data.

ProSale User Manual
6
Workshop Service Sales Process
Click on quick icon at Main menu to enter to relevant transaction surface, different car workshop can define
own working flow.
Examples of service sales process:-
Example A: Customer � Invoice �Receipt
Example B: Customer � Job Card � Invoice �Receipt
Example C: Customer � Appointment � Job Card � Invoice � Receipt
Example D: Customer � Appointment � Job Card � Job Allocation & Assignment � Invoice � Receipt

ProSale User Manual
7
1.5 Job Card
Job card is used to maintain information of the customer in terms of their vehicles Complaints/ Problems,
Price Estimation, Job Done Listing & Comment Notes.
The Job Card shortcut is as in the shown picture above.
Setting up Job Order:
1. Click on the Job Card shortcut and Job Order Screen Will be displayed.
2. Select Vehicle or Customer Particulars and other relevant information needed.
3. Next key in the Job Specification and Recommended Action needs to be taken.
4. Entering Job Order - Estimation. Enter the estimation stock &labourneeded to be used for repairing the
vehicle. Also key in the Quantity, Unit Price, Total Price and which technician will be performing in the task.
# Estimation combines Stock Item and Service Item
A
A
B
B
Click to view vehicle service history
Click to select
preseted service packege
Right click to select
stock &labour code Click to mark for warranty /
free service item
[Qty * U.Price = Total] + Tax
Amount [* GST %] = Net Total
Select up to 2 technician for
each stock / labour

ProSale User Manual
8
5. Entering Job Order - Part issue/Job Perform. Click on to add part &labour from
Estimation to Part issue/Job Perform or Key in manually the details in the provided column.
6. Once the details has been keyed in the Job Order form, the total Estimation for the Stock Item and Service
Item will be sum up at the end corner of the form.
7. Click the Save button the save the record.
8. Click Delete button to delete the record.
9. The New button is used for refreshing the screen to enter new data.
10. There are three buttons for printing where Quotation is to print out the estimation price for servicing and
stock, Job Card is to print out the Estimation and Job Done is to print out the Part Issue Lists to the
customer or for reference purposes.
Total amount sum up by estimation / Part Issue
Click to print different forms
Click to convert Part Issue to Tax Invoice To control Job Status manually
This deposit section will involve GST output tax
ProSale User Manual
9
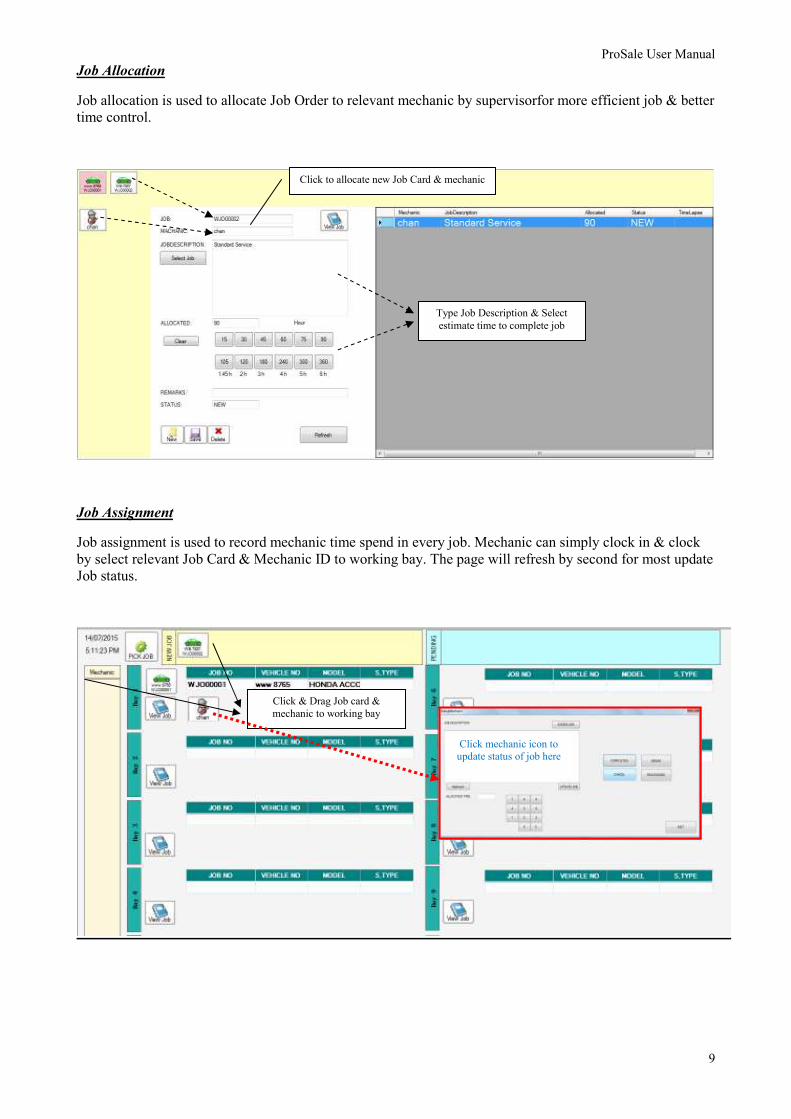
Job Allocation
Job allocation is used to allocate Job Order to relevant mechanic by supervisorfor more efficient job & better
time control.
Job Assignment
Job assignment is used to record mechanic time spend in every job. Mechanic can simply clock in & clock
by select relevant Job Card & Mechanic ID to working bay. The page will refresh by second for most update
Job status.
Click to allocate new Job Card & mechanic
Type Job Description & Select
estimate time to complete job
Click & Drag Job card &
mechanic to working bay
Click mechanic icon to
update status of job here

ProSale User Manual
10
1.6 Invoice
1.6.1 Sales Invoice
This feature is used to create sales invoice. Sales invoice is linked to customer balance file trip. Invoice
entered will directly be reflected in customer outstanding balance.
#Choose the Inv. Shortcut to open the Invoice Main Screen.
Create Sales Invoice:-
1. Click on Inv. shortcut and main screen will appear.
2. The invoice number is self-generated but amendable. There are Cash, Invoice and Internal type of
transactions as the primary key.
3. Select the data from REG NO or Customer by clicking the search button next to it.
4. The data also can be derived from the Job Order if it has created, load the Job Order here to avoid re-
entering the particulars for this Invoice.
5. Alternatively, a new invoice may be created for walk in customer.
6. Click on the Package button to select which promotion package your customer has chosen.
7. Or else right click the Code cell and let it prompt the item selection screen. Select the item by double
clicking on it.
8. Right click on the code for labour part and select service from the labour selection screen by double
clicking on it.
9. Enter the Vehicle Mileage (mandatory), Next Mileage, Next Service Date and Next Maintenance Package
at the top right of the screen.
Auto Generated but amendable Load from Job Card
Select Promotion Package
Key in Current Mileage
Key in customer trade in parts
Click the CODE cell and direct
type Stock ID / right click to select from prompt screen
Mark for warranty /
free service item
[Qty * U.Price = Total] + Tax Amount [* GST %] = Net
Total (can reverse calculation from key in NetTotal)

ProSale User Manual
11
10. Click on the Payment section at bottom of the page,click the cell of Payment Mode to select pay by
Cash, Cheque, or Credit Card. Enter the Amount and Reference.
11. Also enter the Discount, Tax Amount and GSTCode if needed.
12. Click the Save button the save the record.
13. Click Delete button to delete the record.
14. The New button is used for refreshing the screen to enter new data.
15. Click Print button to print out the Invoice Form.
# Tax invoice will be locked after print out, no amendment on stock &labour item is allowed.
1.6.2 Trade In Item
Key in Trade In items:
1. Click on the Trade In Item tab on the top of Service Invoice Form.
2. Enter the Trade In particulars in Description, Reference, Quantity, Unit Price, Total, Remarks cell.
3. Add or delete rows by clicking "-" or "+" button.
4. Click the Save button the save the record.
5. Click Delete button to delete the record.
6. The New button is used for refreshing the screen to enter new data.
7. Click Print button to print out the Invoice Form.
Click to select payment model Bill summary

ProSale User Manual
12
1.7 Receipt
When Payment is made for outstanding invoices, enter the payment into the receipts and offset the
outstanding invoice.
Generate Receipt:
1. Select the Receipt Form from the shortcut as shown.
2. The TransNo is self-generated but it is amendable.
3. Select the Customer by clicking the search button next to it.
4. After selecting the customer, outstanding invoices will be listed out on the Receipt Items table.
5. Select Payment Mode by clicking on the as in the image.
6. The ChequeNo / Credit Card is your Payment Mode Reference Field.
7. Enter the amount received into the Total Field.
8. Click on the Auto Match button and the system will automatic match the receipt and invoice.
9. Click on the Save button to save the receipt.
10. Click on the New button to add another ne Receipt Form.
11. If modifications are done in the future, click Save to update the changes.
12. To cancel the Receipt, click on the Cancel button, but once the bill is cancelled, the system will not allow
"Undo".
14. Click on the Delete button to delete the Receipt record.
15. Click on the Print button to print out the Receipt form.
# pleasedoes not erase Receipt with data as it may be linked with other transactions.
Click to select customer Click to select payment mode
Type customer paid amount here
Click auto-match & system will auto knock off outstanding bills

ProSale User Manual
13
1.8 Customer Credit Note
The Customer Credit Note is used for adjusting the customer account. For instance, when issuing discount to
customer, sales return, cancel tax invoice etc.
Entering Customer Credit Note:
1. Click CN Shortcut to select Credit Note Main Screen.
2. The TransNo is self-generated but it is still amendable.
3. Select by Customer by click on the search button next to it.
4. You may select an authorised person by click on the arrow button next to it.
5. Put a reference to Reference field (E.G Discount Allowed).
6. After you have selected the customer, outstanding invoices will be listed out.
7. Select CNTYPE, click ‘Search Invoice’ to select stock for sales return, or type description, amount etc
manually for Credit Note.
8. Click on the Auto Match button, system will automatic match the credit note and invoice for you.
9. Click on the Save button to save the Credit Note.
10. To add another customer credit note, click the New button to refresh the form.
11. If any modification done in the future, click Save button to update the changes.
12. To cancel the Credit Note, just click on the Cancel button, but once the bill is cancelled, system won’t
allow "Undo".
13. Click delete button to delete the Credit Note.
14. The Print button enables to print the Customer Credit Note Form.
# pleasedoes not erase Credit Note with data as it may link with other transaction.
Click to select customer Key in reason of this CN
1
2
3
1. Select CNTYPE
2. If Sales Return, search Invoice to select stock items
3. If Credit Note, type details manually.
Define TaxCode
Click Auto
Match to match total with
relevant
transaction.
Manual select posting accounting

ProSale User Manual
14
1.9 Customer Debit Note
Customer DebitNotes used to adjust the customer balance. This may due to undercharge, refund or any other
reason.
Entering Customer Debit Note:
1. Click DN Shortcut to select Debit Note Main Screen.
2. The TransNo is self-generated but it is still amendable.
3. Select by Customer by click on the search button next to it.
4. You may select an authorised person by click on the arrow button next to it.
5. Put a reference to Reference field.
6. Click on the Save button to save the Debit Note.
7. If any modification done in the future, click Save button to update the changes.
8. To cancel the Debit Note, just click on the Cancel button, but once the bill is cancelled, system won’t
allow "Undo".
9. Click delete button to delete the Debit Note.
10. The Print button enables to print the Customer Debit Note Form.
# please does not erase Debit Note with data as it may link with other transaction.
Click to select customer Select DN type
Define Tax Code
Select
account code

ProSale User Manual
15
2.0 Accounts Payable
Account Payable Modules consists of Creditor Setup, Creditor Category Setup and Creditor Class Setup and
etc.
2.1 Creditor Category
Creditor category is used to differentiate the creditor groupings. E.G. Demographic, income or other criteria.
Where to find Creditor Category?
Setting up Creditor Category:
1. Find the shortcut from Account Payable Tab > Creditor Category.
2. Enter the ID and description in the prepared field.
3. Click Save button to save the record.
4. To modify the record, retrieve the record from the database by clicking on the search button.
5. Modify the information and click the Save button to save the changes.
6. Click the delete button to erase the record.

ProSale User Manual
16
2.2 Creditor Class
Creditor class is used to further differentiate the supplier groupings.
Where to find Creditor Class?
Setting up Creditor Class:
1. Find the shortcut from Account Payable Tab > Creditor Class.
2. Enter the ID and description in the prepared field.
3. Click Save button to save the record.
5. Modify the information in the future if needed and click the Save button to save the changes.
6. Click the delete button to erase the record.
ProSale User Manual
17
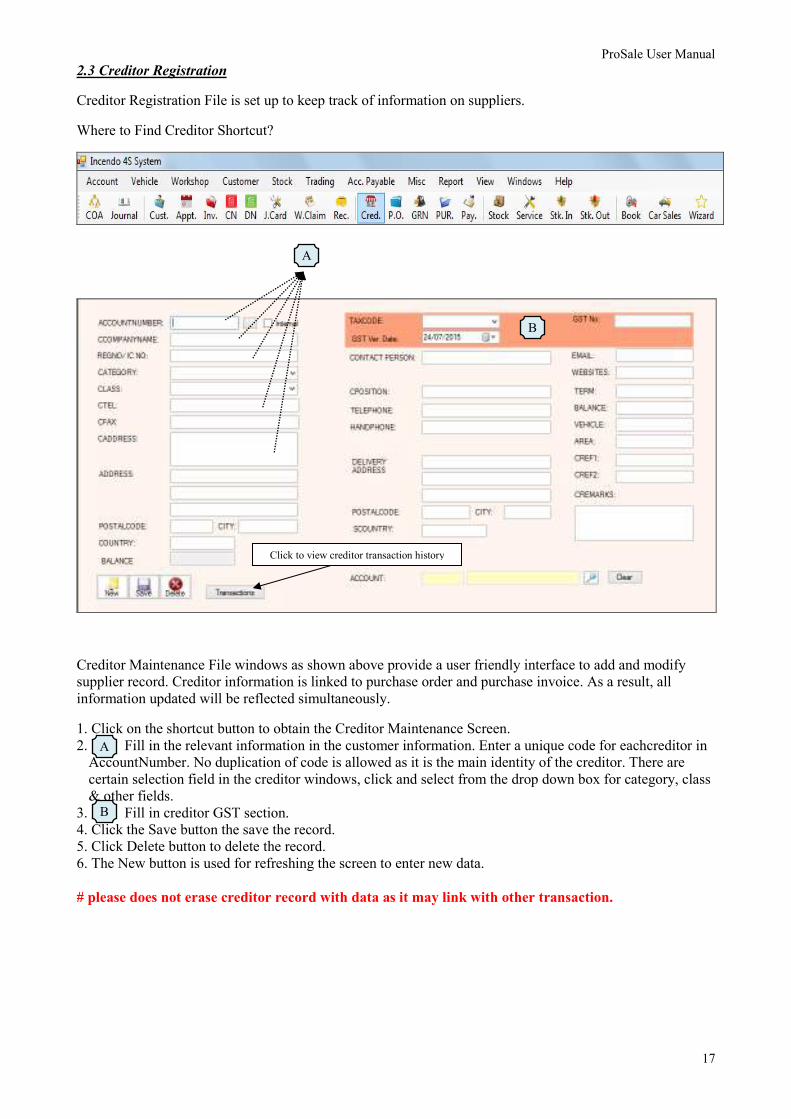
2.3 Creditor Registration
Creditor Registration File is set up to keep track of information on suppliers.
Where to Find Creditor Shortcut?
Creditor Maintenance File windows as shown above provide a user friendly interface to add and modify
supplier record. Creditor information is linked to purchase order and purchase invoice. As a result, all
information updated will be reflected simultaneously.
1. Click on the shortcut button to obtain the Creditor Maintenance Screen.
2. Fill in the relevant information in the customer information. Enter a unique code for eachcreditor in
AccountNumber. No duplication of code is allowed as it is the main identity of the creditor. There are
certain selection field in the creditor windows, click and select from the drop down box for category, class
& other fields.
3. Fill in creditor GST section.
4. Click the Save button the save the record.
5. Click Delete button to delete the record.
6. The New button is used for refreshing the screen to enter new data.
# please does not erase creditor record with data as it may link with other transaction.
A
B
A
B
Click to view creditor transaction history

ProSale User Manual
18
2.4 Creditor Opening Balance
Where to find Creditor Opening Balance?
Setting up Creditor Opening Balance:
1. Find the creditor opening balance shortcut.
2. Retrieve the creditor who opening balance wish to be entered by clicking the Account Number search.
3. Enter the Date, No, Ref, Amount, Term and Type details.
4. Search for the Settled Amount by pressing the search button next to it and enter the Amount Unmatched if
any.
5. Enter more opening transaction if needed.
6. Click Save button to save the record.
7. Modify the information in the future if needed and click the Save button to save the changes.
8. Click the delete button to erase the record.
9. Click on the New button to refresh the form.
Click to view creditor transaction history
Key in outstanding bills detail
Record will listing here after save

ProSale User Manual
19
2.5 Purchase Order
Purchase Order is used to record the orders issued to the supplier.
Where to find Purchase Order Shortcut?
Entering Purchase Order:
1. Find for the shortcut as shown.
2. The TransNo is self generated but it is still amendable.
3. Select the purchase order date.
4. Find the creditor by clicking on the search button next to it.
5. Add in the particular such as Code, Description, Quantity and other necessary details by right clicking on
the Code button.
6. Double click to select from the selection.
7. Insert or delete row by clicking on this button.
8. Click Save button to save the record.
9. Modify the information in the future if needed and click the Save button to save the changes.
10. Click the Delete button to erase the record.
11. Click on the New button to refresh the form.
12. Click on the Print button to print out the Purchase Order form.
Click to select creditor
Right click to select
stock code
Key in quantity, price etc

ProSale User Manual
20
2.5.1Goods Received Notes
Goods Received Notes (GRN) is used to record the goods delivered by supplier.
Where to find Goods Received Notes Shortcut
Entering Goods Received Notes:
1. Find for the shortcut as shown.
2. The TransNo is self generated but it is still amendable.
3. Select the goods received notes date.
4. Find the creditor by clicking on the search button next to it.
5. Add in the particular such as Code, Description, Quantity and other necessary details by right clicking on
the Code button, or click “Load PO” to load items from purchase order.
6. Double click to select from the selection.
7. Insert or delete row by clicking on this button.
8. Click Save button to save the record.
9. Modify the information in the future if needed and click the Save button to save the changes.
10. Click the Delete button to erase the record.
11. Click on the New button to refresh the form.
12. Click on the Print button to print out the Goods Received Notes form.
Click to select creditor
Enter creditor Delivery
Order No.
Load items from
Purchase Order
Right click to select stock code
Key in quantity, price etc

ProSale User Manual
21
2.6 Purchase Invoice
Purchase Invoice is used to record the invoice received from supplier or expenses paid out. The expenses
incurred are linked to other time for analysis purpose.
Where to Find Purchase Invoice?
Entering Purchase Invoice:
1. Find the shortcut of Purchase Invoice.
2. Main Screen Will appears as in Image.
3. The TransNo is self generated but it is still amendable.
4. Select the Creditor details from the search button next to it.
5. If Purchase Order has been created previously for the same creditor, you may load the details from
Purchase Order / Goods Received Notes.
6. Select the purchaser from button.
7. Right click on the code details to select either other items.
8. Double click to select from the selection.
9. You may insert or delete row by using this button.
10. Click Save button to save the record.
11. Modify the information in the future if needed and click the Save button to save the changes.
12. Click the Delete button to erase the record.
13. Click on the New button to refresh the form.
14. Click on the Print button to print out the Purchase Invoice Form.
Right click to select
stock code
Key in quantity, price etc
Click to select creditor Enter creditor Bill no. Load items from Goods Received
Notes or Purchase Order
Key in purchase cost &
GST rounding figure
Please ensure the displayed Tax
code & Tax rate are correct

ProSale User Manual
22
2.7 Payment
When payment is made to supplier for outstanding invoice, data can be entered through the payment screen.
Entering Payment:
1. Select the Payment Main Screen.
2. The TransNo is self generated but it is amendable.
3. Select the Creditor by clicking the search button next to it.
4. After selecting the creditor, outstanding invoices will be listed out on the Payment Items table.
5. Select Payment Mode by clicking on the as in the image.
6. The ChequeNo / Credit Card is your Payment Mode Reference Field.
7. Enter the amount received into the AMOUNT Field.
8. Click on the Auto Match button and the system will automatic match the payment and P.invoice.
9. Click on the Save button to save the Payment.
10. Click on the New button to add another ne Payment Form.
11. If modifications are done in the future, click Save to update the changes.
12. To cancel the Payment, click on the Cancel button, but once the bill is cancelled, the system will not
allow "Undo".
14. Click on the Delete button to delete the Payment record.
15. Click on the Print button to print out the Payment form.
Click to select creditor
Click to select payment mode
Enter amount paid & click auto match
to match with outstanding bill
ProSale User Manual
23
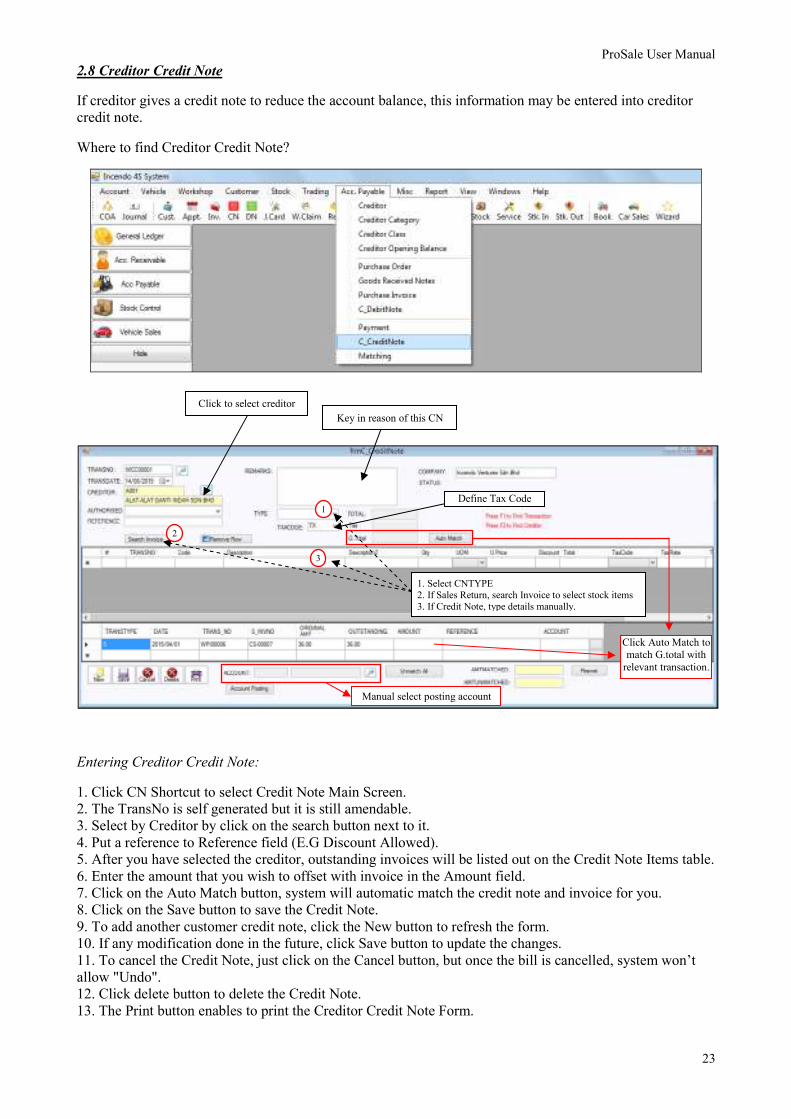
2.8 Creditor Credit Note
If creditor gives a credit note to reduce the account balance, this information may be entered into creditor
credit note.
Where to find Creditor Credit Note?
Entering Creditor Credit Note:
1. Click CN Shortcut to select Credit Note Main Screen.
2. The TransNo is self generated but it is still amendable.
3. Select by Creditor by click on the search button next to it.
4. Put a reference to Reference field (E.G Discount Allowed).
5. After you have selected the creditor, outstanding invoices will be listed out on the Credit Note Items table.
6. Enter the amount that you wish to offset with invoice in the Amount field.
7. Click on the Auto Match button, system will automatic match the credit note and invoice for you.
8. Click on the Save button to save the Credit Note.
9. To add another customer credit note, click the New button to refresh the form.
10. If any modification done in the future, click Save button to update the changes.
11. To cancel the Credit Note, just click on the Cancel button, but once the bill is cancelled, system won’t
allow "Undo".
12. Click delete button to delete the Credit Note.
13. The Print button enables to print the Creditor Credit Note Form.
Click to select creditor
Key in reason of this CN
1
2
3
1. Select CNTYPE
2. If Sales Return, search Invoice to select stock items
3. If Credit Note, type details manually.
Define Tax Code
Click Auto Match to
match G.total with
relevant transaction.
Manual select posting account
ProSale User Manual
24
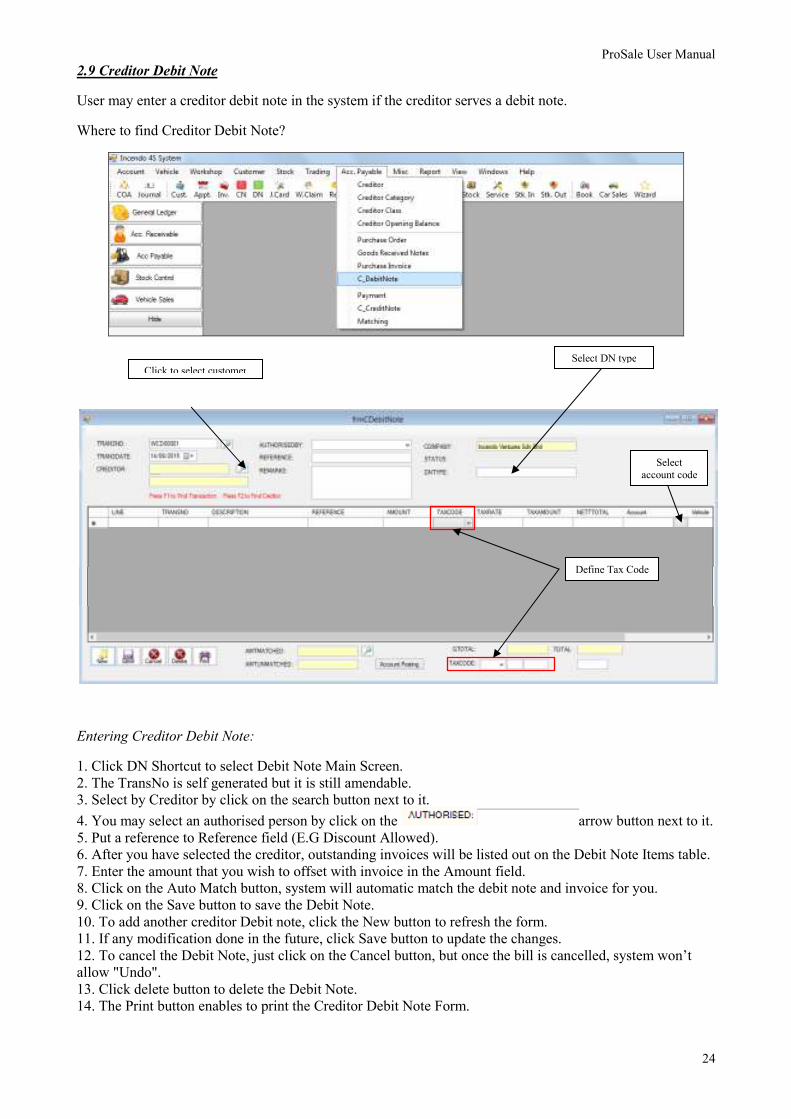
2.9 Creditor Debit Note
User may enter a creditor debit note in the system if the creditor serves a debit note.
Where to find Creditor Debit Note?
Entering Creditor Debit Note:
1. Click DN Shortcut to select Debit Note Main Screen.
2. The TransNo is self generated but it is still amendable.
3. Select by Creditor by click on the search button next to it.
4. You may select an authorised person by click on the arrow button next to it.
5. Put a reference to Reference field (E.G Discount Allowed).
6. After you have selected the creditor, outstanding invoices will be listed out on the Debit Note Items table.
7. Enter the amount that you wish to offset with invoice in the Amount field.
8. Click on the Auto Match button, system will automatic match the debit note and invoice for you.
9. Click on the Save button to save the Debit Note.
10. To add another creditor Debit note, click the New button to refresh the form.
11. If any modification done in the future, click Save button to update the changes.
12. To cancel the Debit Note, just click on the Cancel button, but once the bill is cancelled, system won’t
allow "Undo".
13. Click delete button to delete the Debit Note.
14. The Print button enables to print the Creditor Debit Note Form.
Click to select customer
Select DN type
Define Tax Code
Select
account code
ProSale User Manual
25
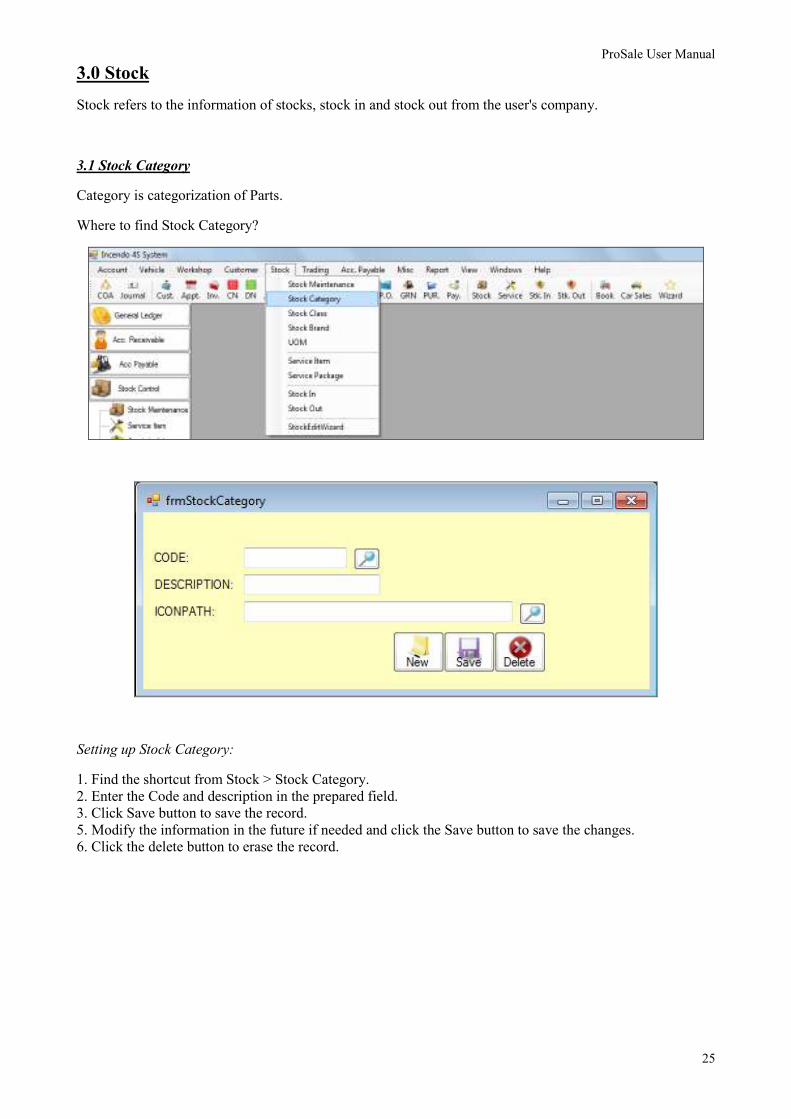
3.0 Stock
Stock refers to the information of stocks, stock in and stock out from the user's company.
3.1 Stock Category
Category is categorization of Parts.
Where to find Stock Category?
Setting up Stock Category:
1. Find the shortcut from Stock > Stock Category.
2. Enter the Code and description in the prepared field.
3. Click Save button to save the record.
5. Modify the information in the future if needed and click the Save button to save the changes.
6. Click the delete button to erase the record.

ProSale User Manual
26
3.2 Stock Class
Stock class is used to further categorize Parts. User could define the specific criteria of the inventory.
Where to find Stock Class?
Setting up Stock class:
1. Find the shortcut from Stock > Stock Class.
2. Enter the Code and description in the prepared field.
3. Click Save button to save the record.
5. Modify the information in the future if needed and click the Save button to save the changes.
6. Click the delete button to erase the record.

ProSale User Manual
27
3.3 Stock Brand
To categorize the brands of the stock.
Where to find Stock Brand Set Up?
Setting up Stock Brand:
1. Find the shortcut from Stock > Stock Brand.
2. Enter the Code and description in the prepared field.
3. Click Save button to save the record.
5. Modify the information in the future if needed and click the Save button to save the changes.
6. Click the delete button to erase the record.
ProSale User Manual
28
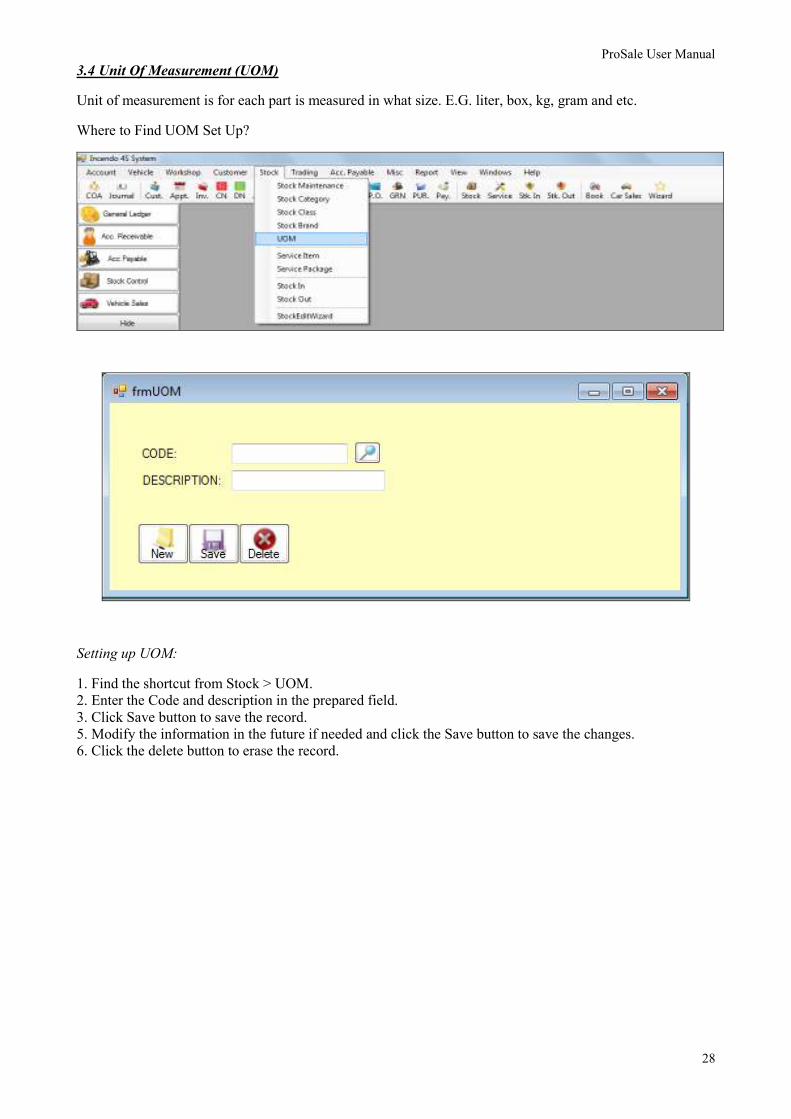
3.4 Unit Of Measurement (UOM)
Unit of measurement is for each part is measured in what size. E.G. liter, box, kg, gram and etc.
Where to Find UOM Set Up?
Setting up UOM:
1. Find the shortcut from Stock > UOM.
2. Enter the Code and description in the prepared field.
3. Click Save button to save the record.
5. Modify the information in the future if needed and click the Save button to save the changes.
6. Click the delete button to erase the record.

ProSale User Manual
29
3.5: Stock Registration
Stock Registration is used to keep track the information of spare parts.
Where to find Stock Registration?
A
Click to search stock.
ProSale User Manual
30
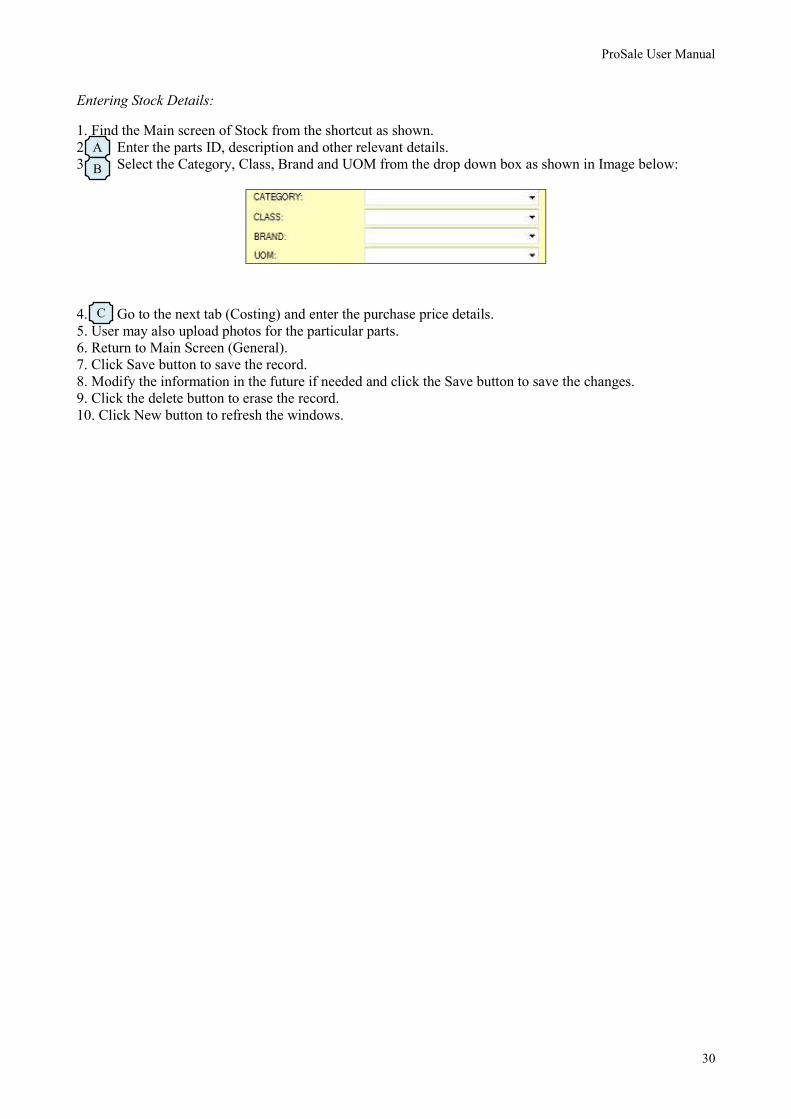
Entering Stock Details:
1. Find the Main screen of Stock from the shortcut as shown.
2. Enter the parts ID, description and other relevant details.
3. Select the Category, Class, Brand and UOM from the drop down box as shown in Image below:
4. Go to the next tab (Costing) and enter the purchase price details.
5. User may also upload photos for the particular parts.
6. Return to Main Screen (General).
7. Click Save button to save the record.
8. Modify the information in the future if needed and click the Save button to save the changes.
9. Click the delete button to erase the record.
10. Click New button to refresh the windows.
A
B
C

ProSale User Manual
31
3.6 Stock In
Stock In is used to stock input method without using purchase.
Where to find Stock In?
Image 53: Shortcut to Stock In
Image 54: Stock In
Entering Stock In:
1. Find the Stock In form from the shortcut as shown in Image 53.
2. Trans No is self generated but still it is amendable.
3. Enter the TransDate and other relevant details.
4. Right click on the code and select the stocks from the selection.
5. The Excel button is to import Excel file into the table by clicking the search button next to it > select the
file > and click on the Excel button to load the table.
6. 7. Click Save button to save the record.
8. Modify the information in the future if needed and click the Save button to save the changes.
9. Click the delete button to erase the record.
10. Click New button to refresh the windows.
11. Click on the Print button to print out the Stock In Forms.

ProSale User Manual
32
3.7 Stock Out
Stock In is used to stock output method without using purchase.
Where to find Stock Output?
Image 55: Shortcut to Stock Output
Image 56: Stock Output
Entering Stock Output:
1. Find the Stock Out form from the shortcut as shown in Image 55.
2. Trans No is self generated but still it is amendable.
3. Enter the TransDate and other relevant details.
4. Right click on the code and select the stocks from the selection.
5. Click Save button to save the record.
6. Modify the information in the future if needed and click the Save button to save the changes.
7. Click the delete button to erase the record.
8. Click New button to refresh the windows.
9. Click on the Print button to print out the Stock In Forms.

ProSale User Manual
33
4.0 Services
Services refer to Labour Services which divides into service item and service package.
4.1 Service Item
Service item is registration of list of services/Labour/Workmanship.
Where to find Service Item?
Item 57: Shortcut to Service Item
Image 58: Service Item
Entering Service Item:
1. Find the Service Item through the shortcut as shown in Image 57.
2. ID is self generated but it is still amendable.
3. Insert all the relevant information’s.
4. Click Save button to save the record.
5. Modify the information in the future if needed and click the Save button to save the changes.
6. Click the delete button to erase the record.
7. Click New button to refresh the windows.

ProSale User Manual
34
4.2 Service Package
Service Package is used to enter certain fixed packages with labour charges and part charges. So it can be
load to the invoice page if the customer if going to use the same package instead of filling in one by one.
Where to find Service Package?
Image 58: Shortcut to Service Package
Image 59: Service Package
Setting up Service Package:
1. Find the Main Screen through the shortcut as shown in Image 58.
2. Enter the Code, Description and Category.
3. Right click and select from the selection in both Code table for Parts and Services.
4. Click Save button to save the record.
5. Modify the information in the future if needed and click the Save button to save the changes.
6. Click the delete button to erase the record.
7. Click New button to refresh the windows.
ProSale User Manual
35
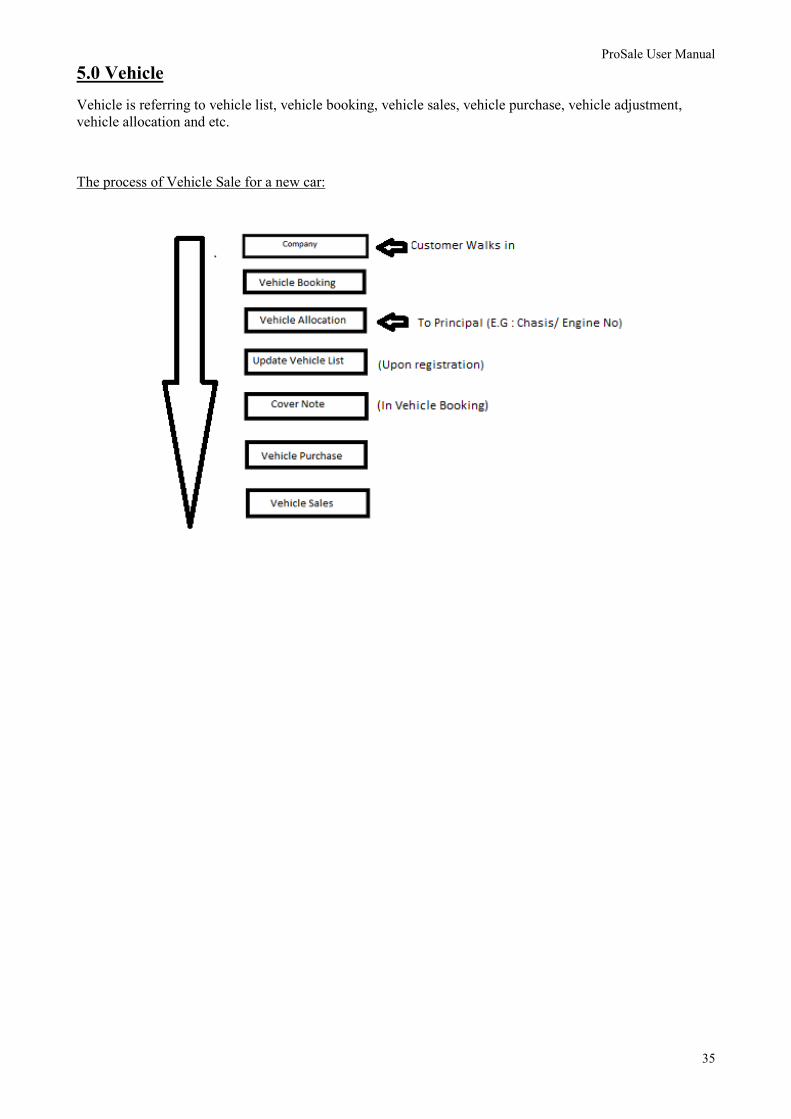
5.0 Vehicle
Vehicle is referring to vehicle list, vehicle booking, vehicle sales, vehicle purchase, vehicle adjustment,
vehicle allocation and etc.
The process of Vehicle Sale for a new car:
ProSale User Manual
36
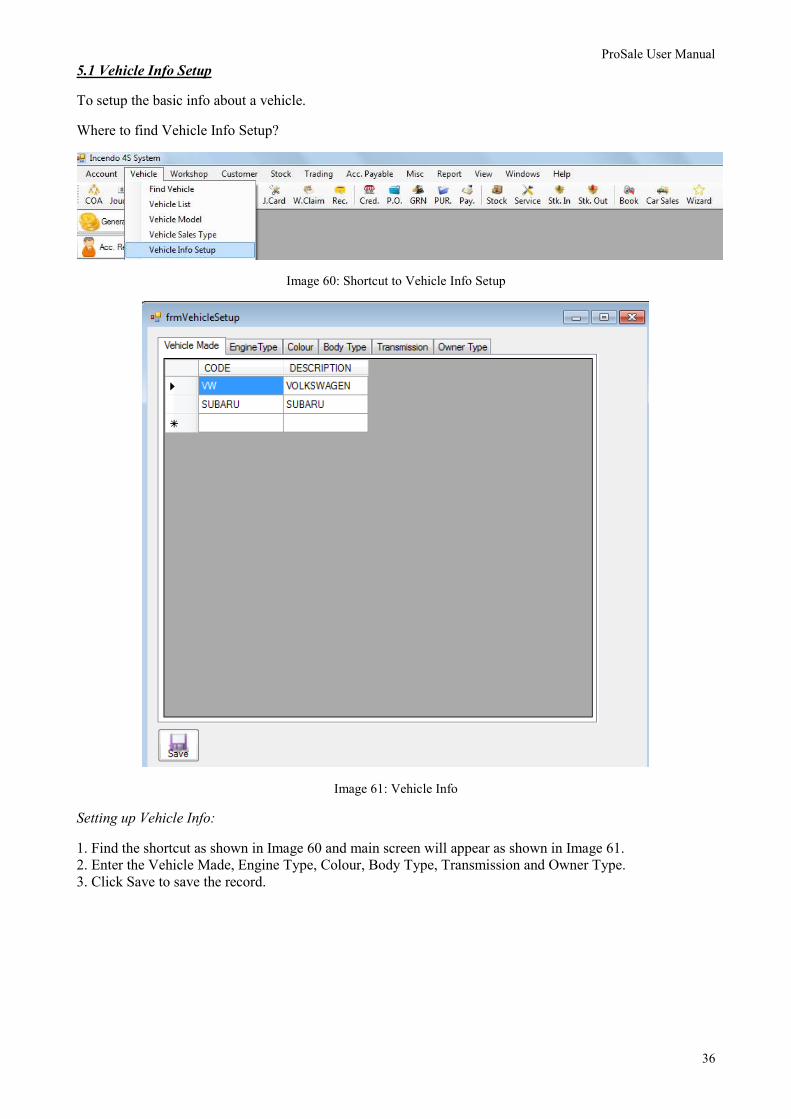
5.1 Vehicle Info Setup
To setup the basic info about a vehicle.
Where to find Vehicle Info Setup?
Image 60: Shortcut to Vehicle Info Setup
Image 61: Vehicle Info
Setting up Vehicle Info:
1. Find the shortcut as shown in Image 60 and main screen will appear as shown in Image 61.
2. Enter the Vehicle Made, Engine Type, Colour, Body Type, Transmission and Owner Type.
3. Click Save to save the record.

ProSale User Manual
37
5. 2 Vehicle Sales Type
Vehicle sale type is to categorize either ne or trade in cars.
Where to find Vehicle Sales Type?
Image 62: Shortcut to Vehicle Sales Type
Image 63: Vehicle Sales Type
Setting up Vehicle Sales Type:
1. Find the shortcut to Vehicle sales Type and Image 63 will appear.
2. Create the code and description.
3. Click Save button to save the record.
4. Modify the information in the future if needed and click the Save button to save the changes.
5. Click the delete button to erase the record.
6. Click New button to refresh the windows.

ProSale User Manual
38
5. 3 Vehicle Model
Vehicle Model is Vehicle registration details to be entered for each model.
Where to find Vehicle Model?
Image 64: Shortcut to Vehicle Model
Image 65: Vehicle Model
Entering Vehicle Model:
1. Find the shortcut and Main Screen will appear as shown in Image 65.
2. Enter all the relevant details into the Vehicle Model Form.
3. Optional Accessories can be filled in, in the table provided together with purchase cost and selling cost.
4. Click Save button to save the record.
5. Modify the information in the future if needed and click the Save button to save the changes.
6. Click the delete button to erase the record.

ProSale User Manual
39
5.4 Vehicle Booking
Used to book a vehicle.
Where to find the Vehicle Booking?
Image 66: Shortcut to Vehicle Booking
Image 67: Vehicle Booking
Image 68: Vehicle Booking Continuation

ProSale User Manual
40
Entering Vehicle Booking:
1. Find out the shortcut and Main Screen will appear as shown in Image 67.
2. The TransNo is self generated but it is still amendable.
3. User must enter the customer details by clicking the search button next to it.
# Customer registration should be done before clicking the search for Customer list in Vehicle
Booking.
4. In vehicle Details column, select the model and colour of vehicle customer wish to book.
5. Click button to load the rest of the details regarding the vehicle from Vehicle Info Setup.
# Attention: Some of the information will be freeze and will only be completed once Vehicle Allocation
is done.
6. In the Insured column, key in the Type of Coverage, Insured Sum and other relevant details.
7. Click the calculate button to calculate the insurance charges.
# Cover note cannot be created till the Vehicle Allocation is done.
8. Next, proceed to finance and deposit as shown in the Image 68.
9. Enter the Bank details and Interest Details and click Calculate button.
10. Enter if there is any deposit amount paid by the customer and the payment mode.
11. Click Save button to save the record.
12. Modify the information in the future if needed and click the Save button to save the changes.
13. Click the delete button to erase the record.
14. Click New button to refresh the windows.
15. Click the Print button to Print out the Vehicle Booking Form.
ProSale User Manual
41
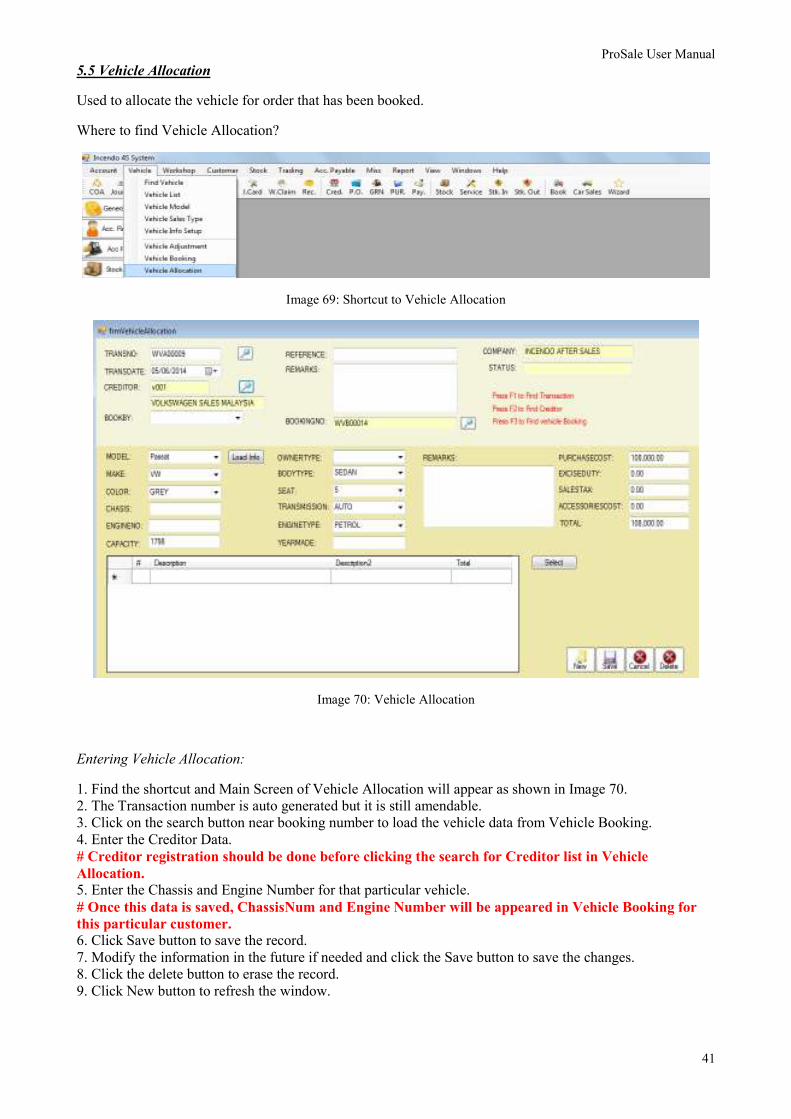
5.5 Vehicle Allocation
Used to allocate the vehicle for order that has been booked.
Where to find Vehicle Allocation?
Image 69: Shortcut to Vehicle Allocation
Image 70: Vehicle Allocation
Entering Vehicle Allocation:
1. Find the shortcut and Main Screen of Vehicle Allocation will appear as shown in Image 70.
2. The Transaction number is auto generated but it is still amendable.
3. Click on the search button near booking number to load the vehicle data from Vehicle Booking.
4. Enter the Creditor Data.
# Creditor registration should be done before clicking the search for Creditor list in Vehicle
Allocation.
5. Enter the Chassis and Engine Number for that particular vehicle.
# Once this data is saved, ChassisNum and Engine Number will be appeared in Vehicle Booking for
this particular customer. 6. Click Save button to save the record.
7. Modify the information in the future if needed and click the Save button to save the changes.
8. Click the delete button to erase the record.
9. Click New button to refresh the window.

ProSale User Manual
42
5.6 Vehicle List
To Register the vehicle registration number
Where to find Vehicle List?
Image 71: Shortcut to Vehicle List
Image 72: Vehicle List
Entering Vehicle List:
1. Click on the search button next to Reg Number and look for the vehicle booked by the customer through
the chassis number.
2. Select the vehicle and data will be extracted to vehicle list.
3. Key in the Registration Number.
4. Click Save button to save the record.
5. Modify the information in the future if needed and click the Save button to save the changes.
6. Click the delete button to erase the record.
7. Click New button to refresh the windows.

ProSale User Manual
43
5.7 Cover Note
Once The Vehicle List is updated, return to Vehicle Booking form to update the cover note details.
1. Click on the TransNo and find for the customer. Data will be loaded.
2. Click on the button to generate the cover note.
3. Cover Note image will appear as shown below:
Image 73: Cover Note
4. Enter the CovernoteNumber.
5. Click on the calculate button to load the data for Premium, Commission and Payable.
6. Click Save button to save the record.
7. Modify the information in the future if needed and click the Save button to save the changes.
8. Click the delete button to erase the record.
9. Click New button to refresh the windows.

ProSale User Manual
44
5.8 Vehicle Purchase
Use to purchase the vehicle from the creditor. Follow the steps as stated below to save the Vehicle Purchase
Screen.
Where to find Vehicle Purchase?
Image 74: Shortcut to Vehicle Purchase
Image 75: Vehicle Purchase
Entering Vehicle Purchase:
1. Find out the shortcut and main screen will appear as shown in Image 75.
2. The TransNo is self generated but it is still amendable.
3. Load the data into Vehicle Purchase by clicking the search button near
vehicle:
4. Enter the Creditor and Customer details by clicking the search buttons next it.
5. Click on the total button, then the Total cost will appear.
6. Click Save button to save the record.
7. Modify the information in the future if needed and click the Save button to save the changes.
8. Click the delete button to erase the record.
9. Click New button to refresh the windows.

ProSale User Manual
45
5.9 Vehicle Sales
Use to keep information on sold vehicles to the customers.
Where to find Vehicle Sales?
Image 76: Shortcut to Vehicle Sales
Image 77: Vehicle Sales
Entering Vehicle Sales:
1. Find out the shortcut and main screen will appear as shown in Image 77.
2. The TransNo is self generated but it is still amendable.
3. Load the data from search button.
4. Click Save button to save the record.
5. Modify the information in the future if needed and click the Save button to save the changes.
6. Click the delete button to erase the record.
7. Click New button to refresh the windows.
8. Click on Print button to print out the Vehicle Sales Form.
ProSale User Manual
46
6.0 Reports
Reports is to view all the data which is been kept in the database. The Reports in ProSales can choose the
date range and also can sum up the totals for certain reports.
6.1 Account Receivable
All the reports can be viewed from Customer details till Sales Invoice Details.
List of reports available for Account Receivable are:
Customer Listing
Customer Ledger Listing
Customer Aging
Customer Statement
Daily Sales report
Daily Sales Summary
Monthly Sales Summary
Daily Collection Report
Sales Invoice Listing
Warranty Claim Listing
Warranty Claim by Item
Warranty Claim by Service
Outstanding Warranty Claim
Debit Note Listing
Receipt Listing
Credit Note Listing
Estimation Listing
Work Order Listing
Insurance Due Date
Service Tax Report
Profit Analysis By Invoice
Vehicle Service History
Where to find for reports?

ProSale User Manual
47
Image 78: Account Receivable Reports
6.2 Account Payable
All the reports can be viewed from Creditor details till Purchase Invoice Details.
List of reports available for Account Payable are:
Creditor Listing
Creditor Ledger Listing
Creditor Aging
Creditor Statement
Purchase Order Listing
Purchase Invoice Listing
Monthly Purchase Summary
Payment Listing
Credit Note Listing
Debit Note Listing
GRN Listing
Outstanding GRN Listing
Outstanding Purchase Order listing
Stock Input List
Where to find for reports?
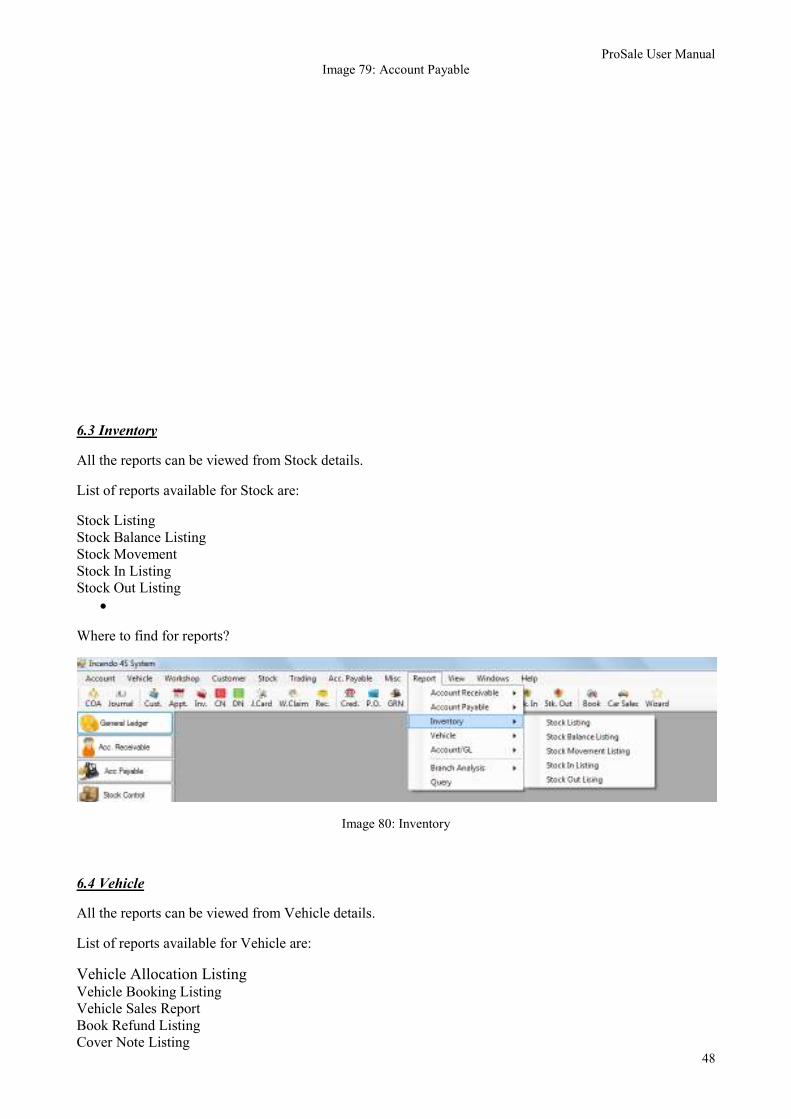
ProSale User Manual
48
Image 79: Account Payable
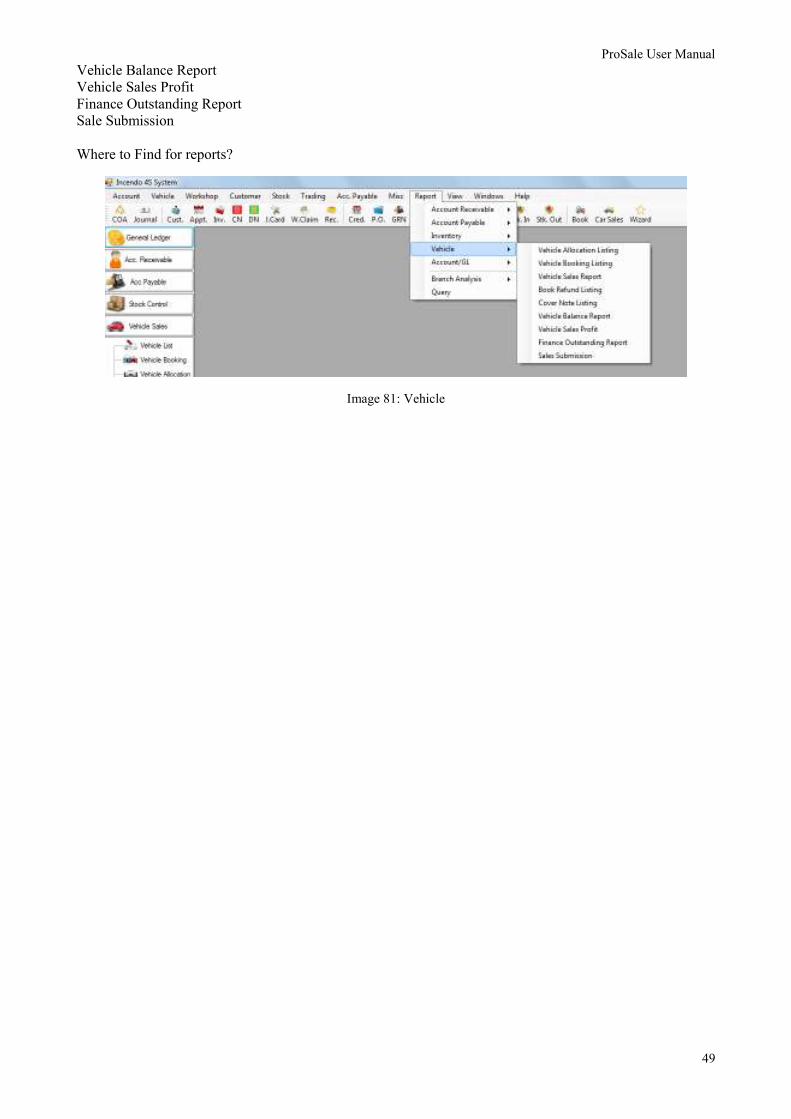
6.3 Inventory
All the reports can be viewed from Stock details.
List of reports available for Stock are:
Stock Listing
Stock Balance Listing
Stock Movement
Stock In Listing
Stock Out Listing
•
Where to find for reports?
Image 80: Inventory
6.4 Vehicle
All the reports can be viewed from Vehicle details.
List of reports available for Vehicle are:
Vehicle Allocation Listing Vehicle Booking Listing
Vehicle Sales Report
Book Refund Listing
Cover Note Listing
ProSale User Manual
49
Vehicle Balance Report
Vehicle Sales Profit
Finance Outstanding Report
Sale Submission
Where to Find for reports?
Image 81: Vehicle

Workshop Pro Enterprise Version
By Incendo Ventures Sdn Bhd
USER MANUAL
(Account Module)

1. Chart of Account
1.1 The chart of account window is the place to set up the account information and structure of the chart of
account.
1.2 The window is divided into 2 sections i.e. Chart of account tree and account properties.
1.3 Chart of account tree displays the structure of the chart of account while account properties display the account
information and properties of the individual account.
1.4 The maximum level of the chart of account is limited to 5 levels only. If you set up more that 5 levels of
account, these account will not be displayed in financial report sunch as balance sheet and profit and loss.
C li c k t h e i c o n to a c c e ss c h a rt o f a c c o u n t
Chart of account tree Account properties

1.5 Understanding the account properties
1.5.1 Account code must be unique. It supports alpha numeric and maxmum length is 30 characters.
1.5.2 Account Name
1.5.3 The parent account of the selected account. e.g. Staff Expenses group account for salary.
1.5.4 Profit and Loss account or balance sheet account.
1.5.5 Credit/Debit attribute of the account. Note that if the account balance is having a credit figure
while the attribute is debit figure, financial statement will display negative figure and vice versa.
1.5.6 It indicates the control account of 'Debtor','Creditor' or 'Bank'. If the account is none of the above.
This properties should be blank. If you do not select 'Bank' attribute for bank account, you not be able to
select the account for bank reconcililation.
1.5.7 It inducates the account attribute is 'Current Earning' or 'Retained Earning'. If the attribute is
selected for the account, the system will display auto calculated current earning and retained earning in
the balance sheet. You should not select more than one account that carries the current earning as well as
retained earning. If the account attribute is none of the above. The field shall be left empty.
1.5.8 Lookup button to select the list of account entered in the system.
1.5.9 If the groupAcc value is checked, it indicates this account is a group account. Group account also
know as parent account. This account can carry child account.(refers to the chart of account, Fixed Assets
Account is a group account) Group account cannot be posted! The value of the account is derived from
the sum of its child account.
1.5.10 Lookup button to select group account. e.g. you would like to setup a Public Bank Account. You
would click the button to select current assets so that Public bank will fall under the child account of
current asset.
1.5.11 To clear the group account.
1.5.12 If you select print at bottom, it will affect the report presentation in the financial statement. e.g.
you would like the wording of 'Gross Profit' display under after the children account, you will select this
option.
Without Print at Bottom Print at Bottom
1.5.13 Print Chart of account
a
b
c
d
e
f
g
h
i
j
k
l
a
b
c
d
e
f
g
h i
j
k l
Gross Profit
Revenue 6000
Cost of Sales 1000
_____
5000
Revenue 6000 Cost of Sales 1000 _____
Gross Profit 5000
m
m
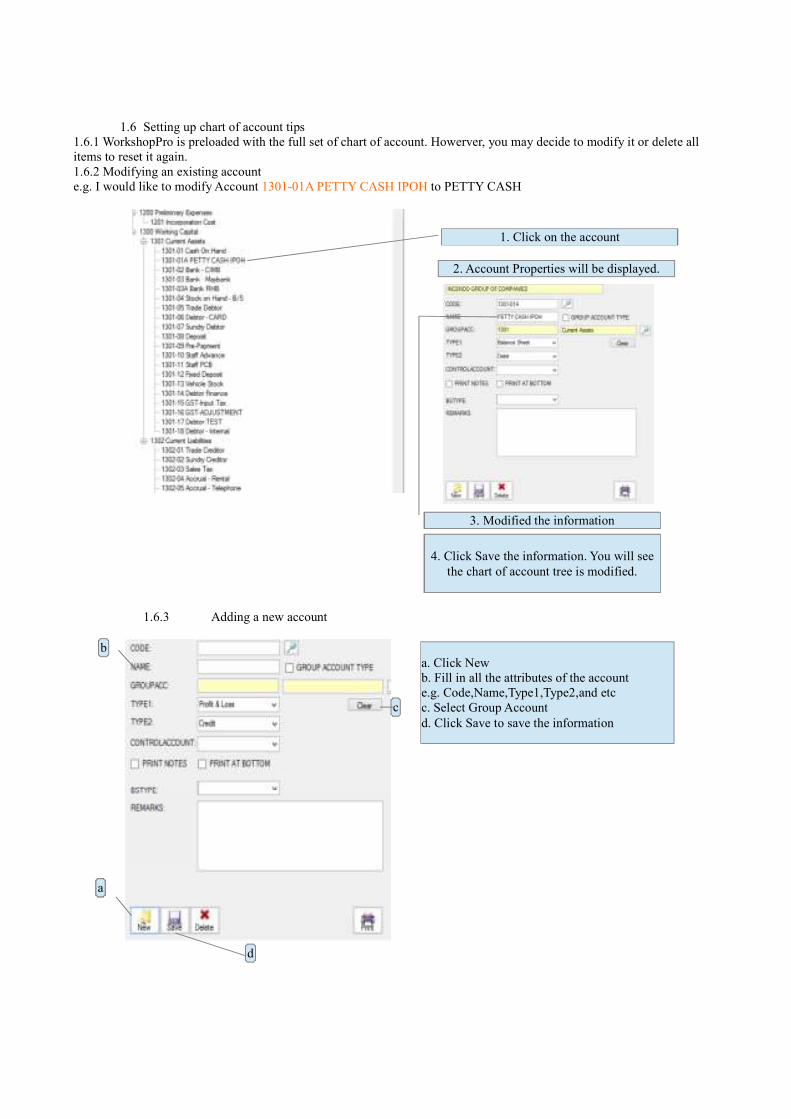
1.6 Setting up chart of account tips
1.6.1 WorkshopPro is preloaded with the full set of chart of account. Howerver, you may decide to modify it or delete all
items to reset it again.
1.6.2 Modifying an existing account
e.g. I would like to modify Account 1301-01A PETTY CASH IPOH to PETTY CASH
1.6.3 Adding a new account
1. Click on the account
2. Account Properties will be displayed.
3. Modified the information
4. Click Save the information. You will see
the chart of account tree is modified.
a
b
a
d
c
a. Click New
b. Fill in all the attributes of the account
e.g. Code,Name,Type1,Type2,and etc
c. Select Group Account
d. Click Save to save the information
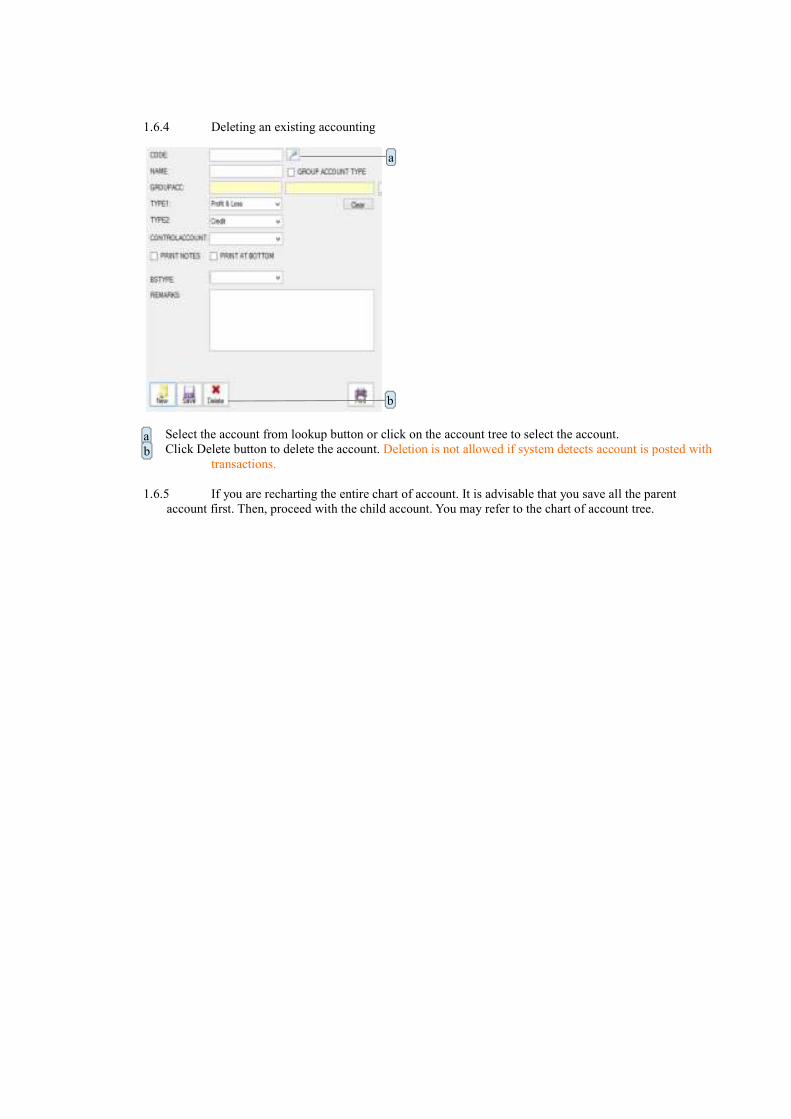
1.6.4 Deleting an existing accounting
Select the account from lookup button or click on the account tree to select the account.
Click Delete button to delete the account. Deletion is not allowed if system detects account is posted with
transactions.
1.6.5 If you are recharting the entire chart of account. It is advisable that you save all the parent
account first. Then, proceed with the child account. You may refer to the chart of account tree.
a
b
a
b

2. Financial Period Definition Financial year is an accounting period that can start on any day of a calendar year but has twelve consecutive
months at the end of which account books are closed, profit or loss is computed, and financial reports are prepared
or filling. e.g. If one accounting period ends on December 31, the next must begin on January 1.
Click New to create new financial period.
Key in period. e.g. 2015
Select date.
Click Save to save to save the information.
Click Account > Financial Year
b c
a
d
a
b
c
d

3. Entry Point Entry Point is the default account posting for transactions. WorkshopPro automate posting of account transactions. In order
to do so, user needs to define the account to be posted for each transactions. Thus, entry point is the place to do such setting.
Click Account > Entry Point

3.1.1 Cash Sales Part – Posting for sales of part account for service invoice where sales type is 'Invoice'
3.1.2 Cash Sales Labour – Posting for sales of Service account
3.1.3 Rounding – Posting for rounding for Sales account
3.1.4 Other Charges – Posting for rounding for Sales account
3.1.5 Credit Sales Part – Posting for sales of part account
3.1.6 Credit Sales Labour – Posting for sales of service account
3.1.7 Internal Sales – Posting for sales of part account
3.1.8 Internal Sales Labour – Posting for sales of service account
3.1.9 Sales Return – Posting for return inwards account
3.1.10 Transport Charge – Posting for transport charges account
3.1.11 Warranty Part – Posting for sales of part account for warranty claim
3.1.12 Warranty Labour – Posting for sales of services for warranty claim
3.1.13 Purchase – Posting for purchase account
3.1.14 Purchase Labour – Posting for purchase account
3.1.15 Internal Purchase – Posting for purchase account
3.1.16 Purchase Return – Posting for return outward account
3.1.17 Purchase Rounding – Posting for purchase rounding account
a
b
c
d
e
f
g
hi
j
k l
mn
o
p
q
a
b
c
d
e
f
g
h
i
j
k
l
m
n
o
p
q

3.2.1 Stock in Hand (B/S) – Posting for stock on hand account
3.2.2 Opening Stock – Posting for opening stock account
3.2.3 Closing Stock – Posting for closing stock account
3.2.4 Stock Loss/Damage – Posting for stock damage & loss account
3.2.5 Vehicle Stock (B/S) – Posting for vehicle stock account
3.2.6 Vehicle Opening Stock – Posting for vehicle sales opening stock account
3.2.7 Vehicle Closing Stock – Posting for vehicle sales closing stock account
3.2.8 Vehicle Purchase – Posting for purchase of vehicle account
3.2.9 Import Duty – Posting for purchase of vehicle account
3.2.10 Excise Duty – Posting for purchase of vehicle account
3.2.11 Sales Tax – Posting for purchase of vehicle account
3.2.12 Purchase Accessories – Posting for purchase of vehicle account
3.3.1 Discount Allowed – Posting for discount allowed account
3.3.2 Discount Received – Posting for discount received account
3.3.3 Debtor – Posting for trade debtor account
3.3.4 Creditor – Posting for trade creditor account
3.3.5 Customer CN – Posting for discount allowed account
3.3.6 Customer DN – Posting for sales of part account
3.3.7 Creditor CN – Posting for discount received account
3.3.8 Creditor DN – Posting for purchase account
3.3.9 Sales Tax – Posting for sales tax account
3.3.10 Deposit – Posting for deposit account
3.3.11 Bank Charges – Posting for bank charges account
a
b
c
d
e
f
g
i
h
j
k
l
a
b
c
d
e
f
g
h
i
j
k
l
a
b
c
d
e
f
g
h
i
j
k
a
b
c
d
e
f
g
h
i
j
k

3.4.1 Booking Deposit – Posting for deposit received account
3.4.2 Vehicle Sales – Posting for sales of vehicle account
3.4.3 Excise Duty – Posting for sales of vehicle account
3.4.4 Sales Tax – Posting for sales tax account
3.4.5 Handling – Posting for sales of inspection and others account
3.4.6 Inspection – Posting for sales of inspection and others account
3.4.7 RegFee – Posting for sales of inspection and others account
3.4.8 HPClaim – Posting for sales of inspection and others account
3.4.9 No Plate – Posting for sales of inspection and others account
3.4.10 Road Tax – Posting for sales of road tax account
3.4.11 Accessories – Posting for sales of accessories account
3.4.12 Delivery Charges – Posting for sales of handling account
3.4.13 Admin Fee – Posting for sales of handling account
3.4.14 Misc – Posting for sales of handling account
3.4.15 Signwriting – Posting for sales of handling account
3.4.16 DPPA – Posting for sales of handling account
3.4.17 Debtor Finance – Posting for sales of handling account
3.4.18 Debtor Car Sales – Posting for sales of handling account
3.4.19 Insurance Sales – Posting for insurance premium collected account
3.4.20 Insurance Purchase – Posting for purchase of insurance account
3.4.21 Discount – Posting for sales of vehicle account
3.4.22 Cancellation Charge – Posting for cancellation charge account
a
b
c
d
e
f
g
h
i
j
k
l
m
n
o
p
q
r
s
t
u
v
a
b
c
d
e
f
g
h
i
j
k
l
m
n o
p
q
r
s
t
u
v

4. General Payment General Payment is used to handle daily cash payout transactions/payroll not involving debtor account. It is normally
used for miscellaneous payment expenses. (Please refer to payment and receipts for transaction involving daily
account)
How do I enter General Payment?
1. Go to Account, click General Payment
2. Transaction No. is self-generated but amendable. System will follow the current date but it is amendable.
3. Enter Pay To in the appropriate box and select the payment mode. Enter the cheque No/ Credit Card Number or
Reference.
4. Go to the detail section and enter the No., Reference and Description, amount, select input Taxcode etc.
5. Key in the amount and right click on the account column to select the account from the pop out windows.
6. Right click on “Account”, double click to select the account.
7. Continue adding the next line.
8. Click “SAVE” to save the record.
9. To delete the record, click “DELETE” to erase the record.

5. General Receipt General Receipt are used to handle daily cash transaction which does not involve debtor or creditor account.
(Please refer to payment and receipts for transaction involving daily account)
How do I enter General Receipts?
1. Go to Account click General Receipts
2. Transaction No. is self-generated but amendable. System will follow the current date is still amendable.
3. Enter Pay From in the appropriate box and select the Payment mode. Enter the Cheque No/ Credit Card Number or
Reference.
4. Go to the detail section. Enter the No., Reference and Description.
5. Key in the amount and right click on the account column to select the account from the pop out windows.
6. Double click to select the account.
7. Continue adding the next line.
8. Click “ SAVE” to save the record.
9. To delete the record, click “DELETE” to erase the record.

6. Journal Entry Journal Entry is used for journal adjustment. To enter the journal entry, simply follow the steps below to enter a transaction.
You may also enter the account opening balance in the journal entry.
How do I enter the journal entry?
1. Journal entry is self-generated but amendable.
2. Date will follow the current date but it is amendable.
3. You may enter the description, and select the authorized by. Enter remarks column if necessary.
4. On the details section, enter the number on the first column, then right click the Account Code column to select the
account code.
5. Right click on the account column and selection box will appear,
6. Double click to select the account.
7. Move your cursor to Reference to key in reference information.
8. Enter the amount on either Debit or Credit side.
9. Continue adding the next line.
10. Click “SAVE” to save the record.
11. To delete the record, click “DELETE” to erase the record.

7. Stock Balance
Enter the stock balance to reflect the closing stock value of the company. Follow the simple steps as below:
How do I define the stock balance?
1. Click on Account and select Stock Balance.
2. The following window will appear:
1. Enter the Period and the Month
2. Enter closing stock value for each month.
3. Click “SAVE” to save the entry.
Tips! You may print out stock balance listing report to find out the stock balance for each month

8. Open Bank Recon & Bank Reconciliation As the term express, the bank reconciliation window is used to reconcile the book balance against the actual bank
balance. This procedure enables you to view the actual financial standing of the company.
How do I do Bank Reconciliation?
1. Click Account, select Bank Reconciliation.
2. Click on “Bank” to select the bank which you would like to reconcile.
3. Select Record Range date, click “Show Unpresented Record”, a list of cheques not deposited and cleared will be
shown. Simply check against the cheques which have been cleared and tick “Status” button to confirm the status.
4. You may click “Print” to print a Bank Reconciliation Report.