working with the online...
TRANSCRIPT

Working With
The Online Builder
QuickStart Guide

2
Welcome to the Online Builder The Online Builder is an online authoring tool that makes it easy to update your Website, create a stunning presence on the Web, and interact with visitors. This guide will help you get to know your way around the Online Builder. When you complete this guide you will find how simple it really is to keep your Website fresh and up to date. In this tutorial you learn to:
Recognize the screen elements in the Online Builder
Edit placeholder text
Add new text and graphics
Add, move, and rename pages
Change the site’s graphic style
Preview and publish the site
You downloaded this tutorial from the Overview screen of the Online Builder. Please print it so that you can follow along without switching between your builder and Acrobat Reader.

3
Explore the Online Builder The Online Builder is so easy to use that you can freshen up content or even build your Website very quickly. The ribbon toolbar contains tabs to edit your website. Nesting on top of the ribbon tool bar you will find common actions such as Preview, Publish, Manage Files, and access to the Online Builder Help. You have already seen the Overview page because that is where you downloaded this tutorial.
➲ If you are still viewing the Overview screen, click the Edit your site now link or
click on the Page Editor tab of the ribbon toolbar. Both actions take you to a view of your Home page in the Online Builder.

4
Preview shows what your site will look like when it is published. This way you can test it before making it available to the world. If you like, you can click Preview now to view the site. Close the preview browser window when you are done.
Note: If you close the Online Builder browser window, you must sign in again using your member name and password. When you sign in again, the browser displays the latest version of your site.
Publish generates the site’s pages and transfers them to an external Web server so your visitors can access it. You will learn how easy it is to publish later in this guide.
Help opens a separate browser window that provides complete reference and operating instructions for using the builder.
The URL shows where the site is or will be published. This is the Web address you will give to your customers.
The Site Structure area contains tools to add, delete, move, and rename pages. It also shows the names of pages under the Home page. You click a page name in the Site Structure area or the Page Navigation area to view and change the
Preview
Publish
Help
Ribbon Toolbar
Collapsable
Site Structure
Page Title
Web Page Navigation
Customizable Key Image Area
User and Site Information
Work Area

5
page in the builder. The work area is where you can click text and objects to edit them directly. What you see is what you get. The Online Builder is so easy to use that you can build, preview, and publish a site very quickly.
Edit Text on Your Home Page Each new site comes with text already populating the Web page. You might have added your own text when you created your site or modified some placeholder text that was available to you when you accessed the website. Now you can add and edit text in the builder.
1. Hover over the text area you would like to edit and click the work area on the Home page to display the builder’s rich text editing tools.
This simple text editor is compatible with the widest range of browsers and provides a wide variety of content editing functionality such as changing font, style, color, size, and alignment of text, and linking text to internal and external Web pages or even PDF and Word documents. When you have finalized your edits, the Spellchecker allows you to feel confident your changes are complete.
1. In the builder’s Work Area, click on the text block you wish to insert text, position the mouse cursor where you want the text to appear, and type the information you would like to be appear on your web page.
Work Area

6
2. Click the Save icon.
3. You’ll see the new text on your Home page.
You can change all text in the work area, such as your business name and slogan, by clicking the text area and using the editing toolbar.
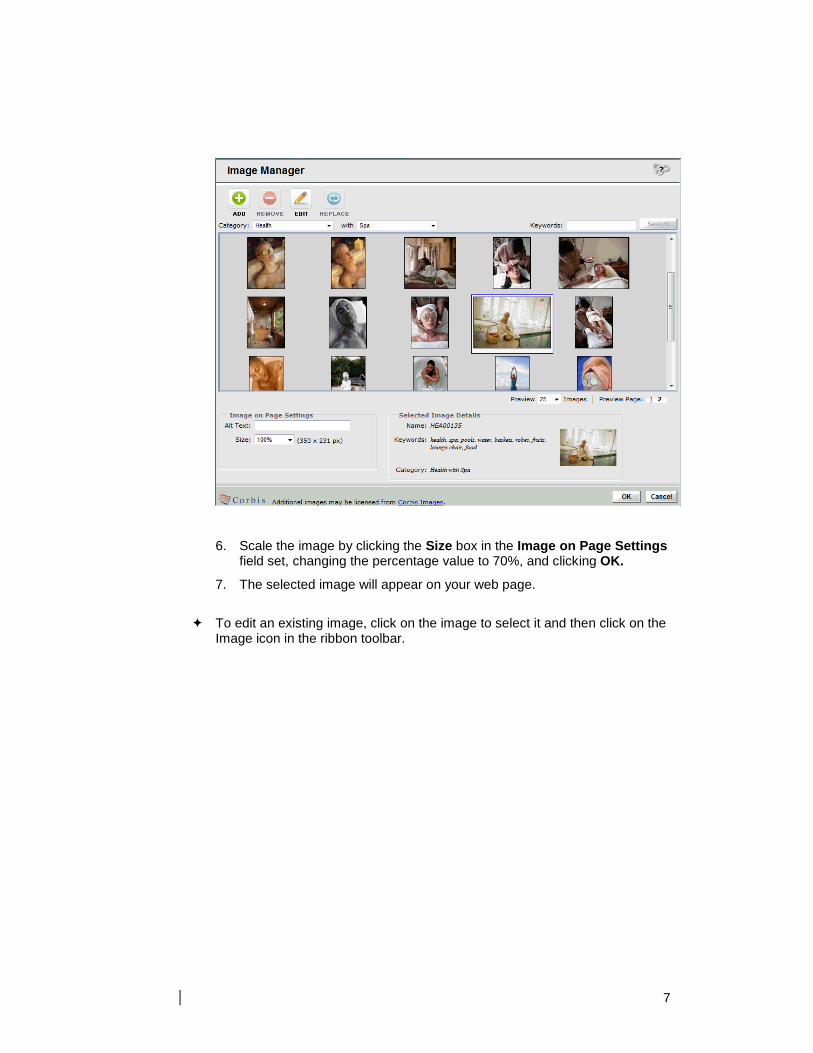
Change the Image on Your Home Page When you need to add or replace an image on the page you have the option to supply your own graphic or select from a large gallery of stock images.
To add an image:
1. Click in the work area where you would like to place the image.
2. Select the Image icon on the ribbon toolbar to display the Image Manager.
3. Select Health in the Category pull-down menu.
4. Select Spa from subcategory pull-down menu.
5. Click on Preview Page 2 and select the image as shown in the example below.
To change the text on a navigation
button, you must select the page in the Site Structure area and click the
Rename Page button
.
7
6. Scale the image by clicking the Size box in the Image on Page Settings field set, changing the percentage value to 70%, and clicking OK.
7. The selected image will appear on your web page.
To edit an existing image, click on the image to select it and then click on the Image icon in the ribbon toolbar.

8
Add Content to a Page When you want to add text or an image to your site, you must add a content block to contain it. Content blocks are arranged in sections, which contain one to six blocks.
1. Select the web page you would like to edit.
2. Click the Add Content Block icon located under the Page Editor tab.
3. Choose a content block section.
4. Select text from the pull-down menu and click OK.
If you have additional services, such as Guestbook, Form, Slideshow, or Counter, you will also be able to select them from this location to be applied on the page.
5. Click OK. The new section appears on your page.
If you want to change to a different block type or arrangement, you must delete the section and add a new one.
To delete a section, click the X in the upper right-hand corner and click OK to confirm.
In this way you can add, edit, and delete sections you add to your site.
Delete Content Block
Move Block
Edit Block Table & Cell Settings
Add New Block Below Existing Block

9
Add and Rearrange Pages You’ll probably want to add, rename, and rearrange pages in your site. A new page is added under the current page.
1. Click the New Page icon in the Site Structure area.
2. Click a thumbnail of the page type.
The page types provide typical content blocks for each type of page.
To add a blank page, use the Blank thumbnail.
The new page appears in the builder.
You can add content blocks to the page, as you need them.
To change the order a page appears in the navigation bar, you must change its order in the Site Structure. You can move a selected page to another position in the Site Structure.
3. Select the About Us page in the Site Structure area.
4. Click the Move Page button.
Move Page
New Blank Page in Site Structure
New Blank Page in the website Navigation
bar.
Page Title Area
New Blank Page Work Area

10
5. Select Location in the list of pages and click OK.
Notice the page arrangement on the website navigation also adjusts to reflect your changes.
6. With the About Us page selected in the Site Structure, click the Rename Page button.
7. Type a new name for the page, such as More About Us, and click OK. The new name appears in the Site Structure area and the page’s navigation bar. You can change the name on the page as well, and it can be different from the page’s name in the navigation bar.
8. Click the page title in the work area.
9. Change the name to Our Story, or whatever name you would like.
Rename Page

11
Change the Style The site style sets the look and feel of the site, and it appears throughout your site to provide a consistent look.
You might want to experiment with different site styles, colors, or key visual elements for your site.
1. On the ribbon toolbar, select the Site Design tab.
2. Click the Site Design icon.
3. Select a Site Style by using the category, sub-category, color, and/or keyword options. Scroll over the thumbnail magnifying glass to see a larger preview of the Site Style.
Each page in your site has a consistent
look because the site style controls most of the visual
elements.
Change Page Title

12
4. Review as many styles as you like. When you are satisfied with your choices, click Set Style, or you can click Cancel to keep the current style. The style appears on all pages of the site.

13
Preview and Publish the Site You can preview or publish your site any time. Preview the site to test it so that you can fix any problems you find. Publish your site so visitors can view it on the Web.
1. Click Preview.
2. Visit all the pages, testing links and verifying content. If you are just starting, most of your pages will have placeholder content. You should not publish until your content is ready, unless no one but you knows your site address.
3. Close the preview’s browser window.
4. Click Publish on the control bar.
You can clear the check boxes for pages that aren’t ready to publish.
5. Click Publish in the dialog.
Preview
Publish
14
6. The Publish Complete message tells you the URL of your site—your Web address.
7. Click the URL to your site and review it. If you are satisfied, give customers the URL. Close the browsers publish window if you like.
8. In the builder, click OK in the Publish Complete dialog message, or click a page in the Site Structure area to continue working on your site.
.