working with sap business one studio suite · sap business one studio and sap business one studio...
TRANSCRIPT
How to Guide SAP Business One 90 and 91 Document Version 10 ndash 2014-04-17
PUBLIC
Working with SAP Business One Studio Suite All Countries
2 PUBLIC copy 2014 SAP SE All rights reserved
Working with SAP Business One Studio Suite Typographic Conventions
Typographic Conventions
Type Style Description
Example Words or characters quoted from the screen These include field names screen titles pushbuttons labels menu names menu paths and menu options
Textual cross-references to other documents
Example Emphasized words or expressions
EXAMPLE Technical names of system objects These include report names program names transaction codes table names and key concepts of a programming language when they are surrounded by body text for example SELECT and INCLUDE
Example Output on the screen This includes file and directory names and their paths messages names of variables and parameters source text and names of installation upgrade and database tools
Example Exact user entry These are words or characters that you enter in the system exactly as they appear in the documentation
ltExamplegt Variable user entry Angle brackets indicate that you replace these words and characters with appropriate entries to make entries in the system
EXAMPLE Keys on the keyboard for example F2 or ENTER
Working with SAP Business One Studio Suite Document History
PUBLIC copy 2014 SAP SE All rights reserved 3
Document History
Version Date Change
10 2012-11-05 The first version
20 2013-01-22 Updated with 90 SP01
30 2014-04-17 Updated with 91
4 PUBLIC copy 2014 SAP SE All rights reserved
Working with SAP Business One Studio Suite Table of Contents
Table of Contents
1 Introduction 5 11 Installing SAP Business One Studio 5 12 Running SAP Business One Studio 6 13 Terms and Definitions 6 14 Related Documentation 7
2 SAP Business One Studio Main Window 8 21 Menu Button 8 22 Toolbar 9 23 Toolbox Window 10 24 Docking Tool Windows 13
3 Working with Add-on Projects in SAP Business One Studio 14 31 Creating an Add-on Project 14 32 Opening an Add-on Project or an External File 14 33 Designing a Form 15
331 Working with Tab Controls 15 332 Working with Grids 16 333 Working with Data Tables 16 334 Working with Matrixes 17 335 Working with Choose From Lists 17 336 Example Creating a Business Partner Field with Linked Button and Choose From List
Functions 18 34 Adding Renaming or Deleting Forms in a Project 19
341 Adding New User Forms 19 342 Adding Existing User Forms 19 343 Adding System Forms 20 344 Adding UDO Forms 20
35 Editing Active Forms in SAP Business One 21 36 Exporting Updated Parts of a System Form 22
4 Working with Add-on Projects in SAP Business One Studio for Microsoft Visual Studio 23 41 Creating SAP Business One Add-on Projects 23 42 Tool Windows in SAP Business One Studio for Microsoft Visual Studio 24 43 Adding Forms in a Project 25
431 Adding SAP Business One User Forms 25 432 Adding SAP Business One System Forms 25 433 Adding SAP Business One UDO Forms 26
44 Loading an Existing B1s File to Your Project 27 45 Packaging Your Project 28
5 SAP Business One Studio Suite Demo Script 30
Working with SAP Business One Studio Suite Introduction
PUBLIC copy 2014 SAP SE All rights reserved 5
1 Introduction
SAP Business One Studio Suite is a state-of-the-art development platform for SAP Business One extensions that dramatically improves partner development efficiency It provides an effective integrated development environment (IDE) for partners to develop extension on top of SAP Business One SAP Business One Studio Suite consists of two editions SAP Business One Studio and SAP Business One Studio for Microsoft Visual Studio
SAP Business One Studio is an open platform based on the NET framework for a variety of designers Currently this platform supports two types of designer Add-On Designer and Workflow Designer In this document SAP Business One Studio stands for SAP Business One Studio as add-on designer You can use SAP Business One Studio to open SAP Business One system forms in edit mode modify the existing controls and logic or add new controls in forms You can also design your own forms SAP Business One Studio not only contains all the functionalities of ScreenPainter but also enhances the functionalities and optimizes the usability of ScreenPainter
SAP Business One Studio for Microsoft Visual Studio is a deeply customized programming environment for SAP Business One Besides the functionalities of SAP Business One Studio SAP Business One Studio for Microsoft Visual Studio leverages the powerful capability of Microsoft Visual Studio in development functionalities such as code generation project and item template wizard code intelligence friendly GUI and so on Whats more the add-on project generated by SAP Business One Studio for Microsoft Visual Studio is based on new object level event framework of SAP Business One SDK Together with system form editing SAP Business One Studio for Microsoft Visual Studio makes it much easier to write a typical SAP Business One add-on and the code generated is much simpler and maintainable
SAP Business One Studio and SAP Business One Studio for Microsoft Visual Studio share with the same file format b1s which is a package for all layout files and other relevant files For using the two editions a typical scenario is that a UI designer works on SAP Business One Studio for GUI drawling and polishing and then a consultant works on it for customization Afterwards a developer can open the b1s generated in SAP Business One Studio by SAP Business One Studio for Microsoft Visual Studio to program on it and finish the complicated logic
11 Installing SAP Business One Studio
Prerequisites
bull The installation computer complies with all hardware and software requirements For information on hardware and software requirements refer to sappartneredgecom
bull You have installed Microsoft NET Framework 40
bull If you want to install SAP Business One Studio for Microsoft Visual Studio you must install Microsoft Visual Studio 2010
Note
If you are just designing your own UI layout you do not need to install the SAP Business One client
6 PUBLIC copy 2014 SAP SE All rights reserved
Working with SAP Business One Studio Suite Introduction
Procedure
To install SAP Business One Studio perform the following steps
1 Insert the SAP Business One Installation DVD and wait for the installation program to appear
2 In the installation window select the Client radio button
3 In the Client Components window select Optional Components and SAP Business One Studio
4 Choose the Install button
5 In the Welcome window choose the Next button
6 In the Customer Information window specify the user name and company name
7 In the Setup Type window specify a setup type Complete or Custom
If you choose Custom type
In the Choose Destination Location window to accept the default location choose the Next button to select a different location choose the Browse button
In the Select Features window select SAP Business One Studio andor SAP Business One Studio for Microsoft Visual Studio and then choose the Next button
8 In the Ready to Install the Program window choose the Install button
9 In the Setup Status window the installation wizard performs the required system actions
10 In the Complete window choose the Finish button
Note
Alternatively you can install the SAP Business One Studio application from the DVD folders PackagesB1Studiosetupexe
12 Running SAP Business One Studio
To run SAP Business One Studio choose All Programs rarr SAP Business One rarr SAP Business One Studio and choose SAP Business One Studio or SAP Business One Studio for Microsoft Visual Studio
Alternatively if you have an SAP Business One client installed in SAP Business One from the Tools menu choose SAP Business One Studio and choose SAP Business One Studio or SAP Business One Studio for Microsoft Visual Studio
13 Terms and Definitions
The following terms are used in this document
Term Definition
B1s SAP Business One solution file
Screen Painter An SAP Business One add-on You can use Screen Painter to create user forms The format of files generated by Screen Painter is srf
Working with SAP Business One Studio Suite Introduction
PUBLIC copy 2014 SAP SE All rights reserved 7
Term Definition
UI API SAP Business One SDK User Interface Application Programming Interface
UDO Form A form that is generated by the User-Defined Object Registration wizard
14 Related Documentation
The documents listed in the table are referred to in this document
Document Location
User Interface Standards and Guidelines httpservicesapcomsmbsbocustomerdocumentation and choose Release Family 90 rarr SDK and Custom Development
SDK online help file SDK_ENCHM httpservicesapcomsmbsbocustomerdocumentation and choose Release Family 90 rarr SDK and Custom Development
Available also on the SAP Business One product DVD and in the download package from SAP Service Marketplace
SAP Business One Administratorrsquos Guide httpservicesapcomsmbsbocustomerdocumentation and choose Release Family 90 rarr System Administration
Available also on the SAP Business One product DVD and in the download package from SAP Service Marketplace
8 PUBLIC copy 2014 SAP SE All rights reserved
Working with SAP Business One Studio Suite SAP Business One Studio Main Window
2 SAP Business One Studio Main Window
You can access all SAP Business One Studio functions from the SAP Business One Studio main window which is divided into the following areas
bull Menu button ndash located at the top of the SAP Business One Studio main window and provides some menu commands For more information see Menu Button
bull Toolbar ndash located below the Menu button and provides the icons for the commonly used functions For more information see Toolbar
bull Design area ndash located in the middle of the SAP Business One Studio main window and you can use this area to design your own forms For more information see Designing a Form
bull Tool windows
o Toolbox window ndash contains the controls you can use to design your form For more information see Toolbox Window
o UI Outline window ndash allows you to view items in a selected pane level and pane level 0 For example when you select 2 the application displays items in pane level 2 and pane level 0
o Solution Explorer window ndash allows you to view the forms in your solution It contains three levels of items solution level project level and form level
o Properties window ndash allows you to set and examine the properties of forms and form items
Note
You can increase the viewing and editing space for the design area depending on how you arrange the tool windows (Toolbox window UI Outline window Solution Explorer window and Properties window)
You can drag the border of the windows to resize the window click (Auto Hide) to hide the window and also dock the windows to a new location (see Docking Tool Windows)
21 Menu Button
The SAP Business One Studio Menu button is located at the top of the SAP Business One Studio main window and contains the following menu commands
Menu Command DescriptionActivity
New Creates a new add-on project or a workflow project
Open Opens an existing solutionproject or a file
Save Current File (Ctrl + S ) Saves the current file B1s is refreshed to latest
Export Current File As (Ctrl + Shift + E )
Exports the current file into the specified path The file type is determined according to the project type For example you can export an add-on project file as a srf file
Working with SAP Business One Studio Suite SAP Business One Studio Main Window
PUBLIC copy 2014 SAP SE All rights reserved 9
Menu Command DescriptionActivity
Save All (Ctrl + Shift + S ) Saves all changes to the project
Recent Files Shows the recently opened files
Recent Solutions Shows the recently opened solutions
View Start Page Opens or hides Start Page
Exit (Alt + F4 ) Closes the SAP Business One Studio application
22 Toolbar
The toolbar located below the Menu button is a collection of icons that provide easy access to commonly used functions Active functions are shown in color while inactive ones are grayed out
Toolbar Icon DescriptionActivity
(Undo (Ctrl + Z )) Reverses the most recent successful action
(Redo (Ctrl + Y )) Redoes the last action that was undone
(Copy (Ctrl + C )) Copies the selected control or text onto the clipboard
(Cut (Ctrl + X )) Removes the selected control or text and places it on the clipboard
(Paste (Ctrl + V )) Inserts the contents of the clipboard at the current location
(Align Left) Aligns the left edges of the selected controls with the left edge of the last selected control
(Align Center) Vertically aligns the selected controls with the center of the last selected control
(Align Right) Aligns the right edges of the selected controls with the right edge of the last selected control
(Align Top) Aligns the top edges of the selected controls with the top edge of the last selected control
(Align Bottom) Aligns the bottom edges of the selected controls with the bottom edge of the last selected control
(Align Middle) Horizontally aligns the selected controls with the center of the last selected control
(Scale Size) Aligns the size of the selected controls with the last selected control
(Scale Height) Aligns the height of the selected controls with the last selected control
(Scale Width) Aligns the width of the selected controls with the last selected control
(Preview in SAP Business One)
Enables you to preview the form in the SAP Business One client
10 PUBLIC copy 2014 SAP SE All rights reserved
Working with SAP Business One Studio Suite SAP Business One Studio Main Window
Toolbar Icon DescriptionActivity
(Settings) Enables you to select language and theme style of the user interface
There are 2 options of theme style Nova has the same look as that for SAP Business One release 882 NS has the same look as that for SAP Business One 90 To apply the new settings choose Update and restart SAP Business One Studio
23 Toolbox Window
The Toolbox window is a collection of controls that you can use to design your form It contains UI Controls and Data Sources To add a control double-click it or drag and drop it into the design area
bull The newly added UI controls appear in the form you can modify the position size and other specific properties of the controls in the Properties window
bull The newly added data sources appear at the bottom of the design area you can modify the properties in the Properties window
UI Controls
UI Control DescriptionActivity
StaticText Represents a label item
Specific Property Caption - the text to display in the label
EditText Represents an edit text box
Specific Properties
bull DataSource - the data source bound to the edit text box
bull ChooseFromListUID - the unique ID of the ChooseFromList object to attach with this edit text box
bull ChooseFromListAlias - the database field by which to filter a ChooseFromList attached to the edit box When you enter a value in the text box and then press the tab key the ChooseFromList dialog is displayed with only those rows where the value of the field specified in this property starts with the entered text After you select a value the key of the selected row is entered into the edit text box
bull IsPassword - specifies whether the input data is of the same look and feel as a password field
bull SuppressZeros - indicates whether to hide leading zeros as well as trailing zeros after a decimal point
bull TabOrder - the order in which this edit text gets focus when you press the TAB key
Working with SAP Business One Studio Suite SAP Business One Studio Main Window
PUBLIC copy 2014 SAP SE All rights reserved 11
UI Control DescriptionActivity
ExtendedEditText Represents a text box that can display multiple lines
Button Represents a button
Specific Properties
bull ButtonType - indicates whether the button acts as a text button or an image button
bull Caption - the text to display on the button
bull ChooseFromListUID - the unique ID of the ChooseFromList object to attach with this button
bull Image - the path to an image displayed on the button
CheckBox Represents a check box
OptionButton Represents an option button (radio button)
ComboBox Represents a combo box
Specific Properties
bull DataSource - the data source bound to the combo box
bull TabOrder- the order in which the combo box items get focus when you press the TAB key
bull ValidValues - the valid values for this combo box item Add or remove valid values from the popup window
TabControl Represents a tab control which is a container of the items to be shown on the tab page In UI API the tab control is named as folder
Specific properties for tab pages
bull AutoPaneSelection - indicates whether the tab control allows automatic pane selection If you specify True when you click on a tab the application automatically sets the form pane level to the pane level bound to the tab control
bull Caption - the text to display on the tab page
bull Pane - the pane level of the tab
For more information see Working with Tab Controls
Grid Represents a grid which is a visual representation of a data table
Specific Properties
bull CollapseLevel - the number of columns grouped together starting from the left-most column For example if you specify 2 for this property all rows are grouped by the values in the first column and all rows within each group are grouped by the values in the second column Default value is 0 indicating not collapsed
bull Columns - the grids columns
bull DataTableID - the data table bound to the grid
bull SelectionMode - indicates how rows can be selected
For more information see Working with Grids
12 PUBLIC copy 2014 SAP SE All rights reserved
Working with SAP Business One Studio Suite SAP Business One Studio Main Window
UI Control DescriptionActivity
Matrix Represents a matrix which displays data in a table
Specific Properties
bull Columns - the collection of columns in the matrix You can add or remove columns in the CollectionEditorForm window
bull MatrixLayout - the layout of the matrix
bull SelectionMode - indicates how rows can be selected
bull TabOrder - the order in which the items get focus when you press the TAB key
For more information see Working with Matrixes
PictureBox Represents a picture box
Specific Property Picture - the picture to display in the picture box
LinkedButton Represents an arrow link ( )
A linked button enables quick navigation between relevant objects For example a linked button next to the Customer field in the AR Invoice form opens the Business Partner Master Data form for the relevant customer
Specific Properties
bull LinkTo - the unique ID of the control to which the linked button links
bull LinkedObject - the target object type of the linked button
ButtonCombo Represents an item that provides the functionality of a combo box and a button in a single control
Data Sources
Data Source DescriptionActivity
DB Data Source Represents a SAP Business One database table to be attached to a form
Specific Property TableName - an SAP Business One database table for example OCRD
User Data Source Represents a container for item data that is not stored in the database
Specific Properties
bull DataType - the data type of the user data source
bull Size - the size of the user data source
bull UniqueID - the unique ID of the user data source
Data Tables Represents data in table form
Specific Properties
bull Type - the type of the data table including Manual and Query types
bull Columns - the columns of the Manual type data table
bull Query - the specified condition (query) of the Query type data table
Working with SAP Business One Studio Suite SAP Business One Studio Main Window
PUBLIC copy 2014 SAP SE All rights reserved 13
Data Source DescriptionActivity
bull UniqueID - the unique ID of the data table
For more information see Working with Data Tables
Choose From List Represents a ChooseFromList form
Specific Properties
bull MultiSelection - indicates whether you can select multiple items in the ChooseFromList form
bull ObjectType - the type of the object from which to generate the valid values
bull UniqueID - the unique ID of the ChooseFromList
For more information see Working with Choose From Lists
24 Docking Tool Windows
To dock the tool windows (Toolbox window UI Outline window Solution Explorer window and Properties window) to a designated area perform the following steps
1 Select the window you want to dock
2 Drag the window from its current location towards the middle of the SAP Business One main window
A guide diamond appears
3 When the window you are dragging reaches the position where you want to dock it move the pointer over the corresponding portion of the guide diamond
4 To dock the window in the position indicated release the mouse button
14 PUBLIC copy 2014 SAP SE All rights reserved
Working with SAP Business One Studio Suite Working with Add-on Projects in SAP Business One Studio
3 Working with Add-on Projects in SAP Business One Studio
This section introduces how to work with your add-on projects in SAP Business One Studio
31 Creating an Add-on Project
You can create your new add-on forms with the same look and feel as the SAP Business One forms
Procedure
1 In the SAP Business One Studio main window choose the Menu button and choose New rarr Project rarr Add-on
Alternatively on the Start Page of SAP Business One Studio choose New Add-on
2 In the New Project window specify the name and the location of your new project
3 Specify the package name
Note
By default the package name is the same as the project name
The extension of a package (SAP Business One add-on solution) file is b1s
4 If you need to create a project that does not contain any forms select the Create Empty Project checkbox
5 Choose OK
A default layout named NewForm 1 appears in the design area of the SAP Business One Studio main window
You can design your own form now For more information see Designing a Form
32 Opening an Add-on Project or an External File
You can open an existing add-on project or a srf file which was created by Screen Painter
Procedure
1 In the SAP Business One Studio main window choose the Menu button and choose Open rarr SolutionProject or Open rarr File
Alternatively on the Start Page of SAP Business One Studio choose Open Project or Open File
2 Specify the existing project or file you want to open
3 Choose Open
The solution hierarchy appears in the Solution Explorer window
Working with SAP Business One Studio Suite Working with Add-on Projects in SAP Business One Studio
PUBLIC copy 2014 SAP SE All rights reserved 15
33 Designing a Form
In the design area of the SAP Business One Studio main window you can design your own form This procedure introduces the basic operation of designing a form
Procedure
1 In the Toolbox window double-click or drag and drop a form item from the UI Controls area or the Data Source area
For example double-click a button A new button appears in the top left corner of the form
2 Use drag and drop to position or resize the item on the form
Note
When you drag the item the application shows a red line which enables you to align the item with the existing ones
3 Select the form or an item to set the properties
You can select the form or a form item either from the design area or from the UI Outline window The UI Outline window groups form items in pane levels
4 In the Properties window edit the properties
5 To preview the form in the SAP Business One client click (PreviewB1Client)
6 Save the form
331 Working with Tab Controls
A tab control is a container of the items to be shown on the tab page In UI API the tab control is named as folder
Procedure
1 Add a tab control
To add a tab control in the Toolbox window UI Controls area double-click the TabControl icon
The tab control is added to the form with one tab page
If the tab control is active a cross-shaped symbol appears at the top left of the tab control
2 To add or remove a tab page right-click the cross-shaped symbol and choose Add Tab Page or Remove Tab Page
3 Specify properties for each tab page
To specify the pane level of the tab page in the Properties window set the AutoPaneSelection field to True and in the Pane field enter the pane level
4 Add UI controls to the tab page area and specify the FromPane ToPane properties
Once the FromPane ToPane properties are set when you switch tab pages the UI controls with the same pane level are displayed on the tab page
16 PUBLIC copy 2014 SAP SE All rights reserved
Working with SAP Business One Studio Suite Working with Add-on Projects in SAP Business One Studio
332 Working with Grids
The grid control is a visual representation of a data table
Procedure
1 Add a grid control
To add a grid control in the Toolbox window UI Controls area double-click the Grid icon
The grid control is added to the form without columns
2 Add a data table
To add a data table in the Toolbox window Data Source area double-click the Data Tables icon
For more information see Working with Data Tables
3 Bind the data table to the grid as follows
1 Select the grid control you want to bind
2 In the Properties window under the Specific area in the DataTableID field select a data table to which you want to bind
Note
o If the data table type is Query the columns are not displayed in edit mode To preview the columns click (PreviewB1Client)
o If the data table type is Manual the columns are displayed in edit mode
3 After binding a grid control to a data table of Manual type you can set the Columns property Perform the following steps
1 In the Columns property field click the button
The CollectionEditorForm window appears
2 Select the column you want to edit from the list in the left area of the window
3 In the Properties area specify the column type
Note
To set a column with a link button select it_EDIT as the column type and in the LinkObjectType field specify the type of the object you want to connect to
333 Working with Data Tables
You can use a data table to perform a free query for example JOIN GROUP BY and so on You can also manually set the data table columns
Procedure
1 To add a data table in the Toolbox window Data Source area double-click the Data Tables icon
Working with SAP Business One Studio Suite Working with Add-on Projects in SAP Business One Studio
PUBLIC copy 2014 SAP SE All rights reserved 17
A new data table is created with a default unique ID and a type
Note
You can change the default ID and type of the data table However changing the type results in the loss of the existing query or columns
2 To set queries change the data table type to Query and in the Query property field specify your query
If the data table is attached to a grid control the grid is automatically filled with columns from the query
3 To set columns for manual data tables change the data table type to Manual and in the Columns property field click the button
In the CollectionEditorForm window you can modify the columns
o To add a new column choose the Add button
A new column is created with a default name and type (ft_AlphaNumeric) You can change the column default name and type
o To delete the column choose the Remove button
4 To bind a data table (with Manual type) to an edit text control perform the following steps
1 In the Properties window of the edit text control set the DataSource property to the data table
2 In the Alias property set the column of the data table
334 Working with Matrixes
The matrix control displays data in a table You specify each column manually and bind each column to a data source
Procedure
1 To add a matrix control in the Toolbox window UI Controls area double-click the Matrix icon
The matrix control is added to the form with a default column Col_0
2 In the Properties window under the Specific area in the Columns property field click the button
The CollectionEditorForm window appears
3 Choose the Add button to add new columns
4 In the Properties area specify the Type field of the column the DataSource Alias fields and the specific fields
5 Add as many columns as needed and choose the OK button
6 To preview the matrix click (PreviewB1Client)
335 Working with Choose From Lists
ChooseFromList is a basic functionality in the SAP Business One application It allows you to open a ChooseFromList form which displays a list of objects of the same type
18 PUBLIC copy 2014 SAP SE All rights reserved
Working with SAP Business One Studio Suite Working with Add-on Projects in SAP Business One Studio
Procedure
1 To add a ChooseFromList control in the Toolbox window Data Source area double-click the Choose From List icon
A new ChooseFromList is created with a default unique ID You can change the default ID
2 In the Properties window specify the ObjectType property and enter the type of the object you want the Choose from List form to display For example enter 2 for business partners
You can connect EditText Button and MatrixGrid column (with type it_EDIT or it_LINKED_BUTTON) items to a choose from list
3 To connect EditText Button and MatrixGrid column items to a choose from list in the Properties window specify the ChooseFromListUID field
4 In the ChooseFromListAlias (EditText MatrixGrid column with type it_EDIT or it_LINK_BUTTON) field enter the alias of the field you want to display
336 Example Creating a Business Partner Field with Linked Button and Choose From List Functions
The linked button function is often used together with the choose from list function For example you add a new field named BP Code For this field you want to have a choose from list to open the List of Business Partners window and a linked button to open the Business Partner Master Data window
Procedure
1 In the Toolbox window UI Controls area add a StaticText a LinkedButton and an EditText
2 In the Data Source area add a DB Data Source and a Choose From List
3 In the Properties window of the form specify a valid value for the ObjectType filed
4 Set the Choose From List properties
In the Properties window of the choose from list in the ObjectType filed enter 2 which represents business partners For more information about other object types see BoObjectTypes Enumeration in SDK Help Center
5 Set the DB Data Source properties
In the Properties window of the DB data source in the TableName filed enter OCRD which represents the SAP Business One system table for business partners For more information about other system tables see Database Tables Reference in SDK Help Center
6 Connect the linked button with the BP Code edit text field
In the Properties window of the linked button in the LinkTo field paste the unique ID of the edit text in the LinkedObject filed enter 2
7 Bind the DB data source to the BP Code edit text field
In the Properties window of the edit text in the DataSource field enter OCRD in the Alias field enter CardCode
8 Connect the choose from list with the BP Code edit text field
Working with SAP Business One Studio Suite Working with Add-on Projects in SAP Business One Studio
PUBLIC copy 2014 SAP SE All rights reserved 19
In the Properties window of the edit text in the ChooseFromListUID field enter the ID of the choose from list in the ChooseFromListAutoFill field select True and in the ChooseFromListAlias field enter CardCode
9 To preview click (PreviewB1Client)
o When you click the choose from list icon of the BP Code field the List of Business Partners window appears
o After you select a business partner from the list the BP Code field is automatically filled and a linked button appears
o Click the linked button the Business Partner Master Data window appears
34 Adding Renaming or Deleting Forms in a Project
To add forms in your project right-click your project in the Solution Explorer window
From the context menu you can add the following types of forms
bull New user form
bull Existing user form
bull System form
bull UDO form
To rename a form in your project in the Solution Explorer window right-click the form and choose Rename
To delete a form in your project in the Solution Explorer window right-click the form and choose Delete
341 Adding New User Forms
A user form is a form designed by a partner It can be generated from SAP Business One Studio Screen Painter UI API or your own code
To add a new user form in the Solution Explorer window right-click your project and choose New Form
A new form opens in edit mode and appears in the Solution Explorer window
You can now design the new form For more information see Designing a Form
342 Adding Existing User Forms
You can add an existing user form to your project
Procedure
1 In the Solution Explorer window right-click your project and choose Add rarr Existing Form
2 In the Add Existing Item window select the form you want to add
3 Choose Open
20 PUBLIC copy 2014 SAP SE All rights reserved
Working with SAP Business One Studio Suite Working with Add-on Projects in SAP Business One Studio
The form opens in edit mode and appears in the Solution Explorer window
343 Adding System Forms
A system form is a standard SAP Business One form that you can add to your project
Procedure
1 In the Solution Explorer window right-click your project and choose Add rarr System Form
2 In the Add System Form window select the form you want to add
Note
The Add System Form window lists the following system forms
o All currently opened system forms if SAP Business One is running
o The locally cached system forms
3 Choose OK
The form opens in edit mode and appears in the Solution Explorer window
Note
Once opened in edit mode a system form will be cached up locally
4 You can now modify the form
In edit mode of the system form you can add new UI controls and modify the properties of the existing system items
5 To preview the system form you need to open the form in the SAP Business One client first and then click (PreviewB1Client)
Caution
Deleting existing system items does not take effect when you preview the modified system form
344 Adding UDO Forms
A UDO form is a form generated by the User-Defined Object Registration wizard (To access the wizard from the SAP Business One menu bar choose Tools rarr Customization Tools rarr Objects Registration Wizard) You can add a UDO form to your project
Procedure
1 In the Solution Explorer window right-click your project and choose Add rarr UDO Form
2 In the Company Logon window specify the details of the company you want to work with and choose Log On
Working with SAP Business One Studio Suite Working with Add-on Projects in SAP Business One Studio
PUBLIC copy 2014 SAP SE All rights reserved 21
Field DescriptionActivity
Server Specify the IP address or the machine name of the SAP Business One server
Server Type From the dropdown list select a server type MSSQL_2008 MSSQL_2012 or HANADB
License Server Specify the license server
Company Name Specify the company defined on the selected SAP Business One server
User ID Specify your user name for the company you want to log on to
Password Enter your password
The UDO form that is registered appears in the List of UDO Forms window
Note
Only the Header Line Style (new UDO style in SAP Business One 882) is supported The Matrix Style (old UDO style) is not supported
3 In the List of UDO Forms window select the UDO form you want to add and choose the Open button
The form opens in edit mode and appears in the Solution Explorer window
Note
You can add more UDO forms The application remembers the company logon information and you do not need to specify it again
If you restart SAP Business One Studio you just need to specify the Password field
4 You can now modify the UDO form
5 To preview the form click (PreviewB1Client)
6 To save the changes in the Solution Explorer window right-click the form and choose Save to DB
When you reopen the form in the SAP Business One client you can see the UDO form is modified
35 Editing Active Forms in SAP Business One
In the SAP Business One client you can edit the active system form through SAP Business One Studio or SAP Business One Studio for Microsoft Visual Studio The active form means the current system form in the SAP Business One client If you have multiple forms open in the SAP Business One client the active form is the top one
Procedure
1 In SAP Business One from the Tools menu choose SAP Business One Studio
2 If you want to edit the active form from SAP Business One Studio choose Edit Active Form
o If SAP Business One Studio is already running the application adds the active system form to the project
o If you have not yet opened SAP Business One Studio the application runs SAP Business One Studio first automatically creates a project and opens the active form in the project
3 If you want to edit the active form from SAP Business One Studio for Microsoft Visual Studio choose Edit Active Form in Visual Studio
22 PUBLIC copy 2014 SAP SE All rights reserved
Working with SAP Business One Studio Suite Working with Add-on Projects in SAP Business One Studio
o If the SAP Business One Studio for Microsoft Visual Studio is already running the application adds the active system form to the project
o If you have not yet opened Microsoft Visual Studio the application does nothing for you You need to open and create a project in Microsoft Visual Studio first and then in the SAP Business One client from the Tools menu choose SAP Business One Studio and choose Edit Active Form in Visual Studio
36 Exporting Updated Parts of a System Form
If you edited a system form you can export the updated part of the system form to a srf file
Procedure
1 In the Solution Explorer window right-click the system form and choose Export Updated Part As
2 In the Export File As window specify the file name
3 Choose Save
Working with SAP Business One Studio Suite Working with Add-on Projects in SAP Business One Studio for Microsoft Visual Studio
PUBLIC copy 2014 SAP SE All rights reserved 23
4 Working with Add-on Projects in SAP Business One Studio for Microsoft Visual Studio
41 Creating SAP Business One Add-on Projects
You can create your new add-on forms with the same look and feel as the SAP Business One forms
Procedure
1 In the Microsoft Visual Studio main window choose New rarr Project
After you install SAP Business One Studio for Microsoft Visual Studio you can locate the SAP Business One template in the New Project dialog box by navigating the expanding list in the left pane under Installed Templates
2 In the New Project window from the Installed Templates area select the SAP Business One template
3 To create an add-on project with an empty user form select SAP Business One Add-on Project and specify the name and the location of your new project
4 To create an add-on project using an existing B1s file from SAP Business One Studio select SAP Business One Add-on Project from B1s File
5 Choose OK
A default form named Form1b1f appears in the Solution Explorer window and the layout of the form appears in the design area A folder B1Studio is generated under CTempltYourAddOnProjectgtltYourAddOnProjectgtbinDebug
You can design the layout of your form and the logic of the controls For more information see Designing a Form
Note
When you create an SAP Business One add-on project it adds the SAPbouiComFramework which is for connecting the UI API application handling LoadBatchAction systemuserUDO form events and generating code It includes
o Menucs - for adding menus and handling menu events
o Programscs - for connecting the UI server and performing the initialization
o SAPbouiCOMFrameworkApplicationSBO_Application - the root COM object of UI API
Sample Code ApplicationSBO_ApplicationMessageBox(Hello world)
o SAPbouiCOMFrameworkFormBaseUIAPIRawForm - the original form COM object of UI API
Sample Code thisUIAPIRawFormClose()Close form
The SAPbouiComFramework contains all UI API COM objects and interfaces therefore we do not recommend that you replace it
24 PUBLIC copy 2014 SAP SE All rights reserved
Working with SAP Business One Studio Suite Working with Add-on Projects in SAP Business One Studio for Microsoft Visual Studio
Note
In SAP Business One 91 a new net SAPBusinessOneSDKdll is added You can build add-on solutions using SAPBusinessOneSDKdll which integrates UI API and DI API
42 Tool Windows in SAP Business One Studio for Microsoft Visual Studio
The tool windows in SAP Business One Studio for Microsoft Visual Studio are very similar to the tool windows in SAP Business One Studio The windows include
bull Toolbox window ndash contains the controls you can use to design your form For more information see Toolbox Window
Note
To program a certain control double-click it The code is automatically generated
bull UI Outline window ndash allows you to view items in a selected pane
Note
This window may not appear by default To display the UI Outline window from the menu bar choose View rarr Other Windows rarr Outline Window
bull Solution Explorer window ndash allows you to view the source files in your project
Note
The project files also include SAP Business One UI API references and predefined menu options (Menucs) In runtime by default the newly added form appears at the bottom of the SAP Business One Main Menu You can change the code if you want to open the form from another menu location
bull Properties window ndash allows you to set and examine the properties and events of forms and form items
Note
To register events of a control in the Properties window click (Events) and double-click the event property you want to edit The code is automatically generated and you can program as needed
You can drag the border of the windows to resize the window click (Auto Hide) to hide the window and also dock the windows to a new location (see Docking Tool Windows)
bull The double-click function - you can double-click an item to add an event The following are the default events that the system supports currently
Item Type Event
Form LoadAfter
EditText KeyDownAfter
CheckBox ClickBefore
OptionButton ClickBefore
Working with SAP Business One Studio Suite Working with Add-on Projects in SAP Business One Studio for Microsoft Visual Studio
PUBLIC copy 2014 SAP SE All rights reserved 25
Item Type Event
Button ClickBefore
ComboBox ComboSelectAfter
bull Toolbar - Located below the Menu button the toolbar is a collection of icons providing easy access to commonly used functions The functions are the same as those for SAP Business One Studio See chapter 22 in this document
43 Adding Forms in a Project
To add forms in your project in the Solution Explorer window right-click your project
From the context menu choose Add rarr New Itemhellip You can add the following types of forms
bull SAP Business One user form
bull SAP Business One system form
bull SAP Business One UDO form
431 Adding SAP Business One User Forms
An SAP Business One user form is a form designed by a partner It can be generated from SAP Business One Studio Screen Painter UI API or your own code
Procedure
1 In the Solution Explorer window right-click your project and choose Add rarr New Itemhellip
2 In the Add New Item window from the Installed Templates area select the SAP Business One add-on template
3 Choose SAP Business One User Form
A new form opens in edit mode and appears in the Solution Explorer window
You can now design the new form For more information see Designing a Form
In runtime by default the newly added form appears at the bottom of the SAP Business One Main Menu
432 Adding SAP Business One System Forms
A system form is a standard SAP Business One form that you can add to your project
26 PUBLIC copy 2014 SAP SE All rights reserved
Working with SAP Business One Studio Suite Working with Add-on Projects in SAP Business One Studio for Microsoft Visual Studio
Procedure
1 In the Solution Explorer window right-click your project and choose Add rarr New Itemhellip
2 In the Add New Item window from the Installed Templates area select the SAP Business One add-on template
3 Choose SAP Business One System Form
Note
The Add System Form window lists the following system forms
o All currently opened system forms if SAP Business One is running
o The locally cached system forms
4 Choose OK
The form opens in edit mode and appears in the Solution Explorer window
You can add user items modify the properties of a system item and register events but you cannot delete existing system items The modification is implemented after you reopen the system form
433 Adding SAP Business One UDO Forms
A UDO form is a form generated by the User-Defined Object Registration wizard (To access the wizard from the SAP Business One menu bar choose Tools rarr Customization Tools rarr Objects Registration Wizard) You can add a UDO form to your project
Procedure
1 In the Solution Explorer window right-click your project and choose Add rarr New Itemhellip
2 In the Add New Item window from the Installed Templates area select the SAP Business One add-on template
3 Choose SAP Business One UDO Form
4 In the Company Logon window specify the details of the company with which you want to work and choose Log On
Field DescriptionActivity
Server Specify the IP address or the machine name of the SAP Business One server
Server Type From the dropdown list select a server type MSSQL_2008 MSSQL_2012 or HANADB
License Server Specify the license server
Company Name Specify the company defined on the selected SAP Business One server
User ID Specify your user name for the company to which you want to log on
Password Enter your password
Working with SAP Business One Studio Suite Working with Add-on Projects in SAP Business One Studio for Microsoft Visual Studio
PUBLIC copy 2014 SAP SE All rights reserved 27
The UDO form that is registered appears in the List of UDO Forms window
Note
Only the Header Line Style (new UDO style in SAP Business One 882) is supported The Matrix Style (old UDO style) is not supported
5 In the List of UDO Forms window select the UDO form you want to add and choose the Open button
The form opens in edit mode and appears in the Solution Explorer window
Note
The application remembers the company logon information and if you want to add more UDO forms you do not need to specify that information again
If you restart SAP Business One Studio you just need to specify the Password field
6 You can now modify the UDO form
To save the changes in the Solution Explorer window right-click the form and choose Save UDO to DB
When you reopen the form in the SAP Business One client you can see the UDO form is modified
44 Loading an Existing B1s File to Your Project
You can load your existing b1s solution or srf file (ScreenPainter file) in the following ways
Creating an Add-on Project Using an Existing B1s File
1 In the Microsoft Visual Studio main window choose New rarr Project
2 In the New Project window from the Installed Templates area select the SAP Business One add-on template
3 To create an add-on project using an existing B1s file from SAP Business One Studio select SAP Business One Add-on Project from B1s File
4 Choose OK
Adding an Existing B1s File to the Current Project
1 In the Solution Explorer window right-click your project and choose Add rarr Existing Business One File
2 In the Open window select the Business One Studio files (b1s) file you want to add
3 Choose Open The form opens in edit mode and appears in the Solution Explorer window
Adding an Existing SRF File to the Current Project
1 In the Solution Explorer window right-click your project and choose Add rarr Existing Business One File
2 In the Open window select the Business One Studio SRF files (srf) file you want to add
3 Choose Open The form opens in edit mode and appears in the Solution Explorer window
28 PUBLIC copy 2014 SAP SE All rights reserved
Working with SAP Business One Studio Suite Working with Add-on Projects in SAP Business One Studio for Microsoft Visual Studio
45 Packaging Your Project
The SAP Business One Extension Package features are integrated in SAP Business One Studio for Microsoft Visual Studio You can package your project directly from the menu bar
Procedure
1 Build your project first to get the executable file of your extension
2 From the menu bar of the Microsoft Visual Studio main window choose SAP Business One Studio rarr Extension Package
3 In the Extension Registration Data Generator window expand Basic Information and specify the following fields
o Extension Name ndash Enter the name of the extension This field is mandatory
o Extension Version ndash Enter the version of the extension for which you want to package and generate the ARD file This field is mandatory
o Extension Provider ndash Enter the name of the SAP partner that creates and owns the extension For example the name of your company
o Extension Namespace ndash Enter a name for the folder in which SAP Business One places the extension after a user registers the extension in the application
o Supported Database ndash Specify the database in which the extension works This field is mandatory
o Contact Data ndash Enter contact information for the SAP partner that creates and owns the extension For example enter the URL of your companys Website
4 Expand Extension File specify the path of the executable file of your 32-bit or 64-bit add-on and select the files that should be packaged in the zip file
To package your apps for the version for SAP HANA specify the app zip file the name and the package of your app
Note
The naming convention for your package is For example if the package hierarchy is sapsboatp in SAP HANA the package name is this and the corresponding URL will be httpshostportsapsboatp
5 Expand Deployment Steps and select the COM dlls to register for your 32-bit or 64-bit add-on
6 Expend SBO Compatibility you can specify the versions of SAP Business One with which the add-on is compatible
In the Compatible with SAP Business One area specify the following
o Version From ndash Enter the earliest version of SAP Business One with which the extension is compatible
o To ndash Enter the latest version of SAP Business One with which the lightweight add-on is compatible
Example
Enter compatible versions of SAP Business One with the format ltxxxyyyxxgt for example 91000000
7 Expand Parameters you can optionally specify shared parameters and parameters for the extension
o Shared Parameters - The parameters or configuration required to run the extension The parameters are shared in all extension instances running on different companies
o Parameters - The parameters or configurations required to run the extension
8 Choose the Package button
Working with SAP Business One Studio Suite Working with Add-on Projects in SAP Business One Studio for Microsoft Visual Studio
PUBLIC copy 2014 SAP SE All rights reserved 29
9 In the Save As window specify the location where you want to save the file and choose the Save button
Note
If you are not yet ready to package your extension you can choose the Save button instead of the Package button The information you entered in the Extension Registration Data Generator window will be saved in your project The next time you open the Extension Registration Data Generator window the saved information will be displayed
For more information see How to Package and Deploy SAP Business One Extensions for Lightweight Deployment
30 PUBLIC copy 2014 SAP SE All rights reserved
Working with SAP Business One Studio Suite SAP Business One Studio Suite Demo Script
5 SAP Business One Studio Suite Demo Script
This section introduces a demo for how to work with your add-on projects in SAP Business One Studio Suite
Procedure
1 Start SAP Business One and log on to a company
o Database MadridDemo
o User manager
o Password 1234
2 Start SAP Business One Studio and add a new project
1 Choose Menu rarr New rarr Project rarr Add-On
2 Choose OK
3 Create a user form add an EditText with ChooseFromList and add a grid with DataTable
1 Add EditText Grid LinkedButton DB DataSource Data Table and ChooseFromList
Working with SAP Business One Studio Suite SAP Business One Studio Suite Demo Script
PUBLIC copy 2014 SAP SE All rights reserved 31
2 Specify the controls properties as follows
o DB DataSource
o Data Table
o ChooseFromList
o EditText
32 PUBLIC copy 2014 SAP SE All rights reserved
Working with SAP Business One Studio Suite SAP Business One Studio Suite Demo Script
o LinkedButton LinkTo = Item_0 LinkedObject = 2
o Grid DataTableID = DT_0
o Form LinkedObject = 2
3 From Toolbar choose Preview
The user form opens in the SAP Business One client The grid displays all BPs
4 To select a business partner choose the ChooseFromList icon The application fills the business partner code in the EditText
To open the business partner form choose the linked button
Working with SAP Business One Studio Suite SAP Business One Studio Suite Demo Script
PUBLIC copy 2014 SAP SE All rights reserved 33
4 Edit a system form (sales order) add a button and preview it
1 In the SAP Business One client from the Main Menu choose Sales rarr Sales Order to open the original sales order
2 Right-click the project node to add a system form
3 Select Sales Order and choose Open (the other form is cache file in local that user opened)
4 From Toolbar add the button and choose Preview
5 Switch to the SAP Business One client to review the updates of the sales order form
34 PUBLIC copy 2014 SAP SE All rights reserved
Working with SAP Business One Studio Suite SAP Business One Studio Suite Demo Script
5 Edit a UDO form add a button and save the UDO to the database
1 To open the original UDO form in the SAP Business One client choose Tools rarr Default Forms rarr UDO1-UDO1
2 To add a UDO form right-click the project node
3 Specify the DI connection information (password 1234) and choose Log On
Working with SAP Business One Studio Suite SAP Business One Studio Suite Demo Script
PUBLIC copy 2014 SAP SE All rights reserved 35
4 To edit the UDO form select UDO1 and choose OK
5 Add the button and save the UDO to the database
6 To review the updates from the SAP Business One client reopen the UDO form
36 PUBLIC copy 2014 SAP SE All rights reserved
Working with SAP Business One Studio Suite SAP Business One Studio Suite Demo Script
6 Start SAP Business One Studio for Microsoft Visual Studio and add a new project
1 Choose Menu rarr File rarr New rarr Project and select the C project templates
o The template SAP Business One Add-on Project is for creating a new project
o The template SAP Business One Add-on Project from B1s File is for creating a project with the existing B1s file
2 Select SAP Business One Add-on Project and create a new project
7 Add a button a Button_ClickBefore event and a popup message box if choosing the button
1 Add a button
2 Double-click the button to add a Button_ClickBefore event
Working with SAP Business One Studio Suite SAP Business One Studio Suite Demo Script
PUBLIC copy 2014 SAP SE All rights reserved 37
3 Add the UI API code as follows
4 To run the add-on from toolbar or by using the F5 shortcut choose Debug
In the Main Menu of the SAP Business One client the add-on adds the user menu
5 Choose the menu to open the user form
6 Choose the button to open a message box
7 Stop debugging and close all forms
8 Edit a system form (sales order) Add a button and a Button_ClickBefore event create a user form if choosing the button
38 PUBLIC copy 2014 SAP SE All rights reserved
Working with SAP Business One Studio Suite SAP Business One Studio Suite Demo Script
1 In the SAP Business One client from the Main Menu choose Sales rarr Sales Order to open the original sales order
2 Right-click the project node to add a system form (sales order)
3 Add a button
4 Double-click the button to add a Button_ClickBefore event
5 Add the UI API code as follows
Working with SAP Business One Studio Suite SAP Business One Studio Suite Demo Script
PUBLIC copy 2014 SAP SE All rights reserved 39
6 To run the add-on from toolbar or by using the F5 shortcut choose Debug
7 From the SAP Business One client open the sales order The new button appears
To open the new form choose the button
9 Edit a system form (sales opportunity) from the menu design the UI API code to set Remark as a mandatory field
1 In the SAP Business One client from the Main Menu choose Sales Opportunities rarr Sales Opportunity to open the original sales opportunity form
2 From the SAP Business One client choose Edit Form in Visual Studio to edit the system form
3 In UI Outline change the pane level to 2
4 Add a button
5 Double-click the button to add a Button_ClickBefore event
6 Add the UI API code as follows
40 PUBLIC copy 2014 SAP SE All rights reserved
Working with SAP Business One Studio Suite SAP Business One Studio Suite Demo Script
7 To run the add-on from toolbar or by using the F5 shortcut choose Debug
8 In the SAP Business One client reopen the sales opportunity
9 On the Potential tab specify the business partner code and potential amount
On the General tab leave the Remark field empty
10 Choose Add
In the status bar the error message Remark is mandatory appears
11 Specify the remark The system adds the sales opportunity
wwwsapcomcontactsap
Material Number
copy 2014 SAP SE All rights reserved No part of this publication may be reproduced or transmitted in any form or for any purpose without the express permission of SAP AG The information contained herein may be changed without prior notice Some software products marketed by SAP AG and its distributors contain proprietary software components of other software vendors Microsoft Windows Excel Outlook and PowerPoint are registered trademarks of Microsoft Corporation IBM DB2 DB2 Universal Database System ads System i5 System p System p5 System x System z System z10 System z9 z10 z9 iSeries pSeries xSeries zSeries eServer zVM zOS i5OS S390 OS390 OS400 AS400 S390 Parallel Enterprise Server PowerVM Power Architecture POWER6+ POWER6 POWER5+ POWER5 POWER OpenPower PowerPC BatchPipes BladeCenter System Storage GPFS HACMP RETAIN DB2 Connect RACF Redbooks OS2 Parallel Sysplex MVSESA AIX Intelligent Miner WebSphere Netfinity Tivoli and Informix are trademarks or registered trademarks of IBM Corporation Linux is the registered trademark of Linus Torvalds in the US and other countries Adobe the Adobe logo Acrobat PostScript and Reader are either trademarks or registered trademarks of Adobe Systems Incorporated in the United States andor other countries Oracle is a registered trademark of Oracle Corporation UNIX XOpen OSF1 and Motif are registered trademarks of the Open Group Citrix ICA Program Neighborhood MetaFrame WinFrame VideoFrame and MultiWin are trademarks or registered trademarks of Citrix Systems Inc HTML XML XHTML and W3C are trademarks or registered trademarks of W3Creg World Wide Web Consortium Massachusetts Institute of Technology Java is a registered trademark of Sun Microsystems Inc JavaScript is a registered trademark of Sun Microsystems Inc used under license for technology invented and implemented by Netscape SAP R3 xApps xApp SAP NetWeaver Duet PartnerEdge ByDesign SAP Business ByDesign and other SAP products and services mentioned herein as well as their respective logos are trademarks or registered trademarks of SAP AG in Germany and in several other countries all over the world All other product and service names mentioned are the trademarks of their respective companies Data contained in this document serves informational purposes only National product specifications may vary These materials are subject to change without notice These materials are provided by SAP AG and its affiliated companies (SAP Group) for informational purposes only without representation or warranty of any kind and SAP Group shall not be liable for errors or omissions with respect to the materials The only warranties for SAP Group products and services are those that are set forth in the express warranty statements accompanying such products and services if any Nothing herein should be construed as constituting an additional warranty
- 1 Introduction
-
- 11 Installing SAP Business One Studio
- 12 Running SAP Business One Studio
- 13 Terms and Definitions
- 14 Related Documentation
-
- 2 SAP Business One Studio Main Window
-
- 21 Menu Button
- 22 Toolbar
- 23 Toolbox Window
- 24 Docking Tool Windows
-
- 3 Working with Add-on Projects in SAP Business One Studio
-
- 31 Creating an Add-on Project
- 32 Opening an Add-on Project or an External File
- 33 Designing a Form
-
- 331 Working with Tab Controls
- 332 Working with Grids
- 333 Working with Data Tables
- 334 Working with Matrixes
- 335 Working with Choose From Lists
- 336 Example Creating a Business Partner Field with Linked Button and Choose From List Functions
-
- 34 Adding Renaming or Deleting Forms in a Project
-
- 341 Adding New User Forms
- 342 Adding Existing User Forms
- 343 Adding System Forms
- 344 Adding UDO Forms
-
- 35 Editing Active Forms in SAP Business One
- 36 Exporting Updated Parts of a System Form
-
- 4 Working with Add-on Projects in SAP Business One Studio for Microsoft Visual Studio
-
- 41 Creating SAP Business One Add-on Projects
- 42 Tool Windows in SAP Business One Studio for Microsoft Visual Studio
- 43 Adding Forms in a Project
-
- 431 Adding SAP Business One User Forms
- 432 Adding SAP Business One System Forms
- 433 Adding SAP Business One UDO Forms
-
- 44 Loading an Existing B1s File to Your Project
- 45 Packaging Your Project
-
- 5 SAP Business One Studio Suite Demo Script
-
Working with SAP Business One Studio Suite Introduction
PUBLIC copy 2014 SAP SE All rights reserved 5
1 Introduction
SAP Business One Studio Suite is a state-of-the-art development platform for SAP Business One extensions that dramatically improves partner development efficiency It provides an effective integrated development environment (IDE) for partners to develop extension on top of SAP Business One SAP Business One Studio Suite consists of two editions SAP Business One Studio and SAP Business One Studio for Microsoft Visual Studio
SAP Business One Studio is an open platform based on the NET framework for a variety of designers Currently this platform supports two types of designer Add-On Designer and Workflow Designer In this document SAP Business One Studio stands for SAP Business One Studio as add-on designer You can use SAP Business One Studio to open SAP Business One system forms in edit mode modify the existing controls and logic or add new controls in forms You can also design your own forms SAP Business One Studio not only contains all the functionalities of ScreenPainter but also enhances the functionalities and optimizes the usability of ScreenPainter
SAP Business One Studio for Microsoft Visual Studio is a deeply customized programming environment for SAP Business One Besides the functionalities of SAP Business One Studio SAP Business One Studio for Microsoft Visual Studio leverages the powerful capability of Microsoft Visual Studio in development functionalities such as code generation project and item template wizard code intelligence friendly GUI and so on Whats more the add-on project generated by SAP Business One Studio for Microsoft Visual Studio is based on new object level event framework of SAP Business One SDK Together with system form editing SAP Business One Studio for Microsoft Visual Studio makes it much easier to write a typical SAP Business One add-on and the code generated is much simpler and maintainable
SAP Business One Studio and SAP Business One Studio for Microsoft Visual Studio share with the same file format b1s which is a package for all layout files and other relevant files For using the two editions a typical scenario is that a UI designer works on SAP Business One Studio for GUI drawling and polishing and then a consultant works on it for customization Afterwards a developer can open the b1s generated in SAP Business One Studio by SAP Business One Studio for Microsoft Visual Studio to program on it and finish the complicated logic
11 Installing SAP Business One Studio
Prerequisites
bull The installation computer complies with all hardware and software requirements For information on hardware and software requirements refer to sappartneredgecom
bull You have installed Microsoft NET Framework 40
bull If you want to install SAP Business One Studio for Microsoft Visual Studio you must install Microsoft Visual Studio 2010
Note
If you are just designing your own UI layout you do not need to install the SAP Business One client
6 PUBLIC copy 2014 SAP SE All rights reserved
Working with SAP Business One Studio Suite Introduction
Procedure
To install SAP Business One Studio perform the following steps
1 Insert the SAP Business One Installation DVD and wait for the installation program to appear
2 In the installation window select the Client radio button
3 In the Client Components window select Optional Components and SAP Business One Studio
4 Choose the Install button
5 In the Welcome window choose the Next button
6 In the Customer Information window specify the user name and company name
7 In the Setup Type window specify a setup type Complete or Custom
If you choose Custom type
In the Choose Destination Location window to accept the default location choose the Next button to select a different location choose the Browse button
In the Select Features window select SAP Business One Studio andor SAP Business One Studio for Microsoft Visual Studio and then choose the Next button
8 In the Ready to Install the Program window choose the Install button
9 In the Setup Status window the installation wizard performs the required system actions
10 In the Complete window choose the Finish button
Note
Alternatively you can install the SAP Business One Studio application from the DVD folders PackagesB1Studiosetupexe
12 Running SAP Business One Studio
To run SAP Business One Studio choose All Programs rarr SAP Business One rarr SAP Business One Studio and choose SAP Business One Studio or SAP Business One Studio for Microsoft Visual Studio
Alternatively if you have an SAP Business One client installed in SAP Business One from the Tools menu choose SAP Business One Studio and choose SAP Business One Studio or SAP Business One Studio for Microsoft Visual Studio
13 Terms and Definitions
The following terms are used in this document
Term Definition
B1s SAP Business One solution file
Screen Painter An SAP Business One add-on You can use Screen Painter to create user forms The format of files generated by Screen Painter is srf
Working with SAP Business One Studio Suite Introduction
PUBLIC copy 2014 SAP SE All rights reserved 7
Term Definition
UI API SAP Business One SDK User Interface Application Programming Interface
UDO Form A form that is generated by the User-Defined Object Registration wizard
14 Related Documentation
The documents listed in the table are referred to in this document
Document Location
User Interface Standards and Guidelines httpservicesapcomsmbsbocustomerdocumentation and choose Release Family 90 rarr SDK and Custom Development
SDK online help file SDK_ENCHM httpservicesapcomsmbsbocustomerdocumentation and choose Release Family 90 rarr SDK and Custom Development
Available also on the SAP Business One product DVD and in the download package from SAP Service Marketplace
SAP Business One Administratorrsquos Guide httpservicesapcomsmbsbocustomerdocumentation and choose Release Family 90 rarr System Administration
Available also on the SAP Business One product DVD and in the download package from SAP Service Marketplace
8 PUBLIC copy 2014 SAP SE All rights reserved
Working with SAP Business One Studio Suite SAP Business One Studio Main Window
2 SAP Business One Studio Main Window
You can access all SAP Business One Studio functions from the SAP Business One Studio main window which is divided into the following areas
bull Menu button ndash located at the top of the SAP Business One Studio main window and provides some menu commands For more information see Menu Button
bull Toolbar ndash located below the Menu button and provides the icons for the commonly used functions For more information see Toolbar
bull Design area ndash located in the middle of the SAP Business One Studio main window and you can use this area to design your own forms For more information see Designing a Form
bull Tool windows
o Toolbox window ndash contains the controls you can use to design your form For more information see Toolbox Window
o UI Outline window ndash allows you to view items in a selected pane level and pane level 0 For example when you select 2 the application displays items in pane level 2 and pane level 0
o Solution Explorer window ndash allows you to view the forms in your solution It contains three levels of items solution level project level and form level
o Properties window ndash allows you to set and examine the properties of forms and form items
Note
You can increase the viewing and editing space for the design area depending on how you arrange the tool windows (Toolbox window UI Outline window Solution Explorer window and Properties window)
You can drag the border of the windows to resize the window click (Auto Hide) to hide the window and also dock the windows to a new location (see Docking Tool Windows)
21 Menu Button
The SAP Business One Studio Menu button is located at the top of the SAP Business One Studio main window and contains the following menu commands
Menu Command DescriptionActivity
New Creates a new add-on project or a workflow project
Open Opens an existing solutionproject or a file
Save Current File (Ctrl + S ) Saves the current file B1s is refreshed to latest
Export Current File As (Ctrl + Shift + E )
Exports the current file into the specified path The file type is determined according to the project type For example you can export an add-on project file as a srf file
Working with SAP Business One Studio Suite SAP Business One Studio Main Window
PUBLIC copy 2014 SAP SE All rights reserved 9
Menu Command DescriptionActivity
Save All (Ctrl + Shift + S ) Saves all changes to the project
Recent Files Shows the recently opened files
Recent Solutions Shows the recently opened solutions
View Start Page Opens or hides Start Page
Exit (Alt + F4 ) Closes the SAP Business One Studio application
22 Toolbar
The toolbar located below the Menu button is a collection of icons that provide easy access to commonly used functions Active functions are shown in color while inactive ones are grayed out
Toolbar Icon DescriptionActivity
(Undo (Ctrl + Z )) Reverses the most recent successful action
(Redo (Ctrl + Y )) Redoes the last action that was undone
(Copy (Ctrl + C )) Copies the selected control or text onto the clipboard
(Cut (Ctrl + X )) Removes the selected control or text and places it on the clipboard
(Paste (Ctrl + V )) Inserts the contents of the clipboard at the current location
(Align Left) Aligns the left edges of the selected controls with the left edge of the last selected control
(Align Center) Vertically aligns the selected controls with the center of the last selected control
(Align Right) Aligns the right edges of the selected controls with the right edge of the last selected control
(Align Top) Aligns the top edges of the selected controls with the top edge of the last selected control
(Align Bottom) Aligns the bottom edges of the selected controls with the bottom edge of the last selected control
(Align Middle) Horizontally aligns the selected controls with the center of the last selected control
(Scale Size) Aligns the size of the selected controls with the last selected control
(Scale Height) Aligns the height of the selected controls with the last selected control
(Scale Width) Aligns the width of the selected controls with the last selected control
(Preview in SAP Business One)
Enables you to preview the form in the SAP Business One client
10 PUBLIC copy 2014 SAP SE All rights reserved
Working with SAP Business One Studio Suite SAP Business One Studio Main Window
Toolbar Icon DescriptionActivity
(Settings) Enables you to select language and theme style of the user interface
There are 2 options of theme style Nova has the same look as that for SAP Business One release 882 NS has the same look as that for SAP Business One 90 To apply the new settings choose Update and restart SAP Business One Studio
23 Toolbox Window
The Toolbox window is a collection of controls that you can use to design your form It contains UI Controls and Data Sources To add a control double-click it or drag and drop it into the design area
bull The newly added UI controls appear in the form you can modify the position size and other specific properties of the controls in the Properties window
bull The newly added data sources appear at the bottom of the design area you can modify the properties in the Properties window
UI Controls
UI Control DescriptionActivity
StaticText Represents a label item
Specific Property Caption - the text to display in the label
EditText Represents an edit text box
Specific Properties
bull DataSource - the data source bound to the edit text box
bull ChooseFromListUID - the unique ID of the ChooseFromList object to attach with this edit text box
bull ChooseFromListAlias - the database field by which to filter a ChooseFromList attached to the edit box When you enter a value in the text box and then press the tab key the ChooseFromList dialog is displayed with only those rows where the value of the field specified in this property starts with the entered text After you select a value the key of the selected row is entered into the edit text box
bull IsPassword - specifies whether the input data is of the same look and feel as a password field
bull SuppressZeros - indicates whether to hide leading zeros as well as trailing zeros after a decimal point
bull TabOrder - the order in which this edit text gets focus when you press the TAB key
Working with SAP Business One Studio Suite SAP Business One Studio Main Window
PUBLIC copy 2014 SAP SE All rights reserved 11
UI Control DescriptionActivity
ExtendedEditText Represents a text box that can display multiple lines
Button Represents a button
Specific Properties
bull ButtonType - indicates whether the button acts as a text button or an image button
bull Caption - the text to display on the button
bull ChooseFromListUID - the unique ID of the ChooseFromList object to attach with this button
bull Image - the path to an image displayed on the button
CheckBox Represents a check box
OptionButton Represents an option button (radio button)
ComboBox Represents a combo box
Specific Properties
bull DataSource - the data source bound to the combo box
bull TabOrder- the order in which the combo box items get focus when you press the TAB key
bull ValidValues - the valid values for this combo box item Add or remove valid values from the popup window
TabControl Represents a tab control which is a container of the items to be shown on the tab page In UI API the tab control is named as folder
Specific properties for tab pages
bull AutoPaneSelection - indicates whether the tab control allows automatic pane selection If you specify True when you click on a tab the application automatically sets the form pane level to the pane level bound to the tab control
bull Caption - the text to display on the tab page
bull Pane - the pane level of the tab
For more information see Working with Tab Controls
Grid Represents a grid which is a visual representation of a data table
Specific Properties
bull CollapseLevel - the number of columns grouped together starting from the left-most column For example if you specify 2 for this property all rows are grouped by the values in the first column and all rows within each group are grouped by the values in the second column Default value is 0 indicating not collapsed
bull Columns - the grids columns
bull DataTableID - the data table bound to the grid
bull SelectionMode - indicates how rows can be selected
For more information see Working with Grids
12 PUBLIC copy 2014 SAP SE All rights reserved
Working with SAP Business One Studio Suite SAP Business One Studio Main Window
UI Control DescriptionActivity
Matrix Represents a matrix which displays data in a table
Specific Properties
bull Columns - the collection of columns in the matrix You can add or remove columns in the CollectionEditorForm window
bull MatrixLayout - the layout of the matrix
bull SelectionMode - indicates how rows can be selected
bull TabOrder - the order in which the items get focus when you press the TAB key
For more information see Working with Matrixes
PictureBox Represents a picture box
Specific Property Picture - the picture to display in the picture box
LinkedButton Represents an arrow link ( )
A linked button enables quick navigation between relevant objects For example a linked button next to the Customer field in the AR Invoice form opens the Business Partner Master Data form for the relevant customer
Specific Properties
bull LinkTo - the unique ID of the control to which the linked button links
bull LinkedObject - the target object type of the linked button
ButtonCombo Represents an item that provides the functionality of a combo box and a button in a single control
Data Sources
Data Source DescriptionActivity
DB Data Source Represents a SAP Business One database table to be attached to a form
Specific Property TableName - an SAP Business One database table for example OCRD
User Data Source Represents a container for item data that is not stored in the database
Specific Properties
bull DataType - the data type of the user data source
bull Size - the size of the user data source
bull UniqueID - the unique ID of the user data source
Data Tables Represents data in table form
Specific Properties
bull Type - the type of the data table including Manual and Query types
bull Columns - the columns of the Manual type data table
bull Query - the specified condition (query) of the Query type data table
Working with SAP Business One Studio Suite SAP Business One Studio Main Window
PUBLIC copy 2014 SAP SE All rights reserved 13
Data Source DescriptionActivity
bull UniqueID - the unique ID of the data table
For more information see Working with Data Tables
Choose From List Represents a ChooseFromList form
Specific Properties
bull MultiSelection - indicates whether you can select multiple items in the ChooseFromList form
bull ObjectType - the type of the object from which to generate the valid values
bull UniqueID - the unique ID of the ChooseFromList
For more information see Working with Choose From Lists
24 Docking Tool Windows
To dock the tool windows (Toolbox window UI Outline window Solution Explorer window and Properties window) to a designated area perform the following steps
1 Select the window you want to dock
2 Drag the window from its current location towards the middle of the SAP Business One main window
A guide diamond appears
3 When the window you are dragging reaches the position where you want to dock it move the pointer over the corresponding portion of the guide diamond
4 To dock the window in the position indicated release the mouse button
14 PUBLIC copy 2014 SAP SE All rights reserved
Working with SAP Business One Studio Suite Working with Add-on Projects in SAP Business One Studio
3 Working with Add-on Projects in SAP Business One Studio
This section introduces how to work with your add-on projects in SAP Business One Studio
31 Creating an Add-on Project
You can create your new add-on forms with the same look and feel as the SAP Business One forms
Procedure
1 In the SAP Business One Studio main window choose the Menu button and choose New rarr Project rarr Add-on
Alternatively on the Start Page of SAP Business One Studio choose New Add-on
2 In the New Project window specify the name and the location of your new project
3 Specify the package name
Note
By default the package name is the same as the project name
The extension of a package (SAP Business One add-on solution) file is b1s
4 If you need to create a project that does not contain any forms select the Create Empty Project checkbox
5 Choose OK
A default layout named NewForm 1 appears in the design area of the SAP Business One Studio main window
You can design your own form now For more information see Designing a Form
32 Opening an Add-on Project or an External File
You can open an existing add-on project or a srf file which was created by Screen Painter
Procedure
1 In the SAP Business One Studio main window choose the Menu button and choose Open rarr SolutionProject or Open rarr File
Alternatively on the Start Page of SAP Business One Studio choose Open Project or Open File
2 Specify the existing project or file you want to open
3 Choose Open
The solution hierarchy appears in the Solution Explorer window
Working with SAP Business One Studio Suite Working with Add-on Projects in SAP Business One Studio
PUBLIC copy 2014 SAP SE All rights reserved 15
33 Designing a Form
In the design area of the SAP Business One Studio main window you can design your own form This procedure introduces the basic operation of designing a form
Procedure
1 In the Toolbox window double-click or drag and drop a form item from the UI Controls area or the Data Source area
For example double-click a button A new button appears in the top left corner of the form
2 Use drag and drop to position or resize the item on the form
Note
When you drag the item the application shows a red line which enables you to align the item with the existing ones
3 Select the form or an item to set the properties
You can select the form or a form item either from the design area or from the UI Outline window The UI Outline window groups form items in pane levels
4 In the Properties window edit the properties
5 To preview the form in the SAP Business One client click (PreviewB1Client)
6 Save the form
331 Working with Tab Controls
A tab control is a container of the items to be shown on the tab page In UI API the tab control is named as folder
Procedure
1 Add a tab control
To add a tab control in the Toolbox window UI Controls area double-click the TabControl icon
The tab control is added to the form with one tab page
If the tab control is active a cross-shaped symbol appears at the top left of the tab control
2 To add or remove a tab page right-click the cross-shaped symbol and choose Add Tab Page or Remove Tab Page
3 Specify properties for each tab page
To specify the pane level of the tab page in the Properties window set the AutoPaneSelection field to True and in the Pane field enter the pane level
4 Add UI controls to the tab page area and specify the FromPane ToPane properties
Once the FromPane ToPane properties are set when you switch tab pages the UI controls with the same pane level are displayed on the tab page
16 PUBLIC copy 2014 SAP SE All rights reserved
Working with SAP Business One Studio Suite Working with Add-on Projects in SAP Business One Studio
332 Working with Grids
The grid control is a visual representation of a data table
Procedure
1 Add a grid control
To add a grid control in the Toolbox window UI Controls area double-click the Grid icon
The grid control is added to the form without columns
2 Add a data table
To add a data table in the Toolbox window Data Source area double-click the Data Tables icon
For more information see Working with Data Tables
3 Bind the data table to the grid as follows
1 Select the grid control you want to bind
2 In the Properties window under the Specific area in the DataTableID field select a data table to which you want to bind
Note
o If the data table type is Query the columns are not displayed in edit mode To preview the columns click (PreviewB1Client)
o If the data table type is Manual the columns are displayed in edit mode
3 After binding a grid control to a data table of Manual type you can set the Columns property Perform the following steps
1 In the Columns property field click the button
The CollectionEditorForm window appears
2 Select the column you want to edit from the list in the left area of the window
3 In the Properties area specify the column type
Note
To set a column with a link button select it_EDIT as the column type and in the LinkObjectType field specify the type of the object you want to connect to
333 Working with Data Tables
You can use a data table to perform a free query for example JOIN GROUP BY and so on You can also manually set the data table columns
Procedure
1 To add a data table in the Toolbox window Data Source area double-click the Data Tables icon
Working with SAP Business One Studio Suite Working with Add-on Projects in SAP Business One Studio
PUBLIC copy 2014 SAP SE All rights reserved 17
A new data table is created with a default unique ID and a type
Note
You can change the default ID and type of the data table However changing the type results in the loss of the existing query or columns
2 To set queries change the data table type to Query and in the Query property field specify your query
If the data table is attached to a grid control the grid is automatically filled with columns from the query
3 To set columns for manual data tables change the data table type to Manual and in the Columns property field click the button
In the CollectionEditorForm window you can modify the columns
o To add a new column choose the Add button
A new column is created with a default name and type (ft_AlphaNumeric) You can change the column default name and type
o To delete the column choose the Remove button
4 To bind a data table (with Manual type) to an edit text control perform the following steps
1 In the Properties window of the edit text control set the DataSource property to the data table
2 In the Alias property set the column of the data table
334 Working with Matrixes
The matrix control displays data in a table You specify each column manually and bind each column to a data source
Procedure
1 To add a matrix control in the Toolbox window UI Controls area double-click the Matrix icon
The matrix control is added to the form with a default column Col_0
2 In the Properties window under the Specific area in the Columns property field click the button
The CollectionEditorForm window appears
3 Choose the Add button to add new columns
4 In the Properties area specify the Type field of the column the DataSource Alias fields and the specific fields
5 Add as many columns as needed and choose the OK button
6 To preview the matrix click (PreviewB1Client)
335 Working with Choose From Lists
ChooseFromList is a basic functionality in the SAP Business One application It allows you to open a ChooseFromList form which displays a list of objects of the same type
18 PUBLIC copy 2014 SAP SE All rights reserved
Working with SAP Business One Studio Suite Working with Add-on Projects in SAP Business One Studio
Procedure
1 To add a ChooseFromList control in the Toolbox window Data Source area double-click the Choose From List icon
A new ChooseFromList is created with a default unique ID You can change the default ID
2 In the Properties window specify the ObjectType property and enter the type of the object you want the Choose from List form to display For example enter 2 for business partners
You can connect EditText Button and MatrixGrid column (with type it_EDIT or it_LINKED_BUTTON) items to a choose from list
3 To connect EditText Button and MatrixGrid column items to a choose from list in the Properties window specify the ChooseFromListUID field
4 In the ChooseFromListAlias (EditText MatrixGrid column with type it_EDIT or it_LINK_BUTTON) field enter the alias of the field you want to display
336 Example Creating a Business Partner Field with Linked Button and Choose From List Functions
The linked button function is often used together with the choose from list function For example you add a new field named BP Code For this field you want to have a choose from list to open the List of Business Partners window and a linked button to open the Business Partner Master Data window
Procedure
1 In the Toolbox window UI Controls area add a StaticText a LinkedButton and an EditText
2 In the Data Source area add a DB Data Source and a Choose From List
3 In the Properties window of the form specify a valid value for the ObjectType filed
4 Set the Choose From List properties
In the Properties window of the choose from list in the ObjectType filed enter 2 which represents business partners For more information about other object types see BoObjectTypes Enumeration in SDK Help Center
5 Set the DB Data Source properties
In the Properties window of the DB data source in the TableName filed enter OCRD which represents the SAP Business One system table for business partners For more information about other system tables see Database Tables Reference in SDK Help Center
6 Connect the linked button with the BP Code edit text field
In the Properties window of the linked button in the LinkTo field paste the unique ID of the edit text in the LinkedObject filed enter 2
7 Bind the DB data source to the BP Code edit text field
In the Properties window of the edit text in the DataSource field enter OCRD in the Alias field enter CardCode
8 Connect the choose from list with the BP Code edit text field
Working with SAP Business One Studio Suite Working with Add-on Projects in SAP Business One Studio
PUBLIC copy 2014 SAP SE All rights reserved 19
In the Properties window of the edit text in the ChooseFromListUID field enter the ID of the choose from list in the ChooseFromListAutoFill field select True and in the ChooseFromListAlias field enter CardCode
9 To preview click (PreviewB1Client)
o When you click the choose from list icon of the BP Code field the List of Business Partners window appears
o After you select a business partner from the list the BP Code field is automatically filled and a linked button appears
o Click the linked button the Business Partner Master Data window appears
34 Adding Renaming or Deleting Forms in a Project
To add forms in your project right-click your project in the Solution Explorer window
From the context menu you can add the following types of forms
bull New user form
bull Existing user form
bull System form
bull UDO form
To rename a form in your project in the Solution Explorer window right-click the form and choose Rename
To delete a form in your project in the Solution Explorer window right-click the form and choose Delete
341 Adding New User Forms
A user form is a form designed by a partner It can be generated from SAP Business One Studio Screen Painter UI API or your own code
To add a new user form in the Solution Explorer window right-click your project and choose New Form
A new form opens in edit mode and appears in the Solution Explorer window
You can now design the new form For more information see Designing a Form
342 Adding Existing User Forms
You can add an existing user form to your project
Procedure
1 In the Solution Explorer window right-click your project and choose Add rarr Existing Form
2 In the Add Existing Item window select the form you want to add
3 Choose Open
20 PUBLIC copy 2014 SAP SE All rights reserved
Working with SAP Business One Studio Suite Working with Add-on Projects in SAP Business One Studio
The form opens in edit mode and appears in the Solution Explorer window
343 Adding System Forms
A system form is a standard SAP Business One form that you can add to your project
Procedure
1 In the Solution Explorer window right-click your project and choose Add rarr System Form
2 In the Add System Form window select the form you want to add
Note
The Add System Form window lists the following system forms
o All currently opened system forms if SAP Business One is running
o The locally cached system forms
3 Choose OK
The form opens in edit mode and appears in the Solution Explorer window
Note
Once opened in edit mode a system form will be cached up locally
4 You can now modify the form
In edit mode of the system form you can add new UI controls and modify the properties of the existing system items
5 To preview the system form you need to open the form in the SAP Business One client first and then click (PreviewB1Client)
Caution
Deleting existing system items does not take effect when you preview the modified system form
344 Adding UDO Forms
A UDO form is a form generated by the User-Defined Object Registration wizard (To access the wizard from the SAP Business One menu bar choose Tools rarr Customization Tools rarr Objects Registration Wizard) You can add a UDO form to your project
Procedure
1 In the Solution Explorer window right-click your project and choose Add rarr UDO Form
2 In the Company Logon window specify the details of the company you want to work with and choose Log On
Working with SAP Business One Studio Suite Working with Add-on Projects in SAP Business One Studio
PUBLIC copy 2014 SAP SE All rights reserved 21
Field DescriptionActivity
Server Specify the IP address or the machine name of the SAP Business One server
Server Type From the dropdown list select a server type MSSQL_2008 MSSQL_2012 or HANADB
License Server Specify the license server
Company Name Specify the company defined on the selected SAP Business One server
User ID Specify your user name for the company you want to log on to
Password Enter your password
The UDO form that is registered appears in the List of UDO Forms window
Note
Only the Header Line Style (new UDO style in SAP Business One 882) is supported The Matrix Style (old UDO style) is not supported
3 In the List of UDO Forms window select the UDO form you want to add and choose the Open button
The form opens in edit mode and appears in the Solution Explorer window
Note
You can add more UDO forms The application remembers the company logon information and you do not need to specify it again
If you restart SAP Business One Studio you just need to specify the Password field
4 You can now modify the UDO form
5 To preview the form click (PreviewB1Client)
6 To save the changes in the Solution Explorer window right-click the form and choose Save to DB
When you reopen the form in the SAP Business One client you can see the UDO form is modified
35 Editing Active Forms in SAP Business One
In the SAP Business One client you can edit the active system form through SAP Business One Studio or SAP Business One Studio for Microsoft Visual Studio The active form means the current system form in the SAP Business One client If you have multiple forms open in the SAP Business One client the active form is the top one
Procedure
1 In SAP Business One from the Tools menu choose SAP Business One Studio
2 If you want to edit the active form from SAP Business One Studio choose Edit Active Form
o If SAP Business One Studio is already running the application adds the active system form to the project
o If you have not yet opened SAP Business One Studio the application runs SAP Business One Studio first automatically creates a project and opens the active form in the project
3 If you want to edit the active form from SAP Business One Studio for Microsoft Visual Studio choose Edit Active Form in Visual Studio
22 PUBLIC copy 2014 SAP SE All rights reserved
Working with SAP Business One Studio Suite Working with Add-on Projects in SAP Business One Studio
o If the SAP Business One Studio for Microsoft Visual Studio is already running the application adds the active system form to the project
o If you have not yet opened Microsoft Visual Studio the application does nothing for you You need to open and create a project in Microsoft Visual Studio first and then in the SAP Business One client from the Tools menu choose SAP Business One Studio and choose Edit Active Form in Visual Studio
36 Exporting Updated Parts of a System Form
If you edited a system form you can export the updated part of the system form to a srf file
Procedure
1 In the Solution Explorer window right-click the system form and choose Export Updated Part As
2 In the Export File As window specify the file name
3 Choose Save
Working with SAP Business One Studio Suite Working with Add-on Projects in SAP Business One Studio for Microsoft Visual Studio
PUBLIC copy 2014 SAP SE All rights reserved 23
4 Working with Add-on Projects in SAP Business One Studio for Microsoft Visual Studio
41 Creating SAP Business One Add-on Projects
You can create your new add-on forms with the same look and feel as the SAP Business One forms
Procedure
1 In the Microsoft Visual Studio main window choose New rarr Project
After you install SAP Business One Studio for Microsoft Visual Studio you can locate the SAP Business One template in the New Project dialog box by navigating the expanding list in the left pane under Installed Templates
2 In the New Project window from the Installed Templates area select the SAP Business One template
3 To create an add-on project with an empty user form select SAP Business One Add-on Project and specify the name and the location of your new project
4 To create an add-on project using an existing B1s file from SAP Business One Studio select SAP Business One Add-on Project from B1s File
5 Choose OK
A default form named Form1b1f appears in the Solution Explorer window and the layout of the form appears in the design area A folder B1Studio is generated under CTempltYourAddOnProjectgtltYourAddOnProjectgtbinDebug
You can design the layout of your form and the logic of the controls For more information see Designing a Form
Note
When you create an SAP Business One add-on project it adds the SAPbouiComFramework which is for connecting the UI API application handling LoadBatchAction systemuserUDO form events and generating code It includes
o Menucs - for adding menus and handling menu events
o Programscs - for connecting the UI server and performing the initialization
o SAPbouiCOMFrameworkApplicationSBO_Application - the root COM object of UI API
Sample Code ApplicationSBO_ApplicationMessageBox(Hello world)
o SAPbouiCOMFrameworkFormBaseUIAPIRawForm - the original form COM object of UI API
Sample Code thisUIAPIRawFormClose()Close form
The SAPbouiComFramework contains all UI API COM objects and interfaces therefore we do not recommend that you replace it
24 PUBLIC copy 2014 SAP SE All rights reserved
Working with SAP Business One Studio Suite Working with Add-on Projects in SAP Business One Studio for Microsoft Visual Studio
Note
In SAP Business One 91 a new net SAPBusinessOneSDKdll is added You can build add-on solutions using SAPBusinessOneSDKdll which integrates UI API and DI API
42 Tool Windows in SAP Business One Studio for Microsoft Visual Studio
The tool windows in SAP Business One Studio for Microsoft Visual Studio are very similar to the tool windows in SAP Business One Studio The windows include
bull Toolbox window ndash contains the controls you can use to design your form For more information see Toolbox Window
Note
To program a certain control double-click it The code is automatically generated
bull UI Outline window ndash allows you to view items in a selected pane
Note
This window may not appear by default To display the UI Outline window from the menu bar choose View rarr Other Windows rarr Outline Window
bull Solution Explorer window ndash allows you to view the source files in your project
Note
The project files also include SAP Business One UI API references and predefined menu options (Menucs) In runtime by default the newly added form appears at the bottom of the SAP Business One Main Menu You can change the code if you want to open the form from another menu location
bull Properties window ndash allows you to set and examine the properties and events of forms and form items
Note
To register events of a control in the Properties window click (Events) and double-click the event property you want to edit The code is automatically generated and you can program as needed
You can drag the border of the windows to resize the window click (Auto Hide) to hide the window and also dock the windows to a new location (see Docking Tool Windows)
bull The double-click function - you can double-click an item to add an event The following are the default events that the system supports currently
Item Type Event
Form LoadAfter
EditText KeyDownAfter
CheckBox ClickBefore
OptionButton ClickBefore
Working with SAP Business One Studio Suite Working with Add-on Projects in SAP Business One Studio for Microsoft Visual Studio
PUBLIC copy 2014 SAP SE All rights reserved 25
Item Type Event
Button ClickBefore
ComboBox ComboSelectAfter
bull Toolbar - Located below the Menu button the toolbar is a collection of icons providing easy access to commonly used functions The functions are the same as those for SAP Business One Studio See chapter 22 in this document
43 Adding Forms in a Project
To add forms in your project in the Solution Explorer window right-click your project
From the context menu choose Add rarr New Itemhellip You can add the following types of forms
bull SAP Business One user form
bull SAP Business One system form
bull SAP Business One UDO form
431 Adding SAP Business One User Forms
An SAP Business One user form is a form designed by a partner It can be generated from SAP Business One Studio Screen Painter UI API or your own code
Procedure
1 In the Solution Explorer window right-click your project and choose Add rarr New Itemhellip
2 In the Add New Item window from the Installed Templates area select the SAP Business One add-on template
3 Choose SAP Business One User Form
A new form opens in edit mode and appears in the Solution Explorer window
You can now design the new form For more information see Designing a Form
In runtime by default the newly added form appears at the bottom of the SAP Business One Main Menu
432 Adding SAP Business One System Forms
A system form is a standard SAP Business One form that you can add to your project
26 PUBLIC copy 2014 SAP SE All rights reserved
Working with SAP Business One Studio Suite Working with Add-on Projects in SAP Business One Studio for Microsoft Visual Studio
Procedure
1 In the Solution Explorer window right-click your project and choose Add rarr New Itemhellip
2 In the Add New Item window from the Installed Templates area select the SAP Business One add-on template
3 Choose SAP Business One System Form
Note
The Add System Form window lists the following system forms
o All currently opened system forms if SAP Business One is running
o The locally cached system forms
4 Choose OK
The form opens in edit mode and appears in the Solution Explorer window
You can add user items modify the properties of a system item and register events but you cannot delete existing system items The modification is implemented after you reopen the system form
433 Adding SAP Business One UDO Forms
A UDO form is a form generated by the User-Defined Object Registration wizard (To access the wizard from the SAP Business One menu bar choose Tools rarr Customization Tools rarr Objects Registration Wizard) You can add a UDO form to your project
Procedure
1 In the Solution Explorer window right-click your project and choose Add rarr New Itemhellip
2 In the Add New Item window from the Installed Templates area select the SAP Business One add-on template
3 Choose SAP Business One UDO Form
4 In the Company Logon window specify the details of the company with which you want to work and choose Log On
Field DescriptionActivity
Server Specify the IP address or the machine name of the SAP Business One server
Server Type From the dropdown list select a server type MSSQL_2008 MSSQL_2012 or HANADB
License Server Specify the license server
Company Name Specify the company defined on the selected SAP Business One server
User ID Specify your user name for the company to which you want to log on
Password Enter your password
Working with SAP Business One Studio Suite Working with Add-on Projects in SAP Business One Studio for Microsoft Visual Studio
PUBLIC copy 2014 SAP SE All rights reserved 27
The UDO form that is registered appears in the List of UDO Forms window
Note
Only the Header Line Style (new UDO style in SAP Business One 882) is supported The Matrix Style (old UDO style) is not supported
5 In the List of UDO Forms window select the UDO form you want to add and choose the Open button
The form opens in edit mode and appears in the Solution Explorer window
Note
The application remembers the company logon information and if you want to add more UDO forms you do not need to specify that information again
If you restart SAP Business One Studio you just need to specify the Password field
6 You can now modify the UDO form
To save the changes in the Solution Explorer window right-click the form and choose Save UDO to DB
When you reopen the form in the SAP Business One client you can see the UDO form is modified
44 Loading an Existing B1s File to Your Project
You can load your existing b1s solution or srf file (ScreenPainter file) in the following ways
Creating an Add-on Project Using an Existing B1s File
1 In the Microsoft Visual Studio main window choose New rarr Project
2 In the New Project window from the Installed Templates area select the SAP Business One add-on template
3 To create an add-on project using an existing B1s file from SAP Business One Studio select SAP Business One Add-on Project from B1s File
4 Choose OK
Adding an Existing B1s File to the Current Project
1 In the Solution Explorer window right-click your project and choose Add rarr Existing Business One File
2 In the Open window select the Business One Studio files (b1s) file you want to add
3 Choose Open The form opens in edit mode and appears in the Solution Explorer window
Adding an Existing SRF File to the Current Project
1 In the Solution Explorer window right-click your project and choose Add rarr Existing Business One File
2 In the Open window select the Business One Studio SRF files (srf) file you want to add
3 Choose Open The form opens in edit mode and appears in the Solution Explorer window
28 PUBLIC copy 2014 SAP SE All rights reserved
Working with SAP Business One Studio Suite Working with Add-on Projects in SAP Business One Studio for Microsoft Visual Studio
45 Packaging Your Project
The SAP Business One Extension Package features are integrated in SAP Business One Studio for Microsoft Visual Studio You can package your project directly from the menu bar
Procedure
1 Build your project first to get the executable file of your extension
2 From the menu bar of the Microsoft Visual Studio main window choose SAP Business One Studio rarr Extension Package
3 In the Extension Registration Data Generator window expand Basic Information and specify the following fields
o Extension Name ndash Enter the name of the extension This field is mandatory
o Extension Version ndash Enter the version of the extension for which you want to package and generate the ARD file This field is mandatory
o Extension Provider ndash Enter the name of the SAP partner that creates and owns the extension For example the name of your company
o Extension Namespace ndash Enter a name for the folder in which SAP Business One places the extension after a user registers the extension in the application
o Supported Database ndash Specify the database in which the extension works This field is mandatory
o Contact Data ndash Enter contact information for the SAP partner that creates and owns the extension For example enter the URL of your companys Website
4 Expand Extension File specify the path of the executable file of your 32-bit or 64-bit add-on and select the files that should be packaged in the zip file
To package your apps for the version for SAP HANA specify the app zip file the name and the package of your app
Note
The naming convention for your package is For example if the package hierarchy is sapsboatp in SAP HANA the package name is this and the corresponding URL will be httpshostportsapsboatp
5 Expand Deployment Steps and select the COM dlls to register for your 32-bit or 64-bit add-on
6 Expend SBO Compatibility you can specify the versions of SAP Business One with which the add-on is compatible
In the Compatible with SAP Business One area specify the following
o Version From ndash Enter the earliest version of SAP Business One with which the extension is compatible
o To ndash Enter the latest version of SAP Business One with which the lightweight add-on is compatible
Example
Enter compatible versions of SAP Business One with the format ltxxxyyyxxgt for example 91000000
7 Expand Parameters you can optionally specify shared parameters and parameters for the extension
o Shared Parameters - The parameters or configuration required to run the extension The parameters are shared in all extension instances running on different companies
o Parameters - The parameters or configurations required to run the extension
8 Choose the Package button
Working with SAP Business One Studio Suite Working with Add-on Projects in SAP Business One Studio for Microsoft Visual Studio
PUBLIC copy 2014 SAP SE All rights reserved 29
9 In the Save As window specify the location where you want to save the file and choose the Save button
Note
If you are not yet ready to package your extension you can choose the Save button instead of the Package button The information you entered in the Extension Registration Data Generator window will be saved in your project The next time you open the Extension Registration Data Generator window the saved information will be displayed
For more information see How to Package and Deploy SAP Business One Extensions for Lightweight Deployment
30 PUBLIC copy 2014 SAP SE All rights reserved
Working with SAP Business One Studio Suite SAP Business One Studio Suite Demo Script
5 SAP Business One Studio Suite Demo Script
This section introduces a demo for how to work with your add-on projects in SAP Business One Studio Suite
Procedure
1 Start SAP Business One and log on to a company
o Database MadridDemo
o User manager
o Password 1234
2 Start SAP Business One Studio and add a new project
1 Choose Menu rarr New rarr Project rarr Add-On
2 Choose OK
3 Create a user form add an EditText with ChooseFromList and add a grid with DataTable
1 Add EditText Grid LinkedButton DB DataSource Data Table and ChooseFromList
Working with SAP Business One Studio Suite SAP Business One Studio Suite Demo Script
PUBLIC copy 2014 SAP SE All rights reserved 31
2 Specify the controls properties as follows
o DB DataSource
o Data Table
o ChooseFromList
o EditText
32 PUBLIC copy 2014 SAP SE All rights reserved
Working with SAP Business One Studio Suite SAP Business One Studio Suite Demo Script
o LinkedButton LinkTo = Item_0 LinkedObject = 2
o Grid DataTableID = DT_0
o Form LinkedObject = 2
3 From Toolbar choose Preview
The user form opens in the SAP Business One client The grid displays all BPs
4 To select a business partner choose the ChooseFromList icon The application fills the business partner code in the EditText
To open the business partner form choose the linked button
Working with SAP Business One Studio Suite SAP Business One Studio Suite Demo Script
PUBLIC copy 2014 SAP SE All rights reserved 33
4 Edit a system form (sales order) add a button and preview it
1 In the SAP Business One client from the Main Menu choose Sales rarr Sales Order to open the original sales order
2 Right-click the project node to add a system form
3 Select Sales Order and choose Open (the other form is cache file in local that user opened)
4 From Toolbar add the button and choose Preview
5 Switch to the SAP Business One client to review the updates of the sales order form
34 PUBLIC copy 2014 SAP SE All rights reserved
Working with SAP Business One Studio Suite SAP Business One Studio Suite Demo Script
5 Edit a UDO form add a button and save the UDO to the database
1 To open the original UDO form in the SAP Business One client choose Tools rarr Default Forms rarr UDO1-UDO1
2 To add a UDO form right-click the project node
3 Specify the DI connection information (password 1234) and choose Log On
Working with SAP Business One Studio Suite SAP Business One Studio Suite Demo Script
PUBLIC copy 2014 SAP SE All rights reserved 35
4 To edit the UDO form select UDO1 and choose OK
5 Add the button and save the UDO to the database
6 To review the updates from the SAP Business One client reopen the UDO form
36 PUBLIC copy 2014 SAP SE All rights reserved
Working with SAP Business One Studio Suite SAP Business One Studio Suite Demo Script
6 Start SAP Business One Studio for Microsoft Visual Studio and add a new project
1 Choose Menu rarr File rarr New rarr Project and select the C project templates
o The template SAP Business One Add-on Project is for creating a new project
o The template SAP Business One Add-on Project from B1s File is for creating a project with the existing B1s file
2 Select SAP Business One Add-on Project and create a new project
7 Add a button a Button_ClickBefore event and a popup message box if choosing the button
1 Add a button
2 Double-click the button to add a Button_ClickBefore event
Working with SAP Business One Studio Suite SAP Business One Studio Suite Demo Script
PUBLIC copy 2014 SAP SE All rights reserved 37
3 Add the UI API code as follows
4 To run the add-on from toolbar or by using the F5 shortcut choose Debug
In the Main Menu of the SAP Business One client the add-on adds the user menu
5 Choose the menu to open the user form
6 Choose the button to open a message box
7 Stop debugging and close all forms
8 Edit a system form (sales order) Add a button and a Button_ClickBefore event create a user form if choosing the button
38 PUBLIC copy 2014 SAP SE All rights reserved
Working with SAP Business One Studio Suite SAP Business One Studio Suite Demo Script
1 In the SAP Business One client from the Main Menu choose Sales rarr Sales Order to open the original sales order
2 Right-click the project node to add a system form (sales order)
3 Add a button
4 Double-click the button to add a Button_ClickBefore event
5 Add the UI API code as follows
Working with SAP Business One Studio Suite SAP Business One Studio Suite Demo Script
PUBLIC copy 2014 SAP SE All rights reserved 39
6 To run the add-on from toolbar or by using the F5 shortcut choose Debug
7 From the SAP Business One client open the sales order The new button appears
To open the new form choose the button
9 Edit a system form (sales opportunity) from the menu design the UI API code to set Remark as a mandatory field
1 In the SAP Business One client from the Main Menu choose Sales Opportunities rarr Sales Opportunity to open the original sales opportunity form
2 From the SAP Business One client choose Edit Form in Visual Studio to edit the system form
3 In UI Outline change the pane level to 2
4 Add a button
5 Double-click the button to add a Button_ClickBefore event
6 Add the UI API code as follows
40 PUBLIC copy 2014 SAP SE All rights reserved
Working with SAP Business One Studio Suite SAP Business One Studio Suite Demo Script
7 To run the add-on from toolbar or by using the F5 shortcut choose Debug
8 In the SAP Business One client reopen the sales opportunity
9 On the Potential tab specify the business partner code and potential amount
On the General tab leave the Remark field empty
10 Choose Add
In the status bar the error message Remark is mandatory appears
11 Specify the remark The system adds the sales opportunity
wwwsapcomcontactsap
Material Number
copy 2014 SAP SE All rights reserved No part of this publication may be reproduced or transmitted in any form or for any purpose without the express permission of SAP AG The information contained herein may be changed without prior notice Some software products marketed by SAP AG and its distributors contain proprietary software components of other software vendors Microsoft Windows Excel Outlook and PowerPoint are registered trademarks of Microsoft Corporation IBM DB2 DB2 Universal Database System ads System i5 System p System p5 System x System z System z10 System z9 z10 z9 iSeries pSeries xSeries zSeries eServer zVM zOS i5OS S390 OS390 OS400 AS400 S390 Parallel Enterprise Server PowerVM Power Architecture POWER6+ POWER6 POWER5+ POWER5 POWER OpenPower PowerPC BatchPipes BladeCenter System Storage GPFS HACMP RETAIN DB2 Connect RACF Redbooks OS2 Parallel Sysplex MVSESA AIX Intelligent Miner WebSphere Netfinity Tivoli and Informix are trademarks or registered trademarks of IBM Corporation Linux is the registered trademark of Linus Torvalds in the US and other countries Adobe the Adobe logo Acrobat PostScript and Reader are either trademarks or registered trademarks of Adobe Systems Incorporated in the United States andor other countries Oracle is a registered trademark of Oracle Corporation UNIX XOpen OSF1 and Motif are registered trademarks of the Open Group Citrix ICA Program Neighborhood MetaFrame WinFrame VideoFrame and MultiWin are trademarks or registered trademarks of Citrix Systems Inc HTML XML XHTML and W3C are trademarks or registered trademarks of W3Creg World Wide Web Consortium Massachusetts Institute of Technology Java is a registered trademark of Sun Microsystems Inc JavaScript is a registered trademark of Sun Microsystems Inc used under license for technology invented and implemented by Netscape SAP R3 xApps xApp SAP NetWeaver Duet PartnerEdge ByDesign SAP Business ByDesign and other SAP products and services mentioned herein as well as their respective logos are trademarks or registered trademarks of SAP AG in Germany and in several other countries all over the world All other product and service names mentioned are the trademarks of their respective companies Data contained in this document serves informational purposes only National product specifications may vary These materials are subject to change without notice These materials are provided by SAP AG and its affiliated companies (SAP Group) for informational purposes only without representation or warranty of any kind and SAP Group shall not be liable for errors or omissions with respect to the materials The only warranties for SAP Group products and services are those that are set forth in the express warranty statements accompanying such products and services if any Nothing herein should be construed as constituting an additional warranty
- 1 Introduction
-
- 11 Installing SAP Business One Studio
- 12 Running SAP Business One Studio
- 13 Terms and Definitions
- 14 Related Documentation
-
- 2 SAP Business One Studio Main Window
-
- 21 Menu Button
- 22 Toolbar
- 23 Toolbox Window
- 24 Docking Tool Windows
-
- 3 Working with Add-on Projects in SAP Business One Studio
-
- 31 Creating an Add-on Project
- 32 Opening an Add-on Project or an External File
- 33 Designing a Form
-
- 331 Working with Tab Controls
- 332 Working with Grids
- 333 Working with Data Tables
- 334 Working with Matrixes
- 335 Working with Choose From Lists
- 336 Example Creating a Business Partner Field with Linked Button and Choose From List Functions
-
- 34 Adding Renaming or Deleting Forms in a Project
-
- 341 Adding New User Forms
- 342 Adding Existing User Forms
- 343 Adding System Forms
- 344 Adding UDO Forms
-
- 35 Editing Active Forms in SAP Business One
- 36 Exporting Updated Parts of a System Form
-
- 4 Working with Add-on Projects in SAP Business One Studio for Microsoft Visual Studio
-
- 41 Creating SAP Business One Add-on Projects
- 42 Tool Windows in SAP Business One Studio for Microsoft Visual Studio
- 43 Adding Forms in a Project
-
- 431 Adding SAP Business One User Forms
- 432 Adding SAP Business One System Forms
- 433 Adding SAP Business One UDO Forms
-
- 44 Loading an Existing B1s File to Your Project
- 45 Packaging Your Project
-
- 5 SAP Business One Studio Suite Demo Script
-
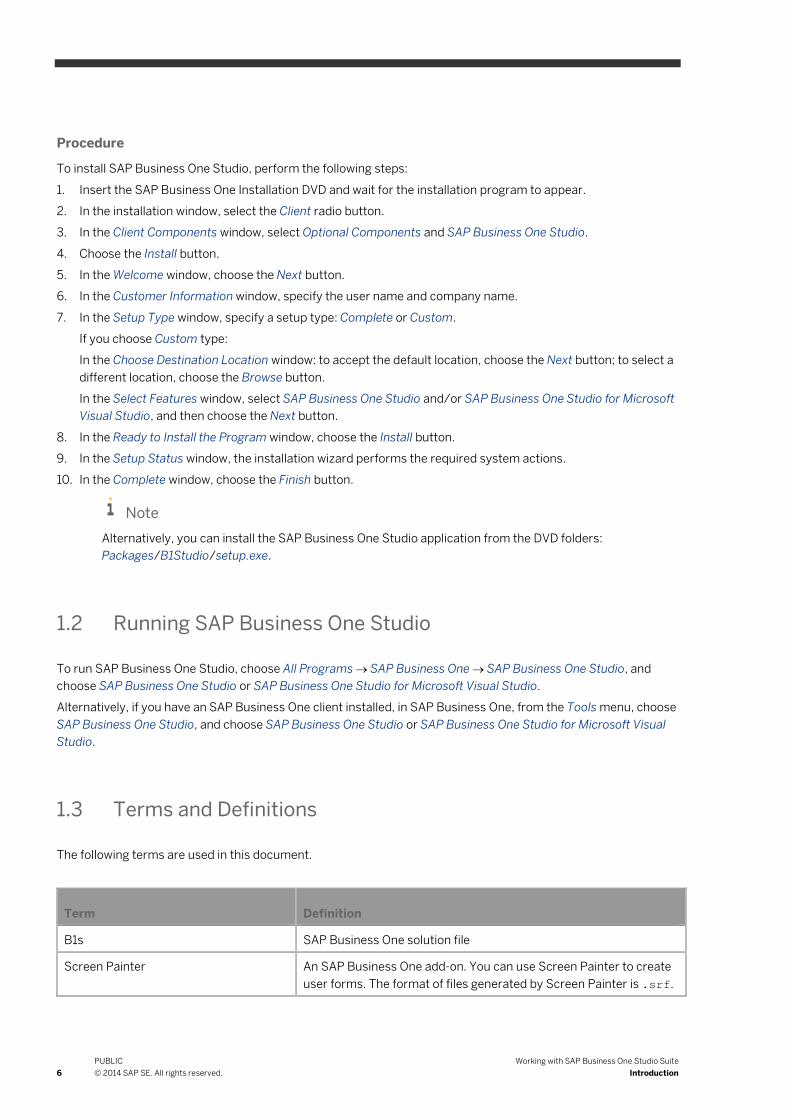
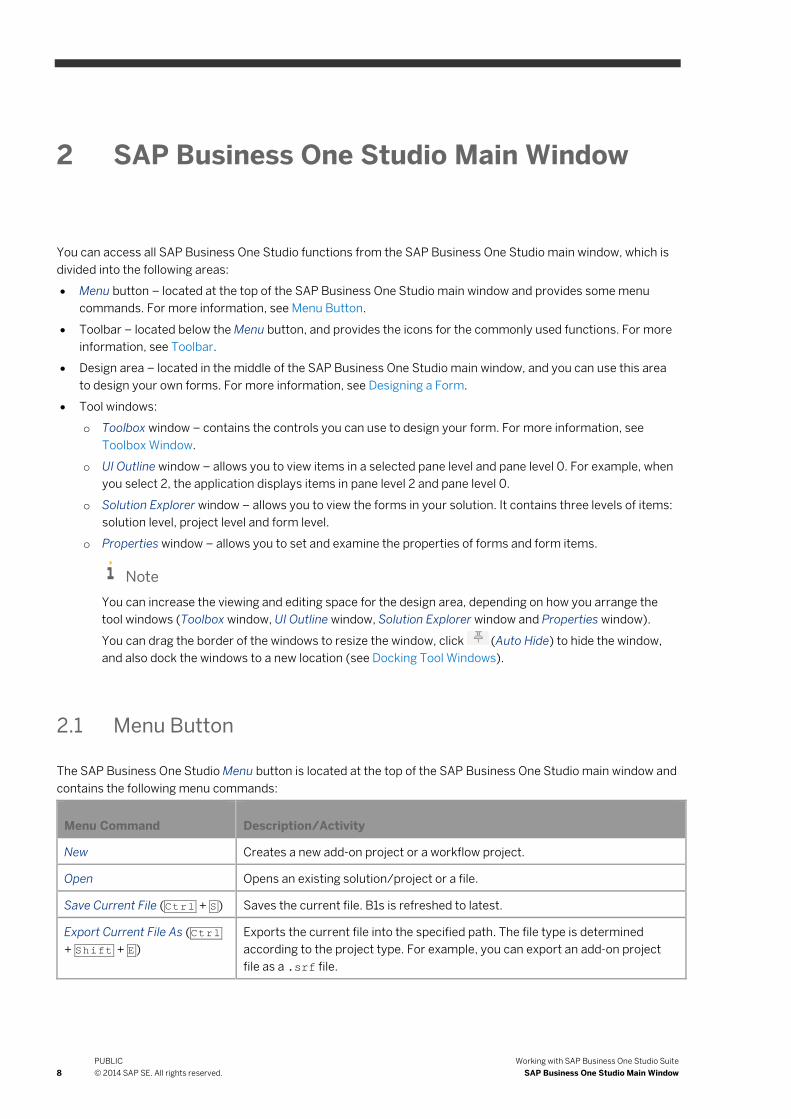
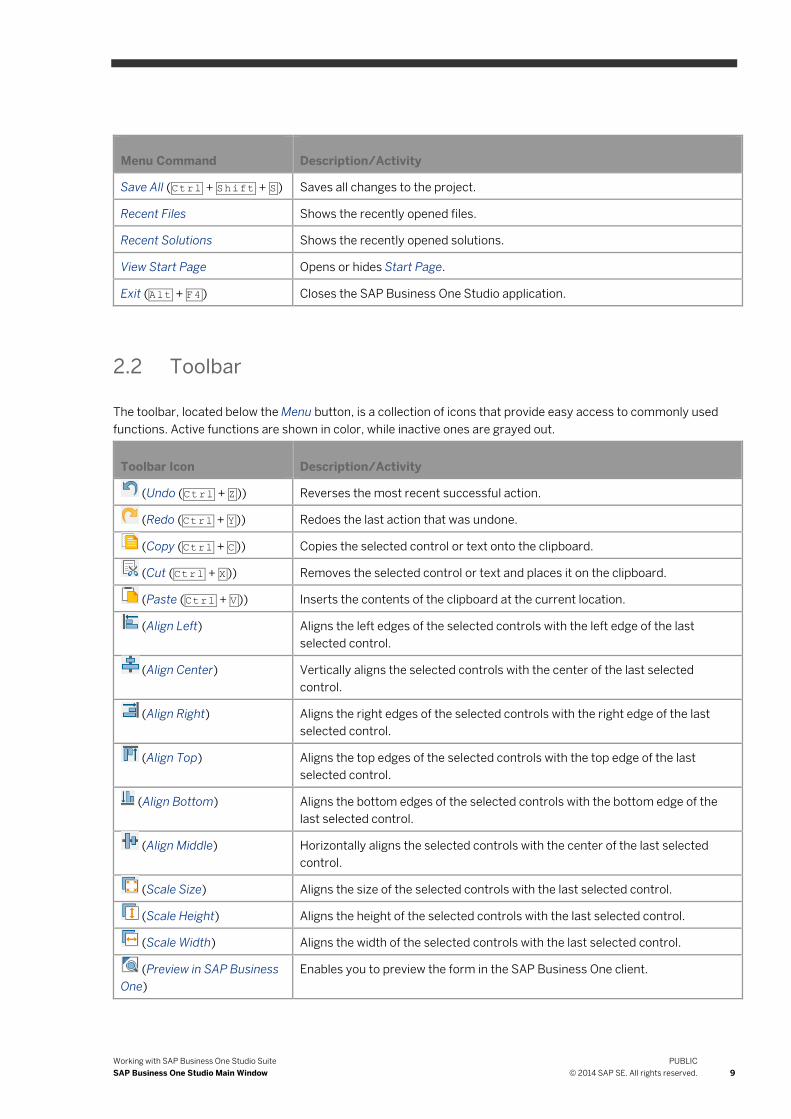
Working with SAP Business One Studio Suite SAP Business One Studio Main Window
PUBLIC copy 2014 SAP SE All rights reserved 9
Menu Command DescriptionActivity
Save All (Ctrl + Shift + S ) Saves all changes to the project
Recent Files Shows the recently opened files
Recent Solutions Shows the recently opened solutions
View Start Page Opens or hides Start Page
Exit (Alt + F4 ) Closes the SAP Business One Studio application
22 Toolbar
The toolbar located below the Menu button is a collection of icons that provide easy access to commonly used functions Active functions are shown in color while inactive ones are grayed out
Toolbar Icon DescriptionActivity
(Undo (Ctrl + Z )) Reverses the most recent successful action
(Redo (Ctrl + Y )) Redoes the last action that was undone
(Copy (Ctrl + C )) Copies the selected control or text onto the clipboard
(Cut (Ctrl + X )) Removes the selected control or text and places it on the clipboard
(Paste (Ctrl + V )) Inserts the contents of the clipboard at the current location
(Align Left) Aligns the left edges of the selected controls with the left edge of the last selected control
(Align Center) Vertically aligns the selected controls with the center of the last selected control
(Align Right) Aligns the right edges of the selected controls with the right edge of the last selected control
(Align Top) Aligns the top edges of the selected controls with the top edge of the last selected control
(Align Bottom) Aligns the bottom edges of the selected controls with the bottom edge of the last selected control
(Align Middle) Horizontally aligns the selected controls with the center of the last selected control
(Scale Size) Aligns the size of the selected controls with the last selected control
(Scale Height) Aligns the height of the selected controls with the last selected control
(Scale Width) Aligns the width of the selected controls with the last selected control
(Preview in SAP Business One)
Enables you to preview the form in the SAP Business One client
10 PUBLIC copy 2014 SAP SE All rights reserved
Working with SAP Business One Studio Suite SAP Business One Studio Main Window
Toolbar Icon DescriptionActivity
(Settings) Enables you to select language and theme style of the user interface
There are 2 options of theme style Nova has the same look as that for SAP Business One release 882 NS has the same look as that for SAP Business One 90 To apply the new settings choose Update and restart SAP Business One Studio
23 Toolbox Window
The Toolbox window is a collection of controls that you can use to design your form It contains UI Controls and Data Sources To add a control double-click it or drag and drop it into the design area
bull The newly added UI controls appear in the form you can modify the position size and other specific properties of the controls in the Properties window
bull The newly added data sources appear at the bottom of the design area you can modify the properties in the Properties window
UI Controls
UI Control DescriptionActivity
StaticText Represents a label item
Specific Property Caption - the text to display in the label
EditText Represents an edit text box
Specific Properties
bull DataSource - the data source bound to the edit text box
bull ChooseFromListUID - the unique ID of the ChooseFromList object to attach with this edit text box
bull ChooseFromListAlias - the database field by which to filter a ChooseFromList attached to the edit box When you enter a value in the text box and then press the tab key the ChooseFromList dialog is displayed with only those rows where the value of the field specified in this property starts with the entered text After you select a value the key of the selected row is entered into the edit text box
bull IsPassword - specifies whether the input data is of the same look and feel as a password field
bull SuppressZeros - indicates whether to hide leading zeros as well as trailing zeros after a decimal point
bull TabOrder - the order in which this edit text gets focus when you press the TAB key
Working with SAP Business One Studio Suite SAP Business One Studio Main Window
PUBLIC copy 2014 SAP SE All rights reserved 11
UI Control DescriptionActivity
ExtendedEditText Represents a text box that can display multiple lines
Button Represents a button
Specific Properties
bull ButtonType - indicates whether the button acts as a text button or an image button
bull Caption - the text to display on the button
bull ChooseFromListUID - the unique ID of the ChooseFromList object to attach with this button
bull Image - the path to an image displayed on the button
CheckBox Represents a check box
OptionButton Represents an option button (radio button)
ComboBox Represents a combo box
Specific Properties
bull DataSource - the data source bound to the combo box
bull TabOrder- the order in which the combo box items get focus when you press the TAB key
bull ValidValues - the valid values for this combo box item Add or remove valid values from the popup window
TabControl Represents a tab control which is a container of the items to be shown on the tab page In UI API the tab control is named as folder
Specific properties for tab pages
bull AutoPaneSelection - indicates whether the tab control allows automatic pane selection If you specify True when you click on a tab the application automatically sets the form pane level to the pane level bound to the tab control
bull Caption - the text to display on the tab page
bull Pane - the pane level of the tab
For more information see Working with Tab Controls
Grid Represents a grid which is a visual representation of a data table
Specific Properties
bull CollapseLevel - the number of columns grouped together starting from the left-most column For example if you specify 2 for this property all rows are grouped by the values in the first column and all rows within each group are grouped by the values in the second column Default value is 0 indicating not collapsed
bull Columns - the grids columns
bull DataTableID - the data table bound to the grid
bull SelectionMode - indicates how rows can be selected
For more information see Working with Grids
12 PUBLIC copy 2014 SAP SE All rights reserved
Working with SAP Business One Studio Suite SAP Business One Studio Main Window
UI Control DescriptionActivity
Matrix Represents a matrix which displays data in a table
Specific Properties
bull Columns - the collection of columns in the matrix You can add or remove columns in the CollectionEditorForm window
bull MatrixLayout - the layout of the matrix
bull SelectionMode - indicates how rows can be selected
bull TabOrder - the order in which the items get focus when you press the TAB key
For more information see Working with Matrixes
PictureBox Represents a picture box
Specific Property Picture - the picture to display in the picture box
LinkedButton Represents an arrow link ( )
A linked button enables quick navigation between relevant objects For example a linked button next to the Customer field in the AR Invoice form opens the Business Partner Master Data form for the relevant customer
Specific Properties
bull LinkTo - the unique ID of the control to which the linked button links
bull LinkedObject - the target object type of the linked button
ButtonCombo Represents an item that provides the functionality of a combo box and a button in a single control
Data Sources
Data Source DescriptionActivity
DB Data Source Represents a SAP Business One database table to be attached to a form
Specific Property TableName - an SAP Business One database table for example OCRD
User Data Source Represents a container for item data that is not stored in the database
Specific Properties
bull DataType - the data type of the user data source
bull Size - the size of the user data source
bull UniqueID - the unique ID of the user data source
Data Tables Represents data in table form
Specific Properties
bull Type - the type of the data table including Manual and Query types
bull Columns - the columns of the Manual type data table
bull Query - the specified condition (query) of the Query type data table
Working with SAP Business One Studio Suite SAP Business One Studio Main Window
PUBLIC copy 2014 SAP SE All rights reserved 13
Data Source DescriptionActivity
bull UniqueID - the unique ID of the data table
For more information see Working with Data Tables
Choose From List Represents a ChooseFromList form
Specific Properties
bull MultiSelection - indicates whether you can select multiple items in the ChooseFromList form
bull ObjectType - the type of the object from which to generate the valid values
bull UniqueID - the unique ID of the ChooseFromList
For more information see Working with Choose From Lists
24 Docking Tool Windows
To dock the tool windows (Toolbox window UI Outline window Solution Explorer window and Properties window) to a designated area perform the following steps
1 Select the window you want to dock
2 Drag the window from its current location towards the middle of the SAP Business One main window
A guide diamond appears
3 When the window you are dragging reaches the position where you want to dock it move the pointer over the corresponding portion of the guide diamond
4 To dock the window in the position indicated release the mouse button
14 PUBLIC copy 2014 SAP SE All rights reserved
Working with SAP Business One Studio Suite Working with Add-on Projects in SAP Business One Studio
3 Working with Add-on Projects in SAP Business One Studio
This section introduces how to work with your add-on projects in SAP Business One Studio
31 Creating an Add-on Project
You can create your new add-on forms with the same look and feel as the SAP Business One forms
Procedure
1 In the SAP Business One Studio main window choose the Menu button and choose New rarr Project rarr Add-on
Alternatively on the Start Page of SAP Business One Studio choose New Add-on
2 In the New Project window specify the name and the location of your new project
3 Specify the package name
Note
By default the package name is the same as the project name
The extension of a package (SAP Business One add-on solution) file is b1s
4 If you need to create a project that does not contain any forms select the Create Empty Project checkbox
5 Choose OK
A default layout named NewForm 1 appears in the design area of the SAP Business One Studio main window
You can design your own form now For more information see Designing a Form
32 Opening an Add-on Project or an External File
You can open an existing add-on project or a srf file which was created by Screen Painter
Procedure
1 In the SAP Business One Studio main window choose the Menu button and choose Open rarr SolutionProject or Open rarr File
Alternatively on the Start Page of SAP Business One Studio choose Open Project or Open File
2 Specify the existing project or file you want to open
3 Choose Open
The solution hierarchy appears in the Solution Explorer window
Working with SAP Business One Studio Suite Working with Add-on Projects in SAP Business One Studio
PUBLIC copy 2014 SAP SE All rights reserved 15
33 Designing a Form
In the design area of the SAP Business One Studio main window you can design your own form This procedure introduces the basic operation of designing a form
Procedure
1 In the Toolbox window double-click or drag and drop a form item from the UI Controls area or the Data Source area
For example double-click a button A new button appears in the top left corner of the form
2 Use drag and drop to position or resize the item on the form
Note
When you drag the item the application shows a red line which enables you to align the item with the existing ones
3 Select the form or an item to set the properties
You can select the form or a form item either from the design area or from the UI Outline window The UI Outline window groups form items in pane levels
4 In the Properties window edit the properties
5 To preview the form in the SAP Business One client click (PreviewB1Client)
6 Save the form
331 Working with Tab Controls
A tab control is a container of the items to be shown on the tab page In UI API the tab control is named as folder
Procedure
1 Add a tab control
To add a tab control in the Toolbox window UI Controls area double-click the TabControl icon
The tab control is added to the form with one tab page
If the tab control is active a cross-shaped symbol appears at the top left of the tab control
2 To add or remove a tab page right-click the cross-shaped symbol and choose Add Tab Page or Remove Tab Page
3 Specify properties for each tab page
To specify the pane level of the tab page in the Properties window set the AutoPaneSelection field to True and in the Pane field enter the pane level
4 Add UI controls to the tab page area and specify the FromPane ToPane properties
Once the FromPane ToPane properties are set when you switch tab pages the UI controls with the same pane level are displayed on the tab page
16 PUBLIC copy 2014 SAP SE All rights reserved
Working with SAP Business One Studio Suite Working with Add-on Projects in SAP Business One Studio
332 Working with Grids
The grid control is a visual representation of a data table
Procedure
1 Add a grid control
To add a grid control in the Toolbox window UI Controls area double-click the Grid icon
The grid control is added to the form without columns
2 Add a data table
To add a data table in the Toolbox window Data Source area double-click the Data Tables icon
For more information see Working with Data Tables
3 Bind the data table to the grid as follows
1 Select the grid control you want to bind
2 In the Properties window under the Specific area in the DataTableID field select a data table to which you want to bind
Note
o If the data table type is Query the columns are not displayed in edit mode To preview the columns click (PreviewB1Client)
o If the data table type is Manual the columns are displayed in edit mode
3 After binding a grid control to a data table of Manual type you can set the Columns property Perform the following steps
1 In the Columns property field click the button
The CollectionEditorForm window appears
2 Select the column you want to edit from the list in the left area of the window
3 In the Properties area specify the column type
Note
To set a column with a link button select it_EDIT as the column type and in the LinkObjectType field specify the type of the object you want to connect to
333 Working with Data Tables
You can use a data table to perform a free query for example JOIN GROUP BY and so on You can also manually set the data table columns
Procedure
1 To add a data table in the Toolbox window Data Source area double-click the Data Tables icon
Working with SAP Business One Studio Suite Working with Add-on Projects in SAP Business One Studio
PUBLIC copy 2014 SAP SE All rights reserved 17
A new data table is created with a default unique ID and a type
Note
You can change the default ID and type of the data table However changing the type results in the loss of the existing query or columns
2 To set queries change the data table type to Query and in the Query property field specify your query
If the data table is attached to a grid control the grid is automatically filled with columns from the query
3 To set columns for manual data tables change the data table type to Manual and in the Columns property field click the button
In the CollectionEditorForm window you can modify the columns
o To add a new column choose the Add button
A new column is created with a default name and type (ft_AlphaNumeric) You can change the column default name and type
o To delete the column choose the Remove button
4 To bind a data table (with Manual type) to an edit text control perform the following steps
1 In the Properties window of the edit text control set the DataSource property to the data table
2 In the Alias property set the column of the data table
334 Working with Matrixes
The matrix control displays data in a table You specify each column manually and bind each column to a data source
Procedure
1 To add a matrix control in the Toolbox window UI Controls area double-click the Matrix icon
The matrix control is added to the form with a default column Col_0
2 In the Properties window under the Specific area in the Columns property field click the button
The CollectionEditorForm window appears
3 Choose the Add button to add new columns
4 In the Properties area specify the Type field of the column the DataSource Alias fields and the specific fields
5 Add as many columns as needed and choose the OK button
6 To preview the matrix click (PreviewB1Client)
335 Working with Choose From Lists
ChooseFromList is a basic functionality in the SAP Business One application It allows you to open a ChooseFromList form which displays a list of objects of the same type
18 PUBLIC copy 2014 SAP SE All rights reserved
Working with SAP Business One Studio Suite Working with Add-on Projects in SAP Business One Studio
Procedure
1 To add a ChooseFromList control in the Toolbox window Data Source area double-click the Choose From List icon
A new ChooseFromList is created with a default unique ID You can change the default ID
2 In the Properties window specify the ObjectType property and enter the type of the object you want the Choose from List form to display For example enter 2 for business partners
You can connect EditText Button and MatrixGrid column (with type it_EDIT or it_LINKED_BUTTON) items to a choose from list
3 To connect EditText Button and MatrixGrid column items to a choose from list in the Properties window specify the ChooseFromListUID field
4 In the ChooseFromListAlias (EditText MatrixGrid column with type it_EDIT or it_LINK_BUTTON) field enter the alias of the field you want to display
336 Example Creating a Business Partner Field with Linked Button and Choose From List Functions
The linked button function is often used together with the choose from list function For example you add a new field named BP Code For this field you want to have a choose from list to open the List of Business Partners window and a linked button to open the Business Partner Master Data window
Procedure
1 In the Toolbox window UI Controls area add a StaticText a LinkedButton and an EditText
2 In the Data Source area add a DB Data Source and a Choose From List
3 In the Properties window of the form specify a valid value for the ObjectType filed
4 Set the Choose From List properties
In the Properties window of the choose from list in the ObjectType filed enter 2 which represents business partners For more information about other object types see BoObjectTypes Enumeration in SDK Help Center
5 Set the DB Data Source properties
In the Properties window of the DB data source in the TableName filed enter OCRD which represents the SAP Business One system table for business partners For more information about other system tables see Database Tables Reference in SDK Help Center
6 Connect the linked button with the BP Code edit text field
In the Properties window of the linked button in the LinkTo field paste the unique ID of the edit text in the LinkedObject filed enter 2
7 Bind the DB data source to the BP Code edit text field
In the Properties window of the edit text in the DataSource field enter OCRD in the Alias field enter CardCode
8 Connect the choose from list with the BP Code edit text field
Working with SAP Business One Studio Suite Working with Add-on Projects in SAP Business One Studio
PUBLIC copy 2014 SAP SE All rights reserved 19
In the Properties window of the edit text in the ChooseFromListUID field enter the ID of the choose from list in the ChooseFromListAutoFill field select True and in the ChooseFromListAlias field enter CardCode
9 To preview click (PreviewB1Client)
o When you click the choose from list icon of the BP Code field the List of Business Partners window appears
o After you select a business partner from the list the BP Code field is automatically filled and a linked button appears
o Click the linked button the Business Partner Master Data window appears
34 Adding Renaming or Deleting Forms in a Project
To add forms in your project right-click your project in the Solution Explorer window
From the context menu you can add the following types of forms
bull New user form
bull Existing user form
bull System form
bull UDO form
To rename a form in your project in the Solution Explorer window right-click the form and choose Rename
To delete a form in your project in the Solution Explorer window right-click the form and choose Delete
341 Adding New User Forms
A user form is a form designed by a partner It can be generated from SAP Business One Studio Screen Painter UI API or your own code
To add a new user form in the Solution Explorer window right-click your project and choose New Form
A new form opens in edit mode and appears in the Solution Explorer window
You can now design the new form For more information see Designing a Form
342 Adding Existing User Forms
You can add an existing user form to your project
Procedure
1 In the Solution Explorer window right-click your project and choose Add rarr Existing Form
2 In the Add Existing Item window select the form you want to add
3 Choose Open
20 PUBLIC copy 2014 SAP SE All rights reserved
Working with SAP Business One Studio Suite Working with Add-on Projects in SAP Business One Studio
The form opens in edit mode and appears in the Solution Explorer window
343 Adding System Forms
A system form is a standard SAP Business One form that you can add to your project
Procedure
1 In the Solution Explorer window right-click your project and choose Add rarr System Form
2 In the Add System Form window select the form you want to add
Note
The Add System Form window lists the following system forms
o All currently opened system forms if SAP Business One is running
o The locally cached system forms
3 Choose OK
The form opens in edit mode and appears in the Solution Explorer window
Note
Once opened in edit mode a system form will be cached up locally
4 You can now modify the form
In edit mode of the system form you can add new UI controls and modify the properties of the existing system items
5 To preview the system form you need to open the form in the SAP Business One client first and then click (PreviewB1Client)
Caution
Deleting existing system items does not take effect when you preview the modified system form
344 Adding UDO Forms
A UDO form is a form generated by the User-Defined Object Registration wizard (To access the wizard from the SAP Business One menu bar choose Tools rarr Customization Tools rarr Objects Registration Wizard) You can add a UDO form to your project
Procedure
1 In the Solution Explorer window right-click your project and choose Add rarr UDO Form
2 In the Company Logon window specify the details of the company you want to work with and choose Log On
Working with SAP Business One Studio Suite Working with Add-on Projects in SAP Business One Studio
PUBLIC copy 2014 SAP SE All rights reserved 21
Field DescriptionActivity
Server Specify the IP address or the machine name of the SAP Business One server
Server Type From the dropdown list select a server type MSSQL_2008 MSSQL_2012 or HANADB
License Server Specify the license server
Company Name Specify the company defined on the selected SAP Business One server
User ID Specify your user name for the company you want to log on to
Password Enter your password
The UDO form that is registered appears in the List of UDO Forms window
Note
Only the Header Line Style (new UDO style in SAP Business One 882) is supported The Matrix Style (old UDO style) is not supported
3 In the List of UDO Forms window select the UDO form you want to add and choose the Open button
The form opens in edit mode and appears in the Solution Explorer window
Note
You can add more UDO forms The application remembers the company logon information and you do not need to specify it again
If you restart SAP Business One Studio you just need to specify the Password field
4 You can now modify the UDO form
5 To preview the form click (PreviewB1Client)
6 To save the changes in the Solution Explorer window right-click the form and choose Save to DB
When you reopen the form in the SAP Business One client you can see the UDO form is modified
35 Editing Active Forms in SAP Business One
In the SAP Business One client you can edit the active system form through SAP Business One Studio or SAP Business One Studio for Microsoft Visual Studio The active form means the current system form in the SAP Business One client If you have multiple forms open in the SAP Business One client the active form is the top one
Procedure
1 In SAP Business One from the Tools menu choose SAP Business One Studio
2 If you want to edit the active form from SAP Business One Studio choose Edit Active Form
o If SAP Business One Studio is already running the application adds the active system form to the project
o If you have not yet opened SAP Business One Studio the application runs SAP Business One Studio first automatically creates a project and opens the active form in the project
3 If you want to edit the active form from SAP Business One Studio for Microsoft Visual Studio choose Edit Active Form in Visual Studio
22 PUBLIC copy 2014 SAP SE All rights reserved
Working with SAP Business One Studio Suite Working with Add-on Projects in SAP Business One Studio
o If the SAP Business One Studio for Microsoft Visual Studio is already running the application adds the active system form to the project
o If you have not yet opened Microsoft Visual Studio the application does nothing for you You need to open and create a project in Microsoft Visual Studio first and then in the SAP Business One client from the Tools menu choose SAP Business One Studio and choose Edit Active Form in Visual Studio
36 Exporting Updated Parts of a System Form
If you edited a system form you can export the updated part of the system form to a srf file
Procedure
1 In the Solution Explorer window right-click the system form and choose Export Updated Part As
2 In the Export File As window specify the file name
3 Choose Save
Working with SAP Business One Studio Suite Working with Add-on Projects in SAP Business One Studio for Microsoft Visual Studio
PUBLIC copy 2014 SAP SE All rights reserved 23
4 Working with Add-on Projects in SAP Business One Studio for Microsoft Visual Studio
41 Creating SAP Business One Add-on Projects
You can create your new add-on forms with the same look and feel as the SAP Business One forms
Procedure
1 In the Microsoft Visual Studio main window choose New rarr Project
After you install SAP Business One Studio for Microsoft Visual Studio you can locate the SAP Business One template in the New Project dialog box by navigating the expanding list in the left pane under Installed Templates
2 In the New Project window from the Installed Templates area select the SAP Business One template
3 To create an add-on project with an empty user form select SAP Business One Add-on Project and specify the name and the location of your new project
4 To create an add-on project using an existing B1s file from SAP Business One Studio select SAP Business One Add-on Project from B1s File
5 Choose OK
A default form named Form1b1f appears in the Solution Explorer window and the layout of the form appears in the design area A folder B1Studio is generated under CTempltYourAddOnProjectgtltYourAddOnProjectgtbinDebug
You can design the layout of your form and the logic of the controls For more information see Designing a Form
Note
When you create an SAP Business One add-on project it adds the SAPbouiComFramework which is for connecting the UI API application handling LoadBatchAction systemuserUDO form events and generating code It includes
o Menucs - for adding menus and handling menu events
o Programscs - for connecting the UI server and performing the initialization
o SAPbouiCOMFrameworkApplicationSBO_Application - the root COM object of UI API
Sample Code ApplicationSBO_ApplicationMessageBox(Hello world)
o SAPbouiCOMFrameworkFormBaseUIAPIRawForm - the original form COM object of UI API
Sample Code thisUIAPIRawFormClose()Close form
The SAPbouiComFramework contains all UI API COM objects and interfaces therefore we do not recommend that you replace it
24 PUBLIC copy 2014 SAP SE All rights reserved
Working with SAP Business One Studio Suite Working with Add-on Projects in SAP Business One Studio for Microsoft Visual Studio
Note
In SAP Business One 91 a new net SAPBusinessOneSDKdll is added You can build add-on solutions using SAPBusinessOneSDKdll which integrates UI API and DI API
42 Tool Windows in SAP Business One Studio for Microsoft Visual Studio
The tool windows in SAP Business One Studio for Microsoft Visual Studio are very similar to the tool windows in SAP Business One Studio The windows include
bull Toolbox window ndash contains the controls you can use to design your form For more information see Toolbox Window
Note
To program a certain control double-click it The code is automatically generated
bull UI Outline window ndash allows you to view items in a selected pane
Note
This window may not appear by default To display the UI Outline window from the menu bar choose View rarr Other Windows rarr Outline Window
bull Solution Explorer window ndash allows you to view the source files in your project
Note
The project files also include SAP Business One UI API references and predefined menu options (Menucs) In runtime by default the newly added form appears at the bottom of the SAP Business One Main Menu You can change the code if you want to open the form from another menu location
bull Properties window ndash allows you to set and examine the properties and events of forms and form items
Note
To register events of a control in the Properties window click (Events) and double-click the event property you want to edit The code is automatically generated and you can program as needed
You can drag the border of the windows to resize the window click (Auto Hide) to hide the window and also dock the windows to a new location (see Docking Tool Windows)
bull The double-click function - you can double-click an item to add an event The following are the default events that the system supports currently
Item Type Event
Form LoadAfter
EditText KeyDownAfter
CheckBox ClickBefore
OptionButton ClickBefore
Working with SAP Business One Studio Suite Working with Add-on Projects in SAP Business One Studio for Microsoft Visual Studio
PUBLIC copy 2014 SAP SE All rights reserved 25
Item Type Event
Button ClickBefore
ComboBox ComboSelectAfter
bull Toolbar - Located below the Menu button the toolbar is a collection of icons providing easy access to commonly used functions The functions are the same as those for SAP Business One Studio See chapter 22 in this document
43 Adding Forms in a Project
To add forms in your project in the Solution Explorer window right-click your project
From the context menu choose Add rarr New Itemhellip You can add the following types of forms
bull SAP Business One user form
bull SAP Business One system form
bull SAP Business One UDO form
431 Adding SAP Business One User Forms
An SAP Business One user form is a form designed by a partner It can be generated from SAP Business One Studio Screen Painter UI API or your own code
Procedure
1 In the Solution Explorer window right-click your project and choose Add rarr New Itemhellip
2 In the Add New Item window from the Installed Templates area select the SAP Business One add-on template
3 Choose SAP Business One User Form
A new form opens in edit mode and appears in the Solution Explorer window
You can now design the new form For more information see Designing a Form
In runtime by default the newly added form appears at the bottom of the SAP Business One Main Menu
432 Adding SAP Business One System Forms
A system form is a standard SAP Business One form that you can add to your project
26 PUBLIC copy 2014 SAP SE All rights reserved
Working with SAP Business One Studio Suite Working with Add-on Projects in SAP Business One Studio for Microsoft Visual Studio
Procedure
1 In the Solution Explorer window right-click your project and choose Add rarr New Itemhellip
2 In the Add New Item window from the Installed Templates area select the SAP Business One add-on template
3 Choose SAP Business One System Form
Note
The Add System Form window lists the following system forms
o All currently opened system forms if SAP Business One is running
o The locally cached system forms
4 Choose OK
The form opens in edit mode and appears in the Solution Explorer window
You can add user items modify the properties of a system item and register events but you cannot delete existing system items The modification is implemented after you reopen the system form
433 Adding SAP Business One UDO Forms
A UDO form is a form generated by the User-Defined Object Registration wizard (To access the wizard from the SAP Business One menu bar choose Tools rarr Customization Tools rarr Objects Registration Wizard) You can add a UDO form to your project
Procedure
1 In the Solution Explorer window right-click your project and choose Add rarr New Itemhellip
2 In the Add New Item window from the Installed Templates area select the SAP Business One add-on template
3 Choose SAP Business One UDO Form
4 In the Company Logon window specify the details of the company with which you want to work and choose Log On
Field DescriptionActivity
Server Specify the IP address or the machine name of the SAP Business One server
Server Type From the dropdown list select a server type MSSQL_2008 MSSQL_2012 or HANADB
License Server Specify the license server
Company Name Specify the company defined on the selected SAP Business One server
User ID Specify your user name for the company to which you want to log on
Password Enter your password
Working with SAP Business One Studio Suite Working with Add-on Projects in SAP Business One Studio for Microsoft Visual Studio
PUBLIC copy 2014 SAP SE All rights reserved 27
The UDO form that is registered appears in the List of UDO Forms window
Note
Only the Header Line Style (new UDO style in SAP Business One 882) is supported The Matrix Style (old UDO style) is not supported
5 In the List of UDO Forms window select the UDO form you want to add and choose the Open button
The form opens in edit mode and appears in the Solution Explorer window
Note
The application remembers the company logon information and if you want to add more UDO forms you do not need to specify that information again
If you restart SAP Business One Studio you just need to specify the Password field
6 You can now modify the UDO form
To save the changes in the Solution Explorer window right-click the form and choose Save UDO to DB
When you reopen the form in the SAP Business One client you can see the UDO form is modified
44 Loading an Existing B1s File to Your Project
You can load your existing b1s solution or srf file (ScreenPainter file) in the following ways
Creating an Add-on Project Using an Existing B1s File
1 In the Microsoft Visual Studio main window choose New rarr Project
2 In the New Project window from the Installed Templates area select the SAP Business One add-on template
3 To create an add-on project using an existing B1s file from SAP Business One Studio select SAP Business One Add-on Project from B1s File
4 Choose OK
Adding an Existing B1s File to the Current Project
1 In the Solution Explorer window right-click your project and choose Add rarr Existing Business One File
2 In the Open window select the Business One Studio files (b1s) file you want to add
3 Choose Open The form opens in edit mode and appears in the Solution Explorer window
Adding an Existing SRF File to the Current Project
1 In the Solution Explorer window right-click your project and choose Add rarr Existing Business One File
2 In the Open window select the Business One Studio SRF files (srf) file you want to add
3 Choose Open The form opens in edit mode and appears in the Solution Explorer window
28 PUBLIC copy 2014 SAP SE All rights reserved
Working with SAP Business One Studio Suite Working with Add-on Projects in SAP Business One Studio for Microsoft Visual Studio
45 Packaging Your Project
The SAP Business One Extension Package features are integrated in SAP Business One Studio for Microsoft Visual Studio You can package your project directly from the menu bar
Procedure
1 Build your project first to get the executable file of your extension
2 From the menu bar of the Microsoft Visual Studio main window choose SAP Business One Studio rarr Extension Package
3 In the Extension Registration Data Generator window expand Basic Information and specify the following fields
o Extension Name ndash Enter the name of the extension This field is mandatory
o Extension Version ndash Enter the version of the extension for which you want to package and generate the ARD file This field is mandatory
o Extension Provider ndash Enter the name of the SAP partner that creates and owns the extension For example the name of your company
o Extension Namespace ndash Enter a name for the folder in which SAP Business One places the extension after a user registers the extension in the application
o Supported Database ndash Specify the database in which the extension works This field is mandatory
o Contact Data ndash Enter contact information for the SAP partner that creates and owns the extension For example enter the URL of your companys Website
4 Expand Extension File specify the path of the executable file of your 32-bit or 64-bit add-on and select the files that should be packaged in the zip file
To package your apps for the version for SAP HANA specify the app zip file the name and the package of your app
Note
The naming convention for your package is For example if the package hierarchy is sapsboatp in SAP HANA the package name is this and the corresponding URL will be httpshostportsapsboatp
5 Expand Deployment Steps and select the COM dlls to register for your 32-bit or 64-bit add-on
6 Expend SBO Compatibility you can specify the versions of SAP Business One with which the add-on is compatible
In the Compatible with SAP Business One area specify the following
o Version From ndash Enter the earliest version of SAP Business One with which the extension is compatible
o To ndash Enter the latest version of SAP Business One with which the lightweight add-on is compatible
Example
Enter compatible versions of SAP Business One with the format ltxxxyyyxxgt for example 91000000
7 Expand Parameters you can optionally specify shared parameters and parameters for the extension
o Shared Parameters - The parameters or configuration required to run the extension The parameters are shared in all extension instances running on different companies
o Parameters - The parameters or configurations required to run the extension
8 Choose the Package button
Working with SAP Business One Studio Suite Working with Add-on Projects in SAP Business One Studio for Microsoft Visual Studio
PUBLIC copy 2014 SAP SE All rights reserved 29
9 In the Save As window specify the location where you want to save the file and choose the Save button
Note
If you are not yet ready to package your extension you can choose the Save button instead of the Package button The information you entered in the Extension Registration Data Generator window will be saved in your project The next time you open the Extension Registration Data Generator window the saved information will be displayed
For more information see How to Package and Deploy SAP Business One Extensions for Lightweight Deployment
30 PUBLIC copy 2014 SAP SE All rights reserved
Working with SAP Business One Studio Suite SAP Business One Studio Suite Demo Script
5 SAP Business One Studio Suite Demo Script
This section introduces a demo for how to work with your add-on projects in SAP Business One Studio Suite
Procedure
1 Start SAP Business One and log on to a company
o Database MadridDemo
o User manager
o Password 1234
2 Start SAP Business One Studio and add a new project
1 Choose Menu rarr New rarr Project rarr Add-On
2 Choose OK
3 Create a user form add an EditText with ChooseFromList and add a grid with DataTable
1 Add EditText Grid LinkedButton DB DataSource Data Table and ChooseFromList
Working with SAP Business One Studio Suite SAP Business One Studio Suite Demo Script
PUBLIC copy 2014 SAP SE All rights reserved 31
2 Specify the controls properties as follows
o DB DataSource
o Data Table
o ChooseFromList
o EditText
32 PUBLIC copy 2014 SAP SE All rights reserved
Working with SAP Business One Studio Suite SAP Business One Studio Suite Demo Script
o LinkedButton LinkTo = Item_0 LinkedObject = 2
o Grid DataTableID = DT_0
o Form LinkedObject = 2
3 From Toolbar choose Preview
The user form opens in the SAP Business One client The grid displays all BPs
4 To select a business partner choose the ChooseFromList icon The application fills the business partner code in the EditText
To open the business partner form choose the linked button
Working with SAP Business One Studio Suite SAP Business One Studio Suite Demo Script
PUBLIC copy 2014 SAP SE All rights reserved 33
4 Edit a system form (sales order) add a button and preview it
1 In the SAP Business One client from the Main Menu choose Sales rarr Sales Order to open the original sales order
2 Right-click the project node to add a system form
3 Select Sales Order and choose Open (the other form is cache file in local that user opened)
4 From Toolbar add the button and choose Preview
5 Switch to the SAP Business One client to review the updates of the sales order form
34 PUBLIC copy 2014 SAP SE All rights reserved
Working with SAP Business One Studio Suite SAP Business One Studio Suite Demo Script
5 Edit a UDO form add a button and save the UDO to the database
1 To open the original UDO form in the SAP Business One client choose Tools rarr Default Forms rarr UDO1-UDO1
2 To add a UDO form right-click the project node
3 Specify the DI connection information (password 1234) and choose Log On
Working with SAP Business One Studio Suite SAP Business One Studio Suite Demo Script
PUBLIC copy 2014 SAP SE All rights reserved 35
4 To edit the UDO form select UDO1 and choose OK
5 Add the button and save the UDO to the database
6 To review the updates from the SAP Business One client reopen the UDO form
36 PUBLIC copy 2014 SAP SE All rights reserved
Working with SAP Business One Studio Suite SAP Business One Studio Suite Demo Script
6 Start SAP Business One Studio for Microsoft Visual Studio and add a new project
1 Choose Menu rarr File rarr New rarr Project and select the C project templates
o The template SAP Business One Add-on Project is for creating a new project
o The template SAP Business One Add-on Project from B1s File is for creating a project with the existing B1s file
2 Select SAP Business One Add-on Project and create a new project
7 Add a button a Button_ClickBefore event and a popup message box if choosing the button
1 Add a button
2 Double-click the button to add a Button_ClickBefore event
Working with SAP Business One Studio Suite SAP Business One Studio Suite Demo Script
PUBLIC copy 2014 SAP SE All rights reserved 37
3 Add the UI API code as follows
4 To run the add-on from toolbar or by using the F5 shortcut choose Debug
In the Main Menu of the SAP Business One client the add-on adds the user menu
5 Choose the menu to open the user form
6 Choose the button to open a message box
7 Stop debugging and close all forms
8 Edit a system form (sales order) Add a button and a Button_ClickBefore event create a user form if choosing the button
38 PUBLIC copy 2014 SAP SE All rights reserved
Working with SAP Business One Studio Suite SAP Business One Studio Suite Demo Script
1 In the SAP Business One client from the Main Menu choose Sales rarr Sales Order to open the original sales order
2 Right-click the project node to add a system form (sales order)
3 Add a button
4 Double-click the button to add a Button_ClickBefore event
5 Add the UI API code as follows
Working with SAP Business One Studio Suite SAP Business One Studio Suite Demo Script
PUBLIC copy 2014 SAP SE All rights reserved 39
6 To run the add-on from toolbar or by using the F5 shortcut choose Debug
7 From the SAP Business One client open the sales order The new button appears
To open the new form choose the button
9 Edit a system form (sales opportunity) from the menu design the UI API code to set Remark as a mandatory field
1 In the SAP Business One client from the Main Menu choose Sales Opportunities rarr Sales Opportunity to open the original sales opportunity form
2 From the SAP Business One client choose Edit Form in Visual Studio to edit the system form
3 In UI Outline change the pane level to 2
4 Add a button
5 Double-click the button to add a Button_ClickBefore event
6 Add the UI API code as follows
40 PUBLIC copy 2014 SAP SE All rights reserved
Working with SAP Business One Studio Suite SAP Business One Studio Suite Demo Script
7 To run the add-on from toolbar or by using the F5 shortcut choose Debug
8 In the SAP Business One client reopen the sales opportunity
9 On the Potential tab specify the business partner code and potential amount
On the General tab leave the Remark field empty
10 Choose Add
In the status bar the error message Remark is mandatory appears
11 Specify the remark The system adds the sales opportunity
wwwsapcomcontactsap
Material Number
copy 2014 SAP SE All rights reserved No part of this publication may be reproduced or transmitted in any form or for any purpose without the express permission of SAP AG The information contained herein may be changed without prior notice Some software products marketed by SAP AG and its distributors contain proprietary software components of other software vendors Microsoft Windows Excel Outlook and PowerPoint are registered trademarks of Microsoft Corporation IBM DB2 DB2 Universal Database System ads System i5 System p System p5 System x System z System z10 System z9 z10 z9 iSeries pSeries xSeries zSeries eServer zVM zOS i5OS S390 OS390 OS400 AS400 S390 Parallel Enterprise Server PowerVM Power Architecture POWER6+ POWER6 POWER5+ POWER5 POWER OpenPower PowerPC BatchPipes BladeCenter System Storage GPFS HACMP RETAIN DB2 Connect RACF Redbooks OS2 Parallel Sysplex MVSESA AIX Intelligent Miner WebSphere Netfinity Tivoli and Informix are trademarks or registered trademarks of IBM Corporation Linux is the registered trademark of Linus Torvalds in the US and other countries Adobe the Adobe logo Acrobat PostScript and Reader are either trademarks or registered trademarks of Adobe Systems Incorporated in the United States andor other countries Oracle is a registered trademark of Oracle Corporation UNIX XOpen OSF1 and Motif are registered trademarks of the Open Group Citrix ICA Program Neighborhood MetaFrame WinFrame VideoFrame and MultiWin are trademarks or registered trademarks of Citrix Systems Inc HTML XML XHTML and W3C are trademarks or registered trademarks of W3Creg World Wide Web Consortium Massachusetts Institute of Technology Java is a registered trademark of Sun Microsystems Inc JavaScript is a registered trademark of Sun Microsystems Inc used under license for technology invented and implemented by Netscape SAP R3 xApps xApp SAP NetWeaver Duet PartnerEdge ByDesign SAP Business ByDesign and other SAP products and services mentioned herein as well as their respective logos are trademarks or registered trademarks of SAP AG in Germany and in several other countries all over the world All other product and service names mentioned are the trademarks of their respective companies Data contained in this document serves informational purposes only National product specifications may vary These materials are subject to change without notice These materials are provided by SAP AG and its affiliated companies (SAP Group) for informational purposes only without representation or warranty of any kind and SAP Group shall not be liable for errors or omissions with respect to the materials The only warranties for SAP Group products and services are those that are set forth in the express warranty statements accompanying such products and services if any Nothing herein should be construed as constituting an additional warranty
- 1 Introduction
-
- 11 Installing SAP Business One Studio
- 12 Running SAP Business One Studio
- 13 Terms and Definitions
- 14 Related Documentation
-
- 2 SAP Business One Studio Main Window
-
- 21 Menu Button
- 22 Toolbar
- 23 Toolbox Window
- 24 Docking Tool Windows
-
- 3 Working with Add-on Projects in SAP Business One Studio
-
- 31 Creating an Add-on Project
- 32 Opening an Add-on Project or an External File
- 33 Designing a Form
-
- 331 Working with Tab Controls
- 332 Working with Grids
- 333 Working with Data Tables
- 334 Working with Matrixes
- 335 Working with Choose From Lists
- 336 Example Creating a Business Partner Field with Linked Button and Choose From List Functions
-
- 34 Adding Renaming or Deleting Forms in a Project
-
- 341 Adding New User Forms
- 342 Adding Existing User Forms
- 343 Adding System Forms
- 344 Adding UDO Forms
-
- 35 Editing Active Forms in SAP Business One
- 36 Exporting Updated Parts of a System Form
-
- 4 Working with Add-on Projects in SAP Business One Studio for Microsoft Visual Studio
-
- 41 Creating SAP Business One Add-on Projects
- 42 Tool Windows in SAP Business One Studio for Microsoft Visual Studio
- 43 Adding Forms in a Project
-
- 431 Adding SAP Business One User Forms
- 432 Adding SAP Business One System Forms
- 433 Adding SAP Business One UDO Forms
-
- 44 Loading an Existing B1s File to Your Project
- 45 Packaging Your Project
-
- 5 SAP Business One Studio Suite Demo Script
-
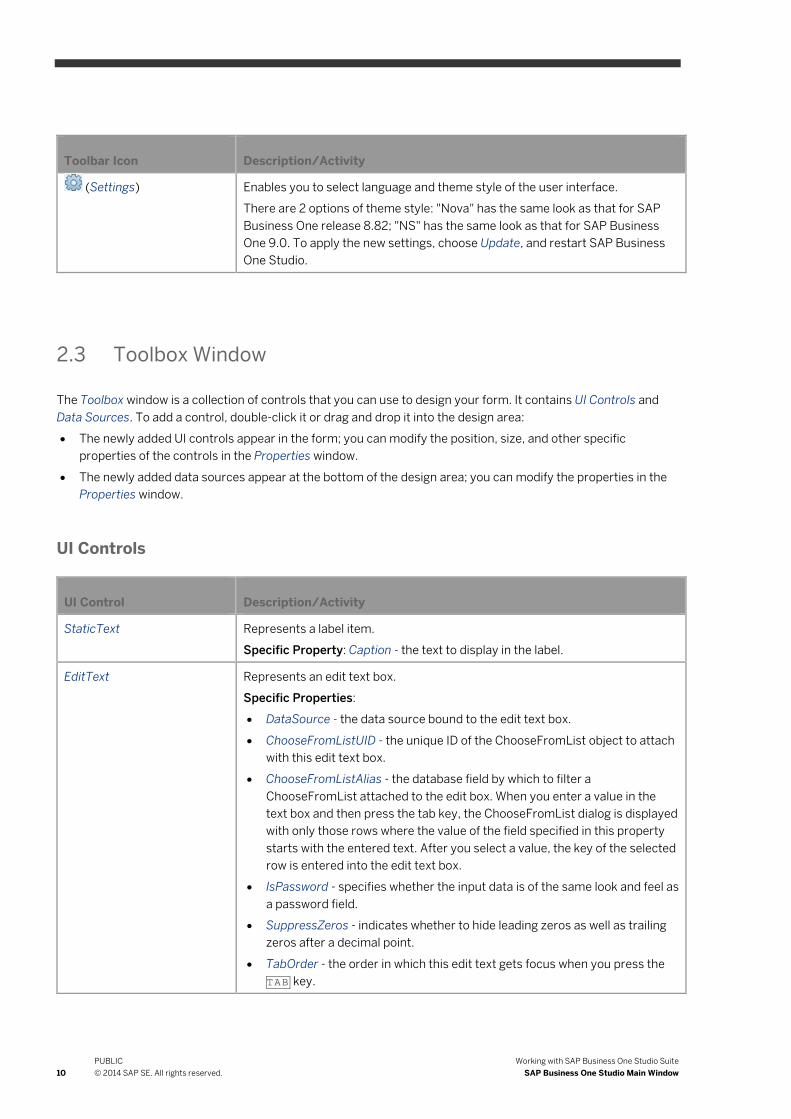
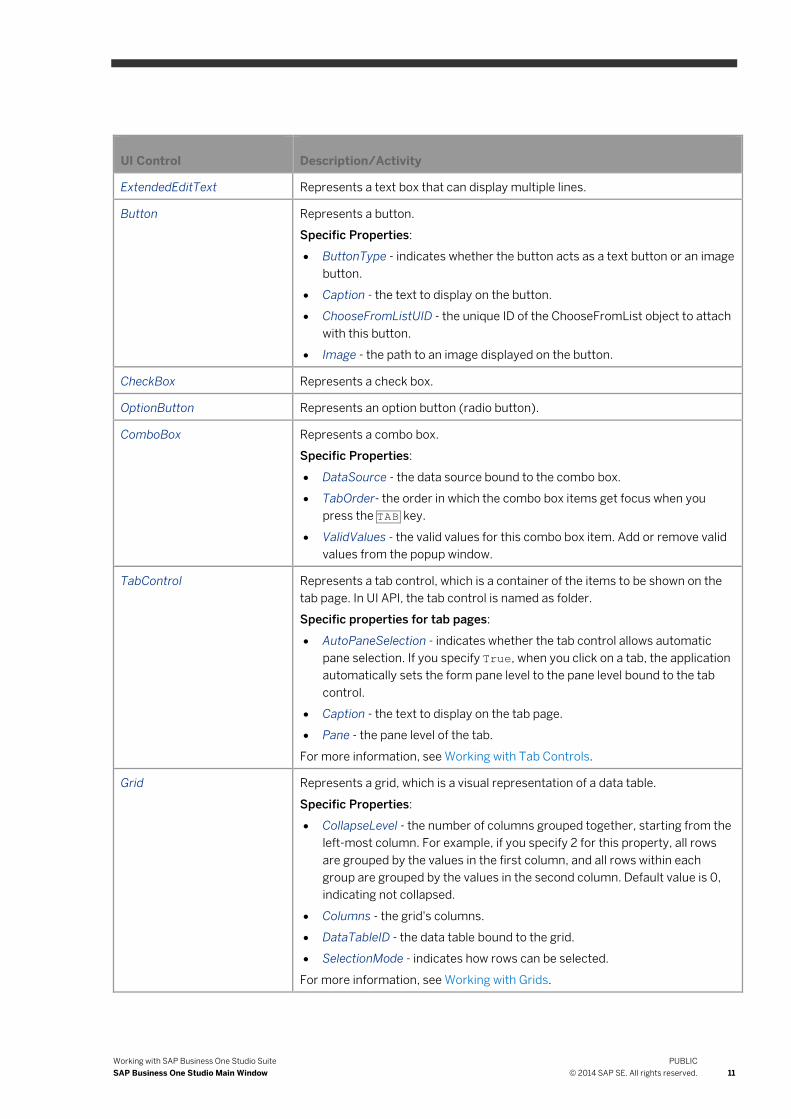
Working with SAP Business One Studio Suite SAP Business One Studio Main Window
PUBLIC copy 2014 SAP SE All rights reserved 11
UI Control DescriptionActivity
ExtendedEditText Represents a text box that can display multiple lines
Button Represents a button
Specific Properties
bull ButtonType - indicates whether the button acts as a text button or an image button
bull Caption - the text to display on the button
bull ChooseFromListUID - the unique ID of the ChooseFromList object to attach with this button
bull Image - the path to an image displayed on the button
CheckBox Represents a check box
OptionButton Represents an option button (radio button)
ComboBox Represents a combo box
Specific Properties
bull DataSource - the data source bound to the combo box
bull TabOrder- the order in which the combo box items get focus when you press the TAB key
bull ValidValues - the valid values for this combo box item Add or remove valid values from the popup window
TabControl Represents a tab control which is a container of the items to be shown on the tab page In UI API the tab control is named as folder
Specific properties for tab pages
bull AutoPaneSelection - indicates whether the tab control allows automatic pane selection If you specify True when you click on a tab the application automatically sets the form pane level to the pane level bound to the tab control
bull Caption - the text to display on the tab page
bull Pane - the pane level of the tab
For more information see Working with Tab Controls
Grid Represents a grid which is a visual representation of a data table
Specific Properties
bull CollapseLevel - the number of columns grouped together starting from the left-most column For example if you specify 2 for this property all rows are grouped by the values in the first column and all rows within each group are grouped by the values in the second column Default value is 0 indicating not collapsed
bull Columns - the grids columns
bull DataTableID - the data table bound to the grid
bull SelectionMode - indicates how rows can be selected
For more information see Working with Grids
12 PUBLIC copy 2014 SAP SE All rights reserved
Working with SAP Business One Studio Suite SAP Business One Studio Main Window
UI Control DescriptionActivity
Matrix Represents a matrix which displays data in a table
Specific Properties
bull Columns - the collection of columns in the matrix You can add or remove columns in the CollectionEditorForm window
bull MatrixLayout - the layout of the matrix
bull SelectionMode - indicates how rows can be selected
bull TabOrder - the order in which the items get focus when you press the TAB key
For more information see Working with Matrixes
PictureBox Represents a picture box
Specific Property Picture - the picture to display in the picture box
LinkedButton Represents an arrow link ( )
A linked button enables quick navigation between relevant objects For example a linked button next to the Customer field in the AR Invoice form opens the Business Partner Master Data form for the relevant customer
Specific Properties
bull LinkTo - the unique ID of the control to which the linked button links
bull LinkedObject - the target object type of the linked button
ButtonCombo Represents an item that provides the functionality of a combo box and a button in a single control
Data Sources
Data Source DescriptionActivity
DB Data Source Represents a SAP Business One database table to be attached to a form
Specific Property TableName - an SAP Business One database table for example OCRD
User Data Source Represents a container for item data that is not stored in the database
Specific Properties
bull DataType - the data type of the user data source
bull Size - the size of the user data source
bull UniqueID - the unique ID of the user data source
Data Tables Represents data in table form
Specific Properties
bull Type - the type of the data table including Manual and Query types
bull Columns - the columns of the Manual type data table
bull Query - the specified condition (query) of the Query type data table
Working with SAP Business One Studio Suite SAP Business One Studio Main Window
PUBLIC copy 2014 SAP SE All rights reserved 13
Data Source DescriptionActivity
bull UniqueID - the unique ID of the data table
For more information see Working with Data Tables
Choose From List Represents a ChooseFromList form
Specific Properties
bull MultiSelection - indicates whether you can select multiple items in the ChooseFromList form
bull ObjectType - the type of the object from which to generate the valid values
bull UniqueID - the unique ID of the ChooseFromList
For more information see Working with Choose From Lists
24 Docking Tool Windows
To dock the tool windows (Toolbox window UI Outline window Solution Explorer window and Properties window) to a designated area perform the following steps
1 Select the window you want to dock
2 Drag the window from its current location towards the middle of the SAP Business One main window
A guide diamond appears
3 When the window you are dragging reaches the position where you want to dock it move the pointer over the corresponding portion of the guide diamond
4 To dock the window in the position indicated release the mouse button
14 PUBLIC copy 2014 SAP SE All rights reserved
Working with SAP Business One Studio Suite Working with Add-on Projects in SAP Business One Studio
3 Working with Add-on Projects in SAP Business One Studio
This section introduces how to work with your add-on projects in SAP Business One Studio
31 Creating an Add-on Project
You can create your new add-on forms with the same look and feel as the SAP Business One forms
Procedure
1 In the SAP Business One Studio main window choose the Menu button and choose New rarr Project rarr Add-on
Alternatively on the Start Page of SAP Business One Studio choose New Add-on
2 In the New Project window specify the name and the location of your new project
3 Specify the package name
Note
By default the package name is the same as the project name
The extension of a package (SAP Business One add-on solution) file is b1s
4 If you need to create a project that does not contain any forms select the Create Empty Project checkbox
5 Choose OK
A default layout named NewForm 1 appears in the design area of the SAP Business One Studio main window
You can design your own form now For more information see Designing a Form
32 Opening an Add-on Project or an External File
You can open an existing add-on project or a srf file which was created by Screen Painter
Procedure
1 In the SAP Business One Studio main window choose the Menu button and choose Open rarr SolutionProject or Open rarr File
Alternatively on the Start Page of SAP Business One Studio choose Open Project or Open File
2 Specify the existing project or file you want to open
3 Choose Open
The solution hierarchy appears in the Solution Explorer window
Working with SAP Business One Studio Suite Working with Add-on Projects in SAP Business One Studio
PUBLIC copy 2014 SAP SE All rights reserved 15
33 Designing a Form
In the design area of the SAP Business One Studio main window you can design your own form This procedure introduces the basic operation of designing a form
Procedure
1 In the Toolbox window double-click or drag and drop a form item from the UI Controls area or the Data Source area
For example double-click a button A new button appears in the top left corner of the form
2 Use drag and drop to position or resize the item on the form
Note
When you drag the item the application shows a red line which enables you to align the item with the existing ones
3 Select the form or an item to set the properties
You can select the form or a form item either from the design area or from the UI Outline window The UI Outline window groups form items in pane levels
4 In the Properties window edit the properties
5 To preview the form in the SAP Business One client click (PreviewB1Client)
6 Save the form
331 Working with Tab Controls
A tab control is a container of the items to be shown on the tab page In UI API the tab control is named as folder
Procedure
1 Add a tab control
To add a tab control in the Toolbox window UI Controls area double-click the TabControl icon
The tab control is added to the form with one tab page
If the tab control is active a cross-shaped symbol appears at the top left of the tab control
2 To add or remove a tab page right-click the cross-shaped symbol and choose Add Tab Page or Remove Tab Page
3 Specify properties for each tab page
To specify the pane level of the tab page in the Properties window set the AutoPaneSelection field to True and in the Pane field enter the pane level
4 Add UI controls to the tab page area and specify the FromPane ToPane properties
Once the FromPane ToPane properties are set when you switch tab pages the UI controls with the same pane level are displayed on the tab page
16 PUBLIC copy 2014 SAP SE All rights reserved
Working with SAP Business One Studio Suite Working with Add-on Projects in SAP Business One Studio
332 Working with Grids
The grid control is a visual representation of a data table
Procedure
1 Add a grid control
To add a grid control in the Toolbox window UI Controls area double-click the Grid icon
The grid control is added to the form without columns
2 Add a data table
To add a data table in the Toolbox window Data Source area double-click the Data Tables icon
For more information see Working with Data Tables
3 Bind the data table to the grid as follows
1 Select the grid control you want to bind
2 In the Properties window under the Specific area in the DataTableID field select a data table to which you want to bind
Note
o If the data table type is Query the columns are not displayed in edit mode To preview the columns click (PreviewB1Client)
o If the data table type is Manual the columns are displayed in edit mode
3 After binding a grid control to a data table of Manual type you can set the Columns property Perform the following steps
1 In the Columns property field click the button
The CollectionEditorForm window appears
2 Select the column you want to edit from the list in the left area of the window
3 In the Properties area specify the column type
Note
To set a column with a link button select it_EDIT as the column type and in the LinkObjectType field specify the type of the object you want to connect to
333 Working with Data Tables
You can use a data table to perform a free query for example JOIN GROUP BY and so on You can also manually set the data table columns
Procedure
1 To add a data table in the Toolbox window Data Source area double-click the Data Tables icon
Working with SAP Business One Studio Suite Working with Add-on Projects in SAP Business One Studio
PUBLIC copy 2014 SAP SE All rights reserved 17
A new data table is created with a default unique ID and a type
Note
You can change the default ID and type of the data table However changing the type results in the loss of the existing query or columns
2 To set queries change the data table type to Query and in the Query property field specify your query
If the data table is attached to a grid control the grid is automatically filled with columns from the query
3 To set columns for manual data tables change the data table type to Manual and in the Columns property field click the button
In the CollectionEditorForm window you can modify the columns
o To add a new column choose the Add button
A new column is created with a default name and type (ft_AlphaNumeric) You can change the column default name and type
o To delete the column choose the Remove button
4 To bind a data table (with Manual type) to an edit text control perform the following steps
1 In the Properties window of the edit text control set the DataSource property to the data table
2 In the Alias property set the column of the data table
334 Working with Matrixes
The matrix control displays data in a table You specify each column manually and bind each column to a data source
Procedure
1 To add a matrix control in the Toolbox window UI Controls area double-click the Matrix icon
The matrix control is added to the form with a default column Col_0
2 In the Properties window under the Specific area in the Columns property field click the button
The CollectionEditorForm window appears
3 Choose the Add button to add new columns
4 In the Properties area specify the Type field of the column the DataSource Alias fields and the specific fields
5 Add as many columns as needed and choose the OK button
6 To preview the matrix click (PreviewB1Client)
335 Working with Choose From Lists
ChooseFromList is a basic functionality in the SAP Business One application It allows you to open a ChooseFromList form which displays a list of objects of the same type
18 PUBLIC copy 2014 SAP SE All rights reserved
Working with SAP Business One Studio Suite Working with Add-on Projects in SAP Business One Studio
Procedure
1 To add a ChooseFromList control in the Toolbox window Data Source area double-click the Choose From List icon
A new ChooseFromList is created with a default unique ID You can change the default ID
2 In the Properties window specify the ObjectType property and enter the type of the object you want the Choose from List form to display For example enter 2 for business partners
You can connect EditText Button and MatrixGrid column (with type it_EDIT or it_LINKED_BUTTON) items to a choose from list
3 To connect EditText Button and MatrixGrid column items to a choose from list in the Properties window specify the ChooseFromListUID field
4 In the ChooseFromListAlias (EditText MatrixGrid column with type it_EDIT or it_LINK_BUTTON) field enter the alias of the field you want to display
336 Example Creating a Business Partner Field with Linked Button and Choose From List Functions
The linked button function is often used together with the choose from list function For example you add a new field named BP Code For this field you want to have a choose from list to open the List of Business Partners window and a linked button to open the Business Partner Master Data window
Procedure
1 In the Toolbox window UI Controls area add a StaticText a LinkedButton and an EditText
2 In the Data Source area add a DB Data Source and a Choose From List
3 In the Properties window of the form specify a valid value for the ObjectType filed
4 Set the Choose From List properties
In the Properties window of the choose from list in the ObjectType filed enter 2 which represents business partners For more information about other object types see BoObjectTypes Enumeration in SDK Help Center
5 Set the DB Data Source properties
In the Properties window of the DB data source in the TableName filed enter OCRD which represents the SAP Business One system table for business partners For more information about other system tables see Database Tables Reference in SDK Help Center
6 Connect the linked button with the BP Code edit text field
In the Properties window of the linked button in the LinkTo field paste the unique ID of the edit text in the LinkedObject filed enter 2
7 Bind the DB data source to the BP Code edit text field
In the Properties window of the edit text in the DataSource field enter OCRD in the Alias field enter CardCode
8 Connect the choose from list with the BP Code edit text field
Working with SAP Business One Studio Suite Working with Add-on Projects in SAP Business One Studio
PUBLIC copy 2014 SAP SE All rights reserved 19
In the Properties window of the edit text in the ChooseFromListUID field enter the ID of the choose from list in the ChooseFromListAutoFill field select True and in the ChooseFromListAlias field enter CardCode
9 To preview click (PreviewB1Client)
o When you click the choose from list icon of the BP Code field the List of Business Partners window appears
o After you select a business partner from the list the BP Code field is automatically filled and a linked button appears
o Click the linked button the Business Partner Master Data window appears
34 Adding Renaming or Deleting Forms in a Project
To add forms in your project right-click your project in the Solution Explorer window
From the context menu you can add the following types of forms
bull New user form
bull Existing user form
bull System form
bull UDO form
To rename a form in your project in the Solution Explorer window right-click the form and choose Rename
To delete a form in your project in the Solution Explorer window right-click the form and choose Delete
341 Adding New User Forms
A user form is a form designed by a partner It can be generated from SAP Business One Studio Screen Painter UI API or your own code
To add a new user form in the Solution Explorer window right-click your project and choose New Form
A new form opens in edit mode and appears in the Solution Explorer window
You can now design the new form For more information see Designing a Form
342 Adding Existing User Forms
You can add an existing user form to your project
Procedure
1 In the Solution Explorer window right-click your project and choose Add rarr Existing Form
2 In the Add Existing Item window select the form you want to add
3 Choose Open
20 PUBLIC copy 2014 SAP SE All rights reserved
Working with SAP Business One Studio Suite Working with Add-on Projects in SAP Business One Studio
The form opens in edit mode and appears in the Solution Explorer window
343 Adding System Forms
A system form is a standard SAP Business One form that you can add to your project
Procedure
1 In the Solution Explorer window right-click your project and choose Add rarr System Form
2 In the Add System Form window select the form you want to add
Note
The Add System Form window lists the following system forms
o All currently opened system forms if SAP Business One is running
o The locally cached system forms
3 Choose OK
The form opens in edit mode and appears in the Solution Explorer window
Note
Once opened in edit mode a system form will be cached up locally
4 You can now modify the form
In edit mode of the system form you can add new UI controls and modify the properties of the existing system items
5 To preview the system form you need to open the form in the SAP Business One client first and then click (PreviewB1Client)
Caution
Deleting existing system items does not take effect when you preview the modified system form
344 Adding UDO Forms
A UDO form is a form generated by the User-Defined Object Registration wizard (To access the wizard from the SAP Business One menu bar choose Tools rarr Customization Tools rarr Objects Registration Wizard) You can add a UDO form to your project
Procedure
1 In the Solution Explorer window right-click your project and choose Add rarr UDO Form
2 In the Company Logon window specify the details of the company you want to work with and choose Log On
Working with SAP Business One Studio Suite Working with Add-on Projects in SAP Business One Studio
PUBLIC copy 2014 SAP SE All rights reserved 21
Field DescriptionActivity
Server Specify the IP address or the machine name of the SAP Business One server
Server Type From the dropdown list select a server type MSSQL_2008 MSSQL_2012 or HANADB
License Server Specify the license server
Company Name Specify the company defined on the selected SAP Business One server
User ID Specify your user name for the company you want to log on to
Password Enter your password
The UDO form that is registered appears in the List of UDO Forms window
Note
Only the Header Line Style (new UDO style in SAP Business One 882) is supported The Matrix Style (old UDO style) is not supported
3 In the List of UDO Forms window select the UDO form you want to add and choose the Open button
The form opens in edit mode and appears in the Solution Explorer window
Note
You can add more UDO forms The application remembers the company logon information and you do not need to specify it again
If you restart SAP Business One Studio you just need to specify the Password field
4 You can now modify the UDO form
5 To preview the form click (PreviewB1Client)
6 To save the changes in the Solution Explorer window right-click the form and choose Save to DB
When you reopen the form in the SAP Business One client you can see the UDO form is modified
35 Editing Active Forms in SAP Business One
In the SAP Business One client you can edit the active system form through SAP Business One Studio or SAP Business One Studio for Microsoft Visual Studio The active form means the current system form in the SAP Business One client If you have multiple forms open in the SAP Business One client the active form is the top one
Procedure
1 In SAP Business One from the Tools menu choose SAP Business One Studio
2 If you want to edit the active form from SAP Business One Studio choose Edit Active Form
o If SAP Business One Studio is already running the application adds the active system form to the project
o If you have not yet opened SAP Business One Studio the application runs SAP Business One Studio first automatically creates a project and opens the active form in the project
3 If you want to edit the active form from SAP Business One Studio for Microsoft Visual Studio choose Edit Active Form in Visual Studio
22 PUBLIC copy 2014 SAP SE All rights reserved
Working with SAP Business One Studio Suite Working with Add-on Projects in SAP Business One Studio
o If the SAP Business One Studio for Microsoft Visual Studio is already running the application adds the active system form to the project
o If you have not yet opened Microsoft Visual Studio the application does nothing for you You need to open and create a project in Microsoft Visual Studio first and then in the SAP Business One client from the Tools menu choose SAP Business One Studio and choose Edit Active Form in Visual Studio
36 Exporting Updated Parts of a System Form
If you edited a system form you can export the updated part of the system form to a srf file
Procedure
1 In the Solution Explorer window right-click the system form and choose Export Updated Part As
2 In the Export File As window specify the file name
3 Choose Save
Working with SAP Business One Studio Suite Working with Add-on Projects in SAP Business One Studio for Microsoft Visual Studio
PUBLIC copy 2014 SAP SE All rights reserved 23
4 Working with Add-on Projects in SAP Business One Studio for Microsoft Visual Studio
41 Creating SAP Business One Add-on Projects
You can create your new add-on forms with the same look and feel as the SAP Business One forms
Procedure
1 In the Microsoft Visual Studio main window choose New rarr Project
After you install SAP Business One Studio for Microsoft Visual Studio you can locate the SAP Business One template in the New Project dialog box by navigating the expanding list in the left pane under Installed Templates
2 In the New Project window from the Installed Templates area select the SAP Business One template
3 To create an add-on project with an empty user form select SAP Business One Add-on Project and specify the name and the location of your new project
4 To create an add-on project using an existing B1s file from SAP Business One Studio select SAP Business One Add-on Project from B1s File
5 Choose OK
A default form named Form1b1f appears in the Solution Explorer window and the layout of the form appears in the design area A folder B1Studio is generated under CTempltYourAddOnProjectgtltYourAddOnProjectgtbinDebug
You can design the layout of your form and the logic of the controls For more information see Designing a Form
Note
When you create an SAP Business One add-on project it adds the SAPbouiComFramework which is for connecting the UI API application handling LoadBatchAction systemuserUDO form events and generating code It includes
o Menucs - for adding menus and handling menu events
o Programscs - for connecting the UI server and performing the initialization
o SAPbouiCOMFrameworkApplicationSBO_Application - the root COM object of UI API
Sample Code ApplicationSBO_ApplicationMessageBox(Hello world)
o SAPbouiCOMFrameworkFormBaseUIAPIRawForm - the original form COM object of UI API
Sample Code thisUIAPIRawFormClose()Close form
The SAPbouiComFramework contains all UI API COM objects and interfaces therefore we do not recommend that you replace it
24 PUBLIC copy 2014 SAP SE All rights reserved
Working with SAP Business One Studio Suite Working with Add-on Projects in SAP Business One Studio for Microsoft Visual Studio
Note
In SAP Business One 91 a new net SAPBusinessOneSDKdll is added You can build add-on solutions using SAPBusinessOneSDKdll which integrates UI API and DI API
42 Tool Windows in SAP Business One Studio for Microsoft Visual Studio
The tool windows in SAP Business One Studio for Microsoft Visual Studio are very similar to the tool windows in SAP Business One Studio The windows include
bull Toolbox window ndash contains the controls you can use to design your form For more information see Toolbox Window
Note
To program a certain control double-click it The code is automatically generated
bull UI Outline window ndash allows you to view items in a selected pane
Note
This window may not appear by default To display the UI Outline window from the menu bar choose View rarr Other Windows rarr Outline Window
bull Solution Explorer window ndash allows you to view the source files in your project
Note
The project files also include SAP Business One UI API references and predefined menu options (Menucs) In runtime by default the newly added form appears at the bottom of the SAP Business One Main Menu You can change the code if you want to open the form from another menu location
bull Properties window ndash allows you to set and examine the properties and events of forms and form items
Note
To register events of a control in the Properties window click (Events) and double-click the event property you want to edit The code is automatically generated and you can program as needed
You can drag the border of the windows to resize the window click (Auto Hide) to hide the window and also dock the windows to a new location (see Docking Tool Windows)
bull The double-click function - you can double-click an item to add an event The following are the default events that the system supports currently
Item Type Event
Form LoadAfter
EditText KeyDownAfter
CheckBox ClickBefore
OptionButton ClickBefore
Working with SAP Business One Studio Suite Working with Add-on Projects in SAP Business One Studio for Microsoft Visual Studio
PUBLIC copy 2014 SAP SE All rights reserved 25
Item Type Event
Button ClickBefore
ComboBox ComboSelectAfter
bull Toolbar - Located below the Menu button the toolbar is a collection of icons providing easy access to commonly used functions The functions are the same as those for SAP Business One Studio See chapter 22 in this document
43 Adding Forms in a Project
To add forms in your project in the Solution Explorer window right-click your project
From the context menu choose Add rarr New Itemhellip You can add the following types of forms
bull SAP Business One user form
bull SAP Business One system form
bull SAP Business One UDO form
431 Adding SAP Business One User Forms
An SAP Business One user form is a form designed by a partner It can be generated from SAP Business One Studio Screen Painter UI API or your own code
Procedure
1 In the Solution Explorer window right-click your project and choose Add rarr New Itemhellip
2 In the Add New Item window from the Installed Templates area select the SAP Business One add-on template
3 Choose SAP Business One User Form
A new form opens in edit mode and appears in the Solution Explorer window
You can now design the new form For more information see Designing a Form
In runtime by default the newly added form appears at the bottom of the SAP Business One Main Menu
432 Adding SAP Business One System Forms
A system form is a standard SAP Business One form that you can add to your project
26 PUBLIC copy 2014 SAP SE All rights reserved
Working with SAP Business One Studio Suite Working with Add-on Projects in SAP Business One Studio for Microsoft Visual Studio
Procedure
1 In the Solution Explorer window right-click your project and choose Add rarr New Itemhellip
2 In the Add New Item window from the Installed Templates area select the SAP Business One add-on template
3 Choose SAP Business One System Form
Note
The Add System Form window lists the following system forms
o All currently opened system forms if SAP Business One is running
o The locally cached system forms
4 Choose OK
The form opens in edit mode and appears in the Solution Explorer window
You can add user items modify the properties of a system item and register events but you cannot delete existing system items The modification is implemented after you reopen the system form
433 Adding SAP Business One UDO Forms
A UDO form is a form generated by the User-Defined Object Registration wizard (To access the wizard from the SAP Business One menu bar choose Tools rarr Customization Tools rarr Objects Registration Wizard) You can add a UDO form to your project
Procedure
1 In the Solution Explorer window right-click your project and choose Add rarr New Itemhellip
2 In the Add New Item window from the Installed Templates area select the SAP Business One add-on template
3 Choose SAP Business One UDO Form
4 In the Company Logon window specify the details of the company with which you want to work and choose Log On
Field DescriptionActivity
Server Specify the IP address or the machine name of the SAP Business One server
Server Type From the dropdown list select a server type MSSQL_2008 MSSQL_2012 or HANADB
License Server Specify the license server
Company Name Specify the company defined on the selected SAP Business One server
User ID Specify your user name for the company to which you want to log on
Password Enter your password
Working with SAP Business One Studio Suite Working with Add-on Projects in SAP Business One Studio for Microsoft Visual Studio
PUBLIC copy 2014 SAP SE All rights reserved 27
The UDO form that is registered appears in the List of UDO Forms window
Note
Only the Header Line Style (new UDO style in SAP Business One 882) is supported The Matrix Style (old UDO style) is not supported
5 In the List of UDO Forms window select the UDO form you want to add and choose the Open button
The form opens in edit mode and appears in the Solution Explorer window
Note
The application remembers the company logon information and if you want to add more UDO forms you do not need to specify that information again
If you restart SAP Business One Studio you just need to specify the Password field
6 You can now modify the UDO form
To save the changes in the Solution Explorer window right-click the form and choose Save UDO to DB
When you reopen the form in the SAP Business One client you can see the UDO form is modified
44 Loading an Existing B1s File to Your Project
You can load your existing b1s solution or srf file (ScreenPainter file) in the following ways
Creating an Add-on Project Using an Existing B1s File
1 In the Microsoft Visual Studio main window choose New rarr Project
2 In the New Project window from the Installed Templates area select the SAP Business One add-on template
3 To create an add-on project using an existing B1s file from SAP Business One Studio select SAP Business One Add-on Project from B1s File
4 Choose OK
Adding an Existing B1s File to the Current Project
1 In the Solution Explorer window right-click your project and choose Add rarr Existing Business One File
2 In the Open window select the Business One Studio files (b1s) file you want to add
3 Choose Open The form opens in edit mode and appears in the Solution Explorer window
Adding an Existing SRF File to the Current Project
1 In the Solution Explorer window right-click your project and choose Add rarr Existing Business One File
2 In the Open window select the Business One Studio SRF files (srf) file you want to add
3 Choose Open The form opens in edit mode and appears in the Solution Explorer window
28 PUBLIC copy 2014 SAP SE All rights reserved
Working with SAP Business One Studio Suite Working with Add-on Projects in SAP Business One Studio for Microsoft Visual Studio
45 Packaging Your Project
The SAP Business One Extension Package features are integrated in SAP Business One Studio for Microsoft Visual Studio You can package your project directly from the menu bar
Procedure
1 Build your project first to get the executable file of your extension
2 From the menu bar of the Microsoft Visual Studio main window choose SAP Business One Studio rarr Extension Package
3 In the Extension Registration Data Generator window expand Basic Information and specify the following fields
o Extension Name ndash Enter the name of the extension This field is mandatory
o Extension Version ndash Enter the version of the extension for which you want to package and generate the ARD file This field is mandatory
o Extension Provider ndash Enter the name of the SAP partner that creates and owns the extension For example the name of your company
o Extension Namespace ndash Enter a name for the folder in which SAP Business One places the extension after a user registers the extension in the application
o Supported Database ndash Specify the database in which the extension works This field is mandatory
o Contact Data ndash Enter contact information for the SAP partner that creates and owns the extension For example enter the URL of your companys Website
4 Expand Extension File specify the path of the executable file of your 32-bit or 64-bit add-on and select the files that should be packaged in the zip file
To package your apps for the version for SAP HANA specify the app zip file the name and the package of your app
Note
The naming convention for your package is For example if the package hierarchy is sapsboatp in SAP HANA the package name is this and the corresponding URL will be httpshostportsapsboatp
5 Expand Deployment Steps and select the COM dlls to register for your 32-bit or 64-bit add-on
6 Expend SBO Compatibility you can specify the versions of SAP Business One with which the add-on is compatible
In the Compatible with SAP Business One area specify the following
o Version From ndash Enter the earliest version of SAP Business One with which the extension is compatible
o To ndash Enter the latest version of SAP Business One with which the lightweight add-on is compatible
Example
Enter compatible versions of SAP Business One with the format ltxxxyyyxxgt for example 91000000
7 Expand Parameters you can optionally specify shared parameters and parameters for the extension
o Shared Parameters - The parameters or configuration required to run the extension The parameters are shared in all extension instances running on different companies
o Parameters - The parameters or configurations required to run the extension
8 Choose the Package button
Working with SAP Business One Studio Suite Working with Add-on Projects in SAP Business One Studio for Microsoft Visual Studio
PUBLIC copy 2014 SAP SE All rights reserved 29
9 In the Save As window specify the location where you want to save the file and choose the Save button
Note
If you are not yet ready to package your extension you can choose the Save button instead of the Package button The information you entered in the Extension Registration Data Generator window will be saved in your project The next time you open the Extension Registration Data Generator window the saved information will be displayed
For more information see How to Package and Deploy SAP Business One Extensions for Lightweight Deployment
30 PUBLIC copy 2014 SAP SE All rights reserved
Working with SAP Business One Studio Suite SAP Business One Studio Suite Demo Script
5 SAP Business One Studio Suite Demo Script
This section introduces a demo for how to work with your add-on projects in SAP Business One Studio Suite
Procedure
1 Start SAP Business One and log on to a company
o Database MadridDemo
o User manager
o Password 1234
2 Start SAP Business One Studio and add a new project
1 Choose Menu rarr New rarr Project rarr Add-On
2 Choose OK
3 Create a user form add an EditText with ChooseFromList and add a grid with DataTable
1 Add EditText Grid LinkedButton DB DataSource Data Table and ChooseFromList
Working with SAP Business One Studio Suite SAP Business One Studio Suite Demo Script
PUBLIC copy 2014 SAP SE All rights reserved 31
2 Specify the controls properties as follows
o DB DataSource
o Data Table
o ChooseFromList
o EditText
32 PUBLIC copy 2014 SAP SE All rights reserved
Working with SAP Business One Studio Suite SAP Business One Studio Suite Demo Script
o LinkedButton LinkTo = Item_0 LinkedObject = 2
o Grid DataTableID = DT_0
o Form LinkedObject = 2
3 From Toolbar choose Preview
The user form opens in the SAP Business One client The grid displays all BPs
4 To select a business partner choose the ChooseFromList icon The application fills the business partner code in the EditText
To open the business partner form choose the linked button
Working with SAP Business One Studio Suite SAP Business One Studio Suite Demo Script
PUBLIC copy 2014 SAP SE All rights reserved 33
4 Edit a system form (sales order) add a button and preview it
1 In the SAP Business One client from the Main Menu choose Sales rarr Sales Order to open the original sales order
2 Right-click the project node to add a system form
3 Select Sales Order and choose Open (the other form is cache file in local that user opened)
4 From Toolbar add the button and choose Preview
5 Switch to the SAP Business One client to review the updates of the sales order form
34 PUBLIC copy 2014 SAP SE All rights reserved
Working with SAP Business One Studio Suite SAP Business One Studio Suite Demo Script
5 Edit a UDO form add a button and save the UDO to the database
1 To open the original UDO form in the SAP Business One client choose Tools rarr Default Forms rarr UDO1-UDO1
2 To add a UDO form right-click the project node
3 Specify the DI connection information (password 1234) and choose Log On
Working with SAP Business One Studio Suite SAP Business One Studio Suite Demo Script
PUBLIC copy 2014 SAP SE All rights reserved 35
4 To edit the UDO form select UDO1 and choose OK
5 Add the button and save the UDO to the database
6 To review the updates from the SAP Business One client reopen the UDO form
36 PUBLIC copy 2014 SAP SE All rights reserved
Working with SAP Business One Studio Suite SAP Business One Studio Suite Demo Script
6 Start SAP Business One Studio for Microsoft Visual Studio and add a new project
1 Choose Menu rarr File rarr New rarr Project and select the C project templates
o The template SAP Business One Add-on Project is for creating a new project
o The template SAP Business One Add-on Project from B1s File is for creating a project with the existing B1s file
2 Select SAP Business One Add-on Project and create a new project
7 Add a button a Button_ClickBefore event and a popup message box if choosing the button
1 Add a button
2 Double-click the button to add a Button_ClickBefore event
Working with SAP Business One Studio Suite SAP Business One Studio Suite Demo Script
PUBLIC copy 2014 SAP SE All rights reserved 37
3 Add the UI API code as follows
4 To run the add-on from toolbar or by using the F5 shortcut choose Debug
In the Main Menu of the SAP Business One client the add-on adds the user menu
5 Choose the menu to open the user form
6 Choose the button to open a message box
7 Stop debugging and close all forms
8 Edit a system form (sales order) Add a button and a Button_ClickBefore event create a user form if choosing the button
38 PUBLIC copy 2014 SAP SE All rights reserved
Working with SAP Business One Studio Suite SAP Business One Studio Suite Demo Script
1 In the SAP Business One client from the Main Menu choose Sales rarr Sales Order to open the original sales order
2 Right-click the project node to add a system form (sales order)
3 Add a button
4 Double-click the button to add a Button_ClickBefore event
5 Add the UI API code as follows
Working with SAP Business One Studio Suite SAP Business One Studio Suite Demo Script
PUBLIC copy 2014 SAP SE All rights reserved 39
6 To run the add-on from toolbar or by using the F5 shortcut choose Debug
7 From the SAP Business One client open the sales order The new button appears
To open the new form choose the button
9 Edit a system form (sales opportunity) from the menu design the UI API code to set Remark as a mandatory field
1 In the SAP Business One client from the Main Menu choose Sales Opportunities rarr Sales Opportunity to open the original sales opportunity form
2 From the SAP Business One client choose Edit Form in Visual Studio to edit the system form
3 In UI Outline change the pane level to 2
4 Add a button
5 Double-click the button to add a Button_ClickBefore event
6 Add the UI API code as follows
40 PUBLIC copy 2014 SAP SE All rights reserved
Working with SAP Business One Studio Suite SAP Business One Studio Suite Demo Script
7 To run the add-on from toolbar or by using the F5 shortcut choose Debug
8 In the SAP Business One client reopen the sales opportunity
9 On the Potential tab specify the business partner code and potential amount
On the General tab leave the Remark field empty
10 Choose Add
In the status bar the error message Remark is mandatory appears
11 Specify the remark The system adds the sales opportunity
wwwsapcomcontactsap
Material Number
copy 2014 SAP SE All rights reserved No part of this publication may be reproduced or transmitted in any form or for any purpose without the express permission of SAP AG The information contained herein may be changed without prior notice Some software products marketed by SAP AG and its distributors contain proprietary software components of other software vendors Microsoft Windows Excel Outlook and PowerPoint are registered trademarks of Microsoft Corporation IBM DB2 DB2 Universal Database System ads System i5 System p System p5 System x System z System z10 System z9 z10 z9 iSeries pSeries xSeries zSeries eServer zVM zOS i5OS S390 OS390 OS400 AS400 S390 Parallel Enterprise Server PowerVM Power Architecture POWER6+ POWER6 POWER5+ POWER5 POWER OpenPower PowerPC BatchPipes BladeCenter System Storage GPFS HACMP RETAIN DB2 Connect RACF Redbooks OS2 Parallel Sysplex MVSESA AIX Intelligent Miner WebSphere Netfinity Tivoli and Informix are trademarks or registered trademarks of IBM Corporation Linux is the registered trademark of Linus Torvalds in the US and other countries Adobe the Adobe logo Acrobat PostScript and Reader are either trademarks or registered trademarks of Adobe Systems Incorporated in the United States andor other countries Oracle is a registered trademark of Oracle Corporation UNIX XOpen OSF1 and Motif are registered trademarks of the Open Group Citrix ICA Program Neighborhood MetaFrame WinFrame VideoFrame and MultiWin are trademarks or registered trademarks of Citrix Systems Inc HTML XML XHTML and W3C are trademarks or registered trademarks of W3Creg World Wide Web Consortium Massachusetts Institute of Technology Java is a registered trademark of Sun Microsystems Inc JavaScript is a registered trademark of Sun Microsystems Inc used under license for technology invented and implemented by Netscape SAP R3 xApps xApp SAP NetWeaver Duet PartnerEdge ByDesign SAP Business ByDesign and other SAP products and services mentioned herein as well as their respective logos are trademarks or registered trademarks of SAP AG in Germany and in several other countries all over the world All other product and service names mentioned are the trademarks of their respective companies Data contained in this document serves informational purposes only National product specifications may vary These materials are subject to change without notice These materials are provided by SAP AG and its affiliated companies (SAP Group) for informational purposes only without representation or warranty of any kind and SAP Group shall not be liable for errors or omissions with respect to the materials The only warranties for SAP Group products and services are those that are set forth in the express warranty statements accompanying such products and services if any Nothing herein should be construed as constituting an additional warranty
- 1 Introduction
-
- 11 Installing SAP Business One Studio
- 12 Running SAP Business One Studio
- 13 Terms and Definitions
- 14 Related Documentation
-
- 2 SAP Business One Studio Main Window
-
- 21 Menu Button
- 22 Toolbar
- 23 Toolbox Window
- 24 Docking Tool Windows
-
- 3 Working with Add-on Projects in SAP Business One Studio
-
- 31 Creating an Add-on Project
- 32 Opening an Add-on Project or an External File
- 33 Designing a Form
-
- 331 Working with Tab Controls
- 332 Working with Grids
- 333 Working with Data Tables
- 334 Working with Matrixes
- 335 Working with Choose From Lists
- 336 Example Creating a Business Partner Field with Linked Button and Choose From List Functions
-
- 34 Adding Renaming or Deleting Forms in a Project
-
- 341 Adding New User Forms
- 342 Adding Existing User Forms
- 343 Adding System Forms
- 344 Adding UDO Forms
-
- 35 Editing Active Forms in SAP Business One
- 36 Exporting Updated Parts of a System Form
-
- 4 Working with Add-on Projects in SAP Business One Studio for Microsoft Visual Studio
-
- 41 Creating SAP Business One Add-on Projects
- 42 Tool Windows in SAP Business One Studio for Microsoft Visual Studio
- 43 Adding Forms in a Project
-
- 431 Adding SAP Business One User Forms
- 432 Adding SAP Business One System Forms
- 433 Adding SAP Business One UDO Forms
-
- 44 Loading an Existing B1s File to Your Project
- 45 Packaging Your Project
-
- 5 SAP Business One Studio Suite Demo Script
-
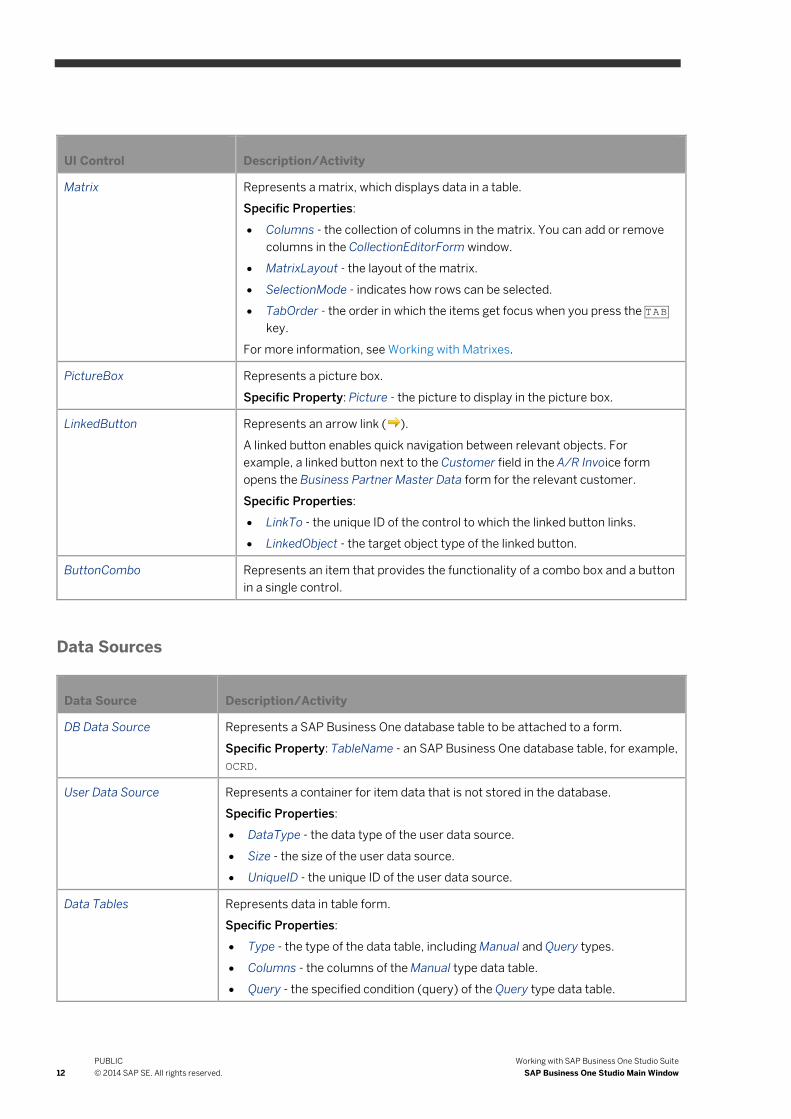
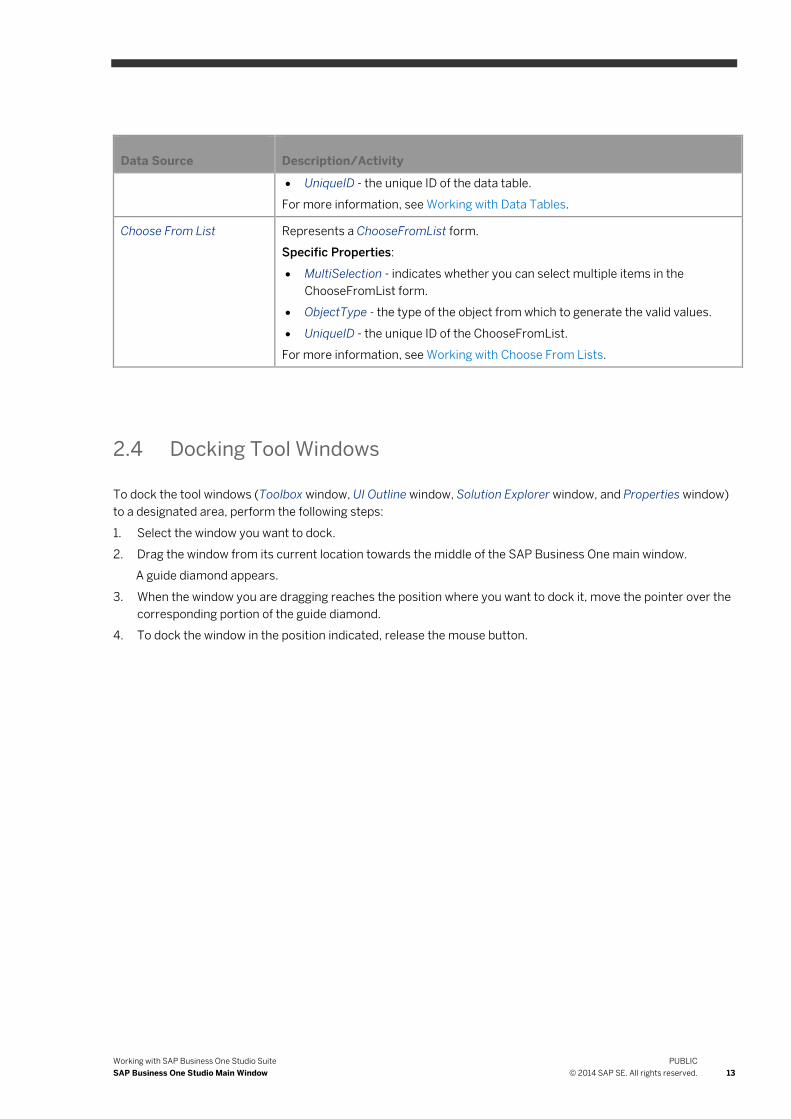
Working with SAP Business One Studio Suite Working with Add-on Projects in SAP Business One Studio
PUBLIC copy 2014 SAP SE All rights reserved 15
33 Designing a Form
In the design area of the SAP Business One Studio main window you can design your own form This procedure introduces the basic operation of designing a form
Procedure
1 In the Toolbox window double-click or drag and drop a form item from the UI Controls area or the Data Source area
For example double-click a button A new button appears in the top left corner of the form
2 Use drag and drop to position or resize the item on the form
Note
When you drag the item the application shows a red line which enables you to align the item with the existing ones
3 Select the form or an item to set the properties
You can select the form or a form item either from the design area or from the UI Outline window The UI Outline window groups form items in pane levels
4 In the Properties window edit the properties
5 To preview the form in the SAP Business One client click (PreviewB1Client)
6 Save the form
331 Working with Tab Controls
A tab control is a container of the items to be shown on the tab page In UI API the tab control is named as folder
Procedure
1 Add a tab control
To add a tab control in the Toolbox window UI Controls area double-click the TabControl icon
The tab control is added to the form with one tab page
If the tab control is active a cross-shaped symbol appears at the top left of the tab control
2 To add or remove a tab page right-click the cross-shaped symbol and choose Add Tab Page or Remove Tab Page
3 Specify properties for each tab page
To specify the pane level of the tab page in the Properties window set the AutoPaneSelection field to True and in the Pane field enter the pane level
4 Add UI controls to the tab page area and specify the FromPane ToPane properties
Once the FromPane ToPane properties are set when you switch tab pages the UI controls with the same pane level are displayed on the tab page
16 PUBLIC copy 2014 SAP SE All rights reserved
Working with SAP Business One Studio Suite Working with Add-on Projects in SAP Business One Studio
332 Working with Grids
The grid control is a visual representation of a data table
Procedure
1 Add a grid control
To add a grid control in the Toolbox window UI Controls area double-click the Grid icon
The grid control is added to the form without columns
2 Add a data table
To add a data table in the Toolbox window Data Source area double-click the Data Tables icon
For more information see Working with Data Tables
3 Bind the data table to the grid as follows
1 Select the grid control you want to bind
2 In the Properties window under the Specific area in the DataTableID field select a data table to which you want to bind
Note
o If the data table type is Query the columns are not displayed in edit mode To preview the columns click (PreviewB1Client)
o If the data table type is Manual the columns are displayed in edit mode
3 After binding a grid control to a data table of Manual type you can set the Columns property Perform the following steps
1 In the Columns property field click the button
The CollectionEditorForm window appears
2 Select the column you want to edit from the list in the left area of the window
3 In the Properties area specify the column type
Note
To set a column with a link button select it_EDIT as the column type and in the LinkObjectType field specify the type of the object you want to connect to
333 Working with Data Tables
You can use a data table to perform a free query for example JOIN GROUP BY and so on You can also manually set the data table columns
Procedure
1 To add a data table in the Toolbox window Data Source area double-click the Data Tables icon
Working with SAP Business One Studio Suite Working with Add-on Projects in SAP Business One Studio
PUBLIC copy 2014 SAP SE All rights reserved 17
A new data table is created with a default unique ID and a type
Note
You can change the default ID and type of the data table However changing the type results in the loss of the existing query or columns
2 To set queries change the data table type to Query and in the Query property field specify your query
If the data table is attached to a grid control the grid is automatically filled with columns from the query
3 To set columns for manual data tables change the data table type to Manual and in the Columns property field click the button
In the CollectionEditorForm window you can modify the columns
o To add a new column choose the Add button
A new column is created with a default name and type (ft_AlphaNumeric) You can change the column default name and type
o To delete the column choose the Remove button
4 To bind a data table (with Manual type) to an edit text control perform the following steps
1 In the Properties window of the edit text control set the DataSource property to the data table
2 In the Alias property set the column of the data table
334 Working with Matrixes
The matrix control displays data in a table You specify each column manually and bind each column to a data source
Procedure
1 To add a matrix control in the Toolbox window UI Controls area double-click the Matrix icon
The matrix control is added to the form with a default column Col_0
2 In the Properties window under the Specific area in the Columns property field click the button
The CollectionEditorForm window appears
3 Choose the Add button to add new columns
4 In the Properties area specify the Type field of the column the DataSource Alias fields and the specific fields
5 Add as many columns as needed and choose the OK button
6 To preview the matrix click (PreviewB1Client)
335 Working with Choose From Lists
ChooseFromList is a basic functionality in the SAP Business One application It allows you to open a ChooseFromList form which displays a list of objects of the same type
18 PUBLIC copy 2014 SAP SE All rights reserved
Working with SAP Business One Studio Suite Working with Add-on Projects in SAP Business One Studio
Procedure
1 To add a ChooseFromList control in the Toolbox window Data Source area double-click the Choose From List icon
A new ChooseFromList is created with a default unique ID You can change the default ID
2 In the Properties window specify the ObjectType property and enter the type of the object you want the Choose from List form to display For example enter 2 for business partners
You can connect EditText Button and MatrixGrid column (with type it_EDIT or it_LINKED_BUTTON) items to a choose from list
3 To connect EditText Button and MatrixGrid column items to a choose from list in the Properties window specify the ChooseFromListUID field
4 In the ChooseFromListAlias (EditText MatrixGrid column with type it_EDIT or it_LINK_BUTTON) field enter the alias of the field you want to display
336 Example Creating a Business Partner Field with Linked Button and Choose From List Functions
The linked button function is often used together with the choose from list function For example you add a new field named BP Code For this field you want to have a choose from list to open the List of Business Partners window and a linked button to open the Business Partner Master Data window
Procedure
1 In the Toolbox window UI Controls area add a StaticText a LinkedButton and an EditText
2 In the Data Source area add a DB Data Source and a Choose From List
3 In the Properties window of the form specify a valid value for the ObjectType filed
4 Set the Choose From List properties
In the Properties window of the choose from list in the ObjectType filed enter 2 which represents business partners For more information about other object types see BoObjectTypes Enumeration in SDK Help Center
5 Set the DB Data Source properties
In the Properties window of the DB data source in the TableName filed enter OCRD which represents the SAP Business One system table for business partners For more information about other system tables see Database Tables Reference in SDK Help Center
6 Connect the linked button with the BP Code edit text field
In the Properties window of the linked button in the LinkTo field paste the unique ID of the edit text in the LinkedObject filed enter 2
7 Bind the DB data source to the BP Code edit text field
In the Properties window of the edit text in the DataSource field enter OCRD in the Alias field enter CardCode
8 Connect the choose from list with the BP Code edit text field
Working with SAP Business One Studio Suite Working with Add-on Projects in SAP Business One Studio
PUBLIC copy 2014 SAP SE All rights reserved 19
In the Properties window of the edit text in the ChooseFromListUID field enter the ID of the choose from list in the ChooseFromListAutoFill field select True and in the ChooseFromListAlias field enter CardCode
9 To preview click (PreviewB1Client)
o When you click the choose from list icon of the BP Code field the List of Business Partners window appears
o After you select a business partner from the list the BP Code field is automatically filled and a linked button appears
o Click the linked button the Business Partner Master Data window appears
34 Adding Renaming or Deleting Forms in a Project
To add forms in your project right-click your project in the Solution Explorer window
From the context menu you can add the following types of forms
bull New user form
bull Existing user form
bull System form
bull UDO form
To rename a form in your project in the Solution Explorer window right-click the form and choose Rename
To delete a form in your project in the Solution Explorer window right-click the form and choose Delete
341 Adding New User Forms
A user form is a form designed by a partner It can be generated from SAP Business One Studio Screen Painter UI API or your own code
To add a new user form in the Solution Explorer window right-click your project and choose New Form
A new form opens in edit mode and appears in the Solution Explorer window
You can now design the new form For more information see Designing a Form
342 Adding Existing User Forms
You can add an existing user form to your project
Procedure
1 In the Solution Explorer window right-click your project and choose Add rarr Existing Form
2 In the Add Existing Item window select the form you want to add
3 Choose Open
20 PUBLIC copy 2014 SAP SE All rights reserved
Working with SAP Business One Studio Suite Working with Add-on Projects in SAP Business One Studio
The form opens in edit mode and appears in the Solution Explorer window
343 Adding System Forms
A system form is a standard SAP Business One form that you can add to your project
Procedure
1 In the Solution Explorer window right-click your project and choose Add rarr System Form
2 In the Add System Form window select the form you want to add
Note
The Add System Form window lists the following system forms
o All currently opened system forms if SAP Business One is running
o The locally cached system forms
3 Choose OK
The form opens in edit mode and appears in the Solution Explorer window
Note
Once opened in edit mode a system form will be cached up locally
4 You can now modify the form
In edit mode of the system form you can add new UI controls and modify the properties of the existing system items
5 To preview the system form you need to open the form in the SAP Business One client first and then click (PreviewB1Client)
Caution
Deleting existing system items does not take effect when you preview the modified system form
344 Adding UDO Forms
A UDO form is a form generated by the User-Defined Object Registration wizard (To access the wizard from the SAP Business One menu bar choose Tools rarr Customization Tools rarr Objects Registration Wizard) You can add a UDO form to your project
Procedure
1 In the Solution Explorer window right-click your project and choose Add rarr UDO Form
2 In the Company Logon window specify the details of the company you want to work with and choose Log On
Working with SAP Business One Studio Suite Working with Add-on Projects in SAP Business One Studio
PUBLIC copy 2014 SAP SE All rights reserved 21
Field DescriptionActivity
Server Specify the IP address or the machine name of the SAP Business One server
Server Type From the dropdown list select a server type MSSQL_2008 MSSQL_2012 or HANADB
License Server Specify the license server
Company Name Specify the company defined on the selected SAP Business One server
User ID Specify your user name for the company you want to log on to
Password Enter your password
The UDO form that is registered appears in the List of UDO Forms window
Note
Only the Header Line Style (new UDO style in SAP Business One 882) is supported The Matrix Style (old UDO style) is not supported
3 In the List of UDO Forms window select the UDO form you want to add and choose the Open button
The form opens in edit mode and appears in the Solution Explorer window
Note
You can add more UDO forms The application remembers the company logon information and you do not need to specify it again
If you restart SAP Business One Studio you just need to specify the Password field
4 You can now modify the UDO form
5 To preview the form click (PreviewB1Client)
6 To save the changes in the Solution Explorer window right-click the form and choose Save to DB
When you reopen the form in the SAP Business One client you can see the UDO form is modified
35 Editing Active Forms in SAP Business One
In the SAP Business One client you can edit the active system form through SAP Business One Studio or SAP Business One Studio for Microsoft Visual Studio The active form means the current system form in the SAP Business One client If you have multiple forms open in the SAP Business One client the active form is the top one
Procedure
1 In SAP Business One from the Tools menu choose SAP Business One Studio
2 If you want to edit the active form from SAP Business One Studio choose Edit Active Form
o If SAP Business One Studio is already running the application adds the active system form to the project
o If you have not yet opened SAP Business One Studio the application runs SAP Business One Studio first automatically creates a project and opens the active form in the project
3 If you want to edit the active form from SAP Business One Studio for Microsoft Visual Studio choose Edit Active Form in Visual Studio
22 PUBLIC copy 2014 SAP SE All rights reserved
Working with SAP Business One Studio Suite Working with Add-on Projects in SAP Business One Studio
o If the SAP Business One Studio for Microsoft Visual Studio is already running the application adds the active system form to the project
o If you have not yet opened Microsoft Visual Studio the application does nothing for you You need to open and create a project in Microsoft Visual Studio first and then in the SAP Business One client from the Tools menu choose SAP Business One Studio and choose Edit Active Form in Visual Studio
36 Exporting Updated Parts of a System Form
If you edited a system form you can export the updated part of the system form to a srf file
Procedure
1 In the Solution Explorer window right-click the system form and choose Export Updated Part As
2 In the Export File As window specify the file name
3 Choose Save
Working with SAP Business One Studio Suite Working with Add-on Projects in SAP Business One Studio for Microsoft Visual Studio
PUBLIC copy 2014 SAP SE All rights reserved 23
4 Working with Add-on Projects in SAP Business One Studio for Microsoft Visual Studio
41 Creating SAP Business One Add-on Projects
You can create your new add-on forms with the same look and feel as the SAP Business One forms
Procedure
1 In the Microsoft Visual Studio main window choose New rarr Project
After you install SAP Business One Studio for Microsoft Visual Studio you can locate the SAP Business One template in the New Project dialog box by navigating the expanding list in the left pane under Installed Templates
2 In the New Project window from the Installed Templates area select the SAP Business One template
3 To create an add-on project with an empty user form select SAP Business One Add-on Project and specify the name and the location of your new project
4 To create an add-on project using an existing B1s file from SAP Business One Studio select SAP Business One Add-on Project from B1s File
5 Choose OK
A default form named Form1b1f appears in the Solution Explorer window and the layout of the form appears in the design area A folder B1Studio is generated under CTempltYourAddOnProjectgtltYourAddOnProjectgtbinDebug
You can design the layout of your form and the logic of the controls For more information see Designing a Form
Note
When you create an SAP Business One add-on project it adds the SAPbouiComFramework which is for connecting the UI API application handling LoadBatchAction systemuserUDO form events and generating code It includes
o Menucs - for adding menus and handling menu events
o Programscs - for connecting the UI server and performing the initialization
o SAPbouiCOMFrameworkApplicationSBO_Application - the root COM object of UI API
Sample Code ApplicationSBO_ApplicationMessageBox(Hello world)
o SAPbouiCOMFrameworkFormBaseUIAPIRawForm - the original form COM object of UI API
Sample Code thisUIAPIRawFormClose()Close form
The SAPbouiComFramework contains all UI API COM objects and interfaces therefore we do not recommend that you replace it
24 PUBLIC copy 2014 SAP SE All rights reserved
Working with SAP Business One Studio Suite Working with Add-on Projects in SAP Business One Studio for Microsoft Visual Studio
Note
In SAP Business One 91 a new net SAPBusinessOneSDKdll is added You can build add-on solutions using SAPBusinessOneSDKdll which integrates UI API and DI API
42 Tool Windows in SAP Business One Studio for Microsoft Visual Studio
The tool windows in SAP Business One Studio for Microsoft Visual Studio are very similar to the tool windows in SAP Business One Studio The windows include
bull Toolbox window ndash contains the controls you can use to design your form For more information see Toolbox Window
Note
To program a certain control double-click it The code is automatically generated
bull UI Outline window ndash allows you to view items in a selected pane
Note
This window may not appear by default To display the UI Outline window from the menu bar choose View rarr Other Windows rarr Outline Window
bull Solution Explorer window ndash allows you to view the source files in your project
Note
The project files also include SAP Business One UI API references and predefined menu options (Menucs) In runtime by default the newly added form appears at the bottom of the SAP Business One Main Menu You can change the code if you want to open the form from another menu location
bull Properties window ndash allows you to set and examine the properties and events of forms and form items
Note
To register events of a control in the Properties window click (Events) and double-click the event property you want to edit The code is automatically generated and you can program as needed
You can drag the border of the windows to resize the window click (Auto Hide) to hide the window and also dock the windows to a new location (see Docking Tool Windows)
bull The double-click function - you can double-click an item to add an event The following are the default events that the system supports currently
Item Type Event
Form LoadAfter
EditText KeyDownAfter
CheckBox ClickBefore
OptionButton ClickBefore
Working with SAP Business One Studio Suite Working with Add-on Projects in SAP Business One Studio for Microsoft Visual Studio
PUBLIC copy 2014 SAP SE All rights reserved 25
Item Type Event
Button ClickBefore
ComboBox ComboSelectAfter
bull Toolbar - Located below the Menu button the toolbar is a collection of icons providing easy access to commonly used functions The functions are the same as those for SAP Business One Studio See chapter 22 in this document
43 Adding Forms in a Project
To add forms in your project in the Solution Explorer window right-click your project
From the context menu choose Add rarr New Itemhellip You can add the following types of forms
bull SAP Business One user form
bull SAP Business One system form
bull SAP Business One UDO form
431 Adding SAP Business One User Forms
An SAP Business One user form is a form designed by a partner It can be generated from SAP Business One Studio Screen Painter UI API or your own code
Procedure
1 In the Solution Explorer window right-click your project and choose Add rarr New Itemhellip
2 In the Add New Item window from the Installed Templates area select the SAP Business One add-on template
3 Choose SAP Business One User Form
A new form opens in edit mode and appears in the Solution Explorer window
You can now design the new form For more information see Designing a Form
In runtime by default the newly added form appears at the bottom of the SAP Business One Main Menu
432 Adding SAP Business One System Forms
A system form is a standard SAP Business One form that you can add to your project
26 PUBLIC copy 2014 SAP SE All rights reserved
Working with SAP Business One Studio Suite Working with Add-on Projects in SAP Business One Studio for Microsoft Visual Studio
Procedure
1 In the Solution Explorer window right-click your project and choose Add rarr New Itemhellip
2 In the Add New Item window from the Installed Templates area select the SAP Business One add-on template
3 Choose SAP Business One System Form
Note
The Add System Form window lists the following system forms
o All currently opened system forms if SAP Business One is running
o The locally cached system forms
4 Choose OK
The form opens in edit mode and appears in the Solution Explorer window
You can add user items modify the properties of a system item and register events but you cannot delete existing system items The modification is implemented after you reopen the system form
433 Adding SAP Business One UDO Forms
A UDO form is a form generated by the User-Defined Object Registration wizard (To access the wizard from the SAP Business One menu bar choose Tools rarr Customization Tools rarr Objects Registration Wizard) You can add a UDO form to your project
Procedure
1 In the Solution Explorer window right-click your project and choose Add rarr New Itemhellip
2 In the Add New Item window from the Installed Templates area select the SAP Business One add-on template
3 Choose SAP Business One UDO Form
4 In the Company Logon window specify the details of the company with which you want to work and choose Log On
Field DescriptionActivity
Server Specify the IP address or the machine name of the SAP Business One server
Server Type From the dropdown list select a server type MSSQL_2008 MSSQL_2012 or HANADB
License Server Specify the license server
Company Name Specify the company defined on the selected SAP Business One server
User ID Specify your user name for the company to which you want to log on
Password Enter your password
Working with SAP Business One Studio Suite Working with Add-on Projects in SAP Business One Studio for Microsoft Visual Studio
PUBLIC copy 2014 SAP SE All rights reserved 27
The UDO form that is registered appears in the List of UDO Forms window
Note
Only the Header Line Style (new UDO style in SAP Business One 882) is supported The Matrix Style (old UDO style) is not supported
5 In the List of UDO Forms window select the UDO form you want to add and choose the Open button
The form opens in edit mode and appears in the Solution Explorer window
Note
The application remembers the company logon information and if you want to add more UDO forms you do not need to specify that information again
If you restart SAP Business One Studio you just need to specify the Password field
6 You can now modify the UDO form
To save the changes in the Solution Explorer window right-click the form and choose Save UDO to DB
When you reopen the form in the SAP Business One client you can see the UDO form is modified
44 Loading an Existing B1s File to Your Project
You can load your existing b1s solution or srf file (ScreenPainter file) in the following ways
Creating an Add-on Project Using an Existing B1s File
1 In the Microsoft Visual Studio main window choose New rarr Project
2 In the New Project window from the Installed Templates area select the SAP Business One add-on template
3 To create an add-on project using an existing B1s file from SAP Business One Studio select SAP Business One Add-on Project from B1s File
4 Choose OK
Adding an Existing B1s File to the Current Project
1 In the Solution Explorer window right-click your project and choose Add rarr Existing Business One File
2 In the Open window select the Business One Studio files (b1s) file you want to add
3 Choose Open The form opens in edit mode and appears in the Solution Explorer window
Adding an Existing SRF File to the Current Project
1 In the Solution Explorer window right-click your project and choose Add rarr Existing Business One File
2 In the Open window select the Business One Studio SRF files (srf) file you want to add
3 Choose Open The form opens in edit mode and appears in the Solution Explorer window
28 PUBLIC copy 2014 SAP SE All rights reserved
Working with SAP Business One Studio Suite Working with Add-on Projects in SAP Business One Studio for Microsoft Visual Studio
45 Packaging Your Project
The SAP Business One Extension Package features are integrated in SAP Business One Studio for Microsoft Visual Studio You can package your project directly from the menu bar
Procedure
1 Build your project first to get the executable file of your extension
2 From the menu bar of the Microsoft Visual Studio main window choose SAP Business One Studio rarr Extension Package
3 In the Extension Registration Data Generator window expand Basic Information and specify the following fields
o Extension Name ndash Enter the name of the extension This field is mandatory
o Extension Version ndash Enter the version of the extension for which you want to package and generate the ARD file This field is mandatory
o Extension Provider ndash Enter the name of the SAP partner that creates and owns the extension For example the name of your company
o Extension Namespace ndash Enter a name for the folder in which SAP Business One places the extension after a user registers the extension in the application
o Supported Database ndash Specify the database in which the extension works This field is mandatory
o Contact Data ndash Enter contact information for the SAP partner that creates and owns the extension For example enter the URL of your companys Website
4 Expand Extension File specify the path of the executable file of your 32-bit or 64-bit add-on and select the files that should be packaged in the zip file
To package your apps for the version for SAP HANA specify the app zip file the name and the package of your app
Note
The naming convention for your package is For example if the package hierarchy is sapsboatp in SAP HANA the package name is this and the corresponding URL will be httpshostportsapsboatp
5 Expand Deployment Steps and select the COM dlls to register for your 32-bit or 64-bit add-on
6 Expend SBO Compatibility you can specify the versions of SAP Business One with which the add-on is compatible
In the Compatible with SAP Business One area specify the following
o Version From ndash Enter the earliest version of SAP Business One with which the extension is compatible
o To ndash Enter the latest version of SAP Business One with which the lightweight add-on is compatible
Example
Enter compatible versions of SAP Business One with the format ltxxxyyyxxgt for example 91000000
7 Expand Parameters you can optionally specify shared parameters and parameters for the extension
o Shared Parameters - The parameters or configuration required to run the extension The parameters are shared in all extension instances running on different companies
o Parameters - The parameters or configurations required to run the extension
8 Choose the Package button
Working with SAP Business One Studio Suite Working with Add-on Projects in SAP Business One Studio for Microsoft Visual Studio
PUBLIC copy 2014 SAP SE All rights reserved 29
9 In the Save As window specify the location where you want to save the file and choose the Save button
Note
If you are not yet ready to package your extension you can choose the Save button instead of the Package button The information you entered in the Extension Registration Data Generator window will be saved in your project The next time you open the Extension Registration Data Generator window the saved information will be displayed
For more information see How to Package and Deploy SAP Business One Extensions for Lightweight Deployment
30 PUBLIC copy 2014 SAP SE All rights reserved
Working with SAP Business One Studio Suite SAP Business One Studio Suite Demo Script
5 SAP Business One Studio Suite Demo Script
This section introduces a demo for how to work with your add-on projects in SAP Business One Studio Suite
Procedure
1 Start SAP Business One and log on to a company
o Database MadridDemo
o User manager
o Password 1234
2 Start SAP Business One Studio and add a new project
1 Choose Menu rarr New rarr Project rarr Add-On
2 Choose OK
3 Create a user form add an EditText with ChooseFromList and add a grid with DataTable
1 Add EditText Grid LinkedButton DB DataSource Data Table and ChooseFromList
Working with SAP Business One Studio Suite SAP Business One Studio Suite Demo Script
PUBLIC copy 2014 SAP SE All rights reserved 31
2 Specify the controls properties as follows
o DB DataSource
o Data Table
o ChooseFromList
o EditText
32 PUBLIC copy 2014 SAP SE All rights reserved
Working with SAP Business One Studio Suite SAP Business One Studio Suite Demo Script
o LinkedButton LinkTo = Item_0 LinkedObject = 2
o Grid DataTableID = DT_0
o Form LinkedObject = 2
3 From Toolbar choose Preview
The user form opens in the SAP Business One client The grid displays all BPs
4 To select a business partner choose the ChooseFromList icon The application fills the business partner code in the EditText
To open the business partner form choose the linked button
Working with SAP Business One Studio Suite SAP Business One Studio Suite Demo Script
PUBLIC copy 2014 SAP SE All rights reserved 33
4 Edit a system form (sales order) add a button and preview it
1 In the SAP Business One client from the Main Menu choose Sales rarr Sales Order to open the original sales order
2 Right-click the project node to add a system form
3 Select Sales Order and choose Open (the other form is cache file in local that user opened)
4 From Toolbar add the button and choose Preview
5 Switch to the SAP Business One client to review the updates of the sales order form
34 PUBLIC copy 2014 SAP SE All rights reserved
Working with SAP Business One Studio Suite SAP Business One Studio Suite Demo Script
5 Edit a UDO form add a button and save the UDO to the database
1 To open the original UDO form in the SAP Business One client choose Tools rarr Default Forms rarr UDO1-UDO1
2 To add a UDO form right-click the project node
3 Specify the DI connection information (password 1234) and choose Log On
Working with SAP Business One Studio Suite SAP Business One Studio Suite Demo Script
PUBLIC copy 2014 SAP SE All rights reserved 35
4 To edit the UDO form select UDO1 and choose OK
5 Add the button and save the UDO to the database
6 To review the updates from the SAP Business One client reopen the UDO form
36 PUBLIC copy 2014 SAP SE All rights reserved
Working with SAP Business One Studio Suite SAP Business One Studio Suite Demo Script
6 Start SAP Business One Studio for Microsoft Visual Studio and add a new project
1 Choose Menu rarr File rarr New rarr Project and select the C project templates
o The template SAP Business One Add-on Project is for creating a new project
o The template SAP Business One Add-on Project from B1s File is for creating a project with the existing B1s file
2 Select SAP Business One Add-on Project and create a new project
7 Add a button a Button_ClickBefore event and a popup message box if choosing the button
1 Add a button
2 Double-click the button to add a Button_ClickBefore event
Working with SAP Business One Studio Suite SAP Business One Studio Suite Demo Script
PUBLIC copy 2014 SAP SE All rights reserved 37
3 Add the UI API code as follows
4 To run the add-on from toolbar or by using the F5 shortcut choose Debug
In the Main Menu of the SAP Business One client the add-on adds the user menu
5 Choose the menu to open the user form
6 Choose the button to open a message box
7 Stop debugging and close all forms
8 Edit a system form (sales order) Add a button and a Button_ClickBefore event create a user form if choosing the button
38 PUBLIC copy 2014 SAP SE All rights reserved
Working with SAP Business One Studio Suite SAP Business One Studio Suite Demo Script
1 In the SAP Business One client from the Main Menu choose Sales rarr Sales Order to open the original sales order
2 Right-click the project node to add a system form (sales order)
3 Add a button
4 Double-click the button to add a Button_ClickBefore event
5 Add the UI API code as follows
Working with SAP Business One Studio Suite SAP Business One Studio Suite Demo Script
PUBLIC copy 2014 SAP SE All rights reserved 39
6 To run the add-on from toolbar or by using the F5 shortcut choose Debug
7 From the SAP Business One client open the sales order The new button appears
To open the new form choose the button
9 Edit a system form (sales opportunity) from the menu design the UI API code to set Remark as a mandatory field
1 In the SAP Business One client from the Main Menu choose Sales Opportunities rarr Sales Opportunity to open the original sales opportunity form
2 From the SAP Business One client choose Edit Form in Visual Studio to edit the system form
3 In UI Outline change the pane level to 2
4 Add a button
5 Double-click the button to add a Button_ClickBefore event
6 Add the UI API code as follows
40 PUBLIC copy 2014 SAP SE All rights reserved
Working with SAP Business One Studio Suite SAP Business One Studio Suite Demo Script
7 To run the add-on from toolbar or by using the F5 shortcut choose Debug
8 In the SAP Business One client reopen the sales opportunity
9 On the Potential tab specify the business partner code and potential amount
On the General tab leave the Remark field empty
10 Choose Add
In the status bar the error message Remark is mandatory appears
11 Specify the remark The system adds the sales opportunity
wwwsapcomcontactsap
Material Number
copy 2014 SAP SE All rights reserved No part of this publication may be reproduced or transmitted in any form or for any purpose without the express permission of SAP AG The information contained herein may be changed without prior notice Some software products marketed by SAP AG and its distributors contain proprietary software components of other software vendors Microsoft Windows Excel Outlook and PowerPoint are registered trademarks of Microsoft Corporation IBM DB2 DB2 Universal Database System ads System i5 System p System p5 System x System z System z10 System z9 z10 z9 iSeries pSeries xSeries zSeries eServer zVM zOS i5OS S390 OS390 OS400 AS400 S390 Parallel Enterprise Server PowerVM Power Architecture POWER6+ POWER6 POWER5+ POWER5 POWER OpenPower PowerPC BatchPipes BladeCenter System Storage GPFS HACMP RETAIN DB2 Connect RACF Redbooks OS2 Parallel Sysplex MVSESA AIX Intelligent Miner WebSphere Netfinity Tivoli and Informix are trademarks or registered trademarks of IBM Corporation Linux is the registered trademark of Linus Torvalds in the US and other countries Adobe the Adobe logo Acrobat PostScript and Reader are either trademarks or registered trademarks of Adobe Systems Incorporated in the United States andor other countries Oracle is a registered trademark of Oracle Corporation UNIX XOpen OSF1 and Motif are registered trademarks of the Open Group Citrix ICA Program Neighborhood MetaFrame WinFrame VideoFrame and MultiWin are trademarks or registered trademarks of Citrix Systems Inc HTML XML XHTML and W3C are trademarks or registered trademarks of W3Creg World Wide Web Consortium Massachusetts Institute of Technology Java is a registered trademark of Sun Microsystems Inc JavaScript is a registered trademark of Sun Microsystems Inc used under license for technology invented and implemented by Netscape SAP R3 xApps xApp SAP NetWeaver Duet PartnerEdge ByDesign SAP Business ByDesign and other SAP products and services mentioned herein as well as their respective logos are trademarks or registered trademarks of SAP AG in Germany and in several other countries all over the world All other product and service names mentioned are the trademarks of their respective companies Data contained in this document serves informational purposes only National product specifications may vary These materials are subject to change without notice These materials are provided by SAP AG and its affiliated companies (SAP Group) for informational purposes only without representation or warranty of any kind and SAP Group shall not be liable for errors or omissions with respect to the materials The only warranties for SAP Group products and services are those that are set forth in the express warranty statements accompanying such products and services if any Nothing herein should be construed as constituting an additional warranty
- 1 Introduction
-
- 11 Installing SAP Business One Studio
- 12 Running SAP Business One Studio
- 13 Terms and Definitions
- 14 Related Documentation
-
- 2 SAP Business One Studio Main Window
-
- 21 Menu Button
- 22 Toolbar
- 23 Toolbox Window
- 24 Docking Tool Windows
-
- 3 Working with Add-on Projects in SAP Business One Studio
-
- 31 Creating an Add-on Project
- 32 Opening an Add-on Project or an External File
- 33 Designing a Form
-
- 331 Working with Tab Controls
- 332 Working with Grids
- 333 Working with Data Tables
- 334 Working with Matrixes
- 335 Working with Choose From Lists
- 336 Example Creating a Business Partner Field with Linked Button and Choose From List Functions
-
- 34 Adding Renaming or Deleting Forms in a Project
-
- 341 Adding New User Forms
- 342 Adding Existing User Forms
- 343 Adding System Forms
- 344 Adding UDO Forms
-
- 35 Editing Active Forms in SAP Business One
- 36 Exporting Updated Parts of a System Form
-
- 4 Working with Add-on Projects in SAP Business One Studio for Microsoft Visual Studio
-
- 41 Creating SAP Business One Add-on Projects
- 42 Tool Windows in SAP Business One Studio for Microsoft Visual Studio
- 43 Adding Forms in a Project
-
- 431 Adding SAP Business One User Forms
- 432 Adding SAP Business One System Forms
- 433 Adding SAP Business One UDO Forms
-
- 44 Loading an Existing B1s File to Your Project
- 45 Packaging Your Project
-
- 5 SAP Business One Studio Suite Demo Script
-
Working with SAP Business One Studio Suite Working with Add-on Projects in SAP Business One Studio
PUBLIC copy 2014 SAP SE All rights reserved 17
A new data table is created with a default unique ID and a type
Note
You can change the default ID and type of the data table However changing the type results in the loss of the existing query or columns
2 To set queries change the data table type to Query and in the Query property field specify your query
If the data table is attached to a grid control the grid is automatically filled with columns from the query
3 To set columns for manual data tables change the data table type to Manual and in the Columns property field click the button
In the CollectionEditorForm window you can modify the columns
o To add a new column choose the Add button
A new column is created with a default name and type (ft_AlphaNumeric) You can change the column default name and type
o To delete the column choose the Remove button
4 To bind a data table (with Manual type) to an edit text control perform the following steps
1 In the Properties window of the edit text control set the DataSource property to the data table
2 In the Alias property set the column of the data table
334 Working with Matrixes
The matrix control displays data in a table You specify each column manually and bind each column to a data source
Procedure
1 To add a matrix control in the Toolbox window UI Controls area double-click the Matrix icon
The matrix control is added to the form with a default column Col_0
2 In the Properties window under the Specific area in the Columns property field click the button
The CollectionEditorForm window appears
3 Choose the Add button to add new columns
4 In the Properties area specify the Type field of the column the DataSource Alias fields and the specific fields
5 Add as many columns as needed and choose the OK button
6 To preview the matrix click (PreviewB1Client)
335 Working with Choose From Lists
ChooseFromList is a basic functionality in the SAP Business One application It allows you to open a ChooseFromList form which displays a list of objects of the same type
18 PUBLIC copy 2014 SAP SE All rights reserved
Working with SAP Business One Studio Suite Working with Add-on Projects in SAP Business One Studio
Procedure
1 To add a ChooseFromList control in the Toolbox window Data Source area double-click the Choose From List icon
A new ChooseFromList is created with a default unique ID You can change the default ID
2 In the Properties window specify the ObjectType property and enter the type of the object you want the Choose from List form to display For example enter 2 for business partners
You can connect EditText Button and MatrixGrid column (with type it_EDIT or it_LINKED_BUTTON) items to a choose from list
3 To connect EditText Button and MatrixGrid column items to a choose from list in the Properties window specify the ChooseFromListUID field
4 In the ChooseFromListAlias (EditText MatrixGrid column with type it_EDIT or it_LINK_BUTTON) field enter the alias of the field you want to display
336 Example Creating a Business Partner Field with Linked Button and Choose From List Functions
The linked button function is often used together with the choose from list function For example you add a new field named BP Code For this field you want to have a choose from list to open the List of Business Partners window and a linked button to open the Business Partner Master Data window
Procedure
1 In the Toolbox window UI Controls area add a StaticText a LinkedButton and an EditText
2 In the Data Source area add a DB Data Source and a Choose From List
3 In the Properties window of the form specify a valid value for the ObjectType filed
4 Set the Choose From List properties
In the Properties window of the choose from list in the ObjectType filed enter 2 which represents business partners For more information about other object types see BoObjectTypes Enumeration in SDK Help Center
5 Set the DB Data Source properties
In the Properties window of the DB data source in the TableName filed enter OCRD which represents the SAP Business One system table for business partners For more information about other system tables see Database Tables Reference in SDK Help Center
6 Connect the linked button with the BP Code edit text field
In the Properties window of the linked button in the LinkTo field paste the unique ID of the edit text in the LinkedObject filed enter 2
7 Bind the DB data source to the BP Code edit text field
In the Properties window of the edit text in the DataSource field enter OCRD in the Alias field enter CardCode
8 Connect the choose from list with the BP Code edit text field
Working with SAP Business One Studio Suite Working with Add-on Projects in SAP Business One Studio
PUBLIC copy 2014 SAP SE All rights reserved 19
In the Properties window of the edit text in the ChooseFromListUID field enter the ID of the choose from list in the ChooseFromListAutoFill field select True and in the ChooseFromListAlias field enter CardCode
9 To preview click (PreviewB1Client)
o When you click the choose from list icon of the BP Code field the List of Business Partners window appears
o After you select a business partner from the list the BP Code field is automatically filled and a linked button appears
o Click the linked button the Business Partner Master Data window appears
34 Adding Renaming or Deleting Forms in a Project
To add forms in your project right-click your project in the Solution Explorer window
From the context menu you can add the following types of forms
bull New user form
bull Existing user form
bull System form
bull UDO form
To rename a form in your project in the Solution Explorer window right-click the form and choose Rename
To delete a form in your project in the Solution Explorer window right-click the form and choose Delete
341 Adding New User Forms
A user form is a form designed by a partner It can be generated from SAP Business One Studio Screen Painter UI API or your own code
To add a new user form in the Solution Explorer window right-click your project and choose New Form
A new form opens in edit mode and appears in the Solution Explorer window
You can now design the new form For more information see Designing a Form
342 Adding Existing User Forms
You can add an existing user form to your project
Procedure
1 In the Solution Explorer window right-click your project and choose Add rarr Existing Form
2 In the Add Existing Item window select the form you want to add
3 Choose Open
20 PUBLIC copy 2014 SAP SE All rights reserved
Working with SAP Business One Studio Suite Working with Add-on Projects in SAP Business One Studio
The form opens in edit mode and appears in the Solution Explorer window
343 Adding System Forms
A system form is a standard SAP Business One form that you can add to your project
Procedure
1 In the Solution Explorer window right-click your project and choose Add rarr System Form
2 In the Add System Form window select the form you want to add
Note
The Add System Form window lists the following system forms
o All currently opened system forms if SAP Business One is running
o The locally cached system forms
3 Choose OK
The form opens in edit mode and appears in the Solution Explorer window
Note
Once opened in edit mode a system form will be cached up locally
4 You can now modify the form
In edit mode of the system form you can add new UI controls and modify the properties of the existing system items
5 To preview the system form you need to open the form in the SAP Business One client first and then click (PreviewB1Client)
Caution
Deleting existing system items does not take effect when you preview the modified system form
344 Adding UDO Forms
A UDO form is a form generated by the User-Defined Object Registration wizard (To access the wizard from the SAP Business One menu bar choose Tools rarr Customization Tools rarr Objects Registration Wizard) You can add a UDO form to your project
Procedure
1 In the Solution Explorer window right-click your project and choose Add rarr UDO Form
2 In the Company Logon window specify the details of the company you want to work with and choose Log On
Working with SAP Business One Studio Suite Working with Add-on Projects in SAP Business One Studio
PUBLIC copy 2014 SAP SE All rights reserved 21
Field DescriptionActivity
Server Specify the IP address or the machine name of the SAP Business One server
Server Type From the dropdown list select a server type MSSQL_2008 MSSQL_2012 or HANADB
License Server Specify the license server
Company Name Specify the company defined on the selected SAP Business One server
User ID Specify your user name for the company you want to log on to
Password Enter your password
The UDO form that is registered appears in the List of UDO Forms window
Note
Only the Header Line Style (new UDO style in SAP Business One 882) is supported The Matrix Style (old UDO style) is not supported
3 In the List of UDO Forms window select the UDO form you want to add and choose the Open button
The form opens in edit mode and appears in the Solution Explorer window
Note
You can add more UDO forms The application remembers the company logon information and you do not need to specify it again
If you restart SAP Business One Studio you just need to specify the Password field
4 You can now modify the UDO form
5 To preview the form click (PreviewB1Client)
6 To save the changes in the Solution Explorer window right-click the form and choose Save to DB
When you reopen the form in the SAP Business One client you can see the UDO form is modified
35 Editing Active Forms in SAP Business One
In the SAP Business One client you can edit the active system form through SAP Business One Studio or SAP Business One Studio for Microsoft Visual Studio The active form means the current system form in the SAP Business One client If you have multiple forms open in the SAP Business One client the active form is the top one
Procedure
1 In SAP Business One from the Tools menu choose SAP Business One Studio
2 If you want to edit the active form from SAP Business One Studio choose Edit Active Form
o If SAP Business One Studio is already running the application adds the active system form to the project
o If you have not yet opened SAP Business One Studio the application runs SAP Business One Studio first automatically creates a project and opens the active form in the project
3 If you want to edit the active form from SAP Business One Studio for Microsoft Visual Studio choose Edit Active Form in Visual Studio
22 PUBLIC copy 2014 SAP SE All rights reserved
Working with SAP Business One Studio Suite Working with Add-on Projects in SAP Business One Studio
o If the SAP Business One Studio for Microsoft Visual Studio is already running the application adds the active system form to the project
o If you have not yet opened Microsoft Visual Studio the application does nothing for you You need to open and create a project in Microsoft Visual Studio first and then in the SAP Business One client from the Tools menu choose SAP Business One Studio and choose Edit Active Form in Visual Studio
36 Exporting Updated Parts of a System Form
If you edited a system form you can export the updated part of the system form to a srf file
Procedure
1 In the Solution Explorer window right-click the system form and choose Export Updated Part As
2 In the Export File As window specify the file name
3 Choose Save
Working with SAP Business One Studio Suite Working with Add-on Projects in SAP Business One Studio for Microsoft Visual Studio
PUBLIC copy 2014 SAP SE All rights reserved 23
4 Working with Add-on Projects in SAP Business One Studio for Microsoft Visual Studio
41 Creating SAP Business One Add-on Projects
You can create your new add-on forms with the same look and feel as the SAP Business One forms
Procedure
1 In the Microsoft Visual Studio main window choose New rarr Project
After you install SAP Business One Studio for Microsoft Visual Studio you can locate the SAP Business One template in the New Project dialog box by navigating the expanding list in the left pane under Installed Templates
2 In the New Project window from the Installed Templates area select the SAP Business One template
3 To create an add-on project with an empty user form select SAP Business One Add-on Project and specify the name and the location of your new project
4 To create an add-on project using an existing B1s file from SAP Business One Studio select SAP Business One Add-on Project from B1s File
5 Choose OK
A default form named Form1b1f appears in the Solution Explorer window and the layout of the form appears in the design area A folder B1Studio is generated under CTempltYourAddOnProjectgtltYourAddOnProjectgtbinDebug
You can design the layout of your form and the logic of the controls For more information see Designing a Form
Note
When you create an SAP Business One add-on project it adds the SAPbouiComFramework which is for connecting the UI API application handling LoadBatchAction systemuserUDO form events and generating code It includes
o Menucs - for adding menus and handling menu events
o Programscs - for connecting the UI server and performing the initialization
o SAPbouiCOMFrameworkApplicationSBO_Application - the root COM object of UI API
Sample Code ApplicationSBO_ApplicationMessageBox(Hello world)
o SAPbouiCOMFrameworkFormBaseUIAPIRawForm - the original form COM object of UI API
Sample Code thisUIAPIRawFormClose()Close form
The SAPbouiComFramework contains all UI API COM objects and interfaces therefore we do not recommend that you replace it
24 PUBLIC copy 2014 SAP SE All rights reserved
Working with SAP Business One Studio Suite Working with Add-on Projects in SAP Business One Studio for Microsoft Visual Studio
Note
In SAP Business One 91 a new net SAPBusinessOneSDKdll is added You can build add-on solutions using SAPBusinessOneSDKdll which integrates UI API and DI API
42 Tool Windows in SAP Business One Studio for Microsoft Visual Studio
The tool windows in SAP Business One Studio for Microsoft Visual Studio are very similar to the tool windows in SAP Business One Studio The windows include
bull Toolbox window ndash contains the controls you can use to design your form For more information see Toolbox Window
Note
To program a certain control double-click it The code is automatically generated
bull UI Outline window ndash allows you to view items in a selected pane
Note
This window may not appear by default To display the UI Outline window from the menu bar choose View rarr Other Windows rarr Outline Window
bull Solution Explorer window ndash allows you to view the source files in your project
Note
The project files also include SAP Business One UI API references and predefined menu options (Menucs) In runtime by default the newly added form appears at the bottom of the SAP Business One Main Menu You can change the code if you want to open the form from another menu location
bull Properties window ndash allows you to set and examine the properties and events of forms and form items
Note
To register events of a control in the Properties window click (Events) and double-click the event property you want to edit The code is automatically generated and you can program as needed
You can drag the border of the windows to resize the window click (Auto Hide) to hide the window and also dock the windows to a new location (see Docking Tool Windows)
bull The double-click function - you can double-click an item to add an event The following are the default events that the system supports currently
Item Type Event
Form LoadAfter
EditText KeyDownAfter
CheckBox ClickBefore
OptionButton ClickBefore
Working with SAP Business One Studio Suite Working with Add-on Projects in SAP Business One Studio for Microsoft Visual Studio
PUBLIC copy 2014 SAP SE All rights reserved 25
Item Type Event
Button ClickBefore
ComboBox ComboSelectAfter
bull Toolbar - Located below the Menu button the toolbar is a collection of icons providing easy access to commonly used functions The functions are the same as those for SAP Business One Studio See chapter 22 in this document
43 Adding Forms in a Project
To add forms in your project in the Solution Explorer window right-click your project
From the context menu choose Add rarr New Itemhellip You can add the following types of forms
bull SAP Business One user form
bull SAP Business One system form
bull SAP Business One UDO form
431 Adding SAP Business One User Forms
An SAP Business One user form is a form designed by a partner It can be generated from SAP Business One Studio Screen Painter UI API or your own code
Procedure
1 In the Solution Explorer window right-click your project and choose Add rarr New Itemhellip
2 In the Add New Item window from the Installed Templates area select the SAP Business One add-on template
3 Choose SAP Business One User Form
A new form opens in edit mode and appears in the Solution Explorer window
You can now design the new form For more information see Designing a Form
In runtime by default the newly added form appears at the bottom of the SAP Business One Main Menu
432 Adding SAP Business One System Forms
A system form is a standard SAP Business One form that you can add to your project
26 PUBLIC copy 2014 SAP SE All rights reserved
Working with SAP Business One Studio Suite Working with Add-on Projects in SAP Business One Studio for Microsoft Visual Studio
Procedure
1 In the Solution Explorer window right-click your project and choose Add rarr New Itemhellip
2 In the Add New Item window from the Installed Templates area select the SAP Business One add-on template
3 Choose SAP Business One System Form
Note
The Add System Form window lists the following system forms
o All currently opened system forms if SAP Business One is running
o The locally cached system forms
4 Choose OK
The form opens in edit mode and appears in the Solution Explorer window
You can add user items modify the properties of a system item and register events but you cannot delete existing system items The modification is implemented after you reopen the system form
433 Adding SAP Business One UDO Forms
A UDO form is a form generated by the User-Defined Object Registration wizard (To access the wizard from the SAP Business One menu bar choose Tools rarr Customization Tools rarr Objects Registration Wizard) You can add a UDO form to your project
Procedure
1 In the Solution Explorer window right-click your project and choose Add rarr New Itemhellip
2 In the Add New Item window from the Installed Templates area select the SAP Business One add-on template
3 Choose SAP Business One UDO Form
4 In the Company Logon window specify the details of the company with which you want to work and choose Log On
Field DescriptionActivity
Server Specify the IP address or the machine name of the SAP Business One server
Server Type From the dropdown list select a server type MSSQL_2008 MSSQL_2012 or HANADB
License Server Specify the license server
Company Name Specify the company defined on the selected SAP Business One server
User ID Specify your user name for the company to which you want to log on
Password Enter your password
Working with SAP Business One Studio Suite Working with Add-on Projects in SAP Business One Studio for Microsoft Visual Studio
PUBLIC copy 2014 SAP SE All rights reserved 27
The UDO form that is registered appears in the List of UDO Forms window
Note
Only the Header Line Style (new UDO style in SAP Business One 882) is supported The Matrix Style (old UDO style) is not supported
5 In the List of UDO Forms window select the UDO form you want to add and choose the Open button
The form opens in edit mode and appears in the Solution Explorer window
Note
The application remembers the company logon information and if you want to add more UDO forms you do not need to specify that information again
If you restart SAP Business One Studio you just need to specify the Password field
6 You can now modify the UDO form
To save the changes in the Solution Explorer window right-click the form and choose Save UDO to DB
When you reopen the form in the SAP Business One client you can see the UDO form is modified
44 Loading an Existing B1s File to Your Project
You can load your existing b1s solution or srf file (ScreenPainter file) in the following ways
Creating an Add-on Project Using an Existing B1s File
1 In the Microsoft Visual Studio main window choose New rarr Project
2 In the New Project window from the Installed Templates area select the SAP Business One add-on template
3 To create an add-on project using an existing B1s file from SAP Business One Studio select SAP Business One Add-on Project from B1s File
4 Choose OK
Adding an Existing B1s File to the Current Project
1 In the Solution Explorer window right-click your project and choose Add rarr Existing Business One File
2 In the Open window select the Business One Studio files (b1s) file you want to add
3 Choose Open The form opens in edit mode and appears in the Solution Explorer window
Adding an Existing SRF File to the Current Project
1 In the Solution Explorer window right-click your project and choose Add rarr Existing Business One File
2 In the Open window select the Business One Studio SRF files (srf) file you want to add
3 Choose Open The form opens in edit mode and appears in the Solution Explorer window
28 PUBLIC copy 2014 SAP SE All rights reserved
Working with SAP Business One Studio Suite Working with Add-on Projects in SAP Business One Studio for Microsoft Visual Studio
45 Packaging Your Project
The SAP Business One Extension Package features are integrated in SAP Business One Studio for Microsoft Visual Studio You can package your project directly from the menu bar
Procedure
1 Build your project first to get the executable file of your extension
2 From the menu bar of the Microsoft Visual Studio main window choose SAP Business One Studio rarr Extension Package
3 In the Extension Registration Data Generator window expand Basic Information and specify the following fields
o Extension Name ndash Enter the name of the extension This field is mandatory
o Extension Version ndash Enter the version of the extension for which you want to package and generate the ARD file This field is mandatory
o Extension Provider ndash Enter the name of the SAP partner that creates and owns the extension For example the name of your company
o Extension Namespace ndash Enter a name for the folder in which SAP Business One places the extension after a user registers the extension in the application
o Supported Database ndash Specify the database in which the extension works This field is mandatory
o Contact Data ndash Enter contact information for the SAP partner that creates and owns the extension For example enter the URL of your companys Website
4 Expand Extension File specify the path of the executable file of your 32-bit or 64-bit add-on and select the files that should be packaged in the zip file
To package your apps for the version for SAP HANA specify the app zip file the name and the package of your app
Note
The naming convention for your package is For example if the package hierarchy is sapsboatp in SAP HANA the package name is this and the corresponding URL will be httpshostportsapsboatp
5 Expand Deployment Steps and select the COM dlls to register for your 32-bit or 64-bit add-on
6 Expend SBO Compatibility you can specify the versions of SAP Business One with which the add-on is compatible
In the Compatible with SAP Business One area specify the following
o Version From ndash Enter the earliest version of SAP Business One with which the extension is compatible
o To ndash Enter the latest version of SAP Business One with which the lightweight add-on is compatible
Example
Enter compatible versions of SAP Business One with the format ltxxxyyyxxgt for example 91000000
7 Expand Parameters you can optionally specify shared parameters and parameters for the extension
o Shared Parameters - The parameters or configuration required to run the extension The parameters are shared in all extension instances running on different companies
o Parameters - The parameters or configurations required to run the extension
8 Choose the Package button
Working with SAP Business One Studio Suite Working with Add-on Projects in SAP Business One Studio for Microsoft Visual Studio
PUBLIC copy 2014 SAP SE All rights reserved 29
9 In the Save As window specify the location where you want to save the file and choose the Save button
Note
If you are not yet ready to package your extension you can choose the Save button instead of the Package button The information you entered in the Extension Registration Data Generator window will be saved in your project The next time you open the Extension Registration Data Generator window the saved information will be displayed
For more information see How to Package and Deploy SAP Business One Extensions for Lightweight Deployment
30 PUBLIC copy 2014 SAP SE All rights reserved
Working with SAP Business One Studio Suite SAP Business One Studio Suite Demo Script
5 SAP Business One Studio Suite Demo Script
This section introduces a demo for how to work with your add-on projects in SAP Business One Studio Suite
Procedure
1 Start SAP Business One and log on to a company
o Database MadridDemo
o User manager
o Password 1234
2 Start SAP Business One Studio and add a new project
1 Choose Menu rarr New rarr Project rarr Add-On
2 Choose OK
3 Create a user form add an EditText with ChooseFromList and add a grid with DataTable
1 Add EditText Grid LinkedButton DB DataSource Data Table and ChooseFromList
Working with SAP Business One Studio Suite SAP Business One Studio Suite Demo Script
PUBLIC copy 2014 SAP SE All rights reserved 31
2 Specify the controls properties as follows
o DB DataSource
o Data Table
o ChooseFromList
o EditText
32 PUBLIC copy 2014 SAP SE All rights reserved
Working with SAP Business One Studio Suite SAP Business One Studio Suite Demo Script
o LinkedButton LinkTo = Item_0 LinkedObject = 2
o Grid DataTableID = DT_0
o Form LinkedObject = 2
3 From Toolbar choose Preview
The user form opens in the SAP Business One client The grid displays all BPs
4 To select a business partner choose the ChooseFromList icon The application fills the business partner code in the EditText
To open the business partner form choose the linked button
Working with SAP Business One Studio Suite SAP Business One Studio Suite Demo Script
PUBLIC copy 2014 SAP SE All rights reserved 33
4 Edit a system form (sales order) add a button and preview it
1 In the SAP Business One client from the Main Menu choose Sales rarr Sales Order to open the original sales order
2 Right-click the project node to add a system form
3 Select Sales Order and choose Open (the other form is cache file in local that user opened)
4 From Toolbar add the button and choose Preview
5 Switch to the SAP Business One client to review the updates of the sales order form
34 PUBLIC copy 2014 SAP SE All rights reserved
Working with SAP Business One Studio Suite SAP Business One Studio Suite Demo Script
5 Edit a UDO form add a button and save the UDO to the database
1 To open the original UDO form in the SAP Business One client choose Tools rarr Default Forms rarr UDO1-UDO1
2 To add a UDO form right-click the project node
3 Specify the DI connection information (password 1234) and choose Log On
Working with SAP Business One Studio Suite SAP Business One Studio Suite Demo Script
PUBLIC copy 2014 SAP SE All rights reserved 35
4 To edit the UDO form select UDO1 and choose OK
5 Add the button and save the UDO to the database
6 To review the updates from the SAP Business One client reopen the UDO form
36 PUBLIC copy 2014 SAP SE All rights reserved
Working with SAP Business One Studio Suite SAP Business One Studio Suite Demo Script
6 Start SAP Business One Studio for Microsoft Visual Studio and add a new project
1 Choose Menu rarr File rarr New rarr Project and select the C project templates
o The template SAP Business One Add-on Project is for creating a new project
o The template SAP Business One Add-on Project from B1s File is for creating a project with the existing B1s file
2 Select SAP Business One Add-on Project and create a new project
7 Add a button a Button_ClickBefore event and a popup message box if choosing the button
1 Add a button
2 Double-click the button to add a Button_ClickBefore event
Working with SAP Business One Studio Suite SAP Business One Studio Suite Demo Script
PUBLIC copy 2014 SAP SE All rights reserved 37
3 Add the UI API code as follows
4 To run the add-on from toolbar or by using the F5 shortcut choose Debug
In the Main Menu of the SAP Business One client the add-on adds the user menu
5 Choose the menu to open the user form
6 Choose the button to open a message box
7 Stop debugging and close all forms
8 Edit a system form (sales order) Add a button and a Button_ClickBefore event create a user form if choosing the button
38 PUBLIC copy 2014 SAP SE All rights reserved
Working with SAP Business One Studio Suite SAP Business One Studio Suite Demo Script
1 In the SAP Business One client from the Main Menu choose Sales rarr Sales Order to open the original sales order
2 Right-click the project node to add a system form (sales order)
3 Add a button
4 Double-click the button to add a Button_ClickBefore event
5 Add the UI API code as follows
Working with SAP Business One Studio Suite SAP Business One Studio Suite Demo Script
PUBLIC copy 2014 SAP SE All rights reserved 39
6 To run the add-on from toolbar or by using the F5 shortcut choose Debug
7 From the SAP Business One client open the sales order The new button appears
To open the new form choose the button
9 Edit a system form (sales opportunity) from the menu design the UI API code to set Remark as a mandatory field
1 In the SAP Business One client from the Main Menu choose Sales Opportunities rarr Sales Opportunity to open the original sales opportunity form
2 From the SAP Business One client choose Edit Form in Visual Studio to edit the system form
3 In UI Outline change the pane level to 2
4 Add a button
5 Double-click the button to add a Button_ClickBefore event
6 Add the UI API code as follows
40 PUBLIC copy 2014 SAP SE All rights reserved
Working with SAP Business One Studio Suite SAP Business One Studio Suite Demo Script
7 To run the add-on from toolbar or by using the F5 shortcut choose Debug
8 In the SAP Business One client reopen the sales opportunity
9 On the Potential tab specify the business partner code and potential amount
On the General tab leave the Remark field empty
10 Choose Add
In the status bar the error message Remark is mandatory appears
11 Specify the remark The system adds the sales opportunity
wwwsapcomcontactsap
Material Number
copy 2014 SAP SE All rights reserved No part of this publication may be reproduced or transmitted in any form or for any purpose without the express permission of SAP AG The information contained herein may be changed without prior notice Some software products marketed by SAP AG and its distributors contain proprietary software components of other software vendors Microsoft Windows Excel Outlook and PowerPoint are registered trademarks of Microsoft Corporation IBM DB2 DB2 Universal Database System ads System i5 System p System p5 System x System z System z10 System z9 z10 z9 iSeries pSeries xSeries zSeries eServer zVM zOS i5OS S390 OS390 OS400 AS400 S390 Parallel Enterprise Server PowerVM Power Architecture POWER6+ POWER6 POWER5+ POWER5 POWER OpenPower PowerPC BatchPipes BladeCenter System Storage GPFS HACMP RETAIN DB2 Connect RACF Redbooks OS2 Parallel Sysplex MVSESA AIX Intelligent Miner WebSphere Netfinity Tivoli and Informix are trademarks or registered trademarks of IBM Corporation Linux is the registered trademark of Linus Torvalds in the US and other countries Adobe the Adobe logo Acrobat PostScript and Reader are either trademarks or registered trademarks of Adobe Systems Incorporated in the United States andor other countries Oracle is a registered trademark of Oracle Corporation UNIX XOpen OSF1 and Motif are registered trademarks of the Open Group Citrix ICA Program Neighborhood MetaFrame WinFrame VideoFrame and MultiWin are trademarks or registered trademarks of Citrix Systems Inc HTML XML XHTML and W3C are trademarks or registered trademarks of W3Creg World Wide Web Consortium Massachusetts Institute of Technology Java is a registered trademark of Sun Microsystems Inc JavaScript is a registered trademark of Sun Microsystems Inc used under license for technology invented and implemented by Netscape SAP R3 xApps xApp SAP NetWeaver Duet PartnerEdge ByDesign SAP Business ByDesign and other SAP products and services mentioned herein as well as their respective logos are trademarks or registered trademarks of SAP AG in Germany and in several other countries all over the world All other product and service names mentioned are the trademarks of their respective companies Data contained in this document serves informational purposes only National product specifications may vary These materials are subject to change without notice These materials are provided by SAP AG and its affiliated companies (SAP Group) for informational purposes only without representation or warranty of any kind and SAP Group shall not be liable for errors or omissions with respect to the materials The only warranties for SAP Group products and services are those that are set forth in the express warranty statements accompanying such products and services if any Nothing herein should be construed as constituting an additional warranty
- 1 Introduction
-
- 11 Installing SAP Business One Studio
- 12 Running SAP Business One Studio
- 13 Terms and Definitions
- 14 Related Documentation
-
- 2 SAP Business One Studio Main Window
-
- 21 Menu Button
- 22 Toolbar
- 23 Toolbox Window
- 24 Docking Tool Windows
-
- 3 Working with Add-on Projects in SAP Business One Studio
-
- 31 Creating an Add-on Project
- 32 Opening an Add-on Project or an External File
- 33 Designing a Form
-
- 331 Working with Tab Controls
- 332 Working with Grids
- 333 Working with Data Tables
- 334 Working with Matrixes
- 335 Working with Choose From Lists
- 336 Example Creating a Business Partner Field with Linked Button and Choose From List Functions
-
- 34 Adding Renaming or Deleting Forms in a Project
-
- 341 Adding New User Forms
- 342 Adding Existing User Forms
- 343 Adding System Forms
- 344 Adding UDO Forms
-
- 35 Editing Active Forms in SAP Business One
- 36 Exporting Updated Parts of a System Form
-
- 4 Working with Add-on Projects in SAP Business One Studio for Microsoft Visual Studio
-
- 41 Creating SAP Business One Add-on Projects
- 42 Tool Windows in SAP Business One Studio for Microsoft Visual Studio
- 43 Adding Forms in a Project
-
- 431 Adding SAP Business One User Forms
- 432 Adding SAP Business One System Forms
- 433 Adding SAP Business One UDO Forms
-
- 44 Loading an Existing B1s File to Your Project
- 45 Packaging Your Project
-
- 5 SAP Business One Studio Suite Demo Script
-
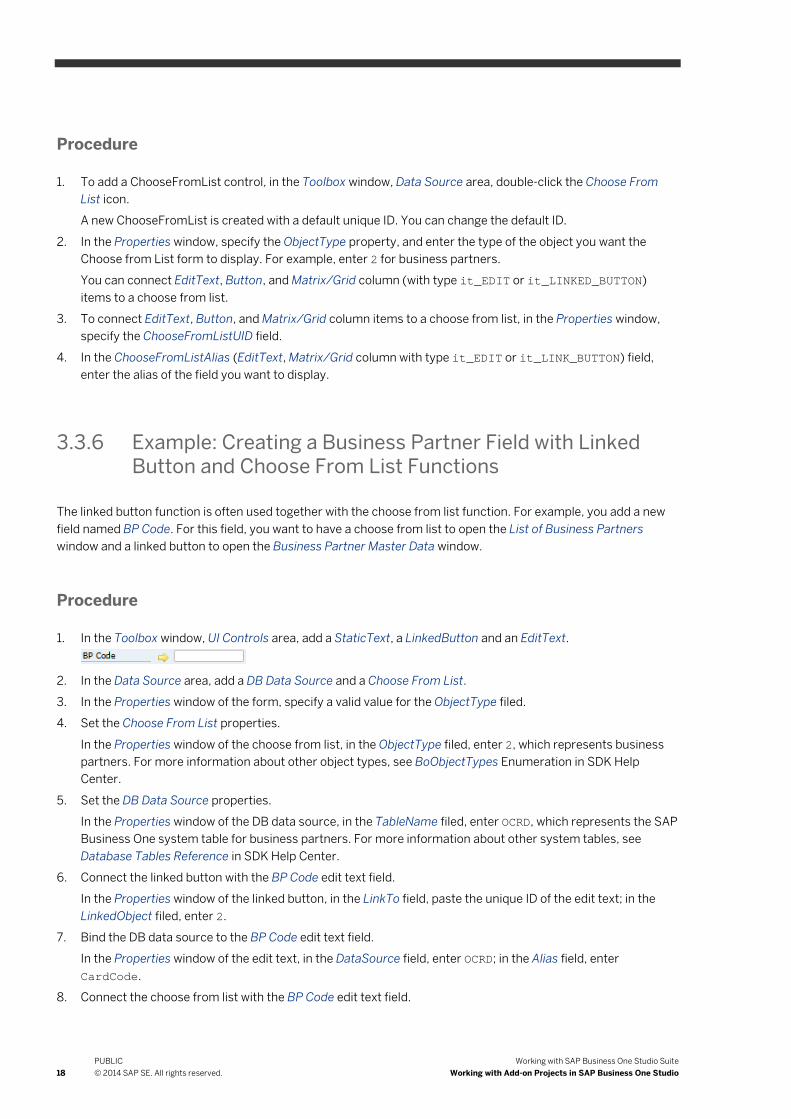
Working with SAP Business One Studio Suite Working with Add-on Projects in SAP Business One Studio
PUBLIC copy 2014 SAP SE All rights reserved 19
In the Properties window of the edit text in the ChooseFromListUID field enter the ID of the choose from list in the ChooseFromListAutoFill field select True and in the ChooseFromListAlias field enter CardCode
9 To preview click (PreviewB1Client)
o When you click the choose from list icon of the BP Code field the List of Business Partners window appears
o After you select a business partner from the list the BP Code field is automatically filled and a linked button appears
o Click the linked button the Business Partner Master Data window appears
34 Adding Renaming or Deleting Forms in a Project
To add forms in your project right-click your project in the Solution Explorer window
From the context menu you can add the following types of forms
bull New user form
bull Existing user form
bull System form
bull UDO form
To rename a form in your project in the Solution Explorer window right-click the form and choose Rename
To delete a form in your project in the Solution Explorer window right-click the form and choose Delete
341 Adding New User Forms
A user form is a form designed by a partner It can be generated from SAP Business One Studio Screen Painter UI API or your own code
To add a new user form in the Solution Explorer window right-click your project and choose New Form
A new form opens in edit mode and appears in the Solution Explorer window
You can now design the new form For more information see Designing a Form
342 Adding Existing User Forms
You can add an existing user form to your project
Procedure
1 In the Solution Explorer window right-click your project and choose Add rarr Existing Form
2 In the Add Existing Item window select the form you want to add
3 Choose Open
20 PUBLIC copy 2014 SAP SE All rights reserved
Working with SAP Business One Studio Suite Working with Add-on Projects in SAP Business One Studio
The form opens in edit mode and appears in the Solution Explorer window
343 Adding System Forms
A system form is a standard SAP Business One form that you can add to your project
Procedure
1 In the Solution Explorer window right-click your project and choose Add rarr System Form
2 In the Add System Form window select the form you want to add
Note
The Add System Form window lists the following system forms
o All currently opened system forms if SAP Business One is running
o The locally cached system forms
3 Choose OK
The form opens in edit mode and appears in the Solution Explorer window
Note
Once opened in edit mode a system form will be cached up locally
4 You can now modify the form
In edit mode of the system form you can add new UI controls and modify the properties of the existing system items
5 To preview the system form you need to open the form in the SAP Business One client first and then click (PreviewB1Client)
Caution
Deleting existing system items does not take effect when you preview the modified system form
344 Adding UDO Forms
A UDO form is a form generated by the User-Defined Object Registration wizard (To access the wizard from the SAP Business One menu bar choose Tools rarr Customization Tools rarr Objects Registration Wizard) You can add a UDO form to your project
Procedure
1 In the Solution Explorer window right-click your project and choose Add rarr UDO Form
2 In the Company Logon window specify the details of the company you want to work with and choose Log On
Working with SAP Business One Studio Suite Working with Add-on Projects in SAP Business One Studio
PUBLIC copy 2014 SAP SE All rights reserved 21
Field DescriptionActivity
Server Specify the IP address or the machine name of the SAP Business One server
Server Type From the dropdown list select a server type MSSQL_2008 MSSQL_2012 or HANADB
License Server Specify the license server
Company Name Specify the company defined on the selected SAP Business One server
User ID Specify your user name for the company you want to log on to
Password Enter your password
The UDO form that is registered appears in the List of UDO Forms window
Note
Only the Header Line Style (new UDO style in SAP Business One 882) is supported The Matrix Style (old UDO style) is not supported
3 In the List of UDO Forms window select the UDO form you want to add and choose the Open button
The form opens in edit mode and appears in the Solution Explorer window
Note
You can add more UDO forms The application remembers the company logon information and you do not need to specify it again
If you restart SAP Business One Studio you just need to specify the Password field
4 You can now modify the UDO form
5 To preview the form click (PreviewB1Client)
6 To save the changes in the Solution Explorer window right-click the form and choose Save to DB
When you reopen the form in the SAP Business One client you can see the UDO form is modified
35 Editing Active Forms in SAP Business One
In the SAP Business One client you can edit the active system form through SAP Business One Studio or SAP Business One Studio for Microsoft Visual Studio The active form means the current system form in the SAP Business One client If you have multiple forms open in the SAP Business One client the active form is the top one
Procedure
1 In SAP Business One from the Tools menu choose SAP Business One Studio
2 If you want to edit the active form from SAP Business One Studio choose Edit Active Form
o If SAP Business One Studio is already running the application adds the active system form to the project
o If you have not yet opened SAP Business One Studio the application runs SAP Business One Studio first automatically creates a project and opens the active form in the project
3 If you want to edit the active form from SAP Business One Studio for Microsoft Visual Studio choose Edit Active Form in Visual Studio
22 PUBLIC copy 2014 SAP SE All rights reserved
Working with SAP Business One Studio Suite Working with Add-on Projects in SAP Business One Studio
o If the SAP Business One Studio for Microsoft Visual Studio is already running the application adds the active system form to the project
o If you have not yet opened Microsoft Visual Studio the application does nothing for you You need to open and create a project in Microsoft Visual Studio first and then in the SAP Business One client from the Tools menu choose SAP Business One Studio and choose Edit Active Form in Visual Studio
36 Exporting Updated Parts of a System Form
If you edited a system form you can export the updated part of the system form to a srf file
Procedure
1 In the Solution Explorer window right-click the system form and choose Export Updated Part As
2 In the Export File As window specify the file name
3 Choose Save
Working with SAP Business One Studio Suite Working with Add-on Projects in SAP Business One Studio for Microsoft Visual Studio
PUBLIC copy 2014 SAP SE All rights reserved 23
4 Working with Add-on Projects in SAP Business One Studio for Microsoft Visual Studio
41 Creating SAP Business One Add-on Projects
You can create your new add-on forms with the same look and feel as the SAP Business One forms
Procedure
1 In the Microsoft Visual Studio main window choose New rarr Project
After you install SAP Business One Studio for Microsoft Visual Studio you can locate the SAP Business One template in the New Project dialog box by navigating the expanding list in the left pane under Installed Templates
2 In the New Project window from the Installed Templates area select the SAP Business One template
3 To create an add-on project with an empty user form select SAP Business One Add-on Project and specify the name and the location of your new project
4 To create an add-on project using an existing B1s file from SAP Business One Studio select SAP Business One Add-on Project from B1s File
5 Choose OK
A default form named Form1b1f appears in the Solution Explorer window and the layout of the form appears in the design area A folder B1Studio is generated under CTempltYourAddOnProjectgtltYourAddOnProjectgtbinDebug
You can design the layout of your form and the logic of the controls For more information see Designing a Form
Note
When you create an SAP Business One add-on project it adds the SAPbouiComFramework which is for connecting the UI API application handling LoadBatchAction systemuserUDO form events and generating code It includes
o Menucs - for adding menus and handling menu events
o Programscs - for connecting the UI server and performing the initialization
o SAPbouiCOMFrameworkApplicationSBO_Application - the root COM object of UI API
Sample Code ApplicationSBO_ApplicationMessageBox(Hello world)
o SAPbouiCOMFrameworkFormBaseUIAPIRawForm - the original form COM object of UI API
Sample Code thisUIAPIRawFormClose()Close form
The SAPbouiComFramework contains all UI API COM objects and interfaces therefore we do not recommend that you replace it
24 PUBLIC copy 2014 SAP SE All rights reserved
Working with SAP Business One Studio Suite Working with Add-on Projects in SAP Business One Studio for Microsoft Visual Studio
Note
In SAP Business One 91 a new net SAPBusinessOneSDKdll is added You can build add-on solutions using SAPBusinessOneSDKdll which integrates UI API and DI API
42 Tool Windows in SAP Business One Studio for Microsoft Visual Studio
The tool windows in SAP Business One Studio for Microsoft Visual Studio are very similar to the tool windows in SAP Business One Studio The windows include
bull Toolbox window ndash contains the controls you can use to design your form For more information see Toolbox Window
Note
To program a certain control double-click it The code is automatically generated
bull UI Outline window ndash allows you to view items in a selected pane
Note
This window may not appear by default To display the UI Outline window from the menu bar choose View rarr Other Windows rarr Outline Window
bull Solution Explorer window ndash allows you to view the source files in your project
Note
The project files also include SAP Business One UI API references and predefined menu options (Menucs) In runtime by default the newly added form appears at the bottom of the SAP Business One Main Menu You can change the code if you want to open the form from another menu location
bull Properties window ndash allows you to set and examine the properties and events of forms and form items
Note
To register events of a control in the Properties window click (Events) and double-click the event property you want to edit The code is automatically generated and you can program as needed
You can drag the border of the windows to resize the window click (Auto Hide) to hide the window and also dock the windows to a new location (see Docking Tool Windows)
bull The double-click function - you can double-click an item to add an event The following are the default events that the system supports currently
Item Type Event
Form LoadAfter
EditText KeyDownAfter
CheckBox ClickBefore
OptionButton ClickBefore
Working with SAP Business One Studio Suite Working with Add-on Projects in SAP Business One Studio for Microsoft Visual Studio
PUBLIC copy 2014 SAP SE All rights reserved 25
Item Type Event
Button ClickBefore
ComboBox ComboSelectAfter
bull Toolbar - Located below the Menu button the toolbar is a collection of icons providing easy access to commonly used functions The functions are the same as those for SAP Business One Studio See chapter 22 in this document
43 Adding Forms in a Project
To add forms in your project in the Solution Explorer window right-click your project
From the context menu choose Add rarr New Itemhellip You can add the following types of forms
bull SAP Business One user form
bull SAP Business One system form
bull SAP Business One UDO form
431 Adding SAP Business One User Forms
An SAP Business One user form is a form designed by a partner It can be generated from SAP Business One Studio Screen Painter UI API or your own code
Procedure
1 In the Solution Explorer window right-click your project and choose Add rarr New Itemhellip
2 In the Add New Item window from the Installed Templates area select the SAP Business One add-on template
3 Choose SAP Business One User Form
A new form opens in edit mode and appears in the Solution Explorer window
You can now design the new form For more information see Designing a Form
In runtime by default the newly added form appears at the bottom of the SAP Business One Main Menu
432 Adding SAP Business One System Forms
A system form is a standard SAP Business One form that you can add to your project
26 PUBLIC copy 2014 SAP SE All rights reserved
Working with SAP Business One Studio Suite Working with Add-on Projects in SAP Business One Studio for Microsoft Visual Studio
Procedure
1 In the Solution Explorer window right-click your project and choose Add rarr New Itemhellip
2 In the Add New Item window from the Installed Templates area select the SAP Business One add-on template
3 Choose SAP Business One System Form
Note
The Add System Form window lists the following system forms
o All currently opened system forms if SAP Business One is running
o The locally cached system forms
4 Choose OK
The form opens in edit mode and appears in the Solution Explorer window
You can add user items modify the properties of a system item and register events but you cannot delete existing system items The modification is implemented after you reopen the system form
433 Adding SAP Business One UDO Forms
A UDO form is a form generated by the User-Defined Object Registration wizard (To access the wizard from the SAP Business One menu bar choose Tools rarr Customization Tools rarr Objects Registration Wizard) You can add a UDO form to your project
Procedure
1 In the Solution Explorer window right-click your project and choose Add rarr New Itemhellip
2 In the Add New Item window from the Installed Templates area select the SAP Business One add-on template
3 Choose SAP Business One UDO Form
4 In the Company Logon window specify the details of the company with which you want to work and choose Log On
Field DescriptionActivity
Server Specify the IP address or the machine name of the SAP Business One server
Server Type From the dropdown list select a server type MSSQL_2008 MSSQL_2012 or HANADB
License Server Specify the license server
Company Name Specify the company defined on the selected SAP Business One server
User ID Specify your user name for the company to which you want to log on
Password Enter your password
Working with SAP Business One Studio Suite Working with Add-on Projects in SAP Business One Studio for Microsoft Visual Studio
PUBLIC copy 2014 SAP SE All rights reserved 27
The UDO form that is registered appears in the List of UDO Forms window
Note
Only the Header Line Style (new UDO style in SAP Business One 882) is supported The Matrix Style (old UDO style) is not supported
5 In the List of UDO Forms window select the UDO form you want to add and choose the Open button
The form opens in edit mode and appears in the Solution Explorer window
Note
The application remembers the company logon information and if you want to add more UDO forms you do not need to specify that information again
If you restart SAP Business One Studio you just need to specify the Password field
6 You can now modify the UDO form
To save the changes in the Solution Explorer window right-click the form and choose Save UDO to DB
When you reopen the form in the SAP Business One client you can see the UDO form is modified
44 Loading an Existing B1s File to Your Project
You can load your existing b1s solution or srf file (ScreenPainter file) in the following ways
Creating an Add-on Project Using an Existing B1s File
1 In the Microsoft Visual Studio main window choose New rarr Project
2 In the New Project window from the Installed Templates area select the SAP Business One add-on template
3 To create an add-on project using an existing B1s file from SAP Business One Studio select SAP Business One Add-on Project from B1s File
4 Choose OK
Adding an Existing B1s File to the Current Project
1 In the Solution Explorer window right-click your project and choose Add rarr Existing Business One File
2 In the Open window select the Business One Studio files (b1s) file you want to add
3 Choose Open The form opens in edit mode and appears in the Solution Explorer window
Adding an Existing SRF File to the Current Project
1 In the Solution Explorer window right-click your project and choose Add rarr Existing Business One File
2 In the Open window select the Business One Studio SRF files (srf) file you want to add
3 Choose Open The form opens in edit mode and appears in the Solution Explorer window
28 PUBLIC copy 2014 SAP SE All rights reserved
Working with SAP Business One Studio Suite Working with Add-on Projects in SAP Business One Studio for Microsoft Visual Studio
45 Packaging Your Project
The SAP Business One Extension Package features are integrated in SAP Business One Studio for Microsoft Visual Studio You can package your project directly from the menu bar
Procedure
1 Build your project first to get the executable file of your extension
2 From the menu bar of the Microsoft Visual Studio main window choose SAP Business One Studio rarr Extension Package
3 In the Extension Registration Data Generator window expand Basic Information and specify the following fields
o Extension Name ndash Enter the name of the extension This field is mandatory
o Extension Version ndash Enter the version of the extension for which you want to package and generate the ARD file This field is mandatory
o Extension Provider ndash Enter the name of the SAP partner that creates and owns the extension For example the name of your company
o Extension Namespace ndash Enter a name for the folder in which SAP Business One places the extension after a user registers the extension in the application
o Supported Database ndash Specify the database in which the extension works This field is mandatory
o Contact Data ndash Enter contact information for the SAP partner that creates and owns the extension For example enter the URL of your companys Website
4 Expand Extension File specify the path of the executable file of your 32-bit or 64-bit add-on and select the files that should be packaged in the zip file
To package your apps for the version for SAP HANA specify the app zip file the name and the package of your app
Note
The naming convention for your package is For example if the package hierarchy is sapsboatp in SAP HANA the package name is this and the corresponding URL will be httpshostportsapsboatp
5 Expand Deployment Steps and select the COM dlls to register for your 32-bit or 64-bit add-on
6 Expend SBO Compatibility you can specify the versions of SAP Business One with which the add-on is compatible
In the Compatible with SAP Business One area specify the following
o Version From ndash Enter the earliest version of SAP Business One with which the extension is compatible
o To ndash Enter the latest version of SAP Business One with which the lightweight add-on is compatible
Example
Enter compatible versions of SAP Business One with the format ltxxxyyyxxgt for example 91000000
7 Expand Parameters you can optionally specify shared parameters and parameters for the extension
o Shared Parameters - The parameters or configuration required to run the extension The parameters are shared in all extension instances running on different companies
o Parameters - The parameters or configurations required to run the extension
8 Choose the Package button
Working with SAP Business One Studio Suite Working with Add-on Projects in SAP Business One Studio for Microsoft Visual Studio
PUBLIC copy 2014 SAP SE All rights reserved 29
9 In the Save As window specify the location where you want to save the file and choose the Save button
Note
If you are not yet ready to package your extension you can choose the Save button instead of the Package button The information you entered in the Extension Registration Data Generator window will be saved in your project The next time you open the Extension Registration Data Generator window the saved information will be displayed
For more information see How to Package and Deploy SAP Business One Extensions for Lightweight Deployment
30 PUBLIC copy 2014 SAP SE All rights reserved
Working with SAP Business One Studio Suite SAP Business One Studio Suite Demo Script
5 SAP Business One Studio Suite Demo Script
This section introduces a demo for how to work with your add-on projects in SAP Business One Studio Suite
Procedure
1 Start SAP Business One and log on to a company
o Database MadridDemo
o User manager
o Password 1234
2 Start SAP Business One Studio and add a new project
1 Choose Menu rarr New rarr Project rarr Add-On
2 Choose OK
3 Create a user form add an EditText with ChooseFromList and add a grid with DataTable
1 Add EditText Grid LinkedButton DB DataSource Data Table and ChooseFromList
Working with SAP Business One Studio Suite SAP Business One Studio Suite Demo Script
PUBLIC copy 2014 SAP SE All rights reserved 31
2 Specify the controls properties as follows
o DB DataSource
o Data Table
o ChooseFromList
o EditText
32 PUBLIC copy 2014 SAP SE All rights reserved
Working with SAP Business One Studio Suite SAP Business One Studio Suite Demo Script
o LinkedButton LinkTo = Item_0 LinkedObject = 2
o Grid DataTableID = DT_0
o Form LinkedObject = 2
3 From Toolbar choose Preview
The user form opens in the SAP Business One client The grid displays all BPs
4 To select a business partner choose the ChooseFromList icon The application fills the business partner code in the EditText
To open the business partner form choose the linked button
Working with SAP Business One Studio Suite SAP Business One Studio Suite Demo Script
PUBLIC copy 2014 SAP SE All rights reserved 33
4 Edit a system form (sales order) add a button and preview it
1 In the SAP Business One client from the Main Menu choose Sales rarr Sales Order to open the original sales order
2 Right-click the project node to add a system form
3 Select Sales Order and choose Open (the other form is cache file in local that user opened)
4 From Toolbar add the button and choose Preview
5 Switch to the SAP Business One client to review the updates of the sales order form
34 PUBLIC copy 2014 SAP SE All rights reserved
Working with SAP Business One Studio Suite SAP Business One Studio Suite Demo Script
5 Edit a UDO form add a button and save the UDO to the database
1 To open the original UDO form in the SAP Business One client choose Tools rarr Default Forms rarr UDO1-UDO1
2 To add a UDO form right-click the project node
3 Specify the DI connection information (password 1234) and choose Log On
Working with SAP Business One Studio Suite SAP Business One Studio Suite Demo Script
PUBLIC copy 2014 SAP SE All rights reserved 35
4 To edit the UDO form select UDO1 and choose OK
5 Add the button and save the UDO to the database
6 To review the updates from the SAP Business One client reopen the UDO form
36 PUBLIC copy 2014 SAP SE All rights reserved
Working with SAP Business One Studio Suite SAP Business One Studio Suite Demo Script
6 Start SAP Business One Studio for Microsoft Visual Studio and add a new project
1 Choose Menu rarr File rarr New rarr Project and select the C project templates
o The template SAP Business One Add-on Project is for creating a new project
o The template SAP Business One Add-on Project from B1s File is for creating a project with the existing B1s file
2 Select SAP Business One Add-on Project and create a new project
7 Add a button a Button_ClickBefore event and a popup message box if choosing the button
1 Add a button
2 Double-click the button to add a Button_ClickBefore event
Working with SAP Business One Studio Suite SAP Business One Studio Suite Demo Script
PUBLIC copy 2014 SAP SE All rights reserved 37
3 Add the UI API code as follows
4 To run the add-on from toolbar or by using the F5 shortcut choose Debug
In the Main Menu of the SAP Business One client the add-on adds the user menu
5 Choose the menu to open the user form
6 Choose the button to open a message box
7 Stop debugging and close all forms
8 Edit a system form (sales order) Add a button and a Button_ClickBefore event create a user form if choosing the button
38 PUBLIC copy 2014 SAP SE All rights reserved
Working with SAP Business One Studio Suite SAP Business One Studio Suite Demo Script
1 In the SAP Business One client from the Main Menu choose Sales rarr Sales Order to open the original sales order
2 Right-click the project node to add a system form (sales order)
3 Add a button
4 Double-click the button to add a Button_ClickBefore event
5 Add the UI API code as follows
Working with SAP Business One Studio Suite SAP Business One Studio Suite Demo Script
PUBLIC copy 2014 SAP SE All rights reserved 39
6 To run the add-on from toolbar or by using the F5 shortcut choose Debug
7 From the SAP Business One client open the sales order The new button appears
To open the new form choose the button
9 Edit a system form (sales opportunity) from the menu design the UI API code to set Remark as a mandatory field
1 In the SAP Business One client from the Main Menu choose Sales Opportunities rarr Sales Opportunity to open the original sales opportunity form
2 From the SAP Business One client choose Edit Form in Visual Studio to edit the system form
3 In UI Outline change the pane level to 2
4 Add a button
5 Double-click the button to add a Button_ClickBefore event
6 Add the UI API code as follows
40 PUBLIC copy 2014 SAP SE All rights reserved
Working with SAP Business One Studio Suite SAP Business One Studio Suite Demo Script
7 To run the add-on from toolbar or by using the F5 shortcut choose Debug
8 In the SAP Business One client reopen the sales opportunity
9 On the Potential tab specify the business partner code and potential amount
On the General tab leave the Remark field empty
10 Choose Add
In the status bar the error message Remark is mandatory appears
11 Specify the remark The system adds the sales opportunity
wwwsapcomcontactsap
Material Number
copy 2014 SAP SE All rights reserved No part of this publication may be reproduced or transmitted in any form or for any purpose without the express permission of SAP AG The information contained herein may be changed without prior notice Some software products marketed by SAP AG and its distributors contain proprietary software components of other software vendors Microsoft Windows Excel Outlook and PowerPoint are registered trademarks of Microsoft Corporation IBM DB2 DB2 Universal Database System ads System i5 System p System p5 System x System z System z10 System z9 z10 z9 iSeries pSeries xSeries zSeries eServer zVM zOS i5OS S390 OS390 OS400 AS400 S390 Parallel Enterprise Server PowerVM Power Architecture POWER6+ POWER6 POWER5+ POWER5 POWER OpenPower PowerPC BatchPipes BladeCenter System Storage GPFS HACMP RETAIN DB2 Connect RACF Redbooks OS2 Parallel Sysplex MVSESA AIX Intelligent Miner WebSphere Netfinity Tivoli and Informix are trademarks or registered trademarks of IBM Corporation Linux is the registered trademark of Linus Torvalds in the US and other countries Adobe the Adobe logo Acrobat PostScript and Reader are either trademarks or registered trademarks of Adobe Systems Incorporated in the United States andor other countries Oracle is a registered trademark of Oracle Corporation UNIX XOpen OSF1 and Motif are registered trademarks of the Open Group Citrix ICA Program Neighborhood MetaFrame WinFrame VideoFrame and MultiWin are trademarks or registered trademarks of Citrix Systems Inc HTML XML XHTML and W3C are trademarks or registered trademarks of W3Creg World Wide Web Consortium Massachusetts Institute of Technology Java is a registered trademark of Sun Microsystems Inc JavaScript is a registered trademark of Sun Microsystems Inc used under license for technology invented and implemented by Netscape SAP R3 xApps xApp SAP NetWeaver Duet PartnerEdge ByDesign SAP Business ByDesign and other SAP products and services mentioned herein as well as their respective logos are trademarks or registered trademarks of SAP AG in Germany and in several other countries all over the world All other product and service names mentioned are the trademarks of their respective companies Data contained in this document serves informational purposes only National product specifications may vary These materials are subject to change without notice These materials are provided by SAP AG and its affiliated companies (SAP Group) for informational purposes only without representation or warranty of any kind and SAP Group shall not be liable for errors or omissions with respect to the materials The only warranties for SAP Group products and services are those that are set forth in the express warranty statements accompanying such products and services if any Nothing herein should be construed as constituting an additional warranty
- 1 Introduction
-
- 11 Installing SAP Business One Studio
- 12 Running SAP Business One Studio
- 13 Terms and Definitions
- 14 Related Documentation
-
- 2 SAP Business One Studio Main Window
-
- 21 Menu Button
- 22 Toolbar
- 23 Toolbox Window
- 24 Docking Tool Windows
-
- 3 Working with Add-on Projects in SAP Business One Studio
-
- 31 Creating an Add-on Project
- 32 Opening an Add-on Project or an External File
- 33 Designing a Form
-
- 331 Working with Tab Controls
- 332 Working with Grids
- 333 Working with Data Tables
- 334 Working with Matrixes
- 335 Working with Choose From Lists
- 336 Example Creating a Business Partner Field with Linked Button and Choose From List Functions
-
- 34 Adding Renaming or Deleting Forms in a Project
-
- 341 Adding New User Forms
- 342 Adding Existing User Forms
- 343 Adding System Forms
- 344 Adding UDO Forms
-
- 35 Editing Active Forms in SAP Business One
- 36 Exporting Updated Parts of a System Form
-
- 4 Working with Add-on Projects in SAP Business One Studio for Microsoft Visual Studio
-
- 41 Creating SAP Business One Add-on Projects
- 42 Tool Windows in SAP Business One Studio for Microsoft Visual Studio
- 43 Adding Forms in a Project
-
- 431 Adding SAP Business One User Forms
- 432 Adding SAP Business One System Forms
- 433 Adding SAP Business One UDO Forms
-
- 44 Loading an Existing B1s File to Your Project
- 45 Packaging Your Project
-
- 5 SAP Business One Studio Suite Demo Script
-
Working with SAP Business One Studio Suite Working with Add-on Projects in SAP Business One Studio
PUBLIC copy 2014 SAP SE All rights reserved 21
Field DescriptionActivity
Server Specify the IP address or the machine name of the SAP Business One server
Server Type From the dropdown list select a server type MSSQL_2008 MSSQL_2012 or HANADB
License Server Specify the license server
Company Name Specify the company defined on the selected SAP Business One server
User ID Specify your user name for the company you want to log on to
Password Enter your password
The UDO form that is registered appears in the List of UDO Forms window
Note
Only the Header Line Style (new UDO style in SAP Business One 882) is supported The Matrix Style (old UDO style) is not supported
3 In the List of UDO Forms window select the UDO form you want to add and choose the Open button
The form opens in edit mode and appears in the Solution Explorer window
Note
You can add more UDO forms The application remembers the company logon information and you do not need to specify it again
If you restart SAP Business One Studio you just need to specify the Password field
4 You can now modify the UDO form
5 To preview the form click (PreviewB1Client)
6 To save the changes in the Solution Explorer window right-click the form and choose Save to DB
When you reopen the form in the SAP Business One client you can see the UDO form is modified
35 Editing Active Forms in SAP Business One
In the SAP Business One client you can edit the active system form through SAP Business One Studio or SAP Business One Studio for Microsoft Visual Studio The active form means the current system form in the SAP Business One client If you have multiple forms open in the SAP Business One client the active form is the top one
Procedure
1 In SAP Business One from the Tools menu choose SAP Business One Studio
2 If you want to edit the active form from SAP Business One Studio choose Edit Active Form
o If SAP Business One Studio is already running the application adds the active system form to the project
o If you have not yet opened SAP Business One Studio the application runs SAP Business One Studio first automatically creates a project and opens the active form in the project
3 If you want to edit the active form from SAP Business One Studio for Microsoft Visual Studio choose Edit Active Form in Visual Studio
22 PUBLIC copy 2014 SAP SE All rights reserved
Working with SAP Business One Studio Suite Working with Add-on Projects in SAP Business One Studio
o If the SAP Business One Studio for Microsoft Visual Studio is already running the application adds the active system form to the project
o If you have not yet opened Microsoft Visual Studio the application does nothing for you You need to open and create a project in Microsoft Visual Studio first and then in the SAP Business One client from the Tools menu choose SAP Business One Studio and choose Edit Active Form in Visual Studio
36 Exporting Updated Parts of a System Form
If you edited a system form you can export the updated part of the system form to a srf file
Procedure
1 In the Solution Explorer window right-click the system form and choose Export Updated Part As
2 In the Export File As window specify the file name
3 Choose Save
Working with SAP Business One Studio Suite Working with Add-on Projects in SAP Business One Studio for Microsoft Visual Studio
PUBLIC copy 2014 SAP SE All rights reserved 23
4 Working with Add-on Projects in SAP Business One Studio for Microsoft Visual Studio
41 Creating SAP Business One Add-on Projects
You can create your new add-on forms with the same look and feel as the SAP Business One forms
Procedure
1 In the Microsoft Visual Studio main window choose New rarr Project
After you install SAP Business One Studio for Microsoft Visual Studio you can locate the SAP Business One template in the New Project dialog box by navigating the expanding list in the left pane under Installed Templates
2 In the New Project window from the Installed Templates area select the SAP Business One template
3 To create an add-on project with an empty user form select SAP Business One Add-on Project and specify the name and the location of your new project
4 To create an add-on project using an existing B1s file from SAP Business One Studio select SAP Business One Add-on Project from B1s File
5 Choose OK
A default form named Form1b1f appears in the Solution Explorer window and the layout of the form appears in the design area A folder B1Studio is generated under CTempltYourAddOnProjectgtltYourAddOnProjectgtbinDebug
You can design the layout of your form and the logic of the controls For more information see Designing a Form
Note
When you create an SAP Business One add-on project it adds the SAPbouiComFramework which is for connecting the UI API application handling LoadBatchAction systemuserUDO form events and generating code It includes
o Menucs - for adding menus and handling menu events
o Programscs - for connecting the UI server and performing the initialization
o SAPbouiCOMFrameworkApplicationSBO_Application - the root COM object of UI API
Sample Code ApplicationSBO_ApplicationMessageBox(Hello world)
o SAPbouiCOMFrameworkFormBaseUIAPIRawForm - the original form COM object of UI API
Sample Code thisUIAPIRawFormClose()Close form
The SAPbouiComFramework contains all UI API COM objects and interfaces therefore we do not recommend that you replace it
24 PUBLIC copy 2014 SAP SE All rights reserved
Working with SAP Business One Studio Suite Working with Add-on Projects in SAP Business One Studio for Microsoft Visual Studio
Note
In SAP Business One 91 a new net SAPBusinessOneSDKdll is added You can build add-on solutions using SAPBusinessOneSDKdll which integrates UI API and DI API
42 Tool Windows in SAP Business One Studio for Microsoft Visual Studio
The tool windows in SAP Business One Studio for Microsoft Visual Studio are very similar to the tool windows in SAP Business One Studio The windows include
bull Toolbox window ndash contains the controls you can use to design your form For more information see Toolbox Window
Note
To program a certain control double-click it The code is automatically generated
bull UI Outline window ndash allows you to view items in a selected pane
Note
This window may not appear by default To display the UI Outline window from the menu bar choose View rarr Other Windows rarr Outline Window
bull Solution Explorer window ndash allows you to view the source files in your project
Note
The project files also include SAP Business One UI API references and predefined menu options (Menucs) In runtime by default the newly added form appears at the bottom of the SAP Business One Main Menu You can change the code if you want to open the form from another menu location
bull Properties window ndash allows you to set and examine the properties and events of forms and form items
Note
To register events of a control in the Properties window click (Events) and double-click the event property you want to edit The code is automatically generated and you can program as needed
You can drag the border of the windows to resize the window click (Auto Hide) to hide the window and also dock the windows to a new location (see Docking Tool Windows)
bull The double-click function - you can double-click an item to add an event The following are the default events that the system supports currently
Item Type Event
Form LoadAfter
EditText KeyDownAfter
CheckBox ClickBefore
OptionButton ClickBefore
Working with SAP Business One Studio Suite Working with Add-on Projects in SAP Business One Studio for Microsoft Visual Studio
PUBLIC copy 2014 SAP SE All rights reserved 25
Item Type Event
Button ClickBefore
ComboBox ComboSelectAfter
bull Toolbar - Located below the Menu button the toolbar is a collection of icons providing easy access to commonly used functions The functions are the same as those for SAP Business One Studio See chapter 22 in this document
43 Adding Forms in a Project
To add forms in your project in the Solution Explorer window right-click your project
From the context menu choose Add rarr New Itemhellip You can add the following types of forms
bull SAP Business One user form
bull SAP Business One system form
bull SAP Business One UDO form
431 Adding SAP Business One User Forms
An SAP Business One user form is a form designed by a partner It can be generated from SAP Business One Studio Screen Painter UI API or your own code
Procedure
1 In the Solution Explorer window right-click your project and choose Add rarr New Itemhellip
2 In the Add New Item window from the Installed Templates area select the SAP Business One add-on template
3 Choose SAP Business One User Form
A new form opens in edit mode and appears in the Solution Explorer window
You can now design the new form For more information see Designing a Form
In runtime by default the newly added form appears at the bottom of the SAP Business One Main Menu
432 Adding SAP Business One System Forms
A system form is a standard SAP Business One form that you can add to your project
26 PUBLIC copy 2014 SAP SE All rights reserved
Working with SAP Business One Studio Suite Working with Add-on Projects in SAP Business One Studio for Microsoft Visual Studio
Procedure
1 In the Solution Explorer window right-click your project and choose Add rarr New Itemhellip
2 In the Add New Item window from the Installed Templates area select the SAP Business One add-on template
3 Choose SAP Business One System Form
Note
The Add System Form window lists the following system forms
o All currently opened system forms if SAP Business One is running
o The locally cached system forms
4 Choose OK
The form opens in edit mode and appears in the Solution Explorer window
You can add user items modify the properties of a system item and register events but you cannot delete existing system items The modification is implemented after you reopen the system form
433 Adding SAP Business One UDO Forms
A UDO form is a form generated by the User-Defined Object Registration wizard (To access the wizard from the SAP Business One menu bar choose Tools rarr Customization Tools rarr Objects Registration Wizard) You can add a UDO form to your project
Procedure
1 In the Solution Explorer window right-click your project and choose Add rarr New Itemhellip
2 In the Add New Item window from the Installed Templates area select the SAP Business One add-on template
3 Choose SAP Business One UDO Form
4 In the Company Logon window specify the details of the company with which you want to work and choose Log On
Field DescriptionActivity
Server Specify the IP address or the machine name of the SAP Business One server
Server Type From the dropdown list select a server type MSSQL_2008 MSSQL_2012 or HANADB
License Server Specify the license server
Company Name Specify the company defined on the selected SAP Business One server
User ID Specify your user name for the company to which you want to log on
Password Enter your password
Working with SAP Business One Studio Suite Working with Add-on Projects in SAP Business One Studio for Microsoft Visual Studio
PUBLIC copy 2014 SAP SE All rights reserved 27
The UDO form that is registered appears in the List of UDO Forms window
Note
Only the Header Line Style (new UDO style in SAP Business One 882) is supported The Matrix Style (old UDO style) is not supported
5 In the List of UDO Forms window select the UDO form you want to add and choose the Open button
The form opens in edit mode and appears in the Solution Explorer window
Note
The application remembers the company logon information and if you want to add more UDO forms you do not need to specify that information again
If you restart SAP Business One Studio you just need to specify the Password field
6 You can now modify the UDO form
To save the changes in the Solution Explorer window right-click the form and choose Save UDO to DB
When you reopen the form in the SAP Business One client you can see the UDO form is modified
44 Loading an Existing B1s File to Your Project
You can load your existing b1s solution or srf file (ScreenPainter file) in the following ways
Creating an Add-on Project Using an Existing B1s File
1 In the Microsoft Visual Studio main window choose New rarr Project
2 In the New Project window from the Installed Templates area select the SAP Business One add-on template
3 To create an add-on project using an existing B1s file from SAP Business One Studio select SAP Business One Add-on Project from B1s File
4 Choose OK
Adding an Existing B1s File to the Current Project
1 In the Solution Explorer window right-click your project and choose Add rarr Existing Business One File
2 In the Open window select the Business One Studio files (b1s) file you want to add
3 Choose Open The form opens in edit mode and appears in the Solution Explorer window
Adding an Existing SRF File to the Current Project
1 In the Solution Explorer window right-click your project and choose Add rarr Existing Business One File
2 In the Open window select the Business One Studio SRF files (srf) file you want to add
3 Choose Open The form opens in edit mode and appears in the Solution Explorer window
28 PUBLIC copy 2014 SAP SE All rights reserved
Working with SAP Business One Studio Suite Working with Add-on Projects in SAP Business One Studio for Microsoft Visual Studio
45 Packaging Your Project
The SAP Business One Extension Package features are integrated in SAP Business One Studio for Microsoft Visual Studio You can package your project directly from the menu bar
Procedure
1 Build your project first to get the executable file of your extension
2 From the menu bar of the Microsoft Visual Studio main window choose SAP Business One Studio rarr Extension Package
3 In the Extension Registration Data Generator window expand Basic Information and specify the following fields
o Extension Name ndash Enter the name of the extension This field is mandatory
o Extension Version ndash Enter the version of the extension for which you want to package and generate the ARD file This field is mandatory
o Extension Provider ndash Enter the name of the SAP partner that creates and owns the extension For example the name of your company
o Extension Namespace ndash Enter a name for the folder in which SAP Business One places the extension after a user registers the extension in the application
o Supported Database ndash Specify the database in which the extension works This field is mandatory
o Contact Data ndash Enter contact information for the SAP partner that creates and owns the extension For example enter the URL of your companys Website
4 Expand Extension File specify the path of the executable file of your 32-bit or 64-bit add-on and select the files that should be packaged in the zip file
To package your apps for the version for SAP HANA specify the app zip file the name and the package of your app
Note
The naming convention for your package is For example if the package hierarchy is sapsboatp in SAP HANA the package name is this and the corresponding URL will be httpshostportsapsboatp
5 Expand Deployment Steps and select the COM dlls to register for your 32-bit or 64-bit add-on
6 Expend SBO Compatibility you can specify the versions of SAP Business One with which the add-on is compatible
In the Compatible with SAP Business One area specify the following
o Version From ndash Enter the earliest version of SAP Business One with which the extension is compatible
o To ndash Enter the latest version of SAP Business One with which the lightweight add-on is compatible
Example
Enter compatible versions of SAP Business One with the format ltxxxyyyxxgt for example 91000000
7 Expand Parameters you can optionally specify shared parameters and parameters for the extension
o Shared Parameters - The parameters or configuration required to run the extension The parameters are shared in all extension instances running on different companies
o Parameters - The parameters or configurations required to run the extension
8 Choose the Package button
Working with SAP Business One Studio Suite Working with Add-on Projects in SAP Business One Studio for Microsoft Visual Studio
PUBLIC copy 2014 SAP SE All rights reserved 29
9 In the Save As window specify the location where you want to save the file and choose the Save button
Note
If you are not yet ready to package your extension you can choose the Save button instead of the Package button The information you entered in the Extension Registration Data Generator window will be saved in your project The next time you open the Extension Registration Data Generator window the saved information will be displayed
For more information see How to Package and Deploy SAP Business One Extensions for Lightweight Deployment
30 PUBLIC copy 2014 SAP SE All rights reserved
Working with SAP Business One Studio Suite SAP Business One Studio Suite Demo Script
5 SAP Business One Studio Suite Demo Script
This section introduces a demo for how to work with your add-on projects in SAP Business One Studio Suite
Procedure
1 Start SAP Business One and log on to a company
o Database MadridDemo
o User manager
o Password 1234
2 Start SAP Business One Studio and add a new project
1 Choose Menu rarr New rarr Project rarr Add-On
2 Choose OK
3 Create a user form add an EditText with ChooseFromList and add a grid with DataTable
1 Add EditText Grid LinkedButton DB DataSource Data Table and ChooseFromList
Working with SAP Business One Studio Suite SAP Business One Studio Suite Demo Script
PUBLIC copy 2014 SAP SE All rights reserved 31
2 Specify the controls properties as follows
o DB DataSource
o Data Table
o ChooseFromList
o EditText
32 PUBLIC copy 2014 SAP SE All rights reserved
Working with SAP Business One Studio Suite SAP Business One Studio Suite Demo Script
o LinkedButton LinkTo = Item_0 LinkedObject = 2
o Grid DataTableID = DT_0
o Form LinkedObject = 2
3 From Toolbar choose Preview
The user form opens in the SAP Business One client The grid displays all BPs
4 To select a business partner choose the ChooseFromList icon The application fills the business partner code in the EditText
To open the business partner form choose the linked button
Working with SAP Business One Studio Suite SAP Business One Studio Suite Demo Script
PUBLIC copy 2014 SAP SE All rights reserved 33
4 Edit a system form (sales order) add a button and preview it
1 In the SAP Business One client from the Main Menu choose Sales rarr Sales Order to open the original sales order
2 Right-click the project node to add a system form
3 Select Sales Order and choose Open (the other form is cache file in local that user opened)
4 From Toolbar add the button and choose Preview
5 Switch to the SAP Business One client to review the updates of the sales order form
34 PUBLIC copy 2014 SAP SE All rights reserved
Working with SAP Business One Studio Suite SAP Business One Studio Suite Demo Script
5 Edit a UDO form add a button and save the UDO to the database
1 To open the original UDO form in the SAP Business One client choose Tools rarr Default Forms rarr UDO1-UDO1
2 To add a UDO form right-click the project node
3 Specify the DI connection information (password 1234) and choose Log On
Working with SAP Business One Studio Suite SAP Business One Studio Suite Demo Script
PUBLIC copy 2014 SAP SE All rights reserved 35
4 To edit the UDO form select UDO1 and choose OK
5 Add the button and save the UDO to the database
6 To review the updates from the SAP Business One client reopen the UDO form
36 PUBLIC copy 2014 SAP SE All rights reserved
Working with SAP Business One Studio Suite SAP Business One Studio Suite Demo Script
6 Start SAP Business One Studio for Microsoft Visual Studio and add a new project
1 Choose Menu rarr File rarr New rarr Project and select the C project templates
o The template SAP Business One Add-on Project is for creating a new project
o The template SAP Business One Add-on Project from B1s File is for creating a project with the existing B1s file
2 Select SAP Business One Add-on Project and create a new project
7 Add a button a Button_ClickBefore event and a popup message box if choosing the button
1 Add a button
2 Double-click the button to add a Button_ClickBefore event
Working with SAP Business One Studio Suite SAP Business One Studio Suite Demo Script
PUBLIC copy 2014 SAP SE All rights reserved 37
3 Add the UI API code as follows
4 To run the add-on from toolbar or by using the F5 shortcut choose Debug
In the Main Menu of the SAP Business One client the add-on adds the user menu
5 Choose the menu to open the user form
6 Choose the button to open a message box
7 Stop debugging and close all forms
8 Edit a system form (sales order) Add a button and a Button_ClickBefore event create a user form if choosing the button
38 PUBLIC copy 2014 SAP SE All rights reserved
Working with SAP Business One Studio Suite SAP Business One Studio Suite Demo Script
1 In the SAP Business One client from the Main Menu choose Sales rarr Sales Order to open the original sales order
2 Right-click the project node to add a system form (sales order)
3 Add a button
4 Double-click the button to add a Button_ClickBefore event
5 Add the UI API code as follows
Working with SAP Business One Studio Suite SAP Business One Studio Suite Demo Script
PUBLIC copy 2014 SAP SE All rights reserved 39
6 To run the add-on from toolbar or by using the F5 shortcut choose Debug
7 From the SAP Business One client open the sales order The new button appears
To open the new form choose the button
9 Edit a system form (sales opportunity) from the menu design the UI API code to set Remark as a mandatory field
1 In the SAP Business One client from the Main Menu choose Sales Opportunities rarr Sales Opportunity to open the original sales opportunity form
2 From the SAP Business One client choose Edit Form in Visual Studio to edit the system form
3 In UI Outline change the pane level to 2
4 Add a button
5 Double-click the button to add a Button_ClickBefore event
6 Add the UI API code as follows
40 PUBLIC copy 2014 SAP SE All rights reserved
Working with SAP Business One Studio Suite SAP Business One Studio Suite Demo Script
7 To run the add-on from toolbar or by using the F5 shortcut choose Debug
8 In the SAP Business One client reopen the sales opportunity
9 On the Potential tab specify the business partner code and potential amount
On the General tab leave the Remark field empty
10 Choose Add
In the status bar the error message Remark is mandatory appears
11 Specify the remark The system adds the sales opportunity
wwwsapcomcontactsap
Material Number
copy 2014 SAP SE All rights reserved No part of this publication may be reproduced or transmitted in any form or for any purpose without the express permission of SAP AG The information contained herein may be changed without prior notice Some software products marketed by SAP AG and its distributors contain proprietary software components of other software vendors Microsoft Windows Excel Outlook and PowerPoint are registered trademarks of Microsoft Corporation IBM DB2 DB2 Universal Database System ads System i5 System p System p5 System x System z System z10 System z9 z10 z9 iSeries pSeries xSeries zSeries eServer zVM zOS i5OS S390 OS390 OS400 AS400 S390 Parallel Enterprise Server PowerVM Power Architecture POWER6+ POWER6 POWER5+ POWER5 POWER OpenPower PowerPC BatchPipes BladeCenter System Storage GPFS HACMP RETAIN DB2 Connect RACF Redbooks OS2 Parallel Sysplex MVSESA AIX Intelligent Miner WebSphere Netfinity Tivoli and Informix are trademarks or registered trademarks of IBM Corporation Linux is the registered trademark of Linus Torvalds in the US and other countries Adobe the Adobe logo Acrobat PostScript and Reader are either trademarks or registered trademarks of Adobe Systems Incorporated in the United States andor other countries Oracle is a registered trademark of Oracle Corporation UNIX XOpen OSF1 and Motif are registered trademarks of the Open Group Citrix ICA Program Neighborhood MetaFrame WinFrame VideoFrame and MultiWin are trademarks or registered trademarks of Citrix Systems Inc HTML XML XHTML and W3C are trademarks or registered trademarks of W3Creg World Wide Web Consortium Massachusetts Institute of Technology Java is a registered trademark of Sun Microsystems Inc JavaScript is a registered trademark of Sun Microsystems Inc used under license for technology invented and implemented by Netscape SAP R3 xApps xApp SAP NetWeaver Duet PartnerEdge ByDesign SAP Business ByDesign and other SAP products and services mentioned herein as well as their respective logos are trademarks or registered trademarks of SAP AG in Germany and in several other countries all over the world All other product and service names mentioned are the trademarks of their respective companies Data contained in this document serves informational purposes only National product specifications may vary These materials are subject to change without notice These materials are provided by SAP AG and its affiliated companies (SAP Group) for informational purposes only without representation or warranty of any kind and SAP Group shall not be liable for errors or omissions with respect to the materials The only warranties for SAP Group products and services are those that are set forth in the express warranty statements accompanying such products and services if any Nothing herein should be construed as constituting an additional warranty
- 1 Introduction
-
- 11 Installing SAP Business One Studio
- 12 Running SAP Business One Studio
- 13 Terms and Definitions
- 14 Related Documentation
-
- 2 SAP Business One Studio Main Window
-
- 21 Menu Button
- 22 Toolbar
- 23 Toolbox Window
- 24 Docking Tool Windows
-
- 3 Working with Add-on Projects in SAP Business One Studio
-
- 31 Creating an Add-on Project
- 32 Opening an Add-on Project or an External File
- 33 Designing a Form
-
- 331 Working with Tab Controls
- 332 Working with Grids
- 333 Working with Data Tables
- 334 Working with Matrixes
- 335 Working with Choose From Lists
- 336 Example Creating a Business Partner Field with Linked Button and Choose From List Functions
-
- 34 Adding Renaming or Deleting Forms in a Project
-
- 341 Adding New User Forms
- 342 Adding Existing User Forms
- 343 Adding System Forms
- 344 Adding UDO Forms
-
- 35 Editing Active Forms in SAP Business One
- 36 Exporting Updated Parts of a System Form
-
- 4 Working with Add-on Projects in SAP Business One Studio for Microsoft Visual Studio
-
- 41 Creating SAP Business One Add-on Projects
- 42 Tool Windows in SAP Business One Studio for Microsoft Visual Studio
- 43 Adding Forms in a Project
-
- 431 Adding SAP Business One User Forms
- 432 Adding SAP Business One System Forms
- 433 Adding SAP Business One UDO Forms
-
- 44 Loading an Existing B1s File to Your Project
- 45 Packaging Your Project
-
- 5 SAP Business One Studio Suite Demo Script
-
Working with SAP Business One Studio Suite Working with Add-on Projects in SAP Business One Studio for Microsoft Visual Studio
PUBLIC copy 2014 SAP SE All rights reserved 23
4 Working with Add-on Projects in SAP Business One Studio for Microsoft Visual Studio
41 Creating SAP Business One Add-on Projects
You can create your new add-on forms with the same look and feel as the SAP Business One forms
Procedure
1 In the Microsoft Visual Studio main window choose New rarr Project
After you install SAP Business One Studio for Microsoft Visual Studio you can locate the SAP Business One template in the New Project dialog box by navigating the expanding list in the left pane under Installed Templates
2 In the New Project window from the Installed Templates area select the SAP Business One template
3 To create an add-on project with an empty user form select SAP Business One Add-on Project and specify the name and the location of your new project
4 To create an add-on project using an existing B1s file from SAP Business One Studio select SAP Business One Add-on Project from B1s File
5 Choose OK
A default form named Form1b1f appears in the Solution Explorer window and the layout of the form appears in the design area A folder B1Studio is generated under CTempltYourAddOnProjectgtltYourAddOnProjectgtbinDebug
You can design the layout of your form and the logic of the controls For more information see Designing a Form
Note
When you create an SAP Business One add-on project it adds the SAPbouiComFramework which is for connecting the UI API application handling LoadBatchAction systemuserUDO form events and generating code It includes
o Menucs - for adding menus and handling menu events
o Programscs - for connecting the UI server and performing the initialization
o SAPbouiCOMFrameworkApplicationSBO_Application - the root COM object of UI API
Sample Code ApplicationSBO_ApplicationMessageBox(Hello world)
o SAPbouiCOMFrameworkFormBaseUIAPIRawForm - the original form COM object of UI API
Sample Code thisUIAPIRawFormClose()Close form
The SAPbouiComFramework contains all UI API COM objects and interfaces therefore we do not recommend that you replace it
24 PUBLIC copy 2014 SAP SE All rights reserved
Working with SAP Business One Studio Suite Working with Add-on Projects in SAP Business One Studio for Microsoft Visual Studio
Note
In SAP Business One 91 a new net SAPBusinessOneSDKdll is added You can build add-on solutions using SAPBusinessOneSDKdll which integrates UI API and DI API
42 Tool Windows in SAP Business One Studio for Microsoft Visual Studio
The tool windows in SAP Business One Studio for Microsoft Visual Studio are very similar to the tool windows in SAP Business One Studio The windows include
bull Toolbox window ndash contains the controls you can use to design your form For more information see Toolbox Window
Note
To program a certain control double-click it The code is automatically generated
bull UI Outline window ndash allows you to view items in a selected pane
Note
This window may not appear by default To display the UI Outline window from the menu bar choose View rarr Other Windows rarr Outline Window
bull Solution Explorer window ndash allows you to view the source files in your project
Note
The project files also include SAP Business One UI API references and predefined menu options (Menucs) In runtime by default the newly added form appears at the bottom of the SAP Business One Main Menu You can change the code if you want to open the form from another menu location
bull Properties window ndash allows you to set and examine the properties and events of forms and form items
Note
To register events of a control in the Properties window click (Events) and double-click the event property you want to edit The code is automatically generated and you can program as needed
You can drag the border of the windows to resize the window click (Auto Hide) to hide the window and also dock the windows to a new location (see Docking Tool Windows)
bull The double-click function - you can double-click an item to add an event The following are the default events that the system supports currently
Item Type Event
Form LoadAfter
EditText KeyDownAfter
CheckBox ClickBefore
OptionButton ClickBefore
Working with SAP Business One Studio Suite Working with Add-on Projects in SAP Business One Studio for Microsoft Visual Studio
PUBLIC copy 2014 SAP SE All rights reserved 25
Item Type Event
Button ClickBefore
ComboBox ComboSelectAfter
bull Toolbar - Located below the Menu button the toolbar is a collection of icons providing easy access to commonly used functions The functions are the same as those for SAP Business One Studio See chapter 22 in this document
43 Adding Forms in a Project
To add forms in your project in the Solution Explorer window right-click your project
From the context menu choose Add rarr New Itemhellip You can add the following types of forms
bull SAP Business One user form
bull SAP Business One system form
bull SAP Business One UDO form
431 Adding SAP Business One User Forms
An SAP Business One user form is a form designed by a partner It can be generated from SAP Business One Studio Screen Painter UI API or your own code
Procedure
1 In the Solution Explorer window right-click your project and choose Add rarr New Itemhellip
2 In the Add New Item window from the Installed Templates area select the SAP Business One add-on template
3 Choose SAP Business One User Form
A new form opens in edit mode and appears in the Solution Explorer window
You can now design the new form For more information see Designing a Form
In runtime by default the newly added form appears at the bottom of the SAP Business One Main Menu
432 Adding SAP Business One System Forms
A system form is a standard SAP Business One form that you can add to your project
26 PUBLIC copy 2014 SAP SE All rights reserved
Working with SAP Business One Studio Suite Working with Add-on Projects in SAP Business One Studio for Microsoft Visual Studio
Procedure
1 In the Solution Explorer window right-click your project and choose Add rarr New Itemhellip
2 In the Add New Item window from the Installed Templates area select the SAP Business One add-on template
3 Choose SAP Business One System Form
Note
The Add System Form window lists the following system forms
o All currently opened system forms if SAP Business One is running
o The locally cached system forms
4 Choose OK
The form opens in edit mode and appears in the Solution Explorer window
You can add user items modify the properties of a system item and register events but you cannot delete existing system items The modification is implemented after you reopen the system form
433 Adding SAP Business One UDO Forms
A UDO form is a form generated by the User-Defined Object Registration wizard (To access the wizard from the SAP Business One menu bar choose Tools rarr Customization Tools rarr Objects Registration Wizard) You can add a UDO form to your project
Procedure
1 In the Solution Explorer window right-click your project and choose Add rarr New Itemhellip
2 In the Add New Item window from the Installed Templates area select the SAP Business One add-on template
3 Choose SAP Business One UDO Form
4 In the Company Logon window specify the details of the company with which you want to work and choose Log On
Field DescriptionActivity
Server Specify the IP address or the machine name of the SAP Business One server
Server Type From the dropdown list select a server type MSSQL_2008 MSSQL_2012 or HANADB
License Server Specify the license server
Company Name Specify the company defined on the selected SAP Business One server
User ID Specify your user name for the company to which you want to log on
Password Enter your password
Working with SAP Business One Studio Suite Working with Add-on Projects in SAP Business One Studio for Microsoft Visual Studio
PUBLIC copy 2014 SAP SE All rights reserved 27
The UDO form that is registered appears in the List of UDO Forms window
Note
Only the Header Line Style (new UDO style in SAP Business One 882) is supported The Matrix Style (old UDO style) is not supported
5 In the List of UDO Forms window select the UDO form you want to add and choose the Open button
The form opens in edit mode and appears in the Solution Explorer window
Note
The application remembers the company logon information and if you want to add more UDO forms you do not need to specify that information again
If you restart SAP Business One Studio you just need to specify the Password field
6 You can now modify the UDO form
To save the changes in the Solution Explorer window right-click the form and choose Save UDO to DB
When you reopen the form in the SAP Business One client you can see the UDO form is modified
44 Loading an Existing B1s File to Your Project
You can load your existing b1s solution or srf file (ScreenPainter file) in the following ways
Creating an Add-on Project Using an Existing B1s File
1 In the Microsoft Visual Studio main window choose New rarr Project
2 In the New Project window from the Installed Templates area select the SAP Business One add-on template
3 To create an add-on project using an existing B1s file from SAP Business One Studio select SAP Business One Add-on Project from B1s File
4 Choose OK
Adding an Existing B1s File to the Current Project
1 In the Solution Explorer window right-click your project and choose Add rarr Existing Business One File
2 In the Open window select the Business One Studio files (b1s) file you want to add
3 Choose Open The form opens in edit mode and appears in the Solution Explorer window
Adding an Existing SRF File to the Current Project
1 In the Solution Explorer window right-click your project and choose Add rarr Existing Business One File
2 In the Open window select the Business One Studio SRF files (srf) file you want to add
3 Choose Open The form opens in edit mode and appears in the Solution Explorer window
28 PUBLIC copy 2014 SAP SE All rights reserved
Working with SAP Business One Studio Suite Working with Add-on Projects in SAP Business One Studio for Microsoft Visual Studio
45 Packaging Your Project
The SAP Business One Extension Package features are integrated in SAP Business One Studio for Microsoft Visual Studio You can package your project directly from the menu bar
Procedure
1 Build your project first to get the executable file of your extension
2 From the menu bar of the Microsoft Visual Studio main window choose SAP Business One Studio rarr Extension Package
3 In the Extension Registration Data Generator window expand Basic Information and specify the following fields
o Extension Name ndash Enter the name of the extension This field is mandatory
o Extension Version ndash Enter the version of the extension for which you want to package and generate the ARD file This field is mandatory
o Extension Provider ndash Enter the name of the SAP partner that creates and owns the extension For example the name of your company
o Extension Namespace ndash Enter a name for the folder in which SAP Business One places the extension after a user registers the extension in the application
o Supported Database ndash Specify the database in which the extension works This field is mandatory
o Contact Data ndash Enter contact information for the SAP partner that creates and owns the extension For example enter the URL of your companys Website
4 Expand Extension File specify the path of the executable file of your 32-bit or 64-bit add-on and select the files that should be packaged in the zip file
To package your apps for the version for SAP HANA specify the app zip file the name and the package of your app
Note
The naming convention for your package is For example if the package hierarchy is sapsboatp in SAP HANA the package name is this and the corresponding URL will be httpshostportsapsboatp
5 Expand Deployment Steps and select the COM dlls to register for your 32-bit or 64-bit add-on
6 Expend SBO Compatibility you can specify the versions of SAP Business One with which the add-on is compatible
In the Compatible with SAP Business One area specify the following
o Version From ndash Enter the earliest version of SAP Business One with which the extension is compatible
o To ndash Enter the latest version of SAP Business One with which the lightweight add-on is compatible
Example
Enter compatible versions of SAP Business One with the format ltxxxyyyxxgt for example 91000000
7 Expand Parameters you can optionally specify shared parameters and parameters for the extension
o Shared Parameters - The parameters or configuration required to run the extension The parameters are shared in all extension instances running on different companies
o Parameters - The parameters or configurations required to run the extension
8 Choose the Package button
Working with SAP Business One Studio Suite Working with Add-on Projects in SAP Business One Studio for Microsoft Visual Studio
PUBLIC copy 2014 SAP SE All rights reserved 29
9 In the Save As window specify the location where you want to save the file and choose the Save button
Note
If you are not yet ready to package your extension you can choose the Save button instead of the Package button The information you entered in the Extension Registration Data Generator window will be saved in your project The next time you open the Extension Registration Data Generator window the saved information will be displayed
For more information see How to Package and Deploy SAP Business One Extensions for Lightweight Deployment
30 PUBLIC copy 2014 SAP SE All rights reserved
Working with SAP Business One Studio Suite SAP Business One Studio Suite Demo Script
5 SAP Business One Studio Suite Demo Script
This section introduces a demo for how to work with your add-on projects in SAP Business One Studio Suite
Procedure
1 Start SAP Business One and log on to a company
o Database MadridDemo
o User manager
o Password 1234
2 Start SAP Business One Studio and add a new project
1 Choose Menu rarr New rarr Project rarr Add-On
2 Choose OK
3 Create a user form add an EditText with ChooseFromList and add a grid with DataTable
1 Add EditText Grid LinkedButton DB DataSource Data Table and ChooseFromList
Working with SAP Business One Studio Suite SAP Business One Studio Suite Demo Script
PUBLIC copy 2014 SAP SE All rights reserved 31
2 Specify the controls properties as follows
o DB DataSource
o Data Table
o ChooseFromList
o EditText
32 PUBLIC copy 2014 SAP SE All rights reserved
Working with SAP Business One Studio Suite SAP Business One Studio Suite Demo Script
o LinkedButton LinkTo = Item_0 LinkedObject = 2
o Grid DataTableID = DT_0
o Form LinkedObject = 2
3 From Toolbar choose Preview
The user form opens in the SAP Business One client The grid displays all BPs
4 To select a business partner choose the ChooseFromList icon The application fills the business partner code in the EditText
To open the business partner form choose the linked button
Working with SAP Business One Studio Suite SAP Business One Studio Suite Demo Script
PUBLIC copy 2014 SAP SE All rights reserved 33
4 Edit a system form (sales order) add a button and preview it
1 In the SAP Business One client from the Main Menu choose Sales rarr Sales Order to open the original sales order
2 Right-click the project node to add a system form
3 Select Sales Order and choose Open (the other form is cache file in local that user opened)
4 From Toolbar add the button and choose Preview
5 Switch to the SAP Business One client to review the updates of the sales order form
34 PUBLIC copy 2014 SAP SE All rights reserved
Working with SAP Business One Studio Suite SAP Business One Studio Suite Demo Script
5 Edit a UDO form add a button and save the UDO to the database
1 To open the original UDO form in the SAP Business One client choose Tools rarr Default Forms rarr UDO1-UDO1
2 To add a UDO form right-click the project node
3 Specify the DI connection information (password 1234) and choose Log On
Working with SAP Business One Studio Suite SAP Business One Studio Suite Demo Script
PUBLIC copy 2014 SAP SE All rights reserved 35
4 To edit the UDO form select UDO1 and choose OK
5 Add the button and save the UDO to the database
6 To review the updates from the SAP Business One client reopen the UDO form
36 PUBLIC copy 2014 SAP SE All rights reserved
Working with SAP Business One Studio Suite SAP Business One Studio Suite Demo Script
6 Start SAP Business One Studio for Microsoft Visual Studio and add a new project
1 Choose Menu rarr File rarr New rarr Project and select the C project templates
o The template SAP Business One Add-on Project is for creating a new project
o The template SAP Business One Add-on Project from B1s File is for creating a project with the existing B1s file
2 Select SAP Business One Add-on Project and create a new project
7 Add a button a Button_ClickBefore event and a popup message box if choosing the button
1 Add a button
2 Double-click the button to add a Button_ClickBefore event
Working with SAP Business One Studio Suite SAP Business One Studio Suite Demo Script
PUBLIC copy 2014 SAP SE All rights reserved 37
3 Add the UI API code as follows
4 To run the add-on from toolbar or by using the F5 shortcut choose Debug
In the Main Menu of the SAP Business One client the add-on adds the user menu
5 Choose the menu to open the user form
6 Choose the button to open a message box
7 Stop debugging and close all forms
8 Edit a system form (sales order) Add a button and a Button_ClickBefore event create a user form if choosing the button
38 PUBLIC copy 2014 SAP SE All rights reserved
Working with SAP Business One Studio Suite SAP Business One Studio Suite Demo Script
1 In the SAP Business One client from the Main Menu choose Sales rarr Sales Order to open the original sales order
2 Right-click the project node to add a system form (sales order)
3 Add a button
4 Double-click the button to add a Button_ClickBefore event
5 Add the UI API code as follows
Working with SAP Business One Studio Suite SAP Business One Studio Suite Demo Script
PUBLIC copy 2014 SAP SE All rights reserved 39
6 To run the add-on from toolbar or by using the F5 shortcut choose Debug
7 From the SAP Business One client open the sales order The new button appears
To open the new form choose the button
9 Edit a system form (sales opportunity) from the menu design the UI API code to set Remark as a mandatory field
1 In the SAP Business One client from the Main Menu choose Sales Opportunities rarr Sales Opportunity to open the original sales opportunity form
2 From the SAP Business One client choose Edit Form in Visual Studio to edit the system form
3 In UI Outline change the pane level to 2
4 Add a button
5 Double-click the button to add a Button_ClickBefore event
6 Add the UI API code as follows
40 PUBLIC copy 2014 SAP SE All rights reserved
Working with SAP Business One Studio Suite SAP Business One Studio Suite Demo Script
7 To run the add-on from toolbar or by using the F5 shortcut choose Debug
8 In the SAP Business One client reopen the sales opportunity
9 On the Potential tab specify the business partner code and potential amount
On the General tab leave the Remark field empty
10 Choose Add
In the status bar the error message Remark is mandatory appears
11 Specify the remark The system adds the sales opportunity
wwwsapcomcontactsap
Material Number
copy 2014 SAP SE All rights reserved No part of this publication may be reproduced or transmitted in any form or for any purpose without the express permission of SAP AG The information contained herein may be changed without prior notice Some software products marketed by SAP AG and its distributors contain proprietary software components of other software vendors Microsoft Windows Excel Outlook and PowerPoint are registered trademarks of Microsoft Corporation IBM DB2 DB2 Universal Database System ads System i5 System p System p5 System x System z System z10 System z9 z10 z9 iSeries pSeries xSeries zSeries eServer zVM zOS i5OS S390 OS390 OS400 AS400 S390 Parallel Enterprise Server PowerVM Power Architecture POWER6+ POWER6 POWER5+ POWER5 POWER OpenPower PowerPC BatchPipes BladeCenter System Storage GPFS HACMP RETAIN DB2 Connect RACF Redbooks OS2 Parallel Sysplex MVSESA AIX Intelligent Miner WebSphere Netfinity Tivoli and Informix are trademarks or registered trademarks of IBM Corporation Linux is the registered trademark of Linus Torvalds in the US and other countries Adobe the Adobe logo Acrobat PostScript and Reader are either trademarks or registered trademarks of Adobe Systems Incorporated in the United States andor other countries Oracle is a registered trademark of Oracle Corporation UNIX XOpen OSF1 and Motif are registered trademarks of the Open Group Citrix ICA Program Neighborhood MetaFrame WinFrame VideoFrame and MultiWin are trademarks or registered trademarks of Citrix Systems Inc HTML XML XHTML and W3C are trademarks or registered trademarks of W3Creg World Wide Web Consortium Massachusetts Institute of Technology Java is a registered trademark of Sun Microsystems Inc JavaScript is a registered trademark of Sun Microsystems Inc used under license for technology invented and implemented by Netscape SAP R3 xApps xApp SAP NetWeaver Duet PartnerEdge ByDesign SAP Business ByDesign and other SAP products and services mentioned herein as well as their respective logos are trademarks or registered trademarks of SAP AG in Germany and in several other countries all over the world All other product and service names mentioned are the trademarks of their respective companies Data contained in this document serves informational purposes only National product specifications may vary These materials are subject to change without notice These materials are provided by SAP AG and its affiliated companies (SAP Group) for informational purposes only without representation or warranty of any kind and SAP Group shall not be liable for errors or omissions with respect to the materials The only warranties for SAP Group products and services are those that are set forth in the express warranty statements accompanying such products and services if any Nothing herein should be construed as constituting an additional warranty
- 1 Introduction
-
- 11 Installing SAP Business One Studio
- 12 Running SAP Business One Studio
- 13 Terms and Definitions
- 14 Related Documentation
-
- 2 SAP Business One Studio Main Window
-
- 21 Menu Button
- 22 Toolbar
- 23 Toolbox Window
- 24 Docking Tool Windows
-
- 3 Working with Add-on Projects in SAP Business One Studio
-
- 31 Creating an Add-on Project
- 32 Opening an Add-on Project or an External File
- 33 Designing a Form
-
- 331 Working with Tab Controls
- 332 Working with Grids
- 333 Working with Data Tables
- 334 Working with Matrixes
- 335 Working with Choose From Lists
- 336 Example Creating a Business Partner Field with Linked Button and Choose From List Functions
-
- 34 Adding Renaming or Deleting Forms in a Project
-
- 341 Adding New User Forms
- 342 Adding Existing User Forms
- 343 Adding System Forms
- 344 Adding UDO Forms
-
- 35 Editing Active Forms in SAP Business One
- 36 Exporting Updated Parts of a System Form
-
- 4 Working with Add-on Projects in SAP Business One Studio for Microsoft Visual Studio
-
- 41 Creating SAP Business One Add-on Projects
- 42 Tool Windows in SAP Business One Studio for Microsoft Visual Studio
- 43 Adding Forms in a Project
-
- 431 Adding SAP Business One User Forms
- 432 Adding SAP Business One System Forms
- 433 Adding SAP Business One UDO Forms
-
- 44 Loading an Existing B1s File to Your Project
- 45 Packaging Your Project
-
- 5 SAP Business One Studio Suite Demo Script
-
Working with SAP Business One Studio Suite Working with Add-on Projects in SAP Business One Studio for Microsoft Visual Studio
PUBLIC copy 2014 SAP SE All rights reserved 25
Item Type Event
Button ClickBefore
ComboBox ComboSelectAfter
bull Toolbar - Located below the Menu button the toolbar is a collection of icons providing easy access to commonly used functions The functions are the same as those for SAP Business One Studio See chapter 22 in this document
43 Adding Forms in a Project
To add forms in your project in the Solution Explorer window right-click your project
From the context menu choose Add rarr New Itemhellip You can add the following types of forms
bull SAP Business One user form
bull SAP Business One system form
bull SAP Business One UDO form
431 Adding SAP Business One User Forms
An SAP Business One user form is a form designed by a partner It can be generated from SAP Business One Studio Screen Painter UI API or your own code
Procedure
1 In the Solution Explorer window right-click your project and choose Add rarr New Itemhellip
2 In the Add New Item window from the Installed Templates area select the SAP Business One add-on template
3 Choose SAP Business One User Form
A new form opens in edit mode and appears in the Solution Explorer window
You can now design the new form For more information see Designing a Form
In runtime by default the newly added form appears at the bottom of the SAP Business One Main Menu
432 Adding SAP Business One System Forms
A system form is a standard SAP Business One form that you can add to your project
26 PUBLIC copy 2014 SAP SE All rights reserved
Working with SAP Business One Studio Suite Working with Add-on Projects in SAP Business One Studio for Microsoft Visual Studio
Procedure
1 In the Solution Explorer window right-click your project and choose Add rarr New Itemhellip
2 In the Add New Item window from the Installed Templates area select the SAP Business One add-on template
3 Choose SAP Business One System Form
Note
The Add System Form window lists the following system forms
o All currently opened system forms if SAP Business One is running
o The locally cached system forms
4 Choose OK
The form opens in edit mode and appears in the Solution Explorer window
You can add user items modify the properties of a system item and register events but you cannot delete existing system items The modification is implemented after you reopen the system form
433 Adding SAP Business One UDO Forms
A UDO form is a form generated by the User-Defined Object Registration wizard (To access the wizard from the SAP Business One menu bar choose Tools rarr Customization Tools rarr Objects Registration Wizard) You can add a UDO form to your project
Procedure
1 In the Solution Explorer window right-click your project and choose Add rarr New Itemhellip
2 In the Add New Item window from the Installed Templates area select the SAP Business One add-on template
3 Choose SAP Business One UDO Form
4 In the Company Logon window specify the details of the company with which you want to work and choose Log On
Field DescriptionActivity
Server Specify the IP address or the machine name of the SAP Business One server
Server Type From the dropdown list select a server type MSSQL_2008 MSSQL_2012 or HANADB
License Server Specify the license server
Company Name Specify the company defined on the selected SAP Business One server
User ID Specify your user name for the company to which you want to log on
Password Enter your password
Working with SAP Business One Studio Suite Working with Add-on Projects in SAP Business One Studio for Microsoft Visual Studio
PUBLIC copy 2014 SAP SE All rights reserved 27
The UDO form that is registered appears in the List of UDO Forms window
Note
Only the Header Line Style (new UDO style in SAP Business One 882) is supported The Matrix Style (old UDO style) is not supported
5 In the List of UDO Forms window select the UDO form you want to add and choose the Open button
The form opens in edit mode and appears in the Solution Explorer window
Note
The application remembers the company logon information and if you want to add more UDO forms you do not need to specify that information again
If you restart SAP Business One Studio you just need to specify the Password field
6 You can now modify the UDO form
To save the changes in the Solution Explorer window right-click the form and choose Save UDO to DB
When you reopen the form in the SAP Business One client you can see the UDO form is modified
44 Loading an Existing B1s File to Your Project
You can load your existing b1s solution or srf file (ScreenPainter file) in the following ways
Creating an Add-on Project Using an Existing B1s File
1 In the Microsoft Visual Studio main window choose New rarr Project
2 In the New Project window from the Installed Templates area select the SAP Business One add-on template
3 To create an add-on project using an existing B1s file from SAP Business One Studio select SAP Business One Add-on Project from B1s File
4 Choose OK
Adding an Existing B1s File to the Current Project
1 In the Solution Explorer window right-click your project and choose Add rarr Existing Business One File
2 In the Open window select the Business One Studio files (b1s) file you want to add
3 Choose Open The form opens in edit mode and appears in the Solution Explorer window
Adding an Existing SRF File to the Current Project
1 In the Solution Explorer window right-click your project and choose Add rarr Existing Business One File
2 In the Open window select the Business One Studio SRF files (srf) file you want to add
3 Choose Open The form opens in edit mode and appears in the Solution Explorer window
28 PUBLIC copy 2014 SAP SE All rights reserved
Working with SAP Business One Studio Suite Working with Add-on Projects in SAP Business One Studio for Microsoft Visual Studio
45 Packaging Your Project
The SAP Business One Extension Package features are integrated in SAP Business One Studio for Microsoft Visual Studio You can package your project directly from the menu bar
Procedure
1 Build your project first to get the executable file of your extension
2 From the menu bar of the Microsoft Visual Studio main window choose SAP Business One Studio rarr Extension Package
3 In the Extension Registration Data Generator window expand Basic Information and specify the following fields
o Extension Name ndash Enter the name of the extension This field is mandatory
o Extension Version ndash Enter the version of the extension for which you want to package and generate the ARD file This field is mandatory
o Extension Provider ndash Enter the name of the SAP partner that creates and owns the extension For example the name of your company
o Extension Namespace ndash Enter a name for the folder in which SAP Business One places the extension after a user registers the extension in the application
o Supported Database ndash Specify the database in which the extension works This field is mandatory
o Contact Data ndash Enter contact information for the SAP partner that creates and owns the extension For example enter the URL of your companys Website
4 Expand Extension File specify the path of the executable file of your 32-bit or 64-bit add-on and select the files that should be packaged in the zip file
To package your apps for the version for SAP HANA specify the app zip file the name and the package of your app
Note
The naming convention for your package is For example if the package hierarchy is sapsboatp in SAP HANA the package name is this and the corresponding URL will be httpshostportsapsboatp
5 Expand Deployment Steps and select the COM dlls to register for your 32-bit or 64-bit add-on
6 Expend SBO Compatibility you can specify the versions of SAP Business One with which the add-on is compatible
In the Compatible with SAP Business One area specify the following
o Version From ndash Enter the earliest version of SAP Business One with which the extension is compatible
o To ndash Enter the latest version of SAP Business One with which the lightweight add-on is compatible
Example
Enter compatible versions of SAP Business One with the format ltxxxyyyxxgt for example 91000000
7 Expand Parameters you can optionally specify shared parameters and parameters for the extension
o Shared Parameters - The parameters or configuration required to run the extension The parameters are shared in all extension instances running on different companies
o Parameters - The parameters or configurations required to run the extension
8 Choose the Package button
Working with SAP Business One Studio Suite Working with Add-on Projects in SAP Business One Studio for Microsoft Visual Studio
PUBLIC copy 2014 SAP SE All rights reserved 29
9 In the Save As window specify the location where you want to save the file and choose the Save button
Note
If you are not yet ready to package your extension you can choose the Save button instead of the Package button The information you entered in the Extension Registration Data Generator window will be saved in your project The next time you open the Extension Registration Data Generator window the saved information will be displayed
For more information see How to Package and Deploy SAP Business One Extensions for Lightweight Deployment
30 PUBLIC copy 2014 SAP SE All rights reserved
Working with SAP Business One Studio Suite SAP Business One Studio Suite Demo Script
5 SAP Business One Studio Suite Demo Script
This section introduces a demo for how to work with your add-on projects in SAP Business One Studio Suite
Procedure
1 Start SAP Business One and log on to a company
o Database MadridDemo
o User manager
o Password 1234
2 Start SAP Business One Studio and add a new project
1 Choose Menu rarr New rarr Project rarr Add-On
2 Choose OK
3 Create a user form add an EditText with ChooseFromList and add a grid with DataTable
1 Add EditText Grid LinkedButton DB DataSource Data Table and ChooseFromList
Working with SAP Business One Studio Suite SAP Business One Studio Suite Demo Script
PUBLIC copy 2014 SAP SE All rights reserved 31
2 Specify the controls properties as follows
o DB DataSource
o Data Table
o ChooseFromList
o EditText
32 PUBLIC copy 2014 SAP SE All rights reserved
Working with SAP Business One Studio Suite SAP Business One Studio Suite Demo Script
o LinkedButton LinkTo = Item_0 LinkedObject = 2
o Grid DataTableID = DT_0
o Form LinkedObject = 2
3 From Toolbar choose Preview
The user form opens in the SAP Business One client The grid displays all BPs
4 To select a business partner choose the ChooseFromList icon The application fills the business partner code in the EditText
To open the business partner form choose the linked button
Working with SAP Business One Studio Suite SAP Business One Studio Suite Demo Script
PUBLIC copy 2014 SAP SE All rights reserved 33
4 Edit a system form (sales order) add a button and preview it
1 In the SAP Business One client from the Main Menu choose Sales rarr Sales Order to open the original sales order
2 Right-click the project node to add a system form
3 Select Sales Order and choose Open (the other form is cache file in local that user opened)
4 From Toolbar add the button and choose Preview
5 Switch to the SAP Business One client to review the updates of the sales order form
34 PUBLIC copy 2014 SAP SE All rights reserved
Working with SAP Business One Studio Suite SAP Business One Studio Suite Demo Script
5 Edit a UDO form add a button and save the UDO to the database
1 To open the original UDO form in the SAP Business One client choose Tools rarr Default Forms rarr UDO1-UDO1
2 To add a UDO form right-click the project node
3 Specify the DI connection information (password 1234) and choose Log On
Working with SAP Business One Studio Suite SAP Business One Studio Suite Demo Script
PUBLIC copy 2014 SAP SE All rights reserved 35
4 To edit the UDO form select UDO1 and choose OK
5 Add the button and save the UDO to the database
6 To review the updates from the SAP Business One client reopen the UDO form
36 PUBLIC copy 2014 SAP SE All rights reserved
Working with SAP Business One Studio Suite SAP Business One Studio Suite Demo Script
6 Start SAP Business One Studio for Microsoft Visual Studio and add a new project
1 Choose Menu rarr File rarr New rarr Project and select the C project templates
o The template SAP Business One Add-on Project is for creating a new project
o The template SAP Business One Add-on Project from B1s File is for creating a project with the existing B1s file
2 Select SAP Business One Add-on Project and create a new project
7 Add a button a Button_ClickBefore event and a popup message box if choosing the button
1 Add a button
2 Double-click the button to add a Button_ClickBefore event
Working with SAP Business One Studio Suite SAP Business One Studio Suite Demo Script
PUBLIC copy 2014 SAP SE All rights reserved 37
3 Add the UI API code as follows
4 To run the add-on from toolbar or by using the F5 shortcut choose Debug
In the Main Menu of the SAP Business One client the add-on adds the user menu
5 Choose the menu to open the user form
6 Choose the button to open a message box
7 Stop debugging and close all forms
8 Edit a system form (sales order) Add a button and a Button_ClickBefore event create a user form if choosing the button
38 PUBLIC copy 2014 SAP SE All rights reserved
Working with SAP Business One Studio Suite SAP Business One Studio Suite Demo Script
1 In the SAP Business One client from the Main Menu choose Sales rarr Sales Order to open the original sales order
2 Right-click the project node to add a system form (sales order)
3 Add a button
4 Double-click the button to add a Button_ClickBefore event
5 Add the UI API code as follows
Working with SAP Business One Studio Suite SAP Business One Studio Suite Demo Script
PUBLIC copy 2014 SAP SE All rights reserved 39
6 To run the add-on from toolbar or by using the F5 shortcut choose Debug
7 From the SAP Business One client open the sales order The new button appears
To open the new form choose the button
9 Edit a system form (sales opportunity) from the menu design the UI API code to set Remark as a mandatory field
1 In the SAP Business One client from the Main Menu choose Sales Opportunities rarr Sales Opportunity to open the original sales opportunity form
2 From the SAP Business One client choose Edit Form in Visual Studio to edit the system form
3 In UI Outline change the pane level to 2
4 Add a button
5 Double-click the button to add a Button_ClickBefore event
6 Add the UI API code as follows
40 PUBLIC copy 2014 SAP SE All rights reserved
Working with SAP Business One Studio Suite SAP Business One Studio Suite Demo Script
7 To run the add-on from toolbar or by using the F5 shortcut choose Debug
8 In the SAP Business One client reopen the sales opportunity
9 On the Potential tab specify the business partner code and potential amount
On the General tab leave the Remark field empty
10 Choose Add
In the status bar the error message Remark is mandatory appears
11 Specify the remark The system adds the sales opportunity
wwwsapcomcontactsap
Material Number
copy 2014 SAP SE All rights reserved No part of this publication may be reproduced or transmitted in any form or for any purpose without the express permission of SAP AG The information contained herein may be changed without prior notice Some software products marketed by SAP AG and its distributors contain proprietary software components of other software vendors Microsoft Windows Excel Outlook and PowerPoint are registered trademarks of Microsoft Corporation IBM DB2 DB2 Universal Database System ads System i5 System p System p5 System x System z System z10 System z9 z10 z9 iSeries pSeries xSeries zSeries eServer zVM zOS i5OS S390 OS390 OS400 AS400 S390 Parallel Enterprise Server PowerVM Power Architecture POWER6+ POWER6 POWER5+ POWER5 POWER OpenPower PowerPC BatchPipes BladeCenter System Storage GPFS HACMP RETAIN DB2 Connect RACF Redbooks OS2 Parallel Sysplex MVSESA AIX Intelligent Miner WebSphere Netfinity Tivoli and Informix are trademarks or registered trademarks of IBM Corporation Linux is the registered trademark of Linus Torvalds in the US and other countries Adobe the Adobe logo Acrobat PostScript and Reader are either trademarks or registered trademarks of Adobe Systems Incorporated in the United States andor other countries Oracle is a registered trademark of Oracle Corporation UNIX XOpen OSF1 and Motif are registered trademarks of the Open Group Citrix ICA Program Neighborhood MetaFrame WinFrame VideoFrame and MultiWin are trademarks or registered trademarks of Citrix Systems Inc HTML XML XHTML and W3C are trademarks or registered trademarks of W3Creg World Wide Web Consortium Massachusetts Institute of Technology Java is a registered trademark of Sun Microsystems Inc JavaScript is a registered trademark of Sun Microsystems Inc used under license for technology invented and implemented by Netscape SAP R3 xApps xApp SAP NetWeaver Duet PartnerEdge ByDesign SAP Business ByDesign and other SAP products and services mentioned herein as well as their respective logos are trademarks or registered trademarks of SAP AG in Germany and in several other countries all over the world All other product and service names mentioned are the trademarks of their respective companies Data contained in this document serves informational purposes only National product specifications may vary These materials are subject to change without notice These materials are provided by SAP AG and its affiliated companies (SAP Group) for informational purposes only without representation or warranty of any kind and SAP Group shall not be liable for errors or omissions with respect to the materials The only warranties for SAP Group products and services are those that are set forth in the express warranty statements accompanying such products and services if any Nothing herein should be construed as constituting an additional warranty
- 1 Introduction
-
- 11 Installing SAP Business One Studio
- 12 Running SAP Business One Studio
- 13 Terms and Definitions
- 14 Related Documentation
-
- 2 SAP Business One Studio Main Window
-
- 21 Menu Button
- 22 Toolbar
- 23 Toolbox Window
- 24 Docking Tool Windows
-
- 3 Working with Add-on Projects in SAP Business One Studio
-
- 31 Creating an Add-on Project
- 32 Opening an Add-on Project or an External File
- 33 Designing a Form
-
- 331 Working with Tab Controls
- 332 Working with Grids
- 333 Working with Data Tables
- 334 Working with Matrixes
- 335 Working with Choose From Lists
- 336 Example Creating a Business Partner Field with Linked Button and Choose From List Functions
-
- 34 Adding Renaming or Deleting Forms in a Project
-
- 341 Adding New User Forms
- 342 Adding Existing User Forms
- 343 Adding System Forms
- 344 Adding UDO Forms
-
- 35 Editing Active Forms in SAP Business One
- 36 Exporting Updated Parts of a System Form
-
- 4 Working with Add-on Projects in SAP Business One Studio for Microsoft Visual Studio
-
- 41 Creating SAP Business One Add-on Projects
- 42 Tool Windows in SAP Business One Studio for Microsoft Visual Studio
- 43 Adding Forms in a Project
-
- 431 Adding SAP Business One User Forms
- 432 Adding SAP Business One System Forms
- 433 Adding SAP Business One UDO Forms
-
- 44 Loading an Existing B1s File to Your Project
- 45 Packaging Your Project
-
- 5 SAP Business One Studio Suite Demo Script
-
Working with SAP Business One Studio Suite Working with Add-on Projects in SAP Business One Studio for Microsoft Visual Studio
PUBLIC copy 2014 SAP SE All rights reserved 27
The UDO form that is registered appears in the List of UDO Forms window
Note
Only the Header Line Style (new UDO style in SAP Business One 882) is supported The Matrix Style (old UDO style) is not supported
5 In the List of UDO Forms window select the UDO form you want to add and choose the Open button
The form opens in edit mode and appears in the Solution Explorer window
Note
The application remembers the company logon information and if you want to add more UDO forms you do not need to specify that information again
If you restart SAP Business One Studio you just need to specify the Password field
6 You can now modify the UDO form
To save the changes in the Solution Explorer window right-click the form and choose Save UDO to DB
When you reopen the form in the SAP Business One client you can see the UDO form is modified
44 Loading an Existing B1s File to Your Project
You can load your existing b1s solution or srf file (ScreenPainter file) in the following ways
Creating an Add-on Project Using an Existing B1s File
1 In the Microsoft Visual Studio main window choose New rarr Project
2 In the New Project window from the Installed Templates area select the SAP Business One add-on template
3 To create an add-on project using an existing B1s file from SAP Business One Studio select SAP Business One Add-on Project from B1s File
4 Choose OK
Adding an Existing B1s File to the Current Project
1 In the Solution Explorer window right-click your project and choose Add rarr Existing Business One File
2 In the Open window select the Business One Studio files (b1s) file you want to add
3 Choose Open The form opens in edit mode and appears in the Solution Explorer window
Adding an Existing SRF File to the Current Project
1 In the Solution Explorer window right-click your project and choose Add rarr Existing Business One File
2 In the Open window select the Business One Studio SRF files (srf) file you want to add
3 Choose Open The form opens in edit mode and appears in the Solution Explorer window
28 PUBLIC copy 2014 SAP SE All rights reserved
Working with SAP Business One Studio Suite Working with Add-on Projects in SAP Business One Studio for Microsoft Visual Studio
45 Packaging Your Project
The SAP Business One Extension Package features are integrated in SAP Business One Studio for Microsoft Visual Studio You can package your project directly from the menu bar
Procedure
1 Build your project first to get the executable file of your extension
2 From the menu bar of the Microsoft Visual Studio main window choose SAP Business One Studio rarr Extension Package
3 In the Extension Registration Data Generator window expand Basic Information and specify the following fields
o Extension Name ndash Enter the name of the extension This field is mandatory
o Extension Version ndash Enter the version of the extension for which you want to package and generate the ARD file This field is mandatory
o Extension Provider ndash Enter the name of the SAP partner that creates and owns the extension For example the name of your company
o Extension Namespace ndash Enter a name for the folder in which SAP Business One places the extension after a user registers the extension in the application
o Supported Database ndash Specify the database in which the extension works This field is mandatory
o Contact Data ndash Enter contact information for the SAP partner that creates and owns the extension For example enter the URL of your companys Website
4 Expand Extension File specify the path of the executable file of your 32-bit or 64-bit add-on and select the files that should be packaged in the zip file
To package your apps for the version for SAP HANA specify the app zip file the name and the package of your app
Note
The naming convention for your package is For example if the package hierarchy is sapsboatp in SAP HANA the package name is this and the corresponding URL will be httpshostportsapsboatp
5 Expand Deployment Steps and select the COM dlls to register for your 32-bit or 64-bit add-on
6 Expend SBO Compatibility you can specify the versions of SAP Business One with which the add-on is compatible
In the Compatible with SAP Business One area specify the following
o Version From ndash Enter the earliest version of SAP Business One with which the extension is compatible
o To ndash Enter the latest version of SAP Business One with which the lightweight add-on is compatible
Example
Enter compatible versions of SAP Business One with the format ltxxxyyyxxgt for example 91000000
7 Expand Parameters you can optionally specify shared parameters and parameters for the extension
o Shared Parameters - The parameters or configuration required to run the extension The parameters are shared in all extension instances running on different companies
o Parameters - The parameters or configurations required to run the extension
8 Choose the Package button
Working with SAP Business One Studio Suite Working with Add-on Projects in SAP Business One Studio for Microsoft Visual Studio
PUBLIC copy 2014 SAP SE All rights reserved 29
9 In the Save As window specify the location where you want to save the file and choose the Save button
Note
If you are not yet ready to package your extension you can choose the Save button instead of the Package button The information you entered in the Extension Registration Data Generator window will be saved in your project The next time you open the Extension Registration Data Generator window the saved information will be displayed
For more information see How to Package and Deploy SAP Business One Extensions for Lightweight Deployment
30 PUBLIC copy 2014 SAP SE All rights reserved
Working with SAP Business One Studio Suite SAP Business One Studio Suite Demo Script
5 SAP Business One Studio Suite Demo Script
This section introduces a demo for how to work with your add-on projects in SAP Business One Studio Suite
Procedure
1 Start SAP Business One and log on to a company
o Database MadridDemo
o User manager
o Password 1234
2 Start SAP Business One Studio and add a new project
1 Choose Menu rarr New rarr Project rarr Add-On
2 Choose OK
3 Create a user form add an EditText with ChooseFromList and add a grid with DataTable
1 Add EditText Grid LinkedButton DB DataSource Data Table and ChooseFromList
Working with SAP Business One Studio Suite SAP Business One Studio Suite Demo Script
PUBLIC copy 2014 SAP SE All rights reserved 31
2 Specify the controls properties as follows
o DB DataSource
o Data Table
o ChooseFromList
o EditText
32 PUBLIC copy 2014 SAP SE All rights reserved
Working with SAP Business One Studio Suite SAP Business One Studio Suite Demo Script
o LinkedButton LinkTo = Item_0 LinkedObject = 2
o Grid DataTableID = DT_0
o Form LinkedObject = 2
3 From Toolbar choose Preview
The user form opens in the SAP Business One client The grid displays all BPs
4 To select a business partner choose the ChooseFromList icon The application fills the business partner code in the EditText
To open the business partner form choose the linked button
Working with SAP Business One Studio Suite SAP Business One Studio Suite Demo Script
PUBLIC copy 2014 SAP SE All rights reserved 33
4 Edit a system form (sales order) add a button and preview it
1 In the SAP Business One client from the Main Menu choose Sales rarr Sales Order to open the original sales order
2 Right-click the project node to add a system form
3 Select Sales Order and choose Open (the other form is cache file in local that user opened)
4 From Toolbar add the button and choose Preview
5 Switch to the SAP Business One client to review the updates of the sales order form
34 PUBLIC copy 2014 SAP SE All rights reserved
Working with SAP Business One Studio Suite SAP Business One Studio Suite Demo Script
5 Edit a UDO form add a button and save the UDO to the database
1 To open the original UDO form in the SAP Business One client choose Tools rarr Default Forms rarr UDO1-UDO1
2 To add a UDO form right-click the project node
3 Specify the DI connection information (password 1234) and choose Log On
Working with SAP Business One Studio Suite SAP Business One Studio Suite Demo Script
PUBLIC copy 2014 SAP SE All rights reserved 35
4 To edit the UDO form select UDO1 and choose OK
5 Add the button and save the UDO to the database
6 To review the updates from the SAP Business One client reopen the UDO form
36 PUBLIC copy 2014 SAP SE All rights reserved
Working with SAP Business One Studio Suite SAP Business One Studio Suite Demo Script
6 Start SAP Business One Studio for Microsoft Visual Studio and add a new project
1 Choose Menu rarr File rarr New rarr Project and select the C project templates
o The template SAP Business One Add-on Project is for creating a new project
o The template SAP Business One Add-on Project from B1s File is for creating a project with the existing B1s file
2 Select SAP Business One Add-on Project and create a new project
7 Add a button a Button_ClickBefore event and a popup message box if choosing the button
1 Add a button
2 Double-click the button to add a Button_ClickBefore event
Working with SAP Business One Studio Suite SAP Business One Studio Suite Demo Script
PUBLIC copy 2014 SAP SE All rights reserved 37
3 Add the UI API code as follows
4 To run the add-on from toolbar or by using the F5 shortcut choose Debug
In the Main Menu of the SAP Business One client the add-on adds the user menu
5 Choose the menu to open the user form
6 Choose the button to open a message box
7 Stop debugging and close all forms
8 Edit a system form (sales order) Add a button and a Button_ClickBefore event create a user form if choosing the button
38 PUBLIC copy 2014 SAP SE All rights reserved
Working with SAP Business One Studio Suite SAP Business One Studio Suite Demo Script
1 In the SAP Business One client from the Main Menu choose Sales rarr Sales Order to open the original sales order
2 Right-click the project node to add a system form (sales order)
3 Add a button
4 Double-click the button to add a Button_ClickBefore event
5 Add the UI API code as follows
Working with SAP Business One Studio Suite SAP Business One Studio Suite Demo Script
PUBLIC copy 2014 SAP SE All rights reserved 39
6 To run the add-on from toolbar or by using the F5 shortcut choose Debug
7 From the SAP Business One client open the sales order The new button appears
To open the new form choose the button
9 Edit a system form (sales opportunity) from the menu design the UI API code to set Remark as a mandatory field
1 In the SAP Business One client from the Main Menu choose Sales Opportunities rarr Sales Opportunity to open the original sales opportunity form
2 From the SAP Business One client choose Edit Form in Visual Studio to edit the system form
3 In UI Outline change the pane level to 2
4 Add a button
5 Double-click the button to add a Button_ClickBefore event
6 Add the UI API code as follows
40 PUBLIC copy 2014 SAP SE All rights reserved
Working with SAP Business One Studio Suite SAP Business One Studio Suite Demo Script
7 To run the add-on from toolbar or by using the F5 shortcut choose Debug
8 In the SAP Business One client reopen the sales opportunity
9 On the Potential tab specify the business partner code and potential amount
On the General tab leave the Remark field empty
10 Choose Add
In the status bar the error message Remark is mandatory appears
11 Specify the remark The system adds the sales opportunity
wwwsapcomcontactsap
Material Number
copy 2014 SAP SE All rights reserved No part of this publication may be reproduced or transmitted in any form or for any purpose without the express permission of SAP AG The information contained herein may be changed without prior notice Some software products marketed by SAP AG and its distributors contain proprietary software components of other software vendors Microsoft Windows Excel Outlook and PowerPoint are registered trademarks of Microsoft Corporation IBM DB2 DB2 Universal Database System ads System i5 System p System p5 System x System z System z10 System z9 z10 z9 iSeries pSeries xSeries zSeries eServer zVM zOS i5OS S390 OS390 OS400 AS400 S390 Parallel Enterprise Server PowerVM Power Architecture POWER6+ POWER6 POWER5+ POWER5 POWER OpenPower PowerPC BatchPipes BladeCenter System Storage GPFS HACMP RETAIN DB2 Connect RACF Redbooks OS2 Parallel Sysplex MVSESA AIX Intelligent Miner WebSphere Netfinity Tivoli and Informix are trademarks or registered trademarks of IBM Corporation Linux is the registered trademark of Linus Torvalds in the US and other countries Adobe the Adobe logo Acrobat PostScript and Reader are either trademarks or registered trademarks of Adobe Systems Incorporated in the United States andor other countries Oracle is a registered trademark of Oracle Corporation UNIX XOpen OSF1 and Motif are registered trademarks of the Open Group Citrix ICA Program Neighborhood MetaFrame WinFrame VideoFrame and MultiWin are trademarks or registered trademarks of Citrix Systems Inc HTML XML XHTML and W3C are trademarks or registered trademarks of W3Creg World Wide Web Consortium Massachusetts Institute of Technology Java is a registered trademark of Sun Microsystems Inc JavaScript is a registered trademark of Sun Microsystems Inc used under license for technology invented and implemented by Netscape SAP R3 xApps xApp SAP NetWeaver Duet PartnerEdge ByDesign SAP Business ByDesign and other SAP products and services mentioned herein as well as their respective logos are trademarks or registered trademarks of SAP AG in Germany and in several other countries all over the world All other product and service names mentioned are the trademarks of their respective companies Data contained in this document serves informational purposes only National product specifications may vary These materials are subject to change without notice These materials are provided by SAP AG and its affiliated companies (SAP Group) for informational purposes only without representation or warranty of any kind and SAP Group shall not be liable for errors or omissions with respect to the materials The only warranties for SAP Group products and services are those that are set forth in the express warranty statements accompanying such products and services if any Nothing herein should be construed as constituting an additional warranty
- 1 Introduction
-
- 11 Installing SAP Business One Studio
- 12 Running SAP Business One Studio
- 13 Terms and Definitions
- 14 Related Documentation
-
- 2 SAP Business One Studio Main Window
-
- 21 Menu Button
- 22 Toolbar
- 23 Toolbox Window
- 24 Docking Tool Windows
-
- 3 Working with Add-on Projects in SAP Business One Studio
-
- 31 Creating an Add-on Project
- 32 Opening an Add-on Project or an External File
- 33 Designing a Form
-
- 331 Working with Tab Controls
- 332 Working with Grids
- 333 Working with Data Tables
- 334 Working with Matrixes
- 335 Working with Choose From Lists
- 336 Example Creating a Business Partner Field with Linked Button and Choose From List Functions
-
- 34 Adding Renaming or Deleting Forms in a Project
-
- 341 Adding New User Forms
- 342 Adding Existing User Forms
- 343 Adding System Forms
- 344 Adding UDO Forms
-
- 35 Editing Active Forms in SAP Business One
- 36 Exporting Updated Parts of a System Form
-
- 4 Working with Add-on Projects in SAP Business One Studio for Microsoft Visual Studio
-
- 41 Creating SAP Business One Add-on Projects
- 42 Tool Windows in SAP Business One Studio for Microsoft Visual Studio
- 43 Adding Forms in a Project
-
- 431 Adding SAP Business One User Forms
- 432 Adding SAP Business One System Forms
- 433 Adding SAP Business One UDO Forms
-
- 44 Loading an Existing B1s File to Your Project
- 45 Packaging Your Project
-
- 5 SAP Business One Studio Suite Demo Script
-
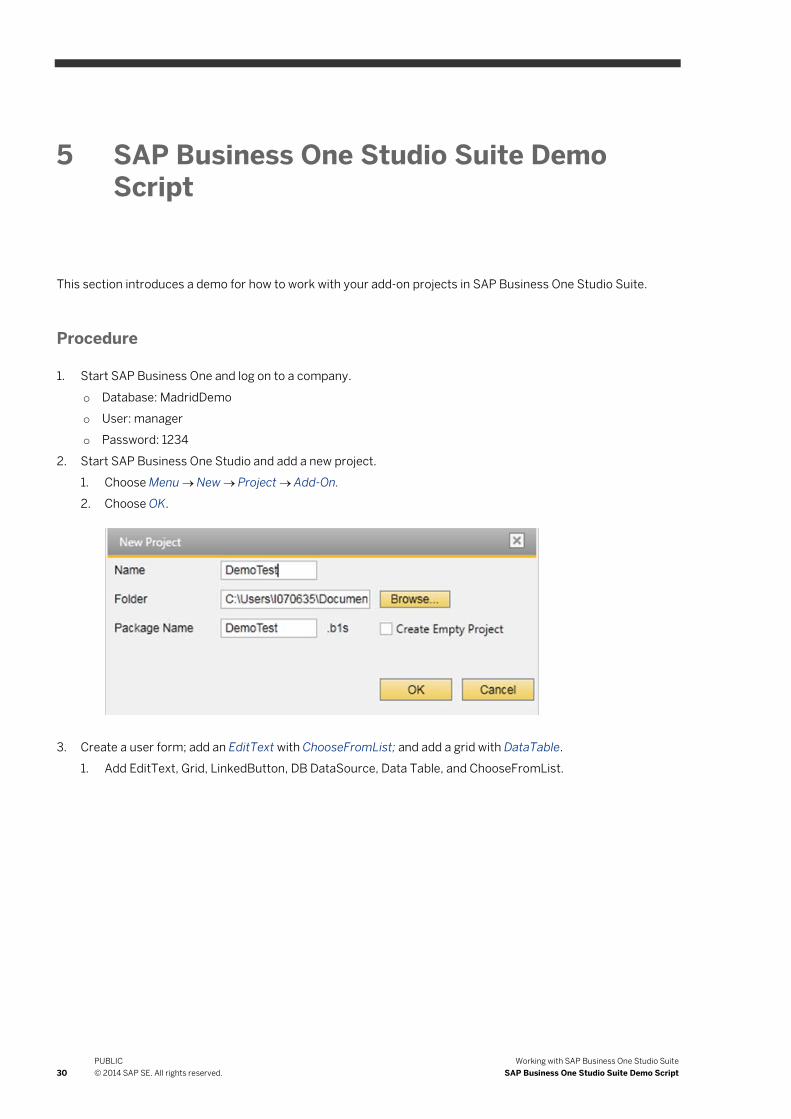
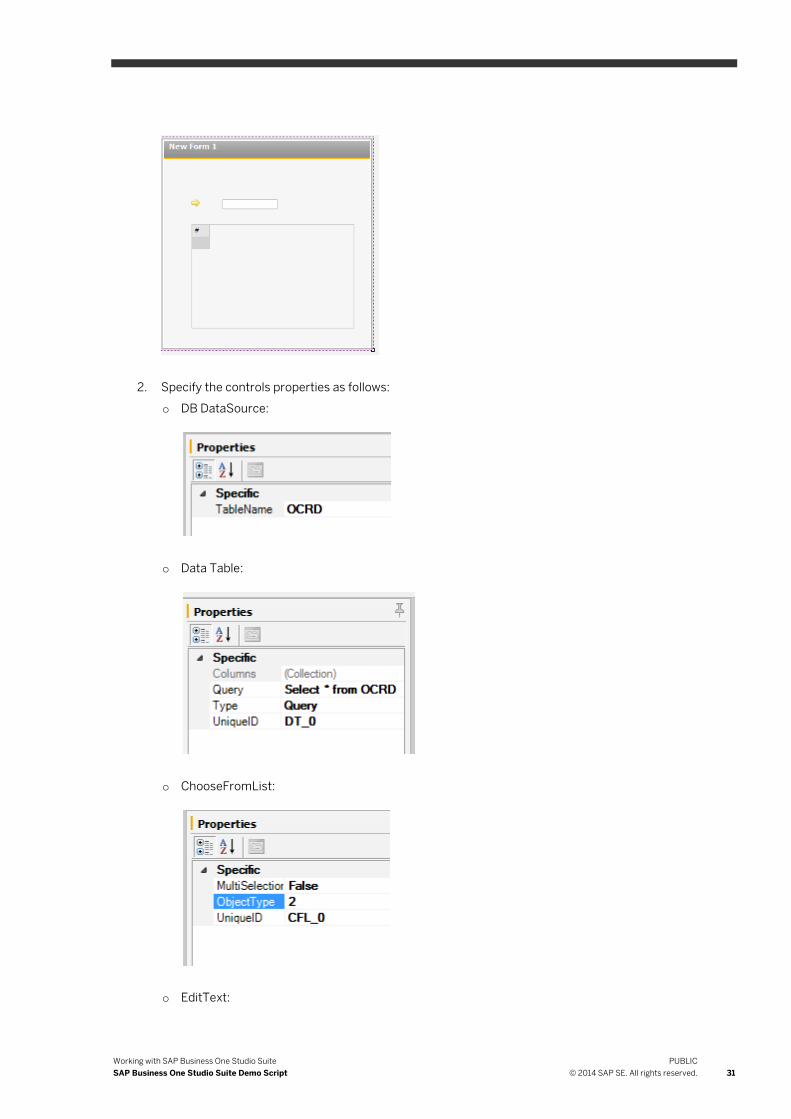
Working with SAP Business One Studio Suite SAP Business One Studio Suite Demo Script
PUBLIC copy 2014 SAP SE All rights reserved 31
2 Specify the controls properties as follows
o DB DataSource
o Data Table
o ChooseFromList
o EditText
32 PUBLIC copy 2014 SAP SE All rights reserved
Working with SAP Business One Studio Suite SAP Business One Studio Suite Demo Script
o LinkedButton LinkTo = Item_0 LinkedObject = 2
o Grid DataTableID = DT_0
o Form LinkedObject = 2
3 From Toolbar choose Preview
The user form opens in the SAP Business One client The grid displays all BPs
4 To select a business partner choose the ChooseFromList icon The application fills the business partner code in the EditText
To open the business partner form choose the linked button
Working with SAP Business One Studio Suite SAP Business One Studio Suite Demo Script
PUBLIC copy 2014 SAP SE All rights reserved 33
4 Edit a system form (sales order) add a button and preview it
1 In the SAP Business One client from the Main Menu choose Sales rarr Sales Order to open the original sales order
2 Right-click the project node to add a system form
3 Select Sales Order and choose Open (the other form is cache file in local that user opened)
4 From Toolbar add the button and choose Preview
5 Switch to the SAP Business One client to review the updates of the sales order form
34 PUBLIC copy 2014 SAP SE All rights reserved
Working with SAP Business One Studio Suite SAP Business One Studio Suite Demo Script
5 Edit a UDO form add a button and save the UDO to the database
1 To open the original UDO form in the SAP Business One client choose Tools rarr Default Forms rarr UDO1-UDO1
2 To add a UDO form right-click the project node
3 Specify the DI connection information (password 1234) and choose Log On
Working with SAP Business One Studio Suite SAP Business One Studio Suite Demo Script
PUBLIC copy 2014 SAP SE All rights reserved 35
4 To edit the UDO form select UDO1 and choose OK
5 Add the button and save the UDO to the database
6 To review the updates from the SAP Business One client reopen the UDO form
36 PUBLIC copy 2014 SAP SE All rights reserved
Working with SAP Business One Studio Suite SAP Business One Studio Suite Demo Script
6 Start SAP Business One Studio for Microsoft Visual Studio and add a new project
1 Choose Menu rarr File rarr New rarr Project and select the C project templates
o The template SAP Business One Add-on Project is for creating a new project
o The template SAP Business One Add-on Project from B1s File is for creating a project with the existing B1s file
2 Select SAP Business One Add-on Project and create a new project
7 Add a button a Button_ClickBefore event and a popup message box if choosing the button
1 Add a button
2 Double-click the button to add a Button_ClickBefore event
Working with SAP Business One Studio Suite SAP Business One Studio Suite Demo Script
PUBLIC copy 2014 SAP SE All rights reserved 37
3 Add the UI API code as follows
4 To run the add-on from toolbar or by using the F5 shortcut choose Debug
In the Main Menu of the SAP Business One client the add-on adds the user menu
5 Choose the menu to open the user form
6 Choose the button to open a message box
7 Stop debugging and close all forms
8 Edit a system form (sales order) Add a button and a Button_ClickBefore event create a user form if choosing the button
38 PUBLIC copy 2014 SAP SE All rights reserved
Working with SAP Business One Studio Suite SAP Business One Studio Suite Demo Script
1 In the SAP Business One client from the Main Menu choose Sales rarr Sales Order to open the original sales order
2 Right-click the project node to add a system form (sales order)
3 Add a button
4 Double-click the button to add a Button_ClickBefore event
5 Add the UI API code as follows
Working with SAP Business One Studio Suite SAP Business One Studio Suite Demo Script
PUBLIC copy 2014 SAP SE All rights reserved 39
6 To run the add-on from toolbar or by using the F5 shortcut choose Debug
7 From the SAP Business One client open the sales order The new button appears
To open the new form choose the button
9 Edit a system form (sales opportunity) from the menu design the UI API code to set Remark as a mandatory field
1 In the SAP Business One client from the Main Menu choose Sales Opportunities rarr Sales Opportunity to open the original sales opportunity form
2 From the SAP Business One client choose Edit Form in Visual Studio to edit the system form
3 In UI Outline change the pane level to 2
4 Add a button
5 Double-click the button to add a Button_ClickBefore event
6 Add the UI API code as follows
40 PUBLIC copy 2014 SAP SE All rights reserved
Working with SAP Business One Studio Suite SAP Business One Studio Suite Demo Script
7 To run the add-on from toolbar or by using the F5 shortcut choose Debug
8 In the SAP Business One client reopen the sales opportunity
9 On the Potential tab specify the business partner code and potential amount
On the General tab leave the Remark field empty
10 Choose Add
In the status bar the error message Remark is mandatory appears
11 Specify the remark The system adds the sales opportunity
wwwsapcomcontactsap
Material Number
copy 2014 SAP SE All rights reserved No part of this publication may be reproduced or transmitted in any form or for any purpose without the express permission of SAP AG The information contained herein may be changed without prior notice Some software products marketed by SAP AG and its distributors contain proprietary software components of other software vendors Microsoft Windows Excel Outlook and PowerPoint are registered trademarks of Microsoft Corporation IBM DB2 DB2 Universal Database System ads System i5 System p System p5 System x System z System z10 System z9 z10 z9 iSeries pSeries xSeries zSeries eServer zVM zOS i5OS S390 OS390 OS400 AS400 S390 Parallel Enterprise Server PowerVM Power Architecture POWER6+ POWER6 POWER5+ POWER5 POWER OpenPower PowerPC BatchPipes BladeCenter System Storage GPFS HACMP RETAIN DB2 Connect RACF Redbooks OS2 Parallel Sysplex MVSESA AIX Intelligent Miner WebSphere Netfinity Tivoli and Informix are trademarks or registered trademarks of IBM Corporation Linux is the registered trademark of Linus Torvalds in the US and other countries Adobe the Adobe logo Acrobat PostScript and Reader are either trademarks or registered trademarks of Adobe Systems Incorporated in the United States andor other countries Oracle is a registered trademark of Oracle Corporation UNIX XOpen OSF1 and Motif are registered trademarks of the Open Group Citrix ICA Program Neighborhood MetaFrame WinFrame VideoFrame and MultiWin are trademarks or registered trademarks of Citrix Systems Inc HTML XML XHTML and W3C are trademarks or registered trademarks of W3Creg World Wide Web Consortium Massachusetts Institute of Technology Java is a registered trademark of Sun Microsystems Inc JavaScript is a registered trademark of Sun Microsystems Inc used under license for technology invented and implemented by Netscape SAP R3 xApps xApp SAP NetWeaver Duet PartnerEdge ByDesign SAP Business ByDesign and other SAP products and services mentioned herein as well as their respective logos are trademarks or registered trademarks of SAP AG in Germany and in several other countries all over the world All other product and service names mentioned are the trademarks of their respective companies Data contained in this document serves informational purposes only National product specifications may vary These materials are subject to change without notice These materials are provided by SAP AG and its affiliated companies (SAP Group) for informational purposes only without representation or warranty of any kind and SAP Group shall not be liable for errors or omissions with respect to the materials The only warranties for SAP Group products and services are those that are set forth in the express warranty statements accompanying such products and services if any Nothing herein should be construed as constituting an additional warranty
- 1 Introduction
-
- 11 Installing SAP Business One Studio
- 12 Running SAP Business One Studio
- 13 Terms and Definitions
- 14 Related Documentation
-
- 2 SAP Business One Studio Main Window
-
- 21 Menu Button
- 22 Toolbar
- 23 Toolbox Window
- 24 Docking Tool Windows
-
- 3 Working with Add-on Projects in SAP Business One Studio
-
- 31 Creating an Add-on Project
- 32 Opening an Add-on Project or an External File
- 33 Designing a Form
-
- 331 Working with Tab Controls
- 332 Working with Grids
- 333 Working with Data Tables
- 334 Working with Matrixes
- 335 Working with Choose From Lists
- 336 Example Creating a Business Partner Field with Linked Button and Choose From List Functions
-
- 34 Adding Renaming or Deleting Forms in a Project
-
- 341 Adding New User Forms
- 342 Adding Existing User Forms
- 343 Adding System Forms
- 344 Adding UDO Forms
-
- 35 Editing Active Forms in SAP Business One
- 36 Exporting Updated Parts of a System Form
-
- 4 Working with Add-on Projects in SAP Business One Studio for Microsoft Visual Studio
-
- 41 Creating SAP Business One Add-on Projects
- 42 Tool Windows in SAP Business One Studio for Microsoft Visual Studio
- 43 Adding Forms in a Project
-
- 431 Adding SAP Business One User Forms
- 432 Adding SAP Business One System Forms
- 433 Adding SAP Business One UDO Forms
-
- 44 Loading an Existing B1s File to Your Project
- 45 Packaging Your Project
-
- 5 SAP Business One Studio Suite Demo Script
-
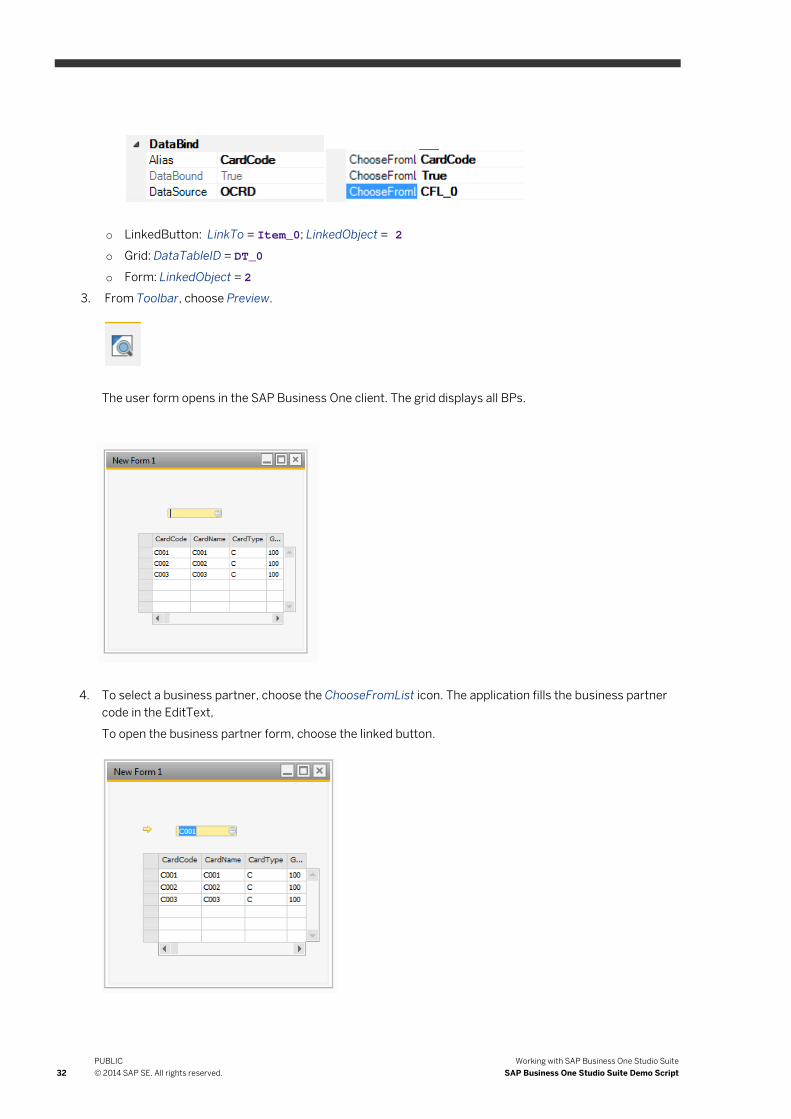
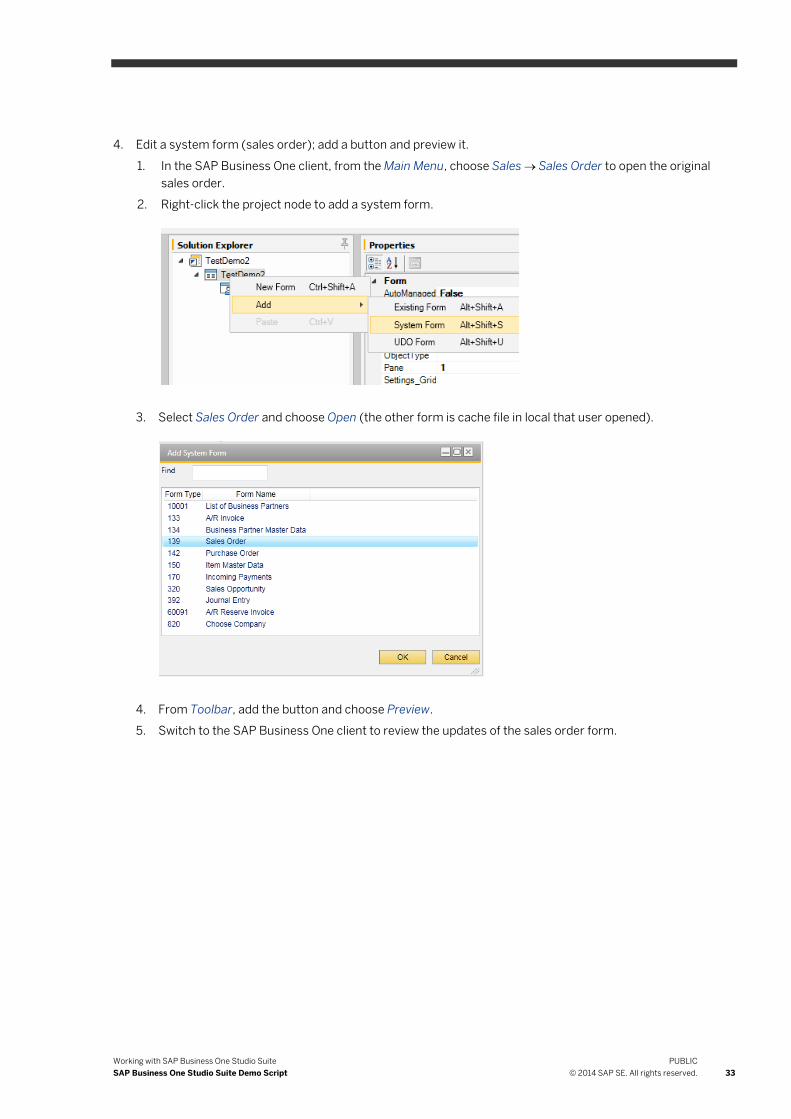
Working with SAP Business One Studio Suite SAP Business One Studio Suite Demo Script
PUBLIC copy 2014 SAP SE All rights reserved 33
4 Edit a system form (sales order) add a button and preview it
1 In the SAP Business One client from the Main Menu choose Sales rarr Sales Order to open the original sales order
2 Right-click the project node to add a system form
3 Select Sales Order and choose Open (the other form is cache file in local that user opened)
4 From Toolbar add the button and choose Preview
5 Switch to the SAP Business One client to review the updates of the sales order form
34 PUBLIC copy 2014 SAP SE All rights reserved
Working with SAP Business One Studio Suite SAP Business One Studio Suite Demo Script
5 Edit a UDO form add a button and save the UDO to the database
1 To open the original UDO form in the SAP Business One client choose Tools rarr Default Forms rarr UDO1-UDO1
2 To add a UDO form right-click the project node
3 Specify the DI connection information (password 1234) and choose Log On
Working with SAP Business One Studio Suite SAP Business One Studio Suite Demo Script
PUBLIC copy 2014 SAP SE All rights reserved 35
4 To edit the UDO form select UDO1 and choose OK
5 Add the button and save the UDO to the database
6 To review the updates from the SAP Business One client reopen the UDO form
36 PUBLIC copy 2014 SAP SE All rights reserved
Working with SAP Business One Studio Suite SAP Business One Studio Suite Demo Script
6 Start SAP Business One Studio for Microsoft Visual Studio and add a new project
1 Choose Menu rarr File rarr New rarr Project and select the C project templates
o The template SAP Business One Add-on Project is for creating a new project
o The template SAP Business One Add-on Project from B1s File is for creating a project with the existing B1s file
2 Select SAP Business One Add-on Project and create a new project
7 Add a button a Button_ClickBefore event and a popup message box if choosing the button
1 Add a button
2 Double-click the button to add a Button_ClickBefore event
Working with SAP Business One Studio Suite SAP Business One Studio Suite Demo Script
PUBLIC copy 2014 SAP SE All rights reserved 37
3 Add the UI API code as follows
4 To run the add-on from toolbar or by using the F5 shortcut choose Debug
In the Main Menu of the SAP Business One client the add-on adds the user menu
5 Choose the menu to open the user form
6 Choose the button to open a message box
7 Stop debugging and close all forms
8 Edit a system form (sales order) Add a button and a Button_ClickBefore event create a user form if choosing the button
38 PUBLIC copy 2014 SAP SE All rights reserved
Working with SAP Business One Studio Suite SAP Business One Studio Suite Demo Script
1 In the SAP Business One client from the Main Menu choose Sales rarr Sales Order to open the original sales order
2 Right-click the project node to add a system form (sales order)
3 Add a button
4 Double-click the button to add a Button_ClickBefore event
5 Add the UI API code as follows
Working with SAP Business One Studio Suite SAP Business One Studio Suite Demo Script
PUBLIC copy 2014 SAP SE All rights reserved 39
6 To run the add-on from toolbar or by using the F5 shortcut choose Debug
7 From the SAP Business One client open the sales order The new button appears
To open the new form choose the button
9 Edit a system form (sales opportunity) from the menu design the UI API code to set Remark as a mandatory field
1 In the SAP Business One client from the Main Menu choose Sales Opportunities rarr Sales Opportunity to open the original sales opportunity form
2 From the SAP Business One client choose Edit Form in Visual Studio to edit the system form
3 In UI Outline change the pane level to 2
4 Add a button
5 Double-click the button to add a Button_ClickBefore event
6 Add the UI API code as follows
40 PUBLIC copy 2014 SAP SE All rights reserved
Working with SAP Business One Studio Suite SAP Business One Studio Suite Demo Script
7 To run the add-on from toolbar or by using the F5 shortcut choose Debug
8 In the SAP Business One client reopen the sales opportunity
9 On the Potential tab specify the business partner code and potential amount
On the General tab leave the Remark field empty
10 Choose Add
In the status bar the error message Remark is mandatory appears
11 Specify the remark The system adds the sales opportunity
wwwsapcomcontactsap
Material Number
copy 2014 SAP SE All rights reserved No part of this publication may be reproduced or transmitted in any form or for any purpose without the express permission of SAP AG The information contained herein may be changed without prior notice Some software products marketed by SAP AG and its distributors contain proprietary software components of other software vendors Microsoft Windows Excel Outlook and PowerPoint are registered trademarks of Microsoft Corporation IBM DB2 DB2 Universal Database System ads System i5 System p System p5 System x System z System z10 System z9 z10 z9 iSeries pSeries xSeries zSeries eServer zVM zOS i5OS S390 OS390 OS400 AS400 S390 Parallel Enterprise Server PowerVM Power Architecture POWER6+ POWER6 POWER5+ POWER5 POWER OpenPower PowerPC BatchPipes BladeCenter System Storage GPFS HACMP RETAIN DB2 Connect RACF Redbooks OS2 Parallel Sysplex MVSESA AIX Intelligent Miner WebSphere Netfinity Tivoli and Informix are trademarks or registered trademarks of IBM Corporation Linux is the registered trademark of Linus Torvalds in the US and other countries Adobe the Adobe logo Acrobat PostScript and Reader are either trademarks or registered trademarks of Adobe Systems Incorporated in the United States andor other countries Oracle is a registered trademark of Oracle Corporation UNIX XOpen OSF1 and Motif are registered trademarks of the Open Group Citrix ICA Program Neighborhood MetaFrame WinFrame VideoFrame and MultiWin are trademarks or registered trademarks of Citrix Systems Inc HTML XML XHTML and W3C are trademarks or registered trademarks of W3Creg World Wide Web Consortium Massachusetts Institute of Technology Java is a registered trademark of Sun Microsystems Inc JavaScript is a registered trademark of Sun Microsystems Inc used under license for technology invented and implemented by Netscape SAP R3 xApps xApp SAP NetWeaver Duet PartnerEdge ByDesign SAP Business ByDesign and other SAP products and services mentioned herein as well as their respective logos are trademarks or registered trademarks of SAP AG in Germany and in several other countries all over the world All other product and service names mentioned are the trademarks of their respective companies Data contained in this document serves informational purposes only National product specifications may vary These materials are subject to change without notice These materials are provided by SAP AG and its affiliated companies (SAP Group) for informational purposes only without representation or warranty of any kind and SAP Group shall not be liable for errors or omissions with respect to the materials The only warranties for SAP Group products and services are those that are set forth in the express warranty statements accompanying such products and services if any Nothing herein should be construed as constituting an additional warranty
- 1 Introduction
-
- 11 Installing SAP Business One Studio
- 12 Running SAP Business One Studio
- 13 Terms and Definitions
- 14 Related Documentation
-
- 2 SAP Business One Studio Main Window
-
- 21 Menu Button
- 22 Toolbar
- 23 Toolbox Window
- 24 Docking Tool Windows
-
- 3 Working with Add-on Projects in SAP Business One Studio
-
- 31 Creating an Add-on Project
- 32 Opening an Add-on Project or an External File
- 33 Designing a Form
-
- 331 Working with Tab Controls
- 332 Working with Grids
- 333 Working with Data Tables
- 334 Working with Matrixes
- 335 Working with Choose From Lists
- 336 Example Creating a Business Partner Field with Linked Button and Choose From List Functions
-
- 34 Adding Renaming or Deleting Forms in a Project
-
- 341 Adding New User Forms
- 342 Adding Existing User Forms
- 343 Adding System Forms
- 344 Adding UDO Forms
-
- 35 Editing Active Forms in SAP Business One
- 36 Exporting Updated Parts of a System Form
-
- 4 Working with Add-on Projects in SAP Business One Studio for Microsoft Visual Studio
-
- 41 Creating SAP Business One Add-on Projects
- 42 Tool Windows in SAP Business One Studio for Microsoft Visual Studio
- 43 Adding Forms in a Project
-
- 431 Adding SAP Business One User Forms
- 432 Adding SAP Business One System Forms
- 433 Adding SAP Business One UDO Forms
-
- 44 Loading an Existing B1s File to Your Project
- 45 Packaging Your Project
-
- 5 SAP Business One Studio Suite Demo Script
-
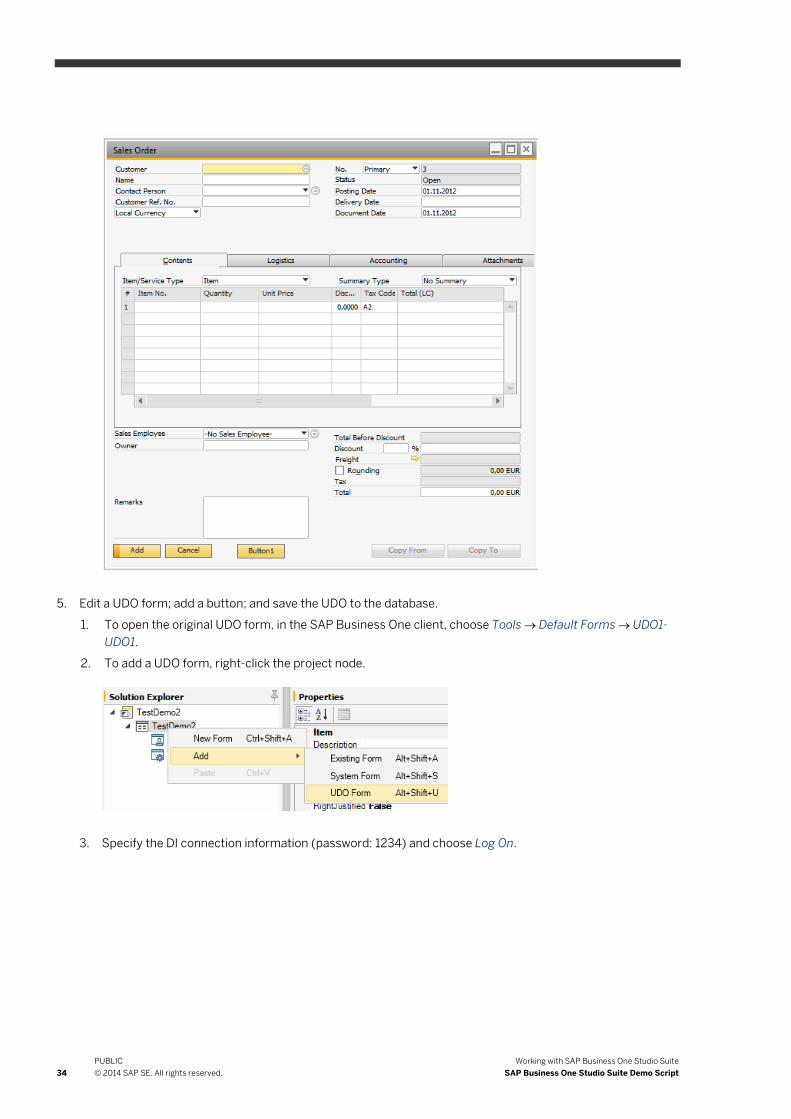
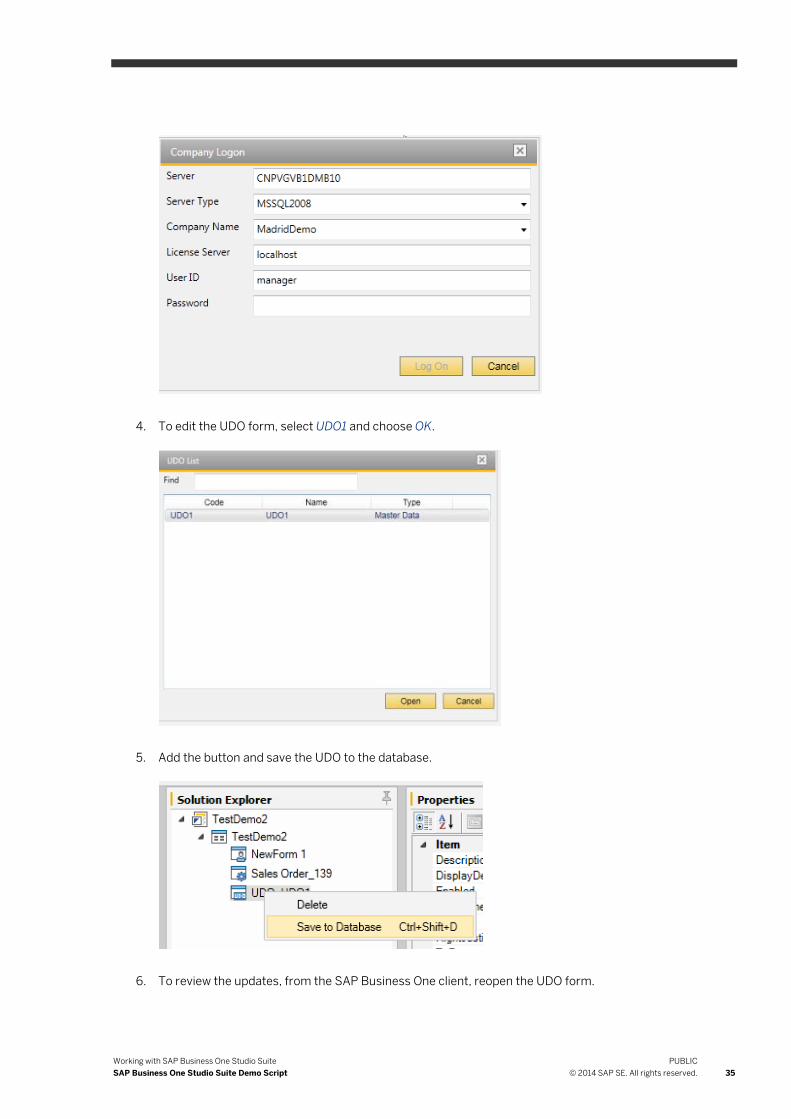
Working with SAP Business One Studio Suite SAP Business One Studio Suite Demo Script
PUBLIC copy 2014 SAP SE All rights reserved 35
4 To edit the UDO form select UDO1 and choose OK
5 Add the button and save the UDO to the database
6 To review the updates from the SAP Business One client reopen the UDO form
36 PUBLIC copy 2014 SAP SE All rights reserved
Working with SAP Business One Studio Suite SAP Business One Studio Suite Demo Script
6 Start SAP Business One Studio for Microsoft Visual Studio and add a new project
1 Choose Menu rarr File rarr New rarr Project and select the C project templates
o The template SAP Business One Add-on Project is for creating a new project
o The template SAP Business One Add-on Project from B1s File is for creating a project with the existing B1s file
2 Select SAP Business One Add-on Project and create a new project
7 Add a button a Button_ClickBefore event and a popup message box if choosing the button
1 Add a button
2 Double-click the button to add a Button_ClickBefore event
Working with SAP Business One Studio Suite SAP Business One Studio Suite Demo Script
PUBLIC copy 2014 SAP SE All rights reserved 37
3 Add the UI API code as follows
4 To run the add-on from toolbar or by using the F5 shortcut choose Debug
In the Main Menu of the SAP Business One client the add-on adds the user menu
5 Choose the menu to open the user form
6 Choose the button to open a message box
7 Stop debugging and close all forms
8 Edit a system form (sales order) Add a button and a Button_ClickBefore event create a user form if choosing the button
38 PUBLIC copy 2014 SAP SE All rights reserved
Working with SAP Business One Studio Suite SAP Business One Studio Suite Demo Script
1 In the SAP Business One client from the Main Menu choose Sales rarr Sales Order to open the original sales order
2 Right-click the project node to add a system form (sales order)
3 Add a button
4 Double-click the button to add a Button_ClickBefore event
5 Add the UI API code as follows
Working with SAP Business One Studio Suite SAP Business One Studio Suite Demo Script
PUBLIC copy 2014 SAP SE All rights reserved 39
6 To run the add-on from toolbar or by using the F5 shortcut choose Debug
7 From the SAP Business One client open the sales order The new button appears
To open the new form choose the button
9 Edit a system form (sales opportunity) from the menu design the UI API code to set Remark as a mandatory field
1 In the SAP Business One client from the Main Menu choose Sales Opportunities rarr Sales Opportunity to open the original sales opportunity form
2 From the SAP Business One client choose Edit Form in Visual Studio to edit the system form
3 In UI Outline change the pane level to 2
4 Add a button
5 Double-click the button to add a Button_ClickBefore event
6 Add the UI API code as follows
40 PUBLIC copy 2014 SAP SE All rights reserved
Working with SAP Business One Studio Suite SAP Business One Studio Suite Demo Script
7 To run the add-on from toolbar or by using the F5 shortcut choose Debug
8 In the SAP Business One client reopen the sales opportunity
9 On the Potential tab specify the business partner code and potential amount
On the General tab leave the Remark field empty
10 Choose Add
In the status bar the error message Remark is mandatory appears
11 Specify the remark The system adds the sales opportunity
wwwsapcomcontactsap
Material Number
copy 2014 SAP SE All rights reserved No part of this publication may be reproduced or transmitted in any form or for any purpose without the express permission of SAP AG The information contained herein may be changed without prior notice Some software products marketed by SAP AG and its distributors contain proprietary software components of other software vendors Microsoft Windows Excel Outlook and PowerPoint are registered trademarks of Microsoft Corporation IBM DB2 DB2 Universal Database System ads System i5 System p System p5 System x System z System z10 System z9 z10 z9 iSeries pSeries xSeries zSeries eServer zVM zOS i5OS S390 OS390 OS400 AS400 S390 Parallel Enterprise Server PowerVM Power Architecture POWER6+ POWER6 POWER5+ POWER5 POWER OpenPower PowerPC BatchPipes BladeCenter System Storage GPFS HACMP RETAIN DB2 Connect RACF Redbooks OS2 Parallel Sysplex MVSESA AIX Intelligent Miner WebSphere Netfinity Tivoli and Informix are trademarks or registered trademarks of IBM Corporation Linux is the registered trademark of Linus Torvalds in the US and other countries Adobe the Adobe logo Acrobat PostScript and Reader are either trademarks or registered trademarks of Adobe Systems Incorporated in the United States andor other countries Oracle is a registered trademark of Oracle Corporation UNIX XOpen OSF1 and Motif are registered trademarks of the Open Group Citrix ICA Program Neighborhood MetaFrame WinFrame VideoFrame and MultiWin are trademarks or registered trademarks of Citrix Systems Inc HTML XML XHTML and W3C are trademarks or registered trademarks of W3Creg World Wide Web Consortium Massachusetts Institute of Technology Java is a registered trademark of Sun Microsystems Inc JavaScript is a registered trademark of Sun Microsystems Inc used under license for technology invented and implemented by Netscape SAP R3 xApps xApp SAP NetWeaver Duet PartnerEdge ByDesign SAP Business ByDesign and other SAP products and services mentioned herein as well as their respective logos are trademarks or registered trademarks of SAP AG in Germany and in several other countries all over the world All other product and service names mentioned are the trademarks of their respective companies Data contained in this document serves informational purposes only National product specifications may vary These materials are subject to change without notice These materials are provided by SAP AG and its affiliated companies (SAP Group) for informational purposes only without representation or warranty of any kind and SAP Group shall not be liable for errors or omissions with respect to the materials The only warranties for SAP Group products and services are those that are set forth in the express warranty statements accompanying such products and services if any Nothing herein should be construed as constituting an additional warranty
- 1 Introduction
-
- 11 Installing SAP Business One Studio
- 12 Running SAP Business One Studio
- 13 Terms and Definitions
- 14 Related Documentation
-
- 2 SAP Business One Studio Main Window
-
- 21 Menu Button
- 22 Toolbar
- 23 Toolbox Window
- 24 Docking Tool Windows
-
- 3 Working with Add-on Projects in SAP Business One Studio
-
- 31 Creating an Add-on Project
- 32 Opening an Add-on Project or an External File
- 33 Designing a Form
-
- 331 Working with Tab Controls
- 332 Working with Grids
- 333 Working with Data Tables
- 334 Working with Matrixes
- 335 Working with Choose From Lists
- 336 Example Creating a Business Partner Field with Linked Button and Choose From List Functions
-
- 34 Adding Renaming or Deleting Forms in a Project
-
- 341 Adding New User Forms
- 342 Adding Existing User Forms
- 343 Adding System Forms
- 344 Adding UDO Forms
-
- 35 Editing Active Forms in SAP Business One
- 36 Exporting Updated Parts of a System Form
-
- 4 Working with Add-on Projects in SAP Business One Studio for Microsoft Visual Studio
-
- 41 Creating SAP Business One Add-on Projects
- 42 Tool Windows in SAP Business One Studio for Microsoft Visual Studio
- 43 Adding Forms in a Project
-
- 431 Adding SAP Business One User Forms
- 432 Adding SAP Business One System Forms
- 433 Adding SAP Business One UDO Forms
-
- 44 Loading an Existing B1s File to Your Project
- 45 Packaging Your Project
-
- 5 SAP Business One Studio Suite Demo Script
-
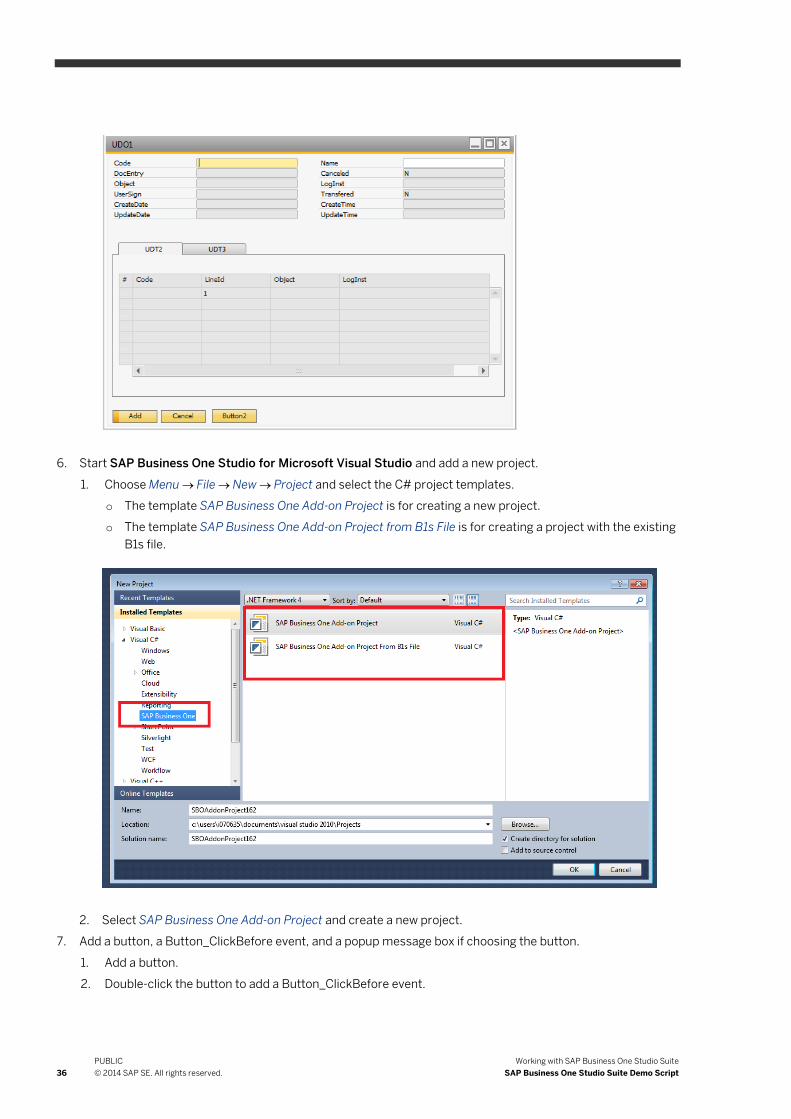
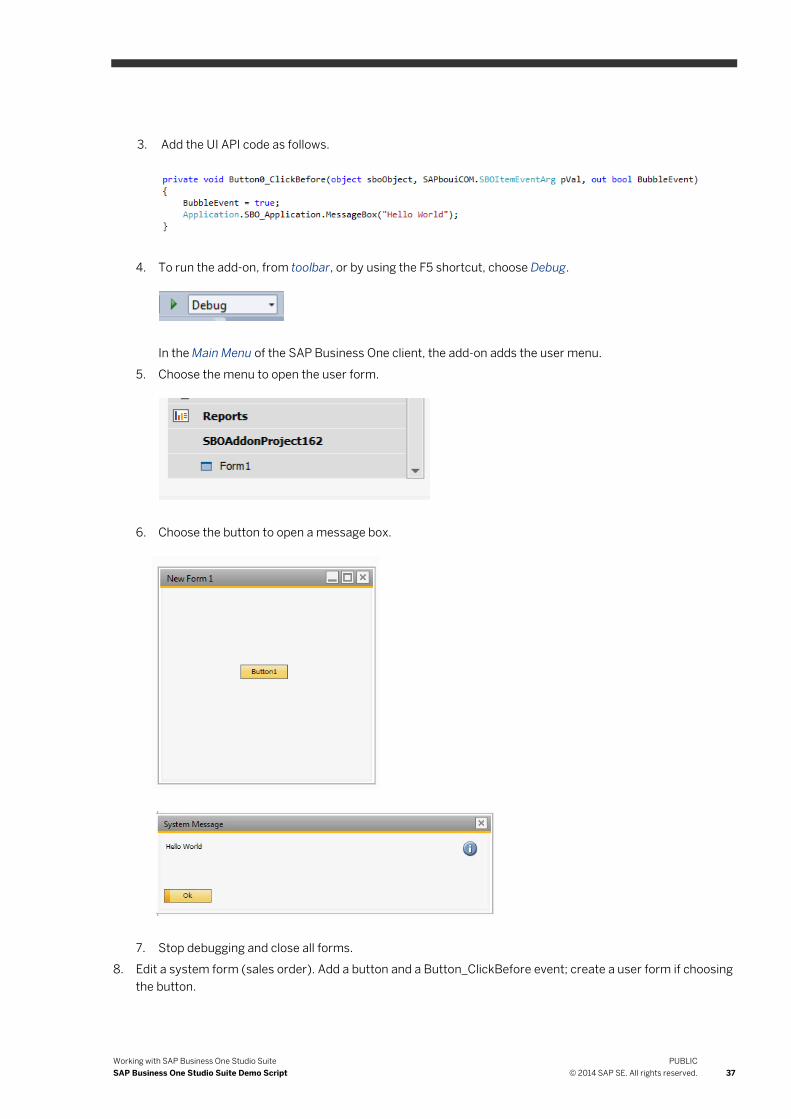
Working with SAP Business One Studio Suite SAP Business One Studio Suite Demo Script
PUBLIC copy 2014 SAP SE All rights reserved 37
3 Add the UI API code as follows
4 To run the add-on from toolbar or by using the F5 shortcut choose Debug
In the Main Menu of the SAP Business One client the add-on adds the user menu
5 Choose the menu to open the user form
6 Choose the button to open a message box
7 Stop debugging and close all forms
8 Edit a system form (sales order) Add a button and a Button_ClickBefore event create a user form if choosing the button
38 PUBLIC copy 2014 SAP SE All rights reserved
Working with SAP Business One Studio Suite SAP Business One Studio Suite Demo Script
1 In the SAP Business One client from the Main Menu choose Sales rarr Sales Order to open the original sales order
2 Right-click the project node to add a system form (sales order)
3 Add a button
4 Double-click the button to add a Button_ClickBefore event
5 Add the UI API code as follows
Working with SAP Business One Studio Suite SAP Business One Studio Suite Demo Script
PUBLIC copy 2014 SAP SE All rights reserved 39
6 To run the add-on from toolbar or by using the F5 shortcut choose Debug
7 From the SAP Business One client open the sales order The new button appears
To open the new form choose the button
9 Edit a system form (sales opportunity) from the menu design the UI API code to set Remark as a mandatory field
1 In the SAP Business One client from the Main Menu choose Sales Opportunities rarr Sales Opportunity to open the original sales opportunity form
2 From the SAP Business One client choose Edit Form in Visual Studio to edit the system form
3 In UI Outline change the pane level to 2
4 Add a button
5 Double-click the button to add a Button_ClickBefore event
6 Add the UI API code as follows
40 PUBLIC copy 2014 SAP SE All rights reserved
Working with SAP Business One Studio Suite SAP Business One Studio Suite Demo Script
7 To run the add-on from toolbar or by using the F5 shortcut choose Debug
8 In the SAP Business One client reopen the sales opportunity
9 On the Potential tab specify the business partner code and potential amount
On the General tab leave the Remark field empty
10 Choose Add
In the status bar the error message Remark is mandatory appears
11 Specify the remark The system adds the sales opportunity
wwwsapcomcontactsap
Material Number
copy 2014 SAP SE All rights reserved No part of this publication may be reproduced or transmitted in any form or for any purpose without the express permission of SAP AG The information contained herein may be changed without prior notice Some software products marketed by SAP AG and its distributors contain proprietary software components of other software vendors Microsoft Windows Excel Outlook and PowerPoint are registered trademarks of Microsoft Corporation IBM DB2 DB2 Universal Database System ads System i5 System p System p5 System x System z System z10 System z9 z10 z9 iSeries pSeries xSeries zSeries eServer zVM zOS i5OS S390 OS390 OS400 AS400 S390 Parallel Enterprise Server PowerVM Power Architecture POWER6+ POWER6 POWER5+ POWER5 POWER OpenPower PowerPC BatchPipes BladeCenter System Storage GPFS HACMP RETAIN DB2 Connect RACF Redbooks OS2 Parallel Sysplex MVSESA AIX Intelligent Miner WebSphere Netfinity Tivoli and Informix are trademarks or registered trademarks of IBM Corporation Linux is the registered trademark of Linus Torvalds in the US and other countries Adobe the Adobe logo Acrobat PostScript and Reader are either trademarks or registered trademarks of Adobe Systems Incorporated in the United States andor other countries Oracle is a registered trademark of Oracle Corporation UNIX XOpen OSF1 and Motif are registered trademarks of the Open Group Citrix ICA Program Neighborhood MetaFrame WinFrame VideoFrame and MultiWin are trademarks or registered trademarks of Citrix Systems Inc HTML XML XHTML and W3C are trademarks or registered trademarks of W3Creg World Wide Web Consortium Massachusetts Institute of Technology Java is a registered trademark of Sun Microsystems Inc JavaScript is a registered trademark of Sun Microsystems Inc used under license for technology invented and implemented by Netscape SAP R3 xApps xApp SAP NetWeaver Duet PartnerEdge ByDesign SAP Business ByDesign and other SAP products and services mentioned herein as well as their respective logos are trademarks or registered trademarks of SAP AG in Germany and in several other countries all over the world All other product and service names mentioned are the trademarks of their respective companies Data contained in this document serves informational purposes only National product specifications may vary These materials are subject to change without notice These materials are provided by SAP AG and its affiliated companies (SAP Group) for informational purposes only without representation or warranty of any kind and SAP Group shall not be liable for errors or omissions with respect to the materials The only warranties for SAP Group products and services are those that are set forth in the express warranty statements accompanying such products and services if any Nothing herein should be construed as constituting an additional warranty
- 1 Introduction
-
- 11 Installing SAP Business One Studio
- 12 Running SAP Business One Studio
- 13 Terms and Definitions
- 14 Related Documentation
-
- 2 SAP Business One Studio Main Window
-
- 21 Menu Button
- 22 Toolbar
- 23 Toolbox Window
- 24 Docking Tool Windows
-
- 3 Working with Add-on Projects in SAP Business One Studio
-
- 31 Creating an Add-on Project
- 32 Opening an Add-on Project or an External File
- 33 Designing a Form
-
- 331 Working with Tab Controls
- 332 Working with Grids
- 333 Working with Data Tables
- 334 Working with Matrixes
- 335 Working with Choose From Lists
- 336 Example Creating a Business Partner Field with Linked Button and Choose From List Functions
-
- 34 Adding Renaming or Deleting Forms in a Project
-
- 341 Adding New User Forms
- 342 Adding Existing User Forms
- 343 Adding System Forms
- 344 Adding UDO Forms
-
- 35 Editing Active Forms in SAP Business One
- 36 Exporting Updated Parts of a System Form
-
- 4 Working with Add-on Projects in SAP Business One Studio for Microsoft Visual Studio
-
- 41 Creating SAP Business One Add-on Projects
- 42 Tool Windows in SAP Business One Studio for Microsoft Visual Studio
- 43 Adding Forms in a Project
-
- 431 Adding SAP Business One User Forms
- 432 Adding SAP Business One System Forms
- 433 Adding SAP Business One UDO Forms
-
- 44 Loading an Existing B1s File to Your Project
- 45 Packaging Your Project
-
- 5 SAP Business One Studio Suite Demo Script
-
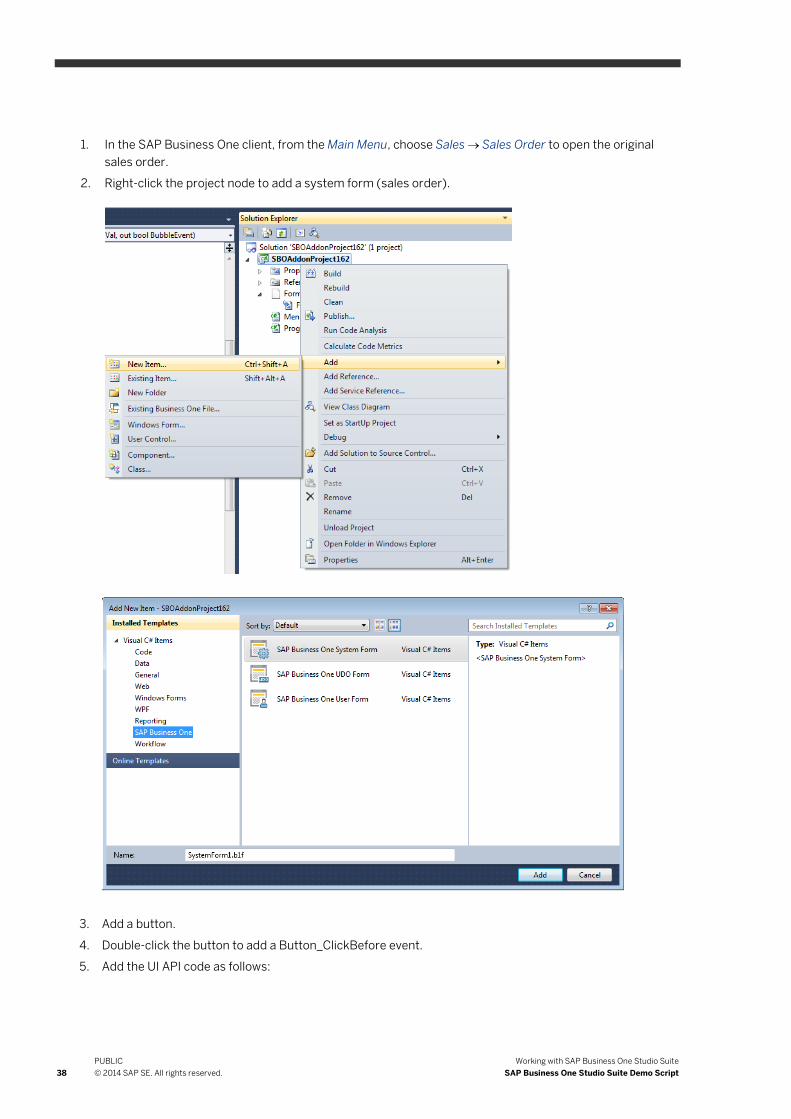
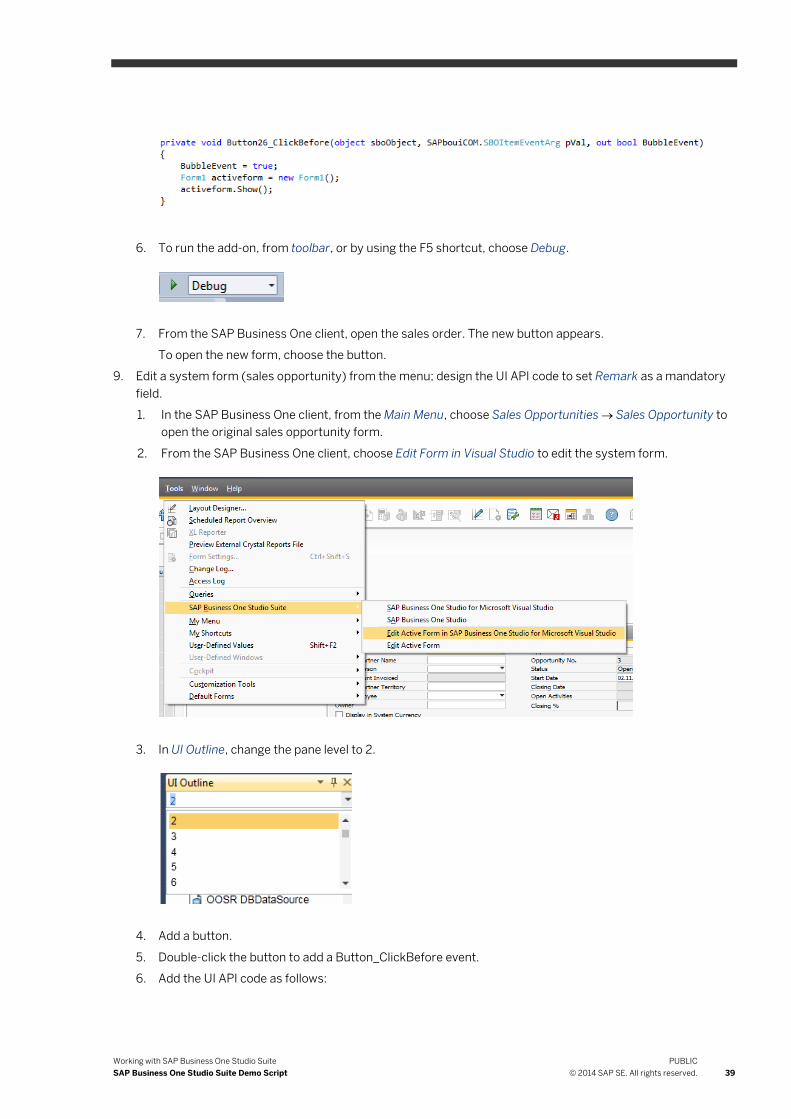
Working with SAP Business One Studio Suite SAP Business One Studio Suite Demo Script
PUBLIC copy 2014 SAP SE All rights reserved 39
6 To run the add-on from toolbar or by using the F5 shortcut choose Debug
7 From the SAP Business One client open the sales order The new button appears
To open the new form choose the button
9 Edit a system form (sales opportunity) from the menu design the UI API code to set Remark as a mandatory field
1 In the SAP Business One client from the Main Menu choose Sales Opportunities rarr Sales Opportunity to open the original sales opportunity form
2 From the SAP Business One client choose Edit Form in Visual Studio to edit the system form
3 In UI Outline change the pane level to 2
4 Add a button
5 Double-click the button to add a Button_ClickBefore event
6 Add the UI API code as follows
40 PUBLIC copy 2014 SAP SE All rights reserved
Working with SAP Business One Studio Suite SAP Business One Studio Suite Demo Script
7 To run the add-on from toolbar or by using the F5 shortcut choose Debug
8 In the SAP Business One client reopen the sales opportunity
9 On the Potential tab specify the business partner code and potential amount
On the General tab leave the Remark field empty
10 Choose Add
In the status bar the error message Remark is mandatory appears
11 Specify the remark The system adds the sales opportunity
wwwsapcomcontactsap
Material Number
copy 2014 SAP SE All rights reserved No part of this publication may be reproduced or transmitted in any form or for any purpose without the express permission of SAP AG The information contained herein may be changed without prior notice Some software products marketed by SAP AG and its distributors contain proprietary software components of other software vendors Microsoft Windows Excel Outlook and PowerPoint are registered trademarks of Microsoft Corporation IBM DB2 DB2 Universal Database System ads System i5 System p System p5 System x System z System z10 System z9 z10 z9 iSeries pSeries xSeries zSeries eServer zVM zOS i5OS S390 OS390 OS400 AS400 S390 Parallel Enterprise Server PowerVM Power Architecture POWER6+ POWER6 POWER5+ POWER5 POWER OpenPower PowerPC BatchPipes BladeCenter System Storage GPFS HACMP RETAIN DB2 Connect RACF Redbooks OS2 Parallel Sysplex MVSESA AIX Intelligent Miner WebSphere Netfinity Tivoli and Informix are trademarks or registered trademarks of IBM Corporation Linux is the registered trademark of Linus Torvalds in the US and other countries Adobe the Adobe logo Acrobat PostScript and Reader are either trademarks or registered trademarks of Adobe Systems Incorporated in the United States andor other countries Oracle is a registered trademark of Oracle Corporation UNIX XOpen OSF1 and Motif are registered trademarks of the Open Group Citrix ICA Program Neighborhood MetaFrame WinFrame VideoFrame and MultiWin are trademarks or registered trademarks of Citrix Systems Inc HTML XML XHTML and W3C are trademarks or registered trademarks of W3Creg World Wide Web Consortium Massachusetts Institute of Technology Java is a registered trademark of Sun Microsystems Inc JavaScript is a registered trademark of Sun Microsystems Inc used under license for technology invented and implemented by Netscape SAP R3 xApps xApp SAP NetWeaver Duet PartnerEdge ByDesign SAP Business ByDesign and other SAP products and services mentioned herein as well as their respective logos are trademarks or registered trademarks of SAP AG in Germany and in several other countries all over the world All other product and service names mentioned are the trademarks of their respective companies Data contained in this document serves informational purposes only National product specifications may vary These materials are subject to change without notice These materials are provided by SAP AG and its affiliated companies (SAP Group) for informational purposes only without representation or warranty of any kind and SAP Group shall not be liable for errors or omissions with respect to the materials The only warranties for SAP Group products and services are those that are set forth in the express warranty statements accompanying such products and services if any Nothing herein should be construed as constituting an additional warranty
- 1 Introduction
-
- 11 Installing SAP Business One Studio
- 12 Running SAP Business One Studio
- 13 Terms and Definitions
- 14 Related Documentation
-
- 2 SAP Business One Studio Main Window
-
- 21 Menu Button
- 22 Toolbar
- 23 Toolbox Window
- 24 Docking Tool Windows
-
- 3 Working with Add-on Projects in SAP Business One Studio
-
- 31 Creating an Add-on Project
- 32 Opening an Add-on Project or an External File
- 33 Designing a Form
-
- 331 Working with Tab Controls
- 332 Working with Grids
- 333 Working with Data Tables
- 334 Working with Matrixes
- 335 Working with Choose From Lists
- 336 Example Creating a Business Partner Field with Linked Button and Choose From List Functions
-
- 34 Adding Renaming or Deleting Forms in a Project
-
- 341 Adding New User Forms
- 342 Adding Existing User Forms
- 343 Adding System Forms
- 344 Adding UDO Forms
-
- 35 Editing Active Forms in SAP Business One
- 36 Exporting Updated Parts of a System Form
-
- 4 Working with Add-on Projects in SAP Business One Studio for Microsoft Visual Studio
-
- 41 Creating SAP Business One Add-on Projects
- 42 Tool Windows in SAP Business One Studio for Microsoft Visual Studio
- 43 Adding Forms in a Project
-
- 431 Adding SAP Business One User Forms
- 432 Adding SAP Business One System Forms
- 433 Adding SAP Business One UDO Forms
-
- 44 Loading an Existing B1s File to Your Project
- 45 Packaging Your Project
-
- 5 SAP Business One Studio Suite Demo Script
-
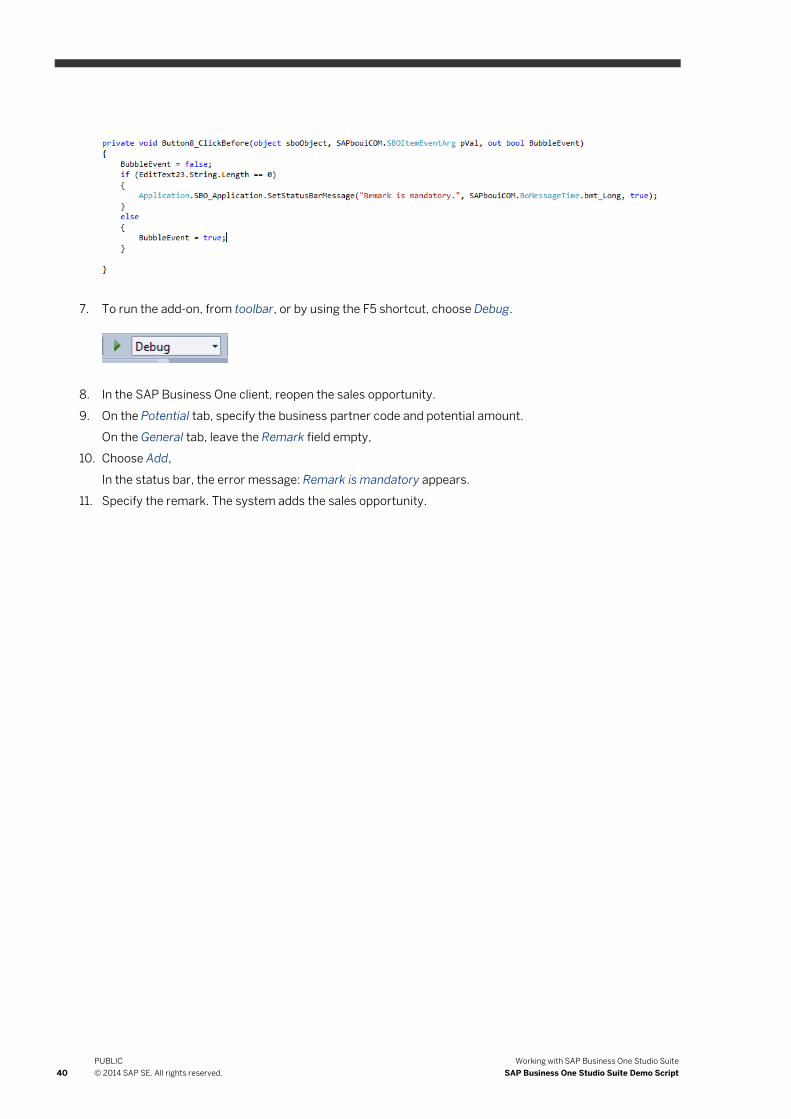