working with master documents - libreoffice · 4 working with master documents. creating a master...
TRANSCRIPT
Writer Guide
Chapter 13 Working with Master Documents
Copyright
This document is Copyright © 2011-2014 by the LibreOffice Documentation Team. Contributors arelisted below. You may distribute it and/or modify it under the terms of either the GNU General Public License (http://www.gnu.org/licenses/gpl.html), version 3 or later, or the Creative Commons Attribution License (http://creativecommons.org/licenses/by/4.0/), version 4.0 or later.
All trademarks within this guide belong to their legitimate owners.
ContributorsRon Faile Jr. Barbara Duprey Jean Hollis WeberDavid Blymire John A Smith Klaus-Jürgen Weghorn
FeedbackPlease direct any comments or suggestions about this document to the Documentation Team’s mailing list: [email protected]
Note: Everything you send to a mailing list, including your email address and any other personal information that is written in the message, is publicly archived and cannot be deleted.
AcknowledgmentsThis chapter is based on Chapter 13 of the OpenOffice.org 3.3 Writer Guide. The contributors to that chapter are:
Jean Hollis Weber Michele Zarri Daniel CarreraIan Laurenson Scott Rhoades Janet M. SwisherSharon Whiston
Publication date and software versionPublished 19 September 2014. Based on LibreOffice 4.2.
Note for Mac users
Some keystrokes and menu items are different on a Mac from those used in Windows and Linux. The table below gives some common substitutions for the instructions in this chapter. For a more detailed list, see the application Help.
Windows or Linux Mac equivalent Effect
Tools > Options menu selection
LibreOffice > Preferences Access setup options
Right-click Control+click and/or right-clickdepending on computer setup
Opens a context menu
Ctrl (Control) ⌘ (Command) Used with other keys
F5 Shift+⌘+F5 Opens the Navigator
F11 ⌘+T Opens the Styles and Formatting window
Documentation for LibreOffice is available at http://www.libreoffice.org/get-help/documentation
Contents
Copyright..............................................................................................................................2Contributors.................................................................................................................................2
Feedback.....................................................................................................................................2
Acknowledgments........................................................................................................................2
Publication date and software version.........................................................................................2
Note for Mac users...............................................................................................................2
Why use a master document?............................................................................................4
Styles in master documents and subdocuments.............................................................4
Creating a master document: scenarios...........................................................................5
Splitting a document into master and subdocuments.....................................................5
Combining several documents into a master document.................................................6
Starting with no existing documents.................................................................................8Step 1. Plan the project................................................................................................................8
Step 2. Create a template............................................................................................................9
Step 3. Create the master document...........................................................................................9
Step 4. Create subdocuments.....................................................................................................9
Step 5. Add some pages to the master document......................................................................10
Step 6. Insert the subdocuments into the master document.......................................................11
Step 7. Add table of contents, bibliography, index......................................................................12
Restarting page numbering..............................................................................................13
Editing a master document...............................................................................................14Changing the appearance of the master document...................................................................14
Editing subdocuments................................................................................................................15
Adding, deleting, or renaming subdocuments............................................................................15
Cross-referencing between subdocuments....................................................................15Preparing items as targets for cross-referencing.......................................................................15
Using bookmarks..................................................................................................................16Setting references.................................................................................................................16
Inserting the cross-references...................................................................................................17
Using the Navigator...........................................................................................................18
Creating one file from a master document and its subdocuments..............................19
Problem solving: Anchoring pictures to a page.............................................................20
Working with Master Documents 3
Why use a master document?
A master document (*.ODM) can be considered as a container that joins separate text documents (*.ODT) into one larger document, and unifies the formatting, table of contents (TOC), bibliography,index, and other tables or lists. Master documents are typically used for producing long documents such as a book, a thesis, or a long report.
A master document is especially useful in these situations:
• When graphics, spreadsheets, or other material cause the file size or number of pages to become quite large; writing, reviewing, and editing may be easier when done on subsets of the full document.
• When different people are writing different chapters or other parts of the full document.
• When files will be published as stand-alone documents as well as becoming part of a largerdocument. The chapters of this Writer Guide are an example of this.
• When subdocuments are used in more than one final document.
You can use several methods to create master documents. Each method has its advantages and disadvantages. Which method you choose depends on what you are trying to accomplish. The different methods are described in this chapter, along with suggestions on when to use each one.
Tip
A master document is not always the best method to use in any of the situations given above. You may find that an ordinary document (.ODT) containing sections linked to other files may do the job just as well. For more about using sections to combine files, see Chapter 4, Formatting Pages.
Styles in master documents and subdocuments
A stand-alone document becomes a subdocument when it is linked into a master document. A document can be used as a subdocument in several master documents. Each master document may have different style definitions (font, type size, color, page size, margins, and so on), which affect the appearance of the final document, but the individual documents retain their original characteristics.
The relationship between styles in a master document and its subdocuments is as follows:
• Custom styles used in subdocuments, such as paragraph styles, are automatically imported into the master document.
• If more than one subdocument uses a custom style with the same name (for example, myBodyText), then only the one in the first subdocument to be linked is imported into the master document.
• If a style with the same name exists in the master document and in the subdocuments (for example, Default Style), then the style is applied as defined in the master document.
• The styles in the subdocuments are only changed in the master document, so when a subdocument is opened for editing the original styles are not affected.
Tip
If you use the same document template for the master document and its subdocuments, the subdocuments will look the same when they are loaded into the master document as they do when viewed as individual files. When you modifyor create a style, make the change in the template (not in the master document or any of the subdocuments). Then when you reopen the master document or a subdocument, the styles will update from the template.
4 Working with Master Documents

Creating a master document: scenarios
Which you choose from the three most common scenarios for creating a master document depends on the current state of your document:
• You have one existing document (a book) that you want to split into several subdocuments (chapters) that will be controlled by the master document.
• You have several existing documents (chapters) by one or more authors that you want to combine into one book, controlled by the master document.
• You have no existing documents but intend to write a long book containing several chapters, possibly by multiple authors.
We will look at each of these scenarios in turn.
Splitting a document into master and subdocuments
When you have one existing document that you want to split into a master document and several subdocuments, you can have Writer split the document automatically at headings with an outline level of your choice.
Although this method is quick and easy, some cleanup work may be necessary:
• The page style of the first page (and possibly all pages) in each subdocument reverts to Default Style. If you are using custom page styles and you want the subdocuments to use the same page layout, whether part of the master document or standalone, you will need toreapply at least the first page style.
• The automatically generated file names for the subdocuments are maindocnameX.odt, where X is 1, 2, 3, and so on. If you have a Preface or other “chapter” starting with a Heading 1 before Chapter 1, the file names will not directly correspond to the chapter numbers. You may wish to rename the subdocuments; see “Adding, deleting, or renaming subdocuments” on page 15.
• If the original document is associated with a template, the .ODM file will also be associated with that template, but the subdocuments will not. The subdocuments will inherit the styles in the original document, but their association with the template will be lost.
How to do it:
1) Open the document and choose File > Send > Create Master Document.
2) On the Name and Path of Master Document dialog (Figure 1):
a) Navigate to the folder where you want to save the master document and its subdocuments (or create a new folder).
b) Type a name for the master document in the File name box.
c) In the separated by: list, choose the outline level where the file should be split into subdocuments. Usually this is Outline: Level 1 for a chapter heading, but your document may be structured differently. For more information about outline levels, see“Defining a hierarchy of headings” in Chapter 6, Introduction to Styles.
d) Leave the Automatic file name extension option selected, and click Save to split the document into subdocuments and create the master document.
If you selected Outline: Level 1 and the paragraph style at that level is Heading 1, each of the subdocuments begins with a Heading 1 paragraph.
Splitting a document into master and subdocuments 5
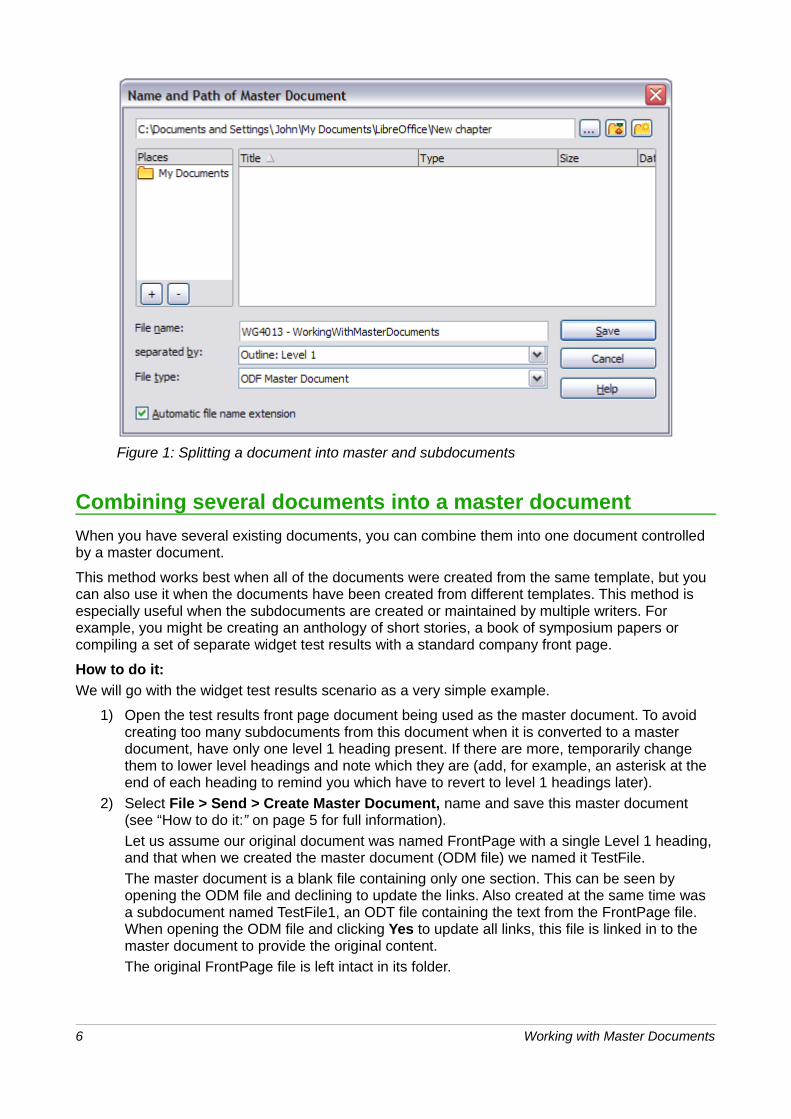
Figure 1: Splitting a document into master and subdocuments
Combining several documents into a master document
When you have several existing documents, you can combine them into one document controlled by a master document.
This method works best when all of the documents were created from the same template, but you can also use it when the documents have been created from different templates. This method is especially useful when the subdocuments are created or maintained by multiple writers. For example, you might be creating an anthology of short stories, a book of symposium papers or compiling a set of separate widget test results with a standard company front page.
How to do it:
We will go with the widget test results scenario as a very simple example.
1) Open the test results front page document being used as the master document. To avoid creating too many subdocuments from this document when it is converted to a master document, have only one level 1 heading present. If there are more, temporarily change them to lower level headings and note which they are (add, for example, an asterisk at the end of each heading to remind you which have to revert to level 1 headings later).
2) Select File > Send > Create Master Document, name and save this master document (see “How to do it:” on page 5 for full information).
Let us assume our original document was named FrontPage with a single Level 1 heading, and that when we created the master document (ODM file) we named it TestFile.
The master document is a blank file containing only one section. This can be seen by opening the ODM file and declining to update the links. Also created at the same time was a subdocument named TestFile1, an ODT file containing the text from the FrontPage file. When opening the ODM file and clicking Yes to update all links, this file is linked in to the master document to provide the original content.
The original FrontPage file is left intact in its folder.
6 Working with Master Documents
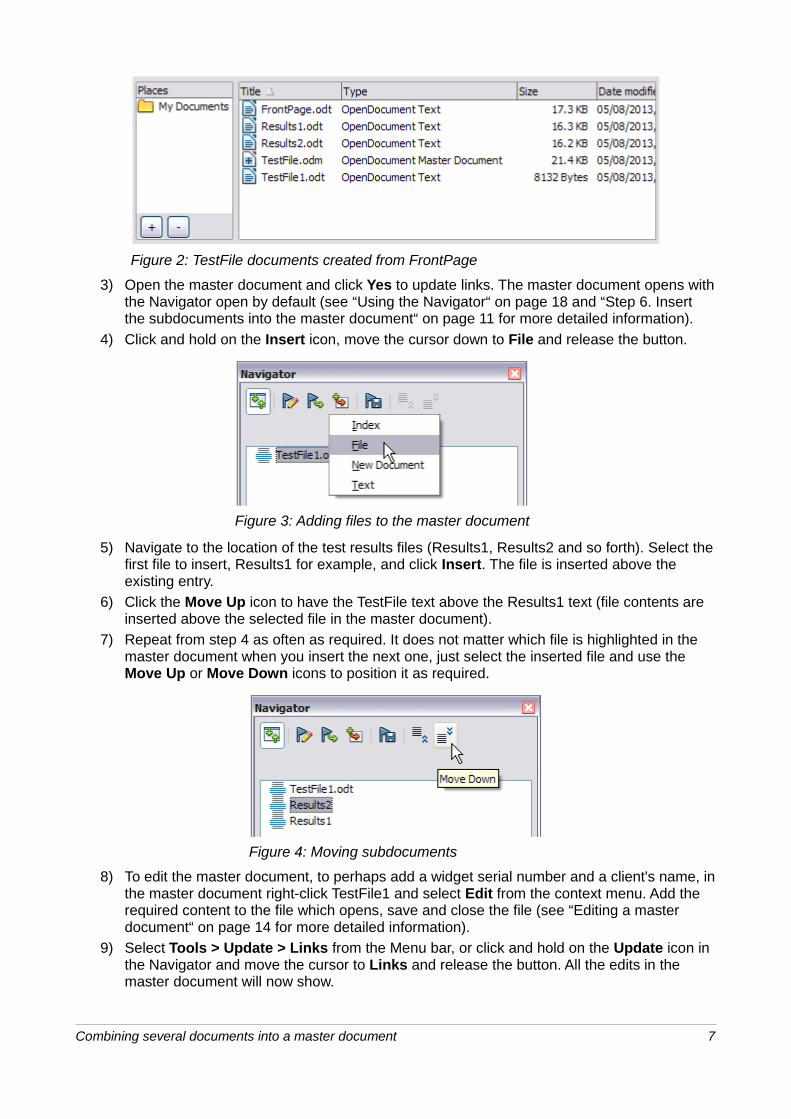
Figure 2: TestFile documents created from FrontPage
3) Open the master document and click Yes to update links. The master document opens withthe Navigator open by default (see “Using the Navigator“ on page 18 and “Step 6. Insert the subdocuments into the master document“ on page 11 for more detailed information).
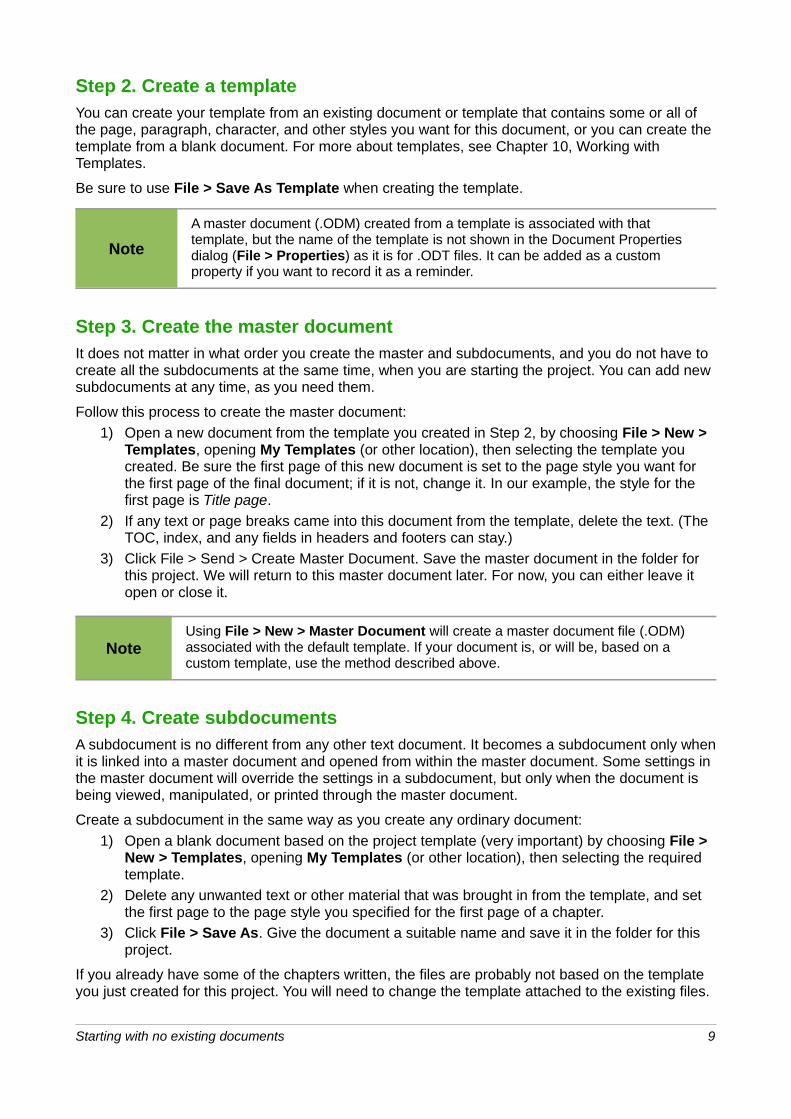
4) Click and hold on the Insert icon, move the cursor down to File and release the button.
Figure 3: Adding files to the master document
5) Navigate to the location of the test results files (Results1, Results2 and so forth). Select thefirst file to insert, Results1 for example, and click Insert. The file is inserted above the existing entry.
6) Click the Move Up icon to have the TestFile text above the Results1 text (file contents are inserted above the selected file in the master document).
7) Repeat from step 4 as often as required. It does not matter which file is highlighted in the master document when you insert the next one, just select the inserted file and use the Move Up or Move Down icons to position it as required.
Figure 4: Moving subdocuments
8) To edit the master document, to perhaps add a widget serial number and a client's name, inthe master document right-click TestFile1 and select Edit from the context menu. Add the required content to the file which opens, save and close the file (see “Editing a master document“ on page 14 for more detailed information).
9) Select Tools > Update > Links from the Menu bar, or click and hold on the Update icon in the Navigator and move the cursor to Links and release the button. All the edits in the master document will now show.
Combining several documents into a master document 7

Starting with no existing documents
When you start with no existing documents, you can set up everything the way you want from the beginning. Follow these steps, in the order given. Each step is explained in detail in the following subsections.
Step 1. Plan the project
Step 2. Create a template
Step 3. Create the master document
Step 4. Create subdocuments
Step 5. Add some pages to the master document
Step 6. Insert the subdocuments into the master document
Step 7. Add table of contents, bibliography, index
Step 1. Plan the projectAlthough you can make changes at most steps in this process, the more you can plan before you start, the less work you will have to do to correct any problems later. Here are some things you need to plan.
Parts of book or report required. What pages will be in the master document and what will be in the subdocuments?
Consider as an example a book with the parts given in the table below.
Part LocationTitle (cover) page In master document
Copyright page In master document
Table of contents (TOC) In master document
Preface (Foreword) Subdocument
Chapters 1 to 7 Subdocuments
Index In master document
Page, paragraph, character, frame, and numbering styles. Determine the styles you wish to use. See Chapter 6, Introduction to Styles, and Chapter 7, Working with Styles, for instructions on how to create or modify styles and examples of the use of styles in book design. Pay particular attention to setting up headings using styles, as described in “Defining a hierarchy of headings” in Chapter 6, Introduction to Styles.
Fields and AutoText entries, as required. See Chapter 3, Working with Text, and Chapter 14, Working with Fields, for ideas.
One or more templates for master and subdocuments. If you are starting a new project, create the master document and all the subdocuments from the same template. Not using the same template can create style inconsistencies that could cause your document not to look as you expect. For example, if two subdocuments have a style with the same name that is formatted differently in each document, the master document will use the formatting from the first subdocument that was added.
Page numbering. In our example, the pages are numbered sequentially from the title page. (The title page style can be defined not to show the page number, but it will still count as page 1.) Therefore the first chapter begins on a higher number page, for example page 5. To create a book in which the page numbering restarts at 1 for the first chapter, you need to do some additional work. See “Restarting page numbering” on page 13.
8 Working with Master Documents
Step 2. Create a templateYou can create your template from an existing document or template that contains some or all of the page, paragraph, character, and other styles you want for this document, or you can create the template from a blank document. For more about templates, see Chapter 10, Working with Templates.
Be sure to use File > Save As Template when creating the template.
Note
A master document (.ODM) created from a template is associated with that template, but the name of the template is not shown in the Document Properties dialog (File > Properties) as it is for .ODT files. It can be added as a custom property if you want to record it as a reminder.
Step 3. Create the master documentIt does not matter in what order you create the master and subdocuments, and you do not have to create all the subdocuments at the same time, when you are starting the project. You can add new subdocuments at any time, as you need them.
Follow this process to create the master document:
1) Open a new document from the template you created in Step 2, by choosing File > New > Templates, opening My Templates (or other location), then selecting the template you created. Be sure the first page of this new document is set to the page style you want for the first page of the final document; if it is not, change it. In our example, the style for the first page is Title page.
2) If any text or page breaks came into this document from the template, delete the text. (The TOC, index, and any fields in headers and footers can stay.)
3) Click File > Send > Create Master Document. Save the master document in the folder for this project. We will return to this master document later. For now, you can either leave it open or close it.
NoteUsing File > New > Master Document will create a master document file (.ODM) associated with the default template. If your document is, or will be, based on a custom template, use the method described above.
Step 4. Create subdocumentsA subdocument is no different from any other text document. It becomes a subdocument only whenit is linked into a master document and opened from within the master document. Some settings in the master document will override the settings in a subdocument, but only when the document is being viewed, manipulated, or printed through the master document.
Create a subdocument in the same way as you create any ordinary document:
1) Open a blank document based on the project template (very important) by choosing File > New > Templates, opening My Templates (or other location), then selecting the required template.
2) Delete any unwanted text or other material that was brought in from the template, and set the first page to the page style you specified for the first page of a chapter.
3) Click File > Save As. Give the document a suitable name and save it in the folder for this project.
If you already have some of the chapters written, the files are probably not based on the template you just created for this project. You will need to change the template attached to the existing files.
Starting with no existing documents 9
You can do this manually by opening the required template and copying and pasting content into the blank template.
Step 5. Add some pages to the master documentTo assist you, do the following:
• Make sure paragraph marks are showing. You can set them in Tools > Options >
LibreOffice Writer > Formatting Aids, or click the Nonprinting Characters icon on theStandard toolbar or press Ctrl+F10.
• Show text boundaries, table boundaries, and section boundaries (Tools > Options > LibreOffice > Appearance).
If your master document does not contain any required “front matter” such as a title page, copyrightpage, or TOC page, add them now. The example in this section uses the sequence of page styles given in “Step 1. Plan the project” on page 8.
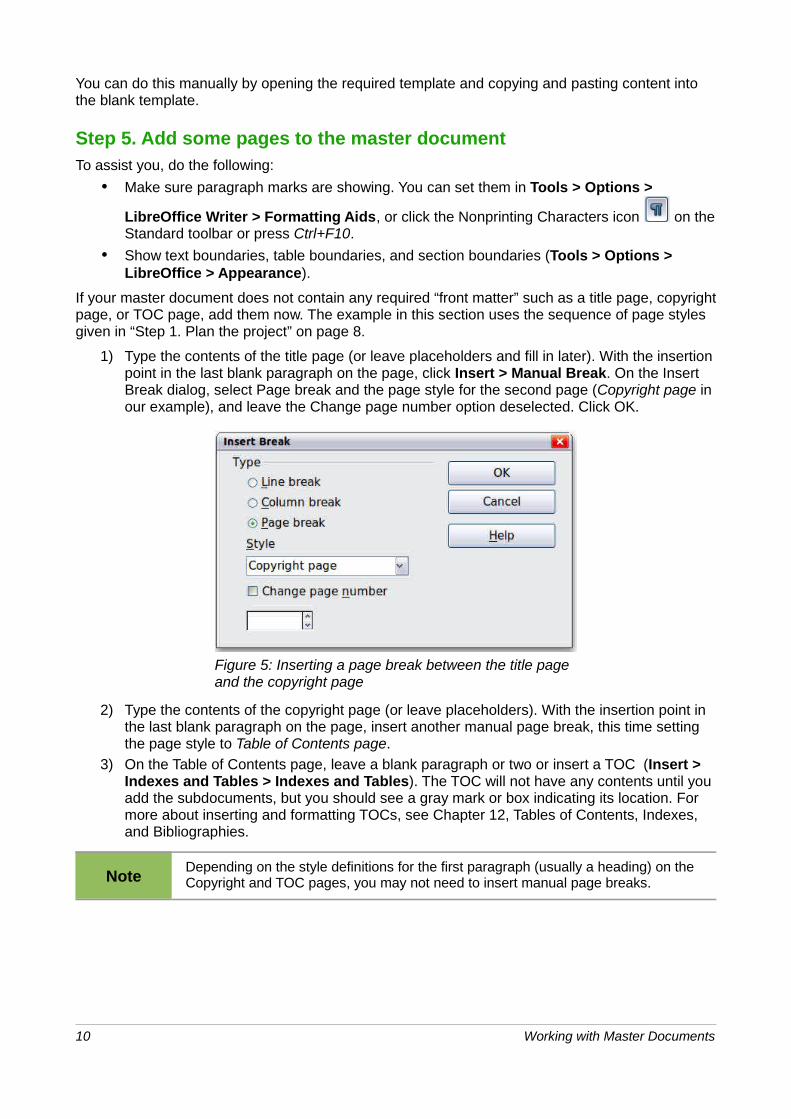
1) Type the contents of the title page (or leave placeholders and fill in later). With the insertionpoint in the last blank paragraph on the page, click Insert > Manual Break. On the Insert Break dialog, select Page break and the page style for the second page (Copyright page in our example), and leave the Change page number option deselected. Click OK.
Figure 5: Inserting a page break between the title page and the copyright page
2) Type the contents of the copyright page (or leave placeholders). With the insertion point in the last blank paragraph on the page, insert another manual page break, this time setting the page style to Table of Contents page.
3) On the Table of Contents page, leave a blank paragraph or two or insert a TOC (Insert > Indexes and Tables > Indexes and Tables). The TOC will not have any contents until you add the subdocuments, but you should see a gray mark or box indicating its location. For more about inserting and formatting TOCs, see Chapter 12, Tables of Contents, Indexes, and Bibliographies.
NoteDepending on the style definitions for the first paragraph (usually a heading) on the Copyright and TOC pages, you may not need to insert manual page breaks.
10 Working with Master Documents

Step 6. Insert the subdocuments into the master documentNow we are ready to add the subdocuments.
Tip
Subdocuments are inserted into a master document before the item highlighted in the Navigator. If you insert the last subdocument first, and then insert the other subdocuments before the last one, they will end up in the correct sequence without the necessity of moving them up or down in the list.
1) Display the Navigator (click View > Navigator, or press F5, or click the Navigator icon .
2) Be sure the Navigator is showing the master view (see “Using the Navigator” on page 18). Click on the Toggle icon at the upper left to toggle between regular and master views.
3) On the Navigator, select Text, then click and hold on the Insert icon, move the mouse pointer down, and click File.
Figure 6: Inserting a subdocument into a master document using the Navigator
A standard File Open dialog appears. Select the required file (which you created in Step 4) and click Insert. This example uses 7 chapters and a preface; we will load Chapter 7 first, as suggested in the Tip above.
The inserted file is listed in the Navigator before the Text item, as shown in Figure 7.
Figure 7: Navigator after inserting one subdocument
4) Because the Text section contains the title page and other material, highlight it and click theMove Up icon to move it to the top of the list.
5) Highlight the subdocument you just inserted (Chapter 7), then click and hold on the Insert icon, move the mouse pointer, and click File to insert the first subdocument; in this example, Preface. Chapter 7 remains highlighted. Repeat with Chapter 1, Chapter 2, and so on until all the subdocuments have been added to the list. The Navigator will now look something like Figure 8.
6) Save the master document again.
Starting with no existing documents 11

Figure 8: The Navigator showing a series of files in a master document
Step 7. Add table of contents, bibliography, indexYou can generate a table of contents, bibliography, or index for the book, using the master document. You must insert these items into a text section in the master document. For more about these document elements, see Chapter 12, Creating Tables of Contents, Indexes, and Bibliographies.
Put the insertion point on the page in the first text section where the table of contents is to go and choose Insert > Indexes and Tables > Indexes and Tables to create the table of contents.
If you do not have a Text section at the end of the master document, insert one before the last subdocument, then move it down so it is after the last subdocument. Now, if you have included bibliographic entries in your subdocuments, you can put the insertion point on the page in this last text section where the bibliography is to go and create the bibliography.
If you have included index entries in your subdocuments, put the insertion point on the page in the last text section where the index is to go and create the index.
Figure 9 shows the Navigator after addition of a TOC and index.
Figure 9: Navigator showing subdocuments, table of contents, and index in a master document
12 Working with Master Documents

Restarting page numbering
The example in the previous section showed a very basic collection of files with sequential page numbering. This is useful for many documents, including e-books, but a typical printed book has the following sequence of page numbers:
• No page numbers on cover page or copyright page
• Lower-case roman numerals in the front matter, starting with i
• Arabic numerals in the body of the document, starting with 1
• Page numbering sequential through the rest of the book
To set up a master document to produce such a book, you need to define a different paragraph style for the heading of the first chapter and assign two special characteristics to it.
ExampleEach chapter may start with a Heading 1 paragraph, set up on the Text Flow tab of the Paragraph Style dialog to start on a new page (Figure 10). The Page number is set to 0, with the effect that numbering continues from the number of the previous page.
Figure 10: Text Flow tab of Paragraph Style dialog for Heading 1
Look on the Outline & Numbering tab (Figure 11) of this dialog to see what outline level Heading 1 is assigned to. Usually this will be Outline Level 1. The level cannot be changed here because it has been set in Tools > Outline Numbering.
Figure 11: Outline & Numbering tab of Paragraph Style dialog for Heading 1
Restarting page numbering 13

Only one paragraph style can be assigned to Outline Level 1 through Tools > Outline Numbering.However, you can assign additional paragraph styles to any outline level by using the Outline & Numbering tab on the Paragraph Style dialog.
Therefore, you want to define a style called Heading 1 Chapter 1 that is identical in appearance to Heading 1 but has one essential difference: on the Text Flow tab, set the Page number to 1 (Figure12). Then, on the Outline & Numbering tab, set the Outline level to Level 1 (Figure 13). This ensures that the heading will appear in the Table of Contents along with the other chapter headings. (The Numbering Style for this heading is None, as it was not assigned an outline level through the Outline Numbering dialog.
Now, assign the new style to the first paragraph of Chapter 1, and you’re done.
Figure 12: Set the page number to restart at 1 for this heading style
Figure 13: Assign the style to outline level
Editing a master document
After creating a master document, you may want to change its appearance or contents.
Changing the appearance of the master documentYou can change the styles in the template as your project develops. Do not make changes to styles in the master document or in any of the subdocuments—make those changes in the template.
14 Working with Master Documents

To update the master document (and all of the subdocuments) with changes to the template, just open the master document. You will get two messages: first, to ask if you want to update all links; and second, if you want to apply the changed styles. Answer Yes to both of these messages.
Editing subdocumentsYou cannot edit a subdocument from within the master document. Instead, you must open the subdocument, either by double-clicking on it in the master document’s Navigator, or by opening it from outside the master document. Then you can edit it just as you would edit any other document.
If, while editing a subdocument, you want to make changes to the styles that apply to the master document, follow the recommendations in “Changing the appearance of the master document” above.
If you change the contents of any subdocument, you need to manually update the table of contents, bibliography, and index from within the master document.
Adding, deleting, or renaming subdocumentsTo add a subdocument, follow the method described in “Step 6. Insert the subdocuments into the master document“ on page 11.
To delete a subdocument, right-click on its file name in the Navigator and choose Delete.
If you rename a subdocument by changing its file name, the next time you update links in the master document, that subdocument will show up as a broken link (shown in red). You can fix this by right-clicking on it in the Navigator, choosing Edit Link, and selecting the renamed file; however, the file name shown in the Navigator does not change (only the link changes). This can be quite confusing, so a better strategy is to delete the subdocument from the Navigator and then add the renamed file.
Cross-referencing between subdocuments
The methods described earlier in this chapter are all most writers will need when using master documents. However, you might want to include automatically updated cross-references between subdocuments. This section describes how to do this.
The process to create cross-references between subdocuments is time consuming, but it works.
Preparing items as targets for cross-referencingBefore you can insert a cross-reference to anything that is not automatically shown on the Cross-references tab of the Fields dialog, such as a heading, you must prepare or “set” that heading as an item to be referenced. To do this, you can either use bookmarks or set references.
When you set references, be sure to select the entire text you want to use as the reference, such as a heading or figure number. Keep a list of your names for the reference fields, and be sure eachname is unique. One way to keep track of this information is to save it in a separate file.
The field names are case-sensitive. You can check the field name by holding the cursor over the referenced item. In our example (Figure 14), the heading has the field name word count.
Figure 14: Finding the field name for a heading
Cross-referencing between subdocuments 15

Using bookmarksBookmarks are listed in the Navigator and can be accessed directly from there with a single mouseclick. To insert a bookmark:
1) Select the text you want to bookmark. Click Insert > Bookmark.
2) On the Insert Bookmark dialog, the larger box lists any previously defined bookmarks. Typea name for the new bookmark in the top box. Click OK.
Figure 15: Inserting a bookmark
Setting referencesOpen the subdocument in which you want to set references.
1) Click Insert > Cross-reference.
Figure 16: Setting text to be used as a target for a cross-reference
16 Working with Master Documents

2) On the Cross-references tab of the Fields dialog (Figure 16), click Set Reference in the Type list. The Selection list shows any references that have been defined. You can leave this page open while you set many headings as references.
3) Click in the document and highlight the text of the first heading to be used as a target for a cross-reference. Click on the Fields dialog. The text of the heading will appear in the Value box in the lower right of the dialog. In the Name box, type some text by which you can identify this heading.
4) Click Insert. The text you typed in the Name box now appears in the Selection list.
5) Repeat steps 3 and 4 as often as required, keeping a note of your references as needed.
6) Repeat for other subdocuments if wanted. Save and close.
Inserting the cross-references1) Open the master document. In the Navigator, select a subdocument, right-click and choose
Edit from the context menu. The subdocument opens for editing.
2) In the subdocument, place the cursor where you want the cross-reference to appear. Click Insert > Cross Reference.
3) On the Cross-references tab of the Fields dialog (Figure 17), select Insert Reference in the Type list on the left hand side. The Selection list in the middle column shows only the reference field names for the subdocument you are using, so ignore that list and check the list you created manually in “Setting references”. Select Reference in the Insert reference to list.
Figure 17: Fields dialog showing manual entry of field name
Cross-referencing between subdocuments 17

4) In the Name field in the lower right hand column, type the name of the reference you set in the subdocument you are referring to. In our example, the reference is in Chapter 3, and itsname is word count.
5) Click Insert, type any text you want to appear between the reference and page number (such as “on page”), and then insert another reference with Page from the Insert reference to list. The cross-references will show an error as shown in Figure 18. When you hover the mouse pointer over one of these fields, you will see the field name.
Figure 18: Viewing the field name
(You can turn on the display of field codes by clicking View > Field Names. The two error fields shown in Figure 18 now look like Figure 19.)
Figure 19: Displaying field codes
6) After you have inserted all the cross-references required in the subdocument, save and close it and return to the master document window.
Select Tools > Update > Links from the Menu bar, or click and hold on the Update icon in the Navigator and move the cursor to Links and release the button. All the edits in the master document will now show. Within the master document, navigate to the page of the subdocument onwhich you inserted the cross-reference field. You should now see the text of the cross-reference appear in the spot where you inserted it. If it does not work, save the master document, close it, and open it again, updating the links.
Figure 20: Field contents visible
This technique also works if you open a subdocument directly in step 2 (that is, not from within the master document) and insert a cross-reference field.
Using the Navigator
The Navigator is a very useful tool that helps you move quickly to specific parts of your document. It also provides information about the content of the document and enables you to reorganize some of the content. For example, if each chapter in your final book is a separate document, then in the master document they can be reordered; the references are renumbered automatically and the table of contents and index can be updated.
In Writer, the Navigator has two distinct forms. One form is used in ordinary text documents and the other in master documents.
18 Working with Master Documents

In an ordinary text document, the Navigator displays lists of the graphics, tables, index entries, hyperlinks, references, and other items in the document, as shown on the left hand side of Figure 21. Click the indicator (+ sign or triangle) by any list to display the contents of the list. You can double-click an entry in the Navigator and jump immediately to that place in the document.
In a master document, you can toggle between the regular and master views by clicking on the Toggle icon at the upper left. In the master view, the Navigator lists the subdocuments and text sections, as shown on the right hand side of Figure 21. The use of the Navigator in a master document is covered in more detail later in this chapter (see “Step 6. Insert the subdocuments into the master document” on page 11 and “Cross-referencing between subdocuments” on page 15).
Figure 21: The Navigator for a text document (left) and for a master document (right)
Creating one file from a master document and its subdocuments
Master documents are .odm files containing linked subdocuments, which are in .odt format. Although linked files are very useful when writing and editing a large document such as a book, sometimes you might need to have a copy of the entire book in one file.
To export a master document to a .odt file (without affecting the original .odm file):
1) Open the master document. Choose File > Export from the menu bar.
2) On the Export dialog (Figure 22), type a name for the exported .odt file and choose ODF Text Document (.odt) from the File format list (it should be the default choice). Click Export. This step creates from the .odm file, a write protected .odt file, with each subdocument in a separate section.
Creating one file from a master document and its subdocuments 19

Figure 22: Exporting a master document to an Open Document Text (.odt) file
3) Close the master document and open the new .odt file, updating all links.
4) To break the links and remove the write protect, go to Format > Sections, select the first item in the Section list, then press Shift+click on the last item in the list in order to select all the items in the list. Deselect both the Link in the Link section and Protected in the Write protection section.
5) Click OK.
6) If you wish to eliminate some or all of the sections to have a plain text document, select thesections you wish to remove, and click Remove. The contents of those sections remain in the document; only the section markers are removed. Click OK.
Problem solving: Anchoring pictures to a page
Some combinations of choices do not work together, and some techniques that affect master documents are not at all obvious. This section describes one problem and what to do about it.
The problemA picture (graphic) anchored “to page” in a subdocument is not displayed in the master document although it always appears correctly in the subdocument.
Because the master document reorganizes the page flow, page numbers, and cross-references when it collates all the subdocuments together, the absolute reference to a page X in a subdocument is lost in the master document. The picture loses its anchor reference and simply disappears.
The solutionTo avoid this problem but keep pictures positioned precisely on a particular page, anchor the pictures as follows:
1) Right-click on the picture and choose Picture from the context menu.
2) On the Type tab of the Picture dialog (Figure 23), set the anchor to To character or To paragraph.
3) Under Position, choose suitable horizontal and vertical references to the page. Click OK to save the changes.
20 Working with Master Documents

Figure 23: Anchoring a graphic and setting its position on a page
Problem solving: Anchoring pictures to a page 21