working with navigation250.alsridi.net/images/docs/working_with_navigation.pdf234 lesson 9 working...
TRANSCRIPT

232
WORKING WITH NAVIGATION
Lesson Overview
In this lesson, you’ll apply several kinds of links to page elements by
doing the following:
Creating a text link to a page within the same site
Creating a link to a page on another website
Creating an email link
Creating an image-based link
Creating a Spry navigation menu
This lesson will take about 2 hours to complete. Before beginning, make
sure you have copied the files for Lesson 9 to your hard drive as described
in the “Getting Started” section at the beginning of the book. If you are
starting from scratch in this lesson, use the method described in the
“Jumpstart” section of “Getting Started.”
9

233
Dreamweaver can create and edit many types of links—from text-based links to image-based links—and does so with ease and flexibility.

234 LESSON 9 Working with Navigation
Hyperlink basics
The World Wide Web, and the Internet in general, would be a far different place
without the hyperlink. Without hyperlinks, HTML would simply be “ML” for
markup language. The hypertext in the name refers to the functionality of the
hyperlink. So what is a hyperlink?
A hyperlink, or link, is an HTML-based reference to a resource that is available on
the Internet or within your own computer. The resource can be anything that can
be stored on and displayed by a computer, such as a webpage, image, movie, sound
file, and so on. A hyperlink creates an interactive behavior specified by HTML and
CSS, or the programming language you’re using, and is enabled by a browser or
other application.
<a href="http://www.sitename.com/pagename.html" target="_blank">Link text</a>
HTML element
Attribute (hypertext reference) Attribute Link Text (visible to visitor)
Uniform Resource Locator (URL) Value (new browser window) Closing TagHTML element Uniform resource locator (URL) Value (new browser window) Closing tag
Attribute (hypertext reference) Attribute Link text (visible to visitor)
Internal and external hyperlinks
The simplest hyperlink is one that takes the user to another part of the same docu-
ment or to another document stored in the same folder or hard drive. This type is
called an internal hyperlink. An external hyperlink is designed to take the user to a
document or resource outside your hard drive, website, or web host.
Internal and external hyperlinks may work differently, but they both have one thing
in common: Both are enabled in HTML by the <a> anchor element. This element
designates the address of the destination, or target, of the hyperlink and can then
specify how it functions using several attributes. You will learn how to create and
modify the <a> element in the exercises that follow.
Relative vs. absolute hyperlinks
The hyperlink address can be written in two different ways. When you refer to
a target by where it is stored in relation to the current document, it is called a
relative link. This is like telling someone that you live next door to the blue house.
If someone were driving down your street and saw the blue house, they would
know where you live. But it really doesn’t tell them how to get to your house
or even to your neighborhood. A relative link frequently will consist of the
resource name and perhaps the folder it is stored within, such as logo.jpg or
images/logo.jpg.
An HTML hyperlink consists of the anchor <a> element and one or more attributes.
ADOBE DREAMWEAVER CS6 CLASSROOM IN A BOOK 235
Sometimes, you need to spell out precisely where a resource is located. In those
instances, you need an absolute hyperlink. This is like telling someone you live at
123 Main Street in Meridien. This is typically how you you refer to resources out-
side your website. An absolute link includes the entire URL of the target and may
even include a filename—such as http://forums.adobe.com/index.jspa—or just a
folder within the site.
There are advantages and disadvantages to both types of links. Relative hyperlinks
are faster and easier to write, but they may not work if the document containing
them is saved in a different folder or location in the website. Absolute links always
work no matter where the containing document is saved, but they can fail if the
targets are moved or renamed. A simple rule that most web designers follow is to
use relative links for resources within a site and absolute links for resources outside
the site. Then, it’s important that you test all links before deploying the page or site.
Previewing the completed file
To see the final version of the file you will work on in this lesson, let’s preview the
completed page in the browser.
1 Launch Adobe Dreamweaver CS6.
2 If necessary, press F8/Cmd-Shift-F to open the Files panel, and select DW-CS6
from the site list.
3 In the Files panel, expand the lesson09 folder.
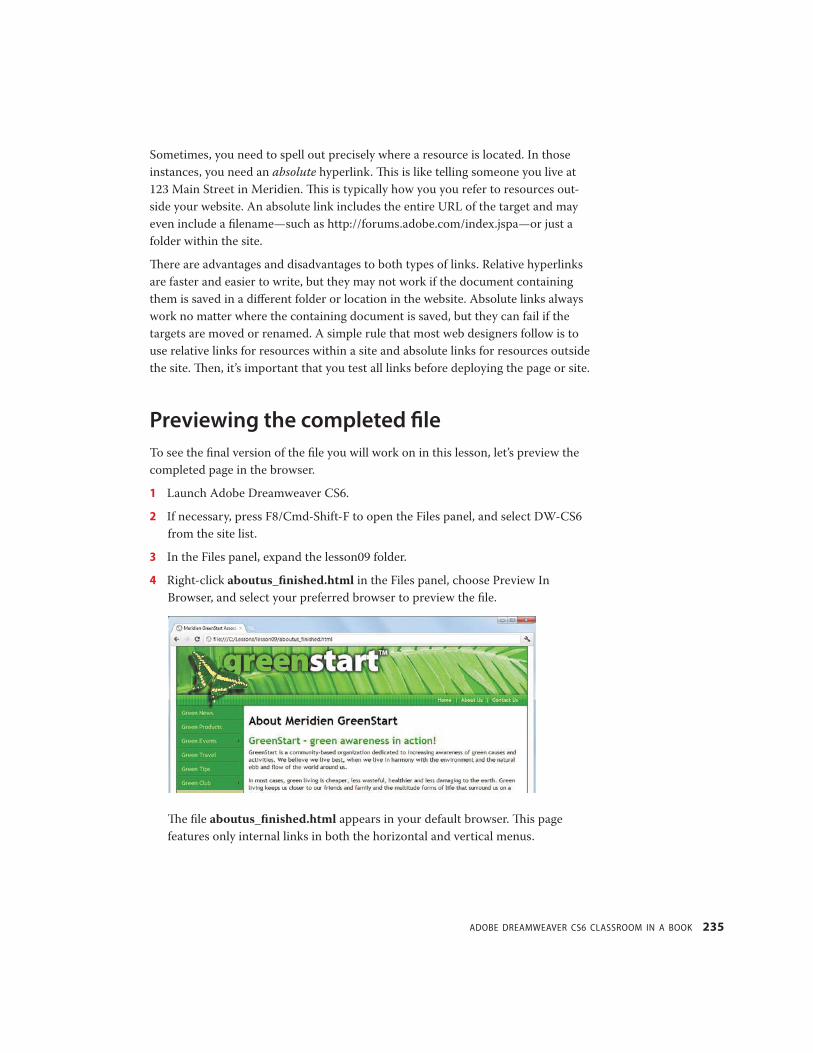
4 Right-click aboutus_finished.html in the Files panel, choose Preview In
Browser, and select your preferred browser to preview the file.
The file aboutus_finished.html appears in your default browser. This page
features only internal links in both the horizontal and vertical menus.
236 LESSON 9 Working with Navigation
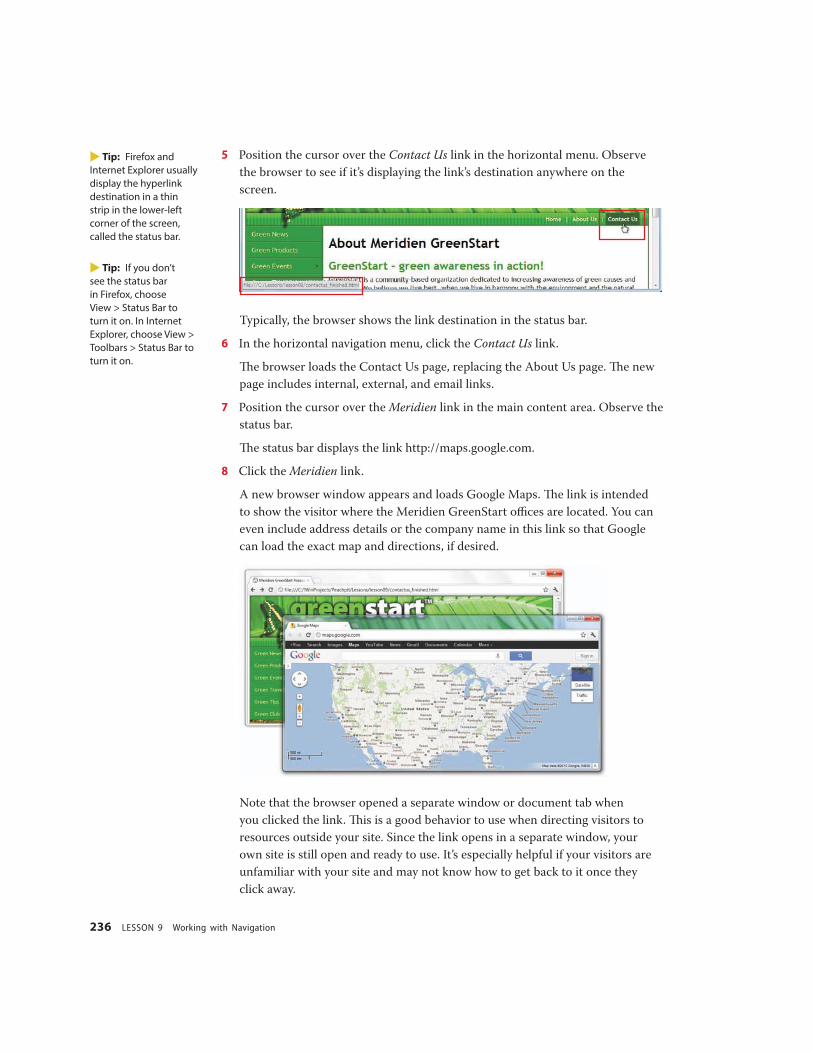
5 Position the cursor over the Contact Us link in the horizontal menu. Observe
the browser to see if it’s displaying the link’s destination anywhere on the
screen.
Typically, the browser shows the link destination in the status bar.
6 In the horizontal navigation menu, click the Contact Us link.
The browser loads the Contact Us page, replacing the About Us page. The new
page includes internal, external, and email links.
7 Position the cursor over the Meridien link in the main content area. Observe the
status bar.
The status bar displays the link http://maps.google.com.
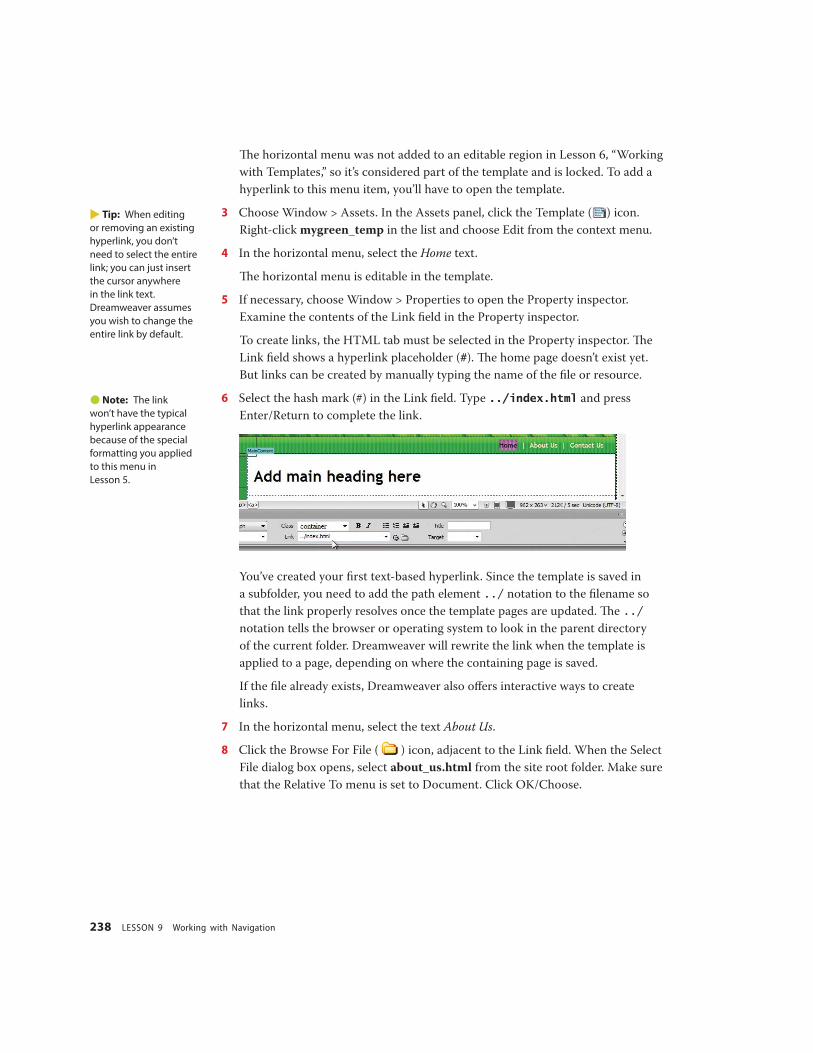
8 Click the Meridien link.
A new browser window appears and loads Google Maps. The link is intended
to show the visitor where the Meridien GreenStart offices are located. You can
even include address details or the company name in this link so that Google
can load the exact map and directions, if desired.
Note that the browser opened a separate window or document tab when
you clicked the link. This is a good behavior to use when directing visitors to
resources outside your site. Since the link opens in a separate window, your
own site is still open and ready to use. It’s especially helpful if your visitors are
unfamiliar with your site and may not know how to get back to it once they
click away.
� Tip: Firefox and Internet Explorer usually display the hyperlink destination in a thin strip in the lower-left corner of the screen, called the status bar.
� Tip: If you don’t see the status bar in Firefox, choose View > Status Bar to turn it on. In Internet Explorer, choose View > Toolbars > Status Bar to turn it on.

ADOBE DREAMWEAVER CS6 CLASSROOM IN A BOOK 237
9 Close the Google Maps window.
The GreenStart Contact Us page is still open. Note that each employee has an
email link.
10 Click an email link for one of the employees.
The default mail application will launch on your computer. If you have not
set up this application to send and receive mail, the program will usually start
a wizard to help you set up this functionality. If the email program is set up,
a new message window will appear with the email address of the employee
automatically entered in the To field.
11 Close the new message window and exit the email program.
12 Switch back to the browser. Position the cursor over the vertical menu. Hover
over each of the buttons and examine the behavior of the menu.
The menu looks similar to the one you created in Lesson 4, “Creating a Page
Layout,” and Lesson 5, “Working with Cascading Style Sheets,” but there’s a new
behavior that didn’t exist before: Some of the buttons have submenus.
13 Hover on the Green Events link, and then click the submenu link Class Schedule.
The browser loads the Green Events page and automatically jumps down to
the table containing the class schedule. As you can see, hyperlinks not only can
target a specific page, they can target a specific item on the page to help visitors
move quickly up and down long pages.
14 Click the Return to Top link that appears above the class schedule.
The browser jumps back to the top of the page.
15 Close the browser and switch to Dreamweaver.
Creating internal hyperlinks
Dreamweaver makes it easy to create hyperlinks of all types. In this exercise, you’ll
create text-based links to pages in the same site using a variety of methods.
1 In the Files panel, double-click the about_us.html file in the site root folder to
open it. Or, if you are starting from scratch in this lesson, follow the “Jumpstart”
instructions in the “Getting Started” section at the beginning of the book.
2 In the horizontal menu, position the cursor over the text Home in the horizontal
menu.
� Note: Many web visitors don’t use email programs installed on their computers. They use web-based services like AOL, Gmail, Hotmail, and so on. For these types of visitors, email links like the one you tested won’t work. To learn how to receive information from visitors without relying on client-based email, see Lesson 12, “Working with Forms.”
� Note: If you’re using the method described in the “Jumpstart” section of “Getting Started,” preexisting files may display the lesson number, such as mygreen_temp_09.dwt.
238 LESSON 9 Working with Navigation
The horizontal menu was not added to an editable region in Lesson 6, “Working
with Templates,” so it’s considered part of the template and is locked. To add a
hyperlink to this menu item, you’ll have to open the template.
3 Choose Window > Assets. In the Assets panel, click the Template ( ) icon.
Right-click mygreen_temp in the list and choose Edit from the context menu.
4 In the horizontal menu, select the Home text.
The horizontal menu is editable in the template.
5 If necessary, choose Window > Properties to open the Property inspector.
Examine the contents of the Link field in the Property inspector.
To create links, the HTML tab must be selected in the Property inspector. The
Link field shows a hyperlink placeholder (#). The home page doesn’t exist yet.
But links can be created by manually typing the name of the file or resource.
6 Select the hash mark (#) in the Link field. Type ../index.html and press
Enter/Return to complete the link.
You’ve created your first text-based hyperlink. Since the template is saved in
a subfolder, you need to add the path element ../ notation to the filename so
that the link properly resolves once the template pages are updated. The ../
notation tells the browser or operating system to look in the parent directory
of the current folder. Dreamweaver will rewrite the link when the template is
applied to a page, depending on where the containing page is saved.
If the file already exists, Dreamweaver also offers interactive ways to create
links.
7 In the horizontal menu, select the text About Us.
8 Click the Browse For File ( ) icon, adjacent to the Link field. When the Select
File dialog box opens, select about_us.html from the site root folder. Make sure
that the Relative To menu is set to Document. Click OK/Choose.
� Tip: When editing or removing an existing hyperlink, you don’t need to select the entire link; you can just insert the cursor anywhere in the link text. Dreamweaver assumes you wish to change the entire link by default.
� Note: The link won’t have the typical hyperlink appearance because of the special formatting you applied to this menu in Lesson 5.

ADOBE DREAMWEAVER CS6 CLASSROOM IN A BOOK 239
The hyperlink placeholder is replaced by the text ../about_us.html. Now let’s
try a more visual approach.
9 In the horizontal menu, select the Contact Us text.
10 Click the Files tab to bring the panel to the top, or choose Window > Files.
11 In the Property inspector, drag the Point To File ( ) icon—next to the Link
field—to contact_us.html in the site root folder displayed in the Files panel.
Dreamweaver enters the filename and any necessary path information into the
Link field. To apply the links to all the pages formatted by this template, just
save the page.
12 Choose File > Save.
The Update Template Files dialog box appears. You can choose to update pages
now or wait until later. You can even update the template files manually, if
desired.
13 Click Update.
� Note: You can select any range of text to create a link, from one character to an entire paragraph or more; Dreamweaver will add the necessary markup to the selection.
� Tip: If a folder in the Files panel contains a page you want to link to but the folder is not open, drag the Point To File icon over the folder and hold it in place to expand that folder so that you can point to the desired file.

240 LESSON 9 Working with Navigation
Dreamweaver updates all pages created from the template. The Update Pages
dialog box appears and displays a report listing the pages that were updated.
14 Close the Update Pages dialog box. Close mygreen_temp.dwt.
Note the asterisk in the document tab for about_us.html. This indicates that
the page has changed but has not been saved.
15 Save about_us.html and preview it in the default browser. Position the cursor
over the text About Us and Contact Us.
When the template was saved, it updated the locked regions of the page, adding
the hyperlinks.
16 Click the Contact Us link.
The Contact Us page loads to replace the About Us page in the browser.
17 Click the About Us link.
The About Us page loads to replace the Contact Us page. The links were added
even to pages that weren’t open at the time.
18 Close the browser and switch to Dreamweaver.
You learned three methods for creating hyperlinks with the Property inspector:
typing the link manually, using the Browse For File function, and using the Point To
File tool.
Creating an image-based link
Links can also be applied to images. Image-based links work like any other hyper-
link and can direct users to internal or external resources. In this exercise, you will
create and format an image-based link that will direct users to the organization’s
About Us page.
1 Open the Assets panel and click the Template ( ) icon. Double-click
mygreen_temp to open it.
2 Select the butterfly image at the top of the page. In the Property inspector, click
the Browse For File icon next to the Link field.
3 Select about_us.html in the site root folder. Click OK/Choose.
The text about_us.html appears in the Link field.
4 In the Alt field of the Property inspector, replace the existing text with Click to
learn about Meridien GreenStart and press Enter/Return.
� Tip: If you don’t see the update report, select the Show Log option.

ADOBE DREAMWEAVER CS6 CLASSROOM IN A BOOK 241
The Alt text will appear whenever the picture doesn’t load or if the user is using
an assistive device to access the webpage.
5 Save the template. Update all child pages.
The Update Pages dialog box appears, reporting how many pages were updated.
6 Close the Update Pages dialog box. Open contact_us.html, if necessary, and
preview it in the default browser. Position the cursor over the butterfly image.
Test the image link.
Clicking the image loads about_us.html in the browser.
7 Switch back to Dreamweaver. Close the template file.
Creating an external link
The pages you linked to in the previous exercise were stored within the current site.
You can also link to any page—or other resource—stored on the web if you know
the full web address, or URL. In this exercise, you’ll apply an external link to exist-
ing text.
1 Click the document tab for contact_us.html to bring it to the top, or open it
from the site root folder.
2 In the second paragraph <p> element in the MainContent region, select the
word Meridien.
You’ll link this text to the Google Maps site. If you don’t know the URL of a
particular site, there’s a simple trick to obtain it.
3 Launch your favorite browser. In the URL field, type google.com and press
Enter/Return. Or, in the search field, type Google Maps and press Enter/
Return. Locate the link for Google Maps in the search report and click it.
Google Maps will appear in the browser window.
� Note: Normally an image formatted with a hyperlink would display a blue border, similar to the blue underscore that text links get. But the predefined CSS that came with the layout includes an a img rule, which sets this default border to None.
� Tip: For this trick, you can use any search engine.
� Note: In some browsers you can type the search phrase directly in the URL field.

242 LESSON 9 Working with Navigation
4 Select the entire URL that appears at the top of the document window. Press
Ctrl-C/Cmd-C to copy this link.
5 Switch to Dreamweaver. In the Property inspector, insert the cursor in the Link
field, press Ctrl-V/Cmd-V to paste the link, and press Enter/Return.
The text displays the standard formatting for a hyperlink.
6 Save the file and preview it in the default browser. Test the link.
When you click the link, the browser takes you to the opening page of Google
Maps, assuming you have a connection to the Internet. But there was a
problem: Clicking the link replaced the Contact Us page in the browser; it didn’t
open a new window as in the earlier example. To make the browser open a new
window, you need to add a simple HTML attribute to the link.
7 Switch to Dreamweaver. Insert the cursor in the Meridien link text, if necessary.
8 Choose _blank from the Target field menu.
9 Save the file and preview the page in the default browser. Test the link.
This time a new, separate window opens for Google Maps.

ADOBE DREAMWEAVER CS6 CLASSROOM IN A BOOK 243
10 Close the browser windows and switch back to Dreamweaver.
As you can see, Dreamweaver makes it easy to create links to internal or external
resources.
Setting up email links
Another type of link is the email link, but instead of taking the visitor to another
page it opens the visitor’s email program instead. It can create an automatic, pre-
addressed email message from your visitors for customer feedback, product orders,
or other important communications. The code for an email link is slightly different
from the normal hyperlink and—as you probably guessed already—Dreamweaver
can create the proper code for you automatically.
1 If necessary, open contact_us.html.
2 Select Elaine’s email address ([email protected]) and press Ctrl-C/Cmd-C
to copy the text.
3 Choose Insert > Email link.
The Email Link dialog box appears. The selected text is automatically entered
into the Text field.
4 Insert the cursor in the Email field and press Ctrl-V/Cmd-V to paste the email
address.
5 Click OK. Examine the Link field in the Property inspector.
Dreamweaver inserted the email address into the Link field and did one more
thing. As you can see, it also entered the notation mailto: in front of the
address. This text changes the link to an email link that will automatically
launch the visitor’s default email program.
� Tip: If the text is selected before you access the dialog box, Dreamweaver will enter the text in the field for you automatically.

244 LESSON 9 Working with Navigation
6 Save the file and preview it in the default browser. Test the email link.
The default email program launches and creates an email message. If there is
no default email program, your computer’s operating system will launch an
available email program or ask you to identify one.
7 Close any open email program, related dialog boxes, or wizards. Switch to
Dreamweaver.
Client-based vs. server-side functions
The email link you just created relies on software installed on the visitor’s computer, such as Outlook or Apple Mail. Such applications are referred to as client-based, or client-side, functionality. The email link won’t work, however, if a user sends his or her mail via an Internet application—such as Hotmail or Gmail—and doesn’t have a desktop email application installed and set up to send and receive email.
Another detraction is that open email links like this can be picked up easily by spambots that roam the Internet. If you want to ensure that you’ll get feedback from every user who wants to send it, you should instead rely on functionality supplied by your server. Web-based applications for capturing and passing data are referred to as server-side functionality. Using server-side scripts and proprietary languages—such as ASP, ColdFusion, and PHP—it’s relatively easy to capture data and return it by email or even insert it directly into a hosted database. You’ll learn some of these techniques in Lesson 12, “Working with Forms,” and Lesson 14, “Building Dynamic Pages with Data.”
Targeting page elements
As you add more content on a page, it gets longer and more difficult to navigate.
Typically, when you click a link to a page, the browser window displays the page
starting at the very top. Whenever possible, it’s a good idea to provide convenient
methods for users to link to a specific point on a page.
In HTML 4.01, there are two methods for targeting specific content or page struc-
tures: One uses a named anchor and the other an ID attribute. However, the named
anchor has been deprecated in HTML5 in favor of IDs. That doesn’t mean named
anchors will suddenly cease to function the day HTML5 is adopted, but you should
start practicing now. In this exercise, you’ll work only with ID attributes.
1 Open events.html.
2 Scroll down to the table that contains the class schedule.
When users move down this far on the page, the navigation menus are out of
sight and unusable. The farther they read down the page, the farther they are
from the primary navigation. Before users can navigate to another page, they

ADOBE DREAMWEAVER CS6 CLASSROOM IN A BOOK 245
have to use the browser scroll bars or the mouse scroll wheel to get back to the
top of the page. Adding a link to take users back to the top can vastly improve
their experience on your site. Let’s call this type of link an internal targeted link.
Internal targeted links have two parts: the link itself and the target element. It
doesn’t matter which one you create first.
3 Insert the cursor in the Class table. Select the <table> tag selector. Press the
Left Arrow key to move the cursor before the opening <table> tag.
4 Type Return to Top and select the text. In the Property inspector, choose
Paragraph from the Format menu.
The text is inserted between the two tables and is formatted as a <p> element.
Let’s center the text.
5 In the CSS panel, click the New CSS Rule icon.
6 Choose Class from the Selector Type menu. In the Selector Name field, type ctr.
Click OK.
7 In the Block category, choose Center from the Text-align field menu. Click OK.
8 Select the tag selector for the paragraph element Return to Top. In the Property
inspector Class menu, choose ctr.
The text Return to Top is aligned to the center. The tag selector now says
<p.ctr>.

246 LESSON 9 Working with Navigation
9 In the Link field, type #top and press Enter/Return. Save all files.
By using #top, you have created a link to a target within the current page.
When users click the Return to Top link, the browser window will jump to
the position of the target. This target doesn’t exist yet. For this link to work
properly, you need to insert the destination as high on the page as possible.
10 Scroll to the top of events.html. Position the cursor over the header element.
The mouse icon indicates that this part of the page (and its related code) is uned-
itable because the header and horizontal navigation menu are based on the site
template. It’s important to put the target at the very top, or a portion of the page
may be obscured when the browser jumps to it. Since the top of the page is part of
an uneditable region, the best solution is to add the target directly to the template.
Creating a link destination using an ID
By adding a unique ID to the template, you will be able to access it automatically
throughout the site wherever you want to add a link back to the top of a page.
1 Open the Assets panel. Click the Template category ( ) icon. Double-click
mygreen_temp to open it.
2 Click the tag selector for <header>. In the Property inspector, type top in the
ID field, and press Enter/Return to complete the ID.
The tag selector changes to <header#top>; otherwise, there’s no visible
difference in the page. The big difference is in how the page reacts to the
internal hyperlink.
� Tip: In some browsers you need only to type the hash mark (#) to enable this function. The browser will jump to the top of the page whenever an unnamed anchor is referenced. Unfortunately, other browsers will ignore them altogether, so it’s important to use a target element as well.

ADOBE DREAMWEAVER CS6 CLASSROOM IN A BOOK 247
3 Save the file and update all template pages. Close the template.
4 Switch to or open events.html, if necessary. Save the file and preview it in the
default browser.
5 Scroll down to the Class table. Click the Return to Top link.
The browser jumps back to the top of the page.
Now that the ID has been inserted in every page of the site by the template,
you can copy the Return to Top link and paste it wherever you want to add this
functionality.
6 Switch to Dreamweaver. Insert the cursor in the Return to Top link. Select the
<p.ctr> tag selector. Press Ctrl-C/Cmd-C.
7 Scroll down to the bottom of events.html. Insert the cursor in the Class table,
and select the <table> tag selector. Press the Right Arrow key to move the
cursor after the closing </table> tag. Press Ctrl-V/Cmd-V.
The <p.ctr> element and link appear at the bottom of the page.
8 Save the file and preview it in the browser. Test both Return to Top links.
Both links can be used to jump back to the top of the document. In the next
exercise, you’ll learn how to use element attributes as link targets.
Adding an ID to an HTML table
Named anchors can be used anywhere you want to create a link. But you don’t
need to add the extra code if there’s a handy element nearby that you can add an ID
attribute to.
1 If necessary, open events.html. Insert the cursor anywhere in the Events table
and select the <table> tag selector.
The Property inspector displays the attributes of the Events table.
2 Open the ID field menu in the Property inspector.
Dreamweaver will display any ID defined by the CSS but currently unused
within the page. There are no IDs displayed in the menu that can be applied to
the table, but it’s easy to create a new one.
� Note: An ID can be applied to any HTML element. They don’t have to be referenced in the style sheet at all.

248 LESSON 9 Working with Navigation
3 Insert the cursor in the ID field. Type calendar and press Enter/Return.
The tag selector now displays <table#calendar>. Since IDs are unique
identifiers, they can be used for targeting specific content on a page. Don’t
forget to create an ID for the Class table too.
4 Select the Class table, as in step 1. Insert the cursor in the ID field. Type classes
and press Enter/Return.
The tag selector now displays <table#classes>. You’ll learn how to link to
these IDs in the next exercise.
5 Save the file.
Inserting Spry menu bars
The existing vertical menu is currently targeting pages within the site. It’s a good
start, but it could be better. In the example at the beginning of this lesson, the
menu in the finished page enabled you to navigate directly to specific content in the
site. These links were displayed as a submenu in the vertical menu.
Although your current menu doesn’t have this functionality, you could add it to the
existing code yourself if you were handy with JavaScript and CSS. But why go to all
that bother when Dreamweaver offers everything you need in a prebuilt widget? A
widget performs a specific set of functions in a browser, enabled by programming
that combines HTML code, CSS, and JavaScript—otherwise known as Ajax and
Adobe’s Spry framework.
To create the menu and behavior you experienced earlier, you will have to replace
the existing vertical menu with one of Dreamweaver’s Spry widgets. Spry menu
bars are an easy and powerful way to insert advanced functionality in your site
without having to perform all the coding by hand. Since the vertical menu is stored
in an uneditable region, you need to open the site template to replace it.
1 In the Assets panel, double-click mygreen_temp in the Templates category
to open the file. If you are using the Jumpstart method, the filename for the
template will include the lesson number, such as mygreen_temp_09.
� Note: When creating IDs, remember that they have to be unique names. IDs are case sensitive, so look out for typos.

ADOBE DREAMWEAVER CS6 CLASSROOM IN A BOOK 249
Learning about Ajax and Spry
The early Internet was dominated by sites and applications that simply re-created existing products and services online. Web 2.0 ushered in a new era in Internet usability and interactivity. The concept behind Web 2.0 was to break down the exist-ing barriers between customer and service or product, to make the online experi-ence seamless.
The prime technology driving Web 2.0 is known as Ajax, which stands for Asynchronous JavaScript and XML. If you’ve ever scrolled through a Google Map or browsed a photo collection on Flickr, you’ve experienced what Ajax can do.
The key term in the Ajax acronym is asynchronous, which means “not at the same time.” Normally, viewing pages on the web is a very linear process: You load a page and the browser displays it and everything remains unchanged until you reload the page or load a new page. In other words, if you don’t reload the entire page, you can’t change any of the information on the page.
Ajax throws out those old rules. Using JavaScript and XML data, Ajax-driven pages can actually update data on the fly without reloading the whole page. This makes the user experience much smoother and more interactive. Data can change at any time, either when it’s updated on the server or when prompted by the user.
Most implementations of Ajax require an advanced knowledge of JavaScript and a great deal of hand coding. To ease the learning curve, Adobe has developed the Spry framework, which integrates Ajax seamlessly with Dreamweaver CS6. There are four sets of Spry tools:
Spry data—Incorporates HTML or XML data into any webpage and allows for the interactive display of data. You will work with a Spry data set in Lesson 13, “Working with Online Data.”
Spry effects—Extend the Dreamweaver behavior library with advanced functionality to interactively affect page elements. Spry effects include the ability to fade, reveal, slide, highlight, and shake targeted page components.
Spry form widgets—Combine form elements, such as text fields and lists, with JavaScript validation functions and user-friendly error messages. You will work with Spry form widgets in Lesson 12, “Working with Forms.”
Spry layout widgets—Provide a series of sophisticated layout controls, including tabbed and accordion panels. In Lesson 10, “Adding Interactivity,” you will work with Spry Accordion widgets.
Visit Adobe Labs at http://labs.adobe.com/technologies/spry if you’d like to peek under the hood and learn more about Spry and how it works.

250 LESSON 9 Working with Navigation
2 Insert the cursor in the vertical menu, and click the <nav> tag selector. Press
Delete.
3 Select Insert > Spry > Spry Menu Bar.
4 In the Spry Menu Bar dialog box, select Vertical, and click OK.
A new vertical menu appears in the sidebar. Note the blue bar that appears
directly above the menu displaying the name Spry Menu Bar: MenuBar1. The
menu features four items and a default set of CSS formatting. You will adjust the
width and appearance of the menu in the next exercise. Dreamweaver provides
special formatting capabilities geared toward Spry widgets.
5 Click the blue bar above the Spry menu.
The Property inspector displays a special interface you can use to add, delete,
and modify links within the menu.
Browse for file
Main menu items
Submenu items
Sub-submenu items
Link textMenu ID
Remove item
Add item
Move item up
Move item down
6 Before customizing the menu bar, choose File > Save. If Dreamweaver asks you
about copying dependent files, click OK.

ADOBE DREAMWEAVER CS6 CLASSROOM IN A BOOK 251
Dreamweaver inserts into your site root folder a folder called SpryAssets,
which will contain necessary components for any Spry widget. Custom CSS and
JavaScript files needed for the menu bar will also be added to this folder. When
files are added to the folder, Dreamweaver will automatically link the template
to them.
The Spry menu bar can be modified directly within the Property inspector.
7 In the first column of the Property inspector, click Item 1 to select it. In the Text
field, select the Item 1 text. Type Green News to replace it, and press Enter/
Return to complete the change.
The text Green News appears in the first menu item on the screen and in the
Property inspector. The Property inspector also provides the means to add the
hyperlink to the item.
8 In the Property inspector, click the Browse ( ) icon.
9 Select news.html in the site root folder. Click OK/Choose.
The text ../news.html is entered in the field. Dreamweaver inserted the notation
../ into the link because the file you are working in at the moment is stored in
a sub-folder of the site root folder. Remember to add this notation to any links
you create manually.
252 LESSON 9 Working with Navigation
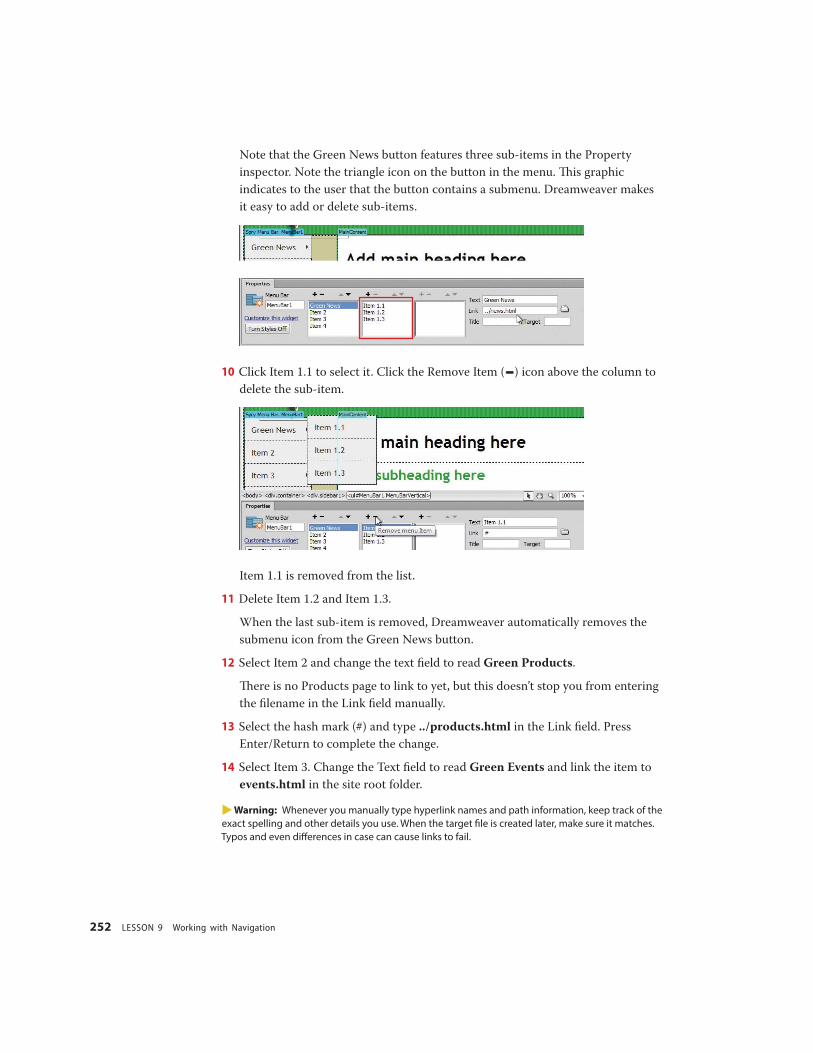
Note that the Green News button features three sub-items in the Property
inspector. Note the triangle icon on the button in the menu. This graphic
indicates to the user that the button contains a submenu. Dreamweaver makes
it easy to add or delete sub-items.
10 Click Item 1.1 to select it. Click the Remove Item ( ) icon above the column to
delete the sub-item.
Item 1.1 is removed from the list.
11 Delete Item 1.2 and Item 1.3.
When the last sub-item is removed, Dreamweaver automatically removes the
submenu icon from the Green News button.
12 Select Item 2 and change the text field to read Green Products.
There is no Products page to link to yet, but this doesn’t stop you from entering
the filename in the Link field manually.
13 Select the hash mark (#) and type ../products.html in the Link field. Press
Enter/Return to complete the change.
14 Select Item 3. Change the Text field to read Green Events and link the item to
events.html in the site root folder.
� Warning: Whenever you manually type hyperlink names and path information, keep track of the exact spelling and other details you use. When the target file is created later, make sure it matches. Typos and even differences in case can cause links to fail.
ADOBE DREAMWEAVER CS6 CLASSROOM IN A BOOK 253
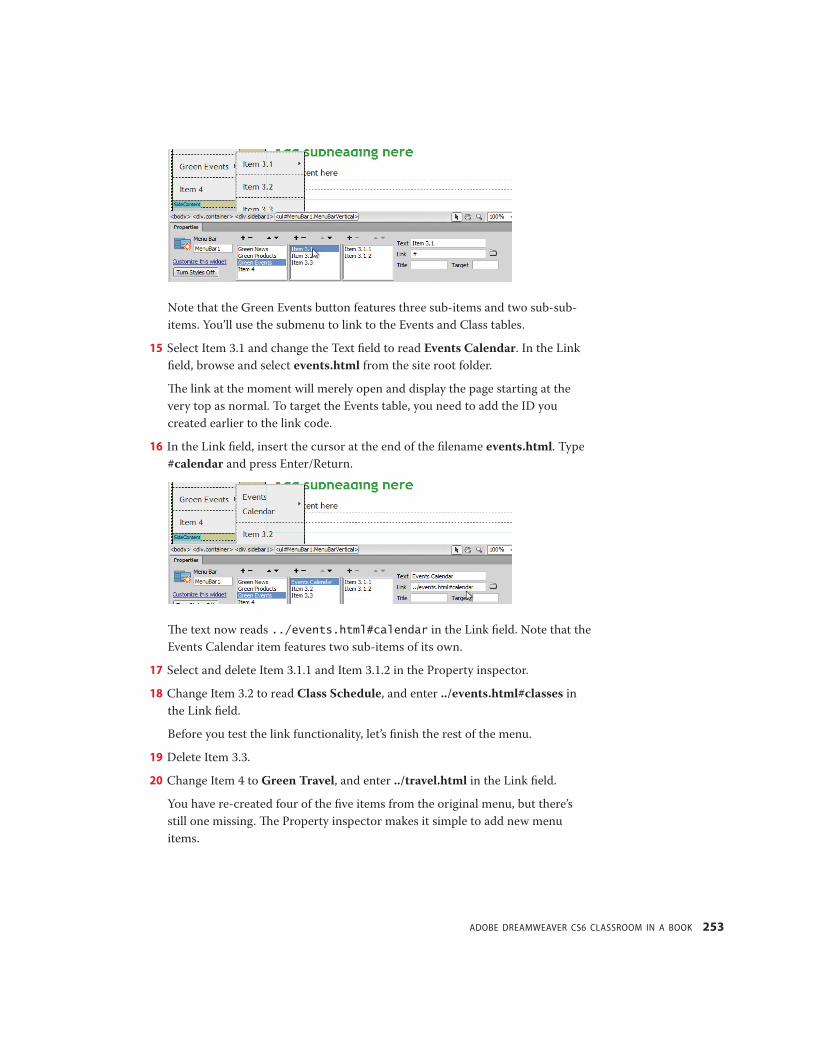
Note that the Green Events button features three sub-items and two sub-sub-
items. You’ll use the submenu to link to the Events and Class tables.
15 Select Item 3.1 and change the Text field to read Events Calendar. In the Link
field, browse and select events.html from the site root folder.
The link at the moment will merely open and display the page starting at the
very top as normal. To target the Events table, you need to add the ID you
created earlier to the link code.
16 In the Link field, insert the cursor at the end of the filename events.html. Type
#calendar and press Enter/Return.
The text now reads ../events.html#calendar in the Link field. Note that the
Events Calendar item features two sub-items of its own.
17 Select and delete Item 3.1.1 and Item 3.1.2 in the Property inspector.
18 Change Item 3.2 to read Class Schedule, and enter ../events.html#classes in
the Link field.
Before you test the link functionality, let’s finish the rest of the menu.
19 Delete Item 3.3.
20 Change Item 4 to Green Travel, and enter ../travel.html in the Link field.
You have re-created four of the five items from the original menu, but there’s
still one missing. The Property inspector makes it simple to add new menu
items.

254 LESSON 9 Working with Navigation
21 Click the Add Item ( ) icon above the first column to add a new item.
A new Untitled Item appears at the bottom of the list.
22 Replace the text Untitled Item with Green Tips and link the item to tips.html
in the site root folder.
23 Save the file. Update all child files.
24 Save all files. Open and preview events.html in the browser. Check out the
menu behavior and test the sub-item links to Events Calendar and Class
Schedule.
The menu behavior is similar to that of the menu you tested at the beginning of
this lesson. When you hover over the Green Events item, a submenu pops open
showing you links to the events calendar and class schedule. When the link is
clicked, the browser jumps down to each table automatically.
25 Switch back to Dreamweaver.
The completed Spry menu appears in the sidebar. In the next exercise, you’ll learn
how to modify this menu by hand.
Modifying Spry menus directly
Although it may look like magic, Spry components are built with everyday HTML
and CSS, with a little JavaScript to spice it up a bit. Most widgets can be modified
directly in Code or Design view, if desired. Don’t be afraid to dive into the code and
create or edit the menu by hand.
1 Switch to or open the site template, if necessary. Insert the cursor into the Spry
menu. Click the tag selector <ul#MenuBar1.MenuBarVertical> to display the
Spry menu interface in the Property inspector.
� Note: Notice that the sub-item isn’t wide enough to display the link text on one line. You will adjust the width of the sub-item in an upcoming exercise.
ADOBE DREAMWEAVER CS6 CLASSROOM IN A BOOK 255
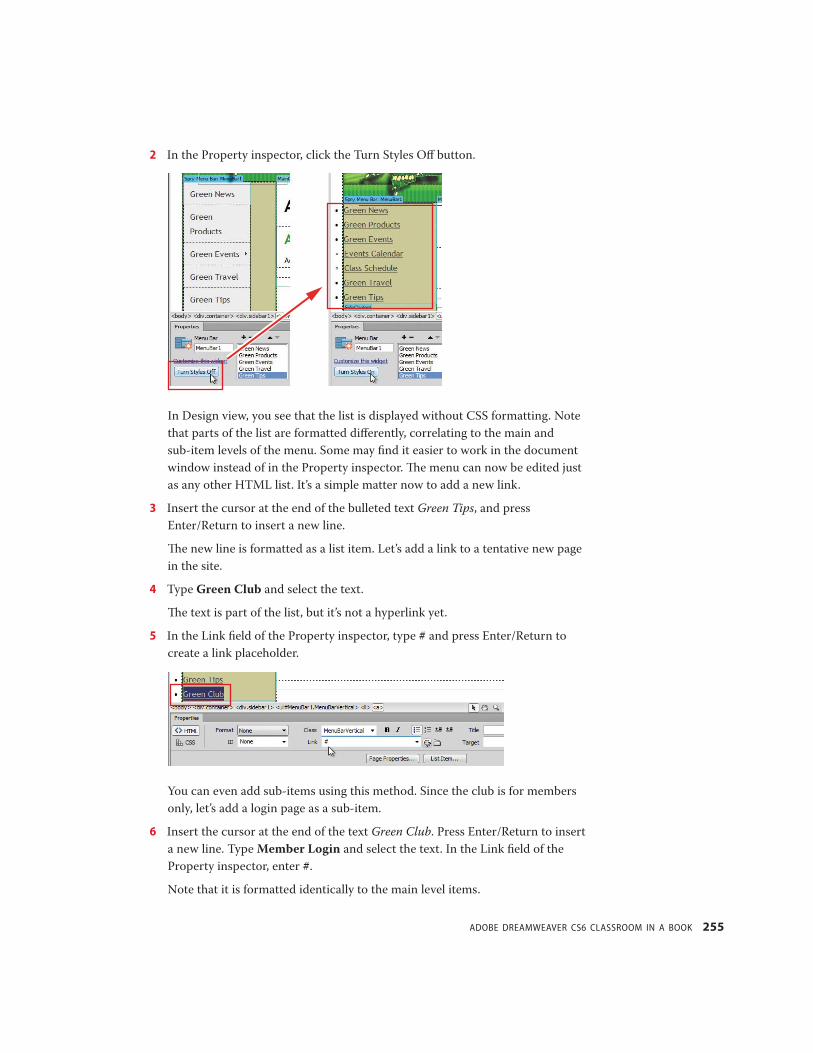
2 In the Property inspector, click the Turn Styles Off button.
In Design view, you see that the list is displayed without CSS formatting. Note
that parts of the list are formatted differently, correlating to the main and
sub-item levels of the menu. Some may find it easier to work in the document
window instead of in the Property inspector. The menu can now be edited just
as any other HTML list. It’s a simple matter now to add a new link.
3 Insert the cursor at the end of the bulleted text Green Tips, and press
Enter/Return to insert a new line.
The new line is formatted as a list item. Let’s add a link to a tentative new page
in the site.
4 Type Green Club and select the text.
The text is part of the list, but it’s not a hyperlink yet.
5 In the Link field of the Property inspector, type # and press Enter/Return to
create a link placeholder.
You can even add sub-items using this method. Since the club is for members
only, let’s add a login page as a sub-item.
6 Insert the cursor at the end of the text Green Club. Press Enter/Return to insert
a new line. Type Member Login and select the text. In the Link field of the
Property inspector, enter #.
Note that it is formatted identically to the main level items.

256 LESSON 9 Working with Navigation
7 In the Property inspector, click the Blockquote button to indent the text.
Although it’s hard to see in this view, the Member Login item has actually been
indented. But the difference between the list items is very subtle and takes the
form of a different type of bullet character. If you study the tag selectors and
examine the bullets carefully, you’ll see that Member Login is formatted in the
same way as the sub-items Events Calendar and Class Schedule.
8 Click the tag selector <ul#MenuBar1.MenuBarVertical> to display the Spry
menu interface in the Property inspector. Click the Turn Styles On button to
return to the styled appearance.
When you turn the formatting back on, you may notice that the Green Club
item doesn’t show the submenu icon, as Green Events does.
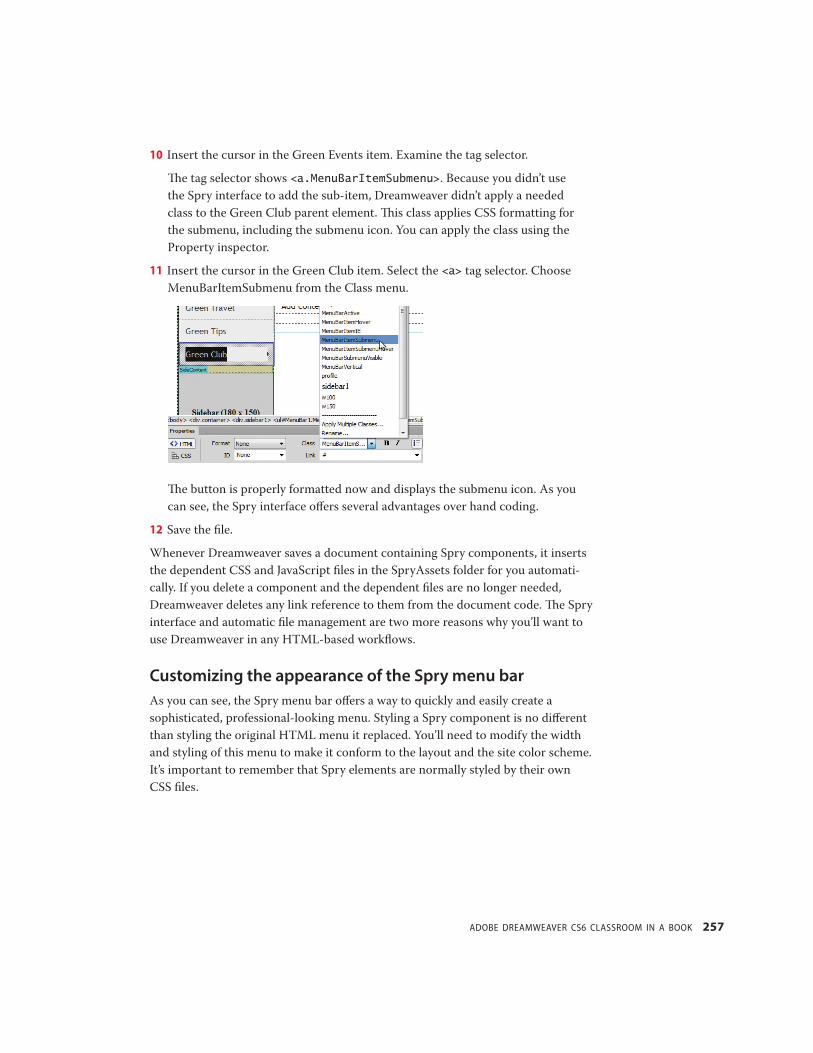
9 Insert the cursor in the Green Club item. Examine the tag selector.
The tag selector shows <a> for a normal hyperlink element.
� Tip: If you don’t see the Turn Styles On button, insert the cursor anywhere in the Spry-based menu and click the blue bar above it to select it again.
ADOBE DREAMWEAVER CS6 CLASSROOM IN A BOOK 257
10 Insert the cursor in the Green Events item. Examine the tag selector.
The tag selector shows <a.MenuBarItemSubmenu>. Because you didn’t use
the Spry interface to add the sub-item, Dreamweaver didn’t apply a needed
class to the Green Club parent element. This class applies CSS formatting for
the submenu, including the submenu icon. You can apply the class using the
Property inspector.
11 Insert the cursor in the Green Club item. Select the <a> tag selector. Choose
MenuBarItemSubmenu from the Class menu.
The button is properly formatted now and displays the submenu icon. As you
can see, the Spry interface offers several advantages over hand coding.
12 Save the file.
Whenever Dreamweaver saves a document containing Spry components, it inserts
the dependent CSS and JavaScript files in the SpryAssets folder for you automati-
cally. If you delete a component and the dependent files are no longer needed,
Dreamweaver deletes any link reference to them from the document code. The Spry
interface and automatic file management are two more reasons why you’ll want to
use Dreamweaver in any HTML-based workflows.
Customizing the appearance of the Spry menu bar
As you can see, the Spry menu bar offers a way to quickly and easily create a
sophisticated, professional-looking menu. Styling a Spry component is no different
than styling the original HTML menu it replaced. You’ll need to modify the width
and styling of this menu to make it conform to the layout and the site color scheme.
It’s important to remember that Spry elements are normally styled by their own
CSS files.

258 LESSON 9 Working with Navigation
1 Open the site template, if necessary. Open the CSS Styles panel and scroll to the
bottom of the list of style sheets.
A new style sheet—SpryMenuBarVertical.css—has been added by
Dreamweaver.
2 Expand the SpryMenuBarVertical.css style sheet.
This style sheet includes the formatting instructions for the Spry vertical menu.
You should feel confident enough by now in your CSS skills to modify the style
sheet without any help. Feel free to try, or simply follow these instructions.
3 Insert the cursor in the Green News item in the Spry menu. Press Ctrl-Alt-N/
Cmd-Opt-N to open the Code Navigator, or click the Code Navigator ( ) icon
when it appears.
The Code Navigator window appears, listing the style sheets and rules that
format this item.
4 Examine the list of CSS rules that format this item. Pay special attention to the
rules in SpryMenuBarVertical.css.
5 Using the cursor, hover over each rule in this style sheet until you identify the
properties you’ll need to modify.
You’re looking for rules that specifically apply to width, color, and hyperlink
behavior. The ul.MenuBarVertical rule sets the width of the menu.

ADOBE DREAMWEAVER CS6 CLASSROOM IN A BOOK 259
6 In the CSS Styles panel, click the ul.MenuBarVertical rule and examine its
properties.
This rule sets the width of the <ul> element to 8 ems. Since the current site is
based on a fixed-width layout, these settings should be changed to match. The
new vertical menu is part of the sidebar element, which was originally set to a
width of 180 pixels.
Em or ex? It’s all relative
An em is a relative measurement system used in graphic design, based on the width of the capital letter M in the current default font for the site. An ex is a measurement based on the size of the lowercase x. Designers use ems and exes when they want to format a text container to preserve certain line breaks. A container width specified in ems will scale along with the text as it gets larger. A container set to a fixed width won’t scale as the text gets larger; to fit, the text has to wrap to additional lines.
Em-width containers: no reflow
Fixed-width containers: text reflows
That’s because the em measurement is based on the size of the font and not on an arbitrary pixel or other fixed measurement. This means that if the user chooses to override your chosen font size in the browser, any web structure based on ems or exes will scale up or down proportionally to adapt to the new font size. That way, line breaks will be preserved and text-based menus won’t break or reflow as the text enlarges, as they will in designs using pixels or fixed measurements.
Width set in pixels: text wraps
Width set in ems: everything scales
� Note: Whenever you set the width of a container using absolute measurements, like pixels or points, you should anticipate that the container, and your layout, may break when visitors override your chosen settings to enlarge the text. Fortunately, most modern browsers now magnify the webpage rather than simply enlarging the text.

260 LESSON 9 Working with Navigation
7 Change the width value to 180px.
Note that the width of the menu doesn’t change. The ul.MenuBarVertical
rule establishes the maximum size of the menu, but because <ul> is not a
block-level element, the width of the menu is actually controlled by a different
rule. Only one other rule specifies a width setting for the first-level items—
namely, ul.MenuBarVertical li.
8 In the CSS Styles panel, select ul.MenuBarVertical li and change the width
to 180px in the Properties section.
The Spry menu assumes the full width of <div.sidebar1>, matching the
size of the previous vertical menu you replaced. In this case, everything seems
to be working fine, but that doesn’t mean it always will. Replacing existing
structures in a web template can be dangerous. The new element can conflict
with the existing layout and possibly break it, as it did in Lesson 4 “Creating a
Page Layout.” Keep an eye on the sizes of the other elements within your layout.
Remember that there is an overall wrapper or container element that has a fixed
size—in this case, 950 pixels. A border, margin, or padding setting could have an
unexpected interaction that might upset your carefully created layout.
ADOBE DREAMWEAVER CS6 CLASSROOM IN A BOOK 261
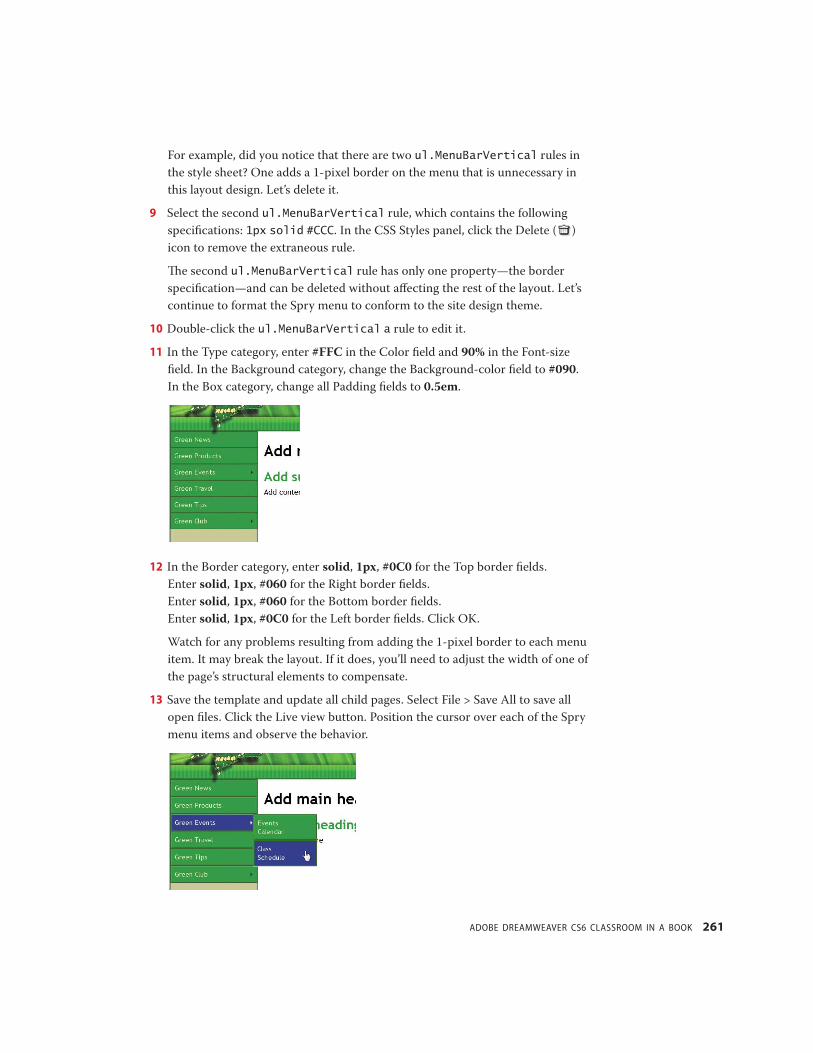
For example, did you notice that there are two ul.MenuBarVertical rules in
the style sheet? One adds a 1-pixel border on the menu that is unnecessary in
this layout design. Let’s delete it.
9 Select the second ul.MenuBarVertical rule, which contains the following
specifications: 1px solid #CCC. In the CSS Styles panel, click the Delete ( )
icon to remove the extraneous rule.
The second ul.MenuBarVertical rule has only one property—the border
specification—and can be deleted without affecting the rest of the layout. Let’s
continue to format the Spry menu to conform to the site design theme.
10 Double-click the ul.MenuBarVertical a rule to edit it.
11 In the Type category, enter #FFC in the Color field and 90% in the Font-size
field. In the Background category, change the Background-color field to #090.
In the Box category, change all Padding fields to 0.5em.
12 In the Border category, enter solid, 1px, #0C0 for the Top border fields.
Enter solid, 1px, #060 for the Right border fields.
Enter solid, 1px, #060 for the Bottom border fields.
Enter solid, 1px, #0C0 for the Left border fields. Click OK.
Watch for any problems resulting from adding the 1-pixel border to each menu
item. It may break the layout. If it does, you’ll need to adjust the width of one of
the page’s structural elements to compensate.
13 Save the template and update all child pages. Select File > Save All to save all
open files. Click the Live view button. Position the cursor over each of the Spry
menu items and observe the behavior.

262 LESSON 9 Working with Navigation
The menu is nearly finished. The initial state of the menu looks good, but the
a:hover state of the hyperlinks doesn’t conform to the site color scheme. To
investigate the situation, you can access the Code Navigator even in Live view.
14 While hovering over the menu item, right-click the Spry menu. Choose Code
Navigator from the context menu. Identify any rules affecting the a:hover state
of the menu hyperlinks.
There are two rules that apply both text and background colors to the a:hover
state.
15 Click the Live view button to turn it off.
16 In the CSS Styles panel, click the ul.MenuBarVertical a:hover,
ul.MenuBarVertical a:focus rule. In the Properties section, change the
Color value to #FFC and the Background-color value to #060.
17 In the CSS Styles panel, click the ul.MenuBarVertical
a.MenuBarItemHover, ul.MenuBarVertical
a.MenuBarItemSubmenuHover, ul.MenuBarVertical
a.MenuBarSubmenuVisible rule. In the Properties section, change the Color
value to #FFC and the Background-color value to #060. Click OK.

ADOBE DREAMWEAVER CS6 CLASSROOM IN A BOOK 263
18 Save all files. Test the menu behavior in Live view or the default browser.
The color and behavior matches the menu you tested at the beginning of the lesson.
But the sub-items would look better on one line. How would you correct this prob-
lem? Here are two obvious fixes: shorten the text or make the button wider.
Editing CSS using the Code Navigator
The Code Navigator isn’t just a tool for examining CSS code; it can also help you to
edit it.
1 Insert the cursor in the Spry menu. Click the blue bar above the vertical
menu to access the Spry menu interface in the Property inspector. Select the
item Green Events in the first column of the interface. Select the item Events
Calendar in the second column.
The sub-items for the Green Events button appear in the Spry interface and in
the Design view document window.
� Tip: The sub-items will remain displayed as long as the Events or Class sub-items are selected in the Property inspector. To hide the sub-item menu, select any parent element.
264 LESSON 9 Working with Navigation
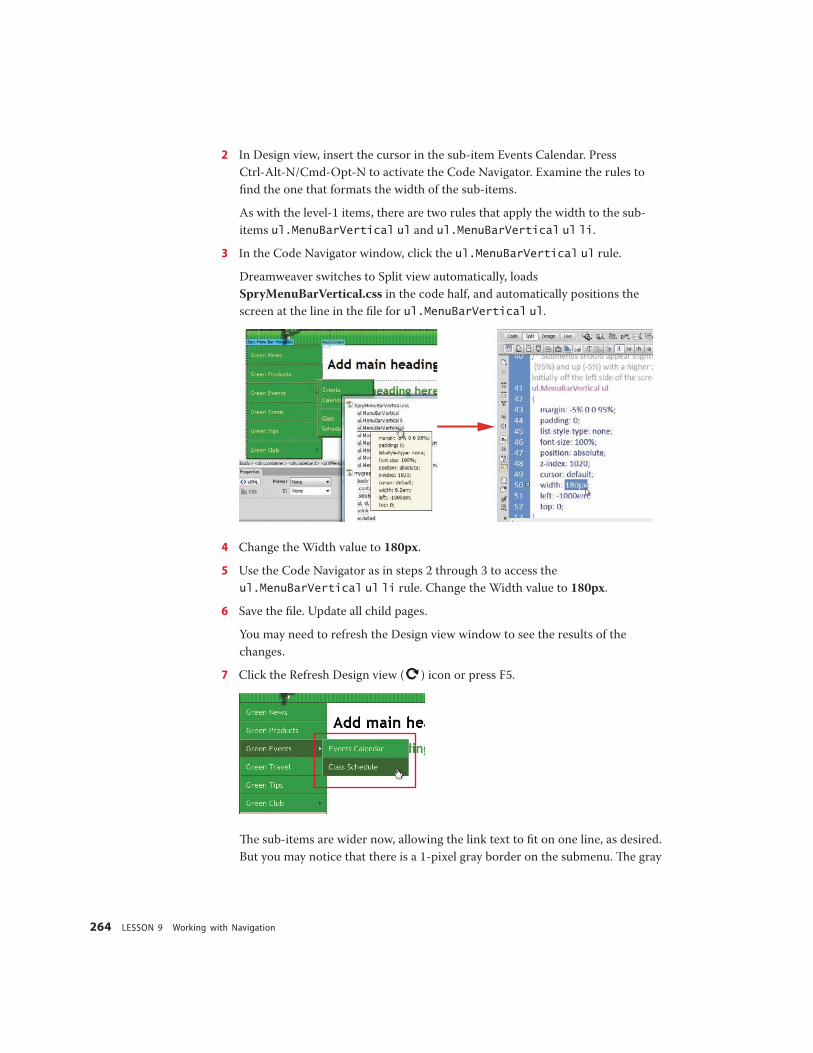
2 In Design view, insert the cursor in the sub-item Events Calendar. Press
Ctrl-Alt-N/Cmd-Opt-N to activate the Code Navigator. Examine the rules to
find the one that formats the width of the sub-items.
As with the level-1 items, there are two rules that apply the width to the sub-
items ul.MenuBarVertical ul and ul.MenuBarVertical ul li.
3 In the Code Navigator window, click the ul.MenuBarVertical ul rule.
Dreamweaver switches to Split view automatically, loads
SpryMenuBarVertical.css in the code half, and automatically positions the
screen at the line in the file for ul.MenuBarVertical ul.
4 Change the Width value to 180px.
5 Use the Code Navigator as in steps 2 through 3 to access the
ul.MenuBarVertical ul li rule. Change the Width value to 180px.
6 Save the file. Update all child pages.
You may need to refresh the Design view window to see the results of the
changes.
7 Click the Refresh Design view ( ) icon or press F5.
The sub-items are wider now, allowing the link text to fit on one line, as desired.
But you may notice that there is a 1-pixel gray border on the submenu. The gray

ADOBE DREAMWEAVER CS6 CLASSROOM IN A BOOK 265
border doesn’t fit with the site theme. A darker green border would be more
appropriate. As with the base menu, there is a duplicate rule that applies only
the gray border.
8 Change the border color in the second ul.MenuBarVertical ul rule to #060.
9 Save the file. Update all child pages and refresh the Design view display.
The Spry menu is complete and styled properly.
10 Close the template.
If you don’t need to troubleshoot the template components themselves, you should
be able to make most of your future changes to the CSS directly from any normal
site page. Since the CSS files are external to the template, changes can be made
without the template being open, even to items within the uneditable regions of
each page.
Checking your page
Dreamweaver will automatically check your page for browser compatibility, acces-
sibility, and broken links. In this exercise, you’ll check your links and learn what
you can do in case of a browser compatibility problem.
1 If necessary, open contact_us.html.

266 LESSON 9 Working with Navigation
2 Choose File > Check Page > Links.
A Link Checker panel opens. The Link Checker panel reports a broken link
to index.html and to the other links you created for nonexistent pages. You’ll
make these pages later, so there’s no need to worry about fixing this broken link
now. The Link Checker will also find broken links to external sites, should you
have any.
3 Right-click the Link Checker tab and choose Close Panel Group.
4 Choose File > Check Page > Browser Compatibility.
The Browser Compatibility report panel opens, listing any identified
compatibility problems along with the file that contains the error and a
description of it. No issues were detected, but if there had been, you could click
the Check Adobe.com link in the lower-right corner of the panel to receive
more information about the issue directly from Adobe.
5 Double-click the Browser Compatibility tab to collapse it.
You’ve made big changes to the appearance of the pages in this lesson by adding a
Spry menu bar and by creating links to specific positions on a page, to email, and to
an external site. You also created a link that uses an image as the clickable item and
re-created the main navigation menu using a Spry menu bar. Finally, you checked
your page for broken links and browser compatibility.
� Tip: You can also check links for the entire website by selecting Check Links For Entire Current Local Site from the Check Links ( ) icon or by choosing Site > Check Links Sitewide.

ADOBE DREAMWEAVER CS6 CLASSROOM IN A BOOK 267
Review questions
1 Describe two ways to insert a link into a page.
2 What information is required to create a link to an external webpage?
3 What’s the difference between standard page links and email links?
4 What are the benefits of using Spry menu bars?
5 How can you check to see if your links will work properly?
Review answers
1 Select text or a graphic, and then in the Property inspector, select the Browse For File
icon next to the Link field and navigate to the desired page. A second method is to
drag the Point To File icon to a file within the Files panel.
2 Link to an external page by typing or copying and pasting the full web address (a fully
formed URL) in the Link field of the Property inspector.
3 A standard page link opens a new page or moves the view to a position somewhere on
the page. An email link opens a blank email message window if the visitor has an email
application installed.
4 All the work of setting up the style rules to make a list appear like a horizontal or
vertical menu bar has been done for you, and so has the work of writing the JavaScript
to make pop-up submenus function.
5 Run the Link Checker to test links on each page or sitewide.