working with domains · after you have selected a subscription, you will need to add a webspace for...
TRANSCRIPT
TM Control Panel User Guide – Working with Domains 1
Working with Domains
After you have selected a Subscription, you will need to add a Webspace for your domain. This will provide you with the ability of creating and then working with your Webspace, including a website, e-mail options and a lot more.
It is possible to work with all domains and services of all Subscriptions in a centralized manner, if the "Allow to use services from different Subscriptions on domain" system- wide option is enabled.
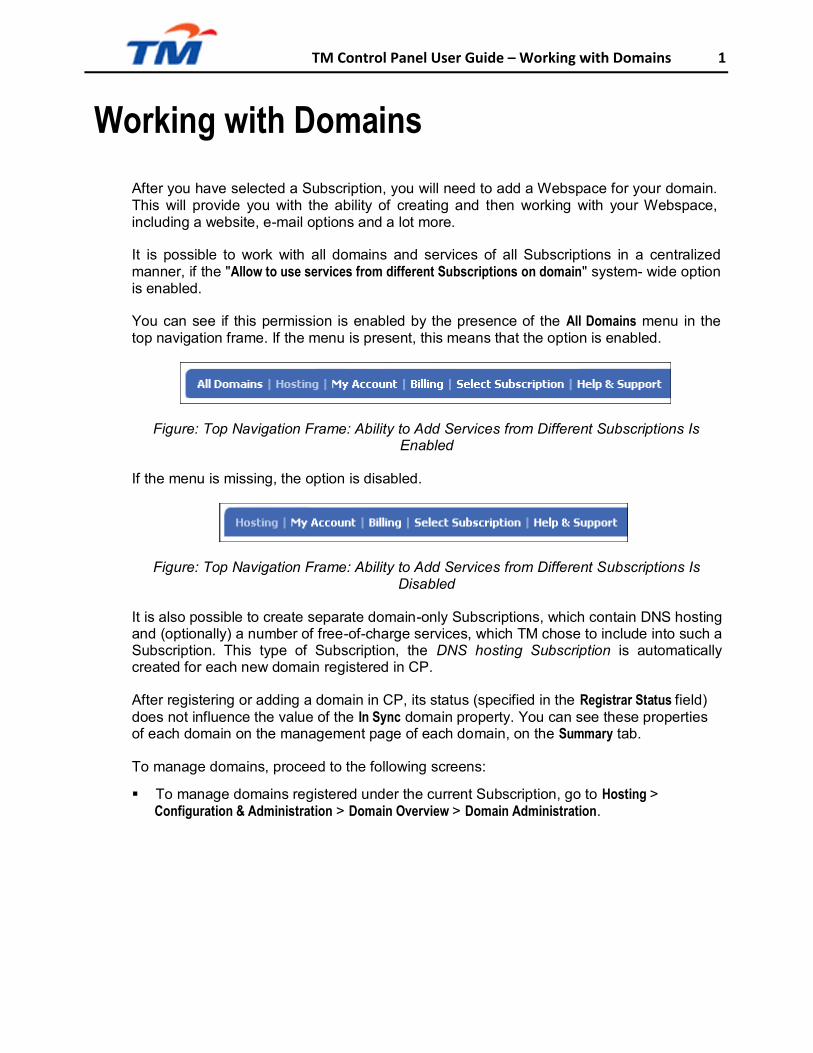
You can see if this permission is enabled by the presence of the All Domains menu in the top navigation frame. If the menu is present, this means that the option is enabled.
Figure: Top Navigation Frame: Ability to Add Services from Different Subscriptions Is Enabled
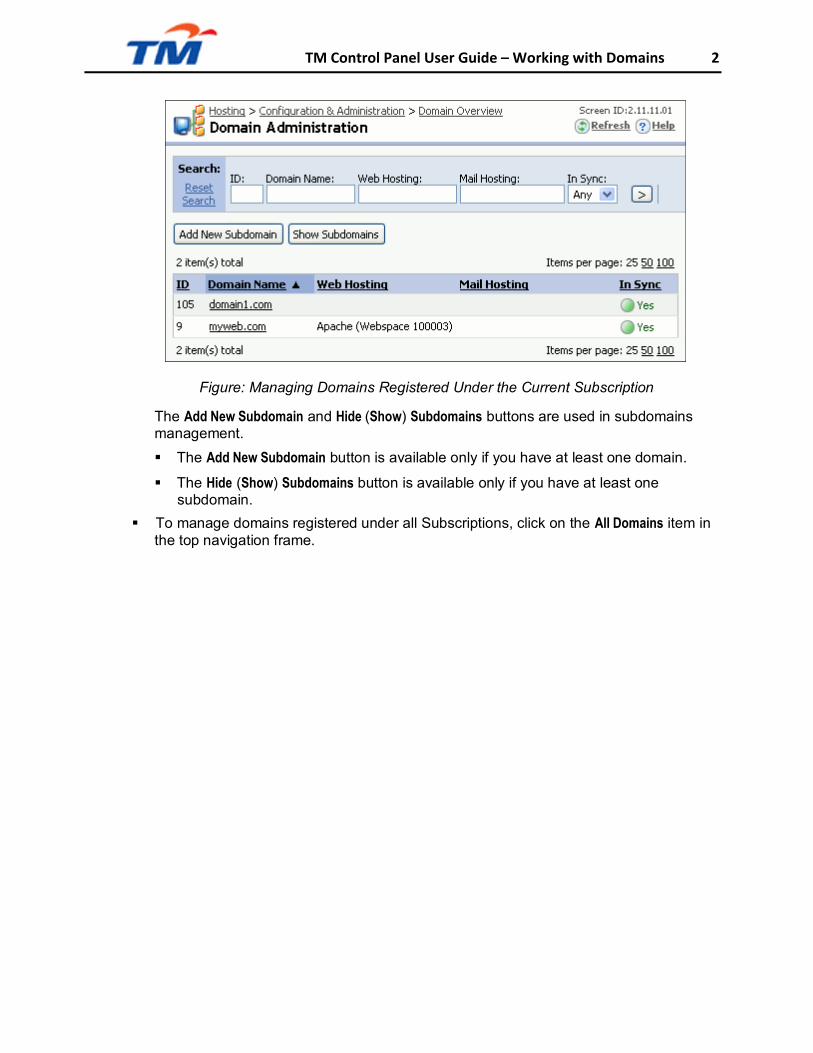
If the menu is missing, the option is disabled.
Figure: Top Navigation Frame: Ability to Add Services from Different Subscriptions Is Disabled
It is also possible to create separate domain-only Subscriptions, which contain DNS hosting and (optionally) a number of free-of-charge services, which TM chose to include into such a Subscription. This type of Subscription, the DNS hosting Subscription is automatically created for each new domain registered in CP.
After registering or adding a domain in CP, its status (specified in the Registrar Status field) does not influence the value of the In Sync domain property. You can see these properties of each domain on the management page of each domain, on the Summary tab.
To manage domains, proceed to the following screens:
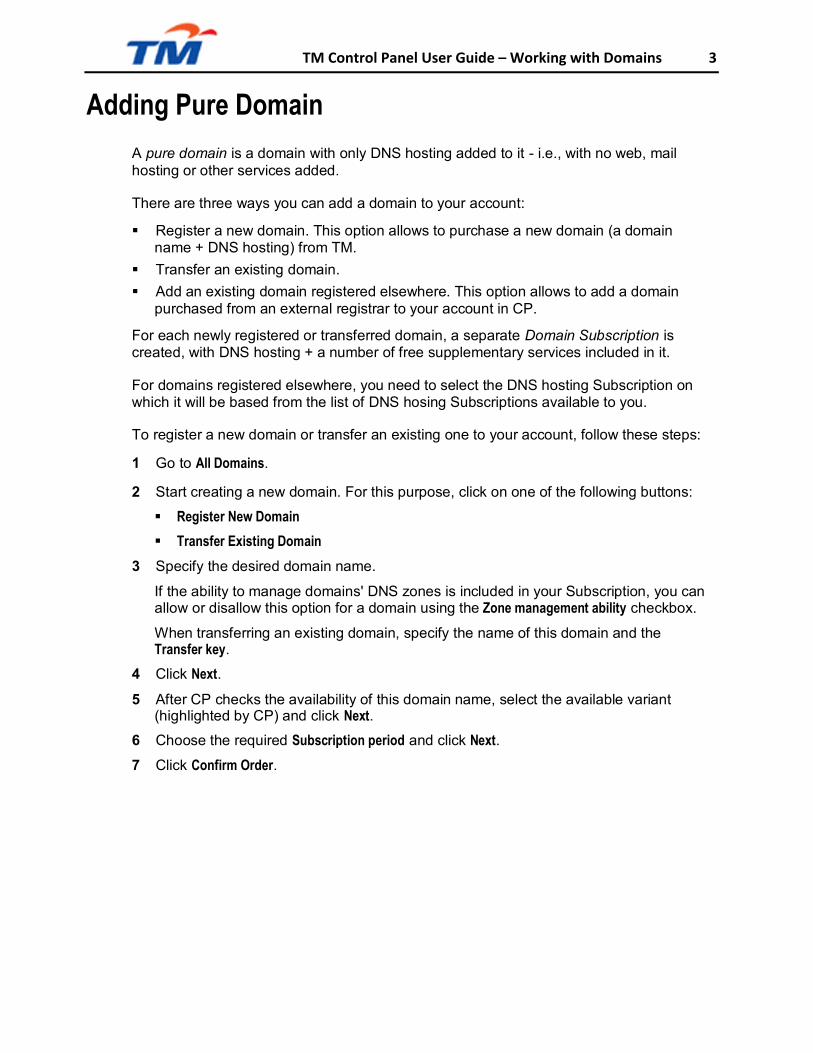
To manage domains registered under the current Subscription, go to Hosting >
Configuration & Administration > Domain Overview > Domain Administration.
TM Control Panel User Guide – Working with Domains 2
Figure: Managing Domains Registered Under the Current Subscription
The Add New Subdomain and Hide (Show) Subdomains buttons are used in subdomains management.
The Add New Subdomain button is available only if you have at least one domain.
The Hide (Show) Subdomains button is available only if you have at least one subdomain.
To manage domains registered under all Subscriptions, click on the All Domains item in the top navigation frame.
TM Control Panel User Guide – Working with Domains 3
Adding Pure Domain
A pure domain is a domain with only DNS hosting added to it - i.e., with no web, mail hosting or other services added.
There are three ways you can add a domain to your account:
Register a new domain. This option allows to purchase a new domain (a domain
name + DNS hosting) from TM. Transfer an existing domain. Add an existing domain registered elsewhere. This option allows to add a domain
purchased from an external registrar to your account in CP.
For each newly registered or transferred domain, a separate Domain Subscription is created, with DNS hosting + a number of free supplementary services included in it.
For domains registered elsewhere, you need to select the DNS hosting Subscription on which it will be based from the list of DNS hosing Subscriptions available to you.
To register a new domain or transfer an existing one to your account, follow these steps:
1 Go to All Domains.
2 Start creating a new domain. For this purpose, click on one of the following buttons:
Register New Domain
Transfer Existing Domain
3 Specify the desired domain name.
If the ability to manage domains' DNS zones is included in your Subscription, you can allow or disallow this option for a domain using the Zone management ability checkbox.
When transferring an existing domain, specify the name of this domain and the Transfer key.
4 Click Next.
5 After CP checks the availability of this domain name, select the available variant (highlighted by CP) and click Next.
6 Choose the required Subscription period and click Next.
7 Click Confirm Order.
TM Control Panel User Guide – Working with Domains 4
The new domain appears on the All Domains screen and on the Hosting > Configuration & Administration > Domain Overview > Domain Administration screen. CP creates a separate Domain Subscription for the domain, which includes DNS hosting and (optionally) a number of free supplementary services which TM chose to include in this type of Subscription.
To add a domain registered elsewhere, perform these steps:
1 Go to All Domains.
2 Click on the Add Existing Domain Registered Elsewhere button.
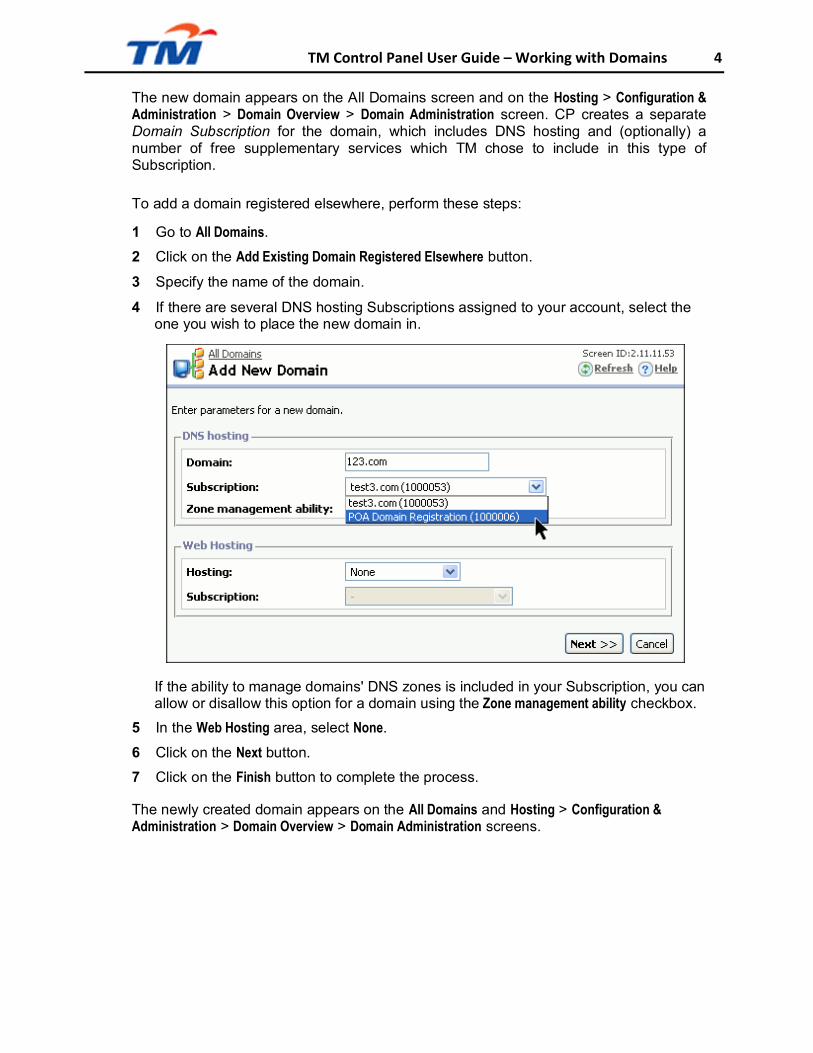
3 Specify the name of the domain.
4 If there are several DNS hosting Subscriptions assigned to your account, select the one you wish to place the new domain in.
If the ability to manage domains' DNS zones is included in your Subscription, you can allow or disallow this option for a domain using the Zone management ability checkbox.
5 In the Web Hosting area, select None.
6 Click on the Next button.
7 Click on the Finish button to complete the process.
The newly created domain appears on the All Domains and Hosting > Configuration & Administration > Domain Overview > Domain Administration screens.

TM Control Panel User Guide – Working with Domains 5
Adding Web or Mail Hosting to Pure Domain
If you want to add web or mail hosting to a pure domain, follow these steps:
1 Go to All Domains. The list of your domains opens.
Note: If the "Allow to use services from different Subscriptions on domain" system-wide option is disabled by TM, this operation starts from the Hosting > Configuration & Administration > Domain Overview > Domain Administration page.
2 Click on the name of the required domain. Domains with no hosting added are marked
by empty field in the Web Hosting (Mail Hosting) columns.
The Summary tab opens.
3 On the Summary tab, in the Web Hosting (Mail Hosting) area, click on the Add Hosting link.
Figure: The Add Hosting Link
4 From the Hosting drop-down box, select the web (mail) hosting type.
Figure: Selecting Hosting Type

TM Control Panel User Guide – Working with Domains 6
5 From the Subscription drop-down box, select the Subscription you wish to set as the basis for web (mail) hosting on this domain.
Figure: Selecting Subscription Hosting will Be Based On
The list of available Subscriptions depends on the selected hosting type.
The choice of Subscription determines the set of additional hosting services and resources available for the domain (such as, for example, MS FrontPage, Plesk Sitebuilder, etc.).
6 Click Next to continue.
7 Follow the wizard instructions.
8 After following all the wizard steps, click on the Finish button to complete the process of adding hosting.
Now, if you reopen the list of your domains, you will see the appropriate hosting type displayed in the Web Hosting (Mail Hosting) columns for the current domain.
Parked Domains
Domain parking allows you to point additional domain names to your already existing domain. For example, your_domain.com, your_domain.net, your_domain.org can all point to the same place preventing others from seeking for your domain zone.
Default Domain Parking
Default domain parking is a service that makes your domain available through HTTP protocol. It means that your parked domain is resolved and accessible through URL http://domain_name.
TM Control Panel User Guide – Working with Domains 7
The HTTP requests to your parked domain will be redirected to a location defined by TM. The content of HTML page displayed is also defined by TM.
To create a parked domain based on default type of domain parking, follow these steps:
1 Go to All Domains. The list of your domains opens.
2 Start creating a new domain as described in Adding Pure Domain.
3 In the DNS hosting area, specify the following parameters:
Domain - Enter the domain name.
Subscription - From the drop-down list select the Subscription on which DNS hosting will be based.
Zone management ability - select this checkbox if you want to get the ability of managing DNS zone for this domain.
4 In the Web Hosting area, specify the following parameters:
From the Hosting list, select Parking.
Subscription - From the drop-down list select the Subscription from which the Domain Parking hosting will be based.
Click on the Next button to continue.
5 Click on the Finish button to complete the process of creating a new domain.
Now you can see the just created domain in the list of your domains. The Web hosting type of the domain is marked in the Web Hosting column as Parking.
TM Control Panel User Guide – Working with Domains 8
Standard Forwarding Domain Parking
Standard forwarding is a type of domain parking which enables you to specify an URL to handle http requests to your parked domain. Thus, an HTTP request to your parked domain will be redirected to the specified URL. The HTML document will be located at this URL.
Suppose, you have a parked domain www.mydomain.com. You want the visitors of www.mydomain.com to see a page located at www.forward.com. For this case, you should select standard forwarding as a type of parking.
Creating Standard Forwarding Domain
To create a domain based on Standard Forwarding type of domain parking, follow these steps:
1 Go to All Domains. The list of your domains opens.
2 Start creating a new domain as described in Adding Pure Domain (on page 57).
3 In the DNS hosting area, specify the following parameters:
Domain - Enter the domain name.
Subscription - From the drop-down list select the Subscription on which DNS hosting will be based.
Zone management ability - select this checkbox if you want to get the ability of managing DNS zone for this domain.
4 In the Web Hosting area, specify the following parameters:
From the Hosting list, select Standard Forwarding.
Subscription - From the drop-down list select the Subscription from which the Domain Parking hosting will be based.
Click on the Next button to continue.
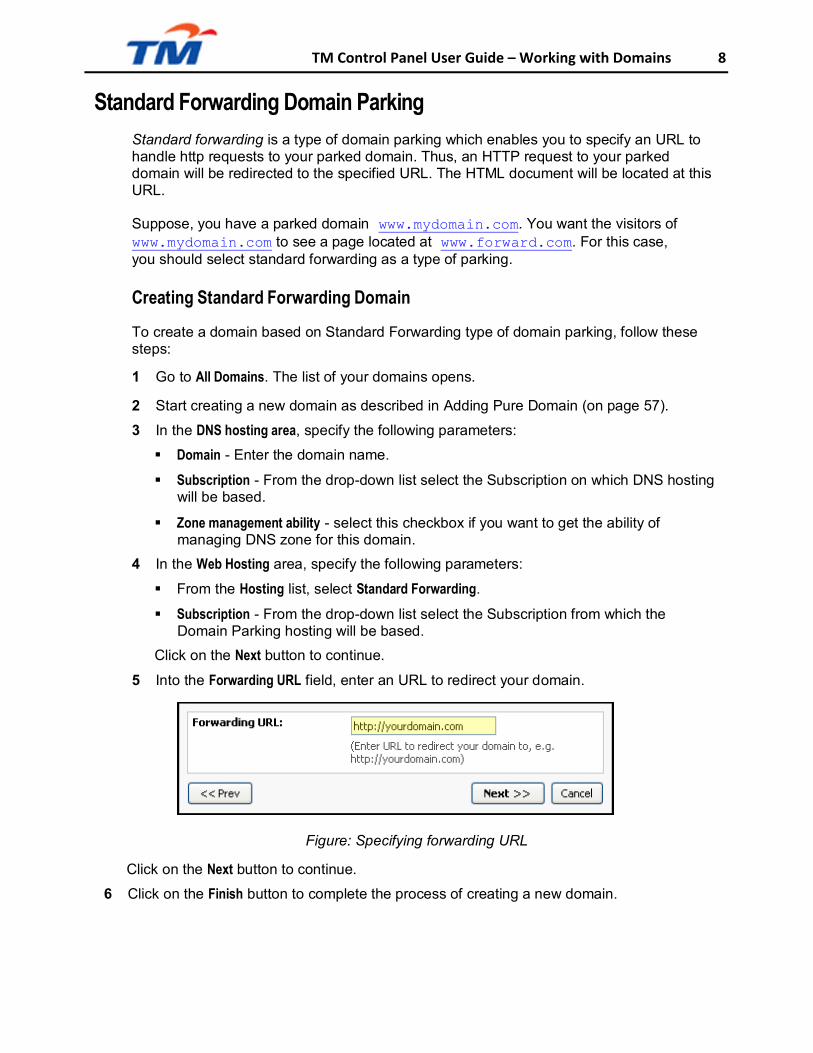
5 Into the Forwarding URL field, enter an URL to redirect your domain.
Figure: Specifying forwarding URL
Click on the Next button to continue.
6 Click on the Finish button to complete the process of creating a new domain.
TM Control Panel User Guide – Working with Domains 9
Now you can see the just created domain in the list of your domains. The Web hosting type of the domain is marked in the Web Hosting column as Standard Forwarding with the target URL in parentheses.
Configuring Standard Forwarding Domain
You may want to change the URL to redirect your standard forwarding domain to. For this purpose, follow these steps:
1 Go to All Domains. The list of your domains opens.
2 Click on the name of the required domain with standard forwarding type of hosting.
Standard forwarding domains are marked by Standard Forwarding in the Web Hosting column.
3 Select the Web tab.
4 Click on the Edit button.
5 Into the Forwarding URL field, enter a new URL to redirect your domain to.
6 Click on the Submit button to save the new setting. Frame Forwarding Domain Parking
Frame forwarding is a type of domain parking that enables you to specify a URL containing the source for HTTP request to your parked domain. In frame forwarding, the HTTP request to your parked domain produces an HTML page with one f rame. The frame source of this page represents the URL specified by you and is described in HTML code as <FRAME SRC = "<customer_specified_url>" >. In other words, the document location does not change.
Suppose, you have a parked domain www.mydomain.com. You want the visitors of www.mydomain.com to see a page located at www.forward.com. If you select frame forwarding as a type of parking, the visitors will see the www.forward.com page; however, the Address field of the browser will contain www.mydomain.com.
TM Control Panel User Guide – Working with Domains 10
Creating Frame Forwarding Domain
To create a domain based on Frame Forwarding type of domain parking, follow these steps:
1 Go to All Domains. The list of your domains opens.
2 Start creating a new domain as described in Adding Pure Domain.
3 In the DNS hosting area, specify the following parameters:
Domain - Enter the domain name.
Subscription - From the drop-down list select the Subscription on which DNS hosting will be based.
Zone management ability - select this checkbox if you want to get the ability of managing DNS zone for this domain.
4 In the Web Hosting list, specify the following parameters:
From the Hosting area, select Frame Forwarding.
Subscription - From the drop-down list select the Subscription from which the Domain Parking hosting will be based.
Click on the Next button to continue.
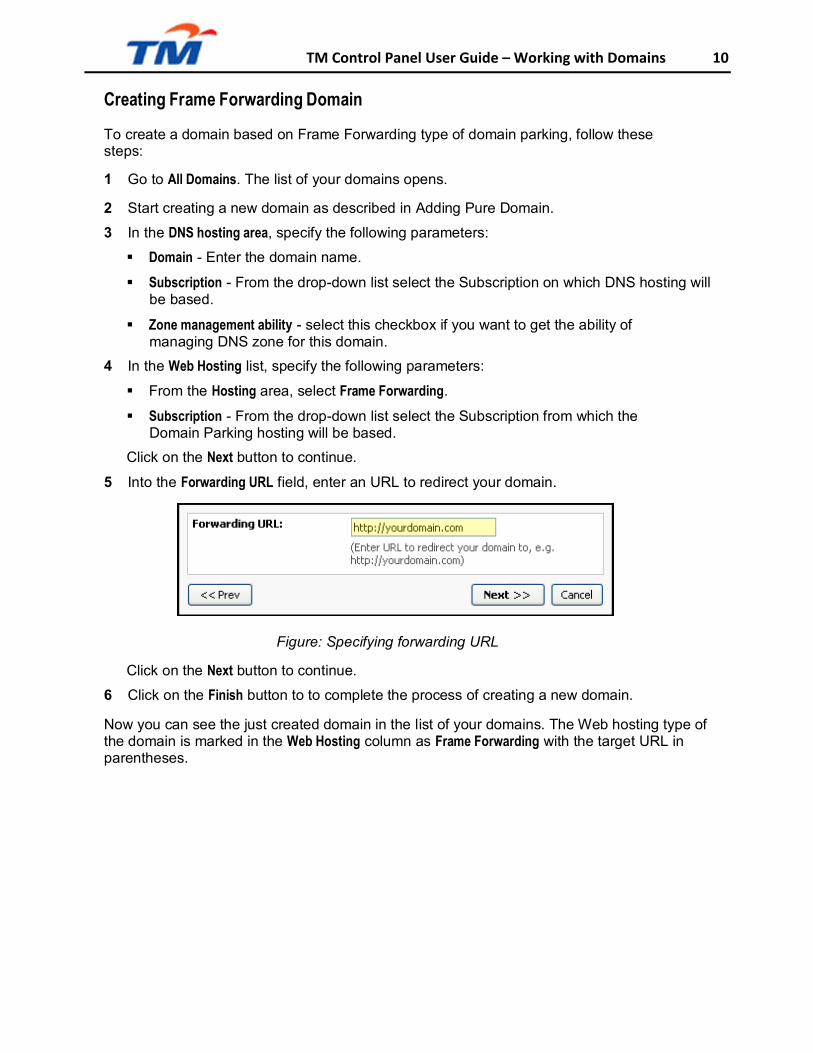
5 Into the Forwarding URL field, enter an URL to redirect your domain.
Figure: Specifying forwarding URL
Click on the Next button to continue.
6 Click on the Finish button to to complete the process of creating a new domain.
Now you can see the just created domain in the list of your domains. The Web hosting type of the domain is marked in the Web Hosting column as Frame Forwarding with the target URL in parentheses.

TM Control Panel User Guide – Working with Domains 11
Configuring Frame Forwarding Domain
You may want to change the URL to redirect your frame forwarding domain to. For this purpose, follow these steps:
1 Go to All Domains. The list of your domains opens.
2 Click on the name of the required domain with frame forwarding type of hosting. Frame
forwarding domains are marked by Frame Forwarding in the Web Hosting column.
3 Select the Web tab.
4 Click on the Edit button.
5 Into the Forwarding URL field, enter a new URL to redirect your domain to.
6 Click on the Submit button to save the new setting.
Single Page Website
Single Page Hosting is a type of domain parking that enables you to specify content of HTML page which will be displayed as the result of HTTP request to your parked domain as http://domain_name. Actually, you can specify only part of HTML page because header and footer for HTML document displayed are usually specified by your provider.
Creating Single Page Website
To create a Single Page Website, follow these steps:
1 Go to All Domains. The list of your domains opens.
2 Start creating a new domain as described in Adding Pure Domain.
3 In the DNS hosting area, specify the following parameters:
Domain - Enter the domain name.
Subscription - From the drop-down list select the Subscription on which DNS hosting will be based.
Zone management ability - select this checkbox if you want to get the ability of managing DNS zone for this domain.
4 In the Web Hosting area, specify the following parameters:
From the Hosting list, select Single Page Website.
Subscription - From the drop-down list select the Subscription from which the Domain Parking hosting will be based.
Click on the Next button to continue.
5 Into the Page Content field, enter the HTML code of your Single Page Website. Click on the Next button to continue.
6 Click on the Finish button to complete the process of creating a new Single Page Website.
Now you can see the just created domain in the list of your domains. The Web hosting type of the domain is marked in the Web Hosting column as Single Page Website.
TM Control Panel User Guide – Working with Domains 12
Configuring Single Page Website
You may want to change the content of your Single Page Website. For this purpose, follow these steps:
1 Go to All Domains. The list of your domains opens.
2 Click on the name of the required Single Page Website.
Single Page Websites are marked by Single Page Website in the Web Hosting column.
3 Select the Web tab.
4 Click on the Edit button.
5 Input a new HTML code of the page into the Page Content field.
6 Click on the Submit button to save the new setting.
Website Managing IIS Website
CP enables you to manage IIS 6.0 and IIS 7.0 websites. If you have an IIS 6.0 Subscription, you can manage only IIS 6.0 websites. Analogically, if you have IIS 7.0 Subscription, you are able to manage only IIS 7.0 websites. You can also upgrade your Subscription from IIS 6.0 to IIS 7.0 if it is allowed by TM. In this case, you will be able to create both IIS 6.0 and IIS 7.0 websites. Upgrade does not affect your existing IIS 6.0 websites.
This chapter describes how to manage the features that are specific for Windows-based hosting.
Creating Microsoft IIS Website
To create IIS website, follow these steps:
1 Go to All Domains. The list of your domains opens.
1. Create a domain as described in Adding Pure Domain, or select an existing domain you would like to add IIS web hosting to.
2. On the Summary tab, in the Web Hosting area, click Add Hosting. For more details on adding web hosting, refer to Adding Web or Mail Hosting to Pure Domain.
3. Select an IIS hosting service from the Hosting drop-down list.
4. Select the Subscription on which IIS hosting will be based from the Subscription drop-down list.
The list of available Subscriptions is filtered to those including IIS web hosting.
The choice of a Subscription determines the set of additional hosting services and resources available for the website (such as, for example, MS FrontPage, Plesk Sitebuilder, etc.).
2 Set Webspace general parameters:
TM Control Panel User Guide – Working with Domains 13
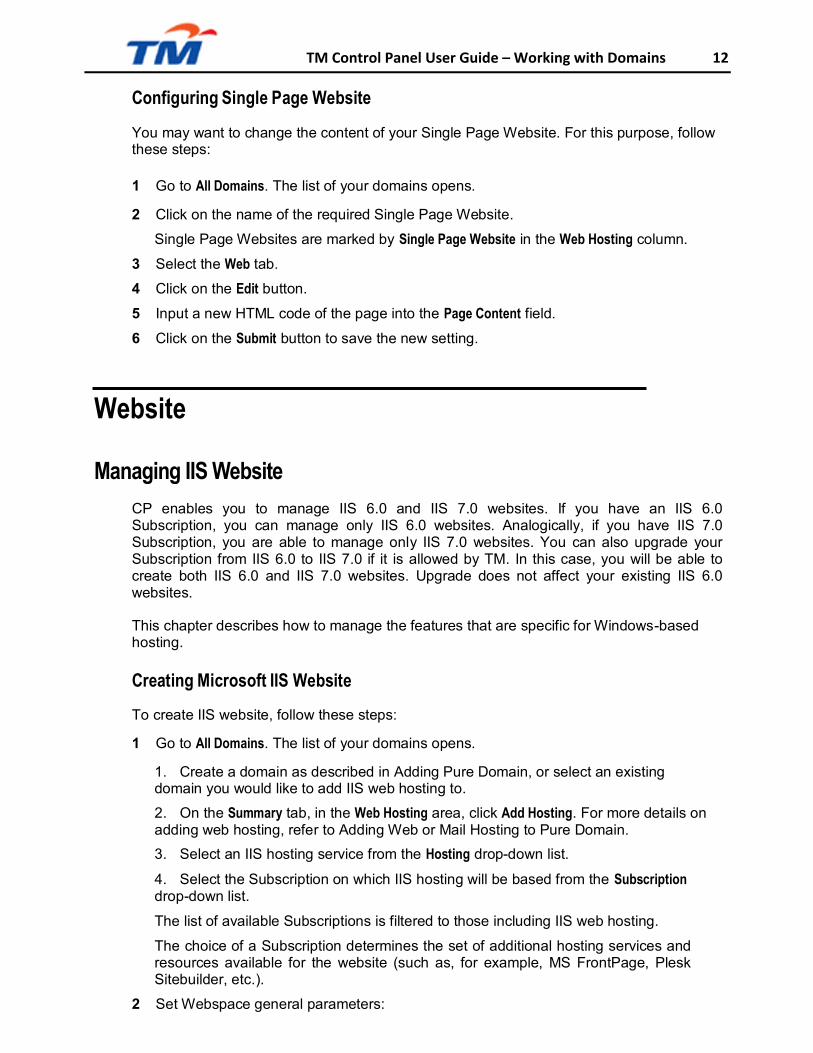
Webspace - Select whether you want to create a new Webspace or attach the website being created to an existing Webspace.
Location - Type the path to the directory where your website will be located.
Figure: Specifying Webspace Settings
Click on the Next button to continue.
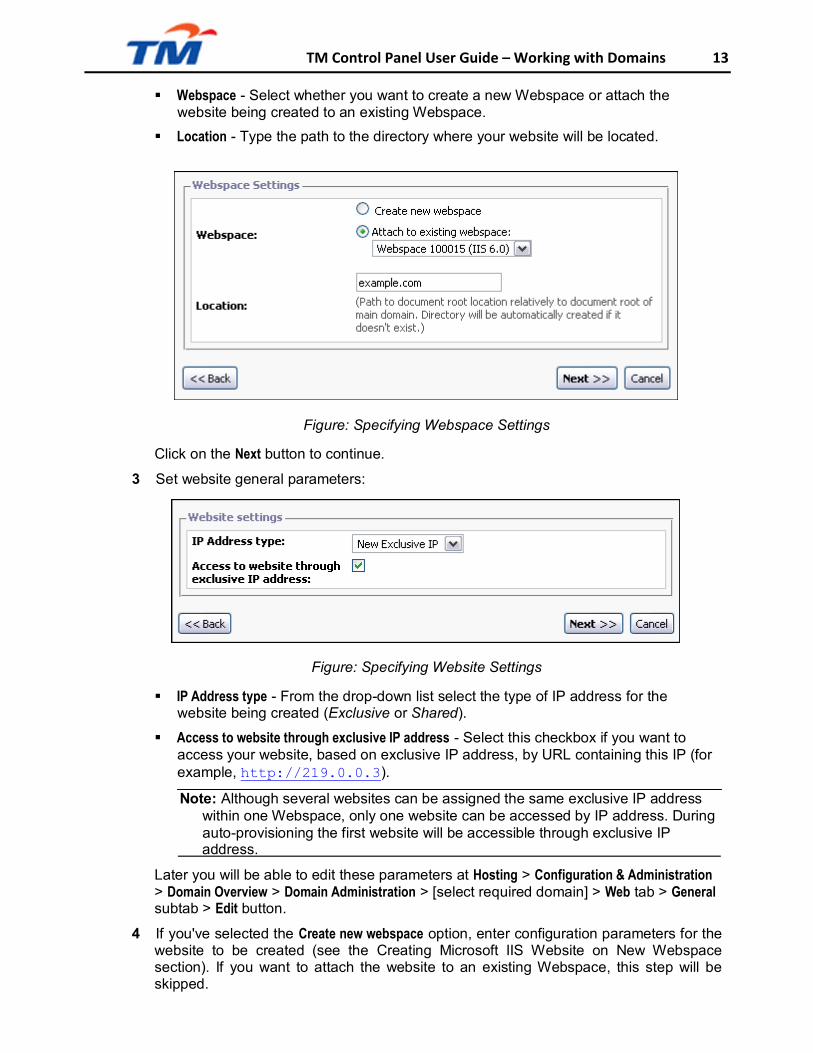
3 Set website general parameters:
Figure: Specifying Website Settings
IP Address type - From the drop-down list select the type of IP address for the website being created (Exclusive or Shared).
Access to website through exclusive IP address - Select this checkbox if you want to access your website, based on exclusive IP address, by URL containing this IP (for example, http://219.0.0.3).
Note: Although several websites can be assigned the same exclusive IP address within one Webspace, only one website can be accessed by IP address. During auto-provisioning the first website will be accessible through exclusive IP
address.
Later you will be able to edit these parameters at Hosting > Configuration & Administration > Domain Overview > Domain Administration > [select required domain] > Web tab > General subtab > Edit button.
4 If you've selected the Create new webspace option, enter configuration parameters for the website to be created (see the Creating Microsoft IIS Website on New Webspace section). If you want to attach the website to an existing Webspace, this step will be skipped.

TM Control Panel User Guide – Working with Domains 14
5 Select a checkbox whether you want to install AWStats on the domain to be created or not. Click Next.
6 A domain creation summary window appears. Check the parameters and click Finish.
Creating Microsoft IIS Website on New Webspace
The number of available services and options (described below) may differ depending on the terms of your Subscription.
To create a Microsoft IIS website, proceed with the instructions from the Creating Microsoft IIS Website section till the Step 4.
Figure: Creating New Webspace
1 On step 4, select the Create new webspace option button. Into the Location field, type the path to the directory where your website will be located.
Click on the Next button to continue.
2 Specify the website general parameters:
Figure: Specifying Website Settings
IP Address type - From the drop-down list select the type of IP address for the website being created (Exclusive or Shared).
Access to website through exclusive IP address - Select this checkbox if you want to enable the website, which resides on exclusive IP address, to be accessed by URL with IP address (like http://127.0.0.1).
TM Control Panel User Guide – Working with Domains 15
Note: Although several websites can be assigned the same exclusive IP address within one Webspace, only one website can be accessed by IP address. During auto-provisioning the first website will be accessible through exclusive IP
address.
Later you will be able to edit these parameters at Hosting > Configuration & Administration > Domain Overview > Domain Administration > [select required domain] > Web tab > General subtab > Edit button.
Click Next.
3 Specify the website configuration parameters.
In the WebSite Configuration area:
SSI support - Select this checkbox, if you want to enable SSI support on a website. Server Side Includes - is a method for dynamically generating WWW documents or parts of them. As the result, some information can be added to a Web page, such as the current date, the file's last modification date, and the size or the last modification of other files. In its more advanced usage, it can provide a powerful interface to CGI (Common Gate Interface - the most common way to create dynamic Web pages).
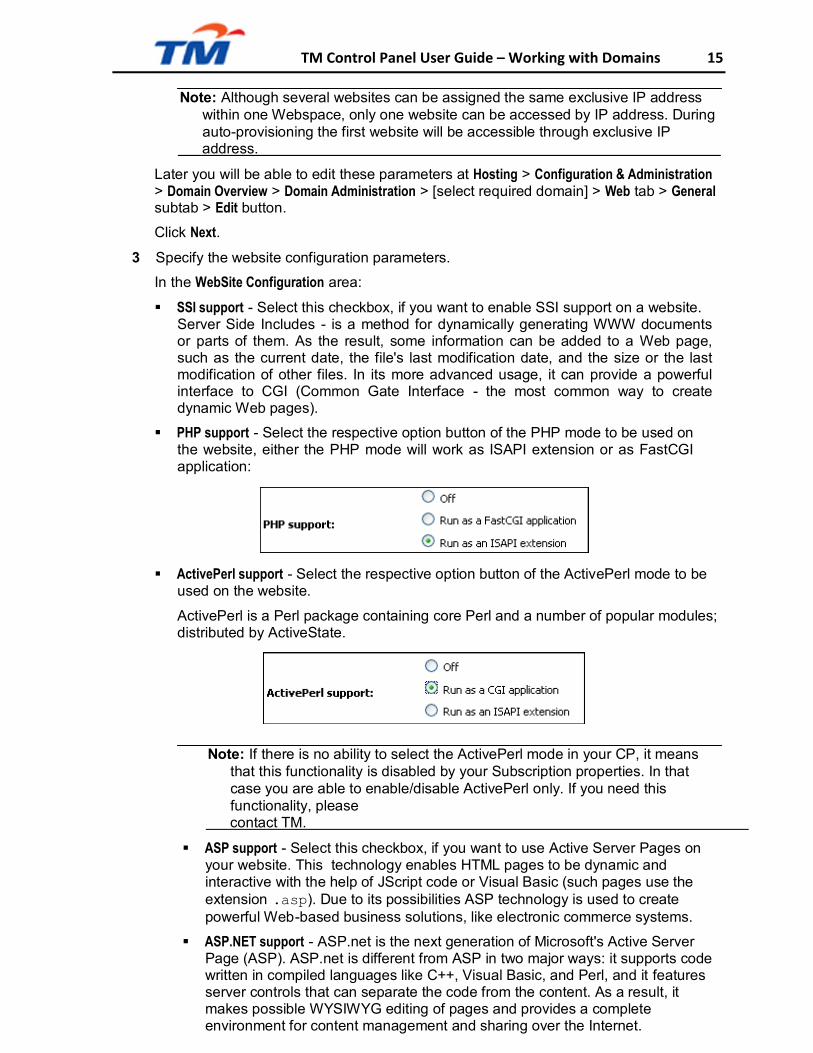
PHP support - Select the respective option button of the PHP mode to be used on the website, either the PHP mode will work as ISAPI extension or as FastCGI application:
ActivePerl support - Select the respective option button of the ActivePerl mode to be used on the website.
ActivePerl is a Perl package containing core Perl and a number of popular modules; distributed by ActiveState.
Note: If there is no ability to select the ActivePerl mode in your CP, it means that this functionality is disabled by your Subscription properties. In that case you are able to enable/disable ActivePerl only. If you need this functionality, please
contact TM.
ASP support - Select this checkbox, if you want to use Active Server Pages on your website. This technology enables HTML pages to be dynamic and interactive with the help of JScript code or Visual Basic (such pages use the extension .asp). Due to its possibilities ASP technology is used to create powerful Web-based business solutions, like electronic commerce systems.
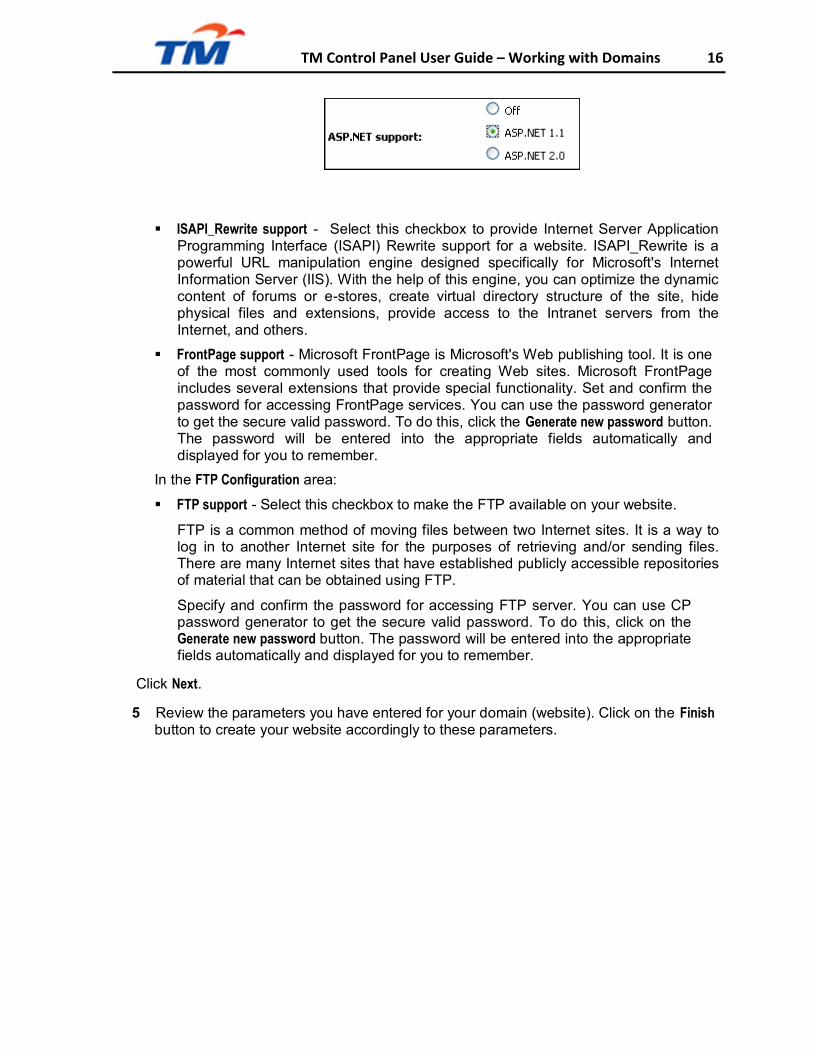
ASP.NET support - ASP.net is the next generation of Microsoft's Active Server Page (ASP). ASP.net is different from ASP in two major ways: it supports code written in compiled languages like C++, Visual Basic, and Perl, and it features server controls that can separate the code from the content. As a result, it makes possible WYSIWYG editing of pages and provides a complete environment for content management and sharing over the Internet.
TM Control Panel User Guide – Working with Domains 16
ISAPI_Rewrite support - Select this checkbox to provide Internet Server Application
Programming Interface (ISAPI) Rewrite support for a website. ISAPI_Rewrite is a powerful URL manipulation engine designed specifically for Microsoft's Internet Information Server (IIS). With the help of this engine, you can optimize the dynamic content of forums or e-stores, create virtual directory structure of the site, hide physical files and extensions, provide access to the Intranet servers from the Internet, and others.
FrontPage support - Microsoft FrontPage is Microsoft's Web publishing tool. It is one of the most commonly used tools for creating Web sites. Microsoft FrontPage includes several extensions that provide special functionality. Set and confirm the password for accessing FrontPage services. You can use the password generator to get the secure valid password. To do this, click the Generate new password button. The password will be entered into the appropriate fields automatically and displayed for you to remember.
In the FTP Configuration area:
FTP support - Select this checkbox to make the FTP available on your website.
FTP is a common method of moving files between two Internet sites. It is a way to log in to another Internet site for the purposes of retrieving and/or sending files. There are many Internet sites that have established publicly accessible repositories of material that can be obtained using FTP.
Specify and confirm the password for accessing FTP server. You can use CP password generator to get the secure valid password. To do this, click on the Generate new password button. The password will be entered into the appropriate fields automatically and displayed for you to remember.
Click Next.
5 Review the parameters you have entered for your domain (website). Click on the Finish
button to create your website accordingly to these parameters.

TM Control Panel User Guide – Working with Domains 17
Managing Domain Security
With CP system you can grant web server permissions for specific domains on your server. You can use web server permissions to control whether visitors to your Webspace are enabled to view a particular web page, upload information, or run scripts.
Moreover, CP system enables you to configure authentication settings for specific domains on your server. Authentication is the process by which visitors confirm their identity and, consequently, their competence to perform functions on the server.
The process is applicable for Windows-based hosting only.
Permissions and authentication make up the security of a specific domain on your server. If you want to set or configure the security parameters for any of your domains, do the following:
1 Go to All Domains. The list of your domains opens.
2 Click on the name of a required domain. The Summary tab opens.
3 Move to the Web tab. The Security sub-tab opens displaying the current security settings for the domain.
4 Click on the Edit button. The security settings are displayed in editing mode.
Figure: Specifying security settings
TM Control Panel User Guide – Working with Domains 18
5 In the Permissions area click to select or click to clear any of the following check boxes that are appropriate for the level of permissions that you want to grant:
Script Source Access. Grant this permission to enable visitors to access source code, such as scripts in Active Sever Pages (ASP) programs. Note that this permission is only available if you grant either the Read or the Write permissions.
When you click Script Source Access, visitors to your domain may be able to view sensitive information, such as a user name and a password, from scripts in an ASP program. They are also able to change source code that runs on your server, which can seriously affect the security and the performance of your server.
It is recommended that you handle access to this type of information and to these functions using individual Windows Accounts and higher-level authentication, such as integrated Windows authentication.
Read. Grant this permission to enable visitors to either view or download files or folders and their associated properties.
Write. Grant this permission to enable users either to upload files and their associated properties to the enabled folder on your server or to change the content or properties of a write-enabled file.
Directory browsing. Grant this permission to enable visitors to view a hypertext listing of the files and the subfolders in the virtual directory. Note that virtual directories are not displayed in folder listings. Visitors should know a virtual directory's alias.
Note: If the Directory browsing is disabled and the visitor attempts to access either a file or folder on your server, without specifying a file name such as Filename.htm in the Address box, an "Access Forbidden" error message is displayed by your Web server in a visitor's Web browser.
6 In the Execute permissions drop-down list, chose a setting to determine how you want
scripts to be run on the site. The following settings are available:
None. Select this setting if you do not want visitors to run scripts or executable programs on the server. When you select this setting, visitors can gain access only to static files such as Hypertext Markup Language (HTML) and image files.
Scripts only. Select this setting to run scripts such as ASP programs on the server.
Scripts and Executables. Select this setting to run both scripts such as ASP programs and executable programs on the server.
7 In the Authentication area click to select or click to clear any of the following check boxes that are appropriate for the level of authentication that you want to provide:
Anonymous access. This scheme gives visitors access to the public areas of your Web site without prompting them for a user name or password.
Integrated Windows authentication. This scheme can use either NTLM or Kerberos V5 authentication and only works with Internet Explorer 2.0 and later. When Internet Explorer attempts to access a protected resource, IIS sends two WWW - Authenticate headers, Negotiate and NTLM.
TM Control Panel User Guide – Working with Domains 19
If Internet Explorer recognizes the Negotiate header, it will choose it because it is listed first. When using Negotiate, the browser will return information for both NTLM and Kerberos.
At the server, IIS will use Kerberos if both the client and the server are running Windows 2000 and later, and both are members of the same domain or trusted domains. Otherwise, the server will default to using NTLM.
If Internet Explorer does not understand Negotiate, it will use NTLM.
When used in conjunction with Kerberos v5 authentication, IIS can delegate security credentials among computers running Windows 2000 and later that are trusted and configured for delegation. Delegation enables remote access of resources on behalf of the delegated user.
Integrated Windows authentication is the best authentication scheme in an intranet environment where users have Windows domain Accounts, especially when using Kerberos.
Integrated Windows authentication, like digest authentication, does not pass the user's password across the network. Instead, a hashed value is exchanged.
Digest authentication. This response mechanism sends a digest (also known as a hash) instead of a password over the network. A digest is a fixed-size result obtained by applying a mathematical function to the combination of the password and the data known to both the server and the client. The client sends the digest to the server as the response to the challenge of the server. The server uses the same process as the client to create a digest. If the digest created by the server matches the digest created by the client, the server authenticates the client.
Basic authentication. When using this scheme, the browser prompts the visitor for a user name and password. This information is then transmitted across HTTP as a plain text.
8 Click on the Finish button to save the settings.
Now visitors can gain access to your Webspace's elements only according to the new permissions and authentication settings.
Configuring List of Service Users Allowed to Manage IIS Website
IIS Website can be managed by a certain list of Service Users where each Service User has his or her own name, login, password, and other properties. You can create several Service Users for managing a single website.
To configure a list of Service Users that can manage a single IIS Website follow these steps:
1 Go to All Domains. The list of your domains opens.
2 Select a domain of Microsoft IIS Web hosting type by clicking on the domain name.

TM Control Panel User Guide – Working with Domains 20
3 The Summary tab of the multi-tabbed window opens. Move to the Managed by tab. The list of Service Users that are able to manage this website opens.
Service Users List consists of the following columns:
Service user. Clicking on the Service User name you will be forwarded to the Service User general information page where you can manage information related to this Service User, enable or disable website content management tools available for him.
Login. Login name of a Service User, which he or she can use to log in to MyCP. See Using MyCP section.
FTP access. Status of FTP service for this Service User (Enabled/Disabled).
File Manager. Status of File Manager service for this Service User (Enabled/Disabled).
Status. Current state of a Service User.
4 To create a new Service User that is able to manage the content of this website, click on the Add Service User button and follow the instructions described in the Creating New Service User section.
To remove a Service User from the list, select a checkbox near the name of a Service User and click the Delete button.
Managing Virtual Directories
Virtual directories are directories that from the viewpoint of web clients seem to share the same physical structure with the web home directory, while in reality they may occupy a completely different location; for example, they may be located on another hard disk or on a remote computer.
Virtual directories let you present a website organization and structure that may be quite different from your actual setup. You can use virtual directories to provide a convenient and organized structure for your web clients to navigate. In this way, virtual directories are similar to logical drives on a hard disk. They serve as a method for reorganizing data to provide a more user-friendly presentation.
Adding New Virtual Directory
To create a virtual directory on your site, perform the following:
1 Go to All Domains. The list of your domains opens.
2 Select the domain based on physical hosting, for which you wish to create a virtual directory. The General tab of the domain will be displayed.
3 Move to the Web tab. Switch to the Virtual directories sub-tab. You can see the list of virtual directories if there are any.
TM Control Panel User Guide – Working with Domains 21
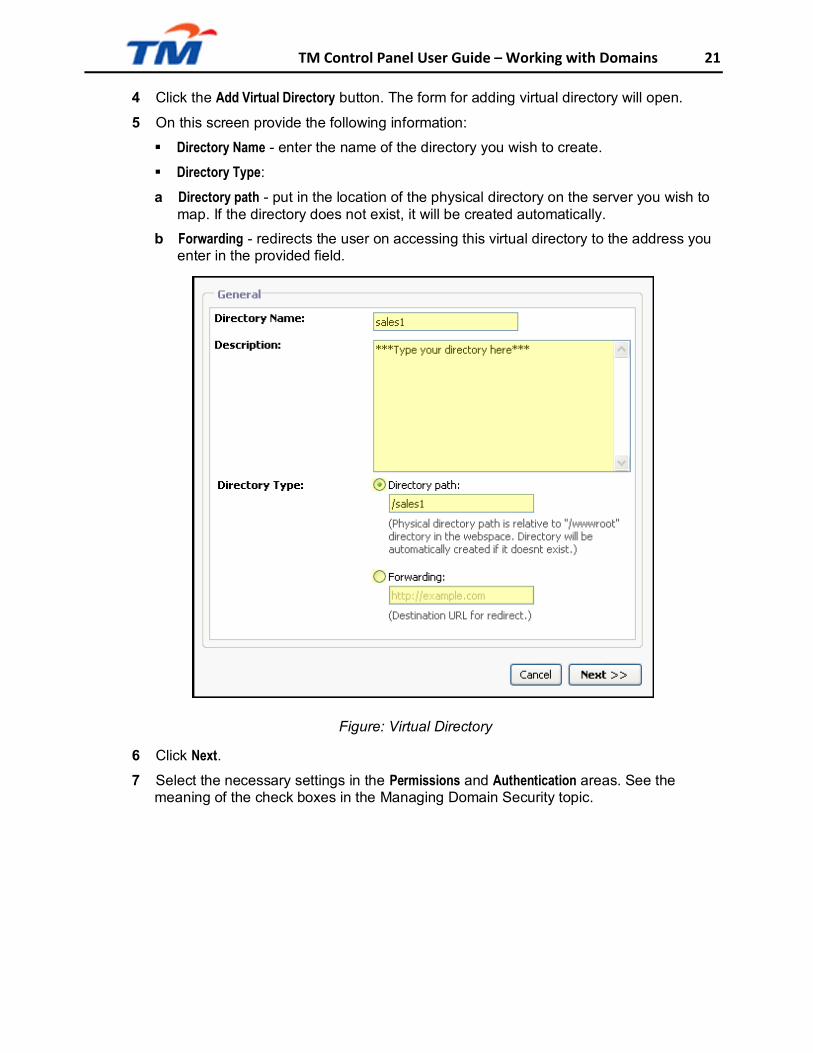
4 Click the Add Virtual Directory button. The form for adding virtual directory will open.
5 On this screen provide the following information:
Directory Name - enter the name of the directory you wish to create.
Directory Type:
a Directory path - put in the location of the physical directory on the server you wish to map. If the directory does not exist, it will be created automatically.
b Forwarding - redirects the user on accessing this virtual directory to the address you enter in the provided field.
6 Click Next.
Figure: Virtual Directory
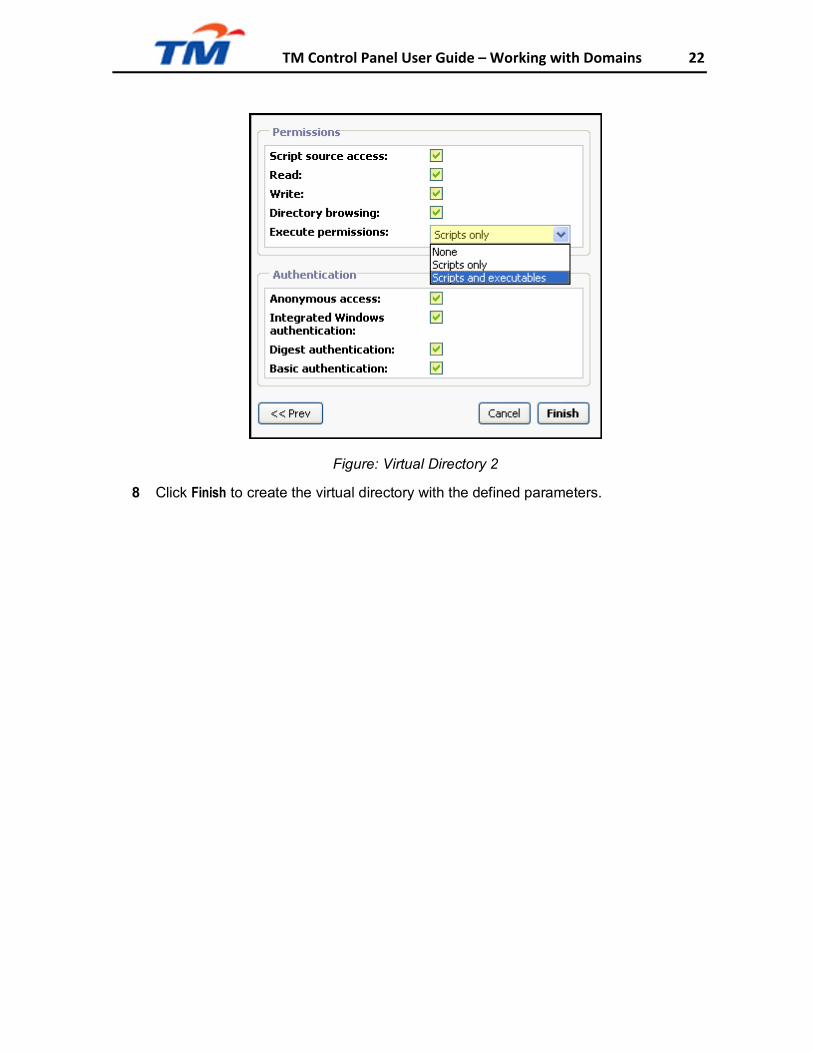
7 Select the necessary settings in the Permissions and Authentication areas. See the meaning of the check boxes in the Managing Domain Security topic.
TM Control Panel User Guide – Working with Domains 22
Figure: Virtual Directory 2
8 Click Finish to create the virtual directory with the defined parameters.
TM Control Panel User Guide – Working with Domains 23
Managing SSL
Usually, web data are sent unencrypted over the Internet. But there are situations when security and privacy are necessary and web traffic needs to be encrypted. For example, in credit card data and bank transactions. For such situations, the use of Secure Socket Layer (SSL) is of high importance. The SSL is used to encrypt the data stream between the web server and the web client (the browser).
The data encrypted by SSL cannot easily be decrypted by a third party. However, to enforce the security of the communication process, SSL certificates. The certificate, signed by a trusted Certificate Authority (CA), ensures that the certificate holder is really who he claims to be.
This section describes how to manage SSL with the help of CP.
Installing SSL Certificate
To install a SSL certificate on your domain, follow these steps:
1 Go to All Domains. The list of your domains opens.
Note: If the "Allow to use services from different Subscriptions on domain" system-wide option is disabled by TM, this operation starts from the Hosting > Configuration & Administration > Domain Overview > Domain Administration page.
2 Select a domain for which you want to install a SSL certificate. Make sure that the
selected domain is provided with Website hosting.
3 Open the Web tab.
4 Open the SSL sub-tab.
5 Click on the Install Certificate and Enable SSL button.
The next steps depend on the variant of the certificate installation. For each variant, the steps are described in the corresponding section below.
Note: You can install a SSL certificate on a domain with exclusive IP address. If the domain IP is shared, follow the steps at Configuring Web Hosting General Parameters to set the IP type as exclusive.
Creating Certificate Signing Request
Certificate Signing Request (CSR) is sent to a CA (such as Thawte or Verisign) who verify the identity of the requestor and issue a signed certificate.
To create a CSR, follow these steps:
TM Control Panel User Guide – Working with Domains 24
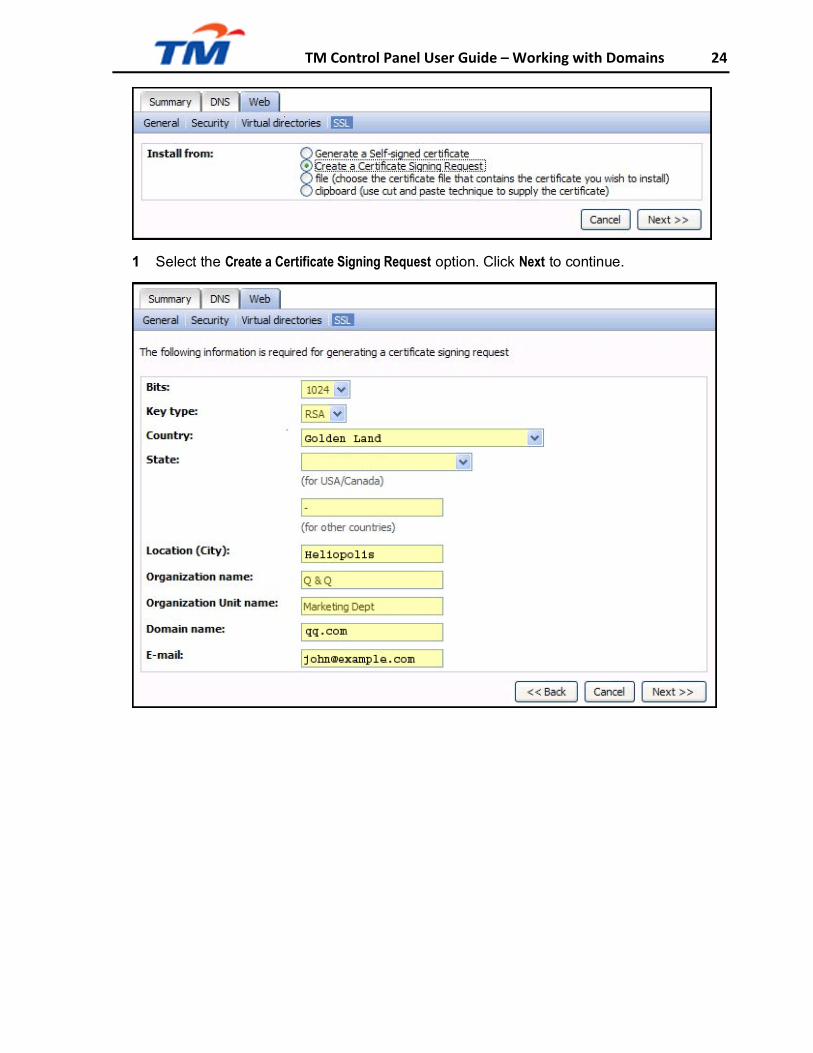
1 Select the Create a Certificate Signing Request option. Click Next to continue.
TM Control Panel User Guide – Working with Domains 25
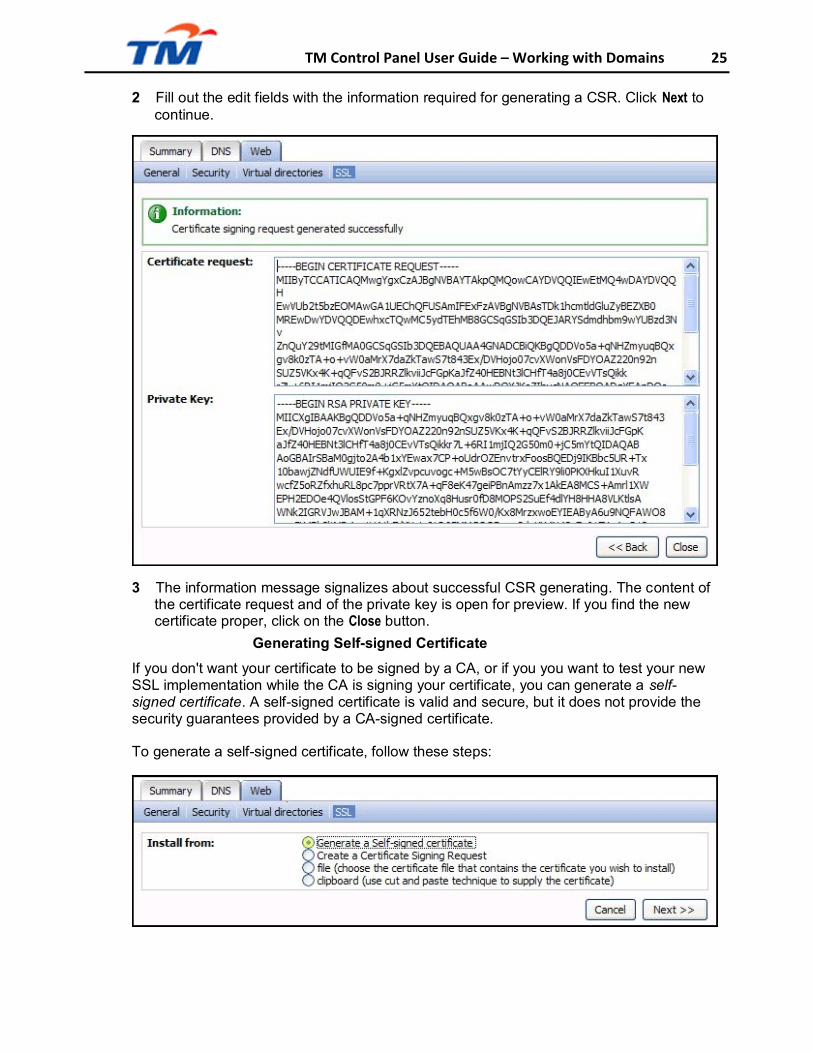
2 Fill out the edit fields with the information required for generating a CSR. Click Next to continue.
3 The information message signalizes about successful CSR generating. The content of the certificate request and of the private key is open for preview. If you find the new certificate proper, click on the Close button.
Generating Self-signed Certificate
If you don't want your certificate to be signed by a CA, or if you you want to test your new SSL implementation while the CA is signing your certificate, you can generate a self- signed certificate. A self-signed certificate is valid and secure, but it does not provide the security guarantees provided by a CA-signed certificate.
To generate a self-signed certificate, follow these steps:
TM Control Panel User Guide – Working with Domains 26
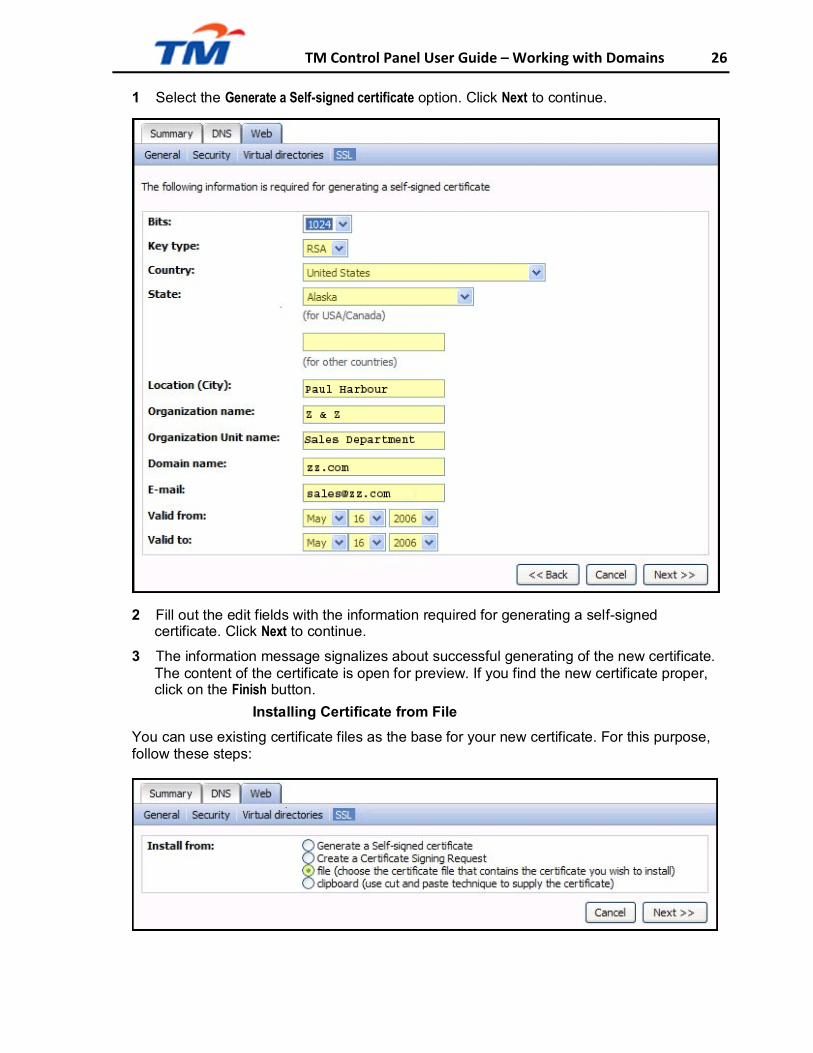
1 Select the Generate a Self-signed certificate option. Click Next to continue.
2 Fill out the edit fields with the information required for generating a self-signed certificate. Click Next to continue.
3 The information message signalizes about successful generating of the new certificate. The content of the certificate is open for preview. If you find the new certificate proper, click on the Finish button.
Installing Certificate from File
You can use existing certificate files as the base for your new certificate. For this purpose, follow these steps:

TM Control Panel User Guide – Working with Domains 27
1 Select the file option. Click Next to continue.
2 Browse to files the content of which you want to use for a new certificate, private key, or CA certificate. Click Next to continue.
3 The information message signalizes about successful generating of the new certificate. The content of the certificate is open for preview. If you find the new certificate proper, click on the Finish button.
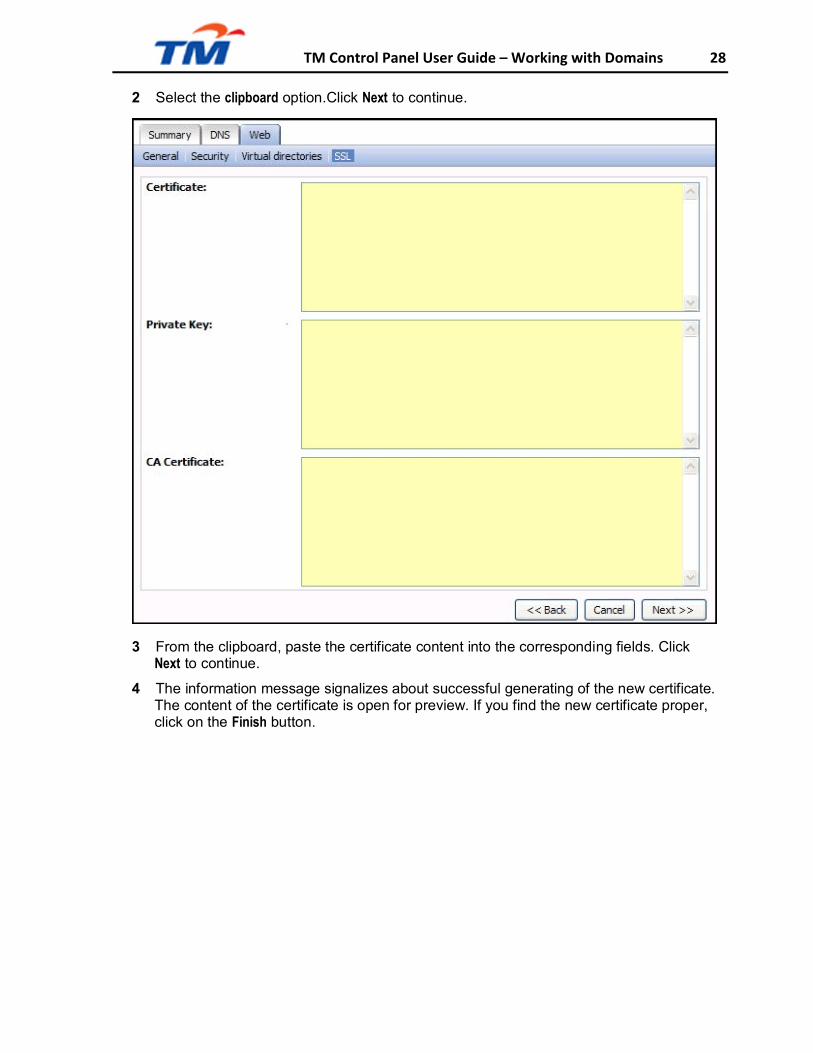
Installing Certificate from Clipboard
You can input texts from the clipboard for your new certificate. For this purpose, follow these steps:
1 To the clipboard of your computer, copy the texts you want to use as the content of a
new certificate, private key, and CA certificate.
TM Control Panel User Guide – Working with Domains 28
2 Select the clipboard option.Click Next to continue.
3 From the clipboard, paste the certificate content into the corresponding fields. Click Next to continue.
4 The information message signalizes about successful generating of the new certificate. The content of the certificate is open for preview. If you find the new certificate proper, click on the Finish button.
TM Control Panel User Guide – Working with Domains 29
Deleting SSL Certificate
To delete an SSL certificate, follow these steps:
1 Go to All Domains. The list of your domains opens.
Note: If the "Allow to use services from different Subscriptions on domain" system-wide option is disabled by TM, this operation starts from the Hosting > Configuration & Administration > Domain Overview > Domain Administration page.
2 Select a domain with SSL certificate.
3 Open the Web tab.
4 Open the SSL sub-tab.
5 Click on the Disable SSL button. The message box appears with the following message:
Are you sure want to disable SSL protection on your Web Site?
6 Click OK in the message box.
After a while, the SSL tab changes its appearance. Now, you can see that the SSL status is marked as Disabled.
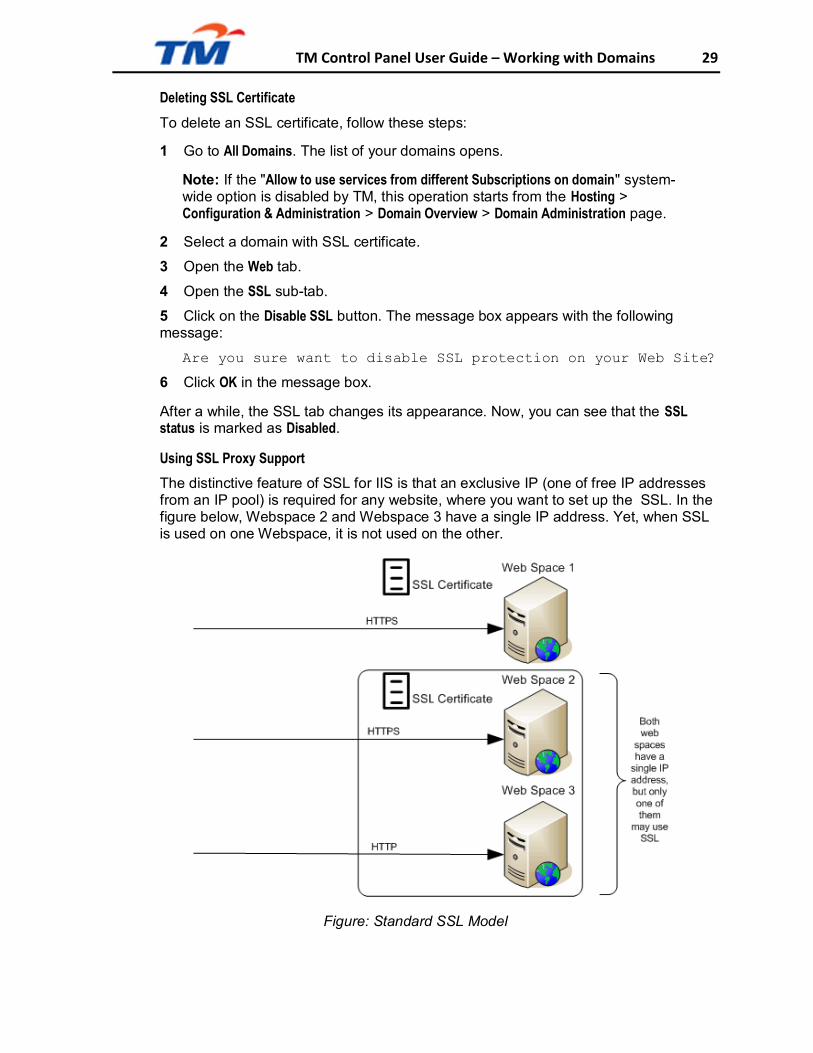
Using SSL Proxy Support
The distinctive feature of SSL for IIS is that an exclusive IP (one of free IP addresses from an IP pool) is required for any website, where you want to set up the SSL. In the figure below, Webspace 2 and Webspace 3 have a single IP address. Yet, when SSL is used on one Webspace, it is not used on the other.
Figure: Standard SSL Model
TM Control Panel User Guide – Working with Domains 30
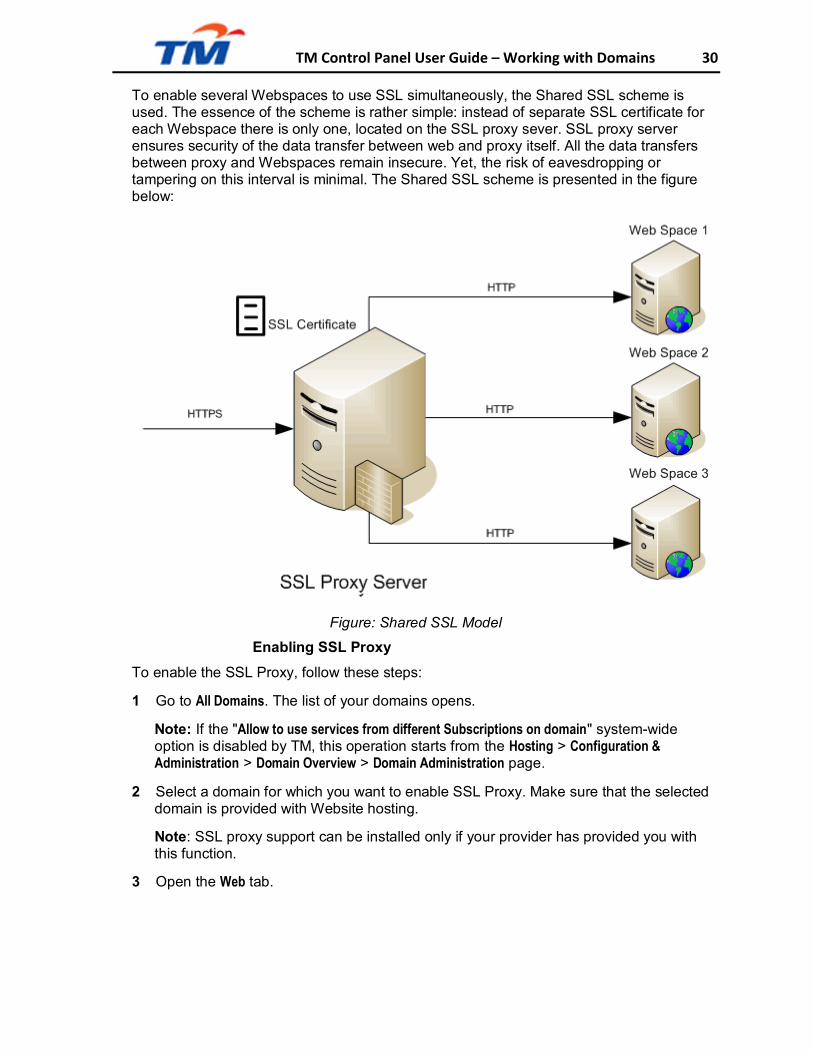
To enable several Webspaces to use SSL simultaneously, the Shared SSL scheme is used. The essence of the scheme is rather simple: instead of separate SSL certificate for each Webspace there is only one, located on the SSL proxy sever. SSL proxy server ensures security of the data transfer between web and proxy itself. All the data transfers between proxy and Webspaces remain insecure. Yet, the risk of eavesdropping or tampering on this interval is minimal. The Shared SSL scheme is presented in the figure below:
Figure: Shared SSL Model
Enabling SSL Proxy
To enable the SSL Proxy, follow these steps:
1 Go to All Domains. The list of your domains opens.
Note: If the "Allow to use services from different Subscriptions on domain" system-wide option is disabled by TM, this operation starts from the Hosting > Configuration & Administration > Domain Overview > Domain Administration page.
2 Select a domain for which you want to enable SSL Proxy. Make sure that the selected
domain is provided with Website hosting.
Note: SSL proxy support can be installed only if your provider has provided you with this function.
3 Open the Web tab.

TM Control Panel User Guide – Working with Domains 31
4 Open the SSL sub-tab.
5 Start enabling the SSL Proxy:
If an SSL certificate is not created, click on the Enable SSL Proxy button.
If an SSL certificate is created, click on the Switch to SSL Proxy button.
In both cases, the message box appears with the question:
Switching to SSL Proxy will cause existing certificate to be uninstalled from this Web Site. Do you really want to enable access through SSL Proxy to this Web Site?
6 Confirm your intention to enable SSL Proxy by clicking OK in the message box.
Note: By enabling the SSL Proxy for any of the domains within certain Webspace, you are simultaneously enable it for entire Webspace and vise versa.

TM Control Panel User Guide – Working with Domains 32
Disabling SSL Proxy
To disable the SSL Proxy on a Webspace, follow these steps:
1 Go to All Domains. The list of your domains opens.
Note: If the "Allow to use services from different Subscriptions on domain" system-wide option is disabled by TM, this operation starts from the Hosting > Configuration & Administration > Domain Overview > Domain Administration page.
2 Select a domain with enabled SSL Proxy.
3 Open the Web tab.
4 Open the SSL sub-tab.
5 Click on the Disable SSL Proxy button. The message box appears with the following message:
Are you sure want to disable SSL protection on your Web Site?
6 Click OK in the message box.
After a while, the SSL tab changes its appearance. Now, you can see that the SSL status is marked as Disabled.
Creating SharePoint Site
CP enables you to create a Windows SharePoint Services site. To do it, follow these steps:
1 Go to All Domains. The list of your domains opens.
Note: If the "Allow to use services from different Subscriptions on domain" system-wide option is disabled by TM, this operation starts from the Hosting > Configuration & Administration > Domain Overview > Domain Administration page.
2 Create a domain as described in Adding Pure Domain, or select an existing
domain you would like to add a SharePoint website to.
3 On the Summary tab, in the Web Hosting area, click Add Hosting.
4 Select a SharePoint hosting service from the Hosting drop-down list.
5 Select the Subscription on which SharePoint hosting will be based from the Subscription drop-down list.
The list of available Subscriptions is filtered to those including SharePoint hosting.
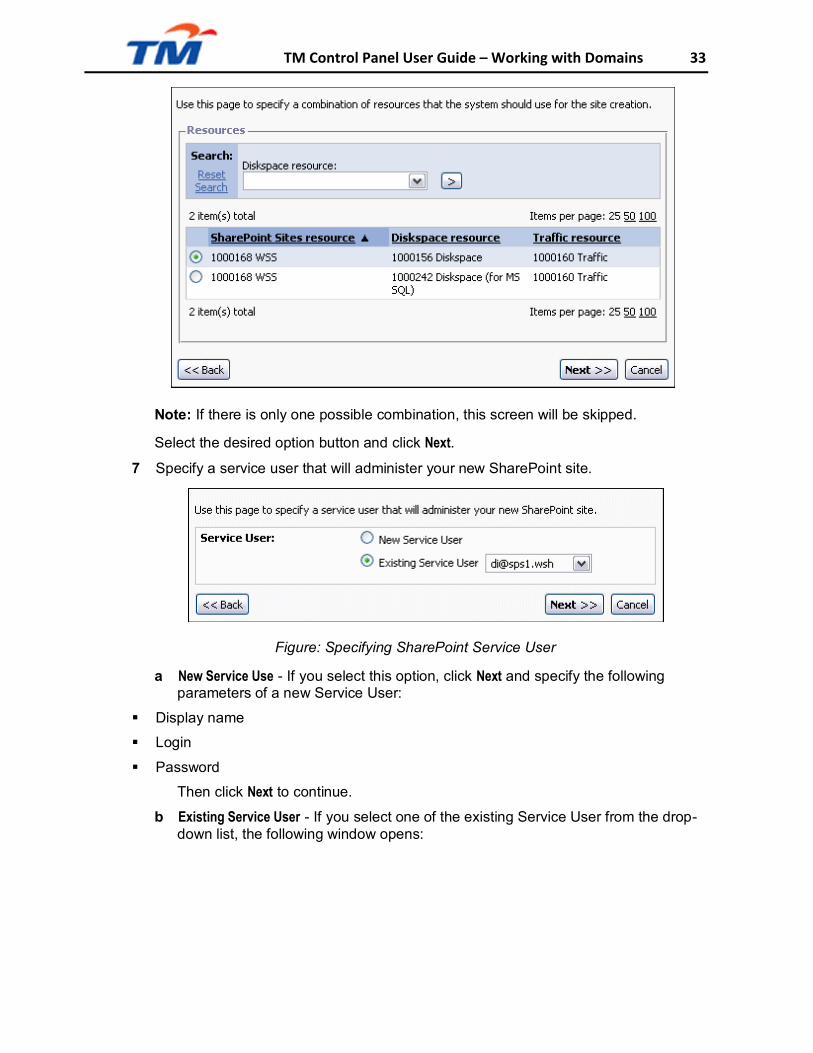
6 Specify a combination of resources that the system should use for the site creation. The SharePoint Sites, Diskspace and Traffic resources are combined automatically for the correct provisioning purposes. All possible combinations are offered here:
TM Control Panel User Guide – Working with Domains 33
Note: If there is only one possible combination, this screen will be skipped.
Select the desired option button and click Next. 7 Specify a service user that will administer your new SharePoint site.
Figure: Specifying SharePoint Service User
a New Service Use - If you select this option, click Next and specify the following parameters of a new Service User:
Display name
Login
Password
Then click Next to continue.
b Existing Service User - If you select one of the existing Service User from the drop- down list, the following window opens:
TM Control Panel User Guide – Working with Domains 34
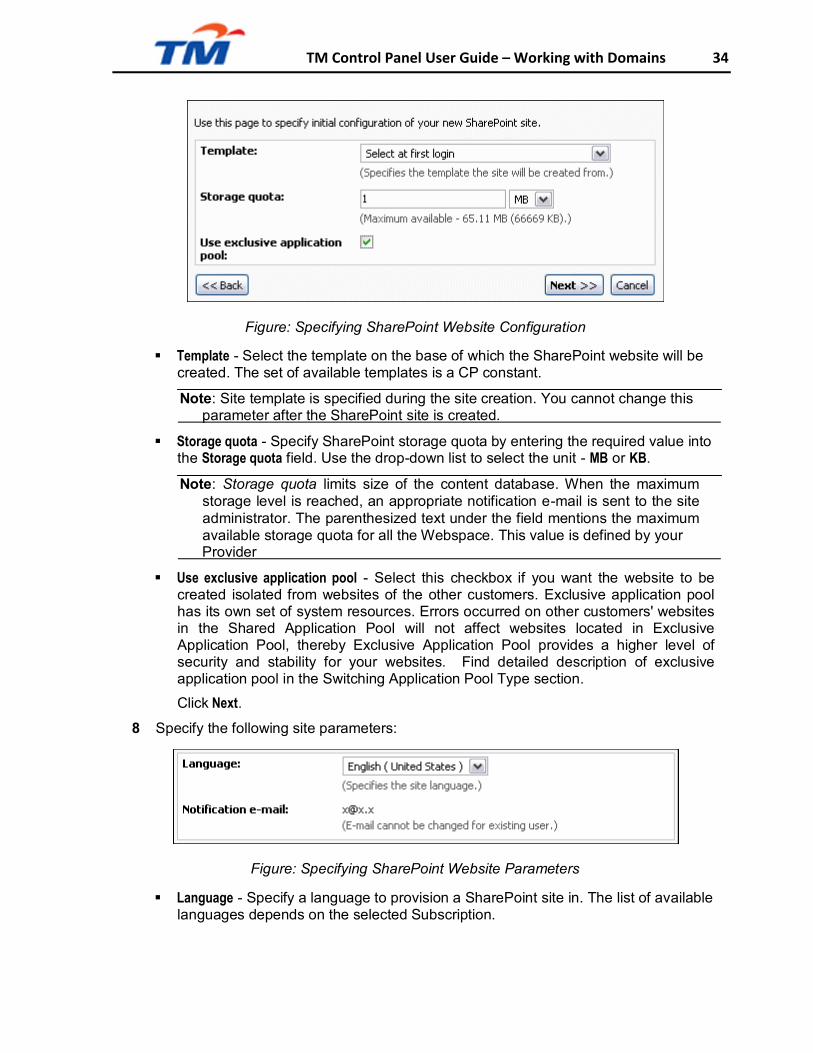
Figure: Specifying SharePoint Website Configuration
Template - Select the template on the base of which the SharePoint website will be created. The set of available templates is a CP constant.
Note: Site template is specified during the site creation. You cannot change this parameter after the SharePoint site is created.
Storage quota - Specify SharePoint storage quota by entering the required value into
the Storage quota field. Use the drop-down list to select the unit - MB or KB.
Note: Storage quota limits size of the content database. When the maximum storage level is reached, an appropriate notification e-mail is sent to the site administrator. The parenthesized text under the field mentions the maximum available storage quota for all the Webspace. This value is defined by your
Provider
Use exclusive application pool - Select this checkbox if you want the website to be created isolated from websites of the other customers. Exclusive application pool has its own set of system resources. Errors occurred on other customers' websites in the Shared Application Pool will not affect websites located in Exclusive Application Pool, thereby Exclusive Application Pool provides a higher level of security and stability for your websites. Find detailed description of exclusive application pool in the Switching Application Pool Type section.
Click Next.
8 Specify the following site parameters:
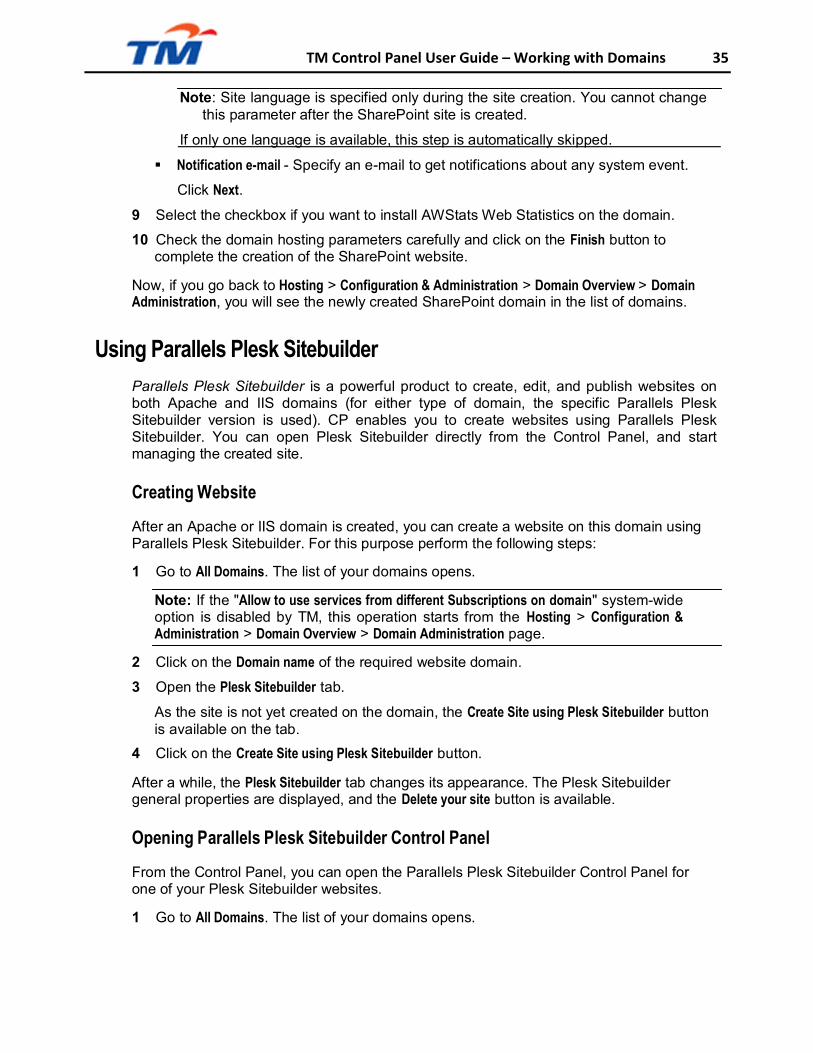
Figure: Specifying SharePoint Website Parameters
Language - Specify a language to provision a SharePoint site in. The list of available languages depends on the selected Subscription.
TM Control Panel User Guide – Working with Domains 35
Note: Site language is specified only during the site creation. You cannot change this parameter after the SharePoint site is created.
If only one language is available, this step is automatically skipped.
Notification e-mail - Specify an e-mail to get notifications about any system event.
Click Next.
9 Select the checkbox if you want to install AWStats Web Statistics on the domain.
10 Check the domain hosting parameters carefully and click on the Finish button to complete the creation of the SharePoint website.
Now, if you go back to Hosting > Configuration & Administration > Domain Overview > Domain Administration, you will see the newly created SharePoint domain in the list of domains.
Using Parallels Plesk Sitebuilder
Parallels Plesk Sitebuilder is a powerful product to create, edit, and publish websites on both Apache and IIS domains (for either type of domain, the specific Parallels Plesk Sitebuilder version is used). CP enables you to create websites using Parallels Plesk Sitebuilder. You can open Plesk Sitebuilder directly from the Control Panel, and start managing the created site.
Creating Website
After an Apache or IIS domain is created, you can create a website on this domain using Parallels Plesk Sitebuilder. For this purpose perform the following steps:
1 Go to All Domains. The list of your domains opens.
Note: If the "Allow to use services from different Subscriptions on domain" system-wide option is disabled by TM, this operation starts from the Hosting > Configuration & Administration > Domain Overview > Domain Administration page.
2 Click on the Domain name of the required website domain.
3 Open the Plesk Sitebuilder tab.
As the site is not yet created on the domain, the Create Site using Plesk Sitebuilder button is available on the tab.
4 Click on the Create Site using Plesk Sitebuilder button.
After a while, the Plesk Sitebuilder tab changes its appearance. The Plesk Sitebuilder general properties are displayed, and the Delete your site button is available.
Opening Parallels Plesk Sitebuilder Control Panel
From the Control Panel, you can open the Parallels Plesk Sitebuilder Control Panel for one of your Plesk Sitebuilder websites.
1 Go to All Domains. The list of your domains opens.

TM Control Panel User Guide – Working with Domains 36
Note: If the "Allow to use services from different Subscriptions on domain" system-wide option is disabled by TM, this operation starts from the Hosting > Configuration & Administration > Domain Overview > Domain Administration page.
2 Click on the Domain name of the required website domain.
3 On the Summary tab, in the Content Management area, click the Edit your site link. You will be forwarded to the Plesk Sitebuilder Control Panel where you will be able to edit the content of the website.
Deleting Website
There are two ways to delete the website from your domain:
I
1 Go to All Domains. The list of your domains opens.
Note: If the "Allow to use services from different Subscriptions on domain" system-wide option is disabled by TM, this operation starts from the Hosting > Configuration & Administration > Domain Overview > Domain Administration page.
2 Click on the Domain name of the required website domain.
3 Open the Plesk Sitebuilder tab.
4 Click on the Delete your site button.
The message box appears with the following question:
Do you really want to delete Plesk Sitebuilder?
5 Click OK in the message box.
II
1 Go to All Domains. The list of your domains opens.
2 Click on the Domain name of the required website domain.
3 On the Summary tab, in the Content Management area, click the Delete your site link.
The message box appears with the following question:
Do you really want to delete Plesk Sitebuilder?
4 Click OK in the message box.

TM Control Panel User Guide – Working with Domains 37
osCommerce Website
osCommerce is an open source software (the "os" prefix stands for "open source") that makes it easy to build profitable web-based storefronts. It helps you manage product catalogs, prices, customer accounts, orders and shipping. Your storefront can even offer bestseller lists, customer product reviews and product recommendations.
CP provides two variants of using the osCommerce software:
Installing osCommerce web application. See the Setting Up osCommerce Store
topic. Creating osCommerce website.

TM Control Panel User Guide – Working with Domains 38
Creating osCommerce Website
To create an osCommerce website, follow these steps:
1 Go to All Domains. The list of your domains opens.
Note: If the "Allow to use services from different Subscriptions on domain" system-wide option is disabled by TM, this operation starts from the Hosting > Configuration & Administration > Domain Overview > Domain Administration page.
2 Create a domain as described in Adding Pure Domain, or select an existing
domain you would like to an osCommerce website to.
3 On the Summary tab, in the Web Hosting area, click Add Hosting.
4 Select an osCommerce hosting service from the Hosting drop-down list.
5 Select the Subscription on which osCommerce hosting will be based from the Subscription drop-down list.
The list of available Subscriptions is filtered to those including osCommerce hosting.
6 Enter the parameters that will be used to authenticate you in the Administration tool:
Type your user name into the Username field.
Enter a password into the Password field.
Confirm the just entered password by retyping it in the Confirm Password field.
Note: If you want CP to generate the password for you, click on the Generate new password button.
Figure: Creating osCommerce Domain, Step 2
Click on the Next button to continue.
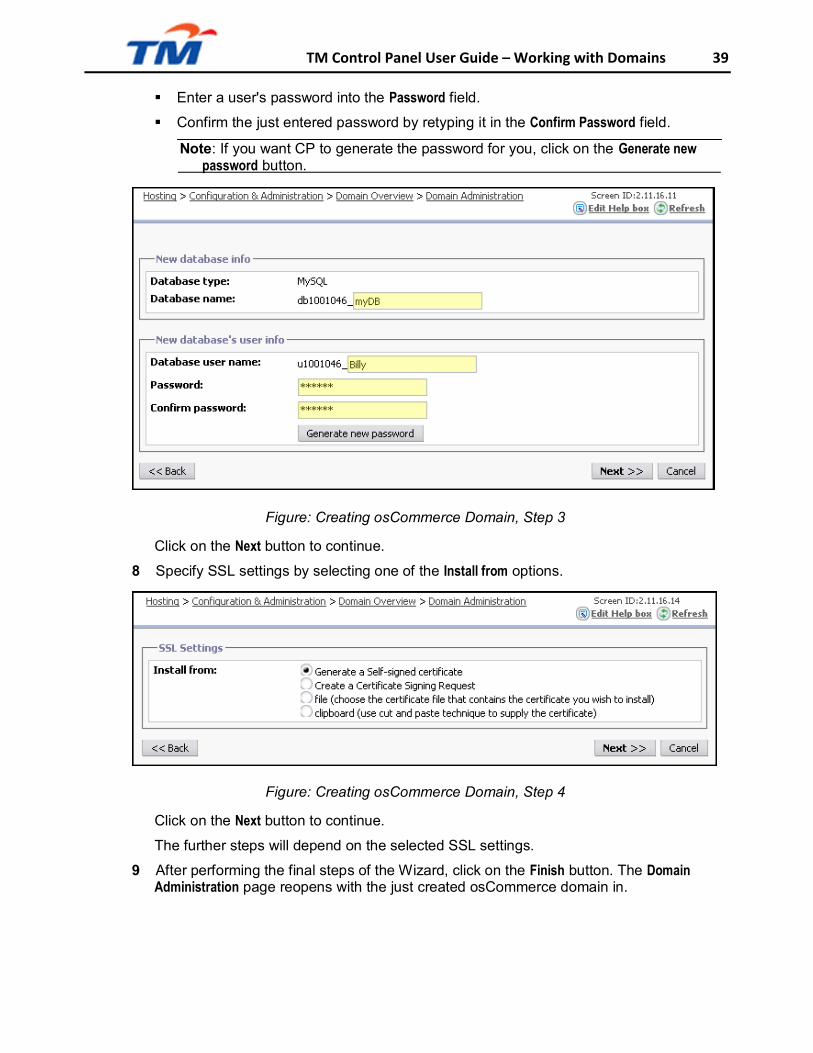
7 Type the name of the new database into the Database name field.
Enter the new database's user parameters:
Type the database user name into the Database user name field.
TM Control Panel User Guide – Working with Domains 39
Enter a user's password into the Password field.
Confirm the just entered password by retyping it in the Confirm Password field.
Note: If you want CP to generate the password for you, click on the Generate new password button.
Figure: Creating osCommerce Domain, Step 3
Click on the Next button to continue.
8 Specify SSL settings by selecting one of the Install from options.
Figure: Creating osCommerce Domain, Step 4
Click on the Next button to continue.
The further steps will depend on the selected SSL settings.
9 After performing the final steps of the Wizard, click on the Finish button. The Domain Administration page reopens with the just created osCommerce domain in.
TM Control Panel User Guide – Working with Domains 40
Managing osCommerce Website
Once you have created an osCommerce website on a domain, you can use this domain to access osCommerce.
To access osCommerce with the administrator's rights, follow these steps:
1 Go to All Domains. The list of your domains opens.
Note: If the "Allow to use services from different Subscriptions on domain" system-wide option is disabled by TM, this operation starts from the Hosting > Configuration & Administration > Domain Overview > Domain Administration page.
2 Click on the name of the required osCommerce domain. Domains with osCommerce
hosting are marked by osCommerce in the Web Hosting column.
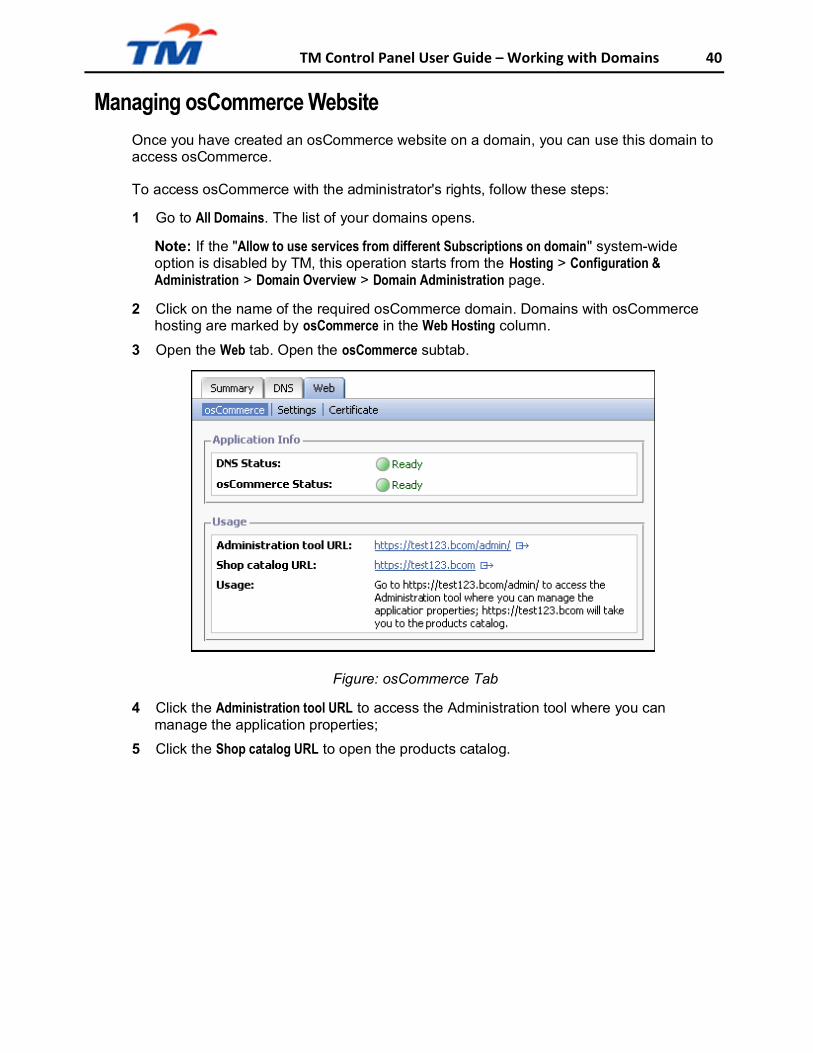
3 Open the Web tab. Open the osCommerce subtab.
Figure: osCommerce Tab
4 Click the Administration tool URL to access the Administration tool where you can manage the application properties;
5 Click the Shop catalog URL to open the products catalog.
TM Control Panel User Guide – Working with Domains 41
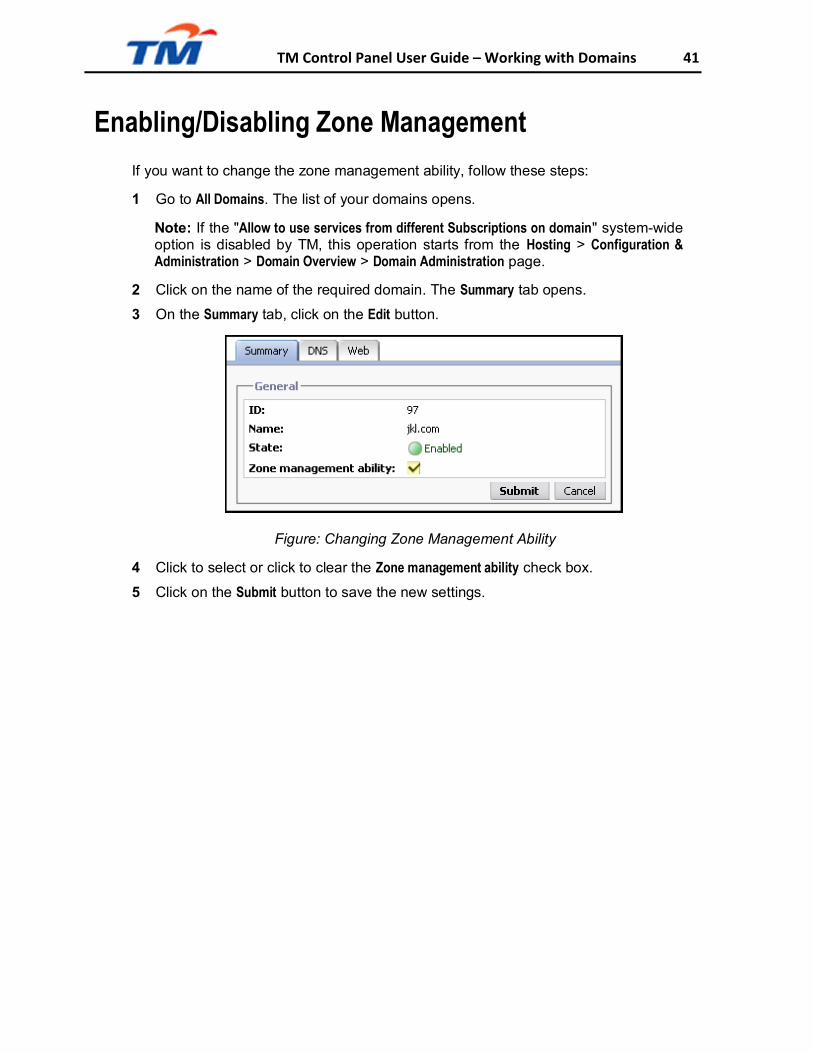
Enabling/Disabling Zone Management
If you want to change the zone management ability, follow these steps:
1 Go to All Domains. The list of your domains opens.
Note: If the "Allow to use services from different Subscriptions on domain" system-wide option is disabled by TM, this operation starts from the Hosting > Configuration & Administration > Domain Overview > Domain Administration page.
2 Click on the name of the required domain. The Summary tab opens.
3 On the Summary tab, click on the Edit button.
Figure: Changing Zone Management Ability
4 Click to select or click to clear the Zone management ability check box.
5 Click on the Submit button to save the new settings.
TM Control Panel User Guide – Working with Domains 42
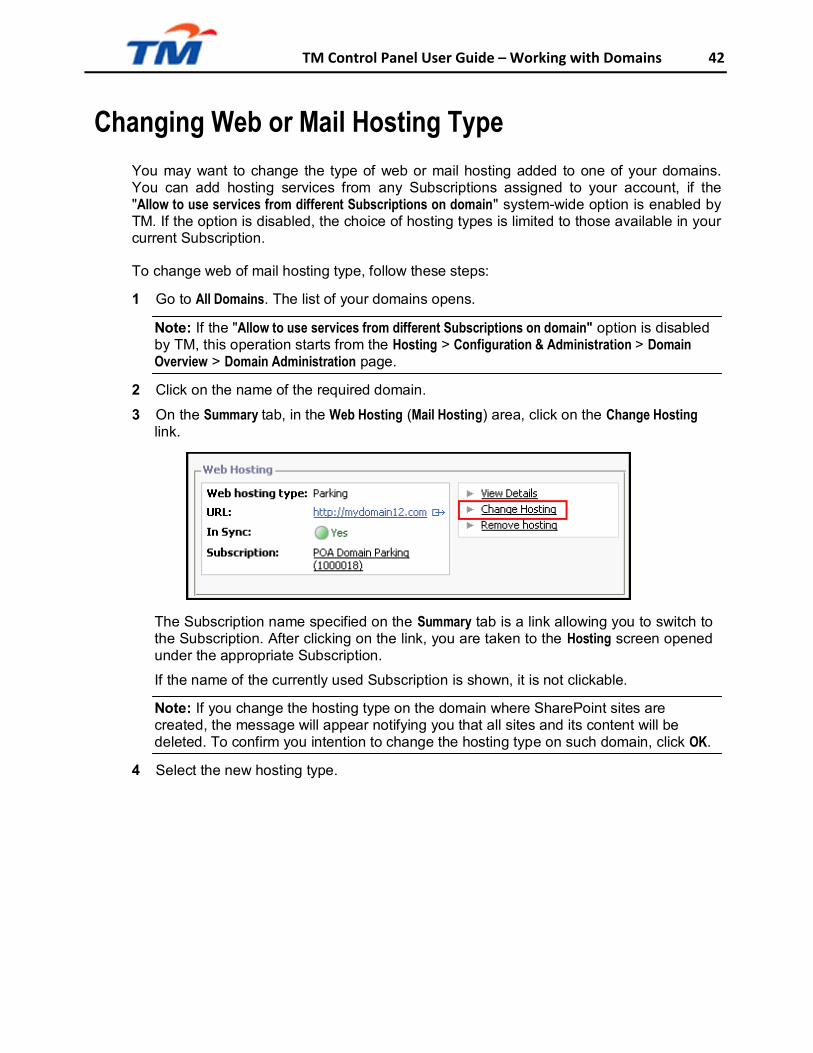
Changing Web or Mail Hosting Type
You may want to change the type of web or mail hosting added to one of your domains. You can add hosting services from any Subscriptions assigned to your account, if the "Allow to use services from different Subscriptions on domain" system-wide option is enabled by TM. If the option is disabled, the choice of hosting types is limited to those available in your current Subscription.
To change web of mail hosting type, follow these steps:
1 Go to All Domains. The list of your domains opens.
Note: If the "Allow to use services from different Subscriptions on domain" option is disabled by TM, this operation starts from the Hosting > Configuration & Administration > Domain Overview > Domain Administration page.
2 Click on the name of the required domain.
3 On the Summary tab, in the Web Hosting (Mail Hosting) area, click on the Change Hosting link.
The Subscription name specified on the Summary tab is a link allowing you to switch to the Subscription. After clicking on the link, you are taken to the Hosting screen opened under the appropriate Subscription.
If the name of the currently used Subscription is shown, it is not clickable.
Note: If you change the hosting type on the domain where SharePoint sites are created, the message will appear notifying you that all sites and its content will be deleted. To confirm you intention to change the hosting type on such domain, click OK.
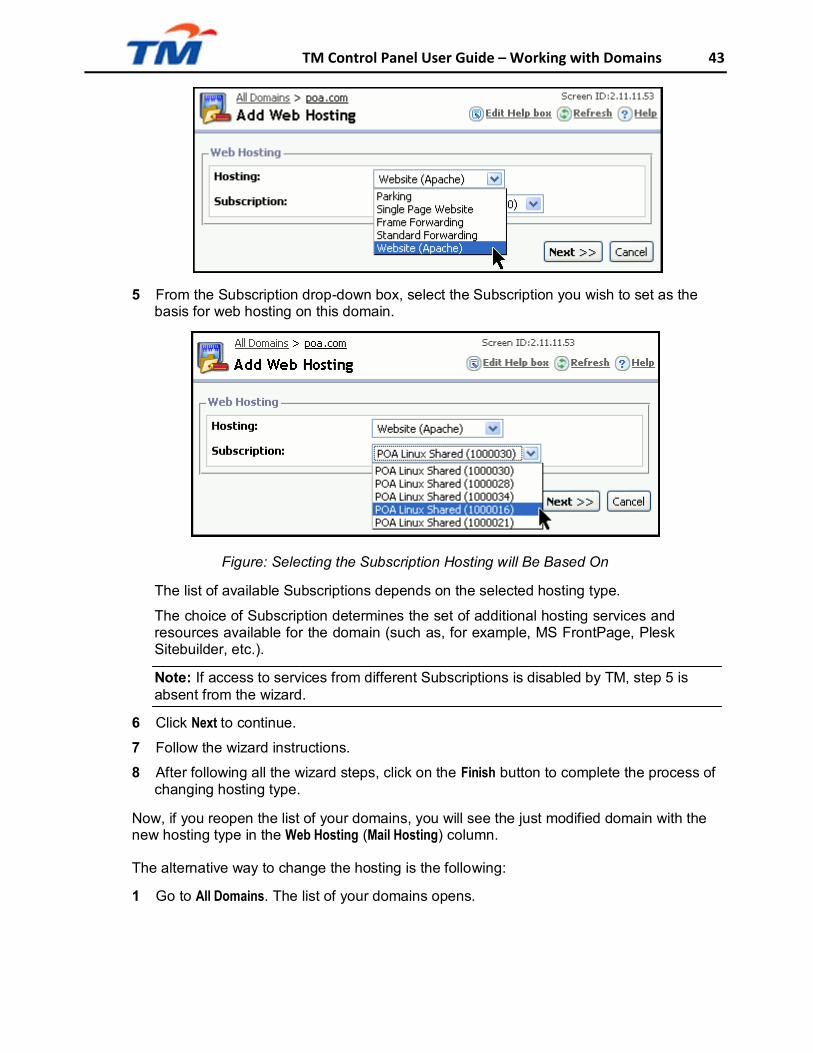
4 Select the new hosting type.
TM Control Panel User Guide – Working with Domains 43
5 From the Subscription drop-down box, select the Subscription you wish to set as the basis for web hosting on this domain.
Figure: Selecting the Subscription Hosting will Be Based On
The list of available Subscriptions depends on the selected hosting type.
The choice of Subscription determines the set of additional hosting services and resources available for the domain (such as, for example, MS FrontPage, Plesk Sitebuilder, etc.).
Note: If access to services from different Subscriptions is disabled by TM, step 5 is absent from the wizard.
6 Click Next to continue.
7 Follow the wizard instructions.
8 After following all the wizard steps, click on the Finish button to complete the process of changing hosting type.
Now, if you reopen the list of your domains, you will see the just modified domain with the new hosting type in the Web Hosting (Mail Hosting) column.
The alternative way to change the hosting is the following:
1 Go to All Domains. The list of your domains opens.

TM Control Panel User Guide – Working with Domains 44
Note: If the "Allow to use services from different Subscriptions on domain" option is disabled by TM, this operation starts from the Hosting > Configuration & Administration > Domain Overview > Domain Administration page.
2 Click on the name of the required domain.
3 Select the Web (Mail) tab.
4 On the Web (Mail) tab, click on the Change Hosting button and follow the wizard instructions.
TM Control Panel User Guide – Working with Domains 45
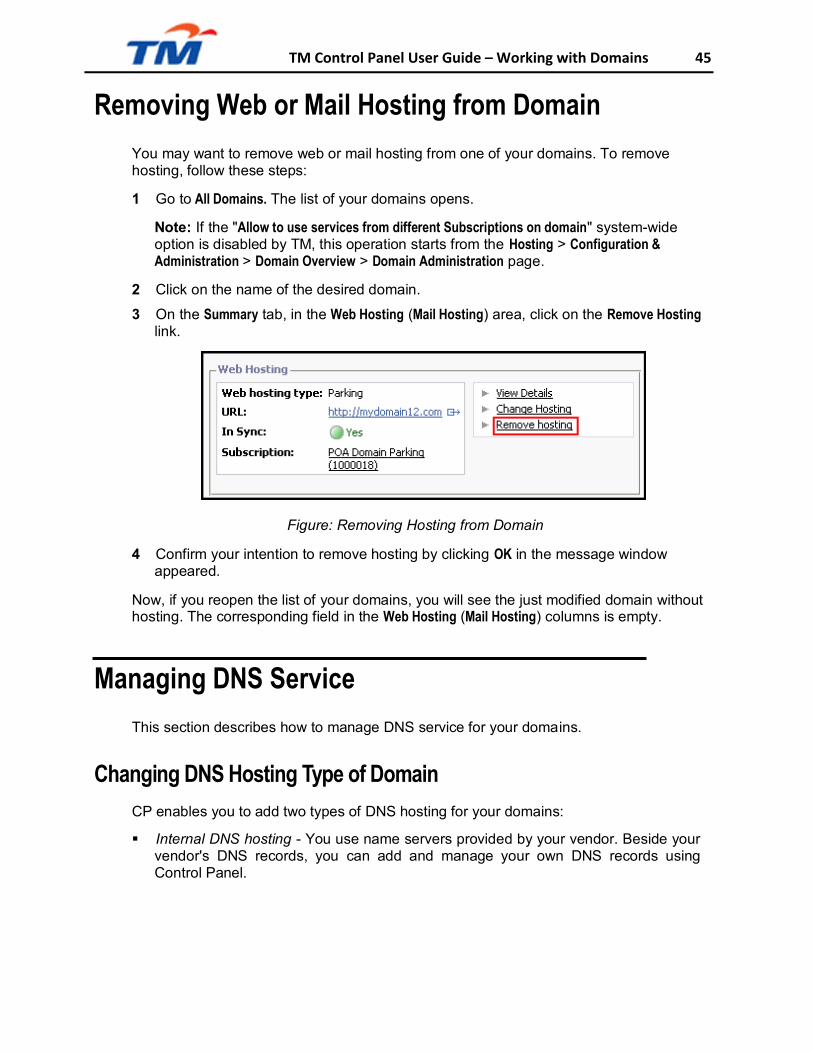
Removing Web or Mail Hosting from Domain
You may want to remove web or mail hosting from one of your domains. To remove hosting, follow these steps:
1 Go to All Domains. The list of your domains opens.
Note: If the "Allow to use services from different Subscriptions on domain" system-wide option is disabled by TM, this operation starts from the Hosting > Configuration & Administration > Domain Overview > Domain Administration page.
2 Click on the name of the desired domain.
3 On the Summary tab, in the Web Hosting (Mail Hosting) area, click on the Remove Hosting link.
Figure: Removing Hosting from Domain
4 Confirm your intention to remove hosting by clicking OK in the message window appeared.
Now, if you reopen the list of your domains, you will see the just modified domain without hosting. The corresponding field in the Web Hosting (Mail Hosting) columns is empty.
Managing DNS Service
This section describes how to manage DNS service for your domains.
Changing DNS Hosting Type of Domain
CP enables you to add two types of DNS hosting for your domains:
Internal DNS hosting - You use name servers provided by your vendor. Beside your vendor's DNS records, you can add and manage your own DNS records using Control Panel.
TM Control Panel User Guide – Working with Domains 46
Working with Domains 105
External DNS hosting - You use external name server and manage it without using Control Panel.
To switch one of your domains to another DNS hosting type, follow these steps:
1 Go to All Domains menu.
Note: If the "Allow to use services from different Subscriptions on domain" option is disabled by TM, this operation starts from the Hosting > Configuration & Administration > Domain Overview > Domain Administration page.
2 Select the required domain.
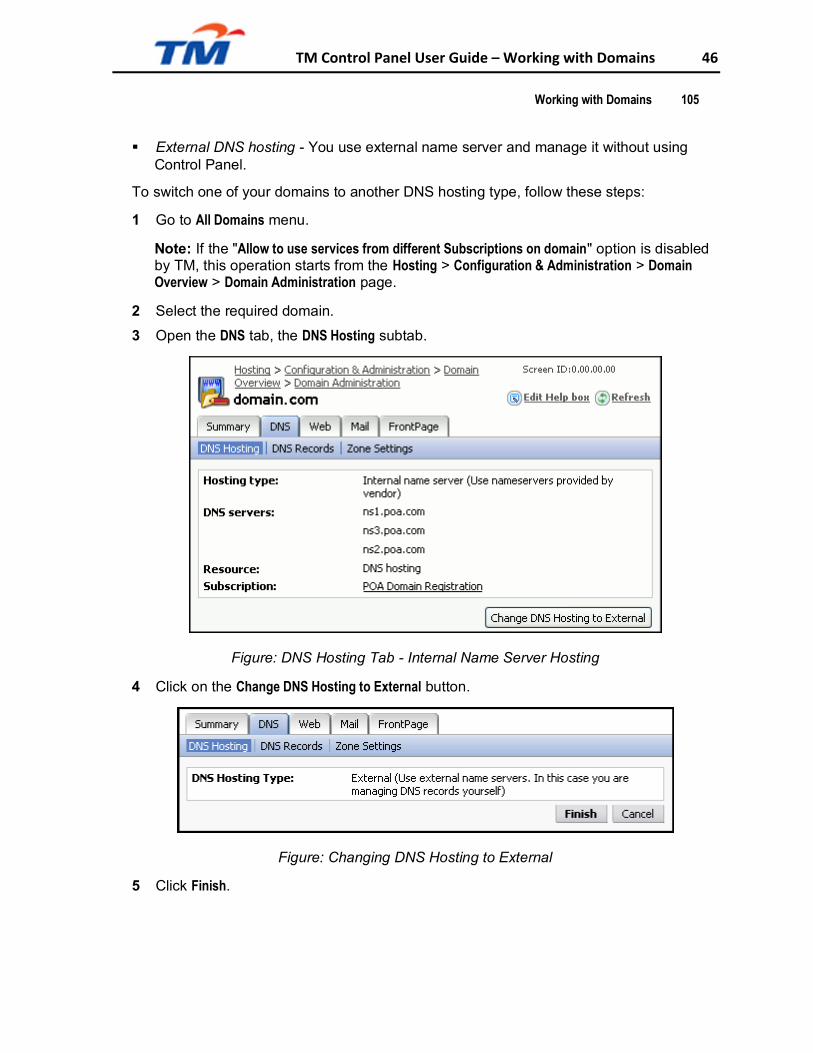
3 Open the DNS tab, the DNS Hosting subtab.
Figure: DNS Hosting Tab - Internal Name Server Hosting
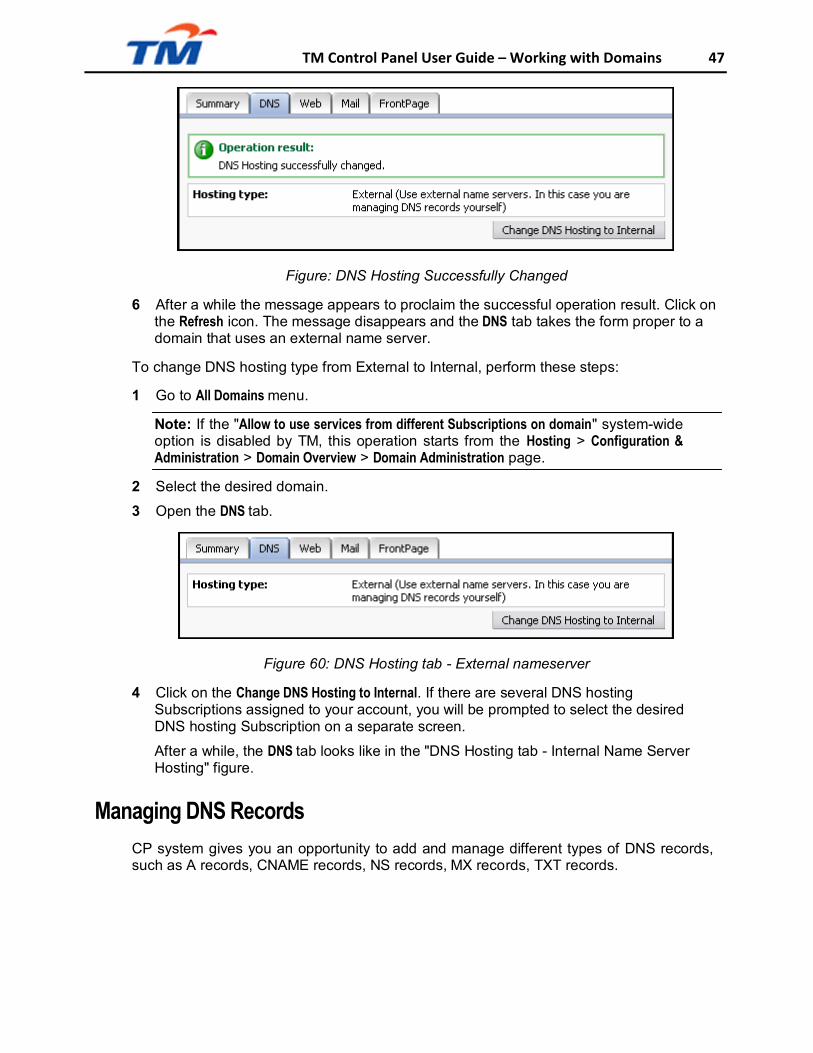
4 Click on the Change DNS Hosting to External button.
5 Click Finish.
Figure: Changing DNS Hosting to External
TM Control Panel User Guide – Working with Domains 47
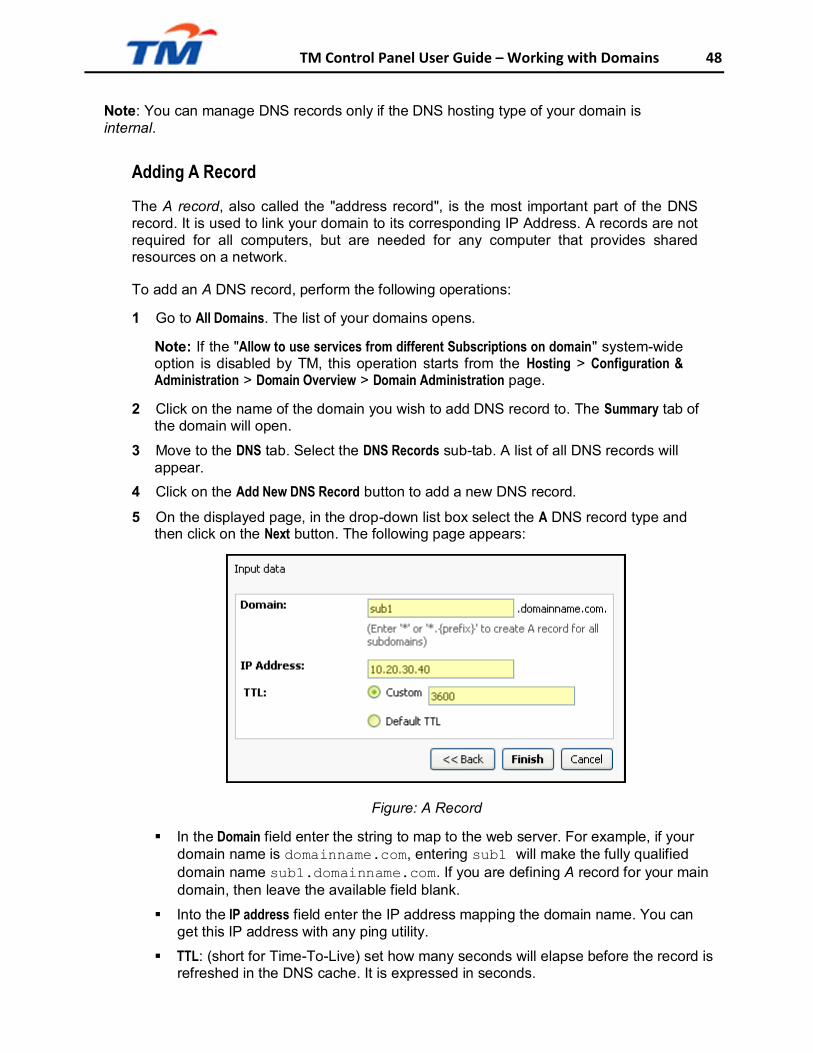
Figure: DNS Hosting Successfully Changed
6 After a while the message appears to proclaim the successful operation result. Click on the Refresh icon. The message disappears and the DNS tab takes the form proper to a domain that uses an external name server.
To change DNS hosting type from External to Internal, perform these steps:
1 Go to All Domains menu.
Note: If the "Allow to use services from different Subscriptions on domain" system-wide option is disabled by TM, this operation starts from the Hosting > Configuration & Administration > Domain Overview > Domain Administration page.
2 Select the desired domain.
3 Open the DNS tab.
Figure 60: DNS Hosting tab - External nameserver
4 Click on the Change DNS Hosting to Internal. If there are several DNS hosting Subscriptions assigned to your account, you will be prompted to select the desired DNS hosting Subscription on a separate screen.
After a while, the DNS tab looks like in the "DNS Hosting tab - Internal Name Server Hosting" figure.
Managing DNS Records
CP system gives you an opportunity to add and manage different types of DNS records, such as A records, CNAME records, NS records, MX records, TXT records.
TM Control Panel User Guide – Working with Domains 48
Note: You can manage DNS records only if the DNS hosting type of your domain is internal.
Adding A Record
The A record, also called the "address record", is the most important part of the DNS record. It is used to link your domain to its corresponding IP Address. A records are not required for all computers, but are needed for any computer that provides shared resources on a network.
To add an A DNS record, perform the following operations:
1 Go to All Domains. The list of your domains opens.
Note: If the "Allow to use services from different Subscriptions on domain" system-wide option is disabled by TM, this operation starts from the Hosting > Configuration & Administration > Domain Overview > Domain Administration page.
2 Click on the name of the domain you wish to add DNS record to. The Summary tab of
the domain will open.
3 Move to the DNS tab. Select the DNS Records sub-tab. A list of all DNS records will appear.
4 Click on the Add New DNS Record button to add a new DNS record.
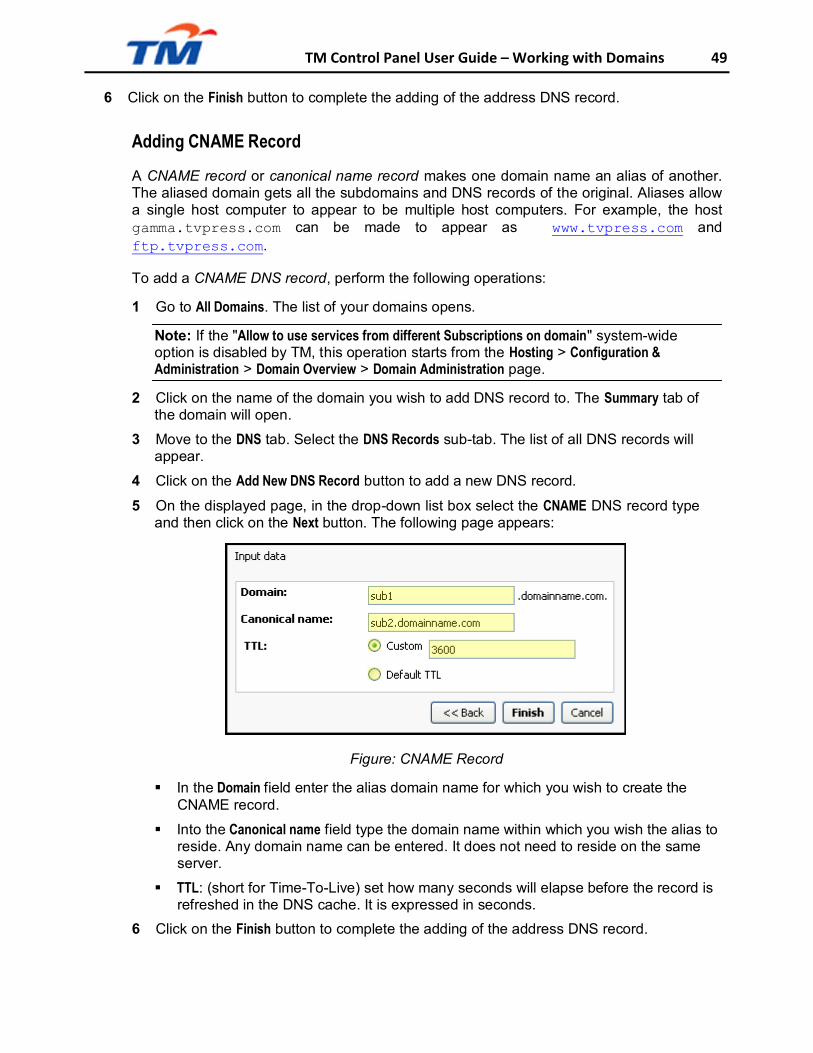
5 On the displayed page, in the drop-down list box select the A DNS record type and then click on the Next button. The following page appears:
Figure: A Record
In the Domain field enter the string to map to the web server. For example, if your domain name is domainname.com, entering sub1 will make the fully qualified domain name sub1.domainname.com. If you are defining A record for your main domain, then leave the available field blank.
Into the IP address field enter the IP address mapping the domain name. You can get this IP address with any ping utility.
TTL: (short for Time-To-Live) set how many seconds will elapse before the record is refreshed in the DNS cache. It is expressed in seconds.
TM Control Panel User Guide – Working with Domains 49
6 Click on the Finish button to complete the adding of the address DNS record. Adding CNAME Record
A CNAME record or canonical name record makes one domain name an alias of another. The aliased domain gets all the subdomains and DNS records of the original. Aliases allow a single host computer to appear to be multiple host computers. For example, the host gamma.tvpress.com can be made to appear as www.tvpress.com and ftp.tvpress.com.
To add a CNAME DNS record, perform the following operations:
1 Go to All Domains. The list of your domains opens.
Note: If the "Allow to use services from different Subscriptions on domain" system-wide option is disabled by TM, this operation starts from the Hosting > Configuration & Administration > Domain Overview > Domain Administration page.
2 Click on the name of the domain you wish to add DNS record to. The Summary tab of
the domain will open.
3 Move to the DNS tab. Select the DNS Records sub-tab. The list of all DNS records will appear.
4 Click on the Add New DNS Record button to add a new DNS record.
5 On the displayed page, in the drop-down list box select the CNAME DNS record type and then click on the Next button. The following page appears:
Figure: CNAME Record
In the Domain field enter the alias domain name for which you wish to create the CNAME record.
Into the Canonical name field type the domain name within which you wish the alias to reside. Any domain name can be entered. It does not need to reside on the same server.
TTL: (short for Time-To-Live) set how many seconds will elapse before the record is refreshed in the DNS cache. It is expressed in seconds.
6 Click on the Finish button to complete the adding of the address DNS record.
TM Control Panel User Guide – Working with Domains 50
Note: There must always be an A record for the machine before a CNAME record (aliases) can be created.
Adding NS Record
An NS record or name server record maps a domain name to a list of DNS servers for that domain. It is used to delegate control of your domain to a specified DNS server. For example, your company has a branch office in Germany, and you want this branch to have its own website. You can make the germany.example.com pointing to a nearby (German) DNS server using NS records. As the result, the colleagues of the German branch office will be able to control germany.example.com and configure it on their own without the help or control of the chief office.
Each primary and secondary name server should be declared through this record. If you obtain secondary name services from an Internet service provider, be sure to insert the appropriate NS records.
To add an NS DNS record, perform the following operations:
1 Go to All Domains. The list of your domains opens.
Note: If the "Allow to use services from different Subscriptions on domain" system-wide option is disabled by TM, this operation starts from the Hosting > Configuration & Administration > Domain Overview > Domain Administration page.
2 Click on the name of the domain you wish to add DNS record to. The Summary tab of
the domain will open.
3 Move to the DNS tab. Select the DNS Records sub-tab. The list of your DNS records will appear.
4 Click on the Add New DNS Record button to add a new DNS record.
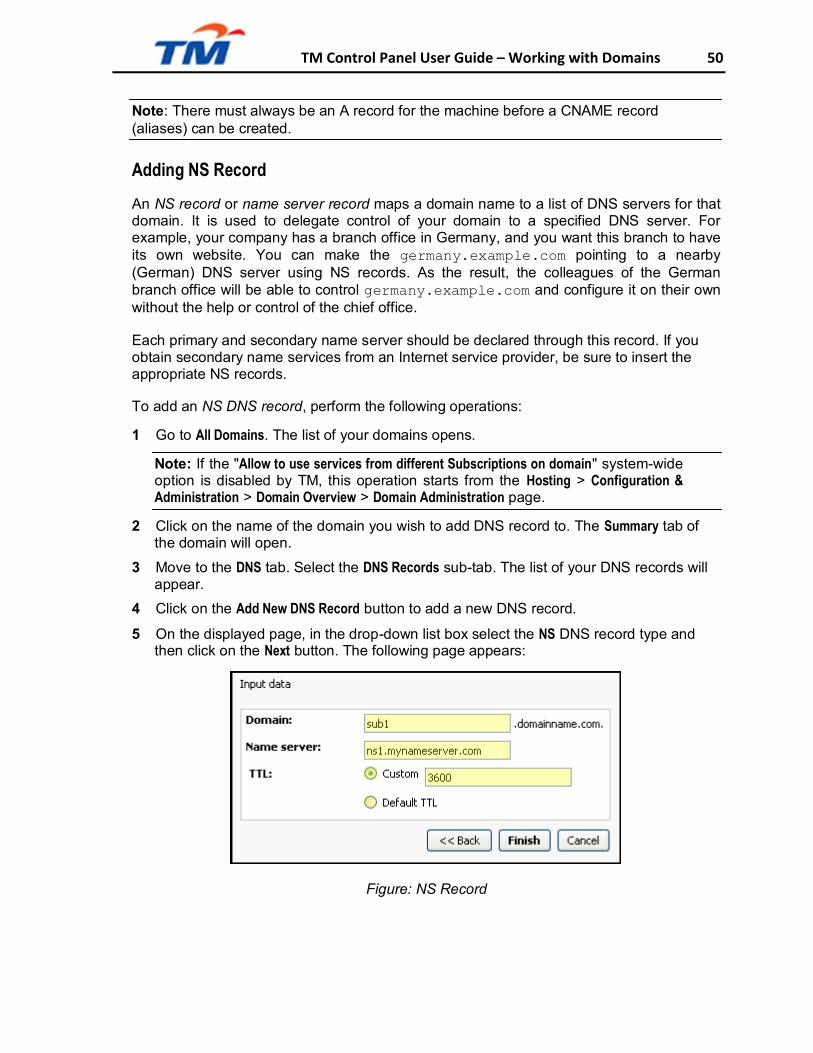
5 On the displayed page, in the drop-down list box select the NS DNS record type and then click on the Next button. The following page appears:
Figure: NS Record

TM Control Panel User Guide – Working with Domains 51
Domain: enter the domain name for which you wish to create the NS record. If you are defining an NS record for your main domain, then you will leave the available field blank.
Name Server: type the appropriate name server. You will need to enter the complete name (i.e. ns1.mynameserver.com).
TTL: (short for Time-To-Live) set how many seconds will elapse before the record is refreshed in the DNS cache. It is expressed in seconds.
6 Click on the Finish button to complete the adding of the address DNS record.

TM Control Panel User Guide – Working with Domains 52
Adding MX Record
MX records (mail exchange records) identify mail exchange servers for the domain. These servers are responsible for processing or forwarding mail within the domain.
To add a MX DNS record, perform the following operations:
1 Go to All Domains. The list of your domains opens.
Note: If the "Allow to use services from different Subscriptions on domain" system-wide option is disabled by TM, this operation starts from the Hosting > Configuration & Administration > Domain Overview > Domain Administration page.
2 Click on the name of the domain you wish to add DNS record to. The Summary tab of
the domain will open.
3 Move to the DNS tab. Select the DNS Records sub-tab. A list of all DNS records will appear.
4 Click on the Add New DNS Record button to add a new DNS record.
5 On the displayed page, in the drop-down list box select the MX DNS record type and then click on the Next button. The following page appears:
Figure: MX Record
In the Mail domain field enter your local domain for which you are creating the MX record. For the main domain, you would simply leave the available field blank.
In the Preference field specify a preference number for the mail server. A preference number is a value from 0 to 65,535 that denotes the mail server's priority within the domain. The mail server with the lowest preference number has the highest priority and is the first to receive mail. If mail delivery fails, the mail server with the next lowest preference number is tried.
In the Mail exchanger field enter the name of the mail server. If you are running a remote mail server named mail.myhostname.com, then you would simply enter mail.myhostname.com.
TM Control Panel User Guide – Working with Domains 53
TTL: (short for Time-To-Live) set how many seconds will elapse before the record is refreshed in the DNS cache. It is expressed in seconds.
6 Click on the Finish button to complete the adding of the address DNS record.
Note: You will need to add the appropriate A record and/or CNAME record if applicable for the remote mail server.
Adding TXT Record
Text (TXT) record provides up to 255 characters of free form text to be linked to a domain name. TXT record may contain any information that the owner wants to be accessible on DNS server. TXT records linked with domain names are widely used in Sender Policy Framework (SPF) anti-forgery solution.
To add a TXT DNS record, perform the following operations:
1 Go to All Domains. The list of your domains opens.
Note: If the "Allow to use services from different Subscriptions on domain" system-wide option is disabled by TM, this operation starts from the Hosting > Configuration & Administration > Domain Overview > Domain Administration page.
2 Click on the name of the domain you wish to add DNS record to. The Summary tab of
the domain will open.
3 Move to the DNS tab. Select the DNS Records sub-tab. A list of all DNS records will appear.
4 Click on the Add New DNS Record button to add a new DNS record.
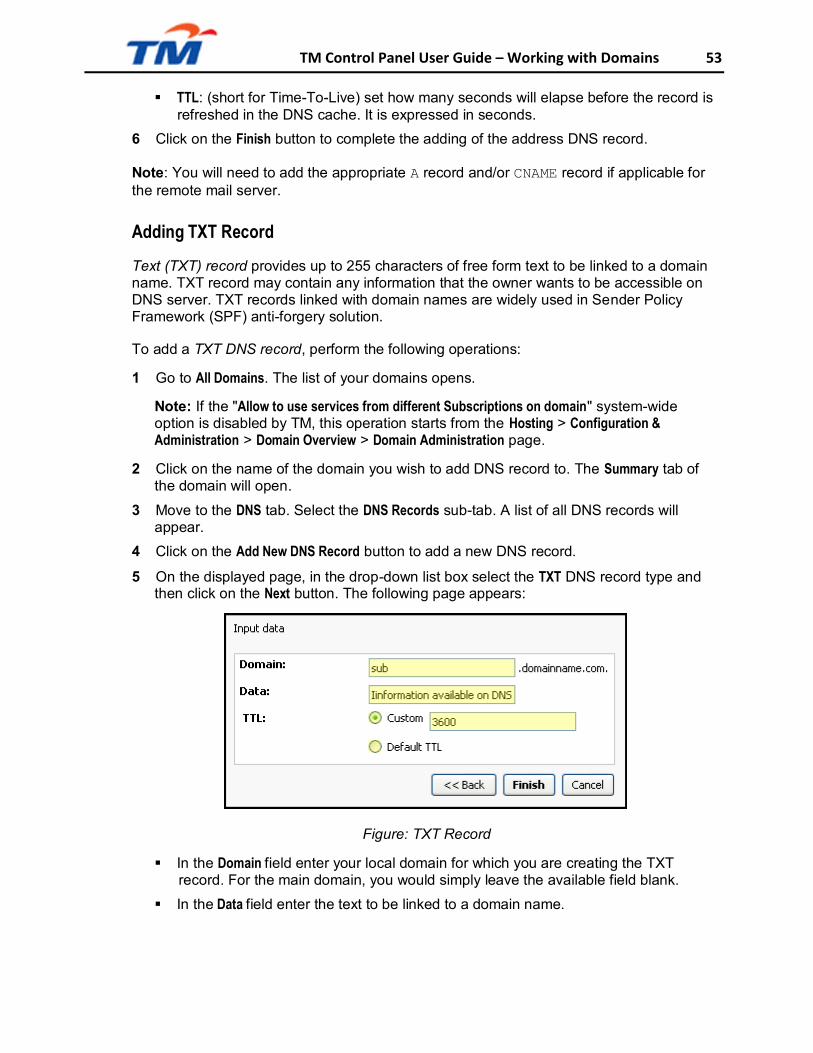
5 On the displayed page, in the drop-down list box select the TXT DNS record type and then click on the Next button. The following page appears:
Figure: TXT Record
In the Domain field enter your local domain for which you are creating the TXT record. For the main domain, you would simply leave the available field blank.
In the Data field enter the text to be linked to a domain name.

TM Control Panel User Guide – Working with Domains 54
TTL: (short for Time-To-Live) set how many seconds will elapse before the record is refreshed in the DNS cache. It is expressed in seconds.
6 Click on the Finish button to complete the adding of the address DNS record.
Deactivating DNS Record
When you deactivate a DNS record, you stop its functioning; yet, in contrast to deleting, the DNS record remains saved so that you can reactivate it at any moment.
To deactivate a DNS record, follow these steps:
1 Open the list of a domain's DNS records:
a Go to All Domains. The list of your domains opens.
Note: If the "Allow to use services from different Subscriptions on domain" system-wide option is disabled by TM, this operation starts from the Hosting > Configuration & Administration > Domain Overview > Domain Administration page.
b Select a domain.
c Open the DNS tab.
d Open the DNS Records sub-tab.
2 Select a DNS record the State of which is marked as Active. The View zone record info page opens.
Figure: Deactivating DNS Record
3 Click on the Deactivate record button. The message box appears with the following question:
Are you sure you want to deactivate this record? 4 Confirm you intention to deactivate the DNS record by clicking OK in the message box.
The record's state turns to Inactive. The Deactivate record button changes its name into Activate record.

TM Control Panel User Guide – Working with Domains 55
Activating DNS Record
If one of your DNS records is in inactive state, you can easily reactivate the record at any moment. For this purpose, perform the following steps:
1 Open the list of a domain's DNS records:
1. Go to All Domains. The list of your domains opens.
Note: If the "Allow to use services from different Subscriptions on domain" system-wide option is disabled by TM, this operation starts from the Hosting > Configuration & Administration > Domain Overview > Domain Administration page.
2. Select a domain.
3. Open the DNS tab.
4. Open the DNS Records sub-tab.
2 Select a DNS record the State of which is marked as Inactive. The View zone record info page opens.
Figure: Activating DNS Record
3 Click on the Activate record button. The message box appears with the following question:
Are you sure you want to activate this record? 4 Confirm you intention to activate the DNS record by clicking OK in the message box.
The record's state turns to Active. The Activate record button changes its name into Deactivate record.
Editing Zone Settings

TM Control Panel User Guide – Working with Domains 56
As a CP Subscriber you have an excellent opportunity not only to add new domain records, but also to modify general DNS zone properties, such as time and duration of different operations for your domain to commit. You can also change the e-mail address of the person in charge of the domain. Modify general DNS zone properties by performing the following operations:
1 Go to All Domains. The list of your domains opens.
Note: If the "Allow to use services from different Subscriptions on domain" system-wide option is disabled by TM, this operation starts from the Hosting > Configuration & Administration > Domain Overview > Domain Administration page.
2 Click on the name of the domain for which you want to change the DNS zone settings.
The Summary tab opens.
3 Move to the DNS tab. Select the Zone Settings sub-tab. On the Zone Settings sub-tab, you can see zone settings of your domain. All the numeric values are expressed in seconds.
4 To change zone settings, click on the Edit button.
Figure: Editing Zone Settings
5 Set new zone settings into the following fields:
Refresh: the interval at which a secondary server checks for zone updates. If set to 60 minutes (3600 seconds), NS record changes may not get propagated to a secondary server for up to an hour. You reduce network traffic by increasing this value.
Retry: the time the secondary sever waits after a failure to download the zone database. If set to 10 minutes (600 seconds) and a zone database transfer fails, the secondary server will wait 10 minutes before requesting the zone database once more.
Expire: the period of time for which zone information is valid on the secondary server. If the secondary server can't download data from a primary server within this period, the secondary server lets the data in its cache expire and stops responding to DNS queries. Setting the Expire Time to seven days allows the data on the secondary server to be valid for seven days.

TM Control Panel User Guide – Working with Domains 57
Min TTL sets the minimum time-to-live value for cached records on the secondary
server. When this value is reached, the secondary expires the associated record and discards it. The next request for the record will need to be sent to the primary server for resolution. Set this value to a relatively high value, such as 24 hours (86400 seconds), to reduce traffic on the network and increase efficiency. However, keep in mind that a higher value slows down the propagation of updates through the Internet.
Note: The time settings should be calculated and entered in seconds.
Mailbox of the person responsible for this zone: in this field you define the e-mail address
of the person in charge of the domain.
6 After you've done with editing, click on the Submit button to save the new settings.
Deleting DNS Record
To delete one or several DNS records at once, follow these steps:
1 Open the list of a domain's DNS records:
a Go to All Domains. The list of your domains opens.
Note: If the "Allow to use services from different Subscriptions on domain" system-wide option is disabled by TM, this operation starts from the Hosting > Configuration & Administration > Domain Overview > Domain Administration page.
b Select a domain.
c Open the DNS tab.
d Open the DNS Records sub-tab.
2 Select the domain(s) to be deleted by clicking check box(es) near the domain name(s).
3 Click on the Delete button. The DNS records disappear from the list and from domains.

TM Control Panel User Guide – Working with Domains 58
Using Instant Access URL
Because of DNS refresh latency, the newly created Webspace is not available for some time. In this case, you can resort to the automatically generated Instant Access URL of this Webspace. In the latter case, you need to follow these steps:
1 Go to All Domains. The list of your domains opens.
Note: If the "Allow to use services from different Subscriptions on domain" system-wide option is disabled by TM, this operation starts from the Hosting > Configuration & Administration > Domain Overview > Domain Administration page.
2 In the list of your domains, select a domain by clicking its name.
3 Switch to the Web tab.
Figure: Instant Access URL
4 On the Web tab, click the URL link.
As a result, your domain opens in the browser.
Deleting Domain
If you want to delete one of your domains, follow these steps:
1 Go to All Domains. The list of your domains opens.
Note: If the "Allow to use services from different Subscriptions on domain" system-wide option is disabled by TM, this operation starts from the Hosting > Configuration & Administration > Domain Overview > Domain Administration page.

TM Control Panel User Guide – Working with Domains 59
2 Click on the name of the required domain. The Summary tab opens.
Figure: Deleting Domain
3 On the Summary tab, click on the Delete button.
4 Confirm your intention to delete the domain by clicking OK in the message window appeared with the question:
Do you really want to delete domain? The list of your domains reopens without the just deleted domain.
Managing Subdomains
A subdomain is a domain that is part of a larger domain name. For example, in the domain name def.abc.com, "def" is a subdomain of the larger second-level domain "abc.com".
CP allows to enable wildcard subdomain (*-subdomain) on your Account. This is a type of subdomains that stands for all possible subdomain names excluding the specified ones. By activating this option, all xxx.domain.com queries will be redirected to *.domain.com. This subdomain type is generally used for reporting that the requested domain does not exist.
In CP, subdomains are managed in the same way as domains. The management includes creating a new subdomain, adding, removing or changing the hosting type, changing the path to the document root location, and other operations that you can learn from the previous topics of the Working With Domains chapter.
To manage subdomains, go to Domain Overview > Domain Administration.
Creating Subdomain
To add a new subdomain, follow these steps:
TM Control Panel User Guide – Working with Domains 60
1 Go to Domain Overview > Domain Administration. A list of your domains and subdomains appears, if you have any.
2 Click on the Add New Subdomain button.
3 Enter the general parameters for a new subdomain:
Into the Subdomain name(s) field, type the name you wish to assign to your subdomain. In the drop-down list, select the domain for which you are creating the subdomain.
Select the Zone management ability option if you want to get the ability of managing DNS zone for your subdomain. This includes the possibility to add and change zone records and tune zone time settings.
Choose the type of hosting by selecting a required option in a hosting area. See the Creating Website topic for the information about Website. See the Domain Parking section for the information about other types of Web hosting.
4 When you have entered all the required values, click on the Next button. The following steps depend on the selected type of hosting.
5 After you have followed the wizard steps, the final wizard step opens. Click on the Finish button to complete the process.
Note: If you select None as the type of Web hosting, the final wizard step opens just after the first step. A subdomain without hosting is called pure subdomain.
The other way to create a subdomain is to perform the following actions:
1 Go to Domain Overview > Domain Administration.
2 Select a domain by clicking on a domain name. The Summary tab opens.
3 On the Summary tab, click on the Add New Subdomain button.
4 Follow the steps 3-5 from the previous instruction.
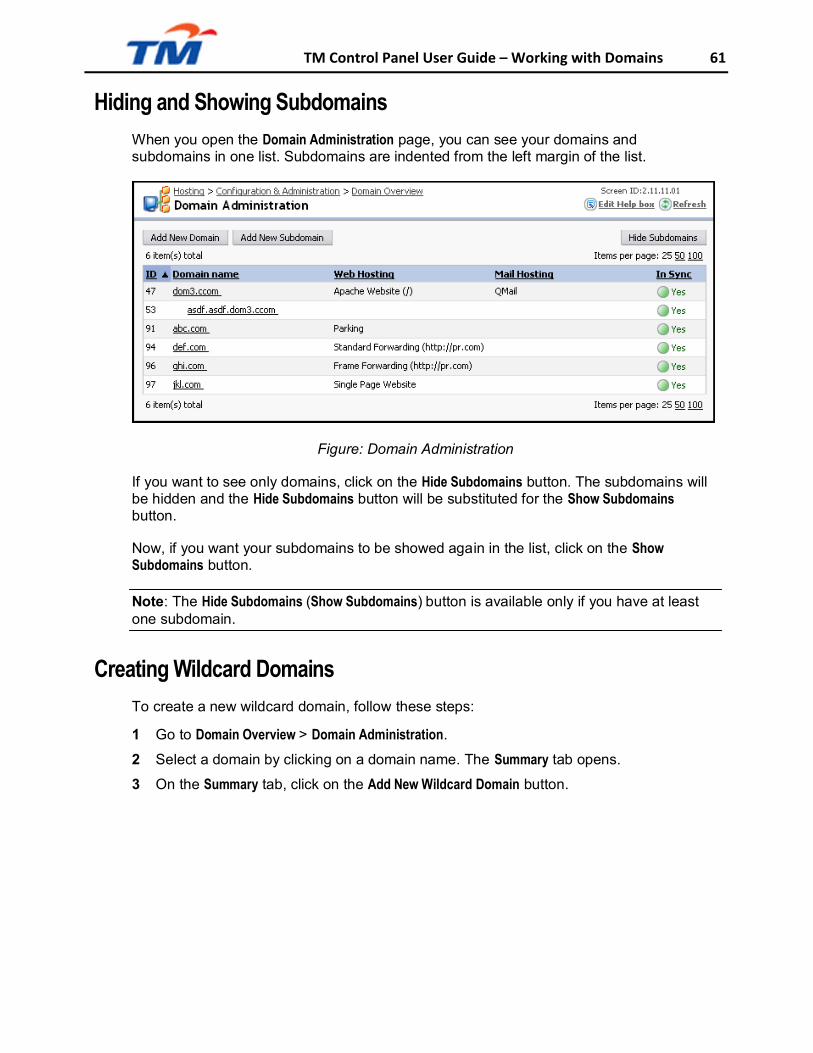
TM Control Panel User Guide – Working with Domains 61
Hiding and Showing Subdomains
When you open the Domain Administration page, you can see your domains and subdomains in one list. Subdomains are indented from the left margin of the list.
Figure: Domain Administration
If you want to see only domains, click on the Hide Subdomains button. The subdomains will be hidden and the Hide Subdomains button will be substituted for the Show Subdomains button.
Now, if you want your subdomains to be showed again in the list, click on the Show Subdomains button.
Note: The Hide Subdomains (Show Subdomains) button is available only if you have at least one subdomain.
Creating Wildcard Domains
To create a new wildcard domain, follow these steps:
1 Go to Domain Overview > Domain Administration.
2 Select a domain by clicking on a domain name. The Summary tab opens.
3 On the Summary tab, click on the Add New Wildcard Domain button.
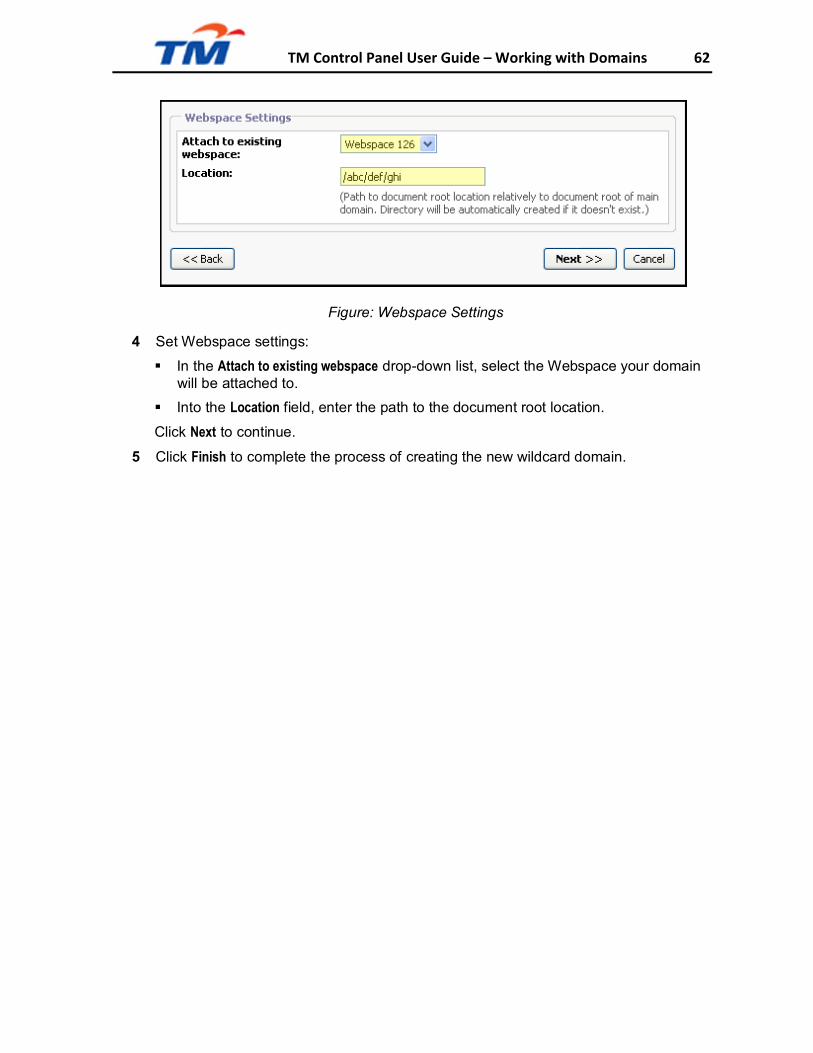
TM Control Panel User Guide – Working with Domains 62
4 Set Webspace settings:
Figure: Webspace Settings
In the Attach to existing webspace drop-down list, select the Webspace your domain will be attached to.
Into the Location field, enter the path to the document root location.
Click Next to continue.
5 Click Finish to complete the process of creating the new wildcard domain.
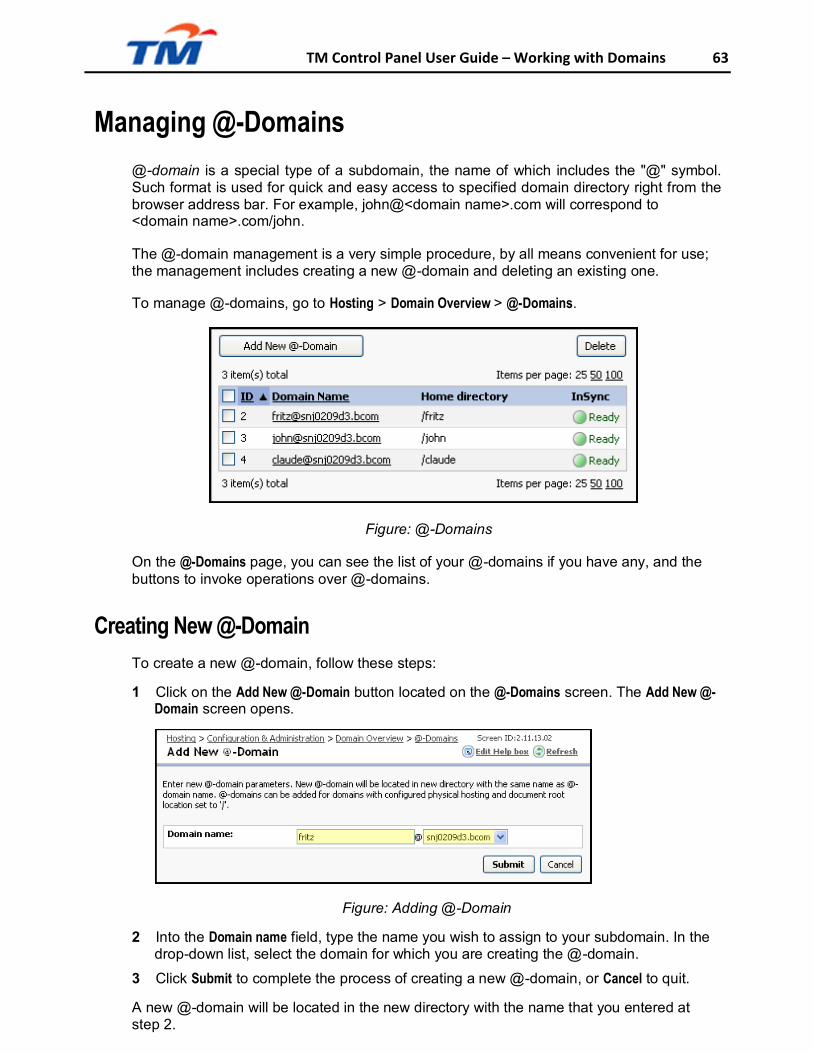
TM Control Panel User Guide – Working with Domains 63
Managing @-Domains
@-domain is a special type of a subdomain, the name of which includes the "@" symbol. Such format is used for quick and easy access to specified domain directory right from the browser address bar. For example, john@<domain name>.com will correspond to <domain name>.com/john.
The @-domain management is a very simple procedure, by all means convenient for use; the management includes creating a new @-domain and deleting an existing one.
To manage @-domains, go to Hosting > Domain Overview > @-Domains.
Figure: @-Domains
On the @-Domains page, you can see the list of your @-domains if you have any, and the buttons to invoke operations over @-domains.
Creating New @-Domain
To create a new @-domain, follow these steps:
1 Click on the Add New @-Domain button located on the @-Domains screen. The Add New @- Domain screen opens.
Figure: Adding @-Domain
2 Into the Domain name field, type the name you wish to assign to your subdomain. In the drop-down list, select the domain for which you are creating the @-domain.
3 Click Submit to complete the process of creating a new @-domain, or Cancel to quit.
A new @-domain will be located in the new directory with the name that you entered at step 2.

TM Control Panel User Guide – Working with Domains 64
@-Domain Instant Access URL
To open your @-domain in a browser, you can type its name in the Address field of the browser, or you can resort to instant access URL. In the latter case, you need to follow these steps:
1 In the @-domains list, select a domain by clicking its name. The General properties
page opens.
Figure: @-Domain General Properties
2 To open the @-domain in the browser, click the URL link.
To see the domain in the browser, click the Webspace on domain link. The General tab opens. Click the URL link on the General tab.
Deleting @-Domains
To delete one or several @-domains at once, follow these steps:
1 In the @-domains list, select the @-domain(s) to be deleted by clicking check boxes in the leftmost column near the domain name(s).
2 Click on the Delete button. The message window appears with the following question: Do you really want to delete selected@-domain(s)? 3 Confirm your intention to delete the @-domain(s) by clicking OK in the message
window.
After a while, the selected @-domain(s) disappear from the list.
TM Control Panel User Guide ‐ Managing SharePoint Services 65
Changing Subscription of Domain
CP offers you the ability to change Subscription of Domain. If your account has several Subscriptions, you can move Domain from one Subscription (source Subscription) to other Subscription (destination Subscription). If Domain has any hosting added within the bounds of source Subscription, these hostings are removed, and all the hostings available within the bounds of destination Subscription are added.
Note: Subscription changing for domain does not transit content and hostings configuration.
Note: You can use this ability only if TM turned it on.
For example, your Account has the Linux Web Hosting and Windows Web Hosting Subscriptions. The Linux Web Hosting Subscription includes Apache Web Hosting and QMail Mail Hosting. The Windows Web Hosting Subscription includes Microsoft IIS Web Hosting and Microsoft Exchange Mail Hosting. The example.com Domain is created within the bounds of Linux Web Hosting Subscription. Apache Web Hosting and QMail Mail Hosting are added on example.com Domain. After changing Subscription of example.com Domain from the Linux Web Hosting Subscription to the Windows Web Hosting Subscription, Apache Web Hosting and QMail Mail Hosting are removed, and Microsoft IIS Web Hosting and Microsoft Exchange Mail Hosting are added to example.com Domain respectively.
To change Subscription of Domain you have to perform the following steps:
1 Go to the Select Subscription menu by clicking on the corresponding link in the top frame
of the interface. You will be presented with the list of all Subscriptions available to you.
2 Select the source Subscription of Domain by clicking on the Select link.
3 Go to All Domains. The list of your domains opens.
Note: If the "Allow to use services from different Subscriptions on domain" system-wide option is disabled by TM, this operation starts from the Hosting > Configuration & Administration > Domain Overview > Domain Administration page.
4 Click on the name of Domain for which you plan to change the Subscription. The
Summary tab of selected Domain appears.
5 On the Summary tab, in the General area, click on the Change Subscription button. The list of Subscriptions appears.
6 Select destination Subscription from the list and click on Submit button to complete the process of Subscription changing.