workflow approval via email - microsoft · pdf file3 workflow approval via email what’s...
TRANSCRIPT

Microsoft Dynamics
®
AX
Workflow approval via email
White Paper
This document highlights the functionality in Microsoft Dynamics AX 2012 R2 that allows workflow to be configured so that a user can take approval action directly from email messages.
Date: November 2013
Updated: September 2014
www.microsoft.com/dynamics/ax

2 WORKFLOW APPROVAL VIA EMAIL
Table of Contents
What’s New ................................................................................................. 3
Setting up the new functionality ................................................................. 3
Overview ..................................................................................................... 5
Setup and system configuration .................................................................. 5
Configuring workflow to allow approval from email .................................... 6
Appendix A: Creating a new Windows Azure Service Bus namespace ....... 20
Appendix B: Configuring the on-premises server with Microsoft Dynamics
AX 2012 and the Microsoft Dynamics AX Connector for Mobile Applications service ...................................................................................................... 21
Microsoft Dynamics AX 2012 and Microsoft Dynamics AX 2012 R2 .............................................21 Set up inbound ports ......................................................................................................... 21 Create and configure a user account in Microsoft Dynamics AX ............................................... 22
Setting up the Microsoft Dynamics AX Connector for Mobile Applications service ..........................23 Prerequisites .................................................................................................................... 23 Installation ...................................................................................................................... 23
Appendix C: Configuring Service Bus namespace details in workflow parameters ............................................................................................... 26
Appendix D: Considerations ...................................................................... 27
Updates since initial publication ............................................................... 27

3
WORKFLOW APPROVAL VIA EMAIL
What’s New
The Approval via email feature has been updated with the following functionality:
Add comments when you approve or reject a workflow with links.
Add attachments to a workflow item to provide additional details.
To use these new features, you’ll need to install the following hotfix. If you are using Microsoft
Dynamics AX 2012 R3 CU8, you don’t need to apply the hotfix because it is included in this release.
You will also need the updated mobile connector that can be found here.
Set up the new functionality
1. To use the new approve or reject links, replace the existing strings in the workflow (an example can be found on page 11 of this document) with the following strings:
Old links
Approve: %Workflow.Link to approve%
Reject: %Workflow.Link to reject%
New links
Approve: %Workflow.Link to approve with comment%
Reject: %Workflow.Link to reject with comment%
The Workflow parameters form now has a new option for adding attachments.

4 WORKFLOW APPROVAL VIA EMAIL
2. Select the check box, and then close the form.
3. Open the Windows Application Store setup form by clicking System administration > Setup > Windows Store.
4. Select the workflow type you would like to add a report to. In the screen shot above, you can
see that a Timesheet document level workflow is selected. By selecting TSTimesheetSignOff on the Report association tab, the Timesheet workflow associated the timesheet sign off report with that workflow type.
5. After the report is associated, close the form.
6. Click System administration > Periodic > Email attachments to create an email attachments
batch job. This is only required if you are attaching reports to the email approval. You can still use the E-mail processing batch if you are not using attachments.
5
WORKFLOW APPROVAL VIA EMAIL
Overview
The Microsoft Dynamics AX workflow infrastructure empowers users to configure workflow in application modules, with a specific focus on tasks and approvals. As one of the workflow features, email messages can be configured and sent that contain links to documents that require actions. For example, an employee enters a timesheet, and then submits it to his or her manager for approval. The manager receives an email message requesting approval. The email message contains a link to
the timesheet that the user entered. One of the most common requests related to this functionality has been for the capability for the manager or approver to approve or reject from the email message itself.
In Microsoft Dynamics AX 2012 R2, this functionality can now be enabled by applying a hotfix download and then installing the Microsoft Dynamics AX Connector for Mobile Applications.
Note: This hotfix is not required if you are running cumulative update 6 for Microsoft Dynamics AX 2012 R2 or later versions.
This document explains the setup that is required to enable the feature and provides an example of defining workflow with the new functionality.
Setup and system configuration
This feature builds on the existing workflow capability to send email workflow instructions to approvers who have been assigned by workflow. The approve via email feature is enabled by providing Approve and Reject links in the email message that is sent to approvers. The Approve and Reject links in the message are action URLs that trigger an approve or reject workflow action when the approver to whom the message is sent clicks the corresponding link.
The action URL is designed to work on any email client, and it works whether the email client is on the
corporate network (for example, on a desktop machine in the office) or off the corporate network (for example, on a mobile phone or tablet). As such, the action URL is based on the capabilities of the Microsoft Windows Azure Service Bus. The Service Bus relays the action from the client to the
Microsoft Dynamics AX Connector for Mobile Applications (the connector). The connector receives the action and then makes a call to Microsoft Dynamics AX to record the action in workflow. At that point, the action is completed in workflow, just as if the user were using the Microsoft Dynamics AX client or Enterprise Portal for Microsoft Dynamics AX.
For a broader understanding of the use of the Windows Azure Service Bus and the Microsoft Dynamics AX Connector for Mobile Applications, see the following configuration document: https://mbs.microsoft.com/downloads/customer/AX/ConfigureAXConnectorforMobileApplications.pdf.
You must follow these steps to enable this feature:
1. Set up a Windows Azure Service Bus, as explained in Appendix A: Creating a new Windows Azure Service Bus namespace. If the connector has already been installed for use with mobile
applications, this step is not necessary.
2. If you are using a version of Microsoft Dynamics AX 2012 R2 earlier than cumulative update 6, apply the hotfix that is provided with the KB article “Approver cannot approve or reject workflow workitems from email notifications directly in Microsoft Dynamics AX 2012 R2”.
You can locate the KB article in PartnerSource by searching for kb2827196.
The hotfix is not required if you are using cumulative update 6 for Microsoft Dynamics AX 2012 R2 or a later version.
3. Enable the inbound port and system account, as explained in Appendix B: Configuring the on-premises server with Microsoft Dynamics AX 2012 and the Microsoft Dynamics AX Connector for Mobile Applications service.
4. Provide the Service Bus namespace in the appropriate workflow parameter field, as explained in Appendix C: Configuring Service Bus namespace details in workflow parameters.
6 WORKFLOW APPROVAL VIA EMAIL
5. Install the connector, which is available at https://mbs.microsoft.com/downloads/customer/AX/AXConnectorForMobileApplications.zip, as explained in the Setting up the Microsoft Dynamics AX Connector for Mobile Applications service section. If the connector has already been installed for use with mobile applications, this step is
not necessary.
6. Make sure that workflow is set up to send workflow instructions via email. For more information about email functionality and workflow, see the TechNet articles, Configure email functionality in Microsoft Dynamics AX and Configure email settings for the workflow system.
Completing step 6 is required for Microsoft Dynamics AX to send email notifications. If step 6 is not completed, email will not be sent.
Configuring workflow to allow approval from email
The following steps assume that the user has Administrator rights when defining the workflow configuration. This example walks you through the process of defining the workflow for an expense
report; however, the capability to allow approvals through email can be used for any workflow type.
1. Sign in to your legal entity, and then go to Travel and expense > Setup > Travel and expense workflows.
2. On the Travel and expense workflows list page, on the Action Pane, click New.
A Create workflow dialog box is displayed.
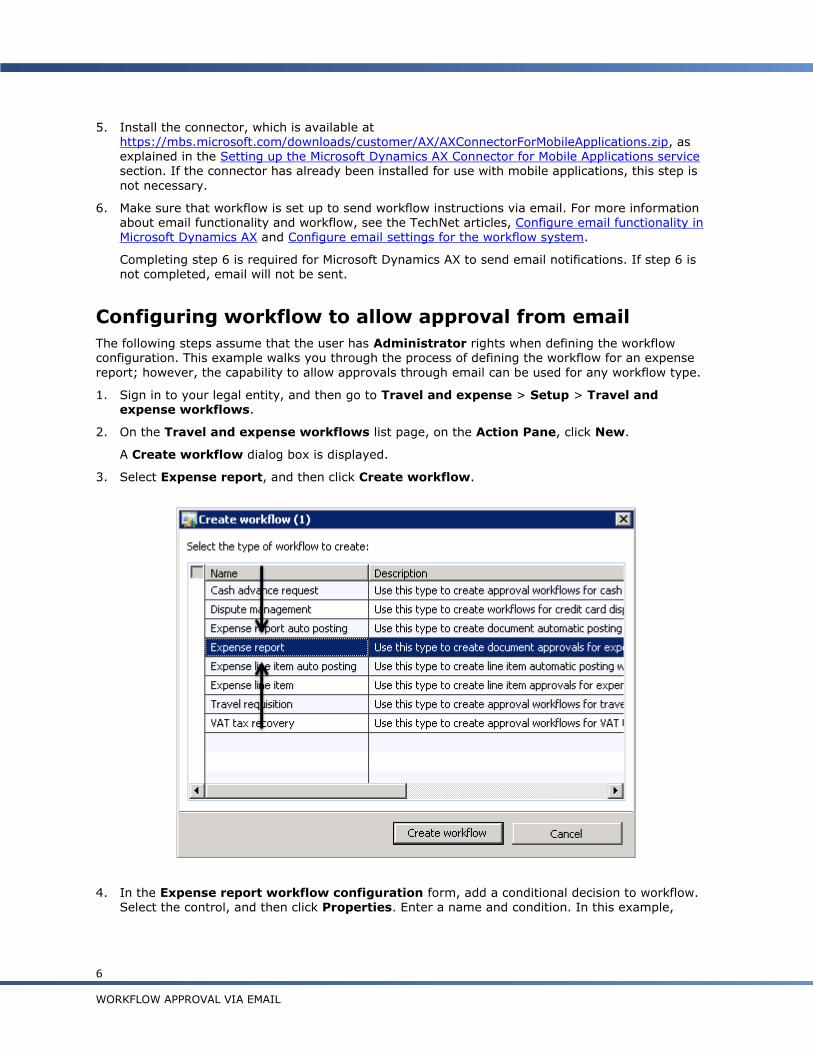
3. Select Expense report, and then click Create workflow.
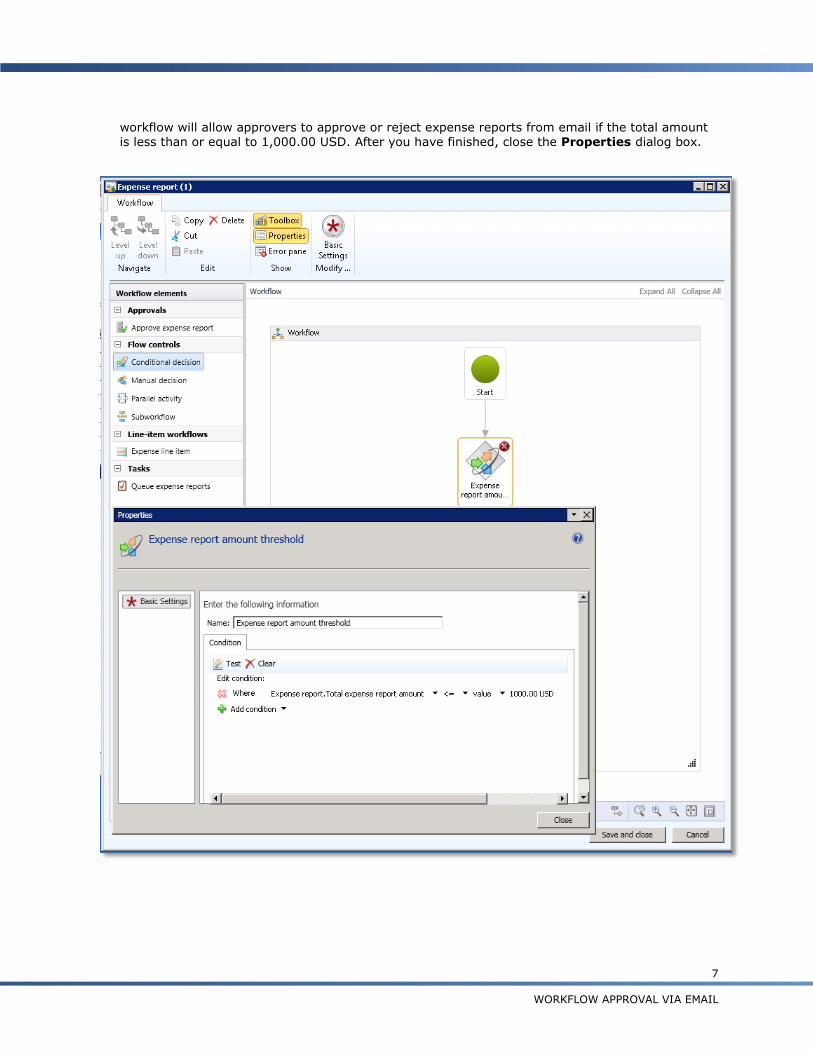
4. In the Expense report workflow configuration form, add a conditional decision to workflow. Select the control, and then click Properties. Enter a name and condition. In this example,
7
WORKFLOW APPROVAL VIA EMAIL
workflow will allow approvers to approve or reject expense reports from email if the total amount is less than or equal to 1,000.00 USD. After you have finished, close the Properties dialog box.

8 WORKFLOW APPROVAL VIA EMAIL
5. Add an Approve expense report element to the workspace. Connect it to the True condition of the element that you added in the last step. In this scenario, the organization wants approvers to be able to approve or reject expense reports from email if the total expense report is less than 1,000.00 USD.

9
WORKFLOW APPROVAL VIA EMAIL
6. Select the Approve expense report element, and then select Properties. Enter a name. No changes are needed on the Automatic actions, Notifications, or Advanced settings tab. Close the Properties dialog box.
7. On the Action Pane, click Level down, or double-click the workflow element.
8. In the left pane, select the Step 1 component, and then, on the Action Pane, click Properties.

10 WORKFLOW APPROVAL VIA EMAIL
9. Enter the instruction information.
Based on the condition that you defined earlier, if the total of the expense report is less than 1,000.00 USD, the approver will receive the instructions that you define in this step. In this scenario, the organization wants approvers to be able to accept or reject expense reports from
email.
The following instruction text is a recommendation. Substitute specific content that is approved by your organization.
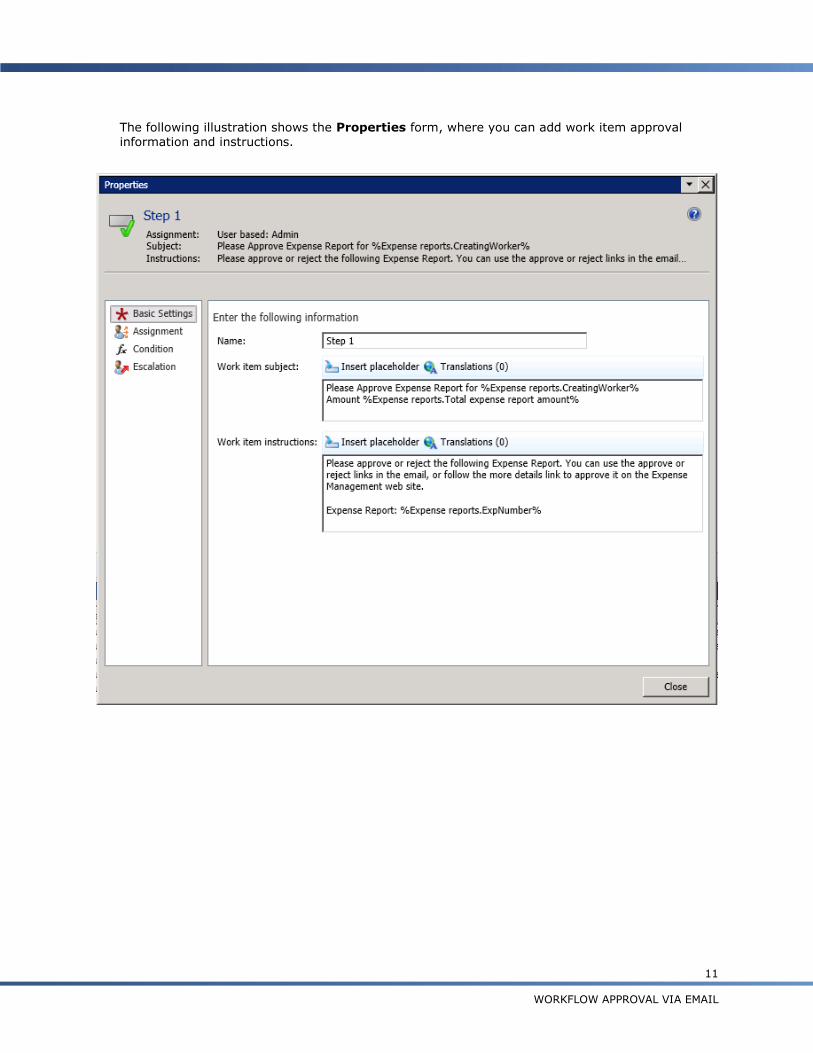
Work item subject:
Please approve this expense report: %Expense report.ExpNumber% from %Expense report.CreatingWorker%
Work item instructions:
Please review and approve or reject the following expense report. You can use the approve or
reject links in the email or follow the more details link to approve it on the expense management website.
Expense report: %Expense report.ExpNumber%
Employee: %Expense report.CreatingWorker%
Purpose: %Expense report.Txt2%
Amount: %Expense report.Total expense report amount% %Expense report.Currency%
Approve: %Workflow.Link to approve%
Reject: %Workflow.Link to reject%
For more details see: %Workflow.Link to web%
Please note there will not be a confirmation upon selecting approve or reject.
**Do not forward**
11
WORKFLOW APPROVAL VIA EMAIL
The following illustration shows the Properties form, where you can add work item approval information and instructions.

12 WORKFLOW APPROVAL VIA EMAIL
10. In the left pane, click Assignment to assign users to the workflow.
11. On the Completion policy tab, select whether only one approval from an approver is required, multiple approvals, or the approval of all approvers.

13
WORKFLOW APPROVAL VIA EMAIL
12. In the left pane, click Condition to specify when the approval is required.
13. Close the Properties dialog box.

14 WORKFLOW APPROVAL VIA EMAIL
14. Add another Approve expense report element, and link it to the False condition.

15
WORKFLOW APPROVAL VIA EMAIL
15. Select the False approval step, and define the properties. Enter a name, and then close the Properties dialog box.

16 WORKFLOW APPROVAL VIA EMAIL
16. Select the highlighted workflow element, and then, on the Action Pane, click Level down, or double-click the workflow element to select the step within the workflow element.
17. On the Action Pane, click Properties.
18. In the Properties form, enter the instruction information.
Based on the condition that you defined earlier, if the total of the expense report is more than 1,000.00 USD, the approver will receive the instructions that you define in this step. Because of the expense report total, the organization has decided that approvers should review these

17
WORKFLOW APPROVAL VIA EMAIL
expense reports before taking action. Approvers are directed to the portal where they can review the expense reports and then take action.
The following instruction text is a recommendation. Substitute specific content that is approved by your organization.
Work item subject:
Please review and approve this expense report: %Expense report.ExpNumber% from %Expense report.CreatingWorker%
Work item instructions:
Please review the following expense report. Use the link to the portal which will provide you specifics for this expense report. You can accept or reject the expense report from the portal.
Expense report: %Expense report.ExpNumber%
Employee: %Expense report.CreatingWorker%
Purpose: %Expense report.Txt2%
Amount: %Expense report.Total expense report amount% %Expense report.Currency%
For more details and to approve: %Workflow.Link to web%
**Do not forward**
19. In the left pane, click Assignment, and on the Assignment Type tab, select User.

18 WORKFLOW APPROVAL VIA EMAIL
20. Click the User tab to assign users to Step 1.
21. On the Completion policy tab, select whether only one approval from an approver is required, multiple approvals are required, or the approval of all approvers is required.
22. In the left pane, click Condition to specify when the approval step is required.
23. Close the Properties dialog box.

19
WORKFLOW APPROVAL VIA EMAIL
24. Link the two Approve expense report elements to the End element.
25. Click Save and close to close the form and activate the workflow.

20 WORKFLOW APPROVAL VIA EMAIL
Appendix A: Creating a new Windows Azure Service Bus namespace
Note: As of August 2014, you cannot use the Azure Management Portal to create a service bus namespace. You must use Azure PowerShell to create the service bus service namespace.
The Microsoft Dynamics AX Connector for Mobile Applications deploys a listening endpoint that services the message coming from the Microsoft Dynamics AX companion apps and email approval links. This endpoint address is structured around the Windows Azure namespace that you will create.
To create a new service bus namespace, complete the following steps:
1. Open Azure PowerShell. Details can be found here.
2. In the PowerShell command prompt, enter the following command to connect Azure PowerShell to your Azure subscription:
Add-AzureAccount
3. When prompted, enter your credentials for your Azure subscription.
4. In the PowerShell command prompt, enter the following command to add a new service bus service namespace: New-AzureSBNamespace –name “InsertNameHere” –location “InsertRegionHere”
5. If you followed the steps correctly and there were no errors, the following information is displayed.
Name: [Name]
Region: [Region]
DefaultKey: 2pRUX4K5EhE5XKvDsaS+816/Neezztkgur/CKsib40w=
Status: Active
CreatedAt: 8/26/2014 7:24:31 PM
AcsManagementEndpoint: https://name-sb.accesscontrol.windows.net/
ServiceBusEndpoint: https://name.servicebus.windows.net/
ConnectionString:
Endpoint=sb://SBName.servicebus.windows.net/;SharedSecretIssuer=own
er;SharedSecretValue=2pRUX4K5EhE5XKvDsaS+816/Nrqzztkgur/CKsib40w=
Copy the DefaultKey, ServiceBusEndpoint, and ConnectionString for reference later. You will use the 256-bit secret
default key when you configure the Microsoft Dynamics AX Connector for Mobile Applications service that is
deployed on the server. For more details, see Configuring the on-premises server for Companion apps.
Property Description
-name Enter the name of the service namespace.
-location Enter your region. The list of region values

21
WORKFLOW APPROVAL VIA EMAIL
Appendix B: Configuring the on-premises server with Microsoft Dynamics AX 2012 and the Microsoft Dynamics AX Connector for Mobile Applications service
Microsoft Dynamics AX 2012 and Microsoft Dynamics AX 2012 R2
Set up inbound ports
1. In Microsoft Dynamics AX, click System Administration > Services and Application integration framework > Inbound ports.
2. Click New, and enter a name and description.
3. Under Service contract customizations, click Service operations. The WSDL URI is populated.

22 WORKFLOW APPROVAL VIA EMAIL
4. In the list of operations on the right side of the Select service operations form, select the SysWorkflowApprovalService.applyUrlAction service operation, and then click < to add it to the list on the left side of the form.
5. Close the Select service operations form, and then, in the Inbound ports form, click Activate.
Create and configure a user account in Microsoft Dynamics AX
1. Create a new service account user, and make sure that the service account user is present in the machine’s Administrator group before you deploy the Microsoft Dynamics AX Connector for
Mobile Applications service on the machine. This user will run the connector service.
2. Make sure that this new service account user has a record in Microsoft Dynamics AX and has been given System administrator privileges.

23
WORKFLOW APPROVAL VIA EMAIL
Setting up the Microsoft Dynamics AX Connector for Mobile
Applications service
The installer can be found at https://mbs.microsoft.com/partnersource/newsevents/news/msdyn_mobileappsax.htm?printpage=false&sid=512hmactzru0t0fs0dcgyvgm&stext=Mobile applications for Dynamics AX.
Use the following procedure to install and configure the Microsoft Dynamics AX Connector for Mobile Applications.
Prerequisites
Make sure that the service account user that you created in the Create and configure a user account in Microsoft Dynamics AX section is an administrator or part of the Administrator group on the machine that the Microsoft Dynamics AX Connector for Mobile Applications is running on.
Only one instance of the Microsoft Dynamics AX Connector for Mobile Applications can be deployed to run on a machine.
Installation
1. Click Start > All Programs > Microsoft Dynamics AX Connector for Mobile Applications, and start the Microsoft Dynamics AX Connector for Mobile Applications Setup Wizard.
2. Select the I accept the terms in the License Agreement check box, and then click Next.
3. On the Destination Folder page, accept the default folder location for the connector, or click Change to select another location. Then click Next.
4. On the Service account page, in the Account name and Password fields, enter the name and password for the user account that you previously created, and then click Next.
5. Click Install.
6. Click Finish.
7. Click Start > Administrative Tools > Service to open the Windows Services list.
8. Click Start to start the Microsoft Dynamics AX Connector for Mobile Applications service. The service will run under the context of the service user account.
9. On the Start menu, click the Microsoft Dynamics AX Connector for Mobile Applications shortcut. The GUI for configuring the connector parameters opens.

24 WORKFLOW APPROVAL VIA EMAIL
10. Use the information in the following table to configure the connector parameters.
Parameter Configuration
Azure service namespace Enter the service namespace that you set up in the Creating a new Windows Azure Service Bus namespace section, and then click Save.
Azure service identity name Enter the service identity name that you set up in the Creating a new Windows Azure Service Bus namespace section.
Azure service identity password Enter the 256-bit symmetric key for the service identity that was generated in the Creating a new Windows Azure Service Bus namespace section.
Endpoint URI of EmailApprovalsServices
The following text is preconfigured in this field:
net.tcp://<AOS_MACHINE_NAME>:8201/DynamicsAx/Services/EmailApprovalsServices
Replace <AOS_MACHINE_NAME> with the name of the machine that hosts Microsoft Dynamics AX Application Object Server (AOS).
Replace the default AOS port number, 8201, if a different port is used.
Important: Do not use the WSDL port, 8101, as the endpoint URI of EmailApprovalsServices. This is used as the default inbound port for an instance of AOS.
The following illustration shows the form that is used to configure the parameters for the Microsoft Dynamics AX Connector for Mobile Applications.

25
WORKFLOW APPROVAL VIA EMAIL
11. Enter values for each parameter, and then click Save.
12. After the connector parameters are saved, click Start in the form. You can see that the status has changed to Started, and that the Microsoft Dynamics AX Connector for Mobile Applications service is now running and listening on the Service Bus.

26 WORKFLOW APPROVAL VIA EMAIL
Appendix C: Configuring Service Bus namespace details in workflow parameters
After setting up and starting the Microsoft Dynamics AX Connector for Mobile Applications, provide the Service Bus details in the workflow parameters form.
1. Go to System Administration > Setup > Workflow > Workflow parameters.
2. In the Base URL to approve/reject workflow field, enter the Service Bus details in the following format:
https://namespace.servicebus.windows.net/Email
Replace namespace with the namespace details that you set up in the section, Appendix A: Creating a new Windows Azure Service Bus namespace.

27
WORKFLOW APPROVAL VIA EMAIL
Appendix D: Considerations
In choosing to enable this feature, consider the following points:
The action URL that is included in the email message is not authenticated to the intended user. Any user who has access to the message can click the action link. For example, if a user forwards the message to another user, the recipient of the message could complete the approve or reject action. We recommend that you include a reminder not to forward the email message in the
message. As a mitigation, each action URL can be used only one time, so that inadvertent forwarding enables only a single action.
The call to the Service Bus via the action URL is not authenticated. However, the action URL does contain a considerably long secret GUID that is required to take the approve or reject action. The connector also applies throttling if it detects repeated failed attempts. The Application Integration Framework (AIF) service is protected by the requirement that a value GUID (which is embedded in the action URL) be presented. If the GUID is not valid, no action is taken.
Updates since initial publication
The following table lists changes made to this document after it was initially published.
Date Changes
September 2014 Corrected inconsistent use of parameter names in the instructions for installing the Microsoft Dynamics AX Connector for Mobile Applications. All instances have been changed to EmailApprovalsServices.
Added content to indicate that the hotfix available from KB 2827196 is not required for cumulative update 6 for Microsoft Dynamics AX 2012 R2 or later versions.
Added a note to indicate that the WSDL port, 8101, should not be used as the endpoint URI of EmailApprovalsServices, because it is used as the default inbound port for an instance of AOS.

28 WORKFLOW APPROVAL VIA EMAIL
The information contained in this document represents the current view of Microsoft Corporation on the issues discussed as of the
date of publication. Because Microsoft must respond to changing market conditions, it should not be interpreted to be a
commitment on the part of Microsoft, and Microsoft cannot guarantee the accuracy of any information presented after the date of
publication.
This white paper is for informational purposes only. Microsoft makes no warranties, express or implied, in this document.
Complying with all applicable copyright laws is the responsibility of the user. Without limiting the rights under copyright, no part of
this document may be reproduced, stored in, or introduced into a retrieval system, or transmitted in any form or by any means
(electronic, mechanical, photocopying, recording, or otherwise), or for any purpose, without the express written permission of
Microsoft Corporation.
Microsoft may have patents, patent applications, trademarks, copyrights, or other intellectual property rights covering subject
matter in this document. Except as expressly provided in any written license agreement from Microsoft, the furnishing of this
document does not give you any license to these patents, trademarks, copyrights, or other intellectual property.
© 2014 Microsoft Corporation. All rights reserved.
Microsoft, Microsoft Dynamics, and the Microsoft logo are either registered trademarks or trademarks of Microsoft Corporation in
the United States and/or other countries.
Microsoft Dynamics is a line of integrated, adaptable business management solutions that enables you and your people to make business decisions with greater confidence. Microsoft Dynamics works like and with familiar Microsoft software, automating and streamlining financial, customer relationship and supply chain processes in a way that helps you drive business success.
U.S. and Canada Toll Free 1-888-477-7989
Worldwide +1-701-281-6500
www.microsoft.com/dynamics