workday time clock instructionsworkdayatensign.com/.../workday_timeclock_instructions.pdf ·...
TRANSCRIPT

Workday Time Clock Instructions
NOTE: The Workday time clocks use a software program called DCS to store employee names, punches, etc.
This software allows Workday and the time clocks to “talk” to each other.
**If you are unable to connect your time clock to the internet (should see this image in the top right of
your time clock screen if it’s connected), then contact your IT Field Resource or Support.
Enrolling an Employee to the Time Clock (For Enrollers/Admins)
To select a user to edit:
1. Press [Menu] on the device (the “M” key). You will see a lock – that is OKAY and means you need to be
authorized to access the Manager area.
2. Enter your EE ID # as an Enroller/Admin (NOT the employee’s ID you’re trying to enroll). Press OK.
3. Enter the password of 123. Press OK.
*If the clock asks for your fingerprint and not a password OR doesn’t recognize your EE ID # or
password, contact your Payroll Resource.
4. Navigate and select User Mng
5. Navigate and select Manage
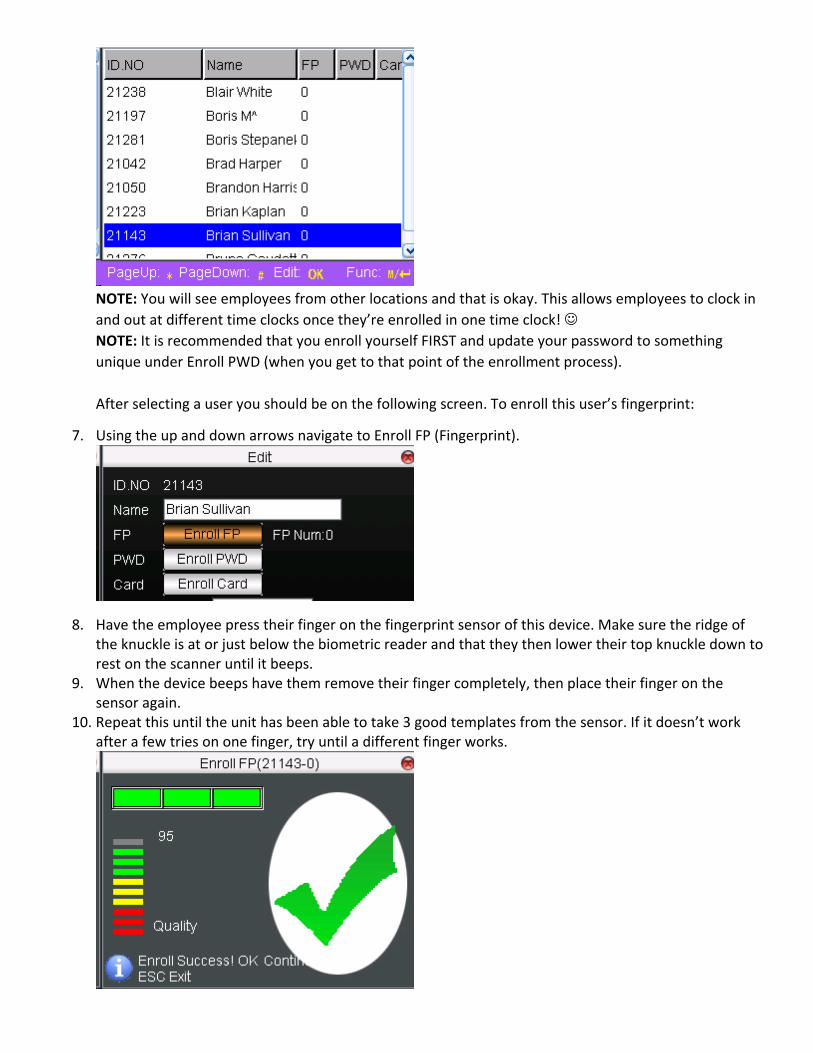
6. Navigate to the user that you want to enroll the fingerprint on using the up and down arrows or press [Menu] to search for a specific User ID or Name (using T9).
NOTE: You will see employees from other locations and that is okay. This allows employees to clock in
and out at different time clocks once they’re enrolled in one time clock!
NOTE: It is recommended that you enroll yourself FIRST and update your password to something
unique under Enroll PWD (when you get to that point of the enrollment process).
After selecting a user you should be on the following screen. To enroll this user’s fingerprint:
7. Using the up and down arrows navigate to Enroll FP (Fingerprint).
8. Have the employee press their finger on the fingerprint sensor of this device. Make sure the ridge of the knuckle is at or just below the biometric reader and that they then lower their top knuckle down to rest on the scanner until it beeps.
9. When the device beeps have them remove their finger completely, then place their finger on the sensor again.
10. Repeat this until the unit has been able to take 3 good templates from the sensor. If it doesn’t work after a few tries on one finger, try until a different finger works.
11. Once you’ve successfully saved a fingerprint, you can press ok to enroll a second fingerprint template for the user.
12. Then navigate down to OK or press the [Menu] button to Save.
After enrolling your user’s fingerprint(s) it will be uploaded to the DCS Server and distributed to the units
where this user is enrolled.
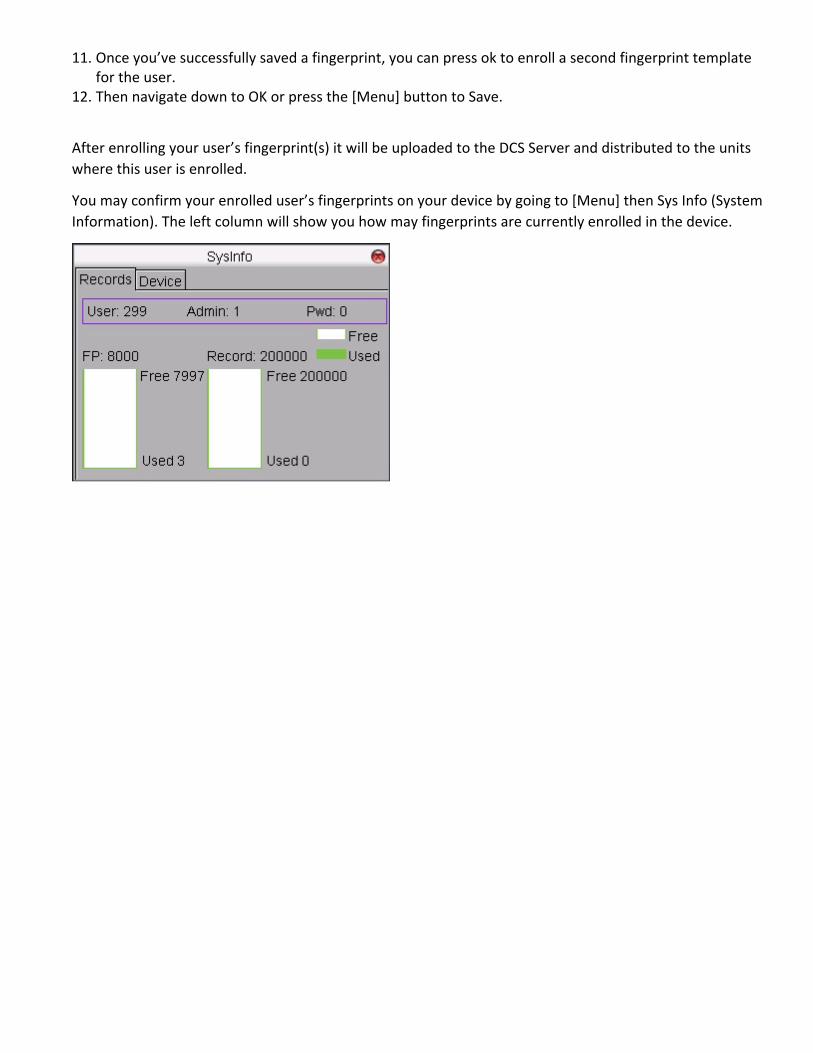
You may confirm your enrolled user’s fingerprints on your device by going to [Menu] then Sys Info (System
Information). The left column will show you how may fingerprints are currently enrolled in the device.
Clocking In & Out on Time Clocks
There are different steps for clocking in and clocking out. Also, View Punch may not be enabled at this time.
We are aware of this and working on it.
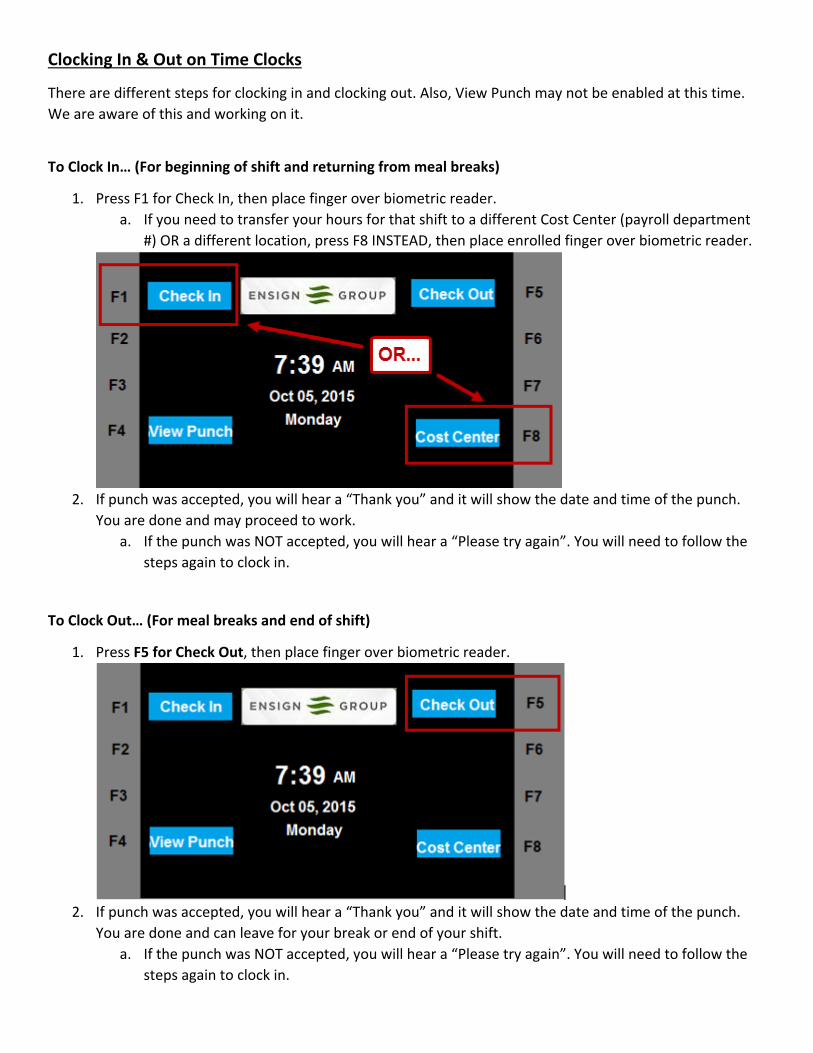
To Clock In… (For beginning of shift and returning from meal breaks)
1. Press F1 for Check In, then place finger over biometric reader.
a. If you need to transfer your hours for that shift to a different Cost Center (payroll department
#) OR a different location, press F8 INSTEAD, then place enrolled finger over biometric reader.
2. If punch was accepted, you will hear a “Thank you” and it will show the date and time of the punch.
You are done and may proceed to work.
a. If the punch was NOT accepted, you will hear a “Please try again”. You will need to follow the
steps again to clock in.
To Clock Out… (For meal breaks and end of shift)
1. Press F5 for Check Out, then place finger over biometric reader.
2. If punch was accepted, you will hear a “Thank you” and it will show the date and time of the punch.
You are done and can leave for your break or end of your shift.
a. If the punch was NOT accepted, you will hear a “Please try again”. You will need to follow the
steps again to clock in.