workcentre pe16 - office equipment, office printing, and office
TRANSCRIPT
WorkCentre PE16
LASER MULTIFUNCTION (4 IN 1)
MFP User’s Guide

About the User’s Guides
Your machine comes with the three user’s guides:
This Laser MFP User’s Guide provides information you need for setting up your machine and installing the supplied software. It also provides all of the detailed instructions for using your machine as a printer, a scanner and a copier and information for maintaining and troubleshooting the machine.
The Laser Facsimile User’s Guide provides information for using your machine as a fax machine. You can find how to send and receive a fax, and how to set fax-related options.
This manual is provided for information purposes only. All information included herein is subject to change without notice. Xerox Corporation is not responsible for any damages, direct or indirect, arising from or related to use of this manual.
© 2003 Xerox Corporation. All rights reserved.
• WorkCentre PE16 and Xerox logo are trademarks of Xerox Corporation.
• Centronics is a trademark of Centronics Data Computer Corporation.
• IBM and IBM PC are trademarks of International Business Machines Corporation.
• Microsoft, Windows, Windows 9x, Window Me, Windows 2000, Windows NT 4.0 and Windows XP are registered trademarks of Microsoft Corporation.
• All other brand or product names are trademarks of their respective companies or organisations.
ii
CONTENTS
Chapter 1: GETTING STARTED
Unpacking .......................................................... 1.2Understanding the Component Location .................. 1.5
Front View ..................................................... 1.5Rear View ...................................................... 1.6Control Panel Functions ................................... 1.7
Installing the Toner Cartridge ................................ 1.9Loading Paper .................................................... 1.11Making Connections ............................................ 1.14Turning the Machine On ....................................... 1.16Changing the Display Language and Country .......... 1.17
Setting Language .......................................... 1.17Setting Country ............................................. 1.17
Setting the Paper Type and Size ........................... 1.18Using the Save Modes ......................................... 1.19
Toner Save Mode ........................................... 1.19Power Save Mode .......................................... 1.19CCD Power Save Mode ................................... 1.20
Chapter 2: INSTALLING SOFTWARE
Printer Driver Features ......................................... 2.2System Requirements .......................................... 2.3Installing Software ............................................... 2.4

iii
Chapter 3: PAPER HANDLING
Selecting Print Materials ....................................... 3.2Size, Input Sources and Capacities .................... 3.2Guidelines for Paper and Special Materials .......... 3.3
Selecting an Output Location ................................. 3.4Printing to the Front Output Tray (Face down) .... 3.5Printing to the Rear Output Slot (Face up) .......... 3.5
Loading Paper in the Paper Tray ............................ 3.6Using the Bypass Tray .......................................... 3.8
Setting the Paper Type and Size for theBypass Tray .................................................. 3.10
Chapter 4: COPYING
Loading Paper for Copying .................................... 4.2Making Copies on the Document Glass .................... 4.2Making Copies from the Automatic Document Feeder ................................. 4.4Setting Copy Options ........................................... 4.6
Contrast ........................................................ 4.6Image ........................................................... 4.6Reduced/Enlarged Copy ................................... 4.7Number of Copies ........................................... 4.8
Using Special Copy Features ................................. 4.8Auto Fit Copying ............................................. 4.9Clone Copying ................................................ 4.9Collation Copying ........................................... 4.102-side Copying .............................................. 4.112-up or 4-up Copying ..................................... 4.12Poster Copying .............................................. 4.12
Changing the Default Settings .............................. 4.13Setting the Time Out Option ................................. 4.14

iv
Chapter 5: PRINTING
Printing a Document ............................................ 5.2Cancelling a Print Job ...................................... 5.5Using a Favorite Setting .................................. 5.6Using Help ..................................................... 5.6
Setting Paper Properties ....................................... 5.7Printing Multiple Pages on One Sheet of Paper (N-Up Printing) .................................................... 5.8Printing a Reduced or Enlarged Document .............. 5.10Fitting Your Document to a Selected Paper Size ...... 5.11Printing Posters .................................................. 5.12Using Watermarks .............................................. 5.13
Using an Existing Watermark ........................... 5.13Creating a Watermark .................................... 5.14Editing a Watermark ...................................... 5.15Deleting a Watermark .................................... 5.15
Using Overlays ................................................... 5.16What is an Overlay? ....................................... 5.16Creating a New Page Overlay .......................... 5.16Using a Page Overlay ..................................... 5.18Deleting a Page Overlay ................................. 5.19
Setting Graphic Properties ................................... 5.20Setting Up the Locally Shared Printer .................... 5.22
In Windows 9x/Me ......................................... 5.22In Windows NT 4.0/2000/XP ........................... 5.23
Chapter 6: SCANNING
TWAIN Scanner Program ...................................... 6.2Scanning Procedure ............................................. 6.3
Load the Originals ........................................... 6.3Run the Scan Application Program .................... 6.4
v
Chapter 7: MAINTENANCE
Clearing the Memory ............................................ 7.2Cleaning Your Machine ......................................... 7.3
Cleaning the Outside ....................................... 7.3Cleaning the Inside ......................................... 7.3Cleaning the Scan Unit .................................... 7.5
Maintaining the Toner Cartridge ............................. 7.6Redistributing Toner ........................................ 7.7Replacing the Toner Cartridge .......................... 7.8Setting the Notify Toner Option ....................... 7.10Cleaning the Drum ......................................... 7.10
Consumables and Replacement Parts .................... 7.11
Chapter 8: TROUBLESHOOTING
Clearing Document Jams ...................................... 8.2Input Misfeed ................................................. 8.2Exit Misfeed ................................................... 8.3Roller Misfeed ................................................ 8.3
Clearing Paper Jams ............................................. 8.4In the Paper Feed Area .................................... 8.4In the Paper Exit Area ..................................... 8.5In the Fuser Area or Around the Toner Cartridge . 8.7In the Bypass Tray .......................................... 8.8Tips for Avoiding Paper Jams When Printing on the A5-sized Paper ..................................... 8.9Tips for Avoiding Paper Jams ........................... 8.10
Clearing LCD Error Messages ................................ 8.11Solving Problems ................................................ 8.14
Paper Feeding Problems ................................. 8.14Printing Problems .......................................... 8.15Printing Quality Problems ................................ 8.18Fax Problems ................................................ 8.22Copying Problems .......................................... 8.24Scanning Problems ........................................ 8.25

vi
Chapter A: SPECIFICATIONS
General Specifications .......................................... A.2Scanner and Copier Specifications .......................... A.3Printer Specifications ............................................ A.4Facsimile Specifications ........................................ A.5Paper Specifications ............................................. A.6
Overview ....................................................... A.6Supported Sizes of Paper ................................. A.6Guidelines for Using Paper ............................... A.7Paper Specifications ........................................ A.8Paper Output Capacity ..................................... A.8Printer and Paper Storage Environment ............. A.9
vii
Important Precautions and Safety Information
When using this machine, these basic safety precautions should always be followed to reduce risk of fire, electric shock, and injury to people:
1. Read and understand all instructions.
2. Use common sense whenever operating electrical appliances.
3. Follow all warnings and instructions marked on the machine and in the literature accompanying the machine.
4. If an operating instruction appears to conflict with safety information, heed the safety information. You may have misunderstood the operating instruction. If you cannot resolve the conflict, contact your sales or service representative for assistance.
5. Unplug the machine from the AC wall socket and/or telephone jack before cleaning. Do not use liquid or aerosol cleaners. Use only a damp cloth for cleaning.
6. Do not place the machine on an unstable cart, stand or table. It may fall, causing serious damage.
7. Your machine should never be placed on, near or over a radiator, heater, air conditioner or ventilation duct.
8. Do not allow anything to rest on the power. Do not locate your machine where the cords will be abused by persons walking on them.
9. Do not overload wall outlets and extension cords. This can diminish performance, and may result in the risk of fire or electric shock.
10. Do not allow pets to chew on the AC power, telephone or PC interface cords.
11. Never push objects of any kind into the machine through case or cabinet openings. They may touch dangerous voltage points, creating a risk of fire or shock. Never spill liquid of any kind onto or into the machine.
12. You machine may have a heavy cover for optimal pressure on the document for the best scanning and/or faxing (usually the flatbed-type machine). In this case, replace the cover after placing document on the scan glass, by holding and moving it down slowly until it seats on its location.
13. To reduce the risk of electric shock, do not disassemble the machine. Take it to a qualified service technician when repair work is required. Opening or removing covers may expose you to dangerous voltages or other risks. Incorrect reassembly could cause electric shock when the unit is subsequently used.
14. Unplug the machine from the telephone jack, PC and AC wall outlet, and refer servicing to qualified service personnel under the following conditions:• When any part of the power cord, plug, or connecting cable is damaged or
frayed.• If liquid has been spilled into the machine.

viii
• If the machine has been exposed to rain or water.• If the machine does not operate properly after instructions have been followed.• If the machine has been dropped, or the cabinet appears damaged.• If the machine exhibits a sudden and distinct change in performance.
15. Adjust only those controls covered by the operating instructions. Improper adjustment of other controls may result in damage, and may require extensive work by a qualified service technician to restore the machine to normal operation.
16. Avoid using this machine during a lightning storm. There may be a remote risk of electric shock from lightning. If possible, unplug the AC power and telephone cord for the duration of the lightning storm.
17. SAVE THESE INSTRUCTIONS.
Laser Safety Statement
The printer is certified in the U.S. to conform to the requirements of DHHS 21 CFR, chapter 1 Subchapter J for Class I(1) laser products, and elsewhere is certified as a Class I laser product conforming to the requirements of IEC 825.
Class I laser products are not considered to be hazardous. The laser system and printer are designed so there is never any human access to laser radiation above a Class I level during normal operation, user maintenance, or prescribed service condition.
WARNING
Never operate or service the printer with the protective cover removed from Laser/Scanner assembly. The reflected beam, although invisible, can damage your eyes.
CAUTION - INVISIBLE LASER RADIATION �WHEN THIS COVER OPEN. �DO NOT OPEN THIS COVER.
VORSICHT - UNSICHTBARE LASERSTRAHLUNG, �WENN ABDECKUNG GEÖFFNET. �NICHT DEM STRAHL AUSSETZEN.
ATTENTION - RAYONNEMENT LASER INVISIBLE EN CAS �D’OUVERTURE. EXPOSITION DANGEREUSE �AU FAISCEAU.�
ATTENZIONE - RADIAZIONE LASER INVISIBILE IN CASO DI �APERTURA. EVITARE L’ESPOSIZIONE AL FASCIO.
PRECAUCIÓN - RADIACIÓN LASER INVISIBLE CUANDO SE ABRE. �EVITAR EXPONERSE AL RAYO.
ADVARSEL. - USYNLIG LASERSTRÅLNING VED ÅBNING, NÅR �SIKKERHEDSBRYDERE ER UDE AF FUNKTION. �UNDGÅ UDSAETTELSE FOR STRÅLNING.
ADVARSEL. - USYNLIG LASERSTRÅLNING NÅR DEKSEL �ÅPNES. STIRR IKKE INN I STRÅLEN. UNNGÅ �EKSPONERING FOR STRÅLEN.
VARNING - OSYNLIG LASERSTRÅLNING NÄR DENNA DEL �ÄR ÖPPEN OCH SPÄRREN ÄR URKOPPLAD. �BETRAKTA EJ STRÅLEN. STRÅLEN ÄR FARLIG.
VARO! - AVATTAESSA JA SUOJALUKITUS OHITETTAESSA �OLET ALTTIINA NÄKYMÄTTÖMÄLLE LASER-�SÄTEILYLLE ÄLÄ KATSO SÄTEESEEN.
PERIGO - RADIAÇÃO LASER INVISÍVEL AO ABRIR. EVITE �EXPOSIÇÃO DIRECTA AO FEIXE.
GEVAAR - ONZICHTBARE LASERSTRALEN BIJ GEOPENDE �KLEP. DEZE KLEP NIET OPENEN.

ix
Ozone Safety
During normal operation, this machine produces ozone. The ozone produced does not present a hazard to the operator. However, it is advisable that the machine be operated in a well ventilated area.
If you need additional information about ozone, please request your nearest Xerox dealer.
Power Saver
This machine contains advanced energy conservation technology that reduces power consumption when it is not in active use.
When the machine does not receive data for an extended period of time, power consumption is automatically lowered.
The energy star emblem does not represent EPA endorsement of any machine or service.
Recycling
Please recycle or dispose of the packaging material for this product in an environmentally responsible manner.
x
Radio Frequency Emissions
FCC Information to the User
This equipment has been tested and found to comply with the limits for a Class B digital device, pursuant to Part 15 of the FCC Rules. These limits are designed to provide reasonable protection against harmful interference in a residential installation. This equipment generates, uses and can radiate radio frequency energy and, if not installed and used in accordance with the instructions, may cause harmful interference to radio communications. However, there is no guarantee that interference will not occur in a particular installation. If this equipment does cause harmful interference to radio or television reception, which can be determined by turning the equipment off and on, the user is encouraged to try to correct the interference by one or more of the following measures:• Reorient or relocate the receiving antenna.• Increase the separation between the equipment and receiver.• Connect the equipment into an outlet on a circuit different from that to which the
receiver is connected.• Consult the dealer or experienced radio TV technician for help.
CAUTION: Change or modifications not expressly approved by the manufacturer responsible for compliance could void the user's authority to operate the equipment.
Canadian Radio Interference Regulations
This digital apparatus does not exceed the Class B limits for radio noise emissions from digital apparatus as set out in the interference-causing equipment standard entitled “Digital Apparatus”, ICES-003 of the Industry and Science Canada.
Cet appareil numérique respecte les limites de bruits radioélectriques applicables aux appareils numériques de Classe B prescrites dans la norme sur le matériel brouilleur: “Appareils Numériques”, ICES-003 édictée par l’Industrie et Sciences Canada.
Fax Branding
The Telephone Consumer Protection Act of 1991 makes it unlawful for any person to use a computer or other electronic device to send any message via a telephone facsimile machine unless such message clearly contains in a margin at the top or bottom of each transmitted page or on the first page of the transmission the following information:
(1) the date and time of transmission(2) identification of either business, business entity or individual sending the
message; and(3) telephone number of either the sending machine, business, business entity or
individual.

xi
Refer to the Facsimile User’s Guide for instructions on how to enter this information into your machine’s memory.
The Telephone Company may make changes in its communications facilities, equipment operations, or procedures where such action is reasonably required in the operation of its business and is not inconsistent with the rules and regulations in FCC Part 68. If such changes can be reasonably expected to render any customer terminal equipment incompatible with telephone company communications facilities, or require modification or alteration of such terminal equipment, or otherwise materially affect its use or performance, the customer shall be given adequate notice in writing, to allow the customer an opportunity to maintain uninterrupted service.
Ringer Equivalence Number
The Ringer Equivalence Number and FCC Registration Number for this machine may be found on the label located on the bottom or rear of the machine. In some instances you may need to provide these numbers to the telephone company.
The Ringer Equivalence Number (REN) is a measure of the electrical load placed on the telephone line, and is useful for determining whether you have “overloaded” the line. Installing several types of equipment on the same telephone line may result in problems making and receiving telephone calls, especially ringing when your line is called. The sum of all Ringer Equivalence Numbers of the equipment on your telephone line should be less than five in order to assure proper service from the telephone company. In some cases, a sum of five may not be usable on your line. If any of your telephone equipment is not operating properly, you should immediately remove it from your telephone line, as it may cause harm to the telephone network.
WARNING:
FCC Regulations state that changes or modifications to this equipment not expressly approved by the manufacturer could void the user’s authority to operate this equipment. In the event that terminal equipment causes harm to the telephone network, the telephone company should notify the customer that service may be stopped. However, where prior notice is impractical, the company may temporarily cease service, providing that they:
a) promptly notify the customer.
b) give the customer an opportunity to correct the equipment problem.
c) inform the customer of the right to bring a complaint to the Federal Communication Commission pursuant to procedures set out in FCC Rules and Regulations Subpart E of Part 68.

xii
You should also know that:
• Your machine is not designed to be connected to a digital PBX system.
• If you intend to use a computer modem or fax modem on the same phone line as your machine, you may experience transmission and reception problems with all the equipment. It is recommended that no other equipment, except for a regular telephone, share the line with your machine.
• If your area experiences a high incidence of lightning or power surges, we recommend that you install surge protectors for both the power and the telephone lines. Surge protectors can be purchased from your dealer or telephone and electronic specialty stores.
• When programming emergency numbers and/or making test calls to emergency numbers, use a non-emergency number to advise the emergency service dispatcher of your intentions. The dispatcher will give you further instructions on how to actually test the emergency number.
• This machine may not be used on coin service or party lines.
• This machine provides magnetic coupling to hearing aids.
• You may safely connect this equipment to the telephone network by means of a standard modular jack, USOC RJ-11C.

xiii
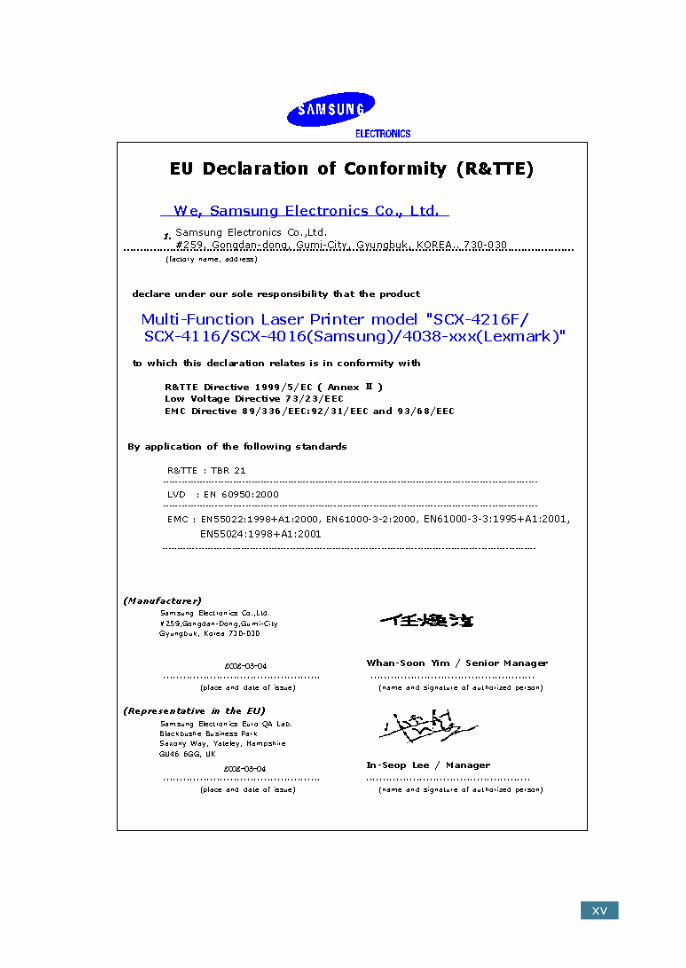
Declaration of Conformity (European Countries)
Approvals and Certifications
The CE marking applied to this product symbolises Xerox Electronics Co., Ltd. Declaration of Conformity with the following applicable 93/68/EEC Directives of the European Union as of the dates indicated:
January 1, 1995: Council Directive 73/23/EEC Approximation of the laws of the member states related to low voltage equipment.
January 1, 1996: Council Directive 89/336/EEC (92/31/EEC), approximation of the laws of the Member States related to electromagnetic compatibility.
March 9, 1999: Council Directive 1999/5/EC on radio equipment and telecommunications terminal equipment and the mutual recognition of their conformity.
A full declaration, defining the relevant Directives and referenced standards can be obtained from your Xerox Electronics Co., Ltd. representative.
EC Certification
Certification to 1999/5/EC Radio Equipment & Telecommunications Terminal Equipment Directive (FAX)
This Xerox product has been self-certified by Xerox for pan-European single terminal connection to the analogue public switched telephone network (PSTN) in accordance with Directive 1999/5/EC. The product has been designed to work with the national PSTNs and compatible PBXs of the European countries:
In the event of problems, you should contact the Euro QA Lab of Xerox Electronics Co., Ltd. in the first instance.
The product has been tested against TBR21. To assist in the use and application of terminal equipment which complies with this standard, the European Telecommunication Standards Institute (ETSI) has issued an advisory document (EG 201 121) which contains notes and additional requirements to ensure network compatibility of TBR21 terminals. The product has been designed against, and is fully compliant with, all of the relevant advisory notes contained in this document.

xiv
Replacing the Fitted Plug (for UK Only)
IMPORTANT
The mains lead for this machine is fitted with a standard (BS 1363) 13 amp plug and has a 13 amp fuse. When you change or examine the fuse, you must re-fit the correct 13 amp fuse. You then need to replace the fuse cover. If you have lost the fuse cover, do not use the plug until you have another fuse cover.
Please contact the people from you purchased the machine.
The 13 amp plug is the most widely used type in the UK and should be suitable. However, some buildings (mainly old ones) do not have normal 13 amp plug sockets. You need to buy a suitable plug adaptor. Do not remove the moulded plug.
WARNING
If you cut off the moulded plug, get rid of it straight away.You cannot rewire the plug and you may receive an electric shock if you plug it into a socket.
IMPORTANT WARNING: You must earth this machine.
The wires in the mains lead have the following colour code:
• Green and Yellow: Earth
• Blue: Neutral
• Brown: Live
If the wires in the mains lead do not match the colours marked in your plug, do the following:
You must connect the green and yellow wire to the pin marked by the letter “E” or by the safety `Earth symbol' or coloured green and yellow or green.
You must connect the blue wire to the pin which is marked with the letter “N” or coloured black.
You must connect the brown wire to the pin which is marked with the letter “L” or coloured red.
You must have a 13 amp fuse in the plug, adaptor, or at the distribution board.
xv
xvi
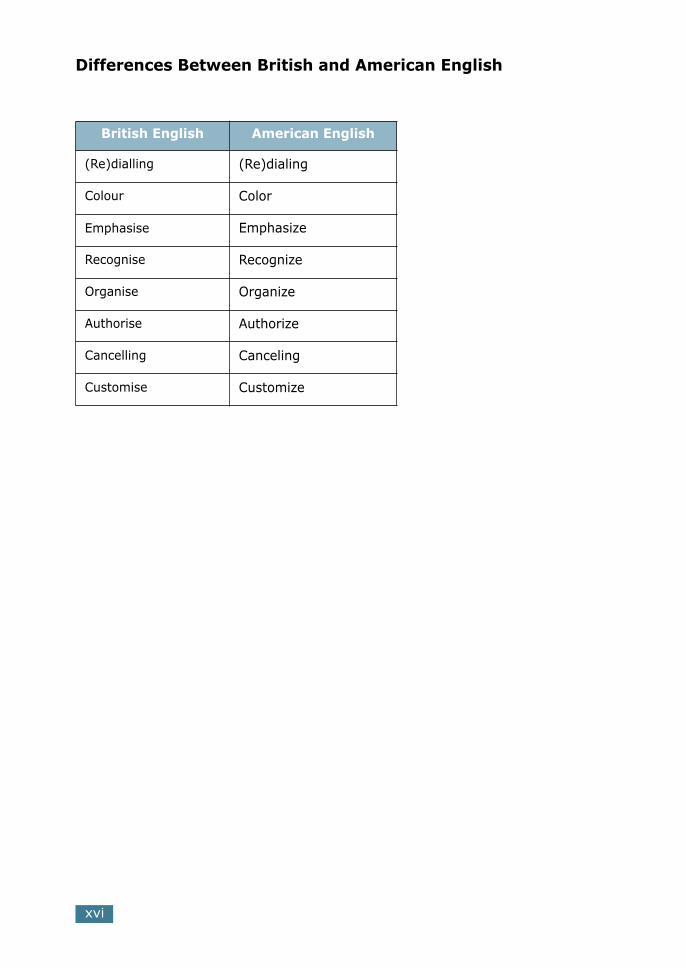
Differences Between British and American English
British English American English
(Re)dialling (Re)dialing
Colour Color
Emphasise Emphasize
Recognise Recognize
Organise Organize
Authorise Authorize
Cancelling Canceling
Customise Customize

1 GETTING STARTED
Thank you for purchasing this Xerox multifunctional product. Your machine provides printing, copying, scanning, and faxing functions!
This chapter gives you step-by-step instructions for setting up your machine.
This chapter includes:
• Unpacking
• Understanding the Component Location
• Installing the Toner Cartridge
• Loading Paper
• Making Connections
• Turning the Machine On
• Changing the Display Language and Country
• Setting the Paper Type and Size
• Using the Save Modes

GETTING STARTED1.2
Unpacking
1 Remove the machine and all accessories from the packing carton. Make sure that the machine has been packed with the following items:
NOTES:
• The appearance of the power cord and the telephone line cord may differ according to your country’s specifications.
• The CD-ROM contains software, the user’s guides and the Adobe Acrobat Reader program.
• You should use the telephone line cord which is supplied with your machine. If you are replacing it with another vendor’s, it should be AWG #26 or lower gage.
• Power cord must be plugged into a grounded power socket.

GETTING STARTED 1.3
1
2 Remove the packing tape from the front, back and sides of the machine.
Tape

GETTING STARTED1.4
Selecting a Location
Select a level, stable place with adequate space for air circulation. Allow extra space for opening covers and trays. The area should be well-ventilated and away from direct sunlight or sources of heat, cold and humidity. Do not set the printer close to the edge of your desk or table.
Clearance SpaceFront: 482.6 mm (enough space so that the paper tray can be removed)
Back: 100 mm (enough space for ventilation)
Right: 100 mm
Left: 100 mm (enough space for ventilation)
674 mm (26.5 in)
1018
.6 m
m (
40.1
in)
482.
6 m
m (
18.8
in.)

GETTING STARTED 1.5
1Understanding the Component Location
These are the main components of your machine:
Front View
Document Guides
Document Input Tray
Document Output Tray
Control Panel(see page 1.7
Paper Tray
Front Cover
Paper Level Indicator
Bypass Tray
AutomaticDocument Feeder
Document Cover
Paper Output Extension
Document Glass
Front Output Tray (face down)

GETTING STARTED1.6
Rear View
AC Power CordConnector
ParallelConnector
Power Switch
USB Connector
Telephone Connector
Rear Output Slot(Face up)
Rear Cover

GETTING STARTED 1.7
1
Control Panel Functions
WorkCentre PE16
1 4 652 3
1COPY
Adjusts the brightness of the documents for the current copy job.
Selects the document type for the current copy job.
Allows you to use special copy features, such as Clone, Collation, Auto fit, 2-side, N-up (multiple pages on a sheet) and Poster copying.
Makes a copy smaller or larger than the original.
Selects the number of copies.
2Displays the current status and prompts during an operation.
Turns on when the toner cartridge is empty.
3
Scrolls through the options available for the selected menu item.
Confirms the selection on the display.
Enters Menu Mode and scrolls through the menus available.

GETTING STARTED1.8
3
Sends you back to the upper menu level.
Stops an operation at any time.In Standby Mode, clears/cancels the copy options, such as the contrast, the image setting, the copy size and the number of copies.
Starts a job.
4 Dials a number or enters alphanumeric characters.
5FAX
Adjusts the resolution of the documents for the current fax job.
Allows you to send a fax to multiple destinations.
• Allows you to store frequently-dialed fax numbers using a one or two-digit speed dial or group number for automatic dialling and edit the stored numbers.
• Allows you to print a Phonebook list.
Redials the last number in Standby Mode or inserts a pause into a fax number in edit mode.
Engages the telephone line.
6SAVE
Allows you to save on toner by using less toner to print a document.
Allows you to save on call costs by sending a fax at a preset toll-saving time. Using this feature, you can take advantage of lower long distance rates at night, for example.
GETTING STARTED 1.9
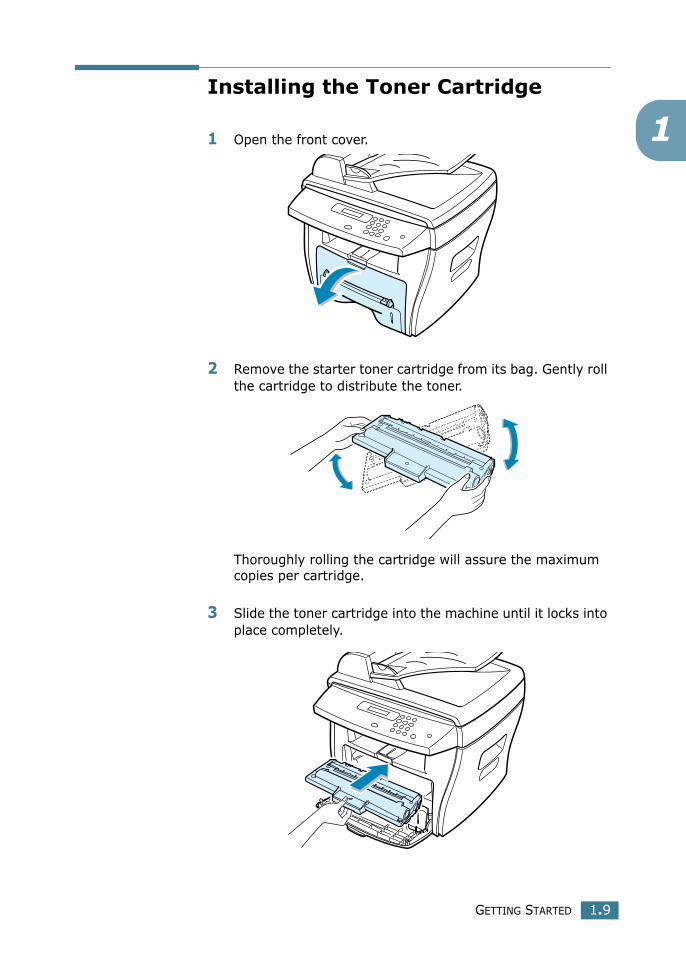
1Installing the Toner Cartridge
1 Open the front cover.
2 Remove the starter toner cartridge from its bag. Gently roll the cartridge to distribute the toner.
Thoroughly rolling the cartridge will assure the maximum copies per cartridge.
3 Slide the toner cartridge into the machine until it locks into place completely.

GETTING STARTED1.10
4 Close the front cover.
NOTE: When the toner cartridge needs to be replaced, the indicator turns on and the “Toner Empty” message appears on the display. To replace the toner cartridge, see page 7.8.
GETTING STARTED 1.11
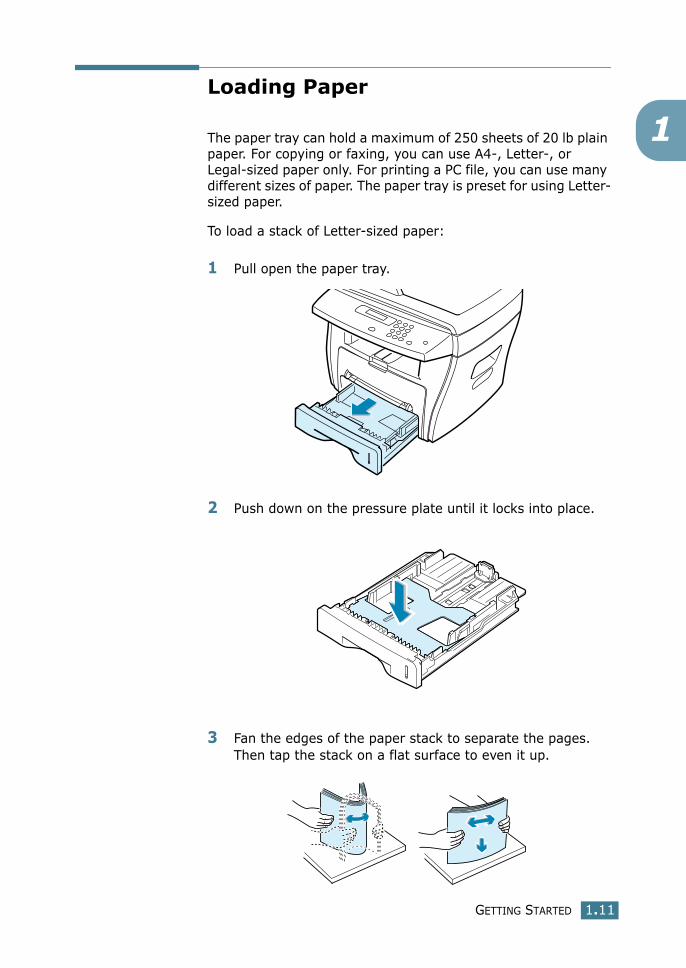
1Loading Paper
The paper tray can hold a maximum of 250 sheets of 20 lb plain paper. For copying or faxing, you can use A4-, Letter-, or Legal-sized paper only. For printing a PC file, you can use many different sizes of paper. The paper tray is preset for using Letter-sized paper.
To load a stack of Letter-sized paper:
1 Pull open the paper tray.
2 Push down on the pressure plate until it locks into place.
3 Fan the edges of the paper stack to separate the pages. Then tap the stack on a flat surface to even it up.

GETTING STARTED1.12
4 Insert the paper stack into the paper tray.
If you want to load a different sized paper, you need to adjust the paper guides. For details, see page 1.13.
5 Pay attention to the paper limit mark on the left inside wall of the tray. Paper overloading may cause paper jams.
6 Slide the paper tray back in.
After you load paper, you need to set up your machine for the paper type and size you loaded. See page 1.18 for copying and faxing, or page 5.7 for PC-printing.

GETTING STARTED 1.13
1
Changing the Paper Size in the Paper Tray
To load longer sizes of paper, such as A4 or Legal-sized paper, you need to adjust the paper guides to extend the paper tray.
1 Pressing and unlatching the guide lock, slide the paper length guide out completely to extend the paper tray to its full length.
2 After inserting paper into the tray, slide in the guide until it lightly touches the end of the paper stack.
3 Pinching the paper width guide as shown, move it toward the stack of paper until it lightly touches the side of the stack.

GETTING STARTED1.14
NOTES:
• Do not push the paper width guide far enough to cause the materials to warp.
• If you do not adjust the paper width guide, it may cause paper jams.
Making Connections
1 Plug the supplied telephone line cord into the LINE jack and the other end into the wall jack.

GETTING STARTED 1.15
1
2 If you want to use a parallel printer cable, purchase only IEEE-1284 compliant parallel cable and connect it to the parallel connector on your machine.
Push the metal clips down to fit inside the notches on the cable plug.
Connecting the printer to the USB port of the computer requires a certified USB cable. Connect the supplied USB 1.1 compliant cable to the USB connector on your machine.
NOTES:• You only need to connect one of the cables mentioned above. Do
not use the parallel and the USB cables at the same time.
• If you are using a USB cable, you must be running Windows 98/Me/2000/XP.
• When using the USB connection, your machine provides two USB modes; Fast and Slow. Fast is the default mode. Some PC users may experience poor USB function in the default mode. If this occurs, select the Slow mode to achieve successful results. For details about changing the USB mode, see page 8.17.
➜ To the parallel port on your computer
➜ To the USB port on your computer
GETTING STARTED1.16
Turning the Machine On
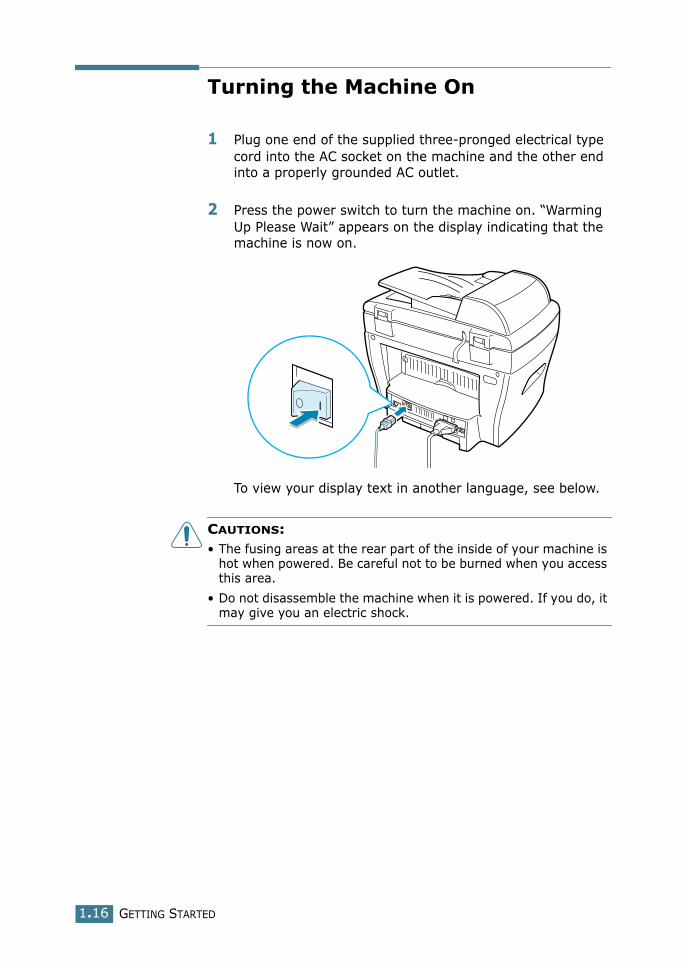
1 Plug one end of the supplied three-pronged electrical type cord into the AC socket on the machine and the other end into a properly grounded AC outlet.
2 Press the power switch to turn the machine on. “Warming Up Please Wait” appears on the display indicating that the machine is now on.
To view your display text in another language, see below.
CAUTIONS:• The fusing areas at the rear part of the inside of your machine is
hot when powered. Be careful not to be burned when you access this area.
• Do not disassemble the machine when it is powered. If you do, it may give you an electric shock.
GETTING STARTED 1.17
1Changing the Display Language and Country
Setting Language
To change the language that displays on the display of the control panel, follow these steps:
1 Press Menu until “Machine Setup” appears on the top line of the display.
2 Press the scroll button (� or �) until “Language” appears on the bottom line of the display.
3 Press Enter. The current setting appears on the bottom line of the display.
4 Press the scroll button (� or �) until the language you want appears on the display.
5 Press Enter to save the selection.
6 To return to Standby Mode, press Stop/Clear.
Setting Country
1 Press Menu until “Machine Setup” appears on the top line of the display.
2 Press the scroll button (� or �) until “Select Country” appears on the bottom line of the display.
3 Press Enter. The current setting appears on the bottom line of the display.
4 Press the scroll button (� or �) until your country appears on the display.
5 Press Enter to save the selection.
6 To return to Standby Mode, press Stop/Clear.
NOTES: Changing the county clears the memory.
GETTING STARTED1.18
Setting the Paper Type and Size
After loading paper in the paper tray, you need to set the paper type and size using the control panel buttons. These settings will apply to copy mode. For PC-printing, you need to select the paper type and size in the application program you use.
1 Press Menu.
The display shows “Paper Setting” on the top line and the first menu item, “Paper Type,” on the bottom line.
2 Press Enter to access the menu item.
3 Use the scroll button (� or �) to find the paper type you are using and press Enter to save it.
4 Press the ��button to scroll to “Paper Size” and press Enter to access the menu item.
5 Press Enter when “Tray Paper” displays on the bottom line.
6 Use the scroll button (� or �) to find the paper size you are using and press Enter to save it.
7 To return to Standby Mode, press Stop/Clear.
GETTING STARTED 1.19
1
Using the Save Modes
Toner Save Mode
The toner save mode allows your machine to use less toner on each page. Activating this mode extends the life of the toner cartridge longer than the normal mode, but it reduces the print quality.
To turn the toner save mode on or off, press Toner Save.
• If the button backlight is on, the mode is active and the machine uses less toner when printing a document.
• If the button backlight is off, the mode is deactivated and the machine prints with the normal quality.
NOTE: For PC-printing, you can also turn on or off the toner save mode in the printer properties. See page 5.20.
Power Save Mode
The power save mode allows your machine to reduce power consumption when it is not in actual use. You can turn this mode on by selecting the length of time for which the machine waits after a job is printed before it switches to a reduced power state.
1 Press Menu until “Machine Setup” appears on top line of the display.
2 Press the scroll button (� or �) until “Power Save” appears on the bottom line. Press Enter.
3 Press the scroll button (� or �) to display “On” on the bottom line and press Enter.
Selecting “Off” means that the power save mode turns off.
4 Press the scroll button (� or �) until the time settings you want appears.
The available options are 5, 10, 15, 30 and 45 (minutes).
5 Press Enter to save the selection.
6 To return to Standby Mode, press Stop/Clear.

GETTING STARTED1.20
CCD Power Save Mode
The scan lamp under the document glass automatically turns off when it is not in actual use to reduce power consumption and extend the lamp life. The lamp automatically wakes up after some warm-up time when you start scanning.
You can set the length of time for which the scan lamp waits after a scan job is completed before it switches to the power save mode.
1 Press Menu until “Machine Setup” appears on top line of the display.
2 Press the scroll button (� or �) until “CCD Power Save” appears on the bottom line. Press Enter.
3 Press the scroll button (� or �) until the time setting you want appears on the bottom line.
The available time options are 1, 4, 8 and 12 (hours).
4 Press Enter to save the selection.
5 To return to Standby Mode, press Stop/Clear.

2 INSTALLING SOFTWARE
This chapter gives you information for installing the supplied software. You must install the software to use your machine as a printer and a scanner.
This chapter includes:
• Printer Driver Features
• System Requirements
• Installing Software
INSTALLING SOFTWARE2.2
Printer Driver Features
Your printer drivers will support the following standard features:
• Paper source selection
• Paper size, orientation and media type
• number of copies
Table below lists a general overview of features supported by your printer drivers.
FeaturePrinter Driver
Win9x/Me Win2000/XP NT4.0
Toner Save Y Y Y
Print quality option Y Y Y
Poster printing Y Y Y
Multiple pages per sheet (N-up) Y Y Y
Fit to page printing Y Y Y
Scale printing Y Y Y
Watermark Y Y Y
Overlay Y Y Y

INSTALLING SOFTWARE 2.3
2
System Requirements
Before you begin, ensure that your system meets the minimum requirements.
Supported Operating System• Windows 95 OSR2• Windows 98/Windows 98 SE• Windows Me• Windows NT 4 Workstation or Server with Service Pack 3• Windows 2000 Professional or Advanced Server• Windows XP Home edition or Professional.
Minimal Requirements• Disk space: 120 MB for installation • Memory: 64 MB • CPU: Pentium II 233 or higher• Required software: Internet Explorer 4.01
Recommended• Disk space: 220 MB for installation• Memory: 128 MB• CPU: Pentium II 400 or higher• Required software: Internet Explorer 5.5
NOTES:
• For Windows NT 4.0/2000/XP, the system administrator should install the software.
• Windows 95 versions prior to OSR2 are not recommended due to incompatibility with OLE/COM libraries.
INSTALLING SOFTWARE2.4
Installing Software
Installing the drivers and other software will enable PC printing. Ensure the WorkCentre PE16 is plugged in and connected to the computer’s parallel or USB port before installing software from the CD.
NOTE: Windows 95 and Windows NT 4.0 do not support USB connection.
1 Switch on the PC and start Windows.
NOTE: If a window appears concerning New Hardware, select Cancel.
2 Insert the Setup CD into the CD-ROM drive of the PC.
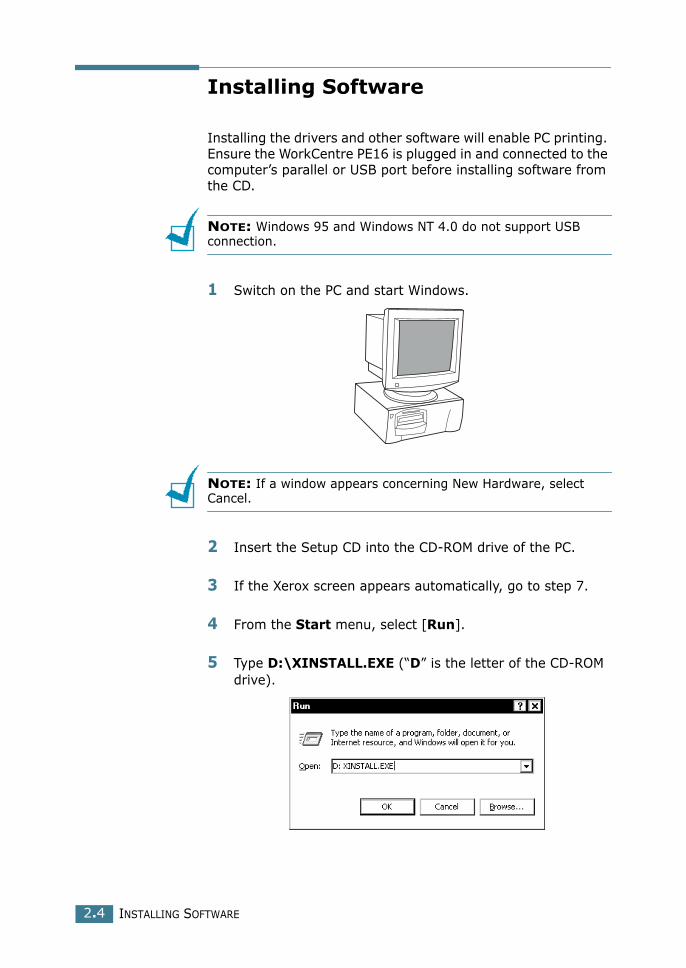
3 If the Xerox screen appears automatically, go to step 7.
4 From the Start menu, select [Run].
5 Type D:\XINSTALL.EXE (“D” is the letter of the CD-ROM drive).

INSTALLING SOFTWARE 2.5
2
6 Select [OK].
7 Follow the on-screen instructions to complete the software installation.
NOTE: For more information about printing refer to the “Printing” chapter of this Guide.
8 For Windows 95/98 eject the CD after re-start.
9 After installing the software reboot the PC.

INSTALLING SOFTWARE2.6
NOTES:

3 PAPER HANDLING
This chapter introduces you to the basics of selecting print materials and loading them into your machine.
This chapter includes:
• Selecting Print Materials
• Selecting an Output Location
• Loading Paper in the Paper Tray
• Using the Bypass Tray

PAPER HANDLING3.2
Selecting Print Materials
Always use print materials that meet the guidelines for use with this machine. Using print materials that are not recommended may cause paper jams or print quality problems.
Size, Input Sources and Capacities
Size (mm/in.)Input Source/Capacity*
Paper Tray Bypass Tray
Plain paperLetter (215.9 x 279/8.5 x 11) A4 (210 x 297/8.27 x 11.69)Folio (215.9 x 330.2/8.5 x 13)Legal (215.9 x 355.6/8.5 x 14)Executive (184.2 x 266.7/7.25 x 10.5)A5 (148 x 210/5.83 x 8.27)A6 (105 x 148/4.13 x 5.88)
YES/250YES/250YES/250YES/250YES/250YES/250YES/250
YES/1YES/1YES/1YES/1YES/1YES/1YES/1
EnvelopesNo.9 (98.4 x 225.4/3.88 x 8.88)No.10 (104.8 x 241.3/4.13 x 9.5) DL (110 x 220/4.33 x 8.66)C5 (162 x 229/6.38 x 9.02)C6 (114 x 162/4.49 x 6.38)B5 (176 x 250/6.93 x 9.84)No.7 3/4 (98.4 x 190.5/3.88 x 7.5)
NO/0NO/0NO/0NO/0NO/0NO/0
YES/1YES/1YES/1YES/1YES/1
Labels**
Letter (215.9 x 279/8.5 x 11)A4 (210 x 297/8.27 x 11.69)
NO/0NO/0
YES/1YES/1
Transparency films**
Letter (215.9 x 279/8.5 x 11)A4 (210 x 297/8.27 x 11.69)
NO/0NO/0
YES/1YES/1
Card stocks**
A6 card (105 x 148/4.13 x 5.88)Post Card (101.6 x 152.4/4 x 6)Hagaki (100 x 148/3.94 x 5.83)
NO/0NO/0NO/0
YES/1YES/1YES/1
*. Maximum capacity may be reduced depending on paper thickness.**. If you experience excessive jamming, load one sheet at a time through the
Bypass tray.

PAPER HANDLING 3.3
3
Guidelines for Paper and Special Materials
When selecting or loading paper, envelopes, or other special materials, keep these guidelines in mind:
• Attempting to print on damp, curled, wrinkled, or torn paper can cause paper jams and the poor print quality.
• Use only high quality copier grade paper. Avoid paper with embossed lettering, perforations, or texture that is too smooth or too rough. Paper jams may occur.
• Store paper in its ream wrapper until ready to use. Place cartons on pallets or shelves, not on the floor. Do not place heavy objects on top of the paper, whether it is packaged or unpackaged. Keep it away from moisture, or other conditions that can cause it to wrinkle or curl.
• During storage, you should use moisture-proof wrap, such as any plastic container or bag, to prevent dust and moisture from contaminating your paper.
• Always use paper and other materials that conform with the specifications listed under “Paper Specifications” on page A.6.
• Use only well-constructed envelopes with sharp, well creased folds.- DO NOT use envelopes with clasps and snaps.- DO NOT use envelopes with windows, coated lining, self-adhesive seals, or other synthetic materials.- DO NOT use damaged or poorly made envelopes.
• Load special paper types one sheet at a time.
• Only use materials specifically recommended for use in laser printers.
• To prevent special materials, such as transparencies and label sheets from sticking together, remove them as they prints out.
• Place transparencies on a flat surface after removing them from the machine.
• Do not leave transparencies in the paper tray for long periods of time. Dust and dirt may accumulate on them resulting in spotty printing.
• To avoid smudging caused by fingerprints, handle transparencies and coated paper carefully.
• To avoid fading, do not expose the printed transparencies to prolonged sunlight.
• Store unused materials at temperatures between 15 oC and 30 oC (59 oF to 86 oF). The relative humidity should be between 10 % and 70 %.
• Verify that your labels’ adhesive material can tolerate fusing temperature of 200 oC (392o F) for 0.1 second.

PAPER HANDLING3.4
• Make sure that there is no exposed adhesive material between labels. Exposed areas can cause labels to peel off during printing, which can cause paper jams. Exposed adhesive can also cause damage to machine components.
• Do not load a sheet of labels through the machine more than once. The adhesive backing is designed for one pass through the machine.
• Do not use labels that are separating from the backing sheet or are wrinkled, bubbled, or otherwise damaged.
NOTE: Do not use Carbonless paper and Tracing paper. They could make smell of chemicals and damage your printer.
Selecting an Output Location
The machine has two output locations; the rear output slot (face up) and the front output tray (face down).
To use the front output tray, make sure that the rear cover is closed. To use the rear output slot, open the cover.
NOTES:
• If paper coming out of the front output tray has problems, such as excessive curl, try printing to the rear output slot.
• To avoid paper jams, do not open or close the rear cover while the machine is printing.
Front outputtray
Rear output slot

PAPER HANDLING 3.5
3
Printing to the Front Output Tray (Face down)
The front output tray collects printed paper face-down, in correct order. The tray should be used for most print jobs.
Printing to the Rear Output Slot (Face up)
Using the rear output slot, paper comes out of the machine face up.
Printing from the Bypass tray to the rear output slot provides the straight paper path. Using the rear output slot might improve the output quality with the following:• envelopes• labels• small custom-sized paper• postcards• transparencies

PAPER HANDLING3.6
To use the rear output slot:
1 Open the rear cover by pulling it upward.
CAUTION: The fusing area at the rear part of the inside of your machine is hot when powered. Be careful not to be burned when you access this area.
2 If you do not want to stack the printed pages on the rear output slot, close the rear cover. The pages stack on the front output tray.
Loading Paper in the Paper Tray
The paper tray can hold a maximum of 250 sheets of 20 lb plain paper. For copying or faxing, you can use A4-, Letter- or Legal-sized paper only. For PC-printing, you can use many different sizes of paper; see page 3.2.

PAPER HANDLING 3.7
3
The paper level indicator on the front of the paper tray shows the amount of paper currently left in the tray. When the tray is empty, the indicator of the bar is lowered.
To load paper, pull open the paper tray and load paper with the print side face down.
You can load letterhead paper with the design side face down. The top edge of the sheet with the logo should be placed at the front side of the tray.
For details about loading paper in the paper tray, see “Loading Paper” on page 1.11.
� Paper empty
Paper full �

PAPER HANDLING3.8
NOTES:
• If you experience problems with paper feed, place the paper in the Bypass tray.
• You can load up to 150 sheets of previously printed paper. The printed side should be facing up with an uncurled edge at the top side. If you experience problems with paper feed, turn the paper around. Note that the print quality is not guaranteed.
Using the Bypass Tray
Use the Bypass tray to print transparencies, labels, envelopes or postcards in addition to making quick runs of paper types or sizes that are not currently loaded in the paper tray.
Postcards, 3.5 by 5.83 in.(index) cards and other custom-sized materials can be printed with this printer. The minimum size is 76 by 127mm(3.0 by 5.0 in.) and the maximum size is 216 by 356mm(8.5 by 14 in.)
Acceptable print materials are plain paper with sizes ranging from 100 x 148 mm (3.9 x 5.8 in.) to Legal, 216 x 356 mm (8.5 x 14 in.), the largest size acceptable, and weighing between 16 lb and 32 lb.
NOTES:
• Always load only the print materials specified in the Specifications on page A.6 to avoid paper jams and print quality problems.
• Flatten any curl on postcards, envelopes and labels before loading them into the Bypass tray.
• When you print on 76mm X 127mm (3 X 5 in.) sized media with loading into the tray, open the rear output tray.
1 Load a sheet of the print material with the print side face up and into the center of the tray.
PAPER HANDLING 3.9
3
For transparencies, hold the transparencies by the edges and avoid touching the print side. Oils from your fingers that are deposited on them can cause print quality problems.
CAUTION: Make sure to open the rear output slot when you print on transparencies. If not, they may tear while exiting the machine.
For envelopes, load a sheet with the flap side face down and with the stamp area on the top left side.
2 Adjust the paper guide to the width of the print material.
The machine picks up the material from the tray and begins printing.
NOTE: When printing on previously printed paper from the Bypass tray, the printed side should be facing down with an uncurled edge to the machine. If you experience problems with paper feed, turn the paper around.

PAPER HANDLING3.10
3 Open the rear cover to use the rear output slot.
4 After printing, close the rear cover.
Setting the Paper Type and Size for theBypass Tray
After loading paper in the Bypass tray, you need to set the correct paper type and size using the control panel buttons. These settings will apply to copy mode. For PC-printing, you need to select the paper size in the application program you use.
To set the paper size for the Bypass tray:
1 Press Menu.
The display shows “Paper Setting” on the top line and the first item, “Paper Type,” on the bottom line.
2 Press Enter to access the menu item.
3 Use the scroll button (� or �) to find the paper type you are using and press Enter to save it.
4 Press the ��button to scroll to “Paper Size” and press Enter to access the menu item.
5 Use the scroll button (� or �) to display “Bypass Paper” on the bottom line. Press Enter to access the menu item.
6 Use the scroll button (� or �) to find the paper size you are using and press Enter to save it.
7 To return to Standby Mode, press Stop/Clear.
4 COPYING
This chapter gives you step-by-step instructions for copying documents.
This chapter includes:
• Loading Paper for Copying
• Making Copies on the Document Glass
• Making Copies from the Automatic Document Feeder
• Setting Copy Options
• Using Special Copy Features
• Changing the Default Settings
• Setting the Time Out Option

COPYING4.2
Loading Paper for Copying
You can copy a document to A4-, Letter- or Legal-sized paper.
The instructions for loading print materials are the same whether you are printing, faxing or copying. For further details, see page 1.11 for loading in the paper tray and page 3.8 for loading in the Bypass tray.
Making Copies on the Document Glass
1 Lift and open the document cover.
2 Place the document face down on the document glass and align it with the registration guide on the top left corner of the glass.

COPYING 4.3
4
NOTE: Make sure that no other documents are in the ADF (Automatic Document Feeder). If a document is detected in the ADF, it has priority over the document on the document glass.
3 Close the document cover.
NOTES:
• Leaving the cover open while copying may affect the copy quality and toner consumption.
• If you are copying a page from a book or magazine, lift the cover until its hinges are caught by the stopper and then close the cover. If the book or magazine is thicker than 30 mm, start copying with the cover open.
4 Customise the copy settings including number of copies, copy size, the contrast and the image type by using the control panel buttons. See “Setting Copy Options” on page 4.6.
To clear the settings, use the Stop/Clear button.
5 If necessary, you can use special copy features, such as Auto Fit, Clone and 2-side copying.
6 Press Start Copy/Fax to begin copying. The display shows the copy processing.
NOTES:
• You can cancel the copy job during an operation. Press Stop/Clear, and the copying will stop.
• Dust on the document glass may cause black spots on the printout. Keep it always clean.
• To get the best scan quality, especially for coloured or gray scaled images, use the document glass.
COPYING4.4
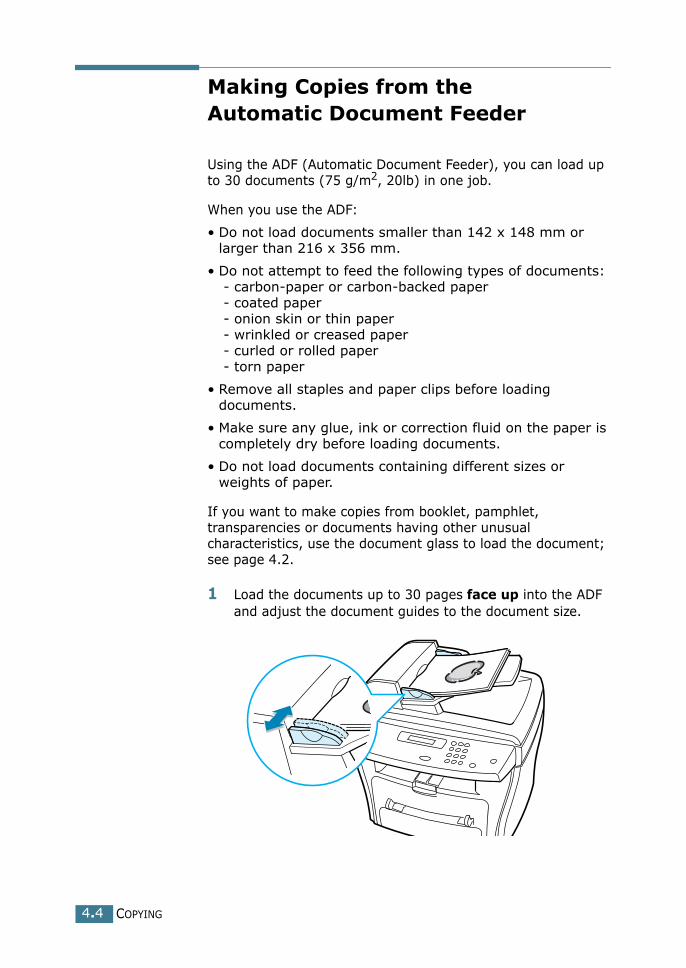
Making Copies from the Automatic Document Feeder
Using the ADF (Automatic Document Feeder), you can load up to 30 documents (75 g/m2, 20lb) in one job.
When you use the ADF:
• Do not load documents smaller than 142 x 148 mm or larger than 216 x 356 mm.
• Do not attempt to feed the following types of documents: - carbon-paper or carbon-backed paper - coated paper - onion skin or thin paper - wrinkled or creased paper - curled or rolled paper - torn paper
• Remove all staples and paper clips before loading documents.
• Make sure any glue, ink or correction fluid on the paper is completely dry before loading documents.
• Do not load documents containing different sizes or weights of paper.
If you want to make copies from booklet, pamphlet, transparencies or documents having other unusual characteristics, use the document glass to load the document; see page 4.2.
1 Load the documents up to 30 pages face up into the ADF and adjust the document guides to the document size.
COPYING 4.5
4
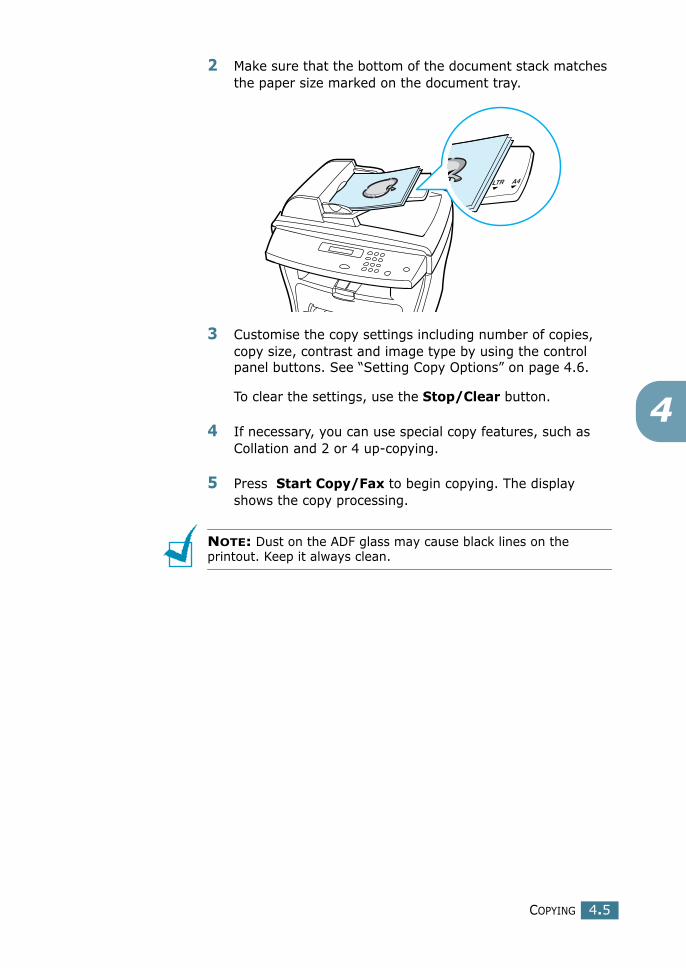
2 Make sure that the bottom of the document stack matches the paper size marked on the document tray.
3 Customise the copy settings including number of copies, copy size, contrast and image type by using the control panel buttons. See “Setting Copy Options” on page 4.6.
To clear the settings, use the Stop/Clear button.
4 If necessary, you can use special copy features, such as Collation and 2 or 4 up-copying.
5 Press Start Copy/Fax to begin copying. The display shows the copy processing.
NOTE: Dust on the ADF glass may cause black lines on the printout. Keep it always clean.

COPYING4.6
Setting Copy Options
The buttons on the control panel let you make all the basic copy options; contrast, image type, copy size and number of copies. Set the following options for the current copy job before pressing Start Copy/Fax to make copies.
NOTE: If you press Stop/Clear while you set the copy options, all of the options you have set for the current copy job will be canceled and return to their default status. Or, they automatically returns to their default status after copying.
Contrast
If you have an original document containing faint markings and dark images, you can adjust the brightness to make a copy that is easier to read.
To adjust the contrast, press Contrast.
Each time you press the button, the LED labeled with the selected mode turns on.
You can choose from the following contrast modes:
• Lighten: works well with dark print.
• Normal: works well with standard typed or printed documents.
• Darken: works well with light print or faint pencil markings.
Image
The Image setting is used to improve the copy quality by selecting the document for the current copy job.
To select the image type, press Image.
Each time you press the button, the LED labeled with the selected mode turns on.
You can choose from the following image modes:
• Text: Use for documents containing mostly text.
• Mixed: Use for documents with mixed text and graphics.
• Photo: Use when the originals are photographs.
NOTE: When you copy a document containing colour on the background, such as a newspaper or a catalog, you can get the background on your copy. If you want to reduce the background, change the Contrast setting to Lighten and/or the Image setting to Text.
COPYING 4.7
4
Reduced/Enlarged Copy
Using the Reduce/Enlarge button, you can reduce or enlarge the size of a copied image, from 25% to 400% when you copy original documents from the document glass or from 25% to 100% from the ADF. Note that the zoom rate available is different depending on the document loading method.
To select from the predefined copy sizes:
1 Press Reduce/Enlarge.
The default setting appears on the bottom line of the display.
2 Use Reduce/Enlarge or the scroll button (� or �) to find the size setting you want.
3 Press Enter to save the selection.
To fine-tune the size of copies:
1 Press Reduce/Enlarge.
2 Press Reduce/Enlarge or the scroll button (� or �) until “Custom:25-100%,” or “Custom:25-400%” displays on the bottom line. Press Enter.
3 Press the scroll button (� or �) until the copy size you want appears on the display.
Pressing and holding the button allows you to quickly scroll to the number you want.
You can enter the value using the number keypad.
4 Press Enter to save the selection.
NOTE: When you make a reduced copy, black lines may appear at the bottom of your copy.

COPYING4.8
Number of Copies
Using the No. of Copies button, you can select the number of copies from 1 to 99.
1 Press No. of Copies.
2 Press the scroll button (� or �) until the number you want appears on the display.
Pressing and holding the button allows you to quickly scroll to the number you want.
you can enter the value using the number keypad.
3 Press Enter to save the selection.
Using Special Copy Features
You can use the following copy features using the Special button on the control panel:
• Auto Fit: Automatically reduces or enlarges the original image to fit on the paper currently loaded in the machine. See below.
• Clone: Prints multiple image copies from the original document on a single page. The number of images is automatically determined by the original image and paper size. See page 4.9.
• Collation: Sorts the copy job. For example, if you make 2 copies of 3 page documents, one complete 3 page document will print followed by the second complete document. See page 4.10.
• 2-Side: Prints 2-sided original document on one sheet of paper. See page 4.11.
• 2/4-Up: Prints 2/4 original images reduced to fit onto one sheet of paper. See page 4.12.
• Poster: Prints an image onto 9 sheets of paper (3x3). You can paste the printed pages together to make one poster-size document. See page 4.12.
NOTE: Some features may not be available depending on where you loaded the document, on the document glass or in the Automatic Document Feeder.

COPYING 4.9
4
Auto Fit Copying
This special copy mode can be applied when you load document only using the document glass. If a document is detected in the ADF, the Auto Fit does not work.
1 Load the document to be copied on the document glass, and close the cover.
2 Press Special.
3 Press Special or the scroll button (� or �) until “Autofit” appears on the bottom line.
4 Press Enter to save the selection.
5 If necessary, customise the copy settings including number of copies, contrast and image type by using the control panel buttons. See “Setting Copy Options” on page 4.6.
NOTE: You cannot adjust the copy size using the Reduce/Enlarge button while the Auto Fit copying is enabled.
6 Press Start Copy/Fax to begin copying.
Clone Copying
This special copy mode can be applied when you load document only using the document glass. If a document is detected on the ADF, the Clone copying feature does not work.
1 Load the document to be copied on the document glass, and close the cover.
2 Press Special.
3 Press Special or the scroll button (� or �) until “Clone” displays on the bottom line.
4 Press Enter to save the selection.
5 If necessary, customise the copy settings including number of copies, contrast and image type by using the control panel buttons. See “Setting Copy Options” on page 4.6.
A

COPYING4.10
NOTE: You cannot adjust the copy size using the Reduce/Enlarge button while making a clone copy.
6 Press Start Copy or Start Copy/Fax to begin copying.
Collation Copying
The Collation copying feature is available only when you load documents in the ADF.
1 Load the documents to be copied in the ADF.
2 Press Special.
3 Press Special or the scroll button (� or �) until “Collation” displays on the bottom line.
4 Press Enter to save the selection.
5 If necessary, customise the copy settings including number of copies, copy size, contrast and image type by using the control panel buttons. See “Setting Copy Options” on page 4.6.
6 Press Start Copy/Fax to begin copying.
12
3
12
3

COPYING 4.11
4
2-side Copying
You can copy a 2-sided document on one page of A4, Letter or Legal-sized paper.
When you copy using this feature, the machine prints one side on the upper half of the paper and the other side on the lower half without reducing the original. This feature is helpful for copying a small-sized document, such as a name card.
If the original document is larger than the printable area, some portions may not be printed.
This special copy mode can be applied when you load document only using the document glass. If a document is detected in the ADF, the 2-side copying feature does not work.
1 Load the document to be copied on the document glass, and close the cover.
2 Press Special.
3 Press Special or the scroll button (� or �) until “2-Side” displays on the bottom line.
4 Press Enter to save the selection.
5 If necessary, customise the copy settings including number of copies, copy size, contrast and image type by using the control panel buttons. See “Setting Copy Options” on page 4.6.
6 Press Start Copy/Fax to begin copying.
Your machine begins scanning the front side.
7 When “Set Backside” displays on the bottom line, open the document cover and flip the document over. Close the cover.
NOTE: If you press the Stop button or if no buttons are pressed for about 30 seconds, the machine cancels the copy job and returns to Standby Mode.
8 Press Start Copy/Fax again.
NOTE: You cannot adjust the copy size using the Reduce/Enlarge button for making a 2-side Copying.
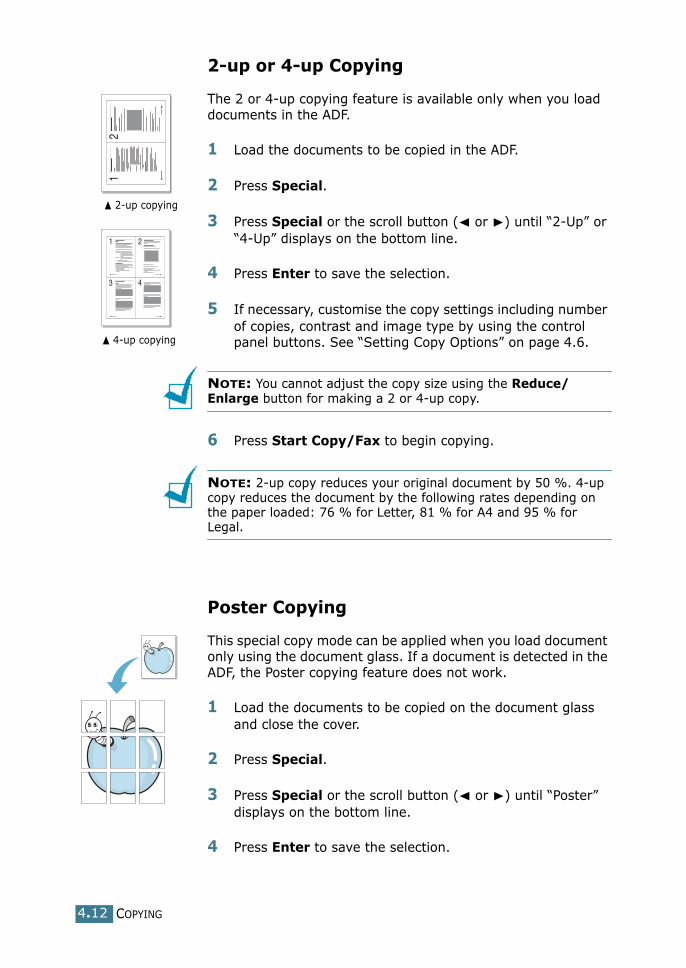
COPYING4.12
2-up or 4-up Copying
The 2 or 4-up copying feature is available only when you load documents in the ADF.
1 Load the documents to be copied in the ADF.
2 Press Special.
3 Press Special or the scroll button (� or �) until “2-Up” or “4-Up” displays on the bottom line.
4 Press Enter to save the selection.
5 If necessary, customise the copy settings including number of copies, contrast and image type by using the control panel buttons. See “Setting Copy Options” on page 4.6.
NOTE: You cannot adjust the copy size using the Reduce/Enlarge button for making a 2 or 4-up copy.
6 Press Start Copy/Fax to begin copying.
NOTE: 2-up copy reduces your original document by 50 %. 4-up copy reduces the document by the following rates depending on the paper loaded: 76 % for Letter, 81 % for A4 and 95 % for Legal.
Poster Copying
This special copy mode can be applied when you load document only using the document glass. If a document is detected in the ADF, the Poster copying feature does not work.
1 Load the documents to be copied on the document glass and close the cover.
2 Press Special.
3 Press Special or the scroll button (� or �) until “Poster” displays on the bottom line.
4 Press Enter to save the selection.
12
1 2
3 4
��2-up copying
��4-up copying

COPYING 4.13
4
5 If necessary, customise the copy settings including number of copies, contrast and image type by using the control panel buttons. See “Setting Copy Options” on page 4.6.
NOTE: You cannot adjust the copy size using the Reduce/Enlarge button for making a poster.
6 Press Start Copy/Fax to begin copying.
Your original document is divided into 9 portions. Each portion is scanned and printed one by one in the following order:
Changing the Default Settings
The copy options, including contrast, image quality, copy size and number of copies, can be set to the most frequently used modes. When you copy a document, the default settings are used unless they are changed by using the corresponding buttons on the control panel.
To create your own default settings:
1 Press Menu on the control panel until “Copy Setup” appears on the top line of the display.
The first menu item, “Change Default”, appears on the bottom line.
2 Press Enter to access the menu item. The first setup option, “Contrast,” appears on the bottom line.
3 Press the scroll button (� or �) to scroll through the setup options.
4 When the option you want to set appears, press Enter to access the option.
5 Change the setting using the scroll button (� or �) or enter the value using the number keypad.

COPYING4.14
6 Press Enter to save the selection.
7 Repeat steps 3 through 6, as needed.
8 To return to Standby Mode, press Stop/Clear.
NOTES: While you set copy options, pressing Stop/Clear cancels the changed settings and restores their default status.
Setting the Time Out Option
You can set the time the machine waits before it restores the default copy settings, if you do not start copying after changing them on the control panel.
1 Press Menu on the control panel until “Copy Setup” appears on the top line of the display.
2 Press the scroll button (� or �) to display “Timeout” on the bottom line.
3 Press Enter to access the menu item.
4 Press the scroll button (� or �) until the status you want appears on the display.
You can select from 15, 30, 60 and 180 (seconds). Selecting “Off” means that the machine does not restore the default settings until you press Start Copy/Fax to begin copying, or Stop/Clear to cancel.
5 Press Enter to save the selection.
6 To return to Standby Mode, press Stop/Clear.

5 PRINTING
This chapter explains how to print your documents in Windows and how to use the print settings.
This chapter includes:
• Printing a Document
• Setting Paper Properties
• Printing Multiple Pages on One Sheet of Paper (N-Up Printing)
• Printing a Reduced or Enlarged Document
• Fitting Your Document to a Selected Paper Size
• Printing Posters
• Using Watermarks
• Using Overlays
• Setting Graphic Properties
• Setting Up the Locally Shared Printer

PRINTING5.2
Printing a Document
The following procedure describes the general steps required for printing from various Windows applications. The exact steps for printing a document may vary depending on the application program you are using. Refer to your software application’s user’s guide for the exact printing procedure.
1 Open the document you want to print.
2 Select Print from the File menu.
The Print window displays. It may look slightly different depending on your application.
The basic print settings are selected within the Print window. These settings include the number of copies and print range.
3 To take advantage of the printer features provided by your machine, click Properties in the application’s print window and go to Step 4.
If you see Setup, Printer or Options, click that button instead. Then click Properties on the next screen.
4 Now you see the Xerox WorkCentre PE16 Properties window, which allows you to access all of information you need when using your machine.
��Windows 98
Make sure that your machine is selected.

PRINTING 5.3
5
The Layout tab first displays.
If necessary, select the Orientation option.
The Orientation option allows you to select the direction in which information is printed on a page.
• Portrait prints across the width of the page, letter style.
• Landscape prints across the length of the page, spreadsheet style.
• If you want to rotate the page in 180 degrees, select Rotate 180 Degrees.
5 From the Paper tab, select the paper source, size and type. For further details, see page 5.7.
6 If necessary, you can set in what sequence the pages will be printed from the Extra tab. Select the required print order from the Print Order drop-down list.
• Normal: Your machine prints in normal order.
The preview image shows the sample page with the settings you currently specified.
��Landscape ��Portrait

PRINTING5.4
• Reverse All Pages: Your machine prints all of the pages in reverse. This setting is helpful when you are using the rear output slot.
• Print Odd Pages: Your machine prints only the odd pages of the document.
• Print Even Pages: Your machine prints only the even pages of the document.
7 Click other tabs on the top of the Xerox WorkCentre PE16 Properties window to access other features, if needed.
8 When you finish setting the properties, click OK until the Print window displays.
9 Click OK to start printing.
Notes:
• Most Windows applications overrides settings you specified in the printer driver. Change all of the print settings available in the software application first, and change any remaining settings using the printer driver.
• The settings you change remain in effect only while you are using the current program. To make your changes permanent, make them in the Printers folder. Follow these steps:
1. Click the Windows Start menu.2. For Windows 95/98/Me/NT 4.0/2000, select Settings and then
Printers.For Windows XP, select Printers and Faxes.
3. Select the Xerox WorkCentre PE16 printer.4. Click the right mouse button on the printer icon and:
• For Window 95/98/Me, select Properties.• For Windows 2000/XP, select Print Setup or select Properties and
click Printing Preferences.• For Windows NT 4.0, select Document Default.
5. Change the settings on each tab and click OK.
PRINTING 5.5
5
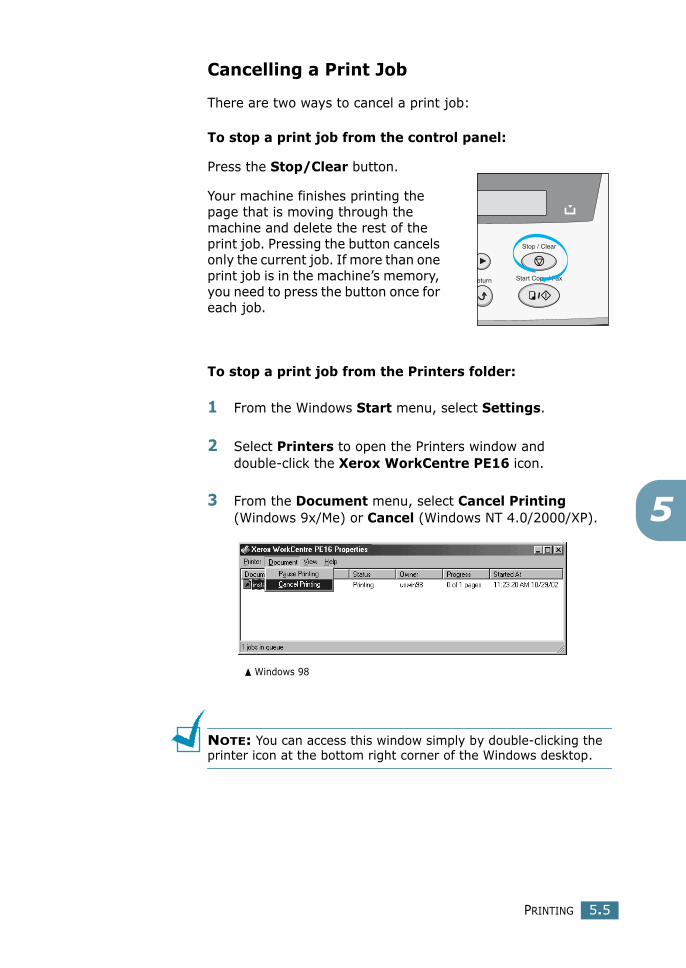
Cancelling a Print Job
There are two ways to cancel a print job:
To stop a print job from the control panel:
Press the Stop/Clear button.
Your machine finishes printing the page that is moving through the machine and delete the rest of the print job. Pressing the button cancels only the current job. If more than one print job is in the machine’s memory, you need to press the button once for each job.
To stop a print job from the Printers folder:
1 From the Windows Start menu, select Settings.
2 Select Printers to open the Printers window and double-click the Xerox WorkCentre PE16 icon.
3 From the Document menu, select Cancel Printing (Windows 9x/Me) or Cancel (Windows NT 4.0/2000/XP).
NOTE: You can access this window simply by double-clicking the printer icon at the bottom right corner of the Windows desktop.
��Windows 98

PRINTING5.6
Using a Favorite Setting
The Favorites option, which is visible on each properties tab, allows you to save the current properties settings for future use.
To save a Favorites item:
1 Change the settings on each tab, as needed.
2 Enter a name for the item in the Favorites input box.
3 Click Save.
To use a saved setting, select it from the Favorites drop-down list.
To delete a favorite setting item, select it from the list and click Delete.
You can also restore the printer driver’s default settings by selecting <Printer Default> from the list.
Using Help
Your machine has a help screen that can be activated by the Help button in the printer’s properties window. These help screens give detailed information about the printer features provided by the printer driver.
You can also click from the upper right hand corner, and then click on any setting.

PRINTING 5.7
5
Setting Paper Properties
Use the following options to set the paper handling needs when you access the printer properties. See page 5.2 for more information about accessing printer properties.
Click the Paper tab to access many paper properties.
Property Description
Copies Copies allows you to choose the number of copies to be printed. You can enter up to 999.
Size The Size option allows you to choose the size of paper loaded in the tray.
If the required size is not listed in the Size box, click Add Custom. When the Custom Page Size window appears, set the paper size and click Ok. The size setting appears on the Size list so that you can select it.
1
2
3
4
1
2
Enter the custom name you want touse.
Enter the paper size.
PRINTING5.8
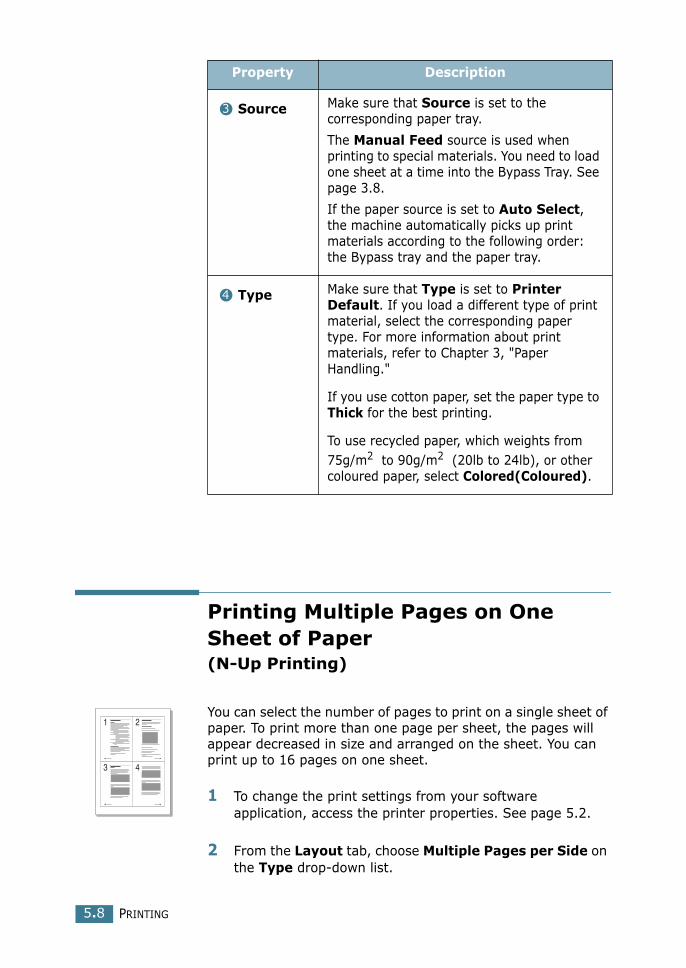
Printing Multiple Pages on One Sheet of Paper (N-Up Printing)
You can select the number of pages to print on a single sheet of paper. To print more than one page per sheet, the pages will appear decreased in size and arranged on the sheet. You can print up to 16 pages on one sheet.
1 To change the print settings from your software application, access the printer properties. See page 5.2.
2 From the Layout tab, choose Multiple Pages per Side on the Type drop-down list.
Source Make sure that Source is set to the corresponding paper tray.
The Manual Feed source is used when printing to special materials. You need to load one sheet at a time into the Bypass Tray. See page 3.8.
If the paper source is set to Auto Select, the machine automatically picks up print materials according to the following order: the Bypass tray and the paper tray.
Type Make sure that Type is set to Printer Default. If you load a different type of print material, select the corresponding paper type. For more information about print materials, refer to Chapter 3, "Paper Handling."
If you use cotton paper, set the paper type to Thick for the best printing.
To use recycled paper, which weights from 75g/m2 to 90g/m2 (20lb to 24lb), or other coloured paper, select Colored(Coloured).
Property Description
3
4
1 2
3 4

PRINTING 5.9
5
3 Select the number of pages you want to print per sheet (1, 2, 4, 9 or 16) on the Pages per Side drop-down list.
4 Select the page order on the Page Order drop-down list, if necessary.
Check Print Page Border to print a border around each page on the sheet. Print Page Border is enabled only, if the pages per sheet is 2, 4, 9 or 16.
5 Click the Paper tab and select the paper source, size and type.
6 Click OK and print the document.
Right, Then Down
1
3
2
4
1
2
3
4
2
4
1
3
3
4
1
2Down, Then Right
Left, Then Down
Down, Then Left

PRINTING5.10
Printing a Reduced or Enlarged Document
You can scale your print job on a page.
1 When you change the print settings from your software application, access the printer properties. See page 5.2.
2 From the Layout tab, select Reduce/Enlarge on the Type drop-down list.
3 Enter the scaling rate in the Persentage input box.
You can also click the ��or � button.
4 Click the Paper tab and select the paper source, size and type.
5 Click OK and print the document.

PRINTING 5.11
5
Fitting Your Document to a Selected Paper Size
You can scale your print job to any selected paper size regardless of the digital document size. This can be useful when you want to check fine details on a small document.
1 When you change the print settings from your software application, access the printer properties. See page 5.2.
2 From the Layout tab, select Fit to Page on the Type drop-down list.
3 Select the correct size from the Target Paper drop-down list.
4 Click the Paper tab and select the paper source, size and type.
5 Click OK and print the document.
A

PRINTING5.12
Printing Posters
You can print a single-page document onto 4, 9 or 16 sheets of paper, for the purpose of pasting the sheets together to form one poster-size document.
1 When you change the print settings from your software application, access the printer properties. See page 5.2.
2 From the Layout tab, select Poster on the Type drop-down list.
3 Configure the poster option:
You can select the page layout from 2x2, 3x3 or 4x4. If you select 2x2, the output will be automatically stretched to cover 4 physical pages.
��2 x 2 ��3 x 3
PRINTING 5.13
5
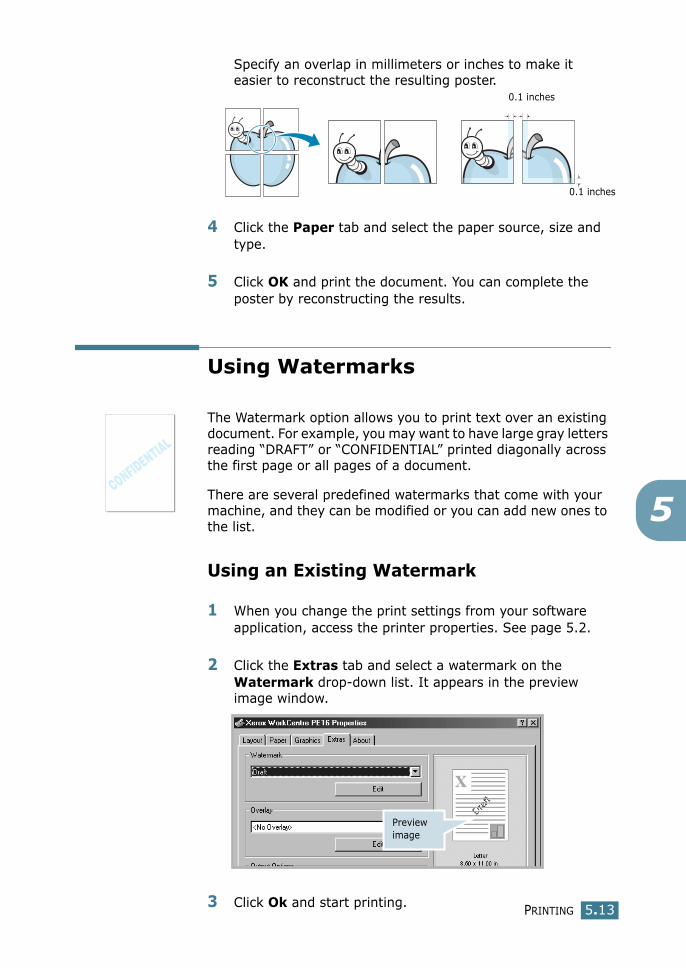
Specify an overlap in millimeters or inches to make it easier to reconstruct the resulting poster.
4 Click the Paper tab and select the paper source, size and type.
5 Click OK and print the document. You can complete the poster by reconstructing the results.
Using Watermarks
The Watermark option allows you to print text over an existing document. For example, you may want to have large gray letters reading “DRAFT” or “CONFIDENTIAL” printed diagonally across the first page or all pages of a document.
There are several predefined watermarks that come with your machine, and they can be modified or you can add new ones to the list.
Using an Existing Watermark
1 When you change the print settings from your software application, access the printer properties. See page 5.2.
2 Click the Extras tab and select a watermark on the Watermark drop-down list. It appears in the preview image window.
3 Click Ok and start printing.
0.1 inches
0.1 inches
Preview image
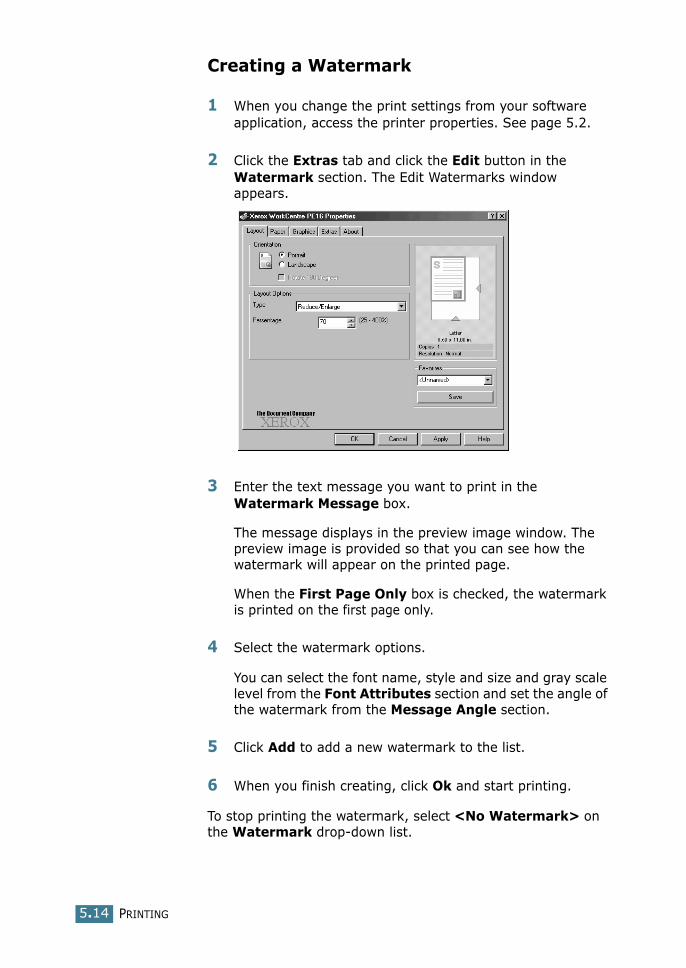
PRINTING5.14
Creating a Watermark
1 When you change the print settings from your software application, access the printer properties. See page 5.2.
2 Click the Extras tab and click the Edit button in the Watermark section. The Edit Watermarks window appears.
3 Enter the text message you want to print in the Watermark Message box.
The message displays in the preview image window. The preview image is provided so that you can see how the watermark will appear on the printed page.
When the First Page Only box is checked, the watermark is printed on the first page only.
4 Select the watermark options.
You can select the font name, style and size and gray scale level from the Font Attributes section and set the angle of the watermark from the Message Angle section.
5 Click Add to add a new watermark to the list.
6 When you finish creating, click Ok and start printing.
To stop printing the watermark, select <No Watermark> on the Watermark drop-down list.

PRINTING 5.15
5
Editing a Watermark
1 When you change the print settings from your software application, access the printer properties. See page 5.2.
2 Click the Extras tab and click the Edit button in the Watermark section. The Edit Watermarks window appears.
3 Select the watermark you want to edit on the Current Watermarks list, and change the watermark message and the options. Refer to “Creating a Watermark” on page 5.14.
4 Click Update to save the changes.
5 Click Ok.
Deleting a Watermark
1 When you change the print settings from your software application, access the printer properties. See page 5.2.
2 From the Extras tab, click the Edit button in the Watermark section. The Edit Watermarks window appears.
3 Select the watermark you want to delete on the Current Watermarks list and click Delete.
4 Click Ok.

PRINTING5.16
Using Overlays
What is an Overlay?
An overlay is text and/or images stored in the computer hard disk drive (HDD) as a special file format that can be printed on any document. Overlays are often used to take the place of preprinted forms and letterhead paper. Rather than using preprinted letterhead, you can create an overlay containing the exact same information that is currently on your letterhead. To print a letter with your company’s letterhead, you do not need to load preprinted letterhead paper in the machine. You need only tell the machine to print the letterhead overlay on your document.
Creating a New Page Overlay
To use a page overlay, you must create a new page overlay containing your logo or image.
1 Create or open a document containing text or an image for use in a new page overlay. Position the items exactly as you wish them to appear when printed as an overlay. If needed, save the file for later use.
2 When you change the print settings from your software application, access the printer properties. See page 5.2.
3 Click the Extras tab and click Edit button in the Overlay section.
WORLD BEST
Dear ABC
Regards
WORLD BEST

PRINTING 5.17
5
4 In the Edit Overlays window, click Create Overlay.
5 In the Create Overlay window, type a name of up to eight characters in the File name box. Select the destination path, if necessary. (The default is C:\Formover).
6 Click Save. You can see the name on the Overlay List.
7 Click OK or Yes until you complete creating.
The file is not printed out. Instead it is stored in your computer HDD disk.
NOTE: The overlay document size must be the same as documents you will print with the overlay. Do not create an overlay with a watermark.

PRINTING5.18
Using a Page Overlay
After an overlay has been created, it is ready to be printed with your document. To print an overlay with a document:
1 Create or open the document you want to print.
2 When you change the print settings from your software application, access the printer properties. See page 5.2.
3 Click the Extras tab.
4 Select the overlay you want to print from the Overlay drop-down list box.
5 When the overlay file doesn’t appear on the Overlay List, click the Edit button and Load Overlay, and select the overlay file.
If you have stored the overlay file you want to use into an external source, you can also load the file when you access this Load Overlay window.
After you select the file, click Open. The file is now shown in the Overlay List box and is available for printing. Select the overlay from the Overlay List box.
PRINTING 5.19
5
6 If necessary, click Confirm Page Overlay When Printing. When this box is checked, a message window appears each time you submit a document for printing, asking you to confirm your wish to print an overlay on your document.
Answering Yes to the window means that the selected overlay will be printed with your document. Answering No to the window cancels overlay printing.
If this box is empty and an overlay has been selected, the overlay will be automatically printed with your document.
7 Click OK or Yes until the printing starts.
The overlay is downloaded with your print job and printed on your document.
Note: The resolution of the overlay document must be the same as that of the document you will print with the overlay.
Deleting a Page Overlay
You can delete page overlays that are no longer used.
1 In the printer properties window, click the Extras tab.
2 Click Edit in the Overlay section.
3 Select the overlay you want to delete from the Overlay List box.
4 Click Delete Overlay.
5 Click OK until you exit the Print window.

PRINTING5.20
Setting Graphic Properties
Use the following graphic options to adjust the print quality for your specific printing needs. See page 5.2 for more information about accessing printer properties.
Click the Graphics tab to display the properties shown below.
Property Description
Resolution
You can select the printing resolution by choosing from 600 dpi (Normal) or 300 dpi (Draft). The higher the setting, the sharper the clarity of printed characters and graphics. Higher settings may increase time it takes to print a document.
Toner Save
Selecting this option extends the life of your toner cartridge and reduces your cost per page without a significant reduction in the print quality. • Printer Setting: When you select this
option, the Toner Save feature is determined by the setting you’ve made on the control panel of the printer.
• On: Select this option to allow the printer to use less toner on each page.
• Off: When you do not need to save toner to print a document, select this option.
1
3
2
1
2

PRINTING 5.21
5
Advanced Options
You can set advanced settings by clicking the Advanced Options button.
Property Description
3
DarknessUse this option to lighten or darken the image appearance in your print.• Normal: This setting is for normal
documents.• Light: This setting is for bolder line
widths or darker gray scale images.• Dark: This setting is for finer line width,
higher definition in graphics and lighter gray scale images.
When the Darken Text option is checked, all text in your document is allowed to print darker than a normal document.
Print All Text BlackWhen the Print All Text Black option is checked, all text in your document is allowed to print solid black, regardless of the colour it appears on the screen. When it is not checked, coloured text is allowed to print in shades of gray.

PRINTING5.22
Setting Up the Locally Shared Printer
You can connect the machine directly to a selected computer, which is called “host computer,” on the network. Your machine can be shared by other users on the network through a Windows 9x, Me, 2000, XP or NT 4.0 network printer connection.
In Windows 9x/Me
Setting Up the Host Computer
1 Start Windows.
2 From the Start menu, select Control Panel and double-click on the Network icon.
3 Check the File and Print Sharing box and click OK.
Advanced Options (continued)
Property Description
3True Type OptionsThis option determines what the driver tells the machine about how to image the text in your document. Select the appropriate setting according to the status of your document. • Download as Bit Image: When this
option is selected, the driver downloads the font data as bitmap images. Documents with complicated fonts, such as Korean or Chinese, or various types of fonts print faster in this setting.
• Print as Graphics: When this option is selected, the driver downloads any fonts as graphics. When printing documents with high graphic content and relatively few TrueType fonts, printing performance (speed) may be enhanced in this setting.

PRINTING 5.23
5
4 Click Start and select Printers from Settings. Double-click your printer name.
5 Select Properties in the Printer menu.
6 Click the Sharing tab and check the Shared As box. Fill in the Shared Name field and then click OK.
Setting Up the Client Computer
1 Right-click Start and select Explorer.
2 Open your network folder in the left column.
3 Right-click the shared name and select Capture Printer Port.
4 Select the port you want, check the Reconnect at log on box and then click OK.
5 From the Start menu, select Settings and then Printers.
6 Double-click your printer icon.
7 From the Printer menu, select Properties.
8 From the Details tab, select the printer port and click OK.
In Windows NT 4.0/2000/XP
Setting Up the Host Computer
1 Start Windows.
2 For Windows NT 4.0/2000, from the Start menu, select Settings and then Printers.
For Windows XP, from the Start menu, select Printers and Faxes.
3 Double-click your printer icon.
4 From the Printer menu, select Sharing.

PRINTING5.24
5 For Windows NT 4.0, check the Shared box.
For Windows 2000, check the Shared As box.
For Windows XP, check the Share this printer box.
6 For Windows NT 4.0, fill in the Share Name field and click OK.
For Windows 2000/XP, fill in the Shared Name field and click OK.
Setting Up the Client Computer
1 Right-click Start and select Explorer.
2 Open your network folder in the left column.
3 Click the shared name.
4 For Windows NT 4.0/2000, from the Start menu, select Settings and Printers.
For Windows XP, from the Start menu, select Printers and Faxes.
5 Double-click your printer icon.
6 From the Printer menu, select Properties.
7 Press the Ports tab and click Add Port.
8 Select Local Port and click New Port.
9 Fill in the Enter a port name field and enter the shared name.
10 Click OK and click Close.
11 For Windows NT 4.0, click OK.
For Windows 2000/XP, click Apply and click OK.

6 SCANNING
This chapter includes:
• TWAIN Scanner Program
• Scanning Procedure

SCANNING6.2
TWAIN Scanner Program
The WorkCentre PE16 TWAIN Scanner program is used to scan images, graphics, photographs, and printed text. Documents can be fed from the Automatic Document Feeder(ADF) or placed on the Document Glass.
There are two methods for scanning images from a PC, both of which require the installation of a scanner program. A simple TWAIN Scanner program is provided on the software CD provided with themachine. For installation instructions, please refer to “Installing Software” on page 2.4.. The TWAIN Scanner settings are fully described in the TWAIN Driver Help program.
An alternative method for color scanning is to use PaperPort. PaperPort is an advanced software program that is provided with the WorkCentre PE16. This software allows users to convert scanned graphics and images into various “usable” formats.

SCANNING 6.3
6
Scanning Procedure
These instructions explain advanced scanning with a TWAIN compliant application program.
NOTES: Refer to the documentation provided by the application manufacturer to learn how to scan and access an image.
Load the Originals
Automatic Document Feeder (ADF):
1 Remove all staples and paper clips prior to loading.
2 Adjust the sliding document guides to the size required.
3 Insert the originals neatly into the Automatic Document Feeder, face up.
The first page should be on top with the headings towards the back or left of the machine.
4 Align the stack with the left and rear edges of the tray. Adjust the guides to just touch the edges of the originals.
Caution: Up to 30 sheets of 75g/m2 (20lb bond) paper can be
loaded. Weight ranges from 45 - 105g/m2 (12.5 - 28lb). Sizes
range from 7” x 10” to 8.5” x 14”. Refer to “Scanner and Copier Specifications” on page A.3. for full ADF specifications.

SCANNING6.4
Document Glass:
NOTES: When using the Document Glass, ensure there are no documents in the ADF. On completion of the job, ensure the Document Feeder is closed.
1 Raise the ADF or cover and position the original face down on the Document Glass.
Align with the registration arrow in the rear left corner.
2 Lower the ADF or cover.
Run the Scan Application Program
1 Start the scan application program being used to acquire the scanned image.
2 Follow the instructions provided with the application program to scan the document and retrieve it at the PC.
7 MAINTENANCE
This chapter provides information for maintaining your machine and the toner cartridge.
This chapter includes:
• Clearing the Memory
• Cleaning Your Machine
• Maintaining the Toner Cartridge
• Consumables and Replacement Parts

MAINTENANCE7.2
Clearing the Memory
You can selectively clear information stored in your machine’s memory.
1 Press Menu on the control panel until “Maintenance” appears on the top line of the display.
2 Press the scroll button (� or �) until you see “Clear Memory” on the bottom line and press Enter.
The first available menu item, “Paper Setting,” displays on the bottom line.
3 Press the scroll button (� or �) until you see the item you want to clear.
• Paper Setting: Restores all of the Paper Setting options to the factory default.
• Copy Setup: Restores all of the Copy Setup options to the factory default.
• Fax Setup: Restores all of the Fax Setup options to the factory default.
• Fax Feature: Cancels all of the scheduled fax jobs in the machine’s memory.
• Advanced Fax: Restores all of the Advanced Fax setting options to the factory default.
• Sound/Volume: Resets the sound and volume settings to the factory default.
• Machine Setup: Resets all of the system settings, such as the machine ID, date and time, display language and save modes, to the factory default.
• Sent Report: Clears all of records of your faxes sent.
• RCV Report: Clears all of records of your faxes received.
• Phone Book: Clears the speed dial or group dial numbers stored in the memory.
4 Press Enter. The selected memory is cleared and the display asks you to continue clearing the next item.
5 Repeat steps 2 and 3 to clear another item.
MAINTENANCE 7.3
7
OR
To return to Standby Mode, press Stop/Clear.
Cleaning Your Machine
To maintain the print quality, follow the cleaning procedures below each time the toner cartridge is replaced or if print quality problems occur.
NOTE: While cleaning the inside of the printer, be careful not to touch the transfer roller (located underneath the toner cartridge). Oil from your fingers can cause print quality problems.
CAUTIONS: Cleaning the cabinet of the printer with surfactants containing large amounts of alcohol, solvent or other strong substances can discolour or crack the cabinet.
Cleaning the Outside
Clean the cabinet of the printer with a soft, lint-free cloth. You can dampen the cloth slightly with water, but be careful not to be let any water drip onto the printer or inside of it.
Cleaning the Inside
During the printing process, paper, toner and dust particles can accumulate inside the machine. This buildup can cause print quality problems, such as toner specks or smearing. Cleaning the inside of the machine clears or reduces these problems.
1 Turn the machine off and unplug the power cord. Wait for the machine to cool down.

MAINTENANCE7.4
2 Open the front cover and pull the toner cartridge out, lightly pushing it down.
3 With a dry and lint-free cloth, wipe away any dust and spilled toner from the toner cartridge area and the toner cartridge cavity.
CAUTION: To prevent damage to the toner cartridge, do not expose it to light for more than a few minute. Cover it with a piece of paper, if necessary. Do not touch the black transfer roller inside the machine.
4 Reinsert the toner cartridge and close the cover.
5 Plug in the power cord and turn the machine on.

MAINTENANCE 7.5
7
Cleaning the Scan Unit
Keeping the scan unit clean helps ensure the best possible copies. We suggest that you clean the scan unit at the start of each day and during the day, as needed.
1 Slightly dampen a soft lint-free cloth or paper towel with water.
2 Open the document cover.
3 Wipe the surface of the document glass and ADF glass until it is clean and dry.
4 Wipe the underside of the white document cover and white sheet until it is clean and dry.
5 Close the document cover.
Document cover
Document glass
White sheet
ADF glass

MAINTENANCE7.6
Maintaining the Toner Cartridge
Toner cartridge storage
To get the most from the toner cartridge, keep the following guidelines in mind:
• Do not remove the toner cartridge from its package until ready for use.
• Do not refill the toner cartridge. The machine warranty does not cover damage caused by using a refilled cartridge.
• Store toner cartridges in the same environment as your machine.
• To prevent damage to the toner cartridge, do not expose it to light for more than a few minute.
Saving toner
To save toner, press the Toner Save button on the printer control panel; see page 1.19. The button backlight will be lit. Using this feature extends the life of the toner cartridge and reduces your cost per page, but it also reduces the print quality.
Expected Cartridge Life
The life of the toner cartridge depends on the amount of toner that print jobs require. When printing text at IDC 5% coverage, a new toner cartridge lasts an average of 3,500 pages. (The original toner cartridge supplied with the printer lasts an average of 1,000 pages.) The actual number may be different depending on the print density of the page you print. If you print a lot of graphics, you may need to change the cartridge more often.
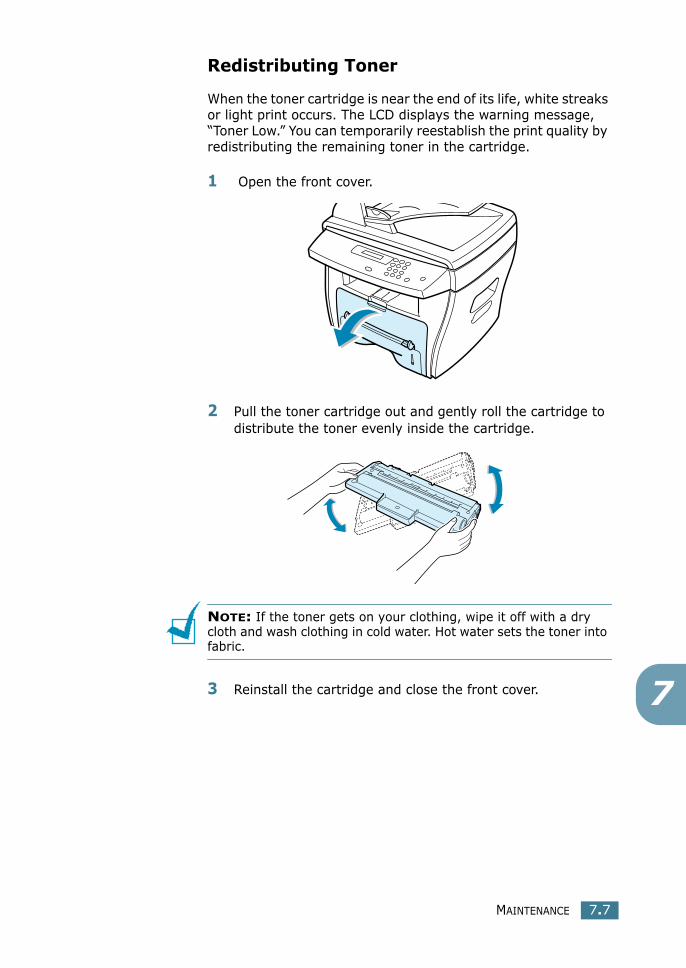
MAINTENANCE 7.7
7
Redistributing Toner
When the toner cartridge is near the end of its life, white streaks or light print occurs. The LCD displays the warning message, “Toner Low.” You can temporarily reestablish the print quality by redistributing the remaining toner in the cartridge.
1 Open the front cover.
2 Pull the toner cartridge out and gently roll the cartridge to distribute the toner evenly inside the cartridge.
NOTE: If the toner gets on your clothing, wipe it off with a dry cloth and wash clothing in cold water. Hot water sets the toner into fabric.
3 Reinstall the cartridge and close the front cover.
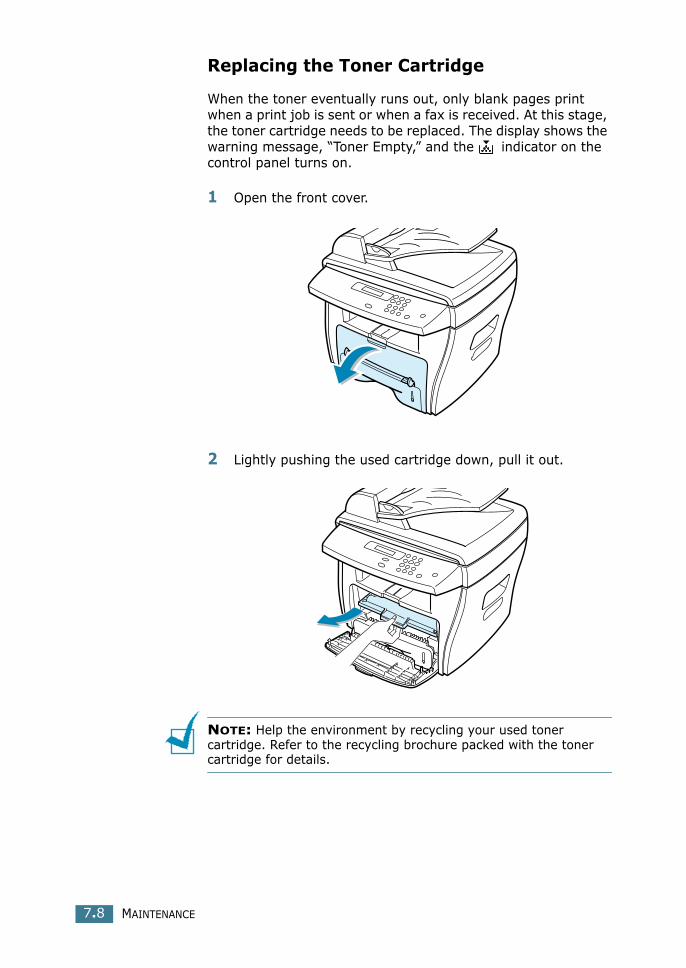
MAINTENANCE7.8
Replacing the Toner Cartridge
When the toner eventually runs out, only blank pages print when a print job is sent or when a fax is received. At this stage, the toner cartridge needs to be replaced. The display shows the warning message, “Toner Empty,” and the indicator on the control panel turns on.
1 Open the front cover.
2 Lightly pushing the used cartridge down, pull it out.
NOTE: Help the environment by recycling your used toner cartridge. Refer to the recycling brochure packed with the toner cartridge for details.

MAINTENANCE 7.9
7
3 Unpack the new toner cartridge and gently shake it horizontally four or five times to distribute the toner evenly inside the cartridge.
Save the box and the cover for shipping.
4 Slide the new toner cartridge in until it locks into place.
5 Close the front cover.

MAINTENANCE7.10
Setting the Notify Toner Option
If you have set the Notify Toner menu option to “On”, your machine automatically sends a fax to your service company or the dealer to notify them that your machine requires a new toner cartridge when the toner cartridge needs to be replaced. The fax number is preset by your dealer when you bought your machine.
1 Press Menu on the control panel until “Maintenance” appears on the top line of the display.
The first available menu item, “Clean Drum,” displays on the bottom line.
2 Press the scroll button (� or �) to display “Notify Toner” on the bottom line and press Enter.
3 Press the scroll button (� or �) to change the setting.
Select “On” to enable this feature. Selecting “Off” disables this feature.
4 Press Enter to save the selection.
Cleaning the Drum
If there are streaks or spots on your print, the OPC drum of the cartridge may require cleaning.
1 Before setting the cleaning procedure, make sure that paper is loaded in the machine.
2 Press Menu on the control panel until “Maintenance” appears on the top line of the display. The first available menu item, “Clean Drum,” displays on the bottom line.
3 Press Enter.
The display confirms your selection.
The machine prints out a cleaning page. Toner particles on the drum surface are affixed to the paper.
4 If the problem remains, repeat steps 1 through 3.

MAINTENANCE 7.11
7
Consumables and Replacement Parts
From time to time, you needs to replace the toner cartridge, roller, and fuser unit to maintain top performance and to avoid print quality problems and paper feed problems resulting from worn parts.
The following items should be replaced after you have printed a specified number of pages:
To purchase the consumables and replacement parts, contact your Xerox dealer or the retailer where you bought your machine. We strongly recommend that items be installed by a trained service professional, except for the toner cartridge.
Items Yield (Average)
ADF rubber pad 20,000
ADF roller 60,000
Paper feeding roller 60,000
Transfer roller 60,000
Fuser unit 60,000

MAINTENANCE7.12
MEMO

8 TROUBLESHOOTING
This chapter gives helpful information for what to do if you encounter an error.
This chapter includes:
• Clearing Document Jams
• Clearing Paper Jams
• Clearing LCD Error Messages
• Solving Problems

TROUBLESHOOTING8.2
Clearing Document Jams
When a document jams while it passes through the ADF (Automatic Document Feeder), “Document Jam” appears on the display.
Input Misfeed
1 Remove the remaining documents from the ADF.
2 Open the ADF cover.
3 Rotate the bushing on one end of the ADF roller toward the ADF ( ) and remove the roller from the slot( ). Pull the document gently to the right and out of the ADF.
4 Close the ADF cover. Then load the documents back into the ADF.
NOTE: To prevent document jams, use the document scanner glass for thick, thin or mixed documents.
a b

TROUBLESHOOTING 8.3
8
Exit Misfeed
1 Remove the remaining documents from the ADF.
2 Open the document cover and turn the release knob to remove the misfed documents from the document output tray.
3 Close the document cover. Then load the documents back into the ADF.
Roller Misfeed
1 Remove the remaining documents from the ADF.
2 Open the document cover.
3 Turn the release knob so that you can easily seize the misfed document, and remove the document from the roller or the feed area by carefully pulling it to the right using both hands.
4 Close the document cover. Then load the documents back into the ADF.
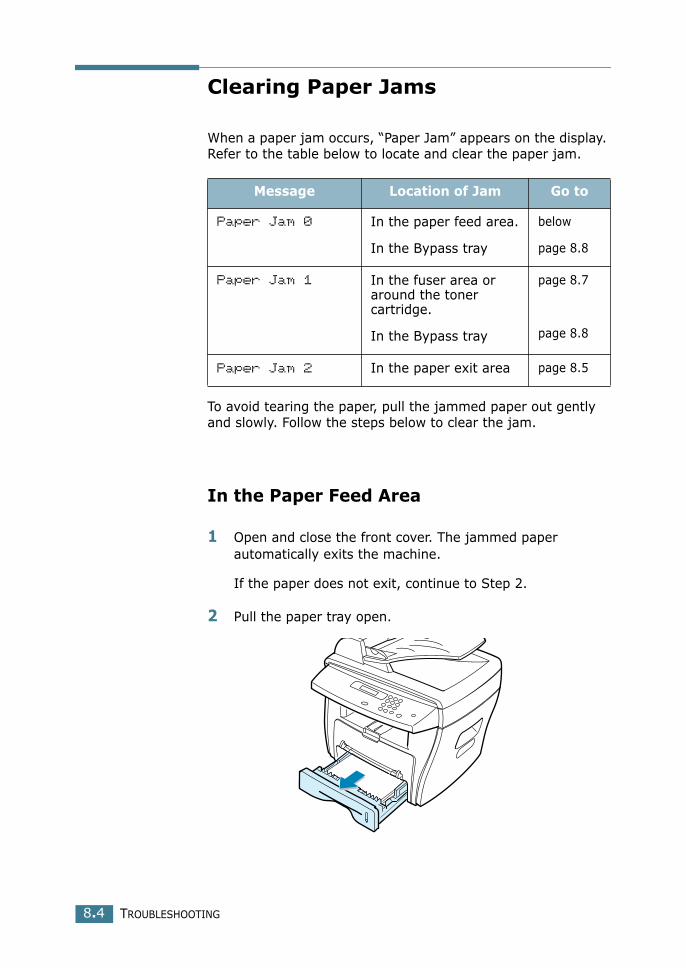
TROUBLESHOOTING8.4
Clearing Paper Jams
When a paper jam occurs, “Paper Jam” appears on the display. Refer to the table below to locate and clear the paper jam.
To avoid tearing the paper, pull the jammed paper out gently and slowly. Follow the steps below to clear the jam.
In the Paper Feed Area
1 Open and close the front cover. The jammed paper automatically exits the machine.
If the paper does not exit, continue to Step 2.
2 Pull the paper tray open.
Message Location of Jam Go to
Paper Jam 0 In the paper feed area.
In the Bypass tray
below
page 8.8
Paper Jam 1 In the fuser area or around the toner cartridge.
In the Bypass tray
page 8.7
page 8.8
Paper Jam 2 In the paper exit area page 8.5

TROUBLESHOOTING 8.5
8
3 Remove the jammed paper by gently pulling it straight out.
If there is any resistance and the paper does not move when you pull or if you cannot see the paper in this area, skip to the fuser area around the toner cartridge. See page 8.7.
4 Insert the paper tray into the machine until it snaps into place.
5 Open and close the front cover to resume printing.
In the Paper Exit Area
1 Open and close the front cover. The jammed paper automatically exits the machine.
If the paper does not exit, continue to Step 2.
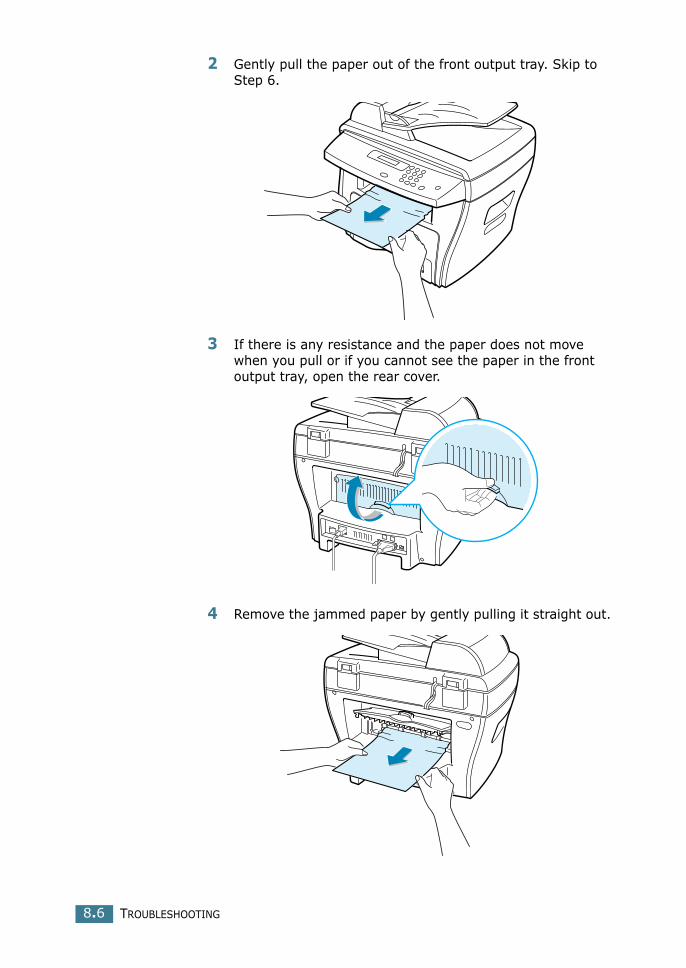
TROUBLESHOOTING8.6
2 Gently pull the paper out of the front output tray. Skip to Step 6.
3 If there is any resistance and the paper does not move when you pull or if you cannot see the paper in the front output tray, open the rear cover.
4 Remove the jammed paper by gently pulling it straight out.
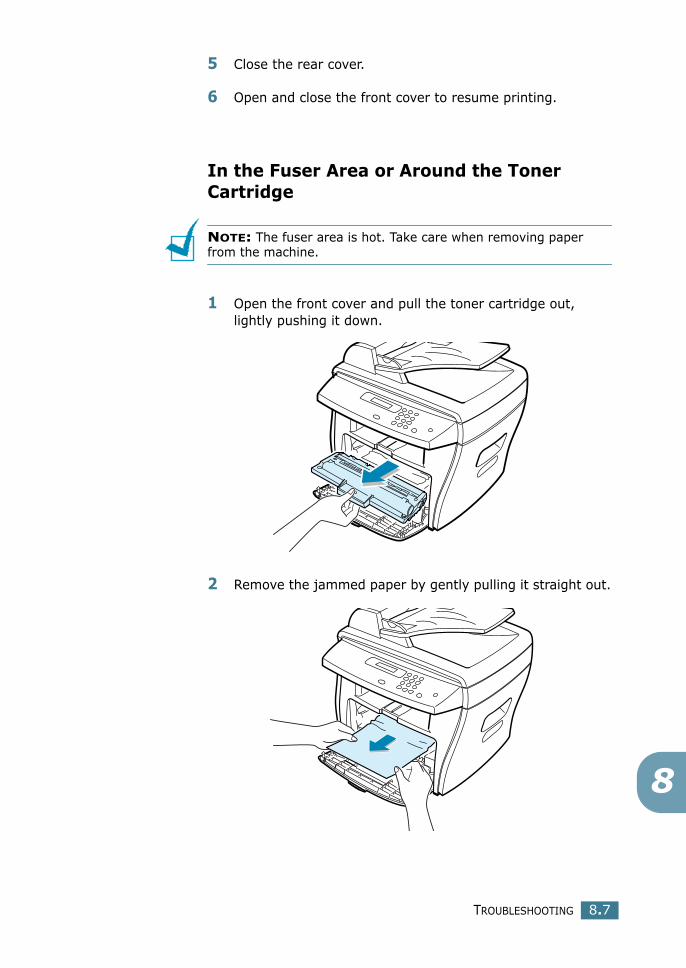
TROUBLESHOOTING 8.7
8
5 Close the rear cover.
6 Open and close the front cover to resume printing.
In the Fuser Area or Around the Toner Cartridge
NOTE: The fuser area is hot. Take care when removing paper from the machine.
1 Open the front cover and pull the toner cartridge out, lightly pushing it down.
2 Remove the jammed paper by gently pulling it straight out.
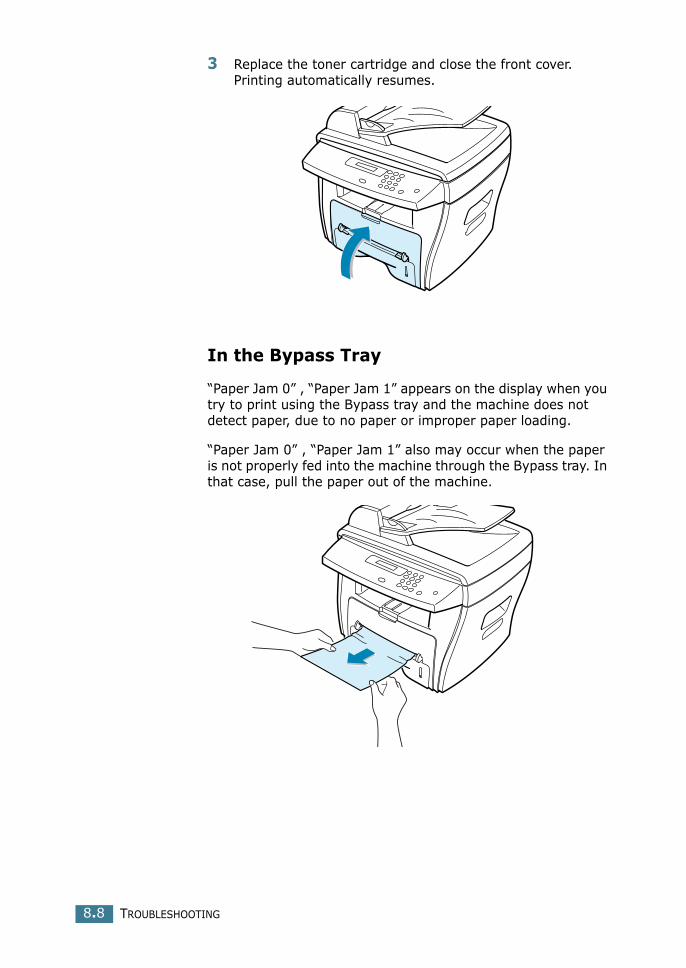
TROUBLESHOOTING8.8
3 Replace the toner cartridge and close the front cover. Printing automatically resumes.
In the Bypass Tray
“Paper Jam 0” , “Paper Jam 1” appears on the display when you try to print using the Bypass tray and the machine does not detect paper, due to no paper or improper paper loading.
“Paper Jam 0” , “Paper Jam 1” also may occur when the paper is not properly fed into the machine through the Bypass tray. In that case, pull the paper out of the machine.
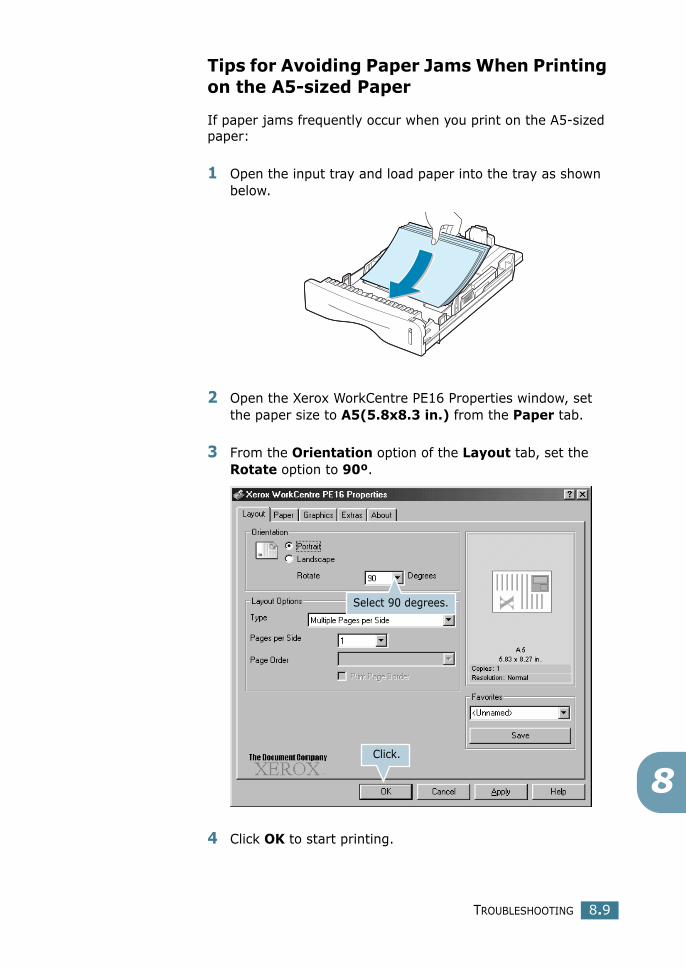
TROUBLESHOOTING 8.9
8
Tips for Avoiding Paper Jams When Printing on the A5-sized Paper
If paper jams frequently occur when you print on the A5-sized paper:
1 Open the input tray and load paper into the tray as shown below.
2 Open the Xerox WorkCentre PE16 Properties window, set the paper size to A5(5.8x8.3 in.) from the Paper tab.
3 From the Orientation option of the Layout tab, set the Rotate option to 90º.
4 Click OK to start printing.
Select 90 degrees.
Click.

TROUBLESHOOTING8.10
Tips for Avoiding Paper Jams
By selecting the correct paper types, most paper jams can be avoided. When a paper jam occurs, follow the steps outlined in “Clearing Paper Jams” on page 8.4.
• Follow the procedures in “Loading Paper” on page 1.11. Ensure that the adjustable guides are positioned correctly.
• Do not overload the paper tray. Ensure that the paper is below the paper capacity mark on the inside wall of the paper tray.
• Do not remove the paper from the tray while your machine is printing.
• Flex, fan and straighten the paper before loading.
• Do not use creased, damp or highly curled paper.
• Do not mix paper types in the paper tray.
• Use only recommended print materials. See “Paper Specifications” on page A.6.
• Ensure that the recommended print side of print materials is facing down in the paper tray and facing up in the Bypass tray.

TROUBLESHOOTING 8.11
8
Clearing LCD Error Messages
Display Meaning Suggested solutions
Cancel ?
1:Yes 2:No
Your machine’s memory is full during the machine stores the document into the memory.
To cancel the fax job, press the 1 button to accept “Yes.” If you want to send the pages were stored, press the 2 button to accept “No.” You should send the remaining pages later when the memory is available.
Comm. ErrorThe machine has a communication problem.
Ask the sender to try again.
Document Jam
The loaded document has jammed in the ADF (Automatic Document Feeder).
Clear the document jam. See page 8.2.
Door OpenThe front or rear cover is not securely latched.
Close the cover until it locks into place.
CRU Fuser Error
There is a problem in the fuser unit.
Unplug the power cord and plug it back in. If the problem persists, please call for service.
Heating Error
Open Heat Error
Over Heat
Group Not
Available
You have tried to select a group location number where only a single location number can be used, such as when adding locations for a broadcasting operation.
Just use a speed dial number or dial a number manually using the number keypad.
Incompatible
The remote machine did not have the requested feature, such as a delayed transmission.
It also occurs if the remote machine does not have enough memory space to complete the operation you are attempting.
Reconfirm the remote machine’s features.
Invalid
Cartridge
You have used unauthorised cartridge.
You must use a Xerox approved cartridge.

TROUBLESHOOTING8.12
Line Busy
The remote party did not answer or the line is already engaged.
Try again after a few minutes.
Line Error
Your machine cannot connect with the remote machine or has lost contact because of a problem with the phone line.
Try again. If the problem persists, wait an hour or so for the line to clear and try again.
Or, turn the ECM mode on. See the Facsimile User’s Guide.
Load Document
You have attempted to set up a copy or fax operation with no document loaded.
Load a document and try again.
LSU Error
A problem has occurred in the LSU (Laser Scanning Unit).
Unplug the power cord and plug it back in. If the problem persists, please call for service.
Memory Full
The memory is full. Delete unnecessary documents, retransmit after more memory becomes available or split the transmission into more than one operation.
No Answer
The remote fax machine has not answered after several redial attempts.
Try again. Make sure that the remote machine is operational.
No CartridgeThe toner cartridge is not installed.
Install the toner cartridge. See page 1.9.
No. Not
Assigned
The speed dial location you tried to use has no number assigned to it.
Dial the number manually using the number keypad or assign the number. See the Facsimile User’s Guide.
No PaperThe paper in the paper tray has run out.
Load paper in the paper tray. See page 1.11.
Operation Not
Assigned
You are doing in the Add/Cancel operation, but there is no jobs waiting.
Check the display to see if there is any scheduled job. The display should indicate them in Standby Mode, for example, Delay Fax.
Display Meaning Suggested solutions
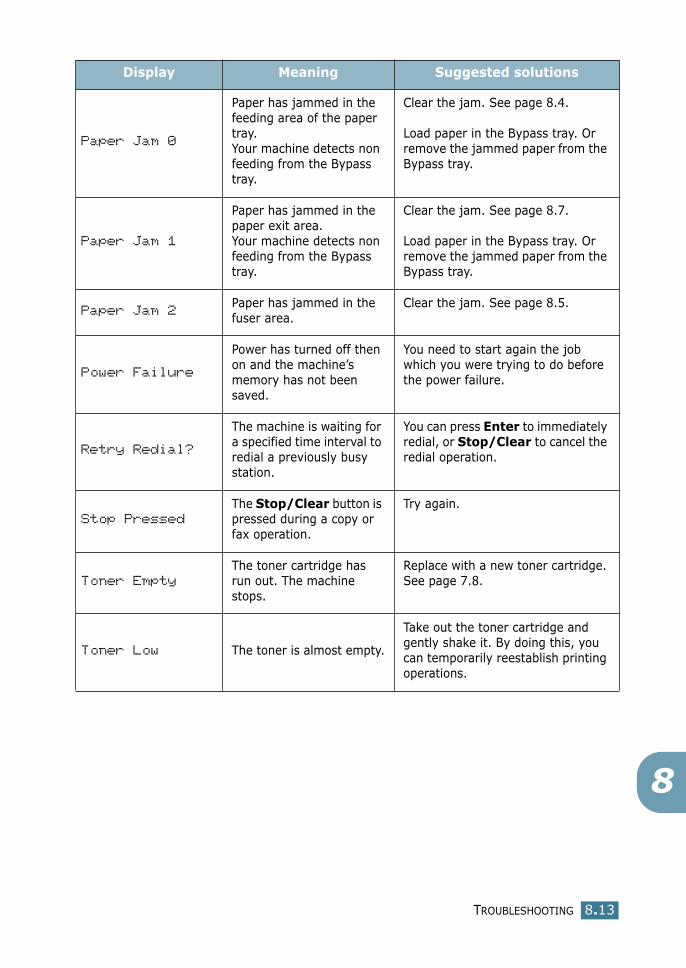
TROUBLESHOOTING 8.13
8
Paper Jam 0
Paper has jammed in the feeding area of the paper tray.Your machine detects non feeding from the Bypass tray.
Clear the jam. See page 8.4.
Load paper in the Bypass tray. Or remove the jammed paper from the Bypass tray.
Paper Jam 1
Paper has jammed in the paper exit area.Your machine detects non feeding from the Bypass tray.
Clear the jam. See page 8.7.
Load paper in the Bypass tray. Or remove the jammed paper from the Bypass tray.
Paper Jam 2Paper has jammed in the fuser area.
Clear the jam. See page 8.5.
Power Failure
Power has turned off then on and the machine’s memory has not been saved.
You need to start again the job which you were trying to do before the power failure.
Retry Redial?
The machine is waiting for a specified time interval to redial a previously busy station.
You can press Enter to immediately redial, or Stop/Clear to cancel the redial operation.
Stop Pressed
The Stop/Clear button is pressed during a copy or fax operation.
Try again.
Toner Empty
The toner cartridge has run out. The machine stops.
Replace with a new toner cartridge. See page 7.8.
Toner Low The toner is almost empty.
Take out the toner cartridge and gently shake it. By doing this, you can temporarily reestablish printing operations.
Display Meaning Suggested solutions

TROUBLESHOOTING8.14
Solving Problems
The following chart lists some conditions that may occur and the recommended solutions. Follow the suggested solutions until the problem is corrected. If the problem persists, please call for service.
Paper Feeding Problems
Condition Suggested solutions
Paper is jammed during printing.
Clear the paper jam. See page 8.4.
Paper sticks together. • Ensure that there is not too much paper in the paper tray. The paper tray can hold up to 250 sheets of paper, depending on the thickness of your paper.
• Make sure that you are using the correct type of paper. See “Paper Specifications” on page A.6.
• Remove paper from the paper tray and flex or fan the paper.• Humid conditions may cause some paper to stick together.
Multiple sheets of paper do not feed.
• Different types of paper may be stacked in the paper tray. Load the paper of only one type, size and weight.
• If multiple sheets have caused a paper jam, clear the paper jam. See page 8.4.
Paper does not feed into the machine.
• Remove any obstructions inside the machine.• Paper has not been loaded correctly. Remove paper from the
tray and reload it correctly.• There is too much paper in the paper tray. Remove excess
paper from the tray.• The paper is too thick. Use only paper that meets the
specifications required by the machine. See “Paper Specifications” on page A.6.
The paper keeps jamming.
• There is too much paper in the paper tray. Remove excess paper from the tray. If you are printing on special materials, use the Bypass tray.
• An incorrect type of paper is being used. Use only paper that meets the specifications required by the machine. See “Paper Specifications” on page A.6.
• There may be debris inside the machine. Open the front cover and remove the debris.
Transparencies stick together in the paper exit.
Use only the transparencies specifically designed for a laser printer. Remove each transparency as it exits from the machine.
Envelopes skew or fail to feed correctly.
Ensure that the paper guides are against both sides of the envelopes.

TROUBLESHOOTING 8.15
8
Printing Problems
Condition Possible cause Suggested solutions
The machine does not print.
The machine is not receiving power.
Check the power cord connections. Check the power switch and the power source.
The machine is not selected as the default printer.
Select Xerox WorkCentre PE16 as your default printer in your Windows.
Check the machine for the following:
• The front or rear cover is not closed.• Paper is jammed.• No paper is loaded.• The toner cartridge is not installed.
If a printer system error occurs, contact your service representative.
The connection cable between the computer and the machine is not connected properly.
Disconnect the printer cable and reconnect it.
The connection cable between the computer and the machine is defective.
If possible, attach the cable to another computer that is working properly and print a job. You can also try using a different printer cable.
The port setting is incorrect.
Check the Windows printer setting to make sure that the print job is sent to the correct port, for example, LPT1. If the computer has more than one port, make sure that the machine is attached to the correct one.
The machine may be configured incorrectly.
Check the printer properties to ensure that all of the print settings are correct.
The printer driver may be incorrectly installed.
Remove the printer driver and then reinstall it.
The machine is malfunctioning.
Check the display message on the control panel to see if the machine is indicating a system error.
The machine selects print materials from the wrong paper source.
The paper source selection in the printer properties may be incorrect.
For many software applications, the paper source selection is found under the Paper tab within the printer properties. Select the correct paper source. See page 5.8.

TROUBLESHOOTING8.16
A print job is extremely slow.
The job may be very complex.
Reduce the complexity of the page or try adjusting the print quality settings.
The maximum print speed of your machine is 17 PPM for Letter-sized paper.
If you are using Windows 9x/Me, the Spooling Setting may be set incorrectly.
From the Start menu, choose Settings and Printers. Right-click the Xerox WorkCentre PE16 printer icon, choose Properties, click the Details tab, and then choose the Spool Settings button. Select the desired spool setting.
Half the page is blank.
The page orientation setting may be incorrect.
Change the page orientation in your application. See page 5.3.
The paper size and the paper size settings do not match.
Ensure that the paper size in the printer driver settings matches the paper in the tray.
Condition Possible cause Suggested solutions

TROUBLESHOOTING 8.17
8
The machine prints, but the text is wrong, garbled, or incomplete.
The printer cable is loose or defective.
Disconnect the printer cable and reconnect. Try a print job that you have already printed successfully. If possible, attach the cable and the machine to another computer and try a print job that you know works. Finally, try a new printer cable.
The wrong printer driver was selected.
Check the application’s printer selection menu to ensure that your machine is selected.
The software application is malfunctioning.
Try printing a job from another application.
The operating system is malfunctioning.
Exit Windows and reboot the computer. Turn the machine off and then back on again.
Pages print, but are blank.
The toner cartridge is defective or out of toner.
Redistribute the toner. if necessary. See page 7.7.
If necessary, replace the toner cartridge.
The file may have blank pages.
Check the file to ensure that it does not contain blank pages.
Some parts, such as the controller or the board, may be defective.
Contact a service representative.
The illustrations print incorrectly in Adobe Illustrator.
The setting in the software application is wrong.
Print the document with selecting Download as Bit Image in the Advanced Options window of the Graphic properties.
An error occurs repeatedly when you are printing with the USB connection.
When the USB mode is set to “Fast,” some PC users may experience poor USB communication.
Change the USB mode to “Slow.” To do so, follow these steps:
1. Press Menu on the control panel until “Machine Setup” appears on the top line of the display.
2. Press the scroll button (� or �) until “USB Mode” appears on the bottom line, and press Enter.
3. Press the scroll button (� or �) to select “Slow.”
4. Press Enter to save the selection.
5. Press Stop/Clear to return to Standby Mode.
Condition Possible cause Suggested solutions

TROUBLESHOOTING8.18
Printing Quality Problems
The dirty inside of the machine or improper paper loading may reduce the print quality. See the table below to clear the problem.
Condition Suggested solutions
Light or faded print
If a vertical white streak or faded area appears on the page:• The toner supply is low. You may be able to temporarily
extend the toner cartridge life. See “Redistributing Toner” on page 7.7. If this does not improve the print quality, install a new toner cartridge.
• The paper may not meet paper specifications; for example, the paper is too moist or too rough. See “Paper Specifications” on page A.6.
• If the entire page is light, the print resolution setting is too low or the toner save mode is on. Adjust the print resolution and turn the toner save mode off. See page 5.20 and page 1.19 respectively.
• A combination of faded or smeared defects may indicate that the toner cartridge needs cleaning. See “Cleaning the Drum” on page 7.10.
Toner specs • The paper may not meet specifications; for example, the paper is too moist or too rough. See “Paper Specifications” on page A.6.
• The transfer roller may be dirty. Clean the inside of your machine. See page 7.3.
• The paper path may need cleaning. See “Cleaning the Drum” on page 7.10.
Dropouts If faded areas, generally rounded, occur randomly on the page:• A single sheet of paper may be defective. Try reprinting the
job.• The moisture content of the paper is uneven or the paper has
moist spots on its surface. Try a different brand of paper. See “Paper Specifications” on page A.6.
• The paper lot is bad. The manufacturing processes can cause some areas to reject toner. Try a different kind or brand of paper.
• The toner cartridge may be defective. Vertical repetitive defects on the next page.
• If these steps do not correct the problems, contact a service representative.
AaBbCcAaBbCcAaBbCcAaBbCcAaBbCc
AaBbCcAaBbCcAaBbCcAaBbCcAaBbCc
AaBbCcAaBbCcAaBbCcAaBbCcAaBbCc

TROUBLESHOOTING 8.19
8
Vertical lines If black vertical streaks appear on the page:• The drum inside the toner cartridge has probably been
scratched. Install a new toner cartridge. See “Installing the Toner Cartridge” on page 1.9.
Gray background If the amount of background shading becomes unacceptable:• Change to a lighter weight pages. See “Paper Specifications”
on page A.6.• Check the machine’s environment; very dry (low humidity) or
high humidity (higher than 80% RH) conditions can increase the amount of background shading.
• Remove the old toner cartridge and install a new one. See “Installing the Toner Cartridge” on page 1.9.
Toner smear • Clean the inside of the machine. See page 7.3.• Check the paper type and quality. See “Paper Specifications”
on page A.6.• Remove the toner cartridge and install a new one. See
“Installing the Toner Cartridge” on page 1.9.
Vertical repetitive defects
If marks repeatedly appear on the printed side of the page at even intervals:• The toner cartridge may be damaged. If a repetitive mark
occurs on the page, print a cleaning sheet several times to clean the cartridge; see “Cleaning the Drum” on page 7.10. After the printout, if you still have the same problems, install a new toner cartridge. See “Installing the Toner Cartridge” on page 1.9.
• Parts of the machine may have toner on them. If the defects occur on the back of the page, the problem will likely correct itself after a few more pages.
• The fusing assembly may be damaged. Contact a service representative.
Condition Suggested solutions
AaBbCcAaBbCcAaBbCcAaBbCcAaBbCc
AaBbCcAaBbCcAaBbCcAaBbCcAaBbCc
AaBbCcAaBbCcAaBbCcAaBbCcAaBbCc

TROUBLESHOOTING8.20
Background scatter
Background scatter results from bits of toner distributed on the printed page. • The paper may be too damp. Try printing with a different
batch of paper. Do not open packages of paper until necessary so that the paper does not absorb too much moisture.
• If background scatter occurs on an envelope, change the printing layout to avoid printing over areas that have overlapping seams on the reverse side. Printing on seams can cause problems.
• If background scatter covers the entire surface area of a printed page, adjust the print resolution through your software application or the printer properties.
Misformed characters
• If characters are improperly formed and producing hollow images, the paper stock may be too slick. Try a different paper. See “Paper Specifications” on page A.6.
• If characters are improperly formed and producing a wavy effect, the scanner unit may need service. For service, contact a service representative.
Page skew • Ensure that the paper is loaded properly.• Check the paper type and quality. See “Paper Specifications”
on page A.6.• Ensure that the paper or other material is loaded correctly
and the guides are not too tight or too loose against the paper stack.
Curl or wave • Ensure that the paper is loaded properly.• Check the paper type and quality. Both high temperature and
humidity can cause paper curl. See “Paper Specifications” on page A.6.
• Turn over the stack of paper in the paper tray. Also try rotating the paper 180° in the tray.
Condition Suggested solutions
A
AaBbCcAaBbCcAaBbCcAaBbCcAaBbCc
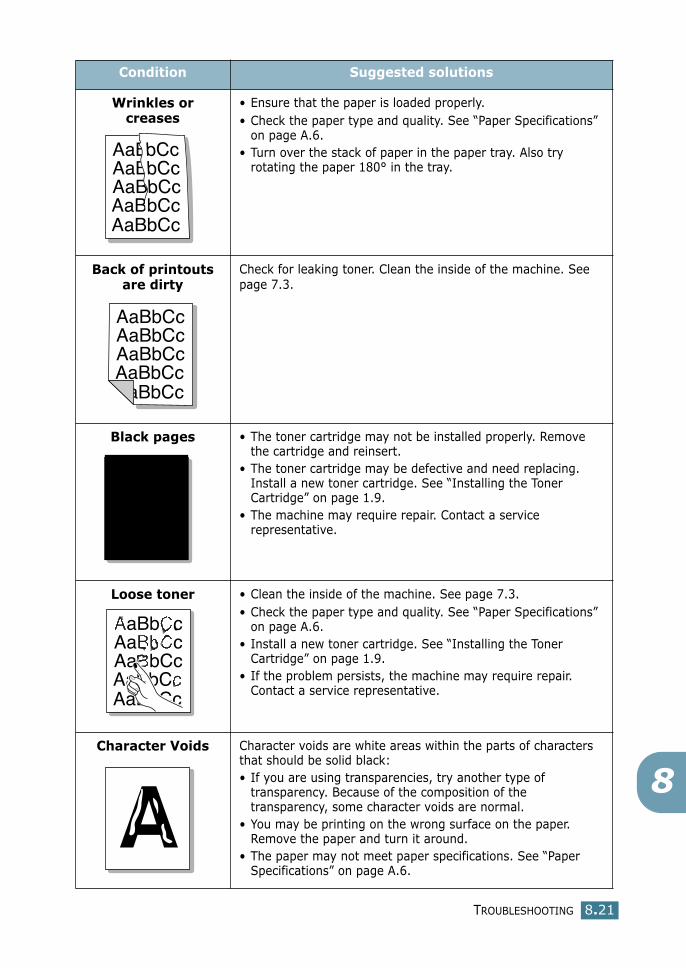
TROUBLESHOOTING 8.21
8
Wrinkles or creases
• Ensure that the paper is loaded properly.• Check the paper type and quality. See “Paper Specifications”
on page A.6.• Turn over the stack of paper in the paper tray. Also try
rotating the paper 180° in the tray.
Back of printouts are dirty
Check for leaking toner. Clean the inside of the machine. See page 7.3.
Black pages • The toner cartridge may not be installed properly. Remove the cartridge and reinsert.
• The toner cartridge may be defective and need replacing. Install a new toner cartridge. See “Installing the Toner Cartridge” on page 1.9.
• The machine may require repair. Contact a service representative.
Loose toner • Clean the inside of the machine. See page 7.3.• Check the paper type and quality. See “Paper Specifications”
on page A.6.• Install a new toner cartridge. See “Installing the Toner
Cartridge” on page 1.9.• If the problem persists, the machine may require repair.
Contact a service representative.
Character Voids Character voids are white areas within the parts of characters that should be solid black:• If you are using transparencies, try another type of
transparency. Because of the composition of the transparency, some character voids are normal.
• You may be printing on the wrong surface on the paper. Remove the paper and turn it around.
• The paper may not meet paper specifications. See “Paper Specifications” on page A.6.
Condition Suggested solutions
A
A

TROUBLESHOOTING8.22
Fax Problems
Horizontal stripes If horizontally aligned black streaks or smears appear:• The toner cartridge may be installed improperly. Remove the
cartridge and reinsert.• The toner cartridge may be defective. Install a new toner
cartridge. See “Installing the Toner Cartridge” on page 1.9.• If the problem persists, the machine may require repair.
Contact a service representative.
Curl If the printed paper is curl or paper does not feed into the printer:• Turn over the stack of paper in the input tray. Also try
rotating the paper 180° in the input tray.
Condition Suggested solutions
AaBbCcAaBbCcAaBbCcAaBbCcAaBbCc
Condition Suggested solutions
The machine is not working, there is no display and the buttons are not working.
• Unplug the power cord and plug it in again. • Ensure that there is power to the electrical receptacle.
No dial tone sounds.• Check that the phone line is connected properly.• Check that the phone socket in the wall is working by
plugging in another phone.

TROUBLESHOOTING 8.23
8
The numbers stored in the memory do not dial correctly.
Make sure that the numbers are stored in the memory correctly. Print a Phonebook list, referring to the Facsimile User’s Guide.
The document does not feed into the machine.
• Make sure that the document is not wrinkled and you are putting it in correctly. Check that the document is the right size, not too thick or thin.
• Make sure that the ADF (Automatic Document Feeder) cover is firmly closed.
Faxes are not received automatically.
• The FAX mode should be selected. • Make sure that there is paper in the tray.• Check to see if the display shows “Memory Full.”
The machine does not send.
• Make sure that the document is loaded in the ADF or on the document glass.
• “TX” should show up on the display. • Check the other fax machine you are sending to, to see if
it can receive your fax.
The incoming fax has blank spaces or is received with a poor-quality.
• The fax machine sending you the fax may be faulty. • A noisy phone line can cause line errors. • Check your machine by making a copy. • The toner cartridge may be empty. Replace the toner
cartridge, referring to page 7.8.
Some of the words on a incoming fax are stretched.
The fax machine sending you the fax had a temporary document jam.
There are lines on the documents you send.
Check your scan glass for marks and clean it. See page 7.5.
The machine dials a number, but a connection with another fax machine fails.
The other fax machine may be turned off, out of paper, or cannot answer incoming calls. Speak with the other machine operator and ask her/him to sort out the problem.
Documents are not stored in the memory.
There may not be enough memory to store the document. If the display shows a “Memory Full” message, delete any documents you no longer need from the memory and then restore the document.
Blank areas appear at the bottom of each page or on other pages, with a small strip of text at the top.
You may have chosen the wrong paper settings in the user option setting. See page 1.18 for the paper tray and page 3.10 for the Bypass tray.
Condition Suggested solutions
TROUBLESHOOTING8.24
Copying Problems
Condition Suggested solutions
Copies are too light or too dark.
Use the Contrast button to darken or lighten the background of the copies.
Smears, lines, marks or spots appears on copies.
• If defects are on the original, press the Contrast button to lighten the background of your copies.
• If no defects are on the original, clean the document glass and underside of the document cover. See page 7.5.
Copy image is skewed.• Ensure that the original is positioned correctly on
document glass.• Check that the copy paper is loaded correctly.
Blank copies print out. Ensure that the original is face down on the document glass or face up in the Automatic Document Feeder.
Image rubs off the copy easily.
• Replace the paper in the paper tray with paper from a new package.
• In high humidity areas, do not leave paper in the machine for the extended periods of time.
Frequent copy paper jams occurs.
• Fan the stack of paper, then turn it over in the paper tray. Replace the paper in the tray with a fresh supply. Check/adjust the paper guides, if necessary.
• Ensure that the paper is the proper paper weight. 75 g/m2 (20 lb) bond paper is recommended.
• Check for copy paper or pieces of copy paper remaining in the machine after a paper jam has been cleared.
TROUBLESHOOTING 8.25
8
Scanning Problems
Fewer copies from the toner cartridge than expected prints out.
• Your originals may contain pictures, solids or heavy lines. For example, your originals may be forms, newsletters, books or other documents that use more toner.
• The machine may be turned frequently on and off. • The document cover may be left open while copies are
being made.
Condition Suggested solutions
Condition Suggested solutions
The scanner does not work. • Make sure that you place the document to be scanned face down on the document glass, or face up in the Automatic Document Feeder.
• There may not be enough available memory to hold the document you want to scan. Try the Prescan function to see if that works. Try lowering the scan resolution rate.
• Check that the USB or parallel cable is connected properly.
• Make sure that the USB or parallel cable is not defective. Switch the cable with a known good cable. If necessary, replace the cable.
• If you are using a parallel cable, ensure that it is compliant with the IEEE 1284 standard.
• Check that the scanner is configured correctly. Check scan setting in the application you want to use to make certain that the scanner job is being sent to the correct port, for example, LPT1.
The unit scans very slowly. • Check if the machine is printing received data. Scan the document after the current job is completed.
• Graphics are scanned more slowly than text.• Communication speed becomes slow in scan
mode because of the large amount of memory required to analyse and reproduce the scanned image. Set your computer to the ECP printer mode through BIOS setting. It will help to increase the speed. For details about how to set BIOS, refer to your computer user’s guide.

TROUBLESHOOTING8.26
Message appears on your computer screen:• “Device can't be set to the H/W
mode you want.”• “Port is being used by another
program.”• “Port is Disabled.• “Scanner is busy receiving or
printing data. When the current job is completed, try again.”
• “Invalid handle.”• “Scanning has failed.”
• There may be a copying or printing job in progress. When the current job is complete, try the job again.
• The Selected port is currently being used. Restart your computer and try again.
• The printer cable may be improperly connected or the power may be off. You must use a parallel cable that supports IEEE-1284 bi-directional communications.
• The scanner driver is not installed or an operating environment is not set up properly.
• Ensure that port is properly connected and power is on, Then restart your computer.
• Check, The USB cable may be improperly connected or the power may be off.
• Do not use the parallel and the USB cables at the same time.
Condition Suggested solutions

A SPECIFICATIONS
This chapter includes:
• General Specifications
• Scanner and Copier Specifications
• Printer Specifications
• Facsimile Specifications
• Paper Specifications

SPECIFICATIONSA.2
General Specifications
Item Description
Automatic document feeder Up to 30 sheets (20 lb, 75 g/m2)
ADF Document size Width: 142 to 216 mm (5.6 to 8.5 inches)
Length: 148 to 356 mm (5.8 to 14 inches)
Paper input capacityPaper tray: 250 sheets (weight: 75 g/m2, 20 lb)
Bypass tray: 1 sheets (weight: 75 g/m2, 20 lb)
Paper output capacityFront output tray: 150 sheets (face down)
Rear output slot: 1 sheet (face up)
Paper typePaper tray: Plain paper (60 ~ 90 g/m2, 16 ~ 24 lb)
Bypass tray: Plain paper, Transparencies, Labels, Card, Post card, Envelopes (60 ~ 120 g/m2, 16 ~ 32 lb)
Consumables 1-piece toner cartridge system
Power requirements100 ~ 127 VAC, 50/60 Hz, 4.5A
220 ~ 240 VAC, 50/60 Hz, 2.5A
Power consumption
Sleep mode: 19 W
Standby mode: 85 W(100 ~ 127 VAC) / 95 W(220 ~ 240 VAC)
Average: 350 W
Noise
Warm-up: 50 dB
Standby mode: 35 dB
Printing: 55 dB
Warm-up Time 42 seconds
Operating conditionsTemperature: 50 oF to 89 oF (10 oC to 32 oC)
Humidity: 20 % to 80 % RH
LCD 16 characters x 2 lines
Toner cartridge life 3,500 pages (for starter, 1,000 pages) @ IDC 5 % coverage
SET dimension (W x D x H) 474 x 436 x 417 mm

SPECIFICATIONS A.3
A
Scanner and Copier Specifications
WeightNet: 13 Kg (including consumables)
Gross: 17 Kg (including consumables, accessories and package)
Package WeightPaper: 2.7 Kg
Plastic: 0.7 Kg
Item Description
Compatibility TWAIN standard
Scanning method ADF and Flat-bed CCD (Charge Coupled Device) module
ResolutionOptical: 600 dpi (Mono and colour)
Enhanced: 4,800 dpi
Effective scanning lengthPlaten: 293 mm (11.5 in.)
ADF : 356 (14 in.)
Effective scanning width 8.2 inches (208 mm)
colour bit depthInternal: 24 bit
External: 24 bit
Mono bit depth1 bit for Text mode
8 bit for Gray mode
Scan speed (Text mode) Platen: 23 seconds
ADF : 25 seconds
Copy speedLetter: 17 copies per minute
A4: 16 copies per minute
Paper size Letter, A4, Legal
Copy resolutionPlaten: 600 x 300 (Text, Mixed) / 600 x 600 (Photo)
ADF : 600 x 300 (Text, Mixed, Photo)
Zoom ratePlaten: 25 ~ 400 %
ADF : 25 ~ 100 %
Item Description

SPECIFICATIONSA.4
Printer Specifications
Multiple copies 99 pages
Gray scale 256 levels
Item Description
Printing method Laser Beam Printing
Printing speedLetter: 17 copies per minute
A4: 16 copies per minute
Paper size
Paper tray: Letter, A4, Legal, Folio, A5, A6
Bypass tray: Letter, Legal, A4, Folio, Executive, A5, A6, A6 card, Post Card 4x6, HagaKi, Envelope 7-3/4, Envelope 9, Envelope 10, Envelope DL, Envelope C5, Envelope C6, Envelope B5
* Min.: 76 x 127 mm (3 x 5 in.) Max.: 216 x 356 (8.5 x 14 in.)
Print resolution 600 x 600 dpi
Emulation SPL (GDI)
PC Interface IEEE 1284 (ECP Only), USB 1.1
Compatibility Windows 95/98/2000/NT 4.0/Me/XP
First printing timeStandby mode: 12 seconds
Power save mode: 54 seconds
Item Description

SPECIFICATIONS A.5
A
Facsimile Specifications
Item Description
Compatibility ITU-T Group 3, ECM
Applicable line Public Switched Telephone Network (PSTN) or behind PABX
Data coding MH/MR/MMR (ECM Mode) and JPEG for colour fax transmission
Modem speed33600/31200/28800/26400/24000/21600/19200/16800/14400/12000/9600/7200/4800/2400 bps with fall back
Transmission speed
Approx. 3 seconds/page
* Transmission time applies to memory transmission of text data with ECM compression using only ITU-T No.1 Chart.
Scanning speed
Platen: approx. 6 seconds/A4 (at standard fax resolution mode)
ADF: approx. 8 seconds/A4 (at standard fax resolution mode)
Maximum document lengthPlaten: 297 mm
ADF: 1.5 m
Paper size Letter, A4, Legal
Resolution
Standard: 203 x 98 dpi
Fine: 203 x 196 dpi
Super Fine: 300 x 300 dpi / 203 x 392 dpi
Photo: 203 x 196 dpi
Colour: 200 x 200 dpi
User Memory 4 MB (320 pages)
Halftone 256 levels
Auto dialer Speed dialling (registration for 100 numbers)

SPECIFICATIONSA.6
Paper Specifications
Overview
Your machine accepts a variety of print materials, such as cut-sheet paper (including up to 100% recycled fiber content paper), envelopes, labels, transparencies and custom-size paper. Properties, such as weight, composition, grain and moisture content, are important factors affecting the machine’s performance and the output quality. Paper that does not meet the guidelines outlined in this user’s guide can cause the following problems:
• Poor print quality
• Increased paper jams
• Premature wear on the machine.
NOTES:
• Some paper may meet all of the guidelines in this guide and still not produce satisfactory results. This may be the result of improper handling, unacceptable temperature and humidity levels, or other variables over which Xerox has no control.
• Before purchasing large quantities of paper, insure the paper meets the requirements specified in this user’s guide.
CAUTION: Using paper that does not meet these specifications may cause problems, requiring repairs. These repairs are not covered by the Xerox warranty or service agreements.
Supported Sizes of Paper
Paper Dimensions* Weight Capacity**
Letter8.5 X 11 in. (216 X 279 mm)
• 60 to 105 g/m2 bond (16 to 28 lb) for the paper tray
• 60 to 120 g/m2 bond (16 to 32 lb) for the Bypass tray
• 250 sheets of 75 g/m2 bond (20 lb) paper for the paper tray
• 1 sheet of paper for the Bypass tray
A4210 X 297 mm (8.3 X 11.7 in.)
Executive7.25 X 10.5 in. (191 X 267 mm)
Legal8.5 X 14 in. (216 X 356 mm)
Folio216 X 330 mm (8.5 X 13 in.)

SPECIFICATIONS A.7
A
NOTE: You may experience jams when using print materials with a length of less than 127 mm (5 in.). For optimum performance, ensure that you are storing and handling the paper correctly. Please refer to “Printer and Paper Storage Environment” on page A.9.
Guidelines for Using Paper
For the best result, use conventional 75 g/m2 (20 lb) paper. Ensure that the paper is of good quality, and free of cuts, nicks, tears, spots, loose particles, dust, wrinkles, voids, and curled or bent edges.
If you are unsure of what type of paper you are loading, such as bond or recycled paper, check the label on the package.
The following problems may cause print quality deviations, jamming or even damage to the printer:
Minimum size (custom)76 x 127 mm(3 x 5 in) 60 to 120 g/m2
bond (16 to 32 lb)
• 1 sheet of paper for the Bypass tray
Maximum size (Legal)216 x 356 mm(8.5 x 14 in)
Transparency
Same minimum and maximum paper sizes as listed above.
138 to 146 g/m2
Labels 120 to 150 g/m2
Cards 90 to 163 g/m2
Envelopes 75 to 90 g/m2
*. The machine supports a wide range of media sizes. See “Size, Input Sources and Capacities” on page 3.2.
**. Capacity may vary depending on print materials’ weight and thickness, and environmental conditions.
Symptom Problem with Paper Solution
Poor print quality or toner adhesion, problems with feeding
Too moist, too rough, too smooth or embossed; faulty paper lot
Try another kind of paper, between 100 ~ 400 Sheffied, 4 ~ 5 % moisture content.
Dropout, jamming, curl Stored improperlyStore paper flat in its moisture-proof wrapping.
Increased gray background shading/printer wear
Too heavyUse lighter paper, use the rear output slot.
Excessive curl problems with feeding
Too moist, wrong grain direction or short-grain construction
• Use the rear output slot.• Use long-grain paper.
Jamming, damage to printer Cutouts or perforationsDo not use paper with cutouts or perforations.
Problems with feeding Ragged edges Use good quality paper.
Paper Dimensions* Weight Capacity**

SPECIFICATIONSA.8
NOTES:
• Do not use letterhead paper printed with low-temperature inks, such as those used in some types of thermography.
• Do not use raised or embossed letterhead.
• The printer uses heat and pressure to fuse toner to the paper. Insure that any coloured paper or preprinted forms use inks that are compatible with this fusing temperature (200 °C or 392 °F for 0.1 second).
Paper Specifications
Paper Output Capacity
Category Specifications
Acid Content 5.5 pH or lower
Caliper 0.094 ~ 0.18 mm (3.0 ~ 7.0 mils)
Curl in Ream Flat within 5 mm (0.02 in.)
Cut Edge Conditions Cut with sharp blades with no visible fray.
Fusing CompatibilityMust not scorch, melt, offset or release hazardous emissions when heated to 200 °C (392 °F) for 0.1 second.
Grain Long Grain
Moisture Content 4 % ~ 6 % by weight
Smoothness 100 ~ 400 Sheffied
Output Location Capacity
Face-down output tray 150 sheets of 75 g/m2 bond (20 lb) paper
Face-up output slot 1 sheet of 75 g/m2 bond (20 lb) paper
SPECIFICATIONS A.9
A
Printer and Paper Storage Environment
Paper storage environmental conditions directly affect the feed operation.
Ideally, the machine and paper storage environment should be at or near room temperature, and not too dry or humid. Remember that paper is hygroscopic; it absorbs and loses moisture rapidly.
Heat works with humidity to damage paper. Heat causes the moisture in paper to evaporate, while cold causes it to condense on the sheets. Heating systems and air conditioners remove most of the humidity from a room. As paper is opened and used, it loses moisture, causing streaks and smudging. Humid weather or water coolers can cause the humidity to increase in a room. As paper is opened and used it absorbs any excess moisture, causing light print and dropouts. Also, as paper loses and gains moisture it can become distorted. This can cause paper jams.
Care should be taken not to purchase more paper than can be used in a short time (about 3 months). Paper stored for long periods may experience heat and moisture extremes, which can cause damage. Planning is important to prevent damage to large supplies of paper.
Unopened paper in sealed reams can remain stable for several months before use. Opened packages of paper have more potential for environment damage, especially if they are not wrapped with a moisture-proof barrier.
The paper storage environment should be properly maintained to ensure optimum performance. The required condition is 20 to 24 °C (68 to 75 °F), with a relative humidity of 45 % to 55 %. The following guidelines should be considered when evaluating the paper’s storage environment:
• Paper should be stored at or near room temperature.
• The air should not be too dry or too humid.
• The best way to store an opened ream of paper is to rewrap it tightly in its moisture-proof wrapping. If the machine environment is subject to extremes, unwrap only the amount of paper to be used during the day’s operation to prevent unwanted moisture changes.

INDEX
Numerics2/4-up, special copy 4.122-side, special copy 4.11
AADF, load 4.4auto fit, special copy 4.9
Bbypass tray, use 3.8
Ccancel
copy 4.3print 5.5
CCD power save mode, use 1.20clone, special copy 4.9collation, special copy 4.10connection
AC power 1.16parallel 1.15telephone line cord 1.14USB 1.15
consumables 7.11contrast, copy 4.6control panel 1.7copy
contrast 4.6default setting, change 4.13from ADF 4.4from document glass 4.2image 4.6number of pages 4.8special features 4.8time out, set 4.14
Ddisplay language and Country, change
control panel 1.17document
jam, clear 8.2load in ADF 4.4load on document glass 4.2
document glassclean 7.5load 4.2
drum, clean 7.10
Eerror messages 8.11
FFavorite setting, use 5.6fit to page
copy 4.9print 5.11
front output tray, use 3.5
Ggraphic properties, set 5.20
Hhelp, use 5.6
Iinstall
toner cartridge 1.9
Jjam, clear
document 8.2

paper 8.4
Mmemory, clear 7.2
Nnetwork printer, set 5.22n-up (multiple pages per sheet)
copy 4.12print 5.8
Oorientation, print 5.3output location, select 3.4overlay, use 5.16
Ppaper guidelines 3.3paper jam, clear 8.4paper level indicator 3.7paper load
in bypass tray 3.8in paper tray 1.11
paper load capacity 3.2paper properties, set 5.7paper size, set
bypass tray 3.10paper tray 1.18print 5.7
paper source, set 5.8paper type 3.2paper type, set
bypass tray 3.10paper tray 1.18print 5.8
parallel, connect 1.15poster
copy 4.12print 5.12
power save mode, use 1.19
print order, set 5.3print resolution 5.20printing
fitting to a selected paper size 5.11from Windows 5.2multiple pages on one sheet 5.8posters 5.12reduced or enlarged document
5.10using overlays 5.16watermarks 5.13
problem, solvecopying 8.24error messages 8.11fax 8.22paper feeding 8.14printing 8.15printing quality 8.18scanning 8.25
Rrear output slot, use 3.5reduced/enlarged
copy 4.7print 5.10
Sspecifications
facsimile A.5general A.2paper A.6printer A.4scanner and copier A.3
system requirementsWindows 2.3
Ttel line, connect 1.14toner cartridge
install 1.9life 7.6

redistribute 7.7replace 7.8
toner save mode, use 1.19
UUSB
connect 1.15mode, change 8.17
Wwatermarks, use 5.13
Zzoom rate, copy 4.7

WorkCentre PE16
LASER MULTIFUNCTION (4 IN 1)
FAX User’s Guide
CONTENTS i
CONTENTS
Chapter 1: GETTING STARTED
Control Panel Functions ....................................... 1.2Setting the Machine ID ......................................... 1.4
Entering Characters Using the Number Keypad ... 1.5Setting the Date and Time .................................... 1.7
Changing the Clock Mode ................................. 1.8Setting Sounds .................................................... 1.8
Speaker, Ringer, Key Sound andAlarm Sound .................................................. 1.9Speaker Volume ............................................. 1.9
Setting the Dial Mode .......................................... 1.10Using the Toll Save Mode ..................................... 1.10Setting up the Fax System ................................... 1.12
Changing the Fax Setup options ...................... 1.12Available Fax Setup Options ............................ 1.12
Chapter 2: GENERAL FAX FUNCTIONS
Sending a Fax ..................................................... 2.2Preparing Documents for Faxing ....................... 2.2Loading an Original Document .......................... 2.2Adjusting the Document Resolution ................... 2.4Sending a Fax Automatically ............................ 2.5Sending a Fax Manually ................................... 2.6Confirming Transmission ................................. 2.6Automatic Redialling ....................................... 2.7
Receiving a Fax ................................................... 2.7About Receiving Modes .................................... 2.7Loading Paper for Receiving Faxes .................... 2.7Receiving Automatically in the Fax Mode ............ 2.8Receiving Manually in the Tel Mode ................... 2.8Receiving Faxes in the Memory ......................... 2.8
CONTENTSii
Chapter 3: AUTOMATIC DIALLING
Speed Dialling ..................................................... 3.2Storing a Number for Speed Dialling .................. 3.2Sending a Fax using a Speed Number ................ 3.3
Group Dialling ..................................................... 3.4Setting Group Dial .......................................... 3.4Editing Group Dial Numbers ............................. 3.5Sending a Fax Using Group Dialling (Multi-address Transmission) ........................... 3.6
Searching for a Number in the Memory ................... 3.7Searching Sequentially through the Memory ....... 3.7Searching with a Particular First Letter .............. 3.7
Printing a Phonebook List ...................................... 3.8
Chapter 4: OTHER WAYS TO FAX
Redialling ........................................................... 4.2Sending Broadcasting Faxes .................................. 4.2Sending a Delayed Fax ......................................... 4.3Sending a Priority Fax .......................................... 4.5Adding Documents To a Scheduled Fax ................... 4.7Cancelling a Scheduled Fax ................................... 4.8
Chapter 5: ADDITIONAL FEATURES
Using the Secure Receiving Mode ........................... 5.2Printing Reports .................................................. 5.3Using Advanced Fax Settings ................................. 5.5
Changing Setting Options ................................ 5.5Advanced Fax Setting Options .......................... 5.6
Using the ControlCentre ....................................... 5.7

1 GETTING STARTED
The following topics are included:
• Control Panel Functions
• Setting the Machine ID
• Setting the Date and Time
• Setting Sounds
• Setting the Dial Mode
• Using the Toll Save Mode
• Setting up the Fax System

GETTING STARTED1.2
Control Panel Functions
1 4 652 3
1COPY*
Adjusts the brightness of the documents for the current copy job.
Selects the document type for the current copy job.
Allows you to use special copy features, such as Clone, Collation, Auto fit, 2-side, N-up (multiple pages on a sheet) and Poster copying.
Makes a copy smaller or larger than the original.
Selects the number of copies.
2Displays the current status and prompts during an operation.
Turns on when the toner cartridge is empty.
3
Scrolls through the options available for the selected menu item.
Confirms the selection on the display.
Enters Menu Mode and scrolls through the menus available.

GETTING STARTED 1.3
13
Sends you back to the upper menu level.
Stops an operation at any time.In Standby Mode, clears/cancels the copy options, such as the contrast, the image setting, the copy size and the number of copies.
Starts a job.
4 Dials a number or enters alphanumeric characters.
5FAX
Adjusts the resolution of the documents for the current fax job.
Allows you to send a fax to multiple destinations.
• Allows you to store frequently-dialed fax numbers using a one or two-digit speed dial or group number for automatic dialling and edit the stored numbers.
• Allows you to print a Phonebook list.
Redials the last number in Standby Mode or insert a pause into a fax number in the edit mode.
Engages the telephone line.
6SAVE
Allows you to save on toner by using less toner to print a document.
Allows you to save on call costs by sending a fax at a preset toll-saving time. Using this feature, you can take advantage of lower long distance rates at night, for example.
*. For details about copy features, refer to the MFP User’s Guide.
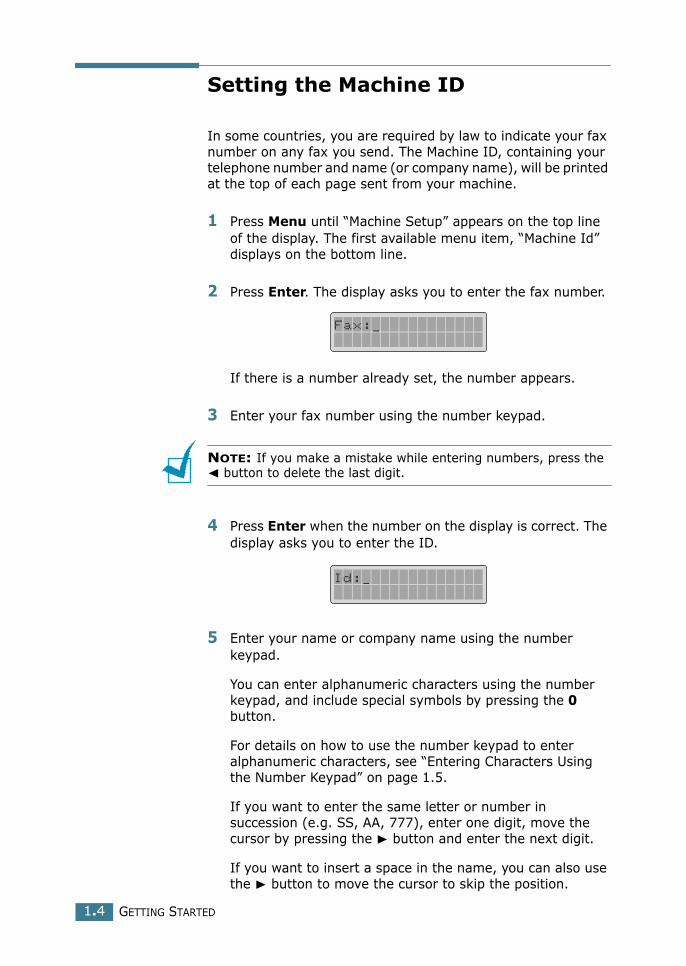
GETTING STARTED1.4
Setting the Machine ID
In some countries, you are required by law to indicate your fax number on any fax you send. The Machine ID, containing your telephone number and name (or company name), will be printed at the top of each page sent from your machine.
1 Press Menu until “Machine Setup” appears on the top line of the display. The first available menu item, “Machine Id” displays on the bottom line.
2 Press Enter. The display asks you to enter the fax number.
If there is a number already set, the number appears.
3 Enter your fax number using the number keypad.
NOTE: If you make a mistake while entering numbers, press the � button to delete the last digit.
4 Press Enter when the number on the display is correct. The display asks you to enter the ID.
5 Enter your name or company name using the number keypad.
You can enter alphanumeric characters using the number keypad, and include special symbols by pressing the 0 button.
For details on how to use the number keypad to enter alphanumeric characters, see “Entering Characters Using the Number Keypad” on page 1.5.
If you want to enter the same letter or number in succession (e.g. SS, AA, 777), enter one digit, move the cursor by pressing the � button and enter the next digit.
If you want to insert a space in the name, you can also use the � button to move the cursor to skip the position.
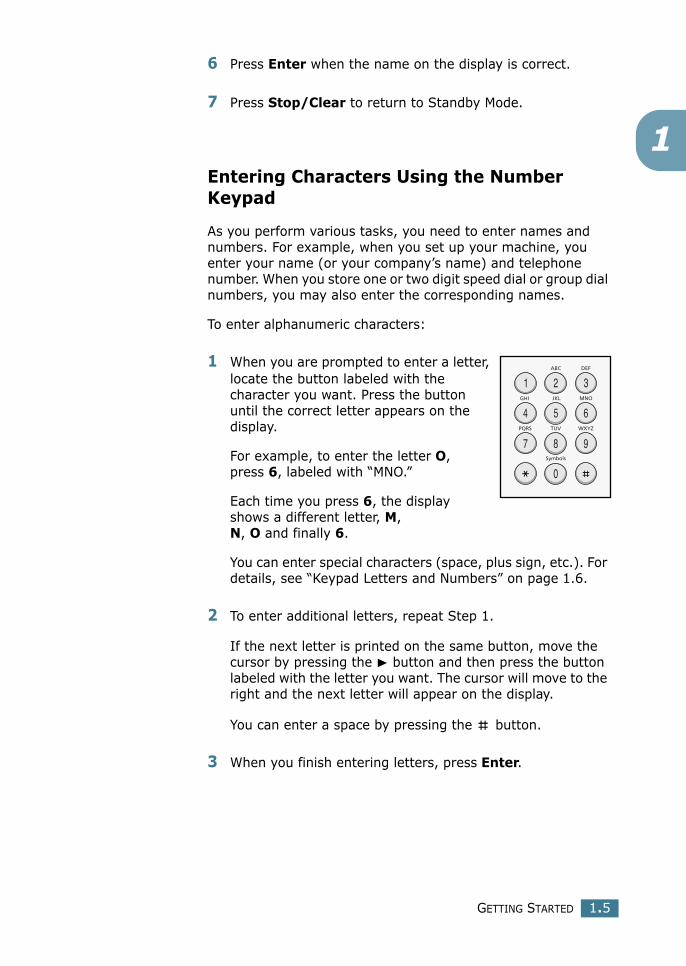
GETTING STARTED 1.5
1
6 Press Enter when the name on the display is correct.
7 Press Stop/Clear to return to Standby Mode.
Entering Characters Using the Number Keypad
As you perform various tasks, you need to enter names and numbers. For example, when you set up your machine, you enter your name (or your company’s name) and telephone number. When you store one or two digit speed dial or group dial numbers, you may also enter the corresponding names.
To enter alphanumeric characters:
1 When you are prompted to enter a letter, locate the button labeled with the character you want. Press the button until the correct letter appears on the display.
For example, to enter the letter O, press 6, labeled with “MNO.”
Each time you press 6, the display shows a different letter, M, N, O and finally 6.
You can enter special characters (space, plus sign, etc.). For details, see “Keypad Letters and Numbers” on page 1.6.
2 To enter additional letters, repeat Step 1.
If the next letter is printed on the same button, move the cursor by pressing the � button and then press the button labeled with the letter you want. The cursor will move to the right and the next letter will appear on the display.
You can enter a space by pressing the button.
3 When you finish entering letters, press Enter.
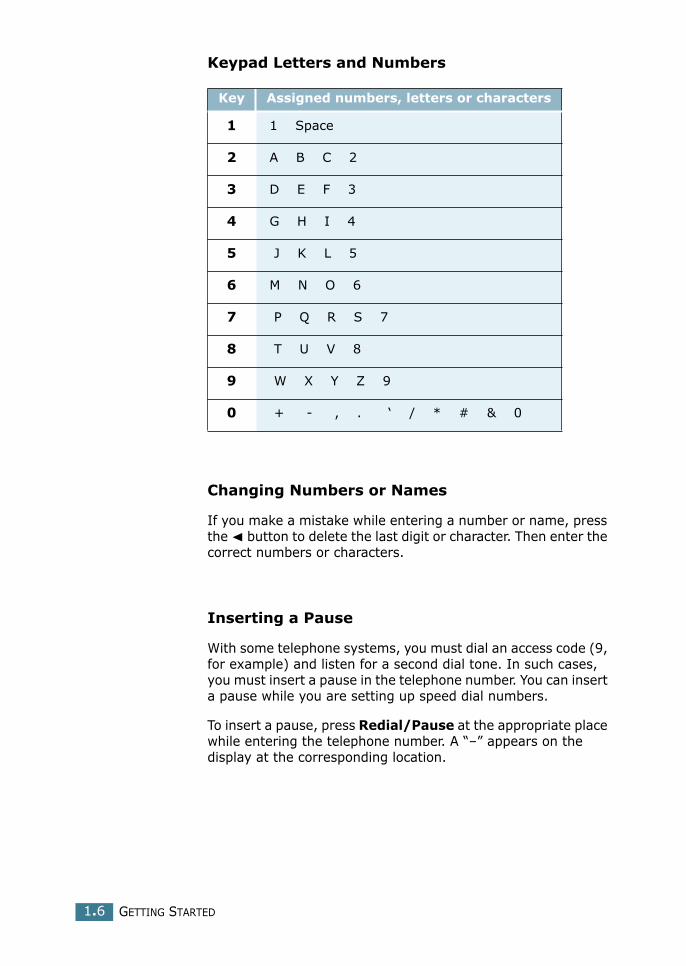
GETTING STARTED1.6
Keypad Letters and Numbers
Changing Numbers or Names
If you make a mistake while entering a number or name, press the � button to delete the last digit or character. Then enter the correct numbers or characters.
Inserting a Pause
With some telephone systems, you must dial an access code (9, for example) and listen for a second dial tone. In such cases, you must insert a pause in the telephone number. You can insert a pause while you are setting up speed dial numbers.
To insert a pause, press Redial/Pause at the appropriate place while entering the telephone number. A “–” appears on the display at the corresponding location.
Key Assigned numbers, letters or characters
1 1 Space
2 A B C 2
3 D E F 3
4 G H I 4
5 J K L 5
6 M N O 6
7 P Q R S 7
8 T U V 8
9 W X Y Z 9
0 + - , . ‘ / * # & 0

GETTING STARTED 1.7
1
Setting the Date and Time
All of your faxes will have the date and time printed on them.
NOTE: If power to the machine is cut off, you need to reset the correct time and date once the power is restored.
1 Press Menu until “Machine Setup” appears on the top line of the display.
2 Press the scroll button (� or �) to display “Date & Time” on the bottom line and press Enter.
3 Enter the correct time and date using the number keypad.
Month = 01 ~ 12Day = 01 ~ 31Year = requires the four digitsHour = 01 ~ 12 (12-hour mode) 00 ~ 23 (24-hour mode)Minute = 00 ~ 59
NOTE: The date format may differ from each country.
You can also use the scroll button (� or �) to move the cursor under the digit you want to correct and enter a new number.
4 To select “Am” or “Pm” for 12-hour format, press the or button.
When the cursor is not under the AM or PM indicator, pressing the or button immediately moves the cursor to the indicator.
You can change the clock mode to 24-hour format (e.g. 01:00 PM as 13:00). For details, see “Changing the Clock Mode” on page 1.8.

GETTING STARTED1.8
5 Press Enter when the time and date on the display is correct.
When you enter a wrong number, the machine beeps and does not proceed to the next step. If this happens, just reenter the correct number.
Changing the Clock Mode
You can set your machine to display the current time using either a 12-hour or 24-hour format.
1 Press Menu until “Machine Setup” appears on the top line of the display.
2 Press the scroll button (� or �) until you see “Clock Mode” on the bottom line and press Enter.
The clock mode currently set for the machine displays.
3 Press the scroll button (� or �) to select the other mode and then press Enter to save the selection.
4 To return to Standby Mode, press Stop/Clear.
Setting Sounds
You can control the following sounds:
• Ringer: You can adjust the ringer volume.
• Key Sound: With this option set to “On,” a key tone sounds each time any key is pressed.
• Alarm Sound: You can turn the alarm sound on or off. With this option set to “On,” an alarm tone sounds when an error occurs or fax communication ends.
• Speaker: You can turn on or off the sounds from the telephone line through the speaker, such as a dial tone or a fax tone. With this option set to “Comm.,” the speaker is on until the remote machine answers.
• You can adjust the volume level using the On Hook Dial button.

GETTING STARTED 1.9
1
Speaker, Ringer, Key Sound andAlarm Sound
1 Press Menu until “Sound/Volume” appears on the top line of the display.
2 Press the scroll button (� or �) to scroll through the options. Press Enter when you see the desired sound option.
3 Press the scroll button (� or �) to display the desired status or loudness for the option you have selected.
You will see the selection on the bottom line of the display.
For the ringer volume, you can select from “Off”, “Low”, “Med” and “High”. Setting “Off” means that the ringer turns off. The machine works normally even if the ringer is turned off.
4 Press Enter to save the selection. The next sound option appears.
5 If necessary, repeat steps 2 through 4.
6 To return to Standby Mode, press Stop/Clear.
Speaker Volume
1 Press On Hook Dial. A dial tone sounds from the speaker.
2 Press the scroll button (� or �) until you hear the loudness you want. The display shows the current volume level.
3 Press On Hook Dial to save the change and return to Standby Mode.
NOTE: You can adjust the speaker volume only when the telephone line is connected.

GETTING STARTED1.10
Setting the Dial Mode
You can select the type of the telephone dial system where your machine is connected.
NOTE: The Dial Mode setting may be unavailable depending on your country.
1 Press Menu until “Machine Setup” appears on the top line of the display.
2 Press the scroll button (� or �) until you see “Dial Mode” on the bottom line and press Enter.
3 Press the scroll button (� or �) to select the desired dial mode.
Select “Tone” if your machine is connected to a tone dial line.
Select “Pulse” if the machine is connected to a pulse dial line.
4 Press Enter to save the selection.
To return to Standby Mode, press Stop/Clear.
Using the Toll Save Mode
Using the Toll Save button on the control panel, you can quickly set your machine to send the document(s) stored in the memory during the preset time slot, when the call charge is lowered. This Toll Save mode helps you to take advantage of lower long distance rates at night, for example.
NOTE: The toll-saving time slot may vary depending on your contract with a long distance phone company.

GETTING STARTED 1.11
1
To turn the toll save mode on:
1 Press Toll Save. The button backlight turns on.
2 Press Enter when “Start Time” displays on the bottom line.
3 Enter the time when your machine starts sending toll save faxes, using the number keypad.
To select “Am” or “Pm” for 12-hour format, press the or button.
4 Press Enter when the start time on the display is correct.
5 Press the scroll button (� or �) to display “End Time” and press Enter.
6 Enter the time when the toll save transmission ends, using the number keypad.
7 Press Enter to save the setting.
8 To return to Standby Mode, press Stop/Clear.
Once the toll save mode is activated, your machine stores all of the documents to be faxed into the memory and sends them at the programed time.
To turn the toll save mode off, press Toll Save again. The button backlight turns off and the mode is deactivated.
NOTE: Once the toll-saving time is set, the Toll Save button allows you to only enable or disable the toll save mode. To change the time setting, use the Toll Save item in the Advaced Fax menu. See page 5.5.

GETTING STARTED1.12
Setting up the Fax System
From the Fax Setup menu, you can configure many settings for the fax system.
Changing the Fax Setup options
1 Press Menu until “Fax Setup” appears on the top line of the display.
The first available menu item, “Receive Mode,” displays on the bottom line.
2 Press the scroll button (� or �) until you see the desired menu item on the bottom line and press Enter.
3 Use the scroll button (� or �) to find the status or use the number keypad to enter the value for the option you have selected.
4 Press Enter to save the selection. The next Fax Setup option appears.
5 If necessary, repeat steps 2 through 4.
6 To return to Standby Mode, press Stop/Clear.
Available Fax Setup Options
Option Description
Receive Mode
You can select the default fax receiving mode.• In the Fax mode, the machine answers an
incoming call and immediately goes into the fax reception mode.
• In Tel mode, you can receive a fax by pressing On Hook Dial (you can hear voice or fax tone from the remote machine) and then Start Copy/Fax on the control panel of your machine.
•
Ring To Answer
You can specify the number of times the machine rings, 1 to 7, before answering an incoming call.

GETTING STARTED 1.13
1Contrast
You can select the default contrast mode to fax your documents lighter or darker.• Lighten works well with dark print.• Normal works well with standard typed or
printed documents.• Darken works well with light print or faint
pencil markings.
Redial TermYour machine can automatically redial a remote fax machine if it was busy. Intervals from 1 to 15 minutes can be entered.
RedialsYou can specify the number of redial attempts, 0 to 13. If you enter 0, the machine will not redial.
MSGConfirm
You can set your machine to print a report showing whether the transmission was successful, how many pages were sent, and more. The available options are On, Off and On-Error, which prints only when a transmission is not successful.
Auto Report
A report with detailed information about the previous 50 communications operations, including time and dates. The available options are On or Off.
Auto Reduction
When receiving a document as long as or longer than the paper loaded in the paper tray, the machine can reduce the size of the document to fit the size of paper loaded in the machine. Select On if you want to automatically reduce an incoming page.
With this feature set to Off, the machine cannot reduce the document to fit onto one page, the document is divided and printed in actual size on two or more pages.
Option Description

GETTING STARTED1.14
Discard Size
When receiving a document as long as longer than the paper installed in your machine, you can set the machine to discard any excess at the bottom of the page. If the received page is outside the margin you set, it will print on two sheets of paper at the actual size.
When the document is within the margin and the Auto Reduction feature is turned on, the machine reduces the document to fit it onto the appropriate sized paper and discard does not occur. If the Auto Reduction feature is turned off or fails, the data within the margin will be discarded. Settings range from 0 to 30 mm.
Option Description

2 GENERAL FAX FUNCTIONS
The following topics are included:
• Sending a Fax
• Receiving a Fax

GENERAL FAX FUNCTIONS2.2
Sending a Fax
Preparing Documents for Faxing
Use the following guidelines to prepare your documents for faxing:
• Do not load documents smaller than 142 x 148 mm or larger than 216 x 356 mm in the Automatic Document Feeder (ADF).
• Do not attempt to load the following types of documents into the ADF: - carbon-paper or carbon-backed paper - coated paper - onion skin or thin paper - wrinkled or creased paper - curled or rolled paper - torn paper
• Remove all staples and paper clips before loading documents in the ADF.
• Make sure any glue, ink or correction fluid on the paper is completely dry before loading documents in the ADF.
• Do not load documents containing different sizes or weights of paper in the ADF.
• If you want to make copies from booklets, pamphlets, transparencies or documents having other unusual characteristics, use the document glass to load the document.
Loading an Original Document
To fax a document using the Automatic Document Feeder (ADF):
1 Slide the document face up into the ADF. You can insert up to 30 sheets at a time.

GENERAL FAX FUNCTIONS 2.3
2
2 Adjust the document guide on the ADF to match the width of the document.
To fax a document from the document glass:
1 Open the document cover.
2 Place the document face down on the document glass and align it with the registration guide on the top left corner of the glass.
3 Close the document cover.

GENERAL FAX FUNCTIONS2.4
NOTES:
• If you are copying a page from a book or magazine, lift the cover until its hinges are caught by the stopper and then close the cover. If the book or magazine is thicker than 30 mm, start copying with the cover open.
• Make sure that no document is in the ADF. If any document is detected in the ADF, it has priority over the document on the document glass.
• To get the best scan quality, especially for coloured or gray scaled images, use the document glass.
Adjusting the Document Resolution
The default document settings produce good results when setting typical text based documents.
However, if you send documents that are of a poor quality, or contain photographs, you can adjust the resolution to produce a higher quality fax.
1 Press Resolution.
2 By pressing Resolution or the scroll button (� or �), you can choose from Standard, Fine, Super Fine, Photo and Color(Colour).
3 When the mode you want to use displays, press Enter to save the selection.
The document types recommended for the resolution settings are described in the table below.
Mode Recommended for:
Standard Documents with normal sized characters.
FineDocuments containing small characters or thin lines or documents printed using a dot-matrix printer.
Super Fine
Documents containing extremely fine detail. The super fine mode is enabled only if the remote machine also supports the Super Fine resolution. See the notes below.
Photo Documents containing shades of gray or photographs.

GENERAL FAX FUNCTIONS 2.5
2
NOTES:
• For the memory transmission, the super fine mode is not available. The resolution setting is automatically changed to Fine.
• When your machine is set to Super Fine resolution and the remote fax machine does not support the Super Fine resolution, the machine transmits using the highest resolution mode supported by the remote fax machine.
Sending a Fax Automatically
1 Load the document(s) face up into the ADF.
OR
Place a single document face down on the document glass.
For details about loading a document, see page 2.2.
2 Adjust the document resolution to suit your fax needs (see page 2.4).
If you need to change the contrast, see page 1.13.
3 Enter the remote fax phone number using the number keypad.
You can use one or two-digit speed or group dial numbers. For details, see Chapter 3, "Automatic Dialling."
4 Press Start Copy/Fax.
5 When the document is loaded on the document glass, the display shows “Another Page?” on the top line after the document is scanned into the memory. If you have the next page, remove the scanned page and load the next page on the glass and select “1.Yes.” Repeat as necessary.
After all of the pages are scanned, select “2.No” when the display shows “Another Page?.”
Color(Colour)
Documents with colours. Sending a colour fax is enabled only if the remote machine supports colour fax reception and you send the fax manually. In this mode, the memory transmission is not available.
Mode Recommended for:
GENERAL FAX FUNCTIONS2.6
6 The number is dialed and then the machine begins sending the fax when the remote fax machine is ready.
NOTE: When you want to cancel the fax job, press Stop/Clear at any time while sending the fax.
Sending a Fax Manually
1 Load the document(s) face up into the ADF.
OR
Place a single document face down on the document glass.
For details about loading a document, see page 2.2.
2 Adjust the document resolution to suit your fax needs (see page 2.4).
If you need to change the contrast, see page 1.13.
3 Press On Hook Dial. You hear a dial tone.
4 Enter the remote fax machine’s fax number using the number keypad.
5 When you hear a high-pitched fax signal from the remote fax machine, press Start Copy/Fax.
NOTE: When you want to cancel the fax job, press Stop/Clear at any time while sending the fax.
Confirming Transmission
When the last page of your document has been sent successfully, the machine beeps and returns to Standby Mode.
If something goes wrong while sending your fax, an error message appears on the display. For a listing of error messages and their meanings, see the MFP User’s Guide.
If you receive an error message, press Stop/Clear to clear the message and try to send the document again.
You can set your machine to print a confirmation report automatically each time sending a fax is completed. For further details, see the MSG Confirm item in “Available Fax Setup Options” on page 1.12.

GENERAL FAX FUNCTIONS 2.7
2
Automatic Redialling
If the number you have dialed is busy or there is no answer when you send a fax, the machine will automatically redial the number every three minutes up to seven times by the factory default settings.
When the display shows “Retry Redial ?,” press Enter to redial the number without waiting. To cancel the automatic redialling, press Stop/Clear.
To change the time interval between redials and the number of redial attempts. See page 1.12.
Receiving a Fax
About Receiving Modes• In the fax mode, the machine answers an incoming fax call
and immediately goes into the fax reception mode.
• In Tel mode, you can receive a fax pressing On Hook Dial (you can hear voice or fax tone from the remote machine) and then pressing Start Copy/Fax on the control panel of your machine.
When the memory is full, the receiving mode automatically switches to Tel.
For details about changing the receiving mode, see page 1.12.
NOTES: If you do not want other people to view your received documents, you can use the secure receiving mode. In this mode, all received faxes are stored in the memory. For further details, see page 5.2.
Loading Paper for Receiving Faxes
The instructions for loading paper in the paper tray are the same whether you are printing, faxing, or copying, except that faxes can only be printed on Letter-, A4- or Legal-sized paper. For

GENERAL FAX FUNCTIONS2.8
details about loading paper and setting the paper size in the tray, refer to the MFP User’s Guide.
Receiving Automatically in the Fax Mode
Your machine is preset to the fax mode at the factory.
When you receive a fax, the machine answers the call on a specified number of rings and automatically receives the fax.
To change the number of rings, see “Available Fax Setup Options” on page 1.12.
If you want to adjust the ringer volume, see “Setting Sounds” on page 1.8.
Receiving Manually in the Tel Mode
When a fax comes in, your machine sounds the ringer and then you can hear a fax tone. Press On Hook Dial and then Start Copy/Fax.
The machine begins receiving a fax and returns to Standby Mode when the reception is completed.
Receiving Faxes in the Memory
Since your machine is a multi-tasking device, it can receive faxes while you are making copies or printing. If you receive a fax while you are copying or printing, your machine stores incoming faxes in the memory. Then, as soon as you finish copying or printing, the machine automatically prints the faxes.

GENERAL FAX FUNCTIONS 2.9
2

GENERAL FAX FUNCTIONS2.10

3 AUTOMATIC DIALLING
The following topics are included:
• Speed Dialling
• Group Dialling
• Searching for a Number in the Memory
• Printing a Phonebook List

AUTOMATIC DIALLING3.2
Speed Dialling
You can store up to 100 frequently dialed numbers in one or two-digit speed dial locations (0-99).
Storing a Number for Speed Dialling
1 Press Phonebook on the control panel.
2 Press Phonebook or the scroll button (� or �) to display “Store/Edit” on the bottom line of the display. Press Enter.
3 Press Enter when “Speed Dials” appears on the display.
4 Enter a one or two-digit speed dial number between 0 and 99, using the number keypad and press Enter.
If a number is already stored in the location you chose, the display shows the number to allow you to change it. To start over with another speed-dial number, press Upper Level.
5 Enter the number you want to store using the number keypad and press Enter.
To insert a pause between numbers, press Redial/Pause and a “-” appears on the display.
6 To assign a name to the number, enter the name. For details about how to enter names, see “Entering Characters Using the Number Keypad” on page 1.5.
OR
If you do not want to assign a name, skip this step.
7 Press Enter when the name appears correctly or without entering a name.
8 To store more fax numbers, repeat steps 4 through 7.
OR
To return to Standby Mode, press Upper Level or Stop/Clear.

AUTOMATIC DIALLING 3.3
3
Sending a Fax using a Speed Number
1 Feed the document(s) face up into the ADF.
Or
Place a single document face down on the document glass.
For details about loading a document, see page 2.2.
2 Adjust the document resolution to suit your fax needs (see page 2.4).
If you need to change the contrast, see page 1.13.
3 Enter the speed dial number.
• For a one-digit speed dial number, press and hold the appropriate digit button.
• For a two-digit speed dial number, press the first digit button and hold the last digit button.
The corresponding entry’s name briefly displays.
4 The document scans into the memory.
When the document is loaded on the document glass, the LCD display asks if you want to send another page. Select “1.Yes” to add more documents or “2.No” to begin sending the fax immediately.
5 The fax number stored in the speed dial location is automatically dialed. The document is sent when the remote fax machine answers.

AUTOMATIC DIALLING3.4
Group Dialling
If you frequently send the same document to several destinations, you can create a group of these destinations and set them under a one or two-digit group dial location. This enables you to use a group dial number setting to send the same document to all the destinations in the group.
Setting Group Dial
1 Press Phonebook on the control panel.
2 Press Phonebook or the scroll button (� or �) to display “Store/Edit” on the bottom line of the display. Press Enter.
3 Press the scroll button (� or �) to display “Group Dials” on the bottom line and press Enter.
4 Press Enter when “New” displays on the bottom line.
5 Enter a group number between 0 and 99 and press Enter.
6 Enter a one or two-digit speed number you want to include in the group and press Enter.
• For a one-digit speed dial number, press and hold the appropriate digit button.
• For a two-digit speed dial number, press the first digit button and hold the last digit button.
7 Repeat Step 6 to enter other speed dial numbers into the group.
8 Press Upper Level button when you have entered all of the desired numbers. The display prompts you to enter a group ID.
9 To assign a name to the group, enter the name.
OR
If you do not want to assign a name, skip this step.
AUTOMATIC DIALLING 3.5
3
10Press Enter when the name appears correctly or without entering a name.
11 If you want to assign another group, repeat from Step 4.
OR
To return to Standby Mode, press Stop/Clear.
NOTE: You cannot include one group dial number in another group dial number.
Editing Group Dial Numbers
You can delete a specific speed dial number from a selected group or add a new number to the selected group.
1 Press Phonebook on the control panel.
2 Press Phonebook or the scroll button (� or �) to display “Store/Edit” on the bottom line of the display. Press Enter.
3 Press the scroll button (� or �) to display “Group Dials” on the bottom line and press Enter.
4 Press the scroll button (� or �) to display “Edit” on the bottom line and press Enter.
5 Enter the group number you want to edit and press Enter.
The display prompts you to enter a speed dial number.
6 Enter a speed dial number to be added or deleted.
7 When you enter the specific number from the group, the display shows “Delete?.”
When you enter a new number, the display shows “Add?.”
8 Press Enter.
9 If you want to edit another group, repeat from Step 4.
Or
To return to Standby Mode, press Upper Level.
AUTOMATIC DIALLING3.6
Sending a Fax Using Group Dialling (Multi-address Transmission)
You can use group dialling for Broadcasting or Delayed transmissions.
Follow the procedure of the desired operation (Broadcasting transmission; see page 4.2, Delayed transmission; see page 4.3). When you come to a step in which the display asks you to enter the remote fax number:
• For a one-digit group number, press and hold the appropriate digit button.
• For a two-digit group number, press the first digit button and hold the last digit button.
You can use only one group number for one operation. Then continue the procedure to complete the desired operation.
Your machine automatically scans the document loaded in the Automatic Document Feeder or on the document glass into the memory. The machine dials each of the numbers included in the group.

AUTOMATIC DIALLING 3.7
3
Searching for a Number in the Memory
There are two ways to search for a number in the memory. You can either scan from A to Z sequentially, or you can search using the first letter of the name associated with the number.
Searching Sequentially through the Memory
1 Press Phonebook.
2 Press Enter when “Search/Dial” appears on the display.
3 Press the scroll button (� or �) to scroll through the memory until the name and number you want to dial display. You can search upwards or downwards through the entire memory in alphabetical order, from A to Z.
While searching through the machine’s memory, you can see that each entry is preceded by one of two letters; “S” for speed dial or “G” for group dial number. These letters tell you how the number is stored.
4 When the name and/or the number you want displays, press Start Copy/Fax or Enter to dial.
Searching with a Particular First Letter
1 Press Phonebook.
2 Press Enter when “Search/Dial” appears on the display.
3 Press the button labeled with the letter you want to search for. A name beginning with the letter displays.
For example, if you want to find the name “MOBILE,” press the 6 button, which is labeled with “MNO.”
4 Press the scroll button (� or �) to display the next name.
5 When the name and/or the number you want displays, press Start Copy/Fax or Enter to dial.
AUTOMATIC DIALLING3.8
Printing a Phonebook List
You can check your automatic dial setting by printing a Phonebook list.
1 Press Phonebook.
2 Press Phonebook or the scroll button (� or �) until “Print” appears on the bottom line and press Enter.
A list showing your speed dial and group dial entries prints out.

4 OTHER WAYS TO FAX
The following topics are included:
• Redialling
• Sending Broadcasting Faxes
• Sending a Delayed Fax
• Sending a Priority Fax
• Adding Documents To a Scheduled Fax
• Cancelling a Scheduled Fax

OTHER WAYS TO FAX4.2
Redialling
To redial the number you last called:
Press Redial/Pause.
When a document is loaded in the ADF (Automatic Document Feeder; see page 2.2), the machine automatically begins to send.
For the document loaded on the document glass, the display asks if you want to load another page. Select “1.Yes” to add. Otherwise, select “2.No.”
Sending Broadcasting Faxes
Using the Broadcasting button on the control panel, you can use the broadcasting fax feature, which allows you to send a document to multiple locations. Documents are automatically stored in the memory and sent to a remote station. After transmission, the documents are automatically erased from the memory.
1 Load the document(s) face up into the ADF.
OR
Place a single document face down on the document glass.
For details about loading a document, see page 2.2.
2 Adjust the document resolution to suit your fax needs (see page 2.4).
If you need to change the contrast, see page 1.13.
3 Press Broadcasting on the control panel.
4 Enter the number of the remote machine using the number keypad.
You can use one or two-digit speed dial or group dial numbers. For details, see Chapter 3, "Automatic Dialling."

OTHER WAYS TO FAX 4.3
4
5 Press Enter to confirm the number. The display asks you to enter another fax number to send the document.
NOTE: Your machine can send one broadcasting fax to multiple destinations. The “Enter Number” prompt does not appear if a broadcast is set up and not completed. You must wait until the current broadcast is completed.
6 If you want to enter more fax numbers, repeat steps 4 and 5. You can add up to 10 destinations.
Note that you cannot use group dial numbers for another fax number.
7 When you finish entering fax numbers, press Start Copy/Fax.
The document is scanned into the memory before transmission. The display shows the memory capacity and the number of pages being stored in the memory.
For the document loaded on the document glass, the display asks if you want to load another page. Select “1.Yes” to add. Otherwise, select “2.No.”
8 The machine begins sending the document in order of the numbers you entered.
Sending a Delayed Fax
You can set your machine to send a fax at a later time when you will not be present.
1 Load the document(s) face up into the ADF.
OR
Place a single document face down on the document glass.
For details about loading a document, see page 2.2.
2 Adjust the document resolution to suit your fax needs (see page 2.4).
If you need to change the contrast, see page 1.13.
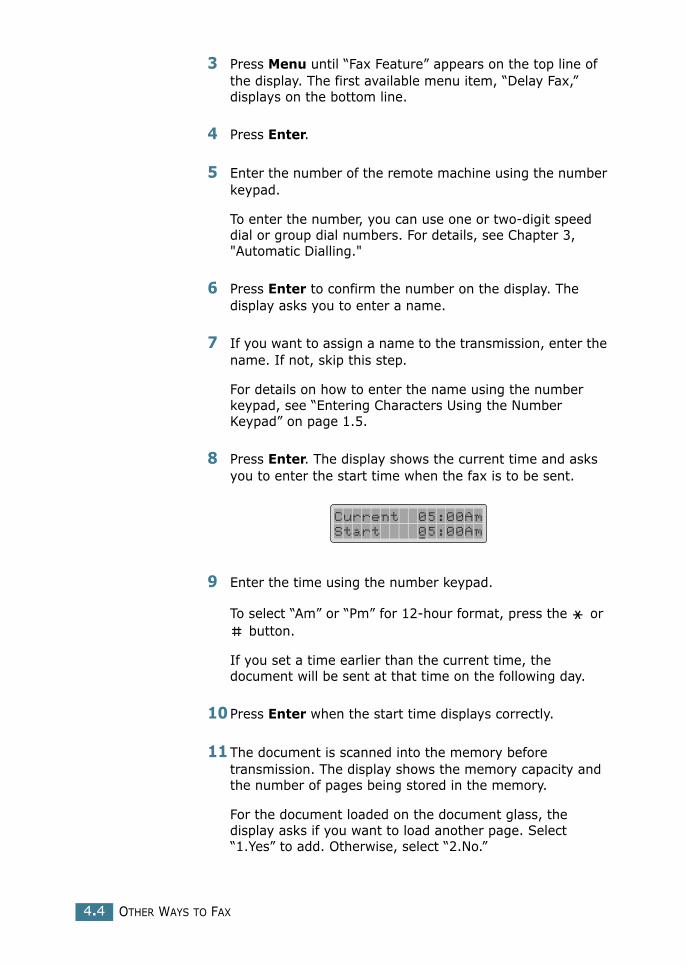
OTHER WAYS TO FAX4.4
3 Press Menu until “Fax Feature” appears on the top line of the display. The first available menu item, “Delay Fax,” displays on the bottom line.
4 Press Enter.
5 Enter the number of the remote machine using the number keypad.
To enter the number, you can use one or two-digit speed dial or group dial numbers. For details, see Chapter 3, "Automatic Dialling."
6 Press Enter to confirm the number on the display. The display asks you to enter a name.
7 If you want to assign a name to the transmission, enter the name. If not, skip this step.
For details on how to enter the name using the number keypad, see “Entering Characters Using the Number Keypad” on page 1.5.
8 Press Enter. The display shows the current time and asks you to enter the start time when the fax is to be sent.
9 Enter the time using the number keypad.
To select “Am” or “Pm” for 12-hour format, press the or button.
If you set a time earlier than the current time, the document will be sent at that time on the following day.
10Press Enter when the start time displays correctly.
11The document is scanned into the memory before transmission. The display shows the memory capacity and the number of pages being stored in the memory.
For the document loaded on the document glass, the display asks if you want to load another page. Select “1.Yes” to add. Otherwise, select “2.No.”
OTHER WAYS TO FAX 4.5
4
12The machine returns to Standby Mode. The display reminds you that you are in Standby Mode and that a delayed fax is set.
NOTE: If you want to cancel the delayed transmission, see “Cancelling a Scheduled Fax” on page 4.8.
Sending a Priority Fax
Using the Priority Fax feature, a high priority document can be sent ahead of reserved operations. The document is scanned into the memory and transmitted when the current operation is finished. In addition, the priority transmission interrupts a broadcast operation between stations (i.e., when the transmission to station A ends, before transmission to station B begins) or between redial attempts.
1 Load the document(s) face up into the ADF.
OR
Place a single document face down on the document glass.
For details about loading a document, see page 2.2.
2 Adjust the document resolution to suit your fax needs (see page 2.4).
If you need to change the contrast, see page 1.13.
3 Press Menu until “Fax Feature” appears on the top line of the display.
4 Press the scroll button (� or �) to display “Priority Fax” on the bottom line and press Enter.
5 Enter the number of the remote machine using the number keypad.
To enter the number, you can use one or two-digit speed dial or group dial numbers. For details, see Chapter 3, "Automatic Dialling."
OTHER WAYS TO FAX4.6
6 Press Enter to confirm the number. The display asks you to enter a name.
7 If you want to assign a name to the transmission, enter the name. If not, skip this step.
For details on how to enter a name using the number keypad, see “Entering Characters Using the Number Keypad” on page 1.5.
8 Press Enter.
The document is scanned into the memory before transmission. The display shows the memory capacity and the number of pages being stored in the memory.
For the document loaded on the document glass, the display asks if you want to load another page. Select “1.Yes” to add. Otherwise, select “2.No.”
9 The machine shows the number being dialed and begins sending the document.

OTHER WAYS TO FAX 4.7
4
Adding Documents To a Scheduled Fax
You can add documents to the delayed transmission previously reserved in your machine’s memory.
1 Load the document(s) face up into the ADF.
OR
Place a single document face down on the document glass.
For details about loading a document, see page 2.2.
2 Adjust the document resolution to suit your fax needs (see page 2.4).
If you need to change the contrast, see page 1.13.
3 Press Menu until “Fax Feature” appears on the top line of the display.
4 Press the scroll button (� or �) to display “Add/Cancel” on the bottom line and press Enter.
5 Press Enter when “Add Page” displays on the bottom line. The display shows the last job reserved in the memory.
6 Press the scroll button (� or �) until you see the fax job to which you want to add documents and press Enter.
The machine automatically stores the documents in the memory, and the display shows the memory capacity and the number of pages.
For the document loaded on the document glass, the display asks if you want to load another page. Select “1.Yes” to add. Otherwise, select “2.No.”
7 After storing, the machine displays the numbers of total pages and added pages and then returns to Standby Mode.

OTHER WAYS TO FAX4.8
Cancelling a Scheduled Fax
1 Press Menu until “Fax Feature” appears on the top line of the display.
2 Press the scroll button (� or �) to display “Add/Cancel” on the bottom line and press Enter.
3 Press the scroll button (� or �) to display “Cancel Job” and press Enter. The display shows the last job reserved in the memory.
4 Press the scroll button (� or �) until you see the fax job you want to cancel, and press Enter.
The selected job is canceled and the machine returns to Standby Mode.

5 ADDITIONAL FEATURES
The following topics are included:
• Using the Secure Receiving Mode
• Printing Reports
• Using Advanced Fax Settings
• Using the ControlCentre

ADDITIONAL FEATURES5.2
Using the Secure Receiving Mode
You may need to prevent your received faxes from being accessed by unauthorised people. You can turn on the secure fax mode using the Secure Receive option to restrict printing out all of the received faxes when the machine is unattended. In the secure fax mode, all incoming faxes will go in the memory. When the mode turns off, any faxes stored will be printed.
To turn the secure receiving mode on:
1 Press Menu until “Advanced Fax” appears on the top line of the display.
2 Press the scroll button (� or �) until “Secure Receive” appears on the bottom line and press Enter.
3 Press the scroll button (� or �) to display “On” on the bottom line and press Enter.
4 Enter a four-digit passcode you want to use, using the number keypad and press Enter.
NOTE: You can use the secure receiving mode without setting a passcode, but cannot protect your faxes.
5 To return to Standby Mode, press Stop/Clear.
When a fax is received in the secure receiving mode, your machine stores it into the memory and displays “Secure Receive” to let you know that there is a fax stored.
To print received documents:
1 Access the Secure Receive menu by following steps 1 and 2 above.
2 Press the scroll button (� or �) to display “Print” on the bottom line and press Enter.
3 Enter the four-digit passcode and pressEnter.
The faxes stored in the memory are printed all together.

ADDITIONAL FEATURES 5.3
5
To turn the secure receiving mode off:
1 Access the Secure Receive menu by following steps 1 and 2 in “To turn the secure receiving mode on:” on page 5.2.
2 Press the scroll button (� or �) to display “Off” on the bottom line and press Enter.
3 Enter the four-digit passcode and press Enter.
The mode is deactivated and the faxes stored in the memory are printed all together.
4 To return to Standby Mode, press Stop/Clear.
Printing Reports
Your machine can print reports containing useful information. The following reports are available:
Phonebook List
This list shows all of the numbers currently stored in the machine’s memory as speed dial and group dial numbers.
You can print this Phonebook list using the Phonebook button; see page 3.8.
Sent Fax Report
This report shows information of the faxes you recently sent.
Received Fax Report
This report shows information of the faxes you recently received.
System Data List
This list shows the status of the user-selectable options. You may print this list to confirm your changes after changing any settings.

ADDITIONAL FEATURES5.4
Scheduled Job Information
This list shows the document currently stored for Delayed faxes or Toll Save faxes. The list shows the starting time and type of operation.
Message Confirmation
This report shows the fax number, the number of pages, the elapsed time of the job, the communication mode, and the communication results.
You can set up your machine to automatically print the message confirmation report after each fax job. See page 1.13.
Junk Fax Number List
This list shows up to 10 fax numbers specified as the junk fax numbers by using the Junk Fax Setup menu; see page 5.6. When the Junk Fax Barrier feature is turned on, incoming faxes from those numbers will be blocked.
This feature recognise the last 6 digits of the fax number set as a remote fax machine’s ID.
Multi-Communication Report
This report is printed automatically after sending documents from more than one location.
Power Failure Report
This report is printed out automatically when power is restored after a power failure, if there occurs any data loss due to the power failure.
NOTE: The lists you have set to print out automatically don’t print out when there is no paper loaded or a paper jam has occurred.
Printing a Report
1 Press Menu until “Reports” appears on the top line of the display. The first available menu item, “Phone Book” displays on the bottom line.
2 Press the scroll button (� or �) to display the report or list you want to print on the bottom line.
• Phone Book: Phonebook list

ADDITIONAL FEATURES 5.5
5
• Sent Report: Sent fax report
• RCV Report: Received fax report
• System Data: System data list
• Scheduled Jobs: Scheduled job information
• MSG Confirm: Message confirmation
• Junk Fax List: Junk fax number list
3 Press Enter.
The selected information prints out.
Using Advanced Fax Settings
Your machine has various user-selectable setting options for sending or receiving faxes. These options are preset at the factory, but you may need to change them. To find out how the options are currently set, print the System Data list. For details about printing the list, see “Printing Reports” on page 5.3.
Changing Setting Options
1 Press Menu until “Advanced Fax” appears on the top line of the display. The first available menu item, “Send Forward,” displays on the bottom line.
2 Press the scroll button (� or �) until you see the desired menu item on the bottom line and press Enter.
3 When the option you want appears on the display, choose the desired status by pressing the scroll button (� or �) or enter the desired value using the number keypad.
4 Press Enter to save the selection.
5 You can exit from the setup mode at any time by pressing Stop/Clear.

ADDITIONAL FEATURES5.6
Advanced Fax Setting Options
Option Description
Send Forward
You can set the machine to always forward all of the outgoing faxes to the specified destination besides the fax numbers you entered.
Select Off to turn this feature off.Select On to turn this feature on. You can set the number of the remote fax machine to which faxes are forwarded.
RCV Forward
You can set your machine to forward incoming faxes to another fax number during a specified time period. When a fax arrives at your machine, it is stored in the memory. Then, the machine dials the fax number that you have specified and sends the fax.
Select Off to turn this feature off.Select On to turn this feature on. You can set the fax number to which faxes are forwarded. Then, you can enter the start time and/or the end time. The Print Local Copy option allows you to set the machine to print the fax, if fax forwarding is completed with no error.
Toll Save
You can set your machine to store your faxes into the memory and send them at the spedified toll-saving time. For details about sending toll save faxes, see page 1.10.
Select Off to turn this feature off.Select On to turn this feature on. You can set the start time and/or the end time for toll save mode.
Junk Fax Setup
Using the Junk Fax Barrier feature, the system will not accept faxes sent from remote stations of which their numbers are stored in the memory as junk fax numbers. This feature is useful for blocking any unwanted fax.
Select Off to turn the feature off. Anybody can send you a fax.Select On to turn the feature on. You can set up to 10 fax numbers as junk fax numbers. After storing numbers, you do not receive any faxes from the registered stations.
Secure Receive
You can keep your received faxes from being accessed by unauthorised people.
For further details about setting this mode, see page 5.2.

ADDITIONAL FEATURES 5.7
5
Using the ControlCentre
Using the ControlCentre, you can set up fax system data options, create and edit Phonebook entries or view information of your machine on the desktop window of your computer.
When you install the Xerox software, the ControlCentre program is automatically installed.
For information about installing the Xerox software, please refer to the MFP User’s Guide.
To open the ControlCentre:
1 Start your Windows.
2 Click the Start button on your desktop computer.
Prefix DialYou can set a prefix dial number of up to five digits. This number dials before any auto dial number is started. It is useful for accessing the PABX exchange.
Stamp RCV Name
This option allows the machine to automatically print the page number, and the date and time of the reception at the bottom of each page of a received document.
Select Off to turn this feature off.Select On to turn this feature on.
ECM Mode
The Error Correction Mode helps with poor line quality and makes sure any fax you send are sent smoothly to any other ECM-equipped fax machine. If the line quality is poor, it takes more time to send a fax when you are using the ECM mode.
Select Off to turn this feature off.Select On to turn this feature on.
Option Description

ADDITIONAL FEATURES5.8
3 From Programs, select Xerox WorkCentre PE16 and then ControlCentre.
Then the ControlCentre program opens.
4 The WorkCentre PE16 ControlCentre window provides five tabs; Settings, Advanced, Phonebook, Information, and Firmware Update.
To exit, click the Exit button at the bottom of each tab.
For further details, click the Help button at the bottom of each tab.
The Settings Tab
Click the Settings tab to configure fax system settings.
Downloads the settings made in ControlCentre to your machine.
Reads the currentsettings in your
machine and refreshesthe ControlCentre with
them.
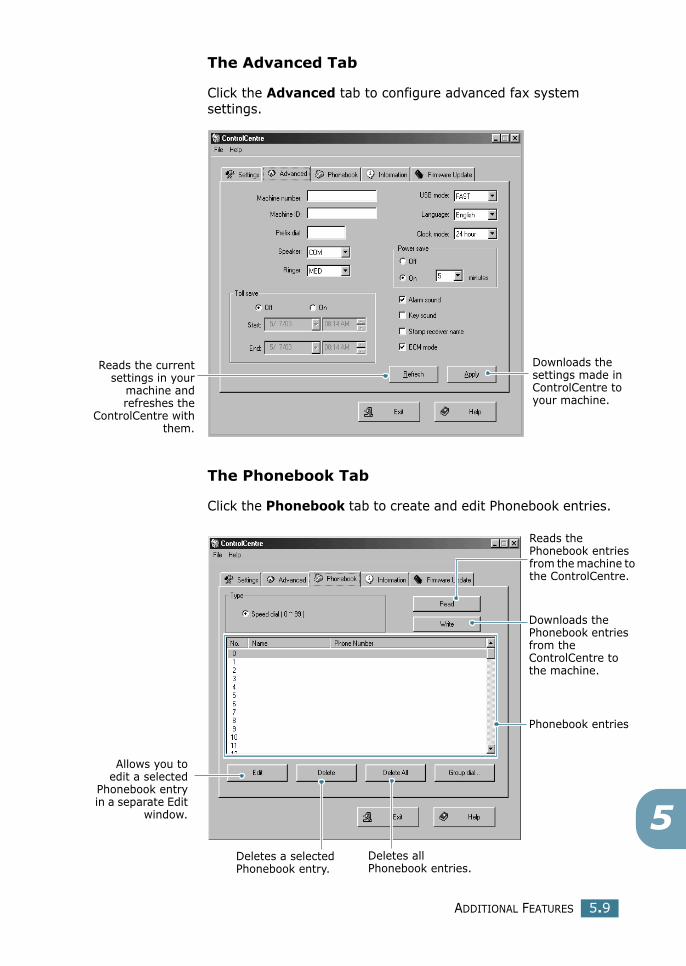
ADDITIONAL FEATURES 5.9
5
The Advanced Tab
Click the Advanced tab to configure advanced fax system settings.
The Phonebook Tab
Click the Phonebook tab to create and edit Phonebook entries.
Reads the currentsettings in your
machine andrefreshes the
ControlCentre withthem.
Downloads the settings made in ControlCentre to your machine.
Reads the Phonebook entries from the machine to the ControlCentre.
Downloads the Phonebook entries from the ControlCentre to the machine.
Phonebook entries
Deletes all Phonebook entries.
Allows you toedit a selected
Phonebook entryin a separate Edit
window.
Deletes a selected Phonebook entry.

ADDITIONAL FEATURES5.10
The Information Tab
Click the Information tab to view the software version information and many counters which allow you to check how many scanning, printing, and jamming are made in your machine.
The Firmware Update Tab
Click the Firmware Update tab to update the firmware of your machine. This feature should be used by an authorised technician. Please consult with the purchase point.
Reads the current information in your machine and refreshes the ControlCentre.

INDEX
Aadd documents 4.7ADF, load 2.2automatic dialling
group 3.4speed 3.2
automatic redialling 2.7
Bbroadcasting faxes 4.2
Ccancelling
fax 2.6scheduled faxes 4.8
characters, enter 1.5contrast, set 1.13control panel 1.2ControlCentre 5.7
Ddate and time, set 1.7delayed fax 4.3document
loadADF 2.2document glass 2.3
prepare 2.2document glass, load 2.3
Ffax system, set
advanced settings 5.5options 1.12
Ggroup dial
dialling 3.6editing 3.5setting 3.4
Mmachine ID, set 1.4
Ppaper, load 2.7print
Phonebook list 3.8reports 5.3
priority fax 4.5
Rreceive a fax
in fax mode 2.8in secure receiving mode 5.2in tel mode 2.8in the memory 2.8
receive mode, set 1.12redial, last number 4.2reports, print 5.3resolution, set 2.4
Ssearch, a number 3.7secure receiving mode, use 5.2send a fax
automatically 2.5manually 2.6
sounds, set 1.8speed dial
dialling 3.3storing 3.2

Ttoll save mode 1.10
Vvolume, adjust
ringer 1.9