word 2013 unit a creating documents with word...
TRANSCRIPT

Word 2013 Unit A
Microsoft® product screenshots used with permission from Microsoft® Corporation.
Creating Documents with Word 2013
Word 2013 Unit A
CASE You have been hired to work in the Marketing Department at Quest Specialty Travel (QST), a tour company that specializes in cultural tourism and adventure
travel. Shortly after reporting to your new office, Ron Dawson, the vice president of marketing, asks you to use Word to create a memo to the marketing staff and a letter to one of the tour hosts.
• Understand word processing software
• Explore the Word window
• Start a document
• Save a document
• Select text
• Format text using the Mini toolbar and the Ribbon
• Use a document template
• Navigate a document
Unit ObjectivesAfter completing this unit, you will be able to:
Files You Will NeedWD A-1.docx
©Tu
many
an/S
hutte
rstoc
k
C8395_UnitA_ptg01_hr_001-024.indd 1 3/4/13 12:14 PM
Propert
y of C
enga
ge Le
arning

Creating Documents with Word 2013Word 2
Word 2013
UNIT A
Learning Outcomes•IdentifythefeaturesofWord
•Statethebenefitsofusingawordprocessingprogram
Understand Word Processing SoftwareA word processing program is a software program that includes tools for entering, editing, andformattingtextandgraphics.MicrosoftWordisapowerfulwordprocessingprogramthatallowsyoutocreateandenhanceawiderangeofdocumentsquicklyandeasily.FigUrE A-1showsthefirstpageofareport created using Word and illustrates some of the Word features you can use to enhance yourdocuments.TheelectronicfilesyoucreateusingWordarecalleddocuments.OneofthebenefitsofusingWordisthatdocumentfilescanbestoredonaharddisk,flashdrive,skydrive,orotherstoragedevice,making them easy to transport, exchange, and revise. CASE Before beginning your memo to the marketing staff, you explore the editing and formatting features available in Word.
You can use Word to accomplish the following tasks:• Typeandedittext
The Word editing tools make it simple to insert and delete text in a document. You can add text to the middle of an existing paragraph, replace text with other text, undo an editing change, and correct typing, spelling, and grammatical errors with ease.
• CopyandmovetextfromonelocationtoanotherUsing the more advanced editing features of Word, you can copy or move text from one location and insert it in a different location in a document. You also can copy and move text between documents. This means you don’t have to retype text that is already entered in a document.
• Formattextandparagraphswithfonts,colors,andotherelementsThe sophisticated formatting tools in Word allow you to make the text in your documents come alive. You can change the size, style, and color of text, add lines and shading to paragraphs, and enhance lists with bullets and numbers. Creatively formatting text helps to highlight important ideas in your documents.
• FormatanddesignpagesThe page-formatting features in Word give you power to design attractive newsletters, create powerful résumés, and produce documents such as research papers, business cards, brochures, and reports. You can change paper size, organize text in columns, and control the layout of text and graphics on each page of a document. For quick results, Word includes preformatted cover pages, pull quotes, and headers and footers, as well as galleries of coordinated text, table, and graphic styles. If you are writing a research paper, Word makes it easy to manage reference sources and create footnotes, endnotes, and bibliographies.
• Enhancedocumentswithtables,charts,graphics,screenshots,andvideosUsing the powerful graphics tools in Word, you can spice up your documents with pictures, videos, photographs, screenshots, lines, shapes, and diagrams. You also can illustrate your documents with tables and charts to help convey your message in a visually interesting way.
• UseMailMergetocreateformlettersandmailinglabelsThe Word Mail Merge feature allows you to send personalized form letters to many different people. You can also use Mail Merge to create mailing labels, directories, e-mail messages, and other types of documents.
• SharedocumentssecurelyThe security features in Word make it quick and easy to remove comments, tracked changes, and unwanted personal information from your files before you share them with others. You can also add a password or a digital signature to a document and convert a file to a format suitable for publishing on the Web.
DEtAilS
C8395_UnitA_ptg01_hr_001-024.indd 2 3/4/13 12:14 PM
Propert
y of C
enga
ge Le
arning

Creating Documents with Word 2013 Word 3
Word 2013
Beforeyoucreateanewdocument,it’sagoodideatospendtimeplanningit.Identifythemessageyouwanttoconvey,theaudienceforyourdocument,andtheelements,suchastablesorcharts,youwanttoinclude.Youshouldalsothinkaboutthetoneandlookofyourdocument—areyouwritingabusinessletter,whichshouldbewritteninapleasant,butserioustoneandhaveaformalappearance,orareyoucreatingaflyerthatmustbecolorful,eye-catching,andfuntoread?Thepurpose
andaudienceforyourdocumentdeterminetheappropriatedesign.Planningthelayoutanddesignofadocumentinvolvesdecidinghowtoorganizethetext,selectingthefontstouse,identifyingthegraphicstoinclude,andselectingtheformat-tingelementsthatwillenhancethemessageandappealofthedocument.Forlongerdocuments,suchasnewsletters,itcanbeusefultosketchthelayoutanddesignofeachpagebeforeyoubegin.
Planning a document
FigUrE A-1: A report created using Word
Add headers to every page
Insert graphics
Format the size and
appearance of text
Create tables
Create columns
of text
Add lines
Create charts
Align text in paragraphs evenly
Add page numbers in footers
Add bullets to lists
C8395_UnitA_ptg01_hr_001-024.indd 3 3/4/13 12:14 PM
Propert
y of C
enga
ge Le
arning
Creating Documents with Word 2013Word 4
Word 2013
UNIT A
Learning Outcomes•IdentifyelementsoftheWordprogramwindow
Explore the Word WindowWhenyoustartWord,theWordstartscreenopens.Itincludesalistofrecentlyopeneddocumentsandagalleryoftemplatesforcreatinganewdocument. CASE You open a blank document and examine the elements of the Word program window.
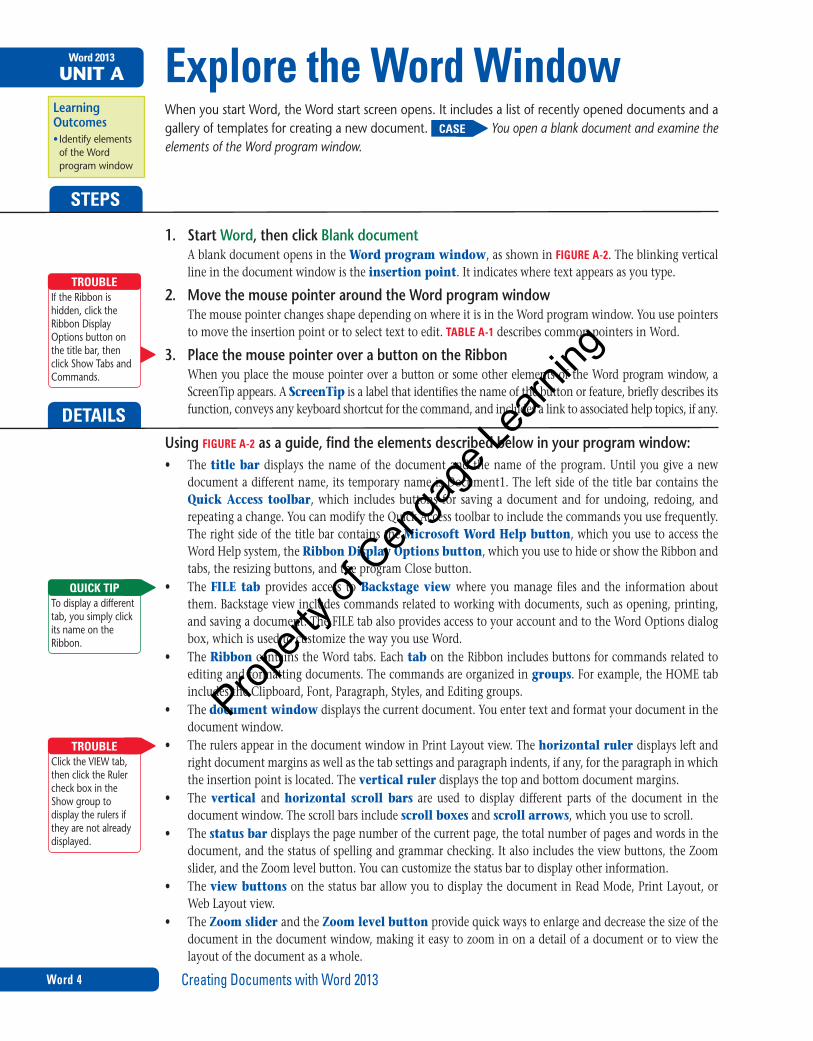
1. StartWord,thenclickBlank documentA blank document opens in the Word program window, as shown in FigUrE A-2. The blinking vertical line in the document window is the insertion point. It indicates where text appears as you type.
2. MovethemousepointeraroundtheWordprogramwindowThe mouse pointer changes shape depending on where it is in the Word program window. You use pointers to move the insertion point or to select text to edit. tAblE A-1describes common pointers in Word.
3. PlacethemousepointeroverabuttonontheRibbonWhen you place the mouse pointer over a button or some other elements of the Word program window, a ScreenTip appears. A ScreenTip is a label that identifies the name of the button or feature, briefly describes its function, conveys any keyboard shortcut for the command, and includes a link to associated help topics, if any.
UsingFigUrE A-2asaguide,findtheelementsdescribedbelowinyourprogramwindow:• Thetitle bar displays the name of the document and the name of the program. Until you give a new
document a different name, its temporary name is Document1. The left side of the title bar contains the Quick Access toolbar, which includes buttons for saving a document and for undoing, redoing, and repeating a change. You can modify the Quick Access toolbar to include the commands you use frequently. The right side of the title bar contains the Microsoft Word Help button, which you use to access the Word Help system, the Ribbon Display Options button, which you use to hide or show the Ribbon and tabs, the resizing buttons, and the program Close button.
• TheFile tab provides access to Backstage view where you manage files and the information about them. Backstage view includes commands related to working with documents, such as opening, printing, and saving a document. The FILE tab also provides access to your account and to the Word Options dialog box, which is used to customize the way you use Word.
• TheRibbon contains the Word tabs. Each tab on the Ribbon includes buttons for commands related to editing and formatting documents. The commands are organized in groups. For example, the HOME tab includes the Clipboard, Font, Paragraph, Styles, and Editing groups.
• Thedocument window displays the current document. You enter text and format your document in the document window.
• TherulersappearinthedocumentwindowinPrintLayoutview.Thehorizontal ruler displays left and right document margins as well as the tab settings and paragraph indents, if any, for the paragraph in which the insertion point is located. The vertical ruler displays the top and bottom document margins.
• Thevertical and horizontal scroll bars are used to display different parts of the document in the document window. The scroll bars include scroll boxes and scroll arrows, which you use to scroll.
• Thestatus bar displays the page number of the current page, the total number of pages and words in the document, and the status of spelling and grammar checking. It also includes the view buttons, the Zoom slider, and the Zoom level button. You can customize the status bar to display other information.
• Theview buttons on the status bar allow you to display the document in Read Mode, Print Layout, or Web Layout view.
• TheZoom slider and the Zoom level button provide quick ways to enlarge and decrease the size of the document in the document window, making it easy to zoom in on a detail of a document or to view the layout of the document as a whole.
StEPS
IftheRibbonishidden,clicktheRibbonDisplayOptionsbuttononthetitlebar,thenclickShowTabsandCommands.
trOUblE
Todisplayadifferenttab,yousimplyclickitsnameontheRibbon.
QUiCK tiP
ClicktheVIeWtab,thenclicktheRulercheckboxintheShowgrouptodisplaytherulersiftheyarenotalreadydisplayed.
trOUblE
DEtAilS
C8395_UnitA_ptg01_hr_001-024.indd 4 3/4/13 12:14 PM
Propert
y of C
enga
ge Le
arning

Creating Documents with Word 2013 Word 5
Word 2013
tAblE A-1: Common mouse pointers in Word
name pointer use to
I-beampointer Movetheinsertionpointinadocumentortoselecttext
ClickandTypepointers,including left-align and center-align
MovetheinsertionpointtoablankareaofadocumentinPrintLayoutorWebLayoutview;double-clickingwithaClickandTypepointerautomaticallyappliestheparagraphformatting(alignmentandindentation)requiredtopositiontextoragraphicatthatlocationinthedocument
Selectionpointer ClickabuttonorotherelementoftheWordprogramwindow;appearswhenyoupointtoelementsoftheWordprogramwindow
Right-pointingarrow pointer
Selectalineorlinesoftext;appearswhenyoupointtotheleftedgeofalineoftextinthedocumentwindow
Hand pointer Openahyperlink;appearswhenyoupointtoahyperlinkinataskpaneorwhenyoupress[Ctrl]andpointtoahyperlinkinadocument
Hide white space pointer
HidethewhitespaceinthetopandbottommarginsofadocumentinPrintLayoutview
Showwhitespace pointer
ShowthewhitespaceinthetopandbottommarginsofadocumentinPrintLayoutview
FigUrE A-2: Elements of the Word program window
Quick Access toolbar
FIle tab
Vertical ruler
Tab
Status bar
Ribbon
Document window
Horizontal ruler
Title bar
Group
Insertion point
Ribbon Display Options button
Microsoft Office Word Help button
Scroll box
I-beam pointer
View buttons Zoom slider Zoom level
Scroll arrowVertical scroll bar
© 2
014
Ceng
age
Lear
ning
C8395_UnitA_ptg01_hr_001-024.indd 5 3/4/13 12:14 PM
Propert
y of C
enga
ge Le
arning
Creating Documents with Word 2013Word 6
Word 2013
UNIT A
Learning Outcomes•Typeandedittext
Start a DocumentYoubeginanewdocumentbysimplytypingtextinablankdocumentinthedocumentwindow.Wordusesword wrap, a featurethatautomaticallymovestheinsertionpointtothenextlineofthedocumentasyoutype.Youonlypress[enter]whenyouwanttostartanewparagraphorinsertablankline. CASE You type a quick memo to the marketing staff.
1.TypeQuestSpecialtyTravel,thenpress[Enter] twiceEach time you press [Enter] the insertion point moves to the start of the next line.
2.TypeTO:,thenpress[Tab]twicePressing [Tab] moves the insertion point several spaces to the right. You can use the [Tab] key to align the text in a memo header or to indent the first line of a paragraph.
3.TypeQSTManagers,thenpress[Enter]The insertion point moves to the start of the next line.
4.Type: FROM:[Tab][Tab]RonDawson[Enter] DATE:[Tab][Tab]March13,2016[Enter] RE:[Tab][Tab]MarketingMeeting[Enter][Enter]
Red or blue wavy lines may appear under the words you typed, indicating a possible spelling or grammar error. Spelling and grammar checking is one of the many automatic features you will encounter as you type. tAblE A-2describes several of these automatic features. You can correct any typing errors you make later.
5.TypeThenextmarketingstaffmeetingwillbeheldonthe17thofMarchat2p.m.inthe conference room on the ground floor.,thenpress[Spacebar]As you type, notice that the insertion point moves automatically to the next line of the document. You also might notice that Word automatically changed “17th” to “17th” in the memo. This feature is called AutoCorrect. AutoCorrect automatically makes typographical adjustments and detects and adjusts typing errors, certain misspelled words (such as “taht” for “that”), and incorrect capitalization as you type.
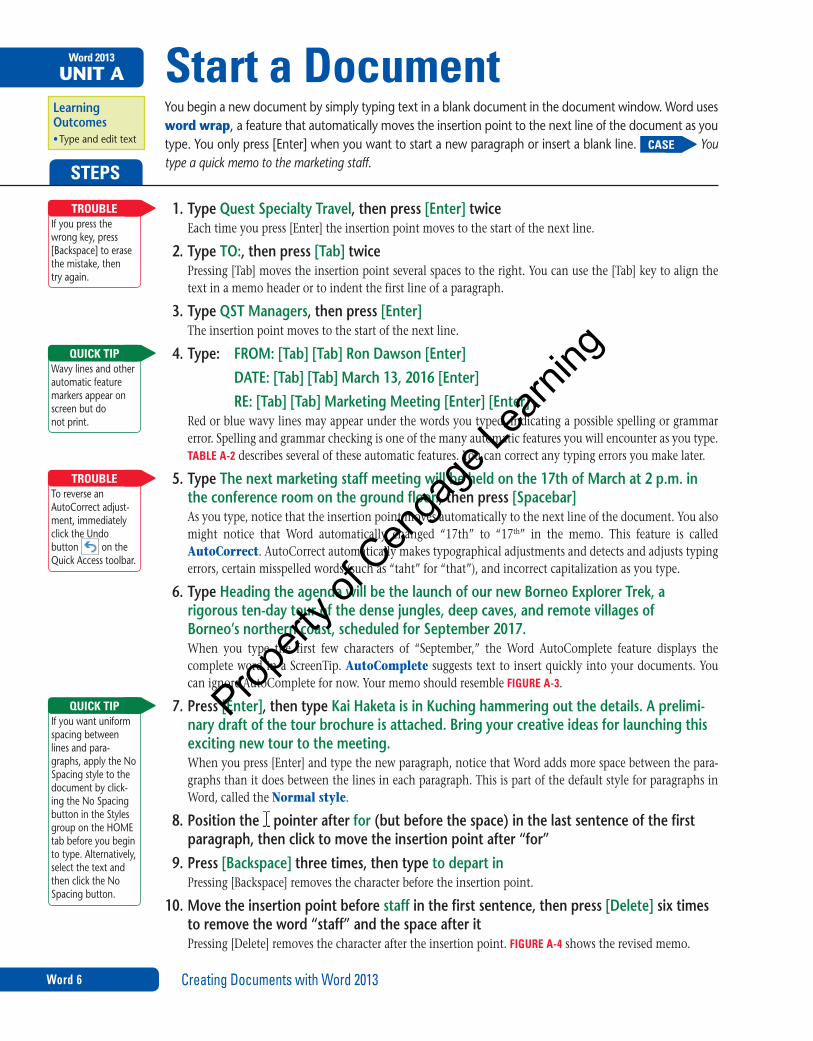
6.TypeHeadingtheagendawillbethelaunchofournewBorneoExplorerTrek,arigorousten-daytourofthedensejungles,deepcaves,andremotevillagesofBorneo’s northerncoast,scheduledforSeptember2017.When you type the first few characters of “September,” the Word AutoComplete feature displays the complete word in a ScreenTip. AutoComplete suggests text to insert quickly into your documents. You can ignore AutoComplete for now. Your memo should resemble FigUrE A-3.
7.Press[Enter],thentypeKaiHaketaisinKuchinghammeringoutthedetails.Aprelimi-narydraftofthetourbrochureisattached.Bringyourcreativeideasforlaunchingthisexcitingnewtourtothemeeting.When you press [Enter] and type the new paragraph, notice that Word adds more space between the para-graphs than it does between the lines in each paragraph. This is part of the default style for paragraphs in Word, called the Normal style.
8. Position the pointer after for(butbeforethespace)inthelastsentenceofthefirstparagraph,thenclicktomovetheinsertionpointafter“for”
9. Press[Backspace]threetimes,thentypeto depart inPressing [Backspace] removes the character before the insertion point.
10.Movetheinsertionpointbeforestaffinthefirstsentence,thenpress [Delete] sixtimestoremovetheword“staff”andthespaceafteritPressing [Delete] removes the character after the insertion point. FigUrE A-4shows the revised memo.
Ifyoupressthewrongkey,press[Backspace]toerasethemistake,thentryagain.
trOUblE
StEPS
Wavylinesandotherautomaticfeaturemarkersappearonscreenbutdonotprint.
QUiCK tiP
ToreverseanAutoCorrectadjust-ment,immediatelyclicktheUndobutton ontheQuickAccesstoolbar.
trOUblE
Ifyouwantuniformspacingbetweenlinesandpara-graphs,applytheNoSpacingstyletothedocumentbyclick-ingtheNoSpacingbuttonintheStylesgroupontheHOMetabbeforeyoubegintotype.Alternatively,selectthetextandthenclicktheNoSpacingbutton.
QUiCK tiP
C8395_UnitA_ptg01_hr_001-024.indd 6 3/4/13 12:14 PM
Propert
y of C
enga
ge Le
arning

Creating Documents with Word 2013 Word 7
Word 2013
tAblE A-2: Automatic features that appear as you type in Word
feature what appears to use
AutoComplete AScreenTipsuggestingtexttoinsertappearsasyoutype
Press[enter]toinsertthetextsuggestedbytheScreenTip;continuetypingtorejectthesuggestion
AutoCorrect Asmallblueboxappearswhenyouplace thepointerovertextcorrectedbyAutoCorrect;anAutoCorrectOptionsbuttonappearswhenyoupointtotheblue box
Wordautomaticallycorrectstypos,minorspellingerrors,andcapitalization,andaddstypographicalsymbols(suchas©and ™)asyoutype;toreverseanAutoCorrectadjustment,clicktheAutoCorrectOptionslistarrow,thenclicktheoptionthatwillundotheaction
SpellingandGrammar Aredwavylineunderawordindicatesapossiblemisspellingorarepeatedword;abluewavylineundertextindicatesapossiblegrammarerror
Right-clickred-orblue-underlinedtexttodisplayashortcutmenuofcorrectionoptions;clickacorrectionoptiontoacceptitandremovethewavyunderline
FigUrE A-3: Memo text in the document window
Memo title
Blank lines between paragraphs
Memo header
Text wraps to the next line (yours might wrap differently)
FigUrE A-4: Edited memo text
Text inserted in the memo
Normal style leaves more space between
paragraphs than between lines
Red, wavy underline indicates a possible spelling error
No Spacing style creates uniform space between lines and paragraphs
© 2
014
Ceng
age
Lear
ning
C8395_UnitA_ptg01_hr_001-024.indd 7 3/4/13 12:14 PM
Propert
y of C
enga
ge Le
arning

Creating Documents with Word 2013Word 8
Word 2013
UNIT A
Learning Outcomes•Saveafileusingadescriptivefilename
•UsetheSaveAsdialogbox
Save a DocumentTostoreadocumentpermanentlysoyoucanopenitandedititatanothertime,youmustsaveitasafile.Whenyousaveadocumentyougiveitaname,calledafilename,andindicatethelocationwhereyouwanttostorethefile.FilescreatedinWord2013areautomaticallyassignedthe.docxfileextensiontodistinguishthemfromfilescreatedinothersoftwareprograms.YoucansaveadocumentusingtheSavebuttonontheQuickAccesstoolbarortheSavecommandontheFILetab.Onceyouhavesavedadocumentforthefirsttime,youshouldsaveitagaineveryfewminutesandalwaysbeforeprintingsothatthesavedfileisupdatedtoreflectyourlatestchanges. CASE You save your memo using a descriptive filename and the default file extension.
1. ClicktheSavebutton ontheQuickAccesstoolbarThe first time you save a document, the Save As screen opens. The screen displays all the places you can save a file to, including SkyDrive, your computer, or a different location.
2. ClickComputerintheSaveAsscreen,thenclickBrowseThe Save As dialog box opens, as shown in FigUrE A-5.The default filename, Quest Specialty Travel, appears in the File name text box. The default filename is based on the first few words of the document. The default file type, Word Document, appears in the Save as type list box. tAblE A-3describes the functions of some of the buttons in the Save As dialog box.
3. TypeWDA-BorneoTourMemointheFilenametextboxThe new filename replaces the default filename. Giving your documents brief descriptive filenames makes it easier to locate and organize them later. You do not need to type .docx when you type a new filename.
4. NavigatetothelocationwhereyoustoreyourDataFilesYou can navigate to a different drive or folder in several ways. For example, you can click a drive or folder in the Address bar or the navigation pane to go directly to that location. Click the double arrow in the Address bar to display a list of drives and folders. You can also double-click a drive or folder in the folder window to change the active location. When you are finished navigating to the drive or folder where you store your Data Files, that location appears in the Address bar. Your Save As dialog box should resemble FigUrE A-6.
5. ClickSaveThe document is saved to the drive and folder you specified in the Save As dialog box, and the title bar displays the new filename, WD A-Borneo Tour Memo.docx.
6. Placetheinsertionpointbeforeconference inthefirstsentence,typelarge,thenpress[Spacebar]You can continue to work on a document after you have saved it with a new filename.
7. ClickYour change to the memo is saved. After you save a document for the first time, you must continue to save the changes you make to the document. You also can press [Ctrl][S] to save a document.
StEPS
Ifyoudon’tseetheextension.docxaspartofthefilename,thesettinginWindowstodisplayfileextensionsisnotactive.
trOUblE
MicrosoftSkyDriveisafreefilehostingservicethatallowsyoutosaveandsyncfilestoa“cloud”andthenaccessthemfromanycomputerthatisconnectedtotheInternet.ThefilesyousavetoMicrosoftSkyDriveareavailableonlytothepeopleyougrantaccess,andeveryfileyoustoreonMicrosoftSkyDriveisautomati-callysyncedsothatyoucangetthemostup-to-dateversionofyourfilesfromanycomputer.WhenyouopenafilethatisstoredonMicrosoftSkyDrive,thefileopensinitscorrespondingOffice
WebApp,whichisasimplifiedversionofWord,excel,PowerPoint,orOneNote.OfficeWebAppsopenwithintheWebbrowser.Becausetheseprogramsareonline,theytakeupnocomputerdiskspace.UsingOfficeWebApps,userscanupload,create,edit,andshareMicrosoftOfficedocumentsdirectlywithinaWebbrowser.YouareconnectedtoSkyDrivewhenyoulogintoyourcomputerusingyourWindowsaccount.Youcanfindmoreinformationinthe“WorkingintheCloud”appendix.
MicrosoftSkyDriveandMicrosoftOfficeWebApps
C8395_UnitA_ptg01_hr_001-024.indd 8 3/4/13 12:14 PM
Propert
y of C
enga
ge Le
arning

Creating Documents with Word 2013 Word 9
Word 2013
tAblE A-3: Save As dialog box buttons
button use to
Back NavigatebacktothelastlocationshownintheAddressbar
Forward NavigatetothelocationthatwaspreviouslyshownintheAddressbar
Upto Navigatetothelocationabovethecurrentlocationinthefolderhierarchy(Windows8only)
Organize Openamenuofcommandsrelatedtoorganizingtheselectedfileorfolder,includingCut,Copy,Delete,Rename,andProperties
New folder Createanewfolderinthecurrentfolderordrive
Changeyourview ChangethewayfolderandfileinformationisshowninthefolderwindowintheSaveAsdialogbox;clicktheChangeyourviewbuttontotogglebetweenviews,orclickthelistarrowtoopenamenuofviewoptions
FigUrE A-6: File to be saved to the Unit A folder
Your dialog box might list the files and folders in the active drive or folder here
location of Data Files (yours might
differ)
New filename
FigUrE A-5: Save As dialog box
Click to create a new folder in the active
folder or drive
Active folder or drive
Default filename and file extension are selected
Folders and files in the active
folder or drive (yours will differ)
Click to change the file type
© 2
014
Ceng
age
Lear
ning
C8395_UnitA_ptg01_hr_001-024.indd 9 3/4/13 12:14 PM
Propert
y of C
enga
ge Le
arning

Creating Documents with Word 2013Word 10
Word 2013
UNIT A
Learning Outcomes•Selecttextusingthemouse
•Useformattingmarks
Select textBeforedeleting,editing,orformattingtext,youmustselectthetext.SelectingtextinvolvesclickinganddraggingtheI-beampointeracrossthetexttohighlightit.Youalsocanclickinthemargintotheleftoftextwiththe pointertoselectwholelinesorparagraphs.tAblE A-4describesthemanywaystoselecttext. CASE You revise the memo by selecting text and replacing it with new text.
1. ClicktheShow/Hide¶button in the Paragraph groupFormatting marks appear in the document window. Formatting marks are special characters that appear on your screen but do not print. Common formatting marks include the paragraph symbol (¶), which shows the end of a paragraph—wherever you press [Enter]; the dot symbol (·), which represents a space—wherever you press [Spacebar]; and the arrow symbol (S), which shows the location of a tab stop—wher-ever you press [Tab]. Working with formatting marks turned on can help you to select, edit, and format text with precision.
2. ClickbeforeQSTManagers,thendragthe pointeroverthetexttoselectitThe words are selected, as shown in FigUrE A-7.For now, you can ignore the faint toolbar that appears over text when you first select it.
3. TypeMarketingStaffThe text you type replaces the selected text.
4. Double-clickRon,typeyourfirstname,double-clickDawson,thentypeyourlastnameDouble-clicking a word selects the entire word.
5. PlacethepointerinthemargintotheleftoftheRE:linesothatthepointerchangesto ,clicktoselecttheline,thentypeRE:[Tab][Tab]LaunchofnewBorneotrekkingtourClicking to the left of a line of text with the pointer selects the entire line.
6. Selectdeep inthethirdlineofthefirstparagraph,typemysterious,selectremote villages,thentypesun-kissedbeaches
7. SelectthesentenceKai Haketa is in Kuching hammering out the details. in the second paragraph,thenpress[Delete]Selecting text and pressing [Delete] removes the text from the document.
8. Click ,thenclicktheSavebutton ontheQuickAccesstoolbarFormatting marks are turned off, and your changes to the memo are saved. The Show/Hide ¶ button is a toggle button, which means you can use it to turn formatting marks on and off. The edited memo is shown in FigUrE A-8.
StEPS
Youdeselecttextbyclickinganywherein thedocumentwindow.
QUiCK tiP
Ifyoudeletetextbymistake,immediatelyclicktheUndobuttonontheQuickAccesstoolbartorestorethedeletedtexttothedocument.
trOUblE
Alwayssavebeforeandaftereditingtext.
QUiCK tiP
C8395_UnitA_ptg01_hr_001-024.indd 10 3/4/13 12:14 PM
Propert
y of C
enga
ge Le
arning

Creating Documents with Word 2013 Word 11
Word 2013
tAblE A-4: Methods for selecting text
to select use the pointer to
Anyamountoftext Dragoverthetext
Aword Double-clicktheword
Alineoftext Movethepointertotheleftoftheline,thenclick
Asentence Pressandhold[Ctrl],thenclickthesentence
Aparagraph Triple-clicktheparagraphordouble-clickwiththepointertotheleftoftheparagraph
Alargeblockoftext Clickatthebeginningoftheselection,pressandhold[Shift],thenclickattheendoftheselection
Multiplenonconsecutiveselections Selectthefirstselection,thenpressandhold[Ctrl]asyouselecteachadditionalselection
Anentiredocument Triple-clickwiththepointertotheleftofanytext;press[Ctrl][A];orclicktheSelectbuttonintheeditinggroupontheHOMetab,andthenclickSelectAll
FigUrE A-8: Edited memo with replacement text
Replacement text
FigUrE A-7: Text selected in the memo
Selected text
left document margin
© 2
014
Ceng
age
Lear
ning
C8395_UnitA_ptg01_hr_001-024.indd 11 3/4/13 12:14 PM
Propert
y of C
enga
ge Le
arning

Creating Documents with Word 2013Word 12
Word 2013
UNIT A
Learning Outcomes•Applyboldtotext•Increasethefontsizeoftext
•Printadocument
Format text Using the Mini toolbar and the ribbonFormattingtextisafastandfunwaytospruceuptheappearanceofadocumentandhighlightimportantinformation.Youcaneasilychangethefont,color,size,style,andotherattributesoftextbyselectingthetextandclickingacommandontheHOMetab.TheMini toolbar,whichappearsabovetextwhenyoufirstselectit,alsoincludescommonlyusedtextandparagraphformattingcommands. CASE You enhance the appearance of the memo by formatting the text using the Mini toolbar. When you are finished, you preview the memo for errors and then print it.
1. SelectQuestSpecialtyTravel The Mini toolbar appears over the selected text, as shown in FigUrE A-9. You click a formatting option on the Mini toolbar to apply it to the selected text. tAblE A-5 describes the function of the buttons on the Mini toolbar. The buttons on the Mini toolbar are also available on the Ribbon.
2. ClicktheIncreaseFontSizebutton ontheMinitoolbarsixtimes,thenclicktheBold button ontheMinitoolbarEach time you click the Grow Font button the selected text is enlarged. Applying bold to the text makes it thicker.
3. ClicktheCenterbuttonintheParagraphgroupontheHOMEtabThe selected text is centered between the left and right margins.
4. SelectTO:,click ,selectFROM:,click ,selectDATE:,click ,selectRE:,thenclickBold is applied to the memo header labels.
5. ClicktheblanklinebetweentheRE:lineandthebodytext,thenclicktheBottom Borderbutton in the Paragraph groupA single-line border is added between the heading and the body text in the memo.
6. Savethedocument,clicktheFILEtab,thenclickPrintInformation related to printing the document appears on the Print screen in Backstage view. Options for printing the document appear on the left side of the Print screen and a preview of the document as it will look when printed appears on the right side, as shown in FigUrE A-10. Before you print a document, it’s a good habit to examine it closely so you can identify and correct any problems.
7. ClicktheZoomInbutton onthestatusbarfivetimes,thenproofreadyourdocumentcarefullyforerrorsThe document is enlarged in print preview. If you notice errors in your document, you need to correct them before you print. To do this, press [Esc] or click the Back button in Backstage view, correct any mistakes, save your changes, click the FILE tab, and then click the Print command again to be ready to print the document.
8. ClickthePrintbutton on the Print screenA copy of the memo prints using the default print settings. To change the current printer, change the num-ber of copies to print, select what pages of a document to print, or modify another print setting, you simply change the appropriate setting on the Print screen before clicking the Print button.
9. ClicktheFILEtab,thenclickCloseThe document closes, but the Word program window remains open.
StEPS
IftheMinitoolbardisappears,right-clicktheselectiontodisplayitagain.
trOUblE
ClicktheDecreaseFontSizebuttontodecreasethefontsize.
QUiCK tiP
YoucancustomizeyourQuickAccesstoolbartoincludetheQuickPrintbut-ton,whichprintsadocumentusingthedefaultprintsettings.
QUiCK tiP
C8395_UnitA_ptg01_hr_001-024.indd 12 3/4/13 12:14 PM
Propert
y of C
enga
ge Le
arning

Creating Documents with Word 2013 Word 13
Word 2013
tAblE A-5: Buttons on the Mini toolbar
button use to button use to
Changethefontoftext Applyboldtotext
Changethefontsizeoftext Italicizetext
Maketextlarger Underlinetext
Maketextsmaller Applycoloredhighlightingtotext
Copytheformatsappliedtoselectedtexttoothertext
Changethecoloroftext
Applyastyletotext Applybulletstoparagraphs
Applynumberingtoparagraphs
FigUrE A-10: Preview of the completed memo
Print command
Options for changing the default print
settings
Text is bold
Bottom border added between heading and body text
Text is enlarged, bold, and centered
Preview of how document will look when printed
FigUrE A-9: Mini toolbar
Bottom Border buttonCenter button
Mini toolbar
Bold button on Ribbon and Mini toolbar
© 2
014
Ceng
age
Lear
ning
C8395_UnitA_ptg01_hr_001-024.indd 13 3/4/13 12:14 PM
Propert
y of C
enga
ge Le
arning

Creating Documents with Word 2013Word 14
Word 2013
UNIT A
Learning Outcomes•Searchfortemplates
•Customizeatemplate
•Usecontentcontrols
Use a Document templateWordincludesmanytemplatesthatyoucanusetocreateletters,reports,brochures,calendars,andotherprofessionallydesigneddocumentsquickly.Atemplate is a formatteddocument thatcontainsplace-holdertextandgraphics,whichyoureplacewithyourowntextandgraphics.Tocreateadocumentthatisbasedonatemplate,youusetheNewcommandontheFILetabinBackstageview,andthenselectatemplatetouse.Youcanthencustomizethedocumentandsaveitwithanewfilename. CASE You use a template to create a cover letter for a contract you will send to the Rainforest Hotel in Kuching.
1. ClicktheFILEtab,thenclickNewThe New screen opens in Backstage view, as shown in FigUrE A-11. You can select a template from this win-dow, or search for other templates.
2. ClickLetters intheSuggestedSearchessectionA gallery of letter templates opens in the New screen.
3. ScrolldownuntilyoufindtheCoverLetter(aligned)thumbnailontheNewscreen,clickit,previewthetemplateinthepreviewwindowthatopens,thenclickCreateThe Cover Letter (aligned) template opens as a new document in the document window. It contains place-holder text, which you can replace with your own information.
4. ClicktheRibbonDisplayOptionsbuttononthetitlebariftheRibbonisnotdisplayed,click ShowTabsandCommands,thenclick[Clicktoselectadate]in the documentThe placeholder text is selected and appears inside a content control. A content control is an interactive object that you use to customize a document with your own information. A content control might include placeholder text, a drop-down list of choices, or a calendar.
5. Clickthe[Clicktoselectadate]listarrowA calendar opens below the content control. You use the calendar to select the date you want to appear on your document—simply click a date on the calendar to enter that date in the document.
6. ClicktheTodaybutton on the calendarThe current date replaces the placeholder text.
7. Click[RecipientName],typeMs.YanaRoy, click [Title],typeManager,click[CompanyName],typeRainforestHotel, click [StreetAddress],typeP.O.Box4397,click[City,ST ZipCode],thentypeKuching93100,MalaysiaYou do not need to drag to select the placeholder text in a content control, you can simply click it. The text you type replaces the placeholder text.
8. Click[Recipient],typeMs.Roy,clickthebodytext placeholdertext,thentypeEnclosedpleasefindacopyofourcontractfortheBorneoExplorerTrektour.Welookforwardto workingwithyou. The text you type replaces the placeholder text in the greeting line and in the body text of the letter.
9. Ifthenameinthesignatureblockisnotyourname,dragtoselectthetext,thentypeyourname,asshowninFigUrE A-12
When the document is created, Word automatically enters the user name identified in the Word Options dialog box in the signature block and in the content control in the upper-left corner of the page. This text is not placeholder text, so you have to drag to select it.
StEPS
YoumusthaveanactiveInternetcon-nectiontosearchfortemplates.
QUiCK tiP
Templateschangeovertime.Ifthistem-plateisnotavailable,selectanotherCoverLettertemplateorjustreadthestepstounderstandhowtoworkwithtemplates.
trOUblE
Youcandeleteanycontentcontrolbyright-clickingit,andthenclickingRemoveContentControlonthemenuthatopens.
QUiCK tiP
10. ClicktheFILEtab,clickSaveAs,thensavethedocumentasWDA-RainforestLetter to thelocationwhereyoustoreyourDataFilesThe document is saved with the filename WD A-Rainforest Letter.
C8395_UnitA_ptg01_hr_001-024.indd 14 3/4/13 12:14 PM
Propert
y of C
enga
ge Le
arning

Creating Documents with Word 2013 Word 15
Word 2013
Wordrememberstheeditingandformattingchangesyoumakesothatyoucaneasilyreverseorrepeatthem.YoucanreversethelastactionyoutookbyclickingtheUndobutton ontheQuickAccesstoolbar,oryoucanundoaseriesofactionsbyclickingtheUndolistarrow andselectingtheactionyouwanttoreverse.WhenyouundoanactionusingtheUndolistarrow,youalsoundoalltheactionsaboveitinthelist—thatis,allactionsthatwereperformedaftertheactionyouselected.Similarly,youcankeepthechangeyoujustreversedbyusingtheRedobutton onthe
QuickAccesstoolbar.TheRedobuttonappearsonlyimmediatelyafterclickingtheUndobuttontoundoachange.
Ifyouwanttorepeatanactionyoujustcompleted,youcanusetheRepeatbutton ontheQuickAccesstoolbar.Forexample,ifyoujusttyped“thankyou,”clicking inserts“thankyou”atthelocationoftheinsertionpoint.Ifyoujustappliedbold,clicking appliesboldtothecurrentlyselectedtext.Youalsocanrepeatthelastactionyoutookbypressing[F4].
UsingtheUndo,Redo,andRepeatcommands
FigUrE A-11: New screen in Backstage view
Click to open an existing document
Types of templates a vailable with an
Internet connection
Click to create a new blank document
Search for a templateYour templates may differ
FigUrE A-12: Document created using the Cover Letter (aligned) template
Placeholder text is replaced with customized text
C8395_UnitA_ptg01_hr_001-024.indd 15 3/4/13 12:14 PM
Propert
y of C
enga
ge Le
arning
Creating Documents with Word 2013Word 16
Word 2013
UNIT A
Learning Outcomes•Removeacontentcontrol
•Zoomandscrolladocument
•UseWorddocumentviews
Navigate a DocumentTheWordZoomfeatureletsyouenlargeadocumentinthedocumentwindowtogetaclose-upviewofadetailorreducethesizeofthedocument inthedocumentwindowforanoverviewofthe layoutasawhole.YouzoominandoutonadocumentusingthetoolsintheZoomgroupontheVIeWtaboryoucanusetheZoomlevelbuttonsandZoomslideronthestatusbar. CASE You find it is helpful to zoom in and out on the document as you finalize the letter.
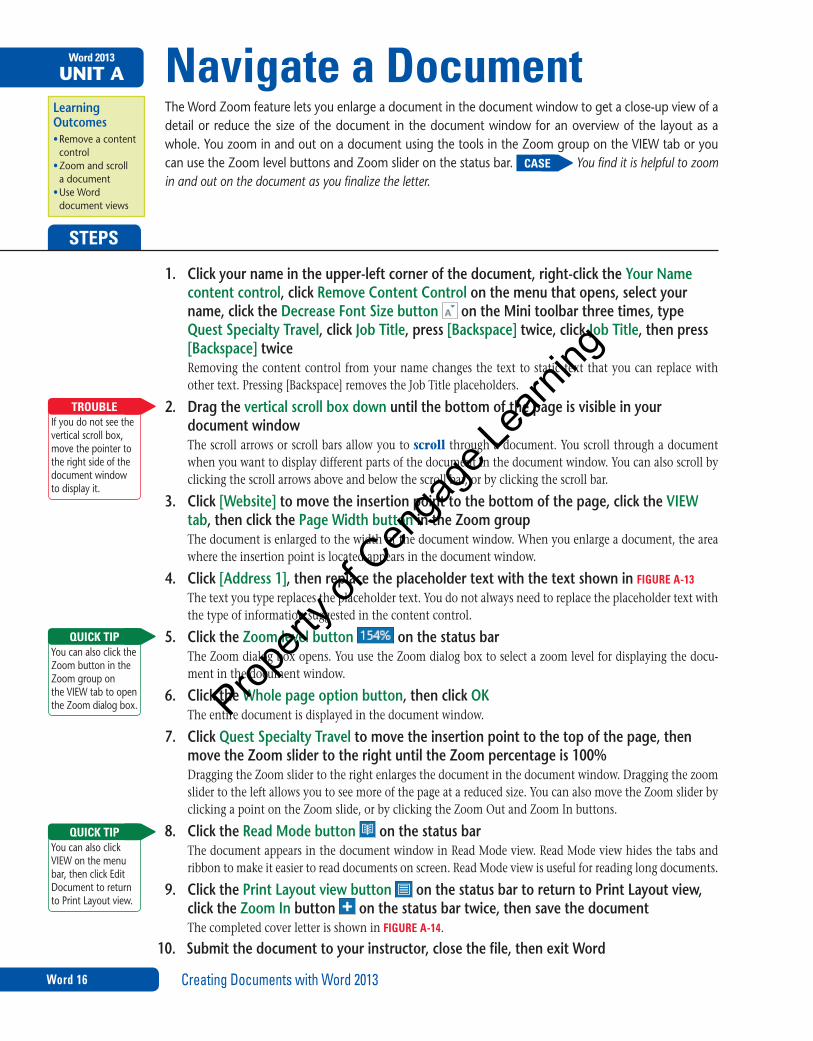
1. Clickyournameintheupper-leftcornerofthedocument,right-clicktheYour Name content control,clickRemoveContentControlonthemenuthatopens,selectyourname,clicktheDecreaseFontSizebutton ontheMinitoolbarthreetimes,typeQuestSpecialtyTravel,clickJobTitle,press[Backspace]twice,clickJobTitle,thenpress[Backspace] twiceRemoving the content control from your name changes the text to static text that you can replace with other text. Pressing [Backspace] removes the Job Title placeholders.
2. Dragthevertical scrollboxdownuntilthebottomofthepageisvisibleinyourd ocument window The scroll arrows or scroll bars allow you to scroll through a document. You scroll through a document when you want to display different parts of the document in the document window. You can also scroll by clicking the scroll arrows above and below the scroll bar, or by clicking the scroll bar.
3. Click[Website]tomovetheinsertionpointtothebottomofthepage,clicktheVIEW tab,thenclickthePageWidthbutton in the Zoom groupThe document is enlarged to the width of the document window. When you enlarge a document, the area where the insertion point is located appears in the document window.
4. Click[Address1],thenreplacetheplaceholdertextwiththetextshowninFigUrE A-13The text you type replaces the placeholder text. You do not always need to replace the placeholder text with the type of information suggested in the content control.
5. ClicktheZoomlevelbutton onthestatusbarThe Zoom dialog box opens. You use the Zoom dialog box to select a zoom level for displaying the docu-ment in the document window.
6. ClicktheWholepageoptionbutton,thenclickOKThe entire document is displayed in the document window.
7. ClickQuestSpecialtyTraveltomovetheinsertionpointtothetopofthepage,thenmovetheZoomslidertotherightuntiltheZoompercentageis100%Dragging the Zoom slider to the right enlarges the document in the document window. Dragging the zoom slider to the left allows you to see more of the page at a reduced size. You can also move the Zoom slider by clicking a point on the Zoom slide, or by clicking the Zoom Out and Zoom In buttons.
8. ClicktheReadModebutton onthestatusbarThe document appears in the document window in Read Mode view. Read Mode view hides the tabs and ribbon to make it easier to read documents on screen. Read Mode view is useful for reading long documents.
9. ClickthePrintLayoutviewbutton onthestatusbartoreturntoPrintLayoutview,click the Zoom In button onthestatusbartwice,thensavethedocumentThe completed cover letter is shown in FigUrE A-14.
StEPS
Ifyoudonotseetheverticalscrollbox,movethepointertotherightsideofthedocumentwindowtodisplayit.
trOUblE
YoucanalsoclicktheZoombuttonintheZoomgroupontheVIeWtabtoopentheZoomdialogbox.
QUiCK tiP
YoucanalsoclickVIeWonthemenubar,thenclickeditDocumenttoreturntoPrintLayoutview.
QUiCK tiP
10. Submitthedocumenttoyourinstructor,closethefile,thenexitWord
C8395_UnitA_ptg01_hr_001-024.indd 16 3/4/13 12:14 PM
Propert
y of C
enga
ge Le
arning

Creating Documents with Word 2013 Word 17
Word 2013
FigUrE A-14: Completed letter
FigUrE A-13: Zoom slider
Document viewsaredifferentwaysofdisplayingadocumentinthedocumentwindow.eachWordviewprovidesfeaturesthatareusefulforworkingondifferenttypesofdocuments.Thedefaultview,Print Layout view,displaysadocumentasitwilllookonaprintedpage.PrintLayoutviewishelpfulforformat-tingtextandpages,includingadjustingdocumentmargins,creatingcolumnsoftext,insertinggraphics,andformattingheadersandfooters.AlsousefulisRead Mode view,whichdisplaysdocumenttextsothatitiseasytoreadonscreen.OtherWordviewsarehelpfulforperformingspecializedtasks. Web Layout viewallowsyoutoformatWebpagesordocumentsthatwillbeviewedonacomputerscreen.InWeb
Layoutview,adocumentappearsjustasitwillwhenviewedwithaWebbrowser.Outline viewisusefulforeditingandformattinglongerdocumentsthatincludemultipleheadings.Outlineviewallowsyoutoreorganizetextbymovingtheheadings.Finally,Draft view,showsasimplifiedlayoutofadocument,withoutmargins,headersandfooters,orgraphics.Whenyouwanttoquicklytypeandedittext,it’softeneasiesttoworkinDraftview.YouswitchbetweenviewsbyclickingtheviewbuttonsonthestatusbarorbyusingthecommandsontheVIeWtab.Changingviewsdoesnotaffecthowtheprinteddocumentwillappear.Itsimplychangesthewayyouviewthedocumentinthedocumentwindow.
UsingWorddocumentviews
Replace placeholder text with this text Zoom slider
at 154%Zoom level button at 154%
C8395_UnitA_ptg01_hr_001-024.indd 17 3/4/13 12:14 PM
Propert
y of C
enga
ge Le
arning