wireless n megapixel network camera f3101/3106
TRANSCRIPT

Wireless N Megapixel Network Camera F3101/3106
86085L1000020

Package Contents
Camera – F3101/3106 Network Camera Quick Installation Guide – To provide brief product information and quick installation and wireless setting. Software CD – Free bundled IP surveillance software, Intelligent IP Installer, user manual and language packs. Ethernet cable – Assist to setup your IP Camera. Mounting Bracket – There are three components including lock ring, brace, and base plate to compose a bracket and three applied screws to fix the base plate to a flat surface. (horizontal or vertical) Adaptor – 12V DC, max 12W

Package Contents
a. Wall mounting and Ceiling mounting 1. Use the 3 supplied screws to fix the base plate to a flat surface. 2. Loosen the lock ring to adjust the desired angle of the camera. 3. Tighten the lock ring. b. Connect cables and power supply b1. Wire Connection 1. Connect the power adaptor to the IP Camera. 2. Use a standard RJ-45 network cable to connect the IP Camera to the Network connection b2. Wireless Connection (F3105) 1. Connect power adaptor to the IP Camera. 2. Connect to Wi-Fi.

User Interface
Power on your PC and insert the CD-ROM. The setup page will show up automatically. Please follow these steps to install the firmware. Select “Intelligent IP Installer” and follow the installation process to complete the installation.
1. Before using Intelligent IP Installer, please check two settings.
a. Browser’s Internet Properties → Security → Default Level
b. Browser’s Internet Properties → Privacy → Uncheck Pop-up Blocker

User Interface
2. Click the Intelligent IP Installer Icon on your desktop. The main page will show up listing all active camera and video server devices. Select the relevant IP camera from the list and click Link to IE.
3. Enter your Username and Password to login to the IP Camera. (Default is admin / admin)
4. When accessing the IP Camera for the first time, a yellow information bar appears below the address bar: This website wants to install the following add-on: ‘AxvideoView.cab from ‘Zavio Inc’.
5. Click the information bar, and select Install ActiveX control.

User Interface
6. Click Install. 7. Live video displays in the centre of your web browser.
1. Select Safari icon
2. Click Bonjour function and select the camera you wish to access.

User Interface 3. Enter name and password to login to the IP camera. (Default is admin/admin)
The default setting of lighting environment is Auto. However, you may also select 50 or 60 Hz upon the lighting environment of your country. Go to“Setting → Basic → Camera → Advanced”, choose the environment setting you wish.
Use the settings screen to set the language of the Web Interface. Go to “Setting → Basic → System → Language”. 1. Insert Software CD into your CD-ROM. 2. Browse and select the preferred language from language pack in the Software CD and then click OK. 3. The web interface will change into your preferred language.
4. The monitor image will be displayed in your browser.

User Interface
1. Using IP Camera via iPhone Select Safari function → Enter IP address in the web link → enter username and password (default value admin/admin) → The Zavio user interface and Live Image will show up in the middle of the screen.
2. Mobile phone viewing a. 3G Mobile Phone Streaming Viewing For 3G mobile phone viewing, please type “ rtsp://<IP>:<PORT>/video.3gp ” into your 3G web media player. <IP> is the IP address of your IP camera; <PORT> is the RTSP port of your IP camera (Default value is 554.) Example: rtsp://100.10.10.1:554/video.3gp b. 2.5G Mobile Phone Viewing b1. WAP viewing For 2.5G WAP mobile phone viewing, type “ http://<IP>/mobile.wml ” into your 2.5G web browser. b2. Browser viewing For 2.5G mobile phone browser viewing, type “http:// <IP>/mobile.htm ” into your 2.5G web browser.
a. Internet connectivity of the IP camera can be established by inputting the cameras IP information within the Information section. (Please go to Setting → Basic → Network→ Information)

User Interface
b. Internet Connectivity of the IP Camera can be established through PPPoE (Point-to-Point Protocol over the Ethernet) by inputting the username and password from your Internet Service Provider (ISP) within the PPPoE section. (Please go to Setting → Basic → Network→ PPPoE) Note 1: Please reboot the IP Camera, after changing the PPPoE settings. Note 2: Please turn on the DDNS and IP Notification function when using the PPPoE function. c. Internet Connectivity of the IP Camera can be established if your router is UPnP(Universal Plug and Play) enabled. The IP camera is automatically detected and added to “My Network Places” on your computer. Please note that only Home Routers manufactured after 2006 support the UPnP function. c1. If your router is a UPnP Internet Gateway Device (IGD), turn on the UPnP function within the UPnP section. (Please go Setting →Basic
→Network → UPnP) Note: If you turn on the UPnP Port Forwarding function, RTSP (Real Time Streaming Protocol) Port information will change to the illustrated value below.
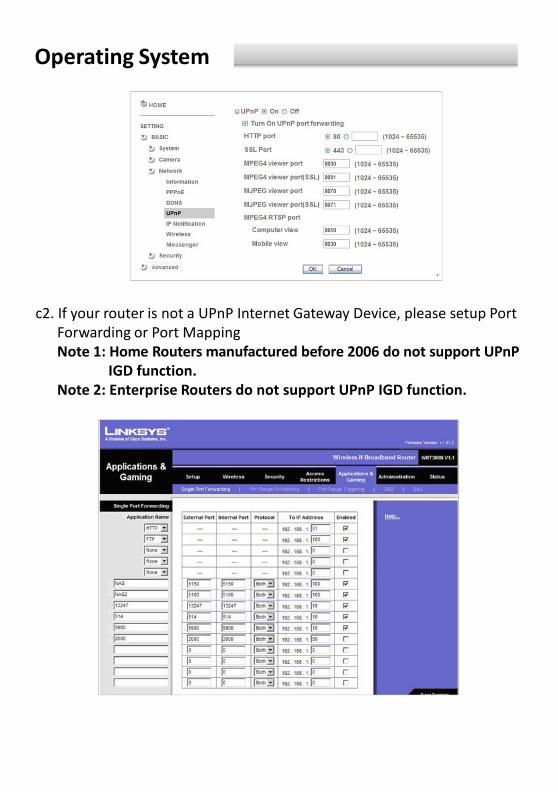
Operating System
c2. If your router is not a UPnP Internet Gateway Device, please setup Port Forwarding or Port Mapping Note 1: Home Routers manufactured before 2006 do not support UPnP IGD function. Note 2: Enterprise Routers do not support UPnP IGD function.
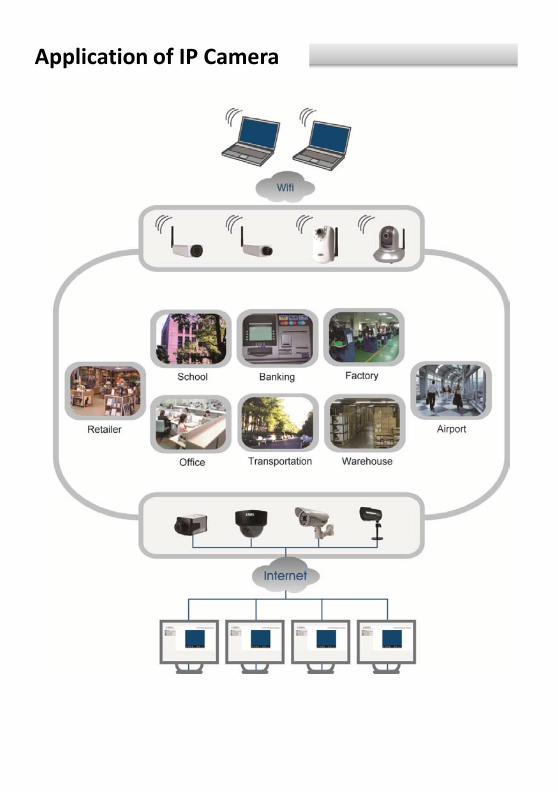
Application of IP Camera

FAQ
1. How can we benefit from this service? This service completely eliminates the needs for advanced network know-how to setup and allows you remote access your camera via desktop PC, laptop and mobile device including iPhone and BlackBerry. Just plug in, run the quick wizard, and in minutes you will be able to view and manage the camera from anywhere in the world. It's that easy. With this service, you can: a). Check camera status b). Remotely configure camera settings. c). Intelligent surveillance of multiple IP-Cams and up 9-CH live view via web browser. 2. How to get more information about the feature keys from
this service? Please login then click 3. How do I register for account? If you are a first-time user and have never created accounts, please use the Wizard CD and it will guide you to register your own account step by step. 4. Which web browsers can I use to login? For PC client, this service so far only supports Microsoft Internet Explorer 7 or higher with ActiveX support and please make sure that your computer's antivirus software does not block ActiveX controls. Browsers such as Firefox, Google those are not supported this service at this time. 5. How to login via mobile device? You can remotely access your camera via WiFi and 3G mobile device. Please add "/mobile" after the URL to use mobile service which is compatible with the following OS and browser of mobile device:
Mobile OS Mobile browser
Windows Mobile Opera 10 mobile
Android OS Embedded web kit
Android OS Dolphin Browser
iPhone OS Safari

MEMO
………………………………………………………………………………………………………………………………………………………………………………………………………………………………………………………………………………………………………………………………………………………………………………………………………………………………………… ………………………………………………………………………………………………………………………………………………………………………………………………………………………………………………………………………………………………………………………………………………………………………………………………………………………………………… ………………………………………………………………………………………………………………………………………………………………………………………………………………………………………………………………………………………………………………………………………………………………………………………………………………………………………… ……………………………………………………………………………………………………………………………………………………………………………………………………………………………………………………………………………………………………………………………………………………