wireless home lighting control - lutron electronics ra-svc.pdf · ra-svc, rb-svc 12 v 50 / 60 hz...
TRANSCRIPT

RA-SVC, RB-SVC12 V 50 / 60 Hz 100 mA
Setup and Installation Guide For aRadioRA® Sivoia QEDTM ControlA Comprehensive Step-by-Step Guide for Installing, Programming, and Operating the Lutron RadioRA® Sivoia QEDTM Control
Note: Please leave this manual with homeowner.
W i re l e ss Home L i gh t i ng Con t ro l
EnglishP/N 044-025
Setup Guide for the RadioRA® Sivoia QEDTM Control2
Important Installation Notes1. Install in accordance with all national and local electrical codes.2. Do not paint the RadioRA Sivoia QED Control.3. Operate in ambient temperatures between 0 °C (32 °F) and 40 °C (104 °F).4. Do not mount outside. Unit must not get wet.5. The range and performance of the RadioRA System is highly dependent on a variety of complex factors such as:
• Distance between system components• Geometry of the home• Construction of walls separating system components• Electrical equipment located near system components
6. Do not mix RadioRA “A” and “B” frequency products within the same system. Products with different frequenciesare not compatible.
Important Application Notes1. The RadioRA Sivoia QED Control will use one dimmer address. The RadioRA System can have a maximum of 32
dimmers or local controls.2. By default, RadioRA Sivoia QED Controls are not assigned to ALL ON or ALL OFF Master Control buttons. To add a
RadioRA Sivoia QED Control to an ALL ON or ALL OFF button, see Section 4 - Adding a RadioRA Sivoia QEDControl to an ALL ON or ALL OFF button.
3. When a RadioRA Sivoia QED Control is programmed to a Security Full/Flash input, it will have the following function:• Full - Window treatment(s) will open, and the Open LED will turn ON.• Flash - Window treatment(s) will close, and the Open and Close LEDs will flash alternately.While in a security mode, the Control is disabled and will ignore commands from a RadioRA Master Control.
Notes on this Manual
Please read before installing
The procedures to setup a RadioRA® Sivoia QEDTM Control are contained in this manual. For more information onprogramming the remainder of your RadioRA System, or for advanced features, refer to the original RadioRA SetupGuide (P/N 044-001).
Consumer InformationWarningThis RadioRA system must not be used to control equipment, other than lighting or window treatments, which is nnoott vviissiibbllee fromevery master or local control location. It also must not be used to control equipment which could create hazardous situations suchas entrapment if operated accidentally. Examples of equipment which must not be controlled by this RadioRA system include (butare not limited to) motorized gates, garage doors, industrial doors, and microwave ovens, heating pads, etc. It is the installer'sresponsibility to ensure that the equipment, other than lighting or window treatments, being controlled is vviissiibbllee from every masteror local control location and that only suitable equipment is connected to this RadioRA system.
FCC InformationNote: This equipment has been tested and found to comply with the limits for a Class B digital device, pursuant to Part 15 of the FCC rules. These limits are designedto provide reasonable protection against harmful interference in a residential installation. This equipment generates, uses and can radiate radio frequency energyand, if not installed and used in accordance with the instructions, may cause harmful interference to radio or television reception. However, there is no guaranteethat interference will not occur in a particular installation. If this equipment does cause harmful interference to radio or television reception, which can be determinedby turning the equipment off and on, the user is encouraged to try to correct the interference by one or more of the following measures:
• Reorient or relocate the receiving antenna.• Increase the seperation between the equipment and receiver.• Connect the equipment into an outlet on a circuit different from that to which the receiver is connected.• Consult the dealer or an experienced radio/TV technician for help.
Caution: Changes or modifications not expressly approved by Lutron Electronics Co. could void the user’s authority to operate this equipment.Operation is subject to the following: (1) This device may not cause harmful interference, and (2) this device must accept any interference received, including interference that may cause undesired operation.

Setup Guide for the RadioRA® Sivoia QEDTM Control 3
Section 1 - OverviewOperation
RadioRA Sivoia QED Control ........................................................................................................4
Section 2 - InstallationInstalling a RadioRA Sivoia QED Control
Installation ........................................................................................................................................5
Section 3 - Start-UpAdding a RadioRA Sivoia QED Control
Activating the Control ....................................................................................................................7Changing Preset Levels ..................................................................................................................9
Master Control Button ProgrammingAssigning a RadioRA Sivoia QED Control to Master Control Buttons......................................10Setting RadioRA Sivoia QED Presets for Master Control Buttons ............................................12
Section 4 - Advanced ProgrammingAdditional Features
Setting a SCENE button as a Stop button ....................................................................................14Adding a RadioRA Sivoia QED Control to an ALL ON or ALL OFF button ..............................16
Default SettingsChanging Default Settings..............................................................................................................18
Section 5 - TroubleshootingTroubleshooting Guide ................................................................................................................20Returning to Default Factory Settings
RadioRA Sivoia QED Control ........................................................................................................22
Table of Contents

Setup Guide for the RadioRA® Sivoia QEDTM Control4
Sect
ion
1 - O
verv
iew
Operation
RadioRA Sivoia QED Control
Raise/Lower ButtonsSivoia QED motorized window treatment(s)will raise or lower to desired position.
Open ButtonSivoia QED motorized window treatment(s)will open.
Preset ButtonsSivoia QED motorized window treatment(s)will go to the preset position.
Close ButtonSivoia QED motorized window treatment(s)will close.
LEDsIndicate which Sivoia QED preset (includingOpen/Close) was last activated; glow softlyas night light when window treatments areclosed (Close LED slightly brighter) or arenot at one of the preset levels.
Notes:• To stop the window treatment(s) after
pressing a preset button (includingOpen/Close), press the same buttonagain.
• Button labels shown on the RadioRASivoia QED Control throughout this SetupGuide are only to show the functionality ofthese buttons. Apply labels from theprovided label sheet during installationand setup.

RReedd
**
RReedd
**
YYeelllloo
ww
WWhhiittee
//BBllaa
cckk
BBlluu
ee
Common
MUX
MUX
AC
AC
11
33
55
66
44
Setup Guide for the RadioRA® Sivoia QEDTM Control 5
Sect
ion
2 - I
nsta
llatio
n
Installing a RadioRA Sivoia QED Control
InstallationRead all instructions completely before installation.
Step 1 Find a suitable location for theRadioRA Sivoia QED Control
The RadioRA Sivoia QED Control must belocated within 30 feet of an RF SignalRepeater.
Step 2 Turn power OFF
Step 3 Wiring the RadioRA SivoiaQED Control
Using the wire connectors provided, wire theControl as per the wiring diagram.• Connect the white/black wire to terminal 1
(COM) on the Sivoia QED EDU. • Connect the yellow wire to terminal 3 (MUX)
on the Sivoia QED EDU. • Connect the blue wire to terminal 4 (MUX)
on the Sivoia QED EDU.• Connect one of the red wires to terminal 5
(AC) on the Sivoia QED EDU. • Connect the other red wire to terminal 6 (AC)
on the Sivoia QED EDU.
DANGER -• Do not connect line voltage power to the
Sivoia QED Control.• Connecting line voltage power or improper
wiring can result in personal injury ordamage to the control or to other equipment.
• All external control equipment must maintainClass 2 isolation.
• Sivoia QED Controls can only be gangedwith other Class 2 devices. Line voltagedevices must use a separate wallbox.
Sivoia QED Electronic Drive Unit (EDU)
* Power wiring for the RadioRA Sivoia QED Controlcan be spliced into the Sivoia QED EDU AC wiringfrom the transformer or wired directly into the EDUterminal block.Notes:1. Wire must be at least 24AWG and may not be
longer than 200 feet. (Recommended Lutron cable:SVQ-CBL-250)
2. To connect more than one Sivoia QED EDU to theRadioRA Sivoia QED Control, wire only terminals1, 3, and 4 (COM , MUX, MUX) of the EDUstogether.
• Continued on next page.
Wiring Diagram
For Sivoia QED Electronic Drive Units withplug-in transformers, unplug the transformer.Otherwise, turn power OFF at circuit breakerpanel or remove fuse from fusebox.
Important Wiring Information
Twist wire connector tight.Be sure no bare wire is
exposed.
When making wire connections, follow the recommended striplengths and combinations for the supplied wire connectors. Note:Wire connectors provided are suitable for copper wire only. Foraluminum wire, consult an electrician.
Strip insulation 1/4" for 16or 18 AWG wireStrip insulation 3/8" for 20or 22 AWG wire.
Use to join two 16, 18,20, or 22 AWG wires.
Wire Connector(actual size)
Terminals 2 and 7 are not connected

Setup Guide for the RadioRA® Sivoia QEDTM Control6
Sect
ion
2 - I
nsta
llatio
nInstalling a RadioRA Sivoia QED Control
Step 4 Mount Control
Step 5 Turn power ON
Tighten screwsuntil snug.
Align Control.
Snap on wallplate.
Attach wallplate adapter. Mount and aligncontrol. Snap on Claro® wallplate (purchasedseparately).
Plug the Sivoia QED Electronic Drive Unittransformer back in, or turn power ON at circuitbreaker panel, or replace the fuse.
Step 6 Test RadioRA Sivoia QEDControl operation
After setting the limits for each Sivoia QEDElectronic Drive Unit (see the Sivoia QEDEDU instructions), test the operation of theRadioRA Sivoia QED Control.
Window treatment(s) should open.
Window treatment(s) should close.
Press the Close button.
Press the Open button.
If window treatment(s) fail to respond to buttonpresses, consult the Troubleshooting Guide onpage 20.
Setup Guide for the RadioRA® Sivoia QEDTM Control 7
Sect
ion
3 - S
tart
-Up
Adding a RadioRA Sivoia QED Control
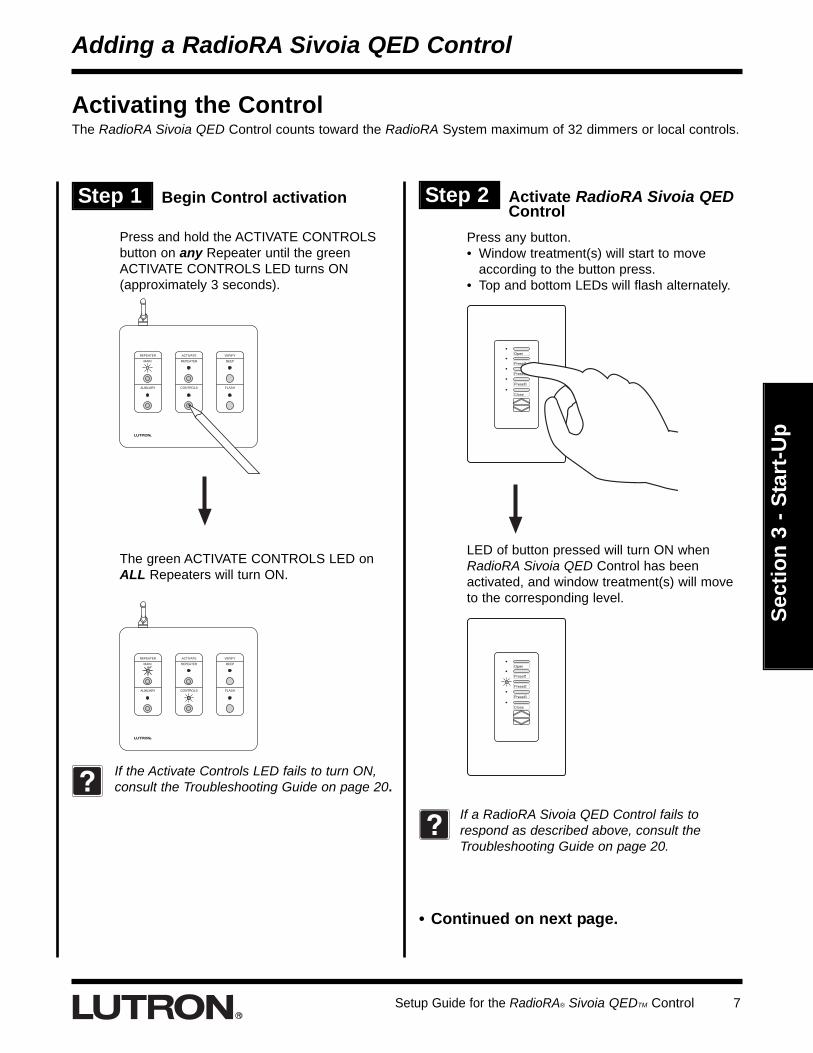
Activating the ControlThe RadioRA Sivoia QED Control counts toward the RadioRA System maximum of 32 dimmers or local controls.
Step 1 Begin Control activation
Press and hold the ACTIVATE CONTROLSbutton on any Repeater until the greenACTIVATE CONTROLS LED turns ON(approximately 3 seconds).
Step 2 Activate RadioRA Sivoia QEDControl
LED of button pressed will turn ON whenRadioRA Sivoia QED Control has beenactivated, and window treatment(s) will moveto the corresponding level.
Press any button.• Window treatment(s) will start to move
according to the button press.• Top and bottom LEDs will flash alternately.
If a RadioRA Sivoia QED Control fails torespond as described above, consult theTroubleshooting Guide on page 20.
If the Activate Controls LED fails to turn ON,consult the Troubleshooting Guide on page 20.
The green ACTIVATE CONTROLS LED onALL Repeaters will turn ON.
• Continued on next page.
Setup Guide for the RadioRA® Sivoia QEDTM Control8
Sect
ion
3 - S
tart
-Up
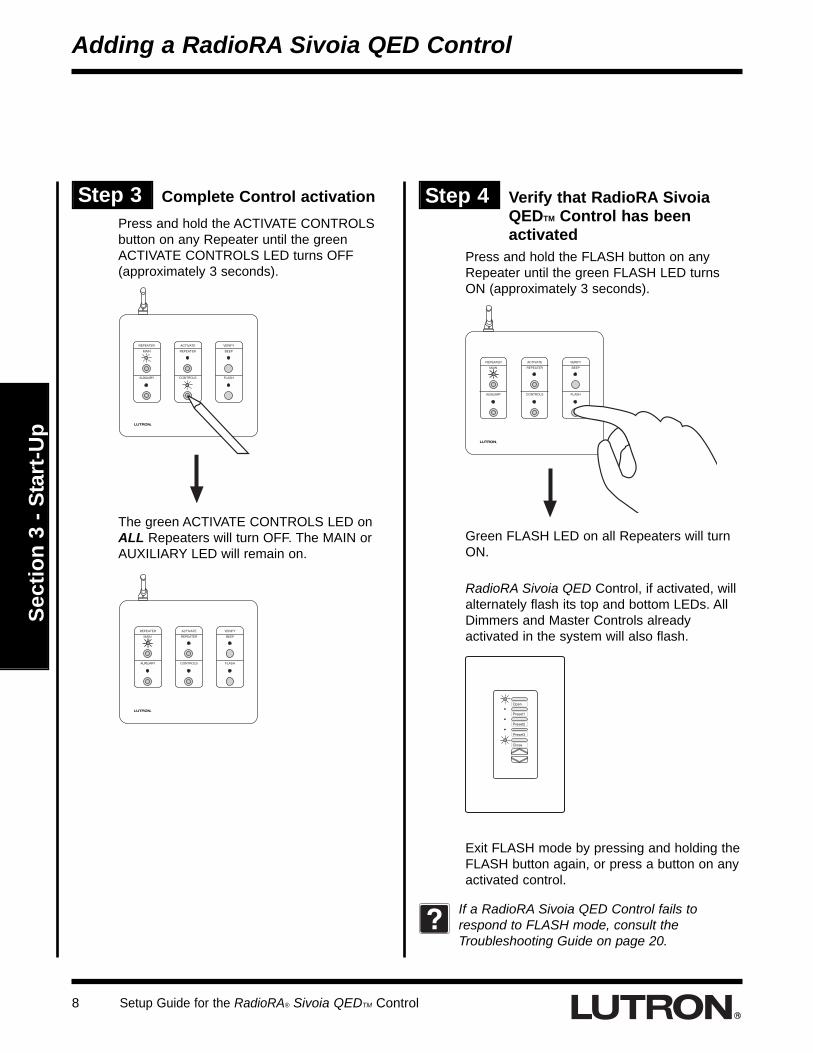
Step 3 Complete Control activationPress and hold the ACTIVATE CONTROLSbutton on any Repeater until the greenACTIVATE CONTROLS LED turns OFF(approximately 3 seconds).
The green ACTIVATE CONTROLS LED onALL Repeaters will turn OFF. The MAIN orAUXILIARY LED will remain on.
Step 4 Verify that RadioRA SivoiaQEDTM Control has beenactivated
Press and hold the FLASH button on anyRepeater until the green FLASH LED turnsON (approximately 3 seconds).
Green FLASH LED on all Repeaters will turnON.
RadioRA Sivoia QED Control, if activated, willalternately flash its top and bottom LEDs. AllDimmers and Master Controls alreadyactivated in the system will also flash.
Exit FLASH mode by pressing and holding theFLASH button again, or press a button on anyactivated control.
Adding a RadioRA Sivoia QED Control
If a RadioRA Sivoia QED Control fails torespond to FLASH mode, consult theTroubleshooting Guide on page 20.
Setup Guide for the RadioRA® Sivoia QEDTM Control 9
Sect
ion
3 - S
tart
-Up
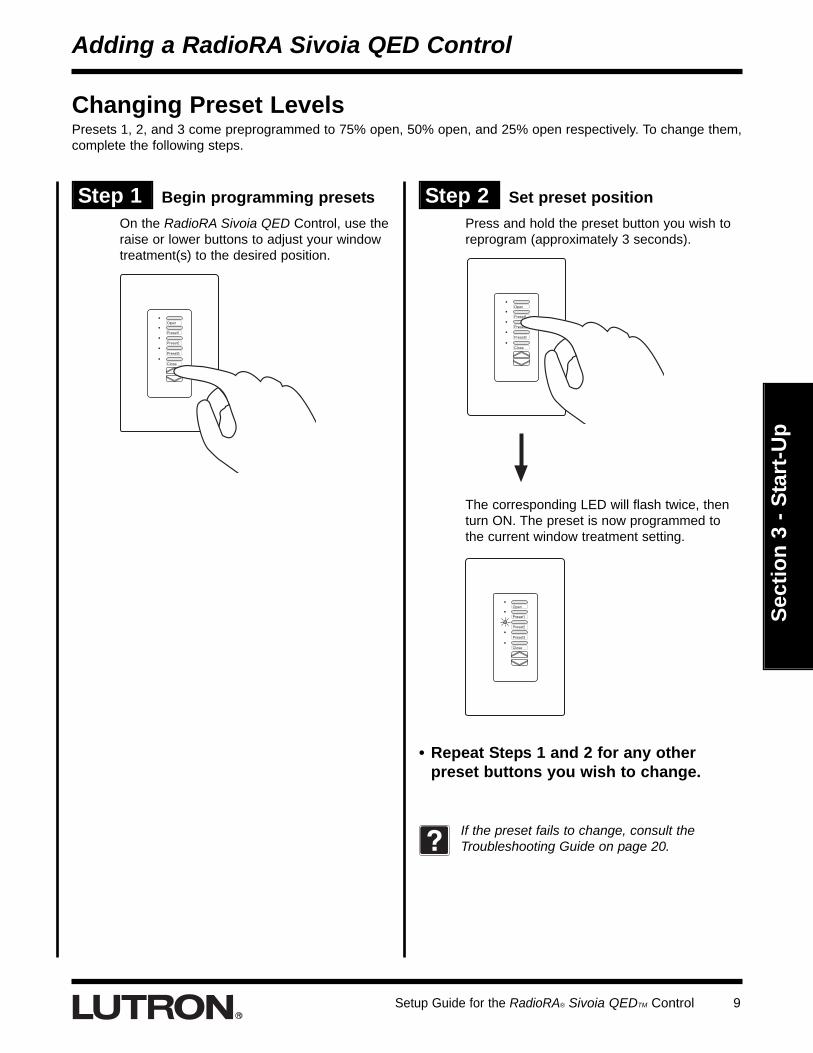
Changing Preset LevelsPresets 1, 2, and 3 come preprogrammed to 75% open, 50% open, and 25% open respectively. To change them,complete the following steps.
Adding a RadioRA Sivoia QED Control
Step 1 Begin programming presetsOn the RadioRA Sivoia QED Control, use theraise or lower buttons to adjust your windowtreatment(s) to the desired position.
Press and hold the preset button you wish toreprogram (approximately 3 seconds).
The corresponding LED will flash twice, thenturn ON. The preset is now programmed tothe current window treatment setting.
Step 2 Set preset position
• Repeat Steps 1 and 2 for any otherpreset buttons you wish to change.
If the preset fails to change, consult theTroubleshooting Guide on page 20.

Setup Guide for the RadioRA® Sivoia QEDTM Control10
Sect
ion
3 - S
tart
-Up
Assigning a RadioRA Sivoia QED Control to MasterControl Buttons
Master Control Button Programming
Step 1 Begin assigning RadioRASivoia QEDTM Controls toROOM/SCENE buttons
Simultaneously press and hold the 2nd and4th buttons in the right most column of theMaster Control until the upper right LEDbegins to flash (approximately 3 seconds).
Tabletop Master Wall MasterOR
Upper right LEDflashes.
Step 2 Select a buttonPress and release the button that you want toprogram. Its LED will begin to flash.
Step 3 Assign a RadioRA® SivoiaQEDTM Control to the button
Assign RadioRA Sivoia QED Controls to theMaster Control button by pressing the Openbutton. The window treatment(s) will open.
If you assign the wrong RadioRA Sivoia QEDControl to a Master Control button, press theClose button on the RadioRA Sivoia QEDControl to unassign it. The window treatment(s)will close.
Notes:• Multiple Dimmers, Switches, GRAFIK RA /
GRAFIK Eye Control Units, or RadioRASivoia QED Controls can be assigned to asingle button.
• Controls must be assigned to a MasterControl button while its LED is flashing.
Note: All devices assigned to that button willturn ON to: Dimmers 100% light level,Switches ON, GRAFIK RATM / GRAFIK Eye®
Control Units to scene 1, and RadioRA®
Sivoia QEDTM Controls to Open. All devicesnot assigned to that button will turn OFF(RadioRA Sivoia QED Controls will Close).

Setup Guide for the RadioRA® Sivoia QEDTM Control 11
Sect
ion
3 - S
tart
-Up
Master Control Button Programming
Step 5 Complete assigning RadioRASivoia QED Controls
Step 4 Select next buttonTo assign a RadioRA Sivoia QED Control toanother Master Control button, press andrelease that button. Its LED will begin to flash.
• Proceed to Step 5 when all buttons onthis Master Control have beenprogrammed.
Simultaneously press and hold the 2nd and4th buttons in the right most column of theMaster Control until all LEDs begin to flutter(approximately 3 seconds).
Perform Step 3 for this newly selected button.
• Repeat Steps 1 through 5 for eachMaster Control you would like to controlthe Sivoia QED motorized windowtreatment(s).
• Pressing a ROOM/SCENE button withnewly assigned RadioRA Sivoia QEDControls will cause those windowtreatment(s) to open.

Setup Guide for the RadioRA® Sivoia QEDTM Control12
Sect
ion
3 - S
tart
-Up
Master Control Button Programming
Setting Sivoia QED Presets for Master Control Buttons
Step 1 Begin setting presets
Simultaneously press the 1st and 5th buttonsin the right most column of the Master Controluntil the upper right LED begins to blink(approximately 3 seconds).
Step 2 Select a button
Upper right LED blinks.
Tabletop Master Wall MasterOR
Step 3 Select desired Sivoia QEDpreset
Press the desired preset button on theassigned RadioRA Sivoia QED Control. Thecorresponding LED will turn ON, indicating thepreset was set to the Master Control button.
Notes:• The raise and lower buttons have special
functionality in this mode. Refer to Section 4- Setting a SCENE button as a Stop button(page 14) for more information.
• Window treatment(s) assigned to a MasterControl ROOM button cannot be set to theClose button.Press and release the button that you want to
program. Its LED will begin to blink.
Note: All devices newly assigned to thatbutton will turn ON to: Dimmers 50% lightlevel for SCENE buttons, Dimmers 100% lightlevel for ROOM buttons, Switches ON,GRAFIK RA / GRAFIK Eye Control Units toscene 1, and RadioRA Sivoia QED Controlsto Open. All devices not assigned to thatbutton will turn OFF (RadioRA Sivoia QEDControls will Close).
Setup Guide for the RadioRA® Sivoia QEDTM Control 13
Sect
ion
3 - S
tart
-Up
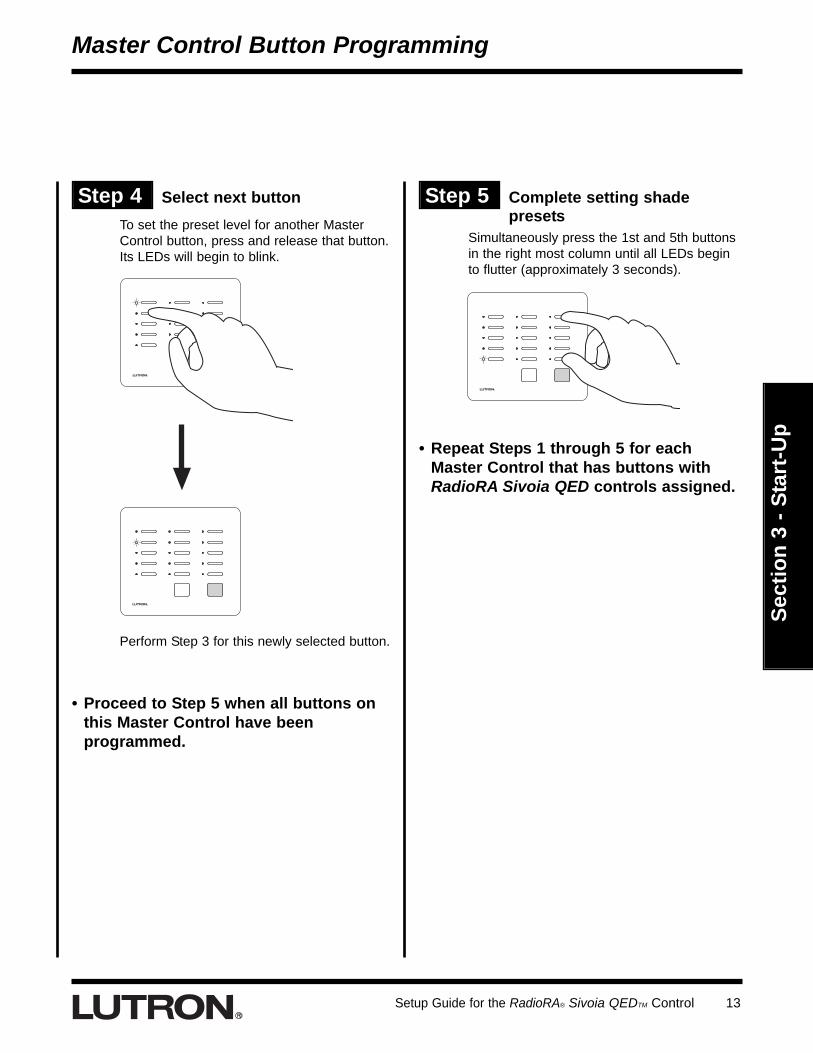
Step 5 Complete setting shadepresets
Step 4 Select next buttonTo set the preset level for another MasterControl button, press and release that button.Its LEDs will begin to blink.
ALL OFFALL ONALL ON ALL OFF
Perform Step 3 for this newly selected button.
• Proceed to Step 5 when all buttons onthis Master Control have beenprogrammed.
Simultaneously press the 1st and 5th buttonsin the right most column until all LEDs beginto flutter (approximately 3 seconds).
Master Control Button Programming
• Repeat Steps 1 through 5 for eachMaster Control that has buttons withRadioRA Sivoia QED controls assigned.

Setup Guide for the RadioRA® Sivoia QEDTM Control14
Sect
ion
4 - A
dvan
ced
Prog
ram
min
gAdditional Features
Setting a SCENE button as a Stop buttonThis feature allows you to stop moving window treatments from a Master Control.
Step 2 Begin setting Stop buttonSimultaneously press the 1st and 5th buttonsin the right most column of the Master Controluntil the upper right LED begins to blink(approximately 3 seconds).
Step 1 Assign RadioRA Sivoia QEDControl to Stop Button
Upper right LED blinks.
Tabletop Master Wall MasterOR
Assign the RadioRA Sivoia QED Control tothe SCENE button that will be the Stop button.See Section 3 - Assigning a RadioRA SivoiaQED Control to Master Control Buttons (page10). ROOM buttons cannot be Stop buttons.
Step 3 Select Stop buttonPress and release the button that you want toprogram. Its LED will begin to blink.
Setup Guide for the RadioRA® Sivoia QEDTM Control 15
Sect
ion
4 - A
dvan
ced
Prog
ram
min
g
Additional Features
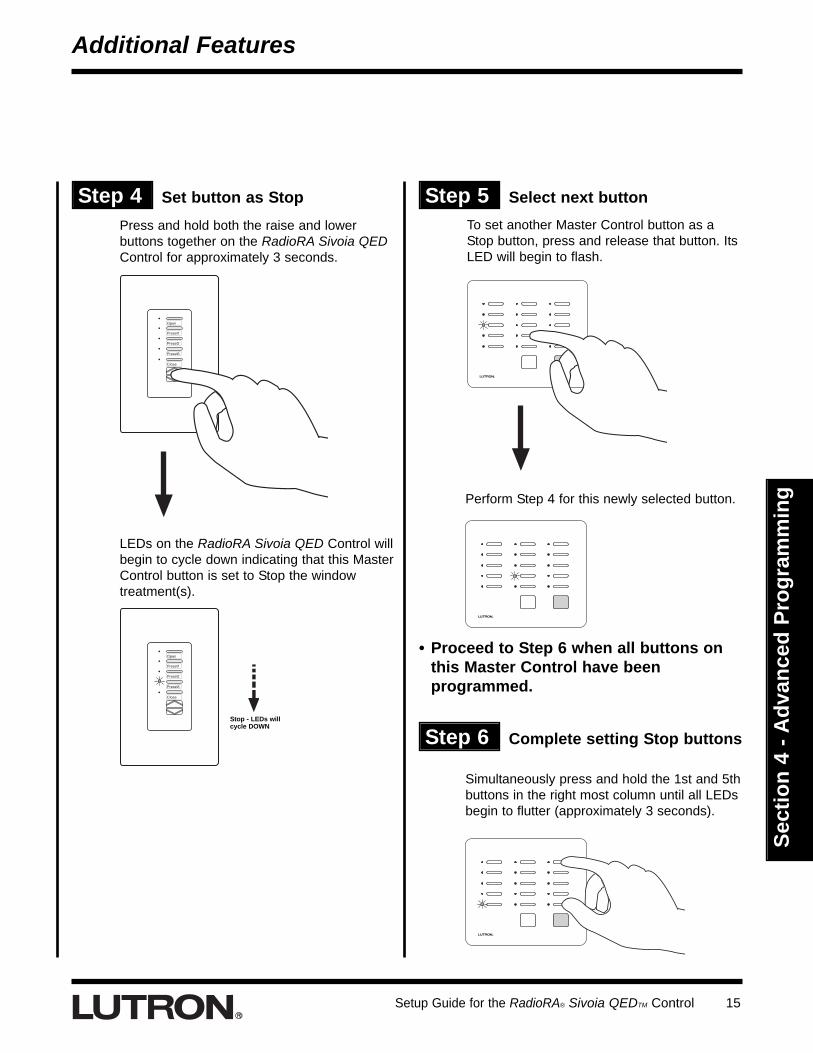
Step 4 Set button as StopPress and hold both the raise and lowerbuttons together on the RadioRA Sivoia QEDControl for approximately 3 seconds.
LEDs on the RadioRA Sivoia QED Control willbegin to cycle down indicating that this MasterControl button is set to Stop the windowtreatment(s).
Step 6 Complete setting Stop buttons
Step 5 Select next buttonTo set another Master Control button as aStop button, press and release that button. ItsLED will begin to flash.
Simultaneously press and hold the 1st and 5thbuttons in the right most column until all LEDsbegin to flutter (approximately 3 seconds).
Perform Step 4 for this newly selected button.
Stop - LEDs willcycle DOWN
• Proceed to Step 6 when all buttons onthis Master Control have beenprogrammed.

Setup Guide for the RadioRA® Sivoia QEDTM Control16
Sect
ion
4 - A
dvan
ced
Prog
ram
min
gAdditional Features
Adding a RadioRA Sivoia QED Control to an ALL ON orALL OFF button
Step 1 Begin the ALL ON or ALL OFFbutton programming
Step 2 Press the ALL ON or ALL OFFbutton
On the Master Control you want to program,simultaneously press and hold the 2nd and4th buttons in the right most column until theupper right LED begins to flash(approximately 3 seconds).
Press the ALL ON or ALL OFF button on theMaster Control you are programming.
Upper right LED flashes.
Tabletop Master Wall MasterOR
The LEDs in all columns will simultaneouslycycle from bottom to top for ALL ON or fromtop to bottom for ALL OFF.
ALL ON - LEDscycle UP
All assigned RadioRA Dimmers, Switches,GRAFIK RA / GRAFIK Eye Control Units, andRadioRA Sivoia QED Controls will turn ON. Allunassigned controls will be OFF.
ALL OFF - LEDscycle DOWN

Setup Guide for the RadioRA® Sivoia QEDTM Control 17
Sect
ion
4 - A
dvan
ced
Prog
ram
min
g
Additional Features
Step 3 Add the RadioRA Sivoia QEDControl to the button
Press the Open button on the RadioRA SivoiaQED Control you want to add.
The corresponding LED will turn ON, and thewindow treatment(s) will open, indicating theRadioRA Sivoia QED Control was added tothe Master Control button.
If you add the wrong RadioRA Sivoia QEDControl, press the Close button to remove itfrom that Master Control button. The windowtreatment(s) will close, indicating the RadioRASivoia QED Control was removed.
Step 4 Complete the ALL ON or ALLOFF button programming
Simultaneously press and hold the 2nd and4th buttons in the right most column until allLEDs begin to flutter (approximately 3seconds).
• Repeat Steps 1 through 4 to add aRadioRA Sivoia QED Control to the ALLON or ALL OFF button of any additionalMaster Controls.

Setup Guide for the RadioRA® Sivoia QEDTM Control18
Sect
ion
4 - A
dvan
ced
Prog
ram
min
gDefault Settings
Changing Default SettingsChanging the default settings will allow you to choose whether the window treatments will remain unchangedwhen a SCENE is being raised, lowered, or toggled to OFF. Local presets may also be locked, so that they arenot accidentally changed.
Step 1 Enter Default Settings Mode
Simultaneously press and hold the Open,Raise and Lower buttons until the top LEDbegins to flash (approximately 3 seconds).
Open LED flashes.
Step 2 Change Settings
Press and hold a button to change the defaultsettings.
Scene OFF ResponseScene Raise/Lower ResponsePreset Lock
LED ON = EnabledLED OFF = Disabled
Scene OFF Response (Preset 1 button) - IfScene OFF Response is enabled, the windowtreatment(s) will Close when a Scene buttonis toggled OFF from a RadioRA MasterControl. If disabled, the window treatment(s)will not move. By default, Scene OFFResponse is disabled.
Scene Raise/Lower Response (Preset 2button) - If Scene Raise/Lower is enabled,the window treatment(s) will raise or lowerwhen a Master Control Raise/Lower buttonthat is assigned to the RadioRA Sivoia QEDControl is pressed. If disabled, the windowtreatment(s) will not move. By default, SceneRaise/Lower Response is enabled.
Preset Lock (Preset 3 button) - If PresetLock is enabled, you will not be able tochange the window treatment(s) preset levelon the RadioRA Sivoia QED Control. Ifdisabled, you will be able to change thepreset levels as described on page 9. Bydefault, Presets are not locked.

Setup Guide for the RadioRA® Sivoia QEDTM Control 19
Sect
ion
4 - A
dvan
ced
Prog
ram
min
g
Default Settings
Step 3 Exit Default Settings Mode
On the RadioRA Sivoia QED Control, pressand hold the Open, Raise, and Lower buttonsuntil the LEDs flutter (approximately 3seconds).
Setup Guide for the RadioRA® Sivoia QEDTM Control20
Sect
ion
5 - T
roub
lesh
ootin
gTroubleshooting Guide
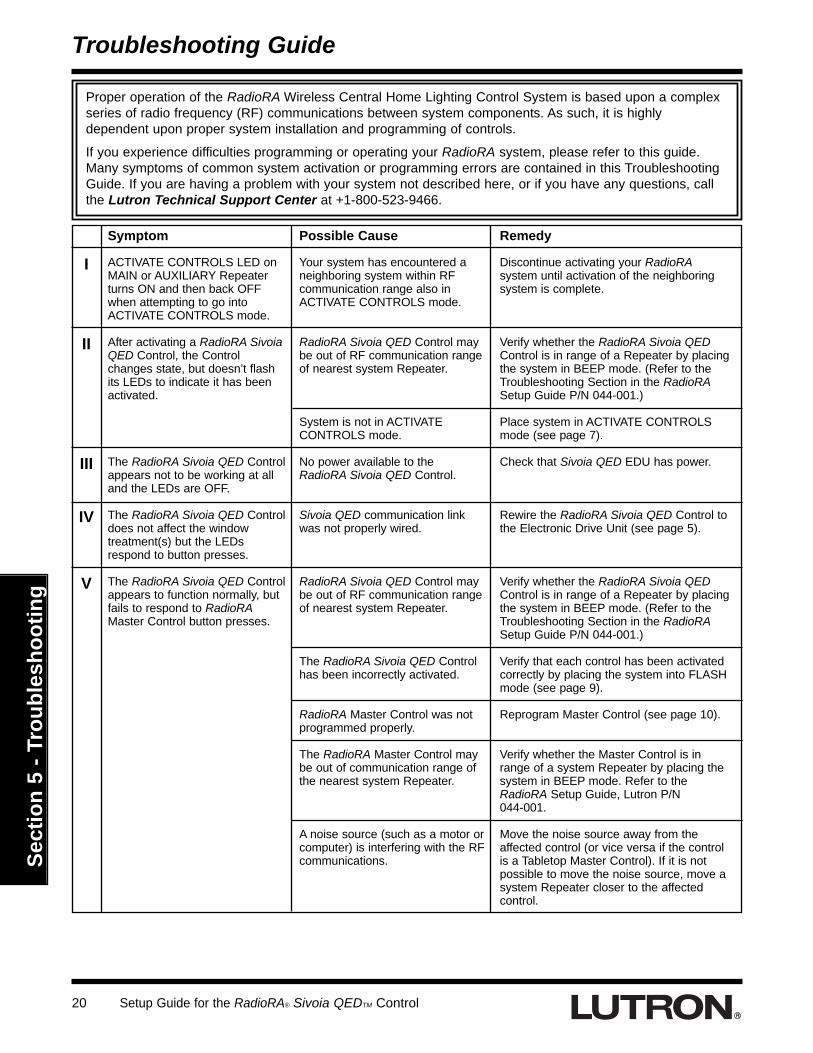
Proper operation of the RadioRA Wireless Central Home Lighting Control System is based upon a complexseries of radio frequency (RF) communications between system components. As such, it is highlydependent upon proper system installation and programming of controls.
If you experience difficulties programming or operating your RadioRA system, please refer to this guide.Many symptoms of common system activation or programming errors are contained in this TroubleshootingGuide. If you are having a problem with your system not described here, or if you have any questions, callthe Lutron Technical Support Center at +1-800-523-9466.
Symptom Possible Cause Remedy
Discontinue activating your RadioRAsystem until activation of the neighboringsystem is complete.
Verify whether the RadioRA Sivoia QEDControl is in range of a Repeater by placingthe system in BEEP mode. (Refer to theTroubleshooting Section in the RadioRASetup Guide P/N 044-001.)
Place system in ACTIVATE CONTROLSmode (see page 7).
Check that Sivoia QED EDU has power.
Rewire the RadioRA Sivoia QED Control tothe Electronic Drive Unit (see page 5).
Verify whether the RadioRA Sivoia QEDControl is in range of a Repeater by placingthe system in BEEP mode. (Refer to theTroubleshooting Section in the RadioRASetup Guide P/N 044-001.)
Verify that each control has been activatedcorrectly by placing the system into FLASHmode (see page 9).
Reprogram Master Control (see page 10).
Verify whether the Master Control is inrange of a system Repeater by placing thesystem in BEEP mode. Refer to theRadioRA Setup Guide, Lutron P/N 044-001.
Move the noise source away from theaffected control (or vice versa if the controlis a Tabletop Master Control). If it is notpossible to move the noise source, move asystem Repeater closer to the affectedcontrol.
I
II
III
IV
V
ACTIVATE CONTROLS LED onMAIN or AUXILIARY Repeaterturns ON and then back OFFwhen attempting to go intoACTIVATE CONTROLS mode.
After activating a RadioRA SivoiaQED Control, the Controlchanges state, but doesn’t flashits LEDs to indicate it has beenactivated.
The RadioRA Sivoia QED Controlappears not to be working at alland the LEDs are OFF.
The RadioRA Sivoia QED Controldoes not affect the windowtreatment(s) but the LEDsrespond to button presses.
The RadioRA Sivoia QED Controlappears to function normally, butfails to respond to RadioRAMaster Control button presses.
Your system has encountered aneighboring system within RFcommunication range also inACTIVATE CONTROLS mode.
RadioRA Sivoia QED Control maybe out of RF communication rangeof nearest system Repeater.
System is not in ACTIVATECONTROLS mode.
No power available to theRadioRA Sivoia QED Control.
Sivoia QED communication linkwas not properly wired.
RadioRA Sivoia QED Control maybe out of RF communication rangeof nearest system Repeater.
The RadioRA Sivoia QED Controlhas been incorrectly activated.
RadioRA Master Control was notprogrammed properly.
The RadioRA Master Control maybe out of communication range ofthe nearest system Repeater.
A noise source (such as a motor orcomputer) is interfering with the RFcommunications.
Setup Guide for the RadioRA® Sivoia QEDTM Control 21
Sect
ion
5 - T
roub
lesh
ootin
g
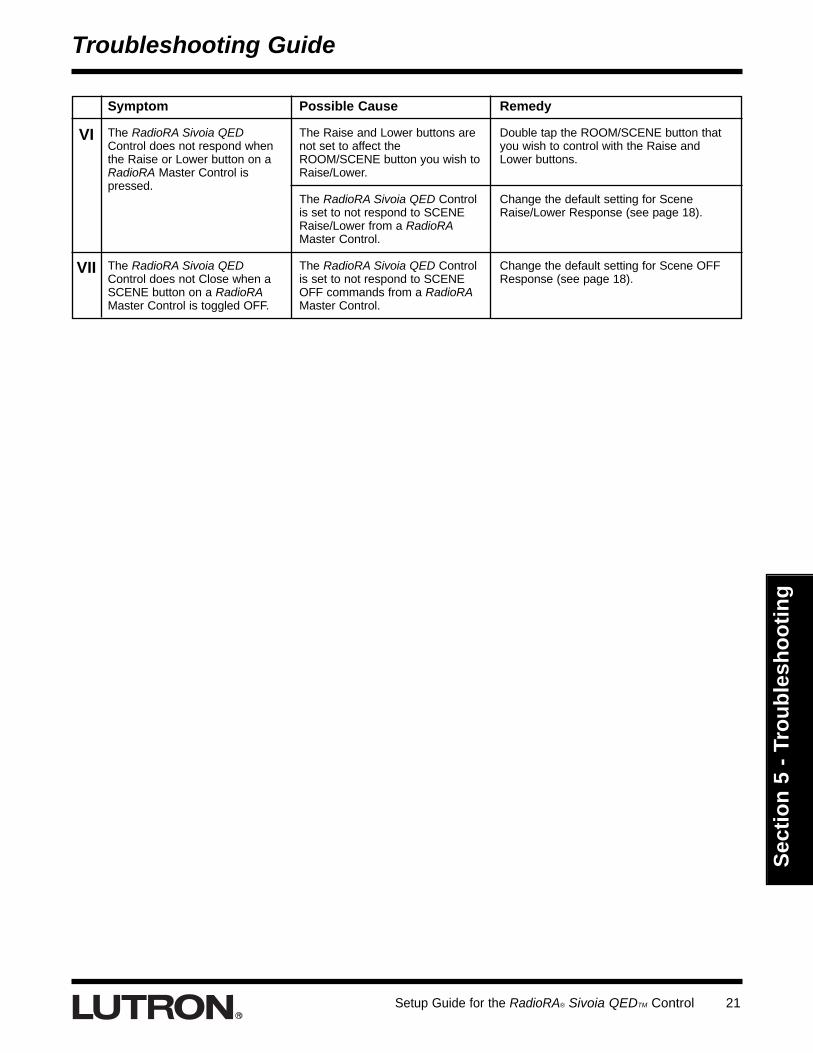
Symptom Possible Cause Remedy
Double tap the ROOM/SCENE button thatyou wish to control with the Raise andLower buttons.
Change the default setting for SceneRaise/Lower Response (see page 18).
Change the default setting for Scene OFFResponse (see page 18).
VI
VII
The RadioRA Sivoia QEDControl does not respond whenthe Raise or Lower button on aRadioRA Master Control ispressed.
The RadioRA Sivoia QEDControl does not Close when aSCENE button on a RadioRAMaster Control is toggled OFF.
The Raise and Lower buttons arenot set to affect theROOM/SCENE button you wish toRaise/Lower.
The RadioRA Sivoia QED Controlis set to not respond to SCENERaise/Lower from a RadioRAMaster Control.
The RadioRA Sivoia QED Controlis set to not respond to SCENEOFF commands from a RadioRAMaster Control.
Troubleshooting Guide
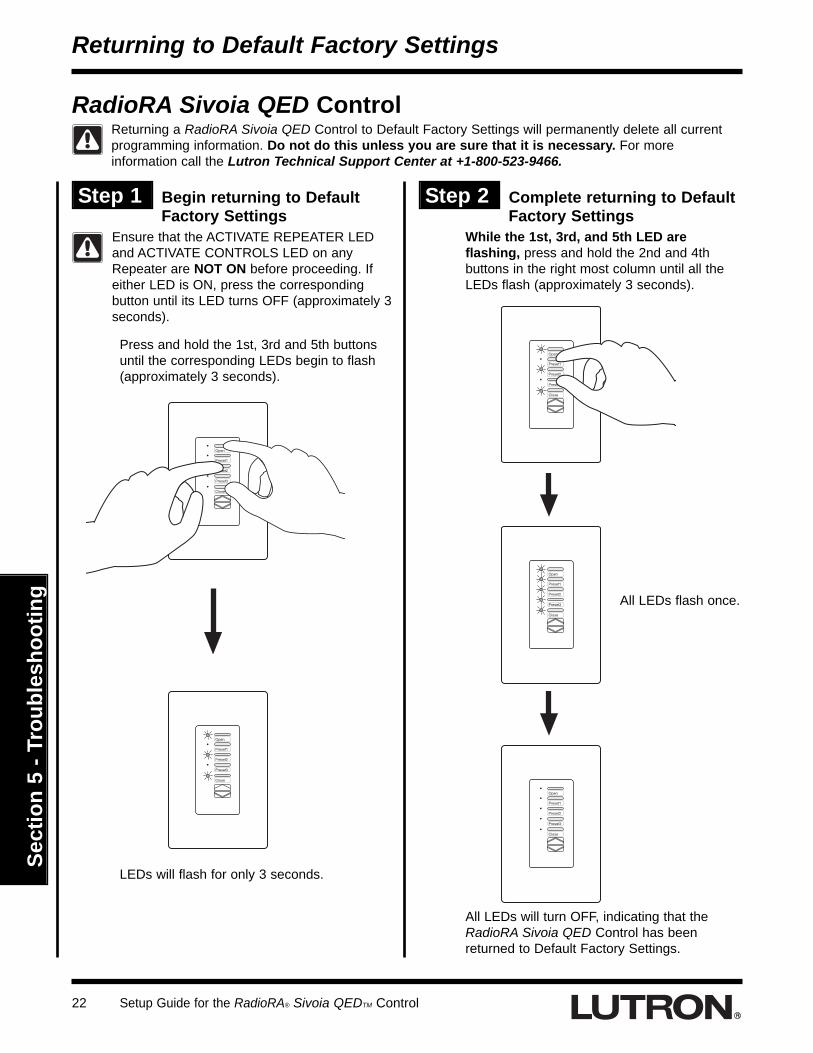
Ensure that the ACTIVATE REPEATER LEDand ACTIVATE CONTROLS LED on anyRepeater are NOT ON before proceeding. Ifeither LED is ON, press the correspondingbutton until its LED turns OFF (approximately 3seconds).
Setup Guide for the RadioRA® Sivoia QEDTM Control22
Sect
ion
5 - T
roub
lesh
ootin
gReturning to Default Factory Settings
RadioRA Sivoia QED ControlReturning a RadioRA Sivoia QED Control to Default Factory Settings will permanently delete all currentprogramming information. Do not do this unless you are sure that it is necessary. For moreinformation call the Lutron Technical Support Center at +1-800-523-9466.
Step 1 Begin returning to DefaultFactory Settings
Step 2 Complete returning to DefaultFactory Settings
Press and hold the 1st, 3rd and 5th buttonsuntil the corresponding LEDs begin to flash(approximately 3 seconds).
LEDs will flash for only 3 seconds.
While the 1st, 3rd, and 5th LED areflashing, press and hold the 2nd and 4thbuttons in the right most column until all theLEDs flash (approximately 3 seconds).
All LEDs will turn OFF, indicating that theRadioRA Sivoia QED Control has beenreturned to Default Factory Settings.
All LEDs flash once.
Setup Guide for the RadioRA® Sivoia QEDTM Control 23
Sect
ion
5 - T
roub
lesh
ootin
g
Notes

World HeadquartersLutron Electronics Co., Inc.7200 Suter RoadCoopersburg, PA 18036-1299 U.S.A.TOLL FREE: +1-800-523-9466 (U.S.A., Canada, andthe Caribbean)Tel: +1-610-282-3800Fax: +1-610-282-3090
Lutron Electronics Co., Inc., reserves the right tomake improvements or changes in its products withoutprior notice. Although every attempt is made to ensurethat this information is accurate and up to date, pleasecheck with Lutron to confirm product availability, latestspecifications and suitability for your application.
© 2007 Lutron Electronics Co., Inc.MADE AND PRINTED IN U.S.A.P/N 044-025 6/07 Rev. B
Technical AssistanceIf you have questions concerning the installation oroperation of this product, call the Lutron TechnicalSupport Center. Please provide exact model numberwhen calling.+1.800.523.9466 (U.S.A., Canada, and the Caribbean)Other countries call +1.610.282.3800Fax +1.610.282.3090Visit our web site at www.lutron.com
Limited WarrantyLutron will, at its option, repair or replace any unit thatis defective in materials or manufacture within oneyear after purchase. For warranty service, return unitto place of purchase or mail to Lutron Electronics Co.,Inc. at 7200 Suter Rd., Coopersburg, PA 18036-1299,postage pre-paid.THIS WARRANTY IS IN LIEU OF ALL OTHEREXPRESS WARRANTIES, AND THE IMPLIEDWARRANTY OF MERCHANTABILITY IS LIMITEDTO ONE YEAR FROM PURCHASE. THISWARRANTY DOES NOT COVER THE COST OFINSTALLATION, REMOVAL OR REINSTALLATION,OR DAMAGE RESULTING FROM MISUSE, ABUSE,OR DAMAGE FROM IMPROPER WIRING ORINSTALLATION. THIS WARRANTY DOES NOTCOVER INCIDENTAL OR CONSEQUENTIALDAMAGES. LUTRON’S LIABILITY ON ANY CLAIMFOR DAMAGES ARISING OUT OF OR INCONNECTION WITH THE MANUFACTURE, SALE,INSTALLATION, DELIVERY, OR USE OF THE UNITSHALL NEVER EXCEED THE PURCHASE PRICEOF THE UNIT.This warranty gives you specific legal rights, and youmay have other rights which vary from state to state.Some states do not allow the exclusion or limitation ofincidental or consequential damages, or limitation onhow long an implied warranty may last, so the abovelimitations may not apply to you. This product may be covered under one or more ofthe following U.S. patents: 5,838,226; 5,848,054;5,905,442; 5,982,103; 6,687,487; 6,983,783 andcorresponding foreign patents. U.S. and foreignpatents pending. Lutron, Claro, GRAFIK Eye, andRadioRA are registered trademarks, and GRAFIK RAand Sivoia QED are trademarks of Lutron ElectronicsCo., Inc. © 2007 Lutron Electronics Co., Inc.