wire work - lapidary worldlapidaryworld.com/pdf/wire_work1.pdf · wire work wrapped loops ... bend...
TRANSCRIPT

WIRE WORK
Wrapped loops
Wrapped loops require practice but they're worth mastering. Not only do they increase security for your beads, they also add an elegant designer touch. You can make one wrap or as many as you wish to produce the effect you desire.
Making loops or eyes
Figure 1: Cut the wire, leaving a 3/8-in. (1cm) tail above the bead. Bend it against the bead at a right angle with the tip of a chainnose pliers.
Figure 2: Grip the very tip of the wire in roundnose pliers. If you can feel it, the loop will be teardrop shaped.
Figure 3: Without pulling, rotate the wire into a loop as far as your wrist will turn. Let go, regrasp the loop at the same place on the pliers, and keep turning to close the loop. The closer to the pliers tip you work, the smaller the loop.
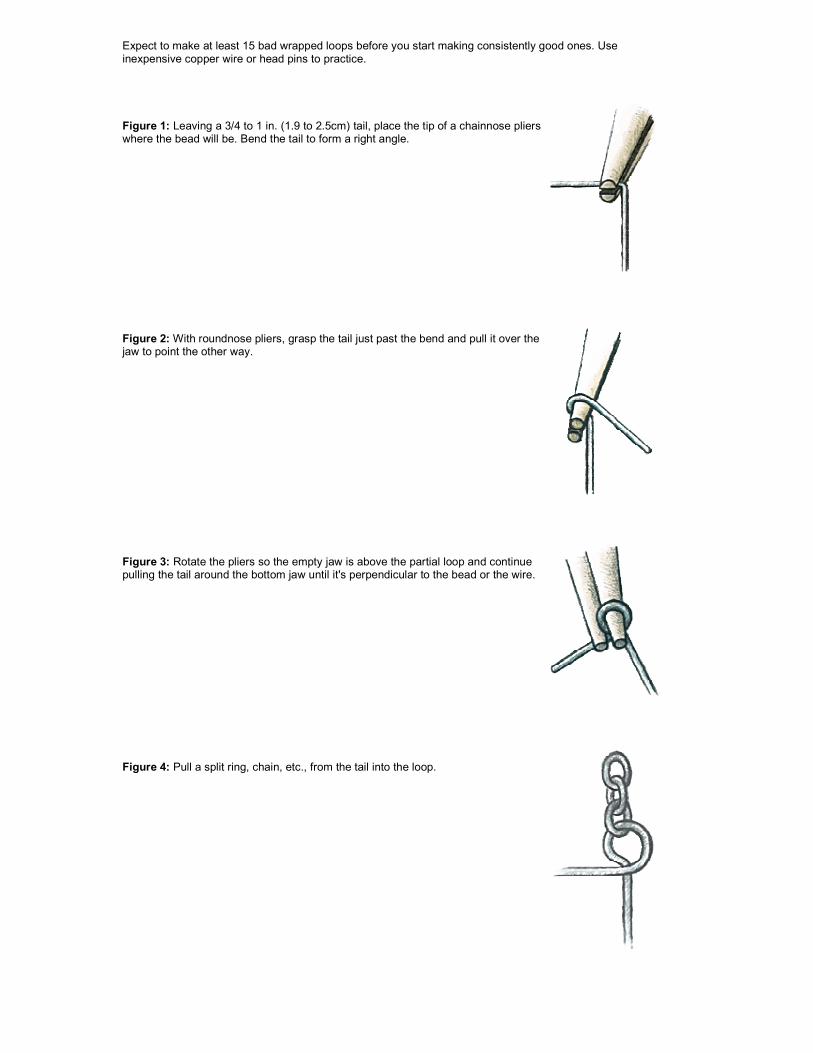
Expect to make at least 15 bad wrapped loops before you start making consistently good ones. Use inexpensive copper wire or head pins to practice.
Figure 1: Leaving a 3/4 to 1 in. (1.9 to 2.5cm) tail, place the tip of a chainnose pliers where the bead will be. Bend the tail to form a right angle.
Figure 2: With roundnose pliers, grasp the tail just past the bend and pull it over the jaw to point the other way.
Figure 3: Rotate the pliers so the empty jaw is above the partial loop and continue pulling the tail around the bottom jaw until it's perpendicular to the bead or the wire.
Figure 4: Pull a split ring, chain, etc., from the tail into the loop.

Figure 5: To keep the loop round, grasp it with roundnose pliers in your non-dominant hand just above the cross. Don't dent the wire.
Figure 6: Grasp the tail with chainnose pliers and pull it around the wire until it meets the bead. Make the first wrap against the pliers and keep wraps close. Clip.
Opening and closing loops
To open a loop or ring, use one or two pairs of pliers to grasp the wire at the opening. Pull one pliers toward you and push the other away to bring the ends of the wire apart and out of the plane of the loop. Never spread the loop side to side, which will fatigue the metal. Close the loop by pulling the ends back into the plane.
Making head pins
Make a head on a piece of wire in one of two ways. Figure left: Strike the end of the wire sharply with a hammer to flatten it. Trim and file the edges smooth. Figure right: Make a tiny U-shaped loop at the end of the wire with the tip of a roundnose pliers, pinch it closed with chainnose pliers, and trim the wire end just past the bend.

Wraps and Loops Being able to make simple loops and wrapped loops with wire or headpins will take you a long way. You can easily make lovely dangling earrings with a simple headpin and a few beads.

For a more complex and exotic look, try multiple dangles of different lengths on the same earring. Try not to make them too heavy though!
You can also make dangles for necklaces, bracelets, connectors, and a host of other things using this simple technique.
Creating a Simple Loop
Thread a few beads on a headpin and create a simple loop with a few twists of your wrist. You want the finished loop to be centred over the wire. This is much stronger than a “P”-shaped loop, which can pull out very easily.
Use roundnose pliers and bend the wire to a 90° angle, making the bend close to the end bead

Cut off the wire, at about 1 cm from the end bead. With practice, you won’t have to measure, but you can make it easy at first by marking 1 cm on your index finger.
Grab the end of the wire, with the end between the jaws of the pliers and not protruding (sometimes you slip off, that’s ok, just try again.)
Hint! for consistent-sized loops, make a mark on your pliers with a felt pen and do all your loops at the same place on the pliers.
Roll your wrist away, making a nice smooth loop. Don’t force your wrist all the way over, just make a partial loop.
Take the pliers out of the half-formed loop, reposition them again back at the start of the loop, and roll again to finish the loop. If the loop is leaning to one side, straighten it up with the pliers.
With practice, this will become effortless!
Always open loops & jump rings from the side
Always open a finished loop by twisting it to the side. Pulling the loop open will bend the wire in such a way as to break it or permanently deform it so that you can’t get it closed nicely again.

Don’t let the wire fly When you cut the wire, the end will fly — try to catch it or aim it at something soft so that you don’t have a lot of sharp ends of wire lying around where they could hurt someone.
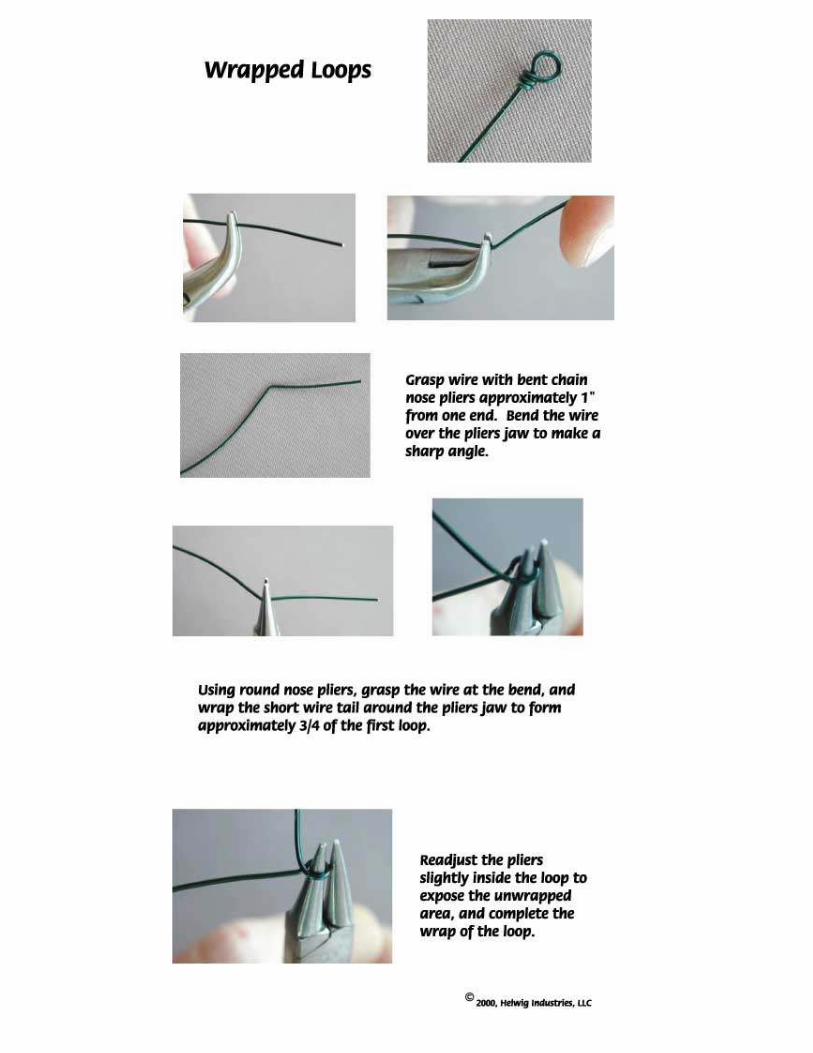
Creating a Wrapped Loop
Alternately, you can create a wrapped loop. Beginners often find this easier and more secure when they are learning. However — if you are struggling with this technique, try using a softer wire.
Use roundnose pliers. Make a 90° bend in the wire. Leave a small space between the bend and the bead. Don’t cut the wire.
Wrap the wire right around the nose of the pliers. Keep going back down to the wire.
Wrap the tail of the wire around the main stem of wire coming from the bead. Keep wrapping until you run out of room, or wire. A full wrap to the end bead does look better. Cut the wire off close and smooth in the end with chainnose pliers. Straighten up the loop if desired.


Page 3


Page 4
http://www.wigjig.com


Page 2
http://www.wigjig.com

http://www.wigjig.com

http://www.wigjig.com
http://www.wigjig.com


http://www.wigjig.com

http://www.wigjig.com
http://www.wigjig.com

http://www.wigjig.com

The Wrapped Link Bracelet is a simple jewelry project made with a link called
the wrapped link. This link is shown below roughly twice normal size.
Wrapped Link
Violet Cubes Bracelet
Tahitian Pearls Bracelet
Jewelry Supplies:
Tools Required: • 22 inches of 20G half-hard gold-filled wire • 20 inches of 22G half-hard gold-filled wire • Six 6mm beads • 1 gold-filled magnetic clasp • 3 inches of fine gold filled chain
• Round Nose Pliers • Flush Cutter • Chain Nose or Bent Chain Nose Pliers
(2) • Nylon Jaw Pliers • Any WigJig with 2 metal pegs • 30 minutes of free time
To make this bracelet you will need to make 6 wrapped bead links each 1/2 inch long. Wrapped Link
Step 1: Cut and straighten a piece of 20G wire 3.5 inches long.
Step 2: Make a wrapped loop in one end of this wire. Wrap only one time around the wire as shown
at left. The technique for making this loop is shown here.
Step 2
Step 3: Position two pegs on a WigJig 1/2 inch apart. (For the Delphi, as shown at right, these pegs
should be positioned on a diagonal with two empty pegs between them.) Now using your chain nose
pliers, grasp the wire just below the second peg and bend the wire 80 degrees. See the picture at right
for how the wire should look.
Step 3
Step 4: Now remove the wire from the jig and make a wrapped loop using your round nose pliers
where you just made this bend. Continue to wrap the wire tail. The picture at left shows this wrap
partially completed. Continue to wrap until the wire segment in the middle is completely covered.
Step 4
Step 5: Cut the wire tail and squeeze it flat using your chain nose pliers. The finished link should
appear as shown at right. Wrapped Bead Link
Step 6: Make six wrapped links.
Step 7: Connect all six wrapped links with wrapped bead links using 6mm beads. Our most
detailed instructions for making the wrapped bead link are found in our online book --
"Wire Design Basics". You can find this book here.
Violet Wrapped Link Bracelet

Step 8: Connect both ends of this bracelet to a clasp. A magnetic clasp was used for the
bracelets shown above and left. Before wrapping these links closed, add 2.5 to 3 inches of
fine chain to each end. This fine chain becomes a guard chain for the bracelet.
Step 9: Wrap both ends closed and admire your finished jewelry making project.
Tahitian Pearl Wrapped Link
Bracelet
Bali Style Silver Wrapped Link Bracelet