windows system response and interrogation with...
TRANSCRIPT

Windows System Response and Interrogation with Sysinternals Tools
Windows Sysinternals is a set of tools that is widely utilized in a range of Windows system administration tasks. The tools can be downloaded from the Windows Sysinternals website or can be run directly from \\live.sysinternals.com\tools\<toolname>.
In this lab, a subset of these tools will be used to demonstrate several security issues and the associated mitigation strategies, including malware infections and confidentiality of data in hard disk drives. Also, a machine is setup to act as a live.sysinternals.com server. The server contains the complete set of tools, including ones that will not be used in this lab.
The lab is divided into three sections. In each section, you will be playing two roles: a system administrator and an attacker. As an attacker, you will execute different means to compromise either a system or system data. As a system administrator, you will attempt to gather as much information about your system to recover from and defend against such attacks.
Lab Network Diagram
Your lab environment consists of 4 virtual computer systems:
1. A Windows 2003 Server which is set up to act as the live.sysinternals.com server. This server's name is Puller and its IP address is 10.0.2.14.
2. A Windows 2003 Server which the attacker compromises and the system administrator investigates. This system’s hostname is DC1 and its IP address is 10.0.2.104.
3. A Windows XP machine which the attacker uses to launch attacks on DC1. A lightweight http server (Hiawatha) is configured on this machine to host the www.malicious.com website. This system's hostname is Jackson and its IP address is 10.0.2.123.
4. A Windows Server 2003 launchpad system that will allow you to remotely access and configure the servers above. This system’s hostname is VTE-Launchpad and its IP address is 10.0.254.254
© 2009 Carnegie Mellon University

Windows System Response and Interrogation with Sysinternals Tools v1.0
1 Investigating a Trojan Trojans are malicious applications in the guise of legitimate software. A common means of becoming infected by a Trojan is through installing software that is downloaded from unverifiable sources on the Internet. In this section, a trojan called Beast will be used by an attacker to compromise a host. This kind of trojan is a remote administration tool that provides the attacker complete control over the host once it is installed. To recover from this infection, several Sysinternals tools will be used to investigate and disable the trojan.
1.1 Setting up a Trojan Here, a trojan with a reverse connection feature will be created through a few simple steps.
1. From the Desktop of ‘VTE-Launchpad’, double click the 'Remote Desktop Connection' icon. Type the IP address for Jackson, 10.0.2.123 and click 'Connect'.
Login to Jackson using the following credentials:
Username: administrator
Password: tartans
2. On Jackson's desktop, double click on the icon named 'Beast2.07'.
The following image shows the Beast interface:
3. Click on the 'Build Server' button to start building the Beast server program. It should
open another interface as follows:
4. Under 'Basic' tab, select 'Reverse Connection'.
2 CERT Training and Education

Windows System Response and Interrogation with Sysinternals Tools v1.0
5. Under 'Notifications', click on 'SIN'. Then click on the 'Get IP' button so that the trojan will be able to contact the attacker's machine. Make sure the 'Enable SIN' option is checked.
6. Under 'Misc.', ensure that 'Melt server on install' is checked. This deletes the trojan installer file after it has been installed on the host. Check 'Fake error message' to make the unknowing administrator believe that the reason why he doesn't see his expected software later on is due to an error during installation.
7. Click on 'Save server', and then click on 'OK' to confirm. After this, there should be a file named 'server.exe' on your desktop. Close the 'Server Settings' window, but don't close Beast.
8. Click on the 'Start Listening [SIN]' button, if an error message appears, click 'Unblock'. The Beast server is now ready to receive acknowledgement from infected hosts.
1.2 Compromising a host using the trojan A web server is already set up in Jackson and a legitimate looking homepage is already prepared. In this section, the trojan installer, server.exe that was created earlier will be made available for download to unsuspecting users.
1. Click on 'Start’ > ‘My Computer'. Browse to 'C:\wwwroot\downloads'.
2. Copy ‘server.exe’ from the Desktop into the 'C:\wwwroot\downloads' directory that you just browsed to.
3. Close Windows Explorer.
4. Minimize the remote connection to Jackson.
Suppose a system administrator is looking for security related software, chances upon www.malicious.com's homepage and installs the software posted on the site, thereby infecting the machine with malware.
5. From the Desktop of VTE-Launchpad, double click the 'Remote Desktop Connection' icon. Type the IP address for DC1, 10.0.2.104 and click 'Connect'.
Login to DC1 using the following credentials:
Username: administrator
Password: tartans
6. Click on 'Start>All Programs>Internet Explorer'.
7. Type http://www.malicious.com on the address bar and press [Enter].
8. If a prompt appears, Click on 'Add' twice and then click 'Close'. The webpage should now appear.
CERT Training and Education 3

Windows System Response and Interrogation with Sysinternals Tools v1.0
9. Click on 'Device Driver Verifier Download'.
10. Click 'Open'. On the security warning prompt, click 'Yes'.
11. On the Error prompt, click 'OK'. This happened because the trojan was configured earlier to show a fake error message.
12. Close Internet Explorer.
To confirm that the trojan is now installed in DC1, check if Beast in Jackson learns of new compromised hosts.
13. Minimize the remote connection to DC1 and maximize Jackson. If the connection has been closed, do the following:
From the Desktop of VTE-Launchpad, double click the 'Remote Desktop Connection' icon. Type the IP address for Jackson, 10.0.2.123 and click 'Connect'.
Login to Jackson using the following credentials:
Username: administrator
Password: tartans
14. A notification similar to the one below left might appear. If there is none, check if the Beast interface looks similar to the one below right (showing the compromised account and IP address)
15. Double click on the alien icon on the 'Beast' interface to connect to the infected
machine. After that, the alien icon would disappear and the 'Go BEAST' button now displays 'Disconnect'.
16. Click on 'Managers' and then 'Files'.
4 CERT Training and Education

Windows System Response and Interrogation with Sysinternals Tools v1.0
17. In the 'File Manager' window, click 'Find Drives'. The C: drive of DC1 should appear in the 'File Manager' window. This confirms that DC1 can now be accessed remotely.
18. Close the File Manager window. Minimize the Remote Desktop of Jackson.
1.3 Finding and cleaning the trojan In this section, the following Sysinternals tools will be used:
• TCPView shows all end to end connections existing in this computer.
• Process Explorer shows processes in real time and other related information such as the PID, description and company names associated with the running process.
• Filemon shows, in real time, file activity related to a process.
• Autoruns shows which programs are configured to run at system start-up.
1.3.1 Finding the trojan process 1. Maximize the remote connection to DC1. If the connection has been closed, do the
following:
From the Desktop of VTE-Launchpad, double click the 'Remote Desktop Connection' icon. Type the IP address for Jackson, 10.0.2.104 and click 'Connect'.
Login to DC1 using the following credentials:
Username: administrator
Password: tartans
2. To run TCPView, click 'Start’ > ‘Run'.
3. Type in \\live.sysinternals.com\tools\tcpview.exe. Click 'OK'. Click 'Open' on the prompt that appears.
4. Click 'Agree' on the license agreement.
5. After a few seconds, the TCPView interface will appear. Next, connections with
ESTABLISHED state will be checked.
CERT Training and Education 5

Windows System Response and Interrogation with Sysinternals Tools v1.0
6. To see only connected endpoints, click on 'Options' and uncheck 'Show Unconnected Endpoints'. This will limit the list to only established connections.
7. After looking at TCPView, a few 'ESTABLISHED' connections destined for 'www.malicious.com', which is Jackson's machine. This could be a clue to a security breach, since the host should not be connected to Jackson.
8. Close TCPView. Next, Process Explorer will be used to gain more information about
the running processes associated with the established connections.
9. Click 'Start’ > ‘Run'. Type in \\live.sysinternals.com\tools\procexp.exe Click 'OK'. Click 'Open' on the prompt that appears. Click 'Agree' on the license agreement. Wait for about a minute for Process Explorer to load.
Process Explorer provides a lot of information about the processes that run in your computer. In searching for malware, processes that meet any of the following conditions should be considered suspicious[5]:
• Have no icon • Have no description • Have no company name • Are not signed • Are packed to evade signature-based detection • Include strange URLs in the process's string • Host suspicious DLLs
However, keep in mind that some of Microsoft's authentic processes are also not signed.
6 CERT Training and Education

Windows System Response and Interrogation with Sysinternals Tools v1.0
Each entry in Process Explorer is highlighted with a color that shows the kind of process running. By default, pink is for “Services” and purple is for “Packed images”.
Check what each color signifies by clicking 'Options’ > ‘Configure Highlighting...'.
10. In the Process Explorer, find a process highlighted in purple named 'svchost.exe'. This process is suspicious for a number of reasons: it is packed, it is named 'svchost.exe' (svchost in Windows hosts system services) and it has no description and company name.
Since it is common to see 'svchost.exe' running in Windows (through programs such as Task Manager), it is common for malware to use the same name. Note that while building the trojan, a process name other than the default 'svchost.exe' can be specified.
11. To check if it is signed. Under 'Options', check 'Verify Image Signatures'.
12. Under 'View' click on 'Select Columns'. Check 'Verified Signer' and 'Image Path', and
13. Notice that the packed (purple) 'svchost.exe' is not signed and that it is located in the
then click on 'OK'. New columns named 'Verified Signer' and 'Path' will be displayed.
'C:\WINDOWS' directory.
CERT Training and Education 7

Windows System Response and Interrogation with Sysinternals Tools v1.0
14. Please write down the 'PID' and the path of the suspicious 'svchost.exe' on the table given. In the screenshot given above, the PID is '3104', but yours might be different from this.
PID of svchost.exe
Path of svchost.exe
15. Minimize Process Explorer.
The previous steps confirm that 'svchost.exe' is indeed malicious. However, sometimes it is best to not rush into terminating the process immediately for the following reasons:
• Depending on the situation, one might want to observe a malware's activity to determine the extent to which the machine has been compromised, the malware’s propagation technique, etc.
• Several malware often have a 'buddy system' in which processes watch over the status of other processes. When a process detects that its 'buddy' has been terminated, a new one will be spawned in its place. One solution is to suspend all the malicious processes, and after determining which files are associated with the process, delete them.
1.3.2 Finding files used by the Trojan through Filemon File Monitor (Filemon) is a tool that shows the activity of the file system (reads, writes, etc.) in real-time. In addition to this, it shows the files that each process accesses.
1. To run File Monitor, Click on 'Start’ > ‘Run' and then type \\live.sysinternals.com\Tools\Filemon.exe and then Click 'OK'.
2. Click 'Open' on the dialog box that appears.
3. If the license agreement prompts, click on 'Agree' and wait for 'Filemon' to load.
8 CERT Training and Education

Windows System Response and Interrogation with Sysinternals Tools v1.0
4. Wait for about 15 seconds and then stop the capture by clicking on the 'Capture icon
‘ ’. The icon will change to to indicate that Filemon has stopped capturing.
5. To find an entry related to the suspicious 'svchost.exe' process. click on the Find ‘ ’ icon on the toolbar.
6. On the Find dialog box, type 'svchost.exe:<PID>' where <PID> is the process ID that you have written down earlier.
7. Click 'Find Next'. A row should be highlighted if the search found a match. If not, click
the Capture icon and wait for a few seconds to stop the capture.
8. To focus on the target process,click on the Filter ‘ ’ icon. The Filter dialog box appears. On the 'Include' field, type svchost.exe:<PID> where <PID> is the process ID that you have written down earlier.
9. Click 'OK' and only entries associated with 'svchost.exe' should be displayed.
10. Notice that the process accesses the file 'C:\WINDOWS\system32\mslg.blf'. This file
is actually where the keystrokes are logged. Write down 'C:\WINDOWS\system32\mslg.blf' in the table in the next section (1.3.3 Cleaning Autoruns Step 5) .
11. Maximize Process Explorer.
CERT Training and Education 9

Windows System Response and Interrogation with Sysinternals Tools v1.0
12. Instead of terminating the trojan 'svchost.exe', it will only be suspended. Right click on the packed (purple) 'svchost.exe' and click 'Suspend'.
13. Minimize Process explorer.
1.3.3 Cleaning Autoruns Autoruns is a tool used to see what programs are configured to run when the computer boots up.
1. Click 'Start’ > ‘Run'. and type \\live.sysinternals.com\tools\autoruns.exe and then click 'OK'. Click 'Open' on the prompt. If the license agreement prompts, click 'Agree'.
2. Wait until 'Ready' is displayed in the lower left corner. Scanning takes about a minute
to finish.
3. Under 'Options', check both 'Hide Microsoft and Windows Entries' and 'Verify Code Signatures'. This is done to easily find and focus on malicious entries.
4. Under 'File', click 'Refresh'. Wait again for a minute to obtain the result.
5. Under 'Explorer' tab, scroll down until an entry named 'n/a' is found. Note that besides being unsigned, it also does not provide any information in the 'Description' and 'Publisher' column and its image path is in the 'system32' folder.
Autorun Entry Image Path
n/a
COM service
File found using Filemon
10 CERT Training and Education

Windows System Response and Interrogation with Sysinternals Tools v1.0
6. The file path associated to the 'n/a' entry is displayed on the 'Image Path' column. Write down this path on the table provided above. To prevent this entry from being activated at startup, right click on 'n/a', and click 'Delete'. Click on 'Yes' to confirm.
7. Under the 'Logon' tab are two suspicious entries named 'COM service'. Repeat Step 6 for both of these entries.
8. Close Autoruns.
9. Maximize Process explorer.
10. Right click on 'svchost.exe' and select 'Kill Process'. Click on 'Yes' to confirm.
11. Click on 'Start’ > ‘My Computer'. Browse to 'C:\WINDOWS' and then delete 'svchost.exe' under this directory.
12. Browse to the 'n/a' image path you wrote down on the table. To delete it, right click on the file and click on 'Delete'. Click 'Yes' to confirm. Repeat the same process to the remaining entries written on the table ('COM service' and file found in Filemon).
13. By now, the attacker machine should completely lose its connection to DC1. Restart DC1 by clicking on 'Start' and then click on 'Shut Down'.
14. A shut down windows will be prompted, please make sure your windows look the same as the following screenshot, and then click on 'OK'.
CERT Training and Education 11
Windows System Response and Interrogation with Sysinternals Tools v1.0
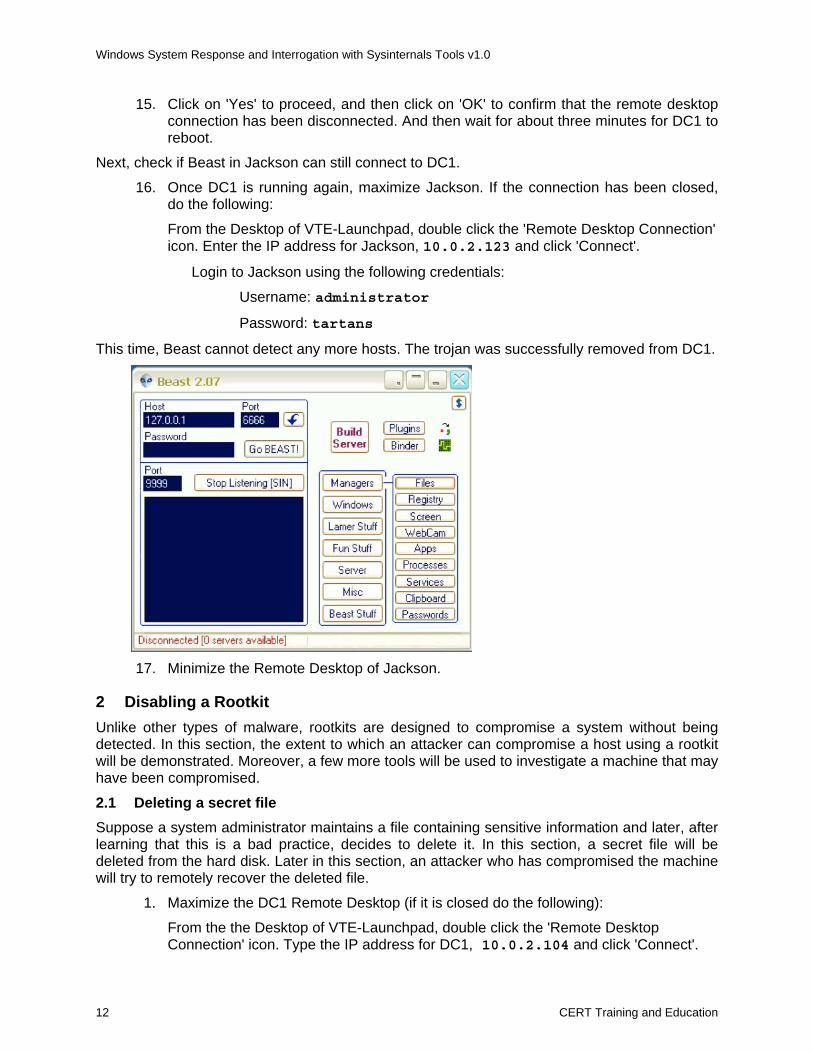
15. Click on 'Yes' to proceed, and then click on 'OK' to confirm that the remote desktop connection has been disconnected. And then wait for about three minutes for DC1 to reboot.
Next, check if Beast in Jackson can still connect to DC1.
16. Once DC1 is running again, maximize Jackson. If the connection has been closed, do the following:
From the Desktop of VTE-Launchpad, double click the 'Remote Desktop Connection' icon. Enter the IP address for Jackson, 10.0.2.123 and click 'Connect'.
Login to Jackson using the following credentials:
Username: administrator
Password: tartans
This time, Beast cannot detect any more hosts. The trojan was successfully removed from DC1.
17. Minimize the Remote Desktop of Jackson.
2 Disabling a Rootkit Unlike other types of malware, rootkits are designed to compromise a system without being detected. In this section, the extent to which an attacker can compromise a host using a rootkit will be demonstrated. Moreover, a few more tools will be used to investigate a machine that may have been compromised.
2.1 Deleting a secret file Suppose a system administrator maintains a file containing sensitive information and later, after learning that this is a bad practice, decides to delete it. In this section, a secret file will be deleted from the hard disk. Later in this section, an attacker who has compromised the machine will try to remotely recover the deleted file.
1. Maximize the DC1 Remote Desktop (if it is closed do the following):
From the the Desktop of VTE-Launchpad, double click the 'Remote Desktop Connection' icon. Type the IP address for DC1, 10.0.2.104 and click 'Connect'.
12 CERT Training and Education

Windows System Response and Interrogation with Sysinternals Tools v1.0
Login to Jackson using the following credentials:
Username: administrator
Password: tartans
2. A text file is already prepared. Click 'Start’ > ‘Run' and type C: and Windows Explorer appears.
3. Copy 'password.txt' from drive C:\ to D:\.
4. While in D:, double click on ‘password.txt’ and the following content will be displayed:
5. Close Notepad.
6. Right click ‘password.txt’ and select 'Delete'. Click on 'Yes' on the prompt to send it to the Recycle Bin.
7. Close Windows Explorer.
8. On the Desktop, right click the ‘Recycle Bin ‘and click 'Empty Recycle Bin'. Click on 'Yes' when you are asked if you want to delete it.
Now it seems that the secret file, password.txt, is completely deleted from drive D: and you cannot see its contents.
Do not close your connection to DC1. We will still be working on it on the next section.
2.2 Compromising a host using a trojan and a rootkit In this section, the attacker on Jackson will try to compromise DC1 by using a trojan as before. In addition to this, the attacker will use the Hacker Defender rootkit to prevent Beast from being detected. After that, several tools will be used to investigate and remove malware from DC1.
2.2.1 Installing the trojan on DC1 1. On DC1 (10.0.2.104), download and install the trojan by clicking on 'Start’ > ‘Internet
Explorer' and browsing to 'http://www.malicious.com'.
2. Click on 'OptiSys PC Accelerator Download' (scroll down the webpage until you see the download link below) and click 'Open' to confirm the file download and then click 'Yes'.
CERT Training and Education 13

Windows System Response and Interrogation with Sysinternals Tools v1.0
3. On the error message that pops up, click 'Ok' (this is the same fake error message that the attacker set up in Section 1).
4. Close Internet Explorer.
Now, the attacker can remotely access DC1. However, like before, the trojan's presence can still be easily detected. So the attacker will also install a rootkit to hide the presence of Beast.
In the following steps, configuration of Hacker Defender will be done on Jackson. After that, it will be uploaded and run on DC1.
5. Minimize your RDP session to DC1.
2.2.2 Installing the Hacker Defender rootkit on DC1
1. Maximize Jackson. If the connection has been closed, do the following:
From the Desktop of ‘VTE-Launchpad’, double click the 'Remote Desktop Connection' icon. Type the IP address for Jackson, 10.0.2.123 and click 'Connect'.
Login to Jackson using the following credentials:
Username: administrator
Password: tartans
2. Now, Hacker Defender will be configured to hide the trojan process (svchost.exe). On the Desktop, double-click on the 'Resources' folder.
3. Open 'HackerDefender', and then double click on ‘hxdef100.ini’
4. On the fourth line insert the line svchost.exe. This tells HackerDefender to cloak any file with the name 'svchost.exe'. The file should look like the one below. Save the file by clicking 'File’ > ‘Save' or [Ctrl+S].
[Hidden Table]
hxdef*
rcmd.exe
svchost.exe
[Root Processes]
hxdef*
rcmd.exe
[Hidden Services]
HackerDefender*
5. Close Notepad.
6. Maximize Beast. In Beast, double click on the ‘Alien icon’ to connect to DC1.
7. Next, 'hxdef100.ini' and 'hxdef100.exe' will be uploaded to DC1 using Beast. To do this, in Beast, click on 'Manager’ > ‘Files' and then the File Manager window will appear.
14 CERT Training and Education

Windows System Response and Interrogation with Sysinternals Tools v1.0
8. On the File Manager window, click 'Find Drives' and you will now be able to see the files and directories on the compromised host (DC1).
9. Click on 'Upload File'.
10. On the upload window, click on the folder icon and browse to 'Desktop>Resources>Hacker Defender'. And then double click on 'hxdef100.ini'.
11. Make sure the Upload window looks like the following one. Click 'Upload'.
12. Upload a second file, 'hxdef100.exe' by following Steps 9-11.
13. To check if the two files have been uploaded to DC1, on the 'File Manager' window click 'Refresh' and then scroll down to check the files as in the following figure.
CERT Training and Education 15

Windows System Response and Interrogation with Sysinternals Tools v1.0
14. To execute the rootkit on DC1, click on 'hxdef100.exe' on the list and then click 'Run File'.
15. Wait for a few seconds and then click on the 'Refresh' button. Check to see if the two 'hxdef100' files are still visible in the list. If not, then the rootkit is already working.
16. Close the File Manager window.
2.3 Recovering the secret data from the victim machine Now that the backdoor is set, the attacker will try to recover deleted data from the compromised host using a file recovery tool. PhotoRec is a powerful free tool which recovers lost files from Hard Disks and CDROM.
In this Lab, it is assumed that the attacker has already transferred Photorec files to the victim machine (in C:\photorec) using Beast. Now, the attacker will connect to DC1 remotely, using Hacker Defender.
1. On the Desktop of Jackson, double-click on 'Resources'. Browse to 'HackerDefender' and double-click on 'bdcli100.exe'. This program provides a command-line interface to the Hacker Defender backdoor on DC1.
2. Type the following when prompted:
For host, DC1's IP-address type 10.0.2.104
For port, type 135. (Hacker Defender can use any open port on the target host.)
For password, type hxdef-rulez
3. Wait for a few seconds until you see a prompt.
4. Create a work folder before executing and recovering files with PhotoRec. Type mkdir C:\work at the prompt.
5. Go into the work directory by typing cd C:\work
6. Run photorec by typing C:\photorec\photorec_win.exe
7. After a few seconds, the PhotoRec menu will be displayed.
16 CERT Training and Education

Windows System Response and Interrogation with Sysinternals Tools v1.0
8. Drive D: will be examined because password.txt was deleted from this drive. Select 'Disk /dev/sdb ...' by using [Up/Down Arrow], then press [Enter].
9. Select 'Intel' and press [Enter].
10. Select 'HPFS - NTFS ...' and press [Enter].
11. Select 'Other' and press [Enter].
CERT Training and Education 17

Windows System Response and Interrogation with Sysinternals Tools v1.0
12. Select 'Free' and press [Enter].
13. Type y, and PhotoRec will start the recovery procedure.
14. When the recovery procedure has finished, the result will look as follows.
Press [Enter] to Quit.
15. Select 'Quit' by using [Left/Right Arrow], and then press [Enter].
18 CERT Training and Education

Windows System Response and Interrogation with Sysinternals Tools v1.0
16. Select 'Quit' by using [Left/Right Arrow], and then press [Enter].
17. The file password.txt which was deleted earlier has been recovered. On the prompt,
type cd C:\work and press [Enter].
18. Type dir and press [Enter] and at least one 'recup_dir' directory will be displayed.
19. Type cd recup_dir.<n> where <n> has the highest number in the list (this directory contains the results of the latest recovery) and then press [Enter].
20. Type dir and then press [Enter] to see the contents of the directory.
21. Type the following on the prompt: more <recovered file> where <recovered file> is the file that was listed in the previous command. Press [Enter].
Notice that its content is the same with password.txt. Details on why the file was recovered will be discussed in Section 3 of this Lab.
CERT Training and Education 19

Windows System Response and Interrogation with Sysinternals Tools v1.0
22. Press the [spacebar] until you see the command prompt again.
Type exit on the prompt and press [Enter].
23. Minimize Jackson.
2.4 Identifying and Cleaning the Malicious Programs In this section, Sysinternals tools will be used to investigate and clean the malware on DC1.
1. Maximize DC1. If the connection has been closed, do the following:
From the Desktop of VTE-Launchpad, double click the 'Remote Desktop Connection' icon. Type the IP address for DC1, 10.0.2.104 and click 'Connect'.
Login to DC1 using the following credentials:
Username: administrator
Password: tartans
2. To use Process Explorer, click 'Start’ > ‘Run'. Type \\live.sysinternals.com\Tools\procexp.exe and then click 'OK'.
3. Click 'Open' on the dialog box that appears. As before, check for signs of the packed 'svchost.exe' in Process Explorer. This time, it will not be included in the list even though it is running. This is because Hacker Defender has cloaked all processes named svchost.exe.
4. Minimize Process Explorer.
5. Next, check end to end connections using TCPView. To use TCPview, click 'Start’ > ‘Run' and type \\live.sysinternals.com\Tools\tcpview.exe and then press [Enter]. Click 'Open'. If a License agreement window appears, select 'Agree' and press [Enter].
6. To see only connected endpoints, click on 'Options' and uncheck 'Show Unconnected Endpoints'. This will limit the list to only established connections.
20 CERT Training and Education

Windows System Response and Interrogation with Sysinternals Tools v1.0
Notice that there are entries where the processes related to the connection are non-existent. Although some of these connections might be non-malicious, some may somehow be cloaked from the system.
To verify if the connection is authorized or not, always check the remote address it connects to. By using TCPview, one can learn that the suspicious connections involve www.malicious.com (10.0.2.123). The Trojan process was cloaked, but the port numbers were not.
7. Close TCPView.
2.4.1 Removing the Rootkit Findings from the previous steps strongly indicate that a rootkit might be responsible for hiding the processes. Next, Rootkit Revealer will be used to determine which objects are hidden.
Rootkit Revealer is a tool designed to detect persistent rootkits. These types of rootkits need to automatically run everytime the system starts up, so their code has to be kept in persistent store. Persistent rootkits hide their code, processes and registry entries from system view by changing API results. What Rootkit Revealer does is to compare high level system view (API results) from the actual structures in the persistent store. If there are discrepancies, then most likely, a rootkit is present in the system.
NOTE: RootkitRevealer sometimes has problems on RDP sessions, so just read through the following 1-4 steps.
1. To use Rootkit Revealer, click on 'Start’ > ‘Run' and type \\live.sysinternals.com\tools\RootkitRevealer.exe and then press [Enter].
2. Click on 'Scan' and wait for the scan to finish.
Now, check the results of the scan. The items shown below are legitimate keys used by Windows. If the scan results in entries besides these, then a rootkit might be installed on the system.
CERT Training and Education 21

Windows System Response and Interrogation with Sysinternals Tools v1.0
3. Check the 'Description' column for entries that say 'Hidden from Windows API'. If
these are present, then a rootkit must be cloaking these files. For example, the last row in the result says that 'C:\Windows\svchost.exe' is hidden from the API.
4. Under the 'Path' column, observe the complete path of the malicious entries. You will
notice that most of them have either the strings 'HackerDefender' or 'hxdef'.
The following steps may now be performed on the lab environment.
5. Check if some of the files above are indeed invisible. Click on 'Start’ > ‘Run' and then type, C:\Windows and press [Enter]. Try to look for 'svchost.exe' in this directory. Later, after removing the rootkit, we will look for this file again.
6. Close Windows Explorer.
Now that some information has been gathered about the malware, one can proceed to find a solution for it. Fortunately, Hacker Defender is one of the most common rootkits and it can be cleaned by Microsoft's Malicious Software Removal Tool. This tool can be downloaded for free and can be used to remove common malware such as rootkits and worms.
22 CERT Training and Education

Windows System Response and Interrogation with Sysinternals Tools v1.0
7. On the Desktop, double click the ‘Resources folder’ and double click on 'windows-kb890830-v2.7.exe'.
8. If a window appears notifying you of a newer version, click 'OK'.
9. Wait for a few seconds and then check the box to ‘Accept’ the license agreement and then click 'Next'.
10. Click 'Next'. Select 'Quick Scan' and then click 'Next' and wait for the scan to finish.
11. After the scan is finished, click 'Cancel' (the system will be restarted the system later)
12. Check if the 'svchost.exe' file we were looking for in Step 5 is already visible. Click on
'Start’ > ‘Run' and then type C:\Windows and then press [Enter].
13. Try to look for 'svchost.exe' in this directory. It should now be visible since the rootkit is already removed. Close Windows Explorer.
14. Maximize Process Explorer and see if 'svchost.exe' is included again in the list of processes. Since the rootkit has been removed, the 'svchost.exe' process is not cloaked anymore.
CERT Training and Education 23

Windows System Response and Interrogation with Sysinternals Tools v1.0
2.4.2 Observing Registry Activity In this section, registry activity associated with the trojan process will be examined.
1. In Process Explorer look for the 'svchost.exe' process (highlighted in purple) and take note of its Process ID (PID) write the PID in the following box:
PID of packed svchost.exe:
In this example, the PID of the malicious process is '484'.
Next, investigate accesses to the registry using Registry Monitor (Regmon). Regmon is a tool that shows real-time activity of each process as it accesses the registry.
2. To run Regmon. Click 'Start’ > ‘Run'. Type \\live.sysinternals.com\Tools\Regmon.exe and click 'Ok'. Wait for a few seconds. Click 'Open' on the dialog box.
3. Click 'Agree' and wait for the Regmon interface to appear.
4. Wait for about 15 seconds and stop the capture by clicking on the Capture icon ‘ ’.
After clicking on it, the icon should turn turn into .
5. To find entries related to the suspicious 'svchost.exe' process, click on the Find ‘ ’ icon on the toolbar.
6. In the Find dialog box, type svchost.exe:<PID> where <PID> is the process ID that you recorded earlier. And then click 'Find Next'.
If a result is highlighted then Regmon has probably captured most of the necessary information. Otherwise, click on the 'Capture' icon again, wait for a few seconds and then stop the capture.
24 CERT Training and Education

Windows System Response and Interrogation with Sysinternals Tools v1.0
7. To focus on a specific process, click on the Filter ‘ ’ icon. The Filter dialog box appears.
8. In the 'Include' field, type svchost.exe:<PID> where <PID> is the process ID that you have written down earlier.
9. Click 'OK' and only registry activity associated to svchost.exe should be displayed.
10. To see the full path for each row, mouse-over entries under the 'Path' column. If it
takes a long time to see the full path, just widen both the Regmon window and the Path column.
11. Mouse-over the entries under the 'Path' column until you find one that says
HKLM\SOFTWARE\Microsoft\Windows\CurrentVersion\policies\Explorer\Run\COM Service.
and click on this row to select this entry.
12. Next, check the value stored in the registry that corresponds to the selected entry. On the toolbar, click 'Edit’ > ‘Regedit Jump...' and wait for a few seconds. This opens Regedit and takes opens the specified registry entry.
CERT Training and Education 25

Windows System Response and Interrogation with Sysinternals Tools v1.0
13. You should see that the value of 'COM Service' refers to the file 'C:\WINDOWS\msagent\msrkkq.com' (a different filename will be used each time since the trojan randomizes it)
14. Do Steps 11-13 to investigate other rows found in Regmon and you might come across the following entries. Notice that some registry entries refer to files found in Section 1 using Autoruns.
• HKLM\SOFTWARE\Microsoft\Active Setup\Installed Components\{42CE4021-DE03-E3CC-EA32-40BB12E6015D}\StubPath
• HKCU\SOFTWARE\Microsoft\Windows\CurrentVersion\policies\Explorer\Run\COM Service
• HKLM\SOFTWARE\Microsoft\Windows\CurrentVersion\policies\Explorer\Run
15. Close all open windows in DC1.
Since the process of disabling the trojan was already done in Section 1, for the interest of time, it will not be done here again. Still, if you wish to remove it, follow steps starting from Section 1.3
3 SDelete and a Flaw in EFS mode In this section, SDelete will be used to ensure that deleted files are securely removed from persistent store. In addition to this, certain issues regarding EFS mode will also be discussed. SDelete has two main functions: complete, secure file deletion and cleaning free space on hard disks. The following sections discuss the latter function.
3.1 Checking and cleaning the hard disk free space As shown in the previous section, “deleted” files can be recovered despite being emptied from the Recycle Bin. To understand why password.txt was recovered, raw data on the D: drive will be examined using HxD, a free hex editor. Hex editors allow you to examine binary files at the binary level.
1. Maximize the DC1 Remote Desktop, if it is closed do the following:
From the the Desktop of VTE-Launchpad, double click the 'Remote Desktop Connection' icon. Type the IP address for DC1, 10.0.2.104 and click 'Connect'.
Login to Jackson using the following credentials:
Username: administrator
Password: tartans
3.1.1 Installing Hex Editor 1. On the Desktop, double click Resources. Right click on ‘HxDSetupEN.zip’ and select
'Extract All'.
2. Click 'Next' to start the Extraction Wizard. Leave the default setting about a folder to extract files to, and then click on 'Next'.
3. Click on 'Finish'.
4. Double click on ‘setup.exe’.
5. Click 'Next' to start Setup Wizard. Select 'I accept the agreement' and click on 'Next'.
6. Leave all settings as default on the following tasks. Click on 'Install'.
26 CERT Training and Education

Windows System Response and Interrogation with Sysinternals Tools v1.0
7. Uncheck 'View readme.txt' and 'Launch HxD Hex Editor', then click 'Finish'.
8. Close all open windows.
3.1.2 Checking Hard Disk Raw Data 1. To launch HxD, click on 'Start’ > ‘All Programs’ >’HxD Hex Editor’ > ‘HxD'.
2. Click on 'Extras’ > ‘Open disk....'
3. To examine the D: drive, click on 'Local Disk 2 (D:)', then click on 'OK'.
4. Raw data on D: drive will be displayed. Click on 'Search’ > ‘Find'.
CERT Training and Education 27

Windows System Response and Interrogation with Sysinternals Tools v1.0
5. Enter 'secret' in the textbox, then click on 'OK'.
Note: Here, a search is made for the file password.txt, which was deleted at the previous section. Thus, instead of 'secret', any string included in password.txt can be used (e.g. user, password, Franks, ...).
The contents of password.txt are visible to the hex editor because the file’s contents are not actually modified during the deletion process, just pointers to our file contents. The contents are technically in unallocated space and simply have not yet been written over.
6. Close HxD.
3.1.3 Cleaning Hard Disk Free Space by SDelete 1. To delete the data completely you will use SDelete. Click on ‘Start’ > ‘Run’, and then
type cmd and click ‘OK’.
2. Type \\live.sysinternals.com\tools\sdelete.exe, and you can see the description of command options. When you get a pop up message about a license agreement, click on 'Agree'.
3. Type \\live.sysinternals.com\tools\sdelete.exe -c d: to zero free space on D: drive. Wait for a few seconds.
28 CERT Training and Education

Windows System Response and Interrogation with Sysinternals Tools v1.0
4. Close the command prompt.
3.1.4 Verification of Cleaning To verify if free space is cleaned, you will check the raw data on D: drive again.
1. Follow Steps 1 - 5 in Section 3.1.2 Checking Hard Disk Raw Data.
This time, you cannot see the content of password.txt because the data has been deleted completely by SDelete.
2. Click on 'OK' on the dialogue box.
3. Close HxD.
3.1.5 Recovery by File Tool (Optional) To recover the file using PhotoRec, proceed through the following steps.
1. Open a command prompt (‘Start’ > ‘Run’, then type cmd and click on 'OK')
2. Follow Steps 5 - 22 in Section 2.3 Recovering the secret data from the victim machine. This time, you will fail to recover the data.
CERT Training and Education 29

Windows System Response and Interrogation with Sysinternals Tools v1.0
3.2 A Flaw in EFS mode In this section, you will see a flaw in Encryption File System (EFS) on Windows and how SDelete mitigates this flaw by securely deleting file contents. EFS provides a transparent file encryption/decryption mechanism on NTFS file system of Windows. Users can easily enable EFS for either entire folders including files/sub folders under the folders or individual files. However, as Microsoft recommends on its web site [3], you should apply EFS for entire folders in production environment. In this Lab, you will discover a flaw when you encrypt individual files.
The following sections involve two users on DC1:
• The administrator that owns the secret file.
• Mallory is the one who tries to recover this file.
3.2.1 Encryption by EFS: Administrator 1. You should still be logged on DC1 as Administrator.
If not, from the VTE-Launchpad Desktop, double click on the ‘Remote Desktop Connection’ icon and connect to the DC1 machine at 10.0.2.104.
Use the following credentials:
User: Administrator
Password: tartans
2. To open Windows Explorer, click on ‘Start’ > ‘My Computer’ and then navigate to ‘D:’ drive.
3. Create a working folder, D:\efs.
4. Copy password.txt from ‘C:\’ to ‘D:\efs’.
5. In ‘D:\efs’, right click on ‘password.txt’, then click on 'Properties'.
6. Click on 'Advanced...'.
7. Check 'Encrypt contents to secure data', then click on 'OK'.
8. Click on 'OK'.
30 CERT Training and Education

Windows System Response and Interrogation with Sysinternals Tools v1.0
9. If a warning message like below appears, check 'Encrypt the file only', then click on 'OK'. Note: You choose individual file encryption just for this Lab exercise. DO NOT choose this option in a production environment.
Observe that the color of the filename turned green. This indicates that the file is encrypted by EFS.
10. Click on ‘Start’ > ‘Log Off’, then click on 'Log Off'.
3.2.2 Checking Hard Disk Raw Data: Mallory 1. Logon to DC1 as 'Mallory'.
From the VTE-Launchpad Desktop, double click on the ‘Remote Desktop Connection’ icon and connect to the DC1 machine at 10.0.2.104.
Login with:
User: mallory
Password: tartans@123
2. To open Windows Explorer, click on ‘Start’ > ‘My Computer’ and then navigate to ‘D:\efs’.
3. Double click on ‘password.txt’ to open the file, but in this case you will be denied to access its content because password.txt has been encrypted by Administrator. Only the file owner who encrypted it and Recovery Agent can decrypt the file. Note: typically, Domain Administrator (domain environment) or the Local Administrator (no domain environment) is assigned as Recovery Agent.
4. Click 'OK' on the Access Denied prompt and close Notepad.
CERT Training and Education 31

Windows System Response and Interrogation with Sysinternals Tools v1.0
In the previous section, you zeroed free space on D: drive using SDelete, so you may expect that no data should be found from D:.Check the raw data on D: drive again.
5. Follow Steps 1 - 5 in Section 3.1.2 Checking Hard Disk Raw Data.
Contrary to what you expect, you will see the content of password.txt even though password.txt is protected by EFS.
As shown above above, although an individual file was encrypted and protected by EFS, the original plaintext data still existed on free space on Hard Disk. That is the reason why you succeeded in recovering the data.
6. Close HxD.
3.2.3 Recovery by File Recovery Tool: Mallory (Optional) To reover the file using PhotoRec, follow these steps.
1. Open a command prompt (‘Start’ > ‘Run’, and then type cmd and click on 'OK')
2. Follow Steps 5 - 22 in Section 2.3 Recovering the secret data from the victim machine. You will succeed in recovering the data.
32 CERT Training and Education

Windows System Response and Interrogation with Sysinternals Tools v1.0
3.2.4 Cleaning Hard Disk Free Space by SDelete: Mallory You will determine if a file can be recovered after being deleted with SDelete.
1. Click on ‘Start’ > ‘Run’, then type cmd.exe and click on 'OK'.
2. Type \\live.sysinternals.com\tools\sdelete.exe -c d: to zero free space on D: drive.
3. If the License Agreements shows, click on 'Agree'. Wait for a few seconds.
4. Close the command prompt.
3.2.5 Verification of Cleaning: Mallory To verify if free space is cleaned, you will check the raw data on D: drive again.
1. Follow Steps 1 - 5 in Section 3.1.2 Checking Hard Disk Raw Data.
2. This time, you cannot see the original contents of password.txt since the original plaintext data has been zeroed out by SDelete.
3. Click on 'OK' on the dialogue box.
4. Close HxD.
3.2.6 Recovery by File Recovery Tool: Mallory (Optional) For your interest, you may try the following steps.
1. Open a command prompt (‘Start’ > ‘Run, and then type cmd and click on 'OK')
2. Follow Steps 5 - 22 in Section 2.3 Recovering the secret data from the victim machine. You will fail in recovering the data.
CERT Training and Education 33

Windows System Response and Interrogation with Sysinternals Tools v1.0
3. Log Off from DC1
4. Click on ‘Start’ > ‘Log Off’, then click on 'Log Off'.
3.3 Optional: Folder Encryption by EFS For your interest, you can try entire folder encryption. This time, the secret data cannot be recovered anymore. You will encrypt an entire folder as Administrator, and then try to recover the data as Mallory.
3.3.1 Encryption by EFS: Administrator 1. Logon to DC1 as 'Administrator'.
From the VTE-Launchpad Desktop, double click on the ‘Remote Desktop Connection’ icon and connect to the DC1 machine at 10.0.2.104.
Login with:
User: Administrator
Password: tartans
2. Before starting the following exercise, delete ‘password.txt’ under ‘D:\efs’ and empty ‘Recycle Bin’.
3. Open Windows Explorer, click on ‘Start’ > ‘My Computer’ and navigate to ‘D:’ drive.
4. Right click on the 'efs' folder and select 'Properties'.
5. Under the 'General' tab, click on 'Advanced...'. Check 'Encrypt contents to secure data', then click on 'OK'.
6. Click on 'OK'.
7. Copy ‘password.txt’ from ‘C:\’ to ‘D:\efs’.
8. Click on ‘Start’ > ‘Log Off’, then click on 'Log Off'.
34 CERT Training and Education

Windows System Response and Interrogation with Sysinternals Tools v1.0
3.3.2 Checking Hard Disk Raw Data: Mallory 1. To logon to DC1 as 'Mallory'.
From the VTELaunchpad Desktop, double click on the ‘Remote Desktop Connection’ icon and connect to the DC1 machine at 10.0.2.104.
Login with:
User: mallory
Password: tartans@123
2. Open Windows Explorer, click on ‘Start’ > ‘My Computer’ and then navigate to ‘D:\efs’.
3. Double click on ‘password.txt’ and you will be denied to access password.txt by EFS.
4. Click 'OK' and close Notepad.
5. Follow Steps 1-5 in Section 3.1.2 Checking Hard Disk Raw Data.
Now, you cannot see the contents of password.txt because the data is protected by EFS.
6. Click on 'OK' on the dialogue box.
7. Close HxD.
3.3.3 Recovery by File Recovery Tool: Mallory
1. Open a command prompt (‘Start’ > ‘Run’, and then type cmd and click on 'OK')
2. Follow Steps 5 - 22 in Section 2.3 Recovering the secret data from the victim machine. Here data recovery will fail.
3. Close the command prompt.
4. Click on ‘Start’ >’Log Off’, and then click on ‘Log Off’.
Conclusion In this lab, we took advantage of features provided by several Sysinternals tools to investigate suspicious system activity caused by malicious programs. Additionally, you also learned a few of the topics concerning the maintaining the confidentiality of files in a Windows file system. You might have also noticed that the features of each tool complement what other tools provide and since Sysinternals suite can be downloaded for free, you might find it worthwhile to include in your response kit.
CERT Training and Education 35

Windows System Response and Interrogation with Sysinternals Tools v1.0
36 CERT Training and Education
References [1] Autoruns. http://en.wikipedia.org/wiki/AutoRun
[2] Beast trojan. http://en.wikipedia.org/wiki/Beast_Trojan_(trojan_horse)
[3] Best practices for the Encrypting File System. http://support.microsoft.com/kb/223316/en
[4] Marcus Murray. A hackers diary: How I can Hack your vulnerable services and how you can stop me. http://www.microsoft.com/emea/spotlight/sessionh.aspx?videoid=989
[5] Mark Russinovich. Advanced Malware Cleaning. http://www.microsoft.com/emea/spotlight/sessionh.aspx?videoid=359
[6] Process Explorer. http://en.wikipedia.org/wiki/Process_Explorer
[7] RootkitRevealer Help File
[8] svchost.exe. http://en.wikipedia.org/wiki/Svchost
[9] Trojan horse. http://en.wikipedia.org/wiki/Trojan_horse_(computing)
[10] Winternals. http://en.wikipedia.org/wiki/Winternals
Resources [1] Sysinternals Suite. http://technet.microsoft.com/en-us/sysinternals/0e18b180-9b7a-4c49-
8120-c47c5a693683.aspx
[2] Beast 2.07. http://terabit.blogfa.com/post-18.aspx
[3] Hiawatha. http://www.hiawatha-webserver.org/files/hiawatha-6.12.zip
[4] Sparkbb092 Webpage Template. http://www.free-template-download.com/download/xhtml/092/
[5] Hacker Defender 1.0.0. http://www.governmentsecurity.org/forum/index.php?showtopic=5739
[6] Microsoft Malicious Software Removal Tool. http://www.microsoft.com/security/malwareremove/default.mspx
[7] HxD. http://mh-nexus.de/en/hxd/
[8] Test Disk. http://www.cgsecurity.org/wiki/TestDisk_Download